

Page 1
Video intercoms for the IP360 system
XTS 7IP WH WIFI
XTS 7IP BK WIFI
XTS 7IP WH WFBF
USER MANUAL
EN
English
FB01186-EN
Page 2
4
2
1
3
p. 2 - Manual FB0118 6 -EN - 06/2018 - © CAME S.p.A. - The contents of this manual may be changed, at any time, and without notice. - This is a translation of the original instructions
GENERAL PRECAUTIONS
• Carefully read the instructions before using the device.
• The installation, programming, commissioning and maintenance of the product must only be carried out by
qualified technicians, properly trained in compliance with the regulations in force, including health and safety
measures and the disposal of packaging.
• The equipment must be destined solely for the use for which it was expressly designed.
• The manufacturer declines all liability for any damage as a result of improper, incorrect or unreasonable use.
Maintenance and precautions when using the device
• Do not expose the LCD screen to direct sunlight.
• To clean, only use soft, dry, or slightly-moistened cloth rags. Do not use any chemicals.
• Do not block the air vents.
DESCRIPTION
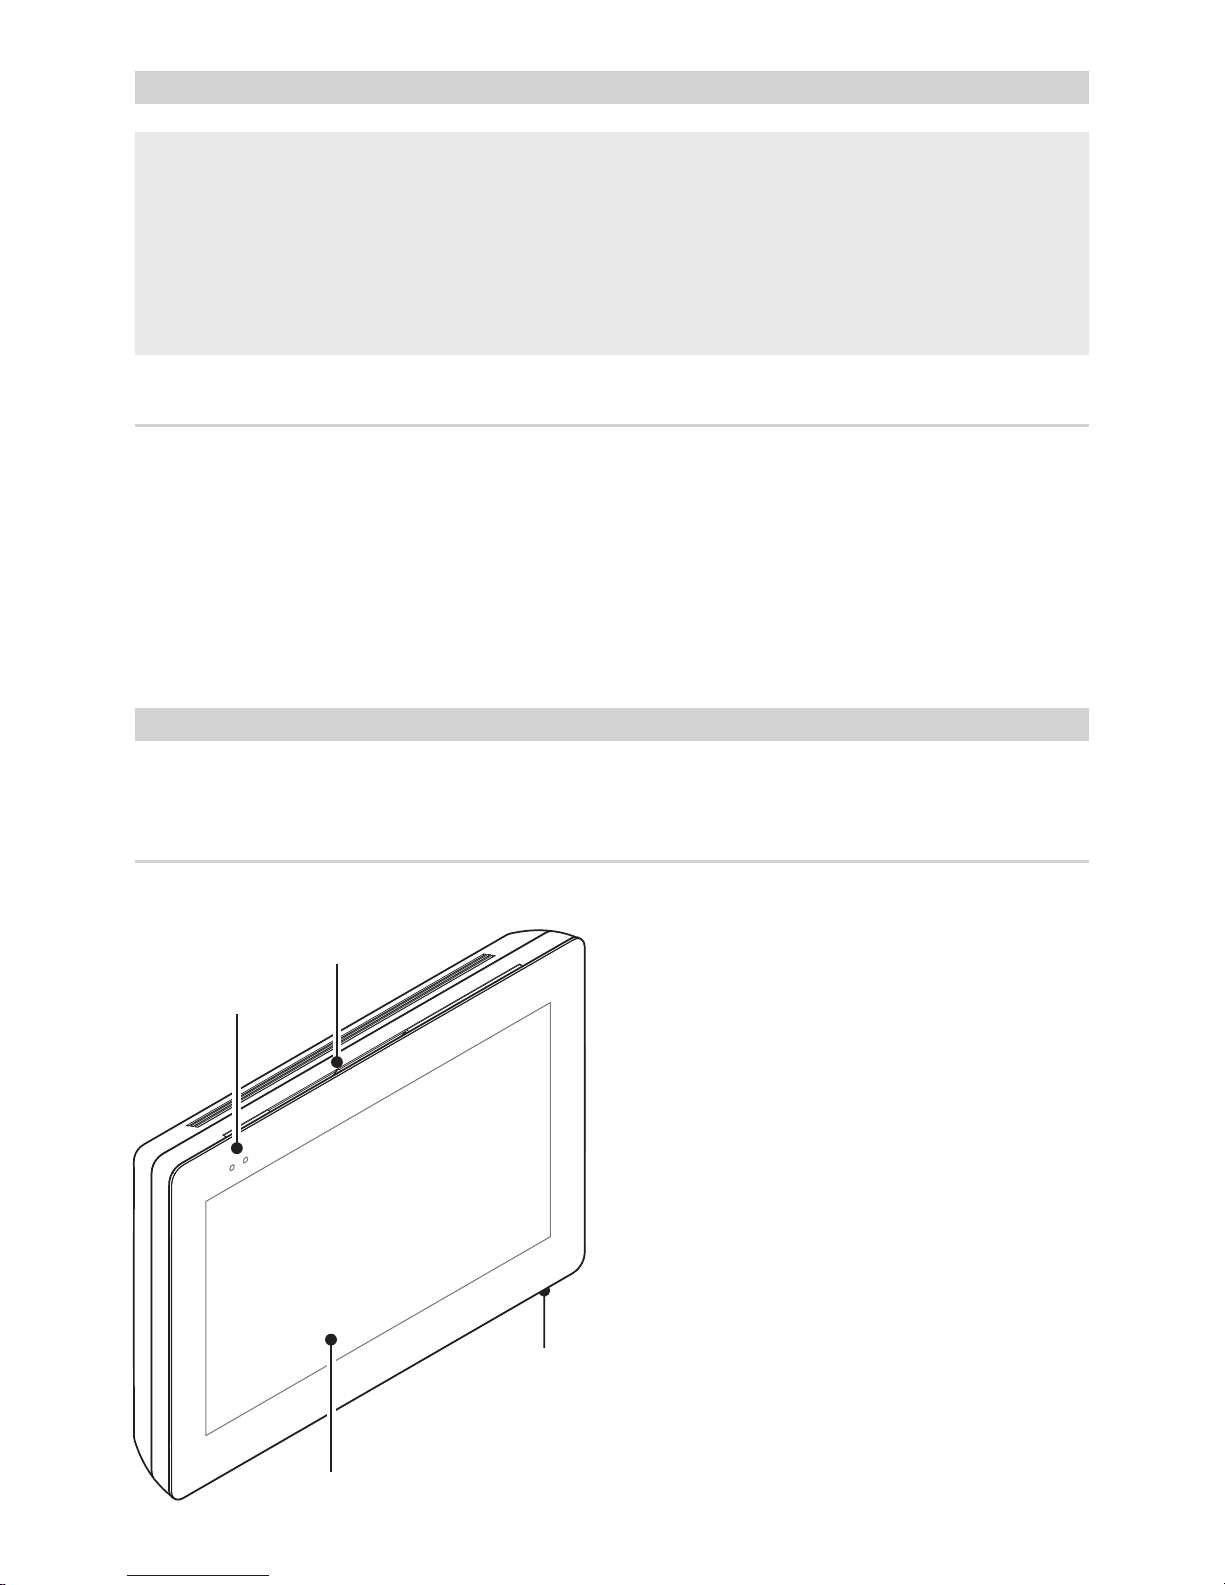
Full-touch video intercom for the IP360 system, with TFT seven-inch touch-screen, featuring WiFi and User Graphic User Interface.
Description of parts
1 Signaling LED
2 Loudspeaker
3 Touch screen display
4 Microphone.
Page 3
P
B C HGF I J
E
D
A
O
N
K
LM
p. 3 - Manual FB0118 6 -EN - 06/2018 - © CAME S.p.A. - The contents of this manual may be changed, at any time, and without notice. - This is a translation of the original instructions
HomeBackInfo
Call register
Contacts
Aux List
Entry panels
Video Recording
Favorites
19:02
Thursday
01 Feb 2018
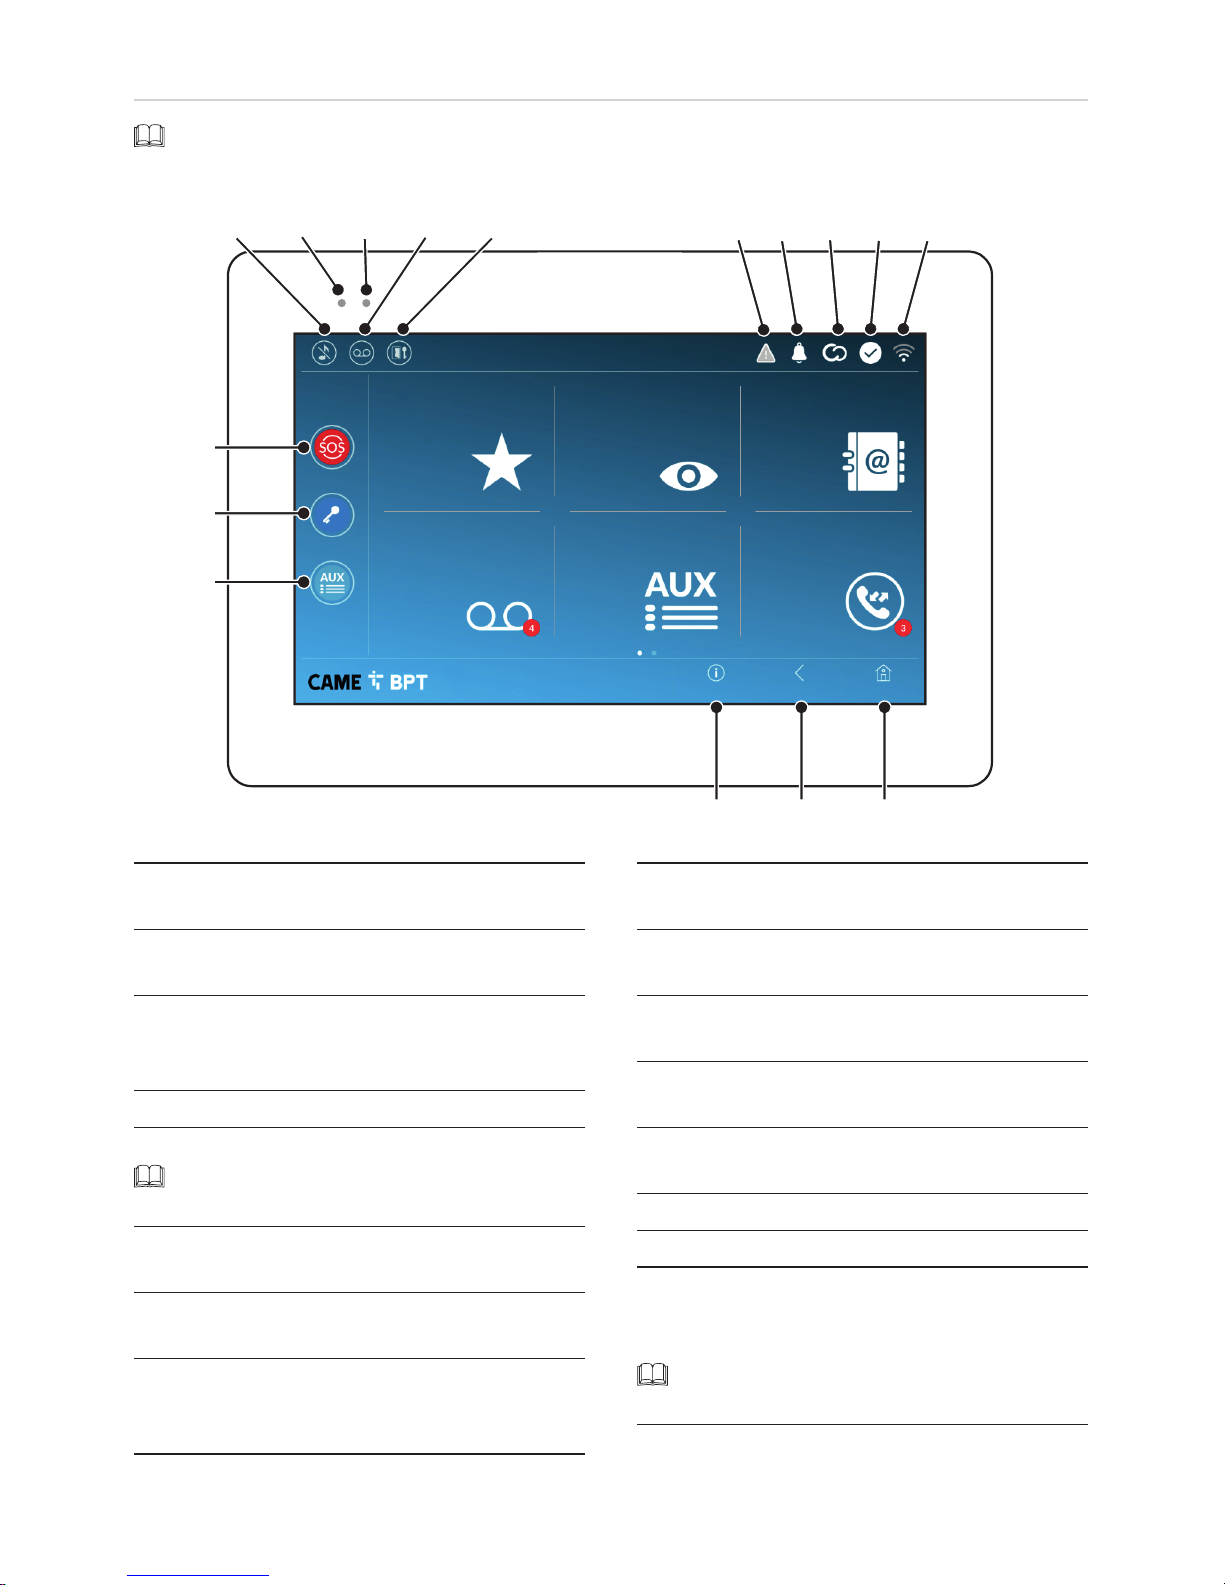
Commands and notifications found on the home page
The appearance of the homepage may vary according to the system settings or the user interface.
A Command to exclude call ringer; when the com-
mand is active, the red LED is lit.
B The red LED means that the device's ringer is
turned off
C The blinking blue LED, when the screen is stand-
ing by, means that there are unseen messages or
missed calls
D Turns the answering service off or on
E Turn the automatic door opener on or off
This icon appears only if the automatic door
opener function is properly set up.
F The blinking icon means there is a programming
error
G The blinking icon means there are unseen mes-
sages or missed calls
H The grey icon means that the device is enabled
for connecting to CAMEConnect; The white icon
means the device is connected to CAMEConnect
I The white icon means that the device is working
properly and is ready to take any calls
J The icon means that the Wifi connection is active
and strong
K this button appears on all screens and is for re-
turning to the homepage
L This button appears on all screens and is for re-
turning to the previous page
M This button appears on all screens and is for ac-
cessing the information pages
N This activates the preset auxiliary command
O Preset door opener command
P HELP button; It sends a "panic alarm" notification
to the assigned concierge,and shows the extension number
This button is featured in systems that require
a concierge service.
Page 4
p. 4 - Manual FB0118 6 -EN - 06/2018 - © CAME S.p.A. - The contents of this manual may be changed, at any time, and without notice. - This is a translation of the original instructions
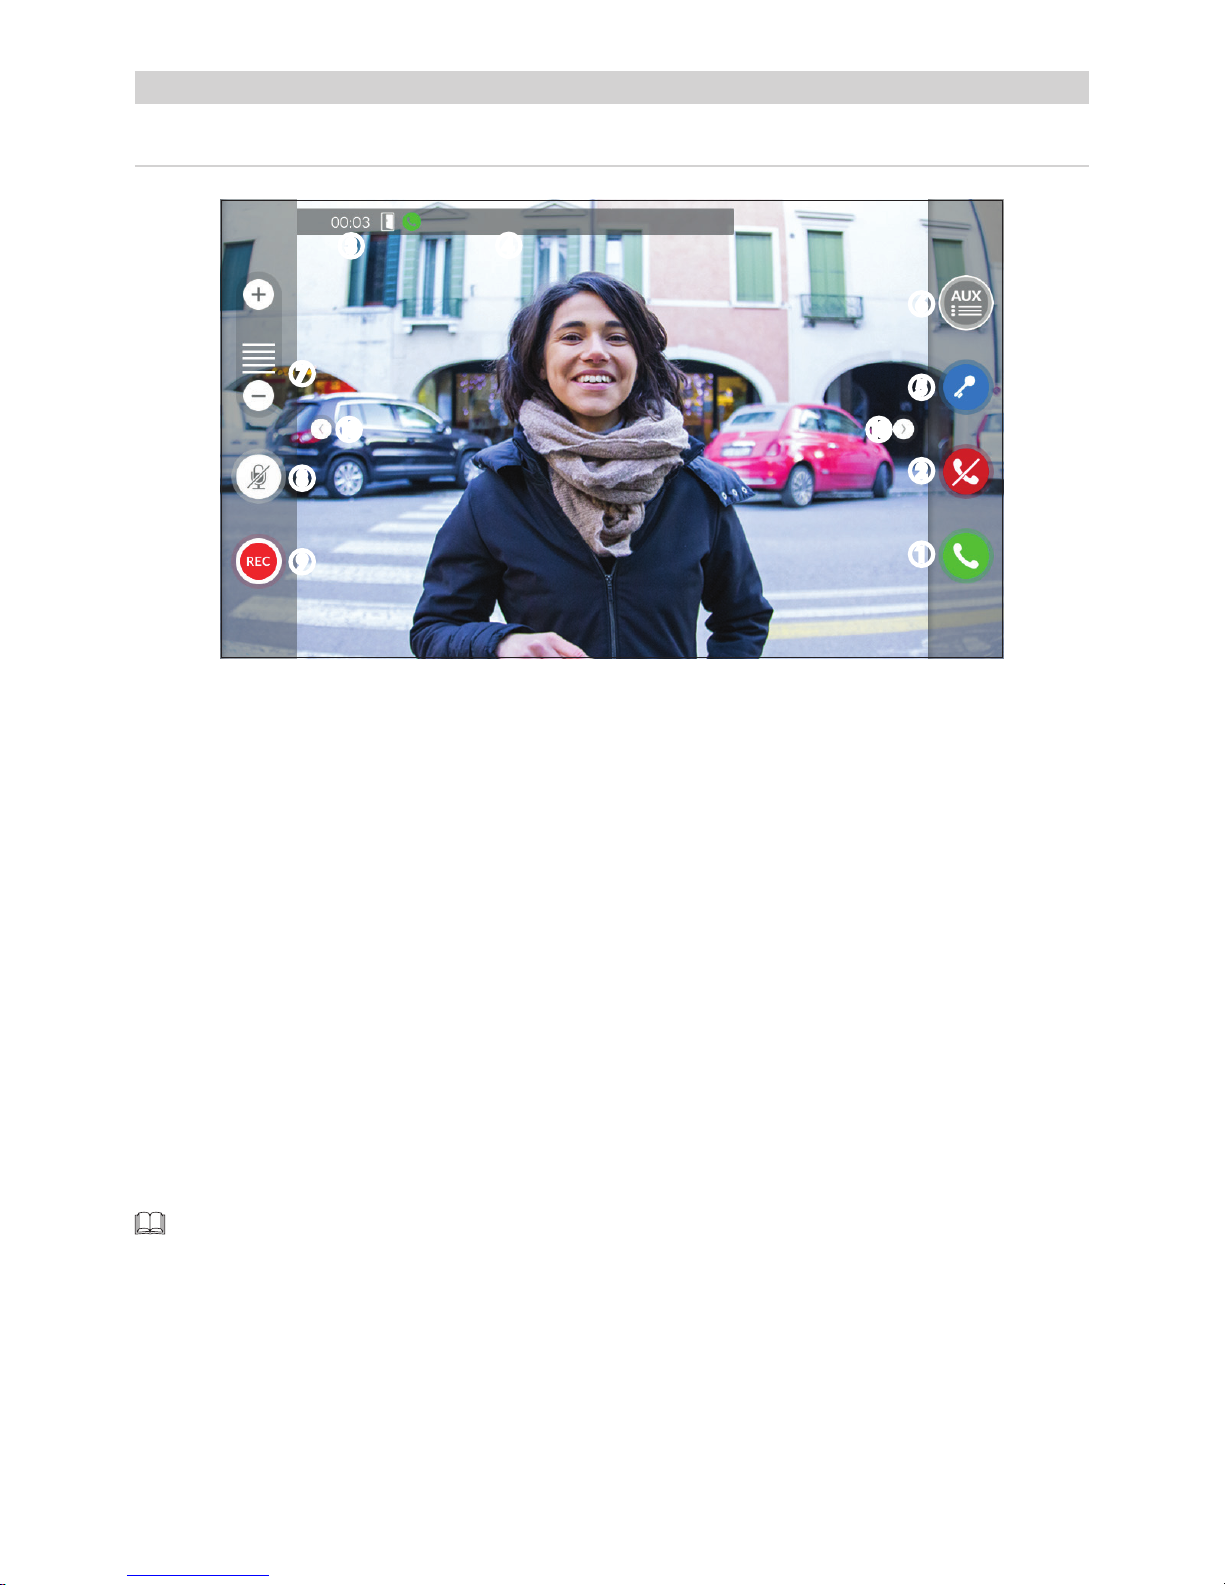
Call from Entry Panel
HOW TO USE THE DEVICE
Answering a call
An image of the caller appears on the screen. The audio from and towards the caller is turned o.
A Touch the button to answer the call and to turn on the audio communication.
B Touch the button to refute the call and to return to the homepage.
Options appearing on the screen during a conversation
C Call duration and state of the door
D Caller's ID.
Commands that are active during a conversation
E It turns on the electric lock of the shown entry panel.
FThis opens the list of auxiliary commands configured for the shown entry panel; touch the name of the com-
mand that you want to send.
G Touch buttons + and - to adjust the audio volume.
H Turn o the microphone (mute function).
I Touch the button the start audio/video recording the current conversation.
A red light signal blinks next to the caller's ID during the recording.
The recording is automatically ended after 10 seconds.
J Touch and drag the image o the screen (or press the side arrows >) to view the entry panel or next/previous
analog video camera on the list, if any more are present; the current audio/video call is ended.
B
E
C
F
D
G
H
I
JJ
A
Page 5
1
2
3
p. 5 - Manual FB0118 6 -EN - 06/2018 - © CAME S.p.A. - The contents of this manual may be changed, at any time, and without notice. - This is a translation of the original instructions
Porter
Main Call
Intercom 2 Not home
Main Call
Intercom 1 Not home
App 01 Call Mario's phone
App 02 Lucy's Home
phone
App 01 Mario's Home
phone
Home
Home
Back
Back
Info
Info
Call register
Contacts
Aux List
Entry panels
Video Recording
Favorites
19:02
Thursday
01 Feb 2018
19:02
Thursday
01 Feb 2018
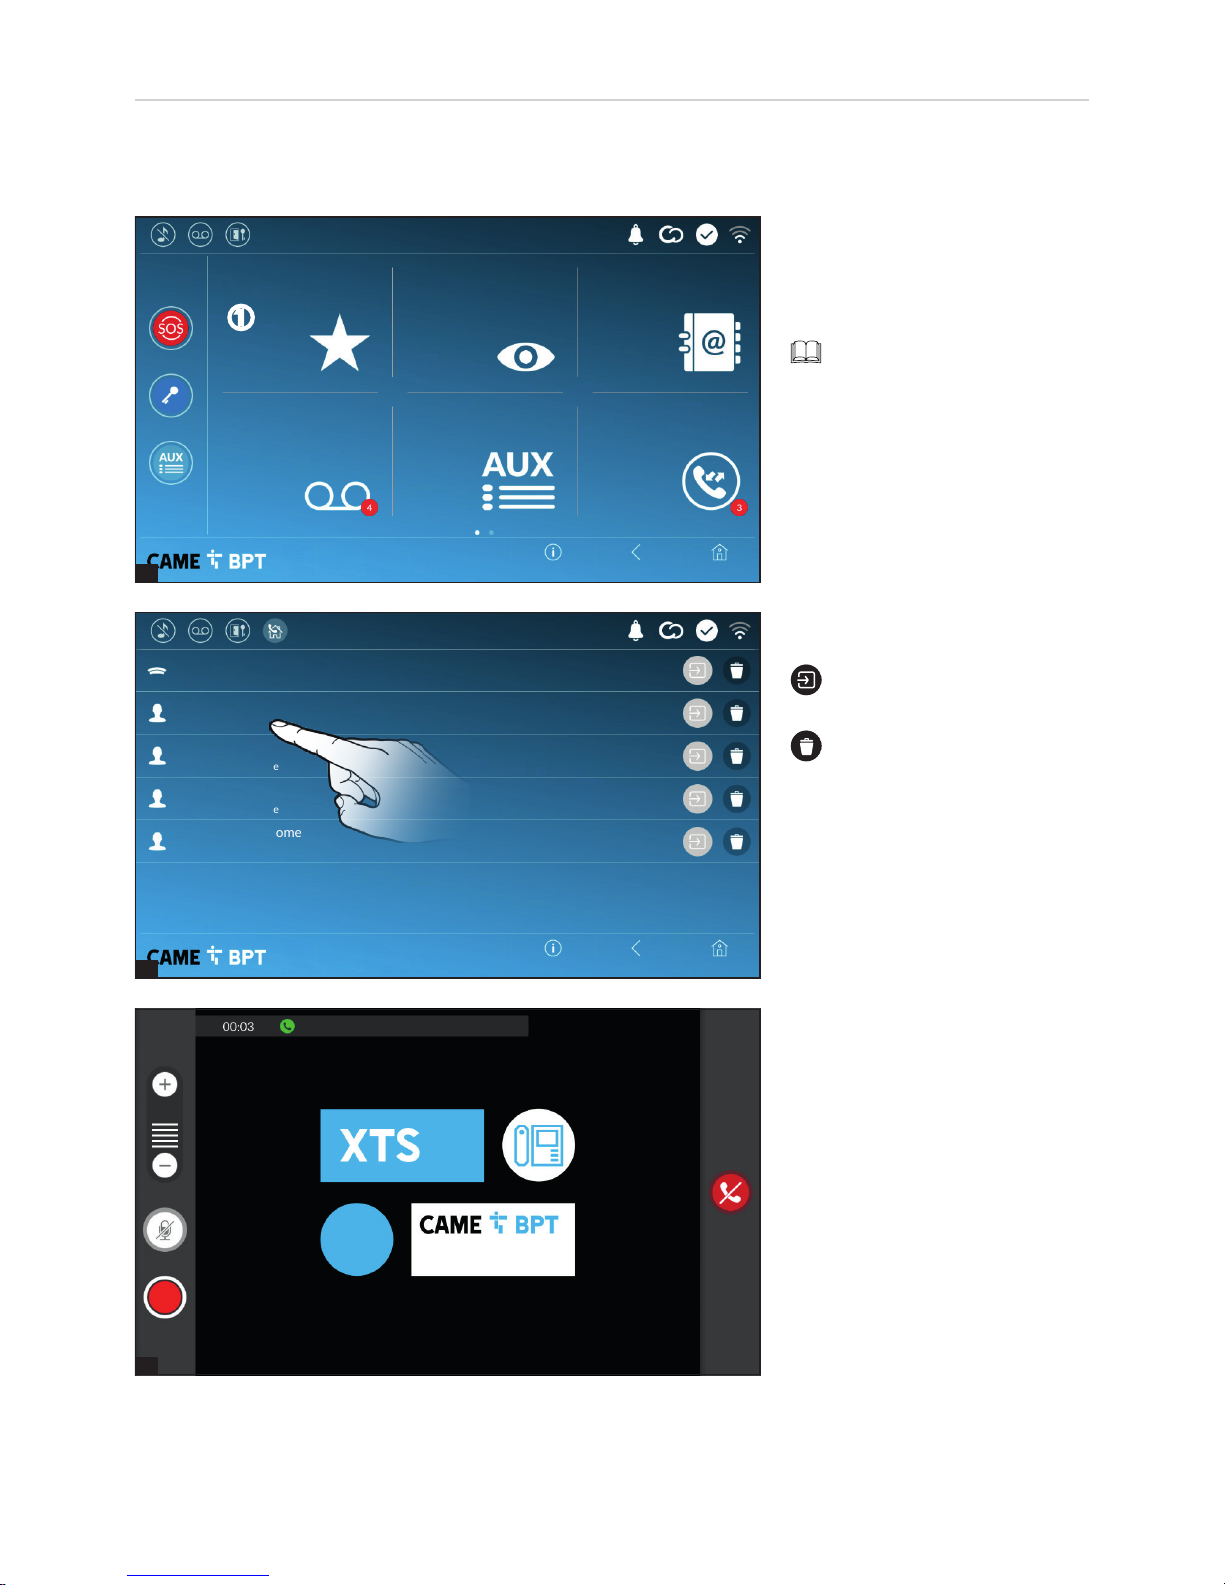
Making a call
This device lets you call other indoor receivers (intercommunication), any devices connected over the Wifi network
or, any entry panels.
Calling a contact on the
favorites list
A Touch the icon to access the list
of favorite contacts.
To fill the list of favorite contacts, see the chapter "Contacts"
on page 7.
Select one of the listed contacts to
initiate a call.
Touch the icon to view contact's details.
Touch the icon to remove the
contact form the list of favorites.
When communication is underway,
certain commands and information
appear on the screen, as mentioned before in the "Answering a
call" on page 4.
A
Page 6
1
3
2
p. 6 - Manual FB0118 6 -EN - 06/2018 - © CAME S.p.A. - The contents of this manual may be changed, at any time, and without notice. - This is a translation of the original instructions
Secondary entry panel
Main entry panel
HomeBackInfo
19:02
Thursday
01 Feb 2018
Secondary entry panel
HomeBackInfo
Call register
Contacts
Aux List
Entry panels
Video Recording
Favorites
19:02
Thursday
01 Feb 2018
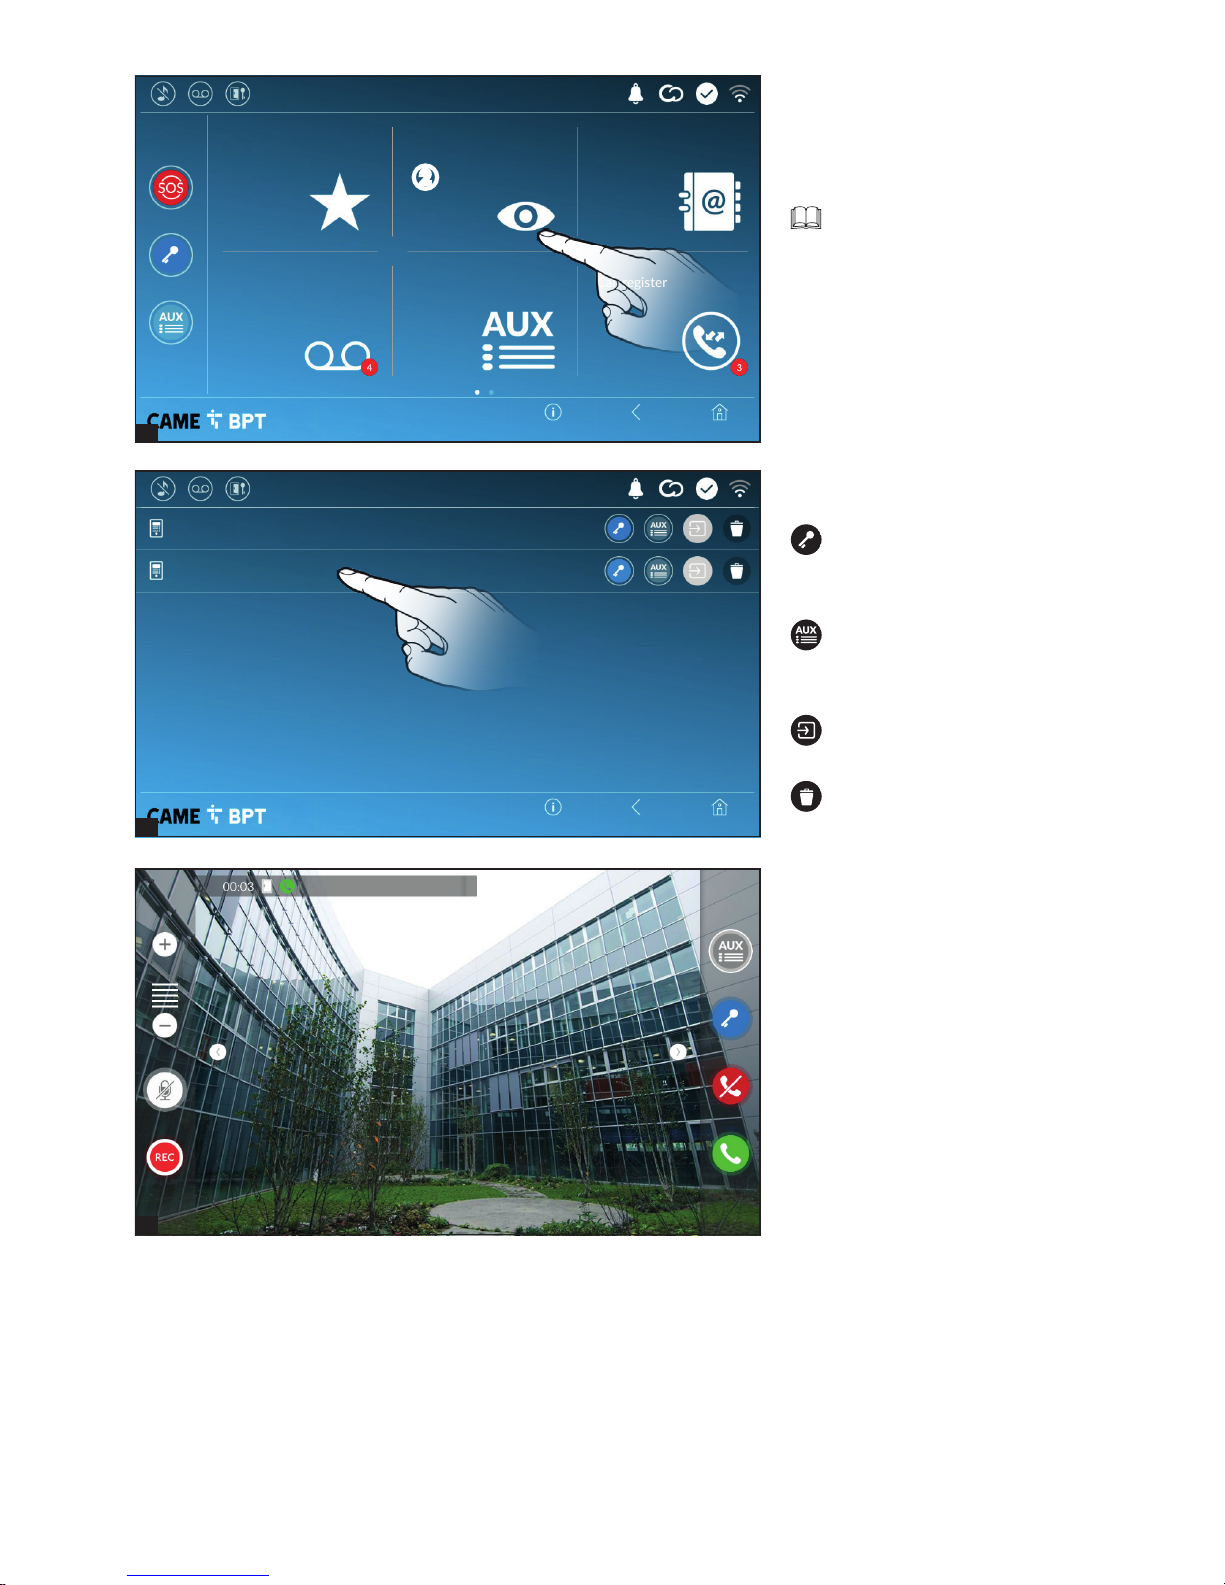
Select one of the entry panels on
the list to initiate the call.
This opens the door associated
to the entry panel without initiating
a call.
Opens a pop-up containing a
list of auxiliary commands associated to the entry panel.
Touch the icon to view contact's details.
Touch the icon the remove the
contact from the list.
Turn on communication to
entry panel
B Touch the icon to access the list
of entry panels.
To fill the list of entry panels,
see the "Contacts" on page 6.
When communication is underway,
certain commands and information
appear on the screen, as mentioned before in the "Answering a
call" on page 4.
B
Page 7
1
2
p. 7 - Manual FB0118 6 -EN - 06/2018 - © CAME S.p.A. - The contents of this manual may be changed, at any time, and without notice. - This is a translation of the original instructions
NORTH entry panel
Home
EAST entry panel
Main entry panel
Porter
Home
Home
Back
Back
Info
Info
Call register
Contacts
Aux List
Entry panels
Video Recording
Favorites
19:02
Thursday
01 Feb 2018
19:02
Thursday
01 Feb 2018
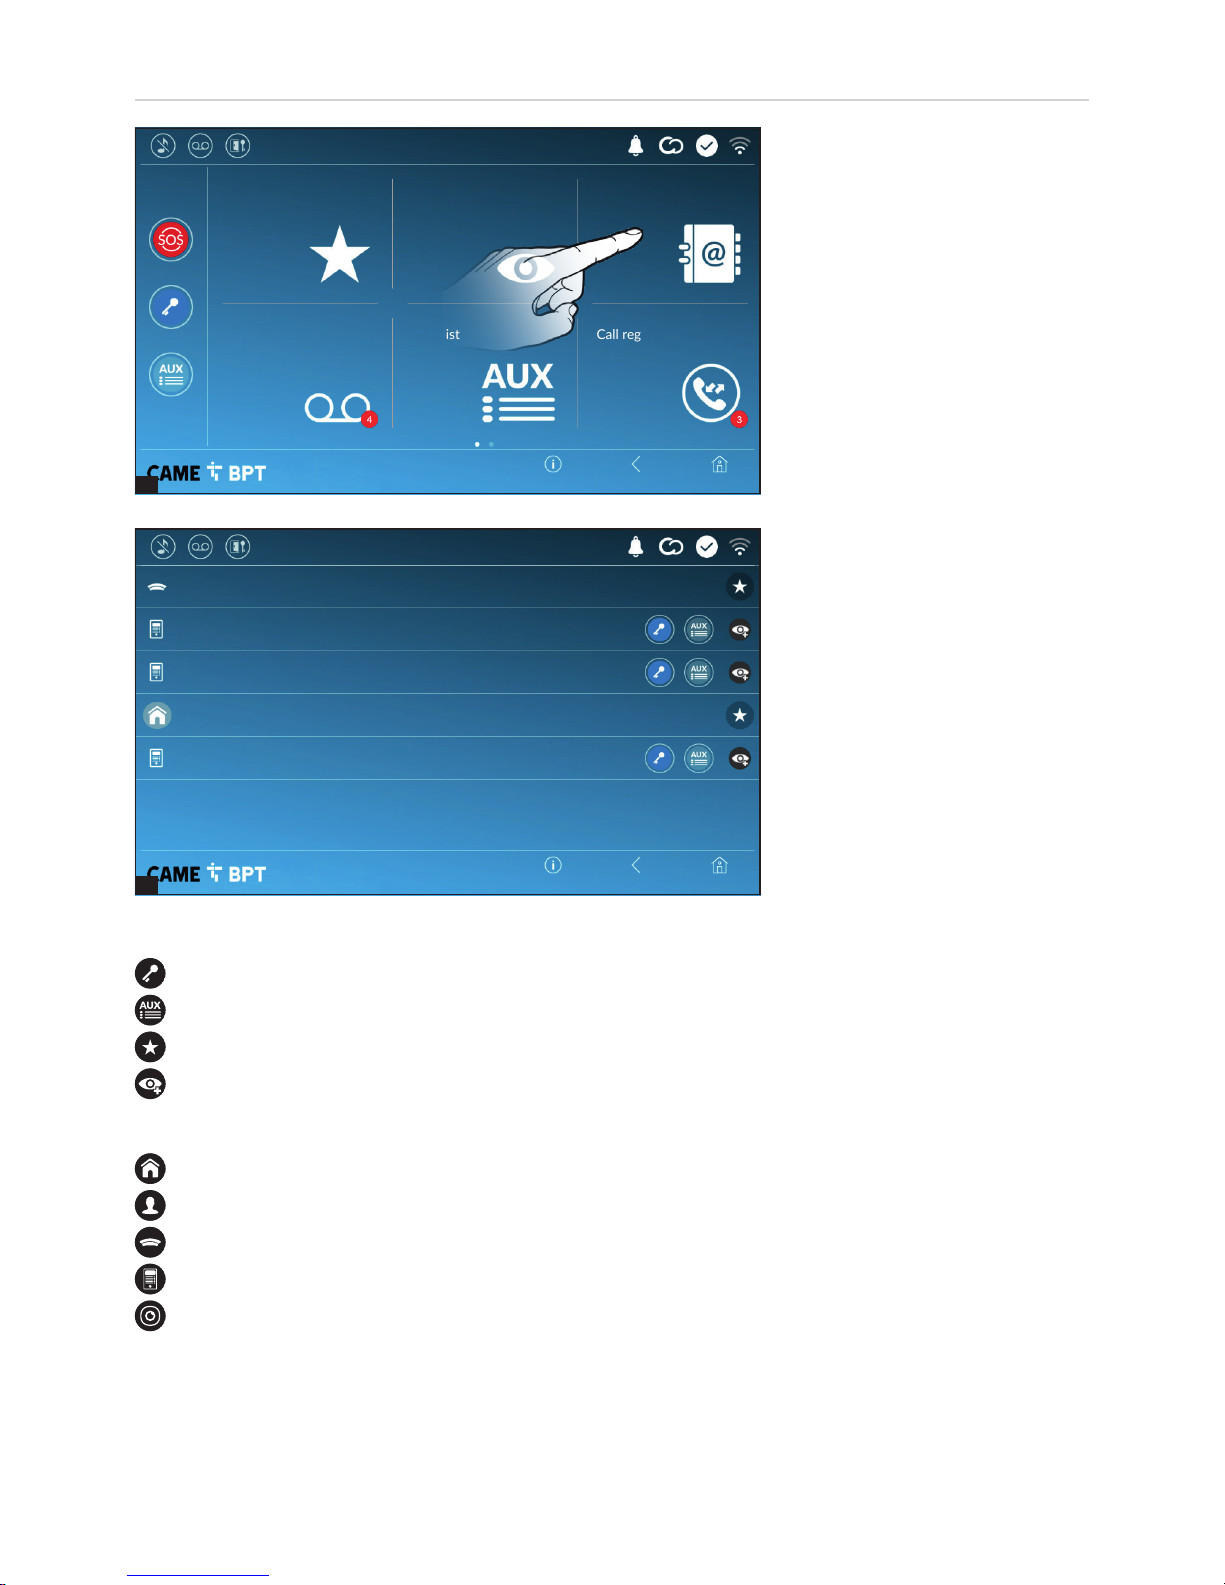
Commands associated with contacts
Opens the door associated to the entry panel.
Opens a pop-up containing a list of auxiliary commands associated to the entry panel.
Adds/removes the selected to and from the favorites list.
Adds/removes the selected to and from the entry panels list.
Types of contact
Household
Single User
Porter
Entry panel
Analog video camera
Touch one of the listed items to access the window for viewing details on the selected contact and to customize
his or her name.
Contacts
Touch the icon to access the contacts list.
The list contains all the devices that
can be contacted.
Page 8
3
4
5
p. 8 - Manual FB0118 6 -EN - 06/2018 - © CAME S.p.A. - The contents of this manual may be changed, at any time, and without notice. - This is a translation of the original instructions
Home
Home
Home
Back
Back
Back
Info
Info
Info
XTS Receiver Basement
Mobile App 3
XTS Receiver Ac
Mobile App 1
EXTENSIONS
XTS receiver
Porter
Main entry panel
Home
19:02
Thursday
01 Feb 2018
19:02
Thursday
01 Feb 2018
19:02
Thursday
01 Feb 2018
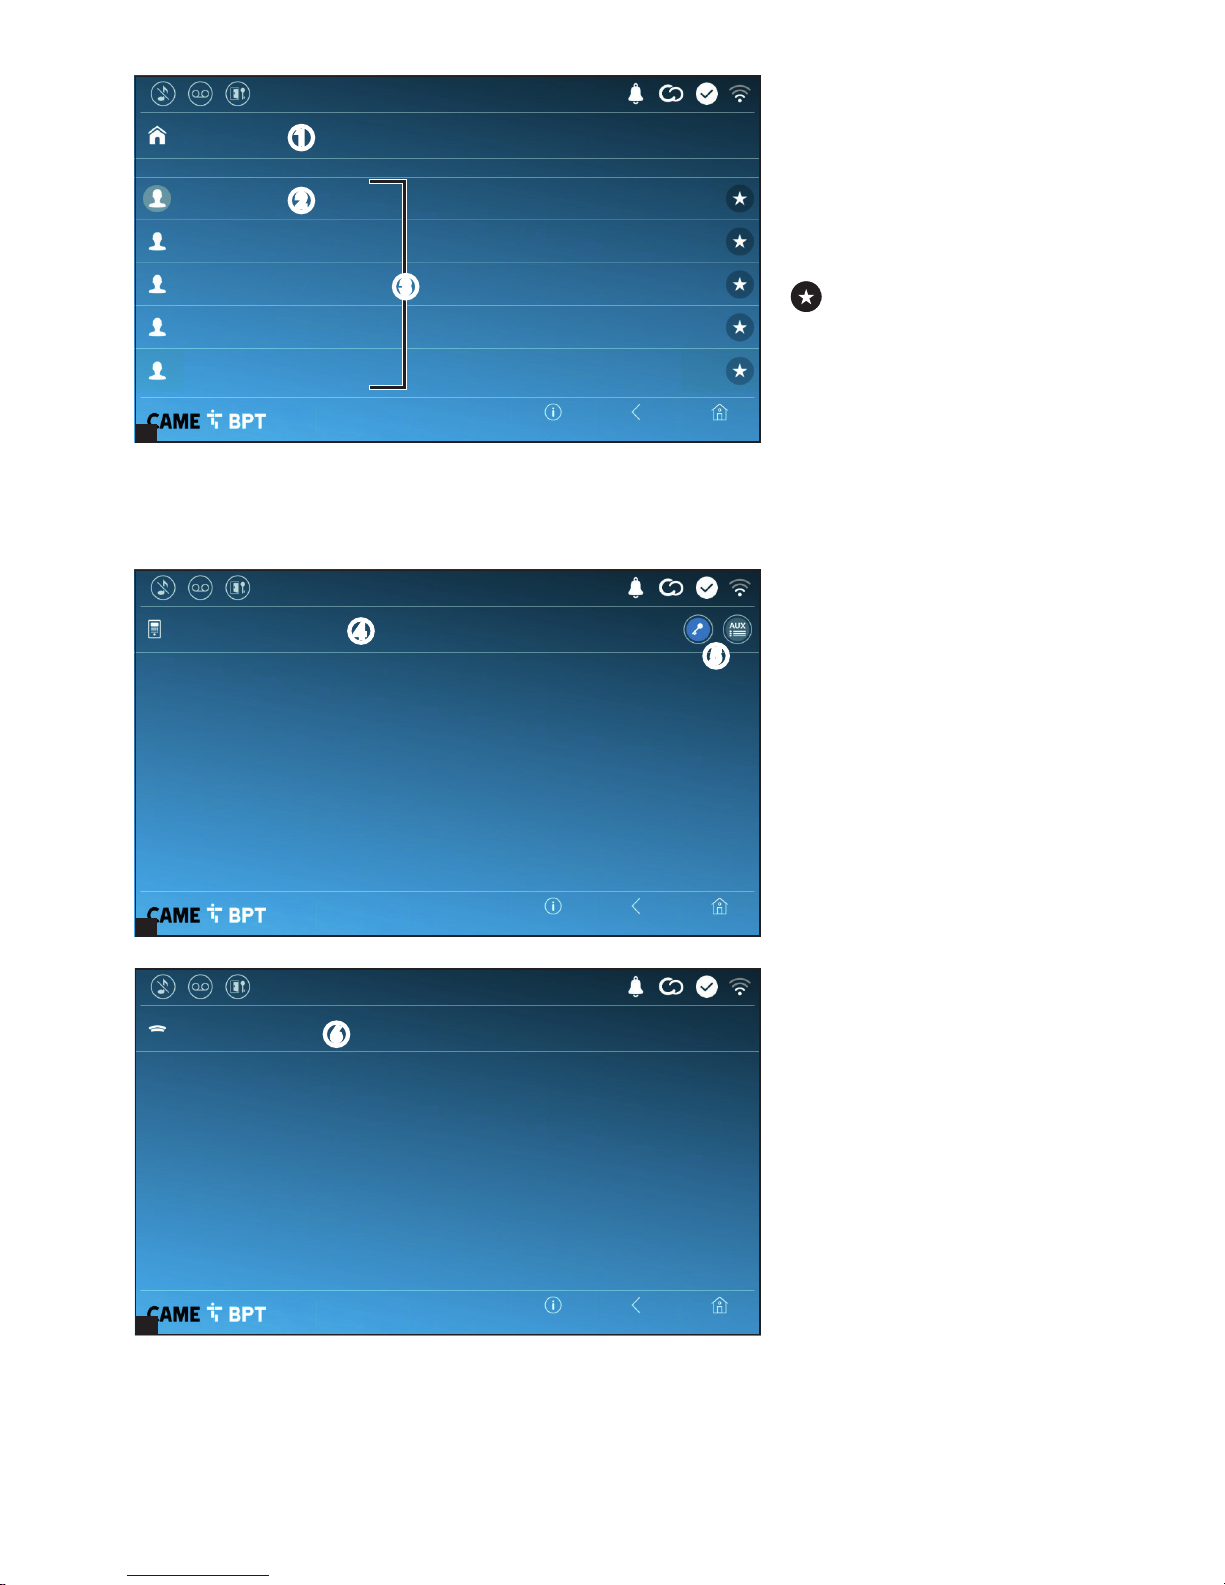
Unit
A Household.
B the indoor receiver.
C Devices belonging to the house-
hold.
Touch the icon to add the contact to the list of favorites.
Touch one of the contacts to initiate
a call.
Touch the button Back to return to
the previous screen.
Porter
F Concierge panel, if the system
features this.
Touch the contact to initiate the
call.
Entry panel
D Entry panel.
E Commands associated to an
entry panel.
Touch the contact to initiate the
call.
B
D
F
E
A
C
Page 9
1
2
p. 9 - Manual FB0118 6 -EN - 06/2018 - © CAME S.p.A. - The contents of this manual may be changed, at any time, and without notice. - This is a translation of the original instructions
Delete all
Entry panel
Entry panel
01 gen 2018 23:55
10s
03 gen 2018 17:33
10s
04 gen 2018 21:03
10s
Entry panel
Home
Home
Back
Back
Info
Info
Call register
Contacts
Aux List
Entry panels
Video Recording
Favorites
19:02
Thursday
01 Feb 2018
19:02
Thursday
01 Feb 2018
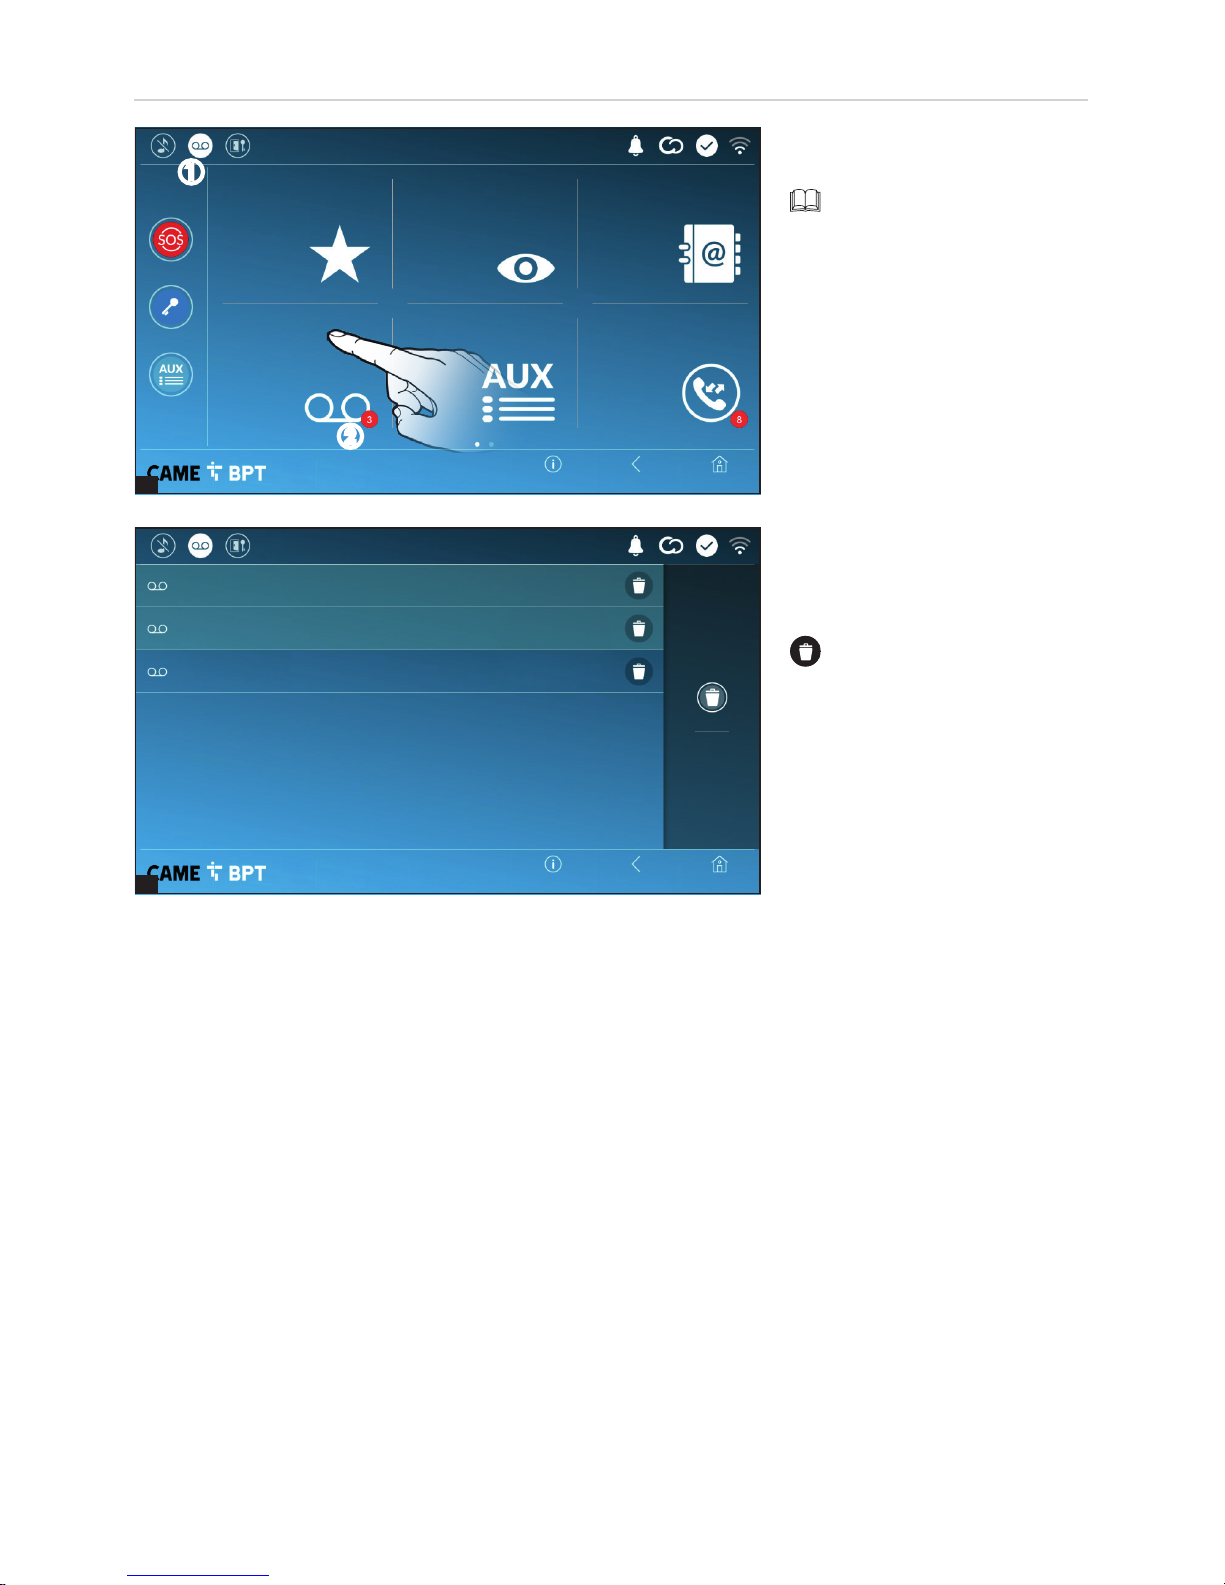
Video Recording
A Touch the icon the turn the answering service on or o.
To properly set up the answering service, see "Video Recording" on page 16.
B The number with the red background is the number of unseen
video messages.
When the screen standing-by,
any unseen video messages, are
flagged by the blinking, blue LED
fitted on the frame.
Any unseen messages are highlighted.
Touch the wanted message to start
its playback.
Touch the icon to remove the
message from the list.
Touch the button Back to return to
the previous screen.
A
B
Page 10

1
2
1
p. 10 - Manual FB0118 6 -EN - 06/2018 - © CAME S.p.A. - The contents of this manual may be changed, at any time, and without notice. - This is a translation of the original instructions
Light
Entry panel
Gate
Entry panel
HomeBackInfo
Call register
Contacts
Aux List
Entry panels
Video Recording
Favorites
Home
Home
Back
Back
Info
Info
Call register
Contacts
Aux List
Entry panels
Video Recording
Favorites
19:02
Thursday
01 Feb 2018
19:02
Thursday
01 Feb 2018
19:02
Thursday
01 Feb 2018
Aux List
A Touch the icon to access the list
of auxiliary contacts.
The auxiliary commands (AUX) let
you activate suitably programmed
contacts to carry out additional
commands to the classic opening
of the entry door.
To fill the list of auxiliary contacts, see the chapter "Aux settings (auxiliary commands)" on
page 14.
Call register
A Touch the icon to access the call
history.
B The number with the red background is the number of missed
calls.
When the screen standing-by, any
missed calls are flagged by the
blinking, blue LED fitted on the
frame.
Touch the name of the wanted
command to activate its corresponding contact.
Touch the icon to edit the
command name.
Touch the button Back to return to
the previous screen.
A
A
B
Page 11

2
2
1
p. 11 - Manual FB0118 6 -EN - 06/2018 - © CAME S.p.A. - The contents of this manual may be changed, at any time, and without notice. - This is a translation of the original instructions
Touch the icon to remove the call from the list.
Touch the button Back to return to the previous screen.
HomeBackInfo
SengsMessagesCCTV
19:02
Thursday
01 Feb 2018
Delete all
30 Jan 2017 15:45
0s
03 Jan 2018 16:31
0s
05 Jan 2018 14:21
0s
07 Jan 2018 21:03
0s
28 Jan 2018 11:23
0s
29 Jan 2018 19:55
0s
Concierge
Intercom 1
Entry panel
Entry panel
Entry panel
Entry panel
Home
Home
Back
Back
Info
Info
IP 04 Video cameraIP 03 Video camera
IP 02 Video cameraIP 01 Video camera
19:02
Thursday
01 Feb 2018
19:02
Thursday
01 Feb 2018
Types of calls
Incoming call.
Outgoing call.
Missed call.
Any missed calls are highlighted .
Touch the line you want to call your
contact.
Touch the icon to start replaying the saved message.
CCTV
A Touch the icon to access the list
of available video cameras.
to fill the list of IP video cameras, see the "IP video cameras"
on page 16.
Select the IP video camera that you
want to view.
A
Page 12

1
2
p. 12 - Manual FB0118 6 -EN - 06/2018 - © CAME S.p.A. - The contents of this manual may be changed, at any time, and without notice. - This is a translation of the original instructions
28 Jan 2018 11:23
29 Jan 2018 19:55
Delete all
Home
Home
Back
Back
Info
Info
Sengs
Porter
Power outage
Porter
Delivery for you
MessagesCCTV
19:02
Thursday
01 Feb 2018
19:02
Thursday
01 Feb 2018
Porter messages
A Touch the icon the view any
messages received from the porter.
Porter messages are grouped
by message subject.
Any yet to be seen messages are
highlighted.
Touch the line to view the messages.
Touch the icon to remove the
message from the list.
Touch the button Back to return to
the previous screen.
A
Page 13

p. 13 - Manual FB0118 6 -EN - 06/2018 - © CAME S.p.A. - The contents of this manual may be changed, at any time, and without notice. - This is a translation of the original instructions
HomeBack
Save
Info
EnglishLanguage
19:02
Thursday
01 Feb 2018
SengsCCTV
Home
Home
Back
Back
Info
Info
IP video cameras
Auxiliary seng
Video Recording
Quick commands
Date/me
Language
System informaon
19:02
Thursday
01 Feb 2018
19:02
Thursday
01 Feb 2018
GENERAL SETTINGS
Touch the icon to return to the list
of settings.
System information
This window gives technical information that is useful for identifying
the device's characteristics and the
hardware and software versions.
Language
Choose the device interface language from the drop-down menu.
Save the setting by touching the
Save button.
Page 14

1
p. 14 - Manual FB0118 6 -EN - 06/2018 - © CAME S.p.A. - The contents of this manual may be changed, at any time, and without notice. - This is a translation of the original instructions
Delete all
New Aux
The list is empty
HomeBackInfo
19:02
Thursday
01 Feb 2018
State/City
Connent
01 Feb 2018 19:02
Date/Time
NTP server
Auto mode
Mode
HomeBack
NTP
Auto
System
Manual
Save
Info
19:02
Thursday
01 Feb 2018
This window is for setting the date
and time on the indoor receiver.
A The date and time are manually
set by the user.
B The date and time are automatically synchronized.
The network connected to
the device must be able to link to
the internet.
By choosing mode B, you can choose the font for the automatic date and time.
C The date and time are automatically synchronized on the system server (or master).
D The date and time are automatically synchronized by a designated internet service via the NTP server.
E In this space provide the NTP server address through which the device will synchronize the date and time.
F When the manual code (A)activated, the pop-up window lets you manually set the current date and time.
G Select from the following lists the continent - state/city where the system is installed.
Press button to save the configuration Save.
Touch the button Back to return to the list of configurable parameters.
Date/time
Aux settings (auxiliary commands)
A touch the button to add a new
auxiliary command.
E
F
G
A
C
B
D
A
Page 15

2
3
p. 15 - Manual FB0118 6 -EN - 06/2018 - © CAME S.p.A. - The contents of this manual may be changed, at any time, and without notice. - This is a translation of the original instructions
EAST EntrancePre-set door release
Main entrancePre-set porter call
EAST ladder lightPreset Aux command
HomeBackInfo
19:02
Thursday
01 Feb 2018
Entry panelDesnaon
Aux 3Command
Gate opener
Garden lights
Entry panel
Gate opener
Entry panel
Descripon
Delete all
New Aux
Home
Home
Back
Back
Save
Info
Info
19:02
Thursday
01 Feb 2018
19:02
Thursday
01 Feb 2018
B Touch the area to assign a name
to the AUX command that you are
going to add.
C Choose the command to associate the AUX to, from the list.
D Choose the destination of the
AUX command from the list.
Save the setting by touching the
Save button.
The configured auxiliary commands
will fill the list.
For editing the selected element.
For eliminating the selected
element.
Touch the button Back to return to
the list of configurable parameters.
Quick commands
This window is for establishing
which commands will be executed
when pressing the buttons on the
left side of the home page.
A From the lists choose the destination of the commands.
Touch the Back button to return to
the list of settable parameters.
B
C
D
A
Page 16

1
p. 16 - Manual FB0118 6 -EN - 06/2018 - © CAME S.p.A. - The contents of this manual may be changed, at any time, and without notice. - This is a translation of the original instructions
Delete all
The list is empty
New video camera
HomeBackInfo
19:02
Thursday
01 Feb 2018
Save
5Answer delay
Courtesy message
O
Play message
Record message
On
HomeBackInfo
19:02
Thursday
01 Feb 2018
IP video cameras
A Touch the button to add a new
IP video camera.
Video Recording
If the system has a video intercom entry panel installed, if the called user is not in, the device lets the caller record
a video message.
The caller may be notified of this by a courtesy message, for example, "The user is not available at the moment,
please leave a message after the beep".
The video message, labelled with the time and date of the call, are stored. You can view it later by consulting video
voicemail.
A From the drop down menu,
select the ring time - expressed in
seconds - after which the automatic recording is activated.
B Enable the courtesy message to
be played back.
C Button for recording and playing
back the courtesy message.
Save the setting by touching the
Save button.
Touch the Back button to return to
the list of settable parameters.
B
A
C
A
Page 17

2
3
p. 17 - Manual FB0118 6 -EN - 06/2018 - © CAME S.p.A. - The contents of this manual may be changed, at any time, and without notice. - This is a translation of the original instructions
Background
HomeBackInfo
19:02
Thursday
01 Feb 2018
Delete all
New video camera
URI for xed image
URI for real-me con
-
necon
IP 04 Video camera
IP 03 Video camera
IP 02 Video camera
IP 01 Video camera
Descripon
Home
Home
Back
Back
Save
Info
Info
19:02
Thursday
01 Feb 2018
19:02
Thursday
01 Feb 2018
Backdrops
The added IP video cameras fill the
list.
For editing the selected element.
For eliminating the selected
element.
Touch the Back button to return to
the list of settable parameters.
B Touch the area to assign a name
to the IP video camera that you are
going to add.
C Touch the area and type the
URI string for connecting the video
camera.
D Touch the area and type the URI
string for acquiring the static image
from the video camera, needed for
the preview.
the URI strings are shown in
the IP Video cameras' manual.
Save the setting by touching the
Save button.
Select your preferred backdrop;
the new settings is immediately
applied.
Touch the button Back to return to
the list of configurable parameters.
B
C
D
Page 18

p. 18 - Manual FB0118 6 -EN - 06/2018 - © CAME S.p.A. - The contents of this manual may be changed, at any time, and without notice. - This is a translation of the original instructions
Brightness in stand-by
Touch sound
Local doorbell tone
Ringing tone
Volume
Brightness
Clean screen
Home
Home
Back
Back
Info
Info
19:02
Thursday
01 Feb 2018
19:02
Thursday
01 Feb 2018
A Adjusts the brightness of the
screen during use.
B This is for adjusting the
screensaver brightness when the
screen is in stand-by mode.
C This makes the screen
insensitive to the touch for 20
seconds, to enable cleaning over it.
Touch the button Back to return to
the list of configurable parameters.
Display
Tones
A It adjusts the general volume of
the ringers for the video intercom
calls.
B Choose the tone to associate to
incoming calls from the drop-down
menu.
C From the drop down menu select the tone to associate to the call
from the landing.
D With this function enabled, each touch on the screen is accompanied by a sound.
Touch the Back button to return to the list of settable parameters.
19:02
Thursday
01 Feb 2018
Info Back Home
Volume
Ringing tone
Local doorbell tone
Touch sound
A
B
C
A
B
C
D
A
B
C
D
Page 19

1
2
p. 19 - Manual FB0118 6 -EN - 06/2018 - © CAME S.p.A. - The contents of this manual may be changed, at any time, and without notice. - This is a translation of the original instructions
HomeBackInfo
19:02
Thursday
01 Feb 2018
DHCP
Save
Stac
MAC address
Gateway
Netmask
IP address
Mode
Ethernet
Type of connecon
HomeBackInfo
19:02
Thursday
01 Feb 2018
Enabled
Enabled
Ethernet
Save
Congure WiFi
Congure Ethernet
Disabled
Disabled
WiFi
DNS
Default gateway
Wireless
Ethernet
On slave indoor receiverOn master indoor receiver
Automac door opener
SIP Sengs
CAME Connect
NetworkNetwork
Maintenance
Maintenance
Conguring the user interface
Automac door opener
Conguring the user interface
Credenals
19:02
Thursday
01 Feb
19:02
Thursday
01 Feb
Advanced settings
This section requires specific
knowledge of how the video intercom system operates. Wrong
settings may cause partial or
even total malfunctions; that is
why the editing of some parameters is allowed only after entering
the installer password; the default
password is 112233).
Network
This section is for establishing in
which way the device connects to
the network.
A Enable/disable the types of
wanted connections
B Select whether the gateway
connection happens via the Ethernet or WiFi network.
CEnter a valid DNS address to
have the CAMEConnect connection
(for example, 8.8.8.8.).
Configuring the Ethernet connection
D Lets you choose the type of ad-
dress from:
DHCP
The device's IP address is as-
signed by the DHCP server; if
there are no special needs, this
mode lets you continue with the
settings without adding any ad-
ditional data.
A
B
C
D
E
F
G
Page 20

3
4
p. 20 - Manual FB0118 6 -EN - 06/2018 - © CAME S.p.A. - The contents of this manual may be changed, at any time, and without notice. - This is a translation of the original instructions
Public WiFi
Protected
Smith home WiFi
Unprotected
Save seng
Scan
Add WiFi network
HomeBackInfo
19:02
Thursday
01 Feb 2018
HomeBackInfo
19:02
Thursday
01 Feb 2018
DHCP
Save
Congure WiFi
Stac
Gateway
Netmask
IP address
Mode
WiFi
Type of connecon
Configuring the Wireless connection
H This button is for enabling the
WiFi network.
This
icon shows that the WiFi
connection is active.
4 The page shows any detected
networks; to manually scan for networks, touch this button I.
Select a network to connect to.
If the network is unprotected the
connection will be immediate.
If the network is protected, enter
the password for the WiFi network
to get access.
Static
The device's IP address is manually assigned.
E IF you have chosen a static IP address, enter the device's IP, which must belong to the same subnet as that of
the router and of the other connected devices.
F If the netmask is dierent from the default one, provide the proper netmask.
G Provide the default gateway for your network.
D
E
F
G
H
I
J
K
Page 21

5
p. 21 - Manual FB0118 6 -EN - 06/2018 - © CAME S.p.A. - The contents of this manual may be changed, at any time, and without notice. - This is a translation of the original instructions
Unit - Mobile App 4
00700101268
Unit - Mobile App 3
00700101273
Unit - Mobile App 2
00700101269
Unit - Mobile App 1
00700100267
Unit - Receiver 3
Unit - Receiver 2
00700100266
Unit - Receiver 1
00700100264
HomeBackInfo
19:02
Thursday
01 Feb 2018
Save
YES NO
Status
Internet service provider
Enable connecon
Keycode
HomeBackInfo
19:02
Thursday
01 Feb 2018
C URL of the service for remote calls (the default one is xip01.cameconnect.net)
D It shows the state of the connection.
A Device's univocal code.
B For enabling or disabling the
VoIP remote control of the video-intercom call.
The factory settings require that
the CAME Connect connection is
disabled.
The CAME Connect connection must be active to receive
calls on the App.
CAME Connect - only on the master indoor receiver
None
Hidden network
Connect
Password
Encrypon
Security
SSID
HomeBackInfo
19:02
Thursday
01 Feb 2018
Top save the setting, touch the K
button.
To establish connection to a WiFi
network with a hidden SSID, touch
button J.
On the page provided yo can enter
an SSID, that is, network name,
type of security, encryption and
password; when required.
To connect, touch this button L.
Top save the setting, touch the K
button.
Credentials - only on the master indoor receiver
The window lets you view the credentials of the users enabled to
connect to the device via mobile
devices.
Touch the user you want to access
the screen that lets you assign or
edit an access password.
L
A
B
C
D
Page 22

p. 22 - Manual FB0118 6 -EN - 06/2018 - © CAME S.p.A. - The contents of this manual may be changed, at any time, and without notice. - This is a translation of the original instructions
D In this space enter the server's IP address.
Example of CAME server IP addresses:
ETI/MiniSER Xip, ETI/DOMO Xip - 192.168.0.3 (port 0) - 192.168.1.3 (port 1)
ETI/SER Xip, 192.168.1.1
Serverless IP entry panel, 192.168.1.5
E Select the type of server to which the device is connected.
Automatic mode
By choosing the automatic SIP setting and pressing the SAVE button, a guided procedure is launched which lets
you choose the server or master device, to which to connect your device. One you have entered the Flat ID call
code assigned to your indoor receiver through the PCS/Xip, during programming, the procedure is complete.
Manual Automac
HomeBackInfo
19:02
Thursday
01 Feb 2018
Save
NoneGenericXIP server
Manual Mode
A In this space enter the “SIP Us-
ername” assigned to the device by
PCS Xip.
B In this space type any password
assigned in the receiver's credentials in the server's setup window.
C Name assigned to the device.
SIP settings - only on the slave indoor receiver
Server type
Server address
Display name
Password
Mode
Flat ID
Username
A
B
C
D
E
Page 23

1
2
3
p. 23 - Manual FB0118 6 -EN - 06/2018 - © CAME S.p.A. - The contents of this manual may be changed, at any time, and without notice. - This is a translation of the original instructions
Save
Save
Sun
Sun
Sat
Sat
Fri
Fri
Thu
Thu
Wed
Wed
Tue
Tue
Mon
Mon
Days of the week
Days of the week
Start me
Start me
13:30
08:30Start me
Start me
Home
Home
Back
Back
Info
Info
19:02
Thursday
01 Feb 2018
19:02
Thursday
01 Feb 2018
C Touch the days of the week during which the time-slot needs to be
active.
D Touch this button to save the
time-slot you have just created.
Create any new time slots and
touch the Save to add them to the
list.
Touch the button Back to view the
list of created time slots.
B Touch the empty sections and
in the pop-up window set the start
and finish time of the time-slot for
activating the function.
The list is empty
New me-slot
HomeBackInfo
19:02
Thursday
01 Feb 2018
A Touch the button to add a new
time slot.
Automatic door opener
This function, which is especially useful for businesses, lets you automatically open the entrance once the call-button is pressed on the entry panel. The activation of this function can be programmed to schedule time slots and
days of the week.
Delete all
A
B
D
C
Page 24

2
1
4
p. 24 - Manual FB0118 6 -EN - 06/2018 - © CAME S.p.A. - The contents of this manual may be changed, at any time, and without notice. - This is a translation of the original instructions
Delete all
New me-slot
13:30 - 18:30
Mon Tue Wed Thu Fri
Mon Tue Wed Thu Fri
08:30 - 12:30
HomeBackInfo
19:02
Thursday
01 Feb 2018
Customize Homepage funcons
Preset Customized
Homepage acve
HomeBackInfo
19:02
Thursday
01 Feb 2018
Save
Number of frames:
HomeBackInfo
19:02
Thursday
01 Feb 2018
Configuring the user interface
For editing the selected element.
For eliminating the selected
element.
Touch the button Back to return to
the list of configurable parameters.
This section is for customizing the
appearance of the homepage.
A Select the type of homepage
that you wish to see.
B Touch the button to create a
customized homepage.
C From the drop down menu,
choose the total number of frames
that you want on the main page.
Each page has six frames, at
most; the last one is always the
settings section.
C
A
B
Page 25

3
p. 25 - Manual FB0118 6 -EN - 06/2018 - © CAME S.p.A. - The contents of this manual may be changed, at any time, and without notice. - This is a translation of the original instructions
Restore preset sengs
Set slave mode
Restart applicaon
Reboot device
HomeBackInfo
19:02
Thursday
01 Feb 2018
The factory settings require the indoor receiver to be in "slave" mode. Any indoor receivers set to "mas-
ter" mode are configured via the PCS/Xip software to match their systems structure.
C Touch the button to set the indoor receiver to "slave" mode.
This setting is only available on the "master" indoor receivers. The changed mode requires the device to
be reconfigured.
D Touch the button to return all the local settings to the default factory settings.
(administrator password required;
the default password is 112233).
A Touch the button to reboot the
indoor receiver.
B Touch the button to reboot only
the application that runs the indoor
receiver.
Maintenance
Save
Empty Sengs
EmptyEmpty
Number of frames:
HomeBackInfo
19:02
Thursday
01 Feb 2018
Touch each of the empty sections
and use the drop-down menu to
select the content that you want to
assign to the section.
Save the setting by touching the
Save button.
A
B
C
D
Page 26

p. 26 - Manual FB0118 6 -EN - 06/2018 - © CAME S.p.A. - The contents of this manual may be changed, at any time, and without notice. - This is a translation of the original instructions
LANGUAGE
English
XTS 7 IP
SETTINGS
Enter
LOGIN MODE
USERS
INSTALLER
PASSWORD
ExitHelp
Voicemail
System
Date and Time
Network
SIP
IP video cameras
Voicemail
Maintenance
Diagnostics
In the Chrome, Firefox, Safari browsers' address bar, type the devices address..
Select the USER access option and type the password to access
the settings screens.
Accessing with "User" credentials, for which the default
password is 123456, only lets you browse the pages that follow, except for the section dedicated to the user.
There is no scroll bar on the right on the settings web
pages. To browse the pages, press and keep pressed the left
mouse button, and drag. On smartphones and tablet PCs, drag
your finger along the screen.
SETTINGS ONLY AVAILABLE ON WEBPAGE
The webpages, besides allowing you to set most of the parameters that may be set up on the indoor receiver's
interface, also allow you to run certain additional functions shown in this section.
Voicemail
This window is for viewing, or saving onto you computer, any messages in the device's answering
service.
View a message
Select the message or press the
corresponding button to initiate the
playback.
Save a message onto your
computer.
A Press the button to immediately
start downloading.
A
Page 27

p. 27 - Manual FB0118 6 -EN - 06/2018 - © CAME S.p.A. - The contents of this manual may be changed, at any time, and without notice. - This is a translation of the original instructions
CONFIRM NEW PASSWORD
NEW PASSWORD
PASSWORD
Exit
CancelSave
Help
Maintenance
CHANGE PASSW... CONFIGUR...
UPDATE...
System
Date and Time
Network
SIP
IP video cameras
Voicemail
Maintenance
Diagnostics
FILE
No file selected
VERSION
Exit
Upload
Help
Maintenance
CHANGE PASSW... CONFIGUR...
UPDATE...
System
Date and Time
Network
SIP
IP video cameras
Voicemail
Maintenance
Diagnostics
Maintenance
Update
This window is for upgrading the
device's firmware, as follows:
A Press the button, select the file
with the firmware upgrade within
your computer and launch the process.
Change password
In this window you can change the
password used for accessing.
A
Page 28

CAME S.p.A.
Via Martiri Della Libertà, 15
31030 Dosson di Casier - Treviso - Italy
tel. (+39) 0422 4940 - fax. (+39) 0422 4941
p. 28 - Manual FB0118 6 -EN - 06/2018 - © CAME S.p.A. - The contents of this manual may be changed, at any time, and without notice. - This is a translation of the original instructions
Pertinent Regulations. CAME SpA, the manufacturer, declares that the products described in this manual conform
to Directive 2014/53/EU. The complete wording of the EU declaration of conformity is available at the following
Internet address: www.came.com
Decommissioning and disposal. Dispose of the packaging and the device at the end of its life cycle responsibly,
in compliance with the laws in force in the country where the product is used. The recyclable components are
marked with a symbol and the material's ID marker.
THE DATA PRESENTED IN THIS MANUAL MAY BE CHANGED, AT ANY TIME, AND WITHOUT NOTICE. MEASUREMENTS, UNLESS OTHERWISE STATED, ARE IN MILLIMETERS.
 Loading...