

Page 1
AUTOMATED HOME CONTROL SYSTEM
32
10
:55
WAVE
C
°
32
10:55
INSTALLATION MANUAL
WA01
Page 2

INDEX
1. Legend of symbols.......................................................3
2. Intended use and res trictions.......................................3
2.1 Int ende d use........................................................3
EN
2.2 Usage restrictions...............................................3
3. Regulator y framework.................................................4
4. Des cript ion..................................................................4
4.1 230V a.c. Control system...................................4
4.2 Technical Data....................................................4
4.3 General Description............................................5
5. Installation..................................................................6
5.1 Preliminary checks.............................................6
5.2 Tools and materials.............................................6
5.3 Dimensions, c entre dis t ance and securing holes.7
5.4 Introduction to the functioning logic...................8
6.4 Menu-Modify user.............................................16
6.5 Menu-New user..................................................18
6.6 Menu-Remove user............................................19
6.7 Menu-TX Radio..................................................20
6.8 Menu-Timer.......................................................21
6.9 Menu-Alarm clock.............................................22
6.10 Menu-Thermostat............................................23
6.11 Menu-Clock......................................................24
6.12 Menu-Key functions.........................................24
6.13 Menu-Password...............................................25
7.Maintenance........................................................28
8.Phasing out and Disposal.....................................28
9.Manufacturer’s statement....................................29
5.5 Connecting cables...............................................9
5.6 Wall mounting...................................................10
6. Programming............................................................11
6.1 Description of commands and the display.11
6.2 Browsing the menu............................................12
6.3 Menu Structure - Main.......................................13
6.3.1 Menu-Settings-Language.........................14
6.3.2 Menu -Settings-Temperature...................15
6.3.3 Menu -Settings-Screensaver....................15
2
The data and information shown in this manual may be changed by CAME cancelli automatici s.p.a. at any time without prior warning
Page 3
“IMPORTANT INSTALLATION, SAFETY INSTRUCTIONS”
“CAUTION: IMPROPER INSTALLATION MAY CAUSE SERIOUS DAMAGE, FOLLOW ALL INSTALLATION INSTRUCTIONS CAREFULLY”
“THIS MANUAL IS ONLY FOR PROFESSIONAL OR QUALIFIED INSTALLERS”
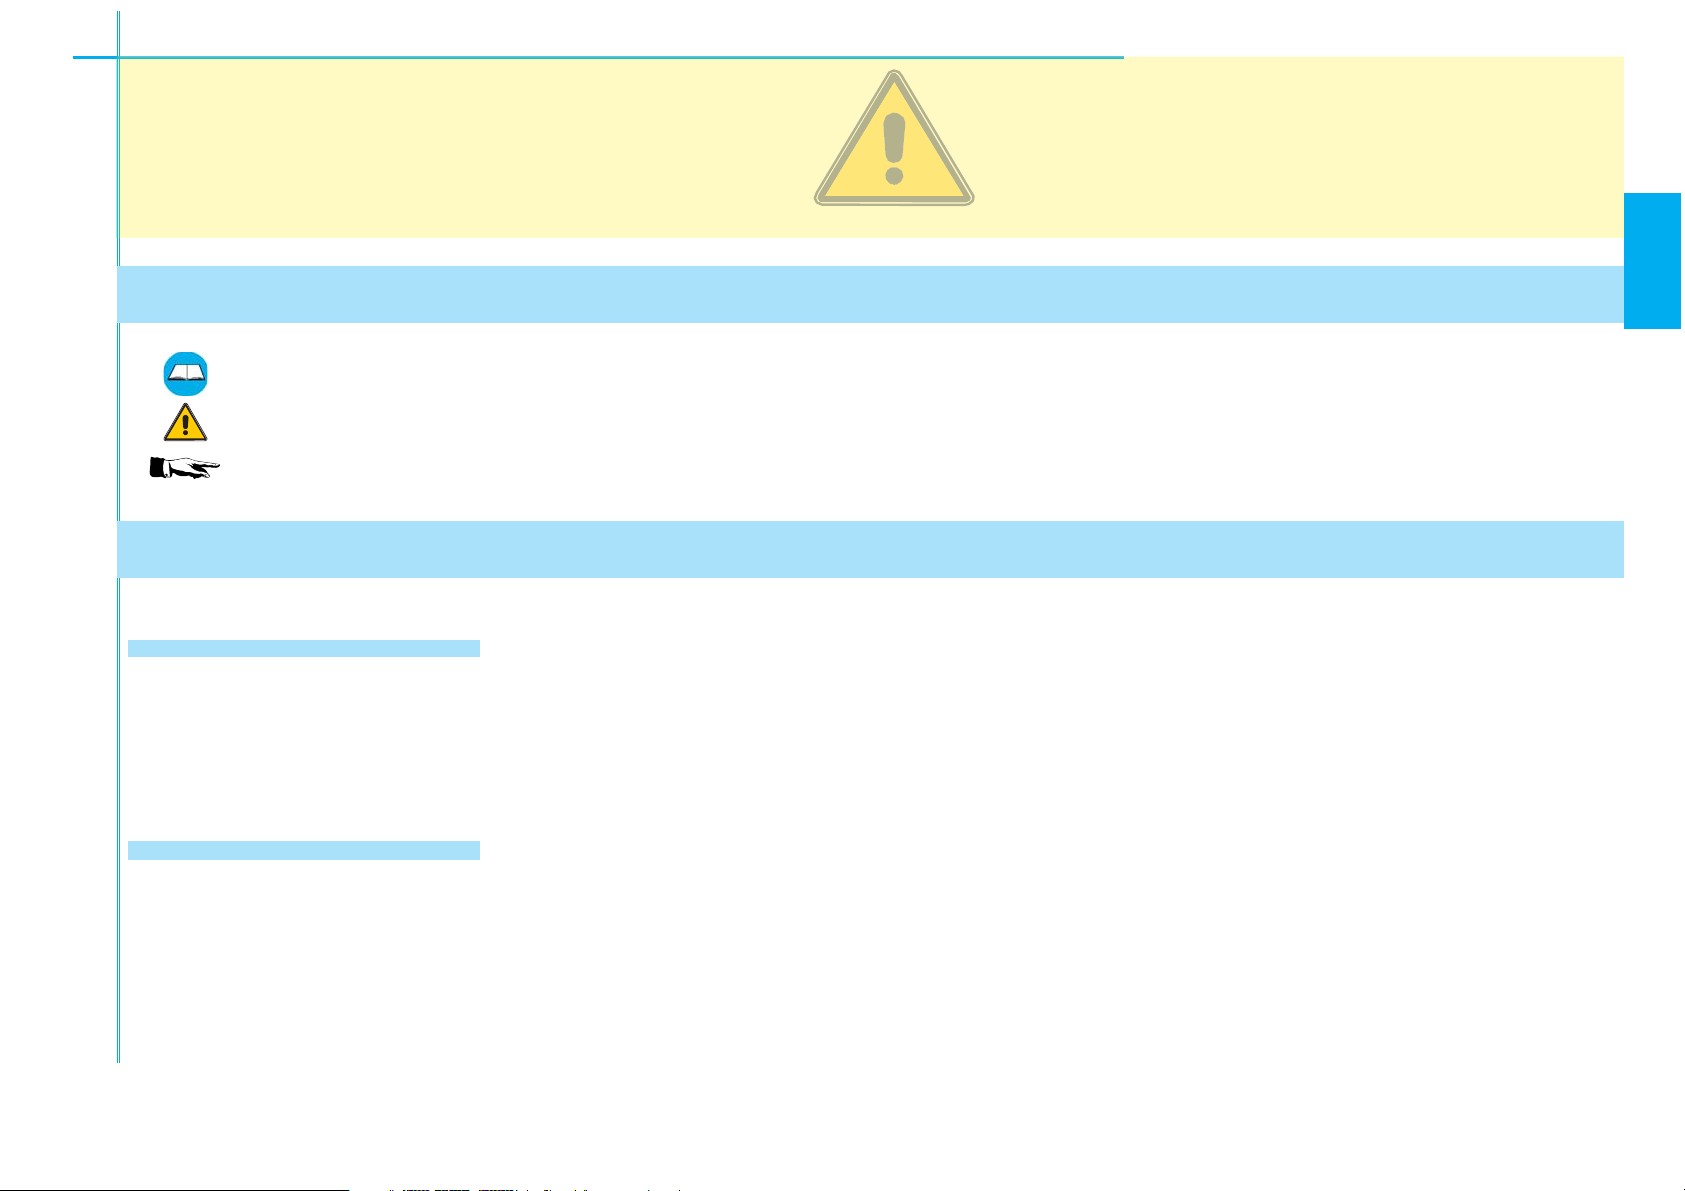
1 Legend of symbols
This symbol tells you to read the section with particular care.
This symbol tells you that the sections concern safety issues.
This symbol tells you what to say to the end-users.
2 Intended use and restrictions
2.1 Intended use
EN
Automated home control system featuring a stand alone function – will interface with the WI08 digital, electronic
card.
2.2 Restrictions
Secure the apparatus in areas free from accidental impacts.
The data and information shown in this manual may be changed by CAME cancelli automatici s.p.a. at any time without prior warning
3
Page 4

3 Reference Standards
This product complies with the following standards: EN 60730-1, EN 60950-1.
4 Description
EN
4.1 230V a.c. control system
Home automation control system powered by 120-230V a.c.; 50÷60 frequency.
CAME projects and produces entirely in Italy.
It fi ts all embedded door wall boxes.
4.2 Technical features
Control panel
Power supply: 120/230V - 50÷60 Hz.
Max Power: 30 mA AC
Power draw when idle: 20 mA AC
Max power load of accessories: 5A 230V AC/24V DC (resistant) ; 1,5A 230V AC (inductive).
Protection rating: IP40
Isolation class: II
Temperature variance: ± 1°C
Material: ABS Support /PC/ - PA6 – PMMA Plate
Radio Frequency: 433.92 MHz
Estimated radio range: 30m (inside building)
Operating temperature:
#
4
#
The data and information shown in this manual may be changed by CAME cancelli automatici s.p.a. at any time without prior warning
Page 5
10:55
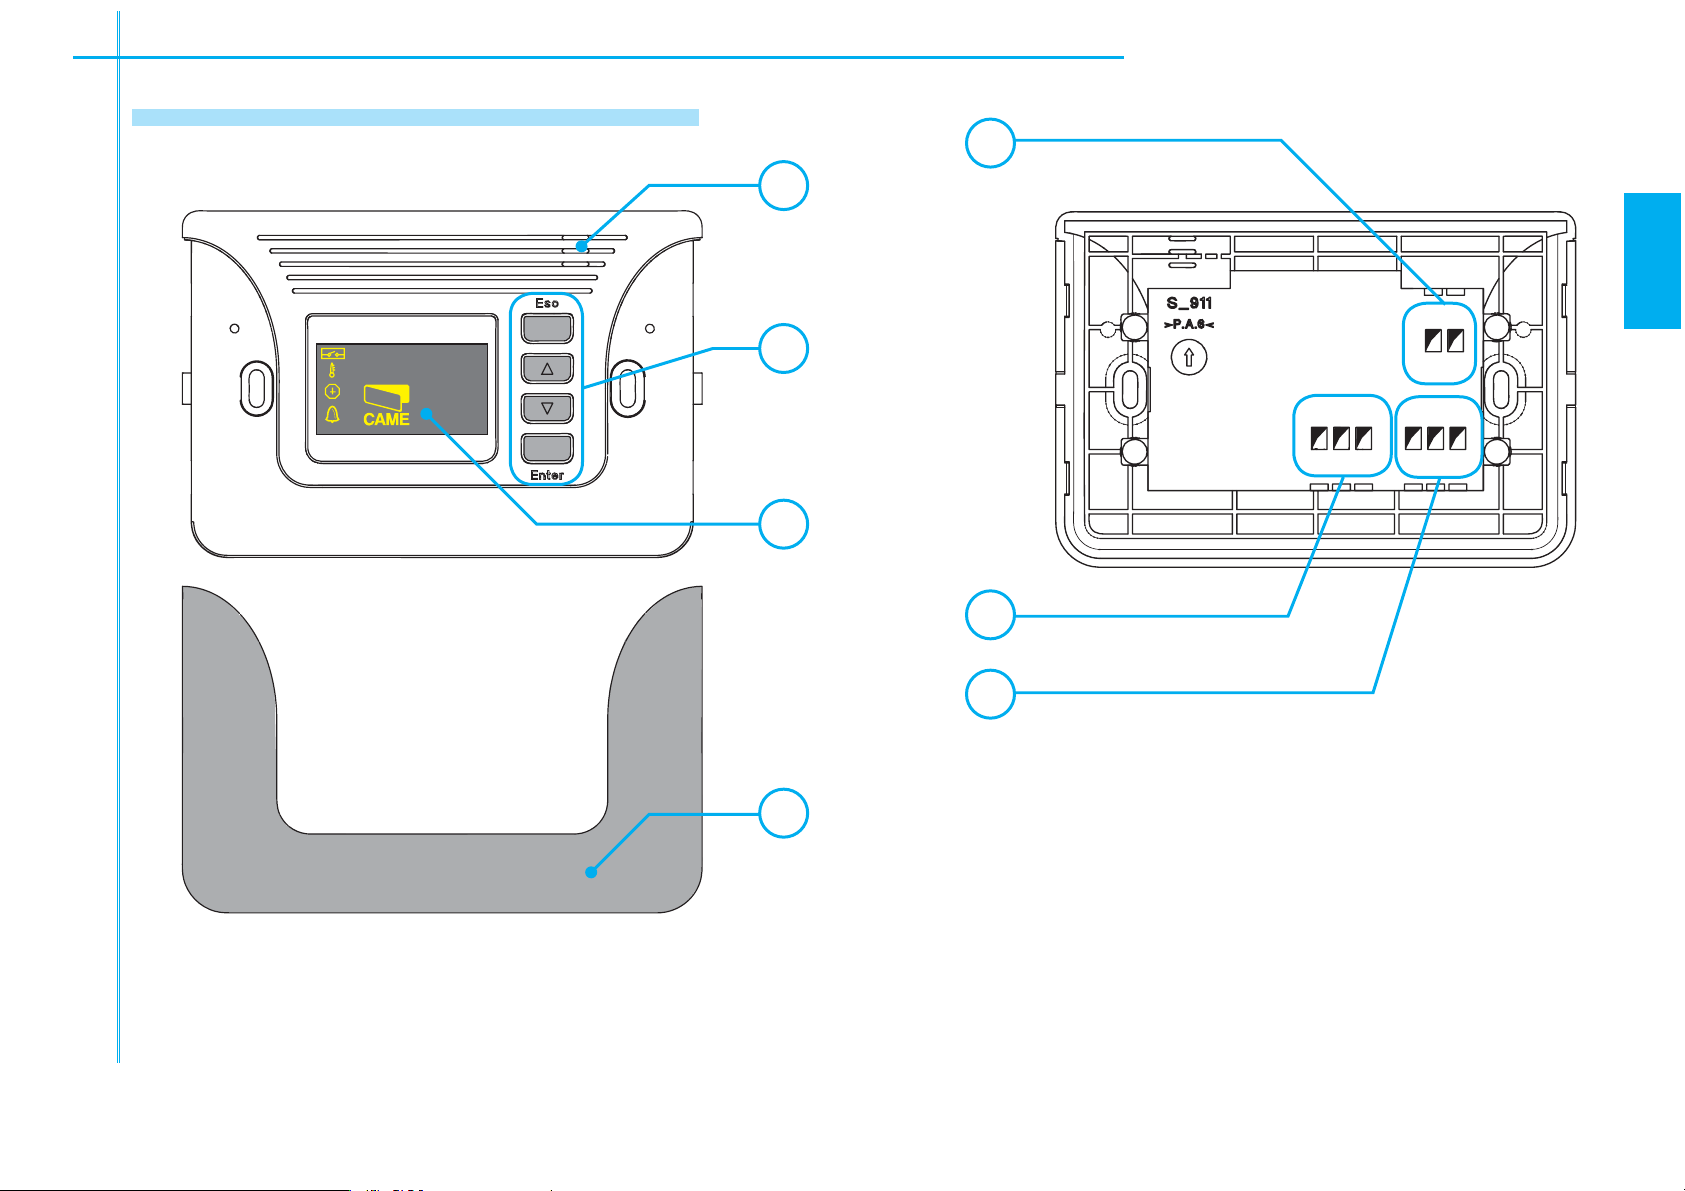
4.3 General description
5
1
EN
,,
3232°C
10:55
2
3
4
6!#
#/- /54
!"'.$ #.#./
6
7
1- Temperature gauge sensor
2- Command keypad
3- Display
4- Hole cover-plate
5- Power terminals
6- Terminals for connecting the WI08
The data and information shown in this manual may be changed by CAME cancelli automatici s.p.a. at any time without prior warning
7- Automation connection terminals (relays).
5
Page 6
5 Installation
5 .1 Preliminary checks
Before installing, do the following:
EN
• Make sure that the sport where the device will be secured is protected from impacts. Secure the device using
suitable screws, plugs, and so on for the type of surface;
• Make sure you have a suitable omnipolar cut-off device with contacts more than 3 mm apart, and independent
(sectioned off) power supply;
•
with extra insulation as compared to the other conductive parts inside;
• Make sure you have suitable tubing and conduits for the electrical cables to pass through and be protected against
mechanical damage;
Make sure that any connections inside the case (that provide continuance to the protective circuit) be fi tted
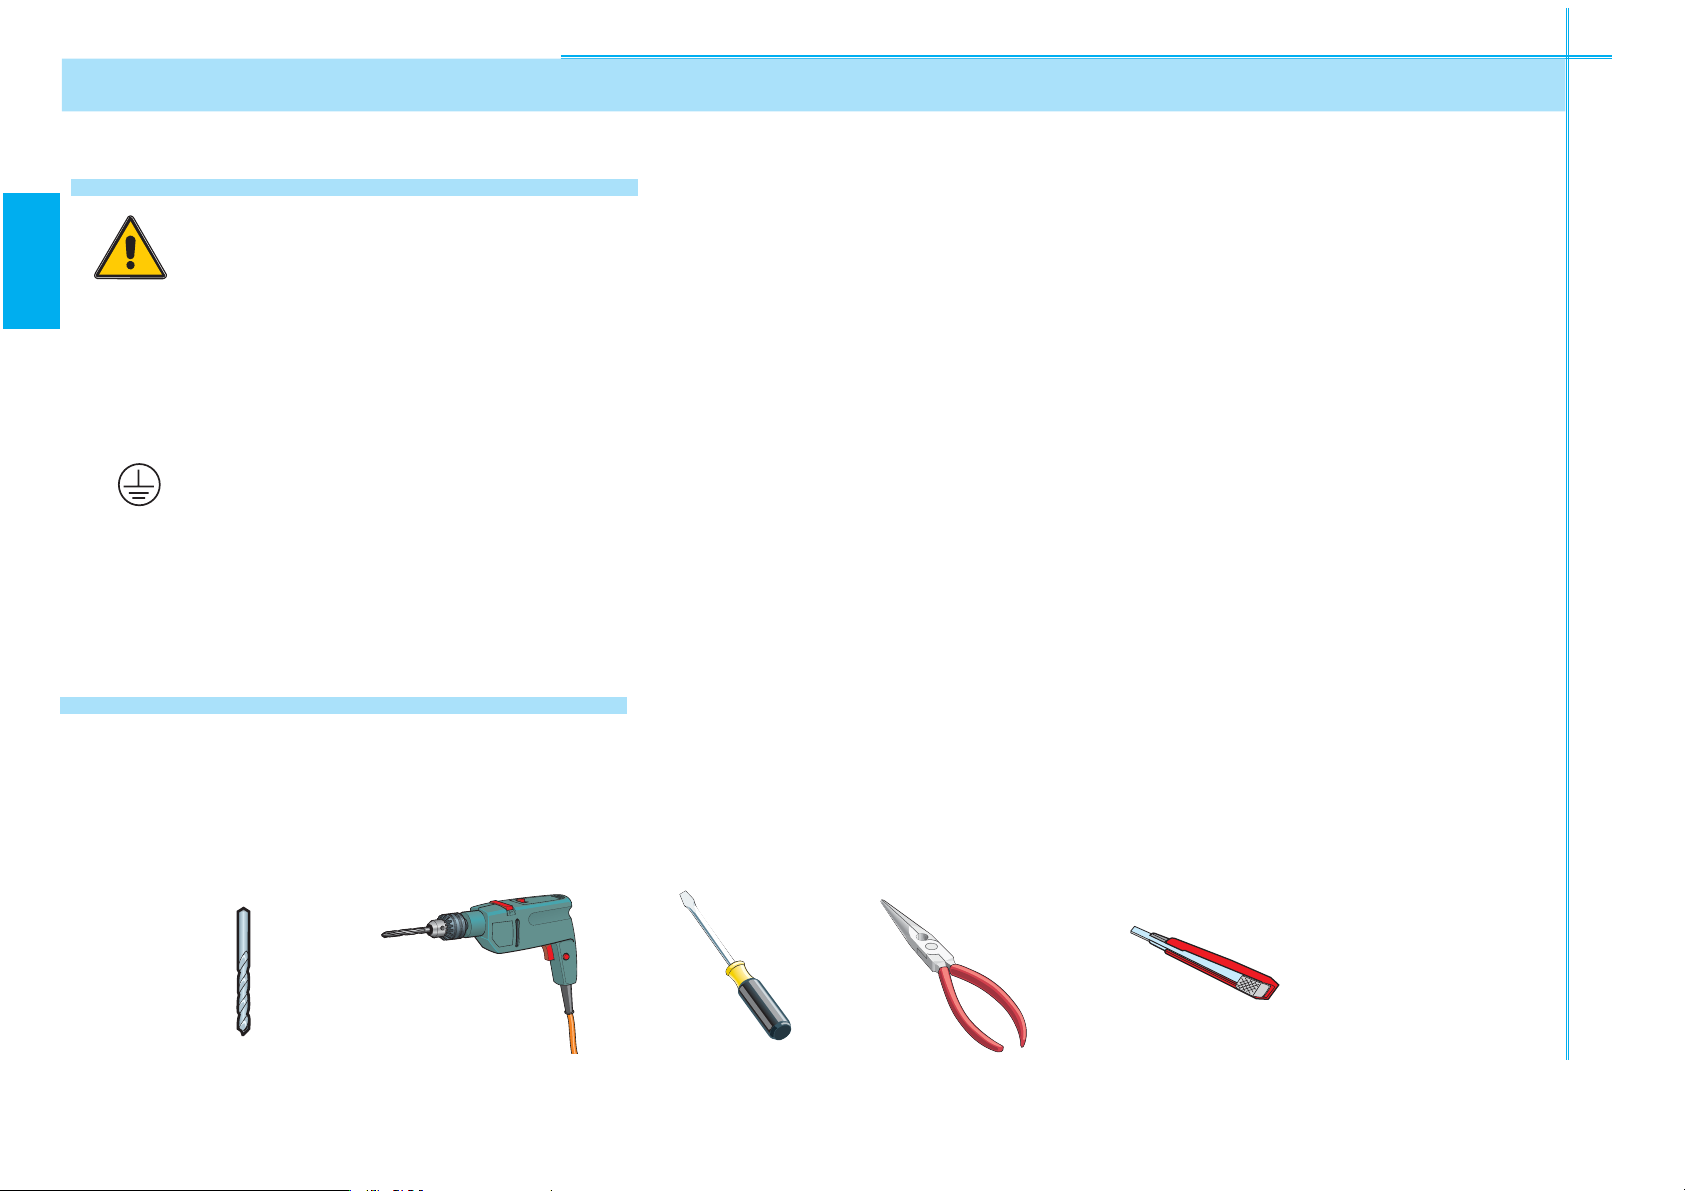
5.2 Tools and materials
Make sure you have all the tools and materials you will need for the installation at hand to work in total safety and
compliance with the current standards and regulations. The following figure illustrates the minimum equipment
needed by the installer.
The data and information shown in this manual may be changed by CAME cancelli automatici s.p.a. at any time without prior warning
6
Page 7
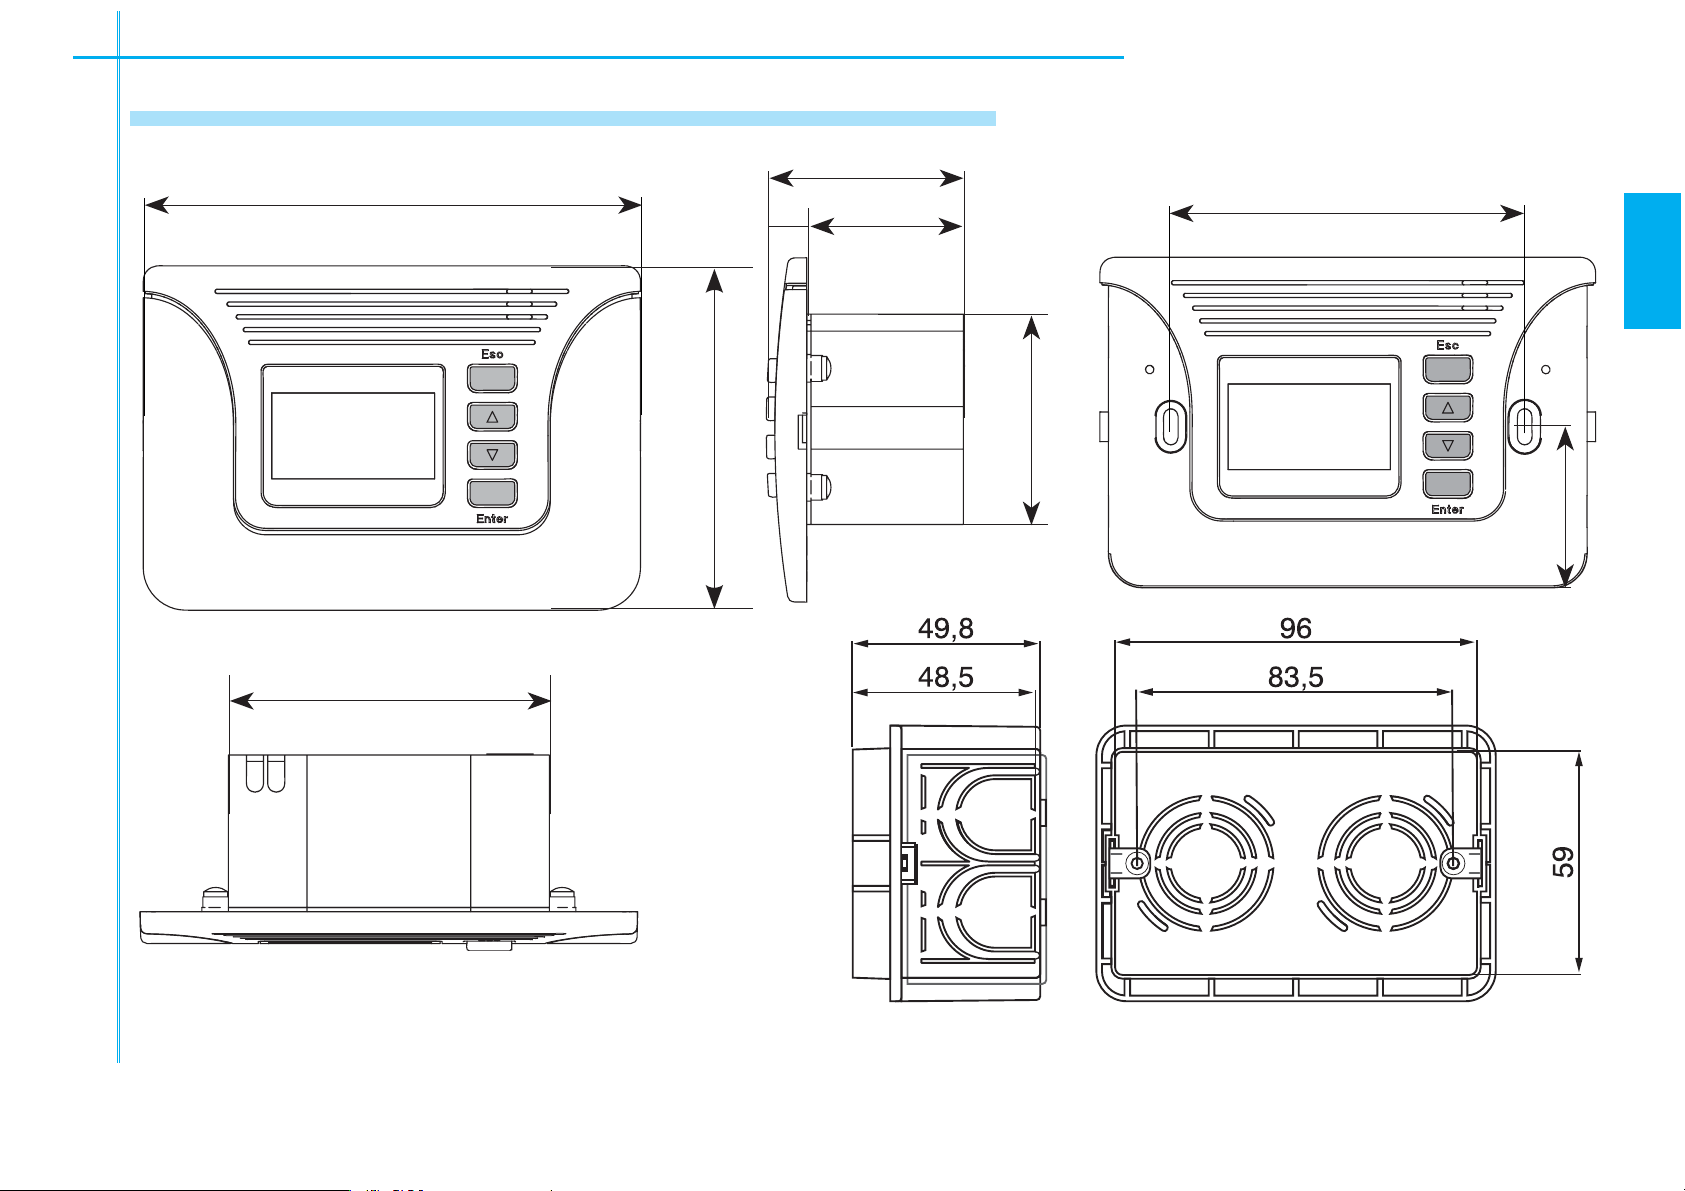
5.3 Dimensions, centre distances and securing holes
46.5
117
9.5
37
83.5
EN
80
75.5
The data and information shown in this manual may be changed by CAME cancelli automatici s.p.a. at any time without prior warning
50
38
7
Page 8
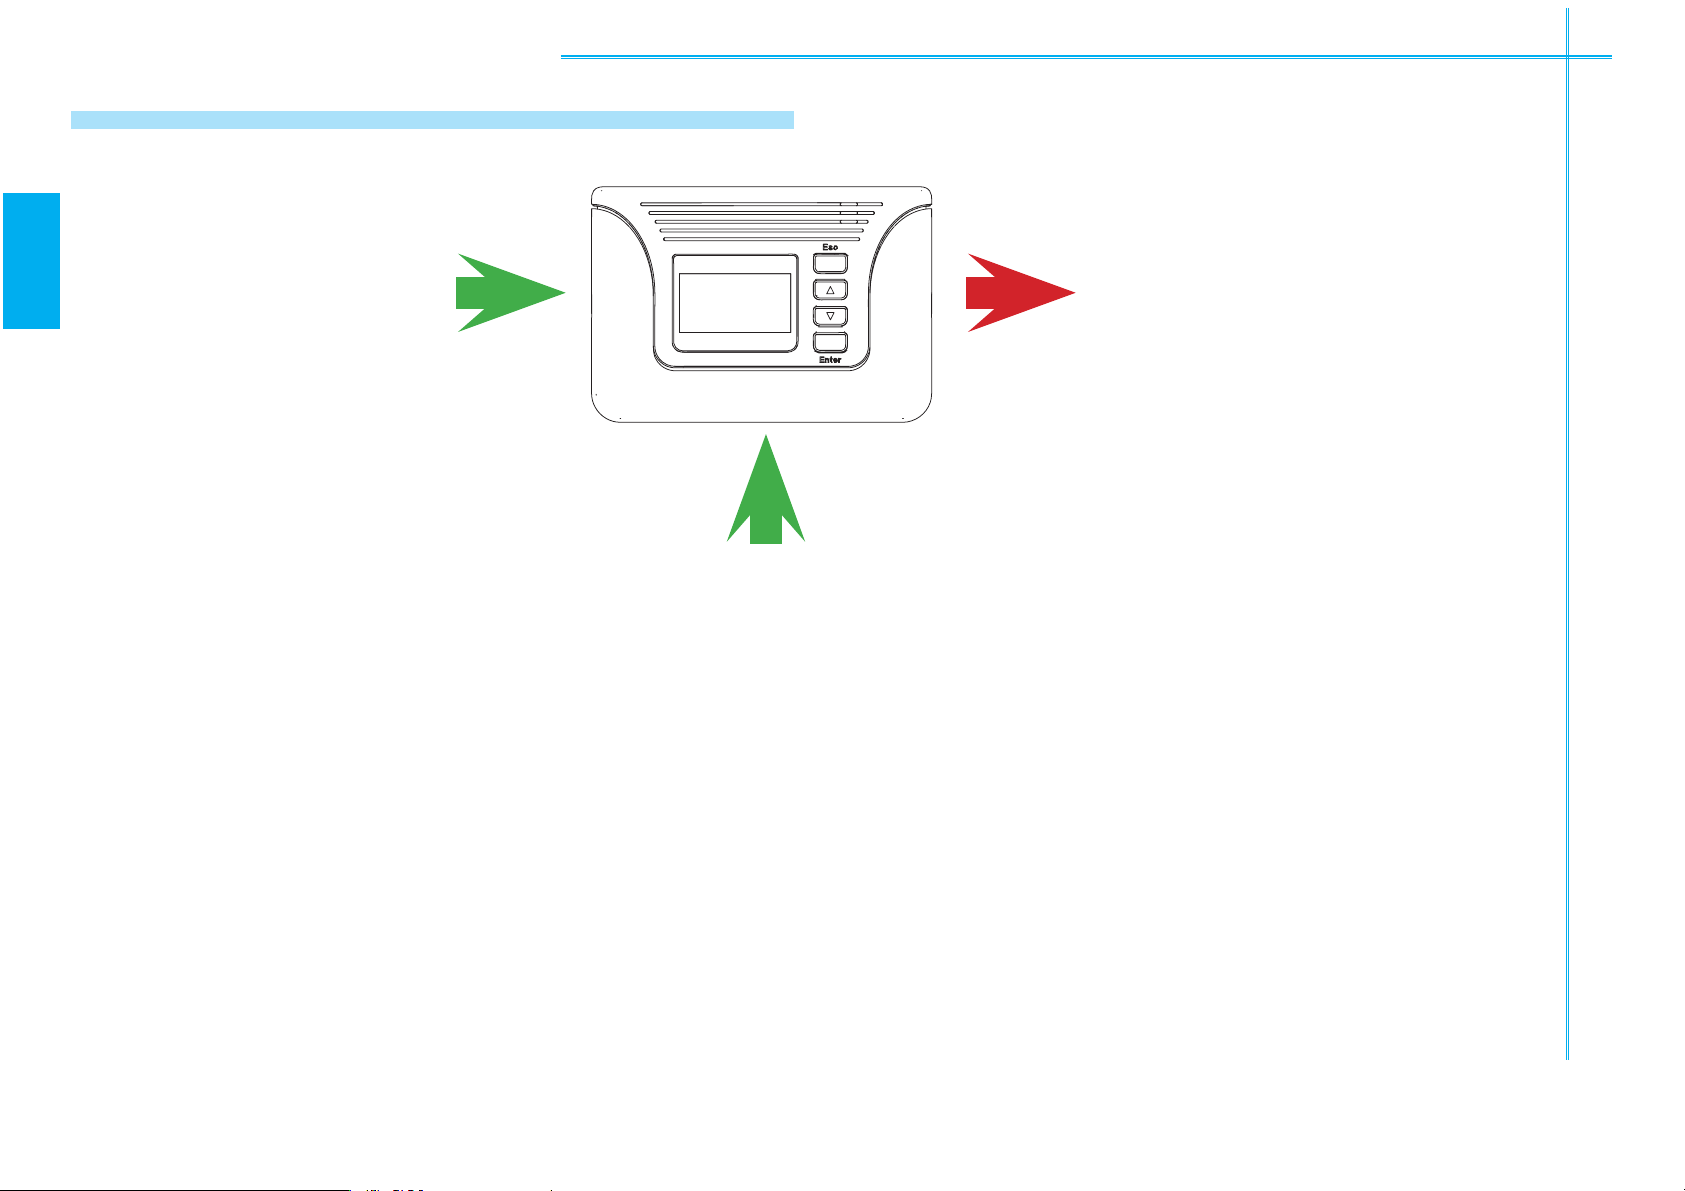
5.4 Introduction to the functioning logic
IN OUT
EN
Transponder
RS 485
Radio
Relay
IN
Keys
Thermostat
Timer
Wave allows you to associate an “IN” command such as:
Transponder, keys, thermostat and timer to an “OUT” instruction such as a radio code or a relay plug or to the
connection of another device (only for the WI08).
For example: you may control the garden lights with either the timer or keys and transponder.
8
The data and information shown in this manual may be changed by CAME cancelli automatici s.p.a. at any time without prior warning
Page 9
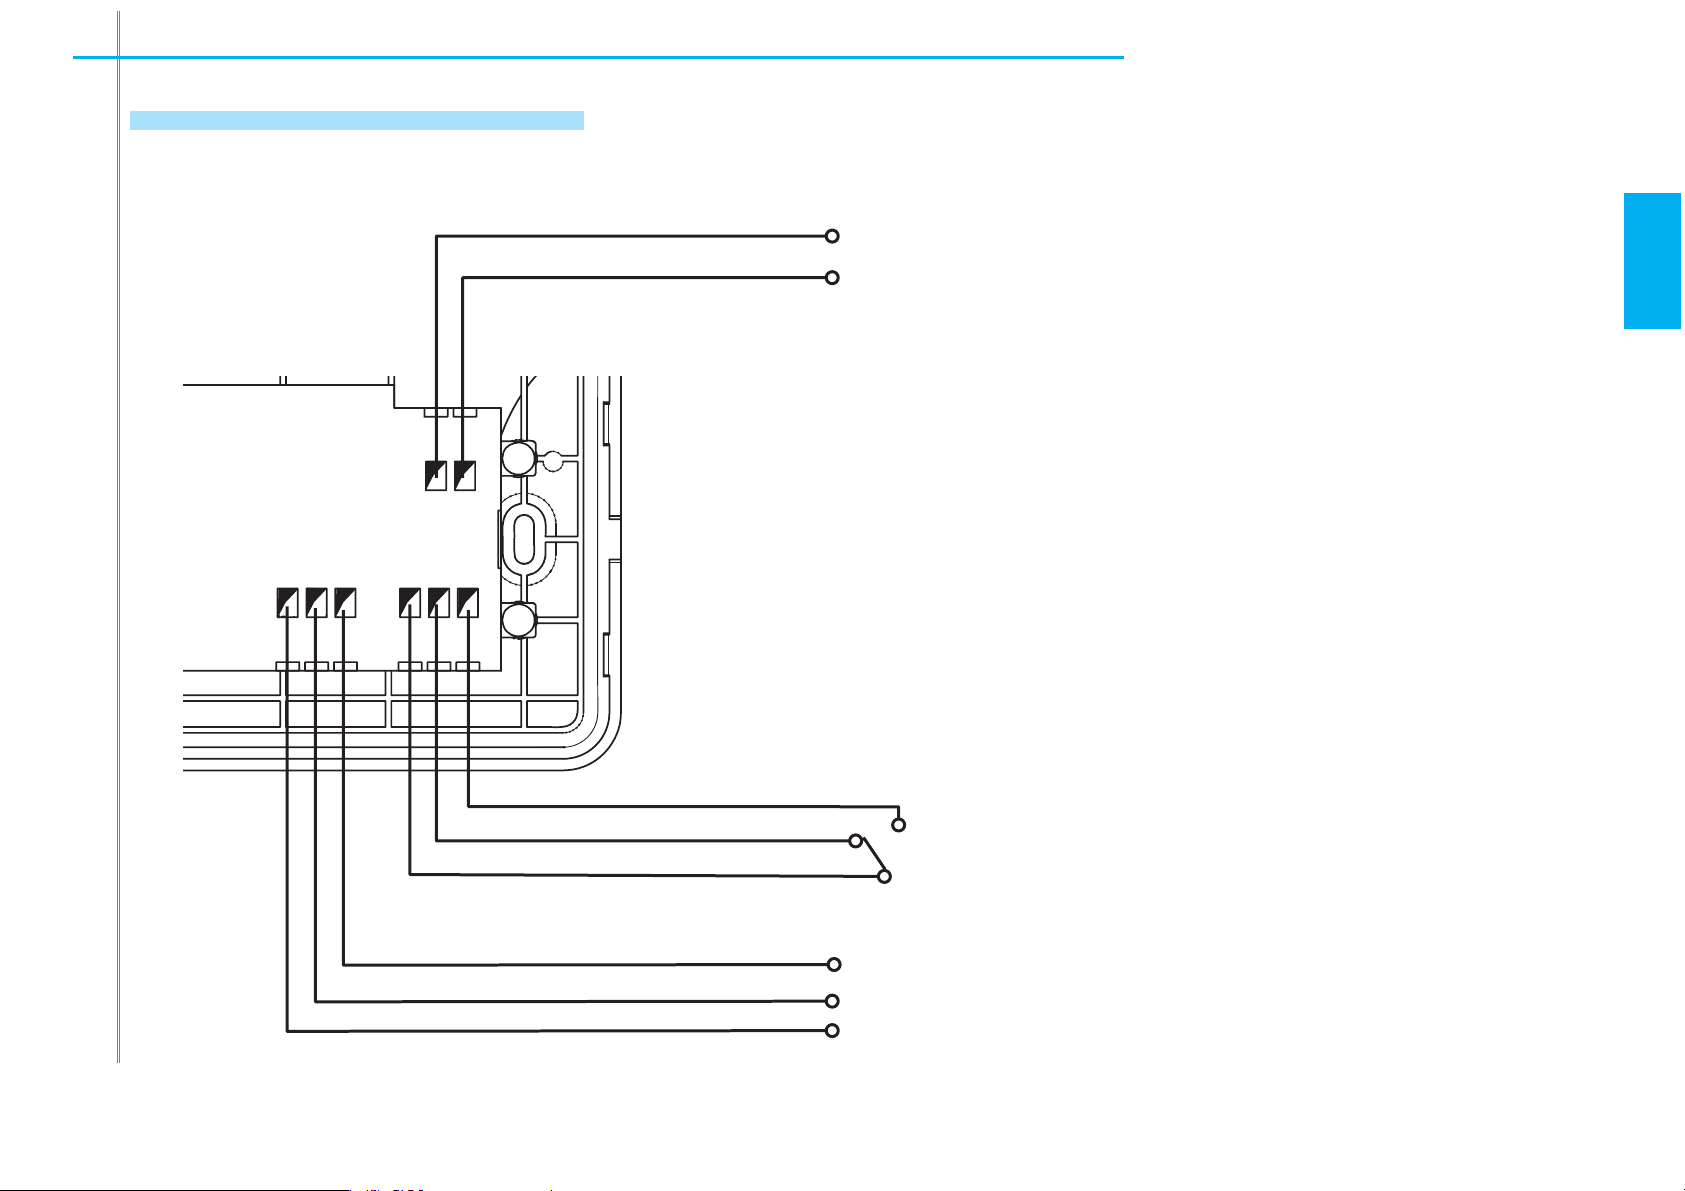
5.5 Connecting cables
,,
6!#
#/- /54
!"'.$ #.#./
EN
230 V. a.c. power source
Relay socket
The data and information shown in this manual may be changed by CAME cancelli automatici s.p.a. at any time without prior warning
Serial connection sockets for WI08 card
9
Page 10
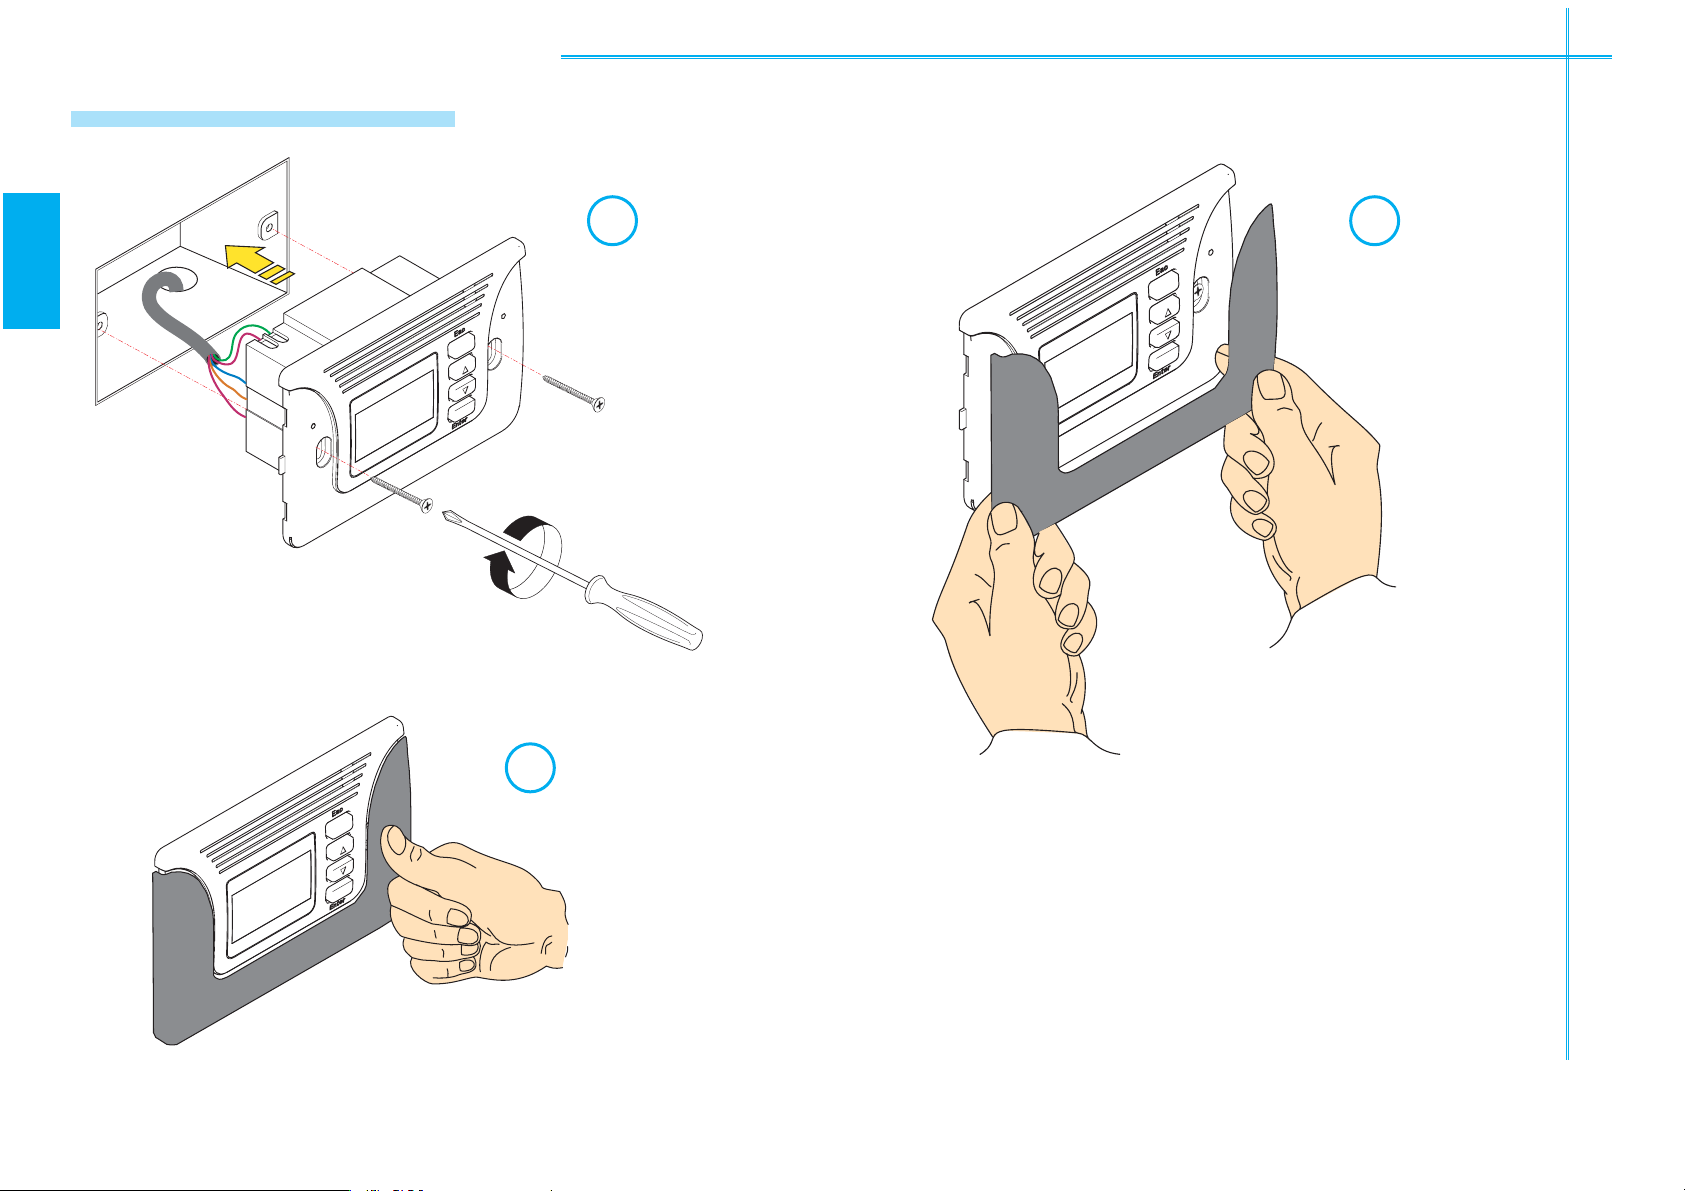
5.6 Wall mounting
EN
1 2
10
3
The data and information shown in this manual may be changed by CAME cancelli automatici s.p.a. at any time without prior warning
Page 11
10:55
32 C
10:55
6 Programming
MENU
Setup
Edit User
New User
Delete User
32 C
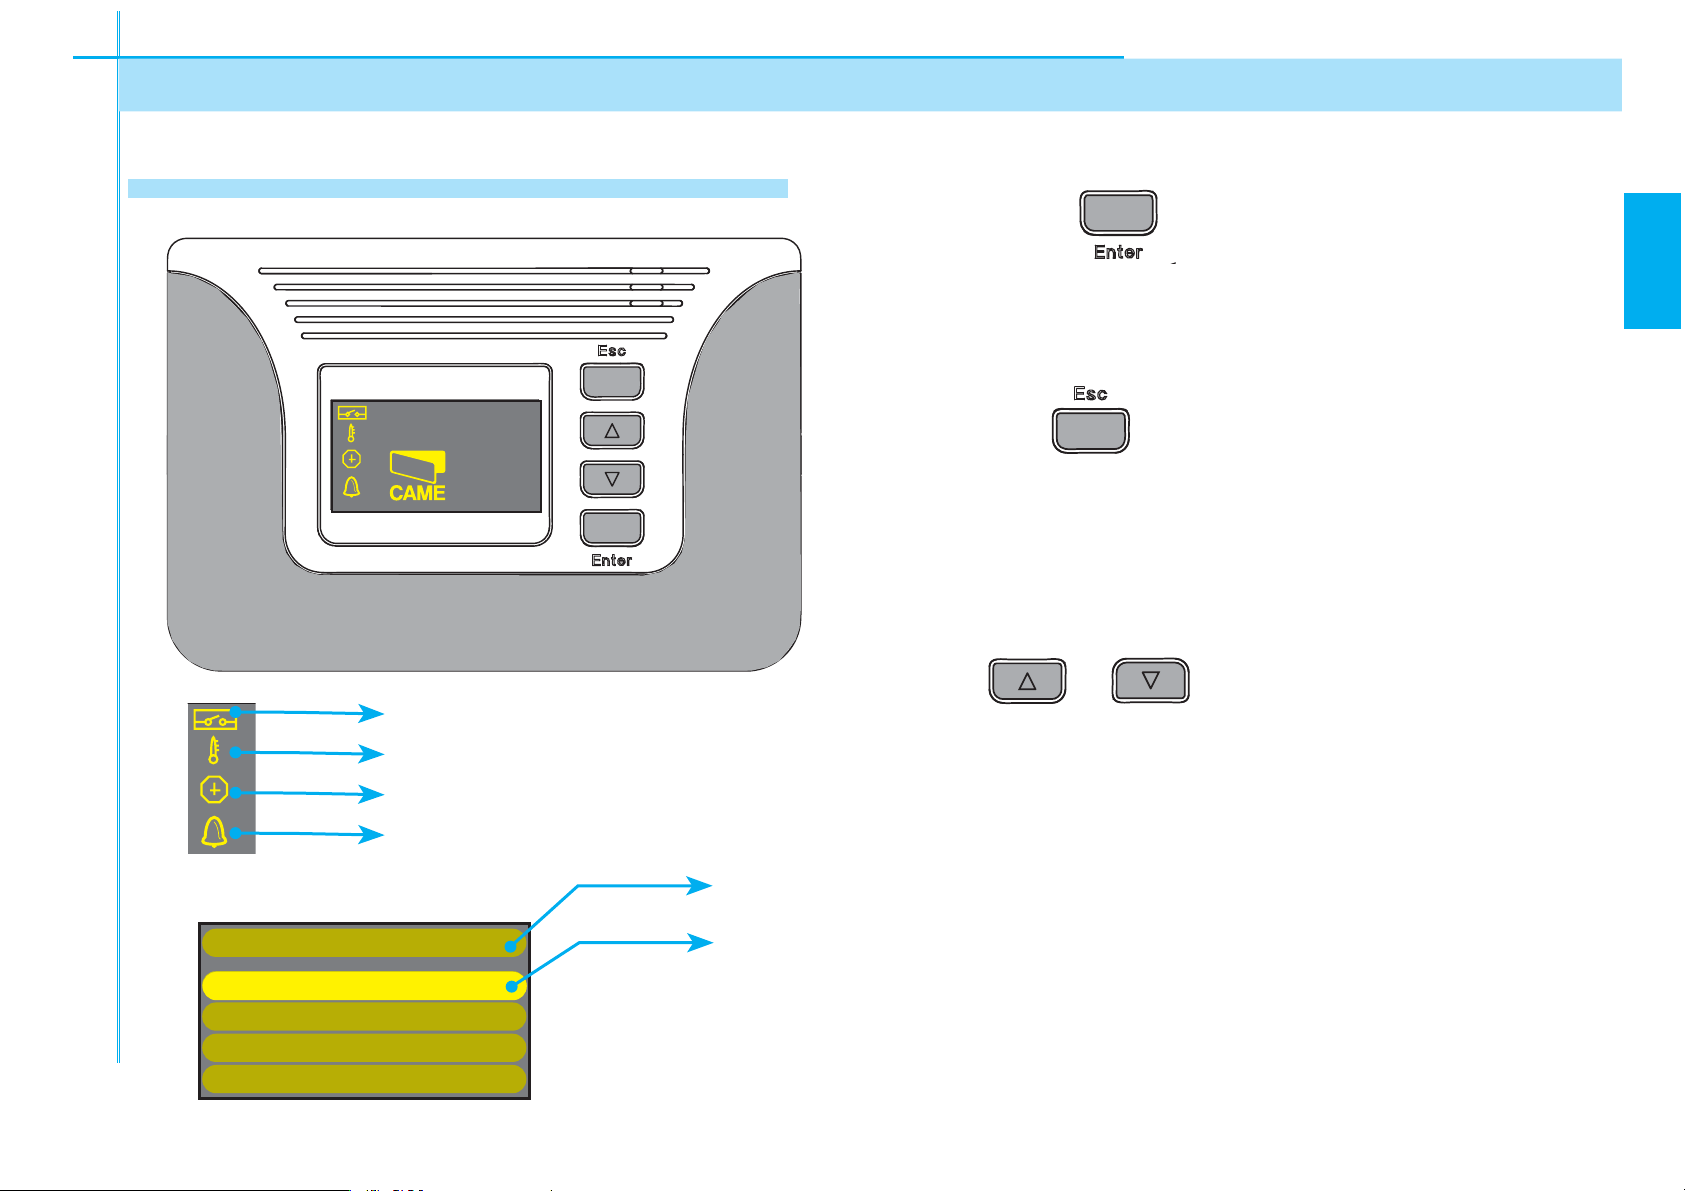
6.1 Description of commands and display
3232°C
10:55
Active local relay
Set Thermostat
Set Timer
Set Alarm clock
The ENTER key
- Accessing the menu
- Confi rming and memorising the set value
The ESC key
- Exiting the menu
- Cancelling changes
- Go back in the editable menus
The key
- Shift from one menu item to another
- Increase and decrease a value
is for :
is for :
are for:
EN
The data and information shown in this manual may be changed by CAME cancelli automatici s.p.a. at any time without prior warning
Delete User
MENU
Setup
Edit User
New User
Status indicator (shows which menu you are browsing)
Selected item
Menu items: can be selected using arrow keys
}
11
Page 12

10:55
6.2 Browsing Menu
MENU
Setup
Edit User
New User
Delete User
MENU
Setup
Edit User
Delete User
CONFIRM (YES)
New User
MENU
Setup
Edit User
Delete User
CONFIRM (NO)
New User
CONFIRM (YES)
New User
EN
10:55
MENU
Setup
Edit User
New User
Delete User
3232°C
To enter the main
menu, keep the
ENTER key pressed
To enter the submenu, press the
ENTER key
MENU
Setup
Edit User
New User
Delete User
MENU
Setup
Edit User
New User
Delete User
New User
?
CONFIRM (NO)
New User
CONFIRM (YES)
?
To chose the selected item, shift
using the ARROWS
To select, shift using the
ARROWS
New User
?
CONFIRM (YES)
12
Press ENTER to confi r m
Pressing the Esc key
takes you to the previous menu
The data and information shown in this manual may be changed by CAME cancelli automatici s.p.a. at any time without prior warning
Page 13

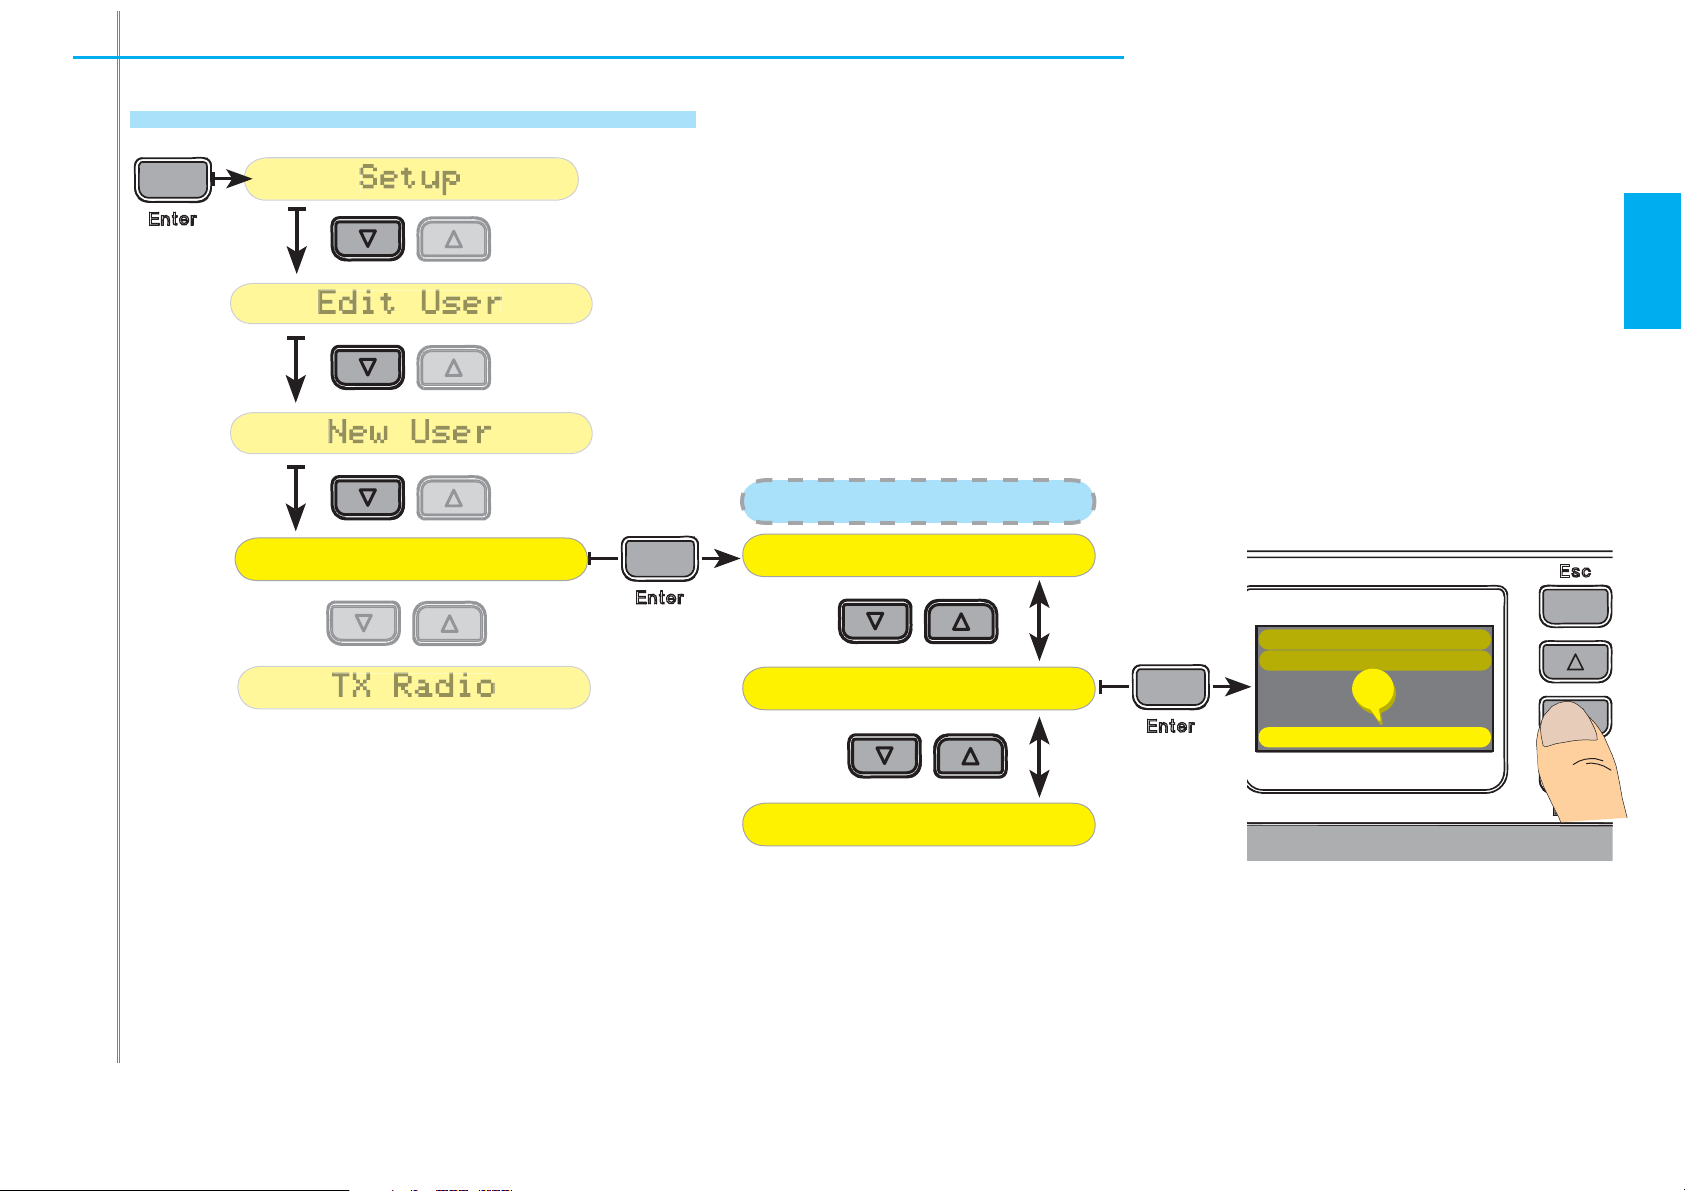
6.3 Structure - Main Menu
Setup
Edit User
New User
Delete User
TX Radio
Timer
Alarm
Thermostat
Clock
Key Function
Password
Pressing the Enter key for a few seconds takes you into
Setup
Edit User
New User
Delete User
TX Radio
Timer
Alarm
Thermostat
the main menu (main level)
To shift from one item to another use the ARROWS
Press Enter to confi rm (this takes you to the second level)
EN
Clock
Pressing Esc takes
Key Function
The data and information shown in this manual may be changed by CAME cancelli automatici s.p.a. at any time without prior warning
Password
you back to the
previous menu
13
Page 14

6.3.1 Menu – Settings – Language
ENGLISH
FRENCH
GERMAN
SPANISH
NEDERLANDS
TemperatureTemperature
Setup
ITALIAN
Language
New User
EN
Setup
Choose the selected language and confi rm by pressing ENTER
Language
ITALIAN
ENGLISH
FRENCH
GERMAN
SPANISH
14
NEDERLANDS
The data and information shown in this manual may be changed by CAME cancelli automatici s.p.a. at any time without prior warning
Page 15

6.3.2 Menu – Settings – Temperature
Temperature
Celsius
LanguageLanguage
Fahrenheit
Setup
New User
TemperatureTemperature
Screen Saver
Setup
Hour
LanguageLanguage
Date
Logo CAME
Edit User
New User
Select the unit of measure for the temperature and confi rm by pressing ENTER
Setup
Temperature
6.3.3 Menu – Settings – Screensaver
Select the screensaver and conform by pressing ENTER
Setup
Celsius
Fahrenheit
EN
The data and information shown in this manual may be changed by CAME cancelli automatici s.p.a. at any time without prior warning
Screen Saver
Logo CAME
Hour
Date
15
Page 16

SELECT USER
New n..
New00
2
New001
6.4 Menu – Change user
Edit User
OUTPUT
NAME
CODE
SetupSetup
Edit User
New001
Change user: Allows you to change the details of a single user (code, name, kind of exit)
EN
Edit User
In the single user
change menu, you
may choose the
parameters to change
SELECT USER
New001
New00
New n..
Edit User
New001
CODE
Select the use to change by
using the arrows. Confi rm by
pressing ENTER
16
using the arrows.
Once you have chosen
which to change
confi rm by pressing
Enter
NAME
OUTPUT
The data and information shown in this manual may be changed by CAME cancelli automatici s.p.a. at any time without prior warning
Page 17

CODE
Edit User
New001
NEW CODE
NAME
Edit User
new001
n
32 C
10:55
6.4 Change user - Menu
CODE
You may memorise a transponder code and
associate it to a chosen user, by approaching
the card to the Wave device which enables code
recognition within 10 s
Edit User
New001
EN
NEW CODE
NAME
Press ENTER
to :
- To go to the next letter that needs changing
- Confi rm the changes (keeping it pressed)
Selecting the NAME item
takes you into the user
change area.
Press ESC
Edit User
new001
- Go back to the previous letter
to :
- Go back to the previous level, without saving any
new 001
The data and information shown in this manual may be changed by CAME cancelli automatici s.p.a. at any time without prior warning
changes (keeping it pressed)
Keep the arrow keys pressed
- Change letter
to:
17
Page 18

OUTPUT
new001
OUTPUT
LOCAL RELAY
Edit User
6.4 Change user - Menu
CONFIRM (NO)
Neu User
New User
Delete User
EXIT associates a command to a user. It can be of two types: the fi rst is defi ned as local exit and is a physical
socket (NO, NC); the second is a radio socket
(up to four different ones can be inserted).
EN
Edit User
new001
To select the output to
associate shift using the
arrow keys and confi rm by
OUTPUT
6.5 New user - Menu
New User
OUTPUT
LOCAL RELAY
Neu User
?
CONFIRM (NO)
pressing Enter
New user : to create a new user
shift using the arrow keys to YES
and confi rm by pressing Enter.
The change menu is activated
automatically. To set the date
see chapter 6.4.
18
The data and information shown in this manual may be changed by CAME cancelli automatici s.p.a. at any time without prior warning
Page 19
6.6 Eliminate User - Menu
CONFIRM (NO)
Delete User
New002
SELECT USER
New n..
New00
2
New001
SetupSetup
New User
Delete User
TX RadioTX Radio
Delete User
Eliminate User: Eliminates a present user.
SELECT USER
New001
New00
EN
Delete User
New002
?
The data and information shown in this manual may be changed by CAME cancelli automatici s.p.a. at any time without prior warning
CONFIRM (NO)
New n..
To confi rm the operation shift to YES using the arrow keys and confi rm using Enter.
19
Page 20

6.7 Radio TX - Menu
TX Radio
RADIO CHNL:1
WAIT
TX Radio
RADIO CHNL
TX Radio
TimerTimer
From the RADIO TX menu you can associate a CAME transmitter code to an output, so as to “repeat” it and
control the automated devices directly through the keyboard or transponder from WAVE.
To select the radio channel
EN
TX Radio
Send the radio code by transmitter
within 10 seconds (as shown in
fi gure). Memorisation is confi rmed
when code is shown on display.
TX Radio
RADIO CHNL
TX Radio
RADIO CHNL:1
WAIT
to be memorised shift using
the arrow and confi rm by
pressing Enter
1
Use transmitters of the
20
following series: Top
433.92MHz or Tam
433.92MHz
The data and information shown in this manual may be changed by CAME cancelli automatici s.p.a. at any time without prior warning
Page 21

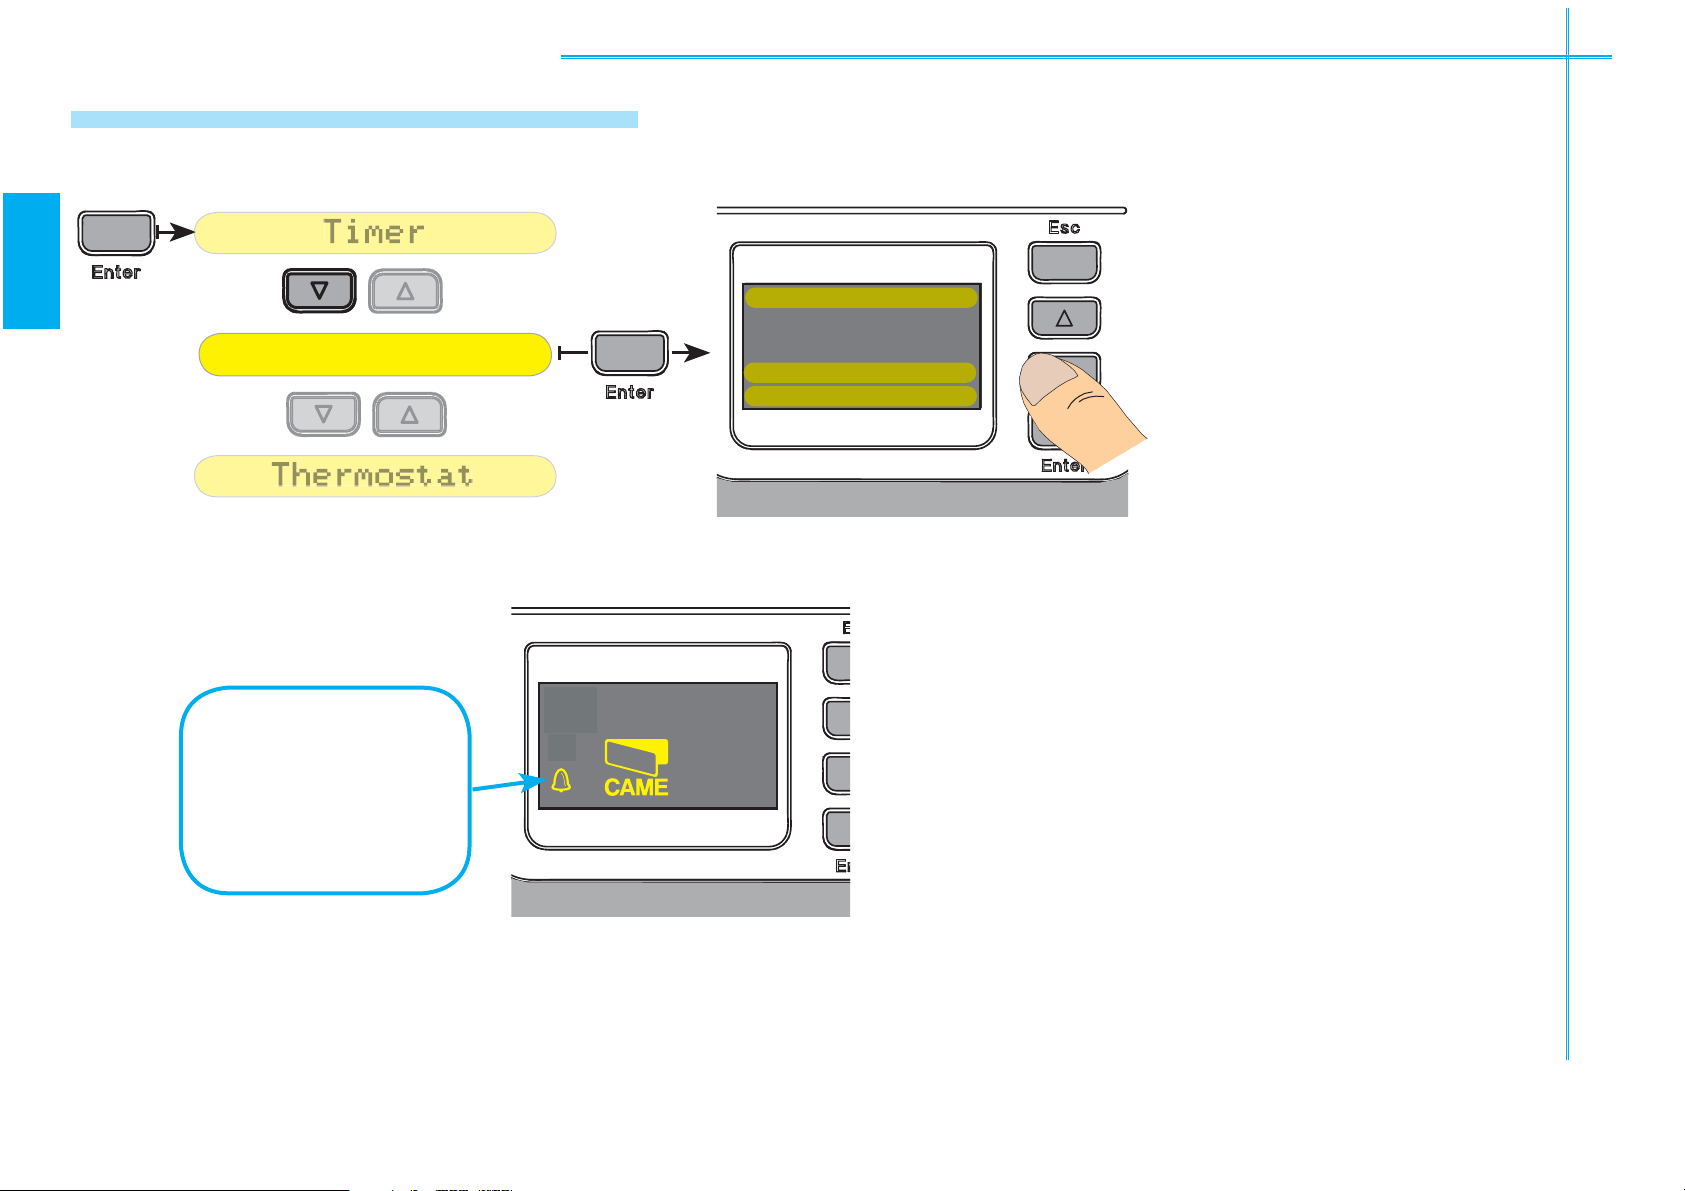
6.8 Menu - Timer
REMOVE
NEW
Timer
EDIT
TIME
08
Timer
SWITCH ON
TX RadioTX Radio
Timer
Timer
REMOVE
NEW
EDIT
ORA
08
Timer
DISATTIVAZIONE
10:55
The TIMER lets you associate commands to pre-set time intervals.
EN
To create a new time interval
…once created, you will be
asked the time and minutes
and the day of activation, and
which command you wish to
associate (local output, or one
of the radio outputs)…
Besides creating a new “TIMER”
you may also
CHANGE
or
ELIMINATE
The data and information shown in this manual may be changed by CAME cancelli automatici s.p.a. at any time without prior warning
those already existing.
Timer
Timer
SWITCH ON
TIME
08
Timer
EDIT
REMOVE
EW
Timer
EDIT
NEW
REMOVE
shift using the arrow key
onto NEW and confi rm by
pressing Enter…
…then set the deactivation day. You will
be asked the same information, to create
a precise time interval.
Once the timer is
set, the display will
show this symbol.
Timer
DISATTIVAZIONE
ORA
08
3232°C
10:55
21
Page 22
6.9 Alarm clock - Menu
Alarm
SELECT
Alarm
ThermostatThermostat
ORA
08
Timer
DISATTIVAZIONE
10:55
ALARM CLOCK allows you to set two sound warnings.
EN
Alarm
Alarm
SELECT
1
Select which of the two
alarm clocks you wish to
set. You will be asked the
time, minutes, and type of
sound. Confi rm by pressing
Enter .
22
Once the alarm
clock/s is/are set,
this symbol will
appear on the
display.
Timer
DISATTIVAZIONE
ORA
08
3232°C
10:55
The data and information shown in this manual may be changed by CAME cancelli automatici s.p.a. at any time without prior warning
Page 23

6.10 Thermostat - Menu
Thermostat
20
o
SWITCH
AlarmAlarm
Thermostat
ORA
08
Timer
DISATTIVAZIONE
10:55
The Thermostat allows you to set a temperature interval, within which Wave will activate a socket..
To create a new interval shift
using the ARROW onto the cho-
Thermostat
sen temperature threshold and
EN
The data and information shown in this manual may be changed by CAME cancelli automatici s.p.a. at any time without prior warning
Thermostat
To deactivate functioning
shift using the ARROWS
onto DEACTIVATED and press
ENTER.
SWITCH
o
20
C
Once the thermostat
is set, this symbol
will appear on the
display.
confi rm by pressing ENTER.
Repeat the process to chose the
deactivation threshold, confi rm
functioning by shifting using
the ARROW onto ACTIVATED
and press ENTER.
Timer
DISATTIVAZIONE
ORA
08
3232°C
10:55
23
Page 24

6.11 Clock – Menu
Clock
21
HOUR
Clock
Key FunctionKey Function
ThermostatThermostat
Key Function
RELAY OUT
KEY
Key Function
Password
With the Clock you can set the current time and date on Wave.
You will be asked to enter the hour,
EN
Clock
Clock
HOUR
21
minutes, seconds, year, month
and day. To insert them proceed
as in the previous steps (using the
arrow keys to make changes to
the values and by pressing Enter
to confi rm).
6.12 Key Functions – Menu
Key Functions allows you to associate, to the two keys, one of the following functions: relay output or
one of the 4 radio codes.
To associate a command to one
of the two key shift using the
arrows onto the chose function,
and confi rm by keeping the
arrow key pressed.
Key Function
Key Function
KEY
RELAY OUT
The data and information shown in this manual may be changed by CAME cancelli automatici s.p.a. at any time without prior warning
24
Page 25

6.13 Password - Menu
Key FunctionKey Function
Password
Password
EDIT
DISABLED
ENABLED
EDIT PASSWRD
CODE
2
CODE 1
PSW TRASP 1
PSW TRASP 2
CODE
1
DEL.PASSWRD
NEW PASSWRD
The Password allows you to limit access to Wave’s functions
Password
Password
The Activate or Deactivate function lets you
DISABLED
ENABLED
EN
make the Password operational.
Code means a
4-digit number,
while transp.
Uses a transponder card to
access.
The data and information shown in this manual may be changed by CAME cancelli automatici s.p.a. at any time without prior warning
EDIT PASSWRD
CODE 1
CODE
PSW TRASP 1
EDIT
ODE
NEW PASSWRD
DEL.PASSWRD
See page 27
1
See page 26
fi g. A
See page 26
fi g. B
New password allows you to create a
new code. Eliminate password allows
to cancel an existing password.
PSW TRASP 2
25
Page 26

6.13 Password - Menu
CONFIRM (NO)
DEL. PASSWRD
TYPE CODE
NEW PASSWRD
1234
5678
90<>
TYPE CODE
1234
5678
90<>
To confi rm the step shift using the ARROW keys onto YES and
EN
fi g. A
fi g. B
DEL. PASSWRD
?
CONFIRM (NO)
TYPE CODE
1
1234
5678
NEW PASSWRD
90<>
1
confi rm by pressing ENTER.
To chose a value shift using the ARROW key, select and confi rm
by pressing ENTER. Repeat the step until you have inserted
26
TYPE CODE
1
1234
5678
90<>
1
the 4-digit code that you have chosen. When the password
is requested upon accessing the WAVE menu, proceed as
described above to insert the code.
The data and information shown in this manual may be changed by CAME cancelli automatici s.p.a. at any time without prior warning
Page 27

6.13 Password - Menu
PSW TRASP 1
DEL.PASSWRD
NEW PASSWRD
CONFIRM (NO)
DEL. PASSWRD
PSW TRASP 1
NEW CODE
PSW TRASP 1
NEW PASSWRD
EN
The data and information shown in this manual may be changed by CAME cancelli automatici s.p.a. at any time without prior warning
DEL.PASSWRD
PSW TRASP 1
NEW CODE
DEL. PASSWRD
?
CONFIRM (NO)
To confi rm the operation
shift using the ARROWS
to YES and confirm by
pressing ENTER
Selecting NEW PASSWORD will
bring up a bar showing the time
allowed for inserting the code.
Approach the card to the Wave
device to allow recognition of
the code. When the main menu
access password is requested approach the “Password” function
card near WAVE.
27
Page 28

7 Maintenance
Wave does not require any periodic maintenance. To clean we suggest using a moist cloth and not any chemical agents
or abrasive materials that may ruin the product’s surface.
For any problems contact after-sales assistance.
EN
8 Phasing out and Disposal
Our products are made of different materials. The majority of these (aluminium, plastic, iron, and electric
cables) are considered solid urban waste. As such they can be recycled by certifi ed centres after proper collection.
thus be turned in to specialised fi rms for their processing and disposal.
28
Other component (such as electronic cards, batteries and transmitters) constitute environmental hazards. They must
The data and information shown in this manual may be changed by CAME cancelli automatici s.p.a. at any time without prior warning
Page 29

9 Manufacturer’s statement
CE CONFORMITY DECLARATION
Pursuant to Low Voltage Directive 73/23/EC
EN
CAME Cancelli Automatici S.p.A.
via Martiri della Libertà, 15
31030 Dosson di Casier - Treviso - ITALY
tel (+39) 0422 4940 - fax (+39) 0422 4941
internet: www.came.it - e-mail: info@came.it
Declares under its own responsibility that the equipments for automatic
garage doors and gates listed below:
WA01
… comply with the National Law related to the following European
Directives and to the applicable parts of the following Standards.
IRECTIVES ---
--- D
73/23/CEE-93/68/CE L
89/336/CEE - 92/31/CEE ELECTROMAGNETIC COMPATIBILITY DIRECTIVE
OW VOLTAGE DIRECTIVE
--- STANDARDS --EN 60730-1/-2/-9 EN301489-1
EN 60950-1
IMPORTANT WARNING!
Do not use the equipment specifi ed here above, before completing the full
installation
In full compliance with the Low Voltage Directive 73/263/EC
MANAGING DIRECTOR
Mr. Andrea Menuzzo
The data and information shown in this manual may be changed by CAME cancelli automatici s.p.a. at any time without prior warning
Reference code to request a true copy of the original: DDF L EN W001
29
Page 30

CAME UNITED KINGDOM LTD
UNIT 3, ORCHARD BUSINESS PARK
TOWN STREET, SANDIACRE
NOTTINGHAM - NG10 5BP - U.K.
Tel - 0044 115 9210430
Fax - 0044 115 9210431
Cod. 119RU27 v 0.1 01/07 © CAME cancelli automatici s.p.a.
 Loading...