

Cambridge Audio Azur 840-C Owners manual

azur 840C
Upsampling compact disc player / Upsampling CD-Player / Lecteur de disque compact à suréchantillonnage /
Reproductor de compact disc de muestreo superior / Lettore di compact disc a sovracampionatura /
Upsampling compact disc speler / cd-afspiller med upsampling /
CD-плейер с повышенной дискретизацией
User’s manual / Benutzerhandbuch / Mode d'emploi / Manual del usuario / Manuale per l'utente /
Gebruikershandleiding / Brugermanual / Руководство для пользователя

2 Azur upsampling compact disc player
English .........................................................................................................2
Deutsch .....................................................................................................22
Français.....................................................................................................42
Español......................................................................................................62
Italiano.......................................................................................................82
Nederlands..............................................................................................102
Dansk ......................................................................................................122
Русский....................................................................................................142
Introduction .................................................................................................3
Safety precautions ......................................................................................4
Important safety instructions.....................................................................5
Rear panel connections..............................................................................6
Front panel controls....................................................................................8
Remote control..........................................................................................10
Remote control of matching products.....................................................11
Operating instructions..............................................................................12
External digital sources............................................................................15
CD player setup.........................................................................................16
Custom installation use............................................................................18
Troubleshooting.........................................................................................18
Technical specifications...........................................................................19
Limited warranty .......................................................................................20
CONTENTS
Azur upsampling compact disc player 3
Thank you for purchasing this Azur 840C Upsampling Compact Disc
Player. This unit is pa
rt of our new '8' series range, taking Cambridge
Audio to new levels of audio excellence. The 8 series range has been
developed as part of our commitment to the on-ggoing development of
the Azur range. We hope that you will appreciate the results and enjoy
many years of listening pleasure from it.
The 840C incorporates a raft of new technologies and features. Key to
its abilities is the ATF
TM
(Adaptive Time Filtering) upsampling process developed in conjunction with Anagram Technologies of Switzerland.
This system intelligently interpolates 16 bit/44.1kHz CD (or other) data
to 24bit/384kHz through the use of a 32 bit Analog Devices Black Fin
DSP (Digital Signal Processor) for the very best sound quality. The ATF
system applies sophisticated polynomial curve fitting interpolation and
incorporates a time domain model which allows data buffering and reclocking almost completely eradicating digital jitter.
Because the audio data rate is so high aliasing artefacts are moved way
above audible frequencies allowing us to use a low order 2 pole linearphase Bessel filter on the output for constant group delay and minimal
phase shift.
Two very high quality Analog Devices AD1955 24 bit DACs (Digital to
Analog Converters) are used in dual differential mode. As each channel
has its own DAC to process information, completely separate and
symmetrical analog filter circuitry can be implemented. These allow
both left and right channel circuitry to operate identically, ensuring the
840C delivers fantastic sound-staging and stereo imaging properties. All
filtering from DACs to output is also fully differential using unique
differential output amplifiers.
This fully balanced configuration largely rejects the already very low
noise and distortion products present in the DACs and filters and
provides an unprecedented level of performance.
A true balanced (XLR) output is fitted as well as a summed conventional
unbalanced phono/RCA output. Automatic DC servo circuits null all DC
offsets allowing no capacitors in the signal path at all.
Two digital inputs are fitted allowing other digital sources to be brought
into the 840C and upsampled, the 840C then working as a very high
quality DAC.
A digital output is also fitted which can even output upsampled data at
various rates and word widths, independent from the main audio output,
which is always set at 24/384 for best sound quality.
In addition to these audiophile features Control Bus Input/Output, IR
Emitter Input and RS232 control are provided to make it easy to
integrate this unit into Custom Installation systems if desired.
A completely new 8-series casework has been designed which combines
massive structural rigidity with careful damping and control of acoustic
resonance. An Azur Navigator remote control is also provided, giving full
remote control of your CD player and Azur amplifiers in an attractive and
easy to use handset.
Your CD player can only be as good as the system it is connected to.
Please do not compromise on your amplifier, speakers or cabling.
Naturally we particularly recommend amplification from the Cambridge
Audio Azur range, and in particular the 840A Integrated Amplifier which
has been designed to the same exacting standards as this CD player.
Your dealer can also supply excellent quality Cambridge Audio
interconnects to ensure your system realises its full potential.
Thanks for taking the time to read this manual; we do recommend you
keep it for future reference.
Matthew Bramble, Technical Director
INTRODUCTION
840C Upsampling compact disc player
4 Azur upsampling compact disc player
Checking the Power Supply Rating
For your own safety please read the following instructions carefully before attempting
to connect this unit to the mains.
Check that the rear of your unit indicates the correct supply voltage. If your mains
supply voltage is different, consult your dealer.
This unit is designed to operate only on the supply voltage and type that is
indicated on the rear panel of the unit. Connecting to other power sources may
damage the unit.
This equipment must be switched off when not in use and must not be used unless
correctly earthed. To reduce the risk of electric shock, do not remove the unit's
cover (or back). There are no user serviceable parts inside. Refer servicing to
qualified service personnel. If the power cord is fitted with a moulded mains plug
the unit must not be used if the plastic fuse carrier is not in place. Should you lose
the fuse carrier the correct part must be reordered from your Cambridge Audio
dealer.
The lightning flash with the arrowhead symbol within an equilateral
triangle is intended to alert the user to the presence of un-insulated
‘dangerous voltage’ within the product’s enclosure that may be of
sufficient magnitude to constitute a risk of electric shock to
persons.
The exclamation point within an equilateral triangle is intended to
alert the user to the presence of important operating and
maintenance instructions in the service literature relevant to this
appliance.
This product complies with European Low Voltage (73/23/ EEC)
and Electromagnetic Compatibility (89/336 /EEC) Directives
when used and installed according to this instruction manual. For
continued compliance only Cambridge Audio accessories should
be used with this product and servicing must be referred to
qualified service personnel.
The crossed-out wheeled bin is the European Union symbol for
indicating separate collection for electrical and electronic
equipment. This product contains electrical and electronic
equipment which should be reused, recycled or recovered and
should not be disposed of with unsorted regular waste. Please
return the unit or contact the authorised dealer from whom you
purchased this product for more information.
Plug Fitting Instructions (UK Only)
The cord supplied with this appliance is factory fitted with a 13 amp mains plug
fitted with a 3 amp fuse inside. If it is necessary to change the fuse, it is important
that a 3 amp one is used. If the plug needs to be changed because it is not suitable
for your socket, or becomes damaged, it should be cut off and an appropriate plug
fitted following the wiring instructions below. The plug must then be disposed of
safely, as insertion into a 13 amp socket is likely to cause an electrical hazard.
Should it be necessary to fit a 3-pin BS mains plug to the power cord the wires
should be fitted as shown in this diagram. The colours of the wires in the mains
lead of this appliance may not correspond with the coloured markings identifying
the terminals in your plug. Connect them as follows:
The wire which is coloured BLUE must be
connected to the terminal which is marked
with the letter ‘N’ or coloured BLACK.
The wire which is coloured BROWN must be
connected to the terminal which is marked
with the letter ‘L’ or coloured RED.
The wire which is coloured GREEN/YELLOW
must be connected to the terminal which is
marked with the letter ‘E’ or coloured GREEN.
If your model does not have an earth wire, then disregard this instruction.
If a 13amp (BS 1363) plug is used, a 3amp fuse must be fitted, or if any other type
of plug is used a 3amp or 5 amp fuse must be fitted, either in the plug or adaptor,
or on the distribution board.
SAFETY PRECAUTIONS

WARNING - To reduce the risk of fire or electric shock, do not expose this unit
to rain or moisture. This unit must not be used near or exposed to dripping or
splashing water or other liquids. No objects filled with liquid, such as vases,
shall be placed on the unit. In the event, switch off immediately, disconnect
from the mains supply and contact your dealer for advice.
Ensure that small objects do not fall through any ventilation grille. If this
happens, switch off immediately, disconnect from the mains supply and
contact your dealer for advice.
To turn the unit off completely switch off on the rear panel. If you do not
intend to use this unit for a long period of time, unplug it from the mains
socket. Unplug this unit during lightning storms.
To clean the unit, wipe its case with a dry, lint-free cloth. Do not use any
cleaning fluids containing alcohol, ammonia or abrasives. Do not spray an
aerosol at or near your CD player.
This unit is not user serviceable, never attempt to repair, disassemble or
reconstruct the unit if there seems to be a problem. Servicing is required
when the unit has been damaged in any way, such as power-supply cord or
plug is damaged, liquid has been spilled or objects have fallen into it, the unit
has been exposed to rain or moisture, does not operate normally or has been
dropped. A serious electric shock could result if this precautionary measure
is ignored.
IImmppoorrttaanntt NNoottee
This unit has been designed to play compact discs,
recordable CDs (CD-R) and re-writable CDs (CD-RW)
bearing the identification logo shown here. No other discs
can be used. The CD-R/CD-RW discs should contain
properly recorded TOC (Table of Contents) information so
that they can be played back. This unit can play only the discs recorded in the
CD-DA format designed for music reproduction. Do not attempt to play a disc
on this unit containing other data, such as a CD-ROM for PCs.
840C Upsampling compact disc player
Azur upsampling compact disc player 5
Please take a moment to read these notes before installing your Azur CD
player, they will enable you to get the best performance and prolong the life
of the product. We advise you follow all instructions, heed all warnings and
keep the instructions for future reference.
The unit is of Class 1 construction and must be connected to a Mains socket
outlet with a protective earthing connection.
Only use the specified attachments/accessories with this unit.
Do not defeat the safety purpose of the polarized or grounding-type plug. A
polarized plug has two blades with one wider than the other. A grounding type
plug has two blades and a third grounding prong. The wide blade or the third
prong are provided for your safety. If the provided plug does not fit into your
outlet, consult an electrician for replacement of the obsolete outlet.
The unit must be installed in a manner that makes disconnection of the
mains plug from the mains socket outlet (or appliance connector from the
rear of the unit) possible. Where the mains plug is used as the disconnect
device, the disconnect device shall remain readily operable. Protect the
power cord from being walked on or pinched particularly at plugs,
convenience receptacles, and the point where they exit from the unit.
This unit must be installed on a sturdy, level surface. Do not place
in a sealed area such as a bookcase or in a cabinet. Any space open
at the back (such as a dedicated equipment rack) is fine however.
When a cart is used, use caution when moving the cart to avoid
injury from tip-over.
The unit requires ventilation. Do not situate it on a rug or other soft surface
and do not obstruct any air inlets or outlet grilles.
Do not install near any heat sources such as radiators, heat registers, stoves,
or other apparatus (including amplifiers) that produce heat.
IMPORTANT SAFETY INSTRUCTIONS
6 Azur upsampling compact disc player
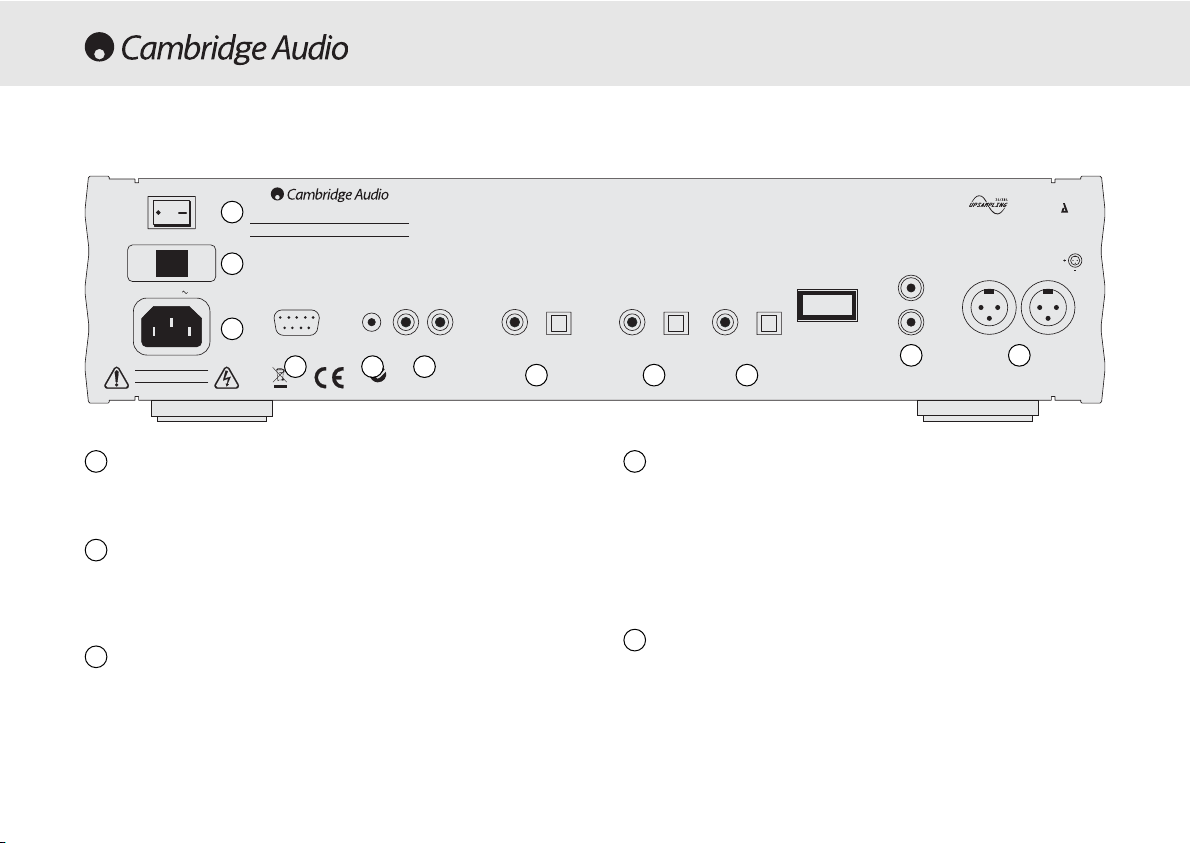
Power On/Off
Switches the unit on and off.
Mains Voltage Selector Switch
Switches the mains voltage between 115V and 230V. For use by
installer/dealer only.
AC power socket
Once you have completed all connections to the amplifier, plug the AC
power cable into an appropriate mains socket then switch on. Your
compact disc player is now ready for use.
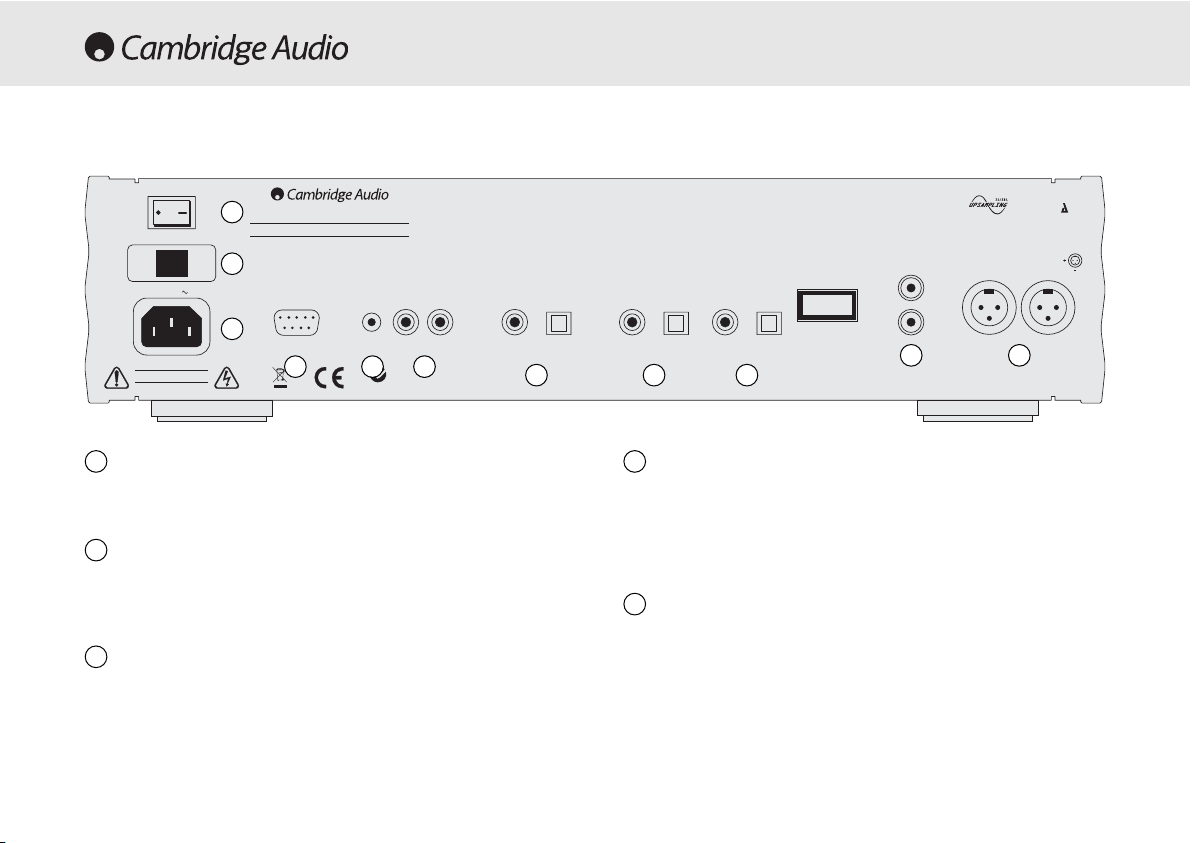
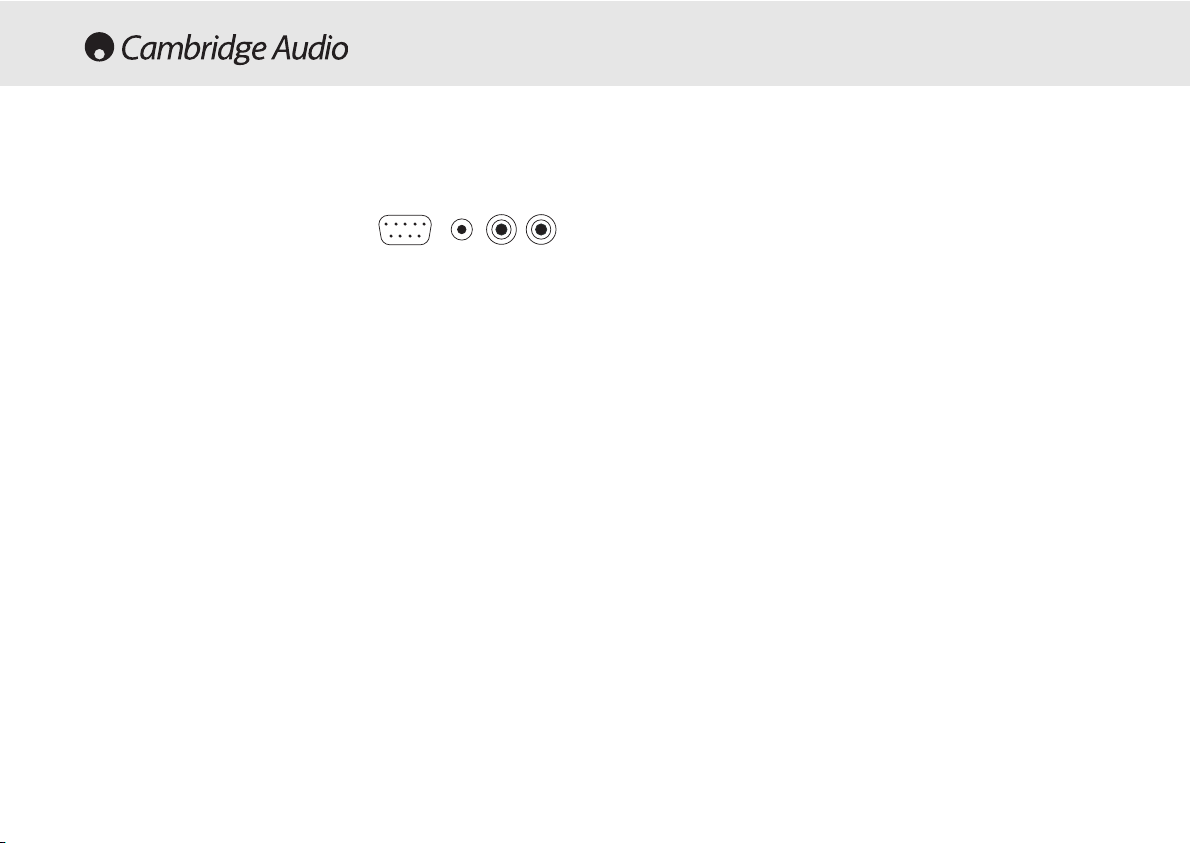
REAR PANEL CONNECTIONS
RS232C
The RS232C port allows some external serial control of the 840C for
custom install use. A command set is available on the Cambridge Audio
website at
www.cambridge-aaudio.com
. This port can also be used by
Cambridge Audio service personnel for software updates.
IR (Infra Red) Emitter In
Allows modulated IR commands from multi-room systems or IR repeater
systems to be received by the amplifier. Commands received here are
not looped out of the Control Bus. Refer to the ‘Custom Installation’
section for more information.
Digital Outputs
Power AC
azur 840C Upsampling Compact Disc Player
Max Power Consumption: 40W
www.cambridge-audio.com
RS232C IR Emitter
InIn Out
Control Bus
S/P DIF
Co-axial
Toslink
Optical
Digital Input 1
Right Left
RightLeft
Balanced Audio OutUnbalanced Audio Out
S/P DIF
Co-axial
Toslink
Optical
Digital Input 2
S/P DIF
Co-axial
Toslink
Optical
Right
Left
Right
Left
Manufactured in an
ISO9002 approved facility
On Off
Power
Class 1 Laser Product
Luokan 1 Laserplaite
Klass 1 Laserapparat
Mains Voltage Selector Switch
115V/230V AC~50/60Hz
GND
Caution
Risk of electric shock. Do not open.
Avis
Risque de choc electrique. Ne pas ouvrir.
Achtung
Vorm öffnen des gerätes. Netzstecker ziehen.
N1863
Designed in London, England
Incorporating Q5™ from:
ANAGRAM
TECHNOLOGIES
1
2
3
4
10
6
97
5
8
11
1
2
4
5
3

840C Upsampling compact disc player
Azur upsampling compact disc player 7
Control Bus
In -
Allows un-modulated commands from multi-rooms systems or other
components to be received by the unit.
Out -
Loop out for control bus commands to another unit.
Digital outputs
The digital outputs allow a separate DAC or digital recording device to be
connected. The sophisticated DSP software in the 840C even allows
these outputs to be set to output raw (pass through) or upsampled data
independently from the main audio outputs. Refer to the ‘Operating
instructions’ section for more information.
S/P DIF CO-aaxial Digital -
To obtain best results, use a high quality 75
ohm digital RCA interconnect cable (not one designed for normal audio
use).
Toslink Optical Digital -
Use a high quality TOSLINK fibre optic
interconnect cable designed specifically for audio use.
Only one of the two output types should be used at a time.
& Digital Inputs 1 / 2
The digital inputs allow the digital outputs of other source components
to be connected to the 840C. The 840C can then act as a very high
quality upsampling DAC, improving the sound quality of the connected
sources. Two digital inputs allow two external sources to be connected:
S/P DIF CO-aaxial Digital -
Use a high quality 75 ohm digital RCA
interconnect cable (not one designed for normal audio use).
Toslink Optical Digital -
Use a high quality TOSLINK fibre optic
interconnect cable designed specifically for audio use.
Only one of the two input types for each input should be used at a time.
Unbalanced Audio Out
Single-ended conventional stereo outputs for connection to the line-level
phono/RCA inputs of an amplifier.
Balanced Audio Out
The 840C also features true balanced (XLR) outputs. This is a higher
quality output that can reject noise and interference in the cable when
used with equipment with balanced inputs. XLR connectors should be
wired: Pin 1 - Ground; Pin 2 - Hot (in-phase); Pin 3 - Cold (phaseinverted).
6
7
8
10
11
9
8 Azur upsampling compact disc player
FRONT PANEL CONTROLS
Standby/On
Switches the unit between Standby mode (indicated by dim power LED)
and On (indicated by bright power LED). Standby is a low power mode
where the power consumption is less than 10 Watts. The unit should be
left in Standby mode when not in use.
Menu
Press to scroll through 840C menu screens. Please refer to the
‘Operating instructions’ section of this manual for more information.
Select
Press to select between CD Playback or Digital Inputs 1 and 2. Also used
to toggle through the options on selected menu screens. Please refer to
the ‘Operating instructions’ section of this manual for more information.
Infrared sensor
Receives IR commands from the supplied Azur remote control. A clear
unobstructed line of sight between the remote control and the sensor is
required.
Disc tray
Compact Disc tray. Use the Open/Close button to activate.
1 2 3
6
5
7
98
10
4
1
2
3
4
5
SelectMenu
Standby / On Stop
Upsampling Compact Disc Player
Open
Close
Pause
Play
Skip
Scan
azur 840C

840C Upsampling compact disc player
Azur upsampling compact disc player 9
Display
LCD used to display upsampling rate, CD track number,
elapsed/remaining time and other CD functions. Please refer to the
‘Operating instructions’ section of this manual for more information.
Open/Close
Allows you to open and close the disc tray thus making it possible to load
a disc. Pressing Play will also close the tray and start the CD.
Play/Pause
Plays the disc and pauses play.
Stop
Stops the CD playing.
Skip/Scan
Allows for skipping between tracks and also searching within tracks.
Press once to skip a track, press and hold to search within a track.
6
7
8
9
10
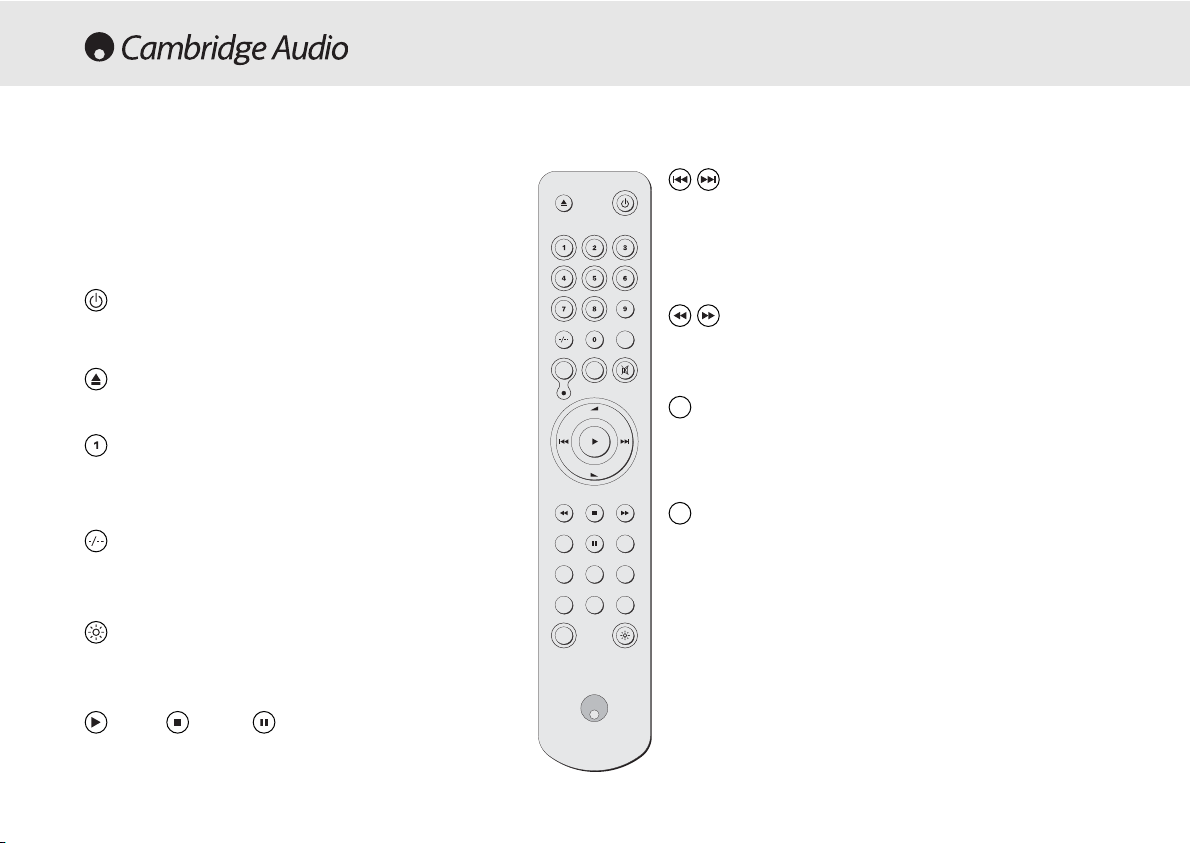
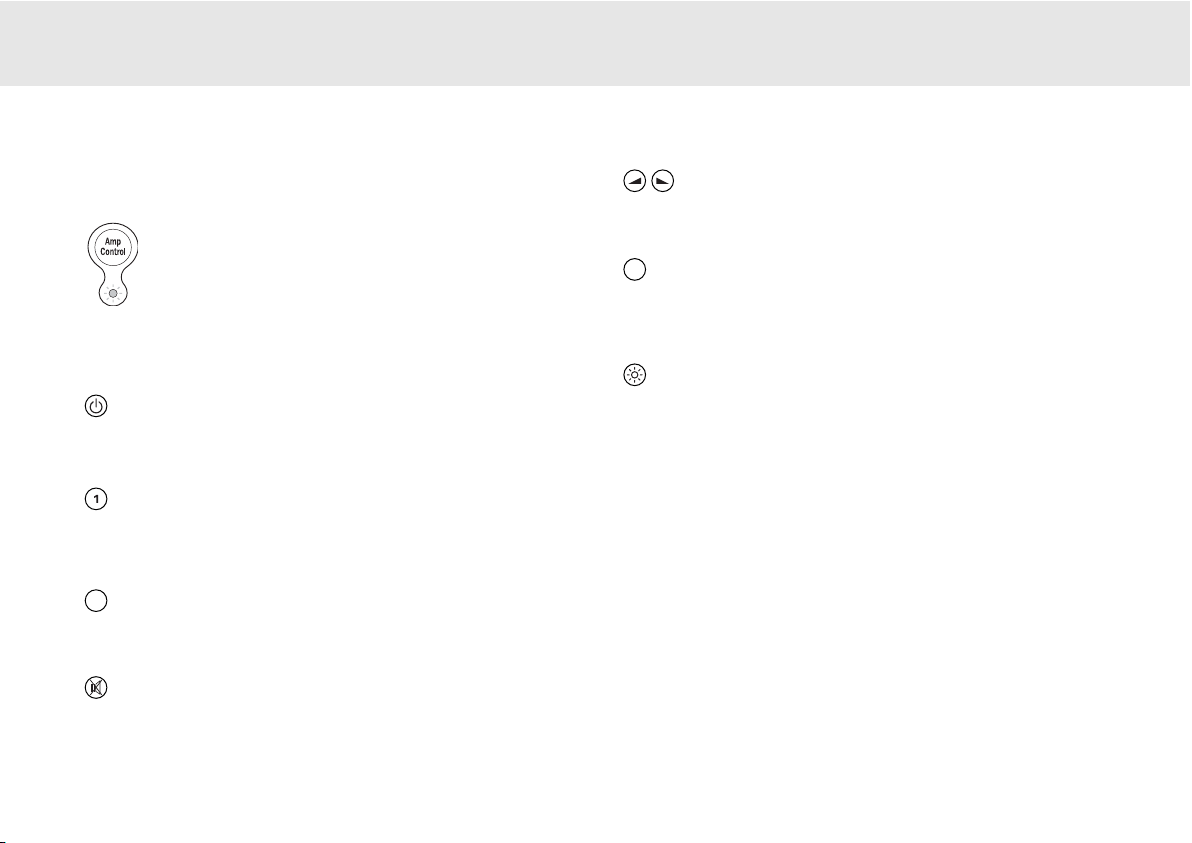
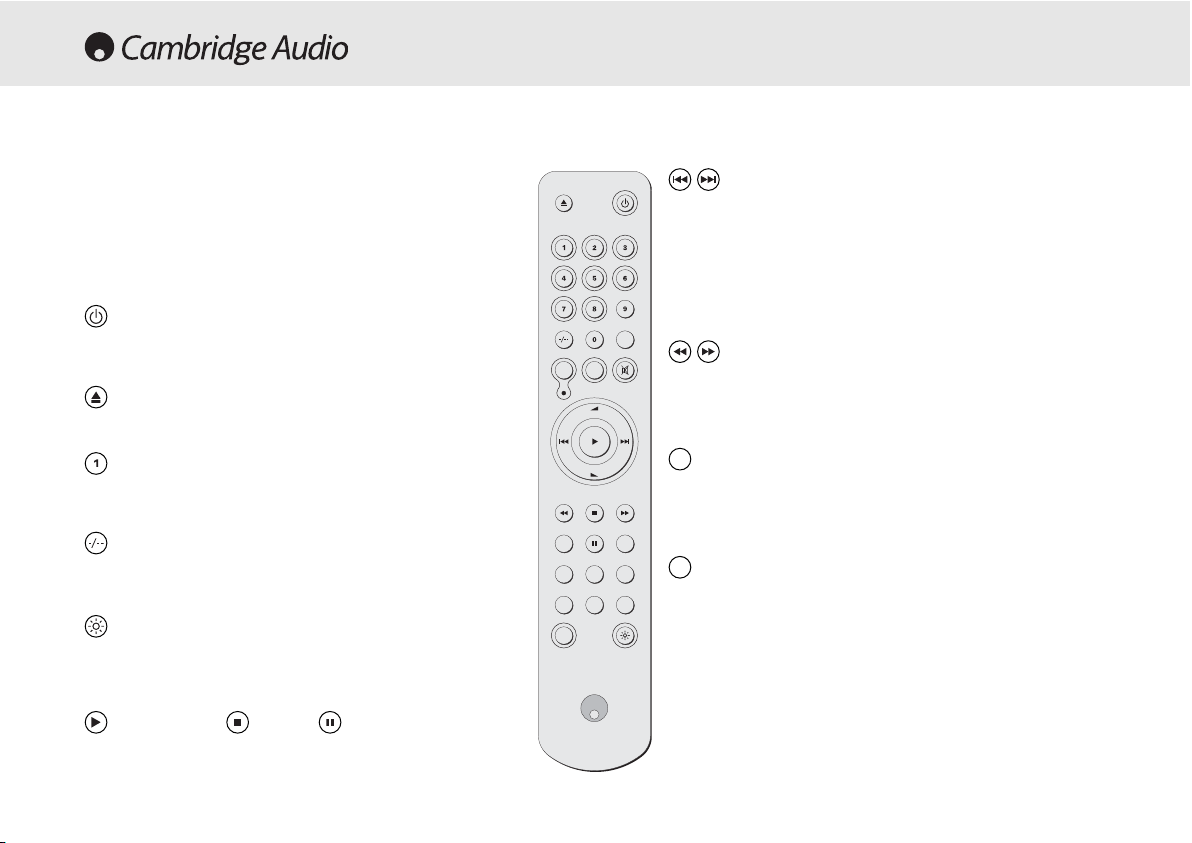
The 840C is supplied with an Azur Navigator remote control that
operates both this CD player and other Cambridge Audio Azur
amplifiers. Insert the supplied AAA batteries to use.
Note:
The remote may be in Amp mode when first activated.
Please refer to the Amp Control section for more information.
Standby/On
Switches the unit between On and Standby mode.
Open/Close
Opens and closes the disc tray.
Numerical Track select
Press the number of the desired track. The track will then be
played from the start of the track.
Track select
To select a track number greater than ten, press -/-- followed by
the track number.
Bright
Alters the brightness of the display backlight. There are three
levels of brightness: Bright, Normal, and Off.
Play / Stop / Pause
Press the relevant button to play, stop or pause the CD.
Skip
Right Skip - press once to skip forward by one track on the CD.
Press and hold to skip forwards through tracks.
Left Skip - press once to skip backward by one track on the CD.
Press and hold to skip backwards through tracks.
Search
Press and hold to search within the selected track. Right button
to fast forward, left button to rewind.
Menu
Press to access the 840C menu system on the front panel
display. Please refer to the ‘Operating instructions’ section of this
manual for more information.
Select
Press to accept the item/function highlighted in the display
menu. Please refer to the ‘Operating instructions’ section of this
manual for more information.
Program, Remain, A-BB, Repeat, Intro, Random, Space
Read the ‘Operating Instructions’ section of this manual for
information on the functions of these buttons.
10 Azur upsampling compact disc player
REMOTE CONTROL
Menu
Select
Control
Menu
Repeat
Speaker
Prog
Amp
Mode
Vol
Vol
Select
RemainA - B
Random
Space
Intro
A/B
840C Upsampling compact disc player
Azur upsampling compact disc player 11
Amp Control mode
The 840A/C remote control comes with an Amplifier Control
button, that when pressed, puts the remote into Amp mode,
allowing operation of a Cambridge Audio Azur amplifier. When
pressed, the LED will light up for 7 seconds (to let you know you
are in Amp mode), and will then flash when any of the relevant
circled Amp buttons is pressed. All other remote buttons are
inactive when in Amp mode.
The functions relevant to the amplifier are as follows:
Standby/On
Switches the amplifier between On and Standby mode.
Numerical buttons 1-88
Press to change the input source to the amplifier. Button 8 toggles Tape
Monitor on/off.
Mode
Press to switch between Volume and Balance modes.
Mute
Mutes the audio on the amplifier. The mute mode is indicated by MUTE
appearing and the volume level being replaced by two flashing dashes
in the display. Press again to cancel mute.
Volume
Increase or decrease the volume of the amplifier output.
Speaker A/B
Press to scroll through the speaker sets connected to the loudspeaker
terminals on the back panel (speaker sets A, B or A and B).
Bright
Adjust the backlight of the front panel display; bright, dim or off.
To exit Amp mode (and return to CD mode), press the Amp Control
button again (the LED will light up for one second).
Mode
Speaker
A/B
REMOTE CONTROL OF MATCHING PRODUCTS

12 Azur upsampling compact disc player
OPERATING INSTRUCTIONS
Loading and unloading discs
1. Press the Standby/On switch.
2. Press the Open/Close button.
3. When the disc tray has opened fully, place a disc carefully in the tray
with the label side facing up.
4. To close the disc tray, press the Open/Close button again. When the
tray, with a correctly loaded disc, is fully closed the disc will start
turning automatically. After the CD player has read the disc it will be
ready to play. Pressing Play will also close the tray and start playing
the disc.
5. The disc tray can be opened at any time by pressing the Open/Close
button. Only remove the disc after the tray has fully opened.
Note:
- Do not put anything except a Compact Disc into the tray, foreign objects
may damage the mechanism.
- Do not force the tray by hand during the opening and closing
operations.
- To avoid dirt and dust entering the mechanism, keep the disc tray
closed.
- If the Compact Disc is seriously scratched or too dirty the player may
not be able to read it or play it.
- Never load more than one disc into the disc tray at one time.
Normal disc play
1. Switch on your amplifier and set its input selector to the correct
position. Adjust the volume control to a minimum.
2. Press the Standby/On switch.
3. Press the Open/Close button to open the disc tray, and load a disc.
4. Press the Open/Close button again to close the tray. The CD player
will read the disc and enter Standby mode. Alternatively pressing Play
will close the tray and start playing the disc.
5. Press the Play button. The disc will start playing from the beginning
of the first track. When the last track has finished playing, the CD
player will return to Standby mode.
6. To stop the disc at any point press the Stop button. Pressing the
Pause button while the disc is playing will pause the disc. When the
disc is paused the display will flash, play can be resumed by pressing
the Play button again.
Locating a specific track
1. Ensure that a disc is loaded.
2. Pressing the right Skip/Scan (Skip on remote) button once will
forward the CD by one track. Repeat as necessary.
3. Press Play. The disc will play to the end of the disc and then return to
Standby mode.
4. Pressing the left Skip/Scan (Skip on remote) button will access the
previous track.

840C Upsampling compact disc player
Azur upsampling compact disc player 13
Locating a particular point in a track
1. Ensure that the disc is playing the desired track.
2. Press and hold the right Skip/Scan button (Search on remote), the
CD will then fast forward within the track.
3. Release the button when the desired time has been reached. Play
will resume.
4. Press and hold the left Skip/Scan (Search on remote) button, the CD
will then rewind within the track.
Repeating discs and tracks
1. Ensure that the disc is playing.
2. Press the Repeat button on the remote control. ‘Repeat All’ will
appear on the display. The whole disc will now be repeated until the
function is turned off.
3. To repeat a specific track press Repeat twice while the track is
playing. ‘Repeat’ will appear on the display and the selected track will
now be repeated until the function is turned off.
4. Press Repeat again to turn off the repeat function.
Playing tracks in a random order
1. Ensure that a disc is loaded and the player is in Standby mode.
2. Press the Random button on the remote control. ‘Random’ will
appear on the display.
3. Press Play. The CD Player will now play the entire disc in a random
order.
4. Press Random to exit Random function. The disc will continue playing
to the end in the correct order.
5. Press the Stop button at any time to stop the disc.
Using the Intro function
1. Ensure that a disc is loaded. The player can be in Standby mode or
playing.
2. Press Intro on the remote control. If the player is in Standby mode it
will automatically play the first ten seconds of each track and then
return to Standby mode. If a disc is being played when Intro is
pressed the player will progress to the next track and play the first ten
seconds of any remaining tracks.
3. Press Intro again at any time to enter normal play mode.

14 Azur upsampling compact disc player
Using the A-BB function
1. Ensure that the disc is playing, press A-B on the remote control. This
will allow you to continuously repeat a specific section of a track.
2. Press the Repeat button on the remote control at the beginning of the
section you want to loop. The A-B icon will be displayed and the player
will memorise the time A-B was pressed.
3. Press A-B again at the end of the section that you want to loop. The
player will now continuously repeat the selected section.
4. Press A-B again to return to normal play mode.
Using the Remain function
1. Ensure that the disc is playing.
2. Press the Remain button on the remote control once to display the
time remaining on the track playing.
3. Press Remain a second time to show remaining number of tracks
and total disc time remaining.
4. Press Remain again to return to normal play mode.
Using the Space function
1. Ensure that a disc is loaded. The player can be in Standby mode or
playing.
2. Press Space on the remote control. ‘Space’ will appear on the display
and a four second gap will be put between each track played.
Programming disc play
1. Ensure that a disc is loaded and the player is in Standby mode.
2. Press Program on the remote control. The Program set-up will appear
in the display.
3. Using the Skip/Scan (Skip on the remote) buttons, skip to the track
number that you want to program as your first track (or press the
actual track number on the remote).
4. Press Program. The desired track is now entered and the program
number increases by one.
5. Repeat steps three and four until all your desired tracks are entered.
6. Press Play. The programmed tracks will play.
7. You can use the Skip and Search functions on your remote control to
move through your programmed selection in the same way as normal
playback.
8. Pressing Stop once will stop play and pressing Stop twice at any time
will wipe the program and return the player to stopped mode.
OPERATING INSTRUCTIONS (CONTINUED)
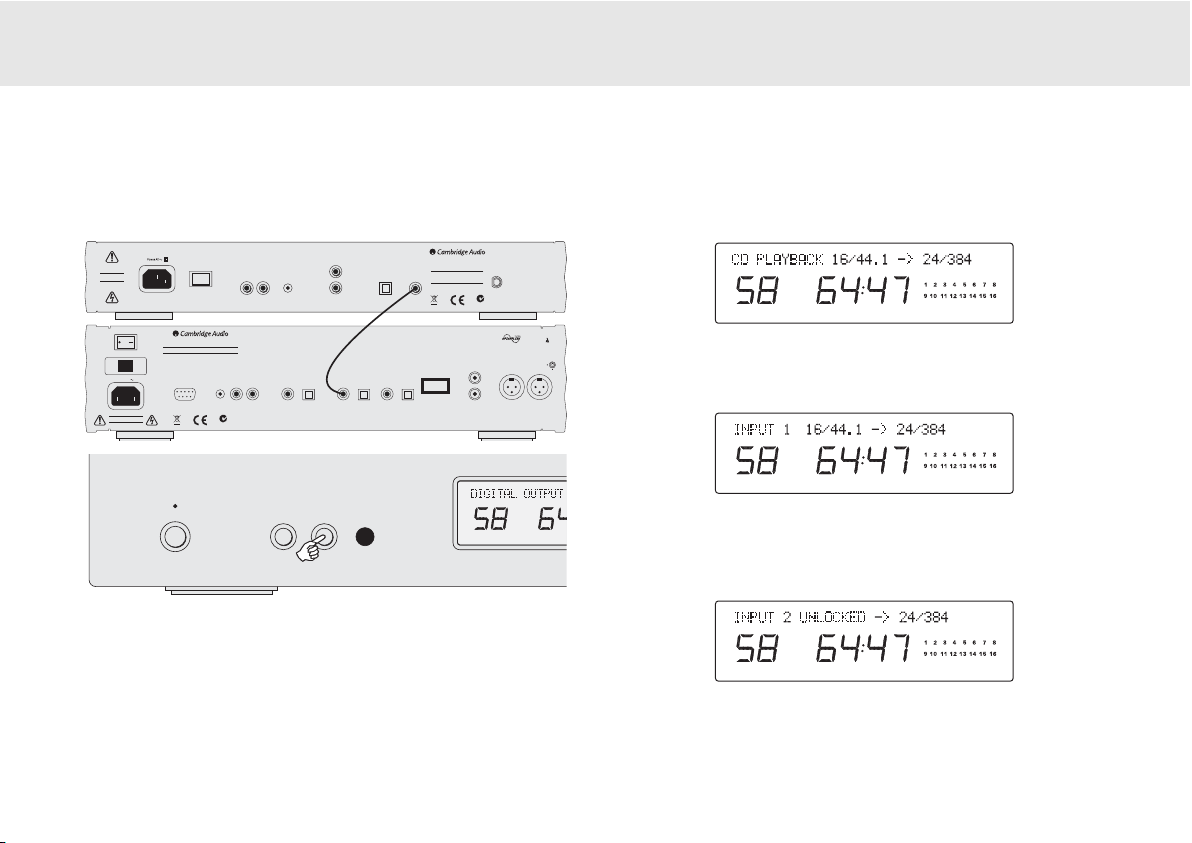
CD playback
The 16 bit/44.1kHz sampling data on a standard CD is upsampled to 24
bit/384kHz for best possible sound quality.
Digital Input 1/2
Press Select again to select Digital Input 1.
The incoming word length (16 to 24 bit) and sample rate will be
displayed along with the indication that the data is being upsampled to
24 bit/384kHz. Note that rather than exact word width, some sources
report data as either 20 bit maximum (displayed as < = 20) or 24 bit
maximum (displayed as < = 24).
If no digital signal is present, the display will show “UNLOCKED” and the
output will be muted.
Press Select again to select Digital Input 2.
To access external digital sources connected to the rear of the 840C,
press the Select button (on front panel or remote) to change between
CD playback, Digital Input 1 and Digital Input 2.
840C Upsampling compact disc player
Azur upsampling compact disc player 15
EXTERNAL DIGITAL SOURCES
Standby / On
SelectMenu
840C
640T
V2.0
Manufactured in an
Caution
Risk of electric shock.
Do not open.
Avis
Risque de choc electrique.
Ne pas ouvrir.
Achtung
Vorm öffnen des gerätes.
Netzstecker ziehen.
On Off
Mains Voltage Selector Switch
115V/230V AC~50/60Hz
Power AC
Risk of electric shock. Do not open.
Risque de choc electrique. Ne pas ouvrir.
Vorm öffnen des gerätes. Netzstecker ziehen.
Power
Caution
Avis
Achtung
ISO9002 approved facility
azur 840C Upsampling Compact Disc Player
Power
On Off
Designed in London, England
Max Power Consumption: 40W
www.cambridge-audio.com
RS232C IR Emitter
Digital Outputs
Line Output
Left
Left
Right
Right
Line Output
Digital Input 1
Toslink
S/P DIF
Toslink
Optical
Co-axial
Optical
IR Emitter
Control Bus
In InOut
Control Bus
InIn Out
S/P DIF
N1863
Co-axial
Designed in London, England
F-Type
50 Ohms
azur 640T DAB/FM Tuner V2.0
Digital Outputs
Power Rating: 230V AC ~ 50Hz
Max Power Consumption: 15W
www.cambridge-audio.com
Toslink
S/P DIF
Optical
Co-axial
Digital Input 2
Class 1 Laser Product
Luokan 1 Laserplaite
Klass 1 Laserapparat
S/P DIF
Toslink
Co-axial
Optical
Input
Aerial
Aerial
Input
50 Ohms
N1863
F-Type
Balanced Audio OutUnbalanced Audio Out
Left
Left
Right
Right
Manufactured in an
ISO9002 approved facility
Incorporating Q5™ from:
ANAGRAM
TECHNOLOGIES
RightLeft
GND
Right Left

Digital outputs
The digital outputs can be set to two options:
1. Output the raw data from the CD (or digital input) with no processing.
2. Upsampled data processing by the DSP to greater resolution.
Press Select to switch between DSP Upsample or Pass Through.
For DSP upsampling the sample frequency, word width and dither are
set by the next three available menus.
Digital out sample frequency
The digital output sample frequency (note this is different to the main
audio output sample frequency which is fixed at 384kHz for best sound
quality) can be set to 48, 96 or 192kHz (the maximum frequency
supported by SPDIF/Toslink):
Press Select to switch between the frequency options.
16 Azur upsampling compact disc player
The 840C has a custom-made display on the front of the unit showing
the current status and allowing access to the 840C System
Configuration menus. The 840C features some advanced settings that
allow its use to be customised to user preference.
Menu structure
Press the Menu button to scroll through the menus, then use the Select
button to scroll through the options/sub menus of that menu. Press the
Menu button again to move to the next menu, or after a few seconds the
display will return to the default main menu.
CD PLAYER SETUP
Default screen
Digital output
Digital out sample frequency
Digital out word width
Digital out dither on/off
Input 1 naming
Input 2 naming
Software version
(Note: If Pass Through is selected here,
the next three menus are bypassed.)
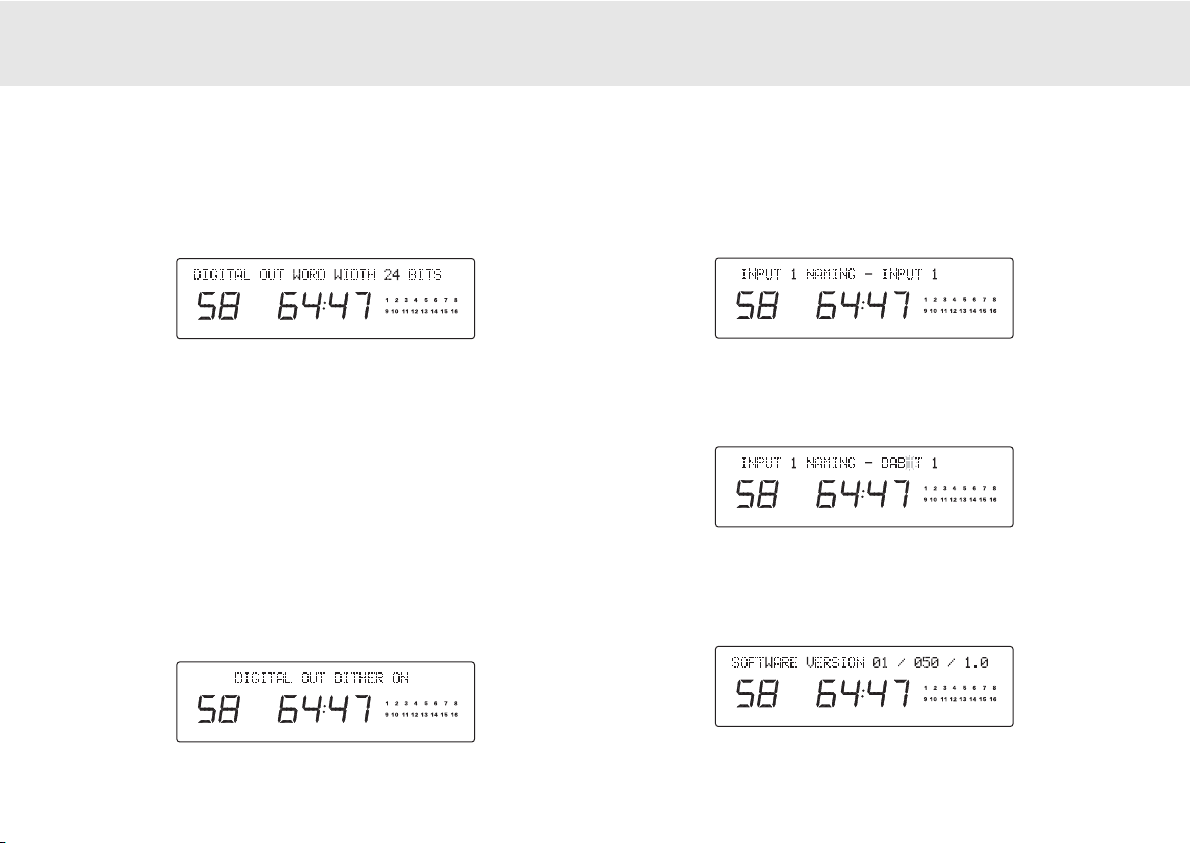
Digital out word width
The digital output word width can be set to 16, 20 or 24 bit (note this is
different to the main audio output word width which is fixed at 24 bit for
best sound quality):
Press Select to switch between the word width options.
Digital out dither
Dithering is a process where pseudo random noise is added to a signal
to remove quantization effects that cause harmonic distortion and
replace them with a slightly increased noise floor. The process can
improve the perceived quality of digitised audio signals as a small
decrease in signal to noise ration (especially where the noise is random)
is much preferably to harmonic distortion to the human ear.
The 840C is able to add what is called Triangular Probability Density
Function dither to the upsampled Digital Output signals. Normally, dither
will have already been added to any CD or source material during its
mastering process so the default for this option is off. However if a
source with no dither is used (perhaps an off board A/D converter etc)
TPDF dither can be turned on:
Press Select to switch between Dither On and Dither Off.
840C Upsampling compact disc player
Azur upsampling compact disc player 17
Changing input names / source naming
The 2 digital inputs can be renamed to reflect the actual source units
you have connected to the 840C. Press the Menu button to scroll to
either the Digital Input 1 or Digital Input 2 naming menus:
Press Select to start changing the name of the input. The first editable
character will begin to flash. Use the Stop button to go up through the
alphabet/available characters, and Play/Pause to scroll down. To accept
your character selection, move to the next character by using the
Skip/Scan buttons:
To save and exit, press Select. To cancel and exit, press Menu.
Software version
Displays the currently loaded software version:
18 Azur upsampling compact disc player
There is no power
Ensure the AC power cord is connected securely.
Ensure the plug is fully inserted into the wall socket and is switched on.
Check fuse in the mains plug or adaptor.
The player will not read the disc
Check the disc is not loaded upside down.
Check that the disc is not too scratched or dirty.
There is no sound
Ensure that the amplifier is set correctly.
Check that the interconnects are inserted correctly.
The disc is skipping
Check that the disc is not too scratched or dirty.
Ensure the player is on a firm surface and not subject to vibrations.
There is a hum coming from the speaker
Ensure that all cable connections are secure.
The remote handset will not function
Check that the batteries have not expired.
Ensure that nothing is blocking the remote sensor.
TROUBLESHOOTINGCUSTOM INSTALLATION (C.I.) USE
The 840C features a Control Bus
input/output that allow un-modulated
remote control commands (positive logic,
TTL level) to be received electrically by the
unit and looped to another unit if desired.
These control commands are typically generated by custom installation
(multi-room) systems or remote IR receiver systems. The Control Bus
sockets are colour-coded orange.
An IR Emitter Input is also provided that allows modulated IR remote
control commands to be received electrically by the unit. Commands on
this input operate the unit only and are not looped out demodulated on
the Control Bus Output. This feature is useful for multi-room systems
(such as the Cambridge Audio Incognito multi-room system) which
feature routed I.R. emitter outputs. Instead of using window emitters
stuck over the CD players front panel IR receiver, a mono 3.5mm minijack to 3.5mm mini-jack lead can be used for a more reliable electrical
connection. An RS232 port is also featured which allows the 840C to be
controlled by C.I. systems.
In addition the units feature 'direct' IR/Control codes as well as toggle
codes for some of their features to simplify programming custom
installation systems. Special direct On/Off and Mute commands can be
accessed on the supplied remote control for teaching into C.I. systems
as follows:
1. Press and hold the Standby button. The remote first generates it's
standby (toggle) command. Keep the button held down, after 12
seconds a CD player “On” command will be generated. If the button
is kept held down for a further 12 seconds, a CD player “Off”
command is generated.
A full code table and RS232 protocol for this product is available on the
Cambridge Audio website at
www.cambridge-aaudio.com
.
RS232C IR Emitter
Control Bus
InIn Out

840C Upsampling compact disc player
Azur upsampling compact disc player 19
TECHNICAL SPECIFICATIONS
D/A converters
Dual Analog Devices
AD1955 24 bit DACs
Digital filter
Analog Devices Black Fin
ADSP-BF532 32 bit DSP
Performing ATF
TM
upsampling to 24 bit 384kHz
Analog filter
2 Pole Fully Differential
Linear Phase Bessel filter
Frequency response
20Hz to 20kHz (+/-0.1dB)
THD @ 1Khz 0dBFs
< 0.0005%
THD @ 1Khz -110dBFs
< 0.0004%
THD @ 20Khz 0dBFs
< 0.0007%
IMD (19/20kHz) 0dBFs
< 0.0002%
Linearity @ -990dBFs
+/- 0.5dB
Stopband rejection (>24kHz)
> 120dB
S/N ratio, A weighted
> 113dB
Total correlated jitter
< 130pS
Crosstalk @1kHz
< -130dB
Crosstalk @20kHz
< -114dB
Output impedance
< 50 ohms
Digital input word widths supported
16 - 24 bit
Digital output word widths supported
16, 20, 24 bit
Digital input sampling frequencies supported
32kHz, 44.1kHz, 48kHz, 88.2kHz,
96kHz, 176.4kHz, 192kHz
Digital output sampling frequencies supported
32kHz - 192kHz pass through
(Including 44.1kHz for CD)
48kHz, 96kHz, 192kHz upsampled
Audio output upsampling
Fixed 24 bit, 384kHz
Dimensions - H x W x D
115 x 430 x 360mm
(4.5 x 16.9 x 14.7”)
Weight
8.5kg (18.7lbs)

20 Azur upsampling compact disc player
Cambridge Audio warrants this product to be free from defects in
materials and workmanship (subject to the terms set forth below).
Cambridge Audio will repair or replace (at Cambridge Audio's option) this
product or any defective parts in this product. Warranty periods may vary
from country to country. If in doubt consult your dealer and ensure that
you retain proof of purchase.
To obtain warranty service, please contact the Cambridge Audio
authorised dealer from which you purchased this product. If your dealer
is not equipped to perform the repair of your Cambridge Audio product,
it can be returned by your dealer to Cambridge Audio or an authorised
Cambridge Audio service agent. You will need to ship this product in
either its original packaging or packaging affording an equal degree of
protection.
Proof of purchase in the form of a bill of sale or receipted invoice, which
is evidence that this product is within the warranty period, must be
presented to obtain warranty service.
This Warranty is invalid if (a) the factory-applied serial number has been
altered or removed from this product or (b) this product was not
purchased from a Cambridge Audio authorised dealer. You may call
Cambridge Audio or your local country Cambridge Audio distributor to
confirm that you have an unaltered serial number and/or you purchased
from a Cambridge Audio authorised dealer.
This Warranty does not cover cosmetic damage or damage due to acts
of God, accident, misuse, abuse, negligence, commercial use, or
modification of, or to any part of, the product. This Warranty does not
cover damage due to improper operation, maintenance or installation,
or attempted repair by anyone other than Cambridge Audio or a
Cambridge Audio dealer, or authorised service agent which is authorised
to do Cambridge Audio warranty work. Any unauthorised repairs will void
this Warranty. This Warranty does not cover products sold AS IS or WITH
ALL FAULTS.
REPAIRS OR REPLACEMENTS AS PROVIDED UNDER THIS WARRANTY
ARE THE EXCLUSIVE REMEDY OF THE CONSUMER. CAMBRIDGE AUDIO
SHALL NOT BE LIABLE FOR ANY INCIDENTAL OR CONSEQUENTIAL
DAMAGES FOR BREACH OF ANY EXPRESS OR IMPLIED WARRANTY IN
THIS PRODUCT. EXCEPT TO THE EXTENT PROHIBITED BY LAW, THIS
WARRANTY IS EXCLUSIVE AND IN LIEU OF ALL OTHER EXPRESS AND
IMPLIED WARRANTIES WHATSOEVER INCLUDING, BUT NOT LIMITED TO,
THE WARRANTY OF MERCHANTABILITY AND FITNESS FOR A PRACTICAL
PURPOSE.
Some countries and US states do not allow the exclusion or limitation of
incidental or consequential damages or implied warranties so the above
exclusions may not apply to you. This Warranty gives you specific legal
rights, and you may have other statutory rights, which vary from state to
state or country to country.
LIMITED WARRANTY

840C Upsampling compact disc player
Azur upsampling compact disc player 21
This guide is designed to make installing and using this product as easy as
possible. Information in this document has been carefully checked for accuracy at
the time of printing; however, Cambridge Audio's policy is one of continuous
improvement, therefore design and specifications are subject to change without
prior notice. If you notice any errors please feel free to email us at:
support@cambridgeaudio.com
This document contains proprietary information protected by copyright. All rights
are reserved. No part of this manual may be reproduced by any mechanical,
electronic or other means, in any form, without prior written permission of the
manufacturer. All trademarks and registered trademarks are the property of their
respective owners.
© Copyright Cambridge Audio Ltd 2006
Adaptive Time Filtering (ATF) technology is copyright 2006 Anagram Technologies
SA. All Rights Reserved.

22 Azur Upsampling CD-Player
Einleitung...................................................................................................23
Vorsichtsmaßnahmen...............................................................................24
Wichtige Sicherheitshinweise ..................................................................25
Anschlüsse an der Rückseite des Geräts...............................................26
Bedienelemente an der Vorderseite .......................................................28
Fernbedienung..........................................................................................30
Fernbedienung passender Produkte.......................................................31
Anweisungen zur Bedienung....................................................................32
Externe digitale Quellen ...........................................................................35
CD-Player einstellen..................................................................................36
Verwendung mit kundenspezifischen Systemen....................................38
Fehlersuche...............................................................................................38
Technische Daten.....................................................................................39
Garantie.....................................................................................................40
INHALTSVERZEICHNIS

Azur Upsampling CD-Player 23
Danke, dass Sie sich für den Kauf eines Azur 840C Upsampling CD-PPlayer
entschieden haben
. Dieses Gerät ist Teil unserer neuen 8er Serie, mit der
Cambridge Audio ein neues Niveau hervorragender Audio-LLeistung erreicht.
Die Entwicklung der 8er Serie ist Teil unseres Bestrebens, die Azur Serie
fortlaufend weiterzuentwickeln. Wir hoffen, dass das Ergebnis Ihre
Ansprüche erfüllt und Sie viele Jahre Freude am Gerät haben werden.
Der 840C enthält eine Unmenge neuer Technologien und Funktionen.
Der Schlüssel für seine Fähigkeiten ist der ATF
TM
-Upsampling-Prozess
(Adaptive Time Filtering), der zusammen mit Anagram Technologies aus der
Schweiz entwickelt wurde. Das System interpoliert durch Verwendung eines
32-Bit-Analoggeräts „Black Fin“ DSP (Digital Signal Processor) intelligent
16-Bit/44,1-kHz-CD-Daten (oder andere) in 24-Bit/384-kHz-Daten. Das ATFSystem wendet eine raffinierte Interpolation mit polynominaler
Kurvenanpassung an und enthält ein Zeitbereichsmodell,
das Datenpufferung und Reclocking ermöglicht, was digitalen Jitter nahezu
vollständig eliminiert.
Weil die Audio-Datenrate so hoch ist, werden Aliasing-Artefakte weit über die
hörbaren Frequenzen hinaus verschoben. Dies ermöglicht den Einsatz eines
2-poligen „Linear-Phase“-Bessel-Filters niedriger Ordnung am Ausgang und
führt zu konstanter Gruppenlaufzeit und minimaler Phasenverschiebung.
Zwei sehr hochwertige Analoggeräte AD1955 24-Bit-DACs (Digital to Analog
Converters) werden im Dual-Differential-Mode verwendet. Da jeder Kanal
seinen eigenen D/A-Wandler zur Informationsverarbeitung hat, kann ein
komplett getrennter und symmetrischer Analogfilterschaltkreis
implementiert werden. Dadurch wird ermöglicht, dass die linken und
rechten Kanalschaltkreise identisch funktionieren und der 840C so
fantastische Tonstufen und Stereo-Eigenschaften bietet. Die gesamte
Filterung der DACs zum Ausgang ist außerdem vollkommen differentiell und
verwendet Verstärker mit Differenzausgang.
Diese vollkommen symmetrische Konfiguration weist die bereits sehr
geringen Rausch- und Verzerrungsprodukte in den D/A-Wandlern und
Filtern ab und bietet eine unvergleichliche Leistungsqualität.
Ein symmetrischer (XLR) Ausgang ist ebenso vorhanden wie ein
unsymmetrischer Phono/RCA-Ausgang. Automatische Servo-Schaltkreise
eliminieren alle Phasenverschiebungen und erlauben keine Kondensatoren
im Signalpfad.
Durch die zwei digitalen Eingängen können an den 840C andere digitale
Quellen für das Upsampling angeschlossen werden. Der 840C arbeitet dann
wie ein hochwertiger DAC.
Ein digitaler Ausgang ist ebenso vorhanden, der sogar upgesampelte Daten
mit unterschiedlichen Raten und Wortbreiten ausgeben kann, unabhängig
vom Audio-Hauptausgang, der immer auf 24/384 eingestellt ist, um eine
optimale Klangqualität zu erhalten.
Zusätzlich zu diesen audiophilen Funktionen gehören ein Control-BusEin-/Ausgang, ein IR-Sendereingang und eine RS232-Steuerung zur
Ausstattung, wodurch dieses Gerät bei Bedarf problemlos in
kundenspezifische Systeme integriert werden kann.
Für die 8er-Serie wurde ein komplett neues Gehäuse entwickelt, das
massive strukturelle Festigkeit mit sorgfältiger Dämpfung und Regelung der
akustischen Resonanz kombiniert. Eine Azur Navigator-Fernbedienung für
alle Funktionen von CD-Playern und Azur-Verstärkern ist beigefügt und
zeichnet sich durch ihr attraktives Design und ihre leichte Handhabung aus.
Der CD-Player kann nur so gut wie das System sein, an das er
angeschlossen ist. Gehen Sie deshalb beim Verstärker, bei den
Lautsprechern oder bei den Kabeln keine Kompromisse ein. Ganz
besonders empfehlen wir Ihnen natürlich die Verstärker aus der Azur-Serie
von Cambridge Audio, und besonders den integrierten Verstärker 840A, die
dieselben hohen Qualitätsanforderungen erfüllen wie dieser CD-Player.
Ihr Händler hält für Sie qualitativ hochwertige Verbindungskabel von
Cambridge Audio bereit, mit denen Sie die Möglichkeiten Ihres Systems
optimal nutzen können.
Danke, dass Sie sich die Zeit zum Lesen dieses Handbuchs nehmen.
Wir empfehlen, dass Sie es für künftigen Gebrauch aufbewahren.
Matthew Bramble
Technischer Direktor
EINLEITUNG
840C Upsampling CD-Player
24 Azur Upsampling CD-Player
Kontrolle der Netzanschlussleistung
Bitte lesen Sie zu Ihrer eigenen Sicherheit die folgenden Anweisungen sorgfältig
durch, bevor Sie dieses Gerät an das Stromnetz anschließen.
Kontrollieren Sie, dass an der Rückseite des Gerätes die richtige Netzspannung
angegeben ist. Wenn Ihre Netzspannung von der angegebenen Spannung
abweicht, nehmen Sie bitte Kontakt mit Ihrem Händler auf.
Dieses Gerät funktioniert nur mit der Netzspannung und dem Spannungstyp,
die/der auf der Rückseite des Gerätes angegeben ist. Wenn das Gerät an eine
anders ausgelegte Stromversorgung angeschlossen wird, kann es beschädigt
werden.
Schalten Sie das Gerät aus, wenn es nicht verwendet wird, und benutzen Sie es
nicht ohne eine entsprechende Erdung. Um die Gefahr eines elektrischen Schlags
zu verringern, darf die Abdeckung (oder die Rückseite) des Geräts nicht entfernt
werden. Im Gerät befinden sich keine Teile, die vom Benutzer gewartet bzw.
repariert werden können. Überlassen Sie die Wartung qualifiziertem
Fachpersonal.
Das Symbol mit dem Blitz und der Pfeilspitze in einem gleichseitigen
Dreieck weist den Benutzer auf das Vorhandensein von nicht
isolierter "gefährlicher Spannung" im Inneren des Produkts hin, die
ausreichend stark sein kann, um die Gefahr eines elektrischen
Schlags für Personen darzustellen.
Das Ausrufungszeichen in einem gleichseitigen Dreieck weist den
Benutzer darauf hin, dass die mit diesem Produkt gelieferte
Dokumentation wichtige Betriebs- und Wartungsanweisungen für
das Gerät enthält.
VORSICHTSMAßNAHMEN
Dieses Produkt erfüllt die europäische
Niederspannungsrichtlinie (73/23/EU) und die Richtlinien über
die Elektromagnetische Verträglichkeit (EMV) (89/336/EU),
wenn es in Übereinstimmung mit diesem Handbuch verwendet
und installiert wird. Damit das Produkt diese Richtlinien auch in
Zukunft erfüllt, darf bei diesem Gerät nur Zubehör von
Cambridge Audio verwendet werden, und die Wartung muss von
qualifizierten Kundendienstmitarbeitern ausgeführt werden.
Die durchgestrichene Abfalltonne auf Rädern ist das Symbol der
Europäischen Union, das das getrennte Sammeln von Elektro- und
Elektronikgeräten anzeigt. Dieses Gerät enthält elektrische und
elektronische Teile, die wiederverwendet, recycelt oder
wiederhergestellt werden können und nicht mit unsortiertem
normalem Restabfall entsorgt werden dürfen. Bitte geben Sie das
Gerät zurück oder wenden Sie sich für weitere Informationen an
Ihren Fachhändler, von dem Sie dieses Gerät gekauft haben.

deshalb nicht auf dem Gerät abgestellt werden. Sollte dennoch Flüssigkeit in den
Verstärker gelangen, schalten Sie das Gerät sofort aus, trennen Sie es von der
Netzspannung, und fragen Sie Ihren Händler um Rat.
Achten Sie darauf, dass keine kleinen Teile durch die Lüftungsgitter fallen können.
Sollte dennoch ein kleines Teil in das Gerät gelangt sein, schalten Sie es sofort aus,
trennen Sie es von der Stromversorgung, und fragen Sie Ihren Händler um Rat.
Wenn Sie zwei Verstärker verwenden, sollten Sie unbedingt Verstärker desselben
Typs einsetzen.
Wenn Sie dieses Gerät über einen längeren Zeitraum nicht benutzen möchten,
schalten Sie es auf Standby und ziehen Sie den Stecker aus der Steckdose. Auch
bei einem Gewitter sollten Sie das Gerät immer von der Stromversorgung trennen.
Sie reinigen das Gerät, indem Sie das Gehäuse mit einem trockenen, fusselfreien
Tuch abwischen. Verwenden Sie keine Reinigungsflüssigkeiten, die Alkohol,
Ammoniak oder Scheuermittel enthalten. Verwenden Sie bei oder in der Nähe
Ihres CD-Players keine Spraydosen.
Das Gerät kann nicht vom Benutzer gewartet oder repariert werden. Versuchen Sie
deshalb nie, Reparaturen selbst durchzuführen, und unterlassen Sie das
Auseinandernehmen und Zusammenbauen des Geräts bei einem Problem. Solche
Wartungs- und Reparaturarbeiten sind erforderlich, wenn das Gerät beschädigt
wurde (z.B. am Netzstecker oder am Netzkabel), wenn Flüssigkeit oder ein
Gegenstand in das Gerät gelangt ist, wenn das Gerät Regen oder Feuchtigkeit
ausgesetzt war, wenn es nicht normal funktioniert, oder wenn es fallen gelassen
wurde. Wenn diese Sicherheitsmaßnahme nicht beachtet wird, kann dies einen
gefährlichen elektrischen Schlag zur Folge haben.
Wichtiger Hinweis
Dieses Gerät wurde für die Wiedergabe von CDs, CD-Rs und CDRWs mit folgendem identifizierenden Logo ausgelegt. Es können
keine anderen Discs verwendet werden. Die CD-Rs/CD-RWs sollten
ein richtig aufgezeichnetes Inhaltsverzeichnis (TOC) enthalten,
damit sie wiedergegeben werden können. Dieses Gerät kann nur Discs im CD-DAFormat, das für die Wiedergabe von Musik entwickelt wurde, abspielen. Versuchen
Sie nicht, auf diesem Gerät Discs wiederzugeben, die andere Daten enthalten, wie
z.B. CD-ROMs für PCs.
840C Upsampling CD-Player
Azur Upsampling CD-Player 25
Bitte nehmen Sie sich einen Moment Zeit und lesen Sie diese Hinweise durch,
bevor Sie Ihren Azur CD-Player installieren; dadurch erhalten Sie die optimale
Leistung, und Sie verlängern die Lebensdauer Ihres Geräts. Wir empfehlen
unbedingt, alle Anweisungen gut durchzulesen, alle Warnhinweise genau zu
beachten, und das Handbuch für spätere Zwecke sicher aufzuheben.
Das Gerät ist als "Class 1" eingestuft und muss an einer Wandsteckdose mit
einem Erdungsleiter angeschlossen werden.
Bitte verwenden Sie bei diesem Gerät nur das angegebene Zubehör.
Bitte achten Sie darauf, die Schutzvorrichtung des gepolten bzw. geerdeten
Steckers nicht zu beschädigen. Ein gepolter Stecker hat zwei Stifte, von denen
einer breiter als der andere ist. Ein geerdeter Stecker hat zwei Stifte sowie einen
Erdungsstift. Der breite Stift bzw. Erdungsstift dient Ihrer Sicherheit. Wenn der
mitgelieferte Stecker nicht in Ihre Steckdose passt, wenden Sie sich bitte an einen
Elektriker, um sich die veraltete Steckdose austauschen zu lassen.
Das Gerät muss in einer Art und Weise installiert werden, die ein Abziehen des
Netzsteckers von der Netzsteckdose (oder einem Gerätestecker an der Rückseite
des Geräts) ermöglicht. Verlegen Sie das Stromkabel nicht so, dass jemand darauf
treten kann, oder dass es durch andere in der Nähe befindliche Gegenstände
beschädigt werden kann.
Dieses Gerät muss auf einer festen, ebenen Oberfläche aufgestellt
werden. Stellen Sie das Gerät nicht in einen abgeschlossenen
Hohlraum, also nicht in einen Bücherschrank oder in eine Vitrine. Jedes
an der Rückseite offene Teil der Wohneinrichtung (zum Beispiel ein
speziell für Anlagen entworfenes Regal) ist jedoch gut geeignet.
Das Gerät benötigt Luftzufuhr. Stellen Sie es nicht auf einen Läufer/Teppich oder
eine andere weiche Oberfläche und decken Sie die Lüftungsgitter für den
Lufteinlass oder -auslass nicht ab.
Das Gerät darf nicht in der Nähe von Wärmequellen wie Heizungen,
Heizspeichern, Öfen oder anderen Wärme abstrahlenden Quellen (wie z.B.
Verstärkern) installiert werden.
WARNHINWEIS - Dieses Gerät darf nicht mit Regen oder Feuchtigkeit in Kontakt
kommen, da sonst die Gefahr eines Brands oder eines elektrischen Schlags
besteht. Tropfwasser, Spritzwasser oder andere Flüssigkeiten dürfen nicht an das
Gerät gelangen. Mit Flüssigkeit gefüllte Gegenstände, wie z.B. eine Vase, dürfen
WICHTIGE SICHERHEITSHINWEISE
26 Azur Upsampling CD-Player
Ein/Aus
Hiermit schalten Sie das Gerät ein und aus.
Netzspannungswahlschalter
Schaltet zwischen der Netzspannung 115 V und 230 V um. Nur vom
Installateur/Händler zu verwenden.
Netzanschluss
Nachdem Sie alle Anschlüsse am Verstärker vorgenommen haben,
stecken Sie das Netzkabel in eine geeignete Steckdose. Jetzt ist Ihr CDPlayer einsatzbereit.
ANSCHLÜSSE AN DER RÜCKSEITE DES GERÄTS
RS232C
Der RS232C-Port ermöglicht die externe serielle Steuerung des 840C
für die Verwendung von kundenspezifischen Systemen. Einen
Befehlssatz finden Sie auf der Cambridge-Audio-Website unter
www.cambridge-aaudio.com
. Dieser Port kann auch von Cambridge
Audio-Kundenservicemitarbeitern für Software-Aktualisierungen
verwendet werden.
IR Emitter In (Infrarot-SSendereingang)
Ermöglicht dem Verstärker den Empfang von modulierten IR-Befehlen
von Mehrraumsystemen oder IR-Repeater-Systemen. Empfangene
Befehle werden hier nicht vom Control-Bus weitergeleitet.
Weitere Informationen finden Sie im Abschnitt „Kundenspezifische
Systeme“.
Digital Outputs
Power AC
azur 840C Upsampling Compact Disc Player
Max Power Consumption: 40W
www.cambridge-audio.com
RS232C IR Emitter
InIn Out
Control Bus
S/P DIF
Co-axial
Toslink
Optical
Digital Input 1
Right Left
RightLeft
Balanced Audio OutUnbalanced Audio Out
S/P DIF
Co-axial
Toslink
Optical
Digital Input 2
S/P DIF
Co-axial
Toslink
Optical
Right
Left
Right
Left
Manufactured in an
ISO9002 approved facility
On Off
Power
Class 1 Laser Product
Luokan 1 Laserplaite
Klass 1 Laserapparat
Mains Voltage Selector Switch
115V/230V AC~50/60Hz
GND
Caution
Risk of electric shock. Do not open.
Avis
Risque de choc electrique. Ne pas ouvrir.
Achtung
Vorm öffnen des gerätes. Netzstecker ziehen.
N1863
Designed in London, England
Incorporating Q5™ from:
ANAGRAM
TECHNOLOGIES
1
2
3
4
10
6
97
5
8
11
1
2
4
5
3

840C Upsampling CD-Player
Azur Upsampling CD-Player 27
Kontrollbus
In (Eingang) - Ermöglicht dem Gerät den Empfang von unmodulierten
Befehlen von Mehrraumsystemen oder anderen Komponenten.
Out (Ausgang) - Zum Weiterleiten von Kontrollbusbefehlen an ein
anderes Gerät.
Digitale Ausgänge
Die digitalen Ausgänge ermöglichen den Anschluss eines separaten DAC
oder digitalen Aufzeichnungsgeräts. Die hochentwickelte DSP-Software
im 840C erlaubt sogar die Einstellung, die Daten „raw“ (Pass through)
oder „upsampled“ auszugeben, unabhängig von den HauptAudioausgängen. Weitere Informationen finden Sie im Abschnitt
„Bedienungsanleitung“.
S/P DIF Co-aaxial Digital -
Um optimale Ergebnisse zu erzielen, sollten Sie
ein hochwertiges, digitales 75-Ohm-RCA-Verbindungskabel verwenden
(d.h. kein Kabel, das nur für normales Audio ausgelegt ist).
Toslink Optical Digital –
Verwenden Sie ein hochwertiges TOSLINK
Glasfaserverbindungskabel, das speziell für Audio ausgelegt ist.
Es sollte jeweils nur eine der zwei Ausgangsarten verwendet werden.
& Digitale Eingänge 1 / 2
Die digitalen Eingänge ermöglichen den Anschluss digitaler Ausgänge
anderer Quellkomponenten an den 840C. Der 840C kann dann als sehr
hochwertiger Upsampling-DAC fungieren, der die Klangqualität der
angeschlossenen Quellen verbessert. Zwei digitale Eingänge ermöglichen
den Anschluss von zwei externen Quellen.
S/P DIF Co-aaxial Digital -
Verwenden Sie ein hochwertiges, digitales
75-Ohm-RCA-Verbindungskabel (d.h. kein Kabel, das nur für normales
Audio ausgelegt ist).
Toslink Optical Digital –
Verwenden Sie ein hochwertiges TOSLINK
Glasfaserverbindungskabel, das speziell für Audio ausgelegt ist.
Nur eine der zwei Eingangsarten für jeden Eingang sollte gleichzeitig
verwendet werden.
Unsymmetrischer Audio-AAusgang
Einpolige konventionelle Stereo-Ausgänge zum Anschluss an Line-LevelPhono/RCA-Eingänge eines Verstärkers.
Symmetrischer Audio-AAusgang
Der 840C bietet außerdem symmetrische (XLR) Ausgänge. Dies ist ein
höherwertiger Ausgang, der Rauschen und Interferenzen im Kabel
unterdrücken kann, wenn er mit Geräten mit symmetrischen Eingängen
verwendet wird. XLR-Anschlüsse sollten folgendermaßen belegt sein:
Stift 1 – Masse; Stift 2 – heiß (normale Polarität); Stift 3 – kalt
(umgedrehte Polarität).
6
7
8
10
11
9

28 Azur Upsampling CD-Player
BEDIENELEMENTE AN DER VORDERSEITE
Standby/On (Standby/Ein)
Mit dieser Taste können Sie zwischen Standby (schwach leuchtende
Status-LED) und ON (Ein) (hell leuchtende Status-LED) wechseln.
Standby ist ein Bereitschaftsmodus mit einem Stromverbrauch von
unter 10 W. Lassen Sie das Gerät bei Nichtgebrauch im Standby-Modus.
Menü
Verwenden Sie diese Taste, um durch die Menübildschirme des 840C
zu blättern. Weitere Informationen finden Sie im Abschnitt
„Bedienungsanleitung“ in diesem Handbuch.
Select (Auswählen)
Verwenden Sie diese Taste, um zwischen CD-Wiedergabe und den
digitalen Eingängen 1 und 2 zu wechseln. Sie können damit außerdem
die Optionen in Menübildschirmen umschalten. Weitere Informationen
finden Sie im Abschnitt „Bedienungsanleitung“ in diesem Handbuch.
Infrarot-SSensor
Empfängt IR-Befehle von der mitgelieferten Azur-Fernbedienung. Dazu
ist eine freie, ungehinderte Sichtlinie zwischen der Fernbedienung und
dem Sensor erforderlich.
Disc-SSchublade
CD-Schublade. Verwenden Sie zur Betätigung die Taste Open/Close.
1 2 3
6
5
7
98
10
4
1
2
3
4
5
Standby / On Stop
SelectMenu
Upsampling Compact Disc Player
Open
Close
Pause
Play
Skip
Scan
azur 840C

840C Upsampling CD-Player
Azur Upsampling CD-Player 29
Display
LCD für die Anzeige der Upsampling-Rate, CD-Titelnummer,
abgelaufenen/verbleibenden Zeit und anderer CD-Funktionen. Weitere
Informationen finden Sie im Abschnitt „Bedienungsanleitung“ in diesem
Handbuch.
Öffnen/Schließen
Mit dieser Taste können Sie die CD-Lade öffnen und schließen und dann
eine CD einlegen. Die CD-Lade wird auch geöffnet, wenn Sie die Taste
“Play” (Wiedergabe) drücken.
Wiedergabe/Pause
Mit dieser Taste geben Sie die CD wieder bzw. schalten Sie auf Pause.
Stopp
Mit dieser Taste stoppen Sie die Wiedergabe der CD.
Springen/Abtasten
Mit dieser Taste können Sie Titel/Spuren überspringen und innerhalb
der Titel/Spuren suchen. Drücken Sie die Taste einmal, um einen
Titel/eine Spur zu überspringen. Drücken und halten Sie die Taste, um
innerhalb eines Titels/einer Spur zu suchen.
6
7
8
9
10
Der 840C wird mit einer Azur Navigator-Fernbedienung geliefert,
die sowohl den CD-Player als auch andere Cambridge Audio AzurVerstärker bedient. Legen Sie zur Inbetriebnahme die mitgelieferten
AAA-Batterien ein.
Hinweis:
Die Fernbedienung kann beim ersten Einschalten im
Verstärker-Modus sein. Weitere Informationen finden Sie im
Abschnitt „Verstärkersteuerung“.
Standby/On (Standby/Ein)
Mit dieser Taste können Sie zwischen den Modi Standby und Ein
wechseln.
Open/Close (Öffnen/Schließen)
Mit dieser Taste wird die CD-Schublade geöffnet und geschlossen.
Zifferntasten für Titelwahl
Drücken Sie die Nummer des gewünschten Titels. Der Titel wird
dann vom Titelanfang an wiedergegeben.
Titelwahl
Für eine Titelnummer größer als 10 drücken Sie die Taste -/— und
dann die entsprechende Titelnummer.
Helligkeit
Mit dieser Taste ändern Sie die Helligkeit der Hintergrundbeleuchtung
des Displays. Es stehen Ihnen drei Helligkeitsstufen zur Verfügung:
Hell, normal und aus.
Wiedergabe/ Stopp/ Pause
Drücken Sie die jeweilige Taste, um die CD wiederzugeben,
zu beenden oder zu unterbrechen.
Springen
Springen rechts – drücken Sie die Taste einmal, um einen Titel auf
der CD vorzuspringen. Drücken und halten Sie
die Taste, um weiter durch die Titel zu springen.
Springen links – drücken Sie die Taste einmal, um einen Titel auf der
CD zurückzuspringen. Drücken und halten Sie die
Taste, um weiter durch die Titel zurückzuspringen.
Suchen
Drücken und halten Sie die Taste, um den gewünschten Titel zu
suchen. Rechte Pfeiltaste für Schnellvorlauf, linke Pfeiltaste für
Rücklauf.
Menü
Drücken Sie diese Taste, um auf das Menü des 840C auf dem
Bedienfeld zuzugreifen. Weitere Informationen finden Sie im
Abschnitt „Bedienungsanleitung“ in diesem Handbuch.
Select (Auswählen)
Mit dieser Taste wählen Sie im Menü hervorgehobene Einträge /
Funktionen. Weitere Informationen finden Sie im Abschnitt
„Bedienungsanleitung“ in diesem Handbuch.
Program, Remain, A-BB, Repeat, Intro, Random, Space
Weitere Informationen zu den Funktionen dieser Tasten finden
Sie im Abschnitt „Bedienungsanleitung“ dieses Handbuchs.
30 Azur Upsampling CD-Player
FERNBEDIENUNG
Menu
Select
Control
Menu
Repeat
Speaker
Prog
Amp
Mode
Vol
Vol
Select
RemainA - B
Random
Space
Intro
A/B
 Loading...