

Cambridge Audio Azur 840-A Owners manual

azur 840A
Class XD Integrated Amplifier
User’s Manual

2 Azur Class XD integrated amplifier
Introduction .................................................................................................3
Safety precautions ......................................................................................4
Important safety instructions .....................................................................5
Rear panel connections..............................................................................6
Front panel controls....................................................................................8
Remote control..........................................................................................10
Connections ..............................................................................................11
Operating instructions ..............................................................................14
Amplifier setup..........................................................................................15
Multi-Room ................................................................................................18
Custom installation use............................................................................19
CAP5 protection system ...........................................................................20
Troubleshooting.........................................................................................22
Technical specifications...........................................................................23
Limited warranty .......................................................................................24
CONTENTS

840A Class XD integrated amplifier
Azur Class XD integrated amplifier 3
Thank you for purchasing this Azur 840A Class XD Integrated Amplifier.
This unit is part
of our new '8' Series taking Cambridge Audio to new
levels of audio excellence as part of our commitment to the on-ggoing
development of the Azur range. We hope that you will appreciate the
results and enjoy many years of listening pleasure from it.
For the 840A we developed many new circuits and components, with
many parts being designed specifically for this model. A unique
proprietary to Cambridge Audio patent pending amplifier topology has
even been developed called Class XD™ which can eliminate crossover
distortion at low signal levels.
This technology creates a region of pure Class-A operation where the
crossover zone would otherwise be. It should not be confused with Class
AB, which gives a small area of Class A, at the cost of higher distortion
as soon as signal levels moves outside it. Class XD circuitry not only
removes crossover distortion from the zero-crossing point but also
reduces distortion in the other parts of the amplifier's output range. A
white paper on this technology is available on our website:
www.cambridge-audio.com.
Please note that because of the Class XD technology the 840A runs
slightly warmer than a conventional Class B/AB amplifier and the
ventilation slots on the top of the unit must not be obscured.
Other features include the use of precision networks of resistors and
relays for the volume and balance control rather than the more common
solid-state or volume potentiometer schemes. Volume is controllable in
1 dB steps over most of the range, giving very fine control, an accurate
logarithmic law and superbly accurate channel balance. Input switching
is also by high quality relays.
The 840A features separate transformer secondaries for left and right
channels, twin rectifiers and separate PSU's for dual mono operation of the
left and right power amplifiers. A separate transformer supplies the preamp
making the 840A effectively a Pre and Power amp combination in one box.
Input 1 features a balanced input using XLRs giving optimal
performance with equipment such as the matching 840C Upsampling
CD player which feature balanced outputs.
A completely new casework has been designed which combines
massive structural rigidity with careful damping and control of acoustic
resonance. An Azur Navigator remote control is also provided, giving full
remote control of your amplifier in an attractive and easy to use
handset.
We have also added many new features, including support for multiroom use. By plugging in one or two external Cambridge Audio Incognito
keypads and a power supply unit your amplifier can become the hub of
a simple multi-room system. In addition, Control Bus Input/Output, IR
Emitter Input and RS232 control are provided to make it easy to
integrate this unit into Custom Installation systems if desired.
Your amplifier can only be as good as the system it is connected to.
Please do not compromise on your source equipment, speakers or
cabling. Naturally we particularly recommend models from the
Cambridge Audio Azur range. These have been designed to the same
exacting standards as this amplifier. Your dealer can also supply
excellent quality Cambridge Audio interconnects to ensure your system
realises its full potential.
Thanks for taking the time to read this manual; we do recommend you
keep it for future reference.
Matthew Bramble
Technical Director
INTRODUCTION
4 Azur Class XD integrated amplifier
Checking the Power Supply Rating
For your own safety please read the following instructions carefully before attempting
to connect this unit to the mains.
Check that the rear of your unit indicates the correct supply voltage. If your mains
supply voltage is different, consult your dealer.
This unit is designed to operate only on the supply voltage and type that is
indicated on the rear panel of the unit. Connecting to other power sources may
damage the unit.
This equipment must be switched off when not in use and must not be used unless
correctly earthed. To reduce the risk of electric shock, do not remove the unit's
cover (or back). There are no user serviceable parts inside. Refer servicing to
qualified service personnel. If the power cord is fitted with a moulded mains plug
the unit must not be used if the plastic fuse carrier is not in place. Should you lose
the fuse carrier the correct part must be reordered from your Cambridge Audio
dealer.
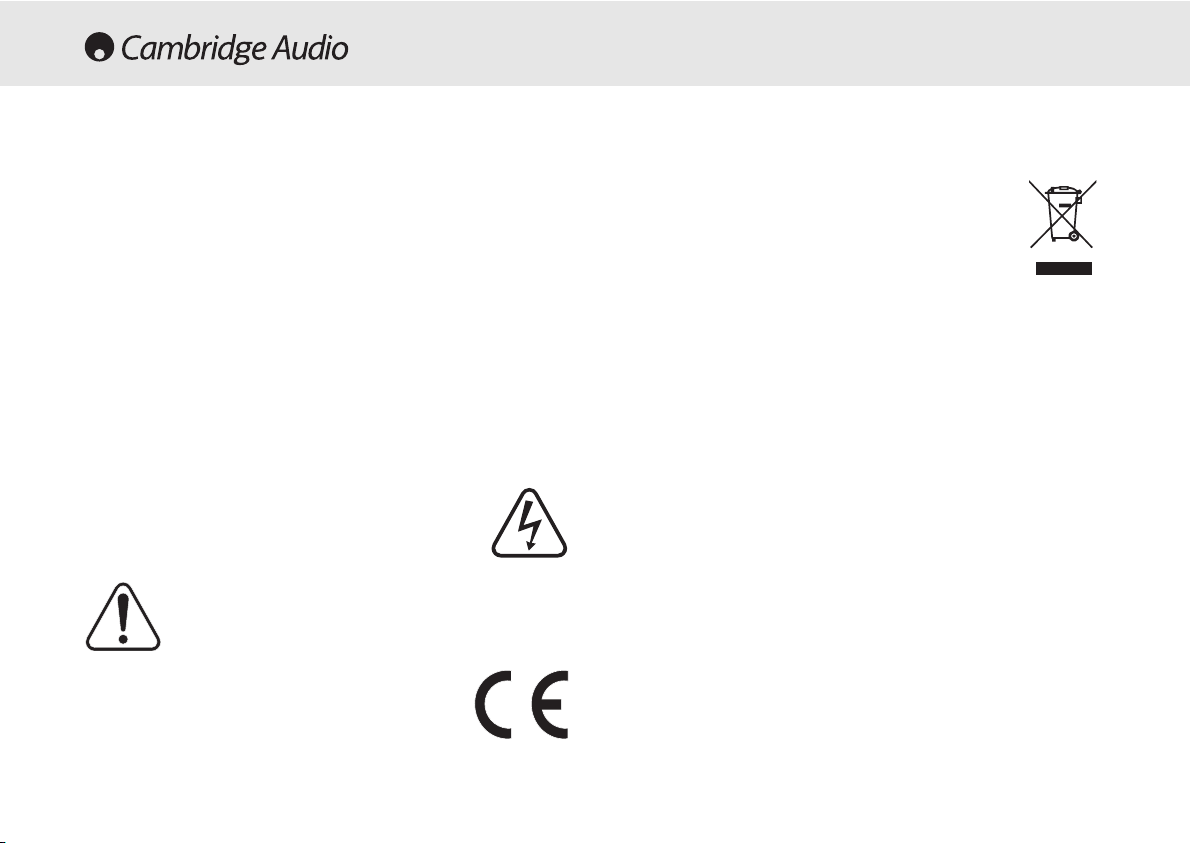
The lightning flash with the arrowhead symbol within an equilateral
triangle is intended to alert the user to the presence of un-insulated
‘dangerous voltage’ within the product’s enclosure that may be of
sufficient magnitude to constitute a risk of electric shock to
persons.
The exclamation point within an equilateral triangle is intended to alert
the user to the presence of important operating and maintenance
instructions in the service literature relevant to this appliance.
This product complies with European Low
Voltage (73/23 /EEC) and Electromagnetic Compatibility
(89/ 336/EEC) Directives when used and installed according to
this instruction manual. For continued compliance only
Cambridge Audio accessories should be used with this product
and servicing must be referred to qualified service personnel.
The crossed-out wheeled bin is the European Union symbol for
indicating separate collection for electrical and electronic
equipment. This product contains electrical and electronic
equipment which should be reused, recycled or recovered and
should not be disposed of with unsorted regular waste. Please
return the unit or contact the authorised dealer from whom you
purchased this product for more information.
Plug Fitting Instructions (UK Only)
The cord supplied with this appliance is factory fitted with a 13 amp mains plug
fitted with a 3 amp fuse inside. If it is necessary to change the fuse, it is important
that a 3 amp one is used. If the plug needs to be changed because it is not suitable
for your socket, or becomes damaged, it should be cut off and an appropriate plug
fitted following the wiring instructions below. The plug must then be disposed of
safely, as insertion into a 13 amp socket is likely to cause an electrical hazard.
Should it be necessary to fit a 3-pin BS mains plug to the power cord the wires
should be fitted as shown in this diagram. The colours of the wires in the mains
lead of this appliance may not correspond with the coloured markings identifying
the terminals in your plug. Connect them as follows:
The wire which is coloured BLUE must be connected to the terminal which is
marked with the letter ‘N’ or coloured BLACK.
The wire which is coloured BROWN must be connected to the terminal which is
marked with the letter ‘L’ or coloured RED.
The wire which is coloured GREEN/YELLOW must be connected to the terminal
which is marked with the letter ‘E’ or coloured GREEN.
If your model does not have an earth wire, then disregard this instruction.
If a 13amp (BS 1363) plug is used, a 3amp fuse must be fitted, or if any other type
of plug is used a 3amp or 5 amp fuse must be fitted, either in the plug or adaptor,
or on the distribution board.
SAFETY PRECAUTIONS

840A Class XD integrated amplifier
Azur Class XD integrated amplifier 5
IMPORTANT SAFETY INSTRUCTIONS
Please take a moment to read these notes before installing your Azur
amplifier, they will enable you to get the best performance and prolong
the life of the product. We advise you follow all instructions, heed all
warnings and keep the instructions for future reference.
The unit is of Class 1 construction and must be connected to a Mains
socket outlet with a protective earthing connection.
Only use the specified attachments/accessories with this unit.
Do not defeat the safety purpose of the polarized or grounding type plug.
A polarized plug has two blades with one wider than the other. A
grounding type plug has two blades and a third grounding prong. The
wide blade or third prong are provided for your safety. If the provided
plug does not fit your outlet, consult an electrician for replacement of
the obsolete outlet.
The unit must be installed in a manner that makes disconnection of the
mains plug from the mains socket outlet (or appliance connector from the
rear of the unit) possible. Where the mains plug is used as the disconnect
device, the disconnect device shall remain readily operable. Protect the
power cord from being walked on or pinched particularly at plugs,
convenience repectacles, and the point where they exit from the unit.
This unit must be installed on a sturdy, level surface. Do not
place in a sealed area such as a bookcase or in a cabinet. Any
space open at the back (such as a dedicated equipment rack)
is fine however. When a cart is used, use caution when moving
the cart to avoid injury from tip-over.
Please ensure there is ample ventilation (at least 10cm clearance all
round). Do not put any objects on top of this unit. Do not situate it on a
rug or other soft surface and do not obstruct any air inlets or outlet
grilles. Do not install near any heat sources such as radiators, heat
registers, stoves, or other apparatus (including amplifiers) that produce
heat. Do not stack multiple units on top of each other. Do not place in
an enclosed area such as a bookcase or in a cabinet without sufficient
ventilation.
WARNING - To reduce the risk of fire or electric shock, do not expose this
unit to rain or moisture. This unit must not be used near water or
exposed to dripping or splashing water or other liquids. No objects filled
with liquid, such as vases, shall be placed on the unit. In the event,
switch off immediately, disconnect from the mains supply and contact
your dealer for advice.
Ensure that small objects do not fall through any ventilation grille. If this
happens, switch off immediately, disconnect from the mains supply and
contact your dealer for advice.
To turn the unit off completely switch off on the rear panel. If you do not
intend to use this unit for a long period of time, unplug it from the mains
socket. Unplug this unit during lightning storms.
To clean the unit, wipe its case with a dry, lint-free cloth. Do not use any
cleaning fluids containing alcohol, ammonia or abrasives. Do not spray
an aerosol at or near the amplifier.
This unit is not user serviceable, never attempt to repair, disassemble or
reconstruct the unit if there seems to be a problem. Servicing is required
when the unit has been damaged in any way, such as power-supply cord
or plug is damaged, liquid has been spilled or objects have fallen into it,
the unit has been exposed to rain or moisture, does not operate
normally or has been dropped. A serious electric shock could result if
this precautionary measure is ignored.
This unit should be installed on a sturdy, level surface. Due to stray
magnetic fields turntables or CRT TV’s should not be located nearby due
to possible interference.
6 Azur Class XD integrated amplifier
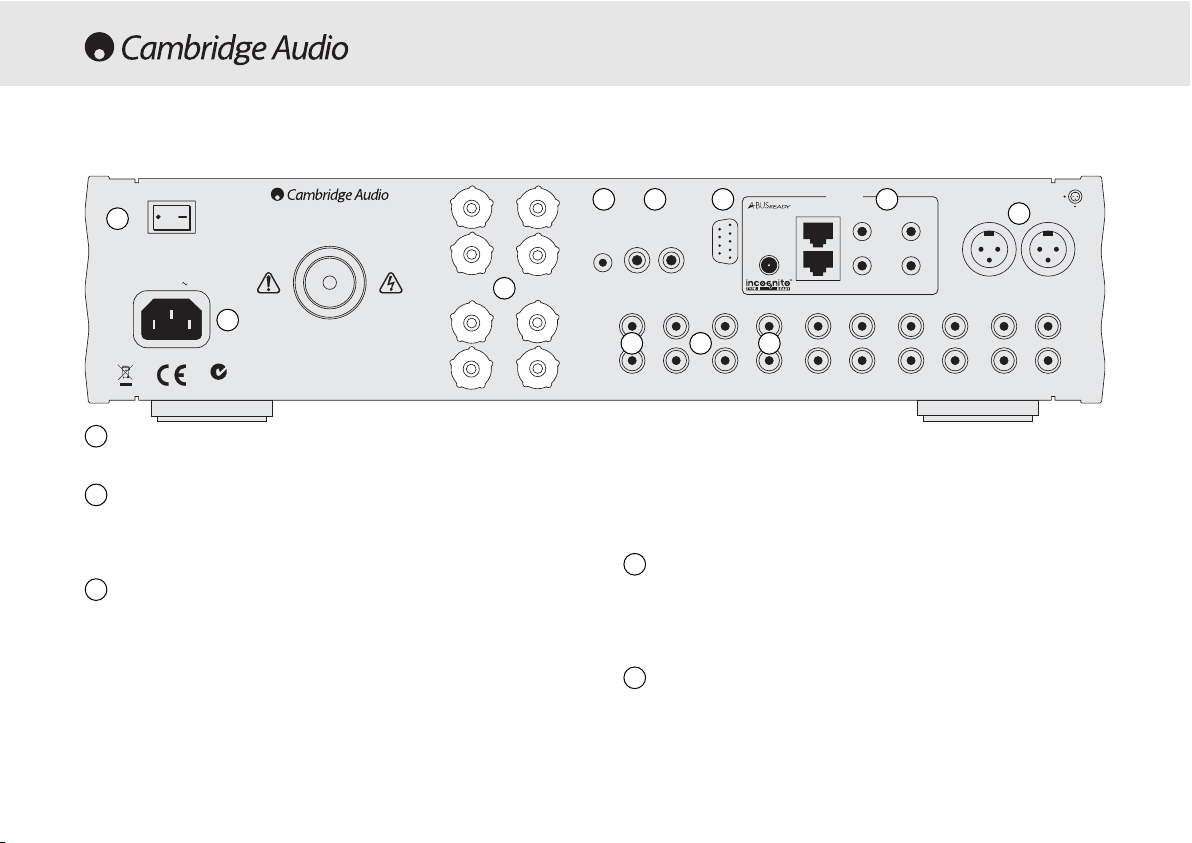
Power On/Off
Switches the unit on and off.
AC power socket
Once you have completed all connections to the amplifier, plug the AC
power cable into an appropriate mains socket then switch on. Your
amplifier is now ready for use.
Loudspeaker terminals
Two sets of loudspeaker terminals are available, A(main loudspeaker
terminals) and B(secondary loudspeaker terminals). Both sets of
speakers can be turned on and off. Connect the wires from your left
channel loudspeaker to the LEFT + & - terminals, and the wires from the
right channel loudspeaker to the RIGHT + & - terminals. In each case,
the red terminal is the positive output and the black terminal is the
negative output.
Care should be taken to ensure no stray strands of wire short the speaker
outputs together. Please ensure that the loudspeaker terminals have been
tightened completely to provide a good electrical connection. It is possible
for the sound quality to be affected if the screw terminals are loose.
Note:
When using one pair of speakers, use speakers with a nominal
impedance of between 4-8 ohms. When using two pairs of speakers,
use speakers with a nominal impedance of between 6-8 ohms.
IR (Infrared) Emitter In
Allows modulated IR commands from multi-room systems to be received
by the amplifier. Commands received here are not looped out of the
Control Bus. Refer to the ‘Custom Installation’ section for more
information.
Control Bus
In -
Allows un-modulated commands from multi-rooms systems or other
components to be received by the unit.
Out -
Loop out for control bus commands to another unit. Also allows the
840A to control some Cambridge Audio units.
+
_
+
__
Right
Right
Right
Right
+
_
+
Left
Left
Left
Left
Right
Left
Right
Left
IR1
IR2
IR3
IR4
Keypad 1
Keypad 2
Multi-Room
IR Emitter
In In Out
Right Left
RightLeft
Preamp OutTape OutTape InInput 7Input 6Input 5Input 4Input 3Input 2Input 1
Preamp Out Tape Out Tape In Input 7 Input 6 Input 5 Input 4 Input 3 Input 2 Input 1
Loudspeaker Terminals
Impedance 4 - 8 ohms
Input 1 Balanced Audio
RS232C
Control Bus
Power
PSU
In
International Patent Pending
LeisureTech Electronics Pty Ltd
Please ensure that loudspeaker terminals are fully tightened
Veuillez s'assurer que les bornes de l'enceinte sont entièrement serrées
B
B
A
A
GND
www.cambridge-audio.com
Manufactured in an ISO9002 approved facility
Power AC
Designed in London, England
Caution Risk of electric shock. Do not open.
Avis Risque de choc electrique. Ne pas ouvrir.
Achtung Vorm öffnen des gërates. Netzstecker ziehen.
azur 840A Class XD™ Integrated Amplifier
Power Rating: 230V AC ~ 50Hz
Max Power Consumption: 800W
On Off
N2409
REAR PANEL CONNECTIONS
1
2
3
1
2
3
4
8
6
4
7
109
5
5
11

840A Class XD integrated amplifier
Azur Class XD integrated amplifier 7
RS232C
The RS232C port allows external serial control of the 840A for custom
install use. A full command set is available on the Cambridge Audio
website at
www.cambridge-aaudio.com
. This port can also be used by
Cambridge Audio service personnel for software updates.
A-BBUS™ Ready/Incognito Ready™ multi-rroom outputs
PSU -
Connect an Incognito PS10 to supply power to the connected
multi-room keypads/speakers.
Keypad 1/2 -
Connect one or two Incognito A-BUS KP10 keypads (or
other A-BUS compatible keypads) using CAT5/5e cable. Incognito AS10
Active Ceiling Speakers can also be connected here.
IR -
Four IR outputs for remote control of source equipment.
Please refer to the ‘Multi-Room’ section of this manual for more
information on connections and set-ups.
Input 1 Balanced Audio
Input 1 features either unbalanced (phono/RCA) or balanced (XLR)
connections. Either type may be used but not both at the same time. The
balanced connection is the higher quality option and can reject noise
and interference in the cable when used with other equipment that
supports this function. An XLR connector is wired Pin 1 - Ground; Pin 2 Hot (in-phase); Pin 3 - Cold (phase-inverted).
When using either the balanced or unbalanced input, make sure that no
cables or equipment are connected to the unused input, as this may
degrade operation. The unused input does not require to be terminated
and this should not be done.
Preamp Out
Connect these sockets to the inputs on an external power amplifier(s) or
active subwoofers etc.
Tape In/Out
Connect to a tape deck or to the analog output sockets on a MiniDisc,
portable digital music player or CD recorder using an interconnect cable
from the recorder's Line Out sockets to the amplifier's Tape In sockets.
The Tape Input circuit of the 840A is a "monitor" type, different from the
other 7 inputs. For the 7 normal inputs, the source selected for listening
to will be sent out of the Tape Out for recording. The source currently
being listened to and (optionally) recorded is then shown on the front
panel display.
However, when the Tape Input is selected a solid circle will appear
beside TAPE MON indicating that the Tape Input is now being listened to
with a different source being sent out of the Tape Out for recording. The
recording source is also shown by a solid circle by the selected input and
can be changed by pressing the other source buttons. To switch Tape
Monitor off, simply press the Tape Mon input select button again,
toggling this function off.
This feature is most useful when using 3-head analog cassette decks
which allow the signal being recorded to be played back live off tape (via
a 3rd head) whilst it is simultaneously recorded. It is then possible by
toggling the Tape Monitor input on and off to compare directly in real
time the original and recorded signal so that adjustments to the
recording parameters of the tape machine can be made (consult the
manual of your 3-head analog cassette deck for full details).
Inputs 1-77
These inputs are suitable for any 'line level' source equipment such as
CD players, DAB or FM/AM tuners etc.
Note:
These inputs are for analog audio signals only. They should not be
connected to the digital output of a CD player or any other digital device.
6
7
8
9
10
11
8 Azur Class XD integrated amplifier
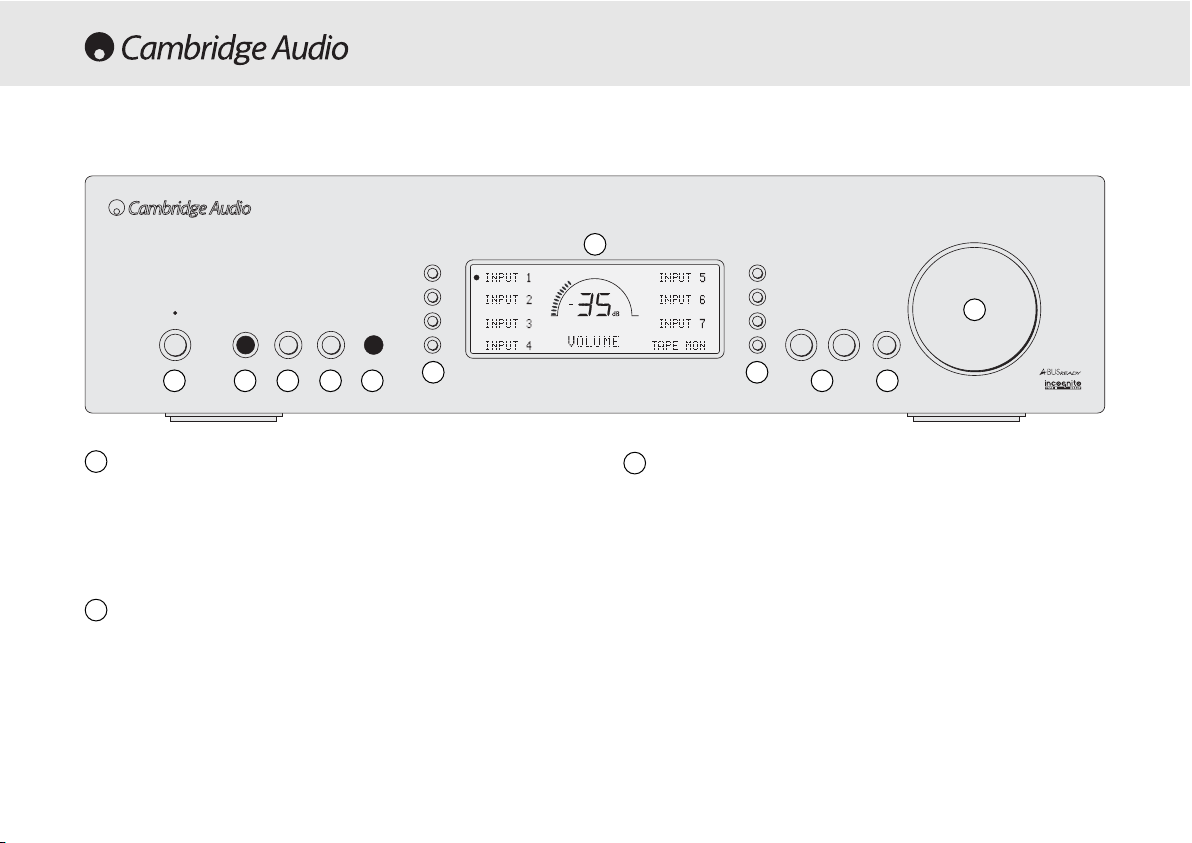
Standby/On
Switches the unit between Standby mode (indicated by dim power LED)
and On (indicated by bright power LED). Standby is a low power mode
where the power consumption is less than 10 Watts. The unit should be
left in Standby mode when not in use.
Phones
Allows for the connection of stereo headphones with a ¼" Jack plug.
Headphones with an impedance of between 32 and 600 ohms are
recommended. When the headphones are connected, the loudspeaker
relays are released switching off the output to the loudspeakers
(speakers A and B).
Speaker A/B
Press to scroll through the speaker sets connected to the loudspeaker
terminals on the back panel (speaker sets A, B or A and B). This can be
used for listening to an extra set of loudspeakers in another room.
Please note that care should be taken when choosing speakers if two
loudspeakers are going to be used on each channel. If the combined
resistance measured on the loudspeaker terminals is too low the
amplifier may not switch out of Standby mode until a suitable load
resistance is detected. For more information refer to the CAP5 section of
this manual.
Note:
When using one pair of speakers, use speakers with a nominal
impedance of between 4-8 ohms. When using two pairs of speakers,
use speakers with a nominal impedance of between 6-8 ohms each.
FRONT PANEL CONTROLS
1
3
2
1 2 3 4
6
8
7
9 10
11
5
azur 840A
Class XD Integrated Amplifier
Volume
Bass Treble DirectModeSpeaker A/BPhonesStandby / On
 Loading...