

Page 1
Your music + our passion
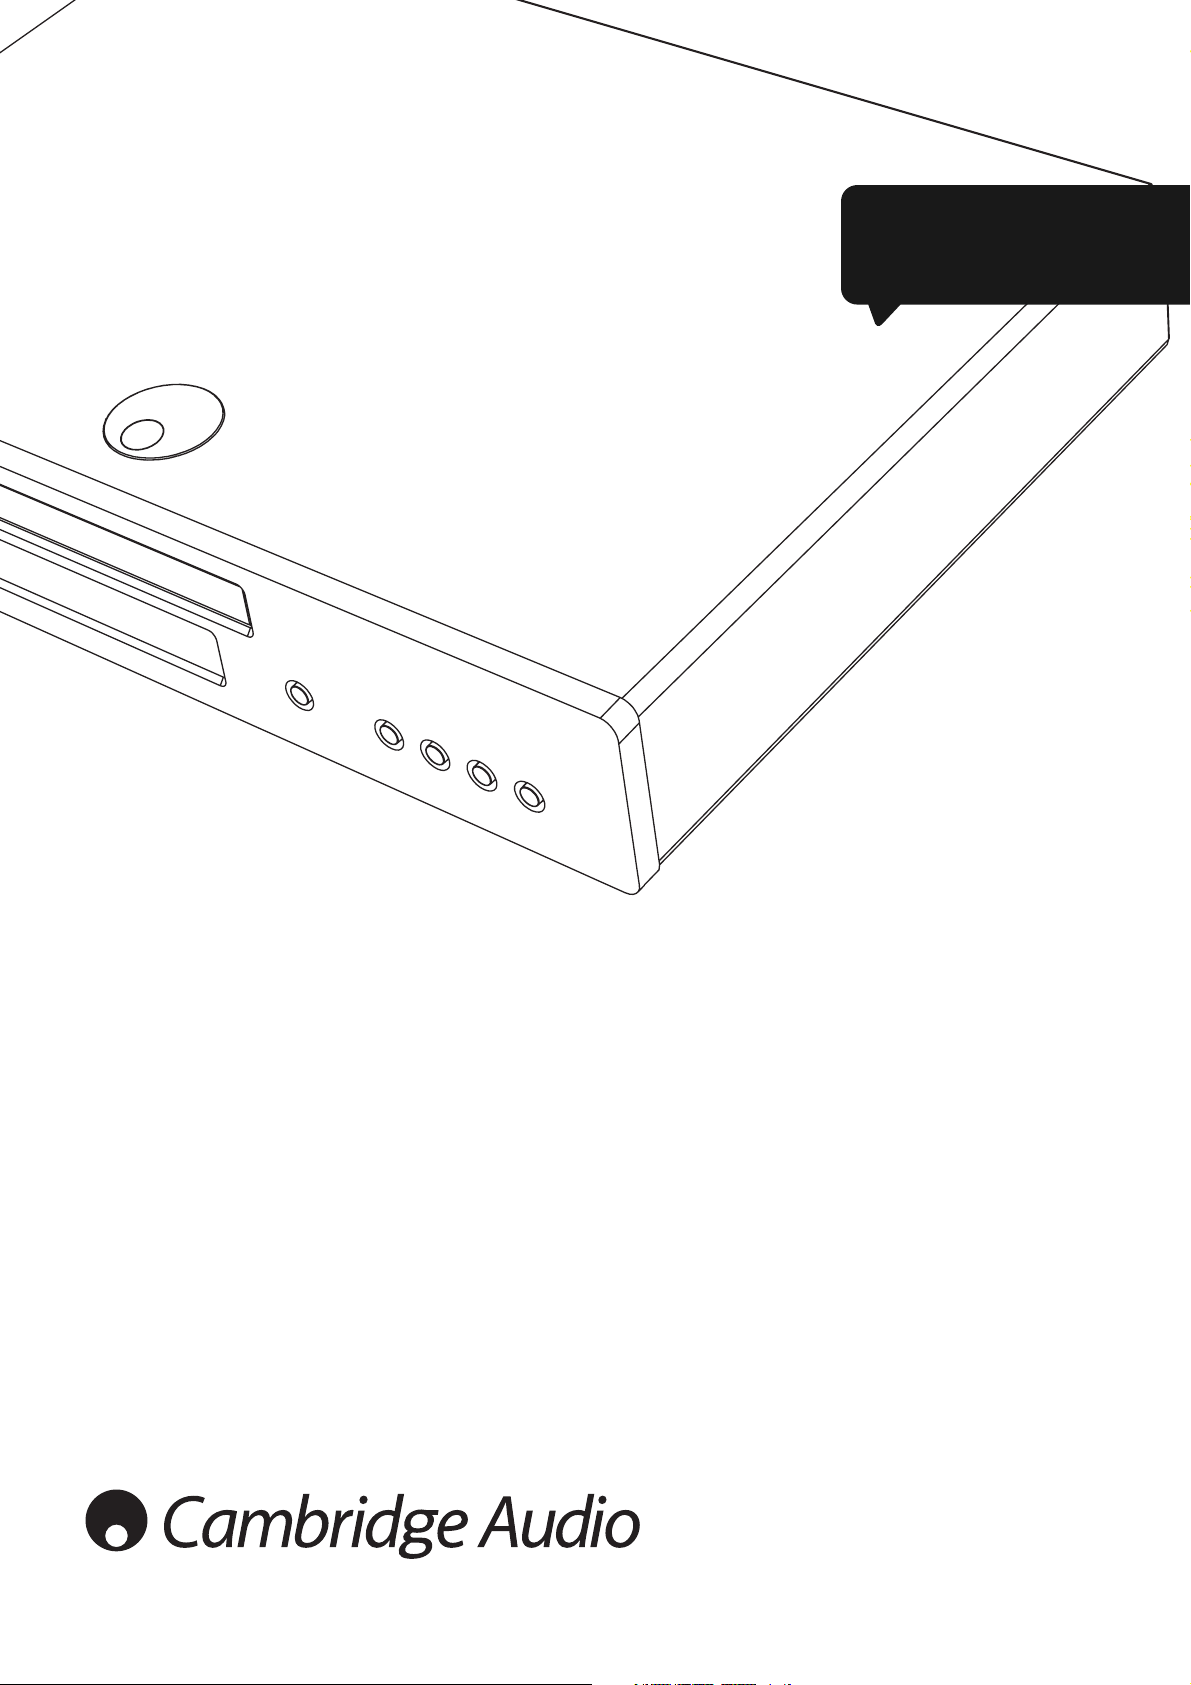
650BD
azur
ENGLISH
Blu-ray player
User’s manual
2
Page 2

2
Contents
Introduction..................................................................................................3
Important safety instructions......................................................................4
Limited warranty..........................................................................................6
Compatible disc types .................................................................................6
Rear panel connections ..............................................................................8
Front panel controls and display ................................................................9
Remote control..........................................................................................10
Connecting to the Internet........................................................................11
Audio connections.....................................................................................12
Analogue video connections ....................................................................13
HDMI connections.....................................................................................13
Setting up the player using the Easy Setup.............................................14
Accessing the Easy Setup Wizard ........................................................14
Choose the primary video output.........................................................14
Select the best output resolution.........................................................14
Determine the display aspect ratio......................................................15
Select the audio setting........................................................................15
Operating instructions...............................................................................16
Picture-in-Picture and Secondary Audio (BONUSVIEW) ......................17
BD-Live ...................................................................................................17
Output resolution ..................................................................................18
TV system selection ..............................................................................18
Other media playback...............................................................................19
Connecting a USB Drive........................................................................19
Setup Menu for more advanced setup ....................................................21
Playback Setup......................................................................................22
Video Setup ...........................................................................................23
Audio Format Setup...............................................................................24
Audio signal reference chart ................................................................26
Recommended audio format 0ptions..................................................27
Audio Processing setup.........................................................................27
Speaker Configuration ..........................................................................27
Other Audio Processing Settings..........................................................29
Device Setup .........................................................................................29
Network Setup.......................................................................................30
Picture Adjustment................................................................................31
Appendix - language code list...................................................................32
Technical specifications............................................................................33
Troubleshooting .........................................................................................33
Make sure you register your purchase.
Visit: www.cambridge-audio.com/care
By registering, you’ll be the first to know about:
G
Future product releases
G
Software upgrades
G
News, events and exclusive offers plus
competitions!
This guide is designed to make installing and using this product
as easy as possible. Information in this document has been
carefully checked for accuracy at the time of printing; however,
Cambridge Audio's policy is one of continuous improvement,
therefore design and specifications are subject to change
without prior notice.
This document contains proprietary information protected by
copyright. All rights are reserved. No part of this manual may be
reproduced by any mechanical, electronic or other means, in any
form, without prior written permission of the manufacturer. All
trademarks and registered trademarks are the property of their
respective owners.
© Copyright Cambridge Audio Ltd 2010
Manufactured under license from Dolby Laboratories. "Dolby"
and the double-D symbol are trademarks of Dolby Laboratories.
Manufactured under license under U.S. Patent #’s: 5,451,942;
5,956,674; 5,974,380; 5,978,762; 6,226,616; 6,487,535;
7,392,195; 7,272,567; 7,333,929; 7,212,872 & other U.S. and
worldwide patents issued & pending. DTS is a registered
trademark and the DTS logos, Symbol, DTS-HD and DTS-HD
Master Audio are trademarks of DTS, Inc. © 1996-2008 DTS,
Inc. All Rights Reserved.
"HDMI","HDMI logo" and "High-Definition Multimedia Interface"
are trademarks or registered trademarks of HDMI Licensing LLC.
"Blu-ray Disc", "BONUSVIEW" and "BD-Live" are trademarks of
Blu-ray Disc Association.
Java and all Java-based trademarks and logos are trademarks or
registered trademarks of Sun Microsystems, Inc. in the United
States and other countries.
DVD Logo is a trademark of DVD Format/Logo Licensing Corp.,
registered in the U.S., Japan and other countries.
Super Audio CD, SACD and the SACD logo are joint trademarks
of Sony Corporation and Philips Electronics N.V. Direct Stream
Digital (DSD) is a trademark of Sony Corporation.
"AVCHD" and the "AVCHD" logo are trademarks of Panasonic
Corporation and Sony Corporation.
Designed for Windows Media, Microsoft, HDCD, and the HDCD
logo are trademarks or registered trademarks of Microsoft
Corporation in the United States and/or other countries.
Page 3

3
650BDazur
ENGLISH
Introduction
Thank you for purchasing this Cambridge Audio Azur Blu-ray Player. Like
all Cambridge Audio products, the 650BD adheres to three core
principles – stunning performance, ease of use and incredible value.
The 650BD features almost universal disc compatibility and can play
back CD, HDCD, DVD-Video, DVD-Audio, Super Audio CD and Blu-Ray
discs. 24/192kHz Digital to Analogue converters and our usual careful
audio design ensure that the 650BD can reproduce the dynamics and
scale required for modern movie soundtracks whilst also being able to
reproduce a genuinely musical performance with either stereo or multichannel music discs.
A full range of HDMI, digital and analogue outputs are fitted. These allow
the connection of suitably equipped TVs and AV receivers.
The latest surround-sound formats are supported including decoding of
Dolby True HD, Dolby Digital Plus, DTS-HD Master Audio and DTS-HD High
Resolution Audio in Stereo, 5.1 or 7.1 variants. In particular support for
the true lossless Dolby True HD and DTS HD Master Audio formats
provides unprecedented audio fidelity from Blu-ray discs.
The 650BD is also capable of outputting all of these formats as
bitstreams over HDMI for decoding in a suitable AV Receiver. Video of up
to 1080p resolution from BD discs at 50/60Hz or 24fps can be output
over HDMI whilst the 650BD can process DVDs to provide an upscaled
1080p output.
Also featured is an environmentally friendly low power (1W) standby
circuit.
All this proprietary engineering is housed within our low resonance,
acoustically damped chassis. An Azur Navigator remote control is also
provided, giving full remote control of your Blu-ray player and if required
a Cambridge Audio amplifier or AV receiver in an attractive and easy to
use handset.
Remember your 650BD can only be as good as the system it is connected
to. Please do not compromise on your AV receiver or speaker package
and always use good quality video and audio cabling. Naturally we
particularly recommend AV receivers such as the matching 650R from
the Cambridge Audio Azur range, which has been designed to the same
exacting standards as this product. Your dealer can also supply excellent
quality Cambridge Audio interconnects to ensure your system realises its
full potential.
Thank you for taking the time to read this manual; we recommend you
keep it for future reference.
Matthew Bramble
Cambridge Audio Technical Director
and the 650BD design team
Page 4

4
Important safety instructions
For your own safety please read the following important safety
instructions carefully before attempting to connect this unit to the mains
power supply. They will also enable you to get the best performance from
and prolong the life of the unit:
1. Read these instructions.
2. Keep these instructions.
3. Heed all warnings.
4. Follow all instructions.
5. Do not use this apparatus near water.
6. Clean only with a dry cloth.
7. Do not block any ventilation openings. Install in accordance with the
manufacturer's instructions.
8. Do not install near any heat sources such as radiators, heat registers,
stoves, or other apparatus (including amplifiers) that produce heat.
9. Do not defeat the safety purpose of the polarized or grounding-type
plug. A polarized plug has two blades with one wider than the other.
A grounding-type plug has two blades and a third grounding prong.
The wide blade or the third prong are provided for your safety. If the
provided plug does not fit into your outlet, consult an electrician for
replacement of the obsolete outlet.
10. Protect the power cord from being walked on or pinched, particularly
at plugs, convenience receptacles and the point where they exit from
the apparatus.
11. Only use attachments/accessories specified by the manufacturer.
12. Use with only the cart, stand, tripod, bracket, or table
specified by the manufacturer, or sold with the apparatus.
When a cart is used, use caution when moving the cart/
apparatus combination to avoid injury from tip-over.
13. Unplug this apparatus during lightning storms or when unused for
long periods of time.
14. Refer all servicing to qualified service personnel. Servicing is required
when the apparatus has been damaged in any way, such as the
power-supply cord or plug having been damaged, liquid has been
spilled or objects have fallen into the apparatus, the apparatus has
been exposed to rain or moisture, does not operate normally, or has
been dropped.
This product utilises a Laser. Use of controls or
adjustments or performance of procedures other than
those specified herein may result in hazardous
radiation exposure. Do not open covers and do not
repair yourself. Refer servicing to qualified personnel.
This label is located on the laser protective housing inside the product.
WARNING
– To reduce the risk of fire or electric shock, do not expose this unit to
rain or moisture.
– Batteries (battery pack or batteries installed) shall not be exposed to
excessive heat such as sunshine, fire or the like.
The unit is of Class 1 construction and must be connected to a mains
socket outlet with a protective earthing connection.
The unit must be installed in a manner that makes disconnection of the
mains plug from the mains socket outlet (or appliance connector from
the rear of the unit) possible. Where the mains plug is used as the
disconnect device, the disconnect device shall remain readily operable.
Only use the mains cord supplied with this unit.
Please ensure there is ample ventilation (at least 10cm clearance all
round). Do not put any objects on top of this unit. Do not situate it on a
rug or other soft surface and do not obstruct any air inlets or outlet grilles.
Do not cover the ventilation grilles with items such as newspapers,
tablecloths, curtains, etc.
This unit must not be used near water or exposed to dripping or splashing
water or other liquids. No objects filled with liquid, such as vases, shall be
placed on the unit.
The lightning flash with the arrowhead symbol within an equilateral
triangle is intended to alert the user to the presence of un-insulated
‘dangerous voltage’ within the product’s enclosure that may be of
sufficient magnitude to constitute a risk of electric shock to persons.
The exclamation point within an equilateral triangle is intended to alert
the user to the presence of important operating and maintenance
instructions in the service literature relevant to this appliance.
WEEE symbol
The crossed-out wheeled bin is the European Union symbol for
indicating separate collection for electrical and electronic
equipment. This product contains electrical and electronic
equipment which should be reused, recycled or recovered and
should not be disposed of with unsorted regular waste. Please return the
unit or contact the authorised dealer from whom you purchased this
product for more information.
CE mark
This product complies with European Low Voltage
(2006/95/EC), Electromagnetic Compatibility (2004/108/EC)
and Environmentally-friendly design of Energy-related Products
(2009/125/EC) Directives when used and installed according to this
instruction manual. For continued compliance only Cambridge Audio
accessories should be used with this product and servicing must be
referred to qualified service personnel.
C-Tick mark
This product meets the Australian Communications Authority’s
Radio communications and EMC requirements.
Ross Test Stamp
This product meets Russian electronic safety approvals.
Page 5

5
650BDazur
ENGLISH
FCC regulations
NOTE: THE MANUFACTURER IS NOT RESPONSIBLE FOR ANY RADIO OR
TV INTERFERENCE CAUSED BY UNAUTHORIZED MODIFICATIONS TO THIS
EQUIPMENT. SUCH MODIFICATIONS COULD VOID THE USER AUTHORITY
TO OPERATE THE EQUIPMENT.
This equipment has been tested and found to comply with the
limits for a Class B digital device, pursuant to Part 15 of the
FCC Rules. These limits are designed to provide reasonable
protection against harmful interference in a residential installation. This
equipment generates, uses and can radiate radio frequency energy and,
if not installed and used in accordance with the instructions, may cause
harmful interference to radio communications. However, there is no
guarantee that interference will not occur in a particular installation.
If this equipment does cause harmful interference to radio or television
reception, which can be determined by turning the equipment off and on,
the user is encouraged to try to correct the interference by one or more
of the following measures:
– Re-orient or relocate the receiving antenna.
– Increase the separation between the equipment and receiver.
– Connect the equipment into an outlet on a circuit different from that to
which the receiver is connected.
– Consult the dealer or an experienced radio/TV technician for help.
Ventilation
IMPORTANT – The unit will become hot when in use. Do not stack multiple
units on top of each other. Do not place in an enclosed area such as a
bookcase or in a cabinet without sufficient ventilation.
Ensure that small objects do not fall through any ventilation grille. If this
happens, switch off immediately, disconnect from the mains supply and
contact your dealer for advice.
Positioning
Choose the installation location carefully. Avoid placing it in direct sunlight
or close to a source of heat. No naked flame sources, such as lighted
candles, should be placed on the unit. Also avoid locations subject to
vibration and excessive dust, cold or moisture. The unit can be used in a
moderate climate.
This unit must be installed on a sturdy, level surface. Do not place in a
sealed area such as a bookcase or in a cabinet. Do not place the unit on
an unstable surface or shelf. The unit may fall, causing serious injury to
a child or adult as well as serious damage to the product. Do not place
other equipment on top of the unit.
Due to stray magnetic fields, turntables or CRT TVs should not be located
nearby due to possible interference.
Electronic audio components have a running in period of around a week
(if used several hours per day). This will allow the new components to
settle down and the sonic properties will improve over this time.
Power sources
The unit should be operated only from the type of power source indicated
on the marking label. If you are not sure of the type of power-supply to
your home, consult your product dealer or local power company.
This unit can be left in Standby mode when not in use and will draw <1W
in this state. To turn the unit off, switch off at the rear panel. If you do not
intend to use this unit for a long period of time, unplug it from the mains
socket.
Overloading
Do not overload wall outlets or extension cords as this can result in a risk
of fire or electric shock. Overloaded AC outlets, extension cords, frayed
power cords, damaged or cracked wire insulation and broken plugs are
dangerous. They may result in a shock or fire hazard.
Be sure to insert each power cord securely. To prevent hum and noise, do
not bundle the interconnect leads with the power cord or speaker leads.
Cleaning
To clean the unit, wipe its case with a dry, lint-free cloth. Do not use any
cleaning fluids containing alcohol, ammonia or abrasives. Do not spray an
aerosol at or near the unit.
Battery disposal
Please dispose of any discharged batteries according to local
environmental/electronic waste disposal guidelines.
Connections
Before making any connections, make sure all power is turned off and
only use suitable interconnects.
Servicing
These units are not user serviceable. Never attempt to repair,
disassemble or reconstruct the unit if there seems to be a problem.
A serious electric shock could result if this precautionary measure is
ignored. In the event of a problem or failure, please contact your dealer.
Plug-fitting Instructions (UK only)
The cord supplied with this appliance is factory-fitted with a UK mains plug fitted with
a 3-amp fuse inside. If it is necessary to change the fuse, it is important that a
3-amp fuse is used. If the plug needs to be changed because it is not suitable for
your socket, or becomes damaged, it should be cut off and an appropriate plug
fitted following the wiring instructions below. The plug must then be disposed of
safely, as insertion into a mains socket is likely to cause an electrical hazard. Should
it be necessary to fit a 3-pin BS mains plug to the power cord, the wires should be
fitted as shown in this diagram. The colours of the wires in the mains lead of this
appliance may not correspond with the coloured markings identifying the terminals
in your plug. Connect them as follows:
The wire which is coloured BLUE must be
connected to the terminal which is marked with
the letter ‘N’ or coloured BLACK.
The wire which is coloured BROWN must be
connected to the terminal which is marked with
the letter ‘L’ or coloured RED.
The wire which is coloured GREEN/YELLOW must
be connected to the terminal which is marked
with the letter ‘E’ or coloured GREEN.
If a standard 13-amp (BS 1363) plug is used, a 3-amp fuse must be fitted or, if any
other type of plug is used, a 3-amp or 5-amp fuse must be fitted, either in the plug
or adaptor, or on the distribution board.
Page 6
6
Compatible disc types
BD-Video
High Definition Blu-ray movie and music discs in BD-ROM, BD-RE and BDR formats.
Blu-ray Discs with virtual packages or Picture-in- Picture functions.
Blu-ray Discs with interactive features when the player is connected to
the Internet.
DVD-Video
DVD movie discs in DVD+RW/DVD+R/DVD-RW/DVD-R formats.
DVD-Audio
DVD format discs containing multi-channel or stereo high resolution audio
of up to 24/96 5.1 or 24/192 resolution with video or still pictures. Some
DVD-Audio discs also contain a DVD-Video portion.
Super Audio CD
High resolution audio-only discs with stereo and/or multi-channel audio
recorded in a special bitstream format called DSD. Hybrid discs with both
high resolution DSD and CD-compatible layers are supported.
Compact Disc
Compact Discs (CD-DA) and CD-R, CD-RW discs.
High-definition digital video camera format.
Discs that cannot be played
• BDs with cartridge
• DVD-RAMs
• HD DVDs
• Data portion of CD-Extras
• BD-Video/DVD-Video with a different region code to the Blu-ray player
you have purchased.
• Some DualDiscs: A DualDisc is a two sided disc with DVD on one side
and digital audio on the other side. The digital audio side does not
generally meet the technical specifications of the Compact Disc Digital
Audio (CD-DA) format so playback is not guaranteed.
• Music discs encoded with copyright protection technologies: among
such discs, some again do not conform to the CD standard so playback
is not guaranteed.
Limited warranty
Cambridge Audio warrants this product to be free from defects in
materials and workmanship (subject to the terms set forth below).
Cambridge Audio will repair or replace (at Cambridge Audio's option) this
product or any defective parts in this product. Warranty periods may vary
from country to country. If in doubt consult your dealer and ensure that
you retain proof of purchase.
To obtain warranty service, please contact the Cambridge Audio
authorised dealer from which you purchased this product. If your dealer
is not equipped to perform the repair of your Cambridge Audio product,
it can be returned by your dealer to Cambridge Audio or an authorised
Cambridge Audio service agent. You will need to ship this product in either
its original packaging or packaging affording an equal degree of
protection.
Proof of purchase in the form of a bill of sale or receipted invoice, which
is evidence that this product is within the warranty period, must be
presented to obtain warranty service.
This warranty is invalid if (a) the factory-applied serial number has been
altered or removed from this product or (b) this product was not
purchased from a Cambridge Audio authorised dealer. You may call
Cambridge Audio or your local country Cambridge Audio distributor to
confirm that you have an unaltered serial number and/or you made a
purchase from a Cambridge Audio authorised dealer.
This warranty does not cover cosmetic damage or damage due to acts of
God, accident, misuse, abuse, negligence, commercial use, or
modification of, or to any part of, the product. This warranty does not
cover damage due to improper operation, maintenance or installation, or
attempted repair by anyone other than Cambridge Audio or a Cambridge
Audio dealer, or authorised service agent which is authorised to do
Cambridge Audio warranty work. Any unauthorised repairs will void this
warranty. This warranty does not cover products sold AS IS or WITH ALL
FAULTS.
REPAIRS OR REPLACEMENTS AS PROVIDED UNDER THIS WARRANTY ARE
THE EXCLUSIVE REMEDY OF THE CONSUMER. CAMBRIDGE AUDIO SHALL
NOT BE LIABLE FOR ANY INCIDENTAL OR CONSEQUENTIAL DAMAGES FOR
BREACH OF ANY EXPRESS OR IMPLIED WARRANTY IN THIS PRODUCT.
EXCEPT TO THE EXTENT PROHIBITED BY LAW, THIS WARRANTY IS
EXCLUSIVE AND IN LIEU OF ALL OTHER EXPRESS AND IMPLIED
WARRANTIES WHATSOEVER INCLUDING, BUT NOT LIMITED TO, THE
WARRANTY OF MERCHANTABILITY AND FITNESS FOR A PRACTICAL
PURPOSE.
Some countries and US states do not allow the exclusion or limitation of
incidental or consequential damages or implied warranties so the above
exclusions may not apply to you. This warranty gives you specific legal
rights, and you may have other statutory rights, which vary from state to
state or country to country.
For any service, in or out of warranty, please contact your dealer.
Page 7
7
650BDazur
ENGLISH
Disc care and handling BD-ROM compatibility
• To keep the disc clean from scratches or fingerprints, handle the disc
by its edge. Do not touch the recording surface.
• Blu-ray Discs record data in very high density and the record layer is
very close to the disc surface. For this reason, Blu-ray Discs are more
sensitive to dust and fingerprints than DVD. Should you encounter
playback problems and see dirty spots on the disc surface, clean the
disc with a cleaning cloth. Wipe the disc from the centre out along the
radial direction. Do not wipe the disc in a circular motion.
• Do not use record cleaning sprays or solvents such as benzene, thinner
and anti-static spray.
• Do not attach labels or stickers to discs as this may cause the disc to
warp, become imbalanced or too thick, resulting in playback problems.
• Avoid exposing the discs to direct sunlight or heat sources.
• Do not use the following discs:
– Discs with exposed adhesive from removed stickers or labels. The
disc may get stuck inside the player.
– Warped or cracked discs.
– Irregularly shaped discs, such as heart or business card shapes.
Since the Blu-ray Disc specifications are new and evolving, some discs
may not play properly depending on the disc type, version and encoding.
It is possible that a Blu-ray disc manufactured after the player was
manufactured uses certain new features of the Blu-ray Disc
specifications. To ensure the best possible viewing experience, the player
may need a firmware or software update from time to time.
Copyright protection
This product incorporates copyright protection technology that is
protected by U.S. patents and other intellectual property rights. Use of
this copyright protection technology must be authorized by Macrovision
Corporation, and is intended for home and other limited viewing uses only
unless otherwise authorized by Macrovision Corporation. Reverse
engineering or disassembly is prohibited.
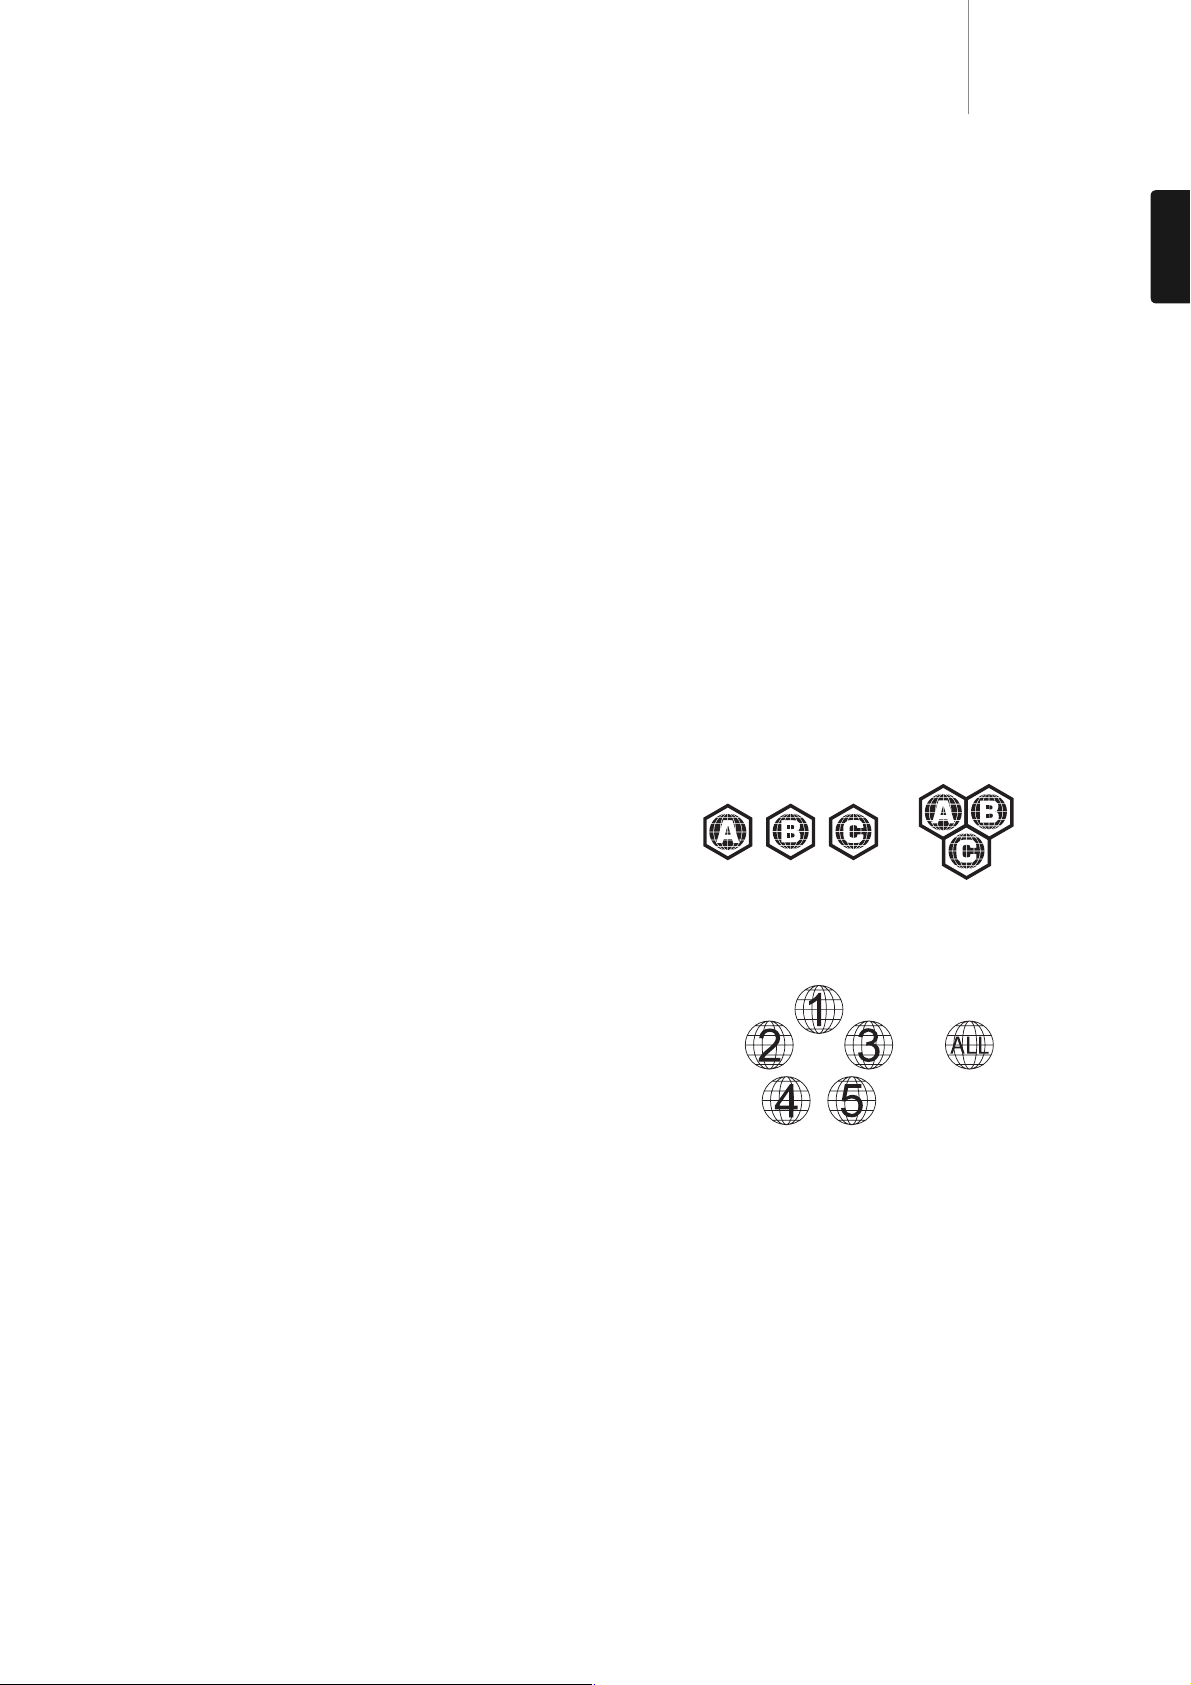
Region management information
This player is designed and manufactured to respond to the region
management information of DVD or BD discs. If the region number of a
BD-Video or DVD disc does not correspond to the region number of this
player, this player cannot play the disc.
BD-Video – This player plays BD-Video with marks that match the code on
the back of the unit (i.e. A, B or C).
Discs that have no region coding are also playable. These usually have all
3 region codes on the packaging in a pyramid.
DVD-Video – This player plays DVD-Video with marks that match the
region code on the back of the unit (i.e. 1, 2, 3, 4 or 5).
Discs that are encoded for All regions are also playable.
Page 8
8
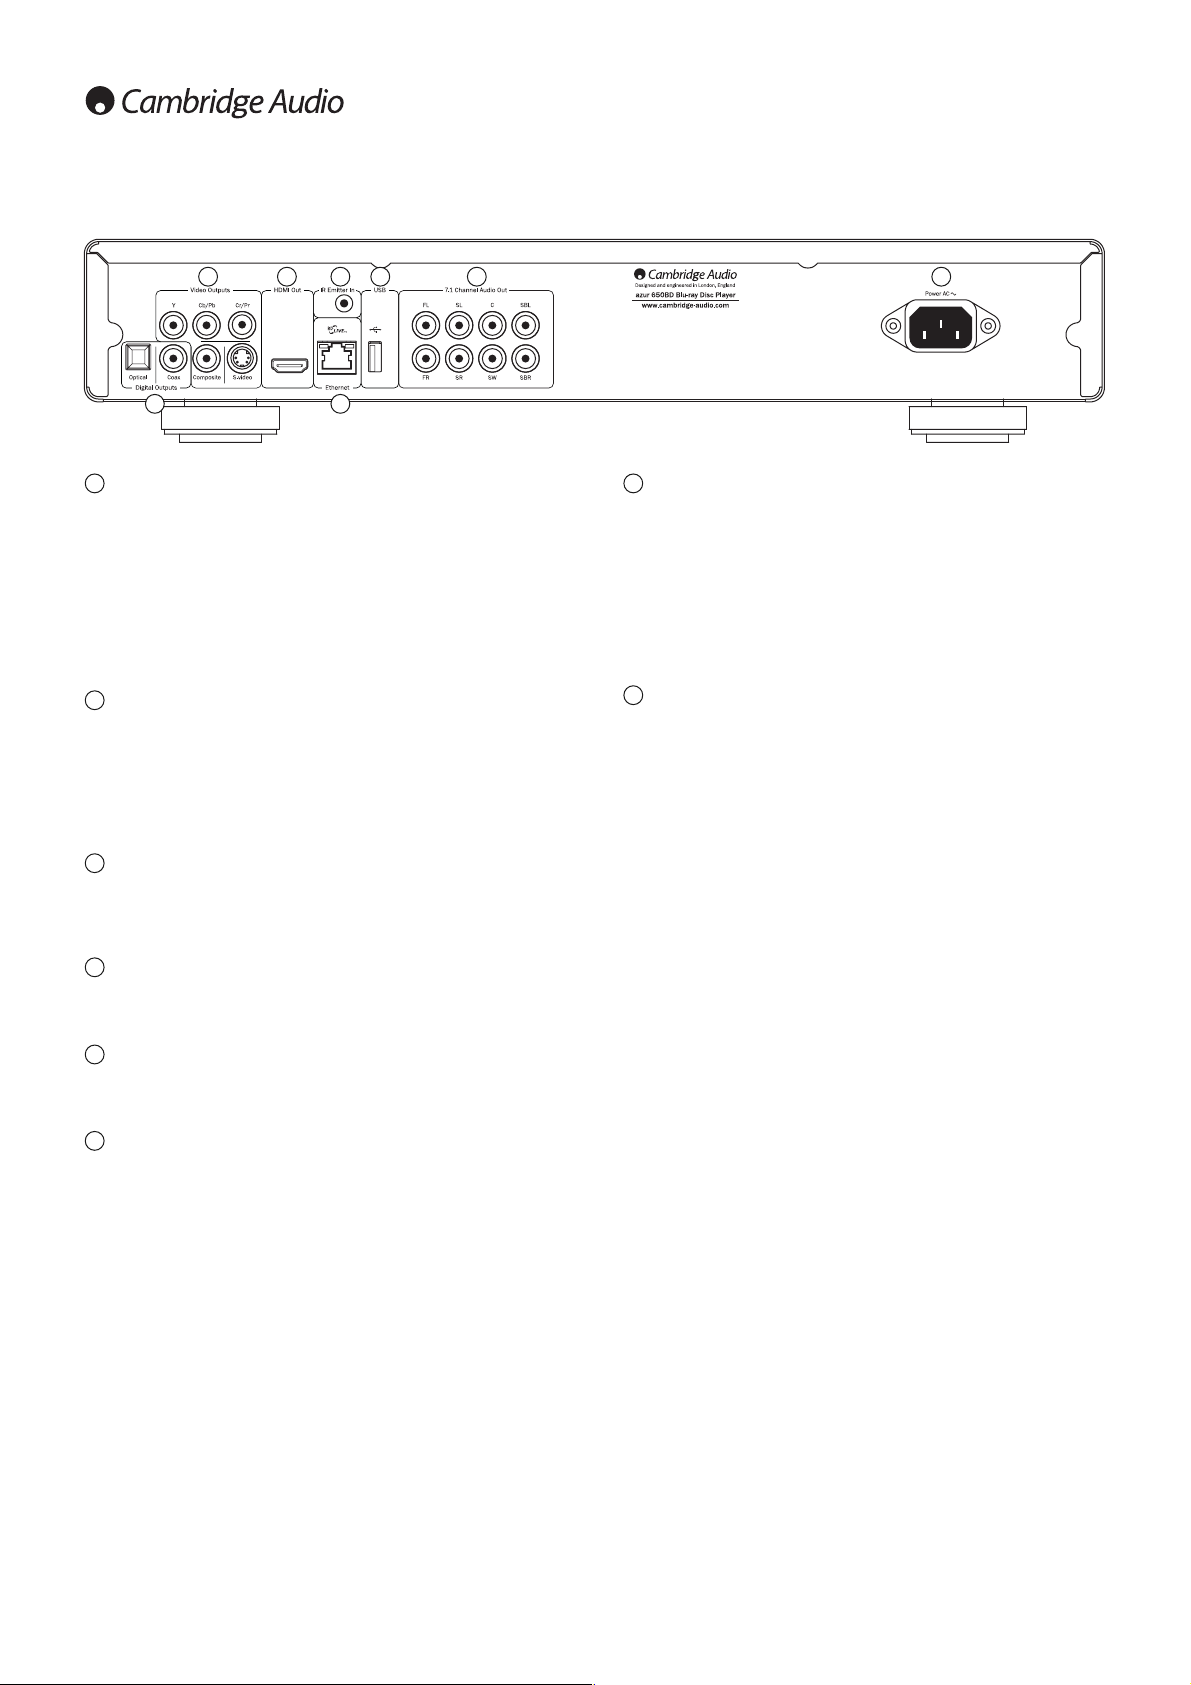
Rear panel connections
Digital outputs
Optical and Coaxial digital audio outputs, normally used to connect to a
suitable Audio/Video Receiver for surround sound decoding (output must
be set for "Bitstream" - refer to the "Audio setup" section). These outputs
can also be used to connect to a separate DAC or digital recording device
(output must be set for "LPCM" - refer to the "Audio setup" section).
Toslink Optical - Use a high quality TOSLINK fibre optic cable.
S/P DIF Co-Axial Digital - Use a high quality 75 ohm digital RCA/Phono
interconnect cable designed specifically for digital audio use.
Analogue video outputs
Component - Connect to the YCbCr or YPbPr terminals of a television set
via three 75 ohm RCA/phono cables designed specifically for video use.
Composite - Connect to your television via 75 ohm RCA/phono cable
designed specifically for video use.
S-Video - Connect to your television via dedicated S-Video cable.
HDMI Out
HDMI (High-Definition Multi-Media Interface) is a purely digital connection
that can carry both audio and video. Use a dedicated HDMI cable to
connect to a TV/Monitor or AV Receiver with a compatible HDMI input.
IR (Infra-Red) Emitter In
Allows modulated IR commands from multi-room systems or IR repeater
systems to be received by the unit.
Ethernet LAN port
Used for discs supporting BD-Live that provide interactive features when
the player is connected to the Internet.
USB port
Port for interfacing to a flash/memory card or "Mass Storage Device".
Notes:
• Only USB 2.0 certified products with the USB 2.0 logo on them are
supported by the 650BD. Please either consult the manufacturer of
the USB 2.0 product to make sure it is properly certified, or go to
www.usb.org for a list of approved products, before purchase. We
cannot be held responsible for any incompatibility issues.
• This unit supports
"USB Mass Storage Class Bulk-Only Transport"
devices only. Most USB thumbs drives, portable hard disk drives and
card readers conform to this device class. Other USB devices such as
MP3 players, digital cameras, and mobile phones may not be
compatible.
• Supported USB drives must be formatted with the FAT (File Allocation
Table) or FAT32 file system. Drives formatted with NTFS file system are
not supported.
7.1 channel analogue audio output
If Down-mix is set to "7.1 CH" in the Speaker Setup page (Down-mix mode
section) of the 650BD’s Setup menus, these sockets provide 7.1 output
from the 650BD's built in Surround-Sound decoder. This can be used to
connect to the 7.1 audio line-level inputs of an amplifier/AV receiver or
amplified speaker package if required. Similarly, Down-mix can be set to
"5.1 CH" to provide 5.1 output. If Down-mix is set to "LT/RT", "Stereo" or
"V.Surround" the Left and Right outputs only are active and provide a
stereo or stereo downmixed output. Refer to the "Speaker configuration"
section of this manual for more information.
AC power socket
Once you have made all audio and video connections, plug the IEC type
AC power cable into the rear of the unit and an appropriate mains socket
then switch on. Your 650BD is now ready for use.
1
1
2
3
4
5
6
2 7643 8
7
8
5
Page 9
9
650BDazur
ENGLISH
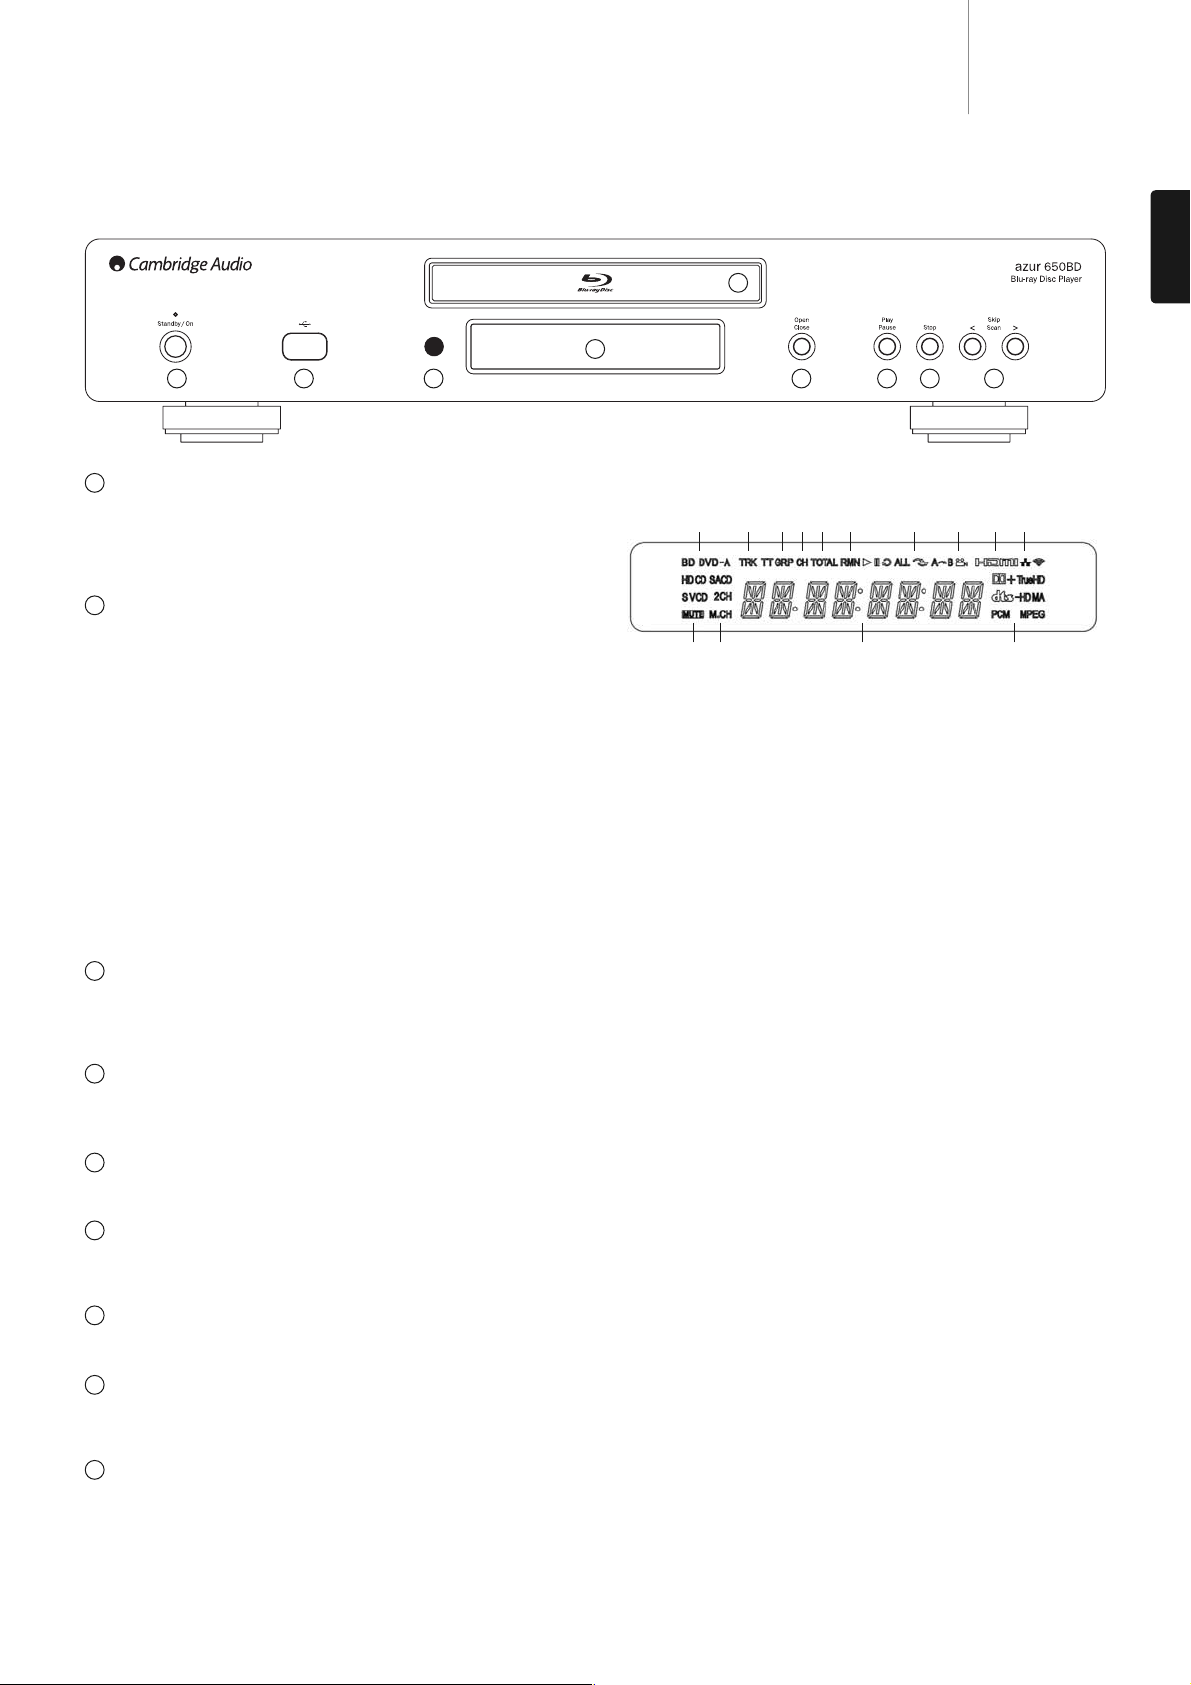
Front panel
Front panel display
Standby/On
Switches the unit between Standby mode (indicated by a dim power LED)
and On (indicated by a bright power LED). Standby is a low power mode
where the power consumption is less than 1 watt. The unit should be left
in Standby mode when not in use.
USB port
Port for interfacing to a flash/memory card or "Mass Storage Device".
Notes:
• Only USB 2.0 certified products with the USB 2.0 logo on them are
supported by the 650BD. Please either consult the manufacturer of
the USB 2.0 product to make sure it is properly certified, or go to
www.usb.org for a list of approved products. We cannot be held
responsible for any incompatibility issues.
• This unit supports
"USB Mass Storage Class Bulk-Only Transport"
devices only. Most USB thumb drives, portable hard disk drives and
card readers conform to this device class. Other USB devices such as
MP3 players, digital cameras, and mobile phones may not be
compatible.
• Supported USB drives must be formatted with the FAT (File Allocation
Table) or FAT32 file system. Drives formatted with NTFS file system are
not supported.
IR sensor
Receives IR commands from the supplied Azur Navigator remote control.
A clear unobstructed line of sight between the remote control and the
sensor is required.
Display
Used to display the 650BD’s functions and playback state, etc. Please
refer to the front panel display section at right for more information.
Disc tray
Use the Open/Close button to activate.
Open/Close
Allows you to open and close the disc tray for loading of discs. Pressing
Play will also close the tray and start playing a disc if one is loaded.
Play/Pause
Plays the disc and pauses (freezes) playback.
Stop
Press once to stop playback. Pressing Play will cause the playback to be
re-started from the same position. Press Stop again to fully stop playback.
Skip
Press once to skip between tracks/chapters.
1. Disc Type Indication – Indicates the currently playing disc type.
2. Track/Chapter – When illuminated, the displayed time applies to a
track or chapter.
3. Title/Group – When illuminated, the displayed time applies to a title or
group.
4. Total – When illuminated, the displayed time is the total play time.
5. Remaining – When illuminated, the displayed time is the remaining
play time.
6. Playback Status – Indicates playback status such as Play, Pause,
Repeat, Repeat All, Random/Shuffle, and A-B Repeat.
7. Angle Icon – Indicates that the scene contains additional camera
angle(s) that can be selected.
8. HDMI – Indicates that the HDMI output is active.
9. Network – Indicates that the unit is connected to a network.
10. Mute Icon – Indicates that the audio is muted.
11. Audio Channel Indication – Indicates whether the audio is 2ch stereo
or multi-channel surround.
12. Main Display – Text messages and numeric display.
13. Audio Type Indication – Indicates the type of audio tracks playing.
1
1
2
3
4
5
6
7
8
9
2 3
4
5
9876
123245 6789
10 11 12 13
Page 10

10
Remote control
The Azur 650BD is supplied with a remote control. Insert
the 3 supplied AAA batteries to activate. For further details
of the various adjustment functions available, refer to the
later sections of this manual.
Opens and closes the disc tray.
Switches the unit between On and Standby mode.
0-9 Numerical buttons
Used to enter numeric values such as the number of a
desired chapter or track to go to.
Info
Show/hide On-Screen Display.
Page/ Page
Show previous/next page.
Go to Home Menu to select media source.
Go To
Press once to bring up an OSD bar showing (from left to
right) Playing Status, Title, Chapter, Time Counter, Progress
Indicator, and Total Time. After pressing the Go To button
for the first time, the cursor will be positioned at the Time
Counter. This is the “Time Search” mode. Each subsequent
press of the Go To button moves the cursor from Time to
Chapter to Title and back round. Use the Numerical or
Nagivation button to enter the hours, minutes and seconds
for your specified search and press the Enter button.
Clear
Press to remove outstanding track programs.
Top Menu
Show BD top menu or DVD title menu.
Pop Up Menu
Show BD pop-up menu or DVD menu.
Setup
Press to enter the Setup menu. Please refer to the "Blu-ray
player setup" section of this manual for more information.
Pure Audio
Turn video off/on.
Navigation
Press the directional arrows to move around menus.
Enter
Press to accept the item/function highlighted in the menu.
Press to play or pause playback.
Press to stop current playback.
Press to return to the previous menu.
Audio/Subtitle
Press once to access alternate audio soundtracks on the
disc (if available on the disc).
Press and hold to access Subtitle function. When pressed
for a few seconds, the Subtitle function will cycle through
available languages.
Scan forwards and backwards
Right Skip – Press once to skip forward by one
track/chapter on the disc.
Left Skip – Press once to skip backward by one
track/chapter on the disc.
Colour buttons
These button functions vary by the content. See later
section of the manual.
A-B/Repeat
Press to mark a segment between A and B for repeated
playback. The first press marks point A, the second press
marks point B.
Press and hold to access Repeat function. When pressed
for a few seconds, the Repeat function will cycle as follows:
DVD and DVD-Audio – Repeat Chapter, Repeat Title,
Repeat All, Repeat Off.
Blu-ray Disc – Repeat Chapter, Repeat Title, Repeat Off.
CD and SACD – Repeat One, Repeat All, Repeat Off.
SAP/PIP
Press to turn Secondary Audio Program on/off. Press and
hold to cycle show/hide Picture-in-Picture. Refer to later
section of the manual.
Angle/Zoom
Press to access various camera angles (if available on the
disc). Press and hold to cycle through the various zoom
magnifications (and back to normal display).
Note: These features may not be available with certain
DVD or Blu-ray discs.
Res/TV Type
Press to switch output resolution. Press and hold to cycle
through TV system output between PAL, NTSC or Multi.
Refer to later section of the manual.
Important information if you are using a Cambride Audio
amplifier or AV receiver
Amp/AVR buttons
The 650BD remote also has buttons that allow control of
a Cambridge Audio azur amplifier or AV receiver.
Note: These buttons are default set to transmit codes for
our Azur 640R or 650R AV Receivers.
To set the remote to an Azur 340R or 540R instead,
simply remove the batteries, leave the remote for a few
minutes and then hold down the Source button whilst reinserting the batteries.
To control an Azur stereo Amplifier, follow the same steps
as before, but hold down the Standby/ On/Mute button.
Source
Press repeatedly to scroll through the source inputs one
by one.
Standby/On/Mute
Press to switch the amplifier/AV receiver between Standby
mode and On. Press and hold to mute/un-mute the
amplifier/AV receiver.
Volume
Press to decrease or increase the volume of the amplifier/
AV Receiver.
Page 11
11
650BDazur
ENGLISH
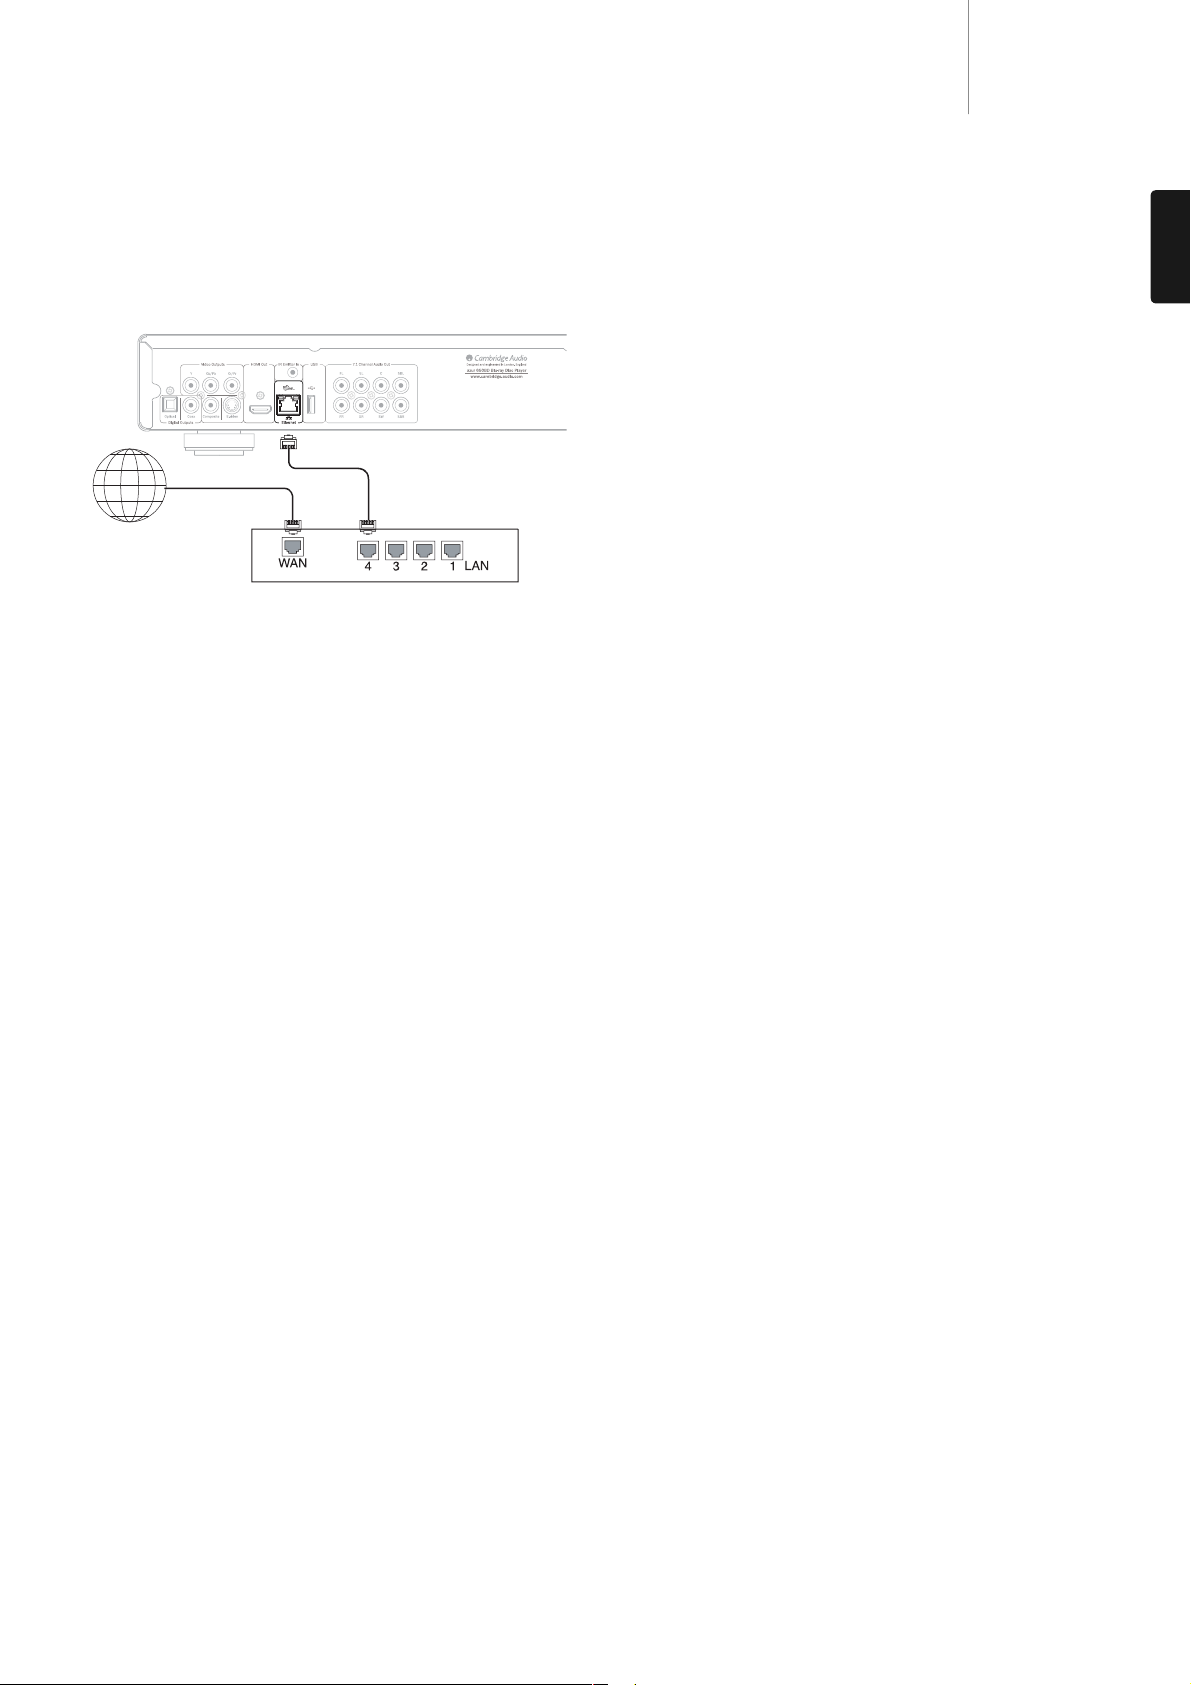
Connecting to the Internet
The 650BD supports the BD-Live feature offered on some Blu-ray Disc
titles. BD-Live offers extra downloadable content and additional online
interactive programs. The available BD-Live content varies by discs and
studios, and may include additional subtitles, commentaries, movie
trailers, games, and/or online chat.
Connecting the player to the Internet will also allow the player to obtain
firmware updates via the Internet.
In order to utilize the BD-Live feature or update firmware via the Internet,
the player needs to be connected to a broadband Internet connection. It
is not necessary to connect to the Internet if you do not intend to use the
BD-Live and online firmware updating functionality.
• Plug one end of a network cable (Category 5/5E straight through
Ethernet cable) into the LAN port on the back of the unit.
• Plug the other end of the network cable into a LAN port on your
broadband router or modem.
• Some network configuration may be required. Please refer to the
Network Setup section of the manual for more details.
• If you would like to connect the player to a broadband Internet
connection via Wi-Fi, please use an Ethernet/wireless LAN media
converter (also called a wireless bridge or a gaming adapter). These
convert between Wi-Fi and Ethernet/Lan as supported by the 650BD.
Refer to the operating instructions supplied with the media converter
for details on how to configure it.
Note: Your broadband router must also support Wi-Fi access.
• Refer to the operating instructions supplied with the broadband router
or modem, or contact the Internet service provider for questions related
to setting up of a router or modem.
Note: Only connect the LAN port of the player to an Ethernet port that
supports 10BASE-T or 100BASE-TX. Connecting to any other ports or
jacks, such as a phone jack, can damage the player.
Network Cable
(Ethernet)
Internet
Broadband Router/Modem
Broadband Internet
connection
65BD Rear Panel
Page 12

12
Analogue stereo
The analogue stereo outputs should be used for play back of CDs, DVDs
etc in stereo through a conventional amplifier or AV receiver with analogue
stereo inputs.
Analogue stereo is also usually the best connection method for listening
to CDs and other stereo discs for best possible sound quality. It is often
a good idea to connect both the analogue stereo outputs (for CD
playback) and digital audio outputs (for surround sound decoding) at the
same time.
To connect an analogue stereo system to the 650BD, use stereo phono
cables (stereo 2RCA-2RCA).
Digital audio
The digital audio outputs should be used to decode the surround-sound
soundtracks of DVDs with an external AV Receiver (Note: Digital output must
be set to "RAW" in the Audio setup page). The 650BD sends an undecoded
audio bitstream to the AV Receiver for decoding into 5.1/7.1 etc.
Either a 75ohm co-axial cable designed for digital audio or a TOSlink fibre
optic cable should be used (only one at a time).
Note: It is also possible to output stereo digital audio from the Digital
Outputs for recording on conventional CD-R/MD etc. machines, see
section on 650BD setup.
Audio connections
Do not plug in the mains power lead or turn the unit on until all
connections have been made.
Three types of audio only connection can be made between the 650BD
and your stereo/AV system:
AV receiver with
5.1/7.1 analogue
inputs
Front right
speaker
Speaker diagram shown for 5.1 channel setup. For 7.1 add two rear speakers.
Surround right
speaker
Front left
speaker
Surround left
speaker
Centre speaker
Subwoofer
1
2
3
AV receiver
In
OR
Phono cable
(2RCA-2RCA)
In
7.1
Analogue 5.1/7.1
The 650BD is also capable of decoding Surround-Sound soundtracks
itself and outputting these as analogue 5.1/7.1 depending on the settings
in the Speaker setup page in the 650BD setup menu.
For 5.1, connect to an AV receiver or amplified speaker system, use 6 x
phono/RCA cables.
For 7.1, connect to an AV receiver or amplified speaker system, use 8 x
phono/RCA cables.
Note: It is also possible to make an HDMI audio/video connection which
carries both audio and video in the same cable. See later section.
However, when making an HDMI connection i.e. to an AV receiver, it is
also often preferable to make an additional audio connection for CD
and/or SACD/DVD-A playback.
Analogue Stereo
Digital Audio
Analogue 5.1/7.1
1
2
3
1
2
3
Page 13

13
650BDazur
ENGLISH
Analogue video connections
HDMI connections
The 650BD can output video in both fully digital (HDMI) and analogue
(Composite, S-Video and Component) formats. If your TV set supports
HDMI then this is the preferred format (see next section).
If your TV set supports only analogue video the preferred connection is (in
declining order of quality) Component, then S-Video and finally
Composite.
1
2
3
TV/Monitor
TV/MonitorTV/Monitor
Component - Connect with 75 ohm Component video cables (3RCA3RCA).
Composite - Connect with single 75 ohm video phono cable
(RCARCA).
S-Video - Connect with S-Video cable.
1
2
3
HDMI cable
HDMI cable
TV/Monitor with HDMI input
TV/Monitor
with HDMI
input
AV receiver
1
2
HDMI cable
Out
In
In
In
1
2
Connection to a TV via an AV Receiver
Direct connection to a TV
HDMI (High-Definition Multi-Media Interface) is a digital connection that
can carry both audio and video in one cable. Direct digital transfer of
video and support for various types of high definition video content make
this the best connection type for picture quality.
DVI output can be supported simply by using DVI to HDMI adaptors as
these two connection types are compatible. When using DVI only video
will be passed to the TV/Monitor. A Co-axial (SPDIF) or Optical (TOSlink)
digital audio connection must be made from the 650BD to the AV receiver
for it to be able to receive audio and decode surround sound etc.
Note: The Dolby Digital Plus, Dolby True HD, DTS HD High Resolution and
DTS HD Master Audio can only be passed by the 650BD over HDMI.
As HDMI can carry both digital audio and video, HDMI can be used to
connect to AV receivers that support this function for external decoding.
Page 14

14
Setting up the player
Accessing the Easy Setup Wizard
When the player is turned on for the first time, an Easy Setup Wizard
screen will appear. This is a series of guided instructions designed to
configure the basic settings for the unit.
Note: If the Easy Setup Wizard has previously been completed or
cancelled, it will no longer initiate when you turn on the unit. To access
Easy Setup Wizard again, press the Setup button on the remote control,
select Device Setup, then Reset Factory Default. Select
"OK" to confirm
loading the factory default settings. Once the factory default settings are
loaded the Easy Setup Wizard will appear again.
To start the Easy Setup Wizard, please follow these steps:
1. Turn on the TV.
2. Turn on the player.
3. Switch the input selection on your TV so that the TV displays the signal
from the player. You should see the first step of the Easy Setup Wizard.
The first step of the Easy Setup Wizard gives you the opportunity to skip
the entire wizard. If you are familiar with setting up audio/video
equipment and would like to fully customize the player settings using its
setup menu, you may use the buttons to select the
"Cancel" option,
then press the Enter button to exit the Easy Setup Wizard. Otherwise, to
continue with the Easy Setup Wizard, select the "OK" option and press
the ‘Enter button.
Choose the primary video output
The player can output HD video through its HDMI or component output
terminals. By setting the "primary video output" option, the player can
optimize video output for the selected terminal. The choices are "HDMI"
and "Component". If you connect the player to the TV using an HDMI
cable, please select "HDMI". If you connect the player to the TV using
component video cables, please select "Component".
Note: HDMI is always the prefered option for best video quality.
To make your selection, use the buttons to highlight the choice, and
then press the Enter button to go to the next
Select the best output resolution
For the latest generation of 1080p, "Full HD" or "True HD" TV displays, the
best output resolution will naturally be 1080p. For all other digital
televisions this will likely be 720p or 1080i. These are general
recommendations that work for most users, but there can be exceptions.
Advanced users may want to try all supported resolutions and choose the
one that provides the best visual result.
The 650BD supports a special
"Source Direct" output resolution on its
HDMI output. This resolution is recommended for use with external video
processors or high-end TVs with high quality scalers. In "Source Direct"
mode, the player works as a "transport". It decodes video from the discs
and then sends the raw video signal in its native resolution and format,
without extra processing, to the external video processor or TV. The actual
output resolution thus varies by content:
Content Source Direct Output Resolution
PAL DVD 576i
NTSC DVD 480i
Most Blu-ray Movies (film-source) 1080p 23.976Hz or 1080p 24Hz
Most Blu-ray TV shows or Concerts 1080i
(video-source)
SACD and DVD-Audio 1080i
Depending on your selection of
"Primary Video Output", the available
output resolution selections will differ. For the HDMI output, the following
output resolutions are available:
Auto, 1080p, 1080i, 720p, 480p/576p, 480i/576i, and Source Direct. If
"Auto" is selected, the player will determine its output resolution based on
the best signal resolution that the TV can display.
For the component output, the following output resolutions are available:
1080i, 720p, 480p/576p and 480i/576i. Please refer to the
specification of your TV to find the best resolution to use.
Press the buttons to select the desired output resolution, then press
the Enter button. The player will apply the selected output resolution and
ask you to confirm the selection. If your TV supports the selected
resolution, you will see a dialog box with a countdown clock. Use the
button to highlight the
"OK" option and press the Enter button to save the
resolution setting. If your TV does not support the selected resolution,
you may see a black screen or an error message. In this case please wait
for 15 seconds and the Easy Setup screen will reappear. Select a different
resolution that your TV can support.
Page 15
15
650BDazur
ENGLISH
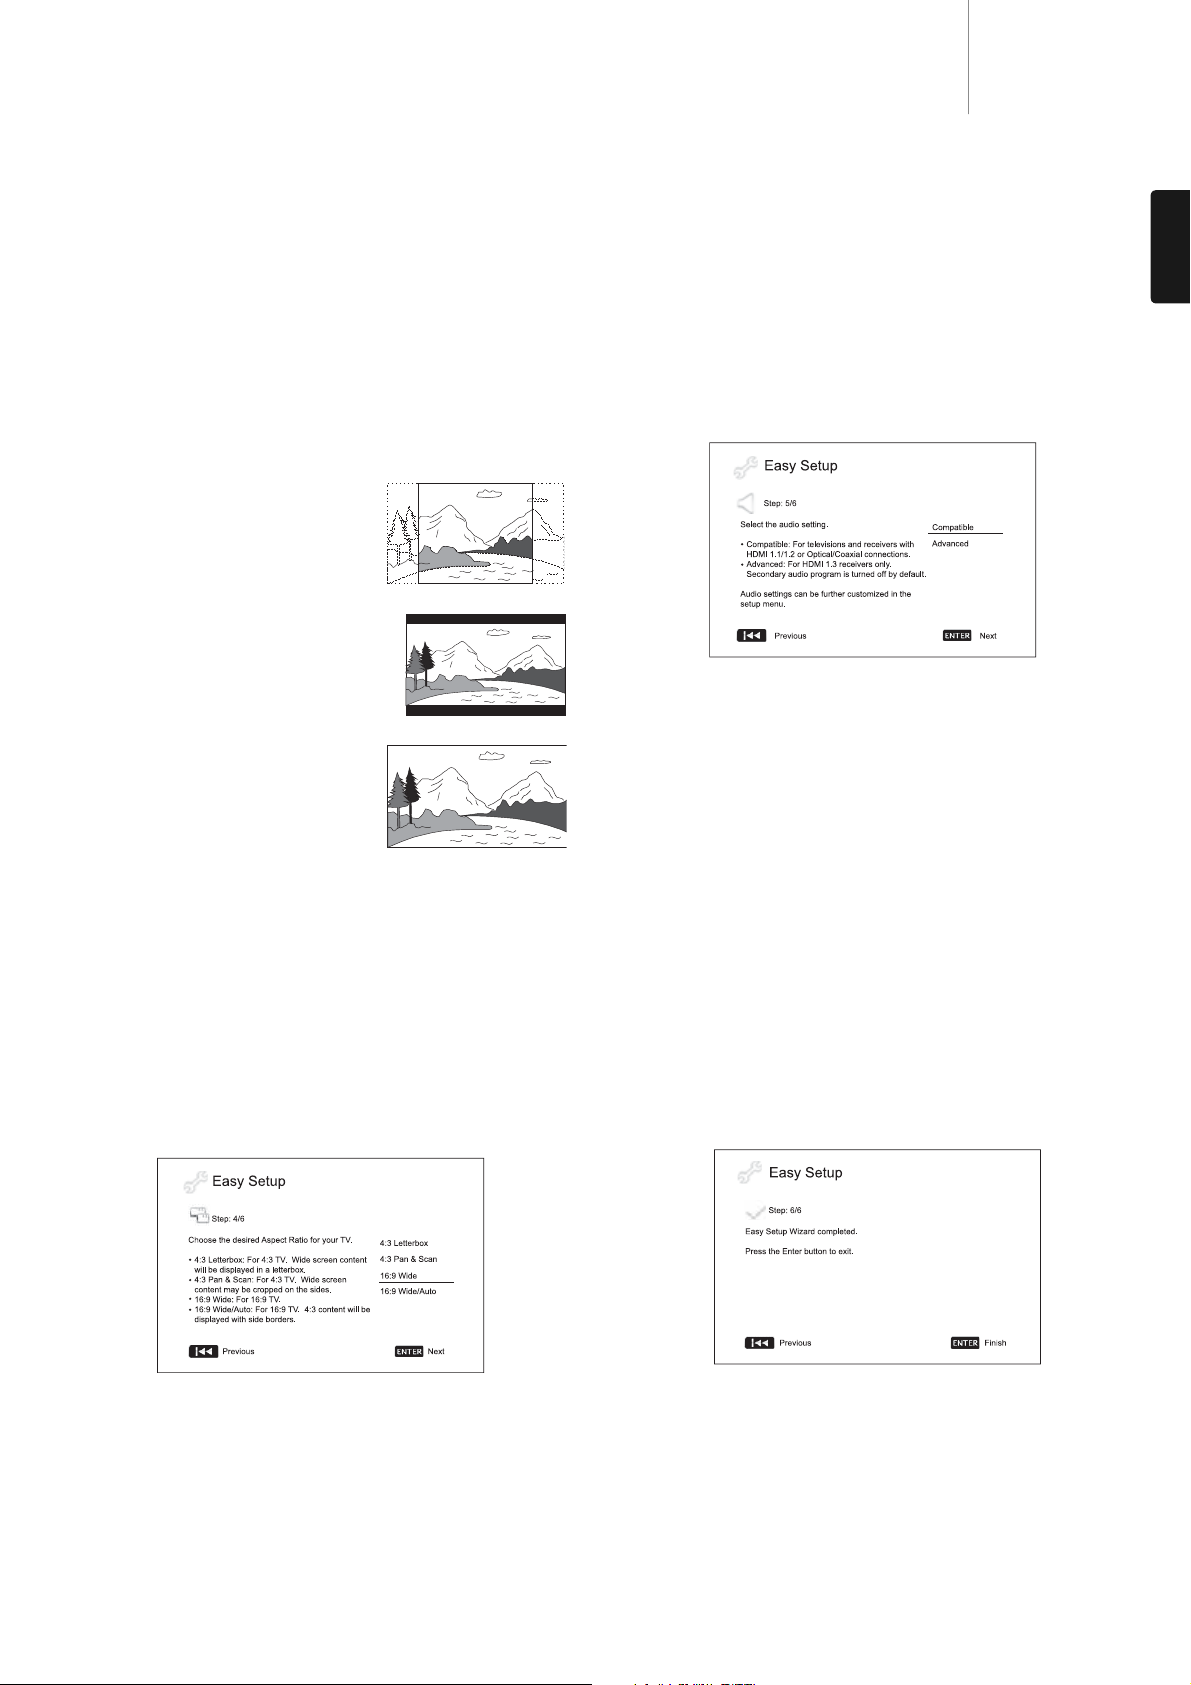
Select the audio setting
The Blu-ray disc format brings not only high resolution video, but also high
bit rate audio such as Dolby Digital Plus, Dolby TrueHD, DTS-HD High
Resolution and DTS-HD Master Audio. Blu-ray Discs may also include
additional audio features such as menu click sound and Secondary Audio
Program (SAP – audio associated with the secondary video in Picture-inPicture mode). Depending on the user preferences and other audio/video
equipment connected to the player, the audio settings need to be
adjusted to achieve the best result. The Easy Setup Wizard offers two
basic selections to get you started.
The
"Compatible" setting configures audio output in a way that is generally
compatible with all types of equipment and content. If you connect the
player to a television directly, or to a receiver with an HDMI 1.1/1.2 or
optical/coaxial input, selecting the "Compatible" setting is recommended.
When menu click sound and Secondary Audio Program are presented in
the content, those will be mixed into the audio output.
The
"Advanced" setting configures audio output to send the original main
audio content to a connected receiver for decoding and reproducing. It
requires a receiver capable of decoding all high bit rate audio formats. If
you connect the player to a receiver supporting HDMI 1.3 and high bit
rate audio formats (such as our 650R AV Receiver), selecting the
"Advanced" setting is recommended. Menu click sound and Secondary
Audio Program are turned off by default to preserve the original quality of
the main audio content.
Press the buttons buttons to select one of the audio setting choices,
and then press the Enter button. The two basic audio setting choices may
not cover all situations. You can further customize the audio settings
using the player’s Setup Menu.
Complete the Easy Setup Wizard
Once you have selected the audio setting, the initial Easy Setup Wizard is
completed.
Press the Enter button to close the Easy Setup Wizard. Your player is now
ready for use. You will see a background screen with a Cambridge Audio
and Blu-ray Disc logo. Please follow the rest of the user manual for basic
and advanced operations.
Note:
• In case you are not able to get a picture using the HDMI or component
output, please connect the player to the TV using the composite video
output, and then use the Setup Menu to adjust the player settings.
• Video up-conversion over the component output is only available for
unencrypted discs such as home video and consumer-created
contents. Most commercially pressed DVD discs are CSS-encrypted and
will be limited to 480i/480p resolution. This restriction applies to the
component output only. The HDMI output is protected with HDCP and
has no such restriction.
Determine the display aspect ratio
Use to select the screen format to fit your TV screen.
4:3 PanScan - You can select this screen
when connected to a 4:3 TV set. The
widescreen picture will display on the full
screen, but some parts of the video picture
will be cut off automatically.
4:3 Letterbox - Alternatively you can select
this screen when connected to a 4:3 TV
set. The full widescreen picture is
displayed on the screen with black strips
on the top and bottom of the screen.
16:9 Wide - Select this screen when
connected to a 16:9 widescreen TV set.
The full picture will now normally be
displayed with no picture cropping (unless
the movie itself has black bars recorded
into the video).
16:9 Wide/Auto - 16:9 (widescreen) as well as 4:3 sources will be
displayed in their native aspect ratio. Please note that in this mode 4:3
sources will be displayed with black borders on both sides to maintain
the correct 4:3 aspect ratio.
Note: If you are using a plasma or widescreen CRT display you will want
to avoid leaving black bars on the screen for any length of time as you may
encounter temporary "burn-in" where the display retains memory of the
"used" part of screen and the unused (black bar) portions are clearly
defined on the screen during subsequent viewing sessions. The "16:9
Wide" mode is the best choice for these types of displays.
Press the buttons to select the proper aspect ratio for your TV, then
press the Enter button.
Page 16

16
Operating instructions
Getting started
Turn on the power of the 650BD, TV, amplifier/AV receiver and any other
components which are connected to the 650BD. Make sure the TV and
the audio receiver are set to the correct input channel.
1. Press the Open/Close button to open the disc tray.
2. Place the disc on the tray, label side facing up.
3. The player will read the disc information and starts playback.
4. Depending on the content of the disc, a menu or navigation screen
may appear. Please use the () navigation and Enter button to
select the content to play.
5. To stop playback, press the button.
6. To turn off the player, press the Standby/On button.
Note:
• During DVD and some Blu-ray Disc playback, pressing the button for
the first time brings the player to a pre-stop mode. You can resume
playback from the stopped point by pressing the / button. This pre-
stop mode allows you to change the player settings and then resume
playback. To completely stop playback, press the button twice.
• Certain Blu-ray Discs with BD-Java technology do not support the prestop mode. Pressing the button during playback of such discs will
completely stop the disc. Pressing the /button once the disc is
stopped will restart it from the very beginning.
• This unit featured an environmentally friendly low power (1W) standby
circuit. If it is not to be used for a long time, unplug it from the
household AC outlet.
• Do not put anything except a BD/DVD/CD sized disc into the tray,
foreign objects may damage the mechanism.
• Do not force the tray by hand during the opening and closing
operations.
• To avoid dirt and dust entering the mechanism, keep the disc tray
closed when not in use.
• If the disc is seriously scratched or too dirty, the player may not be able
to read it or play it.
• Never load more than one disc into the disc tray at one time.
Fast Forward/Rewind search
Press repeatedly to cycle between 1X, 2X, 3X, 4X and 5X playback speed
(without sound) and back to normal playback. Press
button for backwards playback options, or the button for forwards
playback.
Note:
• Certain Blu-ray discs utilising the BD-Java technology may have their
own fast forwarding and reversing control. The actual speed varies by
disc, and a progress scale may be displayed by the disc.
Skip playback
1. Press once to skip forward by one track/chapter on the disc. Press
and hold to skip forwards through several tracks.
2. Press once to skip backward by one track/chapter on the disc. Press
and hold to skip backwards through several tracks.
Go To
Press the Go To button on the remote once to access Time Search and
enter the required time from the start of the disc as H:MM:SS (Hours,
Minutes, Seconds) using the numerical keys or the ()
navigational buttons. Press twice to access Chapter Time Selection and
enter the required time from the start of the chapter. Press three times
to access the Display information.
Slow
When playing a BD/DVD, press the button to pause playback and then
press the or button to cycle round the various speeds of slow motion
(1/16, 1/8, 1/4 and 1/2), forwards and backwards and back to normal
speed. To exit playback, press the / button.
Note: Certain Blu-ray discs utilising the BD-Java technology may not
support slow playback.
Pause and frame by frame
1. During playback, press the / button to temporarily pause the
program. In this mode, a Pause icon will appear on the TV screen.
2. While a DVD or Blu-ray Disc is paused, press the or button to
reverse or advance the video frame-by-frame.
3. Press the / button to resume normal playback.
Repeat
Note: The Repeat function is available only during playback.
Press and hold the A-B/Repeat button to access Repeat function. When
pressed for a few seconds, the Repeat function will cycle as follows:
DVD and DVD-Audio – Repeat Chapter, Repeat Title, Repeat All, Repeat Off.
Blu-ray Disc – Repeat Chapter, Repeat Title, Repeat Off.
CD and SACD – Repeat One, Repeat All, Repeat Off.
Note: The repeat chapter/title setting will be cleared when moving to other
chapter or title. Certain Blu-ray discs may not allow the Repeat function.
A-B Repeat
1. Press the A-B button at your desired starting point. "A" appears briefly
on the TV screen.
2. Press the A-B button at your desired end point.
"A-B" appears briefly
on the TV screen, and the repeat sequence begins.
3. To exit the sequence, press the A-B button.
Note:
• The A-B repeat section can only be set within the current title (for BD/DVD
video) or current track (for BD/DVD audio, Video CD and Audio CD).
• A-B repeat playback is not available with some scenes on BD/DVD.
• A-B repeat playback does not function during title, chapter, track or all
repeat playback.
On-Screen Display
1. During the playback of a BD/DVD disc, press the Info button on the
remote control to show status information; For CD and SACD, the status
information is shown automatically.
2. While the status information is shown, press the buttons to scroll
through several display formats. The playback time information displayed
on the front panel changes together with the on-screen display.
3. Press the Info button again to hide the on-screen display. The playback time
information display on the front panel will remain in the selected format.
In addition to the playback time, the on-screen display may also contain
the following information about the content currently playing:
Playback status – an icon indicating play, pause, and fast forward/reverse status.
Bit rate meter – an indication of the bit rate of the audio and video stream.
Current and total title numbers (DVD and Blu-ray Discs), title chapters
(DVD and Blu-ray Discs) and total tracks (CD and SACD).
Audio information – current and totally available number of audio tracks,
language, format, and channels.
Subtitle information – current and totally available number of subtitle
tracks and language.
Video format information – encoding type, frame rate and original aspect ratio.
Page 17

17
650BDazur
ENGLISH
Audio language (soundtrack) selection
1. To select the audio language, press and hold the Audio/Subtitle button
on the remote control during playback.
2. Repeatedly pressing the Audio/Subtitle button cycles through all
available audio soundtracks on the disc.
Note: The availability of languages and audio soundtracks varies by disc.
Some BD/DVD-Audio discs allow audio track selection with the Audio
button, while others require the user to select from the audio setup menu
of the disc. When playing a SACD with both multi-channel and stereo
contents, the Audio button can be used to switch between the two
formats.
Subtitle selection
1. When playing a DVD, Blu-ray disc or other video programs recorded
with subtitles, press and hold the Audio/Subtitle button on the remote
control to select the desired subtitle.
2. Holding down the Audio/Subtitle button will cycle through all available
subtitles.
3. To turn off subtitles, hold down the Audio/Subtitle button until the
subtitle is turned off.
Angle selection
1. When playing a DVD or Blu-ray Disc, an angle mark will be displayed on
the screen when the player detects scenes recorded with multiple
possible angles.
The angle mark is also shown on the front panel display.
2. Press and hold the Angle/Zoom button on the remote control to select
the desired playing angle.
3. To resume normal playback, hold the Angle/Zoom button until the
default angle is displayed.
Note: This function is available only when the discs are recorded with
multiple angles. The Angle mark display shows when an alternative angle
is available. The Angle mark display on the screen can be turned off using
the Setup Menu of the player.
Zoom
To change the zoom level, press and hold the Angle/Zoom button on the
remote control. Holding down the Angle/Zoom button will switch the zoom
level in the following sequence: 2x, 3x, 4x, 1/2, 1/3, 1/4 then back to
normal.
The zoom level is reset to 1:1 when the disc is ejected, or when the player
is turned off.
Note: The Zoom feature may not be available when certain DVD or Blu-ray
Discs are played because the disc author chooses to disable Zoom.
Blu-ray disc menu
1. Blu-ray discs usually contain a top menu and a pop-up menu. The top
menu normally appears at the beginning of the playback, after the
previews and copyright messages. The Pop-up Menu can be accessed
during playback without interruption.
2. During playback, press the Pop-up Menu button to access the pop-up
menu. Press the Top Menu button to access the top menu.
3. Navigate the menu using the () Navigation buttons, and then
press the Enter button to make the selection.
4. Some menus make use of the colour buttons. You can select menu
functions by pressing the corresponding Colour button on the remote
control.
DVD disc menu
1. Some DVD discs contain title menu or chapter menu functions.
2. During playback, press the Top Menu button to return to the disc title
menu. Press the Pop-Up Menu button to display the chapter menu.
Depending on the disc, one or both menus may not exist.
3. Navigate the menu using the () Navigation buttons, and then
press the Enter button to make the selection.
4. Press the Return button to return to the previous menu. The return
location varies by disc.
Memory and automatic resume
The player automatically remembers the current position for a disc when
playback is interrupted. Operations such as Open/Eject or turning Power
off will cause the player to save the current playing position for that disc.
The position is memorised even after turning off the unit or changing the
disc.
When the next time the same disc is played back, the player will recognize
the saved playing position. Playback will automatically resume from this
saved position. However if you wish to cancel the automatic resume and
start playback from the beginning, you may press the button when
prompted.
The player can remember playback position for up to five discs. When the
sixth disc is memorised, the oldest one is replaced.
Note: Some Blu-ray discs do not support resuming and will always play
from the beginning.
Picture-in-Picture and Secondary Audio
Certain Blu-ray discs contain secondary video (Picture-in-Picture/PIP) and
secondary audio. This feature is often called BONUSVIEW. When such a
disc is played, a Picture-in-Picture mark (PIP Mark) and a Secondary Audio
Program Mark (SAP Mark) may be displayed on the screen to alert you to
the availability of the secondary audio/video content.
The disc menu usually features interactive controls to turn on/off the
Picture-in-Picture video and Secondary Audio Program. Please use those
controls to select the desired secondary audio/video content.
There is also a PIP button on the remote control. If the disc menu does
not offer interactive Picture-in-Picture controls, please use this button to
turn on/off Picture-in-Picture or select from multiple secondary video
programs.
Similarly there is a SAP button on the remote control. If the disc menu
does not offer interactive secondary audio controls, please use this
button to turn on/off Secondary Audio Program or select from multiple
secondary audio tracks. Secondary Audio Programs are generally only
available when Picture-in-Picture is shown.
Note:
• This function is available only when the discs are recorded with
secondary video and audio programs.
• Discs may not always be played back according to the PIP and SAP
remote buttons. Certain discs can ignore or override the remote control
commands.
• The PIP and SAP Marks on the screen (which alert the user to the
presence of these functions on the disc) can be turned off using the
Setup Menu of the player.
Some Blu-ray disc titles are released with the BD-Live feature. BD-Live
offers extra downloadable contents and additional online interactive
programs. The available BD-Live content varies by disc and studio, and
may include additional subtitles, commentaries, preview trailers, games,
and online chat. The player needs to be connected to the Internet in order
to play BD-Live contents.
Page 18

18
Operating instructions continued
Depending on how the studios organise their BD-Live contents, some Blu-ray
discs may start downloading BD-Live content when playback starts; some
have a BD-Live selection on its main menu; some may show a prompt to ask
whether you would like to start downloading; and some may ask you to sign
up for a membership or account. Please follow the instructions that come with
the disc to enjoy BD-Live contents.
Your Internet connection speed, the overall Internet traffic situation and
the capacity of the BD-Live content servers can all affect how fast BDLive content can be downloaded. If you encounter slow downloading or
intermittent playback, please play the disc without accessing the BD-Live
features, or try again at a different time.
When you use the BD-Live feature, the player or disc ID and your IP
(Internet Protocol) address may be sent to the content provider via the
Internet. Generally, no personally identifiable information is sent. However
technologies exist to match your IP address to a certain geographical area
or service provider. Your Internet service provider also has the knowledge
of who is using which IP address. If the BD-Live content provider requires
you to login using a membership or account, the content provider will
have access to your membership or account information. Please check
with your Internet service provider and the BD-Live content providers for
their privacy policy.
You can also choose to restrict BD-Live access using the player’s Setup Menu.
Output resolution
If you would like to change the output resolution, you may do so by
pressing the Res/TV Type button on the remote control:
1. Make sure the video cable is properly connected.
2. Turn on the TV. Make sure the correct input is selected.
3. Make sure that the player is turned on. Although the output resolution
can be changed
"on the fly", it is recommended that you stop playback
and take out the disc before changing the output resolution. Press the
Res/TV Type button. A "Resolution Setting" menu appears on the TV
screen. In case the TV does not support the current resolution and you
cannot see the "Resolution Setting" menu, the current resolution is
also displayed on the front panel.
4. Use the buttons to select the new output resolution. Pressing
the Res/TV Type button cycles through the available output resolutions.
The new resolution is displayed on the front panel just in case you
cannot see the
"Resolution Setting" menu (if it is incompatible with your
TV).
5. Press the Enter button to apply the selected output resolution. Or, if
you do not want to change the output resolution, press the button.
The following output resolutions are available:
PAL output via HDMI – Auto, 1080p, 1080i, 720p, 576p, 576i, Source Direct.
NTSC output via HDMI – Auto, 1080p, 1080i, 720p, 480p, 480i, Source Direct.
PAL output via component – 1080p*, 1080i, 720p, 576p, 576i.
NTSC output via component – 1080p*, 1080i, 720p, 480p, 480i.
* When 1080p is selected with component output selected as the
primary video output, HDMI output resolution will be 1080p and
component output resolution will be 1080i.
Note:
• Some TV sets do not support one more output resolutions (particularly
1080p). If an incompatible output resolution is selected, you will get a
blank screen or an error message. In this case please select an output
resolution that is supported by the TV.
• In case you are not able to get a picture using the HDMI or component
output, please connect the player to the TV using the composite video
output, then use the Setup menu to adjust the player settings.
• Video up-conversion over the component output is only available for
unencrypted discs such as home video and consumer-created
contents. Most commercially pressed DVD discs are CSS-encrypted and
will be limited to 480i/480p resolution. This restriction applies to the
component output only. The HDMI output is protected with HDCP and
has no such restriction.
TV system selection
The 650BD can be set to output all video as PAL or NTSC or output the
video in the same format it was recorded in (Multi). Some TVs only
support PAL or NTSC and not both so forcing the output type to one or the
other can be useful.
Press and hold the Res/TV Type button on the remote control to cycle the
video output to PAL, NTSC or
"Multi" system. The TV screen displays the
selected system name.
Some points to keep in mind:
• When the video output is set to PAL or NTSC, the player will convert the
disc content if different to the selected system.
• When the video output is set to
"Multi", the player will not perform
system conversion and will output the video in its native format on the
disc. The "Multi" mode should only be used if your TV supports both
NTSC and PAL systems.
• Some TV sets only support one of the PAL or NTSC systems. If the wrong
output is selected, the TV may not display a picture. In this case keep
holding the Res/TV Type button until a supported system is selected.
• The output system selected with the Res/TV Type button will be
remembered when the player is turned off. The output system selection
can also be done by setting the
"TV System" item in the "Video Setup"
section of the player’s Setup Menu.
Viewing pictures on DVD-Audio discs
Some DVD-Audio discs contain static pictures, such as photos of the band
or narration of the album. When a DVD-Audio track is playing, you may use
the Page buttons to select the picture.
Note: Availability of static pictures depends on the DVD-Audio disc.
Pure Audio mode
You can enjoy higher quality audio by turning off the video processing and
output. The Pure Audio mode reduces any potential interference between
the video and audio signals.
1. Press the Pure Audio button on the remote control to turn off video
and enter Pure Audio mode. Video output will be turned off.
2. Press the Pure Audio button again to resume video and cancel Pure
Audio mode.
Note:
• Pure Audio mode is automatically cancelled when the unit is switched
off or when playback is stopped.
• Since HDMI carries audio together with video, the HDMI output cannot
be completely turned off. A black screen (inactive video but sync is still
present) is transmitted instead to minimize any potential interference.
Shuffle
When playing a CD or SACD, press the Blue button on the remote control
to activate the Shuffle and Random modes. Each press of the Blue button
switches the playback mode in the following sequence: Shuffle , Random
and Normal.
Page 19

Note: Via USB, the 650BD can play WMA and MP3 files only. The 650BD
cannot play AAC files.
In the music browser, you can perform the following operations:
Press the buttons or Page buttons to move the cursor and
select music files.
When a music file is highlighted by the cursor, press the Enter or
/button to start playback.
Press the Green colour button to add the currently highlighted music file
to the Playlist. A Green check mark will appear in front of the file name,
and the Playlist count in the lower left corner of the screen will increase
by one.
Press the button to move the cursor to the selection menu in the lower
left corner of the screen. This menu contains the following choices:
All Music – List all music files in a flat view without any directory structure.
Playlist – List only music files added to the Playlist.
Browser – List folders and music files according to the original directory
structure on the disc or USB drive.
Now Playing – Show the status of the currently playing music file. Press
the button to move the cursor back to the file listing.
If a music file starts playing and there is no other user operation, the
"Now
Playing" screen will appearafter a few seconds. You can also get to this
screen using the "Now Playing" menu. This screen can show the following
information:
Playback status – /,
Playback mode – Shuffle, Random, Repeat One, Repeat All
Playback progress – Track and time
Other embedded information – If the music file contains supported
album art image and tags, those will be displayed.
19
650BDazur
ENGLISH
As well as normal CD’s, SACD’s, DVD’s and BD’s the 650BD can play
some music, movies and photo files either from optical datadiscs (such
as CD-R, DVD-R etc.) or external memory such as USB flash-drives/thumbdrives and hard-drives.
Connecting a USB Drive
The 650BD is equipped with two USB 2.0 ports, one on the front panel
and the other on the back. You may use either to plug in a USB drive
loaded with digital music, movie and photo files.
The USB ports are rated to provide a maximum of 5V, 500mA power to the
attached device. This is usually sufficient to bus power (i.e. self power)
USB flash drives and flash memory card readers, but may not be sufficient
for USB hard disks. It is recommended that if you use a USB hard disk you
use one with an external power supply.
Note:
• This unit supports
"USB Mass Storage Class Bulk Transport" devices
only. Most USB thumbs drives, portable hard disk drives and card
readers conform to this device class. Other USB devices such as MP3
players, digital cameras, and mobile phones that include their own
memory management may not be compatible.
• Supported USB drives must be formatted with the FAT (File Allocation
Table) or FAT32 file system. Drives formatted with NTFS file system are
not supported.
• In some cases, an incompatible USB device may cause the player to
stop responding. If this occurs simply turn off the power, remove the
USB device, and turn the player back on.
• The player accesses the USB drive in read-only mode. In order to
minimize the risk of data corruption, it is recommended that you only
unplug the USB device when playback has completely stopped.
The Home Menu
When a USB drive or an optical disc stored with media files is inserted, the
player presents a "Home menu" to assist you in navigating and playing
the files. You can also bring up the Home menu with the button on the
remote control. The Home menu is the starting point for accessing media
files.
There are four selections in the Home Menu. Depending on what type of
media files that you intend to play, you can choose from
"Music", "Movie"
and "Photo" categories. The "Setup Menu" selection will bring you to the
player’s Setup Menu just like pressing the Setup button on the remote
control.
Playing music files
To play digital music files stored on an optical disc or USB drive, select
"Music" from the Home Menu. A file browser will appear to assist you in
navigating the files and folders.
The first step is to select the
"Data Disc" or USB device that contains the
music files. The player will take a moment to read the disc and list the
folders and music files.
Other media playback
Page 20
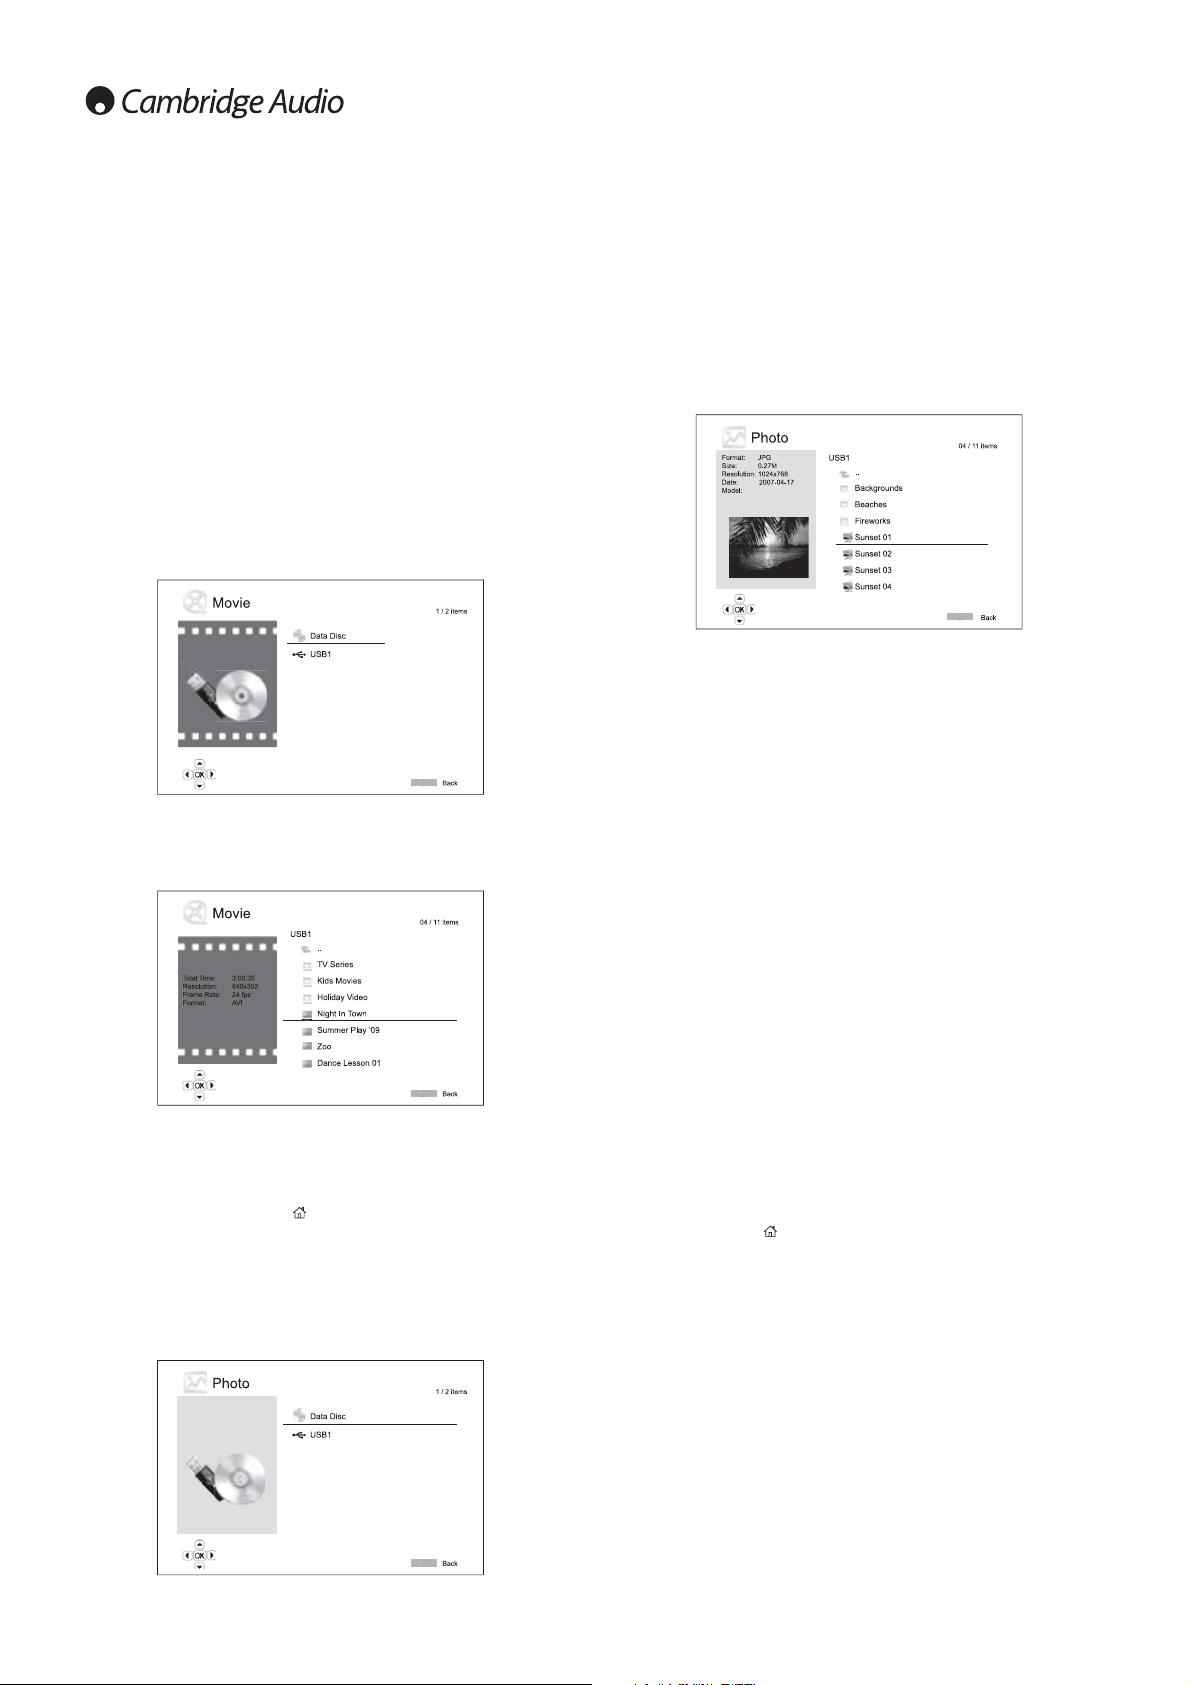
20
Media playback continued
The following operations are available while the "Now Playing" screen is
shown:
Normal playback control – /, , /, , and .
Special playback mode – Repeat and Shuffle/Random (Blue colour
button).
Return to the Browser without stopping the music – Return
Stop playback and return to the Browser – Press twice.
Playing movie files
To play movie files stored on an optical disc or USB drive, select "Movie"
from the Home Menu. A file browser will appear to assist you in navigating
the files and folders.
The first step is to select the
"Data Disc" or USB device that contains the
movie files. The player will take a moment to read the disc and list the
folders and movie files.
In the movie browser, you can perform the following operations:
1. Press the / or Page / buttons to move the cursor and select
movie files.
2. When a movie file is highlighted by the cursor, press the Enter or /
button to start playback.
Once a movie file starts playing, the normal playback control functions
are available. To stop the movie and return to the file browser, press STOP
twice. You can also press the button at any time to get back to the
Home Menu.
Viewing photo files
To view digital photo files stored on an optical disc or USB drive, select
"Photo" from the Home Menu. A file browser will appear to assist you in
navigate the files and folders.
The first step is to select the "Data Disc" or USB device that contains the
photo files. The player will take a moment to read the disc and list the
folders and photo files.
In the photo browser, you can perform the following operations:
• Press the / or Page/ buttons to move the cursor and select
photo files.
• When a photo file is highlighted by the cursor, press the Enter or /
button to start playback in a full screen slideshow fashion.
The following operations are available during the photo slideshow:
Show the help screen – Display
Normal playback control – / and .
Adjust slideshow speed – and
Zoom – Zoom. Once in a zoom mode the navigational buttons
can be used to pan the photo.
Reflect – button.
Mirror – button.
Rotate left (counterclockwise) – button
Rotate right (clockwise) – button
Repeat – Repeat button
Show photos in
"Digest" mode – Red colour button. The "Digest" mode
shows the nine photo thumbnails in a screen to make visual navigation
easy.
Show EXIF information – Green colour button
Play in random/shuffle sequence – Blue colour button
Change slideshow transition effect – Yellow colour button.
Adding background music
You can add background music to the photo slideshow. To do so, you will
need to prepare some digital music files. The music files can be stored on
the same disk as the photos, or on a different USB drive. Start music
playback first by selecting "Music" from the home menu. Once the music
is playing, press the button to get back to the home menu, and start
the photo slideshow by selecting "Photo" in the usual manner.
Page 21

21
650BDazur
ENGLISH
Setup Menu
To access the player’s Setup Menu simply press the Setup button on the
remote control. Since some Setup Menu options can become
inaccessible when the player is playing a disc, it is recommended that
you operate the Setup Menu when playback is fully stopped or when there
is no disc in the player.
The Setup Menu presents many setup and configuration options. For
most users, the default configuration will be sufficient and will often not
require changes to the settings.
However if you wish to configure the player to perfectly match your home
theatre settings and viewing preferences, please refer to the following
sections for details about each configuration option.
Using the Setup Menu System
When performing menu adjustments, we will use the following
terminology to indicate the location of the desired function:
Setup Menu Section > Menu Item > Selection
Setup Menu Section is the uppermost Setup Menu level. With the 650BD
there are six Setup Menu sections listed in the left column of the Setup
Menu screen. They are: Playback Setup, Video Setup, Audio Format
Setup, Audio Processing, Device Setup, and Network Setup.
Menu Item is the parameter to be adjusted which appears in the centre
column of the Setup Menu. Once you enter a Setup Menu Section, the list
of Menu Items and their current value are displayed in a box.
Selection is the actual numeric or descriptive element that represents
the change being made to the selected parameter. It is the item located
to the right of its corresponding Menu Item.
A scroll icon appears at the top or bottom of the menu when there are
more Menu Items or Selections than what can fit in a screen. You may use
the and buttons to scroll the display in order to access additional
items.
Note: It is possible that some setup items are greyed-out and
inaccessible. This can be caused by a disc still being played back or
interlocking with mutually exclusive setup items. Please stop playback or
eject the disc before trying to change these setup items. If you still cannot
access the setup item, please check for configuration conflicts and
consistency. For example, if
"Video Setup > Primary Output" is set to
"Component", the "Output Resolution" menu items "Auto" and "Source
Direct" will be grayed-out. Setting "Primary Output" to "HDMI" will enable
the "Output Resolution" menu items "Auto" and "Source Direct" to be set.
1. Press the Setup button on the remote control, and the TV screen
displays the following:
2. Press the / buttons to select the section. There are six sections:
Playback Setup, Video Setup, Audio Format Setup, Audio Processing,
Device Setup, and Network Setup. Press the Enter button or the
button to enter the selected section.
3. Press the / buttons to select the setup item to be changed, and
press the Enter or button to change the setting. When the scroll icon
is shown at the top or bottom of the Setup Menu, it indicates that there
are more menu items that can be accessed by scrolling with the /
buttons.
4. To select a value from the list of available settings, press the /
buttons and then press the Enter button to confirm. For example, to
select
"Off" for "PIP Mark", use the / buttons to highlight the "Off"
selection and press the Enter button.
5. To exit the Setup menu at any time, press the Setup button on the
remote control or select Exit from the Setup Menu sections.
The settings are permanently saved when the player is turned off using
either the front panel Standby/On button or the same button on the
remote control. If the AC power is interrupted before the player enters
standby status, the settings will not be saved.
Setup
Page 22

22
2. Auto Play Mode (on/off)
To select whether the player willl start playing an audio CD or SACD
automatically. When auto play mode is turn on, these discs will start
playing upon insertion into the player. When auto play mode is turned off,
the player will wait for the user to start playback by pressing the PLAY
button.
3. SACD Priority
To select which audio layer to play by default for SACD (Super Audio CD)
discs which often have multiple soundtracks. The options are:
Multi-Channel – Play the DSD multi-channel surround audio layer.
Stereo – Play the 2-channel DSD stereo audio layer.
CD Mode – Play the 2 channel PCM CD layer of a hybrid SACD disc.
4. DVD-Audio Mode
To select which portion of a DVD-Audio disc to play. The options are:
DVD-Audio – Play the DVD-Audio portion of the disc with high-resolution
audio.
DVD-Video – Play the DVD-Video portion of the disc with Dolby Digital or
DTS audio.
5. Angle Mark (on/off)
To turn on/off the display of an angle mark when a DVD or Blu-ray Disc
with multiple available angles is played. Keeping the angle mark off
avoids distraction from normal movie watching.
6. PIP Mark (on/off)
To turn on/off the display of a Picture-in-Picture mark when a Blu-ray disc
with secondary video is played. Keeping the PIP mark off avoids
distraction from normal movie watching.
7. SAP Mark (on/off)
To turn on/off the display of a Secondary Audio Program mark when a
Bluray Disc with secondary video and audio is played. Keeping the SAP
mark off avoids distraction from normal movie watching.
8. Parental Control
This is used to set parental control ratings in order to prevent minors from
watching inappropriate content. This function does depend on the disc
being properly rated and encoded.
Press the Enter button to bring up the rating selection menu.
To adjust the parental control settings, you must enter the current
parental control password. If you have not set a parental control password
yet, the default password is
"0000".
The parental control menu contains the following sub-items:
BD Ratings - Press the / buttons to select the rating allowed for Blu-
ray Discs.
"Off" means no ratings control and all discs are allowed to play.
Numbers 1 to 21 corresponds to the age limit. Discs encoded with an
age limit that is equal to or above the selected age will be allowed, and
any rating below the selected age will be blocked.
DVD Ratings - Press the / buttons to select the rating to allow for
DVD. The available ratings are Kid, G, PG, PG-13, PGR, R, NC17, Adult
and Off. The selected rating and below will be allowed, and any rating
above will be blocked. If
"Off" is selected, all discs are allowed to play.
Area Code – Some Blu-ray Discs may have different parental control
ratings for different geographical areas. At this time the player only
supports the parental control ratings used in the United Kingdom.
Change Password – To change the parental control password, enter a 4digit number as the new password. Enter the new password again to
confirm. If the two entries are matching, the new password replaces the
old parental control password.
Setup menu continued
Playback Setup
The "Playback Setup" section is designed to configure playback
preferences for various contents. The setup items in this section are:
Menus Settings
Language......................................................Player Language
Disc Menu Language
Audio Language
Subtitle Language
Auto Play Mode ............................................On
Off
SACD Priority ................................................Multi-Channel
Stereo
CD Mode
DVD-Audio Mode ..........................................DVD-Audio
DVD-Video
Angle Mark ...................................................On
Off
PIP Mark .......................................................On
Off
SAP Mark ......................................................On
Off
Parental Control ...........................................BD Ratings
(default password:
"0000")..........................DVD Ratings
Area Code
Change Password
PBC ...............................................................On
Off
1. Language
This is used to configure language preferences:
Player Language – To choose the display language for the player’s
Setup Menu and onscreen display.
Disc Menu Language – To choose the preferred language for displaying
DVD and Blu-ray Disc menus. If a disc menu of the selected language is
available, that menu will be shown instead of the default disc menu.
Audio Language – To choose the preferred audio language for DVD and
Blu-ray Discs. If an audio track of the selected language is available on
the disc, the Audio track will be played back.
Subtitle Language – To choose the preferred subtitle language for DVD.
If a subtitle of the selected language is available on the disc, it will be
displayed. When
"Auto" is selected, the subtitle display is decided by the
disc.
Note: If your preferred language is not listed in the Audio, Subtitle or
Disc Menu options, select
"Other" and enter the Language Code found
on the later section of this manual.
Setup Menu
Playback Setup
Video Setup
Audio Format Setup
Audio Processing
Device Setup
Network Setup
Exit
Language
Auto Play Mode
SACD Priority
DVD-Audio Mode
Angle Mark
PIP Mark
SAP Mark
Configure language preferences
English
On
Multi-Channel
DVD-Audio
Off
Off
Off
Exit
Page 23

1. Picture Adjustment
This is used to adjust picture control parameters. The 650BD provides a
wide array of picture controls. Please refer to the "Picture Adjustment"
section of this manual for details of each control.
2. Primary Output
To select the primary video output method. The options are:
HDMI – Use HDMI as the primary video output. This setting will ensure
that the HDMI output gets the best possible picture quality. Component
and composite video output may not be available or may be limited to a
lower resolution based on content source limitations.
Component – Use component video as the primary video output. This
setting will ensure that the component output will always be available
and displays proper video signals. With this configuration, the video
decoder in the player performs any necessary format conversion.
Note: Copyright control mechanisms encoded on the disc may limit the
output resolution of the component video output. For DVD, if CSS
encryption is in use the output resolution is limited to no more than
480p/576p; for Blu-ray Discs, the output resolution is limited to no more
than 1080i, and could be lower if the disc contains an Image Constraint
Token.
3. TV Aspect Ratio
To set the aspect ratio of the player’s output image. The options are :
4:3 Letterbox – Choose this when the display is standard 4:3. A
widescreen image is displayed in
"letterbox" format with black borders on
top and bottom.
4:3 Pan & Scan – Choose this when the display is standard 4:3. A
widescreen image will be stretched.
16:9 Wide – Choose this when the display is widescreen 16:9. 16:9
materials will be displayed in its native aspect ratio, and 4:3 materials
will be stretched horizontally.
16:9 Wide/Auto – Choose this when the display is widescreen 16:9. 16:9
materials will be displayed in its native aspect ratio, and 4:3 materials
will be displayed with black borders on both sides in order to maintain
the original 4:3 aspect ratio.
4. TV System
To choose the output video standard (PAL/NTSC) to match your TV. The
options are:
PAL – When playing PAL-encoded discs, no system conversion is
performed. NTSC-encoded contents are converted to PAL output. Blu-ray
discs encoded with 24Hz frame rate are converted to 50Hz frame rate if
neither 1080p24 Output nor Source Direct output resolution is enabled.
NTSC– When playing NTSC-encoded discs, no system conversion is
performed. PAL encoded contents are converted to NTSC output. Blu-ray
discs encoded with 24Hz frame rate are converted to 60Hz frame rate if
neither 1080p24 Output nor Source Direct output resolution is enabled.
Multi-system – No system conversion is performed. The output video
system is the same as that encoded on the disc. Blu-ray discs encoded
with 24Hz frame rate are converted to 60Hz frame rate if neither
1080p24 Output nor Source Direct output resolution is enabled. This
mode requires a TV that supports both NTSC and PAL systems.
Note: Do not select
"Multi-system" if your TV does not support both PAL
and NTSC systems. The TV display may become a black screen upon
inserting a disc encoded in a different system than your TV supports.
Should this happen, you can press the OPEN button to eject the disc tray,
and then use the Setup Menu to correct the "TV System" setting.
23
650BDazur
ENGLISH
9. PBC – Play Back Control
To enable/disable Play Back Control. Play Back Control is a primitive form
of disc menu. The options are:
On – If the disc contains Play Back Control, show the menu.
Off – Play back the contents by sequence.
Video Setup
The "Video Setup" section of the Setup Menu system allows you to
configure various video output options. The menu items in this section
are:
Menus Settings
Picture Adjustment ......................................Brightness
Contrast
Hue
Saturation
Sharpness
Primary Output .............................................HDMI
Component
TV Aspect Ratio ............................................4:3 Letterbox
4:3 Pan & Scan
16:9 Wide
16:9 Wide/Auto
TV System.....................................................PAL (default)
NTSC
Multi-system
Output Resolution........................................Auto
1080p
1080i
720p
480p/576p
480i/576i
Source Direct
1080p24 Output..........................................Auto
On
Off (default)
HDMI Option.................................................Colour Space
Auto
RGB Video Level
RGB Limited
YCbCr 4:4:4
YCbCr 4:4:2
Screen Saver ................................................On
Off
Energy Saver
Brightness
Color Space Auto
Page 24

24
Setup menu continued
8. Screen Saver
To turn on/off the screen saver function. The screen saver is designed to
minimize burn-in concerns for plasma and CRT display devices. The
available options are:
On – After about 3 minutes of inactivity, the player will show an animated
Cambridge Audio logo moving on a black background. This allows most
areas of the screen to rest and gives all areas an equal opportunity to
refresh.
Off – The screen saver will not be activated. Use this option if your TV
does not have a burn-in issue.
Energy Saver – Video output will be turned off after 3 minutes of
inactivity. Many projectors and LCD TVs will go into a standby or sleep
mode and turn off their projection lamp or LCD backlight lamp, thus
saving energy and prolonging the lamp life. When you press any button on
the remote control or the player’s front panel, the screen saver will be
cancelled and video output will be restored. If your TV is already in
standby or sleep mode, you may need to wake up the TV by pressing a
button on its remote or control panel.
Audio Format Setup
The "Audio Format Setup" section of the Setup Menu system allows you
to configure preferences for audio output formats. The menu items in this
section are:
Menus Settings
Secondary Audio ..........................................On
......................................................................Off
HDMI Audio...................................................LPCM
......................................................................Bitstream
......................................................................Off
SACD Output.................................................PCM
DSD
Coaxial/Optical Output ................................LPCM
Bitstream
LPCM Rate Limit...........................................48K
96K
192K
5. Output Resolution
To choose the output resolution that best matches your television’s native
resolution. For a detailed description on how to choose a proper output
resolution, please refer to the "Select the Best Output Resolution" section
of this manual.
6. 1080p24 Output
This option only applies to the HDMI output at 1080p resolution. Many
Blu-ray discs that originated from theatrical movies are encoded using
24Hz frame rate, the same number of frames per second as the original
theatrical film. If your TV properly supports 1080p 24Hz, smoother motion
can be achieved by enabling 1080p24 output for such discs. The
available options are:
Auto – Video encoded in 24Hz frame rate will be output as 1080p 24Hz
if the TV informs the player that it can support the 1080p24 signal.
On – Video encoded in 24Hz frame rate will be output as 1080p 24Hz
without regard to whether the TV can support the 1080p24 signal or not.
This is useful if the TV can actually support 1080p24 but does not
properly state its capability. Please note that if the TV cannot support
1080p24, selecting this option will result in no video.
Off (default) – Video encoded in 24Hz frame rate will be converted to
50Hz (PAL) or 60Hz (NTSC)
7. HDMI Options
To configure video options that are unique to the HDMI output. This item
contains a sub-menu with the following settings:
Colour Space – To select the colour space for the HDMI output. The
available options are:
Auto (Recommended) – The player checks with the display device to
automatically determine what colour space to use. If the display device
supports YCbCr 4:4:4, then it will be used to avoid extra colour space
conversion.
RGB Video Level – The HDMI output uses RGB colour space and
normal signal range suitable for video displays. Video signal level below
reference black or above reference white in the original content is
preserved without clipping or alteration.
YCbCr 4:4:4 – The HDMI output uses YCbCr 4:4:4 colour space.
YCbCr 4:2:2 – The HDMI output uses YCbCr 4:2:2 colour space.
Generally this is the colour space that is closest to the colour space
encoded on the discs. (All discs are encoded in YCbCr 4:2:0 colour
space, and the video decoder decodes it into YCbCr 4:2:2.)
On
Page 25

25
650BDazur
ENGLISH
1. Secondary Audio
To set the Secondary Audio Program mixing option. Some Blu-ray discs
contain a secondary audio and video program, such as a director’s
commentary. Some Blu-ray Discs have a sound effect when you make
menu choices. This Setup Menu item allows you to decide whether to mix
the Secondary Audio Program and menu clicking sound into the primary
audio. The options are:
On – The Secondary Audio Program and menu clicking sound are mixed
into the primary audio. Usually this will cause the primary audio volume
to be slightly reduced. High resolution primary audio will be converted to
a normal resolution in order to mix with the secondary audio.
Note: If Secondary Audio Program is set On and a SAP (or menu sound)
is present as well as mixing these into the main audio the 650BD will
output that audio over both HDMI and SPDIF/Toslink as DTS 5.1 ONLY.
No external decoding of DTS Master, Dolby Digital etc. soundtracks will
be possible in this mode. All soundtracks will always be internally
decoded, mixed and then re-encoded as DTS 5.1 before output.
Once you have finished listening to a program with secondary audio
always remember to turn this feature back off.
Off – The Secondary Audio Program and menu clicking sound are not
mixed into the primary audio and you cannot hear the secondary audio
or menu clicking sound. This setting preserves the highest possible audio
quality for the primary audio.
2. HDMI Audio
To select digital audio output format from the HDMI output. The options
are:
LPCM – Digital audio output via HDMI will be multi-channel Linear PCM
format. When this option is selected, compressed audio bit streams will
be decoded by the player and then sent as multi-channel PCM. This
setting is recommended when connecting the HDMI output directly to a
TV or to a receiver without advanced audio decoding capabilities.
Bitstream – Digital audio output via HDMI will be in bitstream format.
This option is recommended when connecting the HDMI output to an A/V
receiver or processor that supports advanced audio decoding of Dolby
TrueHD and DTS-HD Master Audio etc.
Off – No digital audio output via HDMI.
Note: If you use HDMI to connect audio to an HDMI A/V receiver or audio
processor, it is important that you choose 720p or higher HDMI output
resolution when playing high resolution audio content (DVD-Audio,
SACD, Dolby TrueHD and DTS-HD Master Audio). According to the HDMI
specification, the bandwidth available for audio is proportional to the
total bandwidth used by video. At 480p/576p resolution, the HDMI
specification can only support 2 channels of audio with high sample rate
(up to 192kHz), or 8 channels of audio with standard sample rate (up to
48kHz). If you play high resolution audio content at the 480p/576p
resolution, you may get reduced audio resolution, incomplete audio
channels, or even no audio/video output at all. Choosing a higher output
resolution such as 720p or above allows enough bandwidth for all high
sample rate audio channels.
3. SACD Output
To select audio output format for SACD. The options are:
PCM – SACD Direct Stream Digital (DSD) data is decoded by the player
and converted into multi-channel, high resolution PCM data. The HDMI
output can be sent to an external AV receiver capable of receiving multi
channel PCM (HDMI 1.1 or higher inputs are required). The 650BD’s own
audio outputs are also active and playback of SACD material is possible
by the 650BD itself.
DSD – SACD DSD data is output over HDMI without any conversion. For
decoding by an external AV receiver capable of receiving DSD (HDMI 1.2a
or higher inputs are required and the receiver must actually include
support for DSD as it is not a mandatory requirement of the HDMI spec).
4. Coaxial/Optical Output
To set the output format for the coaxial/optical digital audio outputs. The
options are:
LPCM – Forces down-mixed 2-channel digital audio output. Choose this
setting if your receiver/amplifier or DAC only supports stereo digital (PCM)
audio.
Bitstream – Passes audio as compressed bitstream format to the
receiver/amplifier. Choose this setting if your receiver/amplifier is capable
of decoding Dolby Digital and/or DTS etc.
5. LPCM Rate Limit
To set the maximum Linear PCM output frequency for the coaxial/optical
digital output. This menu item is intended to ensure that the audio output
is compatible with equipment that cannot support high sample rates. It
sets an upper limit to decide whether the player shall down-sample audio.
The player does not up-sample audio to higher sample rates. The options
are:
48kHz – Supported by most equipment. Higher sample rate material will
be downsampled to 48kHz.
96kHz – Allows a higher sampling rate and frequency response. It can
result in better audio quality. Ensure that the receiver/amplifier can
support it. Higher sample rate material will be downsampled to 96kHz.
192kHz – Allows the highest sampling rate and frequency response. It
can result in the best audio quality. Ensure that the receiver/amplifier
can support it.
Page 26

26
Audio signal reference chart
Blu-ray Discs may contain many types of audio signal formats, some of
those are of the high resolution lossless types such as Dolby TrueHD and
DTS-HD Master Audio. Blu-ray Discs also have many optional audio
components such as the Secondary Audio Program and the menu clicking
sound. The player’s Audio Format Setup menu allows you to configure the
audio output to meet your specific preference. The following chart
provides a reference to what type of audio signal can be expected.
Setup menu continued
Output Type
HDMI Output Coaxial/Optical Outputs Analogue Outputs
When "Secondary Audio" is set to "Off":
Bitstream LPCM Bitstream LPCM
LPCM 2ch LPCM 2ch LPCM 2ch LPCM 2ch LPCM 2ch 2ch
LPCM 5.1ch LPCM 5.1ch LPCM 5.1ch LPCM 2ch LPCM 2ch 5.1ch
LPCM 7.1ch LPCM 7.1ch LPCM 7.1ch LPCM 2ch LPCM 2ch 7.1ch
Dolby Digital / EX Dolby Digital / EX LPCM 5.1ch Dolby Digital /EX LPCM 2ch 5.1ch
Dolby Digital Plus Dolby Digital Plus LPCM up to 7.1ch Dolby Digital 5.1 LPCM 2ch Up to 7.1ch
Dolby True HD Dolby True HD LPCM up to 192kHz Dolby Digital 5.1 LPCM 2ch Up to 7.1ch
24-bit 7.1ch
DTS / ES DTS / ES LPCM 5.1ch DTS /ES LPCM 2ch 7.1ch
DTS-HD High Resolution DTS-HD LPCM up to 7.1ch DTS 5.1 (core) LPCM 2ch Up to 7.1ch
High Resolution
DTS-HD Master Audio DTS-HD LPCM up to 96kHz DTS 5.1 (core) LPCM 2ch Up to 7.1ch
Master Audio 24-bit 7.1ch or
192kHz 24-bit 2ch
Setting
Source Format
Output Type
HDMI Output Coaxial/Optical Outputs Analogue Outputs
When "Secondary Audio" is set to "On" and the player encounters a disc with secondary audio track or menu clicking sound:
Note: All audio output signals are mixed with primary, second audio and
menu clicking sound.
* Denotes mixed audio re-encoded into DTS bitstream format.
The 650BD can output a DD EX encoded bitstream but internally
decodes EX material as 5.1 DD.
The 650BD can output a DTS ES encoded bitstream but internally
decodes ES material as 5.1 DTS.
Bitstream LPCM Bitstream LPCM
LPCM 2ch DTS* LPCM 2ch DTS* LPCM 2ch 2ch
LPCM 5.1ch DTS* LPCM 5.1ch DTS* LPCM 2ch 5.1ch
LPCM 7.1ch DTS* LPCM 7.1ch DTS* LPCM 2ch 7.1ch
Dolby Digital / EX DTS* LPCM 5.1ch DTS* LPCM 2ch 5.1ch
Dolby Digital Plus DTS* LPCM up to 7.1ch DTS* LPCM 2ch Up to 7.1ch
Dolby TrueHD DTS* LPCM up to 7.1ch DTS* LPCM 2ch Up to 7.1ch
DTS / ES DTS* LPCM 5.1ch DTS* LPCM 2ch 7.1ch
DTS-HD High Resolution DTS* LPCM up to 7.1ch DTS* LPCM 2ch Up to 7.1ch
DTS-HD Master Audio DTS* LPCM up to 7.1ch DTS* LPCM 2ch Up to 7.1ch
Setting
Source Format
Page 27

27
650BDazur
ENGLISH
Recommended audio format 0ptions
Depending on your specific audio/video connection method, the audio
format options of the 650BD may need to be adjusted to match your
configuration. Please refer to the video and audio connection methods
described previously in this guide and the following audio setup
guidelines.
Audio connection directly to TV
If the player is connected directly to the TV through HDMI, through DVI
and analogue L/R audio cables, or through component video and
analogue L/R audio cables, it is recommended that you use the following
audio format options:
Secondary Audio: On
HDMI Audio: LPCM
SACD Output: PCM
Coaxial Optical Output: (any – not in use)
LPCM Rate Limit: (any – not in use)
Multi-channel digital audio to Receiver through HDMI
If your receiver supports HDMI v1.3 with decoding capability for high
resolution lossless audio formats such as Dolby TrueHD and DTS-HD
Master Audio, please set these audio format options:
Secondary Audio: Off (or On if you need secondary audio)
HDMI Audio: Bitstream
SACD Output: PCM (or DSD if the receiver supports
DSD over HDMI)
Coaxial Optical Output: (any – not in use)
LPCM Rate Limit: (any – not in use)
If your receiver supports HDMI v1.1/1.2 Multi-Channel PCM audio, but
not high resolution lossless audio formats such as Dolby TrueHD and DTSHD Master Audio, please set these audio format options:
Secondary Audio: Off (or On if you need secondary audio)
HDMI Audio: LPCM
SACD Output: PCM (or DSD if the receiver supports
DSD over HDMI)
Coaxial Optical Output: (any – not in use)
LPCM Rate Limit: (any – not in use)
Multi-channel analogue audio to Receiver
If the player is connected to an A/V receiver through the 7.1ch or 5.1ch
analogue audio jacks using 8 or 6 RCA/Phono cables, you can still play
all the supported audio formats and let the 650BD decode them and
then listen them via your A/V receiver and surround-sound system. The
following audio format setup options are recommended:
Secondary Audio: Off (or On if you need secondary audio)
HDMI Audio: Off
SACD Output: PCM (DSD is not available through the
analogue audio output)
Coaxial Optical Output: (any – not in use)
LPCM Rate Limit: (any – not in use)
Also set Speaker Configuration in the
"Audio Processing" menu:
Set Down Mix to
"7.1Ch" or "5.1Ch".
Set the speaker size and subwoofer properly according to your actual
audio hardware as detailed on the following pages.
Multi-channel digital audio to Receiver through Coaxial
or Optical SPDIF
If your receiver only supports Coaxial/Optical, Dolby Digital and DTS
decoding, the following audio format setup options are recommended:
Secondary Audio: Off (or On if you need secondary audio)
HDMI Audio: Off
SACD Output: (any – SACD is not available through
the optical/coaxial output)
Coaxial Optical Output: Bitstream
LPCM Rate Limit: 48k (or higher if supported by the
receiver)
Stereo analogue audio to Receiver
If you primarily listen to stereo content or your receiver only offers stereo
audio connections, please use the analogue RCA-style cables to connect
the FL (Front Left) and FR (Front Right) of the player to your receiver. The
following audio format options are recommended:
Secondary Audio: Off (or On if you need secondary audio)
HDMI Audio: Off
SACD Output: PCM (DSD is not available through the
analogue audio output)
Coaxial Optical Output: (any – not in use)
LPCM Rate Limit: (any – not in use)
Audio Processing setup
The "Audio Processing Setup" section of the Setup Menu system allows
you to configure how the player will process audio signals before sending
them to the output.
Menus Settings
Speaker Configuration
Dynamic Range Control...............................Auto
On
Off
Speaker Configuration
The following settings determine how the 650BD’s internal surroundsound decoder operates.
In the Speaker Configuration menu you can configure speaker settings
such as down-mix mode, number of speakers, their distance, size and
trim level. The Speaker Configuration menu shows an illustration of the
speaker placements to assist you on properly configuring the speaker
parameters.
Upon entering this menu, the cursor is positioned on the front left
speaker. You may use the / buttons to move the cursor. The
button moves the cursor in clockwise sequence, and the button moves
the cursor in counterclockwise sequence.
When the cursor is over the
"Down Mix" or "Exit" options, you can also use
the / buttons to highlight these options.
Page 28

28
Down Mix Mode
Down mix is the process of converting multi-channel audio to a lesser
number of channels. For example, converting a 5.1ch source to stereo or
converting a 7.1ch source to 5.1ch. Down mixing allows the audio output
from the player to match the exact number of speakers available in your
home theatre system.
The current down mix mode is displayed in the lower right corner of the
speaker placement illustration.
To change the audio down mix setting, press the Enter button while the
cursor is over the
"Down Mix" option. The following down mix modes are
available:
LT/RT – Left Total/Right Total. The centre and surround channels are
decoded and then Matrix encoded into the two front channels. A Dolby
Pro Logic receiver can then decode the two channel audio that is output
back into surround audio.
Stereo - This mode down-mixes multi-channel audio to 2-channel stereo
output. For original stereo content the output will not change. For original
multi-channel content the surround and centre channels will be mixed
with the left and right front channels. Recommended for use with TV sets
or stereo receiver/amplifiers (without ProLogic decoding).
5.1Ch – This mode enables 5.1ch decoded audio output. The number of
actual output channels depends on the disc. If the source content has
more channels, the surround back channels will be mixed into the
surround channels.
7.1Ch – This mode enables 7.1ch decoded audio output. The number of
actual output channels depends on the disc.
Speaker Settings
For each speaker in the home theatre system, you can set its size,
distance and trim level. To configure a speaker, move the cursor to
highlight the speaker and press the Enter button. The Speaker Settings
menu on the right side of the screen will be activated. In the Speaker
Settings menu, use the / buttons to select a parameter, and then
press the Enter button to change it. To exit the Speaker Settings menu
and return to the Speaker Configuration illustration, press the button
or select the "Exit" option. You can also move on to configure the next
speaker by selecting the "Next Speaker" option.
The following speaker parameters can be configured:
1. Size
The speaker size parameter sets bass filtering control for the speakers.
The bass crossover frequency is fixed at 80Hz. The options are:
Large – Bass frequencies are passed to the speakers.
Small – Bass frequencies are not passed to the speakers to reduce
possible distortion. If a subwoofer is available, bass frequencies are
redirected to a subwoofer.
On (for subwoofer only) – Specify that a subwoofer is available.
Off – Speaker for the corresponding position does not exist. Audio for the
missing speaker is redirected to other speakers or discarded if redirection
is not possible.
Note: The front, surround and surround back speakers are configured as
pairs. Changes to the size of one speaker will automatically change the
other speaker of the pair.
2. Distance
The speaker distance parameters sets delay control for the corresponding
audio channel. This delay is used to compensate for the audio
propagation time difference caused by the placement of speakers of
different distances from the listening position.
Speaker distance delay is only applied if the player is decoding multichannel audio. If you use bitstream audio output to your A/V receiver, the
bitstream audio is not adjusted for speaker distance delay.
Since the delay is calculated based on the distance difference from each
speaker to the listener’s position, it is important to set the distance for the
front speakers first and then the other speakers. Anytime you change the
distance of the front speakers, the distance of the other speakers will be
automatically adjusted to maintain the same distance difference.
For example, in the above diagram, measure the distance (in feet) from the
primary listening position to the Front Left or Front Right Speaker. Your
Front Right and Left speakers must be the same distance from the
listener. Enter the distance of the Front Speakers (1. in the above picture)
into the
"Speaker Configuration" menu.
Next, measure the distance (in feet) from the centre speaker (2) to the
listening position. Move the cursor to highlight the Centre speaker in the
Channel Delay setup page, and enter the distance (as close as possible)
in feet. Repeat for each speaker in the system (Centre, Surround Left,
Surround Right, Surround Back Left, Surround Back Right and Subwoofer)
as available.
Note: The distance between the surround speakers and the listener must
be shorter than or equal to that between the front speakers and the
listener.
Distances:
1 - Listener to Front
2 - Listener to Centre
3 - Listener to Surround Left
Speaker Icons:
FL - Front Left
FR - Front Right
C - Centre
SW - Subwoofer
SL - Surround Left
SR - Surround Right
SBL - Surround Back Left
SBR - Surround Back Right
Setup menu continued
FL
SL
SW
3
SB SBR
C
FR
2
1
SR
Page 29

29
650BDazur
ENGLISH
3. Trim
The speaker trim level parameters sets the volume of each individual
channel. For most accurate results, it is recommended that you use test
tones from a calibration disc, such as Digital Video Essentials HD Basics,
and a SPL (Sound Pressure Level) meter. The trim level can be set to +/10dB in 0.5dB increments.
Other Audio Processing Settings
In addition to Speaker Configuration, two other audio processing settings
are available:
1. Dynamic Range Control
To set the Dynamic Range Compression (DRC). DRC can smooth out the
sonic peaks and valleys common with wide-range digital audio. Enabling
DRC may make low level audio more audible during low-level listening.
Turning off DRC restores the sonic energy present in the original
recording. The available options are:
Auto – Play at the dynamic range specified by the disc. This option applies
to Blu-ray Discs only. For other disc types no dynamic range compression
is applied.
On – Turn on dynamic range compression.
Off – Turn off dynamic range compression.
Device Setup
The "Device Setup" section of the Setup Menu system allows you to
configure additional player options related to the hardware and control
functions. The menu items in this section are:
Menus Settings
Firmware Information ..................................On
Dim
Off
Firmware Notification...................................On
Off
Firmware Upgrade........................................Via Disc
Via USB
Via Network
HDMI CEC .....................................................On
Limited
Off
Dimmer Control............................................On
Dim
Off
OSD Mode ....................................................Normal
Silent
Remaining
Persistent Storage .......................................Storage Device
Internal Flash
USB Drive
Total Space
Available Space
Erase BD-Video Data
Reset Factory Defaults
1. Firmware Information
To display the currently installed firmware version.
2. Firmware Notification
To set whether the player should automatically check if new firmware
versions are available via the Internet server and notify the user about
new firmware. The options are:
On – Check for new firmware version automatically and notify the user
about new firmware. Requires working network connection.
Off – Do not check for new firmware version automatically.
3. Firmware Upgrade
To upgrade the player’s firmware. This operation is only available when
the playback is completely stopped or when there is no disc loaded.
The firmware is the system software that controls the features and
functions of the player. Since the Blu-ray disc specifications are new and
evolving, it is possible that a Blu-ray disc manufactured after the player
was manufactured uses certain new features of the Blu-ray disc
specifications. To ensure the best possible viewing experience, the player
may need a firmware update from time to time.
There are three ways to upgrade the player’s firmware. The options are:
Via Disc – From time to time, you may be able to download a disc image
from the Cambridge Audio’s website www.cambridge-audio.com/care
and burn an upgrade disc.
Via USB – You may also be able to download the firmware files from
Cambridge Audio’s web site to a USB drive and then use the USB drive to
upgrade the player. For the above two cases closely follow any instructions
on our website.
Via Network – If the player has a working Internet connection, you may
upgrade the player directly over the Internet. Please follow the
instructions on your TV screen.
4. HDMI CEC
CEC (Consumer Electronics Control) is an optional HDMI feature that can
enable convenient remote control and automatic setup of consumer
electronics over the HDMI connection. The remote control function allows
you to use a single remote handset to operate multiple devices connected
via HDMI. For example, you may use the TV remote to control playback of
the Blu-ray disc player. The automatic setup function can automatically
turn on the TV and change to the correct input when you start playing a
disc in the Blu-ray Disc player. It can also turn off the player automatically
when you turn off the TV. The implementation and compatibility of this
feature varies by device manufacturer. Each may only implement part of
the features or add their own proprietary functions. The manufacturerspecific implementation of the HDMI CEC function is often given a
proprietary name of "…Link" or "…Sync". The 650BD provides three modes
for the HDMI CEC function:
On – HDMI CEC is enabled. Use this mode if your other devices are
compatible with the player.
Limited – HDMI CEC is enabled but the 650BD will only respond to
playback control commands. It will not respond or issue power on/off and
input selection commands. Use this mode if you do not want the
automatic setup function to turn on/off your devices.
Off – HDMI CEC feature is turned off. The player will not respond to HDMI
CEC commands from other devices, nor will it setup other devices
automatically.
Page 30

30
5. Dimmer Control
To control the display intensity of the front panel Vacuum Fluorescent
Display (VFD) information window. In case you feel that the display
becomes a distraction to your enjoyment of the video, this option allows
you to dim it or turn it off. The available options are:
On - The VFD window is at normal brightness.
Dim - The VFD window is at reduced brightness.
Off – The VFD window is turned off. In this mode the display resumes
momentarily when there is any user operation.
6. OSD Mode
To select how long the on-screen display information, such as elapsed or
remaining time, stays on the TV screen. The available options are:
Normal – On-screen display information stays on the TV screen until the
user cancels it.
Silent – On-screen display information shows on the TV screen for a few
seconds and then disappears. The front panel display still maintains the
selected display information.
Remaining – On-screen display information stays on the TV screen until
the user cancels it. By default display remaining time instead of elapsed
time.
7. Persistent Storage
Persistent storage is a data storage area that holds additional contents
for BonusView and BD-Live features. The data will be kept even if you turn
off the player. The following persistent storage management options are
available:
Storage Device – To select which storage device should be used as the
persistent storage. The 650BD is equipped with 1GB of internal flash
memory. There are also two USB 2.0 ports on the player that can accept
a USB drive to be used as the persistent storage. The choices are:
Internal Flash – Use the internal flash memory for persistent storage.
USB Drive – Use a USB drive for persistent storage. To meet the
specification for BD-Live, a USB flash drive of 1GB or larger is required. A
USB hard disk is not recommended.
Note: The new storage device choice becomes effective only after the
player is restarted. Please make sure that you turn off the player and then
turn it back on after changing the
"Storage Device" option.
Total Space – To display the total space of the persistent storage.
Available Space – To display the currently available space of the
persistent storage. If the available space becomes too low, some Blu-ray
Discs may not play properly.
Erase BD-Video Data – To erase the BD-Video data from the persistent
storage.
8. Reset Factory Defaults
To reset all settings to the factory default value.
Note: The parental control password and ratings will not be reset. This
operation is only available when the playback is completely stopped or
when there is no disc loaded.
Network Setup
The "Network Setup" section of the Setup Menu system allows you to
configure the parameters for the Internet connection of the player, test
the connection and restrict BD-Live access. The menu items in this
section are:
Menus Settings
IP Configuration............................................Auto
Manual
IP Address
Subnet Mask
Gateway
DNS 1
DNS 2
BD-Live Network Access ..............................On
Limited
Off
Connection Test
Mac Address
1. IP Configuration
To determine how the player obtains its IP address. The available options
are:
Auto (DHCP) - The player automatically obtains its IP address information
using DHCP (Dynamic Host Configuration Protocol). This is the default
setting. In most cases, automatic IP configuration can be used.
Manual – Manually enter the numeric IP address information. Set the IP
configuration manually only when the router has no DHCP server
functions or when the router’s DHCP server function is disabled. For more
information on how to manually configure the Internet connection and
what values to use, please consult your broadband router/modem
instruction manuals or call your Internet service provider.
2. IP Address
The Internet Protocol address of the player. When "IP Configuration" is set
to "Auto (DHCP)", the value displayed here is obtained using DHCP and
cannot be changed.
3. Subnet Mask
Each IP address has an associated subnet mask. It is used by the player
to decide whether to route network traffic through the router or directly to
another device on the same network. When "IP Configuration" is set to
"Auto (DHCP)", the value displayed here is obtained using DHCP and
cannot be changed.
4. Gateway
The IP address of the router. It is also called "default gateway" or "default
router". When "IP Configuration" is set to "Auto (DHCP)", the value
displayed here is obtained using DHCP and cannot be changed.
Setup menu continued
Page 31

31
650BDazur
ENGLISH
5. DNS 1
The IP address of the first (primary) DNS (Domain Name System) server.
DNS is the mechanism to translate human-readable addresses to
numeric IP addresses. When "IP Configuration" is set to "Auto (DHCP)",
the value displayed here is obtained using DHCP and cannot be changed.
6. DNS 2
The IP address of the second (secondary) DNS server. When "IP
Configuration" is set to "Auto (DHCP)", the value displayed here is obtained
using DHCP and cannot be changed.
7. BD-Live Network Access
To restrict BD-Live content access. The available options are:
On – BD-Live access is permitted.
Limited – BD-Live access is permitted only for contents that have a valid
content owner certificate. Internet access is prohibited if the BD-Live
contents do not have a certificate. This option ensures that you are
accessing only authentic content, although it may block your access to
smaller independent content providers.
Off – BD-Live access is prohibited.
8. Connection Test
To test the Internet connection. It is recommended that you test the
connection when you initially connect the player to the Internet, or
whenever changes to "IP Configuration" and other network parameters
are made.
9. MAC Address
This read-only field displays the MAC (Media Access Control) address of
the player. Each player has a unique MAC address. It is used by
networking devices (such as a router or PC) on the same network to
provide identification and facilitate communication.
Picture Adjustment
Picture Adjustment is a special section of the Video Setup menu. It allows
you to fine tune many picture control parameters in order to achieve the
optimal picture quality and visual result. To use Picture Adjustment, press
the SETUP button on the remote control to enter the player’s Setup Menu,
and then choose
"Video Setup" – "Picture Adjustment". The Setup Menu
will be replaced by the Picture Adjustment menu:
To change a picture adjustment parameter, use the / buttons to
highlight the parameter, and use the / buttons to change its value.
To aid in the adjustment of picture control parameters, the picture
adjustment menu will be reduced to only show the parameter being
adjusted once you press the / buttons. The reduced menu will be
positioned near the bottom of the screen.
You can continue adjusting the current parameter by pressing the /
buttons. To select another parameter, press the / buttons. Press the
Enter button to return to the large Picture Adjustment menu.
To exit the Picture Adjustment menu and return to the Setup Menu, either
select
"Exit" or press the Return button.
The following picture adjustment controls are available:
Brightness – To adjust the brightness (black level) of the video output.
Contrast – To adjust the contrast (white level) of the video output.
Note: Proper brightness and contrast settings are necessary for a quality
video output. If you do not have the correct black and white levels, your
images can appear washed out or can lose detail in shadows when
watching darker scenes. Televisions have brightness (black level)and
contrast (white level) controls; however it may require a combination of
tweaking both the player and your television to get the optimal result.
First adjust the television’s picture controls for the best possible picture.
Once that is done, try changing the player’s settings to further refine the
picture to the optimal result.
Hue – To adjust the hue (tint) of the video output. This control only applies
to analogue video output (component and composite)
Saturation –To adjust the saturation (colour intensity level) of the video
output.
Sharpness – To adjust the sharpness of the video output.
Page 32

32
Appendix - language code list
Code Language Name
6565 Afar
6566 Abkhazian
6570 Afrikaans
6577 Ameharic
6582 Arabic
6583 Assamese
6588 Aymara
6590 Azerbaijani
6665 Bashkir
6669 Byelorussian
6671 Bulgarian
6672 Bihari
6678 Bengali, Bangla
6679 Tibetan
6682 Breton
6765 Catalan
6779 Corsican
6783 Czech
6789 Welsh
6865 Danish
6869 German
6890 Bhutani
6976 Greek
6978 English
6979 Esperanto
6983 Spanish
6984 Estonian
6985 Basque
7065 Persian
7073 Finnish
7074 Fiji
7079 Faroese
7082 French
7089 Frisian
7165 Irish
7168 Scots Gaelic
7176 Galician
7178 Guarani
7185 Gujarati
7265 Hausa
7273 Hindi
7282 Croatian
Code Language Name
8083 Pashto, Pushto
8084 Portuguese
8185 Quechua
8277 Rhaeto-Romance
8279 Romanian
8285 Russian
8365 Sanskrit
8368 Sindhi
8372 Serbo-Croatian
8373 Singhalese
8375 Slovak
8376 Slovenian
8377 Samoan
8378 Shona
8379 Somali
8381 Albanian
8382 Serbian
8385 Sundanese
8386 Swedish
8387 Swahili
8465 Tamil
8469 Telugu
8471 Tajik
8472 Thai
8473 Tigrinya
8475 Turkmen
8476 Tagalog
8479 Tonga
8482 Turkish
8484 Tatar
8487 Twi
8575 Ukrainian
8582 Urdu
8590 Uzbek
8673 Vietnamese
8679 Volapuk
8779 Wolof
8872 Xhosa
8979 Yoruba
9072 Chinese
9085 Zulu
Code Language Name
7285 Hungarian
7289 Armenian
7365 Interlingua
7378 Indonesian
7383 Icelandic
7384 Italian
7387 Hebrew
7465 Japanese
7473 Yiddish
7487 J avanese
7565 Georgian
7575 Kazakh
7576 Greenlandic
7577 Cambodian
7578 Kannada
7579 Korean
7583 Kashmiri
7585 Kurdish
7589 Kirghiz
7665 Latin
7678 Lingala
7679 Laothian
7684 Lithuanian
7686 Latvian,Lettish
7771 Malagasy
7773 Maori
7775 Macedonian
7776 Malayalam
7778 Mongolian
7779 Moldavian
7782 Marathi
7783 Malay
7784 Maltese
7789 Burmese
7865 Nauru
7869 Nepali
7876 Dutch
7879 Norwegian
7982 Oriya
8065 Panjabi
8076 Polish
Note: These affect the Audio/Subtitle/Disc menu defaults only not the
On Screen menu language.
Page 33

33
650BDazur
ENGLISH
Technical specifications
Disc types Blur-ray (BD), DVD-Video, DVD-Audio,
AVCHD, SACD, CD, HDCD, Kodak
Picture CD, CD-R/RW, DVD±R/RW,
DVD±R DL, BD-R/RE
BD Profile BD-ROM Version 2 Profile 2
(also compatible with Profile 1 Version 1.0
and 1.1)
Architecture Mediatek MTK8520/MTK8575
Internal Storage 1GB (Actual available storage varies due
to system usage)
External Storage 2 x USB 2.0
Analogue audio outputs 7.1 RCA/Phono
Can be set for Stereo, 5.1 or 7.1 output
Analogue video outputs Composite Video (CVBS)
S-Video (S-Video)
Component (YCbCr/YPbPr)
Video Frame Rates 24Hz\50Hz\60Hz
Video Decoding MPEG2, MPEG2 HD, MPEG4, MPEG4 AVC,
VC-1, XviD, VCD, AVCHD, MPEG ISO, AVI,
VOB, MKV (4.1), JPEG, JPEG HD
HDMI output (1.3a) Video
NTSC: 480i/p, 720p, 1080i/p, 1080p24,
PAL: 576i/p, 720p, 1080i/p, 1080p24
Audio
Stereo, up to 7.1ch high-resolution PCM,
up to 5.1ch DSD, bitstream or decoding to
PCM of Dolby Digital, Dolby Digital
Plus, Dolby TrueHD, DTS, DTS-HD High
Resolution Audio, and DTS-HD Master
Audio.
IMD (19/20kHz) 0dBFs < 0.002%
Crosstalk @1kHz < -106dB @ 1kHz
Dynamic Range > 105dB
Frequency response 20Hz – 20kHz (±0.4dB)
THD <0.008% THD @ 1kHz
S/N >100dB
Composite Video 1.0V p-p (75 Ω)
S-Video Y:1.0V p-p (75 Ω)
C:0.286V p-p (75 Ω)
Component Video Y: 1.0V p-p (75 Ω)
Cb/Cr: 0.7V p-p (75 Ω)
Pb/Pr: 0.7V p-p (75 Ω)
Ethernet 100BASE-T
IR Emitter In 3.5mm mini jack, isolated, modulated
PSU Universal switch-mode 100 – 240V AC,
IEC inlet
Max power consumption 30W
Standby consumption <1W
Dimensions (H x W x D) 85 x 430 x 312mm (3.3 x 16.9 x 12.3’’)
with feet
Weight (unboxed) 4.1kg (9.04lbs)
Cambridge Audio’s policy is one of continuous improvement. Design and
specifications are therefore subject to change without prior notice.
Troubleshooting
There is no power
Ensure the AC power cord is connected securely.
Ensure the plug is fully inserted into the wall socket and is switched on.
Check fuse in the mains plug or adaptor.
The player will not read the disc
Check the disc is not loaded upside down.
Check that the disc is not too scratched or dirty.
The disc type is not supported by this unit.
Check its region and type.
Functions on some discs may not work on this unit. This is not a
malfunction of the player.
There is no sound
Ensure that the amplifier is set correctly.
Check that the interconnects are inserted correctly.
Check if the output has been set incorrectly to Bitstream or LPCM.
The disc is skipping
Check that the disc is not too scratched or dirty.
Ensure that the 650BD is on a firm surface and not subject to vibrations.
A low hum or buzz sound can be heard
Power cords or lighting placed near this product.
Analogue inputs not connected securely.
No sound from the rear speakers
Source being played is not recorded in surround-sound.
Unit has been put to stereo or other down-mix mode.
No sound from the centre speaker
A stereo mode has been selected.
Remote control is not working
The batteries are flat.
The remote is too far from the unit or out of the effective range.
Files on a connected USB device do not play
If the USB drive is incompatible, or the player encounters errors while
reading the USB drive or flash memory card, the screen displays "Device
Error". In this case please verify that the USB drive is compatible, and try
to unplug the device and re-insert again.
In some cases, an incompatible USB device may cause the 650BD to
stop responding. If this occurs simply turn off the power, remove the USB
device, and turn the player back on.
The file type is incompatible (i.e. AAC). Check the supported file types.
The drive requires too much power from the USB socket.
Problems using HDMI
Ensure that your screen supports HDCP (High-Definition Copy Protection).
Ensure your screen is capable of displaying the resolution being output
by the Blu-ray player.
Note: Cables which run over 5m may cause sync or grounding issues.
For more frequently asked questions (FAQs), technical advice and
information on getting the most out of your 650BD, please visit the
Support section on Cambridge Audio’s website:
www.cambridgeaudio.com/support.php
Page 34

Cambridge Audio is a brand of Audio Partnership Plc
Registered Office: Gallery Court, Hankey Place
London SE1 4BB, United Kingdom
Registered in England No. 2953313
www.cambridge-audio.com
© 2010 Cambridge Audio Ltd
AP26083/5-A
 Loading...