

Page 1
Page 2
Page 3
4
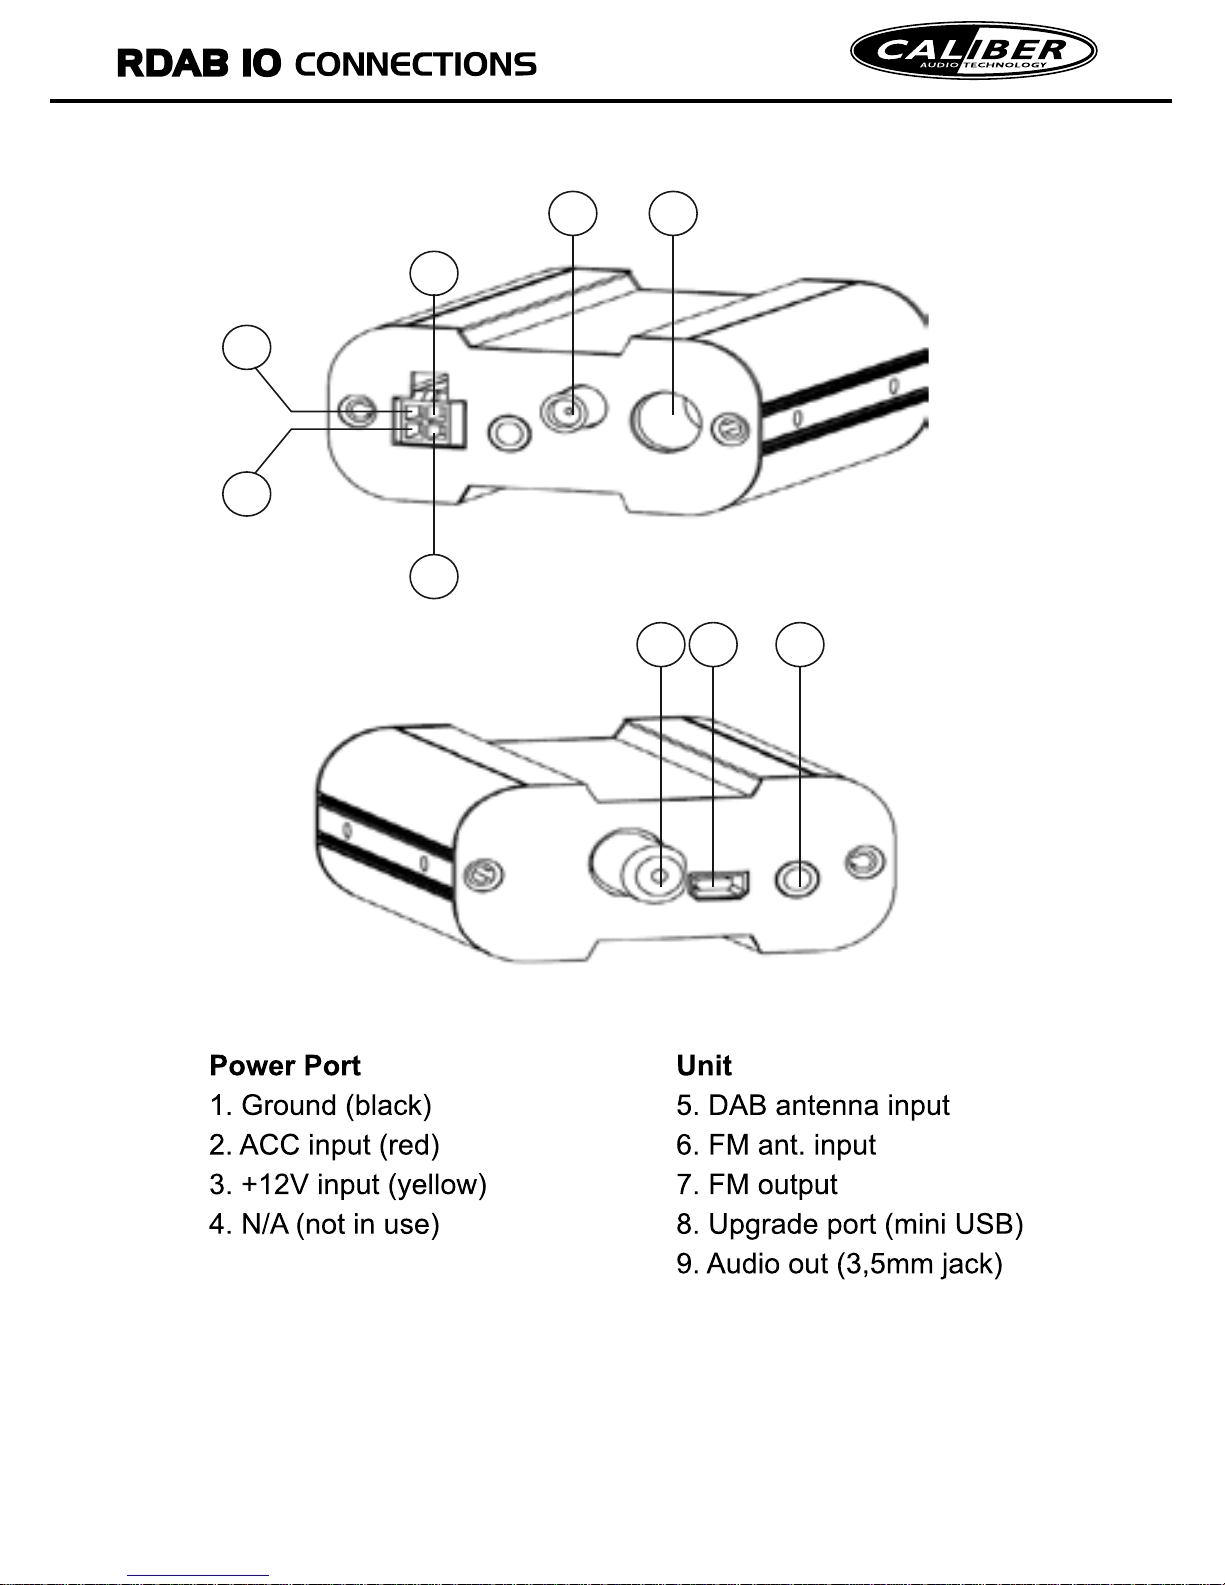
1
3
2
5 6
87 9
Page 4
Page 5
2. Installation of The Device
Integrating this device with your existing car stereo system is simple and easy. Simply
connect both the existing FM antenna and DAB antenna to the device inputs, then the
FM-modulated DAB radio is readily available via its FM output (F female connector on the
other end of device). This paragraph is intended to guide you step by step how to
correctly configure this device with existing FM antenna, power source, and audio output
delivery to car stereo.
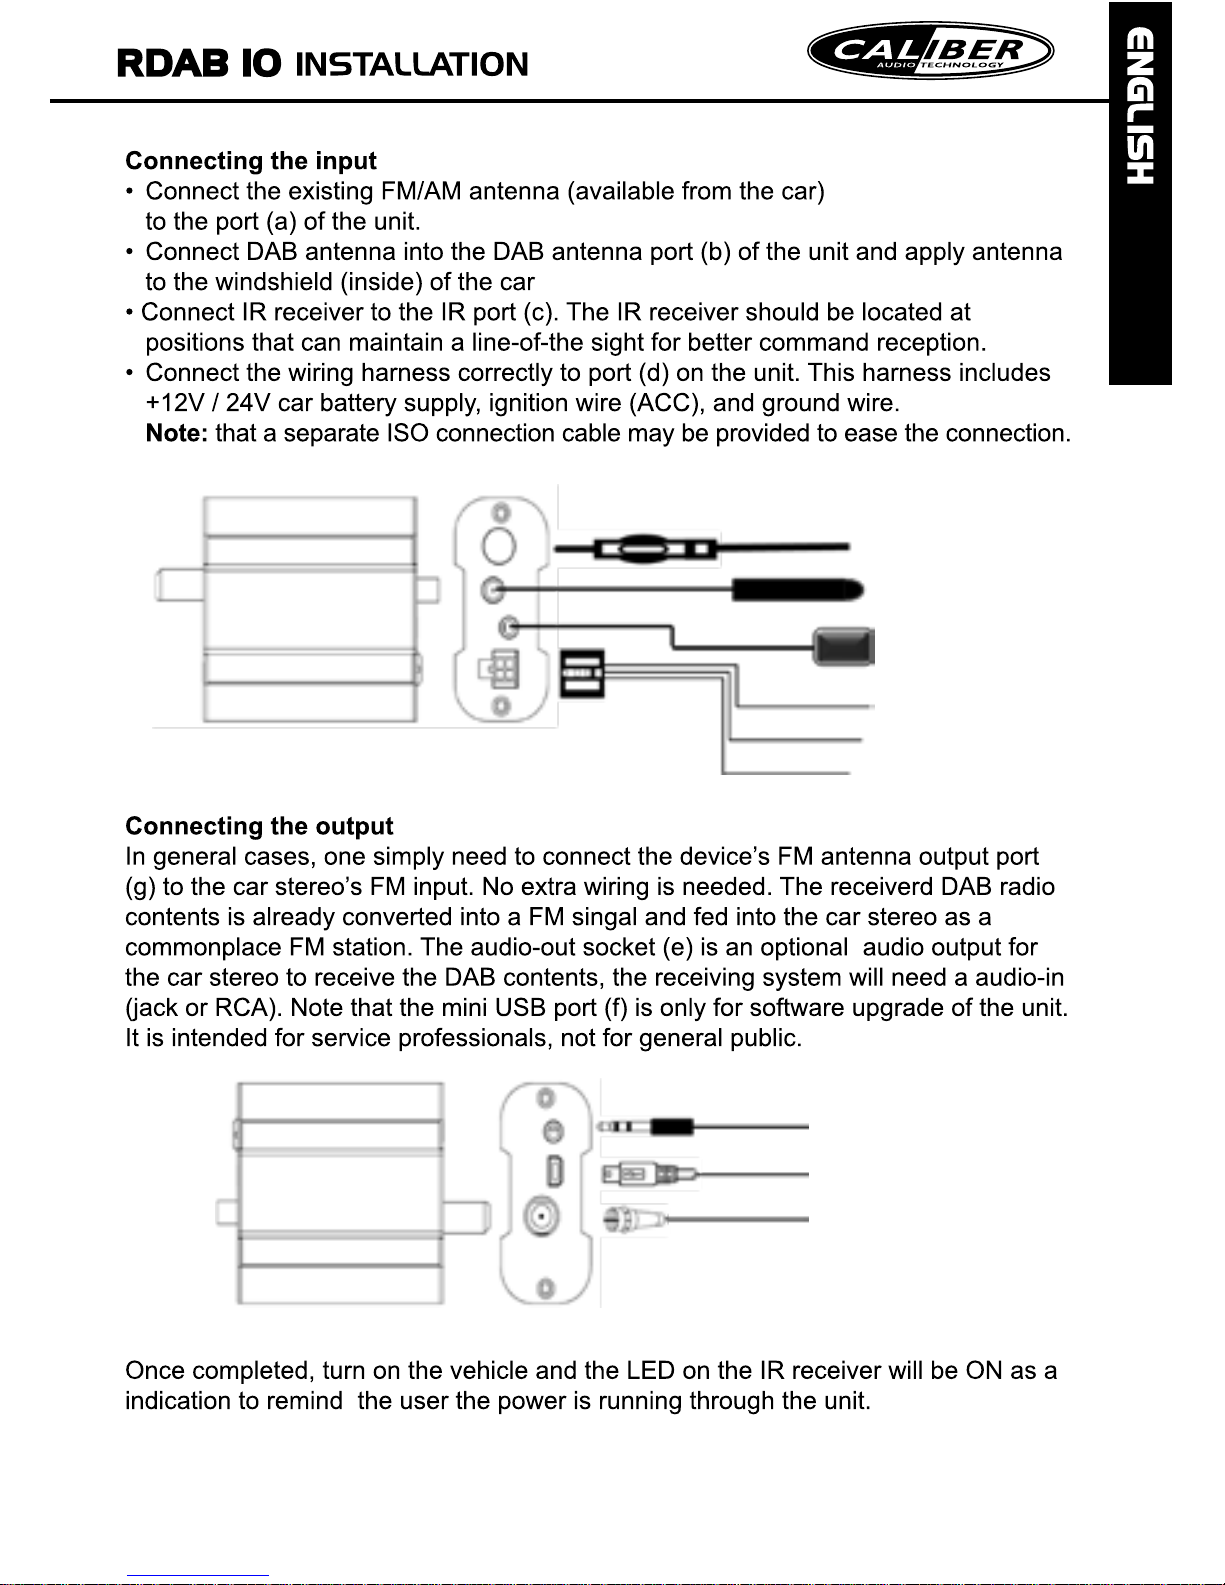
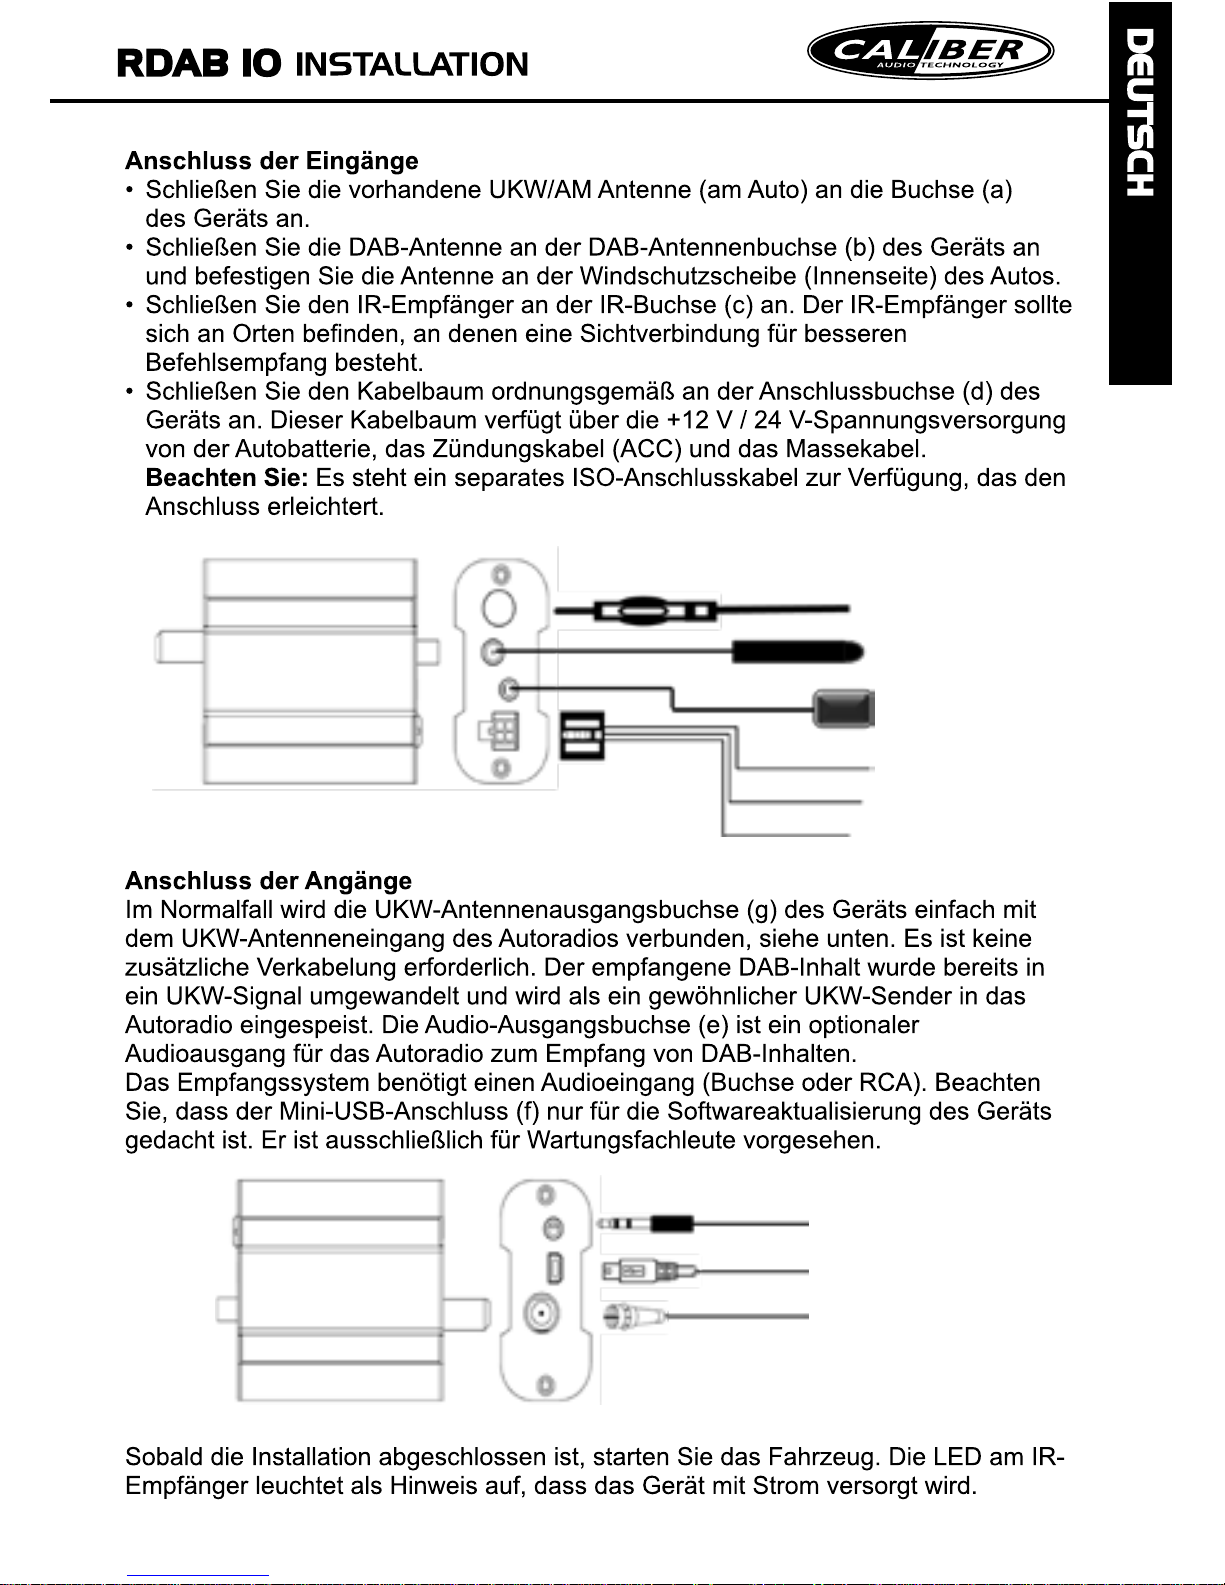
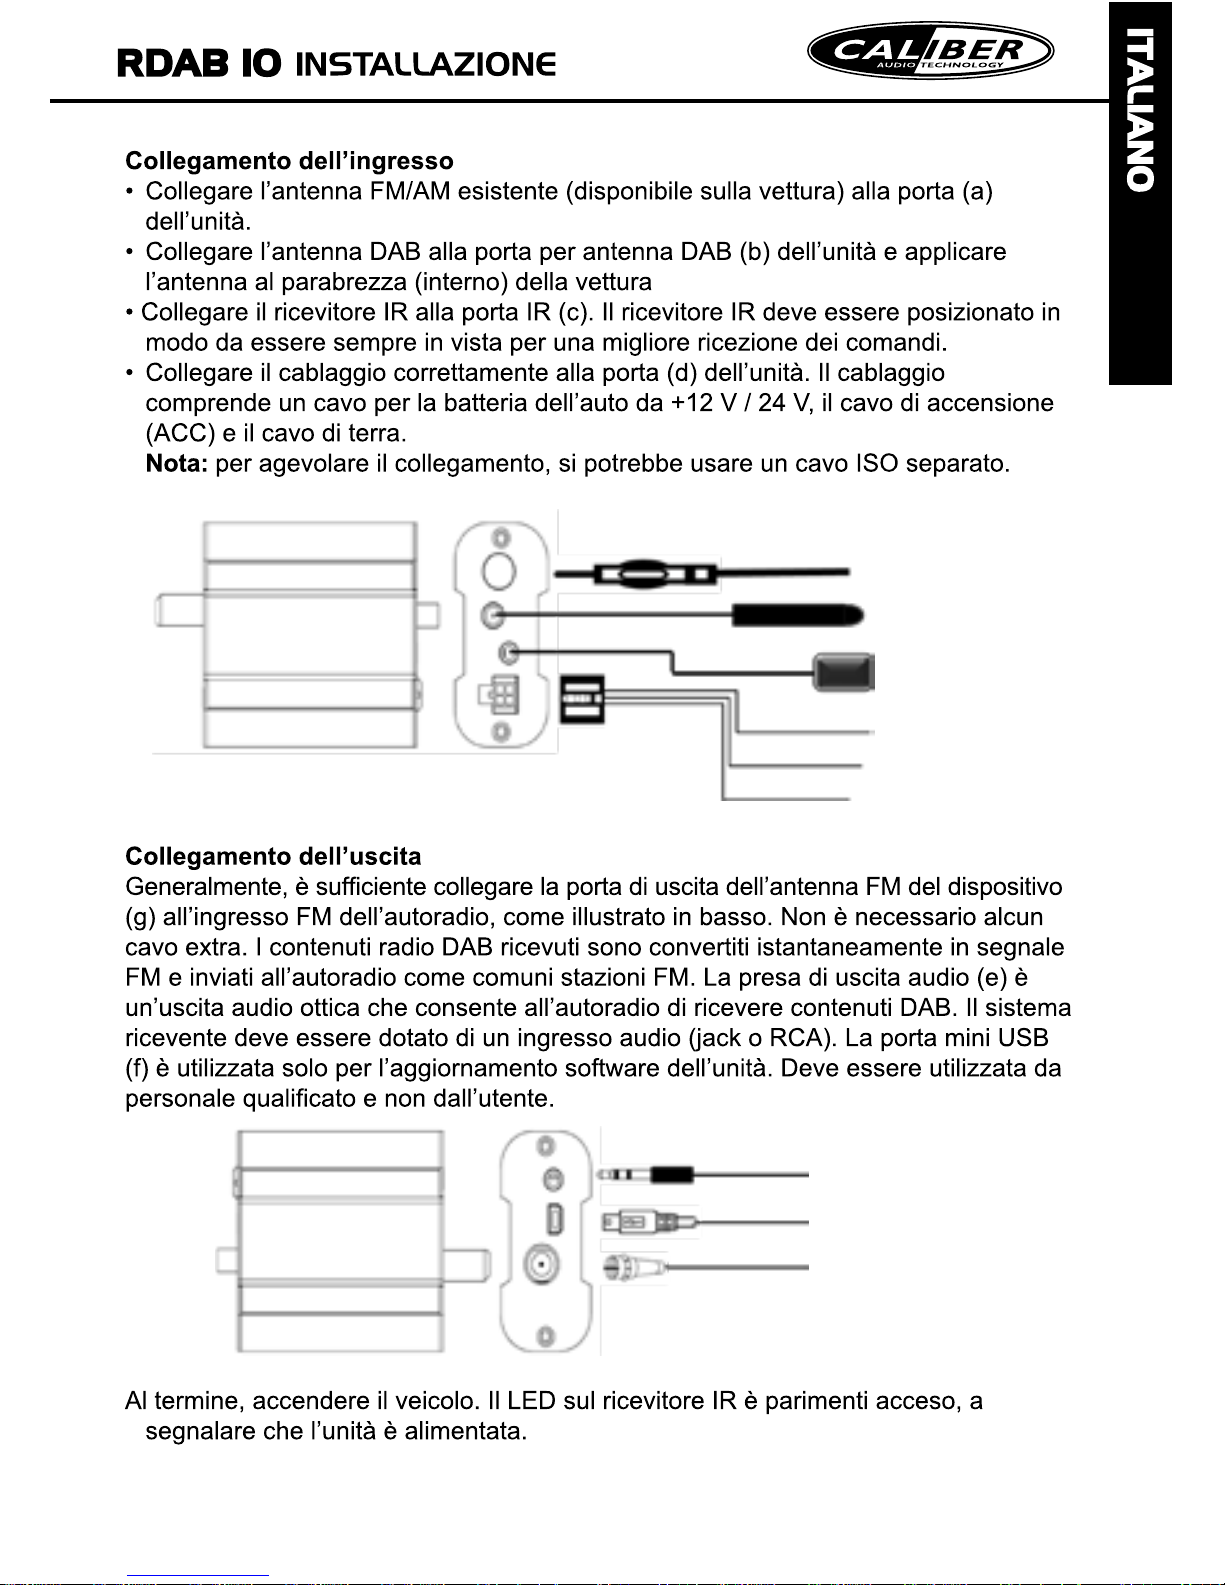
2.1 Connecting to the inputs
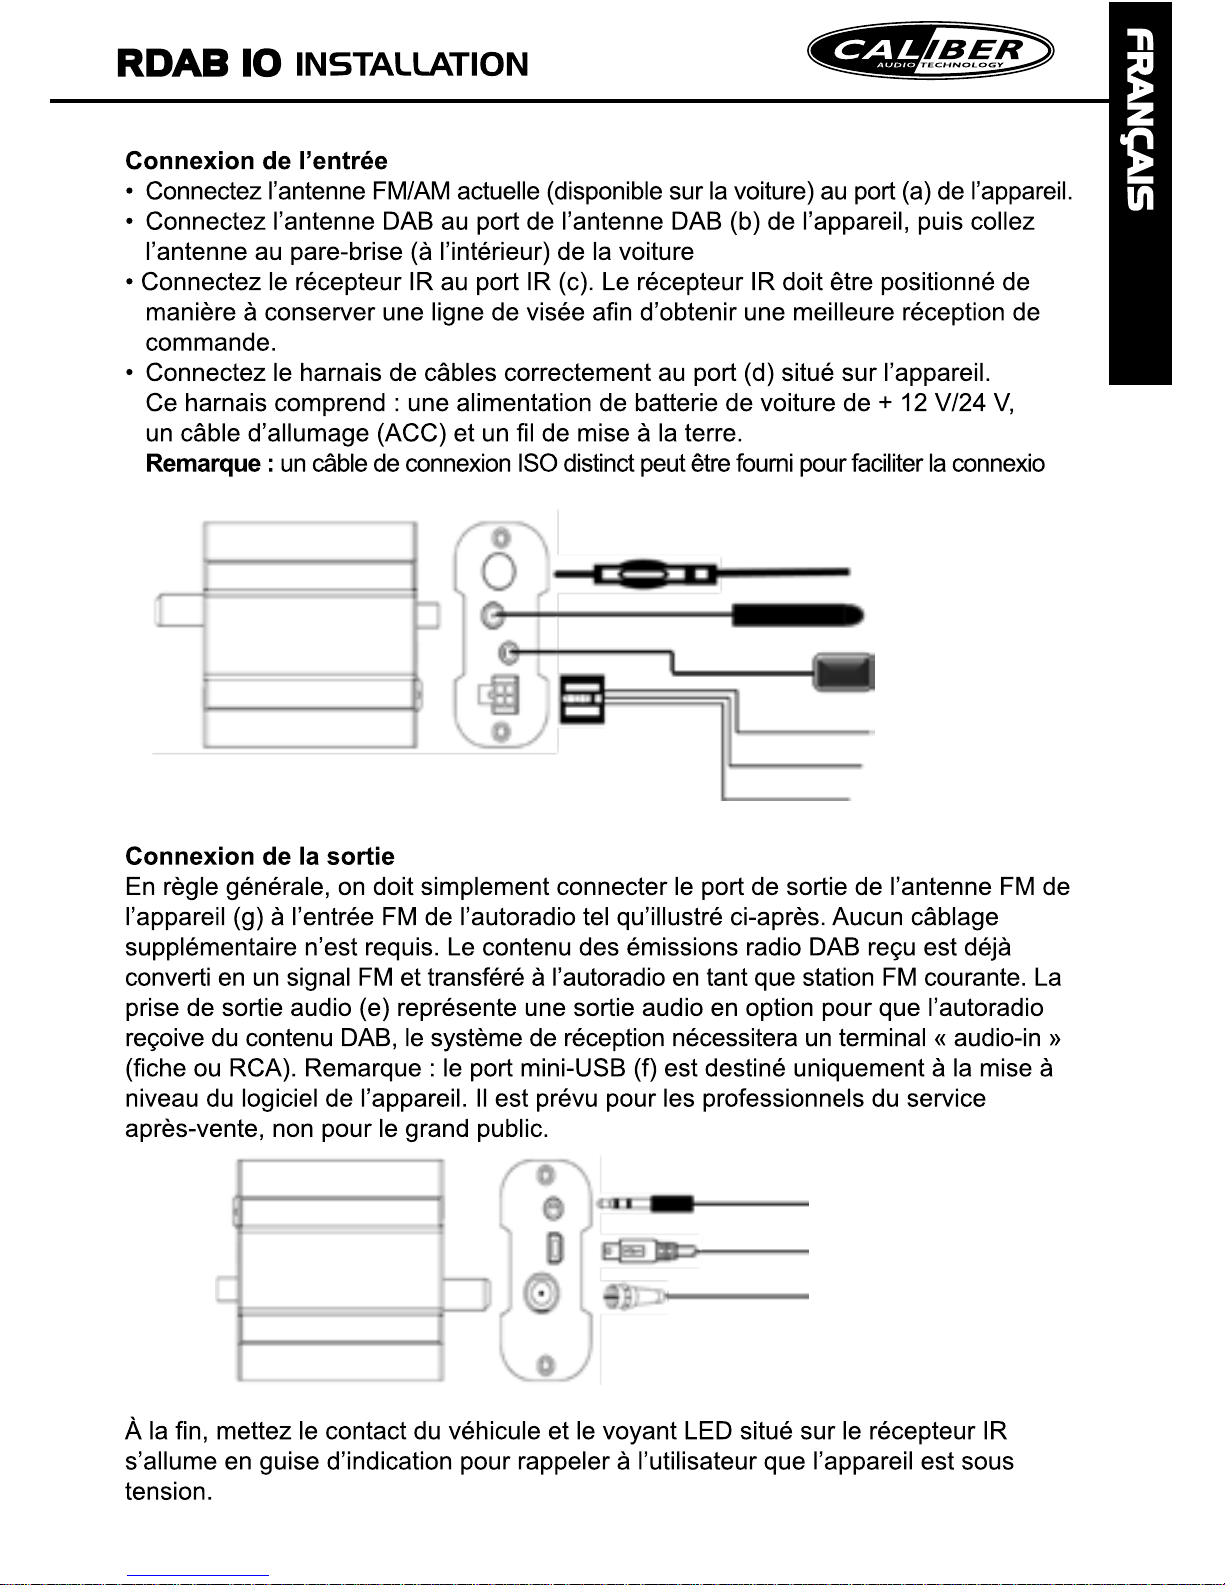
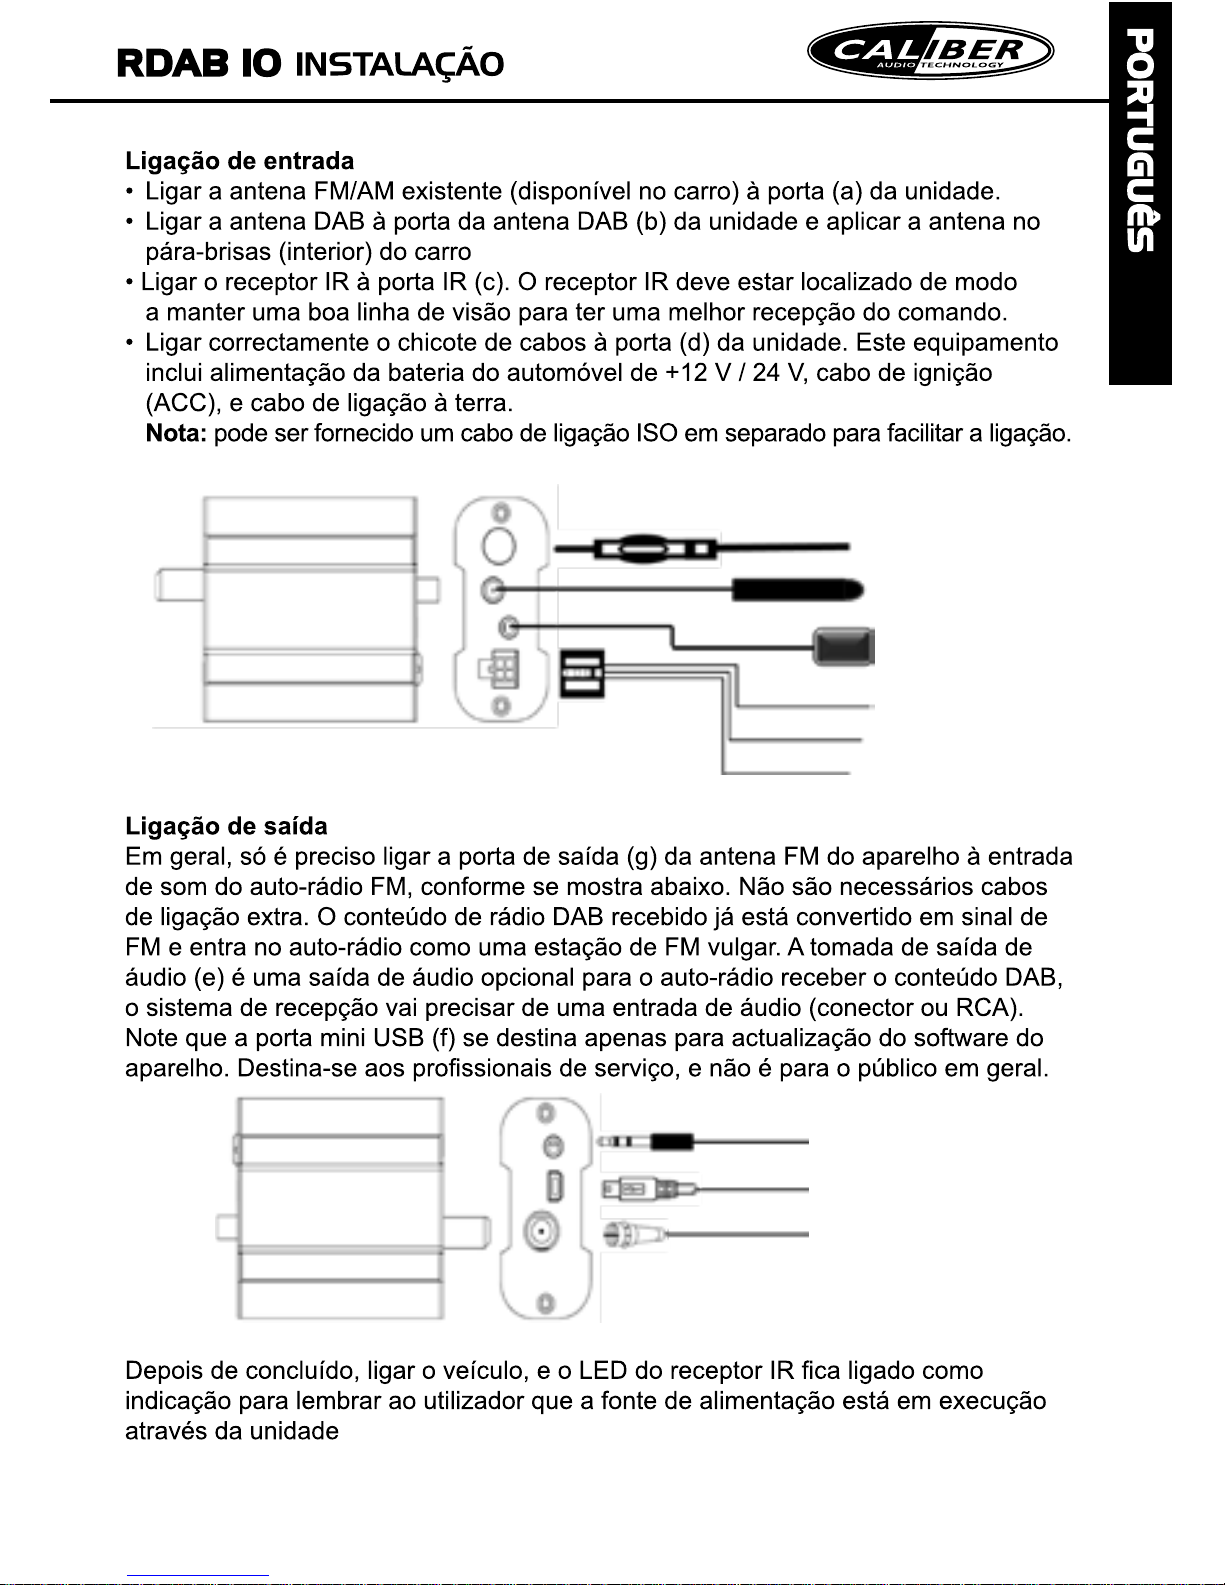
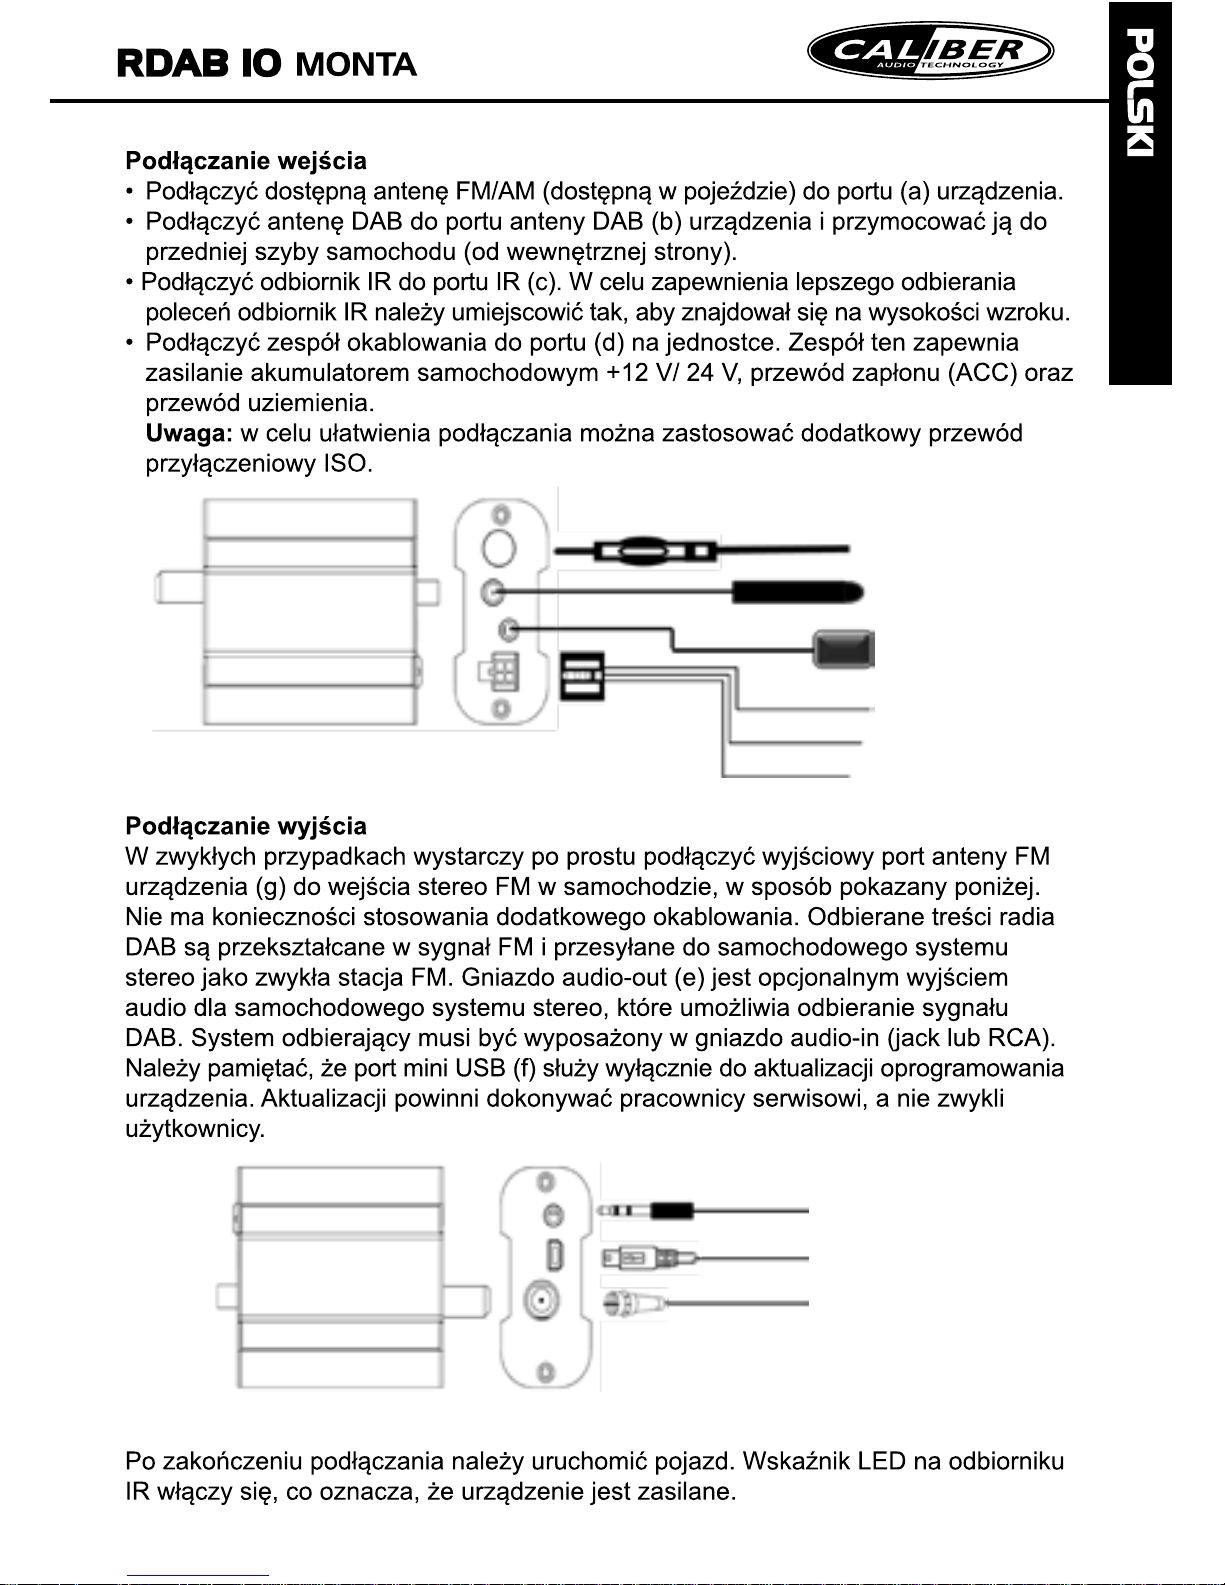
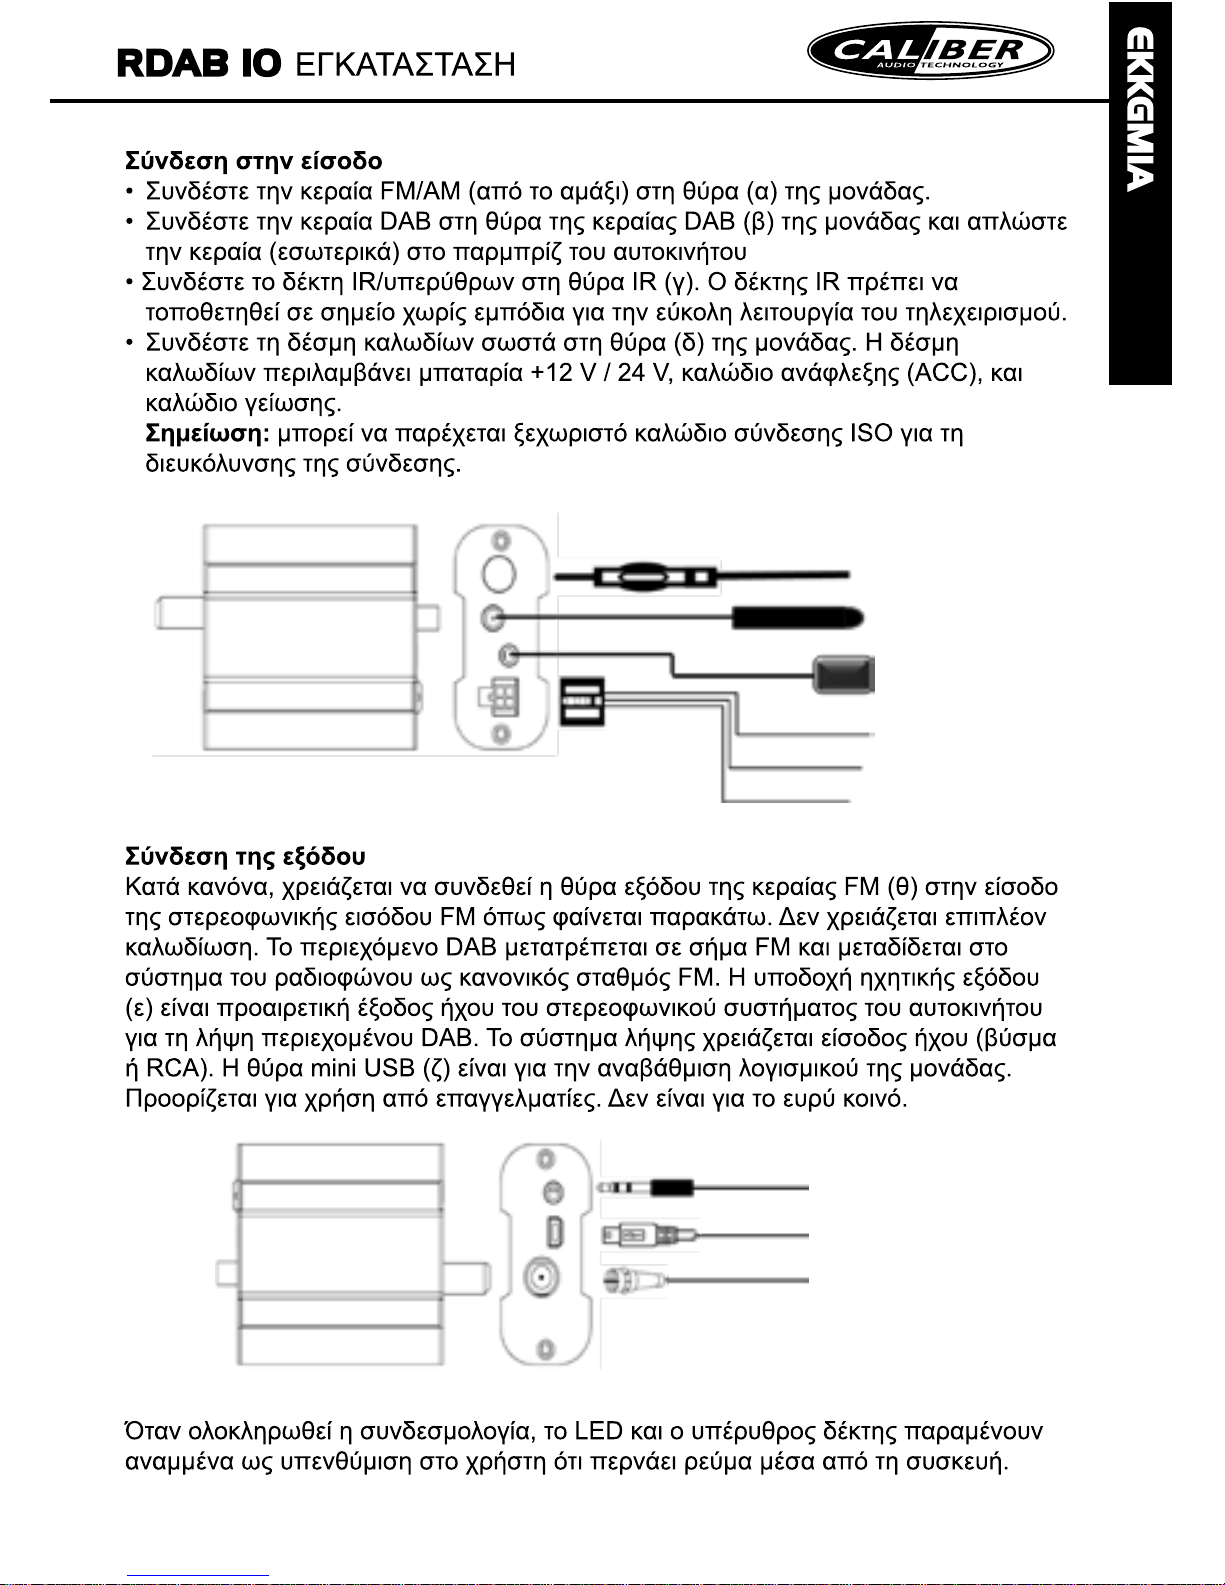
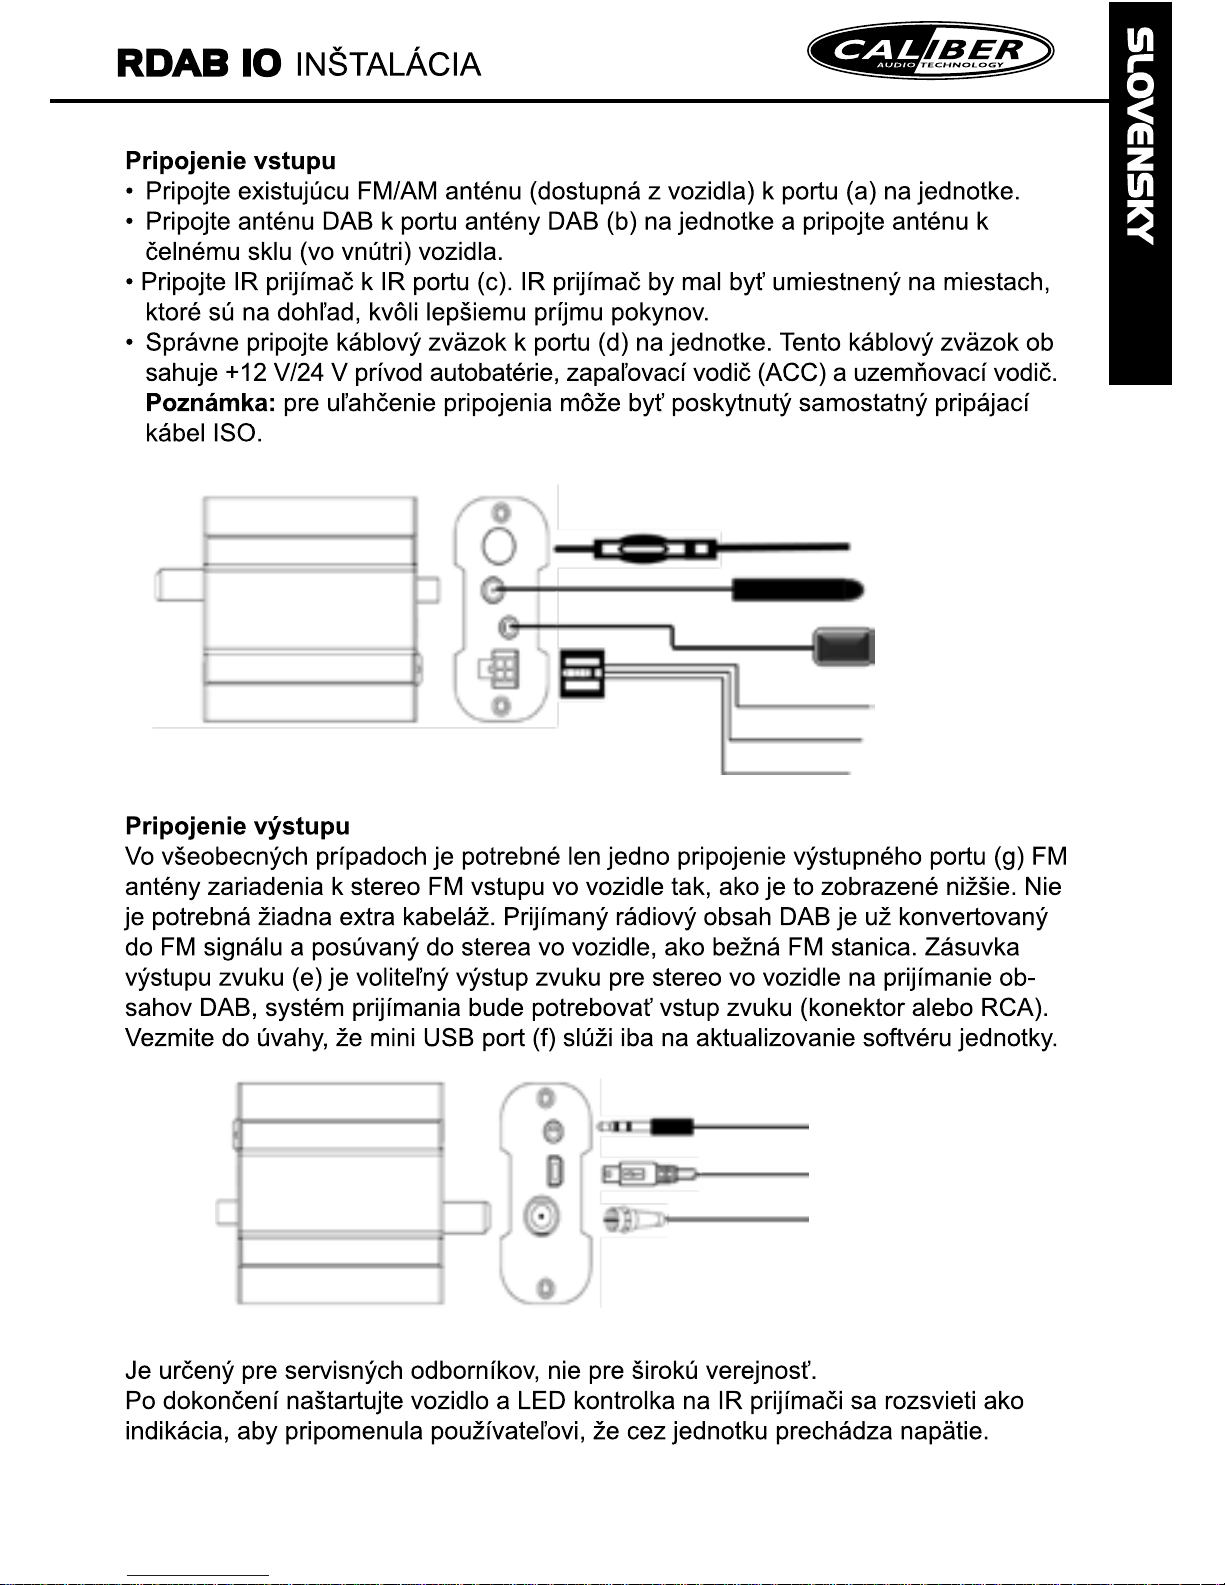
Connect the existing FM/AM antenna (available from the car) to the port (a) of the
unit.
Connect DAB antenna into the DAB antenna port (b) of the unit.
Connect IR receiver to the IR port (c). The IR receiver “window” should be located at
positions that can maintain a line-of-the-sight for better command reception.
Connect the wiring harness correctly to port (d) on the unit. This harness include
+12V car battery supply, ignition wire (ACC), and ground wire. Note that a separate
ISO connection cable may be provided to ease the connection.
FM/AM antenna from car
DAB antenna
In.
IR receiver
Battery +12V wire (yellow)
Ignition ACC wire (red)
Ground wire (black)
Wiring harness
(a)
(b)
(c)
(d)
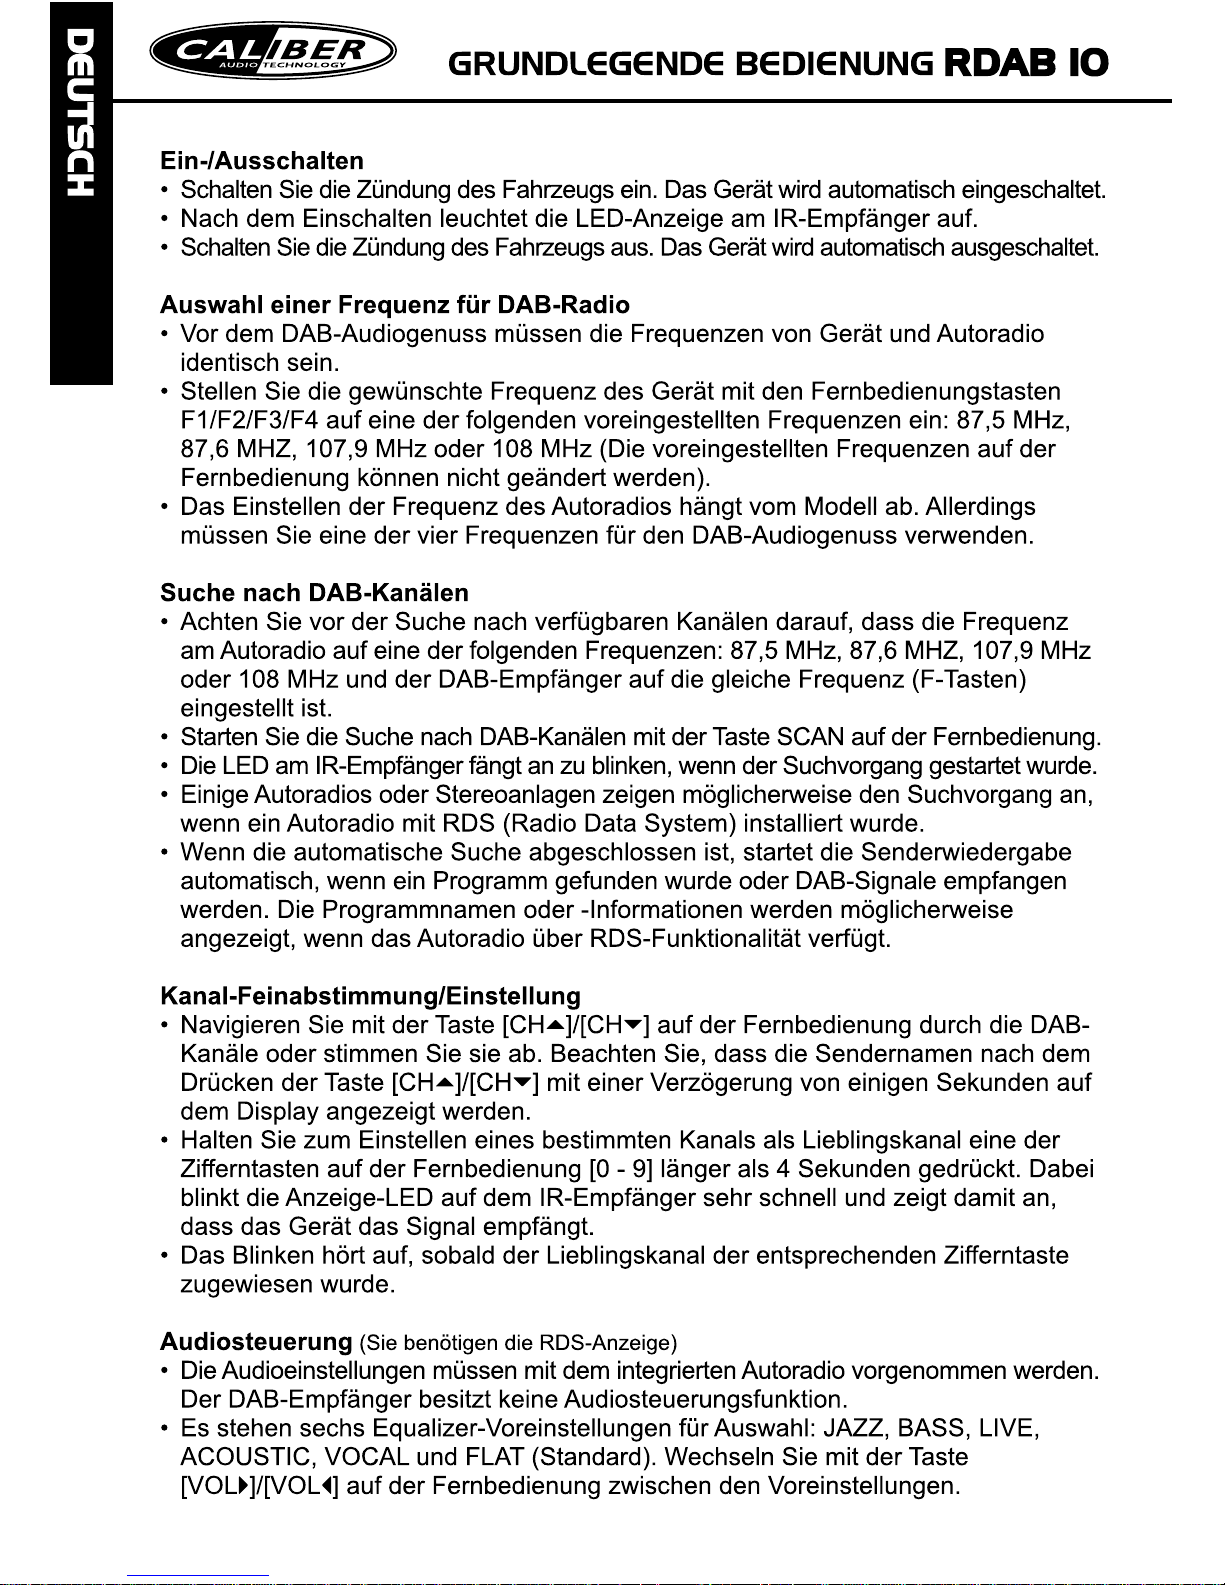
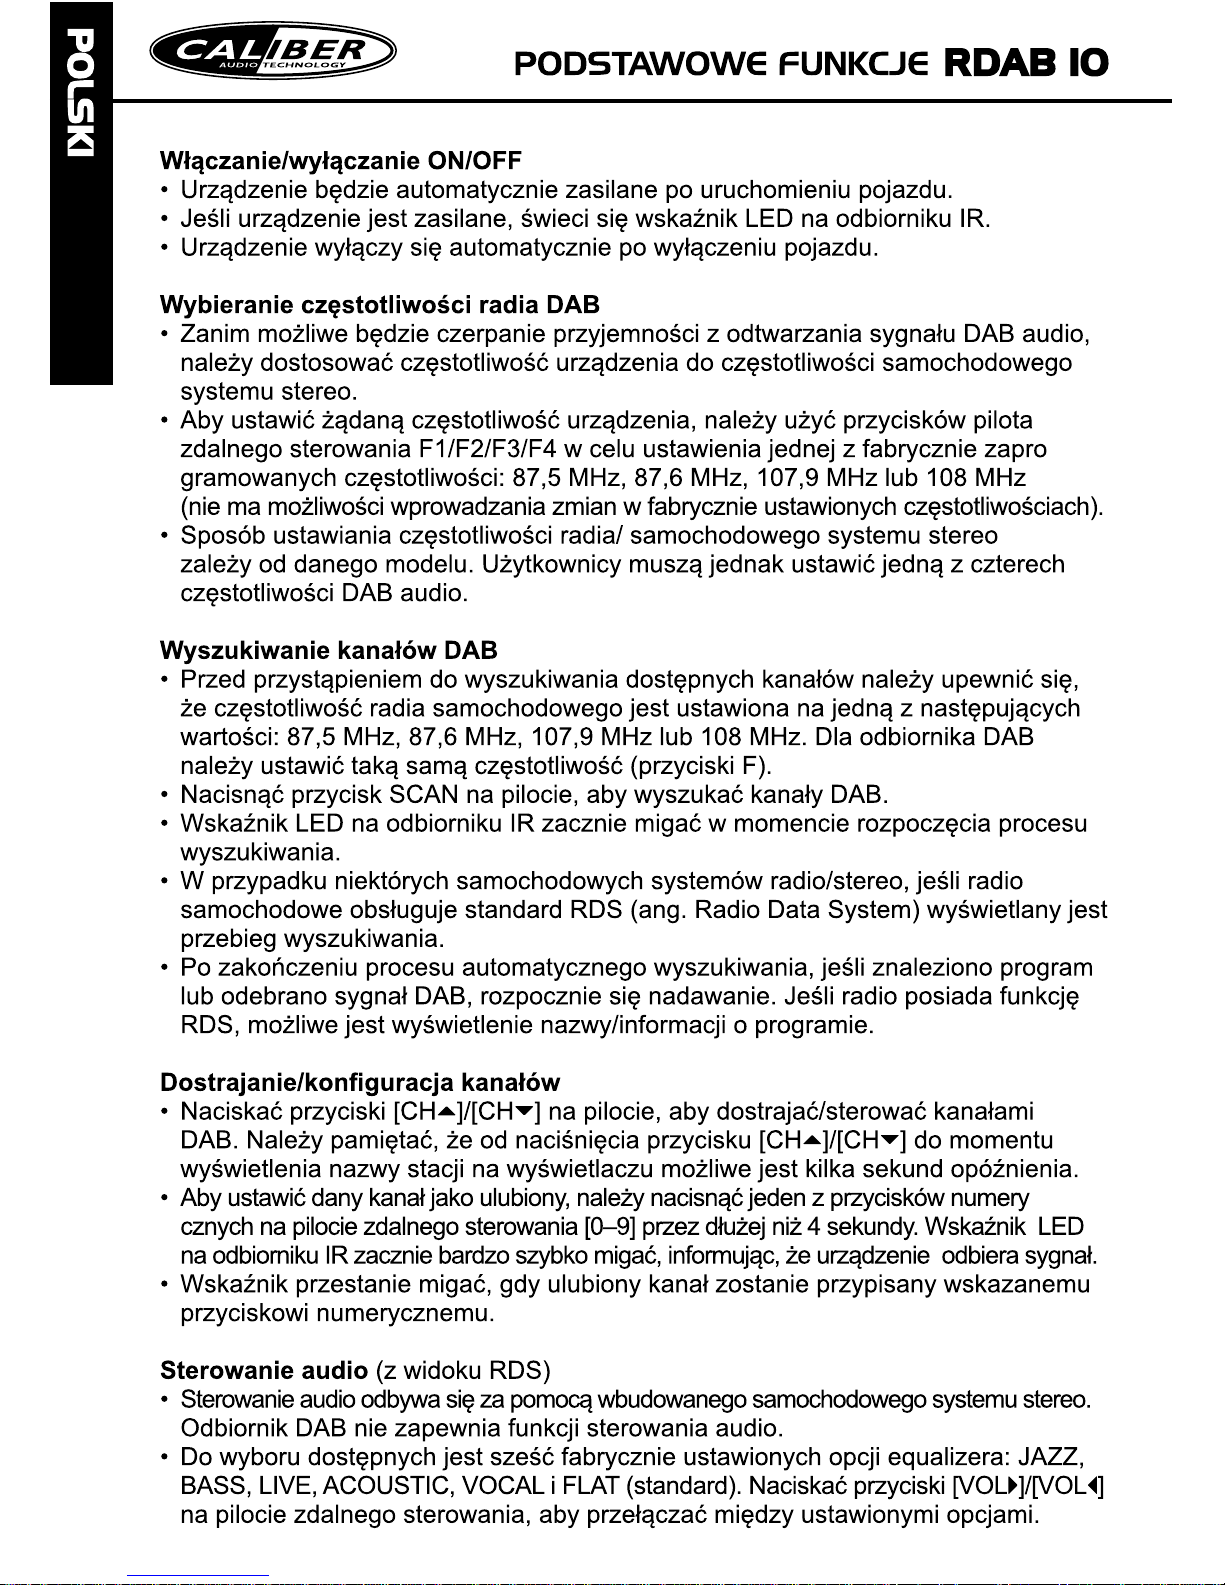
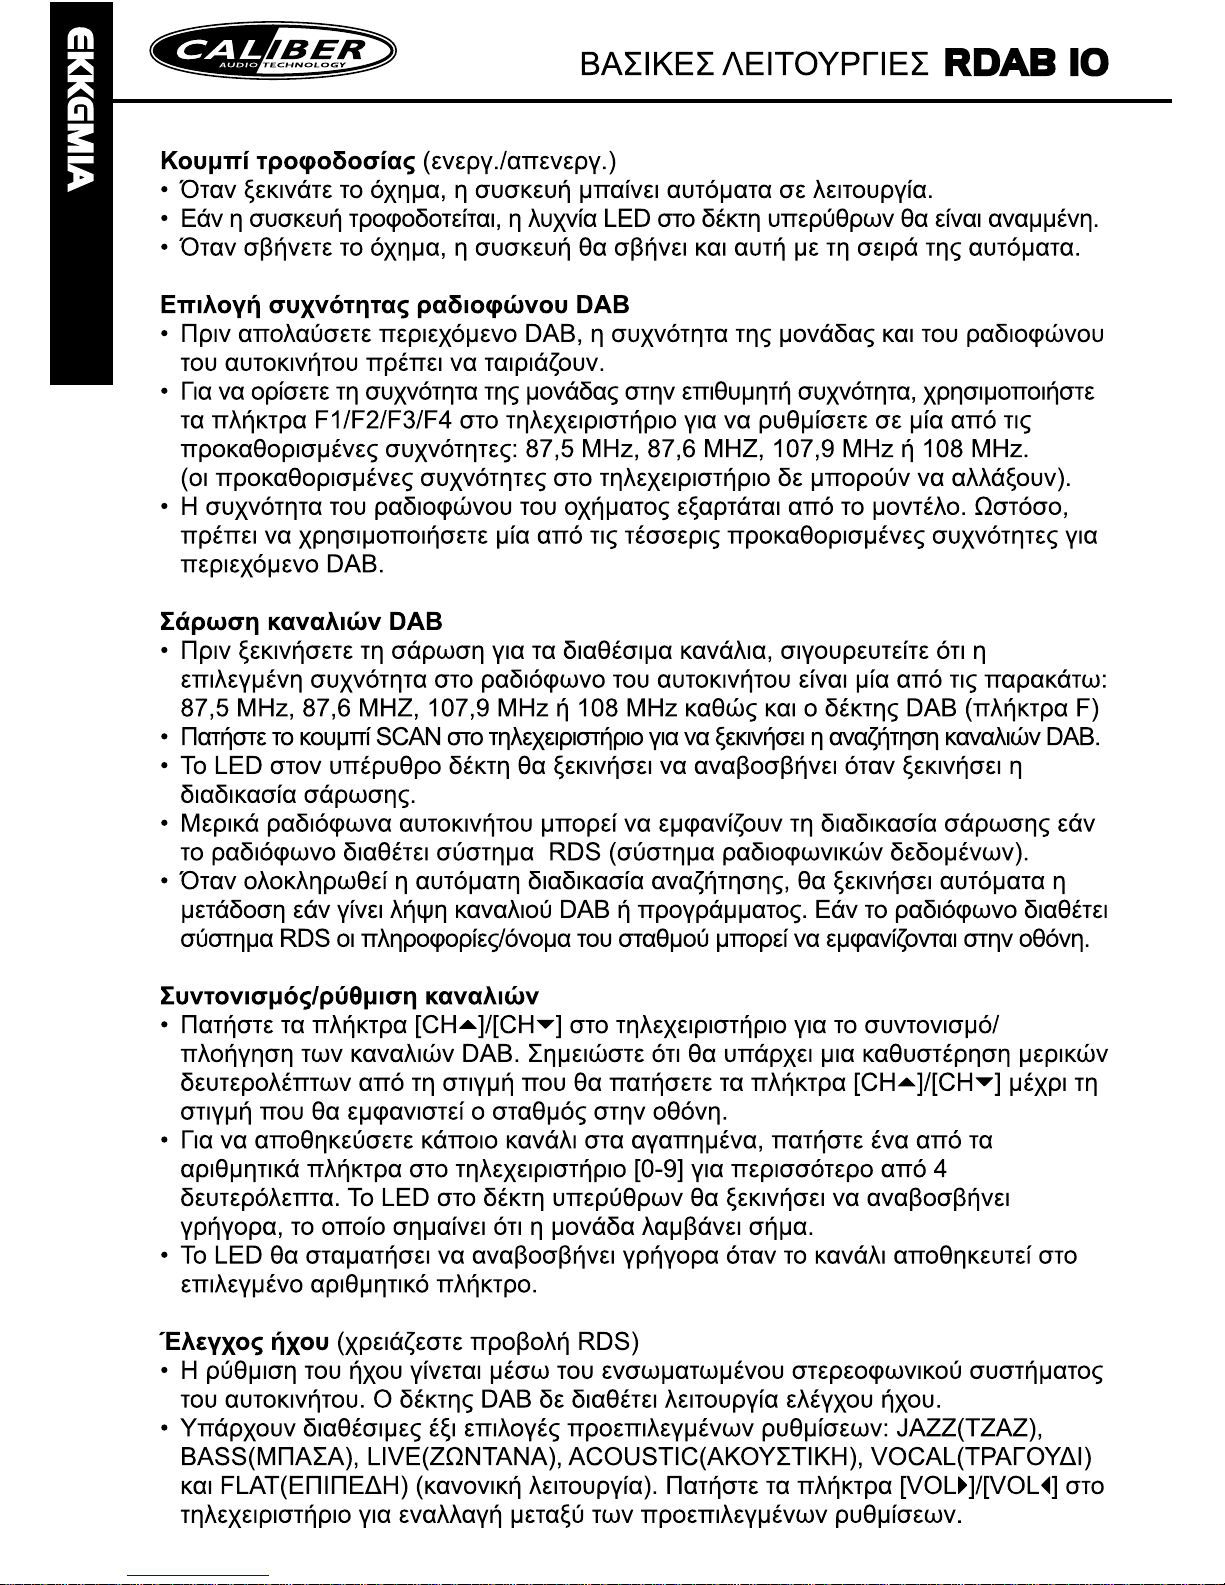
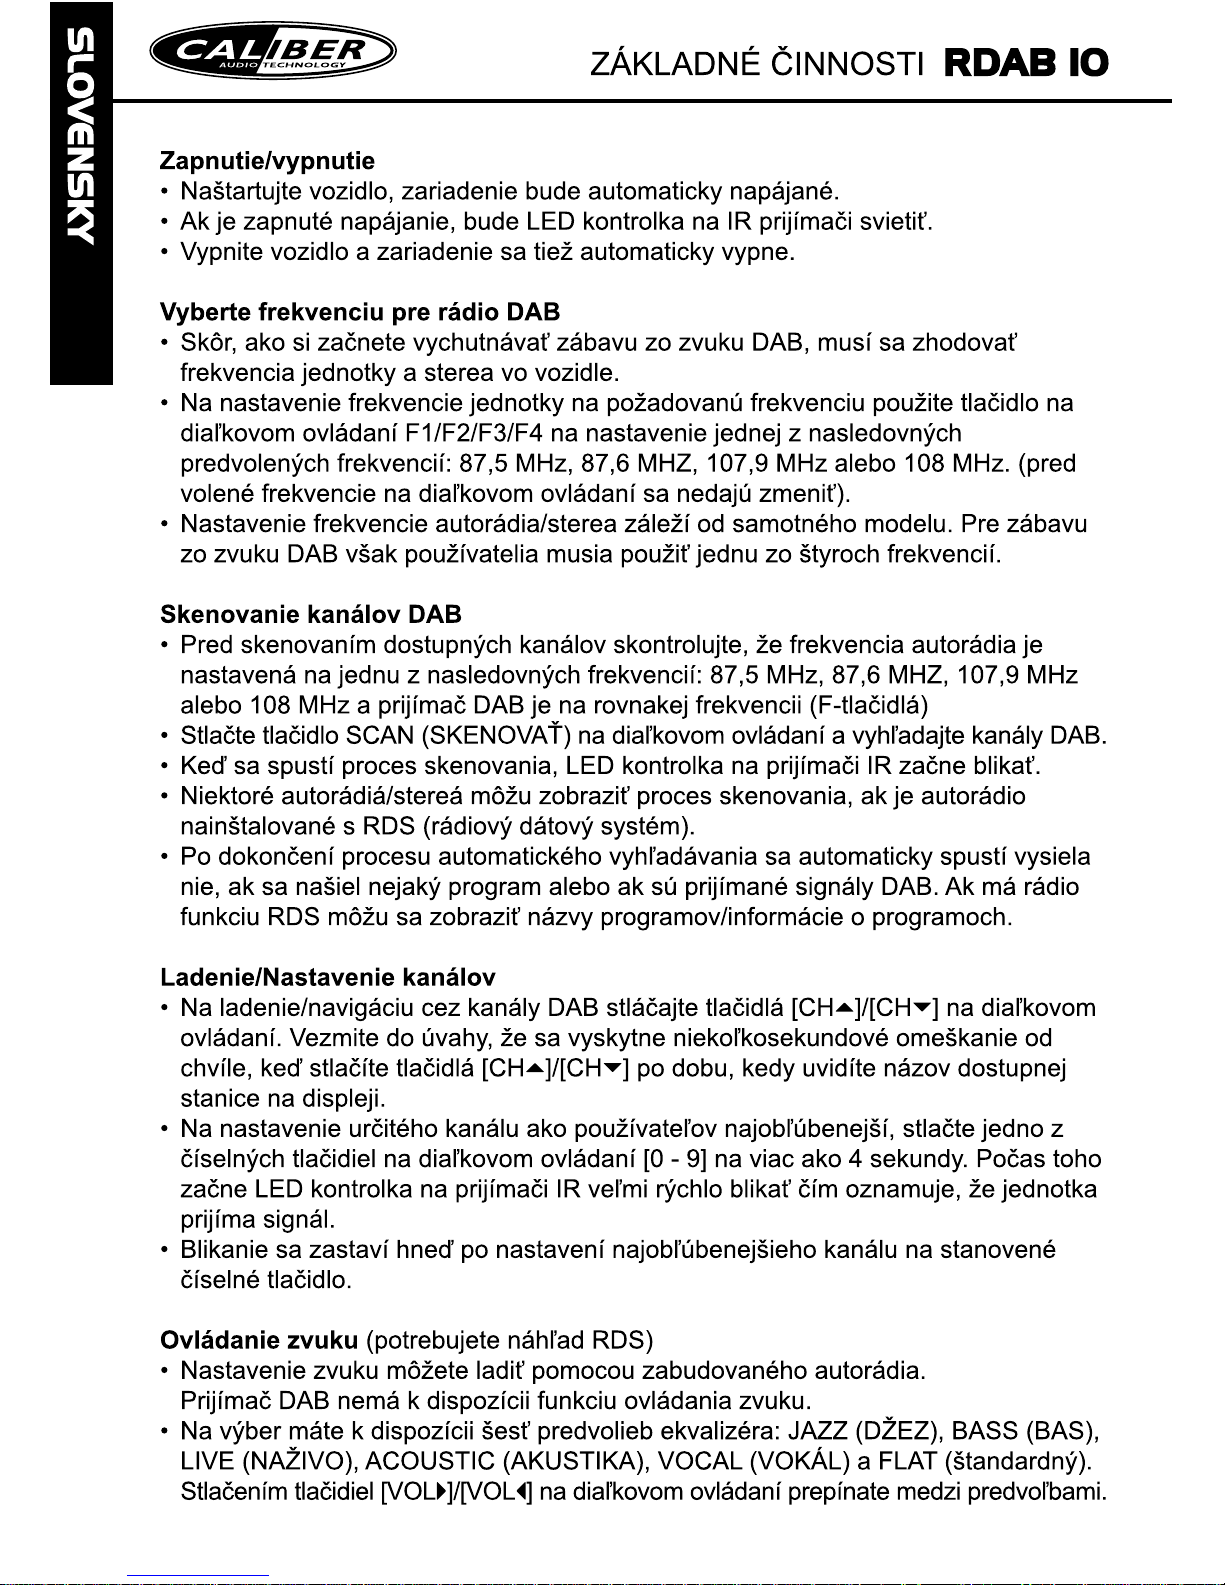
Ear phone socket i.e. port (e) is another audio output option for car stereo to receive the
DAB contents. Note that the Mini USB port (f) is only for software upgrade of the unit. It
is intended for service professionals, not for general public.
Ear phone socket
connects to audio
Upgrade port (mini
USB)
FM output to the car
stereo
(e)
(f)
(g)
Page 6
Page 7
Page 8
Page 9
2. Installation of The Device
Integrating this device with your existing car stereo system is simple and easy. Simply
connect both the existing FM antenna and DAB antenna to the device inputs, then the
FM-modulated DAB radio is readily available via its FM output (F female connector on the
other end of device). This paragraph is intended to guide you step by step how to
correctly configure this device with existing FM antenna, power source, and audio output
delivery to car stereo.
2.1 Connecting to the inputs
Connect the existing FM/AM antenna (available from the car) to the port (a) of the
unit.
Connect DAB antenna into the DAB antenna port (b) of the unit.
Connect IR receiver to the IR port (c). The IR receiver “window” should be located at
positions that can maintain a line-of-the-sight for better command reception.
Connect the wiring harness correctly to port (d) on the unit. This harness include
+12V car battery supply, ignition wire (ACC), and ground wire. Note that a separate
ISO connection cable may be provided to ease the connection.
FM/AM antenna from car
DAB antenna
In.
IR receiver
Battery +12V wire (yellow)
Ignition ACC wire (red)
Ground wire (black)
Wiring harness
(a)
(b)
(c)
(d)
Ear phone socket i.e. port (e) is another audio output option for car stereo to receive the
DAB contents. Note that the Mini USB port (f) is only for software upgrade of the unit. It
is intended for service professionals, not for general public.
Ear phone socket
connects to audio
Upgrade port (mini
USB)
FM output to the car
stereo
(e)
(f)
(g)
Page 10
Page 11
Page 12
Page 13
2. Installation of The Device
Integrating this device with your existing car stereo system is simple and easy. Simply
connect both the existing FM antenna and DAB antenna to the device inputs, then the
FM-modulated DAB radio is readily available via its FM output (F female connector on the
other end of device). This paragraph is intended to guide you step by step how to
correctly configure this device with existing FM antenna, power source, and audio output
delivery to car stereo.
2.1 Connecting to the inputs
Connect the existing FM/AM antenna (available from the car) to the port (a) of the
unit.
Connect DAB antenna into the DAB antenna port (b) of the unit.
Connect IR receiver to the IR port (c). The IR receiver “window” should be located at
positions that can maintain a line-of-the-sight for better command reception.
Connect the wiring harness correctly to port (d) on the unit. This harness include
+12V car battery supply, ignition wire (ACC), and ground wire. Note that a separate
ISO connection cable may be provided to ease the connection.
FM/AM antenna from car
DAB antenna
In.
IR receiver
Battery +12V wire (yellow)
Ignition ACC wire (red)
Ground wire (black)
Wiring harness
(a)
(b)
(c)
(d)
Ear phone socket i.e. port (e) is another audio output option for car stereo to receive the
DAB contents. Note that the Mini USB port (f) is only for software upgrade of the unit. It
is intended for service professionals, not for general public.
Ear phone socket
connects to audio
Upgrade port (mini
USB)
FM output to the car
stereo
(e)
(f)
(g)
Page 14
Page 15
Page 16
Page 17
2. Installation of The Device
Integrating this device with your existing car stereo system is simple and easy. Simply
connect both the existing FM antenna and DAB antenna to the device inputs, then the
FM-modulated DAB radio is readily available via its FM output (F female connector on the
other end of device). This paragraph is intended to guide you step by step how to
correctly configure this device with existing FM antenna, power source, and audio output
delivery to car stereo.
2.1 Connecting to the inputs
Connect the existing FM/AM antenna (available from the car) to the port (a) of the
unit.
Connect DAB antenna into the DAB antenna port (b) of the unit.
Connect IR receiver to the IR port (c). The IR receiver “window” should be located at
positions that can maintain a line-of-the-sight for better command reception.
Connect the wiring harness correctly to port (d) on the unit. This harness include
+12V car battery supply, ignition wire (ACC), and ground wire. Note that a separate
ISO connection cable may be provided to ease the connection.
FM/AM antenna from car
DAB antenna
In.
IR receiver
Battery +12V wire (yellow)
Ignition ACC wire (red)
Ground wire (black)
Wiring harness
(a)
(b)
(c)
(d)
Ear phone socket i.e. port (e) is another audio output option for car stereo to receive the
DAB contents. Note that the Mini USB port (f) is only for software upgrade of the unit. It
is intended for service professionals, not for general public.
Ear phone socket
connects to audio
Upgrade port (mini
USB)
FM output to the car
stereo
(e)
(f)
(g)
Page 18
Page 19
Page 20
Page 21
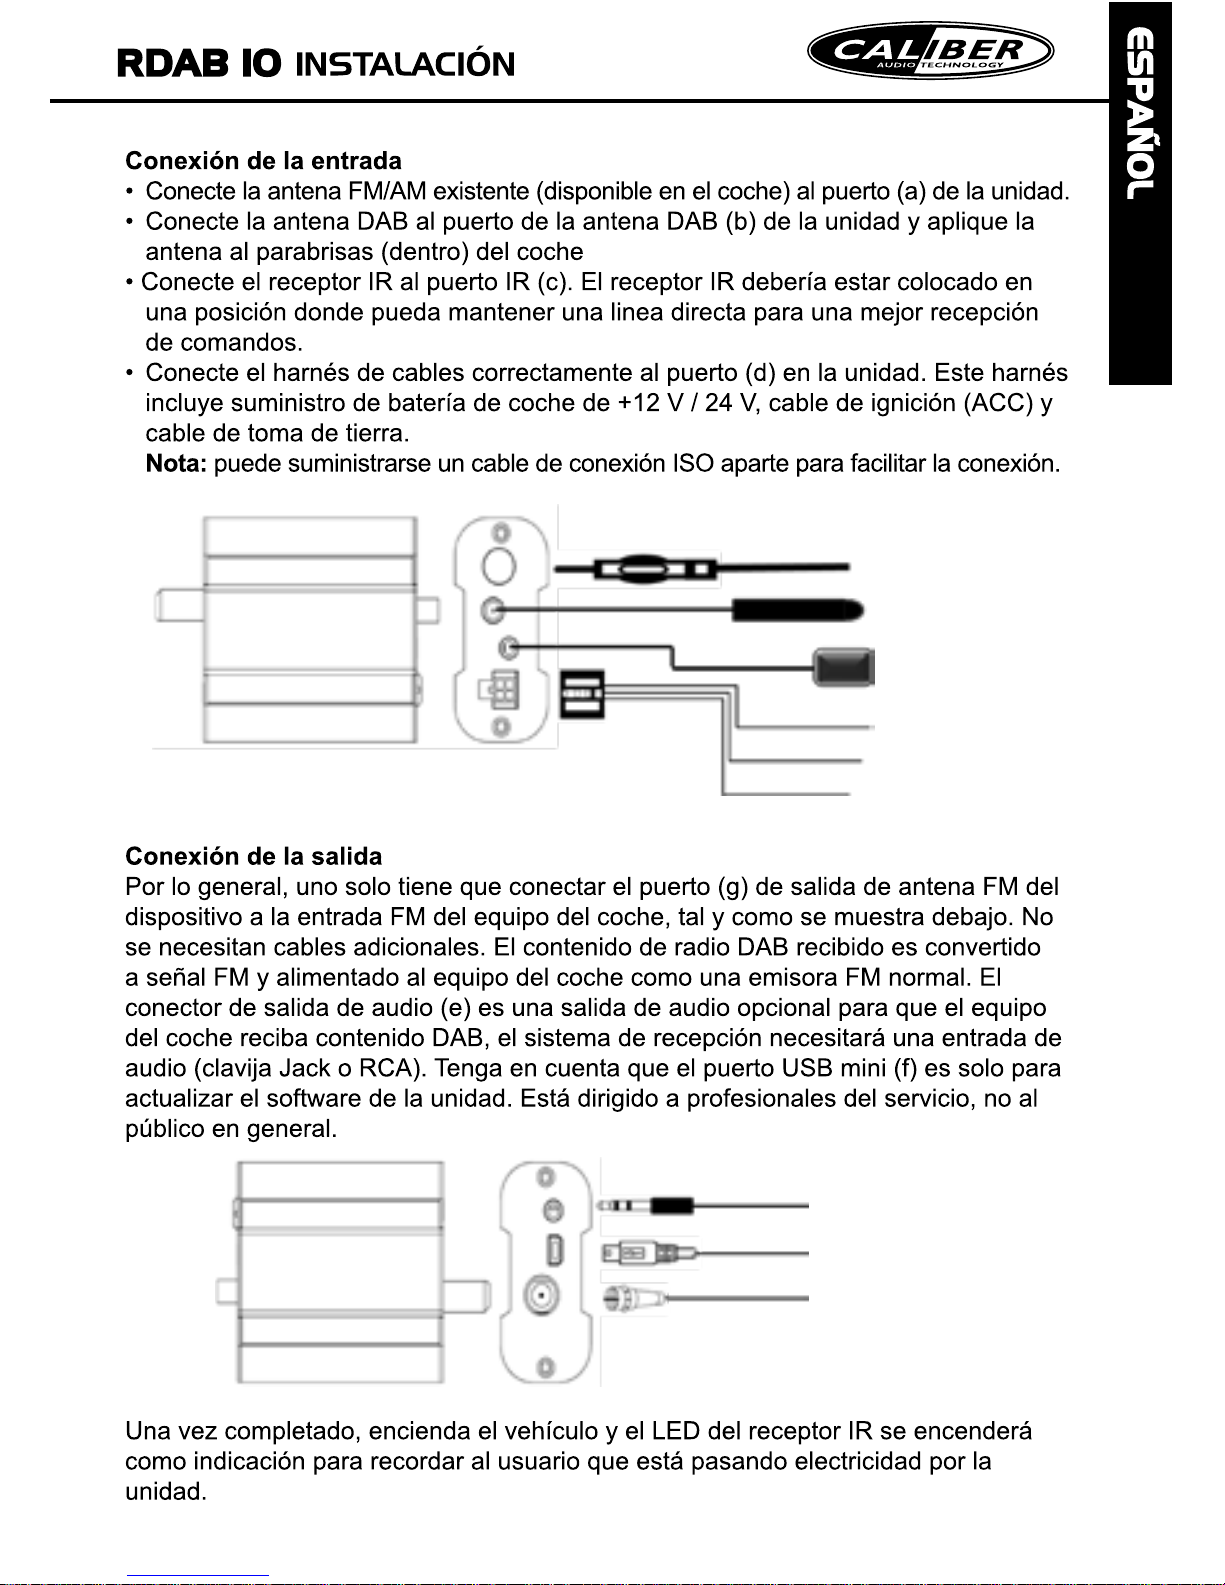
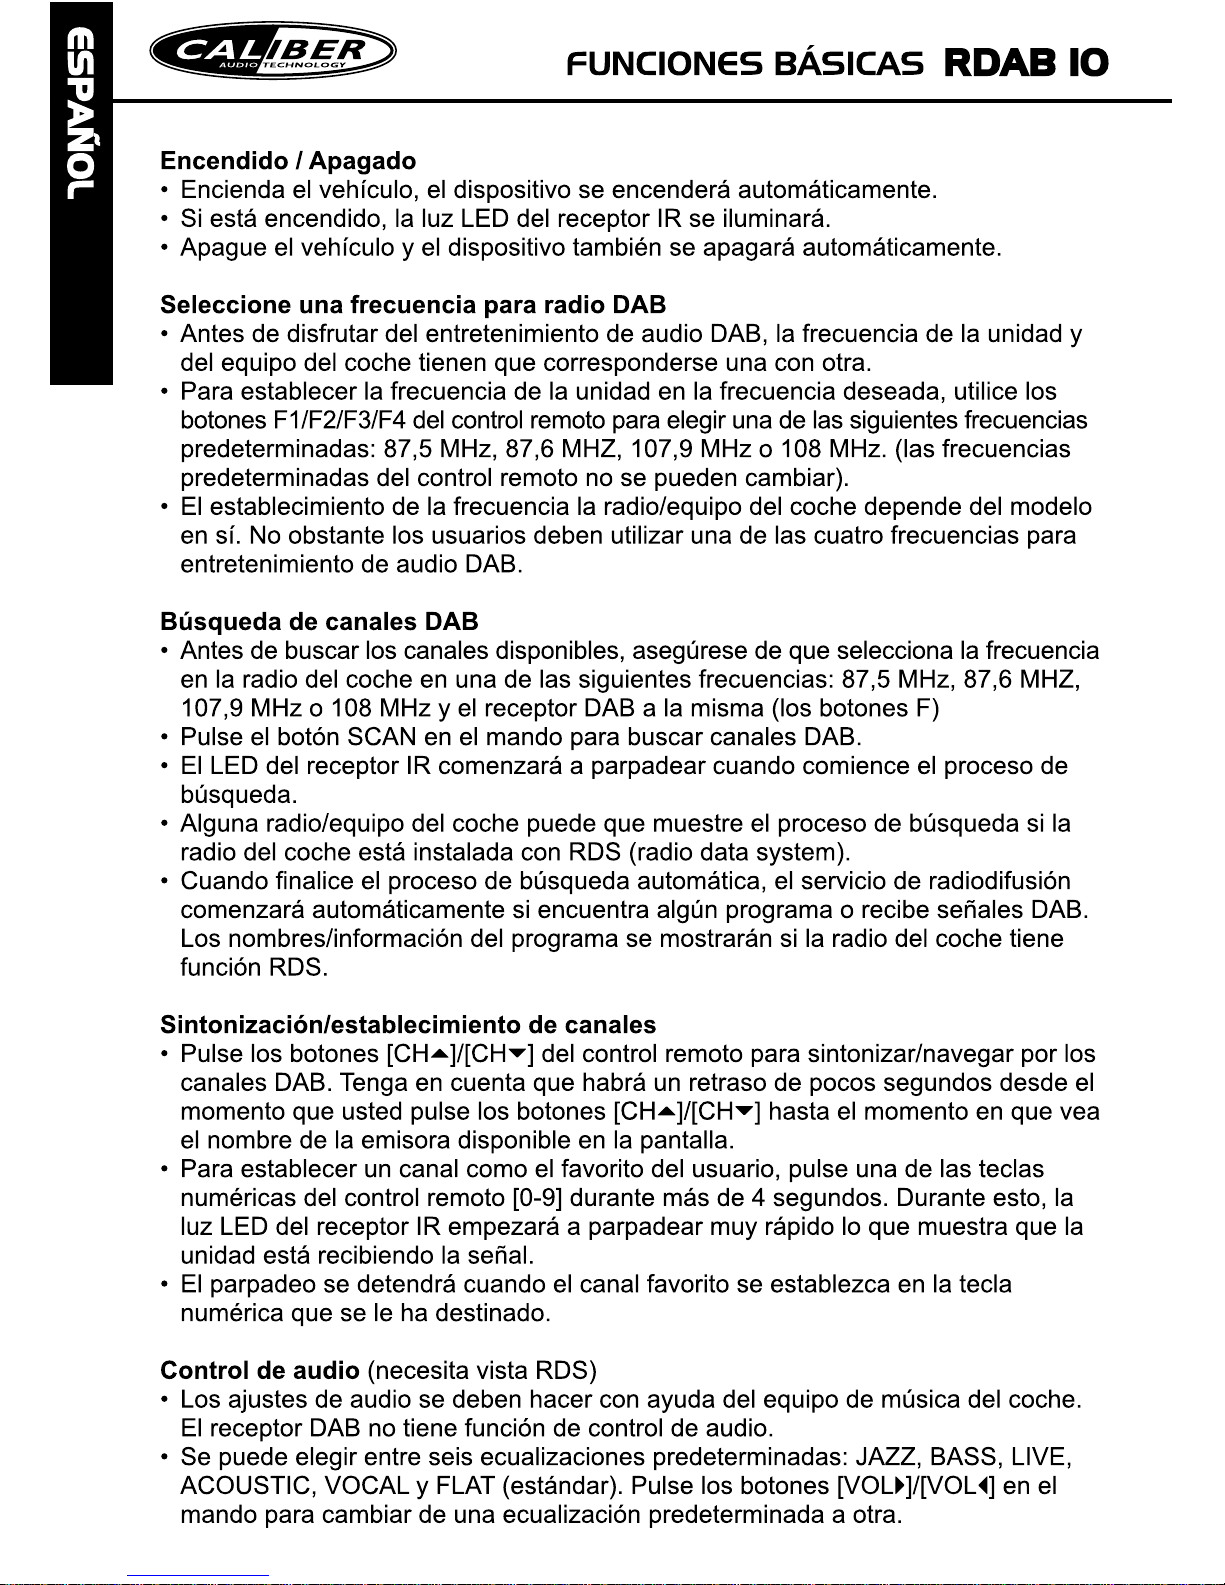
2. Installation of The Device
Integrating this device with your existing car stereo system is simple and easy. Simply
connect both the existing FM antenna and DAB antenna to the device inputs, then the
FM-modulated DAB radio is readily available via its FM output (F female connector on the
other end of device). This paragraph is intended to guide you step by step how to
correctly configure this device with existing FM antenna, power source, and audio output
delivery to car stereo.
2.1 Connecting to the inputs
Connect the existing FM/AM antenna (available from the car) to the port (a) of the
unit.
Connect DAB antenna into the DAB antenna port (b) of the unit.
Connect IR receiver to the IR port (c). The IR receiver “window” should be located at
positions that can maintain a line-of-the-sight for better command reception.
Connect the wiring harness correctly to port (d) on the unit. This harness include
+12V car battery supply, ignition wire (ACC), and ground wire. Note that a separate
ISO connection cable may be provided to ease the connection.
FM/AM antenna from car
DAB antenna
In.
IR receiver
Battery +12V wire (yellow)
Ignition ACC wire (red)
Ground wire (black)
Wiring harness
(a)
(b)
(c)
(d)
Ear phone socket i.e. port (e) is another audio output option for car stereo to receive the
DAB contents. Note that the Mini USB port (f) is only for software upgrade of the unit. It
is intended for service professionals, not for general public.
Ear phone socket
connects to audio
Upgrade port (mini
USB)
FM output to the car
stereo
(e)
(f)
(g)
Page 22
Page 23
Page 24
Page 25
2. Installation of The Device
Integrating this device with your existing car stereo system is simple and easy. Simply
connect both the existing FM antenna and DAB antenna to the device inputs, then the
FM-modulated DAB radio is readily available via its FM output (F female connector on the
other end of device). This paragraph is intended to guide you step by step how to
correctly configure this device with existing FM antenna, power source, and audio output
delivery to car stereo.
2.1 Connecting to the inputs
Connect the existing FM/AM antenna (available from the car) to the port (a) of the
unit.
Connect DAB antenna into the DAB antenna port (b) of the unit.
Connect IR receiver to the IR port (c). The IR receiver “window” should be located at
positions that can maintain a line-of-the-sight for better command reception.
Connect the wiring harness correctly to port (d) on the unit. This harness include
+12V car battery supply, ignition wire (ACC), and ground wire. Note that a separate
ISO connection cable may be provided to ease the connection.
FM/AM antenna from car
DAB antenna
In.
IR receiver
Battery +12V wire (yellow)
Ignition ACC wire (red)
Ground wire (black)
Wiring harness
(a)
(b)
(c)
(d)
Ear phone socket i.e. port (e) is another audio output option for car stereo to receive the
DAB contents. Note that the Mini USB port (f) is only for software upgrade of the unit. It
is intended for service professionals, not for general public.
Ear phone socket
connects to audio
Upgrade port (mini
USB)
FM output to the car
stereo
(e)
(f)
(g)
Page 26
Page 27
Page 28
Page 29
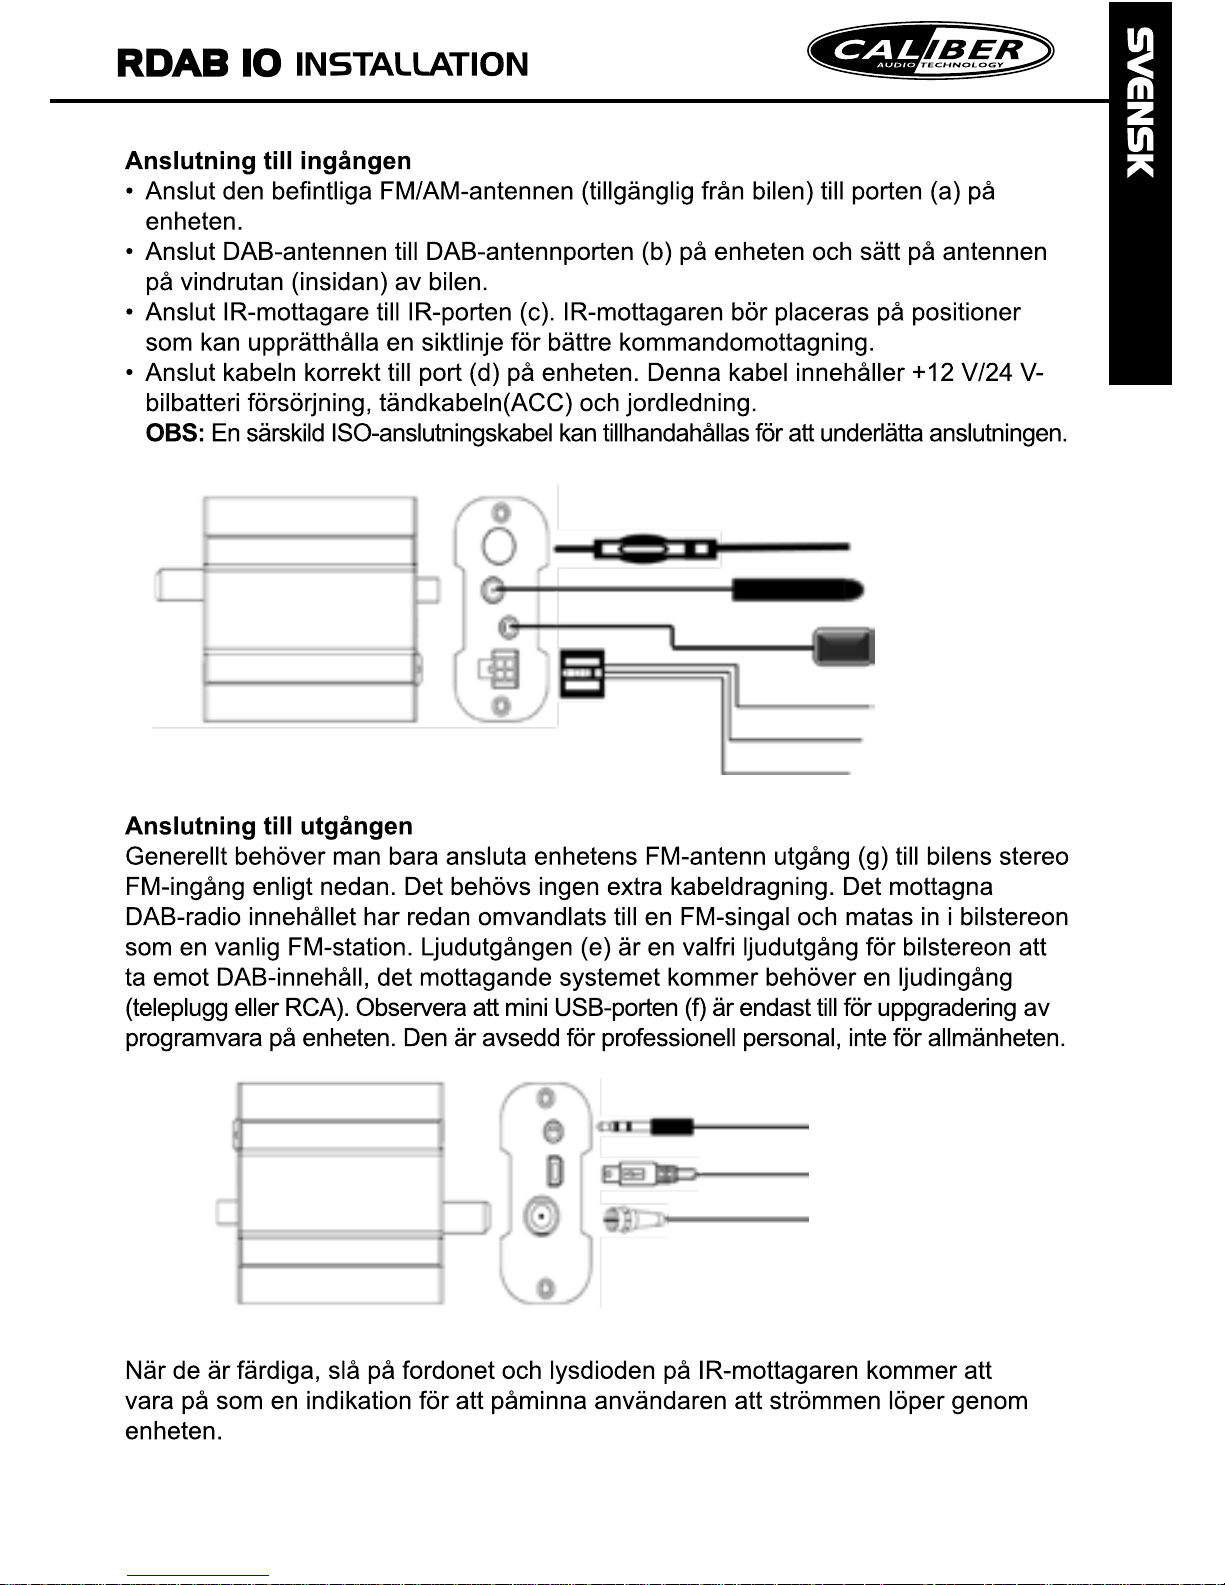
2. Installation of The Device
Integrating this device with your existing car stereo system is simple and easy. Simply
connect both the existing FM antenna and DAB antenna to the device inputs, then the
FM-modulated DAB radio is readily available via its FM output (F female connector on the
other end of device). This paragraph is intended to guide you step by step how to
correctly configure this device with existing FM antenna, power source, and audio output
delivery to car stereo.
2.1 Connecting to the inputs
Connect the existing FM/AM antenna (available from the car) to the port (a) of the
unit.
Connect DAB antenna into the DAB antenna port (b) of the unit.
Connect IR receiver to the IR port (c). The IR receiver “window” should be located at
positions that can maintain a line-of-the-sight for better command reception.
Connect the wiring harness correctly to port (d) on the unit. This harness include
+12V car battery supply, ignition wire (ACC), and ground wire. Note that a separate
ISO connection cable may be provided to ease the connection.
FM/AM antenna from car
DAB antenna
In.
IR receiver
Battery +12V wire (yellow)
Ignition ACC wire (red)
Ground wire (black)
Wiring harness
(a)
(b)
(c)
(d)
Ear phone socket i.e. port (e) is another audio output option for car stereo to receive the
DAB contents. Note that the Mini USB port (f) is only for software upgrade of the unit. It
is intended for service professionals, not for general public.
Ear phone socket
connects to audio
Upgrade port (mini
USB)
FM output to the car
stereo
(e)
(f)
(g)
Page 30
Page 31
Page 32
Page 33
2. Installation of The Device
Integrating this device with your existing car stereo system is simple and easy. Simply
connect both the existing FM antenna and DAB antenna to the device inputs, then the
FM-modulated DAB radio is readily available via its FM output (F female connector on the
other end of device). This paragraph is intended to guide you step by step how to
correctly configure this device with existing FM antenna, power source, and audio output
delivery to car stereo.
2.1 Connecting to the inputs
Connect the existing FM/AM antenna (available from the car) to the port (a) of the
unit.
Connect DAB antenna into the DAB antenna port (b) of the unit.
Connect IR receiver to the IR port (c). The IR receiver “window” should be located at
positions that can maintain a line-of-the-sight for better command reception.
Connect the wiring harness correctly to port (d) on the unit. This harness include
+12V car battery supply, ignition wire (ACC), and ground wire. Note that a separate
ISO connection cable may be provided to ease the connection.
FM/AM antenna from car
DAB antenna
In.
IR receiver
Battery +12V wire (yellow)
Ignition ACC wire (red)
Ground wire (black)
Wiring harness
(a)
(b)
(c)
(d)
Ear phone socket i.e. port (e) is another audio output option for car stereo to receive the
DAB contents. Note that the Mini USB port (f) is only for software upgrade of the unit. It
is intended for service professionals, not for general public.
Ear phone socket
connects to audio
Upgrade port (mini
USB)
FM output to the car
stereo
(e)
(f)
(g)
Page 34
Page 35
Page 36
Page 37
2. Installation of The Device
Integrating this device with your existing car stereo system is simple and easy. Simply
connect both the existing FM antenna and DAB antenna to the device inputs, then the
FM-modulated DAB radio is readily available via its FM output (F female connector on the
other end of device). This paragraph is intended to guide you step by step how to
correctly configure this device with existing FM antenna, power source, and audio output
delivery to car stereo.
2.1 Connecting to the inputs
Connect the existing FM/AM antenna (available from the car) to the port (a) of the
unit.
Connect DAB antenna into the DAB antenna port (b) of the unit.
Connect IR receiver to the IR port (c). The IR receiver “window” should be located at
positions that can maintain a line-of-the-sight for better command reception.
Connect the wiring harness correctly to port (d) on the unit. This harness include
+12V car battery supply, ignition wire (ACC), and ground wire. Note that a separate
ISO connection cable may be provided to ease the connection.
FM/AM antenna from car
DAB antenna
In.
IR receiver
Battery +12V wire (yellow)
Ignition ACC wire (red)
Ground wire (black)
Wiring harness
(a)
(b)
(c)
(d)
Ear phone socket i.e. port (e) is another audio output option for car stereo to receive the
DAB contents. Note that the Mini USB port (f) is only for software upgrade of the unit. It
is intended for service professionals, not for general public.
Ear phone socket
connects to audio
Upgrade port (mini
USB)
FM output to the car
stereo
(e)
(f)
(g)
Page 38
Page 39
Page 40
Page 41
2. Installation of The Device
Integrating this device with your existing car stereo system is simple and easy. Simply
connect both the existing FM antenna and DAB antenna to the device inputs, then the
FM-modulated DAB radio is readily available via its FM output (F female connector on the
other end of device). This paragraph is intended to guide you step by step how to
correctly configure this device with existing FM antenna, power source, and audio output
delivery to car stereo.
2.1 Connecting to the inputs
Connect the existing FM/AM antenna (available from the car) to the port (a) of the
unit.
Connect DAB antenna into the DAB antenna port (b) of the unit.
Connect IR receiver to the IR port (c). The IR receiver “window” should be located at
positions that can maintain a line-of-the-sight for better command reception.
Connect the wiring harness correctly to port (d) on the unit. This harness include
+12V car battery supply, ignition wire (ACC), and ground wire. Note that a separate
ISO connection cable may be provided to ease the connection.
FM/AM antenna from car
DAB antenna
In.
IR receiver
Battery +12V wire (yellow)
Ignition ACC wire (red)
Ground wire (black)
Wiring harness
(a)
(b)
(c)
(d)
Ear phone socket i.e. port (e) is another audio output option for car stereo to receive the
DAB contents. Note that the Mini USB port (f) is only for software upgrade of the unit. It
is intended for service professionals, not for general public.
Ear phone socket
connects to audio
Upgrade port (mini
USB)
FM output to the car
stereo
(e)
(f)
(g)
Page 42
Page 43
Page 44
Page 45
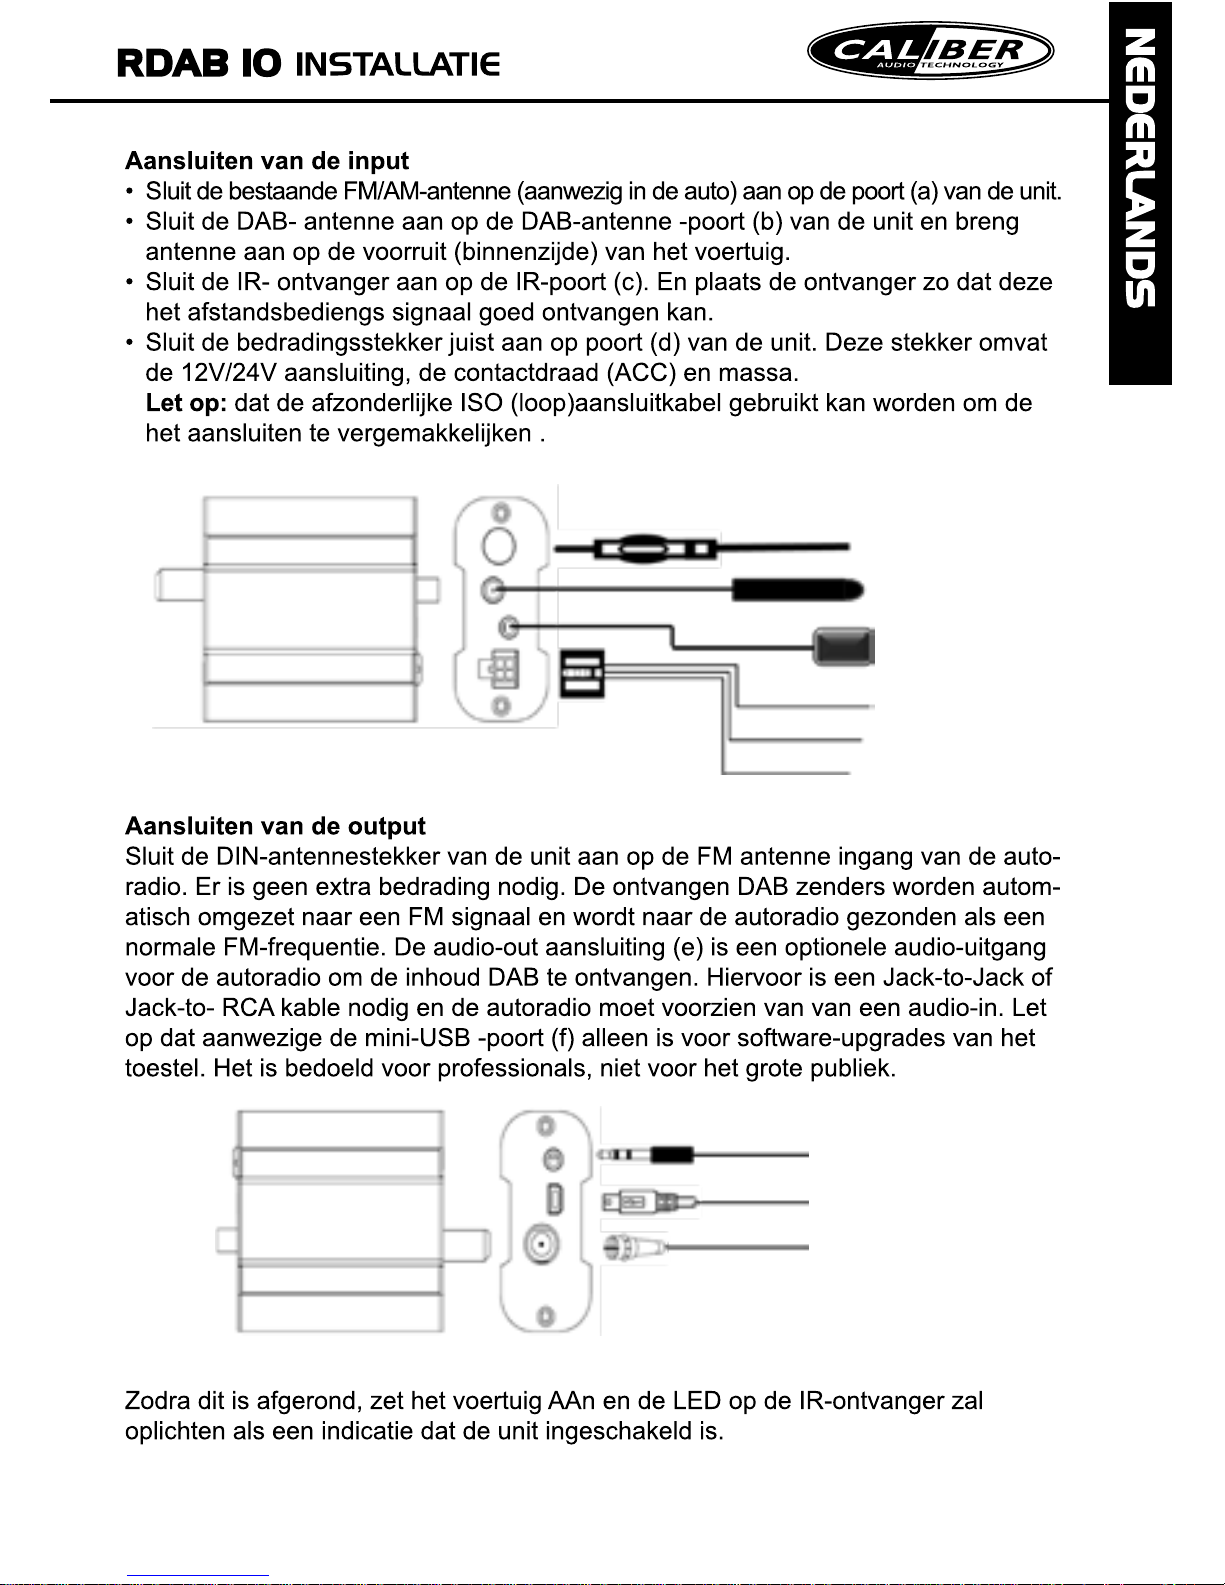
2. Installation of The Device
Integrating this device with your existing car stereo system is simple and easy. Simply
connect both the existing FM antenna and DAB antenna to the device inputs, then the
FM-modulated DAB radio is readily available via its FM output (F female connector on the
other end of device). This paragraph is intended to guide you step by step how to
correctly configure this device with existing FM antenna, power source, and audio output
delivery to car stereo.
2.1 Connecting to the inputs
Connect the existing FM/AM antenna (available from the car) to the port (a) of the
unit.
Connect DAB antenna into the DAB antenna port (b) of the unit.
Connect IR receiver to the IR port (c). The IR receiver “window” should be located at
positions that can maintain a line-of-the-sight for better command reception.
Connect the wiring harness correctly to port (d) on the unit. This harness include
+12V car battery supply, ignition wire (ACC), and ground wire. Note that a separate
ISO connection cable may be provided to ease the connection.
FM/AM antenna from car
DAB antenna
In.
IR receiver
Battery +12V wire (yellow)
Ignition ACC wire (red)
Ground wire (black)
Wiring harness
(a)
(b)
(c)
(d)
Ear phone socket i.e. port (e) is another audio output option for car stereo to receive the
DAB contents. Note that the Mini USB port (f) is only for software upgrade of the unit. It
is intended for service professionals, not for general public.
Ear phone socket
connects to audio
Upgrade port (mini
USB)
FM output to the car
stereo
(e)
(f)
(g)
Page 46
Page 47
Page 48
 Loading...