

Page 1

WEATHERPROOF
MONITOR
OWNER’S MANUAL
WP™1
Page 2
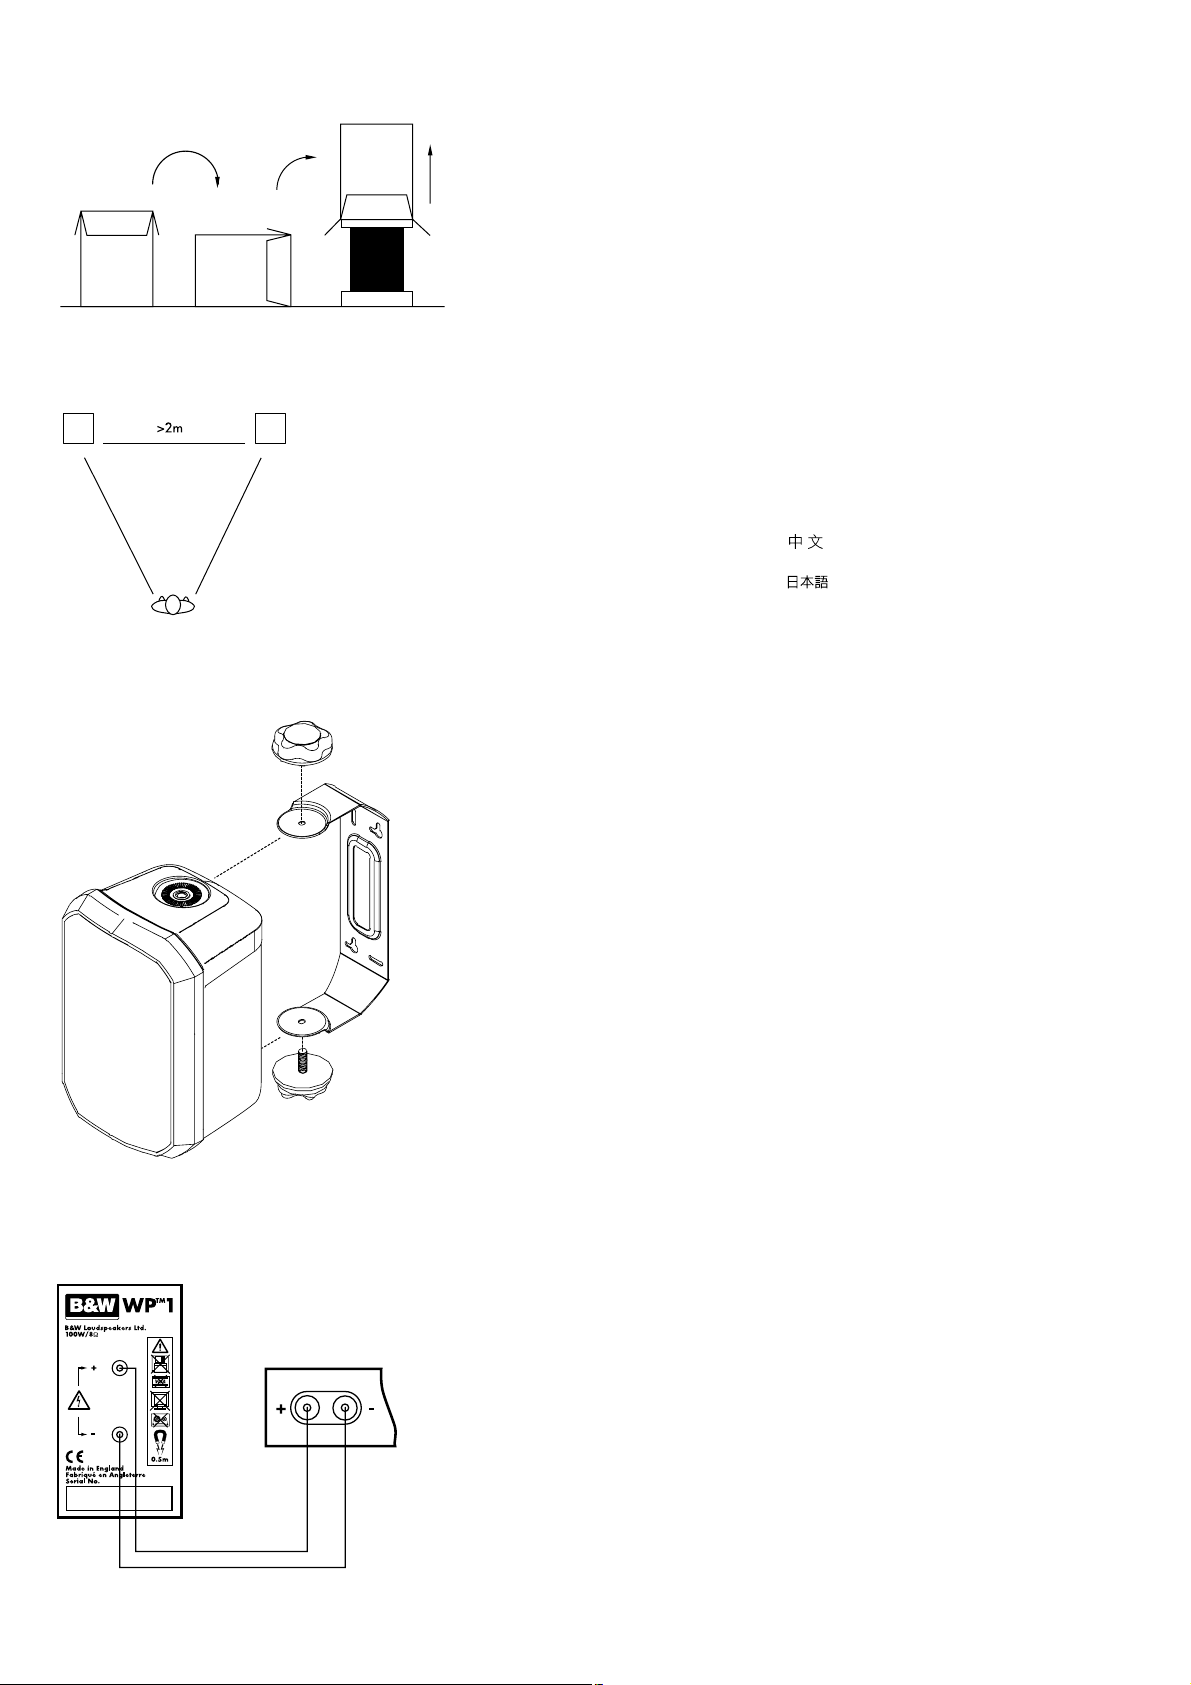
Figure 1
Figure 2
Figure 3
Figure 4
WP™1
WEATHERPROOF
MONITOR
OWNER’S MANUAL
English..........................................1
Français
........................................2
Deutsch.........................................3
Español
.........................................4
Português
......................................5
Italiano .........................................6
Nederlands..................................7
Ελληνικά
....................................8
...........................................9
........................................10
"esky .........................................11
Polski..........................................12
Русский....................................
13
Slovensko
...................................14
Suomi.........................................15
Svenska
......................................16
Page 3

INTRODUCTION
Thank you for choosing B&W.
The WP™1 is designed to operate in environmental
conditions where a conventional loudspeaker would
soon suffer, if work at all. Traditional small monitor
loudspeakers supplement their low frequency output
by using a bass reflex port. This is clearly
impractical for a weatherproof design where such a
port would allow moisture etc. into the loudspeaker
cabinet. Up until now the only alternative has been
a restricted bass output. The WP™1 uses Auxiliary
Bass Radiators (ABRs) hidden behind the two side
grilles. These add to the bass output in a similar
way to a port while keeping the cabinet sealed.
The result is full range weatherproof loudspeaker of
the finest audio quality.
Please read this manual fully before unpacking and
installing the product. It will help you to optimise its
performance.
B&W maintains a network of dedicated distributors
in over 60 countries who will be able to help you
should you have any problems your dealer cannot
resolve.
UNPACKING (figure 1)
• Fold the carton flaps right back and invert
the carton and contents.
•
Lift the carton clear of the contents.
We suggest you retain the packing for future use.
POSITIONING (figure 2)
The weatherproof nature of the speaker means
quality sound can be extended to the garden, pool
area, patio or even onto an ocean going yacht.
•
Position the speakers at the centre of the
listening area approximately at the corners of an
equilateral triangle.
• Keep the speakers at least 2m apart to maintain
left- right separation.
• For best results we recommend you stand the
WP™1 on a shelf or attach it to a wall or ceiling.
Stray magnetic fields
The speaker drive units create stray magnetic fields
that extend beyond the boundaries of the cabinet.
We recommend you keep magnetically sensitive
articles (television and computer screens, computer
discs, audio and video tapes, swipe cards and the
like) at least 0.5m from the speaker.
MOUNTING (figure 3)
For complete flexibility, a number of mounting
variations are catered for.
Two tapped holes are provided at the base of the
rear of the cabinet. They will take either
1
/
4” UNC
or M6 fixings to cater for a number of commercially
available mountings.
The supplied mounting bracket contains slots and
keyhole fixings. We recommend that the slots are
used for permanent fixing (the slots allows for a
small amount of repositioning during mounting) or
where the speaker may be subject to movement or
jolts (on a yacht for instance). The keyhole fixings
allow the speaker to be easily removed or repositioned at some point in the future.
The cut-out in the centre of the bracket allows the
speaker cable to be routed directly through the
bracket for connection to the terminals (see
‘Connections’).
WARNING: You should use sufficient quality, size
and number of corrosion proof fixings to an area of
wall or ceiling of sufficient strength to ensure that
the speaker is safely supported.
The WP
™
1 can be mounted either horizontally or
vertically but consideration should be given to
angling the speaker either left and right or up and
down by moving the speaker relative to its
mounting bracket. This is achieved by slackening
the knobs at the top and bottom of the speaker,
swivelling the speaker and then re-tightening the
two knobs (hand tightening should be sufficient to
keep the speaker in place).
CONNECTIONS (figure 4)
All connections should be made with the equipment
switched off.
Ensure the positive terminal on the speaker
(marked + and coloured red) is connected to the
positive output terminal of the amplifier and
negative (marked - and coloured black) to negative.
Incorrect connection can result in poor imaging
and loss of bass.
Always make sure all the terminal caps are screwed
down tight, as otherwise they may rattle.
Ask your dealer for advice when choosing cable.
Keep the total impedance below the maximum
recommended in the specification and use a low
inductance cable to avoid attenuation of the highest
frequencies.
AFTERCARE
Avoid touching the drive unit diaphragms,
especially the tweeter, as damage may result.
1
Page 4

Description
Drive units
Frequency range
Frequency response
Dispersion
Sensitivity
Harmonic distortion
Nominal impedance
Crossover frequency
Power handling
Max. recommended
cable impedance
Dimensions
Net Weight
WP™1 MONITOR
Kevlar is a registered trademark of Dupont.
B&W Loudspeakers Ltd. reserves the right to amend details of the specification without notice in line with technical developments.
Copyright © B&W Loudspeakers Ltd. Printed in England.
B&W Loudspeakers Ltd, Meadow Road, Worthing, BN11 2RX Tel: +44 (0) 1903 524801 Fax: +44 (0) 1903 524725
http://www.bwspeakers.com
2-way 4th-order with Auxiliary Bass Radiators
1x 125mm (5in) Kevlar
®
bass/mid
1x 25mm (1in) metal dome high-frequency
-6dB at 50Hz and 30kHz
70Hz - 20kHz ± 3dB on reference axis
Within 2dB of response on reference axis
Horizontal: over 40° arc
Vertical: over 10° arc
89dB spl (2.83V, 1m)
2nd & 3rd harmonics
<1% 95Hz - 20kHz (90dB spl, 1m)
8Ω (minimum 4.2Ω)
3kHz
25W-100W continuous into
8Ω on unclipped programme
0.2Ω
Height: 278mm (11 in)
Width: 181mm (7
1
/8in)
Depth: 244mm (81/2in)
3.1kg (6.8 lb)
I 5037
 Loading...