

Page 1
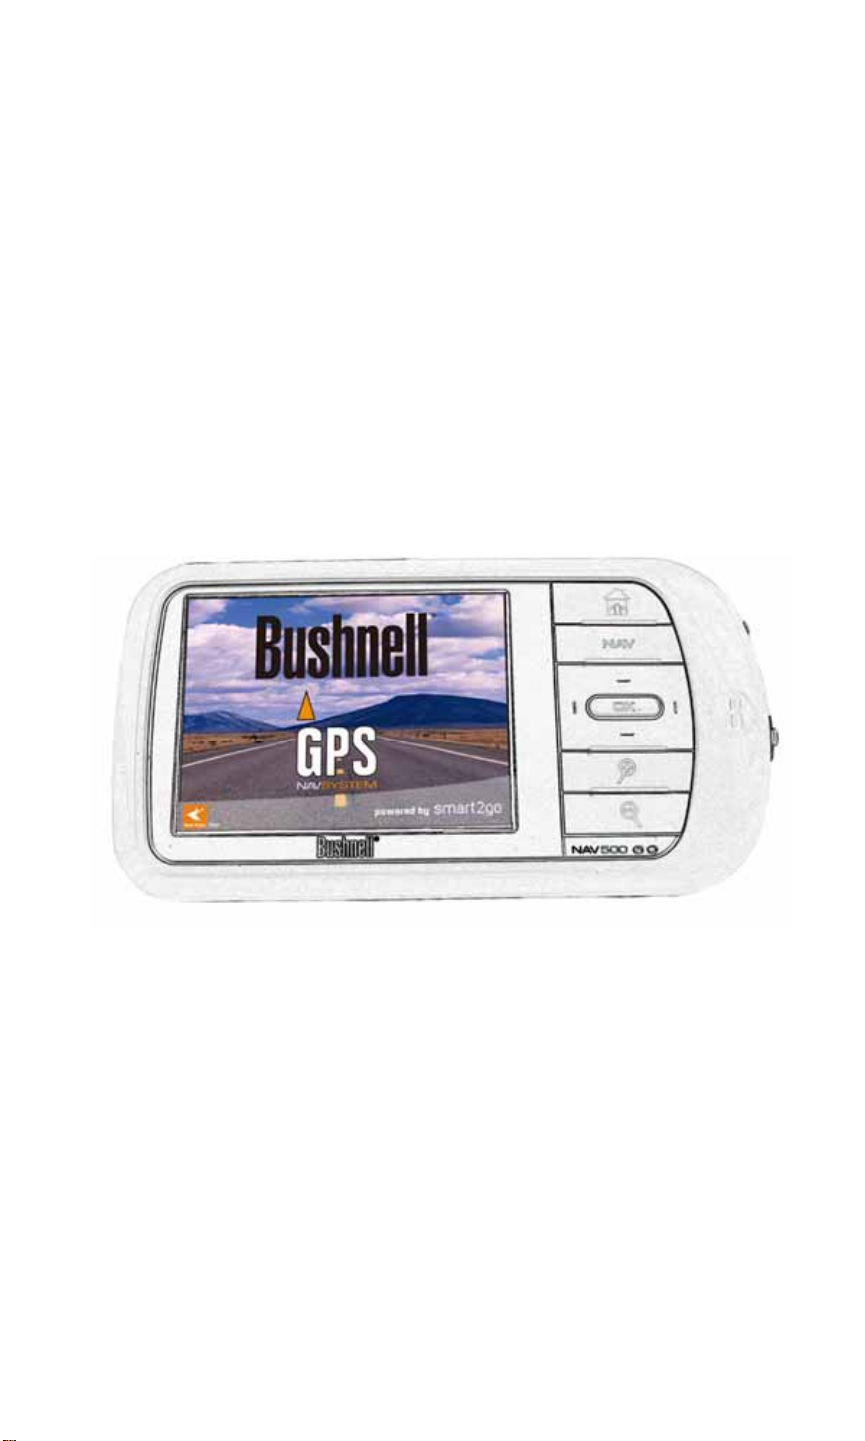
BUSHNELL
NAV500
User Guide
Model Number: Bushnell NAV500
Congratulations on your purchase of the NAV500. Not only can you use
your NAV500 as an in-car navigation system, you can also use it as an
MP3 player and a photo album viewer.
Please read through the following manual carefully in order to use your
NAV500 correctly.
Page 2

Contents
BUSHNELL............................................................................................ 1
NAV500 ................................................................................................... 1
User Guide............................................................................................... 1
Contents.........................................................................................................2
DESCRIPTION OF BUTTONS, ETC................................................... 3
ACCESSING THE NAVIGATOR FUNCTION.................................... 5
MP3 PLAYER......................................................................................... 6
Mp3 player button definitions.....................................................................7
Playing music................................................................................................7
Adjusting the volume ...................................................................................8
Changing the order of tracks ......................................................................8
Repeating tracks...........................................................................................8
Creating a play list .......................................................................................9
Viewing photos............................................................................................11
Using the slideshow ....................................................................................12
SETUP................................................................................................... 13
Setting the time/date...................................................................................14
Setting the volume......................................................................................15
Brightness options ......................................................................................16
Calibrating the touch screen .....................................................................16
Adjusting the brightness............................................................................17
Setting the Idle Time..................................................................................17
Choosing the language ...............................................................................18
Info...............................................................................................................19
DOWNLOADING FILES TO THE MEMORY CARD ...................... 20
CARE AND MAINTENACE................................................................ 21
Design Limitations......................................................................................25
Page 3
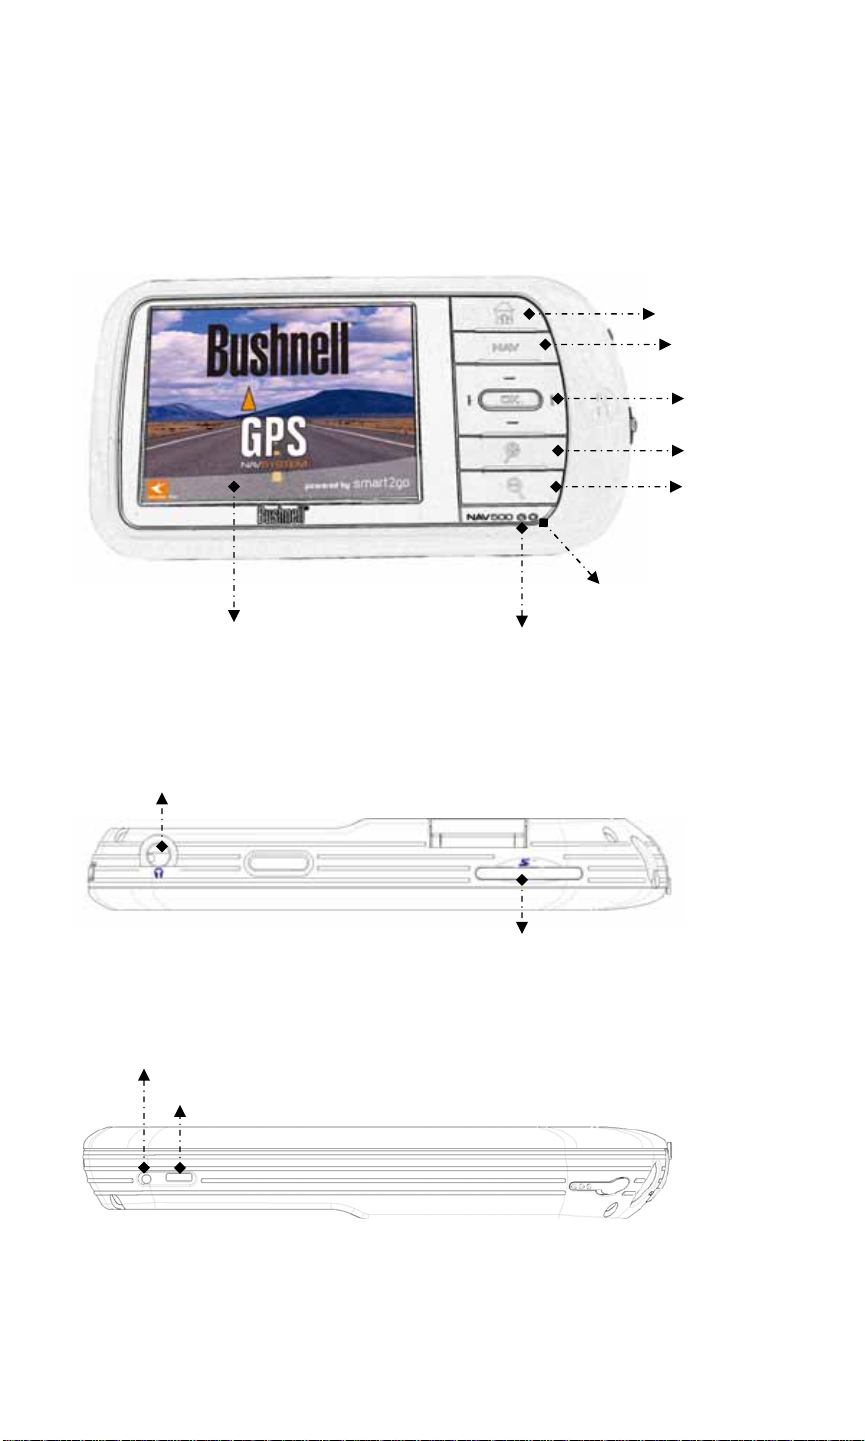
DESCRIPTION OF BUTTONS, ETC.
g
g
r
FRONT VIEW
Main Menu
Navi
ator
Touch screen
TOP VIEW
Headphone/Socket
BOTTOM VIEW
Software reset button
Hardware reset switch
Power indicato
SD card slot
GPS si
Directional
/OK keys
Zoom in
Zoom out
nal indicator
Page 4
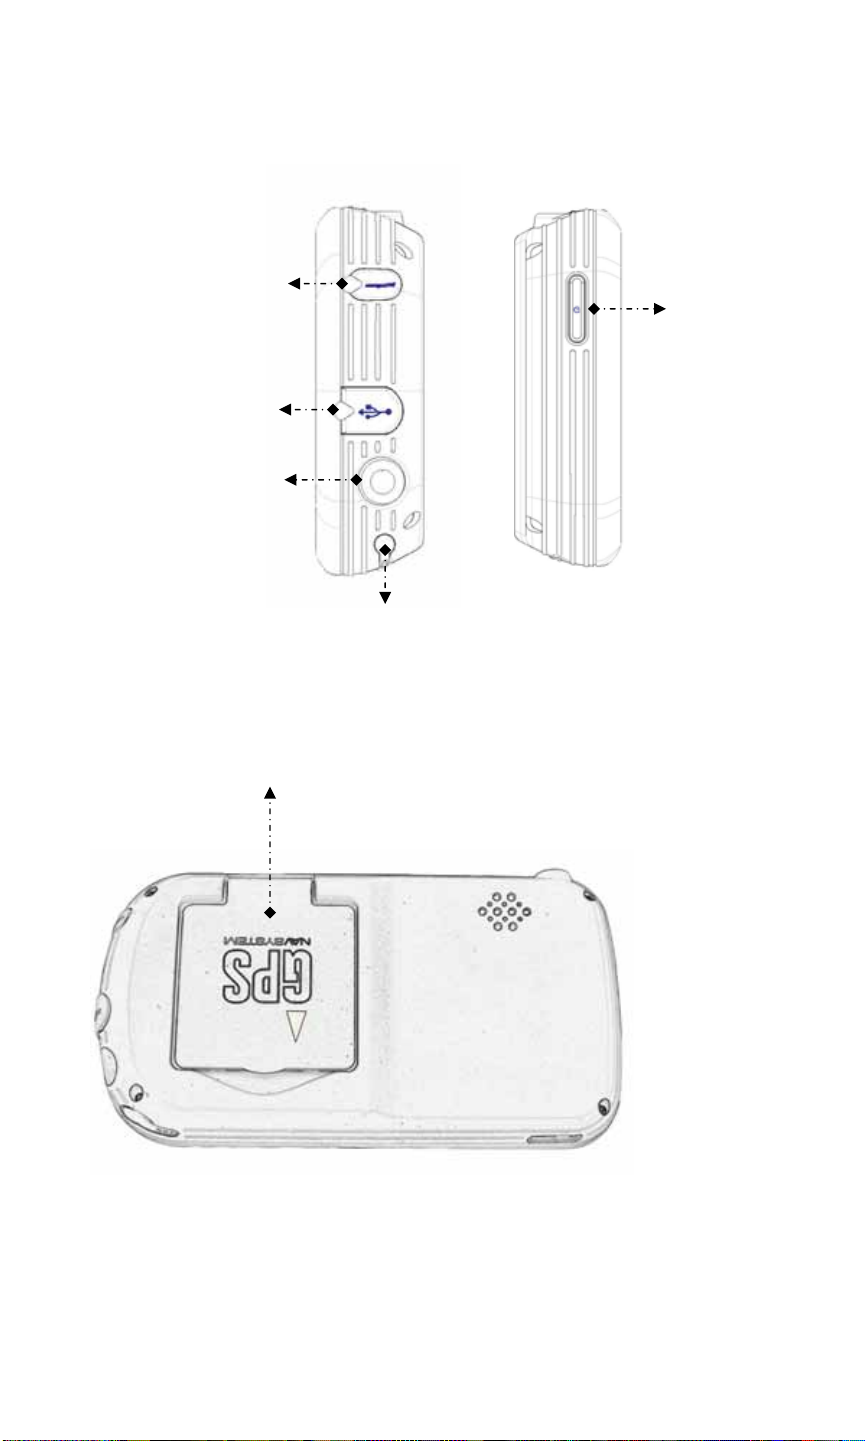
r
y
SIDE VIEWS
External
antenna
connector
USB
connector
External
power
connecto
St
lus
BACK VIEW
Foldable GPS Antenna
on/off
Page 5

ACCESSING THE NAVIGATOR FUNCTION
Switch the unit on and tap Navigator in the Main Menu screen.
Alternatively, you can use the directional keys to highlight
Navigator and then press the OK key.
After the application loads the main Navigator menu will appear. For
more information regarding the Navigator function please see the
Navigator Manual.
Page 6
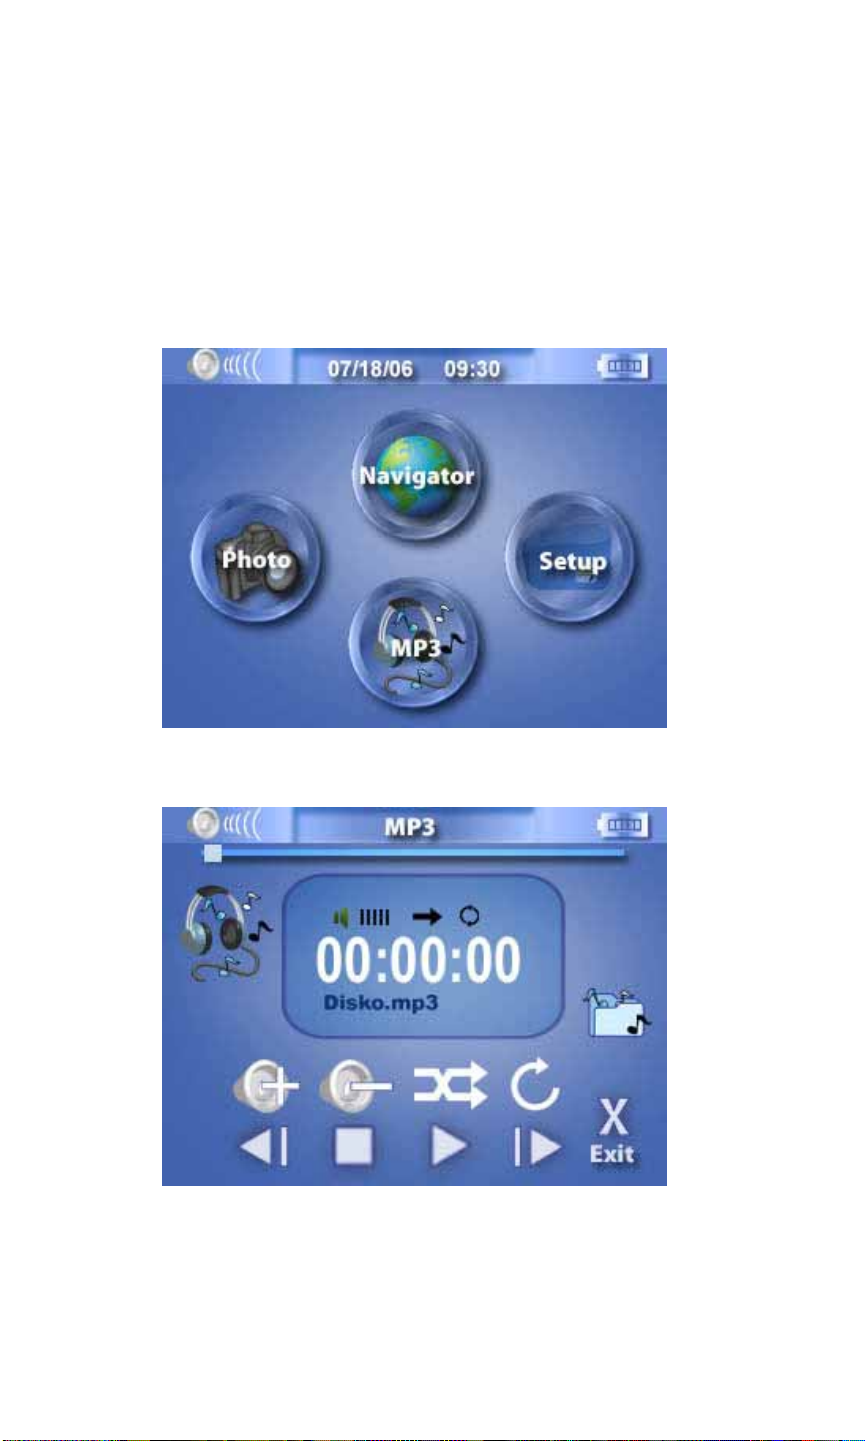
MP3 PLAYER
Playing music on your NAV500 couldn’t be easier.
Switch the unit on and tap MP3 in the Main Menu screen.
Alternatively, you can use the directional keys to highlight MP3
and then press the OK key.
The MP3 screen will now appear in the display:
NOTE: Music must be loaded to the SD memory card from your
computer. See the section entitled DOWNLOADING FILES TO THE
MEMORY CARD for more information.
Page 7
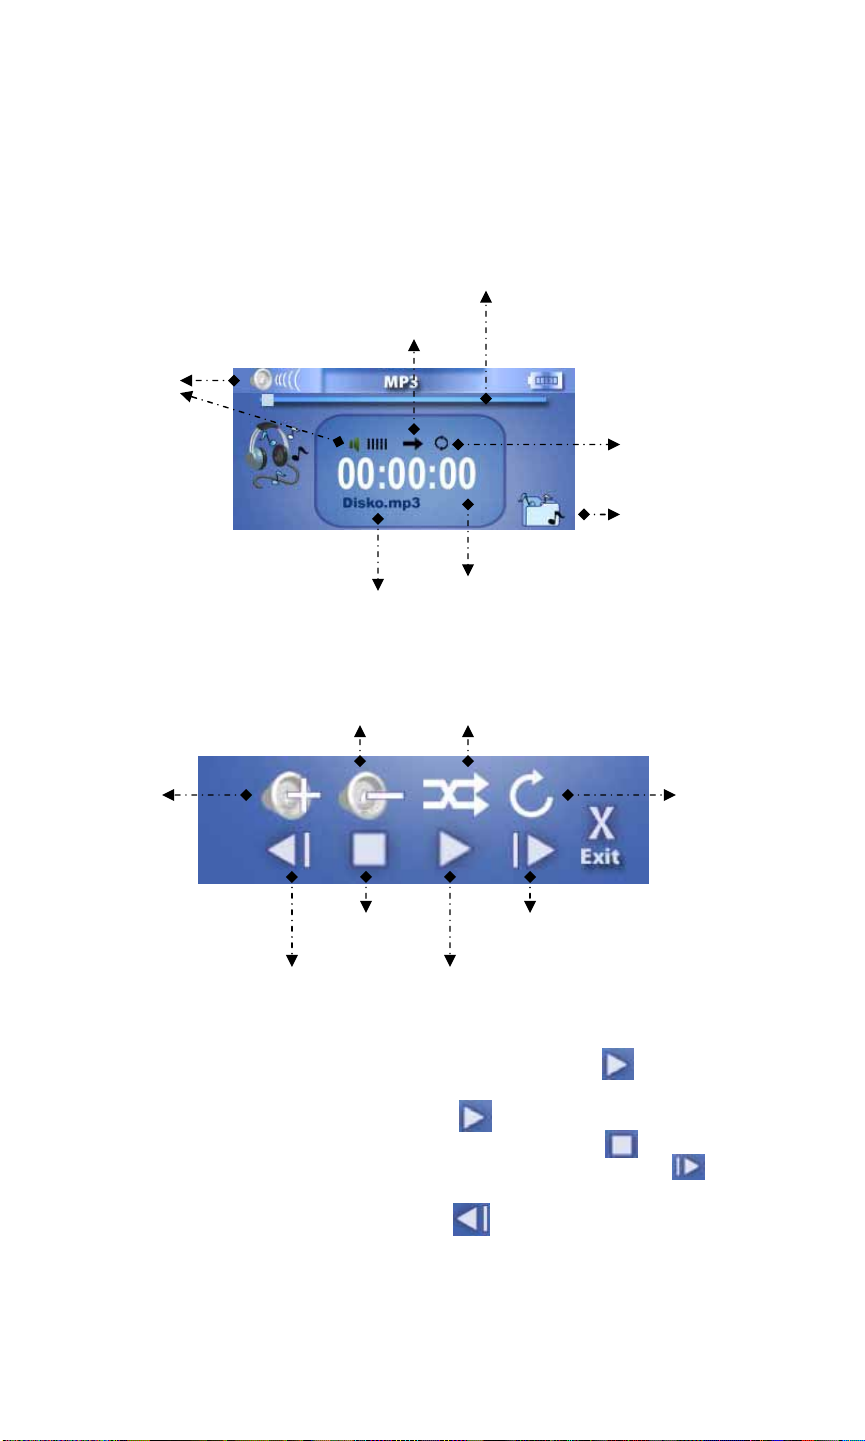
Mp3 player button definitions
g
q
r
y
p
y
/
The MP3 Player Buttons are defined as follows:
Distance throu
h track
uence/random indicato
Volume
indicator
Se
Linear/repeat
indicator
Pla
Song title
Time
Decrease volume
Select
sequence/random
Increase
volume
Sto
Fast forward
Playing music
Rewind Pla
Pause
While on the MP3 screen, press the Play button to begin
listening to music.
To pause music, press the Pause button.
To stop listening to music, press the Stop button .
To skip to the next track, press the Fast forward button .
To go to the beginning of the current track or skip back to the
previous track, press the Rewind button.
list
Select linear/
repeat
Page 8

Adjusting the volume To adjust the volume, press the Increase volume or Decrease
volume buttons.
Changing the order of tracks
To choose between playing tracks in sequential order or random order,
press the Select sequence /random button. The current order
is indicated in the top left-hand side of the screen.
NOTE: The appearance of the Select sequence/random button
changes depending on the current mode.
Repeating tracks To choose between repeating tracks or not, press the Select linear /
repeat button. The current mode is indicated in the top left-hand
side of the screen.
NOTE: The appearance of the Select linear/repeat button changes
depending on the current mode.
Page 9

Creating a play list
Press the Play list button
The Play list screen will now appear in the display
NOTE: By default, all tracks in the My Music folder of the Memory
Card are added to the play list.
To remove ALL tracks from the play list, press the Remove all
tracks
To remove only the currently highlighted track, press the Remove
track
NOTE: To change which track is highlighted, use the up/down
direction buttons or the touch screen.
To add tracks, press the Add track
track/s you would like to add.
To exit the Play list screen, press the Exit button.
button. You will be asked to confirm this operation.
button.
button, then navigate to the
Page 10

PHOTO ALBUM
You can view individual photos or slideshows on your NAV500.
Switch the unit on and tap Photo Album in the Main Menu screen.
Alternatively, you can use the directional keys to highlight Photo
Album and then press the OK key.
The Photo Album screen will now appear in the display:
Page 11

Viewing photos
If you cannot see photo thumbnails, but instead see folders (as in the
above image), then you can click these to access their contents (as in
the image below).
You can also scroll up or down to search up or down the list of folders
or photos.
If you need to move back up a level, click the back button
Once you can see photos, you can click on one to display it full size
(see below).
.
Page 12
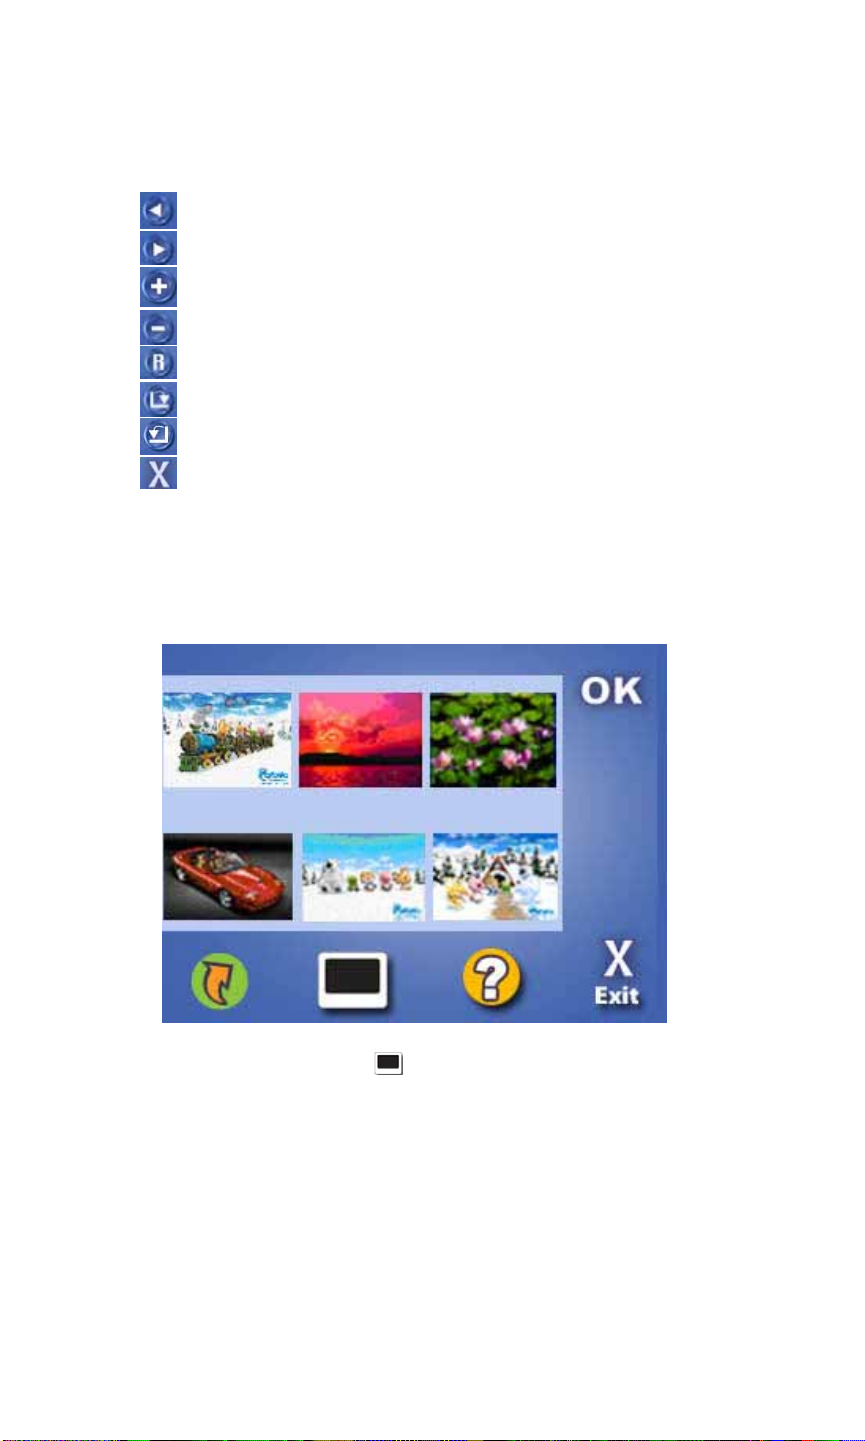
You will see several options at the bottom of the screen, which are
defined as follows:
- Go to previous photo
- Go to next photo
- Zoom in (You can also use the zoom in key)
- Zoom out (You can also use the zoom out key)
- View photo at default rotation
- View photo at 90° clockwise rotation
- View photo at 90° counter clockwise rotation
- Exit screen
Using the slideshow
Make sure you can see photo thumbnails by using the steps outlined in
Accessing Photos
Press the Slideshow button
. The slideshow will start.
To stop the slideshow, click anywhere on the screen.
NOTE: Photos must be loaded to the SD memory card from your
computer. See the section entitled DOWNLOADING FILES TO THE
MEMORY CARD for more information.
Page 13

SETUP
To access the Setup feature on your NAV500:
Switch the unit on and tap Setup in the Main Menu screen.
The Setup screen will now appear in the display:
From this screen you can set:
Clock – Set the time/date
Volume – Set the default volume
Brightness – Calibrate the touch screen and adjust brightness and idle time.
Language – Select the default language
Info – View system information
Page 14

Setting the time/date
Choose Clock from the Setup screen.
The Clock screen will now appear in the display:
Choose the Time Zone from the drop-down list. You can use either
the touch screen or the directional keys to do this.
To enter the Date and Time, highlight the item you wish to change
and then use the up/down directional keys to increase or decrease
their values. The current Time is also shown above for reference.
Once you have finished, press the OK button.
Page 15
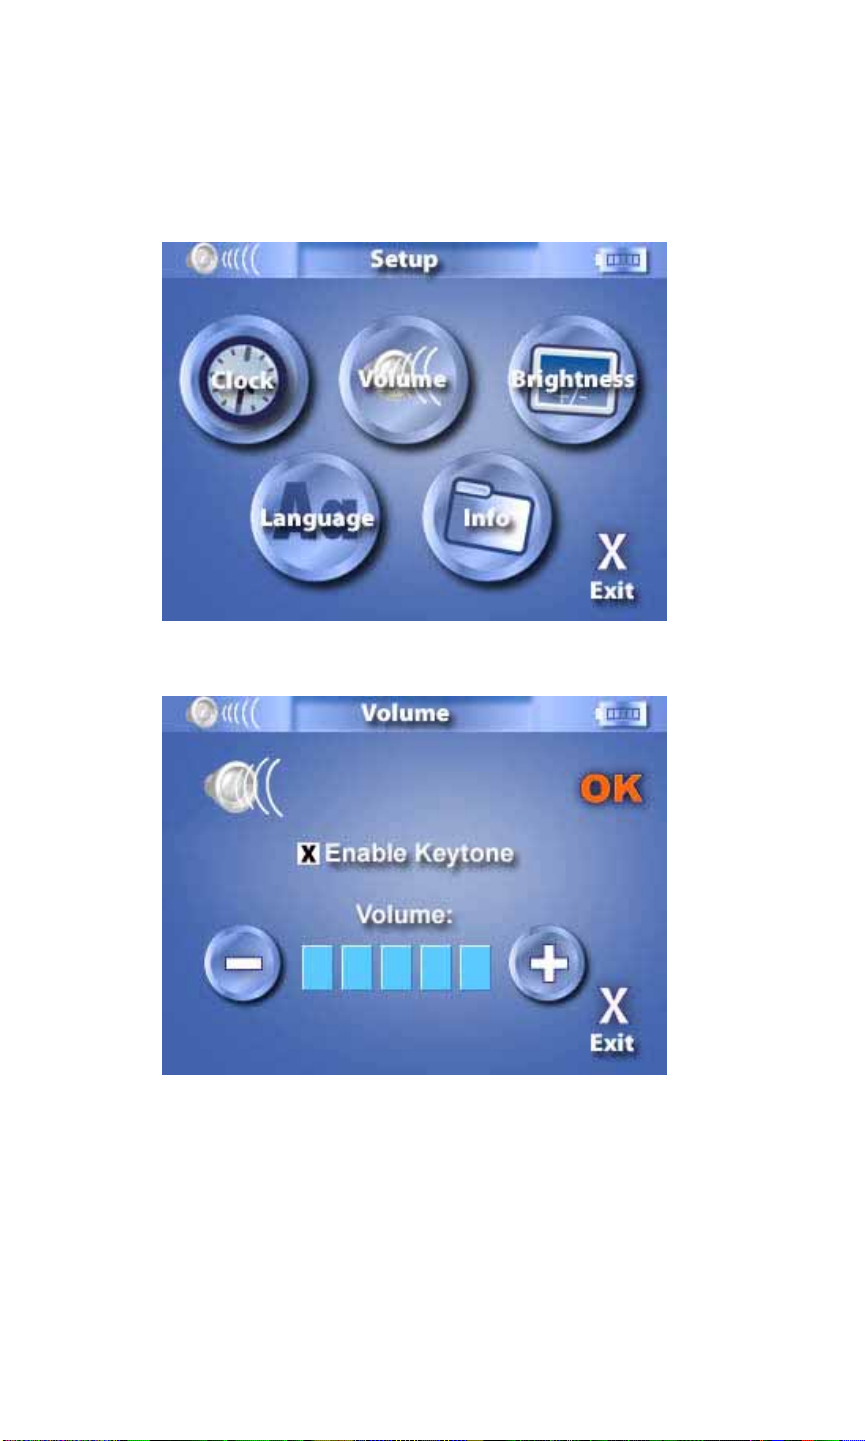
Setting the volume
Choose Volume from the Setup screen.
The Volume screen will now appear in the display:
Click the + or – buttons to increase or decrease the volume.
Alternatively, you can use the right/left directional keys to increase
or decrease the volume.
Check the Enable Keytone option if you would like to hear a
clicking sound each time you press a button.
Once you have finished, press the OK button.
Page 16

Brightness options
Choose Brightness from the Setup screen.
The Screen will now appear in the display:
Calibrating the touch screen
Click Calibration.
The Calibration screen will now appear in the display. You will be asked
to go through a number of simple steps to calibrate the screen.
Page 17

Adjusting the brightness
To adjust the brightness, click the + or – buttons
Alternatively, you can use the right/left directional keys to highlight
Brightness, and then to increase or decrease the brightness.
Once you have finished, press the OK button.
Setting the Idle Time
The idle time feature will automatically switch off the display following a
period of inactivity. For example if an idle time of 5 minutes is chosen,
the display backlight will switch off if no buttons are pressed during that
time.
Use the directional keys to highlight idle time or click it on the touch
screen.
Use the right/left directional keys to choose a suitable idle time.
When you are happy with all the Screen settings click OK.
NOTE: If you do not wish to use the idle time feature, choose “off”.
Page 18

Choosing the language
Choose Language from the Setup screen.
The Language screen will now appear in the display:
Click the right/left arrow buttons or use the right/left directional keys
to choose a language from the list.
Once you have finished, press the OK button.
Page 19
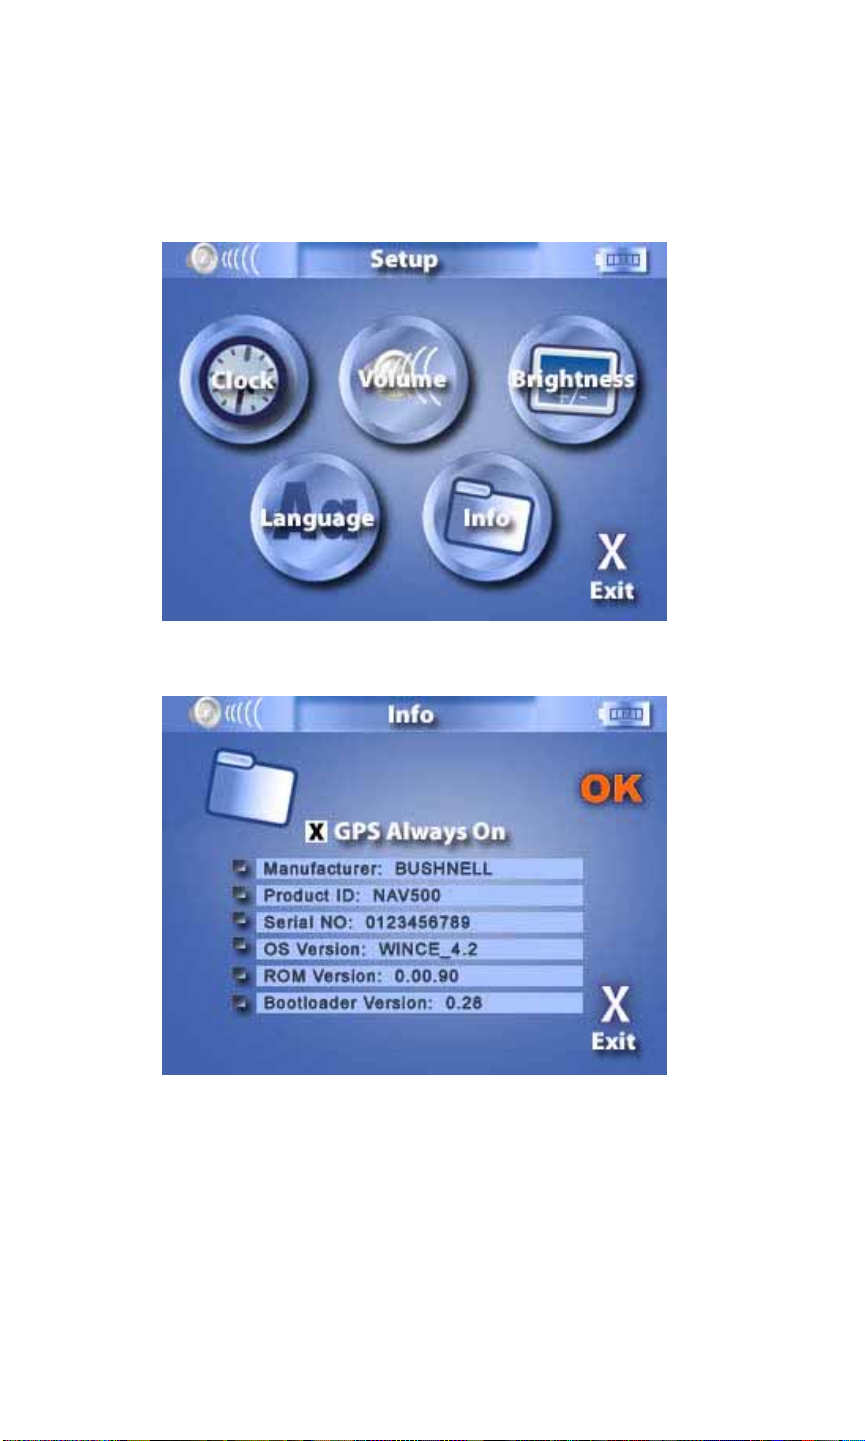
Info
Choose Info from the Setup screen.
The System Info screen will now appear in the display:
Here you can see your device’s serial number, OS version and Bootloader version.
The GPS Always On option is checked by default. This will keep the
GPS module running and the blue signal indicator blinking when the
navigator is launched and after it is closed. If you de-selected this option
it will require a longer time to initialize the GPS module the next time the
navigator is launched. Click OK to exit this screen.
Page 20

DOWNLOADING FILES TO THE MEMORY CARD
There are two ways to add music and photo files to the Memory Card.
If your PC has a card reader attached, you can simply remove the
Memory Card from the Nav500 unit and insert it into your card reader.
Then using Windows on your PC go to ‘My Computer’. This is usually
accessed from the ‘Start’ menu or the desktop. Double click on the
“Removable drive” that relates to your card reader.
You will see My Music and My Photos folders. You can copy and
paste or drag-and-drop any music or photos into these folders from your
computer hard drive or CD-ROM.
If your computer does not have a card reader you can still add photos
and music files to your Memory Card by connecting the Nav500 via
USB to your PC. You need to have Microsoft Active Sync (supplied on
CD) installed first.
Simply connect the USB cable from the NAV500 to a spare USB port on
your computer. Turn the NAV500 on.
Active Sync will detect your Nav500 device and will prompt you to select
a method of synchronizing, you can select ‘Guest mode’.
You will now have Active sync running. You can click on the ‘Explore’
button. This shows you the data stored on the Nav500. If you double
click on the folder named ‘Memory Card’ you will see My Music and
My Photos folders. You can copy and paste or drag-and-drop any
music or photos into these folders from your computer hard drive or CDROM.
NOTE: For more information about using ActiveSync, please see
Activesync Help file.
Page 21

CARE AND MAINTENACE
Keep away from extremely hot, cold or humid conditions.
Do not allow the NAV500 to get wet.
Avoid shocks or vibrations.
Only use the supplied stylus with the touch screen.
Do not open your NAV500. Any attempts to open this device will void
the warranty.
Wipe the touch screen only with a lint-free cloth, slightly dampened,
while the device is switched off.
Do not place objects on top of the NAV500.
Page 22

WARNING:
Bushnell is committed to safe and responsible enjoyment of outdoors.
This device is intended as a navigation aide.
It is the sole responsibility of the driver of the vehicle to operate the
motor vehicle in a safe manner. Information from the GPS unit can
distract the operator of a motor vehicle.
It is unsafe to operate the controls of the GPS unit while operating a
motor vehicle. If used in a motor vehicle, it must not be used by the
operator of the motor vehicle. If it is used in a motor vehicle it must be
mounted in a manner such that it does not distract the operator, does
not interfere with the operator¹s field of view, and does not block or
interfere with the air bags or other safety mechanisms of the motor
vehicle.
The Global Positioning System (GPS) is operated by the government of
the United States, which is solely responsible for its accuracy and
maintenance. The system is subject to changes which could affect the
accuracy and performance of all GPS equipment.
This device is intended as a supplemental navigation aide only. It must
not be used for any purpose requiring precise measurement of location,
direction, distance or velocity.
All map data sources contain some level of inaccuracies or incomplete
data.
Bushnell strives to provide the most recent map information at a
reasonable cost.
Page 23

FCC Note:
This equipment has been tested and found to comply with the limits for
a Class B digital device, pursuant to Part 15 of the FCC Rules. These
limits are designed to provide reasonable protection against harmful
interference in a residential installation. This equipment generates,
uses and can radiate radio frequency energy and, if not installed and
used in accordance with the instructions, may cause harmful
interference to radio communications. However, there is no guarantee
that interference will not occur in a particular installation. If this
equipment does cause harmful interference to radio or television
reception, which can be determined by turning the equipment off and on,
the user is encouraged to try to correct the interference by one or more
of the following measures:
a. Reorient or relocate the receiving antenna.
b. Increase the separation between the equipment and receiver.
c. Connect the equipment into an outlet on a circuit different from
that to which the receiver is connected.
d. Consult the dealer or an experienced radio/TV technician for help
The shielded interface cable must be used with the equipment in order
to comply with the limits for a digital device pursuant to Subpart B, of
Part 15 of FCC Rules.
Specifications and designs are subject to change without any notice or
obligation on the part of the manufacturer.
Page 24

TROUBLESHOOTER
1. NAV500 will not switch on.
• Make sure that the battery is properly charged.
• Make sure the hardware reset switch has not been moved.
2. Bad reception.
• Unfold the foldable antenna (see below picture)
• Use an external antenna.
3. New Memory Card doesn’t work or files have been deleted from
my original Memory Card.
• Format card (only if new), then copy and paste files/folders
from within the Memory Card folder on the NAV500 CD to
your Memory Card.
Page 25

4. Screen frozen, or NAV500 is behaving strangely
• Do a soft reset. To do a soft reset, insert a thin object into
the software reset button.
• If this does not solve the problem, then do hardware reset.
To do a hardware reset, slide the hardware reset switch to
the opposite position, then return it to its original position.
5. I cannot play my music on the NAV500.
• Make sure that all music is MP3, WMA, or WAV format.
6. My music appears to be playing, but I cannot hear it.
• Ensure that the volume is not set to zero.
• Make sure that the track plays correctly on your computer.
7. I cannot see my photos.
• Make sure that your images are jpg, gif, png or bmp formats.
Working Conditions and Design Limitations
z Do not remove the SD card while you are using the navigation
function.
z If the red LED is flashing, the device needs to be recharged
immediately.
z Please use the car charger when possible, and do not charge the
device in extremely hot or cold conditions.
z Please do not use other chargers or adaptors, as these may
damage your device and void the warranty.
z Please only use the supplied USB cable for connecting to a PC.
z Do not operate this device in extremely hot or cold conditions.
Design Limitations
z Please only use the supplied SD card
z If you need to format the SD card, please specify the FAT file
system.
z Please only use jpg, gif, png and bmp images with the photo
viewer.
z The MP3 player only supports mp3, wav and wma formats. The
image files rotatable spec is 1024 x 768.
z Do not remove the SD card while using the photo viewer or MP3
functions.
z During charging, the LED will be orange until charging is complete,
at which time it will change to green. If the charger is removed and
Page 26

connected again, the LED will remain orange for approximately 30
minutes before changing to green.
z Before first use, the device needs to be charged for at least 8
hours.
z Before first use, please make sure that the hardware reset switch
is in the correct position. Leave in this position from then on.
z To switch the device on, press the power button for one second.
To switch off, hold the power button for 3 seconds.
z Do not allow the device to get damp or wet
z Only use the supplied stylus to avoid scratching the screen
The navigation information offered by this device is for reference only.
As map and POI data may change, we cannot guarantee information on
this device is always 100% up-to-date. We will endeavor to reflect the
latest information available, users are advised to use with care and
caution.
Disposal of Used Electrical & Electronic Equipment The meaning of the symbol on the product, its accessory or packaging
indicates that this product shall not be treated as household waste. Please, dispose of this equipment at your applicable
collection point for the recycling of electrical & electronic equipments waste. In the European Union and Other European
countries which there are separate collection systems for used electrical and electronic product. By ensuring the correct
disposal of this product, you will help prevent potentially hazardous to the environment and to human health, which could
otherwise be caused by unsuitable waste handling of this product. The recycling of materials will help conserve natural
resources. Please do not therefore dispose of your old electrical and electronic equipment with your household waste. For
more detailed information about recycling of this product, pleas contact your local city office, your household waste e
disposal service or the shop where you purchased the product.
 Loading...