

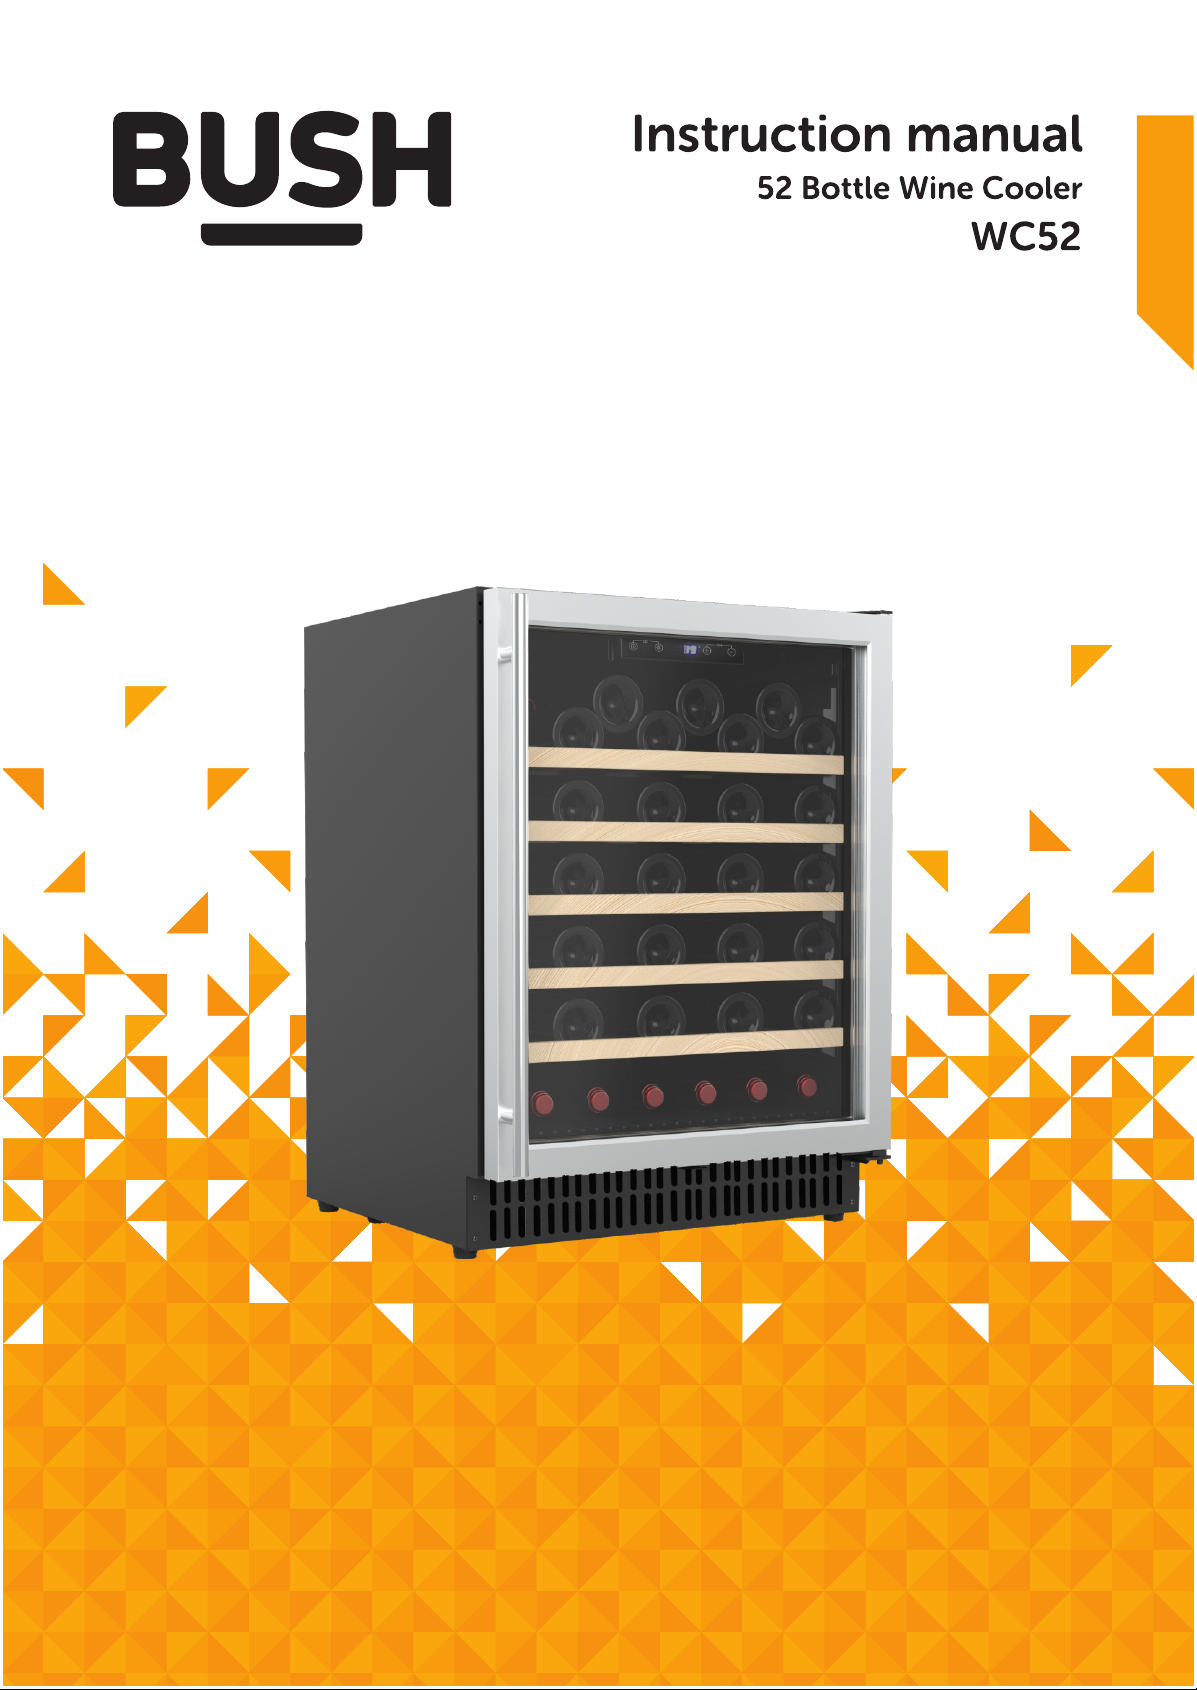
Page 1
Page 2
Page 3
5
10
11
13
13
Page 4

Page 5

Page 6
WARNING: This appliance is intended to be used in household
and domestic applications only.
WARNING: This product is not suitable for food storage and must
not be used to store food inside.
6
Page 7
Do not use the appliance for
industrial and commercial use, or any other purpose.
The appliance is design for indoor use only and must be
protected from rain, moisture and extreme temperature variations.
This appliance is not intended for outdoor use.
If the socket and refrigerator plug are not compatible please contact
after sales service provider.
This appliance can be used by children aged from 8 years and above
and persons with reduced physical, sensory or mental capabilities or lack
of experience and knowledge if they have been given supervision or
instruction concerning use of the appliance in a safe way and understand
the hazards involved. Children shall not play with the appliance. Cleaning
and user maintenance shall not be made by children without supervision.
Children aged from 3 to 8 years are allowed to load and unload refrigerating
appliances.
Do not splash water on the appliance. It may cause electrical
parts to fail and result in an electric shock.
Do not sit stand or place any other heavy objects on top of the
appliance. This could result in injury or damage to the appliance.
To prevent possible harm to the environment or human health from
uncontrolled waste disposal, recycle it responsibly to promote the sustainable
reuse of material resources (further detail on page 26 of this instruction
manual).
Young children should be supervised to ensure that they do
not play with the appliance.
In case there is a flammable gas leak, open the window for air
circulation and disconnect from the mains. Do not turn the temperature knob.
Otherwise sparks may happen.
7
Page 8
24
It is recommended that you remove all the internal and external
packaging and clean the interior of the appliance prior to first use. We
recommend you wipe all parts with warm water then rise and dry.
Place all parts back into the appliance after cleaning.
Cleaning and user maintenance shall not be made by children
without supervision.
Opening the door for long periods of time can cause a significant increase
in the temperature in the compartments of the appliance.
- Only store wine in sealed containers.
- Do not overload the cabinet.
- Only open the door when necessary.
- This is a self-defrosting appliance. The compressor will not run during
the twenty minutes defrost cycle.
- Do not pull the shelves beyond the anti-stop position when fully loaded.
- This appliance is intended to be used exclusively for the storage of wine.
- In the event of a power failure leave the door closed as much as possible
to maintain the internal working temperature. Should the power failure
continue for a prolonged period you should take steps to protect the
contents of the wine cooler against a rise in temperature. The wine
cooler will remember the selected temperature setting and revert to
these setting once the power is restored.
Page 9

Page 10

10
Page 11

1
5
2
3
6
4
1.Cabinet
2.Touch control panel
3.Wine shelves
Accessories included
4.Levelling feet
5.Glass door
6.Lower door hinge
Handle x 1 Screws x 2
Full instructions on how to fix the handle can be found on Page 12 of this manual
Page 12

Page 13

10mm
615
61
0
8
3
0
-
8
9
0
595
575
82
0
~8
8
0
90
30
Installing the stainless steel handle
To install the handle, follow the instructions below:
1. Peel back door seal along the right hand side
of door. You will find a screw hole at the top
and lower of the door where you have
peeled the seal back. (please refer to
the diagram)
2. Take out the screws from bag at back
of cabinet. Put the screws in the hole
where the handle is to be installed.
(Screw hole position please refer to
Point 1).
3. Align the handle with screws,
tighten the screws using a screw
driver until the handle is both flush
and secured tightly against the
door side. (DO NOT over-tighten as
this may cause damage to the door surface)
4. After handle fixed well, put the door seal back to
the door to cover the hole.
Doo r seal
30mm
The installation of this appliance is best carried out
by 2 people.
Dispose of all packaging carefully and responsibly.
The appliance is designed for indoor use only and
must be protected from rain, moisture and extreme
temperature variations.
This appliance is designed for household use. Do
not use the appliance for industrial and commercial use,
or any other purpose.
The appliance MUST be positioned on a firm level
base.
Installation of your appliance
The appliance is designed for built-in, recessed or free standing
installation. The minimum space required is :
615mm W x 605mm D X 830mm H ( refer to right photo)
IMPORTANT: Failure to follow the instructions regarding installation
and ventilation may void the warranty supplied with your
appliance.
13
Page 14

1
2
1
2
Levelling feet
The appliance must be installed level in order to work properly. If the unit is not level, the doors and magnetic seal
alignments will not be covered properly.
To level the unit, adjust one or both levelling feet at the base of the unit.
Adjustable feet
This appliance comes with height adjustable feet which allows the appliance to be installed under bench and ensures
the appliance is stable and level. Just screw the bottom feet anticlockwise to raise the height up to 880mm or clockwise
to lower the height to 820mm. See below photos.
Normal Height
After Adjust
820
8
8
0
Adjusting the plinth
The pre-fitted plinth for this appliance comes with an adjustable lower section that is initially seated behind the upper
section. It helps to hide the feet after it was being adjusted. The process for adjusting the plinth trim is simple and is
achieved by following the image and steps below.
1. Remove the screws (1) from both the top left and top right hand sides.
2. Loosen or remove the screws (2) from the bottom left and bottom right hand sides. Failure to sufficiently loosen the
bottom screws may cause damage to the lower trim when adjusting it.
3. Carefully guide the lower trim down until the desired height is achieved.
4. Reinsert screw (1) and tighten. Then, tighten or reinsert screws (2).
Each appliance has a climate class (shown on
the rating label) where it indicates the temperature
range of the appliance operation in place. The
appliance may not work properly it is left for a long
period at a temperature outside the specified range.
o
Climate Class
SN
N
ST
0
90
5
1
T
Amb.T.( C)
o
10~32 C
o
16~32 C
o
16~38 C
o
16~43 C
o
Amb.T.( F)
o
50~90 F
o
51~90 F
o
61~100 F
o
61~110 F
Detail on how to set temperature can be found on
Page 18 of this manual.
The plinth could be adjusted from 90mm to 150mm.
Page 15

When positioning the appliance, ensure the
supply cord is not trapped or damaged.
Do not locate multiple portable socket-outlets
or portable power supplies at the rear of the
appliance.
Page 16

Page 17

Before use
Final checks before operating the appliance
1. Make sure there is sufficient space for air circulation around the appliance.(Please see page 13 of Instruction
Manual titled ‘Installation requirements’ for this information).
2. The feet have been adjusted for perfect leveling.
3. Clean the compartment per recommendation in section “Care and Maintenance”.
4. Plug in the appliance and it will start operation to the default temperature setting.
5. The LED display may not show the selected temperature whilst the appliance first gets to the correct temperature.
This is normal, and the display will be corrected automatically once the appliance has run for a few hours.
6. If the appliance is switched off, you should allow five minutes before switching it on again to prevent the risk of
unnecessary damage to the compressor.
Please note :
The appliance will work continuously until it gets to correct temperature. Continuous noise from the compressor and
refrigeration system is normal, this is not a defect.
correctly
Please be aware that this wine cooler is designed to fit 0.75 litre Bordeaux style wine bottles (see bottle dimension).
Using different size bottles in the wine cooler may prevent the door from closing, and limit the space between shelves
and between bottles. When using a different size wine bottle we recommend to take out a shelf or rearrange the bottles
to suit the wine bottle size.
Do not exceed the capacity that the appliance is able to handle. Follow below bottle loading diagram.
Diagram for shelf 2-5 loading Diagram for bottom loading
shelf 1
shelf 2
shelf 3
shelf 4
shelf 5
bottom
Diagram for shelf 1 loading
Shelf 1 : Normal loading is 8 bottles each shelf, to achieve 52 bottles loading for your appliance, you may need to stack extra
6 bottles on the top of shelf 1, but make sure place them at center ,do not place on just one side as this may result in the
wine bottles falling down.
Shelf 2-5 : Loading diagram for 8 bottles on each shelf ,max loading 8 bottles.
Bottom : 6 bottles place at bottom directly, no shelf, max loading 6 bottles only.
Caution:
Condensation may be found on the glass door during summer time or humid temperatures. This is normal. Wipe it
with a damp cloth.
Remove the shelves
To remove a shelf from the wine cooler, first remove all bottles from the shelf, then pull out the shelf until it stops. Lift up the
inner end of the shelf up, then the whole shelf can be pulled out from the cooler.
17
Page 18

Defrosting
The wine cooler is designed to defrost automatically every 4 hours. The defrost process will last for 20 minutes.
During defrost, the compressor stops working and fan keeps on running for 20 minutes.
Door alarm
The wine cooler is equipped with an alarm that will sound if the door is open for more than 60 seconds. Close the door
or press any key once to switch off the alarm.
Controls
It is recommended that you install appliance in a place where the ambient temperature is between 16 C - 32 C. If the
ambient temperature is above or below recommended temperature, the performance of the unit may be affected. For
example, placing your unit in extremely cold or hot conditions may cause interior temperatures to fluctuate. The
operation temperature range may not be reached.
1 2 3 4
Key:
1 - Power button
2 - Light button
3 - “+” button
4 - “-” button
o o
12
To switch the power on/off
Press and hold the power button for 6 seconds to switch the wine cooler on.
Press and hold the power button for 6 seconds again to switch the wine cooler off.
To change the temperature
Continue to press the “+” or “-” buttons until the required temperature is shown on the display
The preset temperature is 12 C/54 F.
To change the temperature display from Fahrenheit to Celsius, or Celsius to Fahrenheit, press “+” and “-” button at the
same time for 2 seconds. Tips, please see the “ ” symbol on control panel.
The display shows the current internal temperature when the wine cooler is on.
o o
Optimal temperature selection
Whilst wine is best stored at temperatures between 13 and 15 C , your wine can also be stored at drinking temperature.
As a guide for red wine this is between 15 and 17 C, and for white wine between 12 and 13 C.
o o
o
To use the internal light
Press the light button to switch the light on or off.
To turn the light ON when door opens, press the light button for 6 seconds, the display with show ‘OP’ which means
door controls function is ON
To turn the light function OFF, press the light button for 6 seconds, the display will show ‘CL’, which means the door
control function is OFF.
To lock the whole panel
Press power button and light button at the same time for one second, all the buttons on panel will be locked.
Press power button and light button once again, all the buttons will be unlocked.
Tips, please see the “ ” symbol on control panel.
18
Page 19

Page 20

Do not use hard brushes, steel wool, wire brushes, abrasives, or solvents like, alcohol or acetone,
boiling water, acids or alkaline to clean this appliance, as it may damage or deform the surface or
interior.
Light bulb replacement
The internal light is a LED type. To replace the lamp, please speak to after sales service provider.
Power Failure
If the power failure lasts for up to 24 hours, keep the door closed. This will allow the stored bottles to stay cold as
long as possible. If it lasts longer than 24 hours, it is advised to empty the wine cooler compartment
and temporarily store the bottles in a portable wine chiller.
Short vacation
There is no need to disconnect the appliance from the mains if you will be away for two to three weeks.
Long vacation
Remove all the wine if you are away for three weeks or more. Unplug the appliance and leave the
doors open to provide air circulation to prevent odour and mould.
If the refrigerating appliance is left empty for long periods, switch off, defrost, clean, dry, and leave the
door open to prevent mould developing within the appliance.
Page 21

Model WC52
Fridge capacity 142L
Bottles capacity 52 bottles
Voltage and frequency 220-240V AC/50Hz
Protection class I
Climate class N
Energy consumption 0.65kWh/24h
Rated current
Rated lamp power
Refrigerant
0.9A
1W
R600a/25g
Energy rating C
Size WxDxH (mm)
595x575x820
Page 22

Page 23

Page 24

PROBLEM SOLUTION
THE DOORS DO NOT
CLOSE PROPERLY
UNUSUAL NOISES
THE COOLER DOOR
WILL NOT OPEN
THE COMPRESSOR
RUNS CONSTANTLY
-Ensure there are no obstructions preventing
door closure.
-Check the door compartments and shelves
are correctly in place.
-Check the door seal is not warped or torn.
-Check the appliance is level.
-Check that the appliance is on a flat, level surface
and is stable.
-Check the spacing's around the appliance and
ensure it is not touching other items.
-Bubbling and gurgling sound:
This noise is emitted as the coolant fluid flow through
the pipes within the system. This is normal.
-Contraction and expansion of the inside walls may
cause popping and cracking noises.
-If the door has just been opened, leave it for a few
minutes to allow the air pressure to equalise
before trying again.
-The temperature is set too cold: select a lower
(warmer) setting.
-The door is open, or something is obstructing proper
door closure.
-The room temperature is hotter than usual.
THE EXTERNAL
FRIDGE SURFACE
IS WARM
SMELLS/ODOURS
-The exterior walls can be warmer than room
temperature. This is normal while the compressor
works to transfer heat from inside the bottle cabinet.
-Check all the drinks that are in the cooler are in date
and correctly packaged. Please remove anything
that may be spoiled and repack if necessary.
-Check for spillages throughout the cooler. Spillages
may cause odours if left unwashed. Wash accordingly
to the manufacturers advise.
Page 25

Page 26

Page 27

Page 28

 Loading...