

Bush DFTA13HD, DFTA13HDSIL Instruction Manual
INSTRUCTION MANUAL
Digital Set Top Box
DFTA13HD
DFTA13HDSIL
The Gold Technical Support Line: 1902 215 259
Personal Product Support
(Charges will apply at $2.95 per minute)


2
Introduction
Thank you for buying this Bush product, which is designed to give you many years of
trouble-free service.
You may already be familiar with using a similar unit, but please take time to read
these instructions. They are designed to familiarise you with the units many
features and to ensure you get the very best from your purchase.
Your safety and the safety of others is important. Therefore, please ensure you read
the “ Safety Instructions before you operate this unit.
In the unlikely event that your product fails to work normally, please call the below
Bush warranty number for support.
Safety is important
Warranty
Australia
Bush Warranty: 1800 509 394
New Zealand
Bush Warranty: 0800 450 259
”

- Always read the safety instructions carefully.
- Keep this User's Manual for future reference.
- Keep this equipment away from humidity.
- Place this equipment on a reliable flat surface before setting it up.
- Do not stand it on soft furnishings.
- If any of the following situations arise, have the equipment checked by a service Technician:
The equipment has been exposed to moisture.
The equipment has been dropped and damaged.
The equipment has obvious sign of breakage.
The equipment has not been working well or you cannot get it work according to
User's Manual.
Warning
- T o prevent the risk of electric shock, do not open the cover or the back of the receiver.
- Do not block the ventilation holes of the device. Leave an appropriate gap above
and around the unit to allow for adequate ventilation.
- Do not place the device in an unventilated cabinet or on top of a unit which emits heat.
Copyright Statement
No part of this publication may be reproduced in any form by any means without prior
written permission of BUSH Australia. Other trademarks or brand names mentioned herein
are trademarks or registered trademarks of their respective companies.
Disclaimer
Information in this document is subject to change without notice. The manufacturer does
not make any representations or warranties
(implied or otherwise)regarding the accuracy
and completeness of this document and shall in no event be liable for any loss of profit or
any commercial damage, including but not limited to special, incidental, consequential, or
other damage.
This symbol indicates that this pr
oduct incorporates double insulation between
hazardous mains voltage and user accessible parts. When servicing use only
identical replacement parts.
WARNING:
To reduce the risk of fire or electric shock, do not expose this apparatus to water.
3
Safety Instructions

4
Table Of Contents
Introduction.........................................................................................................................
2
Safety Instructions............................................................................................................... 3
Table Of Contents................................................................................................................. 4
About the Set Top Box.......................................................................................................... 5
Front Panel and Rear Panel Illustration................................................................................
6
Remote Control....................................................................................................................
7
Installing the Batteries......................................................................................................... 8
Setting Remote Control Learning Keys ................................................................................. 9
Connecting to Equipments...........................................................................................10~12
First Time Installation.........................................................................................................13
Basic Operations...........................................................................................................14~16
Main menu..........................................................................................................................17
Channel Manager................................................................................................................19
System Installation.......................................................................................................22~23
System Configuration.........................................................................................................24
Media Manager...................................................................................................................29
Trouble shooting................................................................................................................ 34
Technical specifications......................................................................................................35
Warranty.............................................................................................................................36
Main Features.......................................................................................................................................... 5
Package Contents...................................................................................................................................
5
Front Panel................................................................................................................................................6
Rear Panel.................................................................................................................................................
6
Using the Remote Control......................................................................................................................
7
Menu Tree...............................................................................................................................................18
Channel Organiser.................................................................................................................................19
Favourite List..........................................................................................................................................19
New Channel..........................................................................................................................................20
Edit Channel...........................................................................................................................................20
Delete All.................................................................................................................................................21
Auto Scan................................................................................................................................................22
Manual Scan...........................................................................................................................................22
Delete Carrier......................................................................................................................................... 23
System Setup......................................................................................................................................... 24
Language............................................................................................................................................24
OSD.......................................................................................................................................................25
TV.......................................................................................................................................................... 25
Time......................................................................................................................................................26
Wakeup Timer.....................................................................................................................................26
Parental Lock...................................................................................................................................... 27
Factory Defult........................................................................................................................................ 27
Accessories.............................................................................................................................................28
Game....................................................................................................................................................28
Version.................................................................................................................................................28
Playlist Manager.............................................................................................................................29~32
Media Info...............................................................................................................................................32
Safe Remove...........................................................................................................................................33

This DVB-T TV Receiver is a Free-To-Air digital terrestrial receiver, allowing you to access
free-to-air digital terrestrial TV channels and radio broadcasts on your TV set. Its digital
reception covers VHF & UHF band. Compared with analog TV programs, digital TV
programs eliminate the noise and interference by offering high quality video and audio.
An on-screen initial installation guide is provided so that you can easily start to enjoy
watching te control is included that offersthe programs. In addition, a fully featured remo
you access to every feature with a simple press of a button.
Main Features
- Fully compliant with Australian DVB-T standards
- Full MPEG2 ISO/IEC 13818 transport stream compliant audio/video decoding
- Bandwidth of 7MHz supported
- COFDM demodulator
- Automatic/manual channel search
- Channel edit and deletion
- Parental lock control
- EPG (Electronic Program Guide) and teletext function (where available)
- USB port for viewing JPG files
- Tuner RF in/loop through
- Component/S-Video/Video/Digital Audio via coaxial output
- HDMI output
- Full function remote control
Package Contents
Before installation, please check the items of the package. The package should contain the
following items:
1. DVB-T
T
Vreceiver x1
2. Remote control x 1
3. AAA size battery
for
the remote control x 2
4. Instruction manual x 1
5
About the Set Top Box
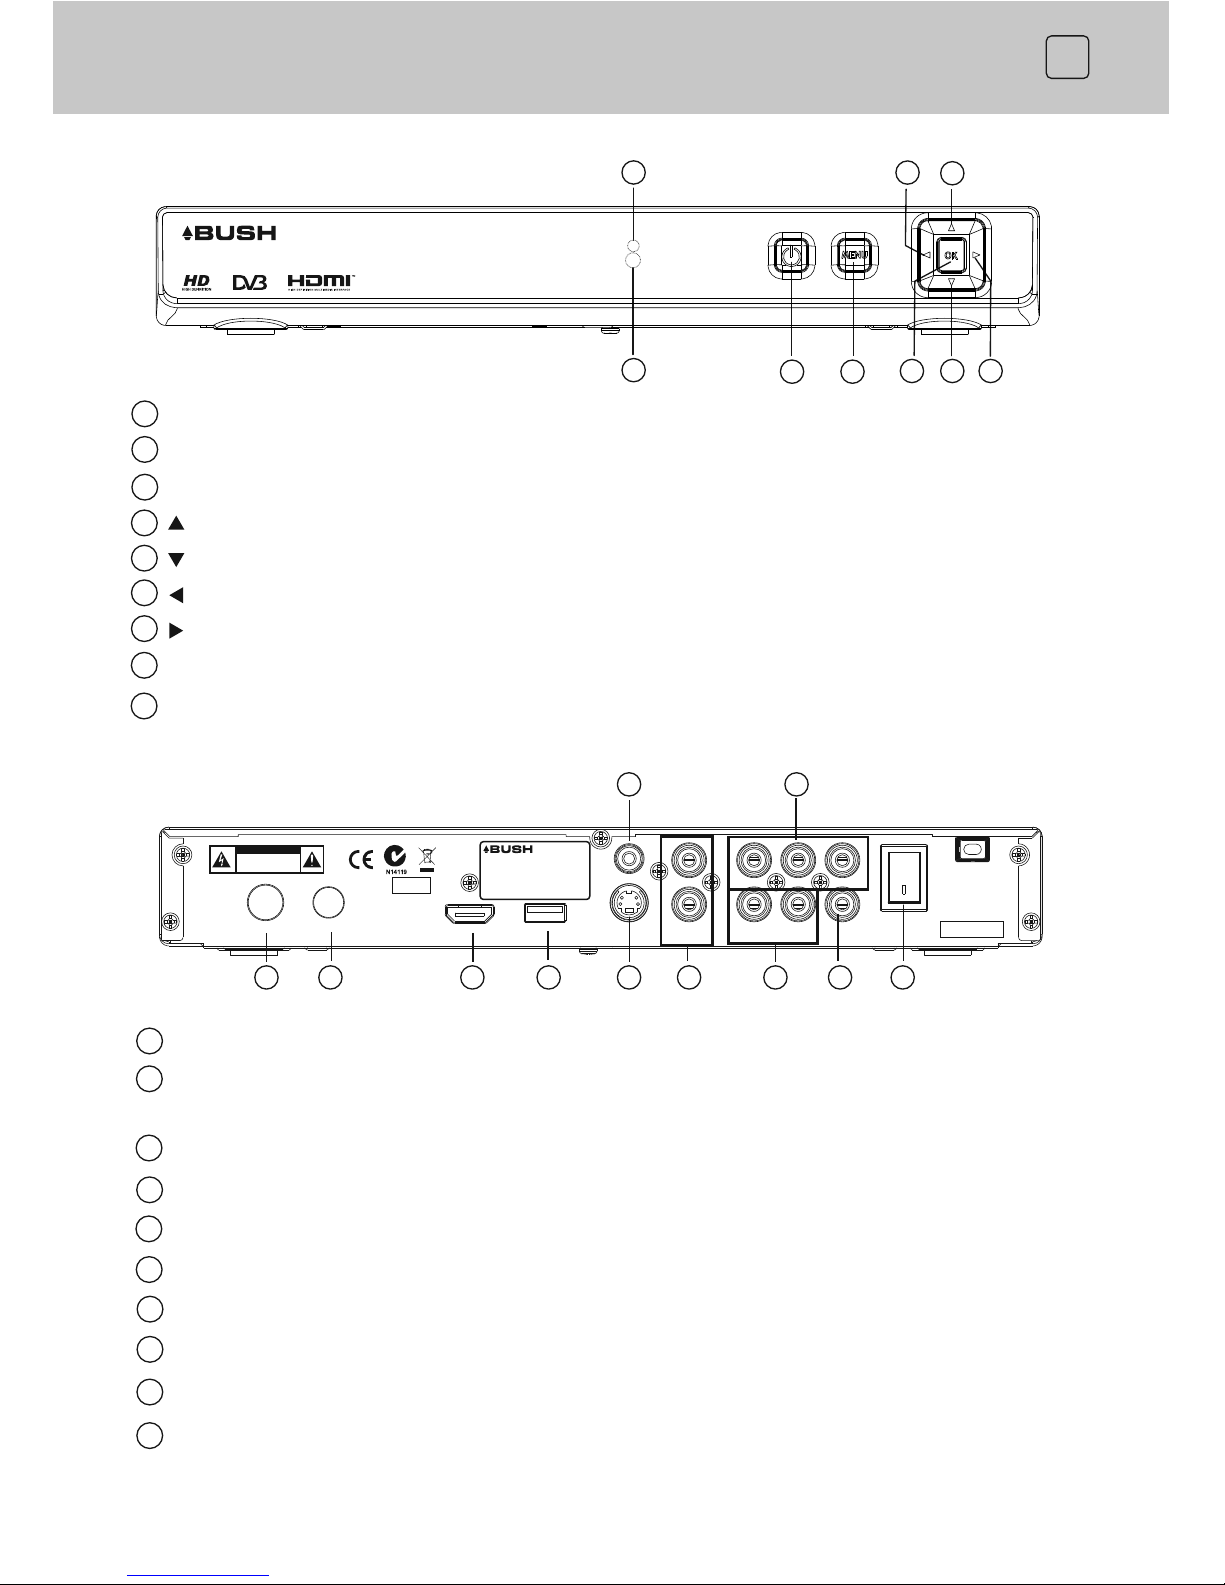
POWER To turn the standby mode ON/OFF.
MENU To enter the main menu.
OK
To confirm selections within the highlighted menu item.
ANT IN Connect the antenna here.
LOOP OUT
To connect the RF signal from the STB to either the RF Input jack (antenna)
on your VCR or to the antenna input of your TV.
HDMI High audio and video output used to connect to a HDMI device.definition
COAXIAL
Digital audio output.
S-VIDEO
Y/C output for a S-VHS or Hi-Fi Video Recorder.
AUDIO L/R
Audio output to connect to your TV.
YPbPr
High definition video output to connect to your TV.
VIDEO
CVBS output to connect to your TV.
POWER
Switch ON/OFF.
USB
To view JPG files via USB Input.
6
1
2
3
1
2
3
4
5
6
7
9
8
10
Front Panel and Rear Panel Illustration
8
LED
The LED light indicates when the receiver is activated. (Amber = standby, Green=On)
9
IR
Infrared Receiver.
CHANNEL+
To change the channel downward.
CHANNEL -
To change the channel upward.
VOL - To decrease volume.
VOL + T o increase volume.
4
5
6
7
1 2 3 4 5
6 7
9 9 8
10
VIDEO
L
AC IN 24 0V~
50Hz 10W
OFF
ON
USB
ANT IN
RF OUT
HDMI
VIDEOS-
R
L- AUDIO- R COAXIAL
Pb
PrY
Serial No.:
YYYY/MM
CAUTION
RISK OF ELECTRIC SHOCK
DO NOT OPEN
POWER SUPPLY: 240V~50Hz
POWER CONSUMPTION:10WATTS
MADE INP.R.C
BUSH WARRANTY: 1800509 394 AUSTRALIA
BUSH WARRANTY: 0800450 259 NEW ZEALAND
8
9
1 2
3
5
4
6
7
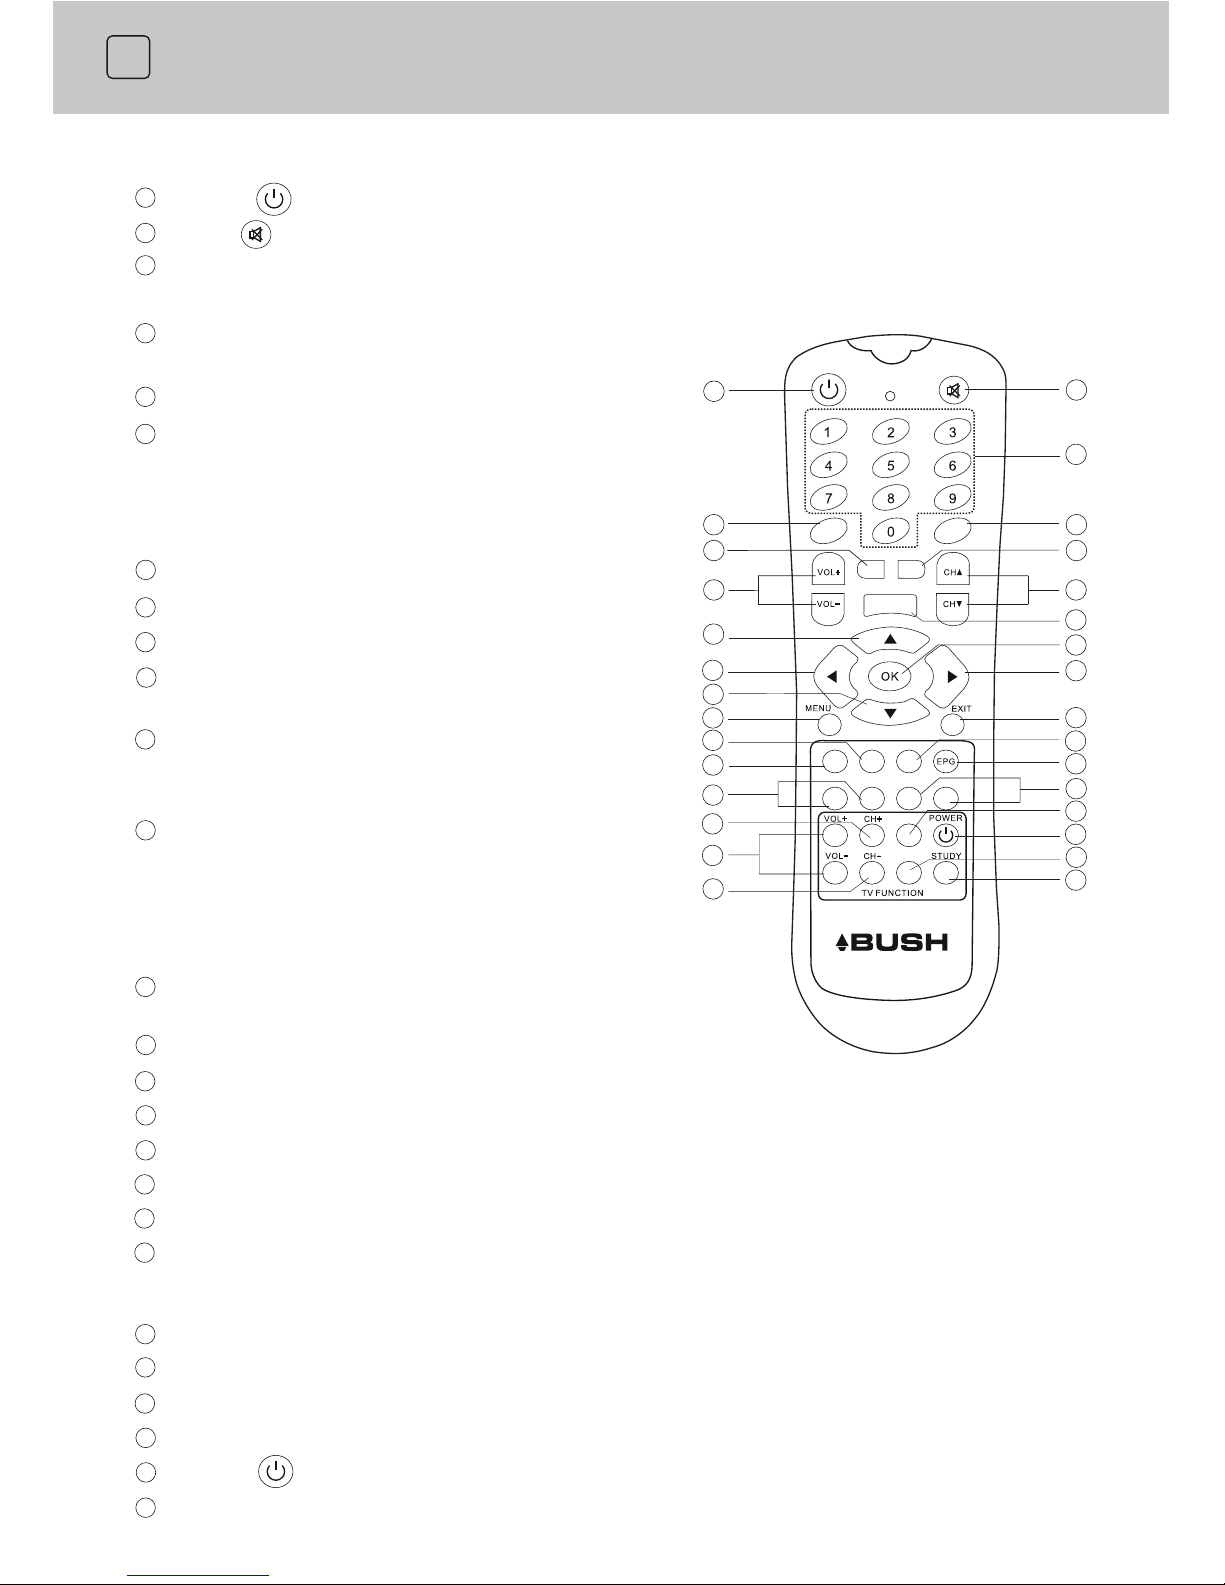
Remote key functions:
POWER To turn the standby mode ON/OFF.
Numeric buttons (0-9)
Tocontrol the numerical operation and to change programs
directly.
EXIT To cancel operation or exit the menu to the previous one.
MENU
To enter into the main menu.
LANG
To display the Audio language, Audio
mode and Audio Type.
4 COLOR KEY Used to operate different functions in TEXT, EPG and other menus.
RECALL T
o return to view the previous program.
MUTE
To mute or recover the sound of the receiver.
TEXT To switch the teletext service ON/OFF.
FAV
To show the favourite channel list.
EPG To introduce some program information to the user.
INFO To display thecurrent
program in-
form
ation. It can also could be an instruction
as " help " totell youthe functionof the
keys on the bottom of the menu.available
To set the sleep time.
OK
- Select a channel or menu option.
VOL +/- Increase or decrease the volume.
CH
▲▼/ To change channels.
TV/RADIO
To switch the program
between TV and Radio.
Up/Down Arrow
Move focused item in
▲▼/
menu or channel list, to change the program
upward/downward.
Left/Right Arrow ◄/►
-
To
switch to favourite channel list inchannel
list menu.
- Change selection in menu.
- Switch to Next/Previous channel list in EPG screen.
TIMER
SUBT Select closed caption.
TV FUNCTION :(Not compatible with all television sets)
VOL +/-
Increase or decrease TV volume
CH +/-
Switch TV channel
F1 Customer define key1
F2 Customer define key2
POWER Enter/Exit TV standby mode
STUDY Enter study mode
7
Remote Control
- To show the channel list.
1
2
3
6
4
5
7
8
9
10
11
12
13
14
15
16
17
20
19
18
22
21
26
24
23
25
LANG
F1
F2
9
11
14
17
16
20
22
22
12
12
13
21
26
24
23
25
20
19
18
15
10
8
76
54
1
3
2
11
RECALL
INFO
FAV
TV/RADIO
TEXTSUBT
TIMER
8
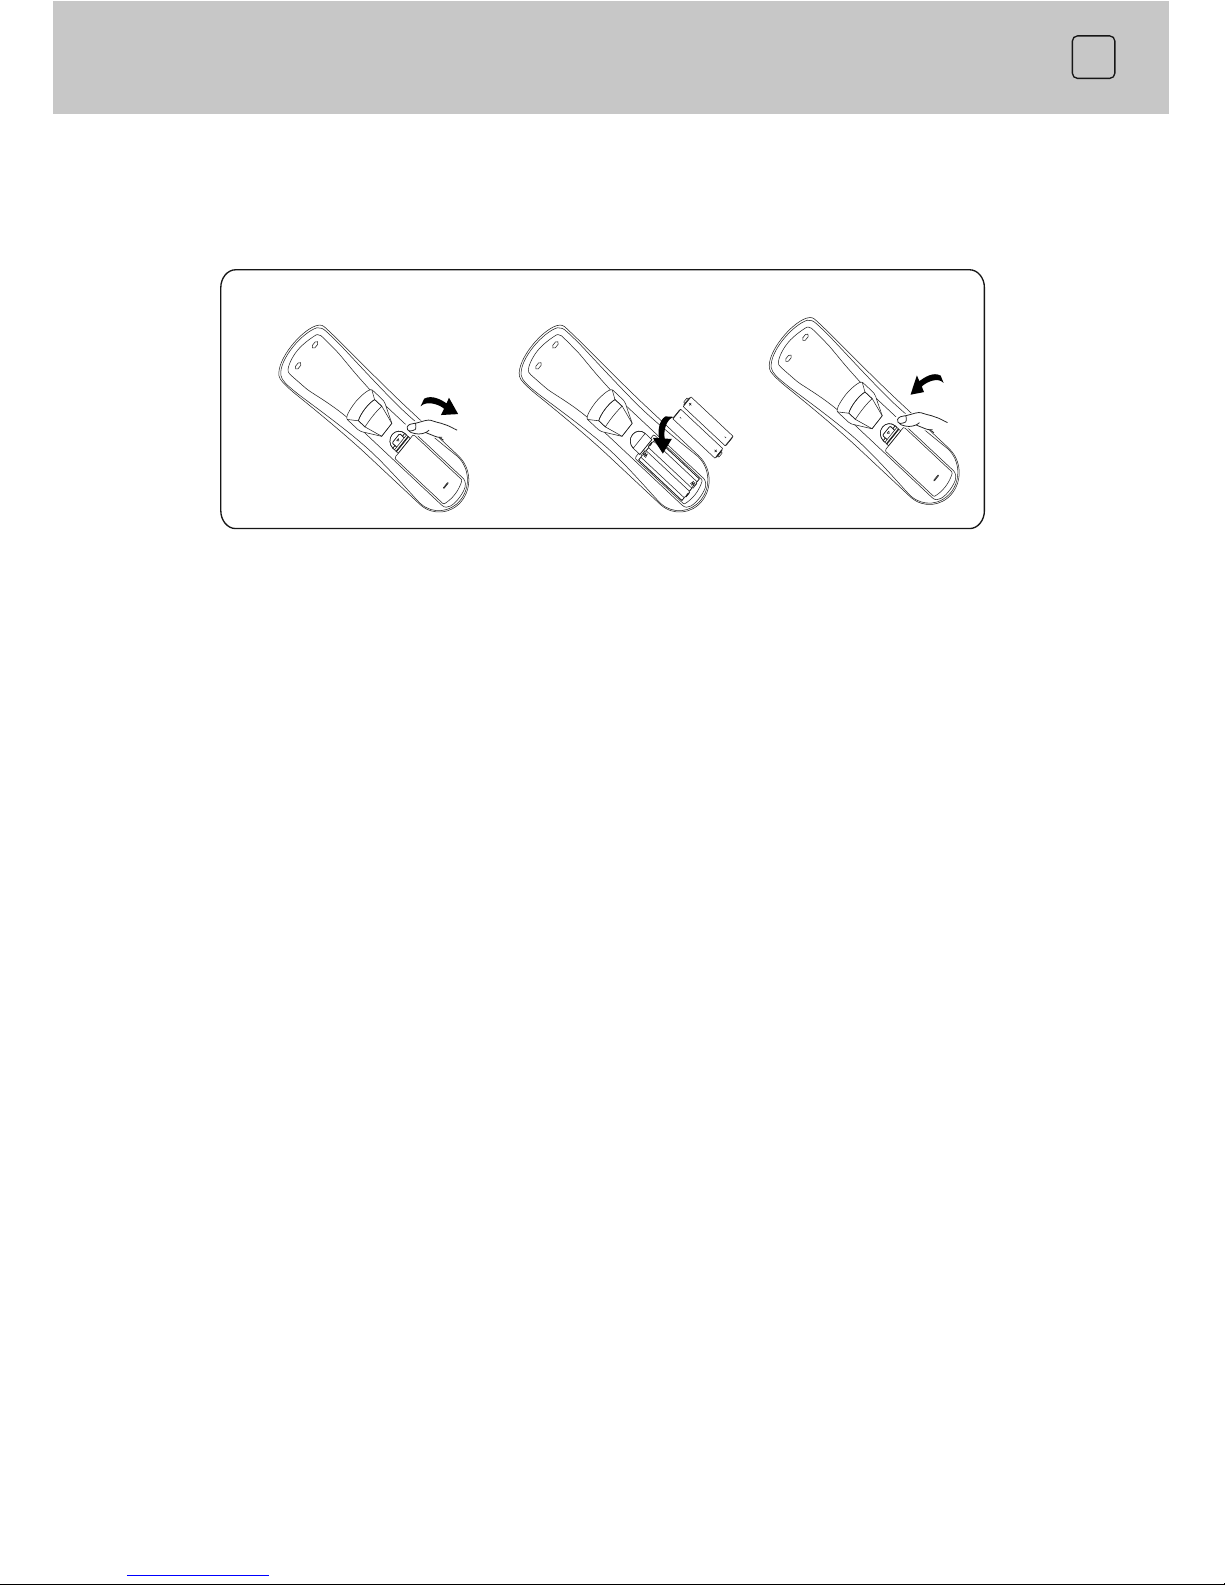
Installing the Batteries
Remove the battery cover from the remote control and put two AAA size batteries inside
the compartment. The diagram inside the battery compartment shows the correct way to
install the batteries.
Caution:
1. Keep batteries out of childrens’ reach.
2. Don t attempt to recharge, short-circuit, di’ sassemble, heat or throw the batteries into fire.
3. Always replace both batteries at the same time. Never mix new and old batteries or
batteries of a different type.
4. If you don’t intend on using the remote control for an extended period, remove the
batteries to prevent possible leakage and corrosion.
5. Do not drop, apply shock or step on the remote control.
6. Do not spill water on the remote control.
Notes: If the receiver does not operate when operating the remote control from a close
range, you may need to replace the batteries.
Using the Remote Control
1. To use the remote control, point it towards the front of the digital set top box.
2. The remote control has a range of up to 7 metres from the set top box at an angle of up
to 60 degrees.
3. The remote control will not operate if its path is blocked.
Note: Sunlight or very bright light will decrease the sensitivity of the remote control.
1. Open the cover
2. Install batteries
3. Close the cover
9
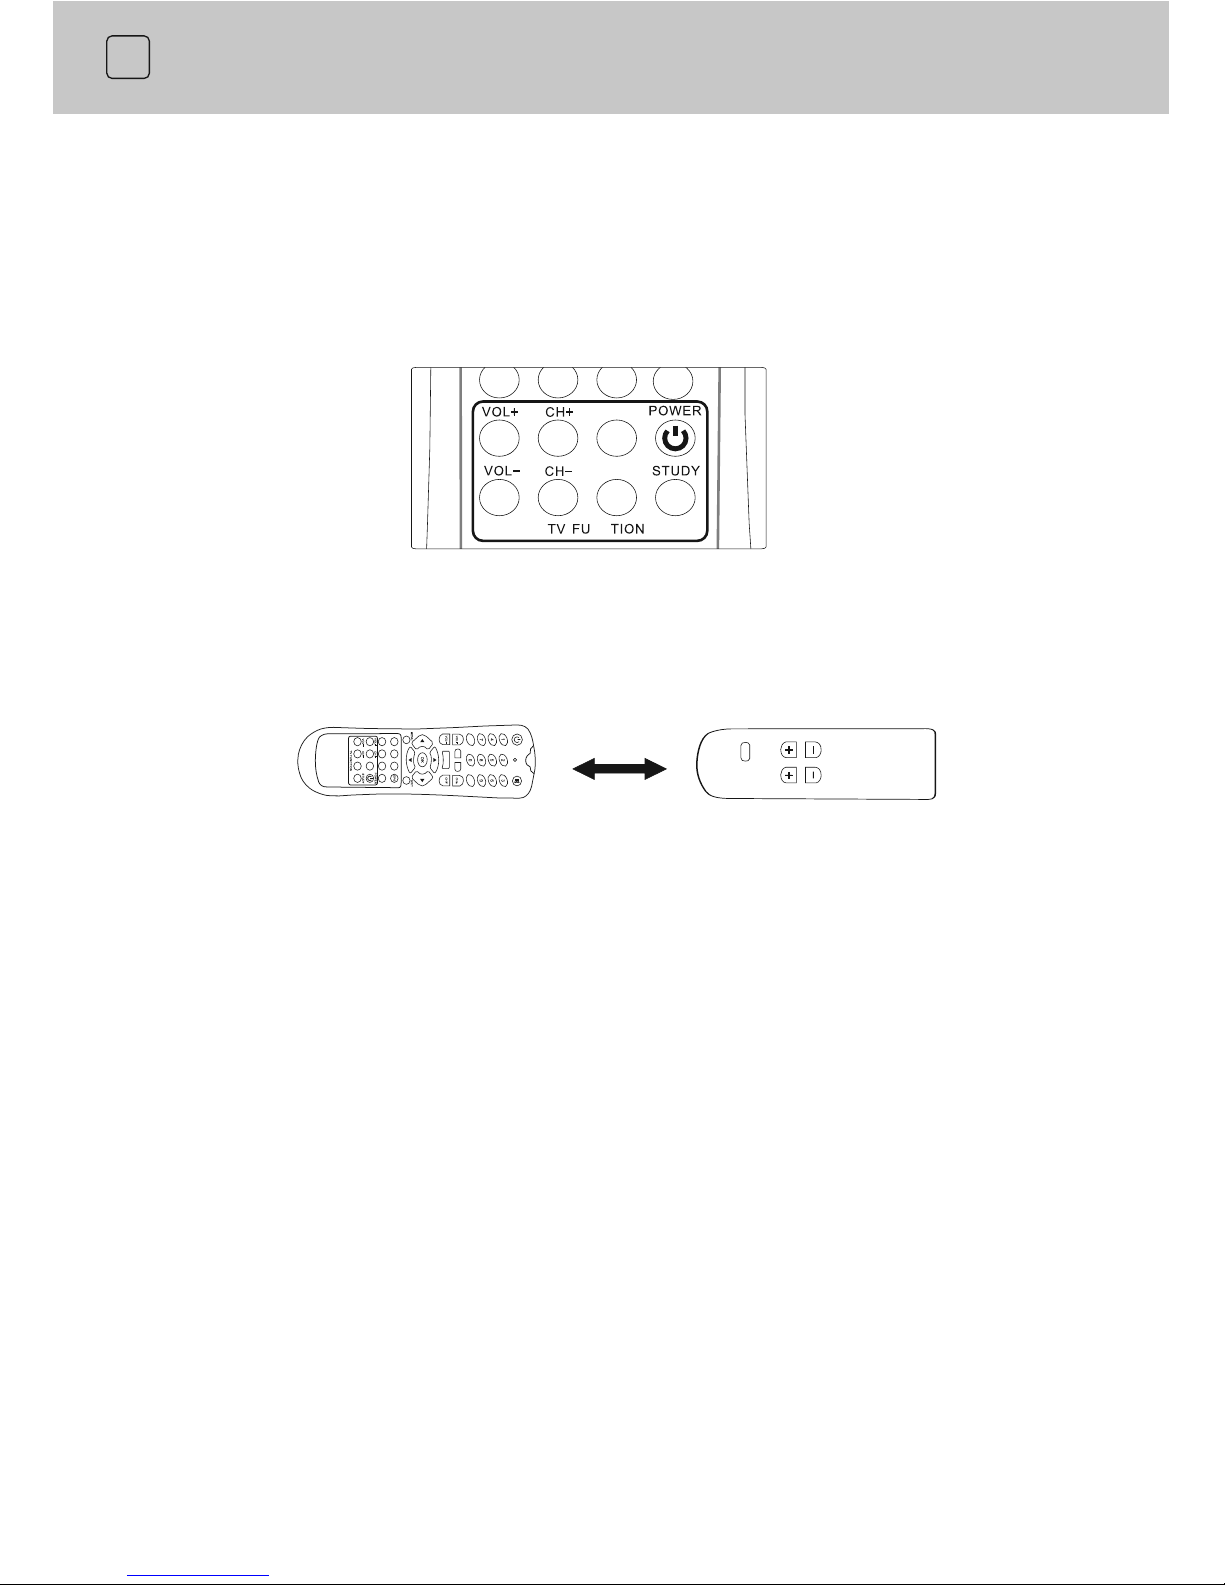
Setting Remote Control Learning Keys
Step 2: Enter settingof learning mode.
Remote control
TV remote control
1~3cm
1.
Press STUDY key until Red LED remainslit (for about 3 seconds)
2.
Point Converter remote control to TV rem
ote control directly, keep thedistance about 1~3 cm.
Step 3: Set TV's remote power key
1. Press the "Power" key at TV's remote control to send signal to Converter remote control. The
LED light will flash till steady. Then press " Power " key at Converter remote control. It will
record the signal.
2.Now the Power key can turn on/off TV's power.
Step 4: Repeat settingof learning for the otherkeys
You can repeat Step 3 forsetting of learning for the other keys at TV remote control, suchas VOL+,
VOL-, CH+, CH-, and F1, F2are reserved for any other keys youwant to set up.
Note:
1. When you finish setting the learning
2. The learning function of this remote control may not support alltypes of TV sets, if youstill
not control your TV after you have attempted the abovesteps, then this remote control
not support your TV or its remote control.
keys, press the STUDY key to leave the learningstatus,
and the LED light will turn off.
can
may
Step 1: Insert batteriesas outlined previously.
RECALL
INFO
FAV
TV/RADIO
TEXTSUBT
TIMER
LANG
F1
F2
NC
F1
F2
Setting of Learning Keys
There are seven keys on the remote control for
TV set,VOL+/-, CH+/-,POWER and two
customer design keys, F1/F2. All the other keys are for converter. Make sure that the
TV sets remote control is working properly, and then set the learning keys according
to the following steps:
10
Connecting to Equipments
How to get good reception
In general you are not required to change the existing antenna. However if your antenna
is not in good condition you should consider replacing it to ensure uninterrupted
digital television viewing.
Viewers in areas of poor analog reception may need specialists’ advice about antenna
requirements for digital reception in their area.
It s recommended that viewers use quad sh' ielded cable from the antenna to the television.
Connections to a TV
There are several ways of connecting your STB receiver to the TV and Hi-Fi System. For
high definition viewing your TV must support either 576p, 720p or 1080i resolution. Also
the connection between the STB receiver and TV must be YPbPr component or HDMI.
Other connections will provide standard definition viewing.
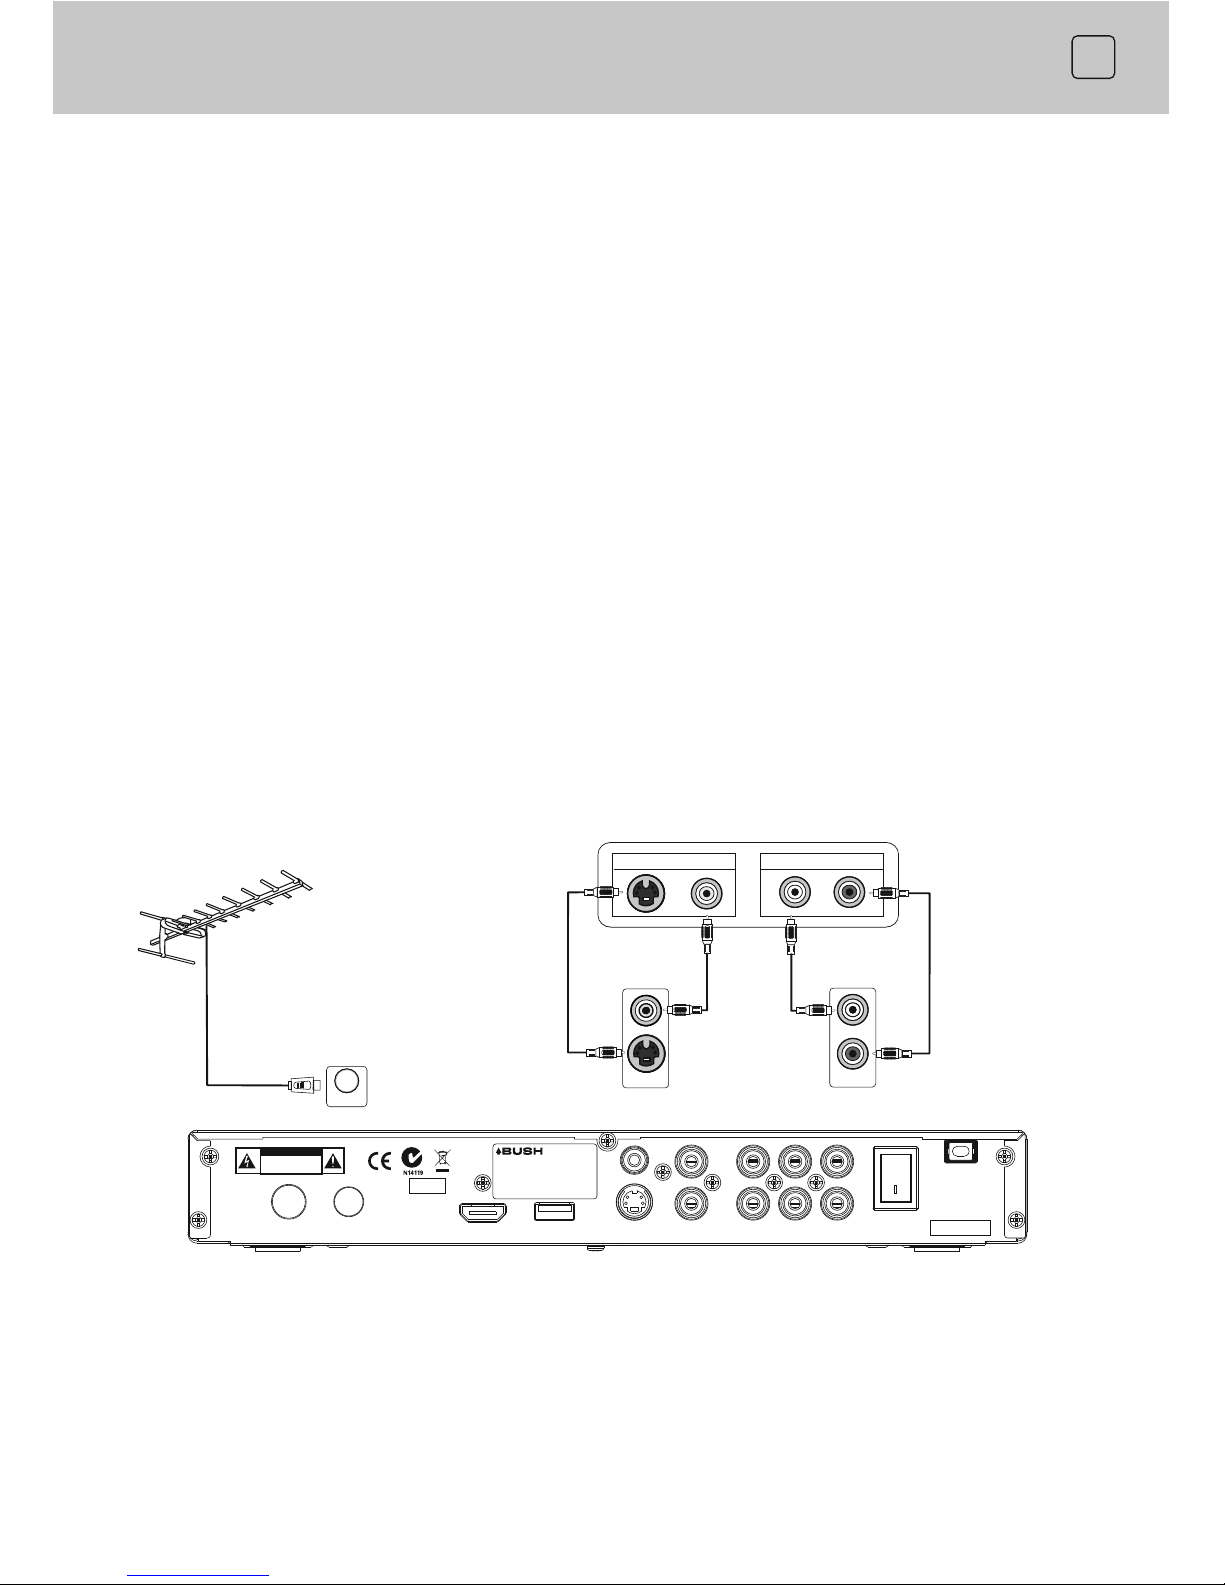
Connect the STB receiver via Video/S-Video and Audio
(for standard definition viewing)
Audio Decoder I nterface
Set Top Box Rear Panel
VIDEOS-VIDEO
AUDIO INPUT
LR
Antenna
S-VIDEO
VIDEO
R
L
VIDEO
L
AC IN 240V~
50Hz 10W
OFF
ON
USB
ANT IN
RF OUT
HDMI
VIDEOS-
R
L- AUDIO- R COAXIAL
Pb
PrY
Serial No.:
YYYY/MM
CAUTION
RISK OF ELECTRIC SHOCK
DO NOT OPEN
POWER SUPPLY: 240V~50Hz
POWER CONSUMPTION:10WATTS
MADE INP.R.C
BUSH WARRANTY: 1800509 394 AUSTRALIA
BUSH WARRANTY: 0800450 259 NEW ZEALAND
ANT IN
11
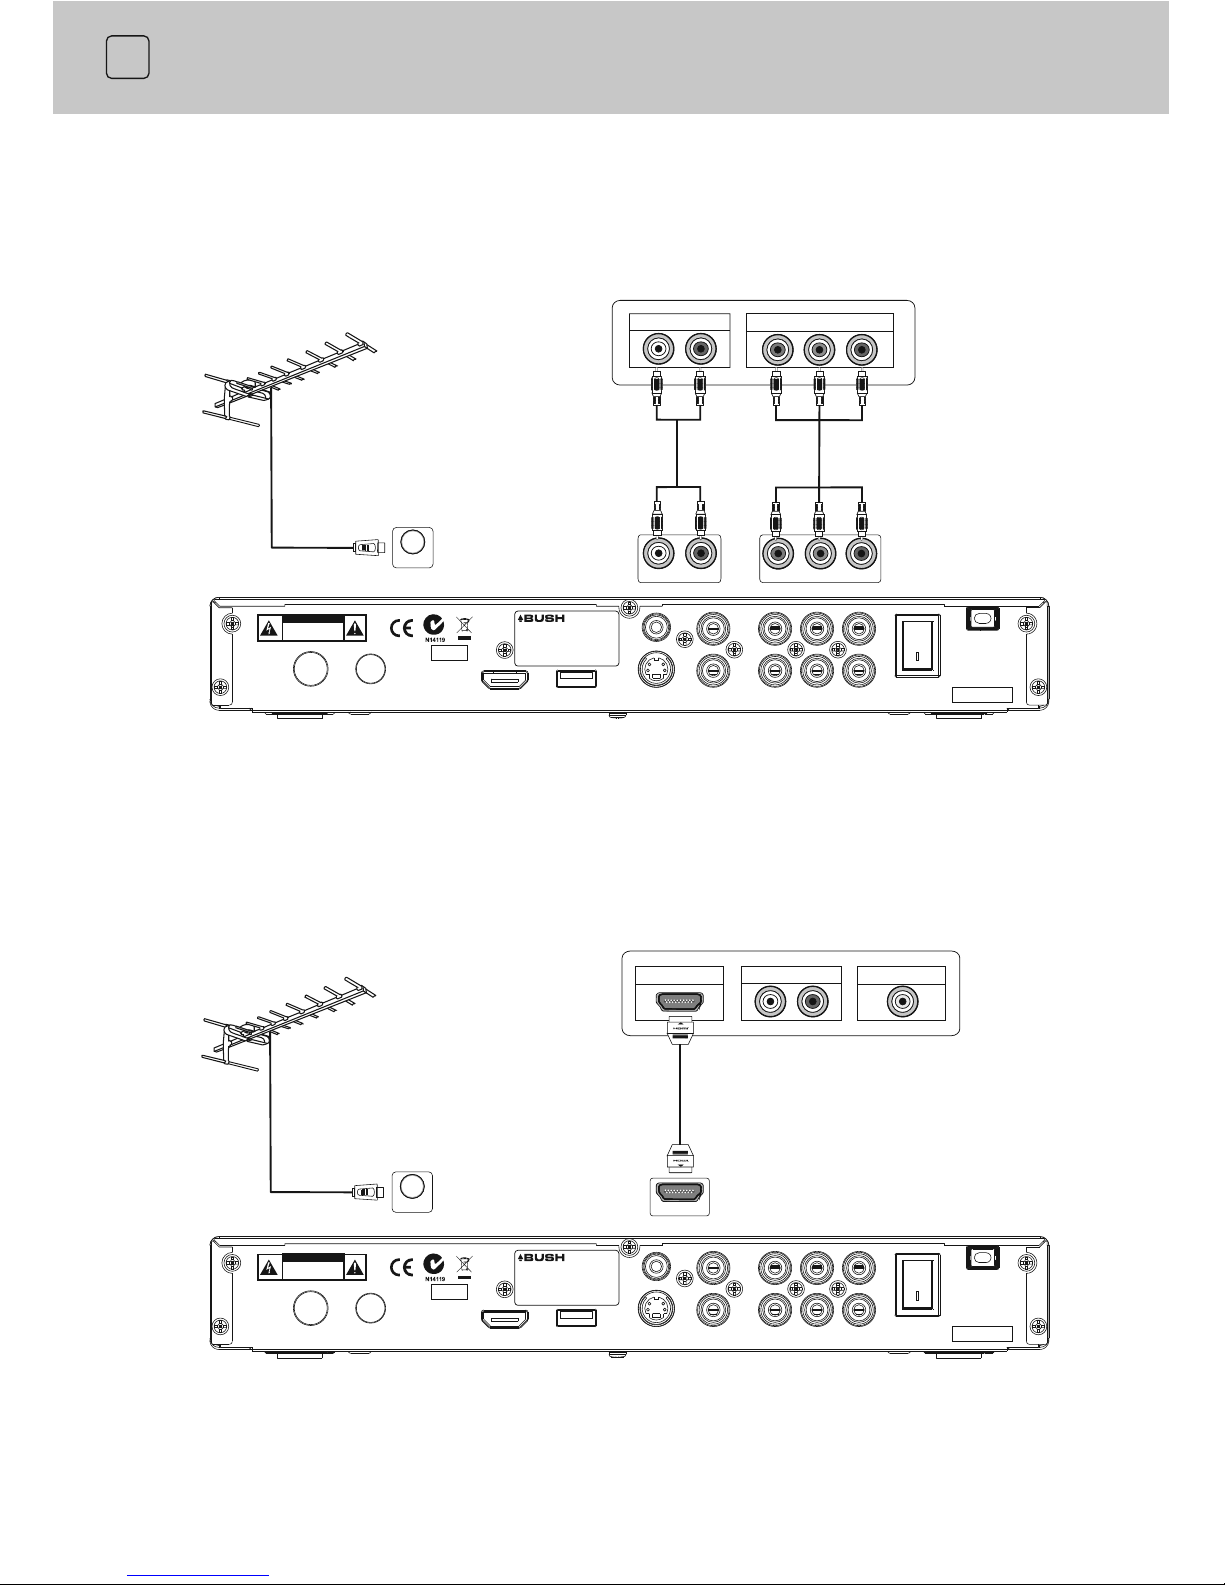
Connect the STB receiver via YPbPr output and Audio output
(for high definition viewing)
Connect the receiver via HDMI output (for high definition viewing)
Connecting to Equipments
AUDIO INPUT
HDTV Interface
Component VIDEOINPUT
Set Top Box Rear Panel
HDTV Interface
AUDIO INPUT VIDEO INPUT
HDMI INPUT
Set Top Box Rear Panel
Antenna
YPbPr
L- AUDIO- R
Antenna
HDMI
VIDEO
L
AC IN 240V~
50Hz 10W
OFF
ON
USB
ANT IN
RF OUT
HDMI
VIDEOS-
R
L- AUDIO- R COAXIAL
Pb
PrY
Serial No.:
YYYY/MM
CAUTION
RISK OF ELECTRIC SHOCK
DO NOT OPEN
POWER SUPPLY: 240V~50Hz
POWER CONSUMPTION:10WATTS
MADE INP.R.C
BUSH WARRANTY: 1800509 394 AUSTRALIA
BUSH WARRANTY: 0800450 259 NEW ZEALAND
VIDEO
L
AC IN 240V~
50Hz 10W
OFF
ON
USB
ANT IN
RF OUT
HDMI
VIDEOS-
R
L- AUDIO- R COAXIAL
Pb
PrY
Serial No.:
YYYY/MM
CAUTION
RISK OF ELECTRIC SHOCK
DO NOT OPEN
POWER SUPPLY: 240V~50Hz
POWER CONSUMPTION:10WATTS
MADE INP.R.C
BUSH WARRANTY: 1800509 394 AUSTRALIA
BUSH WARRANTY: 0800450 259 NEW ZEALAND
ANT IN
ANT IN
 Loading...