


Instruction manual
CTV401

You’ll soon be enjoying your new TV.
It all begins here, with your instructions. Don’t worry,
there’s nothing too technical coming up. Just simple,
step-by-step guidance to get you up and running
quickly. Sound good? Then let’s get started.
Help and Guidance
We’re here to help you get the most from your TV. Should you require any guidance, a
simple solution can often be found online at:
www.argos-support.co.uk
If you still require further assistance, call one of our experts on 0345 604 0105.
If you require any technical guidance or find that your product is not operating as intended, a simple solution can often be found in the Troubleshooting section of these instructions,

Contents
Safety information
1
Safety information 8
Getting to know your TV
2
Ready? Let’s begin 12
Accessories 12
Remote control 13
Side panel 14
Rear panel 15
Installing the remote batteries 16
Remote control information 16
Installing the stand feet 17
Vesa mounting 17
Connections
3
Making the video and audio connections 20
Standard features
4
PVR recording
Recording a current show 28
Recording a future show 28
PVR schedule list 28
Picture settings
Picture mode 29
Contrast 29
Brightness 29
Colour 29
Sharpness 29
Colour temperature 29
Aspect ratio 29
Noise reduction 29
Connect an AV device (HDMI cable) 20
Connect a computer with a VGA cable 21
Connect an AV device (Component cable) 22
Connect an AV device (SCART cable) 22
Connect an AV device (Composite cable) 23
Connect a digital audio receiver 23
Connecting headphones 24
Standard features
4
Turning on the TV for the first time 26
Selecting the input source 27
Channel selection 27
Display channel information 27
Volume adjustment 27
Using the electronic program guide 27
Aspect ratio’s explained 30
Sound settings
Sound mode 31
Treble 31
Bass 31
Balance 31
Auto volume 31
Digital output mode 31
Audio description 31
AD volume 31
Audio language 31
or online at www.argos-support.co.uk If you still require further assistance, call one of our experts on 0345 604 0105.
3

Contents
Channel settings
Channel setting (TV, DTV or Radio) 32
Auto tuning 32
Analogue manual tuning 32
DVB-T manual tuning 33
Channel edit 33
Signal information 33
CI information 33
Recorded list 34
Schedule list 34
Lock settings
Lock system 34
Time settings
Auto sync 35
Setup settings
Language 37
Audio language 37
Subtitle language 37
Hearing impaired 37
Blue screen 37
PVR file system 37
First time installation 37
Software update (USB) 37
Software update (NET) 37
Version info 37
PC settings
Auto adjust 38
Horizontal position 38
Vertical position 38
Clock 35
off time 35
On time 35
Sleep timer 35
OSD timer 35
Auto standby 35
Time zone 36
Network settings
IP configuration 36
Network info 36
Network test 36
Size 38
Phase 38
Advanced features
5
Connecting a USB storage device 40
Multimedia interface 41
Movie operation 41
Photo operation 42
Music operation 42
Supported multimedia formats 43
If you require any technical guidance or find that your product is not operating as intended, a simple solution can often be found in the Troubleshooting section of these instructions,
4

Contents
Other information
6
Technical specification 46
Display modes 46
Care & maintenance 48
Disc handling 48
Product support
7
Troubleshooting 50
Help and assistance 53
Disposal 54
Guarantee 55
or online at www.argos-support.co.uk If you still require further assistance, call one of our experts on 0345 604 0105.
5

This page is left intentionally blank

Safety information
1

Safety information
Important - Please read these instructions fully before
installing or operating
Power source
• This symbol means that this unit is double
insulated. An earth connection is not
required.
• The appliance must be connected to
a 100-240 volt 50/60Hz AC supply by
means of a three pin socket.
• Unplug this apparatus during lightning
storms or when unused for long periods of
time - to prevent damage to this product.
• Opening or removing covers may expose
you to dangerous voltages or other
hazards.
• To prevent risk of fire or electric shock,
avoid overloading wall outlets, extension
cords, or integral convenience receptacles.
• Use suitable power sources - Plug the
product into a suitable power source, as
described in the operating instructions or
as marked on the product.
• The supply voltage should be the
same as that indicated in the technical
specifications and the appliance rating
plate.
• If the socket outlets in your home are not
suitable for the plug supplied with this
unit check with a qualified electrician for
replacement.
• In order to disconnect the apparatus from
the mains completely, switch off the outlet
and remove the mains plug completely.
Moisture and water
• Do not use this apparatus near water or moisture.
• Do not use this product near a bathtub, wash bowl,
kitchen sink, and laundry tub, in a wet basement,
near a swimming pool, or anywhere else that water
or moisture is present.
Heat sources and flames
• Batteries shall not be exposed to excessive
heat such as sun, fire or the like
• To prevent risk of fire or electric shock,
avoid overloading wall outlets, extension
cords, or integral convenience receptacles.
Servicing and repairs
• Refer all servicing to qualified service personnel
• Servicing is required when the apparatus has been
damaged in any way: such as liquid has been
spilled or objects have fallen into the apparatus; the
apparatus has been exposed to rain or moisture,
does not operate normally, or has been dropped.
Temperature
• Avoid extreme degrees of temperature
either hot or cold. Place the unit well away
from heat sources such as radiators or gas/
electric fires.
• Avoid exposure to direct sunlight and other
sources of heat.
• Do not bend, stretch or pull the supply
cable in order to avoid electric shock.
• When installed, the power socket must be
within easy reach.
• Do not install the unit in a confined space.
Allow adequate ventilation to prevent heat
build-up.
• For indoor use only.
•
If you require any technical guidance or find that your product is not operating as intended, a simple solution can often be found in the Troubleshooting section of these instructions,
Safety information8
Safety information
Important - Please read these instructions fully before
installing or operating
Location of unit
• The unit must be placed on a flat stable
surface and should not be subjected to
vibrations.
• Do not place the unit on sloped or
unstable surfaces as the unit may fall off or
tip over.
• The mains socket must be located near
the unit and should be easily accessible.
• This unit is designed for indoor use only.
Ventilation
• To prevent the risk of electric shock or
fire hazard due to overheating, ensure
that curtains and other materials do not
obstruct the ventilation vents.
• Do not install or place this unit in a
bookcase, built-in cabinet or in another
confined space. Ensure the unit is well
ventilated.
• Make sure that there is a gap of at least
10cm on both sides and a gap of 20cm at
the top.
Interference
• Do not place the unit on or near
appliances which may cause
electromagnetic interference. If you do,
it may adversely affect the operating
performance of the TV, and cause a
distorted picture or sound.
or online at www.argos-support.co.uk If you still require further assistance, call one of our experts on 0345 604 0105.
Safety information 9

This page is left intentionally blank

Getting to know your TV
2

Getting to know your TV
OK
You’ll be up and running in no time
Ready? Let’s begin...
Please read these instructions carefully. They contain
important information which will help you get the best
from your TV and ensure safe and correct installation
and operation.
If you require any further assistance, our technical
experts are happy to help. For full details, refer to
the product support section at the end of these
instructions.
Accessories
1. CTV401 TV
2. 2 x TV stand feet
3. 4 x stand fixing bolts
4. Remote control
5. 2 x AAA batteries
6. Instruction manual
7. Quick setup guide
TV Remote controlStand feet
4 x screws (M4 x 12)
2 x AAA batteries
12
If you require any technical guidance or find that your product is not operating as intended, a simple solution can often be found in the Troubleshooting section of these instructions,
Getting to know your TV
Getting to know your TV
You’ll be up and running in no time
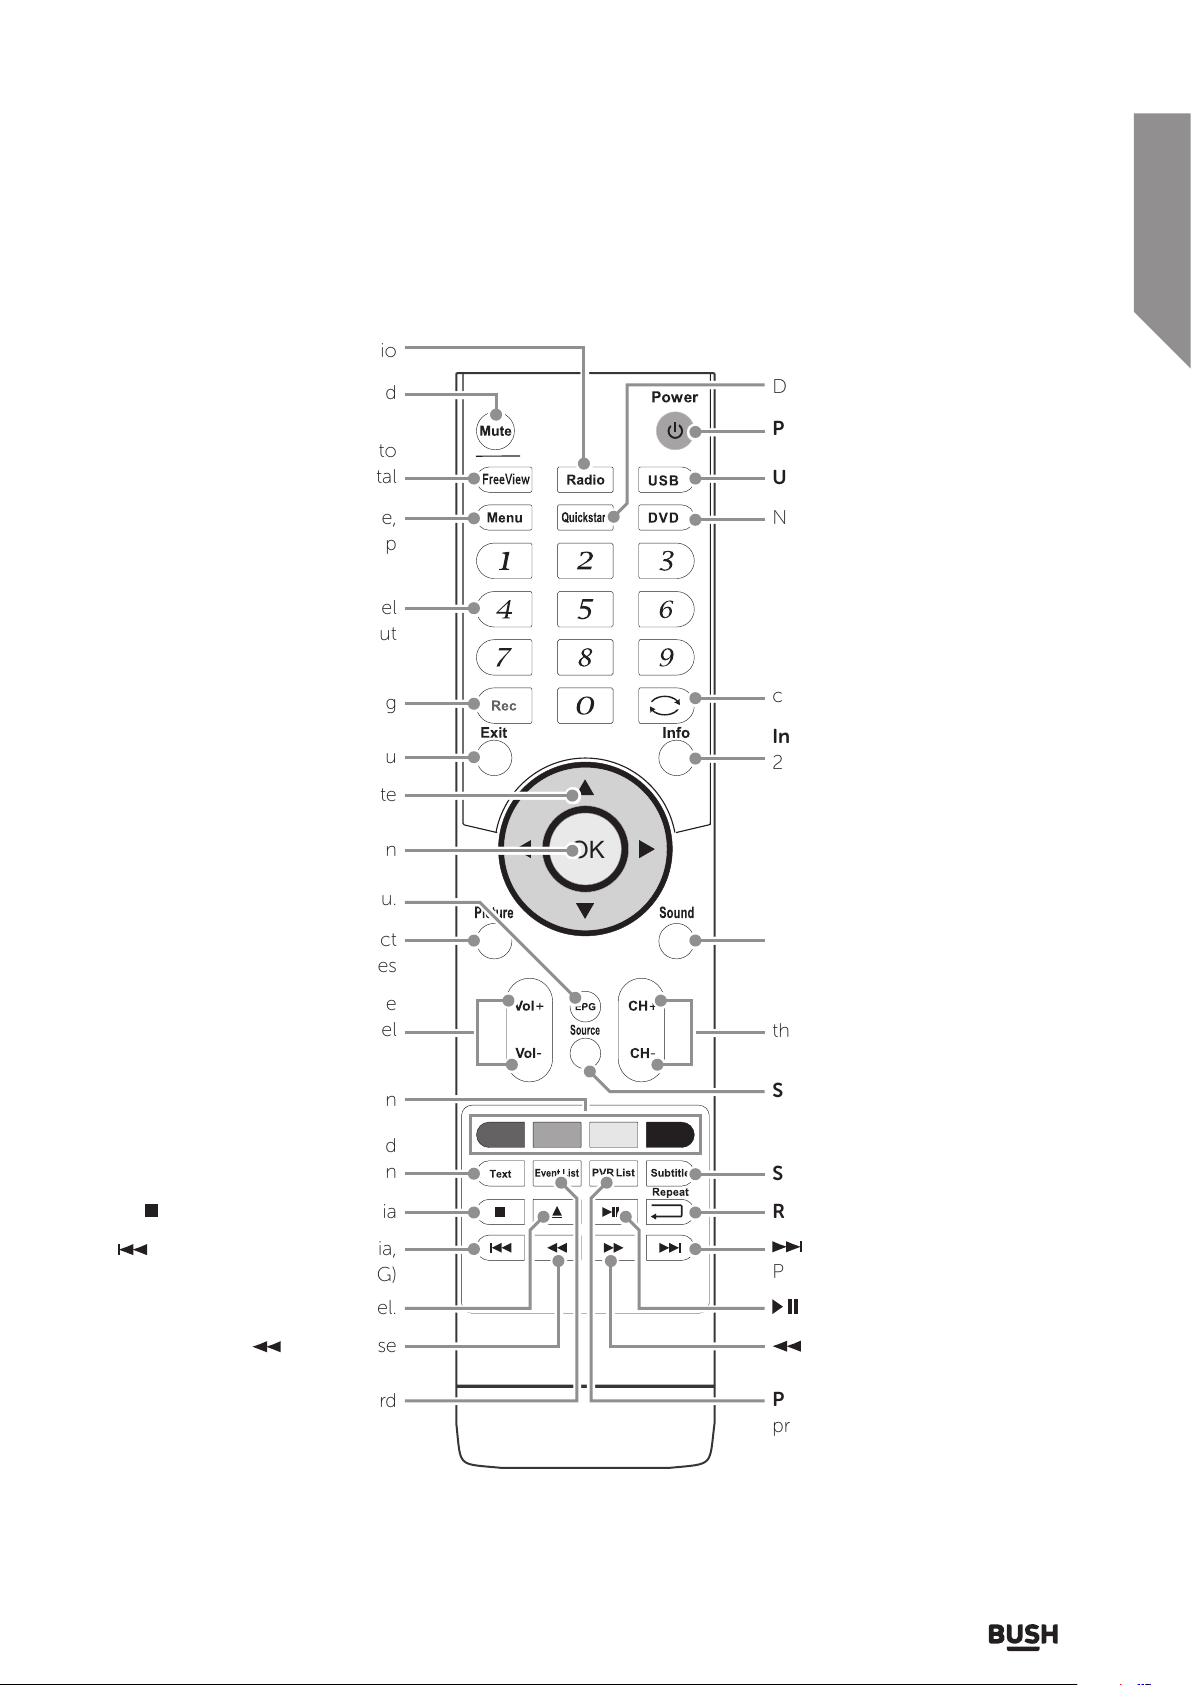
Radio : Switch between
TV and Radio
Mute : Mute sound
Free View : Switch to
Freeview digital
Quickstart: Searches all ATV and
DTV channels
Power: Turn on or standby
USB: Switch to USB mode
Menu : Switch between Picture,
Sound, Channel, Feature & Setup
Numeric buttons : Direct channel
input
Rec : Start recording
Exit : Exit from any menu
Navigation : Press to navigate
OK : Press to select an option
EPG : Press to enter the EPG menu.
Picture : Switch sound & aspect
ratio modes
Volume : Increase or decrease the
volume level
Soft keys : Actions are displayed
on-screen
OK
Non-operational on this model.
Recall: Return to last selected
channel
Info: DTV mode displays now/next.
2nd press extended program info.
When recording displays detail of
the recording and space available
on the card.
TXT mode - Index function
Sound : Switch sound modes &
audio language.
Channel +/-: Increase or decrease
the channel number
Source: Switch input
Teletext : Display associated
teletext information
Stop : PVR and Multimedia
: Prev track, File, Day (Media,
PVR and EPG)
Non-operational on this model.
: Fast reverse
Event List : Show the record
schedule list (DTV mode)
or online at www.argos-support.co.uk If you still require further assistance, call one of our experts on 0345 604 0105.
Subtitle: DTV mode only
Repeat: Select a repeat mode
: next track, File, Day (Media,
PVR & EPG)
: PVR and Multimedia
: Fast forward
PVR list: Display list of recorded
programs (DTV mode)
Getting to know your TV
13
Getting to know your TV
Getting to know your TV
You’ll be up and running in no time
You’ll be up and running in no time
8
7
6
5
4
3
1 2
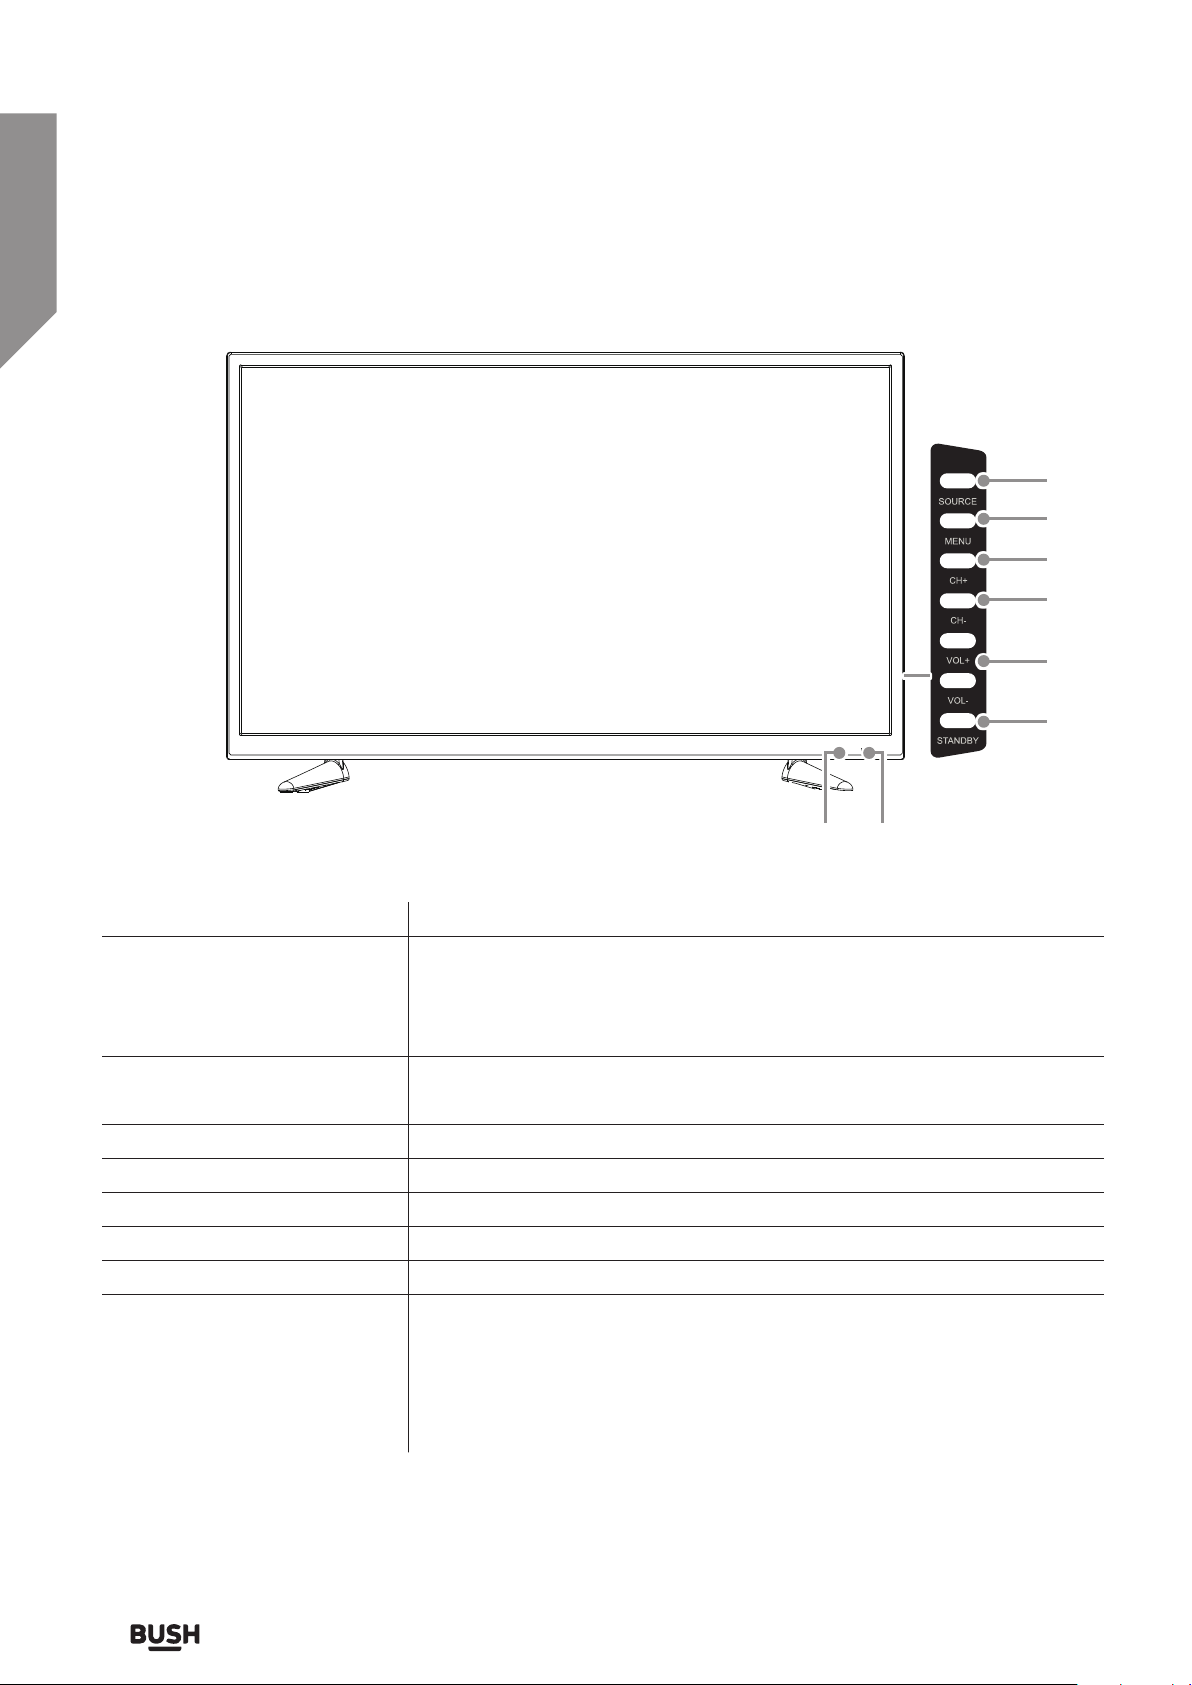
Item Description
1. Power LED Illuminates green when the TV is turned on. Illuminates red when the TV is in
standby mode.
The LED will alternate between red and green when the PVR timer
programming has started in the standby mode.
2. IR (infrared receiver) Receives IR signals from the remote control.
Do not place anything in front of the sensor, as its function may be affected.
3. Standby Switches the TV on or off from standby mode.
4. Vol + / - Adjust the volume level. Press to select and adjust a setting in the OSD menu.
5. CH - Press to select a channel or select a sub-menu from the OSD menu.
6. CH + Press to select a channel or select a sub-menu from the OSD menu.
7. Menu Displays the OSD (On Screen Display) menu.
8. Source Press to select the various input signal sources.
DTV, ATV, COMPOSITE-AV, SCART, VGA-PC, YPBPR (COMPONENT), HDMI1,
HDMI2 and HDMI3.
Confirm a selection on the OSD menu.
If you require any technical guidance or find that your product is not operating as intended, a simple solution can often be found in the Troubleshooting section of these instructions,
14
Getting to know your TV
Getting to know your TV
You’ll be up and running in no time
13
12
11
Common interface
Mini AV Mini YPbPr
10
9
8
7
6
POWER
LAN VGA SCART HDMI1 HDMI2
PC
audio in
Digital
audio out
ANT IN
HDMI3 USB
1 32 4 5 6 6
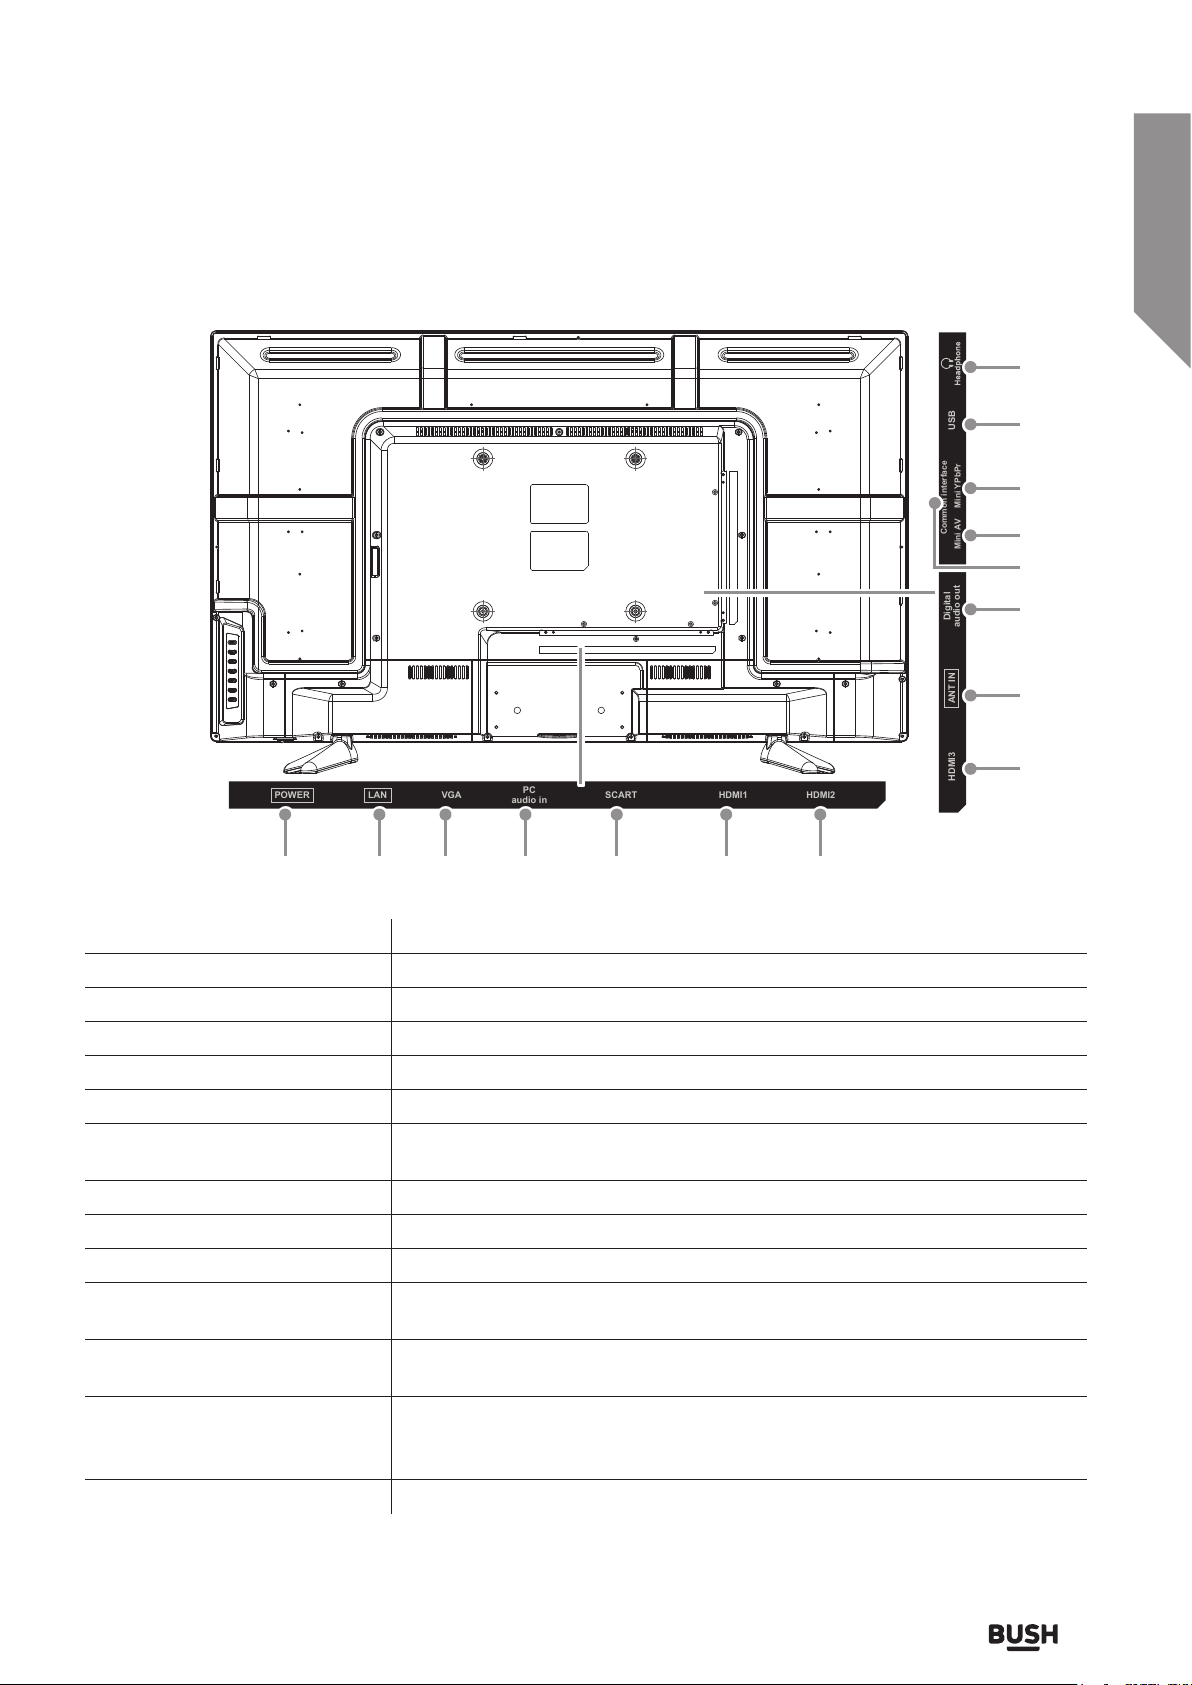
Socket Description
1. Power Connect the mains power cable.
2. LAN Connect to a LAN port
3. VGA input Connect a PC to this input.
4. PC Audio input Connect audio from a PC when using the VGA video input socket.
5. SCART input Connect a VCR, DVD player or other AV devices with a SCART output socket.
6. HDMI inputs Connect to a high definition (HD) signal output device, such as a set-top box,
Blu-ray disc player or AV receiver.
7. TV Antenna input Connect to the antenna/ aerial socket on the wall with an RF coaxial cable.
8. Digital audio out (optical) Connect to a digital audio socket on a 5.1 audio system.
9. CI Slot Connect a common interface subscription card if used.
10. MINI AV Connect to the composite VIDEO and AUDIO (L/R) output sockets on an
external video device.
11. MINI YPBPR / Audio L/R Connect to a DVD player, Digital set-top box or other AV devices with a
component (YPbPr) video and audio output sockets.
12. USB Connect a USB storage device to allow playback or videos, audio, photos and
text files (media mode) and record DTV programmes on to the USB storage
device.
13. Headphone output Connect earphones.
or online at www.argos-support.co.uk If you still require further assistance, call one of our experts on 0345 604 0105.
Getting to know your TV
15
Getting to know your TV
You’ll be up and running in no time
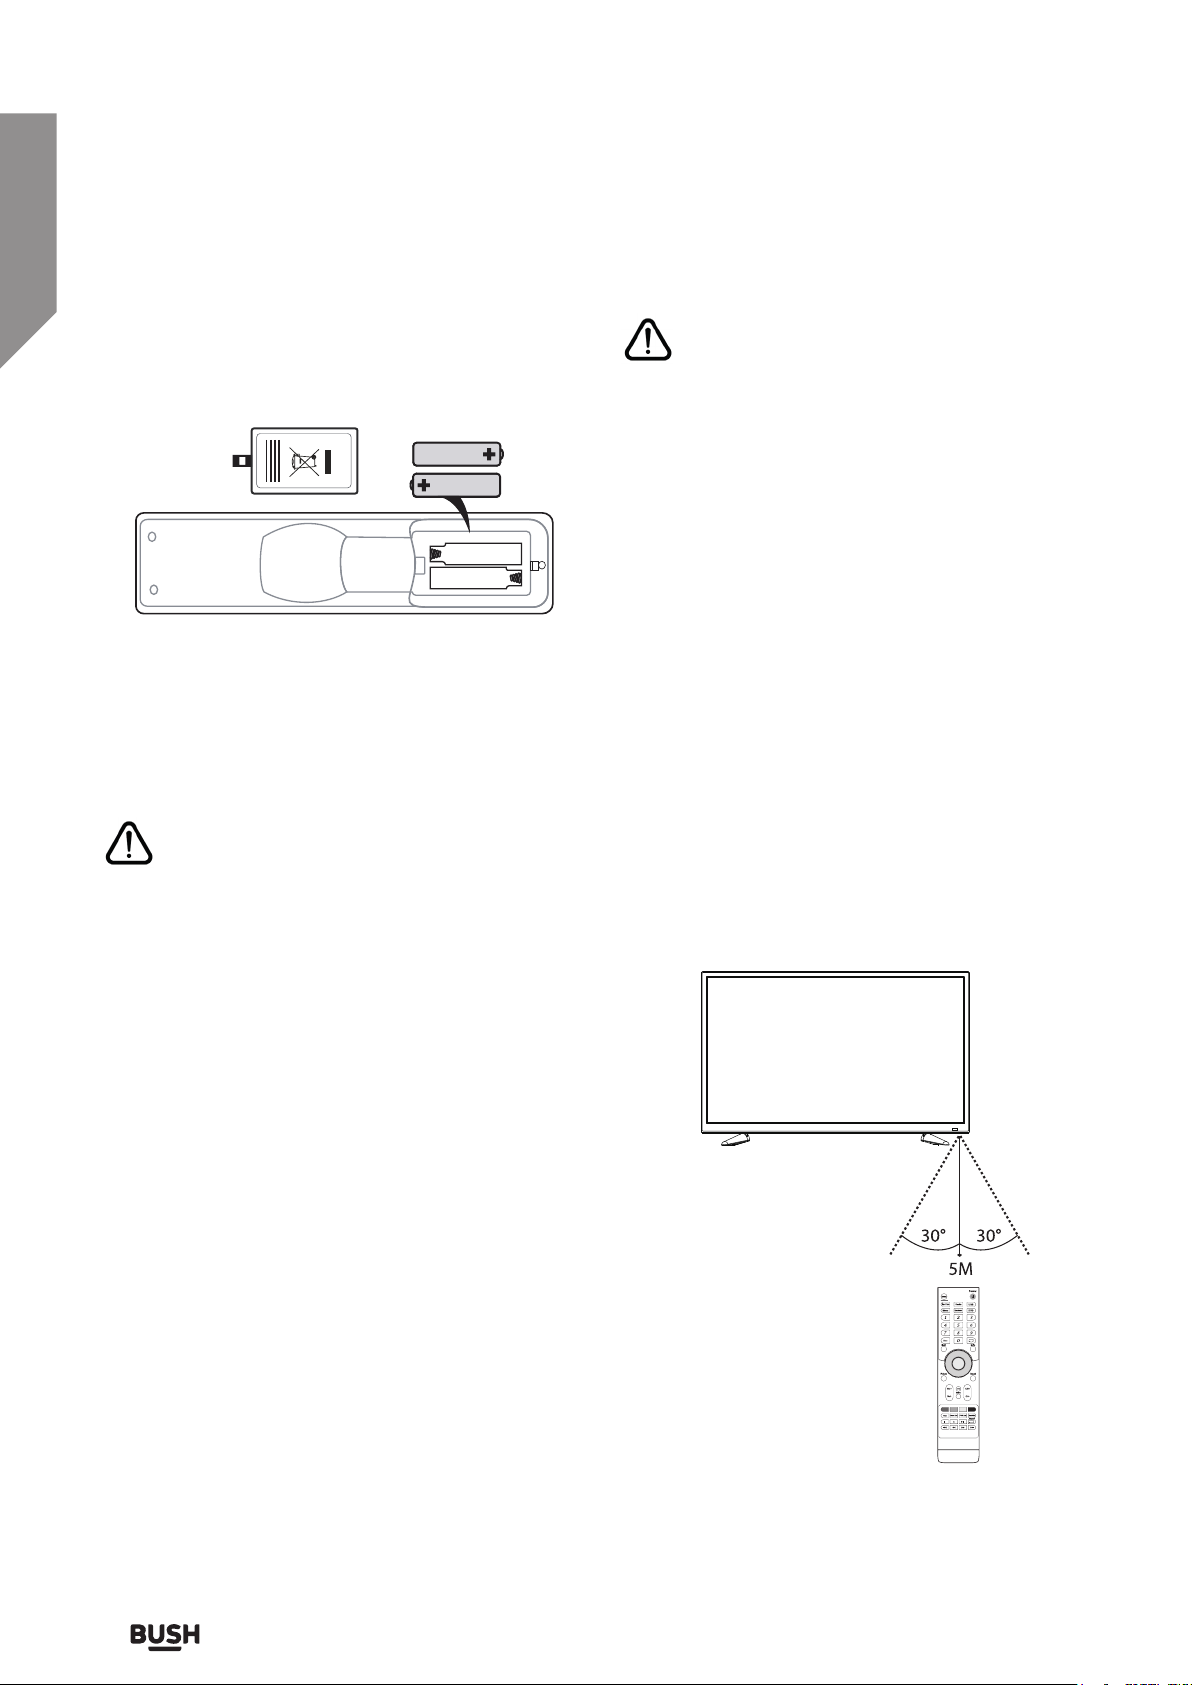
Installing batteries in the remote
1. Press and lift the back cover to open the battery
compartment of the remote control.
2. Insert 2 x 1.5 AAA size batteries. Make sure to
match the (+) and (-) ends of the batteries with
the (+) and (-) ends indicated in the battery
compartment.
3. Close the battery compartment cover.
Handling the batteries
• Improper or incorrect use of batteries may cause
corrosion or battery leakage, which could cause fire,
personal injury or damage to property.
Handling the remote control
• Take care of your fingernails when pressing and
holding the battery release tab.
• Do not drop or cause impact to the remote control.
• Do not spill water or any liquid on the remote
control.
• Do not place the remote control on a wet object.
• Do not place the remote control under direct
sunlight or near sources of excessive heat.
• Remove the batteries from the remote control
when not in use for a long period of time, as it
could cause corrosion or battery leakage and may
result in physical injury and/ or damage of property
including fire.
Remote control operation range
Point the remote control at the TV no more than 5
meters from the remote control sensor on the TV and
within 60o in front of the TV. The operating distance
may vary depending on the brightness of the room.
• Only use the battery type indicated in this manual.
• When the batteries are exhausted, the remote will
not function. Replace both batteries at the same
time with new ones.
• Do not install new batteries with used ones and do
not mix different types of batteries.
• Do not dispose of used batteries as domestic
waste. Dispose of them in accordance with local
regulations.
16
If you require any technical guidance or find that your product is not operating as intended, a simple solution can often be found in the Troubleshooting section of these instructions,
Getting to know your TV
Getting to know your TV
You’ll be up and running in no time
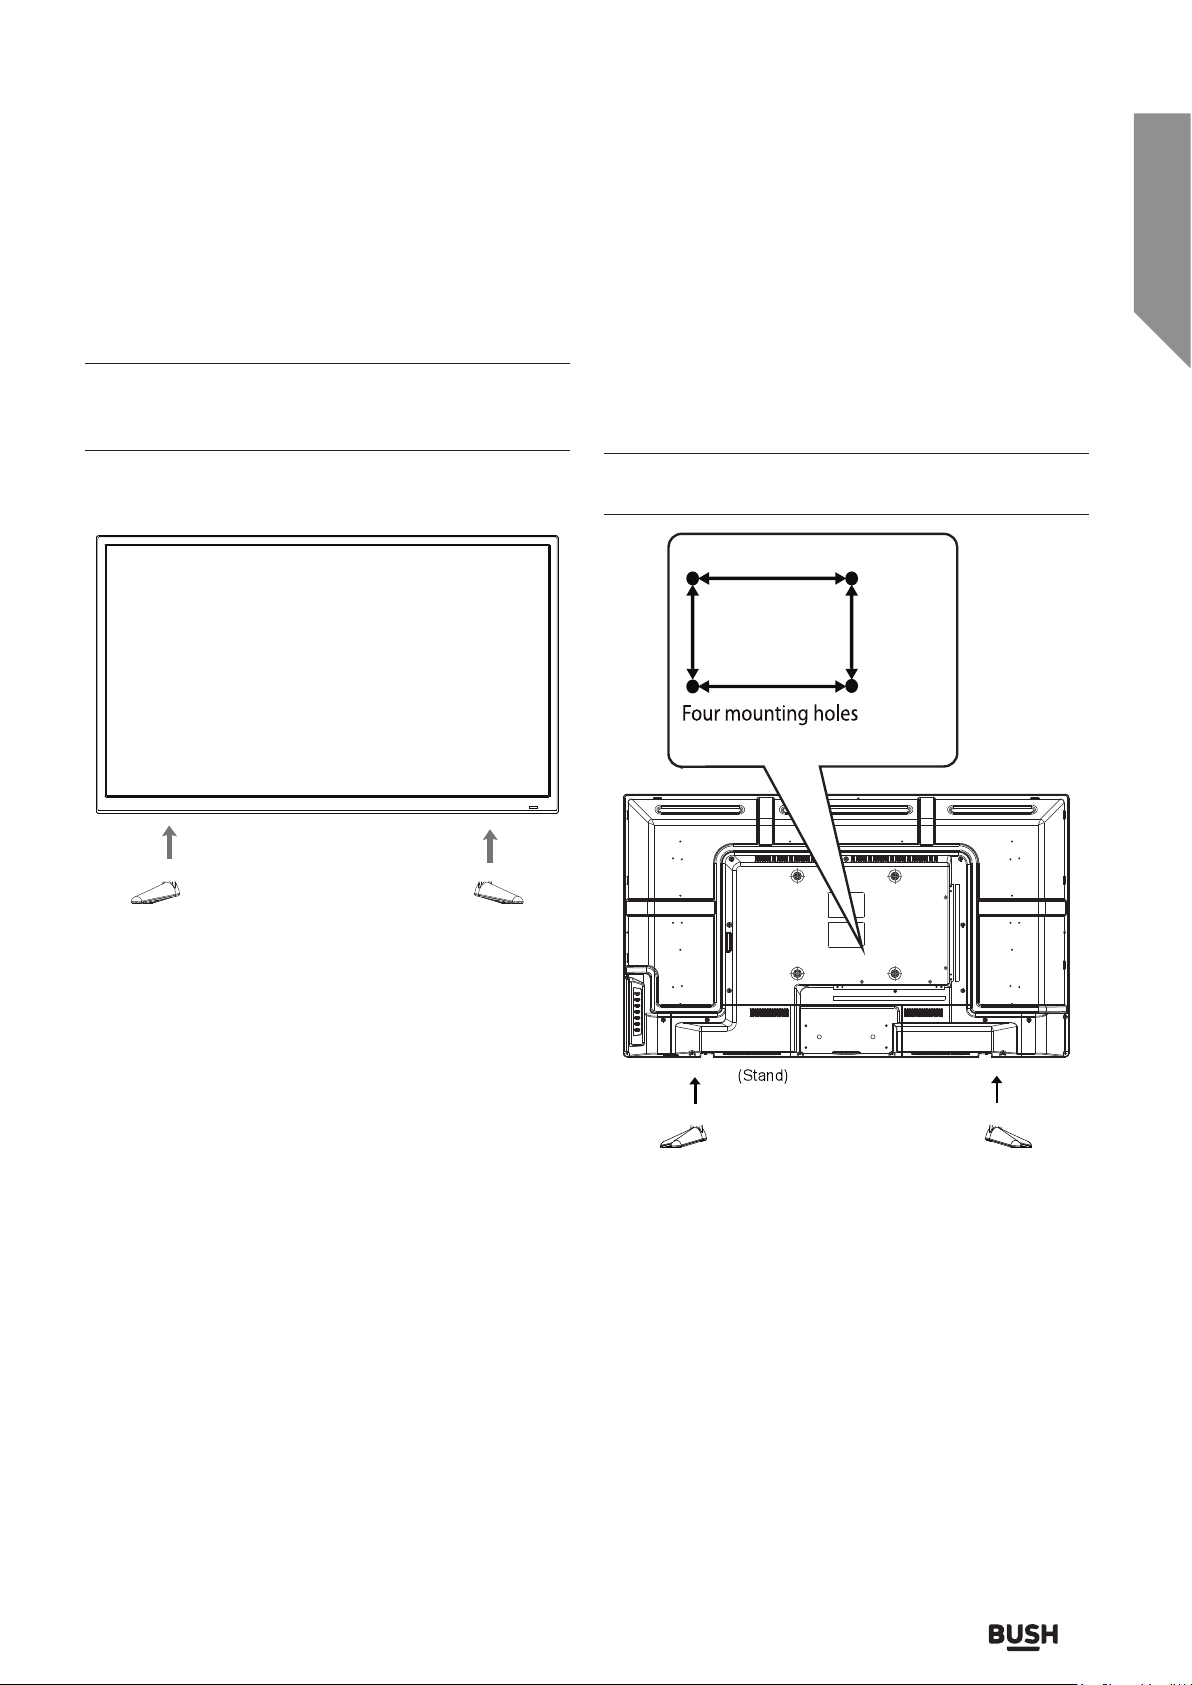
Installing the stand feet
Place the TV face down on a soft and flat surface
(blanket, foam, cloth etc) to prevent damage to the
TV.
1. Attach the stand feet in the positions shown and
secure them with the supplied screws (M4 x 12).
VESA mounting
This unit is VESA-compliant and designed to be wall
mounted with a VESA-compliant 200 x 200mm
mounting kit.
Mount the unit according to the instructions of the
wall bracket (not supplied)
200mm
200mm
Screw size M5 x 10
or online at www.argos-support.co.uk If you still require further assistance, call one of our experts on 0345 604 0105.
Getting to know your TV
17
 Loading...