

Page 1

G1, G3
& G2 trifecta™
INSTALLATION & OPERATING GUIDE
BUNN-O-MATIC CORPORATION OF CANADA
280 INDUSTRIAL PARKWAY SOUTH,
AURORA, ONTARIO, L4G 3T9.
PHONE: (905) 841-2866 FAX: (905) 841-2775
To ensure you have the latest revision of the Operating Manual, or to view the Illustrated Parts
Catalog, Programming Manual, or Service Manual, please visit the Bunn-O-Matic website, at
www.bunn.com. This is absolutely FREE, and the quickest way to obtain the latest catalog and
manual updates. For Technical Service, contact Bunn-O-Matic Corporation at 1-800-263-2256.
43254.7000C 02/12 ©2010 Bunn-O-Matic Corporation
Page 2

BUNN-O-MATIC COMMERCIAL PRODUCT WARRANTY
Bunn-O-Matic Corporation of Canada (“Bunn”) warrants equipment manufactured by it as follows:
1) Airpots, thermal carafes, decanters, GPR servers, iced tea/coffee dispensers, MCP/MCA pod brewers
thermal servers and Thermofresh servers (mechanical and digital) - 1 year parts and 1 year labour.
2) All other equipment - 2 years parts and 1 year labour plus added warranties as specified below:
a) Electronic circuit and/or control boards - parts and labour for 3 years.
b) Compressors on refrigeration equipment - 5 years parts and 1 year labour.
c) Grinding burrs on coffee grinding equipment to grind coffee to meet original factory screen sieve
analysis - parts and labour for 4 years or 40,000 pounds of coffee, whichever comes first.
These warranty periods run from the date of installation. Bunn warrants that the equipment manufactured
by it will be commercially free of defects in material and workmanship existing at the time of manufacture and
appearing within the applicable warranty period. This warranty does not apply to any equipment, component
or part that was not manufactured by Bunn or that, in Bunn’s judgement, has been affected by misuse, neglect,
alteration, improper installation or operation, improper maintenance or repair, non periodic cleaning and descaling,
equipment failures related to poor water quality, damage or casualty. In addition, the warranty does not apply to
replacement of items subject to normal use including but not limited to user replaceable parts such as seals and
gaskets. This warranty is conditioned on the Buyer 1) giving Bunn prompt notice of any claim to be made under
this warranty by telephone at (905) 841-2866 or by writing to 280 Industrial Parkway South, Aurora, Ontario,
L4G 3T9. 2) if requested by Bunn, shipping the defective equipment prepaid to an authorized Bunn service location;
and 3) receiving prior authorization from Bunn that the defective equipment is under warranty.
THE FOREGOING WARRANTY IS EXCLUSIVE AND IS IN LIEU OF ANY OTHER WARRANTY, CONDITION,
WRITTEN OR ORAL, EXPRESS OR IMPLIED, INCLUDING, BUT NOT LIMITED TO, ANY IMPLIED WARRANTY
OF EITHER MERCHANTABILITY, MERCHANTABLE QUALITY OR FITNESS FOR A PARTICULAR PURPOSE.The
agents, dealers or employees of Bunn are not authorized to make modifications to this warranty or to make
additional warranties that are binding on Bunn. Accordingly, statements by such individuals, whether oral or
written, do not constitute warranties and should not be relied upon.
If Bunn determines in its sole discretion that the defective equipment is covered by warranty, Bunn, at its
exclusive option while the equipment is under warranty, shall either 1) provide at no charge replacement parts
and/or labour (during the applicable parts and labour warranty periods specified above) to repair the defective
components, provided that this repair is done by a Bunn Authorized Service Representative; or 2) shall replace
the equipment or refund the purchase price for the equipment.
THE BUYER’S REMEDY AGAINST BUNN FOR THE BREACH OF ANY OBLIGATION ARISING OUT OF THE
SALE OF THIS EQUIPMENT, WHETHER DERIVED FROM WARRANTY OR OTHERWISE, SHALL BE LIMITED, AT
BUNN’S SOLE OPTION AS SPECIFIED HEREIN, TO REPAIR, REPLACEMENT OR REFUND.
In no event shall Bunn be liable for any other damage or loss, including, but not limited to, lost profits, lost
sales, loss of use of equipment, claims of Buyer’s customers, cost of capital, cost of down time, cost of substitute
equipment, facilities or services, or any other special, incidental, consequential or punitive damages.
RETURN POLICY
CONTACT PLANT FOR RETURN MATERIAL AUTHORIZATION. ALL RETURNS MUST
BE AUTHORIZED BY BUNN-O-MATIC AND ARE SUBJECT TO A RETURN CHARGE.
392, AutoPOD, AXIOM, BrewLOGIC, BrewMETER, Brew Better Not Bitter, BrewWISE, BrewWIZARD, BUNN Espress, BUNN Family
Gourmet, BUNN Gourmet, BUNN Pour-O-Matic, BUNN, BUNN with the stylized red line, BUNNlink, Bunn-OMatic, Bunn-O-Matic,
BUNNserve, BUNNSERVE with the stylized wrench design, Cool Froth, DBC, Dr. Brew stylized Dr. design, Dual, Easy Pour, EasyClear, EasyGard, FlavorGard, Gourmet Ice, Gourmet Juice, High Intensity, iMIX, Infusion Series, Intellisteam, My Café, Phase Brew,
PowerLogic, Quality Beverage Equipment Worldwide, Respect Earth, Respect Earth with the stylized leaf and coffee cherry design,
Safety-Fresh, savemycoffee.com, Scale-Pro, Silver Series, Single, Smart Funnel, Smart Hopper, SmartWAVE, Soft Heat, SplashGard,
The Mark of Quality in Beverage Equipment Worldwide, ThermoFresh, Titan, trifecta, Velocity Brew, A Partner You Can Count On, Air
Brew, Air Infusion, Beverage Bar Creator, Beverage Profit Calculator, Brew better, not bitter., BUNNSource, Coffee At Its Best, Cyclonic
Heating System, Daypart, Digital Brewer Control, Nothing Brews Like a BUNN, Pouring Profits, Signature Series, Tea At Its Best, The
Horizontal Red Line, Ultra are either trademarks or registered trademarks of Bunn-O-Matic Corporation.
2
43254 030912
Page 3
11075-7004
11075-7000G
USER NOTICES
Carefully read and follow all notices on the grinder and in this manual. They were written for your protection.
All notices on the grinder are to be kept in good condition. Replace any unreadable or damaged labels.
T
I
A
C
M
D
O
I
R
P
D
R
O
T
A
L
O
R
C
U
E
R
T
E
A
L
P
O
C
R
E
P
R
A
E
L
R
U
È
I
G
L
E
U
R
G
É
R
E
E
S
S
R
S
A
O
O
R
C
G
A
U
T
T
E
O
I
F
È
A
R
C
E
-
D
R
C
A
I
P
F
E
T
R
T
L
E
I
F
I
È
A
R
U
T
E
O
M
A
T
I
Q
U
F
E
I
N
E
E
S
P
R
E
S
S
O
TURKISH / TURC
9
10
7
8
5
6
4
3
2
1
R
E
P
P
E
R
R
A
È
L
I
U
L
G
U
E
G
R
É
R
R
O
T
R
A
U
L
E
O
T
C
A
L
O
C
R
E
R
T
I
P
U
A
T
E
F
A
C
E
R
T
A
L
U
I
T
F
O
E
R
È
I
M
A
T
I
Q
U
E
F
I
N
E
TURKISH / TURC
E
S
P
R
E
S
S
O
11075.7000 11075.7004 (SPECIAL)
WARNING AVERTISSEMENT
To reduce the risk of electric shock, do not remove or
open cover. No user-serviceable parts inside.
Authorized service personnel only. Disconnect power
before servicing.
Afin d’éviter un risque d’électrocution, ne pas ouvrir ou
enlever le panneau. Aucune pièce utile pour
l’opérateur à l’intérieur. Seulement le personnel
autorisé peut effectuer les réparations. Débrancher de la
source de courant avant d’effectuer une réparation.
37881.7000
11076.7000
11075.0100
G2 trifecta
00824.0000
OFF/STOP
FERMÉ/ARRÊT
START
MARCHE
38903.7000
20545.7000
39956.7000 - G1
39957.7000 - G3
3
43254 051710
Page 4

ELECTRICAL REQUIREMENTS
100VAC to 240VAC 50hz or 60hz require 2 wire with ground 15 amp service.
Note: Grinders with optional electrical receptacle must use 20 amp service. Not all models are available in all
voltage configurations or with optional receptacle.
CE REQUIREMENTS
• This appliance must be installed in locations where it can be overseen by trained personnel.
• For proper operation, this appliance must be installed where the temperature is between 5°C to 35°C.
• Appliance shall not be tilted more than 10° for safe operation.
• An electrician must provide electrical service as specied in conformance with all local and national codes.
• This appliance must not be cleaned by water jet.
• This appliance is not intended for use by persons (including children) with reduced physical, sensory or mental
capabilities, or lack of experience and knowledge, unless they have been given instructions concerning use of
this appliance by a person responsible for its safety.
• Children should be supervised to ensure they do not play with the appliance.
• If the power cord is ever damaged, it must be replaced by the manufacturer or authorized service personnel with
a special cord available from the manufacturer or its authorized service personnel in order to avoid a hazard.
• Machine must not be immersed for cleaning.
INITIAL SET-UP
CAUTION - Unplug the grinder throughout the initial set-up.
1. Open the top lid. Clear all foreign objects and shipping materials from the hopper compartment and the
entrance to the grind chamber.
2. The grinder can now be plugged-in and put into service.
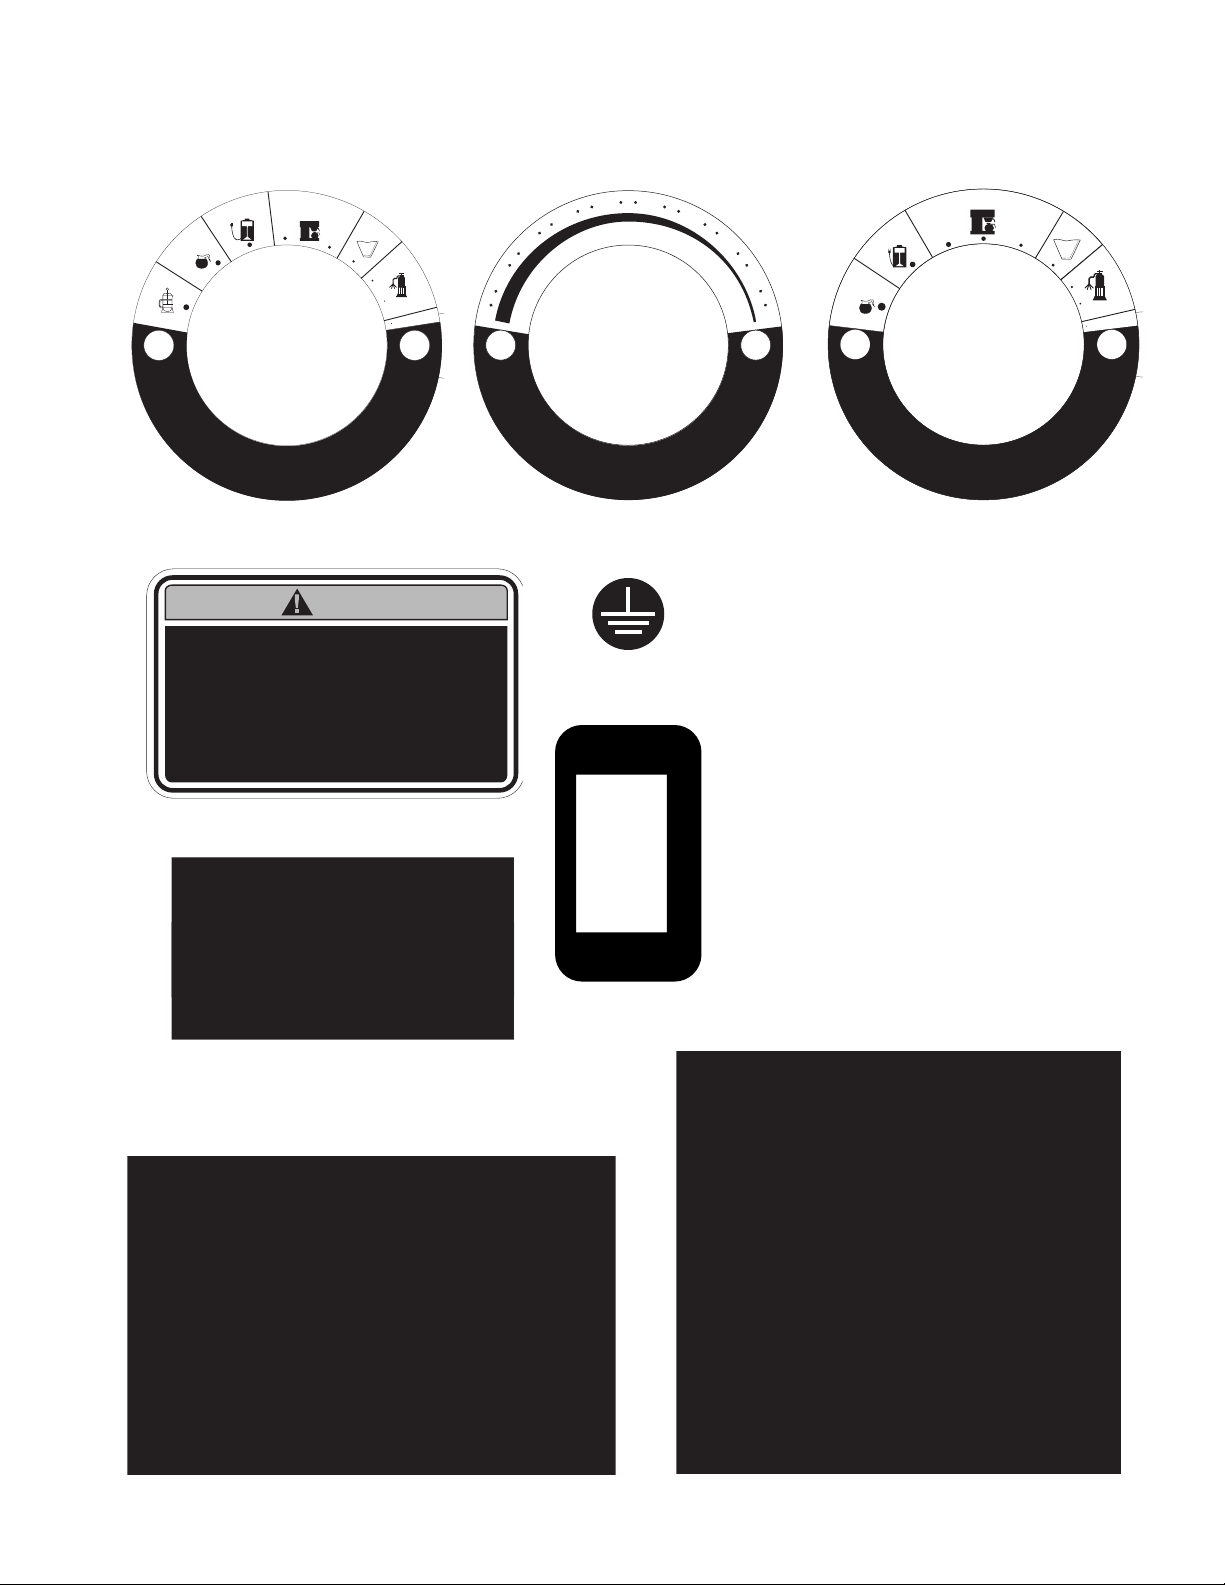
OPERATING CONTROLS
Grind Selector
Allows the user to vary the grind for each coffee. Each setting will provide precisely the same grind every time
it is selected.
Off/On/Start Switch
OFF/STOP - (upper position)
Switching to this position stops the operation of the grinder.
ON - (center, resting position)
The switch will return to this position after a grind cycle has begun and will remain in this position after grinding
has ceased.
START - (lower, momentary position)
Pressing the switch initiates grinding only when a bag is in place behind the chute or the brew cup is in place.
Bag/Brew Cup Sensor
Prevents the grinder from operating unless the back of a bag is in place behind the dispense chute or the brew
cup is not in place. Do not attempt to bypass this safety device.
Cleaning Lever
Allows the operator to clean out any coffee residue left from the previous grind.
4
43254 051710
Page 5

CLEANING
WARNING - Unplug the grinder before the removal of any panel or grind chamber-housing parts.
1. Clean all exterior surfaces using a damp cloth rinsed in any mild, nonabrasive, liquid detergent. Care should
be taken not to scratch the grinder with any abrasive material.
2. Empty all beans from hopper(s). Plug in the grinder, place an empty bag behind the dispense chute or trifecta
brew cup. Press and release the “START” switch. Run a few cycles until all coffee in the grind chamber is
dispensed and disconnect the grinder from the power source. Remove the bag or brew cup.
WARNING - Prior to cleaning the grind chamber, unplug the grinder.
3. Remove the two screws and remove the dial plate and selector knob assembly.
4. Slide the burr auger rotor/spring assembly off the motor shaft and disassemble for cleaning.
5. Remove the two screws securing the stationary burr to the grind chamber.
6. Remove the four screws at the top of the chute and remove the chute. Using a pair of pliers, remove the Cclips securing the flapper arm to the chute. Remove the flapper securing pins carefully (noting the location
of each flapper spring).
7. Wash all parts in a mild solution of detergent with hot water and a stiff non-metallic bristle brush. Rinse all
parts thoroughly and allow them to air dry before reinstalling.
8. Carefully clean the grind chamber, dial plate assembly, chute opening and dial plate opening with a dry stiff
non-metallic bristle brush. Wipe with a clean cloth that has been soaking in a mild solution of detergent and
hot water. Reinstall the spring and rotor with burr onto the motor shaft.
9. Align the slot in the motor shaft with the rotor and reinstall shear plate. Reinstall rotor cup and grind selector
dial plate to the burr housing. Refer to the “Adjustment” section of the Operating and Service manual for
burr adjustments.
PREVENTIVE MAINTENANCE
Bunn-O-Matic® Corporation recommends that preventive maintenance be performed at regular intervals. Maintenance
should be performed by a qualified service technician. For Technical Service, contact Bunn-O-Matic® Corporation at
1-800-286-6070.
NOTE: Replacement parts or service caused by failure to perform required maintenance is not covered by warranty.
6-Month
Weekly Cleaning plus replace the dechaffer assembly.
1-Year
1. On grinders with slide plates check the slide plates and clean.
2. Inspect and clean/replace burrs and grind chamber if necessary.
3. Adjust the burrs and grind time to your specifications for particulate size and throw weight.
BASE RELOCATION
1. Disconnect the grinder from the power source.
2. Tip the machine gently, on its back, so it rests with approximately one inch of the bottom overhanging the
work surface.
3. Remove the drawer from the base assembly.
4. Place the base against the grinder bottom and align the four sets of holes.
5. Securely fasten the base to the grinder bottom using the four screws and washers provided.
6. Raise the grinder to the upright position.
7. Insert the drawer into the base assembly.
5
43254 080510
Page 6

COFFEE GRINDING
1. Turn the selector knob to align the arrow with the desired grind.
2. Raise the top lid and add the whole bean coffee. Close the top lid.
3. Locate the back of a bag behind the dispense chute or insert the brew cup. (The grinder will not operate
unless the bag/brew cup sensor is activated)
4. Allow the bag to rest on the screen beneath the chute.
5. Press the start switch.
6. Flip the cleaning lever a few times as dispensing slows.
7. Remove the bag or brew cup when ground coffee is no longer dispensed from the chute. The grinder will
stop automatically as the bag or brew cup is removed.
NOTE - The start switch will have to be pressed again to continue the cycle if the bag or brew cup is removed
while grinding.
ADJUSTMENT
1. Place a brew cup in place or an empty bag on the screen, with the back of the bag behind the dispense
chute.
2. Start the grinder to clear the grind chamber. Leave grinder “ON”.
3. Turn the Grind Selector knob to the “TURKISH” (or “1”) position.
4. Using a small flat blade screwdriver, loosen the two set screws on the left side of the grind selector knob.
5. Hold the knob in the “TURKISH” (or “1”) position with one hand.
6. Using a large flat blade screwdriver, slowly turn the adjusting screw in the center of the grind selector knob
to the right (clockwise) until a metallic whine can be heard due to the rubbing of the grinding burrs.
7. While holding the knob in the “TURKISH” (or “1”) position, back off the screw to the left (counterclockwise)
just until the metallic whine ceases.
8. Turn-off the grinder.
9. Push the knob against the dial plate and tighten both set screws on the left side of the grind selector
knob.
10. Turn the grinder on and listen again for the metallic whine with the grind selector knob in the “TURKISH”
(or “1”) position. If the metallic whine is heard, repeat steps 7 through 10 until the sound ceases.
11. If no metallic whine is heard, the grinding burrs are adjusted properly. On trifecta models, you should hear
a slight chirp of the burrs contacting if you rotate the knob fully clockwise past the “1” position.
6
43254 051710
Page 7

43254 051710
6
tournez le cadran passé la position « 1 » dans le sens des aiguilles d’une montre.
Sur les modèles trifecta, vous entendrez un léger bruit provenant des meules qui se contractent si vous
11. Si vous n’entendez plus de grincement métallique, les meules de précision sont alors ajustées correctement.
étapes 7 à 10 jusqu’à ce que le bruit ne se fasse plus entendre.
cadran est mis à la position « TURC » (ou « 1 »). Si vous entendez le grincement métallique, répétez les
10. Mettez le moulin sous tension et cherchez à entendre encore une fois le grincement métallique lorsque le
mouture.
9. Poussez le cadran contre la plaque et resserrez les deux vis de serrage à gauche du cadran sélecteur de
8. Éteignez le moulin.
contraire des aiguilles d’une montre) jusqu’à ce que le grincement métallique cesse.
7. Tout en maintenant le cadran à la position « TURC » (ou « 1 »),tournez la vis vers la gauche (dans le sens
(causé par le frottement des meules de précision).
droite (dans le sens des aiguilles d’une montre) jusqu’à ce qu’un grincement métallique se fasse entendre
6. À l’aide d’un gros tournevis à lame plate, tournez délicatement la vis de réglage au centre du cadran vers la
5. Maintenez le cadran à la position « TURC » (ou « 1 ») d’une main.
mouture.
4. À l’aide d’un petit tournevis à lame plate, dévissez les deux vis de serrage à gauche du cadran sélecteur de
3. Tournez le cadran sélecteur de mouture à la position « TURC » (ou « 1 »).
2. Démarrez le moulin pour vider le compartiment de mouture. Laissez le moulin en marche.
1. Mettez en place un porte-filtre ou un sac vide sur la grille, la partie arrière du sac derrière la chute de distribution.
RÉGLAGES
le porte-filtre pendant que le grain se moud.
NOTE - Il faudra appuyer de nouveau sur le bouton de démarrage pour poursuivre le cycle si vous retirez le sac ou
même en retirant le sac ou le porte-filtre .
7. Retirez le sac ou le porte-filtre lorsque la mouture a fini de s’écouler de la chute. Le moulin s’arrêtera de lui-
6. Secouez le levier de nettoyage à quelques reprises lorsque le moulin commence à ralentir.
5. Appuyez sur le bouton de démarrage.
4. Laissez le sac s’asseoir sur la grille sous la chute.
(Le moulin ne démarrera pas si le détecteur du sac ou de porte-filtre est activé.)
3. Placez un sac avec sa partie arrière derrière la chute de distribution ou mettez en place le porte-filtre.
2. Soulevez le couvercle sur le dessus et versez les grains de café entiers. Refermez le couvercle.
1. Tournez le cadran sélecteur de sorte à aligner la flèche rouge avec la mouture voulue.
MOUTURE DU CAFÉ
Page 8

43254 080510
5
7. Remettez en place de tiroir dans sa base.
6. Remettez le moulin en position debout.
5. Fixez solidement la base à la partie de dessous du moulin à l’aide des quatre vis et des quatre rondelles fournies.
4. Placez la base contre le dessous du moulin et alignez les quatre trous.
3. Retirez le tiroir de la base.
travail d’environ un pouce.
2. Délicatement, faites basculer l’appareil et couchez-le sur son dos de sorte que sa base excède la surface de
1. Débranchez le moulin de la prise de courant.
DÉPLACEMENT DE LA BASE
le poids requis.
3. Ajuster les meules et le temps de mouture pour vos spécifications de la grosseur de la mouture ainsi que
2. Vérifier et nettoyer/remplacer les meules de précision et la chambre de mouture si néccessaire.
1. Sur les moulins possédant des rails de soutien , vérifier les rails et nettoyer.
1-An
Nettoyage hebdomadaire et remplacer l’ensemble de lamelle de retenue.
6-Mois
pas couvertes par la garantie.
NOTE: Les pièces de remplacement ou la main d’oeuvre causées par la maintenance préventive non effectuée ne sont
effectuer par un technicien qualifié. Pour le service technique, communiquer avec Bunn-O-Matic au 1-800-263-2256.
Bunn-O-Matic recommande qu’une maintenance préventive doit-être faite à un intervalle régulier. La maintenance doit-être
MAINTENANCE PRÉVENTIVE
Réglages du manuel d’utilisation et d’entretien pour ajuster la meule de précision.
du rotor et la plaque du cadran sélecteur de mouture au boîtier de la meule de précision. Consultez la section
9. Alignez la fente de l’arbre du moteur et le rotor et réinstallez la plaque de cisaillement. Réinstallez la coupelle
le ressort de la meule de précision à même l’arbre du moteur.
linge propre trempé dans une solution détergente douce combinée à de l’eau chaude. Réinstallez le rotor et
plaque du cadran à l’aide d’une brosse à poils raides non métalliques. Essuyez toutes ces surfaces avec un
8. Nettoyez avec soin le compartiment de mouture, la plaque du cadran, l’ouverture de la chute et celle de la
à poils raides non métalliques. Rincez toutes les pièces à fond et laissez sécher à l’air avant de les réinstaller.
7. Lavez toutes les pièces dans une solution détergente douce combinée à de l’eau chaude à l’aide d’une brosse
trouvent les ressorts du rabat).
retiennentlebrasd’articulationdurabatdelachute.Enlevezavecsoinlestigesdurabat(ennotantoùse
6. Enlevez les quatre vis au-dessus de la chute et retirez-la. À l’aide de pinces, enlevez les fixations en C qui
5. Enlevez les deux vis qui retiennent la meule de précision fixe au compartiment de mouture.
4. Faites glisser le rotor et le ressort de la meule de précision de l’arbre du moteur et démontez-les pour les nettoyer.
3. Enlevez les deux vis et retirez la plaque du cadran ainsi que le cadran sélecteur.
MISE EN GARDE- Débranchez l’appareil avant de nettoyer le compartiment de mouture.
de mouture soient moulus. Débranchez le moulin. Retirez le sac ou le porte-filtre.
Faites fonctionner le moulin pendant quelques cycles jusqu’à ce que tous les grains de café du compartiment
sous la chute de distribution ou le porte-filtre trifecta. Appuyez sur le bouton de démarrage et relâchez-le.
2. Videz la trémie de tout grain qui s’y trouve. Branchez le moulin et placez la partie arrière d’un sac vide
abrasif. Prenez soin de ne pas égratigner le moulin avec des substances abrasives.
1. Nettoyez toutes les surfaces extérieures à l’aide d’un linge humide rincé dans un détergent liquide doux non
mouture ou du boîtier.
MISE EN GARDE - Débranchez le moulin avant de retirer tout panneau ou toute pièce du compartiment de
NETTOYAGE
Page 9

43254 051710
4
Permet à l’utilisateur de nettoyer les résidus de café de la mouture précédente.
Levier de nettoyage
ou si le porte-filtre n’est pas en place. N’essayez pas de contourner ce dispositif de sécurité.
Empêche le moulin de se mettre en marche si la partie arrière d’un sac n’est pas placé derrière la chute de distribution
Détecteur de sac et de porte-filtre
avec sa partie arrière sous la chute ou lorsque le porte-filtre est en place.
Lorsqu’on place l’interrupteur dans cette position, le moulin se met en marche seulement lorsqu’un sac est placé
DÉMARRAGE - (vers le bas, position momentanée)
fois que la mouture est terminée.
L’interrupteur se replace dans cette position lorsque le cycle de mouture débute et reste dans cette position une
MARCHE - (au centre, position statique)
Lorsqu’on place l’interrupteur dans cette position, le moulin s’arrête de fonctionner.
ARRÊT - (vers le haut)
Interrupteur marche-arrêt/bouton de démarrage
produisent chaque fois, avec précision, la mouture désirée.
Permet à l’utilisateur de sélectionner une mouture différente pour chaque sac de café. Toutes les sélections
Sélecteur de mouture
COMMANDES DE FONCTIONNEMENT
2. Le moulin est prêt à être mis sous tension et à moudre.
compartiment de la trémie et dans l’entrée du compartiment de mouture.
1. Soulevez le couvercle sur le dessus. Retirez tout objet et tout matériel d’expédition se trouvant dans le
ATTENTION! - Le moulin doit rester débranché pendant le réglage initial.
RÉGLAGE INITIAL
•L’appareilnedoitpasêtreimmergédansl’eaulorsdunettoyage.
obtenu du fabricant ou d’un centre autorisé pour éviter tout risque d’accident.
•Silecordondevenaitendommagé,lefabricantouunréparateurautorisédoitleremplacerparuncordon
•Lasupervisiond’adultesestnécessairepours’assurerquelesenfantsnejouentpasaveccetappareil.
l’utilisation de l’appareil.
son utilisation, à moins d’avoir reçu des instructions d’une personne responsable de sa sécurité à l’égard de
sensorielles ou mentales sont réduites, ni même par des personnes non expérimentées ou non formées à
•Cetappareiln’estpasdestinéàêtreutilisépardespersonnes(nidesenfants)dontlescapacitésphysiques,
•L’appareilnedoitpasêtrenettoyéparjetd’eau.
•Unélectriciendoiteffectuerl’installationélectriqueconformémentauxcodeslocaletnationalenvigueur.
•L’appareilnedoitpasêtreinclinéàplusde10ºpouruneutilisationsécuritaire.
•Pourfonctionneradéquatement,l’appareildoitêtreinstallédansunlieuoùlatempératurevarieentre0et35ºC.
•Cetappareildoitêtreinstallédansunendroitoùilpeutêtresouslasurveillanceétroitedepersonnelqualié.
NORME POUR LA COMMUNAUTÉ EUROPÉENNE (CE)
facultative.
intensité de 20 A. Tous les modèles ne sont pas dotés de cette configuration multiple ni munis de cette prise
Note : Les moulins munis d’une prise électrique facultative doivent être raccordés à une prise de courant d’une
100 V c.a.-240 V c.a., 50 Hz ou 60 Hz, nécessite un circuit bifilaire, mis à la terre, 15 A.
ALIMENTATION ÉLECTRIQUE
Page 10

43254 051710
Artwork for P/N: 38903.7000
Artwork Revision: A
Drawn: RCN
Date: 06/16/10
Colors: White on Black
39957.7000 - G3
3
39956.7000 - G1
11076.7000
38903.0000
20545.7000
MARCHE
START
37881.7000
FERMÉ/ARRÊT
OFF/STOP
00824.0000
source de courant avant d’effectuer une réparation.
autorisé peut effectuer les réparations. Débrancher de la
l’opérateur à l’intérieur. Seulement le personnel
enlever le panneau. Aucune pièce utile pour
Afin d’éviter un risque d’électrocution, ne pas ouvrir ou
before servicing.
Authorized service personnel only. Disconnect power
open cover. No user-serviceable parts inside.
To reduce the risk of electric shock, do not remove or
WARNING AVERTISSEMENT
G2 trifecta
11075.0100
S
E
R
P
S
E
TURKISH / TURC
E
N
I
F
E
U
Q
I
T
A
M
O
T
U
A
R
E
P
I
R
D
C
A
I
T
C
A
F
E
T
I
È
R
E
F
I
L
T
A
U
T
O
M
O
S
R
É
R
G
E
U
G
L
U
I
L
È
A
R
R
E
P
E
R
P
C
O
E
R
L
A
C
T
O
E
L
U
A
R
T
O
R
1
2
3
4
5
7
6
10
9
8
O
S
S
E
R
P
S
E
TURKISH / TURC
E
N
I
E
F
U
Q
I
T
A
M
O
E
T
U
R
A
È
I
E
R
T
E
F
P
I
A
C
R
D
-
E
R
È
I
O
T
U
A
P
11075.7000 11075.7004 (SPÉCIAL)
G
C
R
O
O
A
S
R
S
S
E
E
R
É
G
R
U
E
L
G
I
È
U
R
L
E
A
R
P
E
R
C
O
P
L
A
E
F
I
L
T
T
R
E
U
C
R
O
L
A
T
C
A
F
E
T
O
R
D
R
I
remplacer toute décalcomanie endommagée ou illisible.
protection. Toutes les mises en garde inscrites sur le moulin doivent être maintenues en bonne condition. Veuillez
Prenez soin de lire et de suivre toutes les consignes dans ce manuel et sur le moulin. Elles ont été écrites pour votre
AVIS À L’UTILISATEUR
Page 11

43254 030912
2
Horizontal Red Line, Ultra sont des marques de commerce déposées de Bunn-O-Matic Corporation.
Heating System, Daypart, Digital Brewer Control, Nothing Brews Like a BUNN, Pouring Profits, Signature Series, Tea At Its Best, The
Brew, Air Infusion, Beverage Bar Creator, Beverage Profit Calculator, Brew better, not bitter., BUNNSource, Coffee At Its Best, Cyclonic
The Mark of Quality in Beverage Equipment Worldwide, ThermoFresh, Titan, trifecta, Velocity Brew, A Partner You Can Count On, Air
Safety-Fresh, savemycoffee.com, Scale-Pro, Silver Series, Single, Smart Funnel, Smart Hopper, SmartWAVE, Soft Heat, SplashGard,
PowerLogic, Quality Beverage Equipment Worldwide, Respect Earth, Respect Earth with the stylized leaf and coffee cherry design,
Clear, EasyGard, FlavorGard, Gourmet Ice, Gourmet Juice, High Intensity, iMIX, Infusion Series, Intellisteam, My Café, Phase Brew,
BUNNserve, BUNNSERVE with the stylized wrench design, Cool Froth, DBC, Dr. Brew stylized Dr. design, Dual, Easy Pour, EasyGourmet, BUNN Gourmet, BUNN Pour-O-Matic, BUNN, BUNN with the stylized red line, BUNNlink, Bunn-OMatic, Bunn-O-Matic,
392, AutoPOD, AXIOM, BrewLOGIC, BrewMETER, Brew Better Not Bitter, BrewWISE, BrewWIZARD, BUNN Espress, BUNN Family
DOIVENT-ÊTRE PRÉCÉDEMMENT AUTORISÉS PAR BUNN-O-MATIC ET SONT SUJETS À DES FRAIS DE RETOUR.
COMMUNIQUEZ AVEC BUNN-O-MATIC POUR UNE AUTORISATION DE RETOUR. TOUS LES RETOURS
POLITIQUE DE RETOUR
touts autres dommages-intérêts spéciaux, accessoires, indirects ou punitifs.
des temps d’arrêt, le coût d’appareils de remplacement, de services de remplacement, ou des installations de remplacement, et
profits, les ventes perdues, la perte d’utilisation de l’appareil, les réclamations des clients de l’acheteur, le coût du capital, le coût
En aucun cas Bunn ne sera tenu responsable d’autres dommages ou pertes, y compris, mais sans y être limité à, la perte de
DISCRÉTION DE BUNN.
À LA RÉPARATION, AU REMPLACEMENT, OU AU REMBOURSEMENT DU PRIX D’ACHAT DE L’APPAREIL, À L’ENTIÈRE
VENTE DE CET APPAREIL, QU’IL RELÈVE OU NON DE GARANTIE, SERA LIMITÉ, TEL QUE PRÉCISÉ DANS LA PRÉSENTE,
LE RECOURS DE L’ACHETEUR CONTRE BUNN POUR LA VIOLATION DE TOUTE OBLIGATION DÉCOULANT DE LA
ou rembourser le prix d’achat de l’équipement.
condition que la réparation soit effectuée par un représentant de service autorisé par Bunn; soit 2) remplacer l’équipement
main-d’oeuvre (pendant le délai applicable de garantie tel qu’indiqué ci-dessus) pour réparer les composants défectueux, à
exclusive, pendant que l’appareil est sous garantie, devra soit 1) fournir gratuitement des pièces de rechange et / ou de la
Si Bunn détermine à son entière discrétion que l’appareil défectueux est couvert par la garantie, Bunn, à sa discrétion
la responsibilité de Bunn.
Bunn. Ainsi, les déclarations de ces individus, orales comme écrites, ne constituent pas de garanties et n’engagent pas
ne sont pas autorisés à modifier cette garantie ou à apporter des garanties supplémentaires qui engageront ou affecteront
MARCHANDE, OU DE CONFORMITÉ À UN USAGE PARTICULIER. Les agents, concessionnaires ou employés de Bunn
EXPRESSE OU IMPLICITE, Y COMPRIS MAIS NON LIMITÉE À TOUTE GARANTIE IMPLICITE DE QUALITÉ, DE QUALITÉ
LA GARANTIE CI-DESSUS EST EXCLUSIVE ET REMPLACE TOUTE AUTRE GARANTIE, CONDITION, ÉCRITE OU ORALE,
est sous garantie.
payé, à un centre de service autorisé par Bunn; et 3) reçoive une autorisation préalable de la part de Bunn que l’appareil défectueux
écrit au 280 Industrial Parkway South, Aurora, Ontario L4G 3T9; 2) fasse livrer, à la demande de Bunn, l’appareil défectueux, port
l’acheteur 1) avise Bunn ponctuellement de toute réclamation en vertu de cette garantie par téléphone au (905) 841-2866 ou par
n’est pas limité à des pièces remplaçables par l’utilisateur tels des joints d’étanchéité. Cette garantie est conditionnelle à ce que
remplacement des composantes des appareils devant être remplacées dans le cour normal de leur utilisation; cela comprend mais
d’équipement liées à une eau de mauvaise qualité, à des dommages ou à un accident. En outre, cette garantie ne s’applique pas au
ou un usage impropre, un entretien impropre ou une réparation impropre, un manque de nettoyage et détartrage, des défaillances
été fabriqués par Bunn ou qui, selon Bunn, auraient subi un usage abusif, une négligence, une altération, une installation impropre,
pendant la période couverte par la garantie. Cette garantie ne s’applique pas aux appareils, composants ou pièces qui n’ont pas
affectés d’aucun défaut commercial quant à leur matériel ou leur fabrication, existant au moment de fabrication, et se manifestant
Ces délais de garantie commencent à courir à partir de la date d’installation. Bunn garantit que les appareils fabriqués par elle ne sont
original de l’usine - 4 ans pièces et main-d’oeuvre ou 40 000 livres de café, selon la première éventualité.
c) Bavures de mouture sur équipement de moulure de café pour mourde le café afin de répondre à l’analyse de passage au crible
b) Compresseurs inclus dans l’équipement de réfrigération - 5 ans pièces et 1 an main-d’oeuvre.
a) Cartes de circuits électroniques et / ou de contrôle - 3 ans pièces et main-d’oeuvre.
2) Tout autre appareil - 2 ans pièces et 1 an main-d’oeuvre ainsi que les garanties additionnelles indiquées ci-dessous :
et 1 an main-d’oeuvre.
de type MCP/MCA, serveurs thermiques et serveurs de type Thermofresh (mécanique et numérique) - 1 an pièces
1) Cafetières, carafes thermiques, carafes à décanter, serveurs GPR, distributrices de thé glacé / de café glacé, infuseursnacelle
Bunn-O-Matic Corporation of Canada (« Bunn ») garantit les appareils qu’elle fabrique ainsi :
GARANTIE DE PRODUIT POUR USAGE COMMERCIAL BUNN-O-MATIC
Page 12

43254.7000C 02/12 ©2010 Bunn-O-Matic Corporation
Pour le service technique, contactez la Bunn-O-Matic Corporation, au numéro 1 800-263-2256.
l’adresse www.bunn.com. Ces manuels sont GRATUITS et le téléchargement des mises à jour est rapide.
pièces, le manuel de programmation ou le manuel d’entretien, visitez le site Internet de Bunn-O-Matic, à
Pour obtenir la plus récente version du manuel d’utilisation ou pour visualiser le catalogue illustré de
TÉLÉPHONE : (905) 841-2866 TÉLÉCOPIEUR : (905) 841-2775
Aurora, Ontario, L4G 3T9.
280 Industrial Parkway South,
BUNN-O-MATIC CORPORATION OF CANADA
MANUEL D’INSTALLATION ET D’UTILISATION
MC
& G2 trifecta
G1, G3
 Loading...