

Page 1
BUNNEspress
ESPRESSO/CAPPUCCINO
COFFEE BREWERS
DISCONTINUED VERSION
®
The information in this manual
is no longer current.
TM
E
ES•2A
OPERATING & SERVICE MANUAL
S • 2 A
/
E S• 2 S A
/ ES•2SA
TM
P-244/P-245
BUNN-O-MATIC CORPORATION
POST OFFICE BOX 3227
SPRINGFIELD, ILLINOIS 62708-3227
PHONE: (217) 529-6601 FAX: (217) 529-6644
22700.0000A 11/93 ©1993 Bunn-O-Matic Corporation
Page 2

Page 3

BUNN Espress™
Warranty..............................................................2
User Notices........................................................3
Features.......................................................... 4-5
Installation
Plumbing...............................................6
Electrical Requirments and Hook-up....7
Initial Setup...........................................8
INDEX
ES•2A™/ES•2SA™
Programming ........................................9
Brewing Procedures ...........................10
Cleaning............................................................11
Trouble Shooting ......................................... 12-13
Push-button Board Repacement.......................14
Replacement Parts...................................... 16-31
Wiring Diagrams.......................................... 32-33
1
Page 4

BUNN Espress™
Bunn-O-Matic Corp. (“Bunn”) warrants the equipment manufactured by it to be commercially
free from defects in material and workmanship existing at the time of manufacture and
appearing within one year from the date of installation. This warranty does not apply to any
equipment, component or part that was not manufactured by Bunn or that, in Bunn’s judgement,
has been affected by misuse, neglect, alteration, improper installation or operation, improper
maintenance or repair, damage or casualty.
THE FOREGOING WARRANTY IS EXCLUSIVE AND IS IN LIEU OF ANY OTHER
WARRANTY, WRITTEN OR ORAL, EXPRESS OR IMPLIED, INCLUDING, BUT NOT
LIMITED TO, ANY IMPLIED WARRANTY OF EITHER MERCHANTABILITY OR FITNESS
FOR A PARTICULAR PURPOSE. The agents, dealers or employees of Bunn are not
authorized to make modifications to this warranty or to make additional warranties that are
binding on Bunn. Accordingly, statements by such individuals, whether oral or written, do not
constitute warranties and should not be relied upon.
The Buyer shall give Bunn prompt notice of any claim to be made under this warranty by
telephone at (217) 529-6601 or by writing to Post Office Box 3227, Springfield, Illinois, 62708-
3227. If requested by Bunn, the Buyer shall ship the defective equipment prepaid to an
authorized Bunn service location. If Bunn determines, in its sole discretion, that the equipment
does not conform to the warranty, Bunn shall repair the equipment with no charge for parts
during the one year warranty period and no charge for labor for the first 90 days of the warranty
period. If Bunn determines that repair is not feasible, Bunn shall, at its sole option, replace the
equipment or refund the purchase price for the equipment.
THE BUYER’S REMEDY AGAINST BUNN FOR THE BREACH OF ANY OBLIGATION
ARISING OUT OF THE SALE OF THIS EQUIPMENT, WHETHER DERIVED FROM WARRANTY OR OTHERWISE, SHALL BE LIMITED, AS SPECIFIED HEREIN, TO REPAIR OR,
AT BUNN’S SOLE OPTION, REPLACEMENT OR REFUND. Bunn shall not be liable for any
other damage or loss, including, but not limited to, lost profits, lost sales, loss of use of
equipment, claims of Buyer’s customers, cost of capital, cost of down time, cost of substitute
equipment, facilities or services, or any other special, incidental or consequential damages.
WARRANTY
ES•2A™/ES•2SA™
2
Page 5
BUNN Espress™
The notices on this brewer should be kept in good condition. Replace unreadable or damaged labels.
USER NOTICES
ES•2A™/ES•2SA™
This equipment is to be installed to
comply with the Basic Plumbing Code of
the Building Officials and Code
24247.0000
Administrators International, Inc. (BOCA)
and the Food Service Sanitation Manual
of the Food and Drug Administration (FDA).
00656.0000
CAUTION
HOT
Liquid-Steam-Surfaces
24246.0000
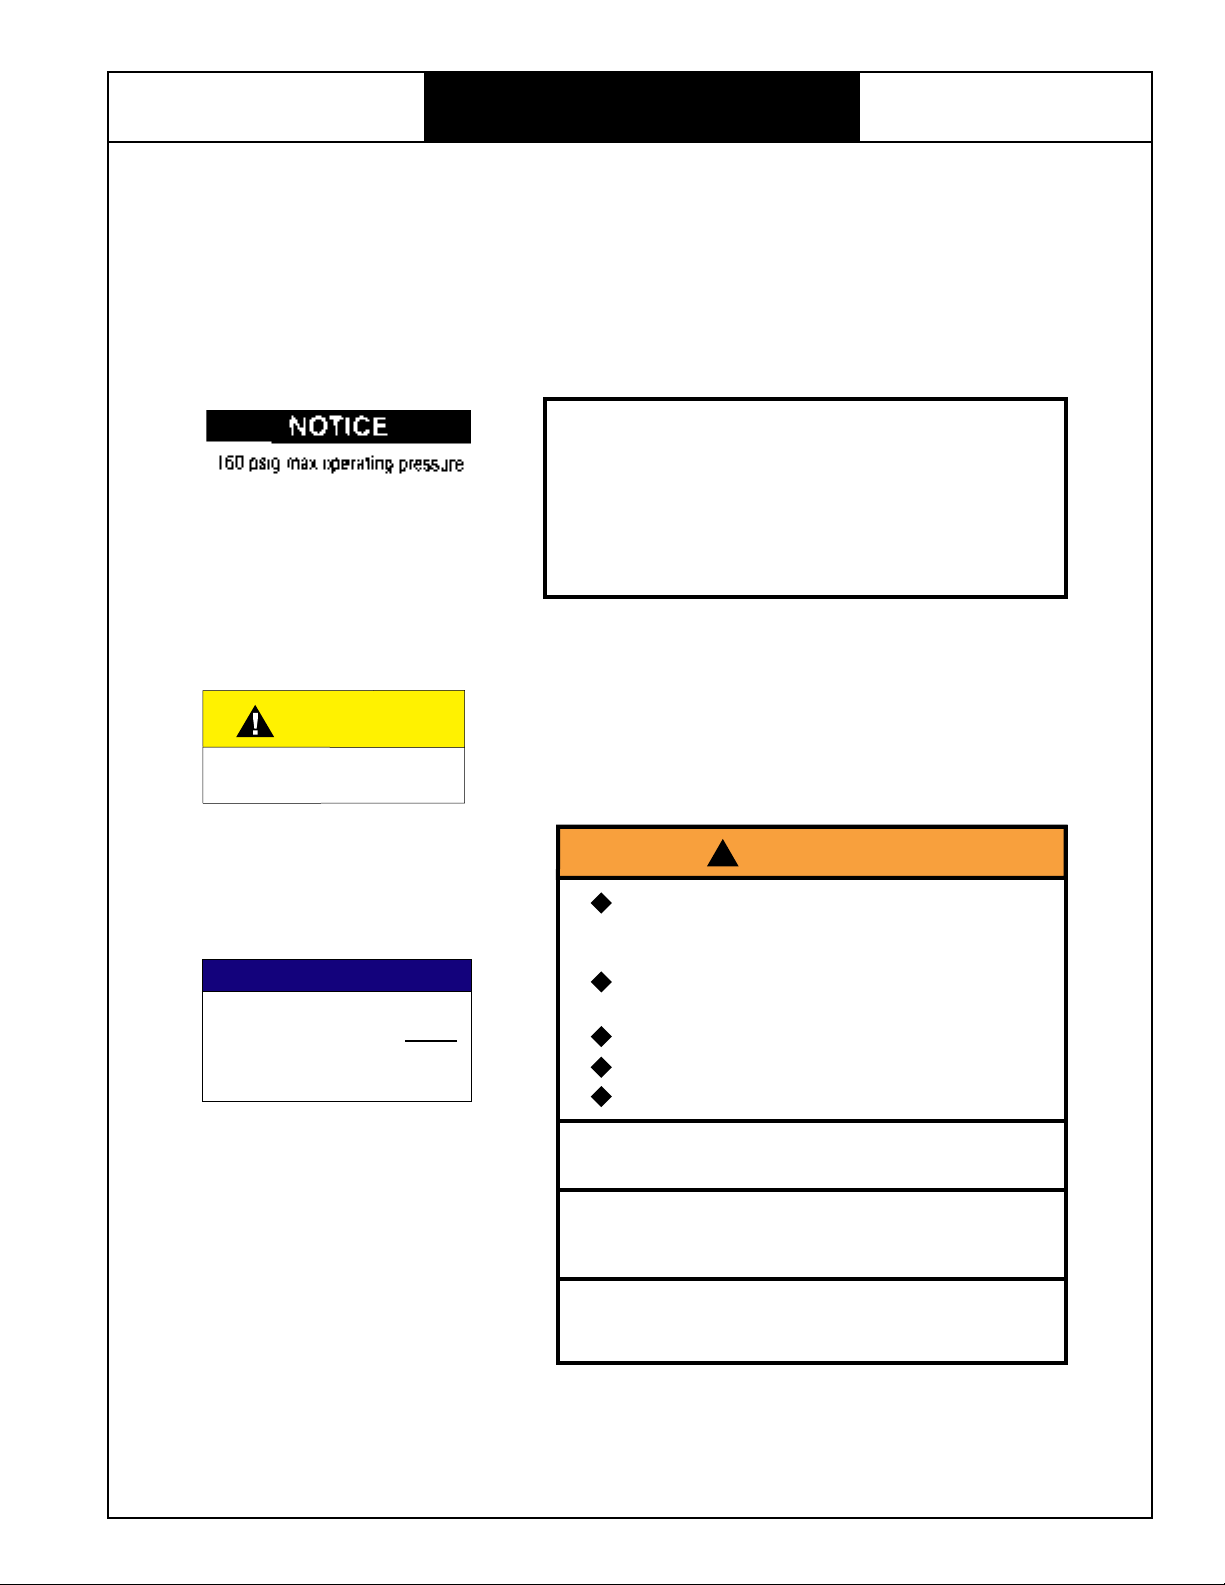
NOTICE
This “
Manual Fill Valve”
used during installation ONLY!
Watch the sight gage during use
and do not fill past normal line!
24245.0000
is to be
!
WARNING
Fill water tank before turning -on
thermostat or connecting appliance
to power source.
Use only on a properly protected
circuit capable of the rated load.
Electrically ground the chassis.
Follow national/local electrical codes.
Do not use near combustibles.
FAILURE TO COMPLY RISKS EQUIPMENT
DAMAGE, FIRE, OR SHOCK HAZARD
READ THE ENTIRE OPERATING MANUAL
BEFORE BUYING OR USING THIS PRODUCT
THIS APPLIANCE IS HEATED WHENEVER
CONNECTED TO A POWER SOURCE
00831.0000F 3/98 © 1988 BUNN-O-MATIC CORPORATION
00831.0000
3
Page 6

BUNN Espress™
FEATURES
ES•2A™/ES•2SA™
HOT WATER RINSE DISPENSING TUBE AND STEAM DISPENSING TUBE
The ES•2A™ ES•2SA™are equipped with a hot water rinse dispensing tube and two steam dispensing
tubes. The Hot Water rinse dispensing tube is controlled by a knob centrally located on the front of the brewer.
The Steam dispensing tubes are controlled by knobs located on the left and right side of the brewer, right knob
controls the right side steam tube and the left knob controls the left side steam tube. They can be placed in
a continuous flow position by turning the knobs approximately half way around. All three outlet tubes possess
a rotary ball and socket type fitting for manual positioning.
WATER FEED TAP
This tap is of the automatically closing type. To introduce water into the tank, turn the control to the left
or right, indistinctly and hold it in position. When you release the control, it will automatically close.
LEVEL
Water level should never rise above the maximum level zone (+) and never descend below the minimum
level zone (-), as this may result in the heating element to melt. The optimum water level zone is indicated
with (N). In the models with electronic water level control for the tank, The optimum water level (N) is
maintained automatically.
Tank
The tank is made of copper plate, 1.5 mm thick and its components are made of cast or drop forged brass.
The tank cover is fixed to the tank by bolts with exterior nuts to facilitate its removal. The operating pressure
of the tank when in use should fluctuate between 0.9 and 1.2 bar as indicated on the tank pressure gauge with
no air inside the tank. Whenever the machine is pressurized, the pressure indicated on the gauge should be
checked to make sure it is the correct pressure. A pressure drop of 0.1 to 0.2 bar is considered normal. If
there is an abnormal amount of air in the tank, a very quick pressure drop will be observed on the pressure
gauge when one of the steam knobs are turned and steam is released. After a few moments, the real tank
pressure can be read on the gauge.
The difference of 0.9 to 1.2 bar, i.e. 0.3 bar, allows the effective exchange required to maintain the
optimum temperature in the units.
However, it is necessary that the installer, when installing the machine, decide at the installation site itself
through the performance of the corresponding tests, the adequate thermal point or correct pressure, keeping
in mind the working conditions of the machine, the hourly production rate required and the room temperature.
PUMP SET
The pump set is made up of a vane type, volumetric pump driven by a 0.25 HP single-phase motor,
supplied at 220 v-60 Hz.
If the water pressure exceeds 7-8 bar, a pressure reducer should be placed between the water line and
the pump set to reduce the output pressure of the water line to between 3-4 bar, which will be the pump set
water feed input pressure.
The output pressure of the pump of the pump set should be between 8-9 bar as a maximum. To check
this pressure, fill the cup of the coffee filter holder with pressed coffee and place it in any one of the infusion
units, press the continuous flow button and read the pressure on the feed line pressure gauge. If the gauge
does not show the previously mentioned values, the pump set’s delivery pressure should be adjusted. This
is done by loosening the screw to reduce pressure. Adjust said screw until the desired pressure is obtained.
The adjustment screw should only be turned very slowly.
NOTE: Pump motor needs to be 1/4 -1/5hp, 1725 rpm, 230 volts, carbonator style, U.L. recognized
4
Page 7

BUNN Espress™
IMPORTANT: None of the high pressure pumps found on the market can operate without water for a
period of more than approximately ONE MINUTE, After one minute of dry operation the pump will seize and
become unserviceable.
Should water be shut off disconnect pump from power supply immediately.
FEATURES
ES•2A™/ES•2SA™
7
6
4
3
9
11
10
2
12
1
P-158
Group head (Espresso extraction chamber)
The group head-espresso extraction chamber is where the coffee infusion takes place. After extraction,
an electric pressure valve automatically discharges the accumulated pressure. When the coil (12) of the
electro-valve receives an electric current, causing the plunger (10) to move, thus closing the discharge valve
(2) and opening the water intake valve (9) allowing the water to pass towards the shower (4) through the
sprayer (3). This is when the brewing process (infusion) begins.
The bubbling effect is produced by an interchange between air, contained in a bubble formed in the
chamber, and water which progressively increases it’s pressure on that bubble. The mixture of air and water
produced then falls on coffee previously dampened by the infusion process. When the liquid extraction
process of the coffee is complete, excess pressure contained in the filter holder is then released through a
discharge valve (2). The atomizer (1) directs the water being discharged to the opening to avoid it’s splashing
outward.
WATER TREATMENT
It is essential to treat water entering the brewer to prevent lime scale build up in the boiler tank and other
plumbing. Recommended treatments are reverse osmosis or softening. Polyphosphate type treatment for
scale reduction, which works well on conventional coffee brewers, is not effective for espresso equipment.
5
Page 8
BUNN Espress™
PLUMBING
ES•2A™/ES•2SA™
PLUMBING REQUIREMENTS
This brewer must be connected to a cold water system with an operating pressure between 20 and 90
psi. A shut-off valve should be installed before the pump. Install a pressure regulator in the line when the
pressure is greater than 90 psi. to reduce the pressure to 50 psi. The water inlet fitting is a 3/8 flare.
This equipment is to be installed to comply with the Basic Plumbing code of the Building Officials and Code
Administrators International, Inc. (BOCA) and the Food Service Sanitation Manual of the Food and Drug
Administration (FDA).
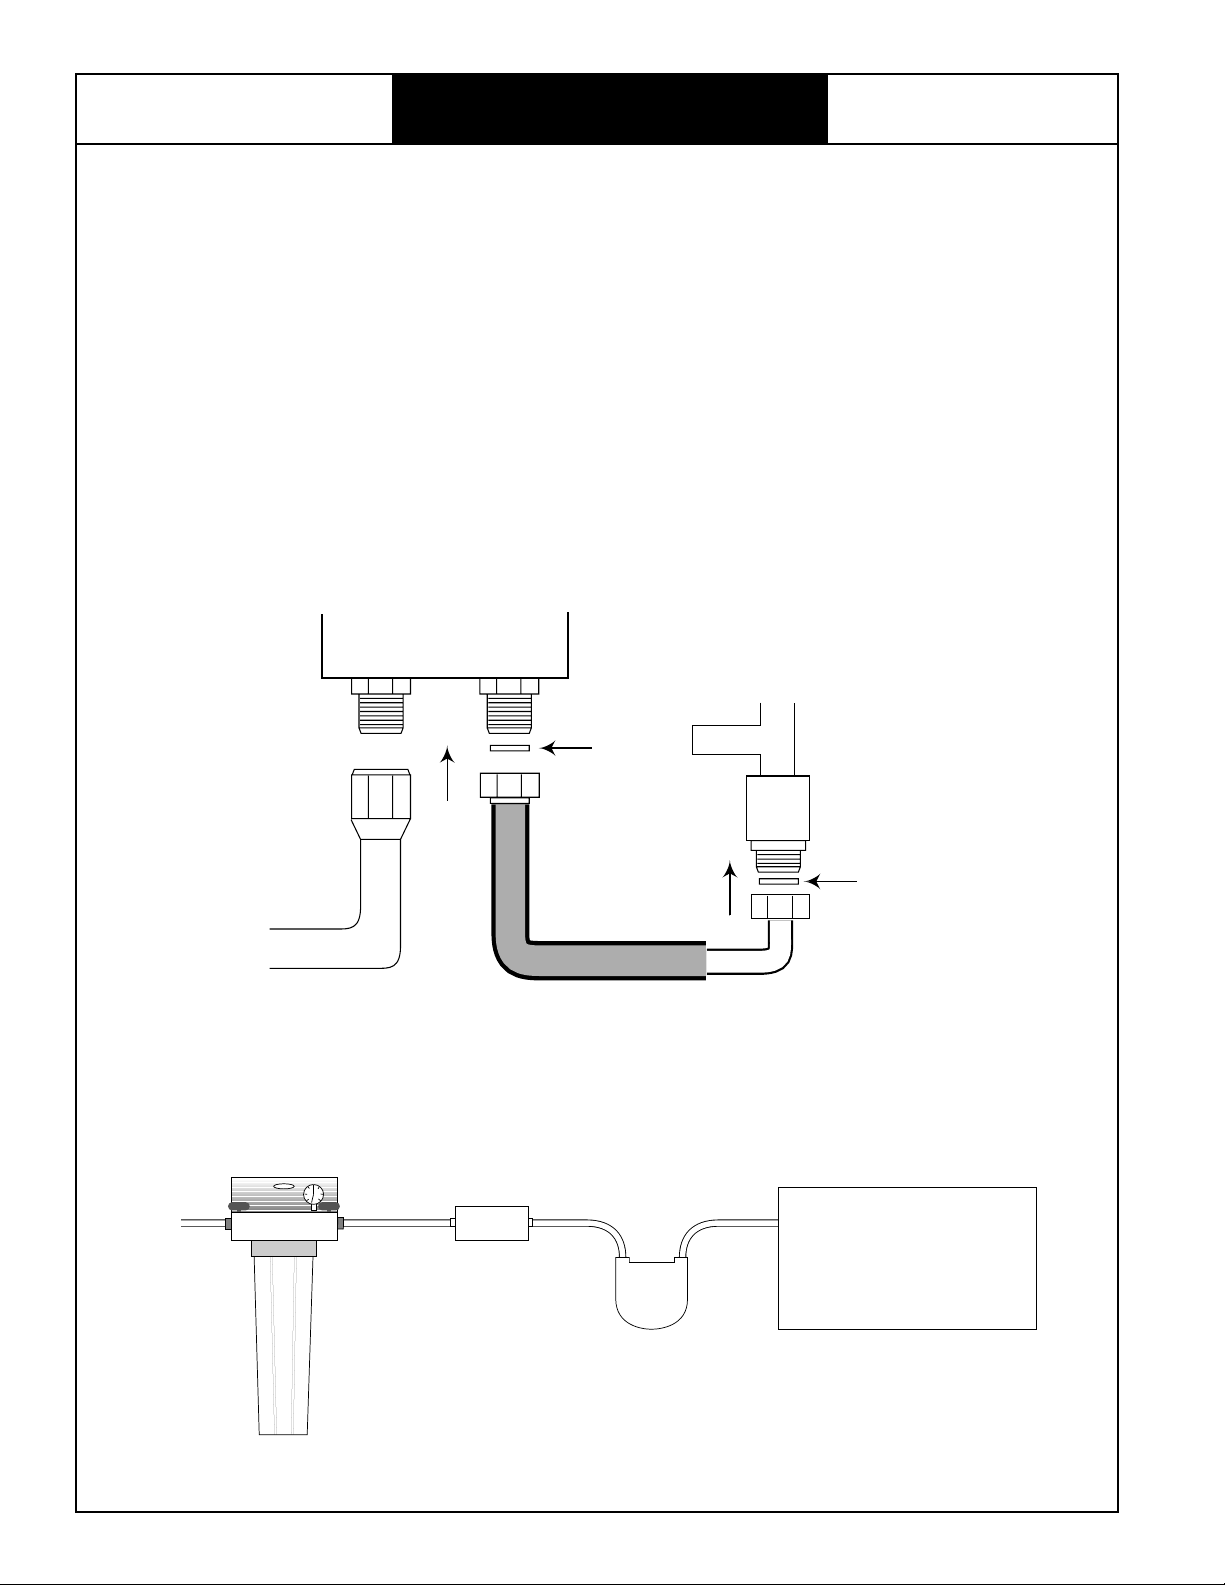
PLUMBING HOOK-UP
1. Flush the water line and securely attach it to the 3/8” flare fitting on the inlet side of the pump.
2. Connect one end of the braided hose (supplied) to the outlet side of the pump and the other end to
the water inlet fitting located under the drain tray of the brewer. This tray is removable. Do not
overtighten the fittings. Rubber gaskets are provided to be inserted into each end of the braided hose.
3. Turn on the water supply and check for leaks.
4. Plumbing diagram is shown below.
PUMP
OutletInlet
supply
line
3⁄8"
copper
Water supply line
(from strainer)
EasyClear filter
strainer
Insert washer
Braided hose
(inside brewer)
Inlet water fitting
Insert washer
brewer
P-138
pump
Important: Both filter and strainer must be hooked up in system.
6
P-139
Page 9
BUNN Espress™
e
ELECTRICAL SPECIFICATIONS
This brewer requires a 2-wire grounded service rated 208 to 240 volts ac, 20 amp, single phase, 60
Hz.
ELECTRICAL HOOKUP
CAUTION: Improper installation will damage electronic components.
1. An electrician must provide electrical service as specified.
2. Using a voltmeter, check the voltage and color coding of each conductor at the electrical source.
3. The plug for the brewer is to be supplied by the installer.
4. Attach the plug to the brewer cordset as shown below:
ELECTRICAL
ES•2A™/ES•2SA™
L1
Red
240V
or
208V
L2
Blk
Grn
Gnd
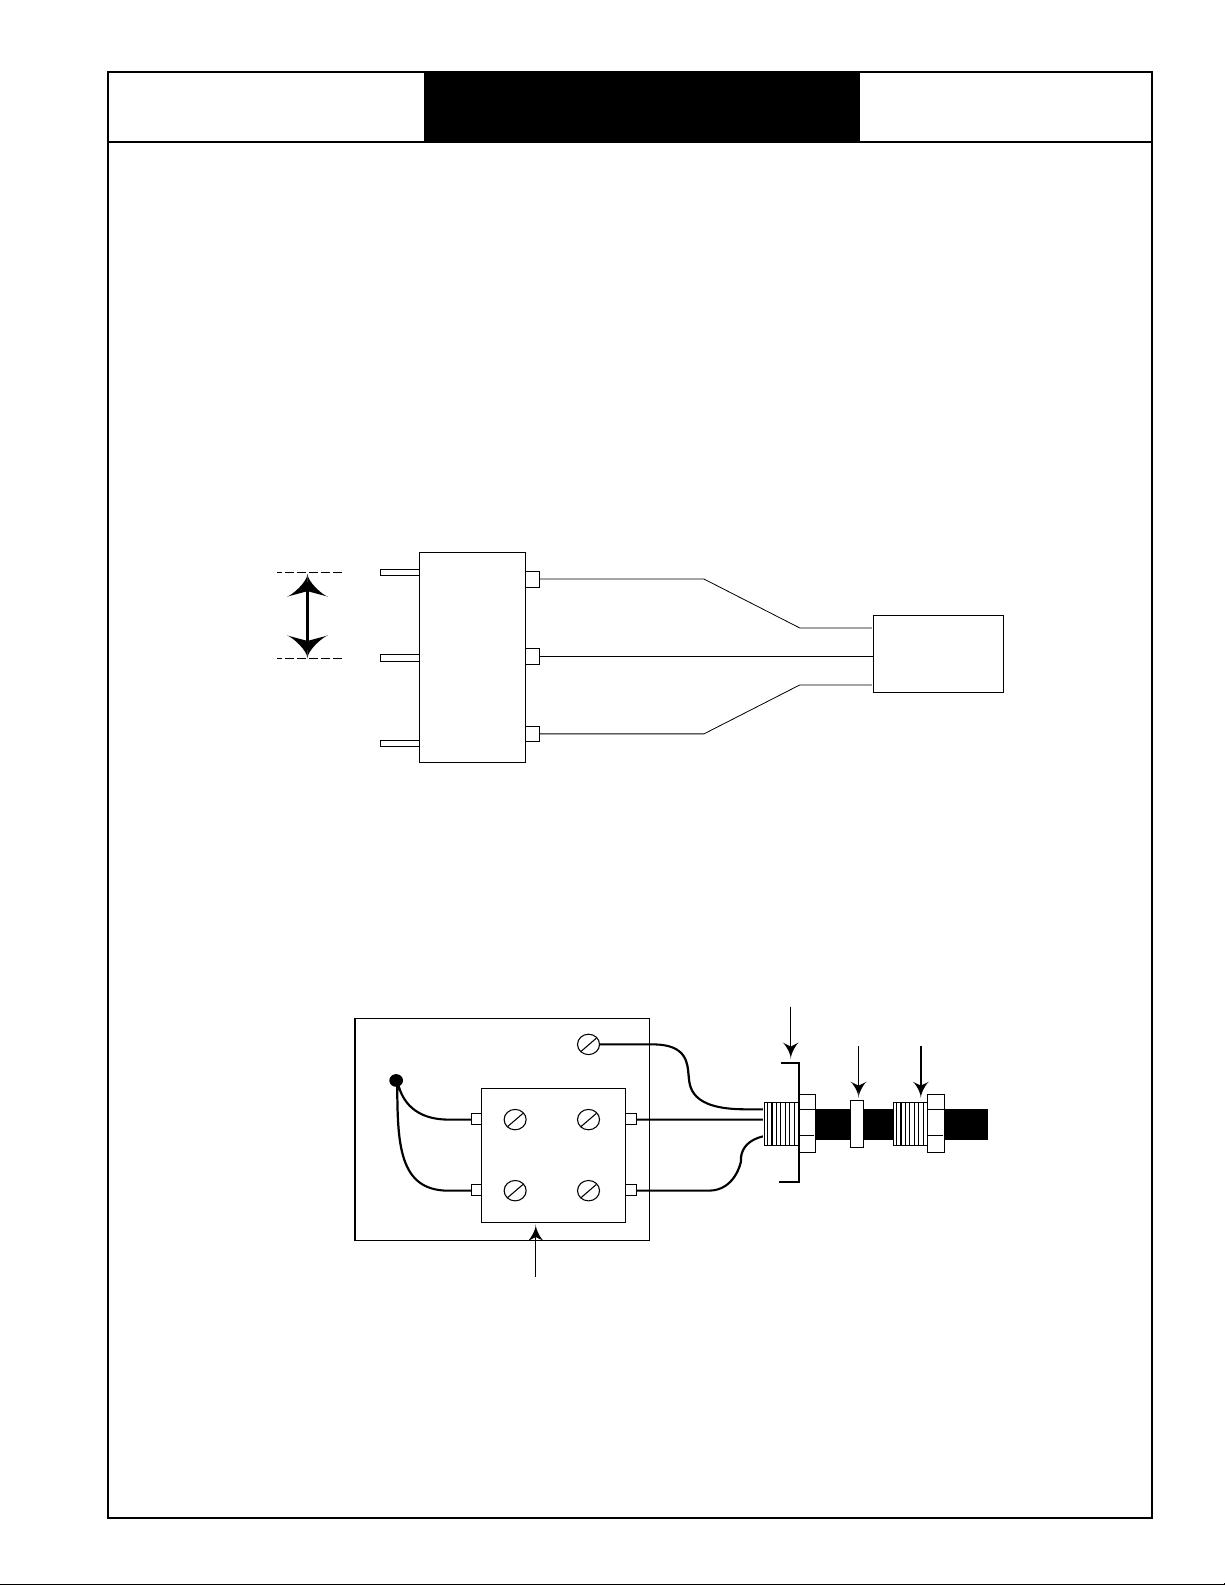
5. Attach wires from pump cordset to terminal block located on pump motor as shown below:
Cover
Brn
Grn/Yel
Blu
Grommet
Compression
nut
From
brew
P-140
Blu
Terminal
block
Blk
P-141
NOTE: Wiring going into the terminal block must be tinned with solder to insure proper connection.
Warning: The brewer and pump must be electrically grounded. Do not assume that a plumbing line
will provide an adequate ground.
7
Page 10

BUNN Espress™
INITIAL SETUP
ES•2A™/ES•2SA™
START-UP
Retighten the tank cover bolts, nuts, flat section strips, tank heaters, and the individual tank section lids
(at upper part of the tank). Fill the tank with water to the optimum water level zone (N) using the water feed
tap. In the models with and electronic water level control fill the tank to the minimum water level zone (-).
Connect the electrical system.
Turn on the toggle switch located on the base (left side bottom). The indicator lamp on the front of the
base (left side) will light up. When the toggle switch is turned on, in the model with an electronic water level
control, the electronic water level operation pilot light will light up, start the pump set and open the water inlet
valve (located inside the machine) introducing water into the tank until it reaches the optimum water level zone
(N).
NOTE: During the initial fill of the tank, if manual fill is not used and automatic is filling the tank,
the alarm condition will arise (during re-fill no water goes through the flowmeter). Refer to
“DOSAGE PULSEMETER MALFUNCTION ALARM” in the TROUBLE SHOOTING section
in this manual for further instruction.
When the water makes contact with the sensor probe, this will close the inlet valve, shut off the pump set,
and disconnect the pilot light.
While waiting for the machine to reach working pressure (tank pressure gauge), check and adjust the
pump set as on page 4.
When the tank and the pump pipes are filled, press the “continuous doses” push button on each set and
the pumping unit will immediately start injecting water into the corresponding tank section and tube leading
to the units until water begins to flow through them. This indicates that air has been bled from the hydraulic
circuit and the push-buttons can be pressed again to shut off the pump.
Before the tank pressure reaches 1.2 bar, air must be bled from inside the tank as described on page 4.
When the tank pressure gauge indicates 1.2 bar, the electrical pressure switch will disconnect. If this does
not occur at the mentioned pressure, adjust the pressure switch (page 29 figure 1), placed inside the machine
on the right side, using the inside adjustment screw. Tightening the screws lowers the tripping pressure and
vice-versa.
When the water in the individual tank sections and hydraulic circuit expands do to heating, the water
pressure gauge reading will exceed 8-9 bar working pressure, and when the pressure reaches 11 bar the
pressure release valve will open to release said pressure. If not, the inside nut (page 19 figure 13) must be
adjusted so that it discharges the pressure at an indicated pressure of 11 bar.
Place a dose of ground coffee (approx. 6 grams) in the cup of the filter-holder and after lightly tamping
the coffee, and wiping the rim free of any excess grounds, place the filter holder in the group head unit.
Turn on the push button control (red button) and all the mechanisms of the unit will begin operating, Let
it run about 30 seconds and observe the pump feed pressure.
8
Page 11
BUNN Espress™
PROGRAMMING
ES•2A™/ES•2SA™
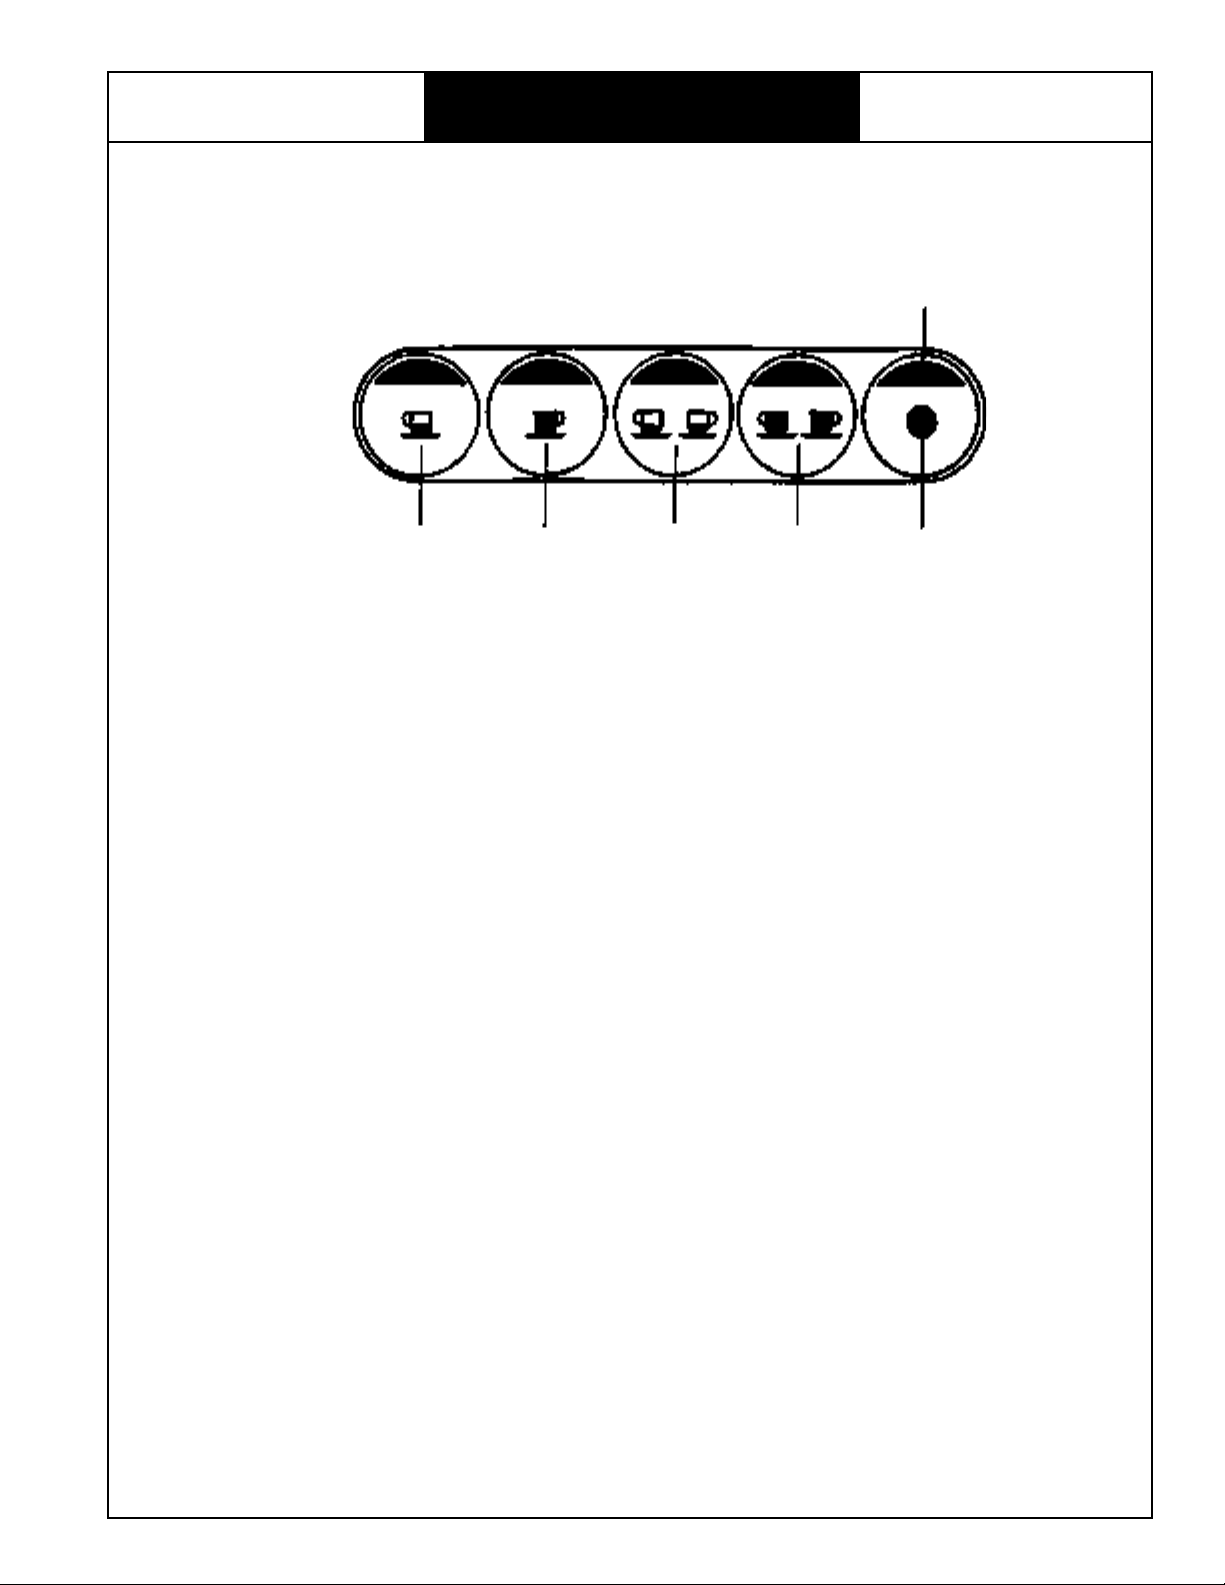
PUSH-BUTTON SET (AUTOMATICS ONLY)
This set is made up of five push-buttons (A,B,C,D, and E) and one pilot light (F). The A, B, C, and D push-buttons
are used to select the four possible water dosed and the E push-button is for continuous infusion injection.
The F pilot light indicates that the unit is operating. To Shut off the infusion injection process (STOP), press
any of the push-buttons (A, B, C, D, or E)
F
A
BC
D
E
PROGRAMMING DOSIFICATIONS
To change the factory set dosages, set the Program/Run toggle switch to the “Program” (right) position.
Depending on the dosage you wish to change (1 cup or 2 cups), fill the filter-holder with the proper amount
of ground coffee and place in the hand infusion unit of the machine. Press the corresponding dosage pushbutton and hold for approximately 3 seconds. The brew light will be flashing. Once the desired amount of
coffee is achieved press any of the dosage push-buttons to save the new setting in memory. Return the “Run/
Program” switch lever to the “Run” (left) position.
NOTES:1. This operation must be repeated for each dosage you wish to reprogram.
2. The push-buttons which were not reprogrammed will continue using the previous dosage
sets.
3. The “Continuous dosage” is not programmable.
PREINFUSION PROGRAMMING
Pre-infusion causes a non-programmable amount of brew water to be injected into the bed of coffee at
the beginning of the brew cycle; thus wetting the coffee, this is followed by a short delay, followed by the
programmed amount of dispense.
In order to check whether or not the pre-infusion has been turned on, turn the programming switch (14)
to the “Program” (right) position. If the pilot lamp (F) comes on, pre-infusion is on. To eliminate the preinfusion, press the continuous dosage button (E) until the pilot lamp (F) turns off; then return the programming
switch to the “Run” position.
9
Page 12

BUNN Espress™
BREWING
ES•2A™/ES•2SA™
COFFEE EXTRACTION
1. Place ground coffee in the filter holder, shake it level, and compress the bed of coffee with the tamper on
the grinder.
2. Clean the edge of the filter holder with the palm of the hand before locking it on to the set. This will prevent
any coffee particles from imbedding themselves into the group gasket.
3. Place the filter holder in the set and twist it to the right until tight. Do not force the filter holder excessively.
4. Press any one of the four dosification buttons or the continuous draw button according to the dose
required.
5. Extraction ends automatically. If the continuous liquid dispensing button was pressed, dispensing can
be stopped by pressing on any one of the five buttons. The automatic liquid extraction caused by using
one of the four dosification buttons can be stopped by pressing any of the dosification buttons.
NOTE: The automatic selections have regulated doses, these can be set between 0 and 500 cc
The machines leave the factory with regulators adjusted for the following approximate amounts:
One short coffee: 50 cc of water
One normal coffee: 100 cc of water
Two short coffees: 100 cc of water
Two normal coffees: 200 cc of water
It should be noted that these doses have been set without coffee in the filter holder. With coffee, the
volumes are slightly less. Should different volumes be required, refer to (Programming dosifications)
OBSERVATIONS
IT IS OF THE UTMOST IMPORTANCE FOR THE INFUSER UNIT OPERATION
intermediate space between the pressed coffee and the injector spray head. Coffee dosage is 6 grams,
although it may be more or less depending on the degree of grinding, coffee quality, etc. Perfect grinding of
the coffee gives it a better creme’. If it is observed that the coffee is produced drop by drop, it means that it
is ground too fine, and if the coffee comes out too quickly, it means that the grounds have not been ground
fine enough.
During long periods in which the machine is not operating, drain the tank and clean the exterior of the
machine, disconnect the power supply and cover the machine.
For optimum operation and conservation, all the elements of the machine should periodically be
lubricated.
Before making the first cup of coffee, it is recommended to run water through the unit to heat up the system.
that there is no
10
Page 13

BUNN Espress™
CLEANING
ES•2A™/ES•2SA™
CLEANING
1. The use of a damp cloth rinsed in any mild, nonabrasive, liquid detergent is recommended for cleaning
all surfaces on Bunn-O-Matic equipment.
2. A cleaning cycle must be ran nightly.
To do this:
a) insert solid filter basket into filter holder.
b) Put 1 teaspoon of Cascade cleaning detergent into filter basket.
c) insert filter holder into group head
d) run brew cycle
e) repeatedly start and stop brew cycles while observing drain cup under drip tray
f) stop when water being discharged into drain cup shows no sign of detergent.
3. Clean the gasket that seals the filter and the group head , located under the group head. Ground coffee
build-up on the gasket will result in a bad seal of the filter holder, and will leak while brewing. This is why
it is important to wipe excess coffee off of the rim of the filter prior to insertion in the group head.
4. It is necessary once a week to remove the group head screen (under the head, fastened with a one slotted
screw), and look through the screen to see if it needs to be cleaned.
5. The drip tray is to be cleaned nightly. Remove the grill and drip pan, wash them out thoroughly, and place
them back into the brewer.
6. The steam wands must be cleaned after each use. Wipe with a damp cloth immediately after use. At the
end of the night, run each wand for about 15 seconds to clean them out.
11
Page 14

BUNN Espress™
A troubleshooting guide is provided to suggest probable causes and remedies for the most likely problems
encountered. If the problem remains after exhausting the troubleshooting steps, contact the Bunn-O-Matic
Technical Service Department at 1-800-637-8606.
• Inspection, testing, and repair of electrical equipment should be performed only by qualified service
personnel.
• Solenoid removal requires interrupting the water supply to the valve. Damage may result if solenoids are
energized for more than ten minutes without a supply of water.
• The use of two wrenches is recommended whenever plumbing fittings are tightened or loosened. This will
help to avoid twists and kinks in the tubing.
• Make certain that all plumbing connections are sealed and electrical connections tight and isolated.
• This brewer is heated at all times unless disconnected from the power source. Keep away from
combustibles.
WARNINGS
• Exercise extreme caution when servicing electrical equipment.
• Disconnect the brewer from the power source when servicing, except when specified.
• Follow recommended service procedures.
• Replace all protective shields and safety notices.
TROUBLESHOOTING
ES•2A™/ES•2SA™
Problem
Equipment will not
operate
Brew cycle will not start
Probable cause
No power or incorrect
voltage
Contactor
Toggle switch (Master
on/off)
No water
Water strainer or filter
Remedy
Connect the brewer to the power
source. Check the contactor
terminals for proper voltages.
Check circuit breaker/fuse.
When on/off toggle (master) is
turned on , pilot lamp on base
should light up and the contactor
should energize and pull in. If
contactor does not pull in, unplug
brewer and check coil for continuity.
If open, replace contactor.
Must be in the on position. Pilot
lamp will light.
Check plumbing and shut off valves.
Direction of flow arrows must be
pointing toward the brewer.
Remove the strainer and/or filter
cartridge and check for obstructions.
Clear or replace.
Start switch
Solenoid valve
Disconnect power supply and check
terminals of switch for continuity
(semi-automatic version)
Check voltage at terminals. If
voltage is present when the start
switch is pressed, disconnect power
supply and check coil terminal for
continuity. If there is continuity,
solenoid is defective. Replace
solenoid.
12
Page 15

BUNN Espress™
TROUBLESHOOTING
ES•2A™/ES•2SA™
Problem
Brew cycle will not
start (cont.)
Water is not hot or
long recovery time.
Probable cause
Pump
Start switch
Limit thermostat
Tank heaters
Remedy
When starting switch is pressed, pump
should turn on immediately. If this dies not
happen, check voltage at terminal block on
the pump.. If correct voltage is present, use
a flat-blade screwdriver to turn the motor
shaft on the rear end of the motor to see if
the pump itself is locked up. If the shaft
dies no turn, replace pump assembly.
Remove the solenoid valve and clear it of
any obstructions. Rebuild or replace the
valve if necessary.
Switch must make and break contacts.
Check with ohmmeter for continuity.
Check continuity of limit with ohmmeter.
Disconnect power supply and check across
limit terminals. If no continuity, replace
limit thermostat.
Check tank heater terminals for correct
voltage. If voltage is present and machine
is not heating properly, replace tank heater.
A good tank heater will show continuity.
DOSAGE PULSOMETER MALFUNCTION ALARM
This alarm is activated if, for any reason, the pump is running and the metering pulses of the volumetric meter are not
received by the central control unit, or when there is a time period longer than 5 seconds (approximately) between meter
pulses. If an infusion unit is operating (pilot light on the push-button panel turned on), it will shut off and the pilot light will
flash on and off. If this happens, the following should be checked:
-Possible obstruction at the coffee outlet (dirty injection head, blocked unit nozzles, etc.)
- Volumetric meter connections.
- Unit electrovalve.
- Unit electrovalve connections.
- Operation of volumetric meter.
- Possible pump malfunction.
To cancel the alarm, just press any push-button on the infusion unit push-button panel that has produced the alarm,
however, if the malfunction continues, the alarm will be reactivated when the programmed doses push-button is pressed.
This alarm does not prevent the machine from operating in the continuous dosage mode.
AUTOMATIC WATER LEVEL MALFUNCTION ALARM
This alarm is activated when there is a demand for water but there is not enough water in the tank, and water level is
not reached within a maximum prefixed time period in each tank, thus preventing a possible flooding of same. The pilot light
on the push-button panel of the infusion units will flash on and off. If this happens, check the following:
• Water level sensor. • Water level sensor connection.
• Water inlet (possible blockage of inlet). • Tank water electrovalve.
This alarm does not prevent the machine from operating in the continuous infusion mode and will not be shut off even
though the machine is disconnected from the electric supply line. Should this occur, the optical level should be checked
by sight and water fed into the boiler manually.
To cancel the alarm after the problem has been solved, place the programming switch in the programming position,
then simultaneously press the push-buttons for one short dose and 2 short coffee doses. Then after the alarm has been
shut off, return the programming switch to the operating position.
Keep in mind that this alarm will surely be activated when filling a completely empty tank or with a very low water level
(after repairs or commissioning of a new machine). To prevent the alarm from being activated, load the water manually.
13
Page 16

BUNN Espress™
BO ARD REPLACEMENT
ES•2A™/ES•2SA™
PUSH-BUTTON BOARD CONNECTIONS
All the set push-button boards are the same and are to be coded only according to the place they occupy
with respect to the infusion units. The numbering order of the infusion units (lst, 2nd, 3rd and 4th), always counted
facing the machine and from left to right.
Wiring connector
Terminals for locating the
jumper on the push button
board, depending on the unit
being connected
(See diagram below)
Location of the jumper when placing the push-button board on unit No. 1
Printed circuit
board
P-137
Location of the jumper when placing the push-button board on unit No. 2
Location of the jumper when placing the push-button board on unit No. 3
Location of the jumper when placing the push-button board on unit No. 4
14
Page 17

BUNN Espress™
ES•2A™/ES•2SA™
15
Page 18

BUNN Espress™
REPLACEMENT PARTS
ES•2A™/ES•2SA™
8
7
9
10
11
12
1314151617
18
19
20
1 234 65
28
27
26
25
24
23
22
21
P-225
16
Page 19

BUNN Espress™
Figure Description Part Number
1.................. Vented top panel (hood) ......................... 22795.0000
2.................. Top cup warmer panel............................ 22319.0001
3.................. Divider panel.......................................... 22782.0000
4.................. Hood corner piece (left & right) .............. 22789.0000
5.................. Cage nut (10-32) ..................................... 22851.0000
6.................. Side panel mounting channel.................. 22776.0000
7.................. Galvanized back plate ............................ 22765.0000
8.................. Back panel (upper).................................. 22787.0000
9.................. Back panel (lower) .................................. 22788.0000
10................ Side panel end cap ................................. 22786.0000
11................ Side panel decorator piece...................... 22792.0000
12................ Side panel (right)..................................... 22790.0000
13................ Machine frame chassis............................ 22764.0000
14................ Chrome front panel................................. 22879.0000
15................ Inlet assy. mounting bracket.................... 22841.0000
16................ Discharge tube........................................ 22661.0000
17................ Drain cup mounting nut.......................... 24046.0000
18 ................ Drain cup ............................................... 22832.0000
19 ................ Base frame .............................................. 22780.0001
20................ Lower hood panel................................... 22797.0000
21 ................ Drip tray ................................................. 22848.0000
22................ Drip tray grate......................................... 22693.0000
23................ Rubber foot............................................. 22615.0000
24................ Foot extension ........................................ 22843.0000
25................ Foot extension nut .................................. 24049.0100
26................ Side panel (left) ....................................... 22791.0000
27................ Front hood panel (semi-automatic).......... 22881.0000
27................ Front hood panel (automatic) .................. 22796.0000
28................ Rubber grommet (faucet tube)................. 22842.0000
REPLACEMENT PARTS
ES•2A™/ES•2SA™
17
Page 20

BUNN Espress™
13
12
11
REPLACEMENT PARTS
15
14
ES•2A™/ES•2SA™
1617
18
19
20
10
21
23
22
25
24
9
REPLACEMENT PARTS
8
7
6
5
4
26
27
28
542930
3
2
1
P-235
18
Page 21

BUNN Espress™
Figure Description Part Number
1.................. Inlet water fitting..................................... 22849.0000
2.................. Brew water inlet tube.............................. 22614.0000
3.................. Heat exchanger bulkhead ....................... 22835.0000
4.................. Nut ......................................................... 24048.0100
5.................. Split lock washer..................................... 24028.0100
6.................. Heat exchanger tube (brew) .................... 22613.0000
7.................. St ud ........................................................ 22834.0000
8.................. Tank-end bulkhead ................................. 22768.0000
9.................. 4-way steam fitting.................................. 22828.0000
10................ O-ring seal.............................................. 22868.0000
11................ Pressure pop-off valves ........................... 22575.0000
12................ Water inlet tube ...................................... 22857.0000
13................ Steam outlet fitting .................................. 22850.0000
14................ 2-way steam fitting.................................. 22827.0000
15................ Copper O-ring seal ................................. 22867.0000
16................ Tank-end water & steam fittings .............. 22817.0000
17................ Tank (boiler) ........................................... 22826.0000
18................ Compression nut..................................... 22815.0000
19................ Tank heater, 1300W, 220V (left) ............. 22607.0000
20................ Tank heater, 1300W, 220V (right)........... 22608.0000
21................ Tank-end bulkhead gasket ...................... 22602.0000
22 ................ ”L“ bracket.............................................. 22859.0000
23 ................ Flat washer ............................................. 24028.0001
24................ Exchanger tube gasket............................. 22612.0000
25................ Tank heater mounting stud...................... 22580.0000
26................ Hex bolt (bulkhead mounting) ................ 24008.0000
27................ Tank heater mounting stud...................... 22580.0000
28................ Tank heater gasket .................................. 22579.0000
29................ Tank heater terminal shorting bar............ 22818.0000
30................ Tank heater terminal cover shield ........... 22639.0000
REPLACEMENT PARTS
ES•2A™/ES•2SA™
19
Page 22

BUNN Espress™
REPLACEMENT PARTS
ES•2A™/ES•2SA™
1
11
Solenoid rebuild kit–
Part # 22811.0000
15
14
13
12
Group assy . (items 1-10)–
Part # 22711.0000
2
16
3
4
5
6
7
8
9
10
Figure Description Part Number
1.................. Solenoid mounting screws ...................... 24005.0400
2.................. Solenoid assembly .................................. 22712.0000
3.................. Group head end plug.............................. 22806.0000
4.................. Group head end plug gasket ................... 22808.0000
5.................. Group head ............................................ 22809.0100
6.................. Filter holder seal gasket........................... 22571.0000
7.................. Sprayhead ............................................... 22804.0000
8.................. Sprayhead mounting screws.................... 24007.0300
9.................. Sprayhead screen.................................... 22708.0000
10................ Sprayhead screen mounting screw .......... 24006.0000
11................ Group head mounting stud nut ............... 24048.0100
12................ Group head mounting stud washer ......... 24028.0100
13................ Group head mounting stud ..................... 22609.0000
14................ Group head cover shield......................... 22783.0000
15................ Cover shield bolt..................................... 24007.0000
16................ Group head to tank gasket ...................... 22657.0000
20
P-234
Page 23

BUNN Espress™
REPLACEMENT PARTS
11
10
4
9
8
ES•2A™/ES•2SA™
16
151412 13
7
6
5
4
3
2
1
Figure Description Part Number
1.................... Tank drain screw.......................................... 24006.0400
2.................... Tank drain screw gasket .............................. 22836.0000
3.................... Lower sight gauge elbow ............................. 22644.0000
4.................... Seal washer ................................................. 22616.0000
5.................... Sight gauge glass gasket............................. 22617.0000
6.................... Sight gauge glass compression nut............. 22618.0000
7.................... Sight gauge housing .................................... 22620.0000
8.................... Sight gauge glass ........................................22619.0000
9.................... Upper sight gauge elbow ............................. 22643.0000
10.................. Probe assy. hex fitting.................................. 22629.0000
11.................. Terminal block (probe)................................. 22814.0000
12.................. Flat washer ..................................................24031.0000
13.................. Lock washer.................................................24030.0000
14.................. Mounting nut ................................................ 24050.0300
15.................. Seal washer ................................................. 22868.0000
16.................. Extension fitting............................................ 22831.0000
21
P-233
Page 24

BUNN Espress™
15
7
6
5
4
3
Complete valve assy.–
Part # 22685.0000
REPLACEMENT PARTS
14
13
12
11
10
9
8
2
1
ES•2A™/ES•2SA™
24/25
16
23
22
21
20
19
18
17
26
27
28
29
31
32
343330
P-240
22
Page 25

BUNN Espress™
Figure Description Part Number
1.................. Actuator shaft - steam valve .................... 22684.0000
2.................. Steam valve collar nut............................. 22824.0000
3.................. Insert washer........................................... 22862.0000
4.................. Blue rubber gasket - steam valve............. 22605.0000
5.................. Spring support washer............................. 24028.0000
6.................. Actuator shaft coupling screw ................. 22766.0000
7.................. Rubber seat - plunger.............................. 22604.0000
8.................. Actuator shaft coupling ........................... 22833.0000
9.................. Actuator pivot nut ................................... 22864.0000
10................ Actuator pivot nut set screw.................... 24005.0000
11................ Steam valve seal fitting............................ 22825.0000
12................ Steam valve seal fitting set screw ............ 22869.0000
13................ Spring - steam valve................................ 22606.0000
14................ Plunger shaft ........................................... 22823.0000
15................ Valve body - steam valve ........................ 22611.0000
16................ Cam mounting screw .............................. 24006.0000
17................ Actuator cam .......................................... 22682.0000
18................ Shaft - steam valve actuator .................... 22681.0000
19................ Housing - actuator shaft .......................... 22781.0000
20................ Knob mounting bushing.......................... 22621.0000
21................ Knob mounting bushing screw................ 24006.0401
22................ Knob - steam/faucet ................................ 22694.0000
23................ Knob retainer screw ................................ 24003.0500
24................ Decal - steam knob................................. 22779.0000
25................ Decal - hot water .................................... 22778.0000
26................ Nozzle - steam wand .............................. 22581.0000
27................ Left side steam wand............................... 22655.0000
27................ Right steam wand ................................... 22649.0000
28 ................ “O-ring” - rubber .................................... 22616.0000
29 ................ Nut ......................................................... 24052.0300
30 ................ Brass bushing.......................................... 22654.0000
31................ Coil spring .............................................. 22653.0000
32................ Rubber valve........................................... 22652.0000
33................ Retaining nut .......................................... 24052.0301
34................ Bulkhead mounting nut........................... 22829.0000
REPLACEMENT PARTS
ES•2A™/ES•2SA™
23
Page 26

BUNN Espress™
REPLACEMENT PARTS
Complete valve assy .– (items 1-14)
Part # 22637.0000
4
4
3
2
ES•2A™/ES•2SA™
8
7
6
5
9
15
17
18
2
1
12
13
14
16
29
28
11
30
10
19
20
21
22
23
24
25
26
27
31
30
32
Complete assy.–
Part # 22658.0000
P-239
24
Page 27

BUNN Espress™
Figure Description Part Number
1.................. Hex nut – plunger shaft........................... 22863.0000
2.................. Black thrush washer................................ 22624.0000
3.................. Faucet valve detent pins.......................... 22845.0000
4.................. Faucet valve detent ................................. 22626.0000
5.................. Copper seal washer................................. 22839.0000
6.................. Faucet spring .......................................... 22610.0000
7.................. Cotter pin................................................ 22798.0000
8.................. Rubber seat ............................................. 22604.0000
9.................. Valve body ............................................. 22852.0000
10................ Plunger shaft ........................................... 22622.0000
11................ O-ring – plunger shaft ............................. 22572.0000
12................ Panel mount fitting.................................. 22625.0000
13................ Brass bearing holder ............................... 22627.0000
14................ Bearing ................................................... 22623.0000
15................ Label – water inlet .................................. 22777.0000
15................ Label – hot water .................................... 22778.0000
16................ Knob – steam-hot water-water inlet......... 22694.0000
17................ Knob set screw........................................ 24003.0500
18................ Valve mounting nut ................................ 22865.0000
19................ Hot water tube........................................ 22697.0000
20................ Hot water nozzle .................................... 22844.0000
21................ Pressure vent cap nut .............................. 22840.0000
22................ Copper seal gasket .................................. 22839.0000
23................ Tension adjusting nut.............................. 22813.0000
24................ Pressure spring ........................................ 22830.0000
25................ Plunger ................................................... 22838.0000
26................ Rubber seat ............................................. 22604.0000
27................ Pressure vent housing ............................. 22837.0000
28................ Seal washer............................................. 22868.0000
29................ Water manifold body .............................. 22670.0000
30................ Copper seal gasket .................................. 22867.0000
31................ Inlet water check valve ........................... 22628.0000
32................ Inlet water fitting..................................... 22850.0000
REPLACEMENT PARTS
ES•2A™/ES•2SA™
25
Page 28

BUNN Espress™
REPLACEMENT PARTS
ES•2A™/ES•2SA™
11
5
4
3
12
9
8
7
6
2
1
16
17
10
15
13
14
26
P-238
Page 29

BUNN Espress™
Figure Description Part Number
1.................. Dispense nozzle - 2 cup ......................... 22802.0000
2.................. Nozzle seal washer................................. 22803.0000
3.................. Filter holder ............................................ 22801.0200
4.................. Filter support wire................................... 22819.0000
5.................. Filter - 2 cup ........................................... 22710.0000
6.................. Handle.................................................... 22704.0000
7.................. Flat washer - handle................................ 24028.0000
8.................. Lock washer - handle.............................. 24028.0100
9.................. Screw - handle........................................ 24008.0400
.................... Complete filter holder assy. - 2 cup......... 22706.0000
10................ Dispense nozzle - 1cup .......................... 22705.0000
11................ Filter - 1 cup ........................................... 22709.0000
.................... Complete filter holder assy. - 1 cup......... 22707.0000
12................ Pessure test cup (no holes) ...................... 22807.0000
13................ Drain hose .............................................. 22603.0000
14................ Water inlet hose (pump out to machine in). 22855.0000
15................ Water inlet hose (supply to pump in) .......... 22662.0000
16................ Rubber seal washer - hose ...................... 22638.0000
17................ Nut - legs ................................................ 24049.0100
REPLACEMENT PARTS
ES•2A™/ES•2SA™
27
Page 30

BUNN Espress™
REPLACEMENT PARTS
2
1
3
4
5
11
ES•2A™/ES•2SA™
30
31
24
32
33
34
12
13
14
16
15
35 36
17
9
8
7
6
18
19
20
23
10
38
21
22
29
25
26
37
39
27
28
P-237
28
Page 31

BUNN Espress™
Figure Description Part Number
1.................. Pressure switch - heater control .............. 22574.0000
2.................. Pressure gauge mounting bracket............ 22645.0000
3.................. Front hood face plate - 2 group............... 22796.0000
4.................. Pump pressure gauge .............................. 22692.0000
5.................. Pump indicator lamp .............................. 22846.0000
6.................. Switch select panel ................................. 22695.0000
7.................. Switch select panel standoff .................... 22698.0000
8.................. Indicator lamp - brew ............................. 22674.0000
9.................. Circuit board assy. .................................. 22699.0000
10................ Steam pressure gauge.............................. 22680.0000
11................ Strainer housing...................................... 22769.0000
12................ Filter screen ............................................ 22667.0000
13................ Rubber o-ring.......................................... 22822.0000
14................ Strainer housing end cap......................... 22770.0000
15................ Flow meter complete .............................. 22775.0000
16................ Flow meter fitting gasket washers............ 22868.0000
17................ Outlet fitting - flow meter........................ 22821.0000
18................ Inlet fitting - flow meter........................... 22771.0000
19................ Refill solenoid end fitting - outlet ............ 22762.0000
20................ Refill solenoid - complete ....................... 22646.0000
21................ End fitting seal washer ............................ 22872.0000
22................ Refill solenoid end fitting - inlet .............. 22805.0000
23................ Refill solenoid - complete ....................... 22763.0000
24................ Protective caps - pump fittings ................ 22665.0000
25................ Pump outlet fitting .................................. 22905.0000
26................ Pump impeller unit ................................. 22713.0000
27................ Motor assy. ............................................. 22903.0000
28................ Rubber foot - pump base......................... 22576.0000
29................ Pump assy. - complete ............................ 22904.0000
30................ Electronic module - 2 group automatic ... 22577.0000
31................ Module bracket support standoffs ........... 22773.0000
32................ Bracket support standoff nut.................... 24046.0000
33................ Module bracket support .......................... 22774.0000
34................ Programming switch - toggle................... 22816.0000
35................ Terminal block mounting bracket ........... 22784.0000
36................ Terminal block........................................ 22578.0000
37................ Pump inlet fitting .................................... 22387.0000
38................ Coil, 220V - refill valve........................... 22890.0000
39................ Capacitor - motor.................................... 22902.0000
REPLACEMENT PARTS
ES•2A™/ES•2SA™
29
Page 32

BUNN Espress™
REPLACEMENT PARTS
ES•2A™/ES•2SA™
3
4
2
1
6
7
5
8
9
10
11
12
Figure Description Part Number
1.................. Red push button on/off switch................. 22687.0000
2.................. Brew indicator light ................................ 22689.0000
3.................. Switch/lamp mounting bracket screw...... 24005.0200
4.................. Switch/lamp mounting bracket................ 22880.0000
5.................. Brew on/off switch .................................. 22688.0000
6.................. Front hood panel (2 group) ..................... 22881.0000
7.................. Bezel - group on/off/indicator ................. 22686.0000
8.................. Control module....................................... 22882.0000
9.................. Socket - control module.......................... 22883.0000
10................ Module/relay support bracket ................. 22691.0000
11................ Relay ...................................................... 22635.0000
12................ Socket - relay .......................................... 22884.0000
30
P-236
Page 33

BUNN Espress™
Figure Description Part Number
1 ..........Water strainer 3⁄8” x 3⁄8” mflrd............................................... 01245.0000
2 ..........Cordset ............................................................................... 01699.0000
3 ..........Limit thermostat .................................................................. 04680.0004
4 ..........Contactor coil ..................................................................... 06335.0002
5 ..........Indicator lamp (240 volt)..................................................... 12984.0003
6 ..........Pressure switch (water inlet) .............................................. 21397.0000
7 ..........Toggle switch (master on/off) ............................................. 22566.0000
8 ..........Base plate........................................................................... 22315.0000
9 ..........Mylar shield (switch & solenoid, semi-automatic) .............. 22316.0000
10 ..........3⁄8” flare x 3⁄8” mpt fitting (pump inlet)................................. 22387.0000
11 ..........Mylar shield (valve & switches, automatic) ........................ 22464.0000
12 ..........Limit thermostat bracket ..................................................... 22563.0000
13 ..........Tube, steam valve steam valve (right) ............................... 22648.0000
14 ..........Tube, tank to right steam valve .......................................... 22650.0000
15 ..........Tube, steam valve steam valve (left) ................................. 22651.0500
16 ..........Tube, inlet valve to refill solenoid ....................................... 22656.0000
17 ..........Tube, water inlet valve to heat exchange........................... 22660.0000
18 ..........Tube, water inlet press. relief-drain .................................... 22661.0000
19 ..........Tube, refill solenoid to tank ................................................ 22663.0000
20 ..........Tube, water inlet valve ....................................................... 22664.0000
21 ..........Tube, sight gauge to tank................................................... 22666.0000
22 ..........Tube assy, drain manifold .................................................. 22669.0000
23 ..........Tube, flow meter to group assy (auto) ............................... 22671.0000
24 ..........Tube, flow meter to flow meter (auto) ................................ 22672.0000
25 ..........Tube, left group solenoid to drain manifold ........................ 22673.0000
26 ..........Tube, screen filter to flow meter ......................................... 22678.0000
27 ..........Tube, right group solenoid to drain manifold...................... 22679.0000
28 ..........Tube, tank to steam valv (left) ............................................ 22767.0000
29 ..........Tube, copper-chrome plated .............................................. 22772.0000
30 ..........Tube, pump gage to flow meter.......................................... 22785.0000
31 ..........Tube, tank to hot water valve ............................................. 22793.0000
32 ..........Tube, tank to pressure gage .............................................. 22794.0000
33 ..........Tube, tank to manual fill ..................................................... 22853.0000
34 ..........Tube, tank to pessure switch.............................................. 22854.0000
35 ..........Tube, tank to sight gage..................................................... 22856.0000
36 ..........Ribbon cable ...................................................................... 22874.0000
REPLACEMENT PARTS
Replacement Parts Not Illustrated
ES•2A™/ES•2SA™
31
Page 34

BUNN Espress™
SCHEMATIC
ES•2SA
ES•2A™/ES•2SA™
32
P-243
Page 35

BUNN Espress™
SCHEMATIC
ES•2A
ES•2A™/ES•2SA™
33
P-244
 Loading...