


Enclave 2011
Table of contents
 Loading...
Black plate (1,1)
Acadia, Acadia Denali, Enclave, Traverse, Lucerne Navigation System - 2011
2011 Acadia, Acadia Denali, Enclave, Traverse, Lucerne
Navigation System M
Infotainment System .. . . .. 3
Introduction . . . . ... . . . ... . . . . 3
Overview . . . . . . . . . . . . . . . . . . . . . . . 4
Radio . . . . . . . . . . . . . . . . . . . . . . . 14
AM-FM Radio . . . . . . . . . . . . . . . . . 14
Satellite Radio . . . . . . . . . . . . . . . . 20
Audio Players . . . . . . . . . . . . . 20
CD/DVD Player . . . . . . . . . . . . . . . 20
Auxiliary Devices . . . . . . . . . . . . . . 34
Navigation . . . . . . . . . . . . . . . . . 35
Using the Navigation
System . . . . . . . . . . . . . . . . . . . . . . 35
Maps . . . . . . . . . . . . . . . . . . . . . . . . . . 37
Navigation Symbols . . . . . . . . . . . 39
Destination . . . . . . . . . . . . . . . . . . . . 44
Configure Menu . . . . . . . . . . . . . . . 57
Global Positioning
System (GPS) . . . . . . . . . . . . . . . 68
Vehicle Positioning . . . . . . . . . . . . 69
Problems with Route
Guidance . . . . . . . . . . . . . . . . . . . . 70
If the System Needs
Service . . . . . . . . . . . . . . . . . . . . . . 70
Ordering Map DVDs . . . . . . . . . . 70
Database Coverage
Explanations . . . . . . . . . . . . . . . . . 71
Voice Recognition . . . . . . . . 71
Index . . . . . . . . . . . . . . . . . . . . . i-1

Black plate (2,1)
Acadia, Acadia Denali, Enclave, Traverse, Lucerne Navigation System - 2011
Black plate (3,1)
Acadia, Acadia Denali, Enclave, Traverse, Lucerne Navigation System - 2011
Infotainment System 3
Introduction
GENERAL MOTORS, GM, the
GM Emblem, CHEVROLET, the
CHEVROLET Emblem, BUICK,
the BUICK Emblem, GMC and
the GMC Truck Emblem, and the
name LUCERNE are registered
trademarks. The names ACADIA,
ACADIA DENALI, ENCLAVE, and
TRAVERSE are trademarks of
General Motors LLC.
Manufactured under license under
U.S. Patent #'s: 5,451,942;
5,956,674; 5,974,380; 5,978,762;
6,487,535 & other U.S. and
worldwide patents issued &
pending. DTS and DTS Digital
Surround are registered trademarks
and the DTS logos and Symbol
are trademarks of DTS, Inc.
© 1996-2010 DTS, Inc. All Rights
Reserved.
Manufactured under license from
Dolby Laboratories. Dolby and the
double-D symbol are trademarks
of Dolby Laboratories. Copyright
1992-2010 Dolby Laboratories. All
rights reserved.
The information in this manual
supplements the owner manual.
Litho in U.S.A.
Part No. 25986869 B Second Printing
©
2010 General Motors LLC. All Rights Reserved.

Black plate (4,1)
Acadia, Acadia Denali, Enclave, Traverse, Lucerne Navigation System - 2011
4 Infotainment System
This manual describes features that
may or may not be on your specific
vehicle either because they are
options that you did not purchase
or due to changes subsequent to
the printing of this owner manual.
Please refer to the purchase
documentation relating to your
specific vehicle to confirm each of
the features found on your vehicle.
For vehicles first sold in Canada,
substitute the name “General
Motors of Canada Limited” for Buick
Motor Division, Chevrolet Motor
Division, or GMC wherever it
appears in this manual.
Keep this manual with the owner
manual in the vehicle, so it will be
there if it is needed. If the vehicle is
sold, leave this manual in the
vehicle.
Canadian Vehicle Owners
(Propriétaires des Véhicules
Canadiens)
A French language copy of this
manual can be obtained from
your dealer or from:
On peut obtenir un exemplaire de
ce guide en français auprès du
concessionnaire ou à l'adresse
suivante:
Helm, Incorporated
P.O. Box 07130
Detroit, MI 48207
1-800-551-4123
Numéro de poste 6438 de langue
française
www.helminc.com
Overview
Read this manual thoroughly to
become familiar with how the
navigation system operates.
The navigation system includes
navigation and audio functions.
While entering the vehicle or when
turning the vehicle off, some DVD
Map Disc noise is normal.
Keeping your eyes on the road and
your mind on the drive is important
for safe driving. The navigation
system has built-in features
intended to help keep your eyes on
the road and mind on the drive.
Some features may be disabled
while driving. Note that these
functions will be grayed-out.
A grayed-out function indicates it is
not available when the vehicle is
moving.
.
Become familiar with the
navigation system operation,
buttons on the faceplate, and
touch-sensitive screen buttons of
the navigation system.
.
Set up the audio by presetting
favorite stations, setting the
tone, and adjusting the
speakers.
Black plate (5,1)
Acadia, Acadia Denali, Enclave, Traverse, Lucerne Navigation System - 2011
Infotainment System 5
.
Set up the navigation features
before beginning driving, such
as entering an address or a
preset destination.
.
Set up your phone numbers
in advance so they can be
called easily with the press of a
single button or a single voice
command (for navigation
systems equipped with phone
capability).
{
WARNING
Taking your eyes off the road too
long or too often while using the
navigation system could cause a
crash resulting in injury or death
to you or others. Focus your
attention on driving.
{
WARNING
Avoid looking too long or too
often at the moving map on the
navigation screen. This could
cause a crash and you or others
can be injured or killed. Use the
turn-by-turn voice guidance
directions whenever possible.
Use the navigation system to:
.
Plan a route.
.
Select a destination using
various methods and choices.
.
Follow turn-by-turn route and
map guidance with voice
prompts, only if permitted by
traffic laws, controls, and
conditions.
You should always be alert and
obey traffic and roadway laws and
instructions, regardless of the
guidance from the navigation
system. Because the navigation
system uses street map information
that does not include all traffic
restrictions or the latest road
changes, it may suggest using a
road that is now closed for
construction or a turn that is
prohibited by signs at the
intersection. Because the system
uses limited information, you must
always evaluate whether following
the system's directions is safe and
legal for the current conditions.
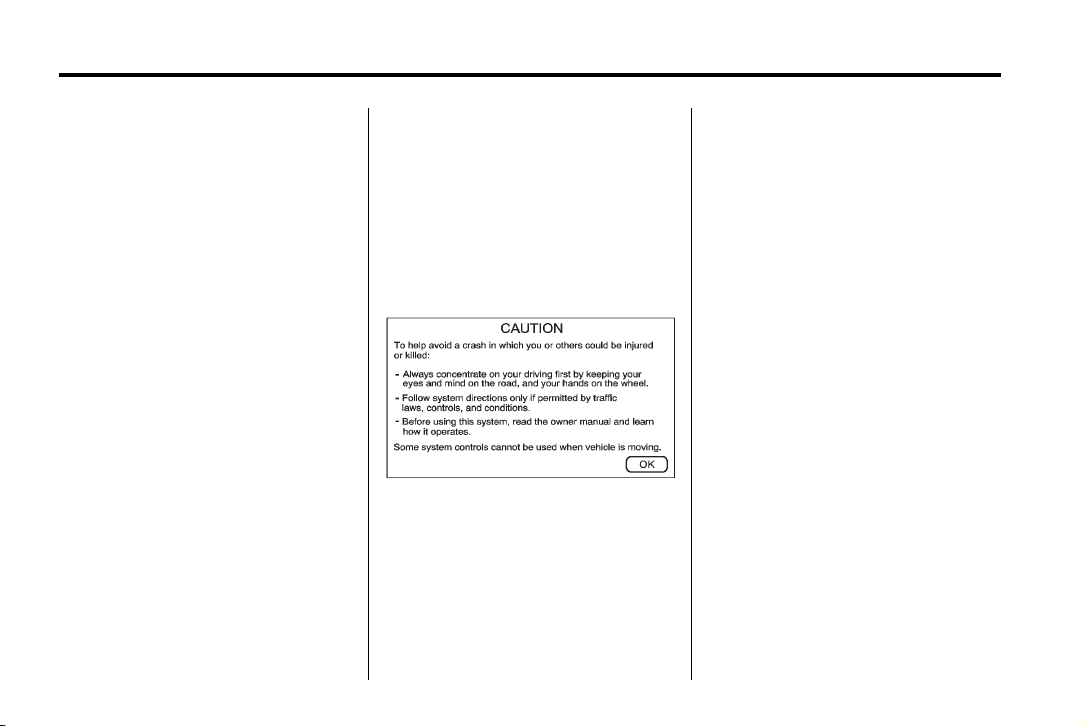
When the navigation system is
turned on, a screen may appear
with the information below, and you
must read and acknowledge the
information it contains.
{
WARNING
Taking your eyes off the road for
extended periods could cause a
crash resulting in injury or death
to you or others.
Black plate (6,1)
Acadia, Acadia Denali, Enclave, Traverse, Lucerne Navigation System - 2011
6 Infotainment System
To help avoid a crash in which you
or others could be killed:
.
Always concentrate on your
driving first by keeping your eyes
and mind on the road, and your
hands on the wheel.
.
Follow system directions only if
permitted by traffic laws,
controls, and conditions.
.
Before using this system, read
the owner's manual and learn
how it operates.
.
Some system controls cannot
be used the when vehicle is
moving.
After you acknowledge the start
up information you will be able
to access the NAV and DEST
functions. Once accessed, you can
enter or delete information in the
navigation system or access other
functions. See instructions later in
this section.
Every fifty times the vehicle is
started and the navigation system is
turned on, the Caution screen
appears. After reading the caution,
press OK to load the map DVD
information. If OK is not pressed, all
buttons except for NAV and DEST
can be accessed. You can also
press the NAV or DEST button to
have this Caution screen appear.
When getting started, set the
navigation system to your
preference or delete information you
may have entered using various
options.
Black plate (7,1)
Acadia, Acadia Denali, Enclave, Traverse, Lucerne Navigation System - 2011
Infotainment System 7
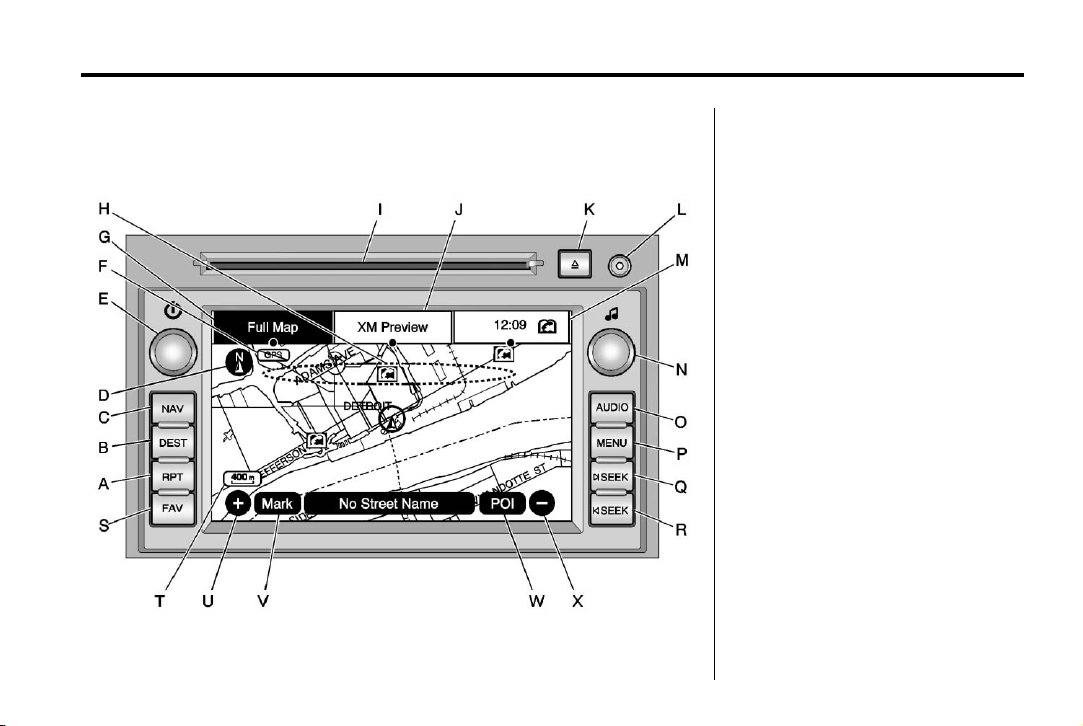
Navigation System Overview
Screen Shown with Map Disc Inserted
A. RPT (Repeat)
B. DEST (Destination)
C. NAV (Navigation)
D. North Up/Heading Up Symbol
E.
O (Power/Volume)
F. No GPS Symbol
G. FULL MAP Screen Button
H. Map DVD
I. CD/DVD Slot
J. Source (AM, FM, XM
(if equipped), CD, etc.)
Screen Button
K.
Z (CD/DVD Eject)
L. Auxiliary Jack
M. Clock Screen Button
N.
f (Tune/Sound)
O. AUDIO
P. MENU
Q.
¨ SEEK
R.
© SEEK

Black plate (8,1)
Acadia, Acadia Denali, Enclave, Traverse, Lucerne Navigation System - 2011
8 Infotainment System
S. FAV (Favorite)
T. Map Scale
U.
0 (Zoom In) Screen Button
V. Mark Screen Button
W. POI (Point of Interest) Screen
Button
X.
1 (Zoom Out) Screen Button
Language
For vehicles with a Driver
Information Center (DIC), see
“Vehicle Personalization” in the
Index of the vehicle's owner manual
to change the language of the
navigation screens.
For vehicles without a Driver
Information Center (DIC), the
radio can be used to change the
language of the navigation screens:
1. Press
O to turn the system on.
2. Press MENU and select the
Display screen button.
3. Select the language; English,
Francais, Espanol.
English/Metric Units
To change the navigation screens
from English or metric, see “Driver
Information Center (DIC)” in the
Index of the vehicle's owner manual.
Limit Features While Driving
The navigation system may have
this feature.
Press the Limit Features While
Driving screen button to turn on
and off the ability to limit functions
while driving. When this button is
highlighted, the following functions
are limited while driving:
.
Music Navigator Scrolling
.
Radio Category Scrolling
.
Navigation Menu Scrolling and
some functions
See “Category” under AM-FM Radio
on page 14 for more information.
See “From Map” under Destination
on page 44 for more information.
Some functions remain limited
regardless of the setting.
Deleting Personal Information
This navigation system can record
and store personal information such
as names and addresses. It is
recommended that stored personal
information is deleted when
disposing the vehicle. See
Configure Menu on page 57 for
deleting information from the
address book.
Storing Radio Station Presets
To set preset radio stations:
1. Press
O to turn the system on.
2. Press AUDIO and select the
desired band (AM, FM1, FM2,
XM1, or XM2 (if equipped)).
3. Use
f or ¨ © SEEK to the
desired station.
4. Press and hold one of the
five preset screen buttons, at
the bottom of the screen, until a
beep is heard or see the station
displayed on the selected preset
button.

Black plate (9,1)
Acadia, Acadia Denali, Enclave, Traverse, Lucerne Navigation System - 2011
Infotainment System 9
5. Repeat the steps for each
preset.
See “Storing Radio Station Presets”
under AM-FM Radio on page 14 for
more information.
Setting the Clock
1. Press O to turn the system on.
2. Press MENU to enter the
Configure Menu options, then
press MENU repeatedly until the
time is selected or press the
time screen button.
3. Press the Set screen button.
4. Press the Hours and Minutes −
and + to decrease or to increase
the time.
See “Setting the Clock” under
Configure Menu on page 57 for
more information.
Entering a Destination by
Using Address, Point of
Interest, Previous Destination,
or the Map Method and Storing
Preset Destinations
Entering an Address
To enter a destination by entering
the city name first:
1. If the radio is on with a map disc
inserted, skip to Step 5.
2. Press
O to turn the system on.
3. Insert the DVD map disc. See
“Installing the Map DVD” under
Maps on page 37 for more
information.
4. A caution may appear. Press OK
to proceed.
5. Press DEST. If guidance is
already active, or if an entry is in
place, you will have to press
either “Add Stopover” or “ADD”
above or below the entry,
depending on where you would
like to place the next waypoint.
6. Press the
2 Address
Entry icon.
7. Press the state/province screen
button, if needed, to change the
current state or province.
.
Enter the name or enter the
two-letter abbreviation.
A list displays.
.
Press the List screen button
and select the state or
province.
8. Press the City name screen
button and start entering the
city name.
.
If five or less names are
available, a list displays.
.
If more than five are
available, the List screen
button has a number in it
that represents the number
of available cities. Press
this button to view the list
and select a city.

Black plate (10,1)
Acadia, Acadia Denali, Enclave, Traverse, Lucerne Navigation System - 2011
10 Infotainment System
9. Once a city has been selected,
the Street name category is
automatically selected for entry.
Do not enter directional
information or street type. Use
the space symbol screen button
U between street or city
names. Use the backspace
V
screen button if an incorrect
character has been entered.
.
If five or less streets are
available for the selected
city, the system displays
the list of streets.
.
If more than five streets
are available the system
displays the alpha
keyboard. Start entering the
street name. If five or less
names are available, a list
displays. If more than five
are available, the List
screen button has a
number in it that represents
the number of available
streets. Press this button to
view the list and select a
street.
10. Once a street has been
selected, select the House #
screen button to enter the
house number. The system
displays the house number
range that is available for the
street.
11. Press Go. A map screen, with
the destination marked
appears.
12. Select the route preference
for Fastest, Shortest, or Other.
The system calculates and
highlights the route.
13. Press the Start Guidance
screen button. The fastest
route automatically begins if
the car starts moving forward.
See “Address Entry ” under
Destination on page 44 and “Voice
Tag Commands” under Voice
Recognition on page 71 for more
information.
Entering a Point of Interest (POI)
To set a destination by entering a
Point of Interest (POI):
1. If the radio is on with a map disc
inserted, skip to Step 5.
2. Press
O to turn the system on.
3. Insert the DVD map disc. See
“Installing the Map DVD” under
Maps on page 37 for more
information.
4. A caution may appear. Press OK
to proceed.
5. Press DEST. If guidance is
already active, or if an entry is
in place, you will have to select
either the “Add Stopover” or the
“ADD” screen buttons above or
below the entry, depending on
where you would like to place
the next waypoint.
6. Press POI (Point of Interest)
screen button.

Black plate (11,1)
Acadia, Acadia Denali, Enclave, Traverse, Lucerne Navigation System - 2011
Infotainment System 11
7. Press the state/province screen
button, if needed, to change the
current state or province.
.
Enter the name or enter the
two-letter abbreviation.
A list displays.
.
Press the List screen button
and select the state or
province.
8. Enter the specific title of the POI
in the POI name space.
.
If five or less names are
available, a list displays.
.
If more than five are
available, the List screen
button has a number in it, it
represents the number of
available POIs. Press this
button to view the list.
9. Press Go, located next to the
POI. A map screen, with the
destination marked appears.
10. Select the route preference for
Fastest, Shortest, or Other. The
system calculates and
highlights the route.
11. Press the Start Guidance
screen button. The fastest
route automatically begins if
the car starts moving forward.
See “Point of Interest (POI)” under
Destination on page 44 for more
information.
Entering Previous Destination
Choose from a list of recent
destinations with this method:
1. Press DEST. Press Previous
Destination to show a list of
previous destinations. This list is
empty at first when the radio is
new or is erased when the
battery is disconnected.
2. Press your selection. You may
not be able to scroll down the list
while the vehicle is in motion,
depending on the settings. See
“Limit Features While Driving” in
this section.
3. Select the route preference for
Fastest, Shortest, or Other. The
system calculates and highlights
the route.
4. Press the Start Guidance screen
button. The fastest route
automatically begins if the
car starts moving forward.
Map Method
1. Press the screen where you
want to go. The system shows
the location, and possibly an
address as well. You can scroll
out to a larger view by first using
the + or − screen buttons at the
lower left and right of the map to
select an appropriate viewing
range.
2. Press Go, that appears when
you are ready to begin routing.
3. Select the route preference for
Fastest, Shortest, or Other. The
system calculates and highlights
the route.
4. Press the Start Guidance screen
button. The fastest route
automatically begins if the car
starts moving forward.

Black plate (12,1)
Acadia, Acadia Denali, Enclave, Traverse, Lucerne Navigation System - 2011
12 Infotainment System
Storing Preset Destinations
1. If the radio is on with a map disc
inserted, skip to Step 5.
2. Press
O to turn the system on.
3. Insert the DVD map disc. See
“Installing the Map DVD” under
Maps on page 37 for more
information.
4. A caution may appear. Press OK
to proceed.
5. Press DEST.
Enter a destination. See
Destination on page 44 for more
information on how to enter a
destination.
6. Press the Map screen button
after entering the destination.
7. Press the Mark screen button
from the map display. The
address book screen appears.
Five preset destinations can be
stored, but you must set them
from the Address Book screen.
There are other ways to get to
the Address Book as well.
8. Press the Name screen button.
An alpha-keyboard displays.
Enter the name. If you have
stored the location with a name
automatically assigned by the
system, use the “BACKSPACE”
screen button (not “BACK”) to
erase the letters and begin
typing your preferred title for
this destination. For example,
choosing a destination by
address and storing it to the
Address Book, stores the actual
address, which may not be easy
to display in a short Preset
button that has 8 digits, so name
it something shorter.
9. Press and hold one of the
screen buttons at the bottom
of the screen until the name
appears in the screen button
on the display. A beep may be
heard.
The name appears in that preset
destination screen button and is
now available to select from the
Destination Entry screen.
See “Using the Stored Preset
Destinations” in this section to
select it as a destination.
A voice recognition tag can also
be assigned to the preset
destinations.
See Destination on page 44 for
more information on how to add
preset destinations.
Using the Stored Preset
Destinations
These destinations are available for
selection while driving.
1. If the radio is on with a map disc
inserted, skip to Step 5.
2. Press
O to turn the system on.
3. Insert the DVD map disc. See
“Installing the Map DVD” under
Maps on page 37 for more
information.
4. A caution may appear. Press OK
to proceed.
5. Press DEST.

Black plate (13,1)
Acadia, Acadia Denali, Enclave, Traverse, Lucerne Navigation System - 2011
Infotainment System 13
6. Select one of the available
preset destination screen
buttons. A map screen, with the
destination marked, appears and
the system immediately begins
to route to that destination.
The preset destination buttons
overwrite and provides guidance
to the selected destination even
if the guidance is in place.
Pressing a preset destination
cancels the current route and
then, routes to the single preset
destination.
If more waypoints or stops are
desired after the preset is used,
follow the adding stopover
method to load a total of four
waypoints.
7. Select the route preference for
Fastest, Shortest, or Other. The
system calculates and highlights
the route.
8. Press the Start Guidance screen
button. The fastest route
automatically begins if the car
starts moving forward.
See “Preset Destination” under
Destination on page 44 for more
information.
Canceling Guidance
Guidance is canceled once you
arrive at your final destination. To
cancel guidance prior to arrival at
the final destination:
1. Press DEST.
2. Press the Cancel Guidance
screen button.
3. A pop-up confirmation appears.
Press OK to cancel guidance or
press Cancel to cancel the
request.
Guidance Volume
To adjust the volume of voice
guidance prompts:
1. Press MENU to enter the menu
options, then press MENU
repeatedly until Nav is selected
or press the Nav screen button.
2. Press the Voice Prompt screen
button.
3. Press On if voice guidance is
not on.
4. Press the + or – screen buttons
to increase or to decrease the
volume of the voice prompts.
The system responds with the
adjusted voice level.
See “Voice Prompt ” under
Configure Menu on page 57 for
more information.
Turning the
O (Power/Volume) knob
during a voice or navigation prompt
also changes the volume.
Cleaning the Display
Use a soft clean cotton cloth
dampened with clean water.

Black plate (14,1)
Acadia, Acadia Denali, Enclave, Traverse, Lucerne Navigation System - 2011
14 Infotainment System
Radio
AM-FM Radio
Notice: Before adding any sound
equipment to the vehicle, such
as an audio system, CD player,
CB radio, mobile telephone,
or two-way radio, make sure that
it can be added by checking with
your dealer. Also, check federal
rules covering mobile radio and
telephone units. If sound
equipment can be added, it is
very important to do it properly.
Added sound equipment can
interfere with the operation of the
vehicle's engine, radio, or other
systems, and even damage them.
The vehicle's systems can
interfere with the operation of
sound equipment that has been
added.
Notice: The chime signals related
to safety belts, parking brake, and
other functions of the vehicle
operate through the navigation
system. If that equipment is
replaced or additional equipment
is added to the vehicle, the
chimes may not work. Make sure
that replacement or additional
equipment is compatible with the
vehicle before installing it. See
“Accessories and Modifications”
in the vehicle's owner manual.
Playing the Radio
O (Power/Volume):
.
Press to turn the audio system
on and off.
.
Turn to increase or to decrease
the volume.
.
Press and hold for more than
two seconds to turn off the
navigation system, the Rear
Seat Entertainment (RSE) video
screen, and Rear Seat Audio
(RSA). If the vehicle has not
been turned off, the RSE and
the RSA can be turned back on
by pressing this knob. The last
active source resumes playing.
f (Tuning/Tone):
.
Turn to go to the next or
previous frequency.
.
Press to go to the Sound menu.
AUDIO:
.
Press to display the audio
screen.
.
Press to switch between AM,
FM, or XM (if equipped), DISC,
AUX (Auxiliary), or press the
screen button. Read through
this section, Satellite Radio on
page 20 (if equipped), CD/DVD
Player on page 20, or Auxiliary
Devices on page 34 for more
information.
Finding a Station
There are three ways to find/change
stations:
.
If viewing a full map screen, use
¨ © SEEK or f. Preset stations
cannot be directly changed from
the full map screen, but can be
selected by using the steering
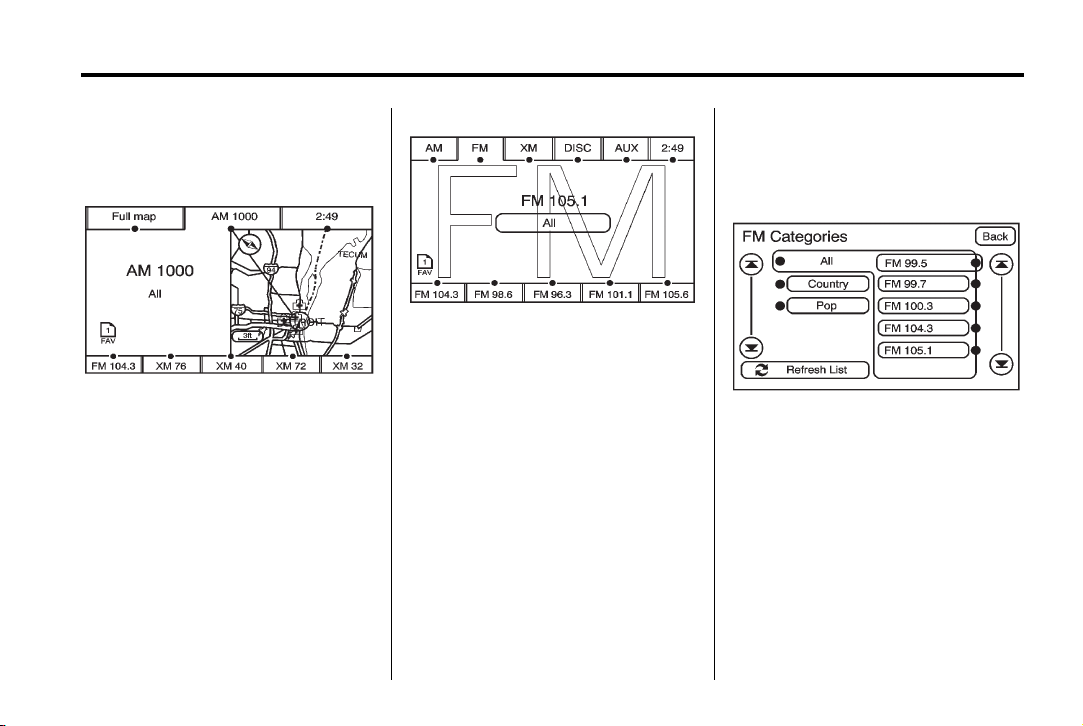
Black plate (15,1)
Acadia, Acadia Denali, Enclave, Traverse, Lucerne Navigation System - 2011
Infotainment System 15
wheel control w or x buttons.
The station will display at the top
for the screen.
AM Source Shown, Other Sources
Similar
.
If viewing a full map screen,
select the source screen (AM,
FM, XM (if equipped), CD, etc.)
button. The display splits
between the audio screen
and the map screen. All
station-changing functions can
be performed from this screen.
FM Source Shown, Other Sources
Similar
.
If you do not want to view a split
screen or you are not on a map
screen, press the AUDIO button
to enter the audio menu screen.
AM/FM/XM: Press the source (AM,
FM, or XM, if equipped) screen
button or press AUDIO repeatedly
until the desired source is selected.
FM Source Shown, Other Sources
Similar

Black plate (16,1)
Acadia, Acadia Denali, Enclave, Traverse, Lucerne Navigation System - 2011
16 Infotainment System
Category:
1. Press the screen button, located
in the middle of the screen, to
receive a list of all of the
selected band stations in
the area.
2. Use the up and down arrow
screen buttons to scroll the
frequencies.
3. Select the desired frequency.
XM (if equipped) lists also contain a
category to select and the stations
or channels that pertain to the
category. For XM, select the left
and right arrow screen buttons to
change categories. The station
information displays. See “Radio
Menu” in this section to add and
remove XM categories from the
category list. When listening to XM
stations, all of the categories can be
selected when using the right and
left arrow screen buttons on the
main audio screen. Categories
cannot be selected from the
category list screen when they
have been removed.
FM lists may contain a category to
select if stations in the area support
Radio Data Systems (RDS).
2 Refresh List: Select this screen
button to refresh the list of stations.
When viewing a map screen the
name of the station or channel
displays in the top center tab.
¨ SEEK / © SEEK: To seek
stations, press the right or left
arrows to go to the next or previous
station.
This function is also available on
the steering wheel controls. See
“Steering Wheel Controls” in the
index of the vehicle's owner manual
for more information.
To scan stations, press and hold
either arrow for more than
two seconds. The radio goes to a
station, plays for a few seconds,
then goes on to the next station. To
stop scanning, press either arrow
again.
Storing Radio Station Presets
This feature allows up to 30 preset
stations (six FAV pages) to be
stored. You can mix AM, FM, and
XM (if equipped). To store presets:
1. Press
O to turn the system on.
2. If viewing a map screen, press
the source screen button, press
the AUDIO or FAV (favorite)
button. The number of presets is
determined by your selection of
how many FAV pages you have
selected. See more information
on “Number of Preset Pages” in
this section.
3. Select the band.
4. Seek, scan, or tune to the
desired station.
5. Press and hold one of the preset
screen buttons for more than
two seconds or until a beep is
heard.
6. Repeat the steps for each
preset.
Black plate (17,1)
Acadia, Acadia Denali, Enclave, Traverse, Lucerne Navigation System - 2011
Infotainment System 17
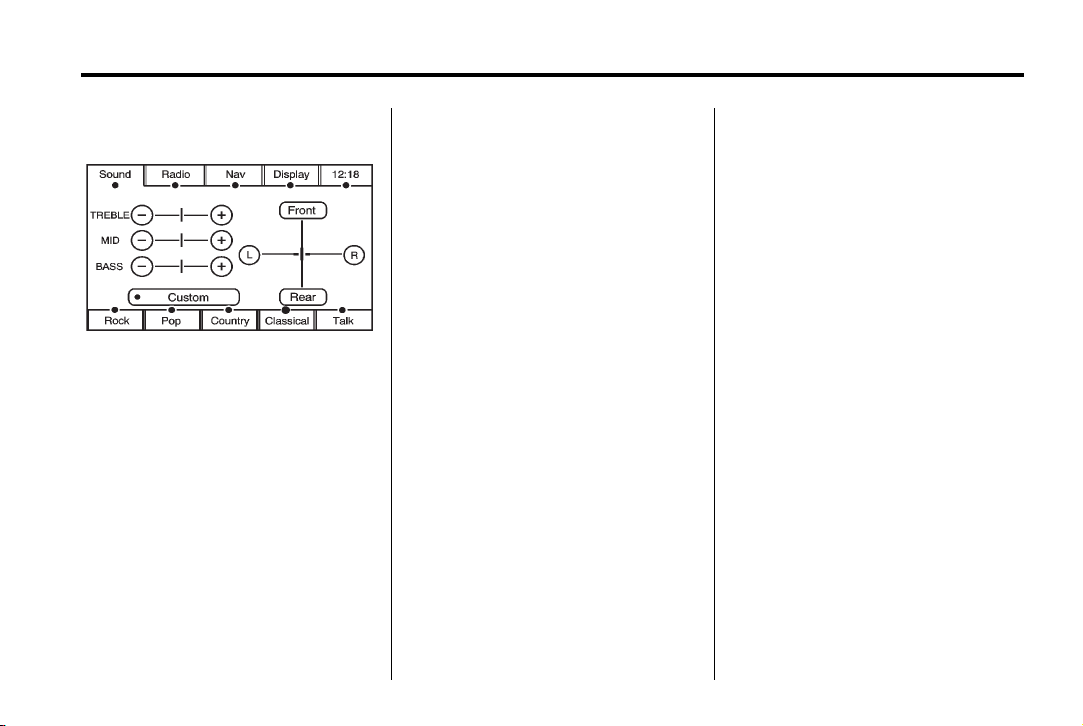
Sound Menu
Base Shown; Uplevel Similar
Sound: Press this button or press
MENU to access the Sound menu
to adjust the treble, midrange, bass,
fade, balance, and equalization.
Settings for treble, midrange, and
bass are remembered for each
source, such as AM/FM, XM (if
equipped), CD/DVD, and AUX.
Setting the Tone
TREBLE: Press and hold the + or
− to increase or decrease. If a
station is weak or noisy, decrease
the treble.
MID (Midrange): Press and hold
the + or − to increase or decrease.
BASS: Press and hold the + or − to
increase or decrease.
Adjusting the Speakers
L/R (Left/Right) (Balance): To
adjust the balance between the left
and the right speakers, press and
hold the L or R screen buttons.
Front/Rear (Fade): To adjust the
fade between the front and the rear
speakers, press and hold the Front
or Rear screen buttons.
If a DVD movie with surround sound
is playing, fading to the rear
speakers will automatically cause
the radio to play stereo sound.
Fading back to the center speakers
will re-engage the surround sound
if it was on before fading was
adjusted. See CD/DVD Player on
page 20 for more information.
Automatic Equalization
With automatic equalization
customized equalization settings
designed for Rock, Pop, Country,
Classical, and Talk can be selected.
Press one of the equalization
screen buttons to hear the change
in sound.
Custom: Press to adjust the bass,
treble, and midrange settings as
desired.
The system saves separate settings
for each source.
Talk: Press to adjust the tone
settings to an automatic preset
for talk radio.
Black plate (18,1)
Acadia, Acadia Denali, Enclave, Traverse, Lucerne Navigation System - 2011
18 Infotainment System
Rear Seat Audio (RSA)
With this feature, if the Rear Seat
Audio (RSA) system has been
turned on, it can be turned off by
selecting the Rear Seat Audio Off
screen button. See “Rear Seat
Audio (RSA)” in the Index of your
vehicles owner manual.
If a DVD movie with surround sound
is active, turning RSA on will force a
stereo downmix of the audio. Some
DVDs do not contain downmix
information. In this case, no sound
through RSA headphones may
occur.
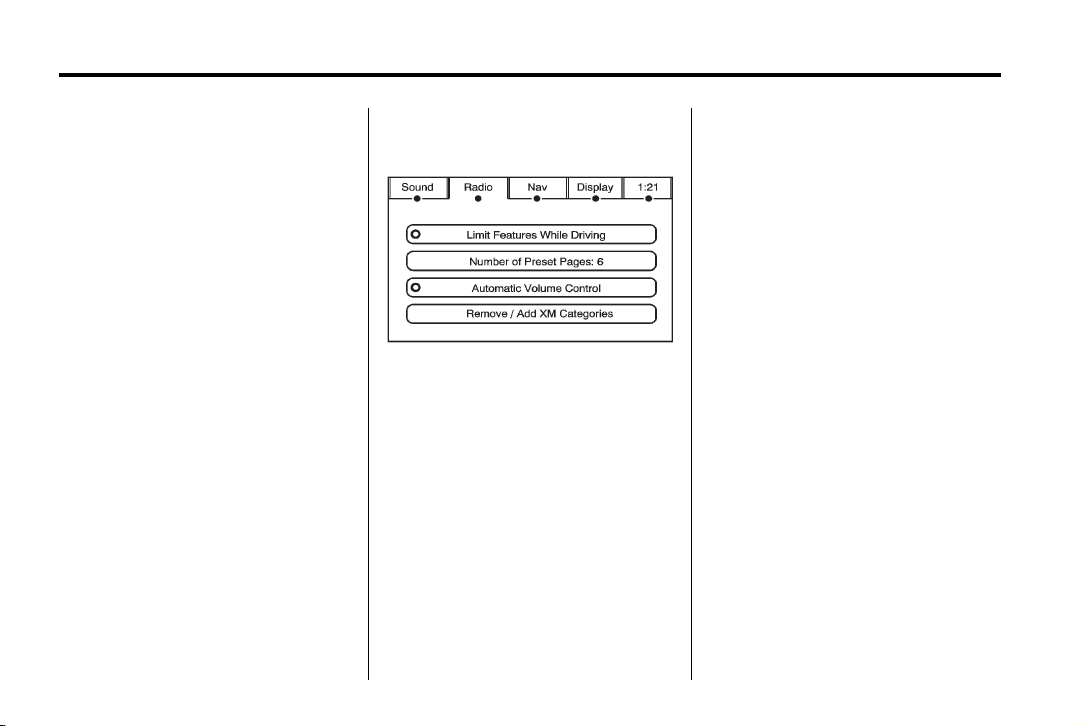
Radio Menu
Press MENU to enter the configure
menu screen, then press it
repeatedly until Radio is selected,
or press the Radio screen button to
make changes for radio information
displayed, number of preset pages,
XM categories (if equipped), and
automatic volume control.
Limit Features While Driving
Press the Limit Features While
Driving screen button to turn on and
off the ability to limit functions while
driving. When this screen button is
highlighted, the following functions
will be limited while driving:
.
Music Navigator Scrolling
.
Radio Category Scrolling
.
Navigation Menu Scrolling and
some functions
See “Category” earlier in this
section for more information. See
“From Map” under Maps on page 37
for more information.
Number of Preset Pages
Press the Number of Preset Pages
screen button to change the number
of preset pages, 1 through 6. Each
preset page can contain five preset
stations. Press on the desired
numbered screen button.

Black plate (19,1)
Acadia, Acadia Denali, Enclave, Traverse, Lucerne Navigation System - 2011
Infotainment System 19
Automatic Volume Control
With automatic volume control, the
audio system adjusts automatically
to make up for road and wind noise
while driving.
To use Automatic Volume Control:
1. Set the volume at the desired
level.
2. Press MENU to enter the menu
screen, then press it repeatedly
until Radio is selected, or press
the Radio screen button.
3. Press the Automatic Volume
Control screen button.
4. Press the LOW, MEDIUM,
or HIGH screen buttons. Each
higher setting allows for more
compensation at faster vehicle
speeds.
Then, as the vehicle is being
driven, automatic volume control
automatically increases the volume,
as necessary, to overcome noise at
any speed. The volume level should
always sound consistent while
driving. To turn automatic volume
control off, press the OFF screen
button.
Remove/Add XM Categories
(If Equipped)
1. Press the Remove/Add XM
Categories screen button to
remove or add XM categories
when selecting from the
category list screen. The list of
XM categories appear on the
screen.
2. Use the up and down arrow
screen buttons to scroll through
the list. The categories to
remove highlights and the
categories to add are dark in
color.
3. Select the category that you
would like to add or remove.
4. Press the Restore All Categories
screen button to add all
categories that have been
removed.
Radio Data System (RDS)
The audio system has a Radio Data
System (RDS). RDS features are
available for use only on FM
stations that broadcast RDS
information. With RDS, the
radio can:
.
Receive announcements
concerning local and national
emergencies
.
Display messages from radio
stations
This system relies on receiving
specific information from these
stations and only work when the
information is available. In rare
cases, a radio station may
broadcast incorrect information that
can cause the radio features to work
improperly. If this happens, contact
the radio station.

Black plate (20,1)
Acadia, Acadia Denali, Enclave, Traverse, Lucerne Navigation System - 2011
20 Infotainment System
The RDS system is always on.
When information is broadcast from
the FM station you are listening to,
the station name or call letters
display on the audio screen. RDS
may provide a program type (PTY)
for current programming and the
name of the program being
broadcast.
Satellite Radio
XM™ Satellite Radio Service
XM is a satellite radio service that is
based in the 48 contiguous United
States and 10 Canadian provinces.
XM Satellite Radio has a wide
variety of programming and
commercial-free music,
coast-to-coast, and in digital-quality
sound. During the trial or when you
subscribe, you will get unlimited
access to XM Radio Online for
when you are not in the vehicle.
A service fee is required to receive
the XM service. For more
information, contact XM at
www.xmradio.com or call
1-800-929-2100 in the U.S. and
www.xmradio.ca or call
1-877-438-9677 in Canada.
When XM is active, the channel
name and number, song title, and
artist displays on the screen.
XM Radio Messages
See “XM Radio Messages” in the
vehicle's owner manual for a list of
possible XM messages.
Audio Players
CD/DVD Player
Playing a CD
The player can be used for CDs
with conventional CD audio, MP3,
or WMA compressed files and may
have the capability to play DVD
audio and DVD video. See “Playing
a Audio DVD and/or DVD Video”
later in this section for more
information about DVD audio
and video.
With the ignition on, insert a CD
partway into the slot, label side
up. The player pulls it in and
the CD should begin playing. The
navigation system can be used
while playing a CD.
When a CD is inserted, the CD tab
displays. If an equalization setting is
selected for the CD, it is activated
each time a CD is played.
Black plate (21,1)
Acadia, Acadia Denali, Enclave, Traverse, Lucerne Navigation System - 2011
Infotainment System 21
If the ignition or radio is turned off
with a CD in the player, it stays in
the player. When the ignition or
radio is turned on, the CD starts
playing where it stopped, if it was
the last selected audio source.
As each new track starts to play, the
track number displays.
If an error displays, see “CD/DVD
Messages” in this section.
If viewing a map screen, press the
CD screen button or the NAV
button. The display splits between
the audio screen and the map
screen. If you do not want to view a
split screen or you are not on a map
screen, press AUDIO, then press
AUDIO again, repeatedly until CD is
selected or press the CD screen
button.
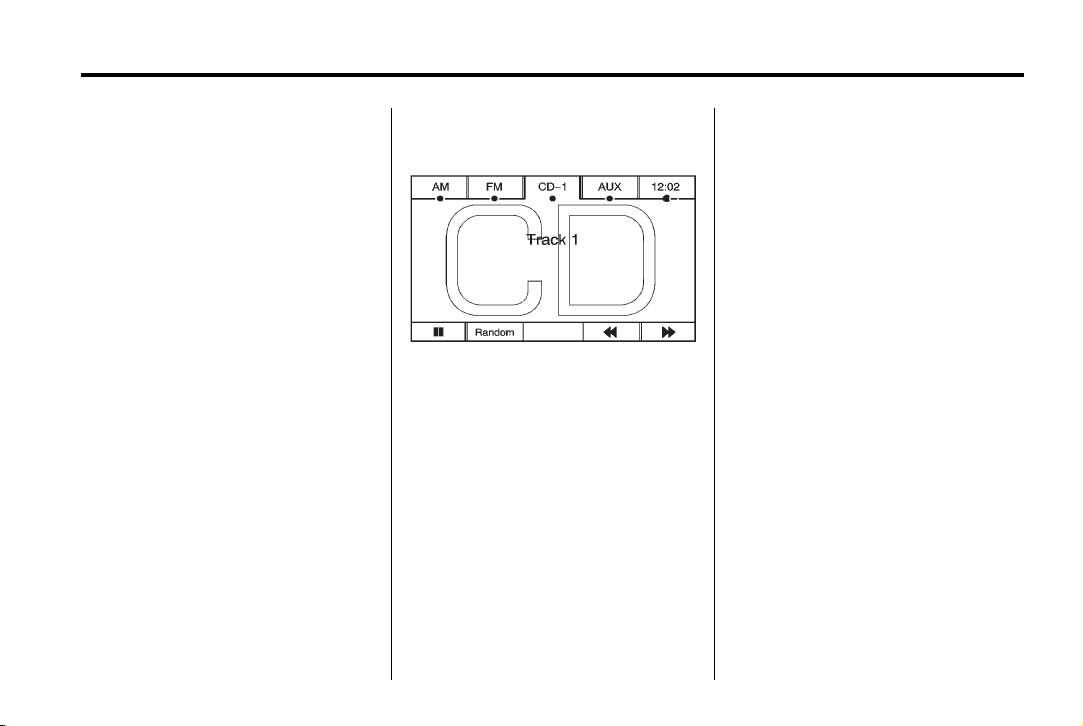
Playing an Audio CD
j / r (Pause/Play):
1. Press to pause the CD. This
button then changes to the play
button.
2. Press the play button to play
the CD.
Random:
1. Press to hear the tracks in
random, rather than sequential
order.
2. Press Random again to turn off
random play.
r (Rewind):
1. Press and hold to rewind quickly
through a track selection. Sound
is heard at a muted or a reduced
volume.
2. Release this button to stop
rewinding. The display shows
the elapsed time of the track.
[ (Forward):
1. Press and hold to fast forward
quickly through a track selection.
Sound is heard at a muted or a
reduced volume.
2. Release this button to stop fast
forwarding. The display shows
the elapsed time of the track.
¨ SEEK / © SEEK:
1. To seek tracks, press the up
arrow to go to the next track.
2. Press the down arrow to go to
the start of the current track,
if more than eight seconds have
played.

Black plate (22,1)
Acadia, Acadia Denali, Enclave, Traverse, Lucerne Navigation System - 2011
22 Infotainment System
3. If either arrow is pressed more
than once, the player continues
moving backward or forward
through the CD. The sound
mutes while seeking.
f (Tuning Knob):
1. Turn counterclockwise one notch
to go to the start of the current
track, turn it again to go to the
previous track.
2. Turn clockwise to go to the next
track.
While playing an audio CD the rear
seat operator can power on the
RSE video screen and use the
remote control to navigate through
the tracks on the CD.
Using a Compressed Audio
CD/DVD
Compressed Audio CD/DVD
Format
There are guidelines that must be
met, when creating an MP3, WMA,
or mixed disc. If the guidelines are
not met when recording a burned
disc, the disc may not play. The
guidelines are:
.
ID3 tag information is displayed
by the radio if it is available.
The radio supports ID3 tag
information v1.0, v1.1, and v2.0.
The radio displays a filename,
song name, artist name, album
name, and directory name.
.
Maximum 32 characters,
including spaces, in a file or
folder name.
.
The recommended maximum
number of folders is 100 with
a maximum hierarchy of three
folders.
.
Create a folder structure that
makes it easy to find songs
while driving. Organize songs
by albums using one folder for
each album.
.
All playlist files (.m3u or .pls)
must be removed from disc
contents. Playlists are not
supported.
.
It is recommended that there is a
maximum of 192 files on a
CD-R(W) disc.
.
It is recommended that there
is a maximum of 200 files on
a DVD+R(W) disc.
.
The files can be recorded on a
CD-R(W) or DVD+R(W).
.
Copy protected WMA files are
not supported.

Black plate (23,1)
Acadia, Acadia Denali, Enclave, Traverse, Lucerne Navigation System - 2011
Infotainment System 23
Scanning Compressed Audio Disc
Scanning a compressed audio disc
categorizes and allows sorting of
songs by folder artist or album.
.
Press center folder/artist/album
screen button to initiate
scanning mode. The radio plays
and a progress bar displays.
.
Background scanning occurs
with the radio on and the
compressed audio disc inserted
but not being played.
.
Only the first 200 songs appears
in the compressed audio music
navigator.
.
Scanning time varies depending
on the number of files and
folders on the disc.
Root Directory
The root directory is treated as a
folder. If the root directory has
compressed audio files, the
directory is displayed as ROOT.
All files contained directly under the
root directory is accessed prior to
any root directory folders.
Empty Directory or Folder
If a root directory or a folder exists
somewhere in the file structure that
contains only folders/subfolders
and no compressed files directly
beneath them, the player advances
to the next folder in the file structure
that contains compressed audio
files and the empty folder is
displayed or numbered.
No Folder
When the disc contains only
compressed files, the files are
located under the root folder. The
next and previous folder functions
have no function on a disc that was
recorded without folders. When
displaying the name of the folder
the radio displays ROOT.
Order of Play
Tracks are played in the following
order:
.
The radio does not support
playlist files.
.
Order of play differs depending if
the compressed audio disc is
fully scanned or unscanned. See
“Scanning Compressed Audio
Disc” previously in this section.
.
When playing an unscanned
disc, the next and previous
screen buttons may be required
to switch away from the current
folder when quickly seeking
rather than allowing the last
song of a folder to play to
completion.
.
Play begins from the first track
under the root directory. When
all tracks from the root directory
have been played, play
continues from files according to
their numerical listing. After
playing the last track from the

Black plate (24,1)
Acadia, Acadia Denali, Enclave, Traverse, Lucerne Navigation System - 2011
24 Infotainment System
last folder, play begins again at
the first track of the first folder or
root directory.
.
A scanned compressed audio
disc in artist/album modes only
play songs within the current
category. The next and previous
screen buttons change to
different artists or albums.
When play enters a new folder, the
display does not automatically show
the new folder name. The new track
name displays.
File System and Naming
The song name that displays is the
name that is contained in the ID3
tag. If the song name is not present
in the ID3 tag, then the radio
displays the file name without the
extension (such as .mp3) as the
track name.
Track names longer than
32 characters or four pages are
shortened. The display does not
show parts of words on the last
page of text and the extension of
the filename does not display.
Playing a Compressed Audio Disc
As stated earlier in this section, the
player can be used for CDs with
conventional CD audio, MP3,
or WMA compressed files. Read the
information under “CD Player” for
more information on playing an
audio disc.
j / r (Pause/Play):
1. Press to pause the CD. This
button then changes to the play
button.
2. Press the play button to play
the CD.
Random:
1. Press to hear the tracks in
random, rather than sequential,
order.
2. Press Random again to turn off
random play.
r (Rewind):
1. Press and hold to rewind quickly
through a track selection. Sound
is heard at a muted or reduced
volume.
2. Release to stop rewinding. The
display shows the elapsed time
of the track.
Loading...