

Page 1

INSTRUCTIONS
AND
PARTS MANUAL
PROGRAMMABLE
GANTRY SYSTEM
Please record your equipment identication information below for future reference. This information can be found
on your machine nameplate.
Model Number
Serial Number
Date of Purchase
Whenever you request replacement parts or information on this equipment, always supply the information you
have recorded above.
LIT-PGS-IPM-0314
Bug-O Systems is guided by honesty, integrity and
ethics in service to our customers and in all we do.
A DIVISION OF WELD TOOLING CORPORATION
280 TECHNOLOGY DRIVE CANONSBURG, PENNSYLVANIA 15317-9564 USA
PHONE: 412-331-1776 http://www.bugo.com FAX: 412- 331- 0383
Page 2

SAFETY
PROTECT YOURSELF AND OTHERS FROM SERIOUS INJURY OR DEATH.
KEEP CHILDREN AWAY. BE SURE THAT ALL INSTALLATION, OPERATION,
MAINTENANCE AND REPAIR PROCEDURES ARE PERFORMED ONLY BY
QUALIFIED INDIVIDUALS.
ELECTRIC SHOCK can kill.
1) The equipment is not waterproof. Using
the unit in a wet environment may result
in serious injury. Do not touch equipment
when wet or standing in a wet location.
2) The unused connectors have power on
them. Always keep the unused connec tors covered with the supplied protective
panels. Operation of the machine without
the protective panels may result in injury.
3) Never open the equipment without rst
unplugging the power cord or serious
injury may result.
4) Verify the customer-supplied power
connections are made in accordance
with all applicable local and national
electrical safety codes. If none exist,
use International Electric Code (IEC)
950.
5) Never remove or bypass the equipment
power cord ground. Verify the equipment
is grounded in accordance with all appli cable local and national electrical safety
codes. If none exist, use International
Electric Code (IEC) 950.
EQUIPMENT DAMAGE
POSSIBLE.
1) Do not plug in the power cord without rst
verifying the equipment is OFF and the
cord input voltage is the same as required
by the machine or serious damage may
result.
2) Always verity both the pinion and wheels
are fully engaged before applying power
or equipment damage may occur.
3) Do not leave the equipment unattended.
4) Remove from the work site and store in
a safe location when not in use.
FALLING EQUIPMENT
can cause serious
personal injury and
equipment damage.
Faulty or careless user installation is
possible. As a result, never stand or
walk underneath equipment.
MOVING PARTS can
cause serious injury.
READ INSTRUCTIONS.
1) Never try to stop the pinion from moving
except by removing power or by using the
STOP control.
Read the instruction manual before
installing and using the equipment.
2) Do not remove any protective panels,
covers or guards and operate equipment.
2
Page 3

HIGH FREQUENCY WARNINGS
SPECIAL PRECAUTIONS ARE REQUIRED WHEN USING PLASMA,
TIG OR ANY WELDING PROCESS THAT USES HIGH FREQUENCY TO
STRIKE AN ARC.
WARNING: HIGH FREQUENCY CAN EFFECT MACHINE
OPERATION AND THEREFORE, WELD QUALITY.
Read the precautions below before installing and using the equipment.
PRECAUTIONS:
1) Some plasma or welding cables are strong sources of high frequency interference.
NEVER lay a plasma or welding cable across the controls of the machine.
2) Always physically separate the plasma or welding cable leads from the machine
cables. For example, the plasma or welding cable leads should NEVER be bundled
with a pendant cable or the machine power cord. Maximize the separation between
any machine cables and the plasma or welding cables.
3) Strictly follow the grounding procedures specied for the plasma or welding unit.
NOTE: Some plasma and welding units produce exceptionally large amounts of high
frequency noise. They may require a grounding rod be driven into the earth within six
feet (2 meters) of the plasma or welding unit to become compatible with an automatic
cutting or welding process.
4) If the high frequency is produced using a spark gap, adjust the points so the gap is as
small as possible. The larger the gap, the higher the voltage and the higher the inter ference.
5) Some plasma or welding units will inject high frequency interference into the AC
power line. Use separate power line branches whenever possible to power the
plasma or welding source and the machine. Do not plug them into the same outlet
box.
6) High frequency noise may enter the machine through the plasma or welding supply
remote contactor leads. Some plasma and welding sources can produce noise spikes
of up to several thousand volts. These sources are not compatible with automated
cutting and welding equipment. It is recommended that the remote contactor leads on
these plasma or welding sources not be connected to the machine. An alternate
solution is to purchase a separate remote contactor isolation box.
3
Page 4

PROGRAMMABLE GANTRY SYSTEM
INSTRUCTIONS AND PARTS MANUAL
TABLE OF CONTENTS PAGE
PAGE
5.............. Setup and Operating Instructions
6,7........... Introduction: Program Control Description and Operation
7.............. Shape Programming
8.............. Segment Type and Quadrant Chart #1
9-11 ......... Programming Data Requirements
12............ Setting Measurement Units: Metric or Inches
13-14 ...... Shape Programming Examples
15............ Hand Held Pendant
16............ PGS-1000 Programmable Gantry System / Exploded View
17............ Programmable Gantry System / Parts List / Technical Data
18............ MUG-1680 Control Box Functions
19............ MUG-1680 Control Box Wiring Diagram
20............ MUG-1680 Control Box Electrical Component Chart
21............ MUG-1590-E Drive Unit / Parts List
22............ MUG-1595 Encoder Assembly / Parts List
23............ Drive Unit / Encoder Assembly Wiring Diagram
24............ Pendant Cable Wiring
25............ Plasma Cutting
26............ Aluminum Rigid Rail
27............ PRS-1010 Power Racker Introduction / Technical Data
28............ PRS-1050 Motorized Block Assembly / Parts List
29............ Power Racker Wiring Diagram / Electrical Component Chart
30............ Accessories
31-32 ...... Suggested Bed Designs for Burning Table
33............ Operation Checklist and Troubleshooting
34............ Keypad Character / Map Direct and Shifted Characters
35............ Program Diagnostics for Gantry
36............ Warranty
------CAUTION------
DO NOT LEAVE EQUIPMENT
UNATTENDED WITH POWER ON.
BE CERTAIN POWER IS OFF WHEN
4
NOT IN USE!
Page 5

SETUP
The GANTRY is shipped in major assemblies, ready to assemble on your burning table. It is very important to
construct the burning table carefully; two suggested bed designs are shown on pages 31 and 32. Whichever design is
used, it is critical that:
1. The ARR-1080 Rails are mounted on strong supports, independent of the burning bed. By using a 6" (150 mm)
beam, the rails may be mounted in a straight line, by using the ARR-1050 mounting system, even though the steel
may not be perfectly straight. USE A TRANSIT when setting the rails to ensure they are both LEVEL AND
STRAIGHT.
2. After the rails are installed and checked, put the carriages one at the time on the rails. The LEFT carriage is the
one with the Controls.
3. Insert the 2 vertical columns (MUG-1053) into the column bases (MUG-1050). Place the Crossing Rail on the
columns, and bolt on loosely. With the drives disengaged, square up the gantry, level the crossing rail, and then
tighten the Crossing Rail clamps. Slide the cross drive on to the rail.
4. Connect the cables between various components, referring to diagrams on page 16.
5. Rotate the clutches on the 3 drive units to engage the pinions with the racks. The machine can now be plugged in
and run.
OPERATING INSTRUCTIONS
1. Check that the cross-beam is square to the main track. Adjust the torch position, and connect the required gas
hoses or plasma trigger connection.
2. Plug the machine into the power line of correct voltage, and push the RESET button.
3. Push the red STOP/PAUSE button and use the toggle switches to move the machine and cross drive to the
starting position. Press the RESET button to make this the starting point.
4. Set the speed knob for correct speed. Speed can be checked by moving the machine manually using the toggle
switches.
5. It the required shape has not been programmed, refer to Shape Programming, and enter the program. If the
shape has been programmed, turn on the preheat gases, set the torch height and ignite the torch.
6. When the work piece is heated enough, press the black RUN button. The solenoid will turn on the cutting oxygen,
the machine will start moving along the programmed shape, and at the end of the shape it will stop and turn off
the, solenoid. Manually turn off the preheat gases. The machine is now ready for the next cut. Note: For Plasma
Cutting, see page 25.
5
Page 6

INTRODUCTION
This is a 2-axis gantry that has 2 synchronized drives running on parallel tracks, and a second axis drive carrying a
cutting torch that runs on a cross beam. It can be used for ame or plasma cutting, or welding, of a variety of shapes
programmed and stored in memory.
PROGRAM CONTROL DESCRIPTION
The machine has 20 storage areas in memory for different programmed shapes, numbered 0 to 19. At any time, one of
these shape numbers is the current one, and will stay current even when power is shut off and turned back on, until the
shape number is changed by the operator.
All programming is done with the hand-held terminal provided; this may be plugged into the connector on the rear of the
machine or unplugged at any time. The terminal is not needed to run the machine once programmed; it is recommended
it be disconnected when cutting.
Shapes are built up only from the segments provided: circular arcs and straight lines, square or inclined, by selecting
type and quadrant for each segment. A shape can have up to 50 segments. Some other operations, like solenoid On/
Off, time delay, or repeat another shape a number of times, also count as one segment each if used.
OPERATION
When rst plugged in, the position of the machine becomes the reference Start (Home) position. Now there are 3
options (the pendant terminal is not needed for the rst two).
1. MOVE
To change the Start position, push and release the STOP/PAUSE button, move the machine manually to the
required position using the manual X and Y jog switches, and push the RESET button.
2. RUN
Push the RUN button to cut a shape.
3. PROGRAM using the Hand Held Terminal
The Programming operation is selected by pressing keys A, B, C, D, E.
A: ALL SEGMENTS; data entry for new shape consists of Total number of segments
Data for each: Type (arc, x/y line or slope)
Quadrant 1-4
Size (radius, or x/y dimension) See Shape programming for details.
For example, a 2 inch diameter circle could be 4 Segments:
1. 2 1 100 Counterclockwise arc quadrant 1 1.00 inch rad
2. 2 2 100 Counterclockwise arc quadrant 2 1.00 inch rad
3. 2 3 100 Counterclockwise arc quadrant 3 1.00 inch rad
4. 2 4 100 Counterclockwise arc quadrant 4 1.00 inch rad
The data should be tabulated on paper from a diagram before entering.
B: PROGRAM SEGMENT
Press B on terminal to re-program a single segment. This is useful if there is an error in data for just one
segment, so the whole shape does not have to be re-entered.
C: CHANGE Shape Number
Press C on terminal to change the current shape number. Enter the new shape number. The program
switches to the new number in memory, and to whatever shape is stored there.
6
Page 7

OPERATION, CONT’D.
D: DISPLAY Shape Data
Press D to display the data for the current shape. The terminal display shows Total No. of segments, and
data for each segment one by one each time you press Enter.
E: END of segment Slowdown.
Press E to set Deceleration value for the shape, when the machine approaches the end of each segment.
This is useful when the shape has sharp corners, to prevent overshoot. 99 is maximum slowdown, 0 is no
slowdown.
IMPORTANT:
1. Once the HOLD button is pressed, computer control is halted until the RUN or the RESET button is pressed.
Therefore the programming cannot be done with the handheld terminal in this state; the RESET button should
be pressed rst.
2. After pushing A and programming a new shape, End of segment Slowdown will still have the old value unless
reprogrammed. To set-new value, push E.
SHAPE PROGRAMMING
1. Draw the required shape on paper to some scale.
2. Refer to the Segment Chart (Chart #1) and divide the shape into straight line and arc segments.
3. Decide on the operation sequence and mark any other operations such as turning torch on or off, or delay.
4. Number all the segments in sequence, including other operations if any, and make a table with required data.
Example for a clockwise circle starting from the top:
(Dimensions described for metric version)
Seg. No. Type Quadrant Dimensions
1. 1 1 300 (30 mm)
2. 1 4 300
3. 1 3 300
4. 1 2 300
5. With the machine powered up and pendant plugged in, select which shape number this will be.
Push C : display reads Shape No.
Push 3 for No. 3, press Enter key (backward arrow) .The program is now in Shape No. 3
6 . Push A : display reads “Total segments?”
Push 4 for 4 segments and Enter.
Display reads “1. Type?” waiting for Segment 1 data.
7. Push 1 for type, clockwise arc. (Refer to Chart #1).
Display reads “Quadrant?”
Push 1 for quadrant 1.
Display reads “mm x 10”
Push 3, 0, 0, Enter, for 300, which is 30.0 mm.
Segment 1 has now been entered, display reads “2. Type?”, asking for data for segment 2.
8. Repeat above steps to enter data for all segments, in sequence. Display will read “Ready” after all segments
are entered.
The shape program is now stored in memory as shape No. 3, and the machine is ready to cut the shape.
7
Page 8
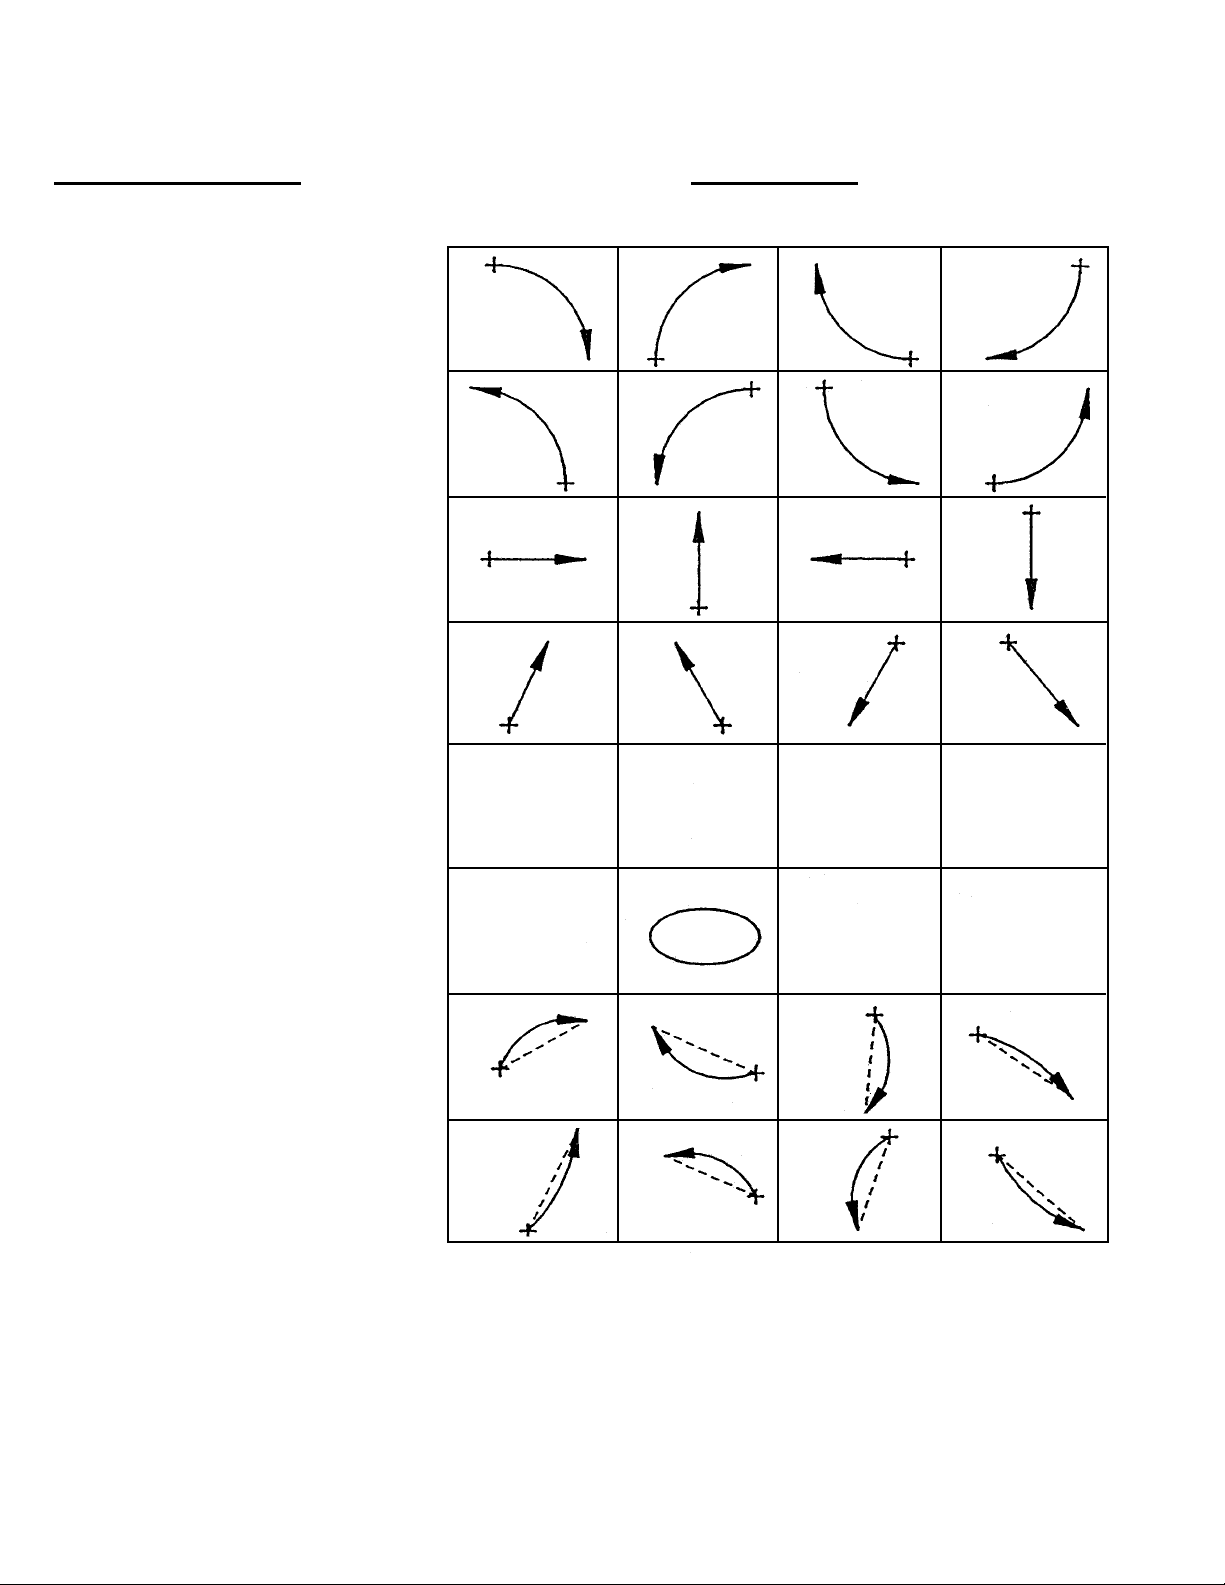
SEGMENT TYPE AND QUADRANT CHART
SEGMENT TYPES: QUADRANT:
#1 #2 #3 #4
1. CLOCKWISE 900 ARC
0
2. COUNTERCLOCKWISE 90
3. X OR Y AXIS LINE
ARC
4. OBLIQUE LINE
5. FUNCTIONS
6. FUNCTIONS
7. CLOCKWISE PARTIAL ARC
8. COUNTERCLOCKWISE
PARTIAL ARC
WELD/OXY
ON
REPEAT
ANOTHER
SHAPE
WELD/OXY
OFF
WAIT FOR
START BUTTON
AUXILIARY
MODES
TIME
DELAY
PERCENT
SPEED
CHART #1
8
Page 9

PROGRAMMING DATA REQUIREMENTS
To program a complete new shape (press “A”):
Count the number of segments or operations and enter the total.
For each segment (refer to DIMENSIONS REQUIRED Chart #2, Page 10)
Enter TYPE : Select from 1 through 8
QUADRANT: 1,2,3 or 4; refer to Chart #1.
SIZE: One or more dimensions per segment as described below; 100 per inch or 10 per mm
(Depending on machine version); or for time, 100 per second of delay.
Eg. 150 = 1.5", or for metric 375 = 37.5 mm
NOTE: Maximum distance per segment is 72" (1829 mm)
DETAILED DESCRIPTION OF TYPES
Type 1. Clockwise, 900 arc segments.
Quadrant determined by which quarter of a full circle makes the arc. (See Chart #1).
Dimensions required: Radius only.
Type 2. Counterclockwise , 900 arc segments.
Quadrant determined by which quarter of a full circle makes the arc. (See Chart #1).
Dimensions required: Radius only.
Type 3. Line along X or Y axis.
Quadrant determined by direction of movement. (See Chart #1) (East: 1, North: 2, West: 3, South:4).
Dimensions required: Length only.
Type 4. Angled straight line.
Quadrant determined by direction of movement. (See Chart #1) (NE: 1, NW: 2, SW: 3, SE: 4 ).
Dimensions required: (1) X-dimension; movement along X axis
(2) Y-dimension; movement along Y axis
Type 5. Functions or other operations.
Quadrant by selecting function. (See Chart #1)
1. Weld/oxygen ON: turn ON weld contact-relay or cutting oxygen solenoid.
Dimensions required: None.
2. Weld/oxygen OFF.
Dimensions required: None.
3. Pause: Machine stops and waits until START/RUN button is pushed again.
Dimensions required: None.
4. Delay: Machine stops and holds position for a programmed time period, up to 99.99 seconds.
Dimensions required: time in .01 second units.
(eg. 2.5 seconds = 250)
Type 6. Special functions.
Determine quadrant by selecting function.
1. Repeat: Another complete shape will be repeated the specied number of times.
Shape No. of the repeated shape MUST BE LOWER than the Shape No. of the current
shape being programmed. Therefore it CANNOT BE USED IN SHAPE No. 0.
Data required: (1) Shape No. to be repeated
(2) Number of times.
2. Ellipse: This is provided for making a complete true ellipse, always starting from the left
(West extremity) and moving clockwise.
Dimensions required: (1) diameter along X-axis.
(2) diameter along Y-axis.
9
Page 10
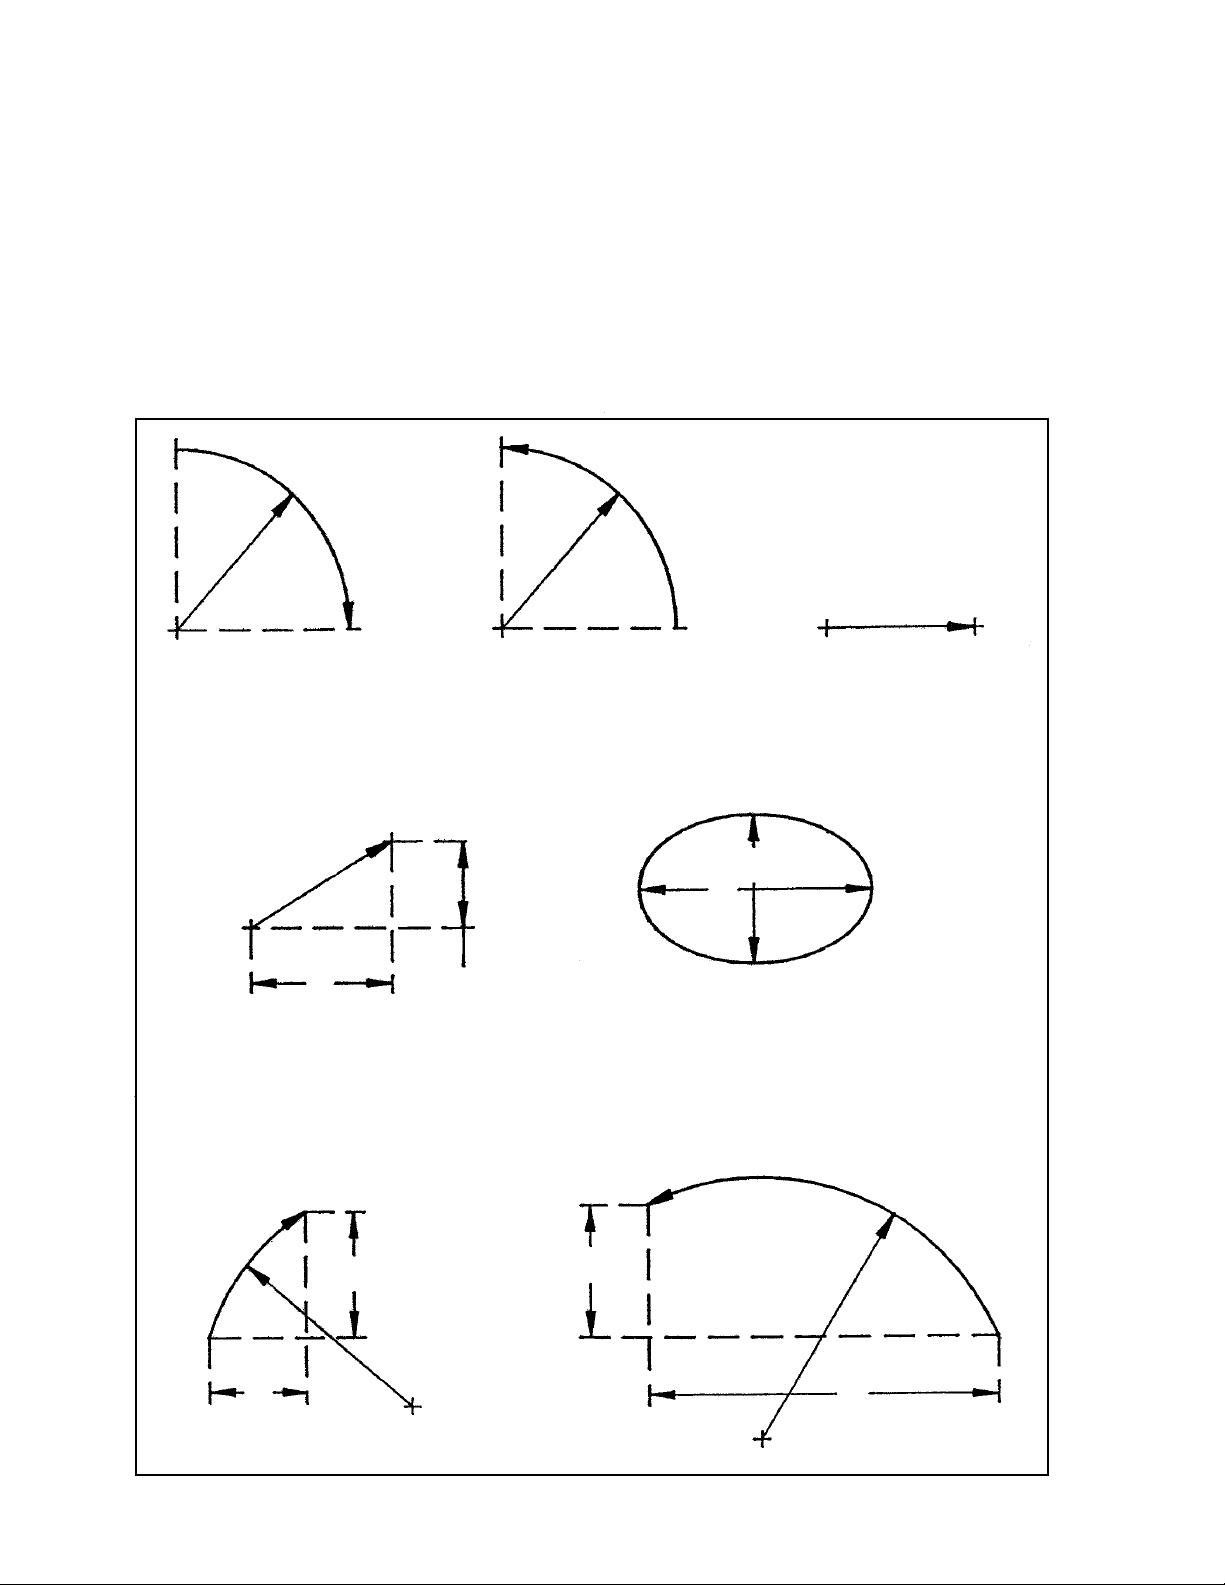
PROGRAMMING DATA REQUIREMENTS, CONT’D.
Type 7. Clockwise arc, must be less than 1800.
Quadrant determined by direction of end point of arc relative to the start point. (See Chart #2).
Dimensions required:
(1) X-dimension; offset along X-axis from start to end point.
(2) Y-dimension; offset along Y-axis from start to end point.
(3) Radius of arc.
Type 8. Counterclockwise arc, must be less than 1800.
Quadrant determined by direction of end point of arc relative to the start point. (See Chart #2).
Dimensions required:
(1) X-dimension; offset along X-axis from start to end point.
(2) Y-dimension; offset along Y-axis from start to end point.
(3) Radius of arc.
R R
L
1
X
4
Y
2
3
X
Y
6-2
10
X
R
7
Y
Y
R
X
8
CHART #2
Page 11

PROGRAMMING DATA REQUIREMENTS, CONT’D.
AUXILIARY MODES: TYPE 6, QUADRANT 3
This function allows the 2 internal Solid State Relay outputs to be independently turned ON and OFF, providing
control of 2 output signals; and also to switch the machine between Rapid Traverse mode and Set Speed.
The machine is shipped with OUTPUT (1) wired to the amphenol connector for the external relay or solenoid,
using pins A and C. By default, this Output turns ON when the Start button is pressed to run a shape, and
turns OFF at the end of the shape. Both the contact relay and cutting solenoid use only Output (1).
OUTPUT (2) is present across pins A and D on the amphenol connector, but is not used by the standard relay
box - a custom box has to be made to use this output. By default the output is OFF when a shape is started,
until specically turned ON by the Solenoid/Weld ON command Type 5, Quad 1.
Subsequently while running, the Type 5 ON and OFF commands turn both Outputs On and Off together, and
both turn Off at the end.
When programming Type 6 Quad 3, a Mode Number is required to be entered. The 8 auxiliary modes, numbered
0 through 7, allow the setting of a mode with any combination of Outputs On or Off, and choice of Set Speed
by the speed knob, or maximum speed regardless of setting. The combinations are listed in the table below:
AUXILIARY MODES CHART
Mode
No.
Output 1 Output 2 Speed
0 Off Off Set
1 Off On Set
2 Off Off Hi
3 Off On Hi
4 On Off Set
5 On On Set
6 On Off Hi
7 On On Hi
11
Page 12

PROGRAMMING DATA REQUIREMENTS, CONT’D.
SET % SPEED, FRACTION OF SET SPEED: Type 6, Quadrant 4
Selecting Type 6-4 allows the speed to change to a fraction of the set speed. Display will read “Speed %”,
and data entry is accepted from 1 to 99. Entering 0 or just return will make the speed 100%, which is the
same as set speed.
When the program reaches a Type 6-3 segment while running, the speed will change to the percent
entered, and continue at this setting until there is a later Type 6-3 segment which changes it to another %
setting or back to 100%.
NOTE: If Type 6-3 has been set for HI (rapid traverse) then this setting will cut down the HI speed to the
same %.
Settings below 10 % are not recommended.
SETTING MEASUREMENT UNITS: METRIC OR INCHES
The machine is factory set in inch or metric units before shipping, and is not meant to be switched between
the two systems on a regular basis. However if the machine happens to be set in a unit system not wanted
by the user, the setting can be changed to suit.
To set the machine for programming in mm or inches:
First with power on, push the RESET button on the machine. Next, on the keypad of the handheld terminal,
note the blank “Shift” key. (Refer to Hand Held Pendant diagram if necessary, page 34).
Press the Shift Key, then “9”, and the display should read: “English/metric, 0/1”
Then Push 1 to select metric dimensions, 0 to select inches. Any shapes in the machine should be
reprogrammed; the machine will not convert numbers already entered.
12
Page 13

SHAPE PROGRAMMING EXAMPLES
EXAMPLE: OBROUND SHAPE
3.0"
A
B C
6.0"
CUTTING PATH:
START
F
4.0"
A-B-C-D-E-F-A
E
10.0"
TOTAL NO. OF SEGMENTS = 6
SEG NO TYPE QUADRANT SIZE COMMENT
AB 1 1 2 300 CW Arc, 3.00" rad
BC 2 3 1 400 X-axis line, 3.00"
CD 3 1 1 300 CW Arc
DE 4 1 4 300 CW Arc
EF 5 3 3 400 X-axis Line
FA 6 1 3 300 CW Arc
AB: Type 1 species Clockwise Arc
Quadrant No. is 2
Size 300 species Radius = 3.00" (Metric: 300 = 30.0 mm)
13
Page 14

SHAPE PROGRAMMING EXAMPLES, CONT’D.
Type 6 Quadrant 1.
The shape shown has a rectangular tooth form repeated six times. The required shape is numbered Shape
2, and the four segment repeated tooth is Shape 1 so that it can be called for by Shape 2. (A Repeat in a
program must call for a lower number shape).
Shape No. 2:
13"
6
Start
1
5
4
8"
2
Shape No.
3
1:
2
4
1
Shape # 1
Segment Type Quad. Dimension
1. 3 1 100
2. 3 2 200
3. 3 1 100
4. 3 4 200
Shape #2
Segment Type Quad. Dimension
1. 3 4 800
2. 6 1 1
6
3. 3 1 100
4. 3 2 600
5. 2 1 200
6. 3 3 1100
(Repeat #1)
(6 times)
3
14
Page 15

HAND HELD PENDANT
This is a hand held terminal with keypad and display, which plugs into the control panel. Press
keys A, B, C, D, or E for the function desired, as described in the Programming instructions
on pages 6, 7 & 8. Use the digit keys to enter move distances or other dimensions; push the
Enter button to store the numeric value entered. The Backspace (BKSP) key deletes the last
digit before pushing the Enter button, in case a correction is required.
15
Page 16

PGS-1000 PROGRAMMABLE GANTRY SYSTEM
10
2
11
9
12
1
10
11
9
13
1
5
16
14
17
15
17
4
7
8
13
10
11
3
9
6
to
16
Page 17

PGS-1000-8,-10,-12 PROGRAMMABLE GANTRY SYSTEM PARTS LIST
ITEM QTY PART NO. DESCRIPTION
1 2 BUG-2785 Carriage, 36"
2 1 BUG-2975 Cable Mounting Assembly
3 1 BUG-5250 Carriage, 12"
4 1 BUG-5285 H. D. Cutting Group (optional)
5 1 BUG-6050 Hand Held Pendant
6 2 MUG-1050 Column Base
7 2 MUG-1053 Column
8 1 MUG-1410-8 Face Rail Assembly 8 ft.
-10 Face Rail Assembly 10 ft.
-12 Face Rail Assembly 12 ft.
9 3 MUG-1590-E Drive Unit (100:1) 4-80 ipm
10 3 MUG-1595 Encoder
11 3 MUG-1621-1.5 Cable 18"
12 1 MUG-1633-3 Shielded Cable 3' (X1)
13 2 MUG-1633-12 Shielded Cable 12'(X2, Y)
-14 Shielded Cable 14' (X2,Y)
-16 Shielded Cable 16' (X2,Y)
14 1 MUG-1678 Cable Carrier (8', 10' or 12') ft
15 1 MUG-1680 XXY Gantry Control Box 120 VAC
MUG-1682 same as above except 240 VAC
16 1 MUG-1685 Cable Carrier Mount
17 1 ARR-1080 H.D. Rigid Rail, 8' (ordered separately)
TECHNICAL DATA
Gantry Control Box MUG-1680 120 VAC/50-60 Hz/1
Power Requirements: MUG-1682 240 VAC/50-60 Hz/1
Travel Speed: 4-80 in/min (100-2000 mm/min)
Maximum Segment
Dimension: 72" (1800 mm) Within Limits of Travel
Minimum Dimension
Increment: Inches: 0.01" Metric: 0.1 mm
Delay Increment: 0.01 seconds
Maximum Delay 99.99 seconds
17
Page 18

MUG-1680 CONTROL BOX FUNCTIONS
2
1
4
3
7
6
5
8
PANEL CONTROLS:
9
1. SPEED
2. START / RUN
3. STOP / PAUSE
4. RESET
5. PILOT LIGHT
6. POWER ON/OFF SWITCH
7. CIRCUIT BREAKER
8. MANUAL JOG Y DRIVE
9. MANUAL JOG X-X DRIVES
18
Page 19

MUG-1680 CONTROL BOX WIRING DIAGRAM
RED
103
BLK
103
RED
BLK
103
RED
BLK
RED
BLK
BLK
RED
RED
BLK
YEL
MC 1
WHT
BLU
X 1
E
F
X 1
D
A
B
C
CN 3
GY
PK
YEL
103
SW 5
PK
7
9
8
6
5
3
2
4
BLU
1
PK
TAN
GY
10
TAN
WHT
10
9
8
BLU
F
A
7
BLK
WHT
Y
10
9
BLU
F
A
SW 6
OR
8
E
Y
D
B
C
CN 5
BRN
OR
103
7
6
5
3
2
4
1
TAN
BLU
BRN
TAN
OR
CM
TAN
BLU
TAN
YEL
GY
BRN
0- VOLT
YEL
WHT
BLU
PK
WHT
YEL
OR
WHT
PUR
223
E
X 2
D
B
C
CN 4
BLU
PUR
YEL
103
6
5
3
2
4
1
MC 3
PUR
BLU
BLU
TAN
TAN
WHT
CB
BLK
BLK
VT
PL
LF
GRN
PC
WHT
WHT
TB 1
SW 1
BLK
T1
GY
GY
BLK
BLU + YEL
RED
RED
BLU + YEL
BLK
WHT
TB 2
T2
GY
BLK
GY
BLK
BLU + YEL
RED
RED
BLU + YEL
BLU
RED
SW 2
GRN
START
BLU
BLU/WHT
YEL
P
SW 3
STOP
RESET
DLF
CN 2
CN 1
SW 4
WHT/BLK
OR
YEL
BLU
BLU
WHT/BLK
WHT/BLK
BRN
BLK
RED
10
8
1
B
A
104
GRN
A
D
1
C
D
E
F
B
C
19
Page 20

MUG-1680 CONTROL BOX ELECTRICAL COMPONENT CHART
ITEM DESCRIPTION
120 VAC 240 VAC 42 VAC
PC Power Cord BUG-9445 GOF-3115 BUG-9442
CB Circuit Breaker BUG-2931 BUG-2923 ARM-2278
1.0 A 0.7 A 3.0 A
PL Pilot Light BUG-1415 BUG-1428 BUG-1427
VT Volt Trap BUG-1393 BUG-1563 BUG-1393
T1,T2 Transformer BUG-5218 BUG-5231 BUG-5232
P Potentiometer BUG-9686
SW1 Toggle SW (Power) ARM-2279
SW2 PB Switch (Start) SWT-1113
SW3 PB Switch (Stop) SWT-1112
SW4 PB Switch (Reset) SWT-1111
SW5 Toggle SW (X Dir) MUG-1199
SW6 Toggle SW (Y Dir) MUG-1199
LF Line Filter BUG-6069
CM Control Module MUG-1670-XXY
MUG-1680 MUG-1682 MUG-1684
MC1, 2, 3 Motor Control Board BUG-1770
TB1, TB2 Terminal Block BUG-6028
CN 1 Connector (AUX) MUG-1156
CN2 Connector (Pendant) BUG-9902
CN3 Connector (X1) BUG-9909
CN4 Connector (X2) BUG-9909
CN5 Connector (Y) BUG-9909
DLF Data Line Filter SEO-4118
Encoder / Motor MUG-1686
Wiring Harness
Speed Board MUG-1687
Wiring Harness
Panel Controls MUG-1688
Wiring Harness
Toggle Switch MUG-1689
Wiring Harness
20
Page 21

MUG-1590-E DRIVE UNIT / PARTS LIST
ITEM QTY PART NO. DESCRIPTION
1 1 BUG-1595 Gear Motor (100:1)
2 1 BUG-2988 Left Side Panel
3 1 BUG-5112 Front End Plate
4 1 BUG-5114 Swivel Plate
5 1 BUG-5120 Cam Clutch Assy (Includes Items 6-11)
6 1 BUG-2767 Wing Nut
7 1 BUG-5113 Cam & Tube Assy
8 1 BUG-5116 Stud
9 1 BUG-5119 Knob w/ Fastener
10 1 BUG-5122 Delrin Washer
11 1 WAS-0240 1/4 SAE Washer
12 4 BUG-5121 Stand Off
13 1 BUG-5128 Pinion, Long Shaft
14 1 BUG-5131 Sleeve
15 1 BUG-9614 Needle Bearing
16 1 BUG-9635 Flange Bearing 3/8"
17 1 BUG-9909 Panel Connector, 6-T, Male
18 8 FAS-0114 Pan Hd Scr 6-32 x 3/8 Lg.
19 4 FAS-0124 Pan Hd Scr 8-32 x 3/8 Lg.
20 8 FAS-0204 Rnd Hd Scr 4-40 x 318 Lg.
21 1 FAS-0654 Soc Hd Shr Scr 5/6 x 3/8 x 1/4-20
22 8 FAS-1305 Hex Nut 4-40
23 4 FAS-2824 Fit Hd Slt Scr 8-32 x 1-3/4 Lg.
24 1 GOF-3019 Handle w/Nuts
25 1 MUG-1156 Panel Connector, 4-T, Female
26 1 MUG-1586 Cover
17
20,22
24
12
4
26
25
20,22
5
6.750
(171 mm)
6
11
7.125
(181 mm)
9
2
1
10
6.563
(167 mm)
7
18
3
23 15
13
8 16
14
19 21
21
Page 22

MUG-1595 ENCODER ASSEMBLY
12
4.000 REF
3.750 REF
5.500 REF
1
5
4
9, 6, 8
13
10
2
11
22
.250 REF
PARTS LIST
ITEM QTY PART NO. DESCRIPTION
1 1 BUG-6059 Encoder
2 1 BUG-6044 Flexible Coupling
3 1 BUG-6047 Pinion w/ Shaft
4 2 FAS-0115 Pan Hd Scr. 6-32 x 1/2
5 1 FAS-0124 Pan Hd Scr. 8-32 x 3/8
6 4 FAS-0204 Rnd Hd Scr. 4-40 x 3/8
7 2 FAS-0227 Rnd Hd Scr. 8-32 x 3/4
8 4 FAS-1305 4-40 Hex Nut
9 1 MUG-1156 Socket Connector
10 1 MUG-1592 Bracket
11 1 MUG-1593 Pod
12 1 MUG-1594 Plate
13 1 MUG-1596 Enclosure
14 2 SFX-1218 Flange Bearing
* 1 CBP-1598 Connector Cable
7
14
3
Page 23

DRIVE UNIT / ENCODER ASSEMBLY WIRING DIAGRAM
MUG-1633-
Shielded cable
BUG-9909
Panel
Connector
6-T, M
PK
BLU
RED
MOTOR
BLK
RED
BLK
MUG-1156
Panel Connector
4-T, F
WHT
D
A
C
B
MUG-1621-1.5
Cable 18"
YEL
MUG-1595 Encoder Assembly
MUG-1156
Panel Connector
4-T, F
A
D
B
C
WHT
YEL
RED
BLK
CAP-1105 M
Capacitor 1.0 mF
5
4
3
2
1
+5 V
GND
BUG-6039
Encoder
23
Page 24

PENDANT CABLE WIRING
BUG-6050
Hand Held Terminal
A ____ Black: Circuit Com.
B ____ Yellow: TX (Transmit)
BUG-9906
Cable Connector, 6-T, M
BLK
(SHIELD)
F
RED
BRN
OR
YEL
E
(Front View)
A
B
C
D
C ____ Orange: RX (Receive) 9600 Baud
D ____ Brown: Signal Ground
E ____ Red: Power (5 V)
F ____ Shield Drain Wire, Bare, Touching Foil Shielding
NOTE: Other wires should be trimmed and unable to touch terminal pins.
24
Page 25

PLASMA CUTTING
The Programmable Gantry System can be used successfully for plasma cutting; however it is important to
take certain precautions to avoid interference and protect the control circuits. (These comments also apply
to TIG welding or any process that uses high frequency to strike an arc.) An external relay box is available
separately or in the welding kit to provide the contact signal to the plasma source.
PRECAUTIONS:
1. NEVER lay the plasma gun cable across the top of the machine. The further away from the machine
it can be routed and supported, the better.
2. See that all grounding procedures specied for the plasma source are followed diligently.
3. If the high frequency is produced using a spark gap, adjust the points so that the gap is as small as
possible. The larger the gap, the higher the voltage and stronger the interference.
4. We strongly recommend you disconnect the Hand Held Terminal (programming pendant) when
running the machine. Any length of wire acts as an antenna to receive HF radiation, and though the
cable is shielded, it is possible for some induced voltage to leak through.
5. Use separate power line branches whenever possible to power the plasma source and the machine.
Do not plug them into the same outlet box.
6. Though there is an internal power line lter, an external protective device will always help. Computer
equipment line protection boxes are readily available at low cost, with surge suppression and line
ltering circuitry. The machine can be plugged into the power line through one of these boxes.
25
Page 26

ALUMINUM RIGID RAIL
ALUMINUM RIGID RAIL is a high quality alloy, rigid section made to the machine tool tolerance shown in
the sectional view below. The carriage drive pinion meshes with a machined gear rack that is mounted on
the rail. The wheels of the carriage travel in opposed grooves at either side of the rail, locking the carriage
to the rail. Heavy duty [H.D.] aluminum four-legged rigid rail is supplied in two lengths: ARR-1080 [93-1/2"
(2.37 m)] called 8' (2.37 m) rail and ARR-1085 [46-1/2" (1.18 m)] called 4' (1.18 m) rail - see insert below.
Extra heavy duty aluminum four-legged rigid rail: ARR-1250 [93-1/2" (2.37 m)] called 8' (2.37 m) rail and
ARR-1200 [46-1/2" (1.18 m)] called 4' (1.18 m) rail, is also available.
RAIL FOR LONGER SPANS:
When unsupported rail paths longer than 93-1/2" (2.37 m) nominal 8' (2.37 m) rail are required, multiple
sections of standard rail are mounted on plate, channel or box sections.
ARR-1080 / H.D. ALUMINUM RIGID RAIL 8' (2.37 m)
A
C
B
A 2.75" (70 mm)
B 4.0" (102 mm)
C .375" (9.5 mm)
D .875" (22 mm)
D
5
3
4
1
2
6
7
26
PARTS LIST
ITEM QTY PART NO. DESCRIPTION
1 1 ARR-1006 Rack
2 2 ARR-1027 Splice Bar
3 2 ARR-1028 Carriage Bolt
4 1 ARR-1081 Rail Extrusion
5 2 FAS-0375 Hex Hd Cap Scr 5/16-18 x 1/2
6 2 FAS-1370 Hex Nut 5/16-18
7 16 FAS-1445 S.T. Pan Hd Scr 10-32 x 1/2
Page 27

PRS-1010 POWER RACKER
The POWER RACKER is a compact, motorized drive that enables the operator to position the process tool
using a handheld pendant. It consists of a Control Box, Pendant Control and Motorized Block. The Power
Racker also includes a 15" Heavy Duty Tube Rack and Right Angle Clamp which can used in conjunction
with a BUG-2708 Clamp for welding, or a BUG-5188 Torchholder for cutting applications.
TECHNICAL DATA:
PRS-1010
Power Racker
120 VAC / 60 Hz
PENDANT
CONTROL
PRS-1012
Power Racker
240 VAC / 60 Hz
CONTROL BOX
MOTORIZED
BLOCK
7.435"
(189mm)
3"
(76mm)
1.624"
(41mm)
15"
(381mm)
27
Page 28

PRS-1050 MOTORIZED BLOCK ASSEMBLY
ABOD
OD
RED
BLK
MOTOR
13
10
11
3,4
9
7
1
2
8
5
12
6
PARTS LIST
ITEM QTY PART NO. DESCRIPTION
1 1 BUG-1034 Panel Connector, 4-T, M
2 10 FAS-0112 Pan Hd Scr. 6-32 x 1/4
3 4 FAS-0204 Rnd Hd Scr. 4-40 x 3/8
4 4 FAS-1305 Hex Nut 4-40
5 8 FAS-1412 S.T. Pan Hd Screw “F”
6 3 PRS-1027 Soc Hd Cap Scr. 3 mm.5p, 35 L
7 1 PRS-1025-P Motor
8 1 PRS-1026 Pinion
9 1 PRS-1040 Cover
10 1 PRS-1041 End Plate
11 1 PRS-1042 End Plate
12 2 PRS-1048 Bearing
13 1 PRS-1049 Racker Block
28
Page 29

POWER RACKER WIRING DIAGRAM
PRS-1070
PENDANT CONTROL
BLK 8V
SW
P
OR F/R
BLU OV
BRN SP
PC
PRS-1100
CONTROL BOX 120 VAC
CB
BLK
GRN
C
WH
B
C
R
A
F
E
D
CN1
VT
CN2
A
D
B
C
RED
BLU
CN3
COM
NC
R
NO
T
TAN
BLU
TAN
BLU
RED
TAN
BLU
TAN
WHT/BLU
A
B
F
E
C
D
YEL
BLU
BRN
MCB
POWER RACKER ELECTRICAL COMPONENT CHART
ITEM DESCRIPTION
120 VAC 240 VAC 42 VAC
CB Circuit Breaker BUG-2923 BUG-2952 BUG-2933
PC Power Cord BUG-9445 GOF-3115 BUG-9442
R Relay BUG-1383 BUG-1551 BUG-9636
T Transformer BUG-5001 BUG-5002 BUG-5003
VT Volt Trap BUG-1393 BUG-1563 BUG-1393
C Cable MUG-1625
CN1 Cable Connector 6-T, M BUG-9906
CN2 Panel Connector, 6-T, F BUG-9902
CN3 Panel Connector 4-T, F MUG-1156
MCB Speed Control CAS-1770
P Potentiometer BUG-9686
SW Toggle Switch (For-Off-Rev) MUG-1199
PRS-1081 PRS-1083 PRS-1085
29
Page 30

ACCESSORIES
BUG-5275
H.D. Cutting Group
BUG-5285
H.D. Welding Group
BUG-2708
Clamp with
7/8" Rod
MUG-1695
Contact Relay 120 VAC
MUG-1697
Contact Relay 240 VAC
BUG-5188
Torchholder
Assembly
*MUG-1690
Q. A. Manifold
w/ Solenoid 120 VAC
30
*MUG-1692-_
Q. A. Manifold
w/ Solenoid 240 VAC
* Includes 3-Hose Assembly
Page 31

SUGGESTED BED DESIGNS FOR BURNING TABLE
The construction of your burning table is very important. The table must be rigid and strong. 6" (150
mm) WF Beams are recommended for rail supports, so that even if they are not straight, the ARR-O
rails 4" wide (102 mm) may be mounted in a straight line. A transit is recommended for set-up, but
piano-wire can be used. The bolting holes in the rail are uniformly spaced, but rather than laying-out
the holes, position the rail on its supports and transfer the holes. Make sure that the rails on each
side start at the same place!
Actual Length
1/4" x 6" Bars
Centerline to Centerline
Distance. Maximum Work
Width plus 24"
(Material Length
Plus 5'0" or more)
Side Rails should be
3-4" below burning bed
Note:
1. Rail should be mounted on separate supports - not connected to burning bed
- so the rail alignment will not be disturbed during loading and unloading.
2. Rail must be straight and at - parallel to cutting table.
6" Wide Flange at
12 1b/FT
ARR-O Rail
Legs Grouted in
Concrete
31
Page 32

SUGGESTED BED DESIGNS FOR BURNING TABLE, CONT’D.
AT 12 1B/FT
6" WIDE FLANGE
3-4"
THAN RAIL BASE
SHOULD BE 3-1" HIGHER
BURNING BED
32
(Check Quote For Actual Length)
MATERIAL LENGTH PLUS APPROX. 5'
1/4" X 6" BARS
4"
L
P + 24"
Maximum Width
Page 33

OPERATION CHECKLIST AND TROUBLE SHOOTING
1. Plug in the machine and turn on the Power Switch. Use the X and Y direction toggle switches to jog the GANTRY
in all 4 directions in turn. This overrides any speed command from the computer control. If the drives run in
corresponding direction, and the speed can be varied with the Speed Pot, this indicates:
a) the speed control boards are OK
b) the controller circuit is supplying the required voltages
If only one motor does not run then it is likely that the motor’s speed control is faulty. If both X and Y motors do not
operate properly then there may be a bad component on the control module that prevents proper voltages to be
supplied to the toggle switches.
A bad connection in the speed signal line to the speed board may also run the motor in one direction only at full
speed.
Manual control must function correctly before checking the computer control.
2. Attach the Handheld Pendant and push the Reset button. The display should read “Reset OK”. Push D on the
keypad and push “RETURN” until the display shows the Shape No. and data for all segments. If the display functions
this indicates:
a) the communication line is functioning
b) the computer is operating its program
If the message “Reset OK” comes up but pushing D or any other key has no effect, there could be a false signal
coming in from the STOP button, due to a wire short or damaged switch.
3. Disconnect the Handheld Terminal and power up.
Toggle the X and Y switches in all 4 directions after pushing Reset. When the switch is let go, the machine should
go back to its original position.
This conrms the computer is running its program, and also interfacing correctly with encoders and the speed
signal outputs to the speed boards.
If one motor returns to home and not the other, then the computer may not be receiving the encoder signals
properly from that axis - encoder pick up gear or coupling may be loose or the pins in the encoder plug may not be
making good connection.
If a motor returns home from one direction but not from the other, the speed control may be faulty and drive only
in one direction.
33
Page 34

KEYPAD CHARACTER / MAP DIRECT AND SHIFTED CHARACTERS
Shift Key, then “9”
E.g. to type U for units, press
SHIFTED CHARACTER SET
Shift Key
34
V: Version Number
T: Test drives & encoders, function
R: set Ratio SE4-P; DO NOT USE
U: set Units, inch or metric
Page 35

PROGRAMMED DIAGNOSTICS FOR GANTRY
These diagnostics are included in the control module for Programmable Gantries since version XXY01.
See character map of keypad for shifted keys to use these commands.
Press “T” for Test
The display should show “D-E-F?”
Next press “D” to check Drives
E for Encoders
F to Finish; get back to main menu
After selecting either D or E, for Drive or Encoder, the display will show
“Axis No.”
Press 1 for Axis 1: main drive, 2: for Axis 2: cross drive (or 3 for 2nd X- drive on a Gantry).
If drive was selected, the axis selected should run:
1 second forward (display shows “F”)
1 second back (display shows “B”)
The drive should move regardless of whether encoder pulses are counted, at the speed set by the speed pot.
If Encoder was selected, the encoder count of the corresponding encoder (1 or 2) should scroll up continuously in the
display. Press any key to stop.
Rotating the encoder in either direction will increase or decrease the displayed count, if the computer is successfully
counting the pulses from it. The encoder can be rotated manually if disengaged, or by using the joystick to move in the
desired direction.
Note: the count is in hexadecimal notation (number base 16) (10H=16 decimal, 400H =1024 decimal).
Press “V” for Version.
The display will show the program version number; e.g. SH005 or XXYOI, etc.
Applicable to new program versions only.
35
Page 36

WARRANTY
MODEL ____________________________
Limited 3-Year Warranty
For a period ending one (1) year from the date of invoice, Manufacturer warrants that any new machine or part is free from defects in materials and workmanship and Manufacturer agrees to repair or
replace at its option, any defective part or machine. HOWEVER, if the invoiced customer registers
the Product Warranty by returning the Warranty Registration Card supplied with the product within
90 days of the invoice date, or by registering on-line at www.bugo.com, Manufacturer will extend the
warranty period an additional two (2) years which will provide three (3) total years from the date of
original invoice to customer. This warranty does not apply to machines which, after Manufacture’s
inspection are determined by Manufacturer to have been damaged due to neglect, abuse, overloading, accident or improper usage. All shipping and handling charges will be paid by the customer.
The foregoing express warranty is exclusive and Manufacturer makes no representation or warranty
(either express or implied) other than as set forth expressly in the preceding sentence. Specifically,
Manufacturer makes no express or implied warranty of merchantability or fitness for any particular
purpose with respect to any goods. Manufacturer shall not be subject to any other obligations or liabilities whatsoever with respect to machines or parts furnished by Manufacturer.
Manufacturer shall not in any event be liable to Distributor or any customer for any loss of profits, incidental or consequential damages or special damages of any kind. Distributor’s or customer’s sole
and exclusive remedy against Manufacturer for any breach of warranty, negligence, strict liability or
any other claim relating to goods delivered pursuant hereto shall be for repair or replacement (at
Manufacturer’s option) of the machines or parts affected by such breach.
SERIAL NO. ________________________
DATE PURCHASED: _________________
WHERE PURCHASED:________________
Distributor’s Warranty:
In no event shall Manufacturer be liable to Distributor or to any customer thereof for any warranties,
representations or promises, express or implied, extended by Distributor without the advance written consent of Manufacturer, including but not limited to any and all warranties of merchantability or
fitness for a particular purpose and all warranties, representations or promises which exceed or are
different from the express limited warranty set forth above. Distributor agrees to indemnify and hold
Manufacturer harmless from any claim by a customer based upon any express or implied warranty
by Distributor which exceeds or differs from Manufacturer’s express limited warranty set forth above.
HOW TO OBTAIN SERVICE:
IF YOU THINK THIS MACHINE IS NOT OPERATING PROPERLY, RE-READ THE INSTRUCTION
MANUAL CAREFULLY, THEN CALL YOUR AUTHORIZED BUG-O DEALER/DISTRIBUTOR. IF
THEY CANNOT GIVE YOU THE NECESSARY SERVICE, WRITE OR PHONE US TO TELL US
EXACTLY WHAT DIFFICULTY YOU HAVE EXPERIENCED. BE SURE TO MENTION THE MODEL
AND SERIAL NUMBERS.
36
 Loading...