

LinkStation
Setup Manual
www.buffalotech.com
35010969 ver.02

Contents
Chapter 1 Setup ................................................................3
LinkNavigator Setup (LS-XHL, LS-CHL) ................................. 3
LinkNavigator Setup (LS-WXL)
LinkNavigator Setup (LS-WSXL)
Diagrams and Layout (LS-XHL, LS-CHL)
Diagrams and Layout (LS-WXL)
Diagrams and Layout (LS-WSXL)
............................................... 5
............................................. 7
............................... 10
............................................. 12
........................................... 14
Chapter 2 Using your LinkStation ...................................16
Open Shared Folder ................................................................ 16
Open shared folder from the second PC
Adding the LinkStation
Power Mode Switch
Web Administration Tool
Add a shared folder
............................................................ 18
................................................................ 19
.......................................................... 20
................................................................. 22
................................. 17
Adding Users
Adding Groups
Access Restrictions
RAID Arrays
Changing the administrator user name and the password ..... 42
Initialization
LinkStation Setup Manual
........................................................................... 24
........................................................................ 26
................................................................. 27
............................................................................ 37
............................................................................. 43
1

Chapter 3 Useful Functions .............................................45
RAID Scanning ........................................................................ 45
WebAccess
BitTorrent Client
Direct Copy
Time Machine
Sleep Timer
Web/database server
............................................................................. 46
....................................................................... 54
............................................................................. 60
.......................................................................... 62
............................................................................. 67
.............................................................. 69
Appendix .....................................................................71
Specications .......................................................................... 71
Status LED (LS-XHL, LS-CHL)
Status LED (LS-WXL)
Status LED (LS-WSXL)
............................................................. 75
........................................................... 79
Hard drive replacement procedure (LS-WXL)
............................................... 72
......................... 82
Software
Info folder
.................................................................................. 87
................................................................................ 88
Troubleshooting
Data Backup
LinkStation Setup Manual
...................................................................... 89
............................................................................ 91
2
Chapter 1 Setup
LinkNavigator Setup (LS-XHL, LS-CHL)
To set up your LinkStation (initial setting), from your computer, you will need to install LinkNavigator, which is included on the Utility CD. NAS Navigator2 program, which will also be
installed during set up, can be used to open shares on the unit.
In a DHCP network environment, you simply connect this device to the network and power it on to
use. It is suggested that the workgroup setting, network drive mapping, date, time and other settings be congured manually using the following procedures.
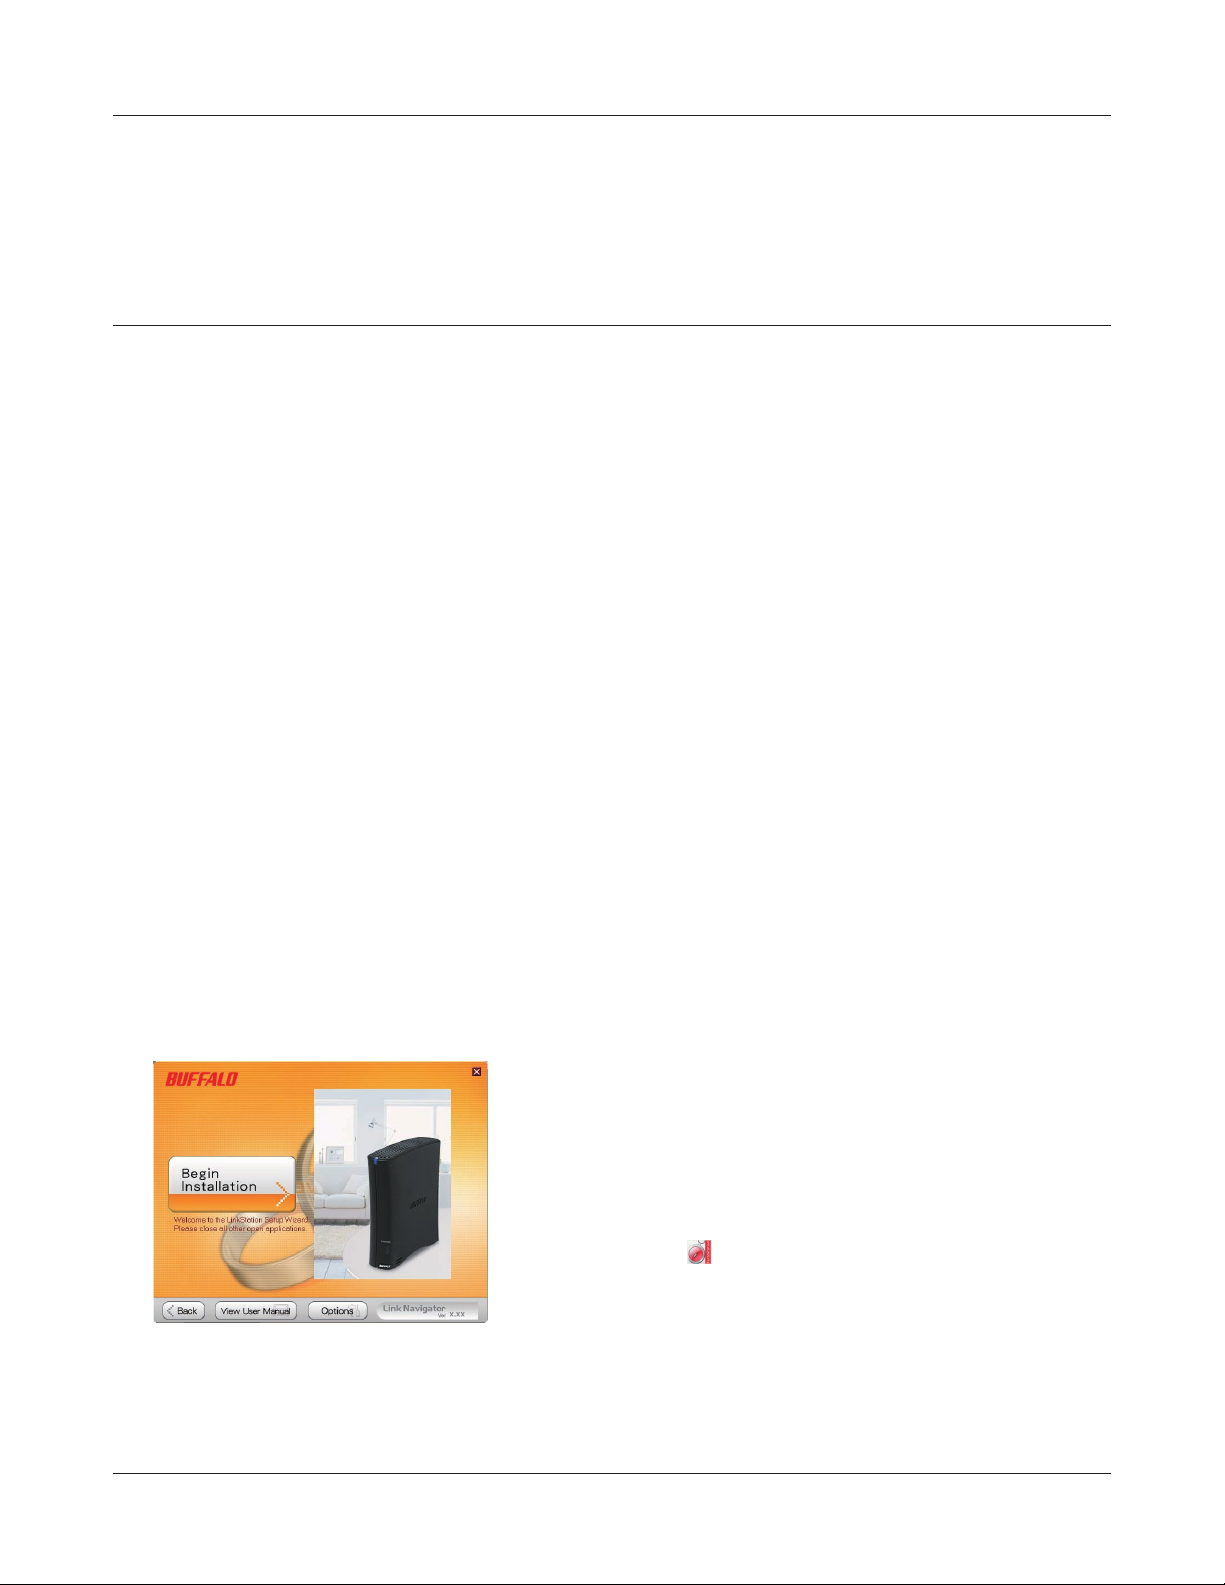
Insert the Utility CD in your computer’s CD drive. LinkNavigator will launch.
1
Note:– If you are using Windows 7 or Vista, the autoplay screen may appear. Click ‘Run LSNavi.
exe’.
2
– If “Do you want to allow the following program to make changes to this computer ?” is
displayed in Windows 7, please click ‘Yes’.
– If “Your permission is necessary to continue program” is displayed in Windows Vista,
please click ‘Continue’.
– For Mac OS, double-click on the LinkNavigator icon in the utility CD.
– Temporarily disable your anti-virus software and software rewall before installing. You
may not be able to set up this device if they are enabled. Refer to the software’s manual
for instructions. After setup is complete, re-enable the software.
Click [Begin Installation].
The example here shows the Windows' screen (on LS-XHL).
Note: – If this screen is not displayed on Windows,Double
click on
CD.
icon (LSNavi.exe) included in the Utility
LinkStation Setup Manual
3
Chapter1 Setup
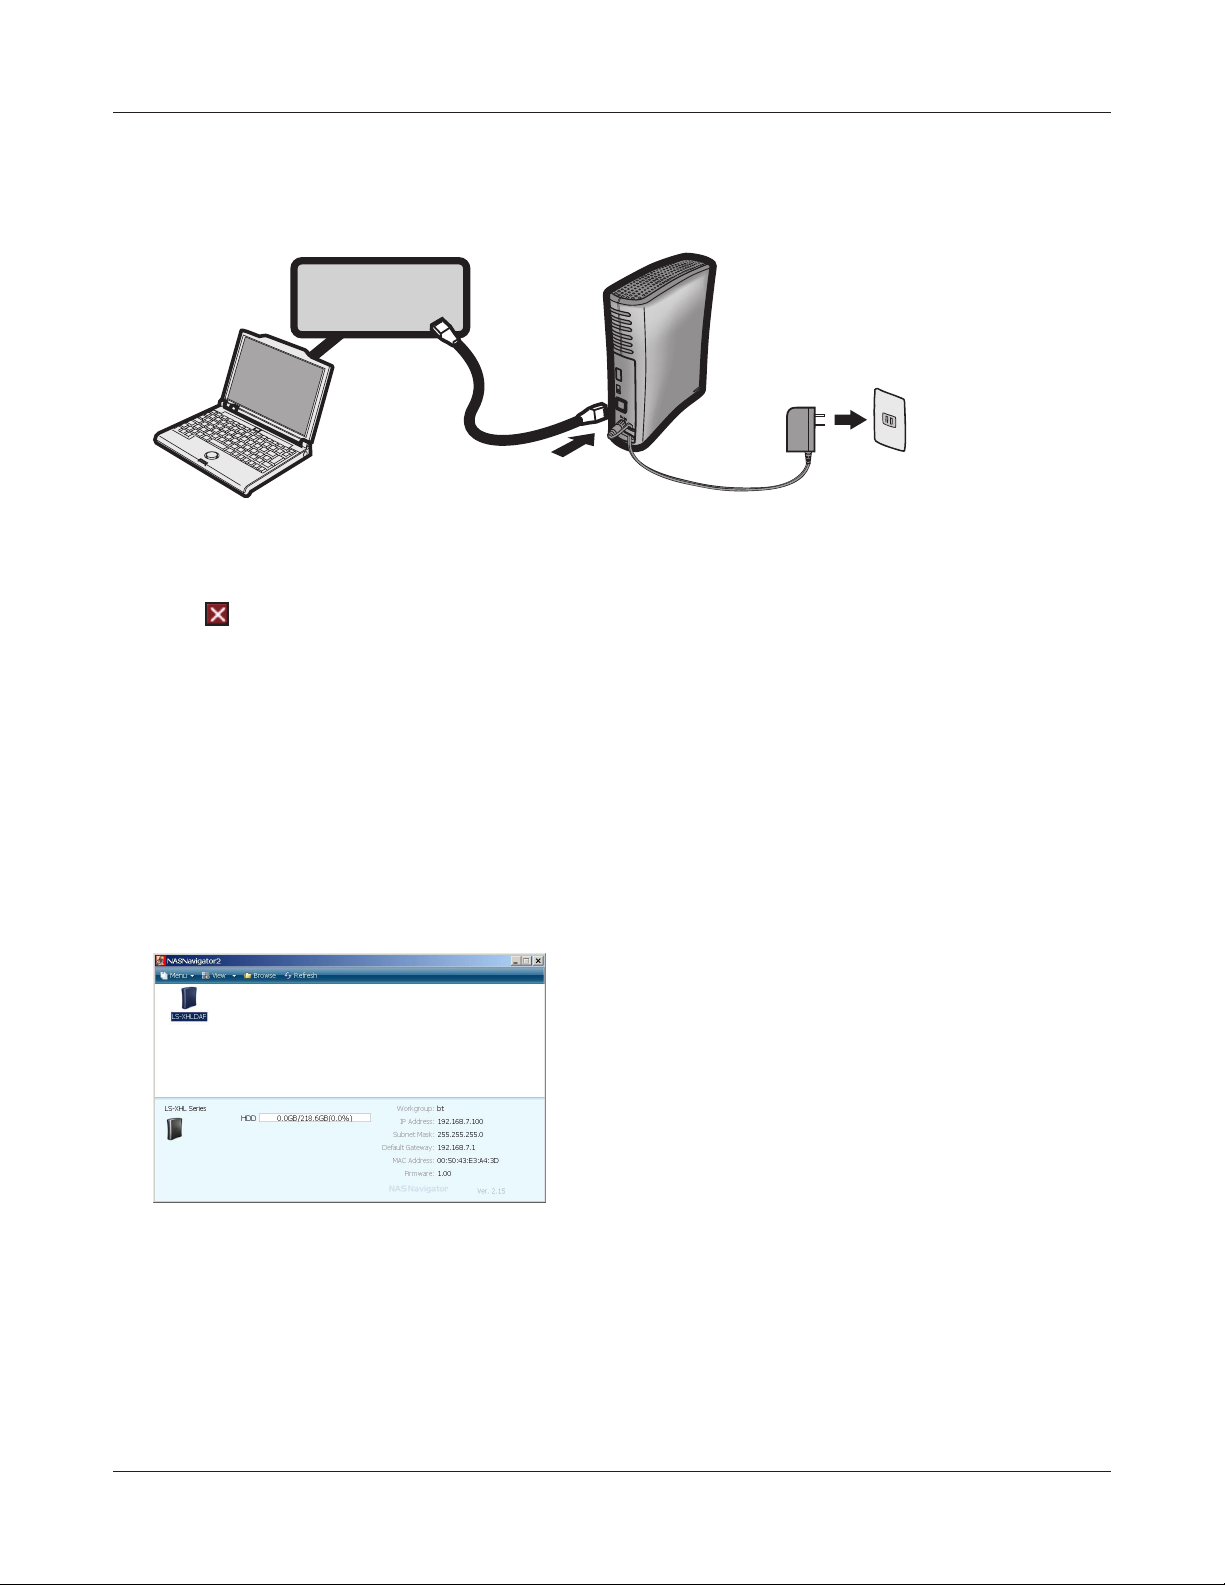
Follow the instructions on the screen to connect and set up (initialize) the LinkStation.
3
Hub or Router
Now you have completed the setup (initial settings) of your LinkStation.
4
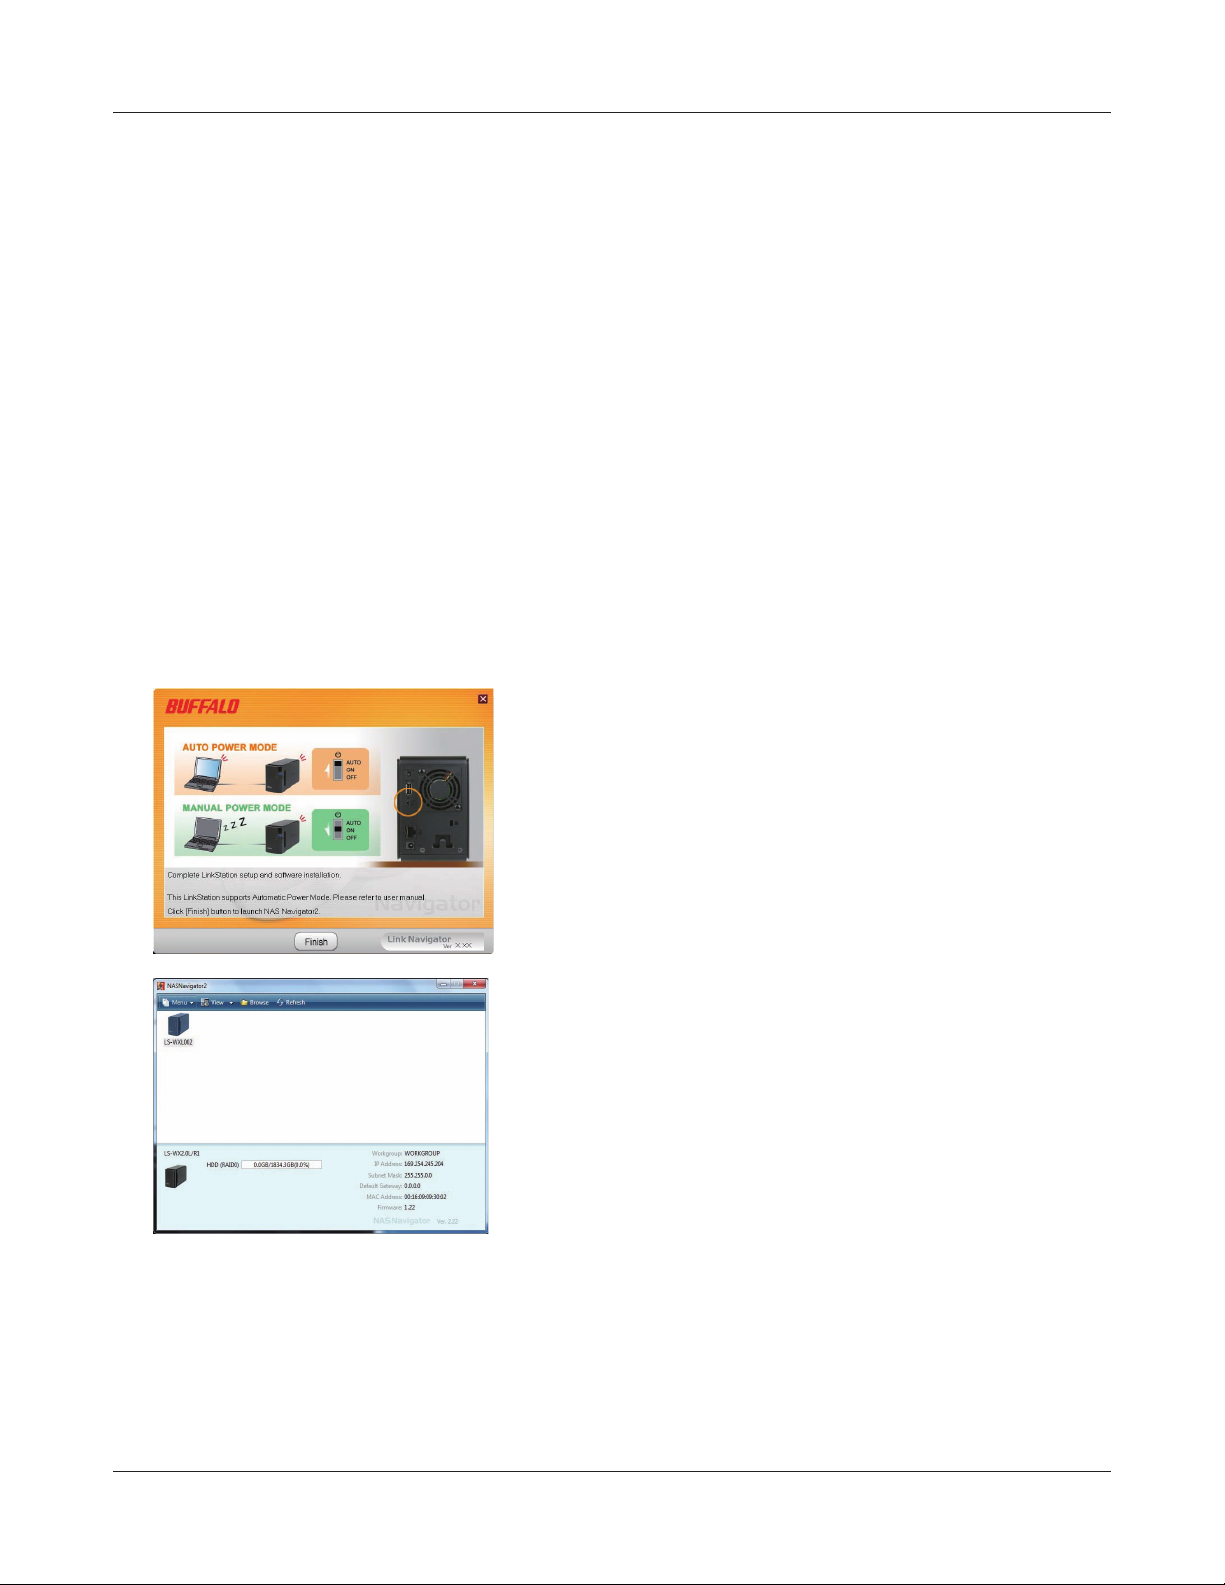
Click
Then, open the shared folder of the LinkStation using NAS Navigator2 which was installed
during setup.
Launch NAS Navigator2.
5
Note: – On Windows, click [start] - [All Programs] - [BUFFALO] - [BUFFALO NAS Navigator] - [BUF-
to close the LinkNavigator.
FALO NAS Navigator2].
– On Mac OS, double click on [NAS Navigator2] icon in the Dock.
6
Double click on the LinkStation's icon.
The example here shows the Windows' screen (on
LS-XHL).
The shared folder in the LinkStation is displayed.
7
Note: – On Mac OS, LinkStation is either mounted as a drive icon on the desktop, or displayed in
the sidebar on the Finder.
Now you have completed the setup. You can now use the LinkStation’s shared folder to save les just
like another hard drive.
LinkStation Setup Manual
4
Chapter1 Setup
LinkNavigator Setup (LS-WXL)
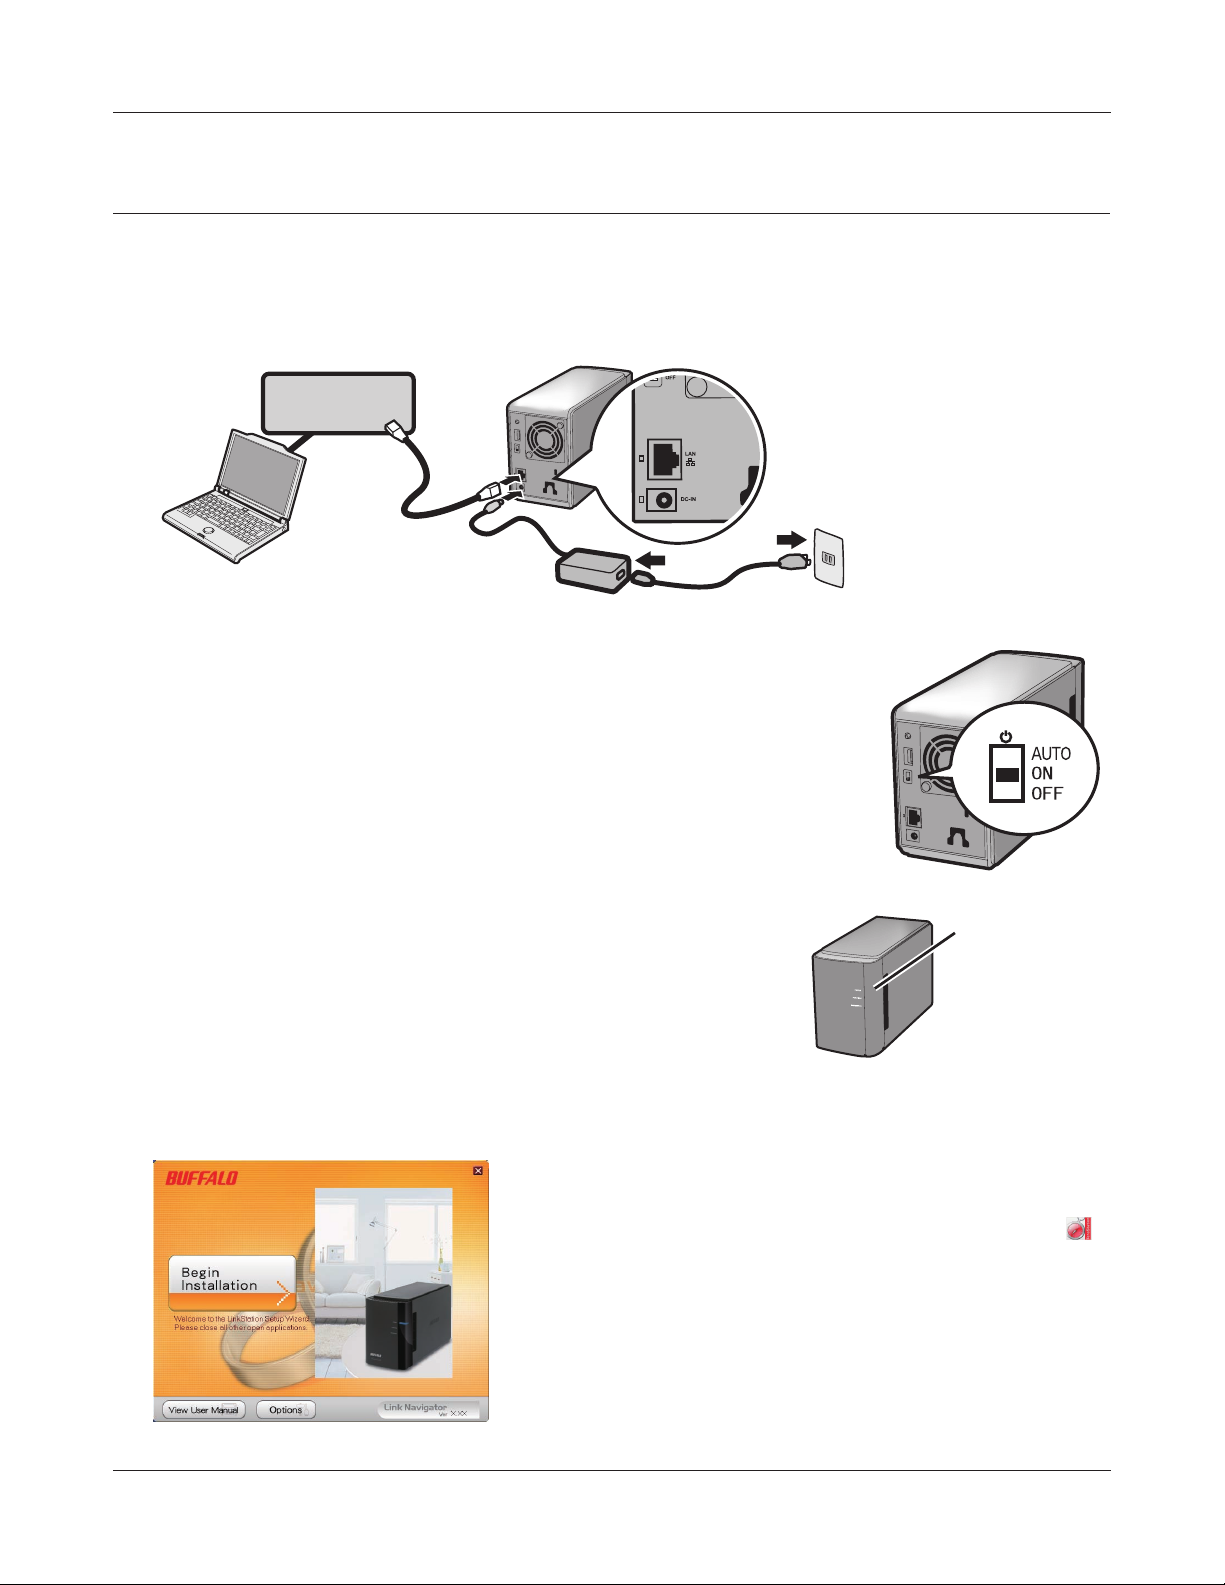
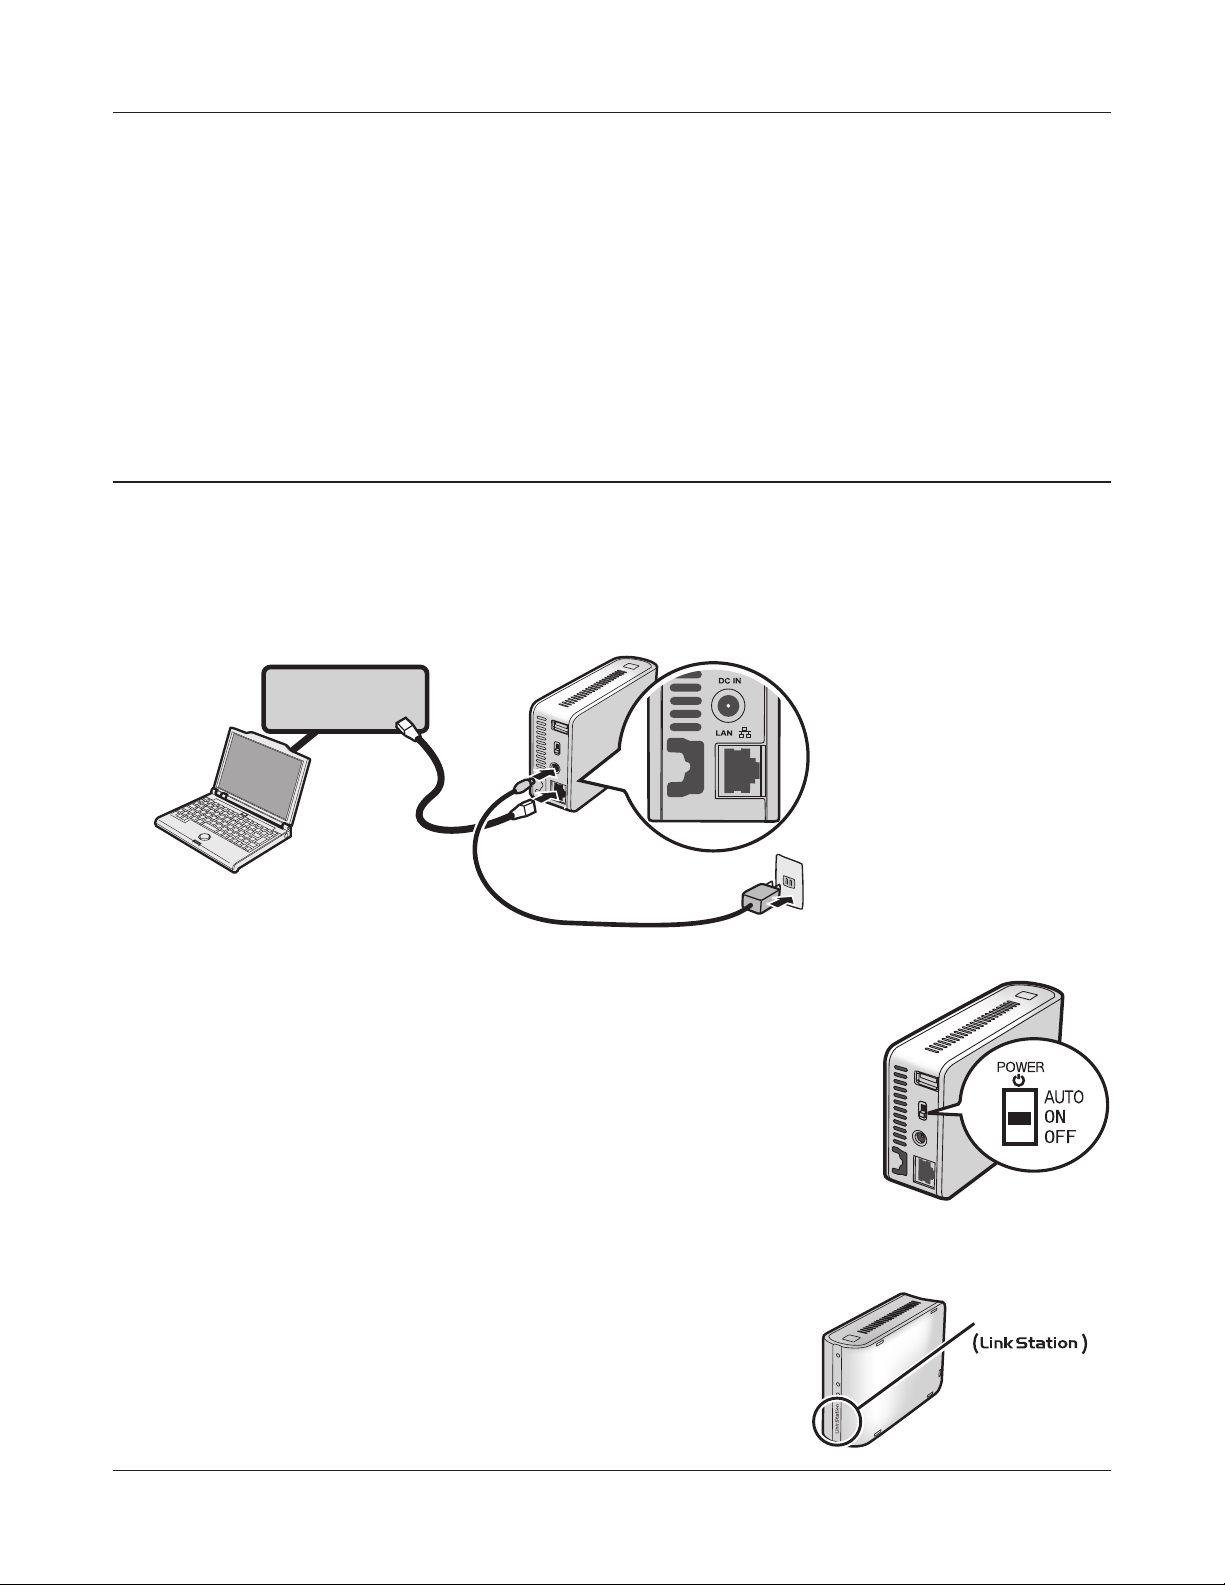
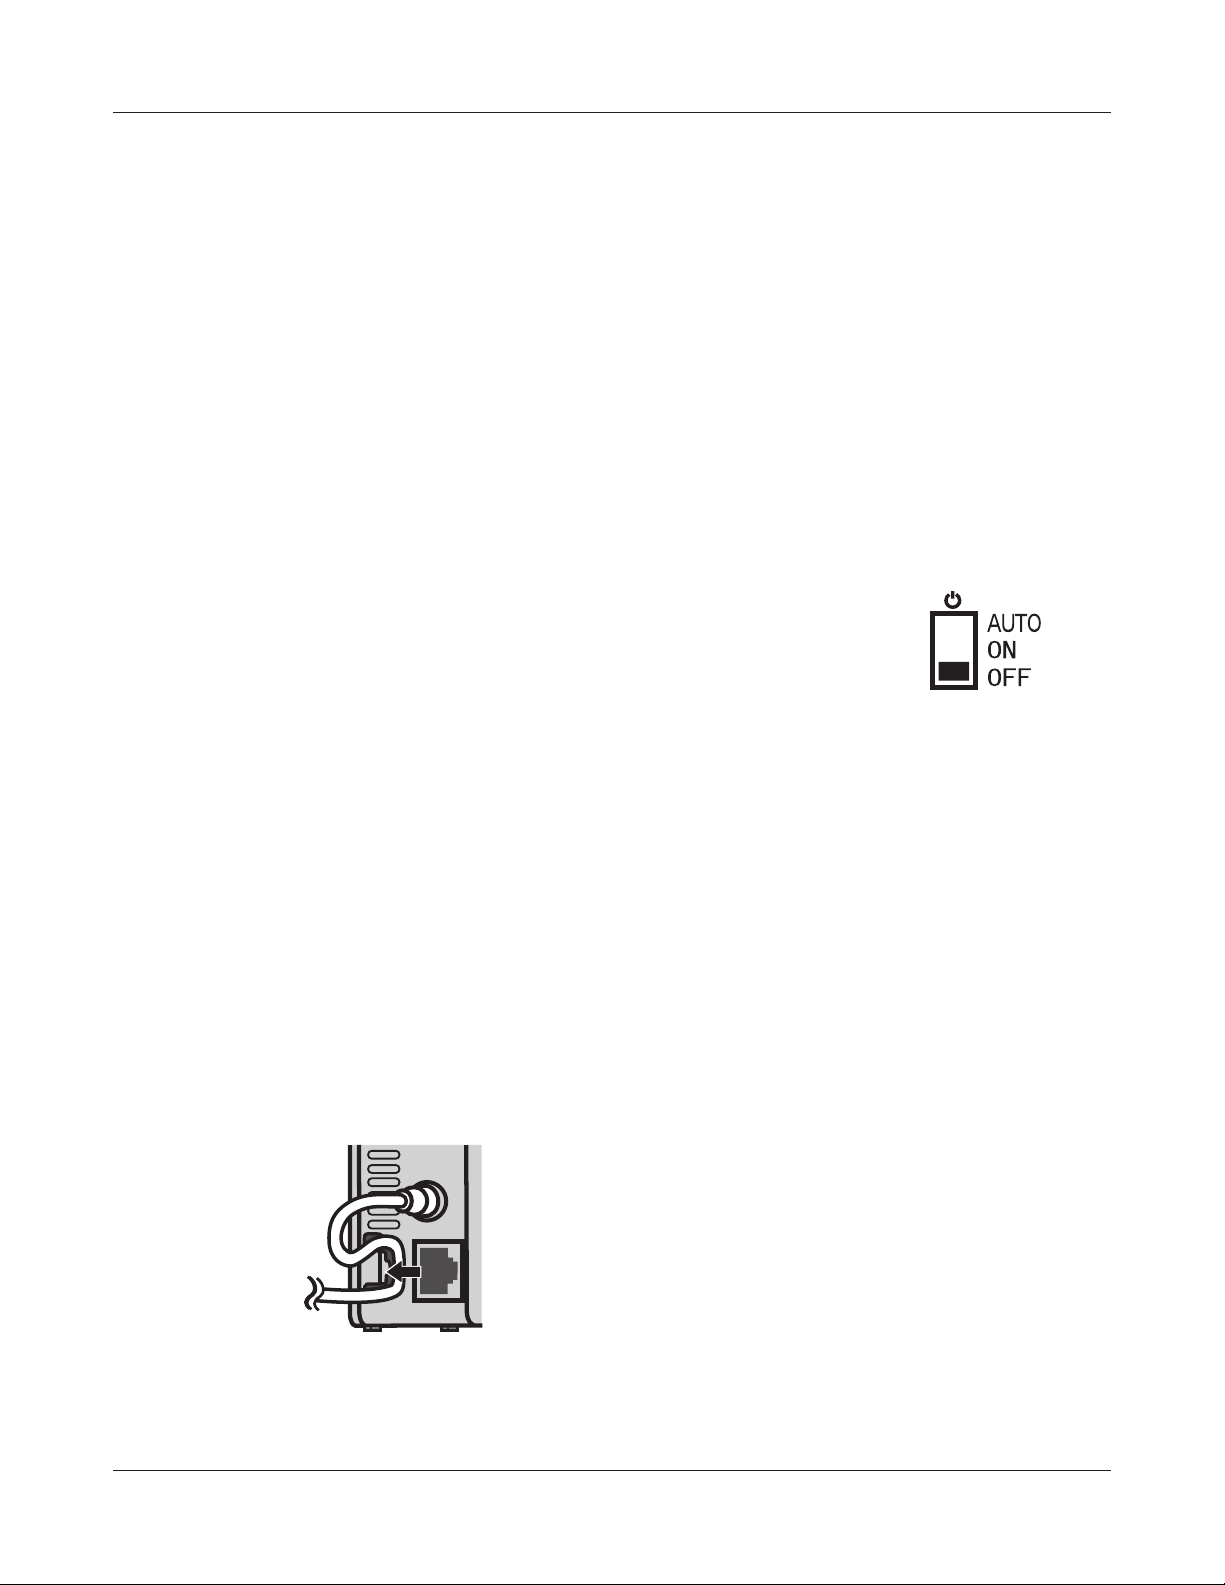
Connect an Ethernet cable and AC adaptor to the LinkStation.
1
The Ethernet cable will “click” and lock in place when inserted properly.
ИхвптТпхфет
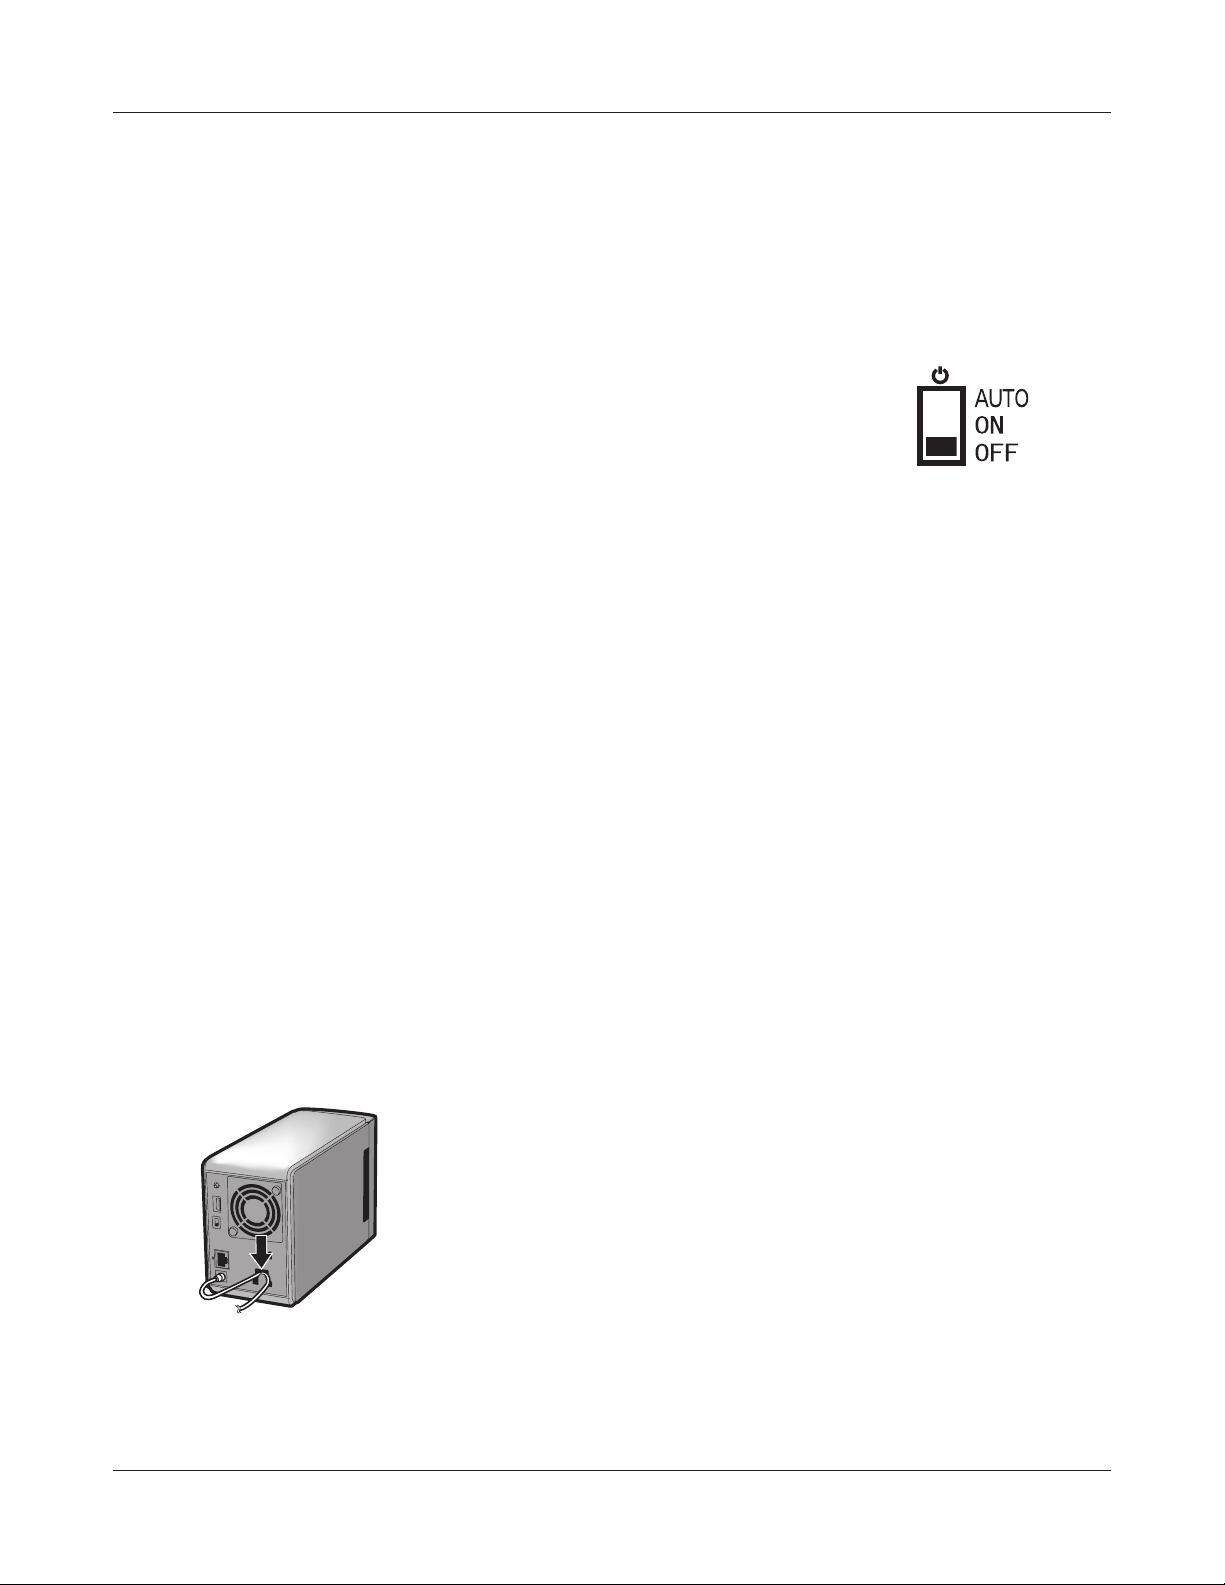
Move the power mode switch on the back of the LinkStation to ‘on’.
2
Note: – Do not set the power mode switch to ‘auto’ at this time. After
the initial installation is complete, then the auto power mode
may be used.
Wait until the power LED stops blinking and becomes a steady blue.
3
Insert the Utility CD in your computer’s CD drive. LinkNavigator will launch.
4
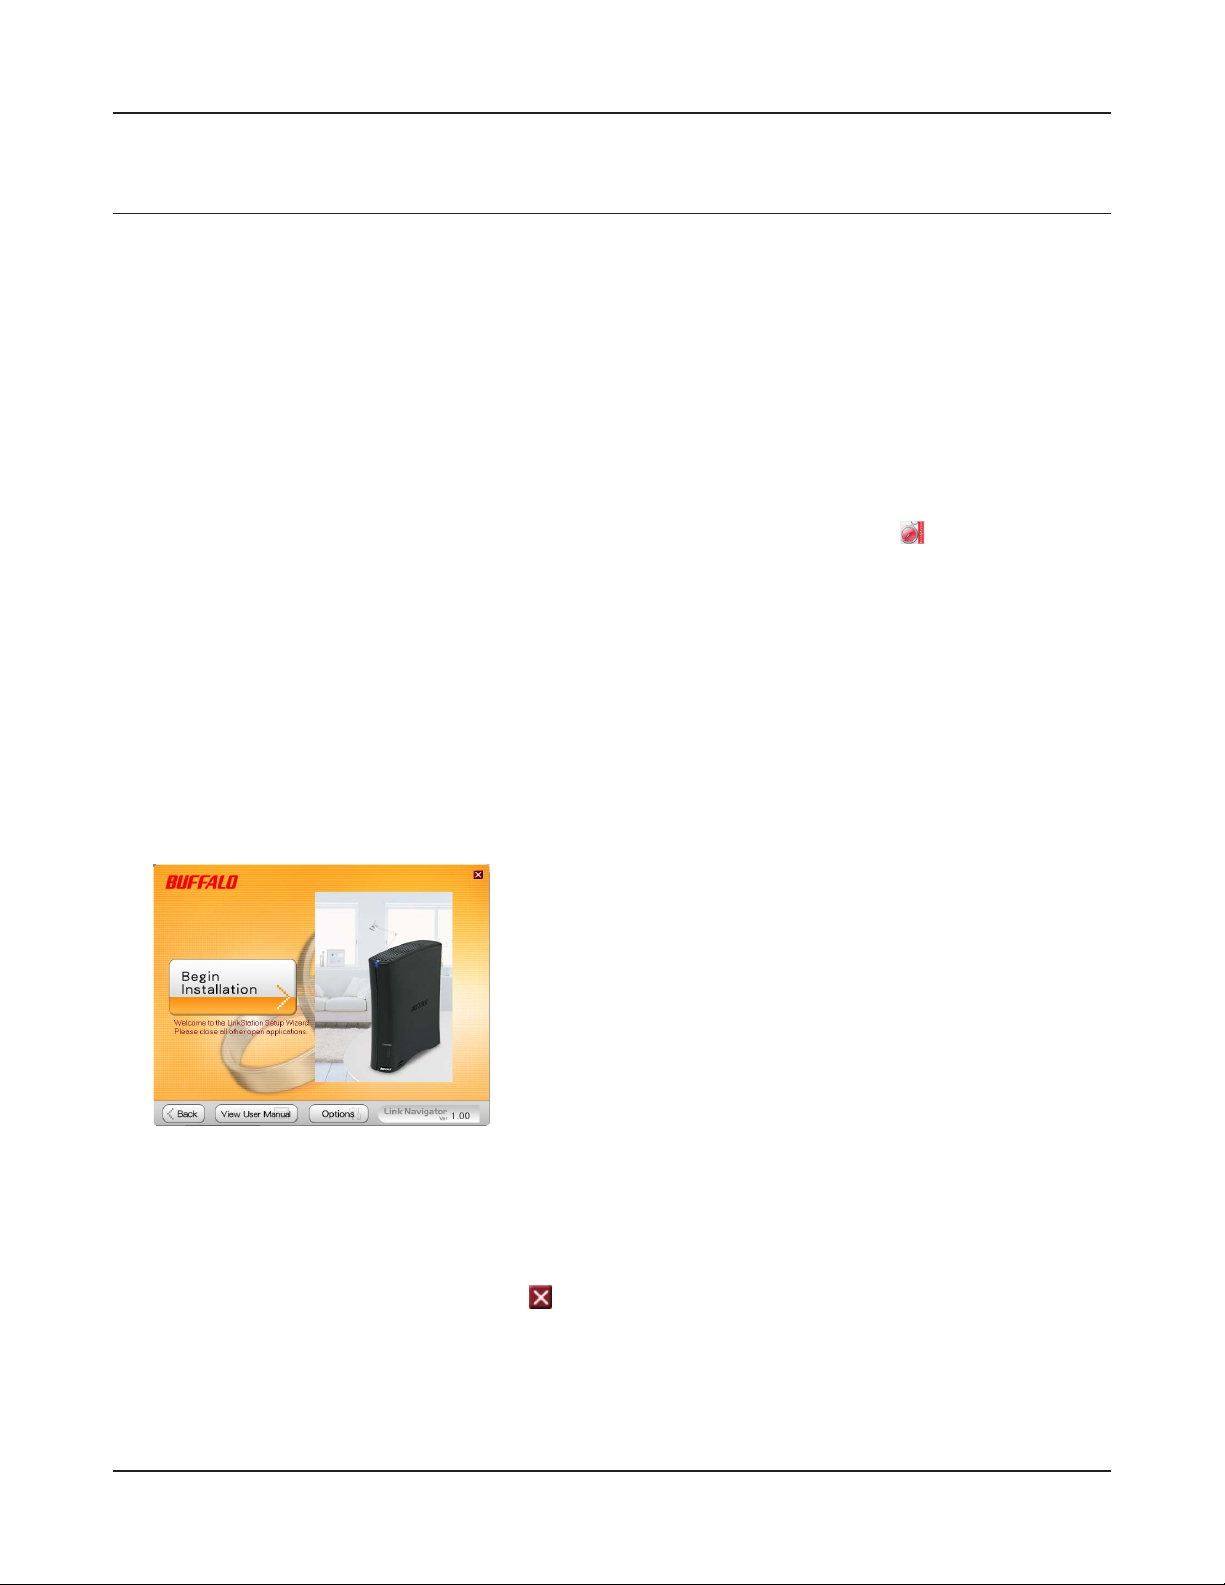
Click ‘Begin Installation’.
If LinkNavigator doesn’t open,
open the Utility CD and double-click ‘LSNavi.exe’ icon .
The screen is an example of execution with Windows.
Power LED
ໃʳʽʡ
LinkStation Setup Manual
5
Chapter1 Setup
Note: – If you are using Windows 7 or Vista, the autoplay screen may appear. Click ‘Run LSNavi.
exe’.
– If “Do you want to allow the following program to make changes to this computer?” is
displayed in Windows 7, please click ‘Yes’.
– If “Your permission is necessary to continue program” is displayed in Windows Vista,
please click ‘Continue’.
– For Mac OS, double-click on the LinkNavigator icon in the utility CD.
– Temporarily disable your anti-virus software and software rewall before installing. You
may not be able to set up this device if they are enabled. Refer to the software’s manual
for instructions. After setup is complete, re-enable the software.
– If your computer doesn’t have a CD drive, you may download the LinkNavigator soft-
ware from www.bualotech.com.
.
5
6
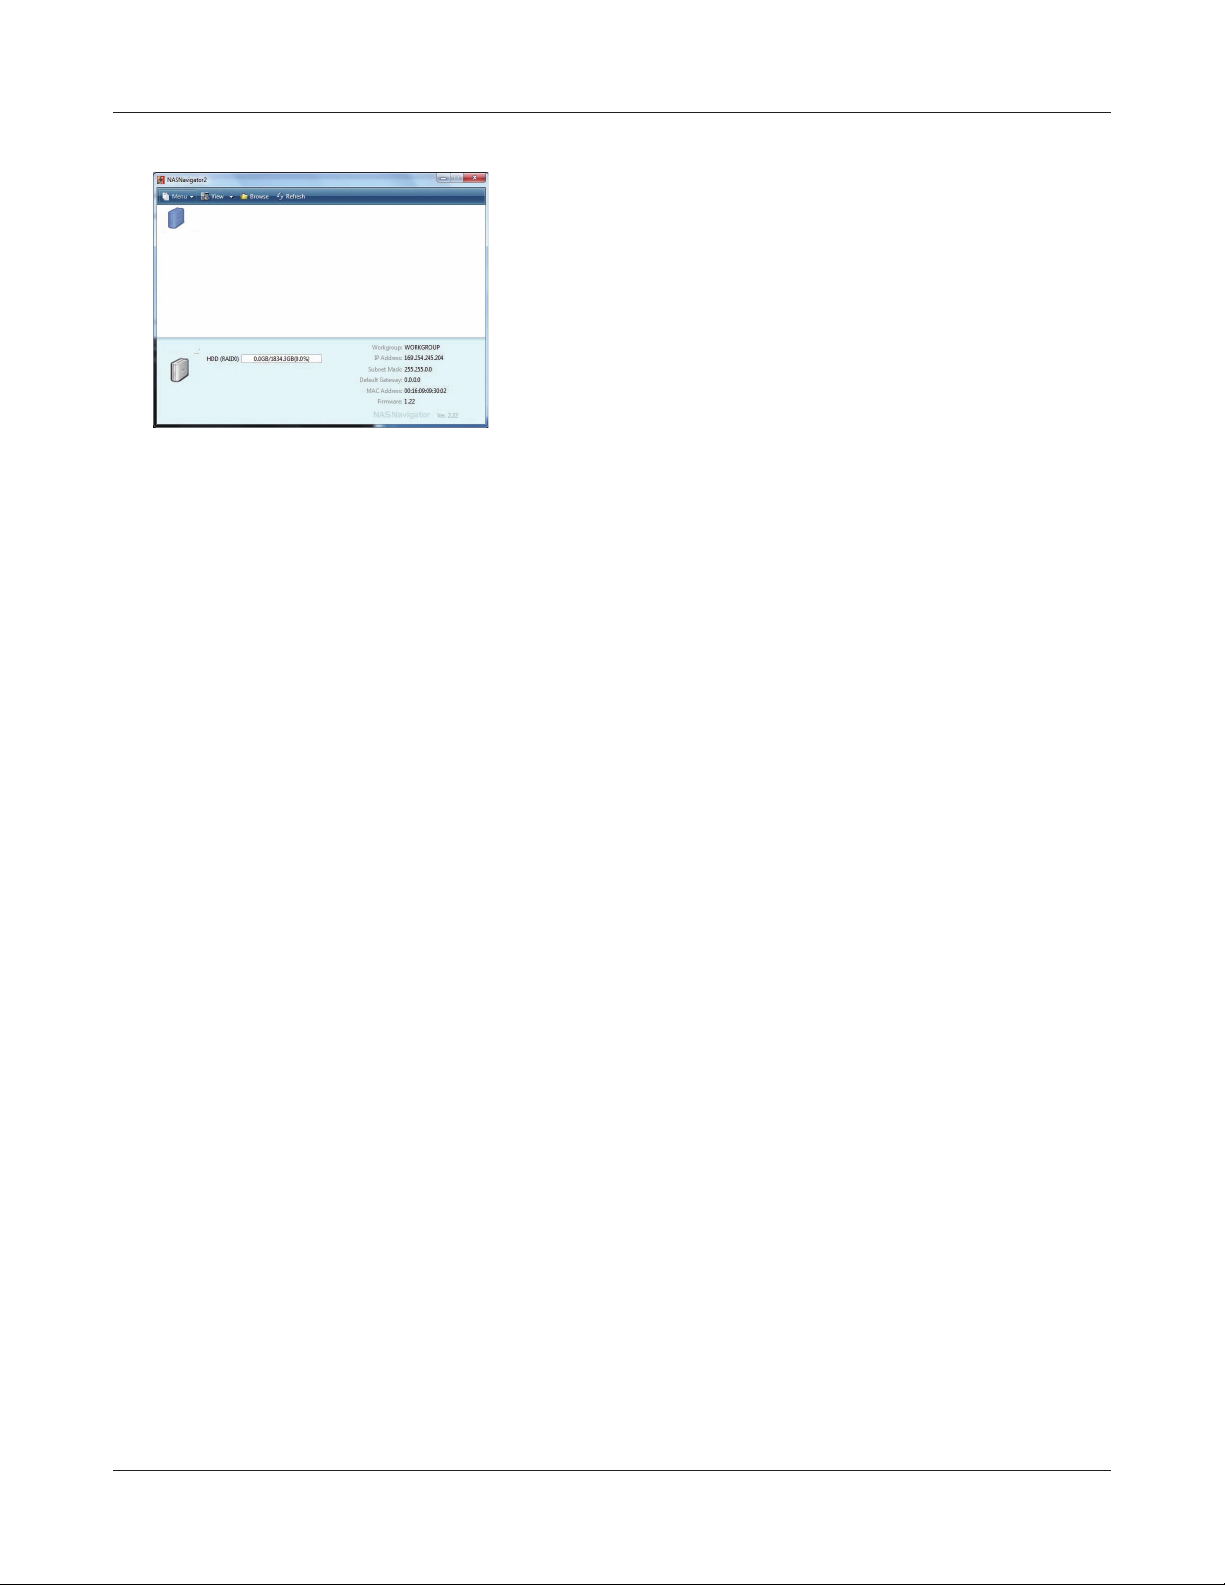
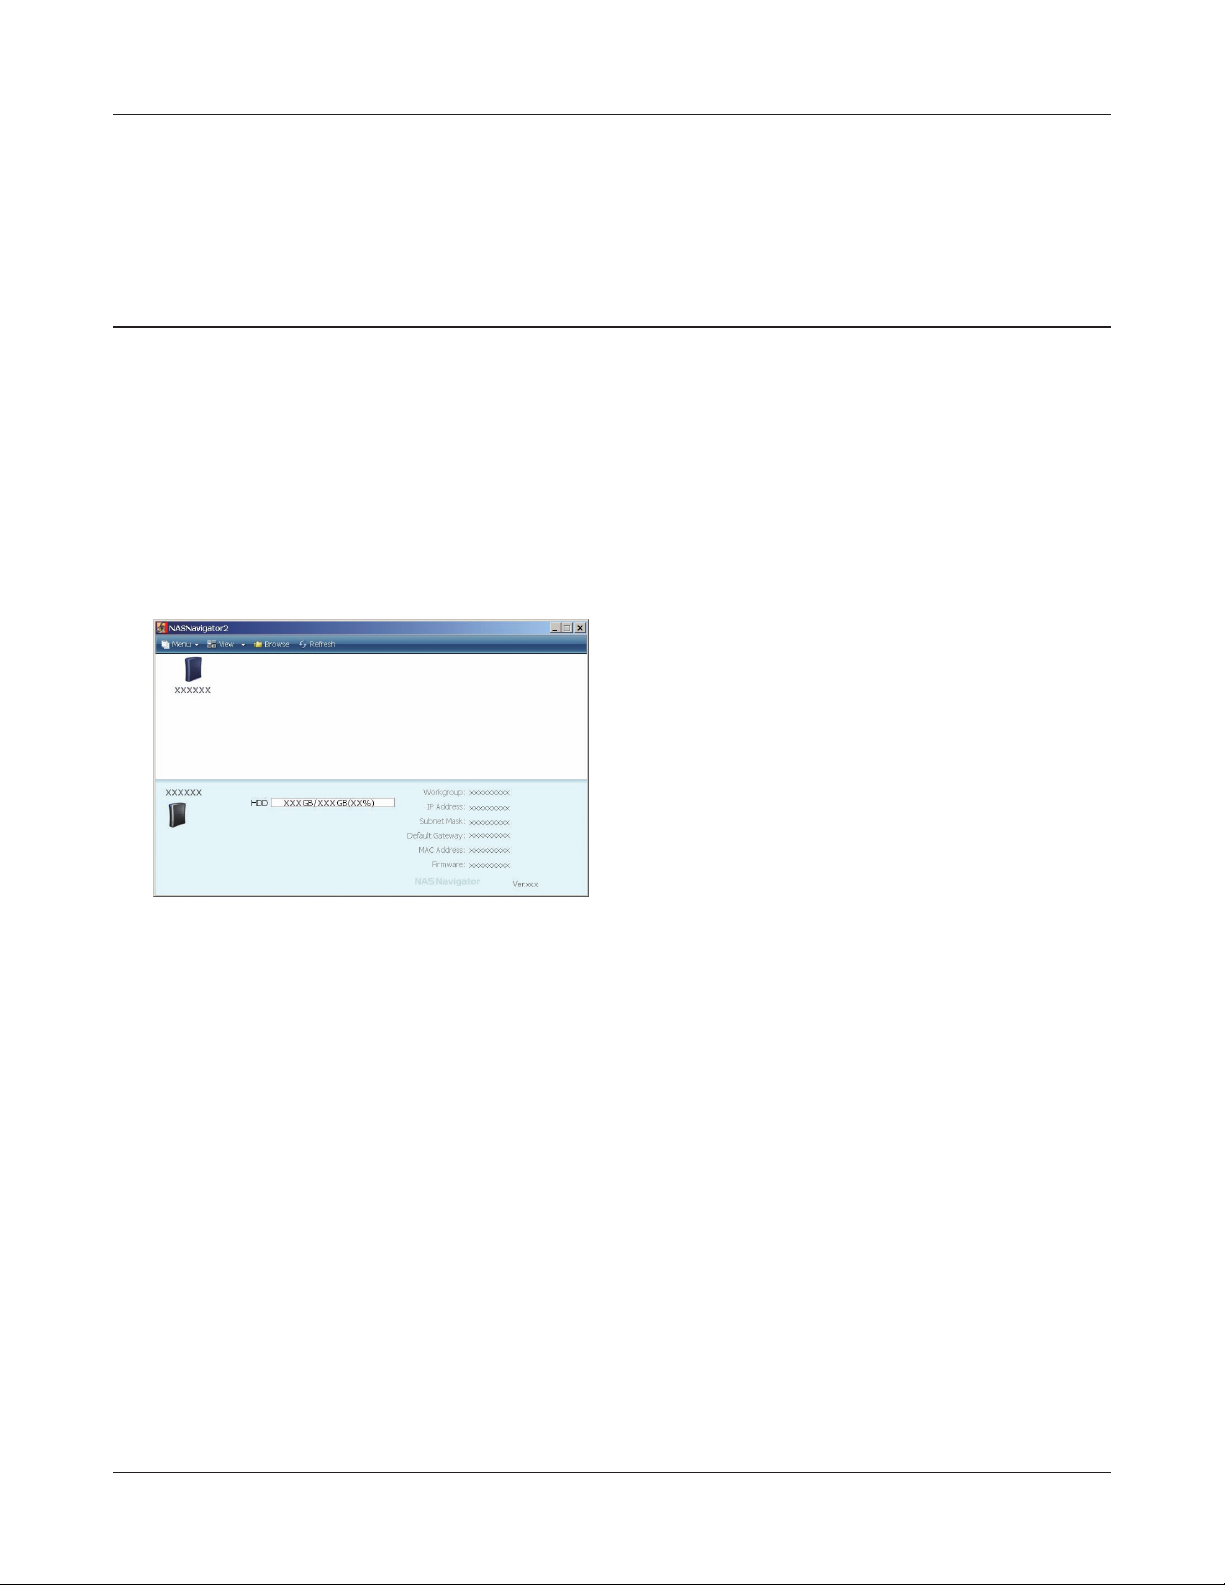
Click 'Finish'. NAS Navigator2 starts automatically.
In NAS Navigator2, double-click your LinkStation’s icon.
The LinkStation’s shared folder opens. You can now use the LinkStation’s shared folder to save
7
les just like any other hard drive.
LinkStation Setup Manual
6
Chapter1 Setup
You can now use the LinkStation’s shared folder to save les just like another hard drive.
Note: – With Mac OS, the LinkStation is mounted as a drive icon on the desktop, or it is displayed
in the sidebar of the Finder.
Setup is now complete.
LinkNavigator Setup (LS-WSXL)
Connect an Ethernet cable and AC adaptor to the LinkStation.
1
The Ethernet cable will “click” and lock in place when inserted properly.
ИхвптТпхфет
Move the power mode switch on the back of the LinkStation to ‘On’.
2
Note: – Do not set the power mode switch to “Auto” at this time.
After the initial installation is complete, then the auto
power mode may be used.
Wait until the power LED stops blinking and
3
becomes a steady blue.
LinkStation Setup Manual
Power LED
7

Chapter1 Setup
Insert the Utility CD in your computer’s CD drive. LinkNavigator will launch.
4
Click ‘Begin Installation’.
Note:– If LinkNavigator doesn’t open, open the Utility CD and double-click ‘LSNavi.exe’.
– If you are using Windows 7 or Vista, the autoplay screen may appear. Click ‘Run
LSNavi.exe’.
5
– If “Do you want to allow the following program to make changes to this
computer ?” is displayed in Windows 7, please click ‘Yes’.
– If “Your permission is necessary to continue program” is displayed in Windows
Vista, please click ‘Continue’.
– For Mac OS, double-click on the LinkNavigator icon in the utility CD.
– Temporarily disable your anti-virus software and software rewall before
installing. You may not be able to set up this device if they are enabled. Refer to
the software’s manual for instructions. After setup is complete, re-enable the
software.
– If your computer doesn’t have a CD drive, you may download the LinkNavigator
software from www.bualotech.com.
Click 'Finish'. NAS Navigator2 starts automatically.
LinkStation Setup Manual
8
Chapter1 Setup
6
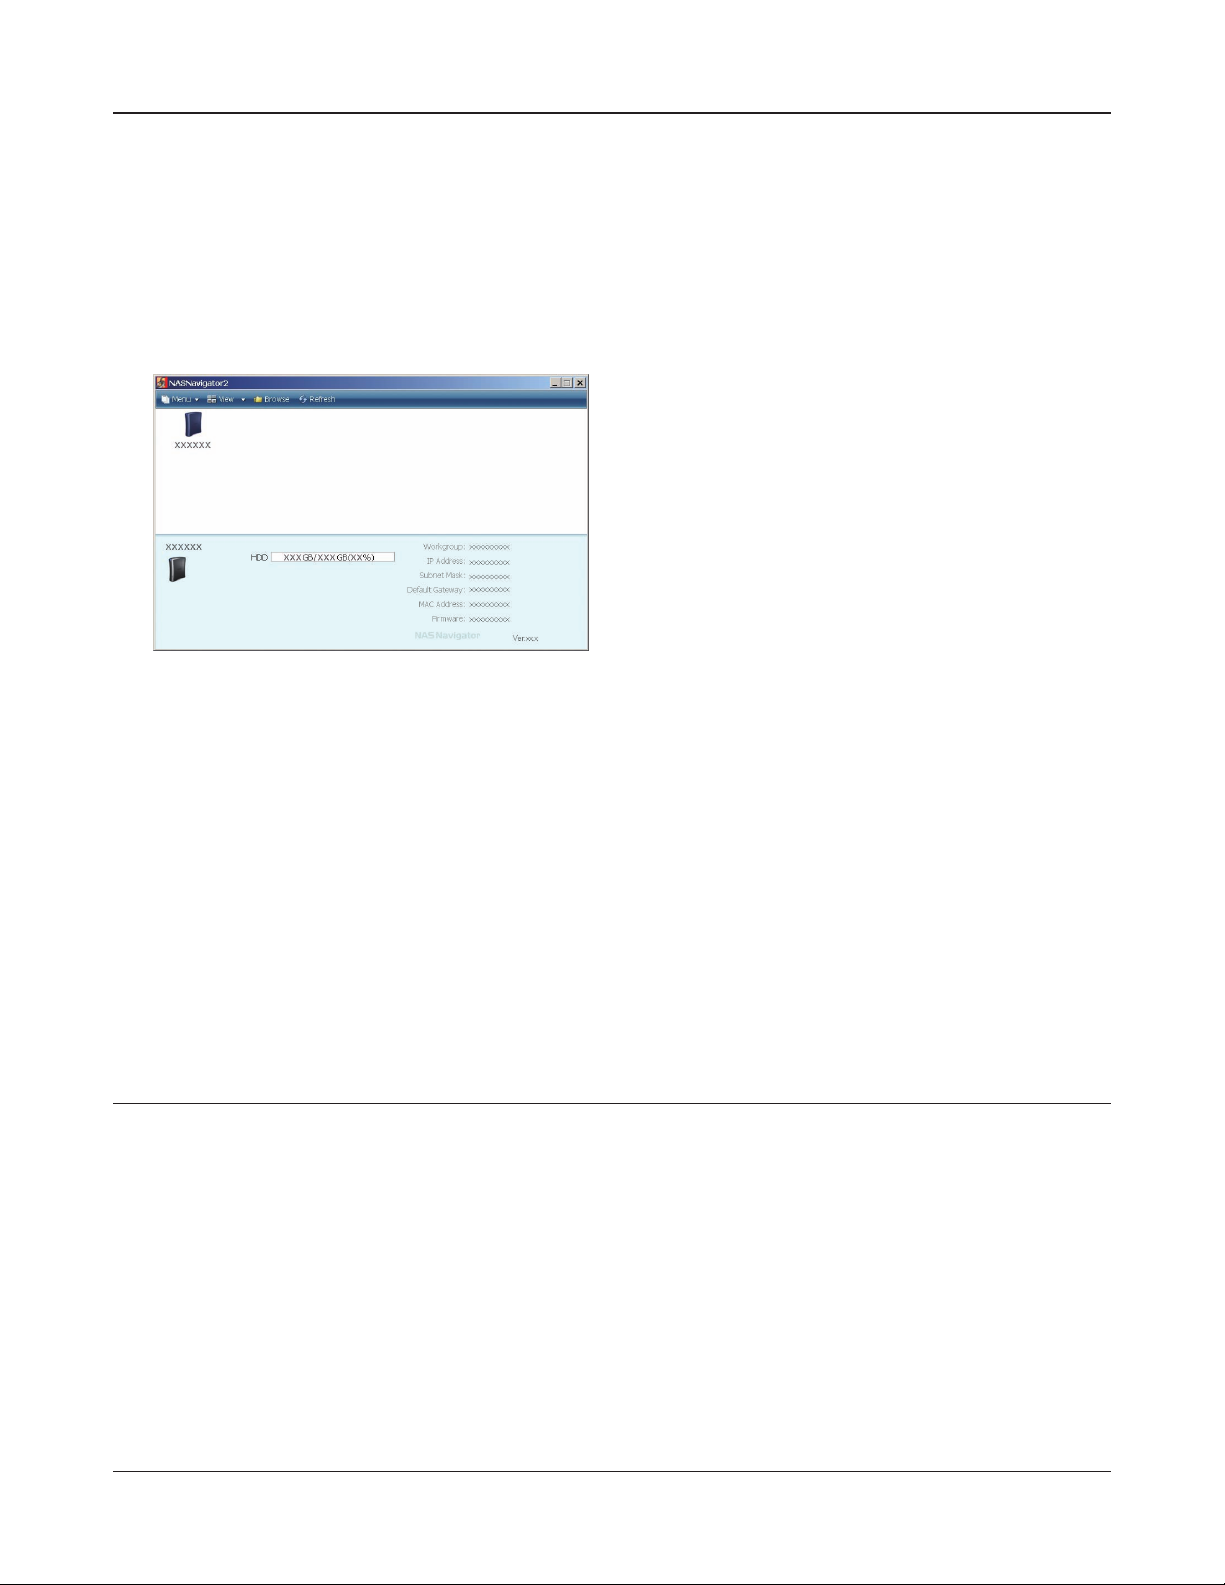
The shared folder in LinkStation is displayed.
7
You can now use the LinkStation’s shared folder to save les just like another hard drive.
Note: – On Mac OS, LinkStation is mounted as a drive icon on a desktop screen or it is displayed
in the sidebar of Finder.
Setup is now complete.
If the screen on the left side is displayed, double-click
the icon of LinkStation displayed on the screen of NAS
Navigator2.
LinkStation Setup Manual
9
Chapter1 Setup
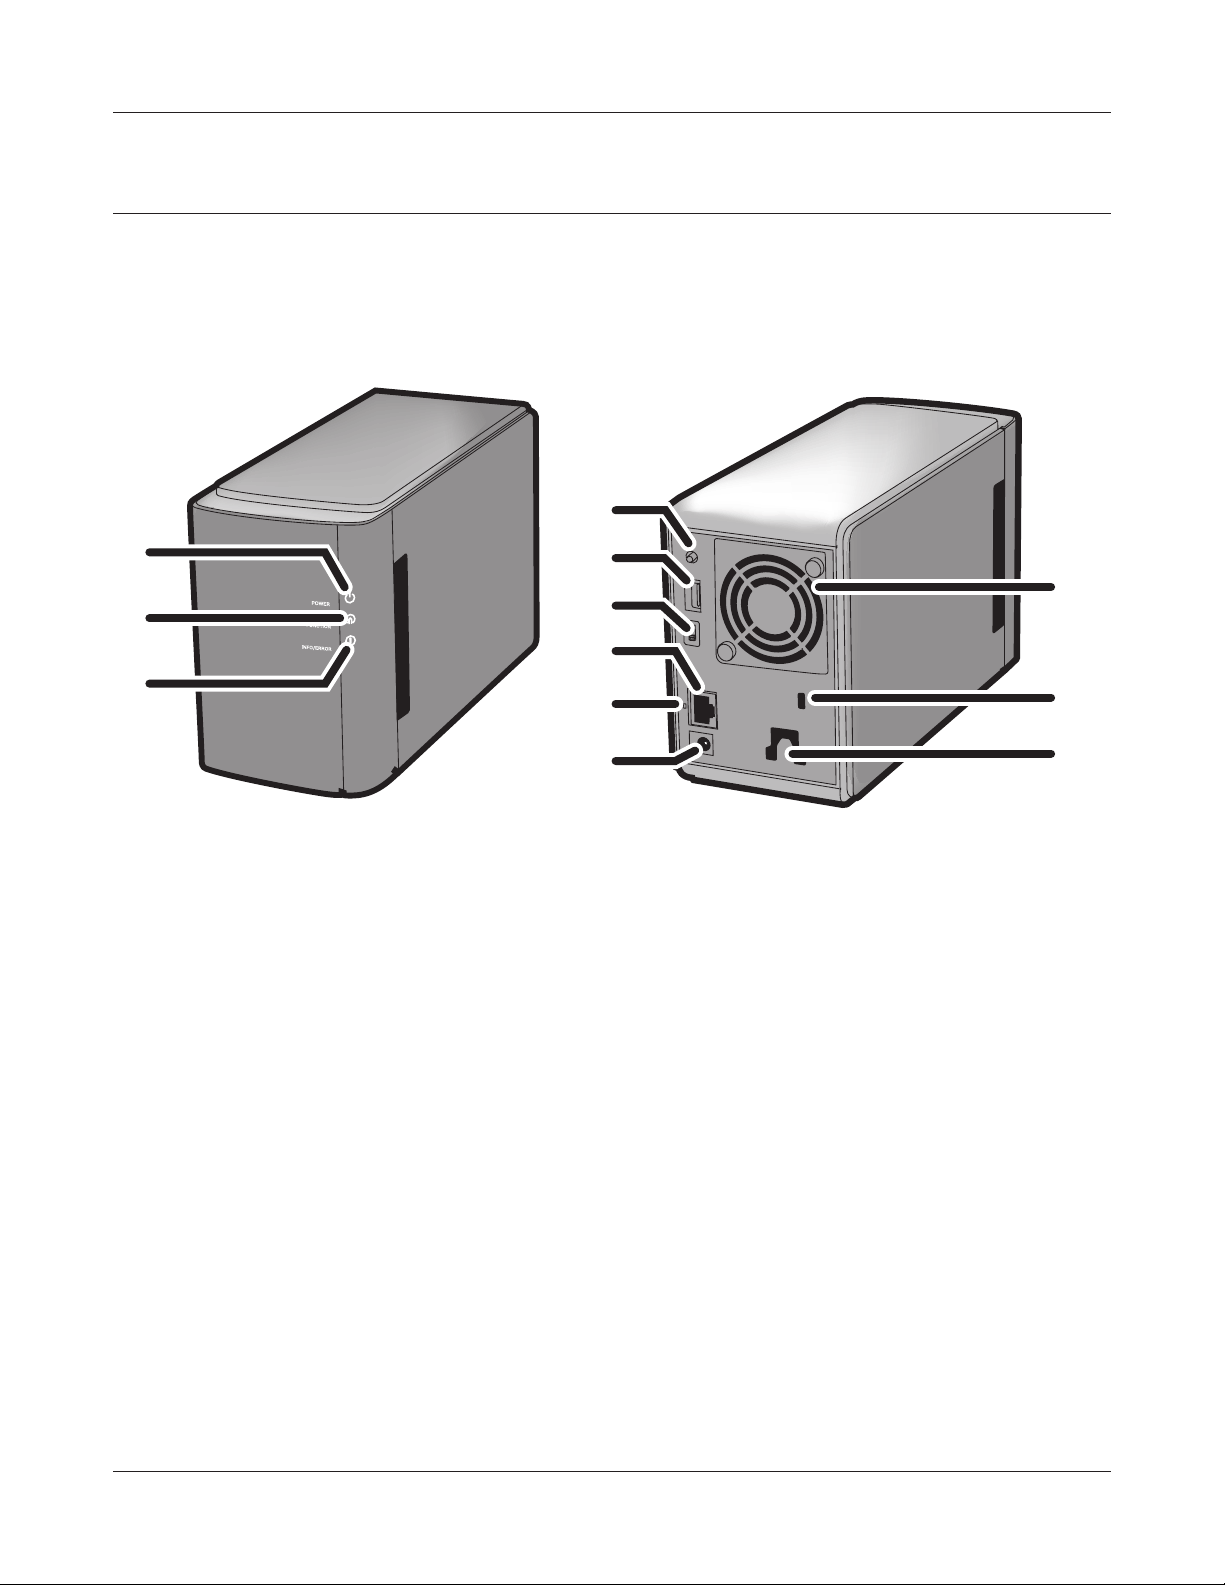
Diagrams and Layout (LS-XHL, LS-CHL)
The following list shows the name of each component of the LinkStation.
Front
Power LED
1
1
Blue light is ON: Power ON
Blue light is OFF: Power OFF
Amber light is ashing: The amber light ashes if there is a
message. Flashing pattern varies depending
on each message. For more information, refer
to "Status LED" on page 72.
Red light is ashing: Red light ashes when an error occurs.
Flashing pattern varies depending on each
message. For more information, refer to "Status LED" on page 72.
2
Function switch
2
This is used for the Direct Copy function (function to copy
media les on storage device to LinkStation), for removing USB devices which is connected to the LinkStation or
for initializing settings of the LinkStation. Refer to "Direct
Copy" on page 60, "Remove a USB device" on page 61, and
"Initialization" on page 43 for more information.
LinkStation Setup Manual
1010
Chapter1 Setup
Back
3
4
Fan
3
Do not block the fan when installing the unit.
USB Connector (USB 2.0/1.1 Series A)
4
A USB Mass Storage device, a card reader (except one that
recognizes more than 2 memory cards), a UTP device, such
as a digital camera, compatible UPS devices, or a compatible
USB Printer, may be connected to the LinkStation USB port
on the back of the unit. USB devices such as USB hub, mouse
or keyboard may not be used.
6
7
5
5
8
Power Mode Switch
5
AUTO: Power the LinkStation automatically when the PC is
on.
ON: Turn the LinkStation ON.
OFF: (The factory default) Turn the LinkStation OFF.
LAN Port Connect a Ethernet cable.
6
The LED next to the LAN port is the LINK/ACT LED. The LED
will turn green when the unit is Linked, and flashes green
when there is network activity.
Power Connector Connect the AC cable.
7
When the AC adapter is connected, the LED light next to the
power connector will turn green.
Hook Used as a strain relief for AC Adapter cable..
8
7
LinkStation Setup Manual
8
1111
Chapter1 Setup
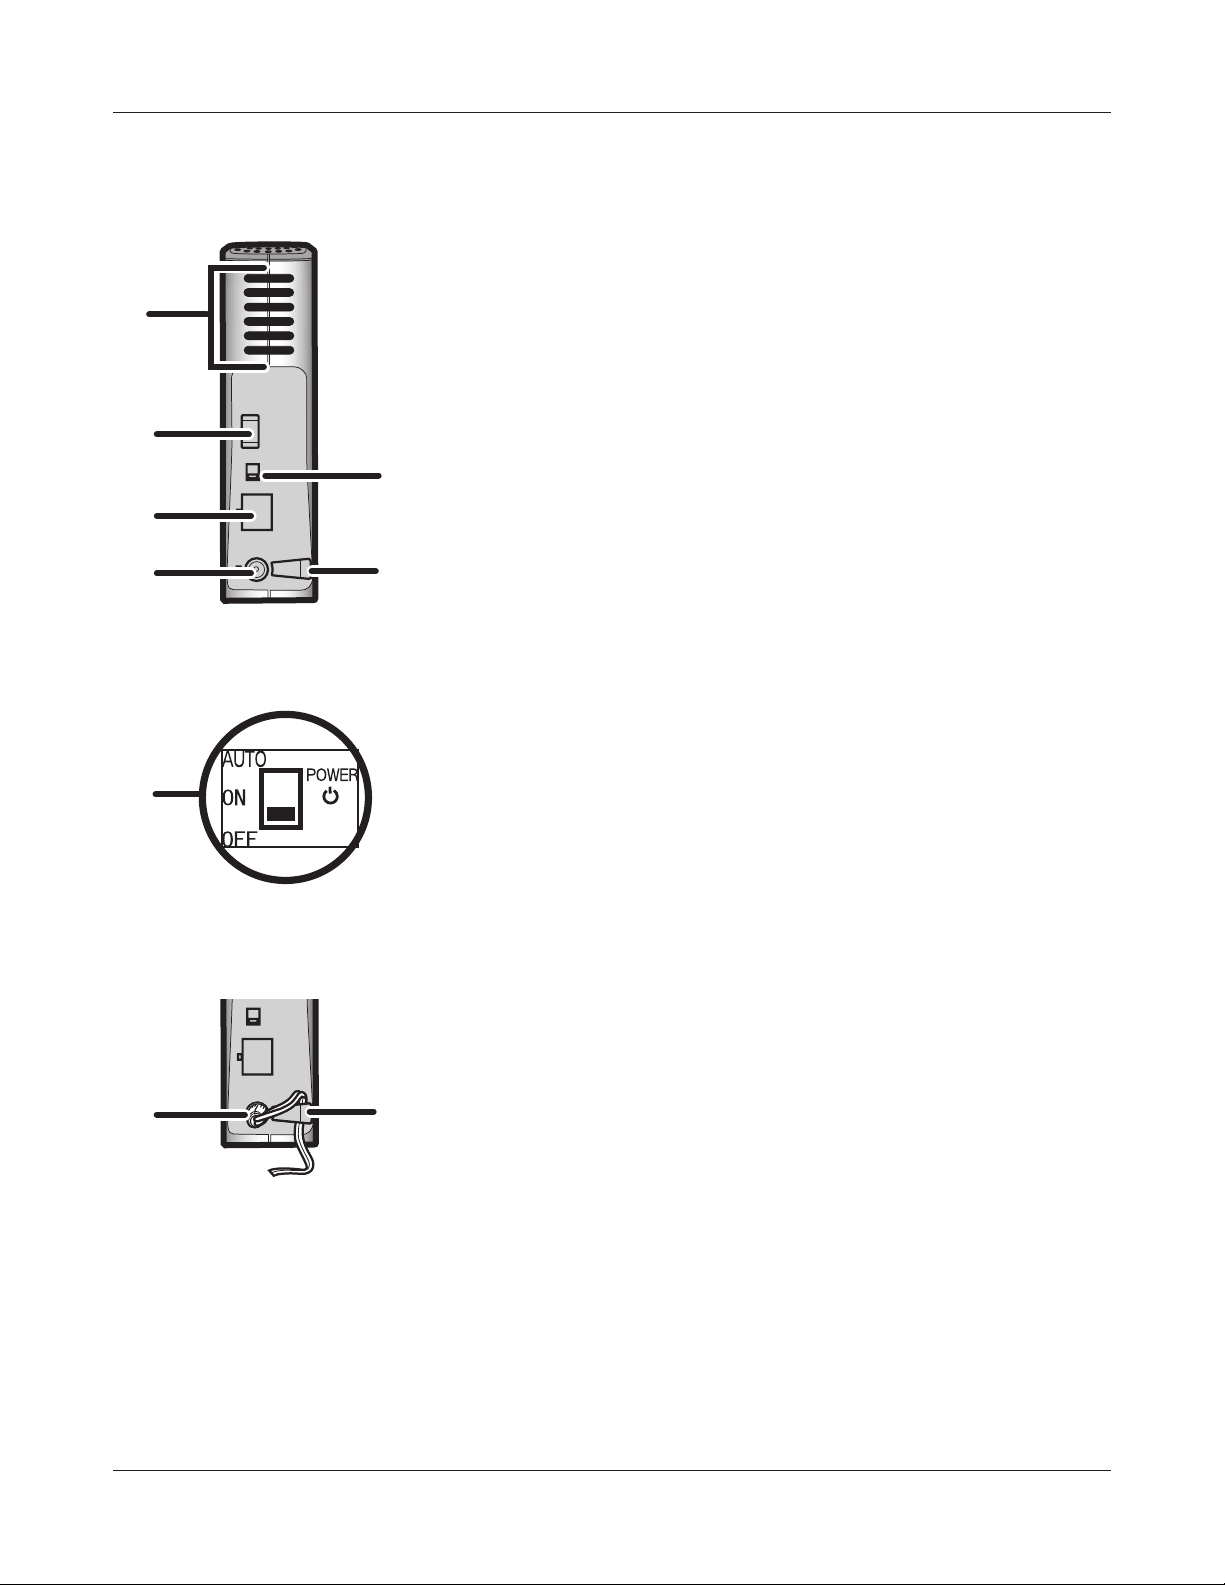
Diagrams and Layout (LS-WXL)
The following list shows the name of each component of the LinkStation.
Front
1
2
3
Back
4
5
6
7
8
9
Note: – Please do not lift the LinkStation by its front cover. It might come o.
1 Power LED
Blue LED: Power on.
LED is o: Power o.
Blinks blue: During startup / shutdown.
10
11
12
2 Function LED
The Function LED glows blue when direct copy is nished, during initialization, and during
USB dismounting (about 60 seconds). During direct copy the Function LED blinks blue.
3 Info/Error LED
The Info/Error LED blinks orange when there’s a message and red when there’s an error.
4 Function Switch
The Function Switch initiates direct copy, dismounts USB devices, and is used to initialize the
LinkStation.
LinkStation Setup Manual
1212
Chapter1 Setup
5 USB connector (USB 2.0/1.1 Series A)
A USB storage device, card reader (except one that recognizes more than 2 memory
cards), digital camera, or USB Printer may be connected to the USB port on the back of the
LinkStation. USB hubs, mice, and keyboards are not supported.
6 Power mode switch
AUTO: The LinkStation turns on and o automatically with your PC (s).
ON: The LinkStation boots and is operational.
OFF: The LinkStation shuts down.
7 LAN port
Connect to your LAN with an Ethernet cable.
8 Link/Act LED
Glows green for connection.
Blinks green for access.
9 Power connector
The AC adaptor connects here.
10 Fan
Do not block the fan when installing the unit.
11 Security lock for anti-theft
Many security cables are compatible with this lock.
12 Hook
Secure the power cable so that it doesn’t come o by mistake. Slide the cable down to secure.
The inserted cable is xed in the hook by
sliding it in the downward direction.
LinkStation Setup Manual
1313
Chapter1 Setup
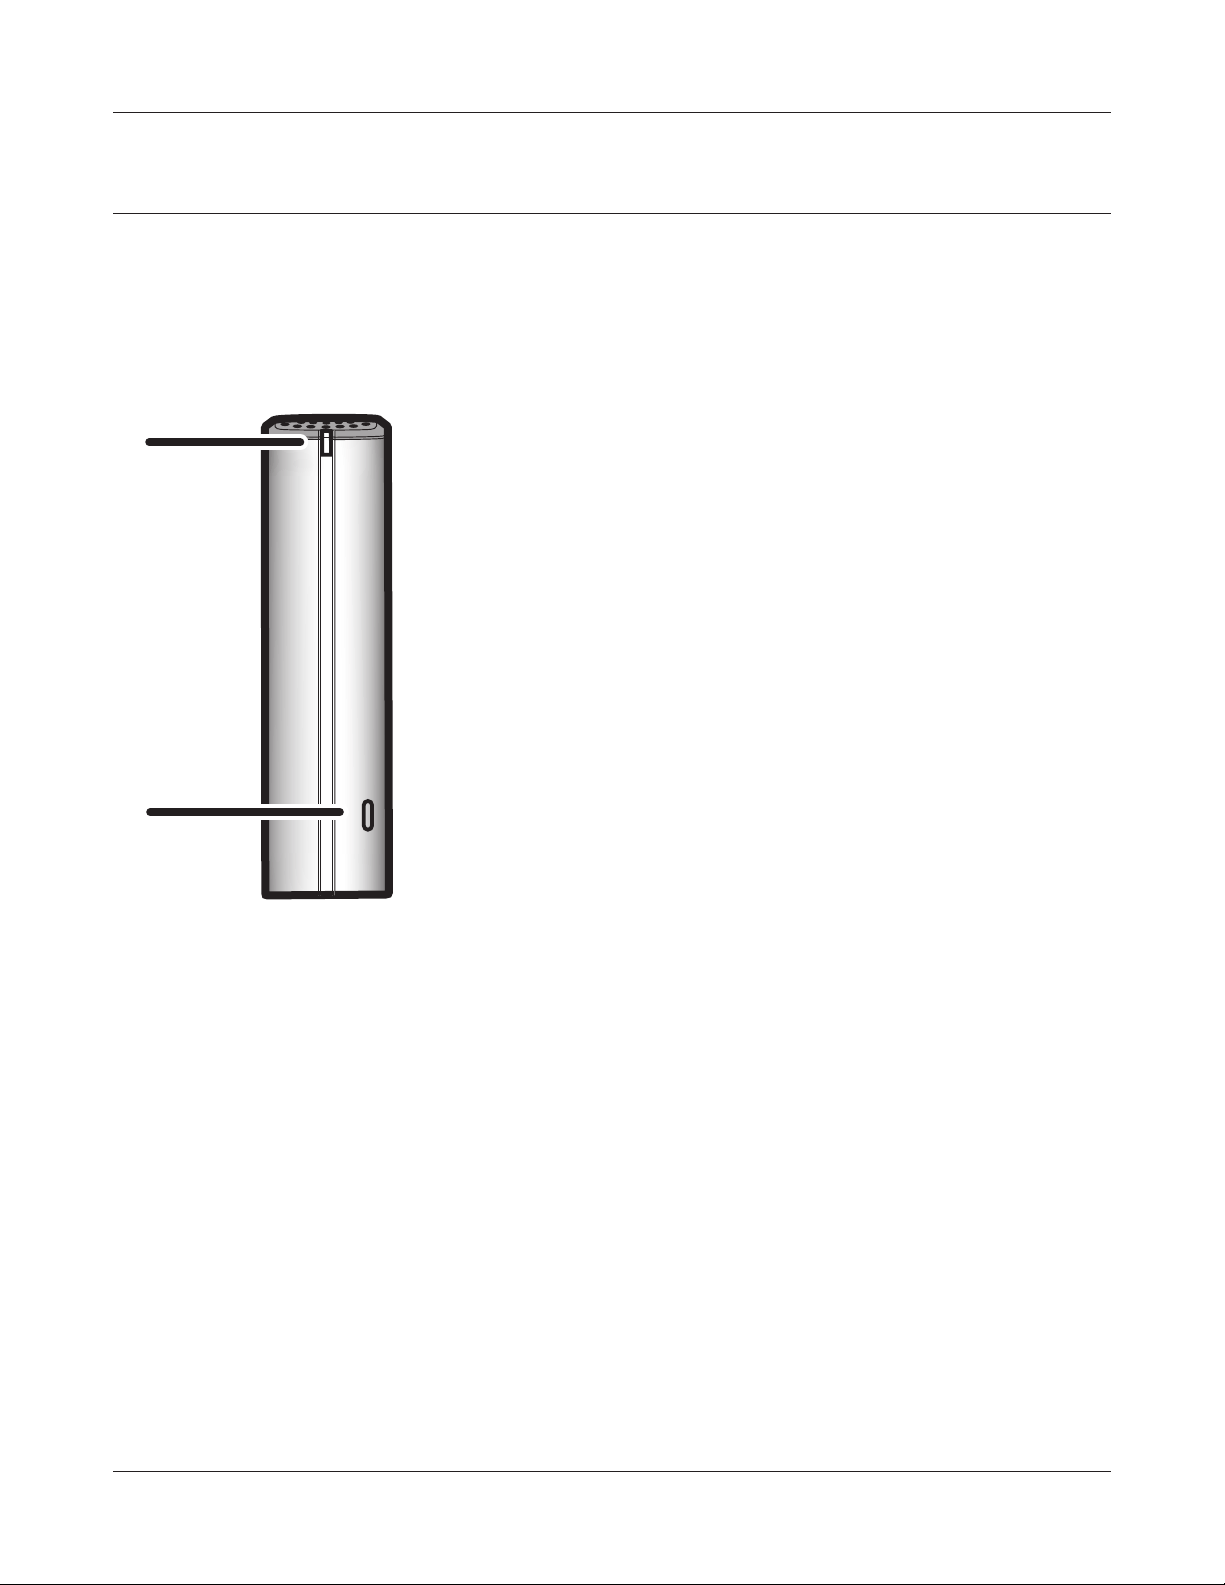
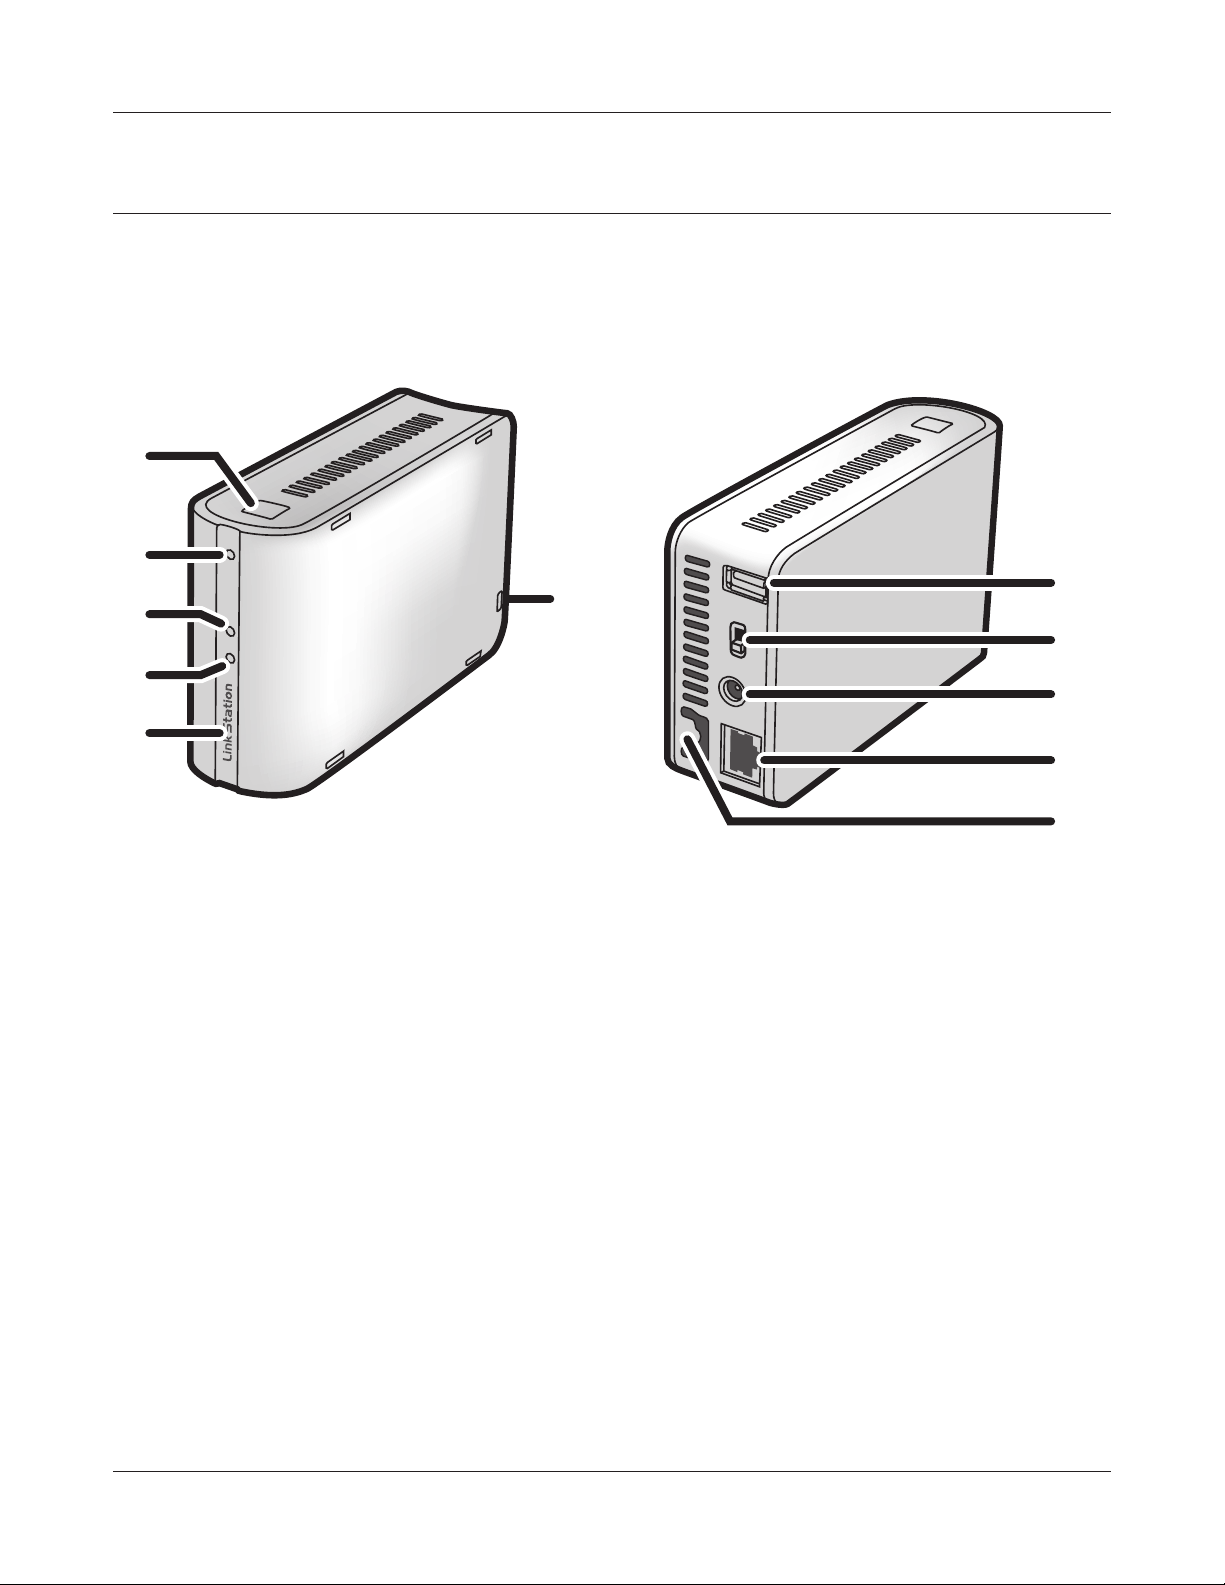
Diagrams and Layout (LS-WSXL)
The following list shows the name of each component of the LinkStation.
Front
1
2
3
4
5
Back
7
6
8
9
10
11
1 Function button
The function button initiates direct copy, dismounts USB devices, and is used to initialize the
LinkStation.
2 Function LED
The Function LED glows blue when direct copy is nished, during initialization, and during
USB dismounting (about 60 seconds). During direct copy the Function LED blinks blue.
3 Link/Act LED
Glows green for connection.
Blinks green for access.
4 Info/Error LED
The Info/Error LED blinks orange when there’s a message and red when there’s an error.
LinkStation Setup Manual
1414
Chapter1 Setup
5 Power LED (LinkStation)
Blue LED: Power on.
LED is o: Power o.
Blinks blue: During startup / shutdown.
6 Security lock for anti-theft
Many security cables are compatible with this lock.
7 USB connector (USB2.0/1.1 Series A)
A USB Mass Storage device, a card reader (except one that recognizes more than 2 memory cards), a UTP device, such as a digital camera, compatible UPS devices, or a compatible
USB Printer, may be connected to the LinkStation USB port on the back of the unit.
8 Power mode switch
Auto: The LinkStation turns on and o automatically with your PC(s).
On: The LinkStation boots and is operational.
O: The LinkStation shuts down and turns o.
9 Power connector
The AC adaptor connects here.
10 LAN port
Connect to your LAN with an Ethernet cable.
11 Hook
Secure the power cable so that it doesn’t come o by mistake. Slide the cable down to secure.
The inserted cable is xed in the hook by
sliding it in the downward direction.
LinkStation Setup Manual
1515
Chapter 2 Using your LinkStation
Open Shared Folder
Launch NAS Navigator2.
1
Note: – On Windows, click [start] - [All Programs] - [BUFFALO] - [BUFFALO NAS Navigator2] - [BUF-
FALO NAS Navigator2].
– On Mac OS, double click on [NAS Navigator2] icon in the Dock.
2
The shared folder of the LinkStation is displayed.
3
Note: – On Mac OS, LinkStation is mounted as a drive icon on the desktop, or displayed in the
sidebar on the Finder.
You can now use the LinkStation’s shared folder to save les just like another hard drive.
Double click on the LinkStation's icon.
The example here shows the Windows' screen
(on LS-XHL).
LinkStation Setup Manual
1616
Chapter2 Using your LinkStation
Open shared folder from the second PC
You will not have to perform the setup (initial settings) again if you have already set up the LinkStation from one computer.
You will have to install NAS Navigator2 on each additional computer, to open the LinkStation shared
folders.
Insert the Utility CD in your computer’s CD drive. LinkNavigator will launch.
1
Click ‘Begin Installation’.
Note: – If LinkNavigator doesn’t open, open the Utility CD and double-click
– If you are using Windows 7 or Vista, the autoplay screen may appear. Click ‘Run LSNavi.
exe’.
– If “Do you want to allow the following program to make changes to this computer ?”is
displayed in Windows 7, please click ‘Yes’.
– If “Your permission is necessary to continue program” is displayed in Windows Vista,
please click ‘Continue’.
– For Mac OS, double-click on the LinkNavigator icon in the utility CD.
2
Click [Options] - [Additional Software Installation].
For Mac OS, click [Install NAS Navigator].
‘LSNavi.exe’.
Follow the instruction on the screen to install NAS Navigator2.
3
After NAS Navigator2 is installed, click on the right top of the LinkNavigator to close it.
4
Then, open the shared folder of the LinkStation using NAS Navigator2 which was just installed.
LinkStation Setup Manual
1717
Chapter2 Using your LinkStation
Launch NAS Navigator2.
5
Note: – On Windows, click [start] - [All Programs] - [BUFFALO] - [BUFFALO NAS Navigator2] - [BUF-
FALO NAS Navigator2].
– On Mac OS, double click on [NAS Navigator2] icon in the Dock.
6
Double click on the LinkStation's icon.
The shared folder in the LinkStation is displayed.
7
Note: – On Mac OS, LinkStation is mounted as a drive icon on the desktop, or displayed in the
sidebar on the Finder.
Setup is completed.
You can now use the LinkStation’s shared folder to save les just like another hard drive.
Adding the LinkStation
You will have to run the LinkNavigator for each LinkStations that you add to your network. (You cannot set up multiple LinkStations at the same time.)
LinkStation Setup Manual
1818
Chapter2 Using your LinkStation
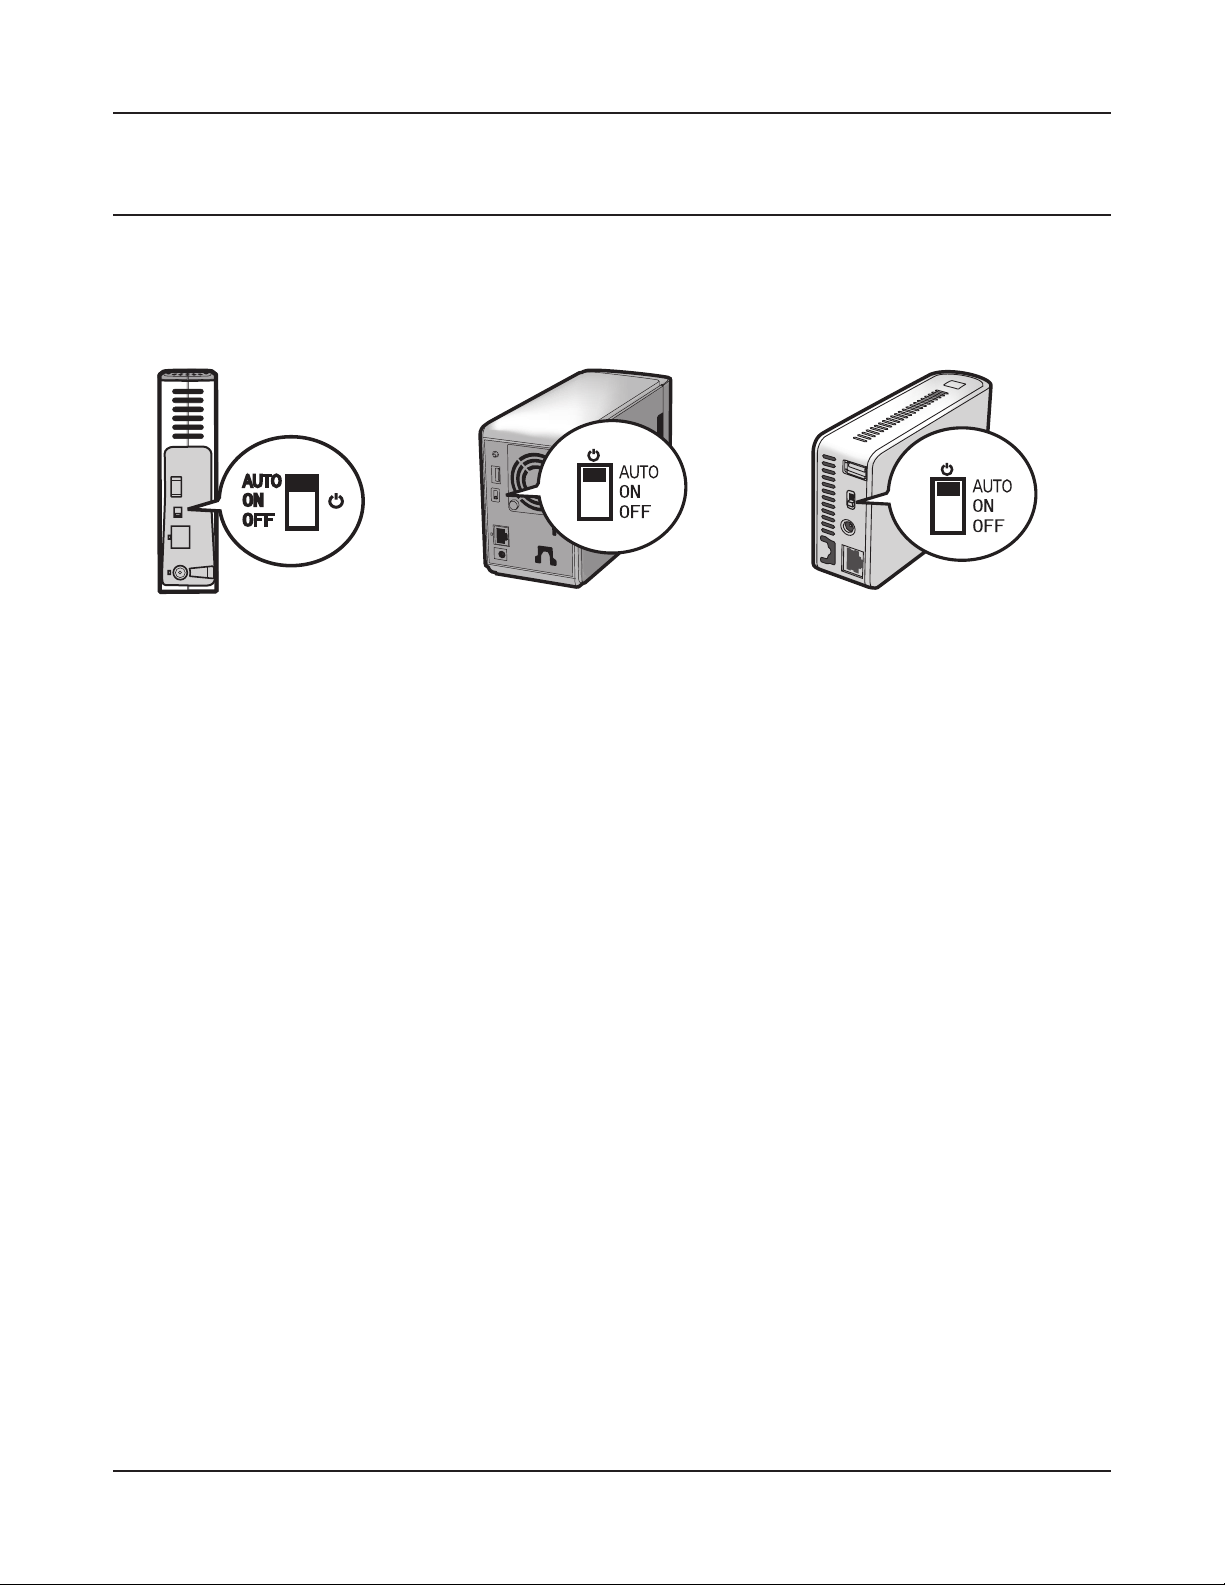
Power Mode Switch
The LinkStation automatically turns ON or OFF with your computer. Install NAS Navigator2 on a
computer and set “Auto Power Management feature”.
LS-XHL, CHL LS-WXL LS-WSXL
Auto: LinkStation automatically turns o when computers with NAS Navigator2 installed
turn o. The LinkStation automatically powers on when any of the computers on the net
work power on. (The LinkStation uses very low power consumption using this feature)
On: The LinkStation stays on, even when computers are o.
O: Turns LinkStation o. (Factory default)
Note: – Damage can occur to the LinkStation if the AC adapter is removed while in the ON posi-
tion.
– Some environment may not recognize “AUTO” or this unit may not synchronize with the
computer’s power behavior. When this occurs, switch it to “ON”.
– It may take a while until the Power LED turns o after you turn o your computer.
– Set the Power switch to “ON” position when you set up the LinkStation. Otherwise (or
when it is set to “AUTO”), the LinkStation may shutdown during the setup. After the initial setup, switch it to “AUTO” to synchronize with the power of your computer.
– If the LinkStation is off while using the power linking feature with PC due to a power
outage or AC adapter is removed, switch the Power switch to ON and boot LinkStation.
Put the Power Switch back to the “AUTO” position after LinkStation boot up, enabling
the power linking feature with PC.
– Keep in mind that immediately after the Power switch is switched to the “ON” or “AUTO”
position, the LinkStation will not shut down for about 5 minutes while it checks the status of your computer.
– The LS-WXL and LS-WSXL don’t automatically shut down during RAID initialization or
rebuild. If the attached personal computer is shut down during RAID initialization or
rebuild, the LinkStation will complete the RAID initialization or rebuild before shutting
down.
LinkStation Setup Manual
1919
Chapter2 Using your LinkStation
Web Administration Tool
To display the LinkStation conguration screen, follow the procedure below.
Launch NAS Navigator2.
1
Note:– On Windows, click [start] - [All Programs] - [BUFFALO] - [BUFFALO NAS Navigator2] - [BUF-
FALO NAS Navigator2].
– On Mac OS, double click on [NAS Navigator2] icon in the Dock.
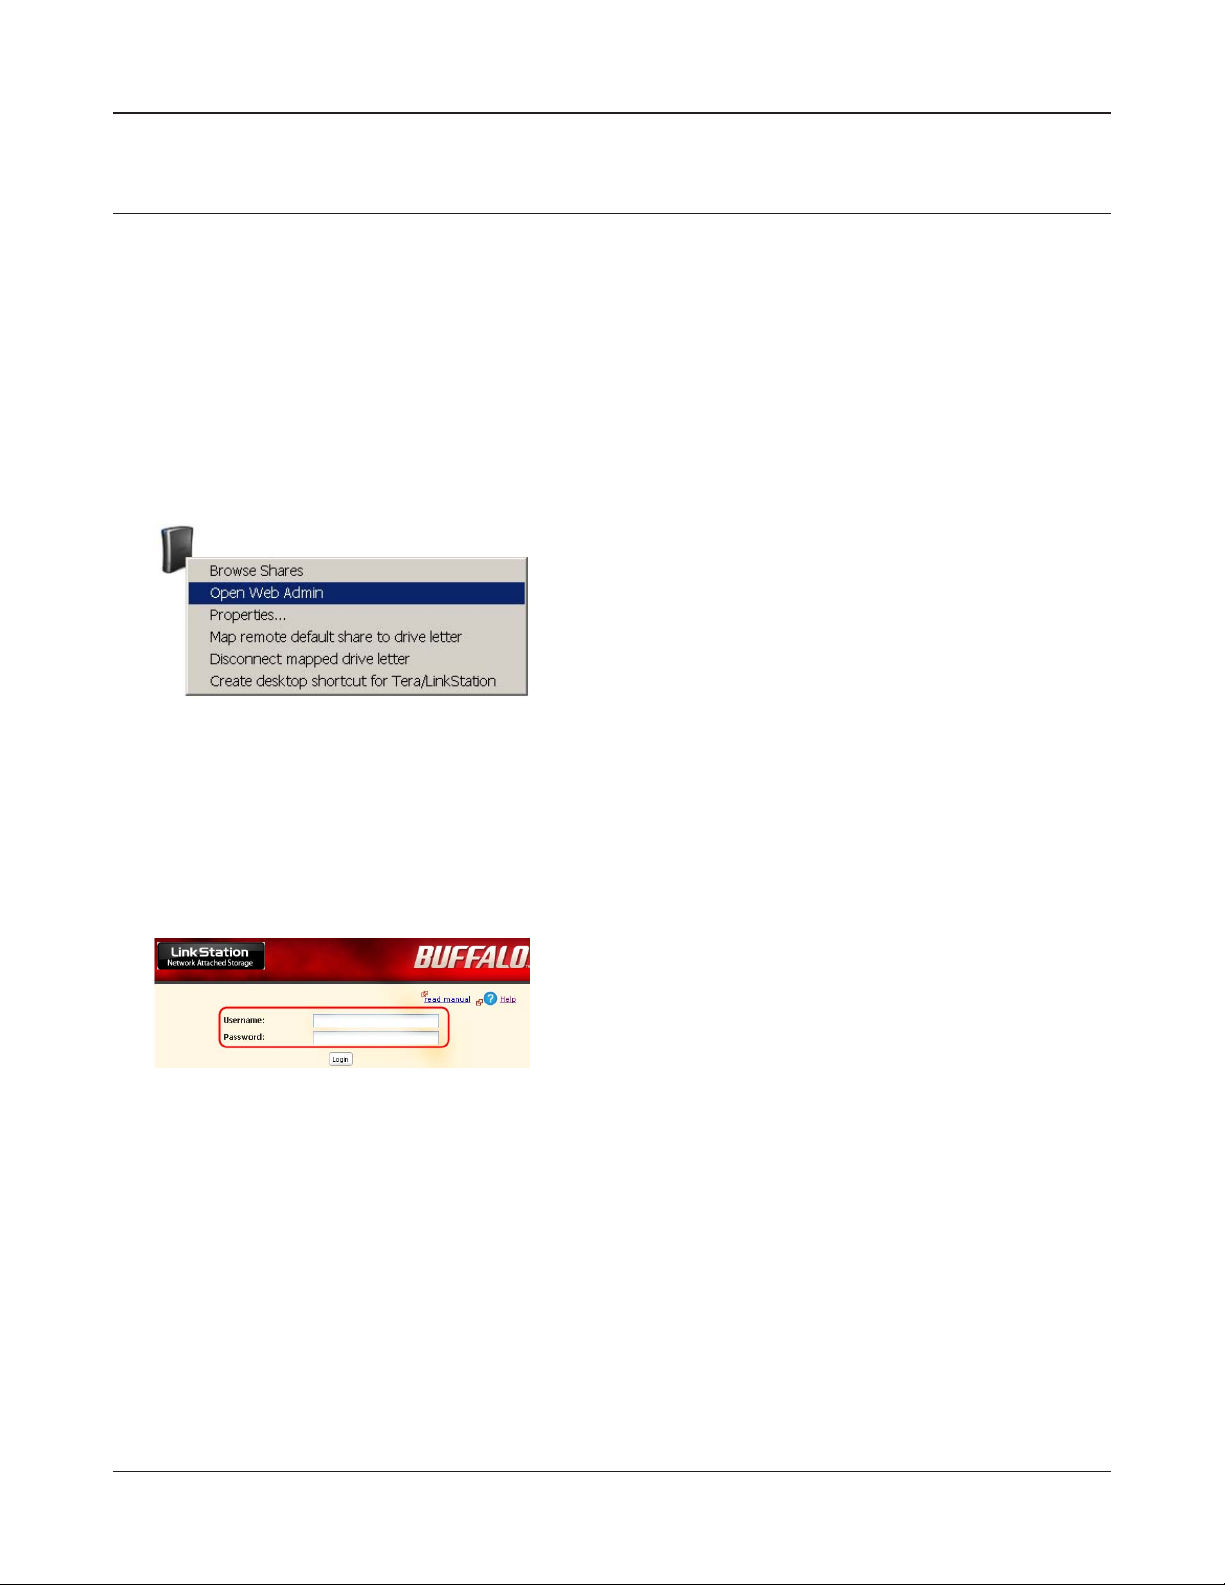
2
Right click on the LinkStation icon (on Mac OS click
the icon while holding down the control key), select
[Open Web Admin] in the displayed menu.
Note: – When the total of more than 2 LinkStations
and TeraStations are connected on the same
network, multiple icons will be displayed. Select the LinkStation you want to display.
3
– When selecting the LinkStation icon, you can
verify individual information of LinkStation
such as IP address.
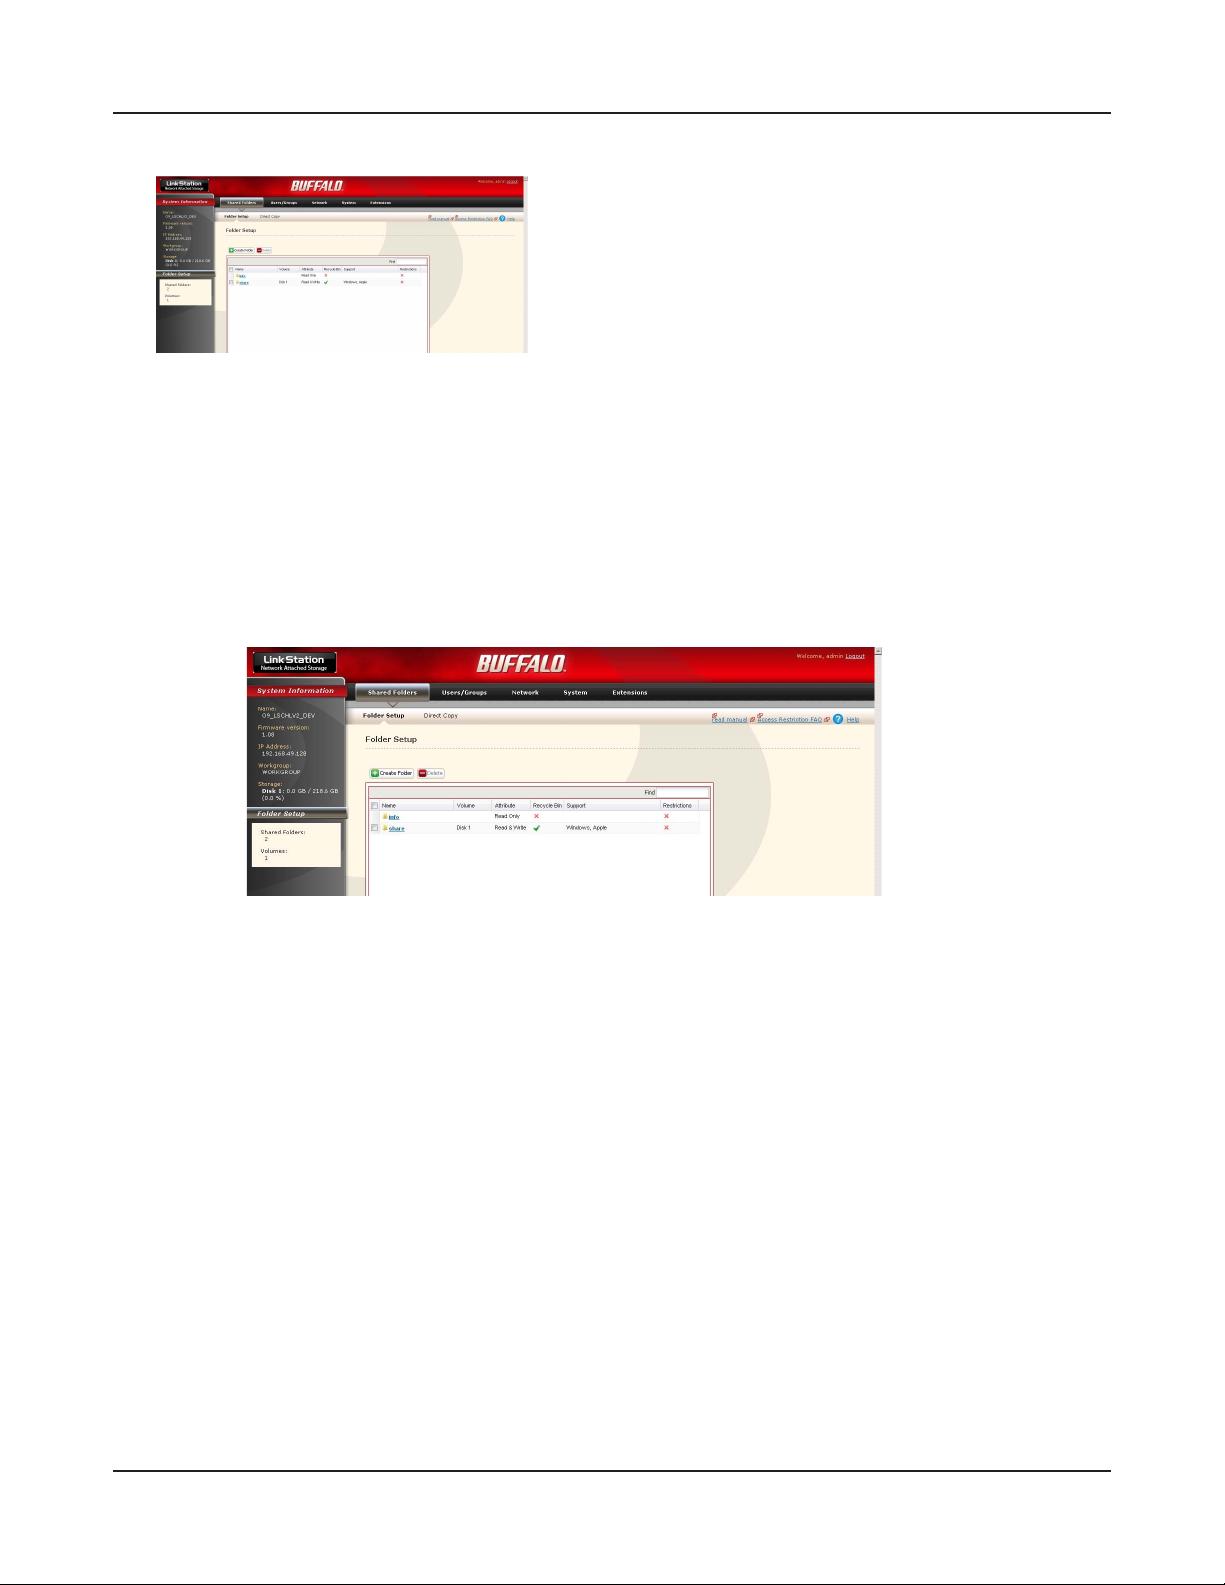
Enter your user name and password, and click [Login].
Note: – To display the configuration screen, use the
following user name and password.
User name: admin
Password: password
After you login, change the password for security purposes. Refer to page 42.
LinkStation Setup Manual
2020
Chapter2 Using your LinkStation
4
Now displaying the LinkStation’s conguration has been completed.
Note: – Compatible browsers for the conguration screen are Internet Explorer 6.0 Service Pack
2 or later, Firefox 1.5 or later, and Safari 3 or later. The conguration screen may not be
displayed properly in any other browser which is not listed above. For Windows, install
Internet Explorer 6.0 Service Pack 2 or later or Firefox 1.5 or later. For Mac OS X 10.3.9, install Firefox 1.5 or later. For Mac OS X 10.4, install Safari 3 or later, or Firefox 1.5 or later.
The conguration screen contains the following items.
The conguration screen is displayed.
Note: – The current status of the LinkStation (a Link-
Station name, IP address, workgroup and hard
disk information) is displayed.
• Shared folders
You can add/delete shared folders, set access restrictions, and configure for a direct
copy.
• Users/Groups
Register and delete users/groups.
• Networks
Register and delete a network or workgroup.
• Systems
Perform Name, time, disk check format, backup, mail notication settings, timer ON/
OFF, UPS synchronization settings, initialization, and complete disk format.
• Extension
Congure for WebAccess, Print Server, and Time Machine.
LinkStation Setup Manual
2121
Chapter2 Using your LinkStation
Add a shared folder
To add a shared folder, use the following procedure.
Note: – Refer to page 20 for the procedures to display the conguration screen.
1
2
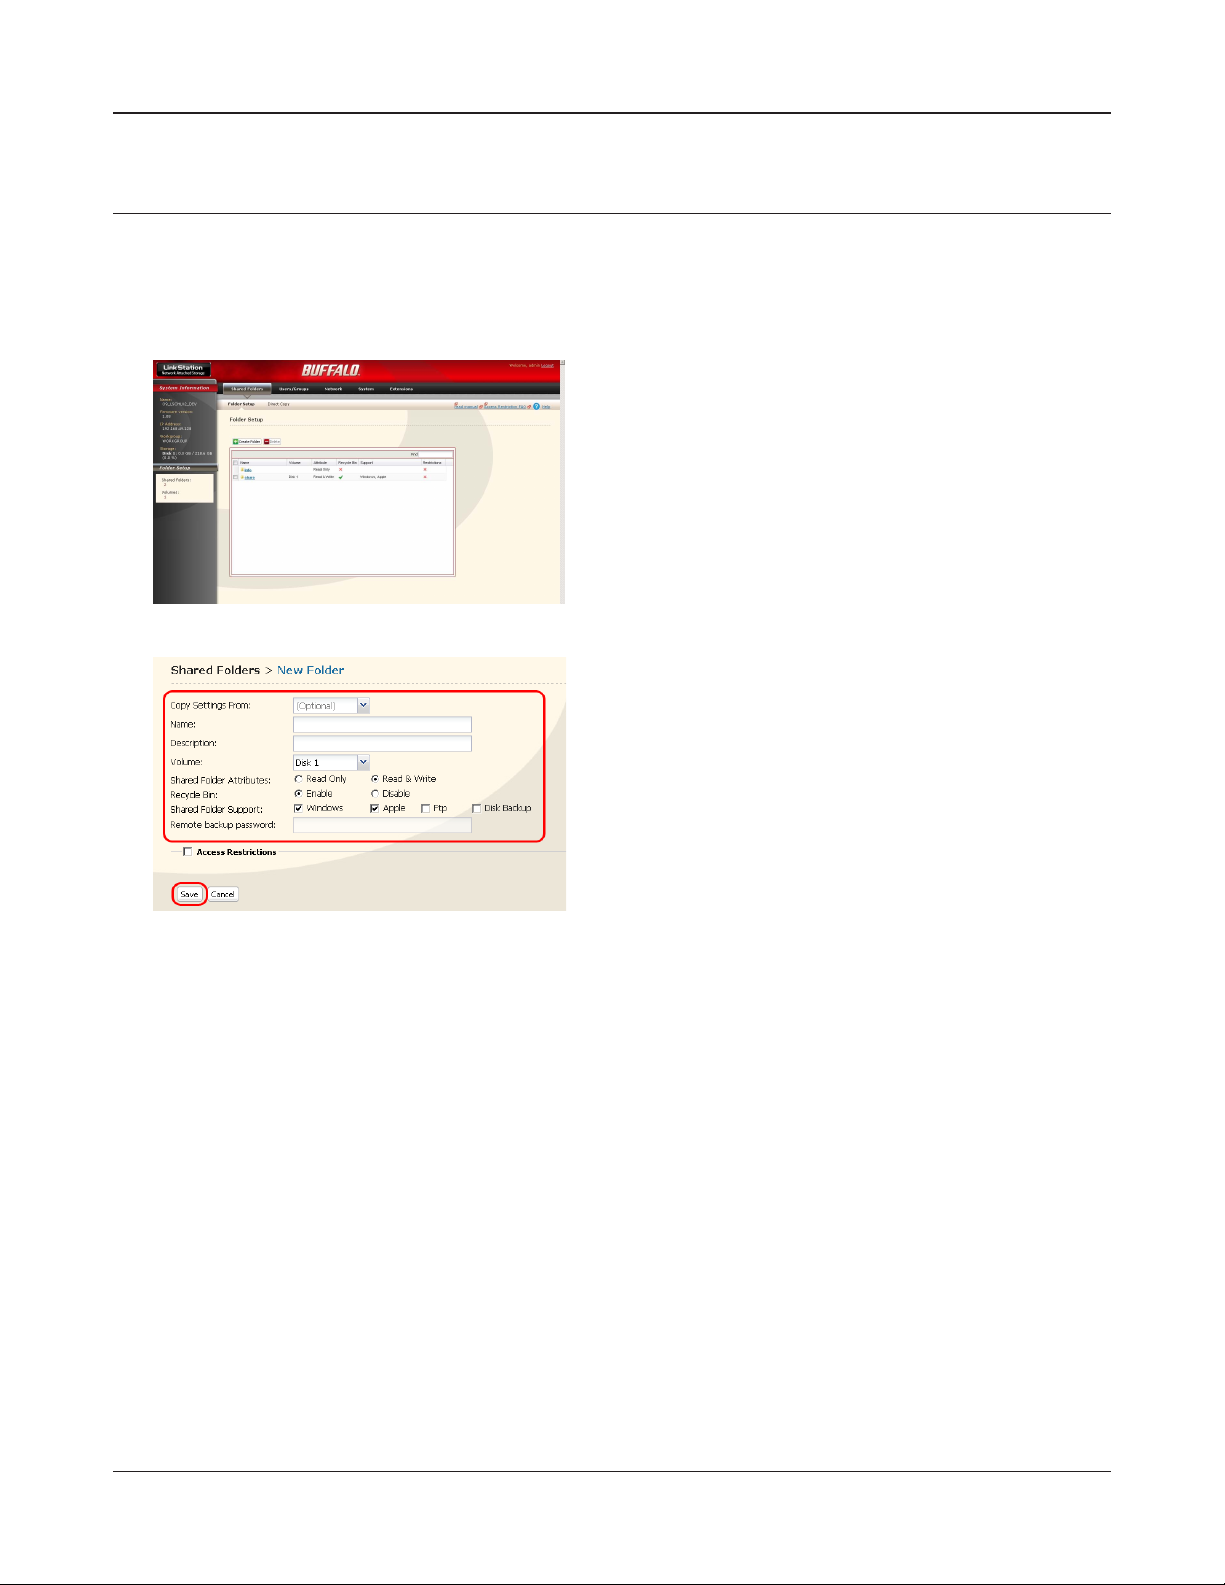
In the LinkStation conguration screen, click [Create Folder] in [Shared Folders].
1 Set a shared folder name, attributes and other
settings.
Note: – If you would like to copy the settings of
an existing folder, select a source folder at
[Copy Settings From].
2 Click [Save].
Now you have created a new shared folder.
LinkStation Setup Manual
2222

Chapter2 Using your LinkStation
To protect your data in a shared folder accidentally being deleted (Using Recycle Bin).
You can configure a recycle bin for each folder on the configuration screen above (Not available for AppleTalk and FTP connections). It is just like a recycle bin on your OS. Deleted data in a
shared folder will be temporarily moved to a [Recycle Bin] folder. To recover deleted data, open
the [Recycle Bin] folder and move les.
To set a shared folder to Read-only
A shared folder will become Read-Only when you select the [Read Only] attribute of a shared
folder in the Shared Folder Conguration screen and click [Save].
Note: – This is set to [Read & Write] by factory default.
– A shared folder whose attribute is set to Read Only cannot be written by any users or
groups who has a privilege to read and write, therefore this folder will be read only for
all users.
– A shared folder whose attribute is set to Read Only or a USB hard disk with NTFS/HFS+
format, the message "(Read Only)” is added to the descriptions of that share folder.
LinkStation Setup Manual
2323
Chapter2 Using your LinkStation
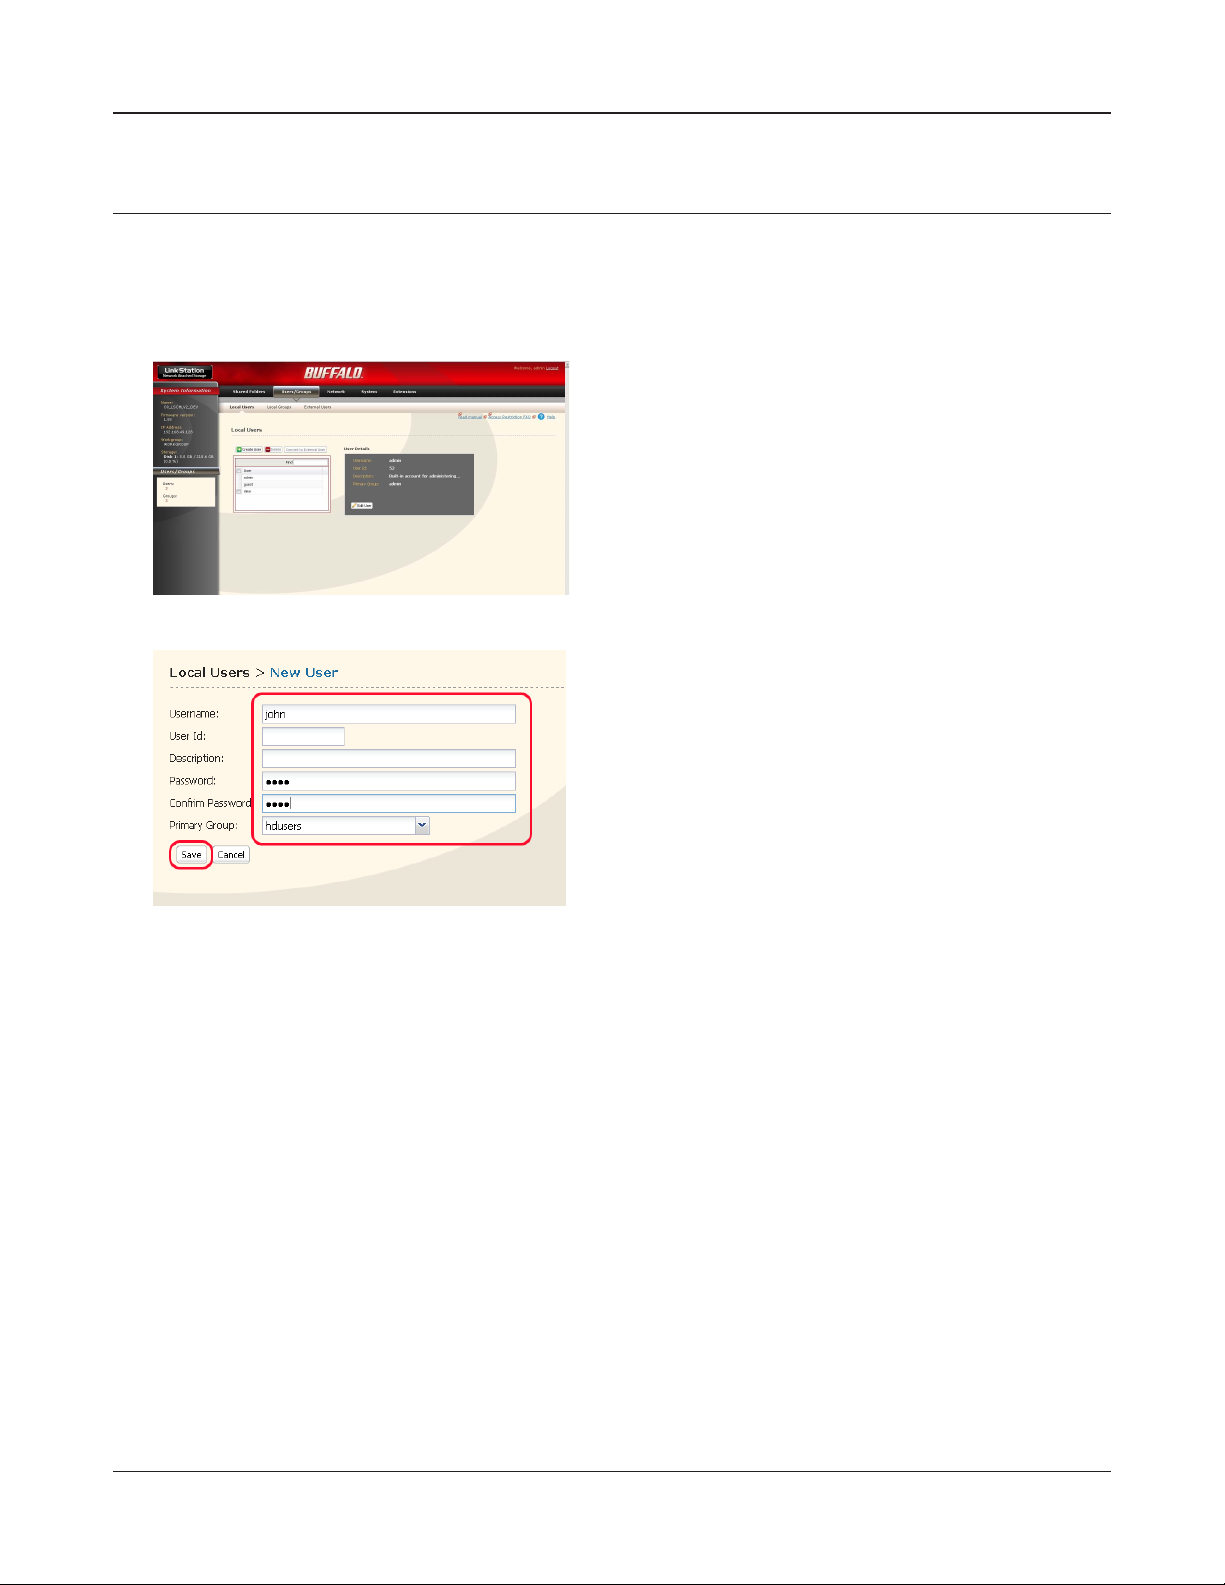
Adding Users
To add a user, use the following procedure.
Note: – Refer to page 20 for the procedures to display the conguration screen.
1
2
1 Click [Users/Groups] - [Local Users] on the Link-
Station conguration screen.
2 Click [Create User].
1 Enter a name and descriptions of a user.
2 Click [Save].
Now you have completed adding a user.
LinkStation Setup Manual
2424

Chapter2 Using your LinkStation
• Use the same user name and password for LinkStation as Window's network login. If
these values are dierent, a shared folder which you have set access restrictions cannot
be accessed.
Also, you cannot access a shared folder even though the screen to enter a user name
and password is displayed if the network login name is dierent on Windows 7/Vista/
XP/2000 and Windows Server 2003/Server 2008. You must login to Windows using the
user name and password set here. To conrm an owner, use the following procedure.
• In properties screen of each le or folder, open a new window using [Security] tab - [Advanced Settings] button, and verify in the [Owner] tab.
• Right click on the bar on which [Name], [Size], [Type], and [Date Modied] and other information regarding My Computer or Explorer are displayed, you can select information
to be displayed. From the menu popped up by right clicking, you can verify [Owner].(The
procedure to check an owner is dierent for each OS. The example above shows for Windows XP.)
LinkStation Setup Manual
2525

Chapter2 Using your LinkStation
Adding Groups
To add a group, use the following procedure.
Note: – Refer to page 20 for the procedures to display the conguration screen.
1
2
1 Click [Users/Groups] - [Local Groups] on the
LinkStation conguration screen.
2 Click [Create Group].
1 Enter a group name and description for that
group.
Note: – If a group ID is left blank, a group ID will
be automatically assigned.
2 Select users who join a group, click [Add].
3 Click [Save].
Now you have completed adding a Group.
LinkStation Setup Manual
2626

Chapter2 Using your LinkStation
Access Restrictions
Use the following methods to restrict users on the LinkStation.
Access restrictions for locally registered users
Follow the procedures described on page 28.
Access restrictions on NT Domain
Follow the procedures described on page 30.
Access restrictions on Active Directory
Follow the procedures described on page 27.
Access restrictions by using Delegate Authority server feature
Follow the procedures described on page 34.
Note: – You can set access restrictions per shared folder, but you cannot set restrictions to fold-
ers in a shared folder.
– User/Group permissions can not be set from the security tab on the properties screen of
a folder when using a Windows SMB server.
LinkStation Setup Manual
2727

Chapter2 Using your LinkStation
Access restrictions for locally registered users
You can set the access restrictions for shared folders by user name and group name for locally regis-
tered users.
If you are using Windows, create a new Windows user account and set a password.
1
You can create a user account and password for Windows in the [User Accounts] within Control
Panel.
If you do not want to create a new account, write down an account and password which has
been already registered on Windows.
Register a user and group for the LinkStation.
2
1 Register a user name that will use the LinkStation.
Follow the procedures described in “Adding Users” on page 24.
2 Register a group name that will use the LinkStation.
Follow the procedures described in “Adding Groups” on page 26.
Set the access restrictions for shared folders.
3
Note: – Refer to page 20 for the procedures to display the conguration screen.
1 In the LinkStation conguration screen, click [Shared Folders] - [Folder Setup].
2
Click a shared folder you want to set access restrictions for.
3
Click the checkbox for [Access Restrictions].
LinkStation Setup Manual
2828

Chapter2 Using your LinkStation
4
5
Click [Add].
Note: – The procedure described here shows an
example of how to set the access restrictions for local users. To set the access
restrictions for local group, click [Local
Groups]-[Add].
1 Click a user you want to permit to access, and
insert a checkmark.
Note: – If you have selected [Local Groups] in
Step 4, click the group you want to permit to access.
2 Click [Add].
6
Click [Save].
7
Now you have completed the settings for access restrictions.
If you log on from a Microsoft Network Domain, you can set the access restrictions with the user
names/group names which are registered on the domain.
If the read-only and writable privileges are both given to a specic user, that user will have readonly access.
Select privilege of the user or group you added.
LinkStation Setup Manual
2929

Chapter2 Using your LinkStation
Access Restrictions on NT Domain
The LinkStation can download users, groups, and passwords from an NT Domain server. This procedure is recommended for system administrators only.
Create an account on the Domain Controller for the LinkStation.
1
Note: – If there is an option to “Accept accounts for computers with Windows 2000 or earlier”,
then select it.
2
3
Click [Network] - [Workgroup/Domain] - [Modify
Settings] in the Web Admin tool
1 Select [NT Domain].
2 Select [NT Domain Name].
3 Select [NT Domain Controller Name].
4 Enter an Administrator password.
5 Enter an Administrator password.
6 Enter WINS Server IP Address
7 Click [Save].
Follow the instructions on page 28 to add Access Restrictions to Domain Users/Domain Groups.
4
Note: – Domain names can contain up to 15 alpha-numeric letters. Hyphens, underscores, and
periods may be used.
– Don’t use a number or symbol as the rst letter of a domain name.
– Domain controller names can contain up to 12 alpha-numeric letters. Hyphens, under-
scores, and periods may be used. Don’t use a number or symbol as the rst letter of a
domain name.
LinkStation Setup Manual
3030

Chapter2 Using your LinkStation
Restrictions
If you change the LinkStation’s Name, you will no longer be able to use Domain Users/Groups or access restrictions. Rejoin the domain.
If a domain user name contains more than 20 characters, the LinkStation truncates it to 20 characters.
The LinkStation only downloads the rst 1000 users or the rst 1000 groups from a Domain Controller.
If you operate LinkStation as a member server of NT Domain or Active Directory Domain, you cannot
connect as a guest user via AFP.
When you change the user or group settings on the domain controller, these changes may not take
eects immediately on LinkStation. If you need to reect changes on the domain controller immediately, reboot LinkStation.
While you are operating LinkStation as a member server of NT Domain or Active Directory and you
change the [Authentication Method] in [Network] - [Workgroup Settings] to [Workgroup] on the
Web Admin tool, the computer account on the domain controller will not be deleted automatically.
If it has already joined the domain network, you cannot connect to the LinkStation via FTP using a
domain user account.
LinkStation Setup Manual
3131

Chapter2 Using your LinkStation
Access Restrictions on Active Directory
The LinkStation can download users, groups, and passwords from an Active Domain server. This
procedure is recommended for system administrators only.
1
2
Click [Network] - [Workgroup/Domain] - [Modify
Settings] in the Web Admin tool.
1 Select [Active Directory].
2 Enter an Active Directory Domain Name (Net-
BIOS name).
3 Enter an Active Directory Domain Name (DNS
name).
4 Enter an Active Directory Domain Controller
Name (Computer name).
5 Enter an Administrator password.
6 Enter an Administrator password.
7 Enter WINS Server IP Address
8 Click [Save].
Follow the instructions on page 28 to add Access Restrictions to Domain Users/Domain Groups.
3
You have completed the settings for this feature.
LinkStation Setup Manual
3232

Chapter2 Using your LinkStation
Restrictions when administrating in Active Directory Domain
When you have the LinkStation joined to an Active Directory domain, you must specify the DNS
Server which can resolve names for Active Directory domain.
After building an Active Directory domain, the administrator's password which is needed to join the
Active Directory Domain must be changed at least once, or joining the Active Directory domain will
fail.
Active Directory domain's DNS name and NetBIOS name must be identical.
If there are more than 5 minutes dierences between the LinkStation’s clock and the Domain controllers' clock, joining the domain or authenticating domain user or group may fail.
LinkStation Setup Manual
3333

Chapter2 Using your LinkStation
Access restrictions by using the Delegate Authority server feature
Follow the below procedure to permit access by administration all user accounts and passwords that
access LinkStation using a delegate server.
The network administrators or a person who has proper knowledge regarding Microsoft should
complete this procedure. Consult your network administrator for details.
• Setting access permission per user/group from the properties screen security tab is not supported
when using a SMB server.
There are restrictions when administrating through delegate authority server. You must read restrictions below.
• You cannot set access restrictions if you do not access the LinkStation while logged in to Windows
using the account information.
• If you are not accessing the LinkStation while logging into Windows using the account information
registered to the authentication server.
• You cannot connect as a guest user via AFP if you use the Delegate Authority option.
• You cannot connect as anonymous via FTP id you use the Delegate Authority option.
For Windows Vista, Windows Server 2003/Server 2008 Users
When using Delegate Authority to External SMB server feature to restrict access, you need to change
the security settings on Windows Vista, Windows Server 2003/Server 2008.
Select [Start] - [Programs] - [BUFFALO] - [File Sharing Security Level Change Tool] - [File Sharing Security Level Change Tool], and then select [Change security level] to change the security settings (Select
“Recover default security level” change it back to the previous setting).
Note: – “File Sharing Security Level Change Tool” can be installed only on Windows Vista using
the CD included.
– During the initial setup, the message, “Start changing le sharing security level. Will you
continue?” will be displayed. If you click [Yes], follow the instructions on the screen and
restart your PC .
LinkStation Setup Manual
3434

Chapter2 Using your LinkStation
1
2
1 Click [Network] - [Workgroup] on the LinkSta-
tion conguration screen.
2 Click [Modify Settings].
1 Enter the workgroup name.
Note: – If you specify the Windows Domain Con-
troller as an external SMB authentication
server, you need to match the workgroup
of this unit to the Windows Domain Controller name.
2 Select [Delegate Authority to External SMB
Server].
3
You can restrict the access to the shared folder by the user name selected.
4
1 Enter the name or IP address of an authentica-
tion server.
Note: – When connecting using AFP and FTP, al-
ways use an IP address. It may not be authenticated if a server name is used.
2 Click [Use Windows Domain Controller as Au-
thentication Server] and [Automatic User Registration] to insert check marks.
3 Click [Enable Authentication Shared Folder]
to insert the check mark, and enter the shared
folder name for the authentication test.
4 Click [Save].
LinkStation Setup Manual
3535

Chapter2 Using your LinkStation
A user that has been registered to the specied authentication server will be automatically registered as a LinkStation's user when he/she opens the shared folder for authentication (you can also
register users directly).
A user who is automatically registered will belong to the "hdusers" group. They can be set to belong
to any group from the Group settings.
You can restrict the access to the shared folder by the user name obtained.
Names of users who are registered are listed in the [Users/Groups] - [External Users]. To delete a user,
select a user and click [Delete].
When connecting using AFP and FTP, always use an IP address. It may not be authenticated if a server name is used.
Enter the IP address when specifying a server in other segment (such as the network over the router).
AFP connection and FTP connection does not allow to obtain user information by delegating authority to external SMB server.
Now you have completed the settings for the Authentication Server.
LinkStation Setup Manual
3636

Chapter2 Using your LinkStation
RAID Arrays
Several RAID modes are available for LS-WXL and LS-WSXL LinkStations. LinkStations with only one
hard drive do not support RAID modes.
Note:– All data is lost when the RAID mode is changed. Back up any important data before
changing RAID modes.
– In this document, “Recovery” means putting the LinkStation back to the state it was in
before the malfunction happened. It does not mean reading data from broken hard
drives.
– When the use mode of the hard disk is changed, all the data in the hard disk gets delet-
ed. Please take back-up before changing use mode so that the important data will not
be lost.
• RAID 1 mode
Uses 2 hard drives in a mirrored array. One drive’s worth of space is usable. Identical data is written to
both drives. If one drive is damaged, data can be recovered by replacing the damaged drive.
• RAID 0 mode(LS-WXL, LS-WSXL Default Settings)
Multiple hard drives are combined into a single array. The total capacity of all drives is usable. This is
the fastest of the LinkStation’s RAID modes. If any drive is damaged, all data on the array is lost.
• Normal Mode
Each drive is accessible as a separate, individual drive. The total capacity of each drive is usable.
If any drive is damaged, all data on that drive is lost.
LinkStation Setup Manual
3737

Chapter2 Using your LinkStation
• Using in RAID 1 mode
Change system to normal mode (page 41).
1
2
3
4
Navigate to [System] - [Storage] - [RAID Array] in
the Web Admin tool.
Click the array you want to congure.
Select both drives.
5
The confirmation screen will appear. Enter the number shown in the [Confirmation Number]
6
eld within 60 seconds, and click [Apply].
Follow the instructions displayed on the screen.
7
You have set up a RAID 1 array. Turn to page 22 to create a shared folder.
LinkStation Setup Manual
1 Select [RAID 1].
2 Click [Create Raid Array].
3838

Chapter2 Using your LinkStation
Note: –If power is turned o during a RAID rebuild, the RAID rebuild will continue when power
is restored. (Example: In LinkStation of 1TB when power supply is changed from OFF to
ON after lapse of 3 hours from construction of RAID then reconstruction of RAID should
start in remaining 3 hours).
Conrmation screen
When you perform any of the following tasks, a conrmation screen is
displayed . To continue, enter the displayed number within 60 seconds
and click [Apply].
Conrmation Screen
• Change RAID array (Create/Delete) • Format Array or Disk
• Delete Folder • Remove Disk
• Restore Factory Defaults • Rebuild RAID array
• Format LinkStation
LinkStation Setup Manual
3939

Chapter2 Using your LinkStation
• Changing to RAID 0 mode
Change system to normal mode (page 41).
1
2
3
4
Navigate to [System] - [Storage] - [RAID Array] in
the Web Admin tool.
Click the array you want to congure.
Select all available hard drives.
5
The confirmation screen will appear. Enter the number shown in the [Confirmation Number]
6
eld within 60 seconds, and click [Apply].
Follow the instructions displayed on the screen.
7
You have set up a RAID 0 array. Turn to page 22 to create a shared folder.
LinkStation Setup Manual
1 Select [RAID 0].
2 Click [Create Raid Array].
4040

Chapter2 Using your LinkStation
• Changing to Normal mode
1
2
Click [Create RAID Array].
3
Navigate to [System] - [Storage] - [RAID Array] in
the Web Admin tool.
Select the array you want to congure.
When [Are you sure you want to change RAID mode?] is displayed, click [Apply].
4
The confirmation screen will appear. Enter the number shown in the [Confirmation Number]
5
eld within 60 seconds, and click [Apply].
Follow the instructions displayed on the screen.
6
You have set up a Normal mode. Turn to page 22 to create a shared folder.
LinkStation Setup Manual
4141

Chapter2 Using your LinkStation
Changing the administrator user name and the password
Setting for the administrator user name and the password of LinkStation.
On a setting screen of LinkStation, [User /group] [Local Groups] is clicked.
1
2
3
Note: – In case of the access restriction for which the administrator user is specied, the WebAc-
cess cannot be used. Please use the administrator user name as a user name when login
in LinkStation Web Administration Tool.
Select the user name (It is admin in initialization)
on the top and click the ‘Edit User’.
1 Enter the user name, the password, and the pass-
word for the conrmation.
2 Click [Save].
Now you have completed the setting of administrator’s password.
LinkStation Setup Manual
4242

Chapter2 Using your LinkStation
Initialization
To restore the LinkStation to its factory default settings, follow the procedure below.
Move the power switch to ‘ON’ while holding down the function button. The function button will
1
ash blue for 1 minute.
While the function button is ashing, press it again. The status LED will ash blue, then amber.
2
Initialization will take 2 – 3 minutes.
When the ashing status LED turns solid blue, initialization is complete.
3
Note: – When the LinkStation is initialized with this process, only the IP address, Ethernet frame
size settings, and admin password are reset to factory defaults. You have the option to
not initialize the admin password if desired. Other settings can be initialized from the
Web Admin Tool.
– To keep the current admin password, select the [Keep current admin password] option.
– If [Keep current admin password] is selected, you will not be able to reset the admin
password if you forget it. Write the password down and keep it in a safe place!
– Before rerunning the LinkStation’s original installation program, initialize the LinkStation
(including the admin password) from the Web Admin Tool.
Initialization of the LinkStation’s conguration has been completed.
LinkStation Setup Manual
4343

Chapter2 Using your LinkStation
Initialization on the conguration screen
On the LinkStation conguration screen, you can initialize following settings in addition to the initialized items described above.
Note: – The following settings will be initialized;LinkStation name, Description, NTP settings,
Workgroup settings, Shared service settings, the access restrictions of the shared folder,
User settings, User group, mail notification feature settings, UPS synchronization settings, Backup Settings, Administrator’s password, Print server function, WebAccess feature, Language settings, Timer ON/OFF, HDD spin down, Media server, BitTorrent, and
Time Machine.
1
Click [Restore LinkStation].
2
The [Conrm Operation] screen will be displayed.
3
Enter the exact same number as shown in the [Conrmation Number] eld within 60 seconds,
and click [Apply].
Follow the instructions displayed on the screen.
4
Click [System]-[Restore/Format] on the LinkStation conguration screen.
Now the initialization on the conguration screen has been completed.
LinkStation Setup Manual
4444

Chapter 3 Useful Functions
RAID Scanning
In RAID 1, LS-WXL and LS-WSXL LinkStations support RAID scanning. A RAID scan tests the RAID
array for read performance. If defective sectors are found, they are repaired automatically. If your
multiple-drive LinkStation is in RAID 1 mode, you should run RAID scans regularly. Congure regular
RAID scans as follows:
<The RAID maintenance function >
The RAID maintenance function is a function which can check whether it is possible to read without
problem, and whether there is any defective sector in the array where RAID1 is constructed and if
there is any problem it automatically repairs that problem. When LinkStation is used with RAID1, it is
advisable to regularly execute the RAID maintenance.
1
2
Note: – Check [Shutdown] to automatically shut down the LinkStation whenever a RAID error
occurs. Check [Begin Immediate RAID Scan] to initiate an immediate RAID scan.
– To stop a RAID scan, click [Abort RAID Scanning].
Navigate to [System] - [Storage] - [RAID Scanning]
in the web admin tool. Under [RAID Scanning],
click [Modify Settings].
Choose [Enable], enter your desired schedule, and
click [Save].
– Single-drive LinkStations don’t support RAID arrays or RAID scanning.
RAID Scanning is now congured.
LinkStation Setup Manual
4545

Chapter 3 Useful Functions
WebAccess
About WebAccess Feature
This feature allows you to access les in a shared folder on the LinkStation via the Internet (you can
access the LinkStation from anywhere to play your music, display pictures, or download/upload
data). You can set the access restrictions on the LinkStation per shared folder that you want visible
from other computers.
LinkStation is also equipped with auto settings feature for routers via UPnP and redirect feature by
using the bualonas.com server (similar to Dynamic DNS).
WebAccess conguration procedure
Note: – Refer to page 20 for the procedures to display the conguration screen.
1
1 Click [Extensions].
2
2 Click [WebAccess].
Click the shared folder to be published.
LinkStation Setup Manual
4646

Chapter 3 Useful Functions
3
Click the shared folder to be published.
1 Select share you want to set access restriction
from [WebAccess Settings].
• Disable: Shared folders will not be published.
• Allow Anonymous: Anyone can access
(view) shared folders.
• Allow All Group / Users: Only LinkStation
registered groups/users can access (view).
• Use Inherited Folder Permissions: Use
shared folders access restrictions set from
shares management screen. If access restrictions are not set in the shared folder
management screen, this option is not
displayed.
4
2 Click [Save].
Note: – Depending on settings, files in a shared
folder will be visible on the Internet without access restrictions.
Click [Modify Settings].
LinkStation Setup Manual
4747

Chapter 3 Useful Functions
5
1 Select [Enable].
2 Click [Use BuffaloNAS.com] to insert a check-
mark.
3 Enter the LinkStation name to be published in
[BualoNAS.com Name].
Note: – This is the name to enter when accessing
BuffaloNAS.com. It does not have to be
the same name as the actual LinkStation.
4 Enter the password to save and use the name
in [BualoNAS.com Key].
5 Click [Auto-Congure Firewall (UPnP)] to insert
a checkmark.
Note: – This does not work unless the router's
UPnP is enabled.
6 Click [Save].
Note: – If you want to transmit data more securely by using SSL encryption, insert a checkmark
[HTTPS/SSL Encryption]. The security alert message will be displayed at this time, proceed with operation.
• To use the generic DNS service instead of using BualoNAS.com, enter the host name in
[DNS Hostname].
• If conguring manually without using UPnP, enter the external port of a router side. Port
9000 of the LinkStation is default and is used to allow access from the router side the
LinkStation (The port on the LinkStation side is set to 9000).
• If the LinkStation is left unconnected from the Internet a certain period of time, its
name registration will be deleted on the BualoNAS.com server.
Now you have completed the settings for the WebAccess feature.
LinkStation Setup Manual
4848

Chapter 3 Useful Functions
Procedure to access (view) published folder set by the WebAccess feature
Open the following URL in an Internet browser.
1
(BualoNAS.com) http://bualonas.com/
To access BualoNAS.com from iPhone/iPod touch:
1 Tap Safari from “Home” screen, and connect to the Internet.
2 Tap the address bar on top of the “Safari” screen.
3 Enter “http://bualonas.com/” in the address bar, and select “Go”.
• The screen shots for step 2 and later screen shots are examples from a PC. The screens
will look dierent from the actual iPhone/iPod screens.
• You cannot play video les or music les for which DRM is set by using this feature.
• You cannot play video les or music les that are saved in the WebAccess folders where
access restrictions are set.
2
• You cannot download les saved to iPhone/iPod touch by using this feature (the video
le and music le will be streaming, and the picture les are displayed in the browser).
• The compatibility of playing the video les and music les depends on the specications of Safari and QuickTime installed on the iPhone/iPod.
• To create a video le which is playable on the iPhone, use o-the-shelf software to convert to playable formats for the iPhone or iPod touch.
• It does not support uploading les, changing le names, or deleting les.
• iPhone and iPod are trademarks of Apple Inc., registered in the U.S. and other countries.
Enter BuffaloNAS.com name which is set in the
WebAccess Service conguration on the LinkStation, and click [Connect].
LinkStation Setup Manual
4949

Chapter 3 Useful Functions
3
To view without using BualoNAS.com, open the following URL on the Internet browser.
http://global IP address of the LinkStation:9000/
(For SSL, use https://global IP address of the LinkStation:9000/)
Note: – To verify the IP address of your LinkStation, see the conguration screen of your router.
Refer to your router’s manual for the procedure of how to verify the IP address.
Now you can access (view) a shared folder of the LinkStation which is published.
On the Internet browser, you can view folder or
les on the LinkStation that are published.
LinkStation Setup Manual
5050

Chapter 3 Useful Functions
What you can do on the WebAccess screen
You can perform following operations on the WebAccess screen.
"open”, “rename”, “delete”, “Link to this le”, “mail link to this le”, “Create Folder”, “Upload"
1 open Open a le and folder.
Click [open] to open the specied le/folder.
save a le on the local drive , by right clicking the mouse on the le and click [save as] .
To
2 rename Change a le/folder name.
Click [rename] to display the following screen. Enter a le name or folder name in [File Name]
you want to change, and click [Change].
• You can use up to 80 characters for a folder name and le name, regardless of single or
multi bytes characters (including the extension).
3 delete Delete les/folders.
Click [delete] to display the following screen. Click [Yes] to delete the selected le.
4 Link to this le Link to a le or folder.
The le or folder name will be highlighted when you click on it. Right click on [Link to this le],
and select [Copy Shortcut]. It will copy the address link and can be accessed directly from the
outside. Use this feature when you want to give out this address link. From the right-click menu,
select [Add to Favorites] to bookmark address link.
LinkStation Setup Manual
5151

Chapter 3 Useful Functions
5 Mail link to this le Send the address link by e-mail.
The le or folder name will be highlighted when you click on it. Click [Mail link to this le] in the
highlighted area, and your mail software will launch with the link address included in the mail
body to this le which is accessible from the outside. Use this feature when you want to distribute this address link by e-mail.
6 Create Folder Create a folder.
Click [Create Folder], and then the following screen will be displayed. Enter a folder name to create in [Folder Name], and click [Create]. The new folder will be created.
• You can use up to 80 characters for a folder name and le name, regardless of full or half
bytes characters (including the extension).
7 Upload Upload les.
Click [Upload] to display the following screen. Click [Browse] in the upload les area, and select a
le to be uploaded. Clicking [Upload] will start uploading data you have selected.
Click [Upload Files] to display the following screen.
LinkStation Setup Manual
5252

Chapter 3 Useful Functions
Select les you want to upload in [Append les], and click [Start upload].
Note: – The following conditions applies to upload.
• Up to 2GB in le size
• Up to 100 les per upload
You cannot upload a le if the same le name already exists on the destination.
Delete the le with the identical name in the destination before uploading the new le.
Note: – About the Preview feature
If a graphic data type file is selected, the word [Preview] is displayed next to the file
name. Clicking [Preview] will display the preview of the selected le on the browser.
Click at the bottom of the image to nish displaying the preview.
Move the mouse cursor on the right top of the preview image, and
will be displayed (this will not be displayed if there is no additional graphic les). Clicking
will display the next graphic data for a preview.
Move the mouse cursor on the left top of the preview image, and
(this will not be displayed if there is no previous graphic le). Clicking
will be displayed
will display
the previous graphic data for a preview.
LinkStation Setup Manual
5353

Chapter 3 Useful Functions
BitTorrent Client
About BitTorrent
BitTorrent is the le sharing protocol and a le sharing software (P2P software) protocol, and uses
P2P (peer-to-peer) networking.
The dierences from other traditional le sharing software and this software are:
• You can download files faster since files are distributed on the network and network
trac to le location will not be concentrated even with a large le.
• It does not keep anonymity, and it is easily known who publishes what les.
Note: – It is prohibited to use any copyrighted movies and audio les without permission from
the owner.
<BitTorrent’s Website> http://www.bittorrent.com/
Step of downloading with BitTorrent
Download Torrent information from a search engine on the Internet.
1
Note: – Torrent Information is called “tracker” (the le with extension of “.torrent”). This le in-
cludes information about “the server that knows where the hosts having the les you
want to download are”.
– Torrent Information can be downloaded from BitTorrent Inc.’s website or personal web-
sites. Follow the terms of use and copyright rules for Torrent Information described on
each website.
Torrent Information is sent to a server called “tracker” and receive information about a hosts
2
which has a le.
Start downloading based on the information received from the “tracker” server.
3
Download pieces of data from multiple hosts and make one complete le.
4
Use the following steps to download shared les to the LinkStation which are published with BitTorrent Protocol.
LinkStation Setup Manual
5454

Chapter 3 Useful Functions
Enabling BitTorrent feature and selecting folders
Note: – Refer to page 20 for the procedures to display the conguration screen.
1
2
3
1 Click [Extensions] - [BitTorrent] on the congu-
ration screen of the LinkStation.
2 Click [Modify Settings].
1 Click [Enable].
2 From the Download Folder, select a shared
folder where the les downloaded with BitTorrent.
3 Click [Save].
Click [Open Download Manager].
4
LinkStation Setup Manual
The Download Manager screen will be displayed.
There are two methods downloading; Downloading by adding Torrent information Add Torrent
From a URL or Add Torrent From a le.
5555

Chapter 3 Useful Functions
How to download Torrent Information by URL
1
Click [Add Torrent From URL].
2
Note: – Torrent Information can be download from BitTorrent Inc.’s website or personal websites.
Follow the terms of use and copyright rules for Torrent Information described in each
website.
3
4
1 Enter the URL which has Torrent Information in
the frame at the left of [Add].
2 Click [Add].
When the message [Torrent URL has been sent.] is
displayed, click [Okay].
Downloading to the destination folder will begin.
When progress reaches 100%, the download is
completed.
Now you have downloaded Torrent Information by adding it from URL.
LinkStation Setup Manual
5656

Chapter 3 Useful Functions
How to download Torrent Information by adding it from a le
1
2
Note: – Torrent Information can be download from BitTorrent Inc.’s website or personal websites.
Follow the terms of use and copyright rules for Torrent Information described for each
website.
Downloading to the destination folder will begin.
3
4
Click [Add Torrent From File].
1 Click [Browse...] and select Torrent le saved on
the LinkStation or your computer.
2 Click [Add].
When progress reaches 100%, the download is
completed.
Now you have downloaded Torrent Information by adding from a le.
LinkStation Setup Manual
5757

Chapter 3 Useful Functions
What you can do in the download screen
1
Click a queue name and click [Stop], this stops downloading.
2
Click [Start], it resumes downloading.
3
Click a queue name and click [Remove], the le will be deleted.
4
Torrent information will be searched in http://www.bittorrent.com/ . Enter a word to search in
the top right of the download screen and click [Search]. The search result will be displayed in a
separate window.
5
The order of the download queue can be changed by each item. The displayed order can be
switched by clicking following items.
[Name ][Size] [Progress] [Download] [Upload] [ETA]
6
Click [Settings] to display the conguration screen of BitTorrent.
LinkStation Setup Manual
5858

Chapter 3 Useful Functions
What you can do in the conguration screen
1 Port Settings
Changes a port to use for BitTorrent communication. When the LinkStation is connected to a
router, the port of the router will be automatically set by using UPnP.
To set the port manually without using UPnP, enter the port number (the default setting is "Default (6881)) on any port number on the LinkStation side.
2 Bandwidth Management
If this is set to [Automatic], Transmission bandwidth of BitTorrent will be automatically set. If
this is set to [Manual], you can specify a maximum bandwidth for download, upload, and seeds.
The default setting is [Automatic].
3 Seeding setting
Set the seed period for a le which is nished downloading.
Note: – Seeds are dened as a part of the downloading le that is published on other comput-
ers.
[Seed until removed] will continue to seed until Torrent information is deleted.
[Stop seeding when ratio reaches] will stop seeding when the upload percentage (a percentage
of the number of byte downloaded against the number of byte uploaded) is achieved to the
pre-dened value (%).
[Stop seeding after] stop seeding automatically after the pre-dened time (in minute) has been
reached.
The default setting is [Seed until removed].
LinkStation Setup Manual
5959

Chapter 3 Useful Functions
Direct Copy
When you use the Direct Copy feature, you can connect a USB device to the LinkStation port to copy
movie, music, and image data directly to the LinkStation without using computers.
You can connect a USB mass storage class, a card reader (except for a card reader that can recognize
more than 2 memory cards), a UTP device such as digital camera, and the USB connector of the LinkStation. You cannot connect any other USB devices (such as a USB hub, mouse, keyboards and so
on).
Connect a USB device (USB ash/digital camera/hard disk/card reader) to the LinkStation.
1
USB
Connector
Function
Switch
Function
LED
Power LED
Function Switch
USB
Connector
Function Switch
Function LED
The following restrictions apply if a USB device does not fall into the USB Mass Storage class.
•After a USB device is recognized, the function switch turns blue (for about 60 seconds).
•You will be able to access the USB device after Blue function switch goes out.
Data is copied from a USB device to the Direct Copy folder after you connect a USB device and
2
push the function switch on the LinkStation while the function switch is ashing blue (for about
60 seconds).
Note: – While copying, the functions switch will flash blue. Pushing the function switch one
more time at this time will abort the Direct Copy.
The destination shared folder is set to a [share] folder as default.
Select a dierent shared from [Shared Folders] - [Direct Copy] - [Modify Settings] on the conguration screen of a LinkStation and click [save]. Then you can change the shared folder’s destination folder.
LinkStation Setup Manual
6060

Chapter 3 Useful Functions
Also, the following copy destination folder will be automatically created in the destination
shared folder.
<Direct Copy folder>/pictures/yyyymmdd
yyyy: year copied
mm: month copied
dd: date copied
A folder under the date folder will be created after if a second or third copy is done.
<Direct Copy folder>/pictures/yyyymmdd/n
yyyy: year copied
mm: month copied
dd: date copied
n: 1st time n=0, 2nd time n=1, 3rd time=2 and so on.
Note: – In USB Mass Storage class USB devices, les with following extensions will be copied.
avi, divx, asf, mpg, mpe, m1v, vob, mts, m2ts, m2t, mpeg, mpeg2, vdr, spts, tp, ts, 3gp,
mov, m4v, wmv, dvr-ms, xvid, mp4, jpg, jpeg, gif, png, tif, ti, yuv, bmp, mp3, mpa, wma,
aac, apl, ac3, lpcm, pcm, wav, m3u, m4a, m4b,aif, ai, ac, ogg, mp2, mp1
– All les on digital cameras that do not fall under USB Mass Storage Class will be trans-
ferred.
After you nished copying, make sure that the access LED of USB device is not ON and remove
3
the USB device.
Removing a USB device
If the power of the LinkStation is ON, press and hold the function switch on the front panel of
the LinkStation for more than 3 seconds (the function switch will be lit in blue). After the function switch which is illuminated in blue stops illuminating, you can remove a USB device.
If the LinkStation is powering OFF, you can remove the USB device without doing anything.
LinkStation Setup Manual
6161

Chapter 3 Useful Functions
Time Machine
If you use Time Machine feature which is the back up method from Apple and is supported on Mac
OS X 1.5 or later, use the following procedure.
Note: – Refer to page 20 for the procedures to display the conguration screen.
1
2
Click [AFP] on [Network] - [Settings] - [Network Service].
Select [Enable] and click [Save].
3
LinkStation Setup Manual
1 Click [Shared Folders].
2 Click a shared folder you want to set as a backup
destination on Time Machine feature.
6262

Chapter 3 Useful Functions
4
5
1 Select [Apple].
2 Click [Save].
1 Click [Extensions] - [Time Machine].
2 Click [Modify Settings].
6
7
1 Select [Enable].
2 Select a shared folder of the LinkStation you
have set on step 3-4 from applicable shared
folders.
3 Click [Save].
1 Enter a host name of Macintosh which uses the
Time Machine feature.
2 Enter the MAC address of Macintosh which uses
the Time Machine feature.
3 Click [Create].
LinkStation Setup Manual
6363

Chapter 3 Useful Functions
• To verify Macintosh host name:
See under [Computer Name] on [System Preferences]-[Sharing] screen.
e.g.) If it is displayed as "bbbbbbbbbb.local", enter
"bbbbbbbbbb" as a host name.
e.g.) If it is displayed as "cccccccccc.eee -ee.lo-
cal", enter "cccccccccc" as a host name .e.g.) If
it is displayed as "dddddddddd.fff-ff.jp", enter
"cccccccccc" as a host name.
• To verify the MAC address of Macintosh:
1 Open [About This Mac] from Apple menu, and
click [More Info].
2 System Profiler is open, click [Network] on the
menu at the left of the screen.
3 To display MAC address, select one whose BSD
Device Name is [en0] from [Active Services]. Alphanumeric characters displayed on [MAC Address] are the MAC address. You can easily enter
the MAC address by dragging and copying the
MAC address displayed and pasting it to [Target
MAC address].
The folder called <Macintosh host name>_<Macintosh MAC address>.sparsebundle will created
in a shared folder of the LinkStation which is set as a backup destination by Time Machine feature. Be aware that changing this folder name or deleting this folder may prevent from using it
as a backup destination of Time Machine or recovering properly.
LinkStation Setup Manual 64

Chapter 3 Useful Functions
Select [System Preferences] from Apple Menu of Mac OS X 10.5.
8
9
Click [Time Machine].
10
11
Click [Choose Backup Disk].
Select LinkStation, and click [Use for Backup].
LinkStation Setup Manual
6565

Chapter 3 Useful Functions
12
Enter a user name and password to access the shared
folder of the LinkStation, click [Connect].
If you do not use access restrictions for the shared folder of the LinkStation you set as a backup
destination, enter “admin” in the user name box and your password for “admin” in the password.
If you use the access restrictions feature. enter a user name and password that has the read and
write access right.
13
Now you have completed to backup using Time Machine.
Make sure that the switch of Time Machine is "ON".
The number of seconds displayed in [Next Backup] will be counted down, and a backup job will
starts when it hits zero.
A backup job will be done in background, so you
can operate and shutdown Mac OS as usual.
If you want to recover data or set items you want
to exclude from a backup job, refer to Mac OS
Help.
LinkStation Setup Manual
6666

Chapter 3 Useful Functions
Sleep Timer
To save energy, you can specify the time to set the LinkStation to Standby mode (hard disk and LED
lights are turned o).
You can use Timer ON/OFF feature only when the LinkStation’s power switch is ON. This feature cannot be used when it is set to “AUTO” or “OFF”.
1
2
1 Click [System]-[Power Management]-[Sleep
Timer] on the conguration screen of the LinkStation.
2 Click [Modify Settings] for Timer ON/OFF.
1 Specify a timer interval, beginning time and
ending time.
2 Click [Save] at the bottom of the screen.
* You can set up to 3 timers.
* You can set wake up at from 0:00 to 23:45.
You can Begin sleep at 0:00 to 27:45.
(If the ending time is 24:00 or later, the beginning time can be set from 4:00 to 23:45.
24:00 is equivalent to 0:00 of the next day, and 27:00 is equivalent to 3:00 of the next day.
* You can not set the ending time before or the same time as a beginning time.
• During processing disk check, disk format, and backup jobs or when a backup job is scheduled before and after 5 minutes of the current time, the LinkStation will not be proceeded to
Standby mode even though the end time has reached.
• If time of the timers are duplicated, the longest interval time is used to operate.
LinkStation Setup Manual
)
6767

Chapter 3 Useful Functions
• The examples of multiple timers are set are as following.
(e.g.1) Currently the timer set on Wednesday 10:00 is working:
Timer 1 Everyday 12:00 - 24:00
Timer 2 not used
Timer 3 not used
• Nothing happens on 12:00 and it moves to Standby mode on 24:00
(e.g.2) Currently the timer set on Wednesday 10:00 is working:
Timer 1 Everyday 9:00 - 18:00
Timer 2 Day specied Wednesday 10:00 - 20:00
Timer 3 not used
• Other than on Wednesdays, it starts to work on 9:00 and moves to Standby mode on 18:00.
On Wednesdays, it moves to Standby mode on 20:00.
(e.g.3) Currently the timer set on Wednesday 10:00 is working:
Timer 1 Everyday 9:00 - 18:00
Timer 2 Day specied Wednesday 10:00 - 25:00
Timer 3 not used
• Other than on Wednesdays, it starts to work on 9:00 and moves to Standby mode on 18:00.
• Other than on Wednesdays, it moves to Standby mode on 1:00 of a next day.
(e.g.4) Currently the timer set on Wednesday 10:00 is working:
Timer 1 Everyday 9:00 - 18:00
Timer 2 Day specied Wednesday 07:30:00 - 22:00:00
Timer 3 not used
• Other than on Wednesdays, it moves to Standby mode on 18:00.
• It starts working on 7:30 of Wednesday, and it moves to Standby mode on 22:00 of a next day.
During a Standby mode, pressing the LinkStation's function button or move the power switch to
AUTO will cause the status change to the Standby mode to power ON.
Now you have completed the Sleep Timer settings.
LinkStation Setup Manual
6868

Chapter 3 Useful Functions
Web/database server
The LinkStation can be used as a Web server.
HTML, CGI scripts, images, and JavaScript are supported.
Note: – The LinkStation’s Web server is for advanced users only. Don’t enable it unless you know
what you’re doing.
Navigate to [Network] – [Web Server] in the Web Admin tool and click [Modify Settings].
1
[Enable] Web Server, choose an external port setting (81 is the default) and a Web server public
2
folder, and click [Save].
3
Edit the php.ini file to change the PHP language
interpreter settings,. Instructions are in the le.
The Web server is now con gured.
LinkStation Setup Manual 69

Chapter 3 Useful Functions
<My SQL server>
The LinkStation can be used as a MySQL server.
A MySQL database may be installed and linked with the web server.
Note: – The LinkStation’s MySQL server is for advanced users only.
– Don’t enable it unless you know what you’re doing.
Navigate to [Network] – [MySQL Server] in the Web Admin tool and click [Modify Settings].
1
[Enable] MySQL Server, choose a port and a data folder, and click [Save].
2
The MySQL server is now congured.
LinkStation Setup Manual
7070

Appendix
Specications
Check Bualo's catalogs or web site (www.bualotech.com) for information about the latest products or compatible models.
Interface
(LAN port)
Interface
(USB Connector)
Power/ Consumption power
Interface: Complied with IEEE802.3ab (1000BASE-T)
Complied with IEEE802.3u (100BASE-TX)
Complied with IEEE802.3 (10BASE-T)
Transfer Speed:1000Mbps Full duplex (AutoNegotiation)
100Mbps Full duplex/Half duplex (auto-negotiation),
10Mbps Full duplex/Half duplex (auto-negotiation),
Number of ports:1 port (support AUTO-MDIX)
Connector type: RJ-45 8-pin
Access method:
Protocol:
Network File Systems: SMB/CIFS, AFP, FTP, HTTP/HTTPS
Jumbo Frame frame length: 1,518/4,102/7,422/9,694 Bytes(Including 14
bytes of the header and 4 bytes of FCS)
Interface: USB Standard Revision 2.0
Data transfer speed: Maximum 480 Mbps (Theoretical value)
Connector: USB connector (Series A) X 1
Supporting USB devices: USB hard disk manufactured by Bualo, USB UPS,
USB printer and etc. Please ensure the supported USB UPS on Buffalo's
website (www.bualotech.com).
AC100V 50/60Hz /
LS-XHL,CHL: Approximately 24 W (Maximum) Approximately 17 W (Average)
LS-WXL: Approximately 48 W (Maximum) Approximately 26 W (Average)
LS-WSXL: Approximately 15 W (Maximum) Approximately 9 W (Average)
CSMA/CD
TCP/IP
External size / Weight
Operating Environment
Com pat ible Models
C o m p a ti b l e
computer
Compatible OS
LinkStation Setup Manual
LS-XHL,XHL: W45 X H175 X D156 mm (excluding protruding parts) / about 1.1 kg
LS-WXL: W86 X H127 X D204 mm (excluding protruding parts) / about 2.3 kg
LS-WSXL: W40 X H82 X D135 mm (excluding protruding parts) / about 0.5 kg
Temperature 5 - 35 °C / Humidity 20 - 80 % (no condensation)
IBM/PC Compatible (OADG spec), NEC PC98-NX Series, Apple Mac Series
NOTE: Equipped with LAN interface.
• The LinkStation cannot be connected with computers via USB; It is only
connected via LAN.
Windows 7/Vista/XP/2000, Windows Server2003/Server2008,
Mac OS X 10.3.9 or later
7171

Appendix
Status LED (LS-XHL, LS-CHL)
Glowing blue
When the power of LinkStation is ON, the blue Status LED is ON. When it is OFF, the LED is also OFF.
Red ashing (Error code)
An error has occurred when the red status LED at the front on the LinkStation is ashing. The way it
ashes indicates the type of error.
Note: – If there is an error message, you can check the meanings of an error with the message
displayed when you search for the LinkStation with NAS Navigator2.
Place Status
10’s place The LED illuminates for 1 second every 0.3 seconds.
The number of ashes is the ten’s place of the information code.
1’s place The LED illuminates for 0.5 seconds every 0.3 seconds.
The number of ashes is the one’s place of the information code.
LinkStation Setup Manual
7272

Appendix
Error code Error Details
E01 Problems in DRAM DATA LINE.
E02 Problems in DRAM ADDRESS LINE.
E03 Problems in RTC CHIP.
E04 Fail to extract Kernel.
E06 The rmware is corrupted.
E07 Hard disks are not found.
E10 A UPS error. Operating using UPS battery due to the power outage. System will be
safely shut down based on the conguration conditions. After the LinkStation shuts
down, ensure that power is supplied to the UPS. If there is no problem, briey press
the function switch on the LinkStation (pressing and holding down the switch will
not work).
E11 Fan Error. The fan is spinning too slow, or has stopped.
Move the unit where there is no objects blocking the fan, providing a good airow,
and in a cool place. The LED is still lit, replace a fan (OP-FAN/LS) which is sold separately.
E15 Hard disk IO error.
E16 The hard disk is not connected or malfunctions.
E17 LinkStation's internal controller error.
E20 The circuit board is damaged. Unplug the power code of the LinkStation and reboot
it.
E21 LinkStation's internal controller error.
E22 Mounting error.
E23 The hard disk is damaged.
LinkStation Setup Manual
7373

Appendix
Amber ashing LED (Information code)
There is an information message when amber status LED at the front of the LinkStation is ashing.
The way it ashes indicates the type of error.
Note: – If there is an information message, you can check the meanings of the information with
the message displayed when you search for the LinkStation with NAS Navigator2.
Place Status
10’s place The LED illuminates for 1 second every 0.3 seconds.
The number of ashes is the ten’s place of the information code.
1’s place The LED illuminates for 0.5 seconds every 0.3 seconds.
The number of ashes is the one’s place of the information code.
Information codes Meanings of the message
I19 Erasing disk (lled with zero).
I23 Initializing the system settings.
I25 Updating the rmware.
I26 Initializing the Web settings.
I27 Checking a USB hard disk.
I28 Formatting a USB hard disk.
LinkStation Setup Manual
7474

Appendix
Status LED (LS-WXL)
There are 5 LEDs on the LinkStation: “Power”, “Function”, “Info/Error”, “Link/Act”, and “AC adaptor”.
Power LED
Function LED
Info/Error LED
Power LED
Link/Act LED
AC adaptor LED
Status
Solid Blue The LinkStation is powered on.
Blinking Blue The LinkStation is starting up or shutting down.
LED is o The LinkStation is o.
Meaning
Function LED
Status Meaning
Solid Blue DirectCopy is ready (lights for 1 minute).
USB device is dismounted (lights for 5 seconds).
Initialization is in progress.
Blinking Blue DirectCopy is in use.
Notes:
The function LED (blue) and the info/error LED (Orange) blink together if an error
occurs during DirectCopy. Please do the following if this happens:.
1. Shut down the LinkStation .
2. Detach the USB device from the LinkStation.
3. Reattach the USB device to the LinkStation.
4. Power on the LinkStation.
LinkStation Setup Manual
7575

Appendix
Info/Error LED
The Info/Error LED blinks orange when it has a message. The message is coded by the pattern of
blinking.
Note: – The messages are also available (uncoded) in NAS Navigator2.
Place Status
10’s place The LED illuminates for 1 second every 0.3 seconds.
The number of ashes is the ten’s place of the information code.
1’s place The LED illuminates for 0.5 seconds every 0.3 seconds.
The number of ashes is the one’s place of the information code.
Information code Message contents
I11 Many defective sectors have been found.
I13 The RAID array is being formatted.
I14 The RAID array is being checked.
I15 The error status of the RAID array is being investigated.
Data transfers will be slower than usual until this is complete.
I16 The RAID array is being created.
I17 The RAID array is being resynchronized.
Data transfers will be slower than usual until this is complete.
I18 The RAID array is being recongured.
Data transfers will be slower than usual until this is complete.
I19 The RAID array is being erased.
I23 Initializing the system settings
I25 Updating the rmware
I27 Checking a USB drive
I28 Formatting a USB hard drive
LinkStation Setup Manual
7676

Appendix
The Info/Error LED blinks red to indicate an error.
The error may be identied by the pattern of blinking.
Note: – The error may also be viewed from NAS Navigator2.
Place Status
10’s place The LED illuminates for 1 second every 0.3 seconds.
The number of ashes is the ten’s place of the error code.
1’s place The LED illuminates for 0.5 seconds every 0.3 seconds.
The number of ashes is the one’s place of the error code.
Error code Error details
E00 MPU is abnormal; no power.
E01 DRAM data line is abnormal.
E02 DRAM address line is abnormal.
E03 RTC chip is abnormal.
E04 Kernel failure.
E14 The RAID array cannot be mounted. Turn o power, then turn power on again.
If the same error is displayed, re-congure RAID.
E15 I/O error of hard drive.
E16 The hard drive is not connected, or data transfer has failed.
E17 Controller error.
E21 Controller error.
E23 The hard drive has crashed.
LinkStation Setup Manual
7777

Appendix
Link/Act LED
Status Meaning
Solid green Linking.
Blinking green Accessing.
AC adaptor LED
Status Meaning
Green Power is connected.
O Power is not connected.
LinkStation Setup Manual
7878

Appendix
Status LED (LS-WSXL)
There are 4 LEDs on the LinkStation: “Function”, “Info/Error”, “Link/Act”, and “Power”.
Function LED
Link/Act LED
Info/Error LED
Power LED
Function LED
Status Meaning
Solid Blue DirectCopy is ready (lights for 1 minute).
USB device is dismounted (lights for 5 seconds).
Lights during initialization.
Blinking Blue DirectCopy is in use.
Notes:
The function LED (blue) and the info/error LED (Orange) blink together if an error
occurs during DirectCopy. Please do the following if this happens:.
1. Shut down the LinkStation .
2. Detach the USB device from the LinkStation.
3. Reattach the USB device to the LinkStation.
4. Power on the LinkStation.
Link/Act LED
Status Meaning
Solid green Linking.
Blinking green Accessing.
LinkStation Setup Manual
7979

Appendix
Info/Error LED
The Info/Error LED blinks orange when it has a message.
The message is coded by the pattern of blinking.
Note: – The messages are also available (uncoded) in NAS Navigator2.
Place Status
10’s place The LED illuminates for 1 second every 0.3 seconds.
The number of ashes is the ten’s place of the information code.
1’s place The LED illuminates for 0.5 seconds every 0.3 seconds.
The number of ashes is the one’s place of the information code.
Information code Message contents
I11 Many defective sectors have been found.
I13 The RAID array is being formatted.
I14 The RAID array is being checked.
I15 The error status of the RAID array is being investigated.
Data transfers will be slower than usual until this is complete.
I16 The RAID array is being created.
I17 The RAID array is being resynchronized.
Data transfers will be slower than usual until this is complete.
I18 The RAID array is being recongured.
Data transfers will be slower than usual until this is complete.
I19 The RAID array is being erased.
I23 Initializing the system settings
I25 Updating the rmware
I27 Checking a USB drive
I28 Formatting a USB hard drive
LinkStation Setup Manual
8080

Appendix
The Info/Error LED blinks red to indicate an error.
The error may be identied by the pattern of blinking.
Note: – The error may also be viewed from NAS Navigator2.
Place Status
10’s place The LED illuminates for 1 second every 0.3 seconds.
The number of ashes is the ten’s place of the error code.
1’s place The LED illuminates for 0.5 seconds every 0.3 seconds.
The number of ashes is the one’s place of the error code.
Error code Error details
E00 MPU is abnormal; no power.
E01 DRAM data line is abnormal.
E02 DRAM address line is abnormal.
E03 RTC chip is abnormal.
E04 Kernel failure.
E14 The RAID array cannot be mounted. Turn o power, then turn power on again.
If the same error is displayed, re-congure RAID.
E15 I/O error of hard drive.
E16 The hard drive is not connected, or data transfer has failed.
E17 Controller error.
E21 Controller error.
E23 The hard drive has crashed.
Power LED
Status Meaning
Solid Blue The LinkStation is powered on.
Blinking blue The LinkStation is starting up or shutting down.
O The LinkStation is o.
LinkStation Setup Manual
8181

Appendix
Hard drive replacement procedure (LS-WXL)
The LS-WXL’s hard drives are simple to replace in case of a disk failure.
Drives in RAID1
You can identify the failed disk in the Web Admin Tool by navigating to [System] – [Storage]. Shut down the LinkStation, and replace the failed drive promptly. When the RAID is rebuilt,
your data is copied to the new drive.
Note: – For best results, congure the LinkStation to shut down automatically in the case of a
disk failure.
Drives in RAID 0 or normal mode
You can identify the failed disk in the Web AdminTool by navigating to [System] – [Storage]. Shut
down the LinkStation, and replace the failed drive.
Note: – All data on the failed drive and any array that it was part of has been lost.
Replacement hard drives for the LS-WXL are available from www.bualotech.com.
Hard drives on the LS-WSXL are not user-replaceable.
Contact technical support to arrange a replacement LS-WSXL if it fails during the warranty period.
LinkStation Setup Manual
8282

Appendix
Note: –
Please do not lift the LinkStation by its front cover. The front cover might come
off.
–
Before removing hard drives, touch a metal object to dissipate static electricity in
your body, or wear a static wrist strap.
–
Work carefully! Some of the metal edges inside the LinkStation are sharp.
–
Damage done to the LinkStation by improper disassembly of the LinkStation is
not covered by Warranty.
–
Do not reverse the right and left hard drives, or your data may be lost.
–
Replacement drives should be the same capacity as the drive being replaced, or
larger.
–
Do not use a hard drive that has previously been used in a LinkStation or TeraStation as a replacement drive. Remove any partitions on it first, or rebuild might
not work normally.
LinkStation Setup Manual
8383

Appendix
1
2
Shut down the LinkStation and remove all cables.
Pull the front cover forward while pressing gently
on the hollow on the left side.
3
LinkStation Setup Manual
Remove the front cover.
8484

Appendix
Knob
Tab
4
5
Pull out the tab above the failed drive while pressing the release below the drive. The tab will slide
out approximately 2cm ( 1 inch) .
Note: – Be careful so that the finger will not be
caught in knob, tab and hard disks.
Remove the failed drive.
6
Insert the new drive until it clicks.
LinkStation Setup Manual
8585

Appendix
7
Reattach all cables and power on the LinkStation.
8
9
Reattach the front cover.
In the Web Admin Tool, navigate to [System] –
[Storage] – [RAID array 1] and rebuild the RAID
array.
Note: – If the LinkStation is in normal mode, format the new drive in [System] – [Storage].
LinkStation Setup Manual
8686

Appendix
Software
You can install following software applications and the manual by using utilities CD which comes
with the LinkStation.
Select and install software from the selection screen which is displayed during Setup (Or click [Option] and follow the instruction on the screen to install software).
NAS Navigator2
You need NAS Navigator2 in order to display the
conguration screen of the LinkStation or search for
the LinkStation from the network.
It is always installed when you setup by clicking [Begin Installation] on LinkNavigator.
Note: – When using Power Management with PC
feature, you need to install NAS Navigator2 on all computers connected within the
same network as LinkStation.
File Sharing Security Level Change Tool
When you configure the [access restrictions by using Delegate Authority server] on the conguration
screen of the LinkStation, you need to change security on Windows Vista and Windows Server 2003/
Server 2008. Select [Start]-[Programs]-[BUFFALO][File Sharing Security Level Change Tool]-[File Sharing Security Level Change Tool], and then select
[Change security level] to change the security settings (Select “Recover default security level” change
it back to the previous setting).
Note: – This utility can be installed only on Windows
Vista and Windows Server2003/Server2008.
Note: – During the initial setup, the message, “Start changing le sharing security level. Will you
continue?” will be displayed. If you click [Yes], follow the instructions on the screen and
restart your PC .
Click [Option]-[Uninstall Software] on LinkNavigator to delete software you have installed. Follow
the instructions displayed on the screen.
LinkStation Setup Manual
8787

Appendix
Info folder
In the folder called "info" on the internal hard disk of the LinkStation, Install programs such as the
NAS Navigator2 is included.
[info]-[English] Folder
- [NASNavi2] Folder. . . Installs NAS Navigator2 by double-clicking Inst.exe.
LinkStation Setup Manual
8888

Appendix
Troubleshooting
Cannot Setup
The following section lists typical occurrences and causes when you cannot setup the LinkStation
by using LinkNavigator or cannot use LinkStation even after nishing setup,
Occurrence: The message "Cannot find LinkStation", "No available LinkStation was found", or
"Setup cannot be completed" is displayed.
Cause 1. A LAN cable is not connected.
Reconnect the AC adapter and the LAN cable, and turn on the LinkStation again.
Cause 2. The rewall is enabled, or software running in the background is installed.
Disable the rewall or uninstall software which enables the rewall, and try to search for the
LinkStation again.
Cause 3. Both wireless and Ethernet adapter are enabled.
Disable any adapters other than the LAN adapter to connect to the LinkStation.
Cause 4. The defective LAN cable or the connection is not stable.
Change a port on the hub to connect or replace the LAN cable.
Cause 5. Your LAN board, card, or adapter is malfunctioning.
Replace a LAN board, card, or adapter.
Cause 6. The LAN board you are using or the transfer mode of the hub is not set.
Change the LAN board, or change the transfer mode to [10M half-duplex] or [100M halfduplex].
Some LAN boards and hubs may not be connected to the network properly if the transfer
mode is set to [Auto Negotiation].
Cause 7. There is a network bridge.
If any network bridge which is not used, delete them.
Cause 8. You are searching from a dierent network.
You cannot search for the LinkStation over network segments. Connect the LinkStation to
the same segment as the computer you use for search.
LinkStation Setup Manual
8989

Appendix
Cause 9. TCP/IP does not work properly.
Install the LAN adapter's driver again.
Cause 10. You are running Setup second time or more (it has been already run before).
After initializing the LinkStation, follow steps described in "LinkNavigator Setup" on Page 3
to run Setup.
Note: – When using Power Management with PC feature, you need to install NAS Navigator2 on
all computers connected within the same network as the LinkStation.
If a shared folder does not open on NAS Navigator2
The LinkStation may not be physically connected or may not be recognized properly. Reconnect the
LAN cable and restart your computer and the LinkStation.
A shared folder does not open suddenly
If you use a shared folder on the LinkStation as a network drive, you may not be able to access to the
LinkStation when the IP address or the workgroup has changed.
In such a case, follow the instructions in "Open shared folder" on Page 16 and open the shared folder
on the LinkStation by using NAS Navigator2.
Note: – On Mac OS, LinkStation is mounted as a drive icon on the desktop, or displayed in the
sidebar on Finder.
– If the problem still persists after you tried the procedures described above on Mac OS,
select [System]-[Storage]-[Disks]-[Check Disk]-[Delete any hidden, non-essential MacOS
dedicated les] on the conguration screen of the LinkStation, and run Disk Check.
If a shared folder does not open even though NAS Navigator 2 recognizes the LinkStation
If power outage occurred or the AC adapter is unplugged while the LinkStation is ON, the LinkStation's rmware may be corrupted and shared folders may not open (You can search for folders on
NAS Navigator2 but they do not open).
Note: – In such a case, the LinkStation name displayed on NAS Navigator2 or the configura-
tion screen on the LinkStation is displayed as LS-CHL-abc(abc stands for last 3 digits of
the MAC address of the LinkStation) or LS-XHL-abc. In such a case, download the latest
rmware from BUFFALO's website (www.bualotech.com) and update it.
LinkStation Setup Manual
9090

Appendix
Data Backup
While using the LinkStation, you may loose your important data due to sudden accidents, hard disk
failure, or accidental misoperation. It is important to backup your data to recover data or minimize
losses in such a case.
Use Mass Storage class hard disk manufactured by BUFFALO (such as TeraStation/LinkStation and a
USB external hard disk) as a backup destination.
GPL Information
The source code for Bualo products that use GPL code is available at http://opensource.bualo.jp/ .
LinkStation Setup Manual
9191
 Loading...