

Page 1

BTL-5000
Laser
USER'S GUIDE
112IE08/08/2008CZ
Page 2

OBSAH
1 USER'S GUIDE .............................................................................................................................................. 4
1.1 Introduction................................................................................................................................................... 4
1.2 Light-The Principle of Laser Light and its Specifics ...................................................................................... 4
1.3 Types of Lasers ............................................................................................................................................ 6
1.3.1 Source......................................................................................................................................................6
1.3.2 Wavelength (primarily semi-conductor lasers) .........................................................................................6
1.3.3 Beam Operation Mode .............................................................................................................................7
1.3.4 Type of Beam...........................................................................................................................................7
1.3.5 Laser Class (defined by the output)..........................................................................................................7
1.3.6 Use...........................................................................................................................................................8
1.4 Basic Physical Quantities ............................................................................................................................. 8
1.5 Biologické účinky laseru o nízkém výkonu (neinvazivního laseru)................................................................ 9
1.6 Akupuncture ............................................................................................................................................... 10
1.6.1 Frequencies for Laser Acupuncture According to Dr.Nogier ..................................................................10
1.6.2 Frequencies for Laser Acupuncture According to Dr.Voll (EAV) ............................................................11
2 SETUP OF LASER GENERATOR............................................................................................................... 12
2.1 Access Password ....................................................................................................................................... 12
2.2 Setup and Control of Laser Therapy........................................................................................................... 12
2.2.1 Dose.......................................................................................................................................................12
2.2.2 Frequency ..............................................................................................................................................13
2.2.3 Output (laser probe) ...............................................................................................................................13
2.2.4 Output (laser cluster)..............................................................................................................................13
2.2.5 Area........................................................................................................................................................14
2.2.6 Distance between the Probe/Cluster and the Irradiated Surface............................................................15
2.2.7 Time of Therapy .....................................................................................................................................15
2.2.8 Course of Signal – Duty Factor (DF) ......................................................................................................15
2.2.9 Physiological Effects .............................................................................................................................17
2.2.10 Laser Sequences ...................................................................................................................................17
2.3 Specific settings.......................................................................................................................................... 17
2.3.1 Door Activity ...........................................................................................................................................17
2.3.2 Acupuncture ...........................................................................................................................................18
2.3.3 Self-calibration of the Laser Probe .........................................................................................................18
2.4 Locking of the Equipment If Door Opens .................................................................................................... 19
2.4.1 COM IN/OUT connector .........................................................................................................................19
2.5 Laser Probes .............................................................................................................................................. 20
2.6 Optical Attachments for Laser Probes ........................................................................................................ 21
2.6.1 Dental Attachment..................................................................................................................................21
2.6.2 Gynaecological Attachment....................................................................................................................21
2.6.3 ENT Attachment.....................................................................................................................................21
2.6.4 How to Connect the Attachment.............................................................................................................22
2.7 Laser clusters ............................................................................................................................................. 22
STRANA 2 Z 25
Page 3

2.8 Use of Safety Eyewear ............................................................................................................................... 23
3 APPENDIX ................................................................................................................................................... 24
3.1 Warning Labels Placed on the Case of the Device and on the Laser Probe .......................................... 24
3.1.1 Label placed on the case of the device, warning about occurrence of visible and invisible radiation of
class 3B..................................................................................................................................................24
3.1.2 Label placed on the probe, warning about proximity of aperture of laser of the stated wavelength, power
and laser class .......................................................................................................................................24
3.1.3 Label placed on the laser cluster, warning about proximity of aperture of laser of the stated wavelength,
power and laser class.............................................................................................................................25
3.1.4 Label for marking of the laser workplace, warning about proximity of 3B-class laser.............................25
STRANA 3 Z 25
Page 4
1 USER'S GUIDE
1.1 INTRODUCTION
This User's Guide is intended to make you familiar with the BTL-5000 Laser device designed for performing non-
invasive, low level laser therapy. At the same time, it will give you general instructions on how to perform low level
laser therapy in clinical practice.
Please note that, according to applicable legislation, the staff operating therapy lasers must be trained by
competent institutions.
1.2 LIGHT-THE PRINCIPLE OF LASER LIGHT AND ITS SPECIFICS
The nature and qualities of light can be interpreted in more ways, according to classic, relativistic or quantum
physics. However, the basic nature of light itself as either a particle/corpuscular or an electromagnetic/wave
mechanism remains unreachable for our senses and it is incomparable to any other level of reality. Therefore, we
can only accept conclusions and deductions of numerous experiments.
Laser radiation has specific qualities:
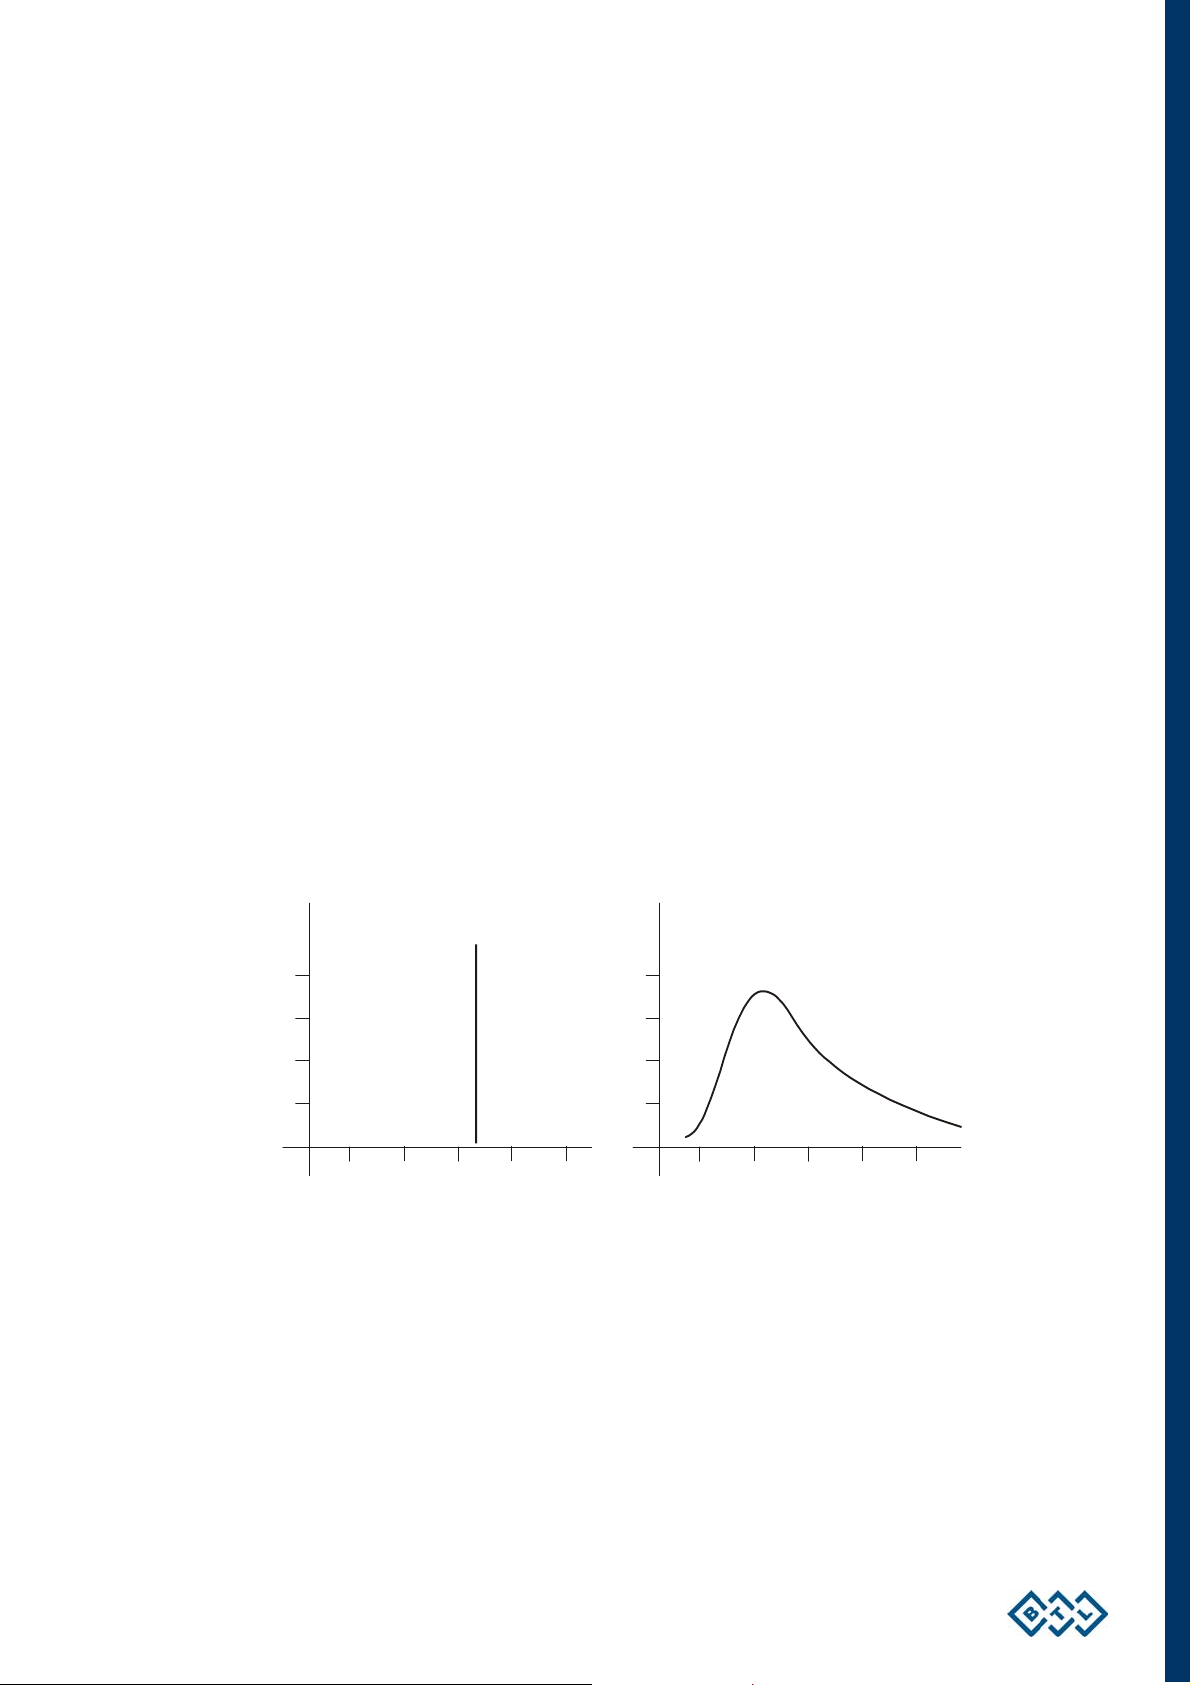
• totally monochromatic: maintaining only one wavelength
LASER 635 nm
Intensity
500 700400
600
800
Intensity
nm
BULB
800 1600400 20001200
nm
USER'S GUIDE | PAGE 4 FROM 25
Page 5
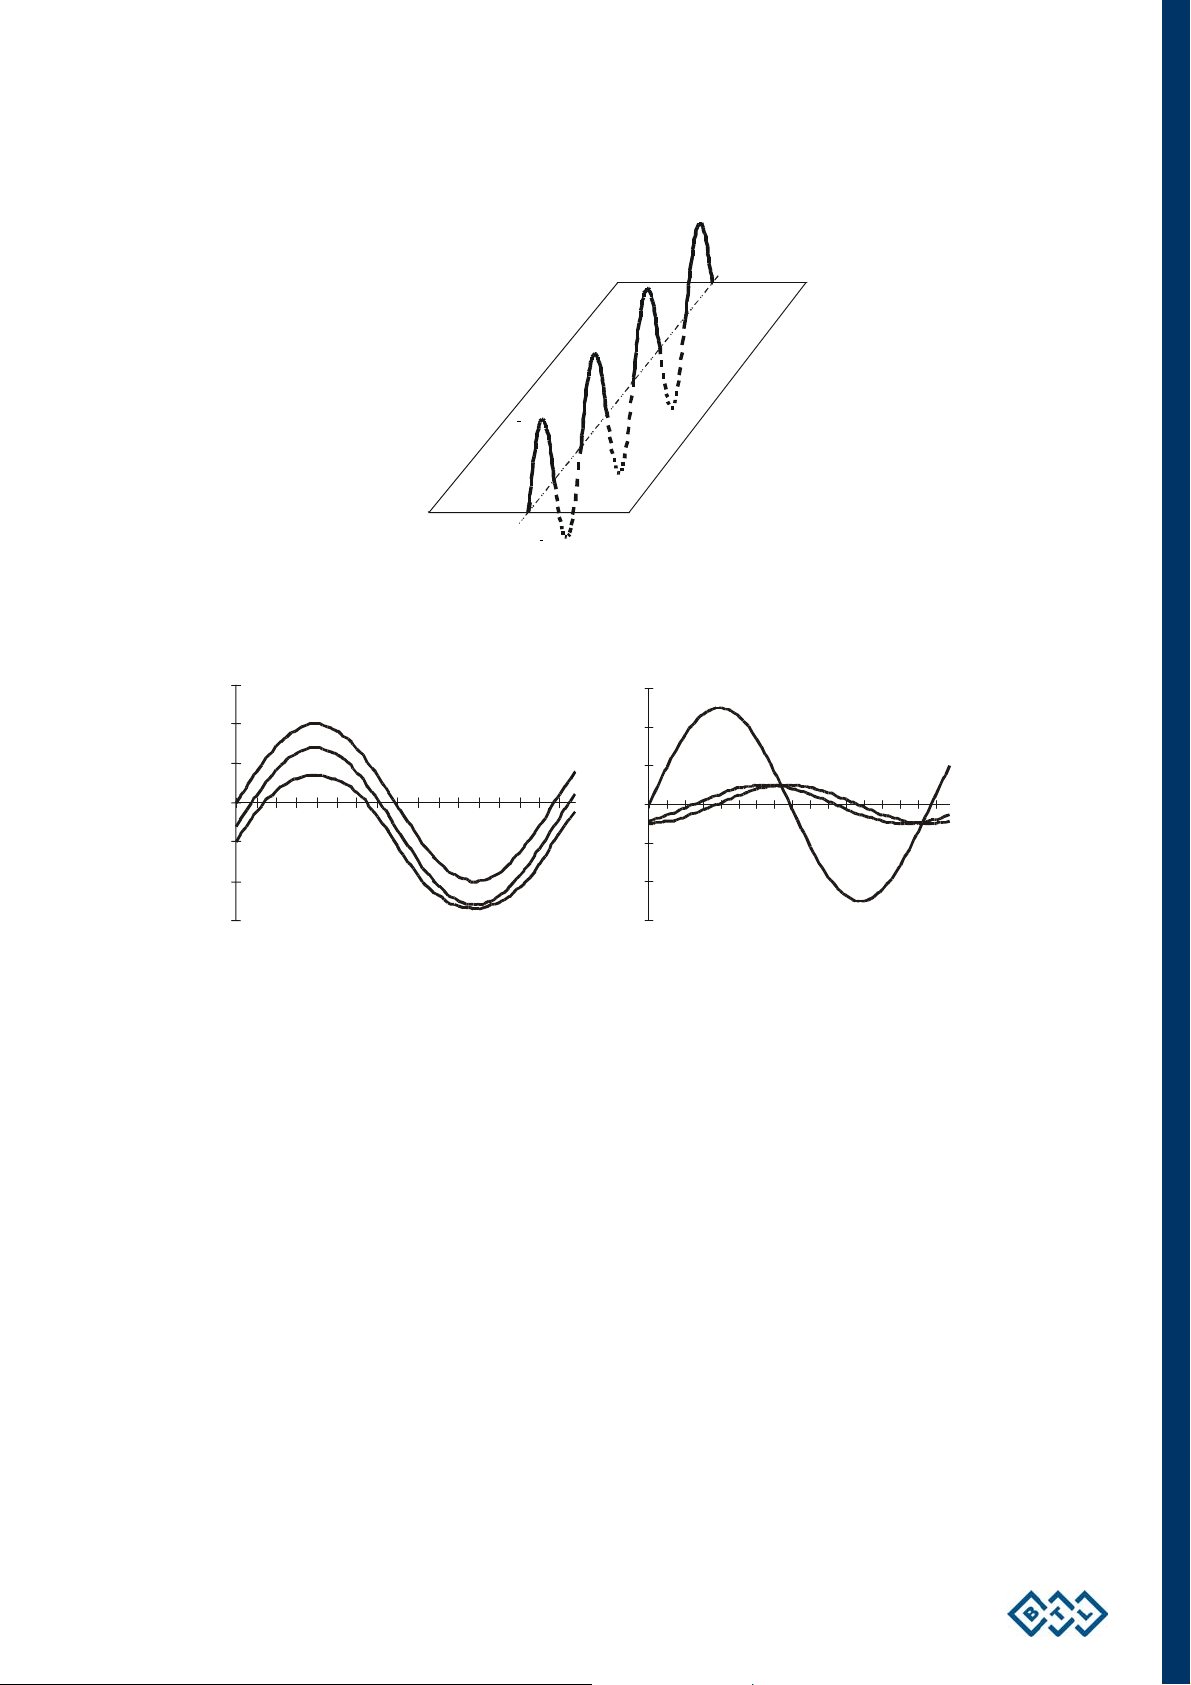
• totally polarized – waves are absolutely spatially oriented on a defined area
Linear polarization
• totally coherent – it is absolutely oriented in time - maxima and minima of all waves are identical in time
and the waveforms are the same
Coherent light Non-coherent light
A laser beam of a high output represents the “death ray” of sci-fi authors of old; it can destroy material or matter.
However, a laser beam of low output (not exceeding 500 mW) shows slightly different effects on living organisms
and tissues, especially significant stimulative effect – see the part concerning clinical effects of low-power laser
beam.
The word LASER stands for Light Amplification by Stimulated Emission of Radiation.
The first theoretical postulates on a laser beam were laid down by Albert Einstein in the early twentieth century,
describing the theoretical possibilities of a stimulated emission of light in 1916-1917. However, the first laser unit
was not constructed until 1960, following other important discoveries in the area of the so called quantum
radiotechnique (N.G. Basov and A.M. Prochorov of the former USSR and C.H. Townes of the USA received a
Nobel Prize for these discoveries in 1964).
The medical application of laser light followed soon after. At first, only high intensity laser beams were utilized.
Lasers of this type provide a source of energy that can destroy (cut, shear) as well as evaporate and, using its
thermic effect, cauterize tissue.
E. Mester, a Hungarian scientist, was the first to introduce the stimulative effect of a low intensity laser. He
conducted his experiments - which are still of a great importance - in the late sixties.
USER'S GUIDE | PAGE 5 FROM 25
Page 6
1.3 TYPES OF LASERS
Lasers can be divided according to several criteria:
1.3.1 SOURCE
• solid lasers (ruby laser)
• liquid lasers
• gas lasers - helium-neon, argon
• semi-conductor lasers (GaAs, GaAlAs) – now the most important of the non-invasive therapy lasers
The advantages of semi-conductor lasers include a significant miniaturization of the source, robustness and
immunity to damage and the theoretic possibility to construct a laser unit of any wavelength, according to the
user's requirements. Nevertheless, some lasers still remain at experimental level (see below).
1.3.2 WAVELENGTH (PRIMARILY SEMI-CONDUCTOR LASERS)
• blue lasers – approx. 400-500 nm
• green lasers – approx.500-550
• red lasers – approx.600-700nm
• infra-red lasers – approx.700-950 nm
Visible spectrum
500nm 700nm
cosmic radiation; gamma-rays, X-rays, UV radiation
400nm
600nm
infrared radiation, microwaves, radio waves, very long waves
Laser beam penetration through the tissue is largely dependent on the wavelength. In general, green and blue
lasers are still being developed and their clinical use is extremely limited. Most commonly used are the beams in
the wavelength of red light. After 2-3 mm penetration through living tissue, their intensity is reduced to half. This
predetermines red laser beams to be used especially in therapy of mucous membrane and skin diseases. Since
the output is absorbed by a very small column of the tissue, devices of an output of 50 mW or lower are usually
fully sufficient.
The intensity of infra-red lasers is reduced to half after penetration of 2-3 cm through the tissue. These lasers are
used especially in treating of deeper-located structures (joints, muscles, insertions...). Since the output is
absorbed by the column of the tissue, and since we want the intensity on the target area deep in the tissue to be
sufficient, we recommend using devices of a minimum output at least 50 mW.
See the part concerning the emitted power density below.
USER'S GUIDE | PAGE 6 FROM 25
Page 7
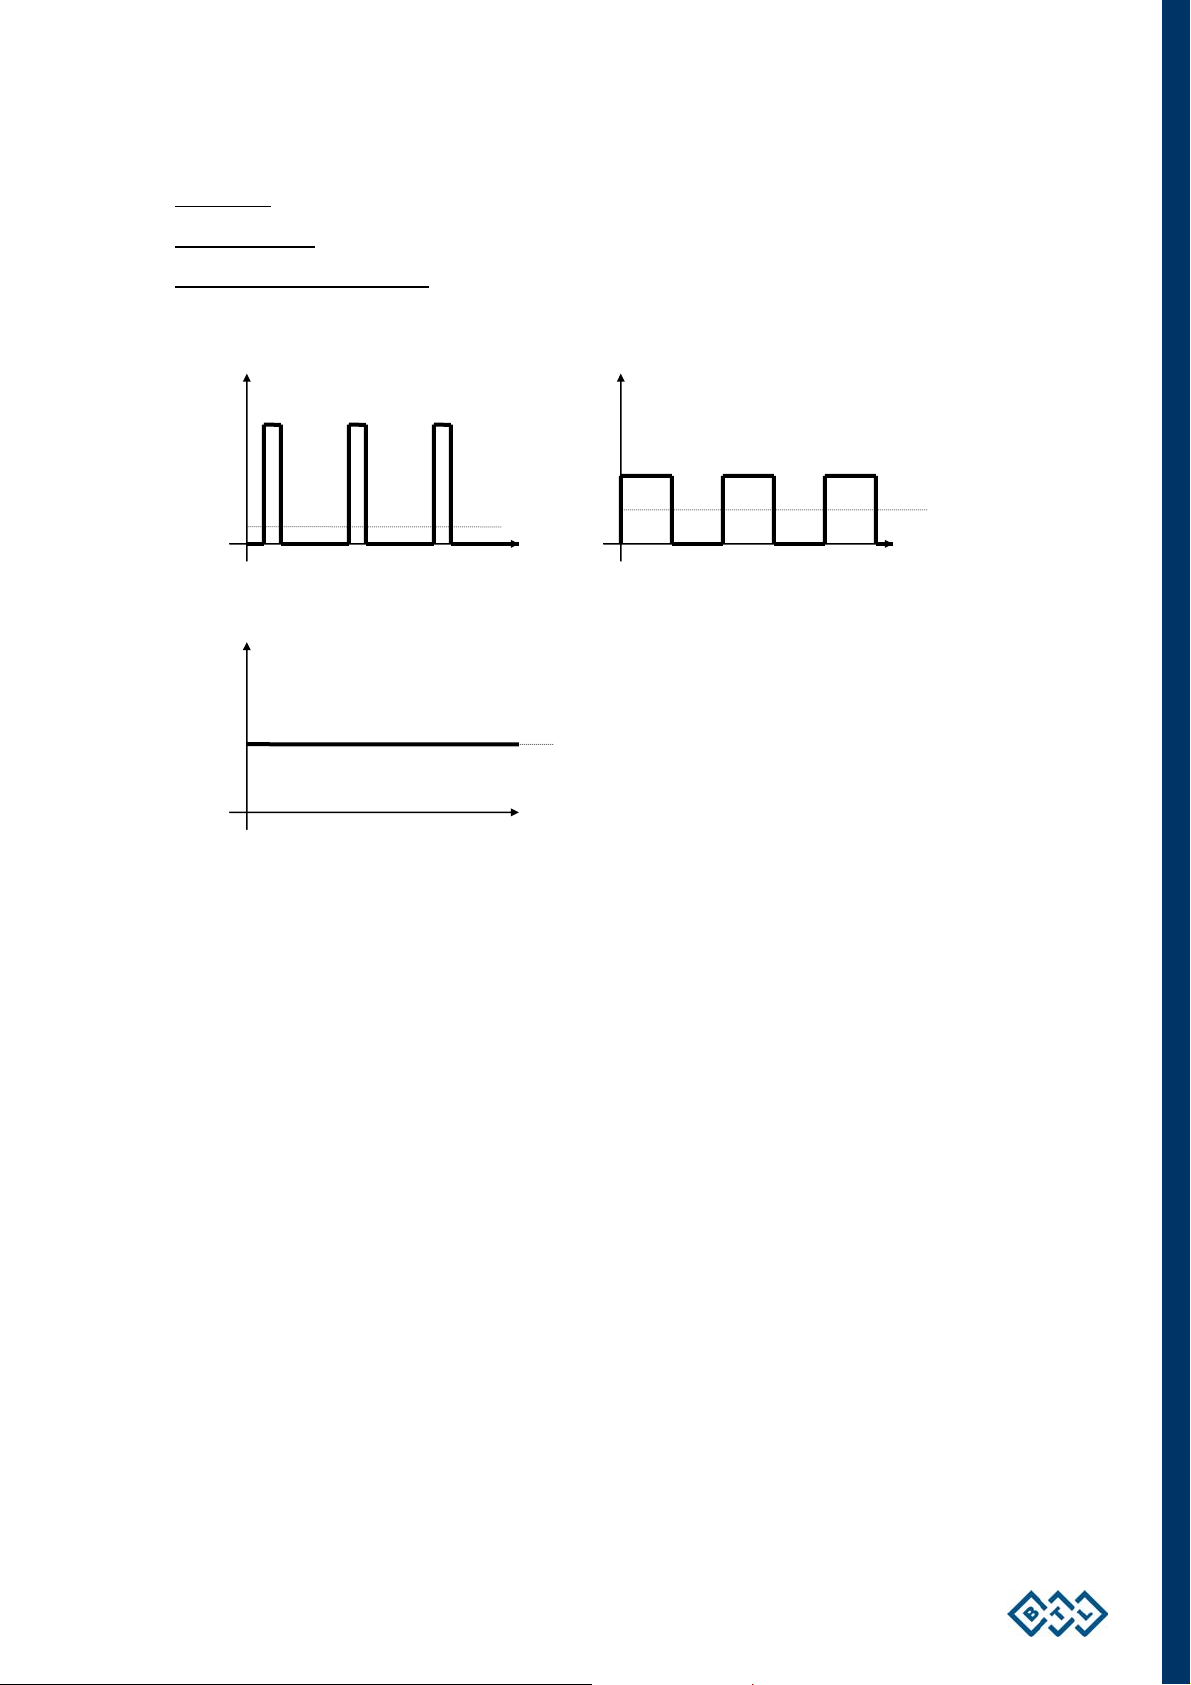
1.3.3 BEAM OPERATION MODE
• pulse lasers
– very short pulses – hundreds of ns, peak output in watts or tens of watts
• continuous lasers
• lasers with modulated operation
output reaches up to several hundreds of mW.
Output
Output
– the pulse length depends on the frequency and on the duty factor; the peak
CONTINUOUS
Mean
value
Time
Time
Output
MODULATED PULSE
Mean
value
Time
Mean
value
Manufacturers usually offer various alternatives, including the possibility of combination of various modes
modulated according to various parameters.
See below the parts concerning clinical effects and use.
1.3.4 TYPE OF BEAM
• convergent (point) beam
• divergent (widening) beam – allows irradiation of a larger area without the need of sweeping the probe over
the treated tissue
• laser scanners – devices for irradiation of large areas
• laser clusters – generate several independent laser beams, which may be of various wavelengths. They
enable to irradiate a large area without the necessity of sweeping over the treated tissue. To some extent
they substitute laser scanners.
1.3.5 LASER CLASS (DEFINED BY THE OUTPUT)
• Class 2: up to an output of 1 mW
• Class 3A (3R, 3M): up to an output of 5 mW and output density of 25 W/m2
• Class 3B: up to 500 mW
USER'S GUIDE | PAGE 7 FROM 25
Page 8

Note
The stated values are only rough, exact classification of the hygienic class is more complicated and shall be
performed according to applicable standards.
1.3.6 USE
• simple pen lasers ("laser-pen") – usually feature only a very limited range of frequency modes. The
advantage of this type is its perfect portability
• "pocket" lasers – usually designed to fit in a physician's coat pocket; in most cases the probe is connected
with the device's body by a conductor – these devices largely prevail on the market, at present the
manufacturers can equip these devices by probes of an output up to hundreds of mW
• desk-top lasers – usually supplied from the mains, the probe is connected with the device by a cable. The
advantages of this type usually include a wide range of frequency modes and the possibility to set many
different parameters. New generation devices (including BTL-5000 Laser) have also the possibility of
replacement of probes of various wavelengths and outputs. These devices are designed especially for
rehabilitation. One of their advantages is the possibility of building of "sets" of the devices which can provide
as wide range of treatments as possible on a small area.
1.4 BASIC PHYSICAL QUANTITIES
• Wavelength - one of the basic parameters of a monochromatic laser beam (i.e. of only one wavelength). Its
unit is nanometer [nm]
• Output – its unit is mW. The given output is either peak, i.e. pulse amplitude, or mean (average). In case of
the BTL 5000 Laser the screen displays the peak output value measured on the output aperture of the probe.
Use of an optical attachment or light conductor causes approximately a 10% loss of output which shall be
deducted from the displayed value. For each attachment supplied by the manufacturer of BTL devices, the
decrease of output is stated in the attachment's technical documentation.
• It is always necessary to know the output level at the active end of the probe/cluster (output aperture) –
especially when the beam is transmitted by a light conductor, the resulting output can markedly differ from the
output of the source! Every passage between media (source-air, source-lightguide, lightguide-air) lowers the
output.
• The mean output also depends on the chosen mode, i.e. continuous or pulse (The computing unit of the BTL-
5000 Laser takes into account the mode in which the device is working when calculating the treatment time).
• Modulation frequency – its unit is Hertz [Hz] (= number of oscillations per second), sometimes there is in
addition the percentage value of the active state time ("Duty factor") and the pulse width. The most commonly
used are numerical frequencies (5 Hz stimulation, 10 Hz analgesic effect), very common are also frequencies
according to Dr. Nogier (previously used mainly in acupuncture), frequencies according to Dr. Bahr
(nowadays used mainly in acupuncture) or according to Dr. Voll
• Power density - its unit is J/cm2 – power emitted per unit of area. This quantity is improperly called dose –
however, this term has become so common in the laser theory that also in this document the terms "emitted
power dose" or "dose" are used, but they always mean "emitted power density".
Below you can see a formula for calculation of an emitted power dose (Note: this is the dose emitted to the skin
surface, not to more deeply located structures).
USER'S GUIDE | PAGE 8 FROM 25
Page 9

mean radiation output (W) x application time (s)
emitted power dose [J/cm2] = -------------------------------------------------------------------
irradiated area (cm2)
Knowledge of basic physical quantities (which is also acquired in obligatory training) significantly facilitates grasp
of the laser therapy.
1.5 BIOLOGICKÉ ÚČINKY LASERU O NÍZKÉM VÝKONU (NEINVAZIVNÍHO LASERU)
Specific physical qualities of a laser beam result in specific clinical effects. The most considerable clinical effects
are:
• analgesic effect (A)
• antiphlogistic effect (F)
• antiedematous effect (E)
• biostimulation effect (B)
• vasodilatation effect (V)
All these effects are based on positively established and verified mechanisms:
• acceleration of microcirculation
• increase of intracellular activity of many enzymes, particularly in Krebs cycle
• increased oxygen circulation, improved glucose utilization
• DNA synthesis stimulation (via phytohemaglutinin stimulation)
• increased fibroblast activity (for keloids these activated fibroblasts are able to perform resorption of fibrin)
• phagocytosis activation
• activation of the Na/K pump on the membrane
• activation of metabolic processes in the cellula: partly through the Na/K pump and Ca transport affection,
partly through direct activation of the mitochondrial system
• changes of local level of important mediators -- inflammatory (histamin substances, prostaglandins) or e.g.,
endorphins
When performing an in vitro experiment, no difference can be seen between laser beams applied in continuous
and pulse modes. However, when performing an in vivo experiment, we observe marked differences between a
continuous beam and a beam adjusted to a certain defined mode. In physical therapy, this phenomenon can be
observed when performing electrotherapy or applying ultrasound. It seems that, for a complex organism with its
numerous information systems and feedbacks, a physical quantity modulated to a certain frequency features one
additional quality -- specific information transmitted by this frequency.
The effect of laser beam in acupuncture is totally specific. A laser beam affects tissue in a way fully comparable
with the effect of an inserted needle -- but without any pain or complications related to the needle insertion. The
skin above the acupuncture point is a light conductor for the laser beam. We find it interesting that in laser
acupuncture, in contrast with other forms of laser therapy, the wavelength of a laser beam is not of a big
USER'S GUIDE | PAGE 9 FROM 25
Page 10

importance (however, red lasers are slightly more effective) and the output of the device is of no importance at all
(we can even use a laser-pen). We conclude that in this method of application it is not the effect of a physical
quantity itself, but the above-mentioned transmission of information, that plays the key role.
Many treatments utilize several effects of laser light at a time (e.g. treatment of the varicose ulcer combine
analgesic, stimulative, as well as bactericidal effects).
1.6 AKUPUNCTURE
As stated above, laser beam has a specific effect on acupuncture points, adequate to use of an acupuncture
needle. The laser acupuncture has several advantages: it is non-invasive, painless (many patients report non-
pleasant sensations when acupuncture needle is being inserted), and saves time (even for sedative techniques
the treatment lasts no more than several tens of seconds).
Modulation by Nogier frequencies or EAV frequencies is very useful and it is commonly used in acupuncture.
Application of these frequencies for the most frequent diagnoses is stated below. For details see specialized
literature.
1.6.1 FREQUENCIES FOR LASER ACUPUNCTURE ACCORDING TO DR.NOGIER
Frequency [Hz] Use and Area of Application
U 1.14 Universal – whole body
A 2.28 Chaotic changes – tissues and transitional epithelium, body openings (mouth, nose,
eyes...)
B 4.56 Nutritive effect, chest and abdominal cavity
C 9.12 Mesenchyma, limbs, gluteal area, muscles and ligaments, kidneys, genitals
D 18.3 Metabolism, joints of cerebral symmetric organs
E 36.5 Nerve tissue, peripheral parts of spine, back and top parts of head and neck
F 73.0 Psychosomatic disorders, subcortical areas, lower parts of face
G 146 Emotional diseases, cerebral cortex, nervous system, frontal and temporal parts of head,
lateral parts of nose
USER'S GUIDE | PAGE 10 FROM 25
Page 11

1.6.2 FREQUENCIES FOR LASER ACUPUNCTURE ACCORDING TO DR.VOLL (EAV)
Frequency [Hz] Use
1.20 Tachycardia
1.70 Abscess, furunculosis
1.75 Psychostimulating and sympathicotonic effect
2.20 Fatigue, lipothymia, exhaustion, restlessness, pains of legs
2.45 Haematoma, edema, excessive menstrual bleeding associated with myoma, bleeding
from varices, insomnia, vegetative disorders, sinusitis
2.50 Distortions, vegetative distrophy
2.65 Gallbladder dystonia, periostitis
2.90 Rhinitis
3.30 Arteriosclerosis, arteriosclerotic hypertension
3.50 Lithiasis, renal colic, tremor, melancholy, knee asthenia
3.60 Insomnia, excitability
3.80 All spasms, tongue burn
3.90 Neuralgia, anxiety, sleeping disorders
4.00 Pancreatic disorders, hormonal disorders, menorrhagia, headache, vertigo
4.90 Dysmenorrhea, stiff neck
5.55 Angiospasms with paresthesis
5.80 Fear, vertigo, headache
5.90 Spastic paralysis
6.00 Parasympathicotonic effect, hypertension, spasmodic stiff neck
6.30 Irritability, headache
6.80 Muscle cramps
7.50 Neuralgia n. trigemini
7.70 Spastic paralysis
8.25 Paralytic paralysis
9.20 Eczema connected with kidney secretory function disorder, hypertension with increased
diastole, renal insufficiency
9.35 Paralytic paralysis
9.40 Cystitis, prostate diseases, diseases of large intestine, bronchitis, eczema accompanying
lung and vascular diseases, gout, joint aches, stomach problems including ulcers,
paresis, varix, haemorrhoids
9.45 Angina, angina pectoris, disorders of hypophysis and gonads
9.50 Spastic hypertension, climacteric hypertension, migraine, laryngitis
9.60 Arthritis, rheumatic diseases, vertebrogenous diseases
9.70 Ischialgia, rheumatism
10.00 Phlebitis, varicose ulcer
USER'S GUIDE | PAGE 11 FROM 25
Page 12

2 SETUP OF LASER GENERATOR
2.1 ACCESS PASSWORD
According to applicable standards, each laser device must be protected against unauthorized handling. In case of
the BTL-5000 series, it is guaranteed by the access password. If the device contains a laser generator, the
access password is always required after the unit is switched on. The password is preset to 0000 by the
manufacturer. After entering the correct password and confirmation by the enter button it is possible to work with
the device. If an incorrect password is entered, the device makes a warning and awaits a new entry.
The password can be changed at any time, but it cannot be disabled. For the process of password change, see
Chapter 3.2.1 Password Setting in the BTL-5000 Series USER’S MANUAL
Note
If you happen to forget your password, you can anytime use the universal one: 00000000.
2.2 SETUP AND CONTROL OF LASER THERAPY
On the therapy parameters screen it is possible to select individual laser therapies or laser sequences.
All pre-set therapy values are interconnected by the following mathematical relation:
2
Dose = Output * (DF/100) * Time / Area [J/cm
All pre-set values except frequency influence each other, and the device always tries to calculate the therapy
parameters in the way that the last pre-set parameter is at the value set by the user. Other parameters can be
changed, if necessary (except dose which is a key therapy parameter). Maximum values of parameters strongly
depend on the maximum power of the connected laser probe/cluster; therefore, some values can be set for the
probe with the output of 300mW but they are not allowed for the 30mW probe. When calculating therapy
parameters the device tries, if necessary, to adjust the output of the probe/cluster so that the therapy time is 1
minute.
2.2.1 DOSE
This value represents the power density to the area [J/cm
; W, %, s, cm2]
2
].
It is a key therapy parameter – therefore its value is a fixed part of the
program (diagnosis) and the device does not change it at internal
calculations (the user can change it freely). Dose can be changed within the
range stated in the technical parameters of the device. It is the maximum
range, and in practice, with some types of probes/clusters it is not possible
to reach the upper limit because they do not have enough power for it and
the necessary time of therapy would exceed the limit of 99:59.
After pressing the dose button it is possible to set dose by steps by the
select knob. It is also possible to set the value directly by the numerical keyboard (see chapter 2.4.2 Numerical
keyboard of the BTL-5000 Series USER’S MANUAL). Under the displayed current value of dose there are
"quick jump" buttons – after pressing one of them the dose value changes to the value written on the button and
further setting goes on from this value.
SETUP OF LASER GENERATOR | PAGE 12 FROM 25
Page 13

2.2.2 FREQUENCY
This parameter states the number of cycles in the time interval of 1 sec, its
unit is Hertz [Hz].
The equipment works either in continuous (i.e. uninterrupted) or in pulse
mode. If the zero value of the laser beam output frequency is set, the
equipment works in the so-called continuous mode (it can be also
recognized visually – the laser beam shines constantly and does not blink).
If a non-zero positive value of frequency is set, the equipment works in the
pulse mode (the laser beam is blinking). Note: the human eye can recognize
blinking of the beam up to the frequency of approx. 25 Hz, higher
frequencies are subjectively perceived by the human eye as continuous.
Frequency is a second key parameter of therapy – it is also a fixed component of the program (diagnosis) and the
device does not change it at internal calculations (the user can change it freely). Frequency can be set within the
range stated in the technical parameters of the device. The process of frequency setup is similar to that of other
therapy parameters.
After pressing the frequency button it is possible to set frequency by steps by the select knob. It is also possible
to set the value directly by the numerical keyboard (see Chapter 2.4.2 Numerical keyboard of the BTL-5000
Series USER’S MANUAL). Under the displayed current value of frequency there are "quick jump" buttons – after
pressing one of them the frequency value changes to the value written on the button and further setting goes on
from this value. Frequency is set by certain preset steps.
Setting frequency to 0 means continuous operation.
Acupuncture therapy
such case it is necessary to enter the exact value of frequency by the numeric keyboard, or to choose the
respective program or diagnosis (Nogier, EAV) in which the frequency is set to the required value.
2.2.3 OUTPUT (LASER PROBE)
This therapy parameter is the most dependent on the laser probe being
used. Each laser probe has a limiting value of minimum and maximum
laser beam output which it can generate. The device reads these data
from the probe and does not allow to set a value outside this range. When
setting the other parameters (area, dose) the device sets the output in the
way that the therapy time is 1 minute if possible. If it is necessary to set a
certain output value, it is possible to change the output, and the device will
automatically calculate the other therapy parameters.
After pressing the output button it is possible to set output by steps by the
select knob. It is also possible to set the value directly by the numerical keyboard (see chapter 2.4.2 Numerical
keyboard of the BTL-5000 Series USER’S MANUAL). Under the displayed current value of output there are
"quick jump" buttons – after pressing one of them the output value changes to the value written on the button and
further setting goes on from this value. Naturally, output can be set only within the range allowed by the
connected laser probe.
requires very precise setting of frequency to the values which cannot be set by steps. In
2.2.4 OUTPUT (LASER CLUSTER)
This therapy parameter is the most dependent on the laser cluster being
used. Each laser cluster has a limiting value of minimum and maximum
laser beam output which it can generate. The device reads these data
from the cluster and does not allow to set a value outside this range. The
cluster may consist of up to three independent output sections which can
be separately adjusted, i.e. the "red" section, "infrared" section and "blue"
SETUP OF LASER GENERATOR | PAGE 13 FROM 25
Page 14

supplementary lighting section. Maximum outputs of individual sections are stated on the label on the cluster. It is
also possible to switch off individual sections and to perform therapy, for example, only by the "red" section.
When setting the other parameters (area, dose) the device sets the output in the way that the therapy time is 1
minute if possible. The resulting output is divided linearly among all sections of the laser cluster. The displayed
output is divided into individual sections, which enables clear orientation. The first displayed value is the output of
the "infrared" section; the second one is the output of the "red" section.
If it is necessary to set a certain output value (or to switch a section on/off) it is possible to change the output, and
the device will automatically calculate the other therapy parameters.
After pressing the output button it is possible to set output by steps and by individual sections. Zero value of
output means that the section is off. It is also possible to set the value directly by the numerical keyboard (see
chapter 2.4.2 Numerical keyboard of the BTL-5000 Series USER’S MANUAL). Under the displayed current
value of output there are "quick jump" buttons – after pressing one of them the output value changes to the value
written on the button and further setting goes on from this value. Obviously, output can be set only within the
range allowed by the connected laser cluster.
2.2.5 AREA
This therapy parameter is often changed by the user because each treated
part has a different size. This parameter is also available in the ergonomic
mode. When using a divergent probe the screen displays the distance
between the probe and the surface so that the irradiated area equals to
the pre-set one. The maximum displayed distance is 25 cm, and when
irradiating from larger distance the diverged laser beam is too dispersed
and therapeutic effects are lower. If the injured area is larger, it is
necessary to treat it similarly as with convergent probes and continuously
"sweep" over the affected area. With convergent probes, it is necessary to
continuously sweep the beam over the whole injured area. With laser clusters the therapy is applied contactless
(the aperture of the laser cluster is immediately above the injury); in case of a larger injured area it is possible to
"sweep" over it similarly as with convergent probes. The area of the laser cluster is stated on the relevant tab
under its picture and in the technical parameters (typically 25cm
2
). We recommend not setting an area smaller
than stated in the technical parameters; in case of a larger area increase it by multiples. When calculating therapy
parameters the device assumes that the whole area is irradiated evenly,
which is achieved by the above-mentioned continuous sweeping.
The maximum accessible area also depends on the connected laser
probe/cluster – for low-power probes the maximum area that can be set
can be reduced by the device if the maximum therapy time 99:59 could be
exceeded.
After pressing the area button it is possible to set the area by steps by the
select knob. It is also possible to set the value directly by the numerical
keyboard (see chapter 2.4.2 Numerical keyboard of the BTL-5000
SETUP OF LASER GENERATOR | PAGE 14 FROM 25
Page 15

Series USER’S MANUAL). Under the displayed current value of area there are "quick jump" buttons – after
pressing one of them the area value changes to the value written on the button and further setting goes on from
this value.
Area can be also changed directly by turning the intensity knob.
2.2.6 DISTANCE BETWEEN THE PROBE/CLUSTER AND THE IRRADIATED SURFACE
When using convergent probes the distance is not measured because the beam is virtually parallel. For the laser
cluster the distance is not stated either, since the distance between the laser cluster aperture and the injury
should be minimal (although still contactless). This parameter therefore applies only to probes with divergent
beam. The distance is a recommended value which is calculated from the relation between the probe's distance
from the irradiated surface, divergence of the beam, and the size of the irradiated area. Its unit is centimetre [cm].
Further it is necessary to take into account the required depth of penetration which has to be subtracted from the
distance between the probe and body surface.
When using an attachment with lightguide (not designed for laser clusters) or probes with convergent beam,
sweep evenly over the whole pre-set area. During therapy let the beam, if possible, fall vertically on the surface of
the tissue, to prevent undesirable reflection and possible reduction of energy absorbed by the tissue. It is
advisable to degrease the skin before therapy.
2.2.7 TIME OF THERAPY
According to pre-set parameters the device automatically calculates other
parameters so that the time of therapy is, if possible, 1 minute. Modification
of the calculated time, if necessary, is possible, but it is important to take
into account that it will also influence the output of the used probe/cluster so
that the required dose of therapy is achieved. Maximum time of therapy is
99 minutes and 59 seconds.
In the pulse mode it is possible to modify the time of therapy also by
changing the duty factor (DF) value – to shorten the therapy increase the
DF.
After pressing the time button it is possible to set time by minutes or seconds. It is also possible to set the value
directly by the numerical keyboard (see chapter 2.4.2 Numerical keyboard of the BTL-5000 Series USER’S
MANUAL), separately for minutes and for seconds.
Time can be also changed directly by turning the time knob.
2.2.8 COURSE OF SIGNAL – DUTY FACTOR (DF)
This button serves for displaying of the modulation signal. After pressing
this button there appears a screen with the displayed waveform of the
output signal. If a non-zero frequency is set, it is possible to change the
ratio between the period in which the laser beam does and does not shine,
the so-called "Duty Factor". Duty factor can be changed by the select knob
or by the numerical keyboard.
Additional information:
pulse [ms], period [ms] – information about length of the pulse and of the period calculated from the pre-set
frequency and duty factor
frequency [Hz] – information about the pre-set frequency
Duty factor (DF) stated in [%] expresses the ratio of the pulse length t
to the period tp (see picture); it can be set
i
only in the pulse mode.
SETUP OF LASER GENERATOR | PAGE 15 FROM 25
Page 16

A
A
Change of value of the duty factor considerably influences the value of the average laser output. The following
picture shows comparison of two different duty factor settings, all other conditions being equal. From the picture it
is apparent that for higher DF the laser emits higher average output which implies shorter time of irradiation.
Comparison of two DF settings
a) f = 10 Hz, P = 20 mW, DF = 50 %
verage output 10 mW
Output [mW]
20
ti=0.05 tm=0.05
tp=0.1
Time [s]
b) f = 10 Hz, P = 20 mW, DF = 90 %
verage output 18 mW
Output [mW]
20
ti=0.09
t
m
=0.01
Time [s]
tp=0.1
SETUP OF LASER GENERATOR | PAGE 16 FROM 25
Page 17

2.2.9 PHYSIOLOGICAL EFFECTS
The symbols of effects used in the device have the following meanings:
A analgesic
F antiphlogistic
E antiedematous
B biostimulation
V vasodilatation
For the factory-preset programs and diagnoses, the effects are filled in. If you are not satisfied with them, you can
edit them and save the program as a user one.
2.2.10 LASER SEQUENCES
This item enables to run sequences of therapies selected by the name or by
the program number. It is possible to create new sequences and edit the
existing ones.
A sequence is a set of individual therapies followed one after another, and it
is necessary to create individual programs, which are to be included in the
sequence, before creating the sequence.
Unlike the ultrasound and electro sequences, the laser sequences do not contain the "time" parameter for
individual sections. Time is displayed for individual sections only for information and cannot be changed because
it is directly influenced by the dose which is pre-set in each section, and by the currently connected probe/cluster.
That is why when the probe/cluster is changed, the time of individual sections and the total time of the sequence
are changed. Time changes in the way so that the needed dose is reached in each section of the sequence. The
total time of a sequence is limited to 99:59.
Area is set globally for the entire sequence before the start of therapy.
Each sequence can be saved with its physiological effects among the user programs. For details see Chapter
USER SEQUENCES in the BTL-5000 Series USER’S MANUAL
2.3 SPECIFIC SETTINGS
Besides common settings, each generator has some specific setting items. These items are included in the
specific settings menu item which can differ according to which tab
(generator) is active. The following part describes specific settings for the
laser generator.
2.3.1 DOOR ACTIVITY
Here it is possible to set when the door is considered open - if it is when
voltage is brought or is not brought to the device – see Chapter 2.4 Locking
of the Equipment If Door Opens. The screen displays the door switch
setting and its current status; by opening and closing the door you can check
if the door status in the device corresponds to the actual status. If not, switch
the door activity from positive to negative or vice versa.
SETUP OF LASER GENERATOR | PAGE 17 FROM 25
Page 18

In case of any questions, contact the authorized BTL service department. It is also possible to buy the complete
door switch set from the BTL supplier.
2.3.2 ACUPUNCTURE
Using a special attachment, the laser generator can measure
acupuncture (not designed for laser clusters). Since this attachment is
not standardly supplied with the device, the acupuncture measuring
function is off. This item serves for switching the function on.
When the acupuncture measuring function is on, the acupuncture
button appears among therapy parameters in the manual settings
screen. After pressing this button you can start measuring of
acupuncture. The button displays a horizontal bargraph the size of
which is directly proportional to the skin resistance. The acupuncture
point is indicated by a local jump in the skin resistance. During measuring the device generates a sound the pitch
of which corresponds to the value on the bargraph. Since basic skin resistance of patients differs, it is possible to
change the sensitivity of measuring during the process of acupuncture measuring by the select knob.
To find an acupuncture point, slowly sweep the probe with the acupuncture attachment above the place of an
expected location of the acupuncture point. After finding the acupuncture point it is possible to start therapy by
pressing the button on the probe. During irradiation the device suspends the search mode and returns to it after
stopping the therapy or after activating the pause.
Owing to the fact that the acupuncture attachment significantly attenuates the passing laser beam, the equipment
corrects the maximum adjustable output when irradiating in the acupuncture mode. If you irradiate using the
acupuncture attachment and the acupuncture mode is off, it is necessary to "manually" recalculate the dose or
output for the 85% attachment attenuation.
2.3.3 SELF-CALIBRATION OF THE LASER PROBE
The probes are calibrated by the manufacturer and the user cannot calibrate them. The internal mechanism in the
probe automatically checks the reached output during therapy and makes corrections so that the displayed output
corresponds to the output generated by the laser probe/cluster. If for some reason the output of the probe/cluster
does not correspond to the pre-set values and it is not possible to correct the error, the probe/cluster is set as
defective by its internal automatics, it is locked, and further therapy cannot be performed with it.
Self-calibration is a function which tries to put back into operation the probe/cluster which was locked as
described above. If self-calibration is run on an unlocked probe/cluster, it has no influence on its functioning.
CAUTION
The self-calibration does not in any case replace the required regular calibration and check of the device
by the manufacturer or authorized service of BTL-5000 Series devices.
SETUP OF LASER GENERATOR | PAGE 18 FROM 25
Page 19

2.4 LOCKING OF THE EQUIPMENT IF DOOR OPENS
According to applicable standards, each laser generator must be equipped with the safety door switch which
prevents generation of the laser beam if the door is open and there is a real danger of hitting an unprotected
person by the laser beam.
This door contact is brought to the rear panel of the device to the COM IN/OUT connector and at the same time it
could be also brought to the one of the patient output connectors depending on the current configuration of the
device – see table Tab. 2.1 Configuration of output connectors in the BTL-5000 Series USER’S MANUAL.
If the level on the connector's input is active (e.g. in case of open door) the equipment for safety reasons does not
allow to run a therapy. If a therapy is already running, it is interrupted (PAUSE status) and the screen displays a
warning, optionally together with a sound signal. The therapy can be resumed only after the signal on the
connector's input subsides (i.e. the door is closed), or it can be cancelled by the esc button.
In case of any questions, contact the authorized BTL service department. It is also possible to buy the complete
door switch set from the BTL supplier.
2.4.1 COM IN/OUT CONNECTOR
The door contact is connected between contacts 1 and 3 at the COM IN/OUT connector. It is possible to preset
whether the switch is considered active in the closed or in the open status. By default, the status is set to active in
the closed status (i.e. the door is open). For details on setting the activity of the door switch see Chapter 2.3.1.
Door Activity.
2.4.2 PATIENT OUTPUT CONNECTOR
Voiltage is brought in the patient output connector between contacts 3 and 4. Any security equipment with AC or
DC voltage output can be connected to this connector. The polarity of voltage does not matter, the equipment
detects it itself and adapts to it. The minimum supplied voltage is 5V, maximum 35V. The switched current in the
connector is max. 10mA. It is possible to preset if the switch is considered active in the connected or
disconnected status (with or without voltage supply). By default, the switch is set to active in the connected status.
For details on setting the activity of the door switch see Chapter 2.3.1. Door Activity.
Power supply
-
Door contact
SETUP OF LASER GENERATOR | PAGE 19 FROM 25
Page 20

2.5 LASER PROBES
Laser probes are used for laser beam therapy. There are many types manufactured, of various power, and the
customers can choose according to their needs.
Division of probes by the wave length:
• Red probes
• Infrared probes
Division of probes by the type of the beam:
• Convergent – point beam (the probes have additional green lighting for better identification of the point of
incidence of the beam)
• Divergent beam – enables to irradiate larger area at a time without the need of sweeping over the treated
tissue (these probes do not have supplementary lighting).
direction of laser beam radiation
laser aperture
power cable
Note:
The probes are constructed in the way that the active surface of the button does not protrude the outline of the
probe. This prevents from accidental pressing e.g. in case of laying the probe on a flat surface (such as a desk,
etc.).
Ageing of the laser probe
The semiconductor laser diodes used in this equipment have a limited lifetime. During this time the diode ages
which leads to decrease of its maximum output. Since all laser diodes are calibrated before mounting into the
probes, the equipment is able to measure the actual output of the diode and can adjust the maximum output that
can be set according to the status of the laser diode. If the output drops under 40 % of the value stated on the
probe label (because of a defect or ageing of the diode) we recommend installing a new probe.
According to the value of the probe output just being emitted, the emission of the laser diode is regulated. This
ensures that the value on the screen is correct and it is not necessary to use an external measuring device for the
probe. Owing to the losses which occur on optical interfaces inside probes, the maximum output that can be pre-
set can be lower than the output stated on the probe label.
START / STOP button (emergency laser stop)
indicator of laser activity
label with classification and aperture
SETUP OF LASER GENERATOR | PAGE 20 FROM 25
Page 21

2.6 OPTICAL ATTACHMENTS FOR LASER PROBES
Special lightguide attachments serve for leading the laser beam to hardly accessible places. The range includes
attachments for dentistry, gynaecology and otorhinolaryngology (ENT). The lightguide attachments reduce the
maximum achievable output of the probe which they are connected to – therefore, when they are used, it is
necessary to make adjustment of the dose or output according to the values given below in the parts concerning
individual attachments.
Note:The attachments are not included in standard accessories of the BTL-5000 series devices.
The attachments are not designed for the laser clusters.
2.6.1 DENTAL ATTACHMENT
When using the dental optical attachment it is necessary to increase the dose by 15 % (when using probes with
wavelength of 685 nm or 830 nm.
2.6.2 GYNAECOLOGICAL ATTACHMENT
When using the gynaecological optical attachment it is necessary to increase the dose by 25 % (when using
probes with wavelength of 685 nm or 830 nm).
2.6.3 ENT ATTACHMENT
When using the optical attachment for ENT it is necessary to increase the dose by 20 % (when using probes with
wavelength of 685 nm or 830 nm). Before each use it is necessary to sterilize the attachments for 10 minutes at
the temperature of 120°C.
SETUP OF LASER GENERATOR | PAGE 21 FROM 25
Page 22

2.6.4 HOW TO CONNECT THE ATTACHMENT
Unscrew the brass cover of the probe's head. In its place screw the plastic attachment with the light waveguide plugged in.
Make sure that the plastic attachment is fixed fast and the light waveguide is immovable. If you want to replace the attachment
by another one, simply loosen the head by approximately one thread, take out the previous attachment, put in the new one and
tighten the head
.
2.7 LASER CLUSTERS
Laser clusters are used for the laser beam therapy. They are particularly suitable for the treatment of larger area
injuries, where using of a standard laser probe would be too laborious for the therapist (because of the necessity
of sweeping). Laser clusters can irradiate evenly a much larger area at a time (e.g. 25cm
manufactured, of various power and wavelength, and the customers can choose according to their needs.
Division of laser clusters by the wavelength:
• red clusters
• infrared clusters
2
). There are many types
• combined clusters (both red and infrared)
All laser clusters include focusing beam which facilitates focusing of the laser beam even when using protective means. A
particularly useful feature is the possibility of using combined clusters (both red and infrared, which enable to perform both types
of therapy with one accessory).
START / STOP button
power cable
label with classification and aperture
laser aperture
direction of laser
SETUP OF LASER GENERATOR | PAGE 22 FROM 25
Page 23

Note
The probes are constructed in the way that the active surface of the button does not protrude the outline of the
probe. This prevents from accidental pressing e.g. in case of laying the cluster on a flat surface (such as a desk,
etc.).
Ageing of the laser cluster
The semiconductor laser diodes used in this equipment have a limited lifetime. During this time the diode ages
which leads to decrease of its maximum output. Since all laser diodes are calibrated before mounting into the
cluster, the equipment is able to measure the actual output of the diode and can adjust the maximum output that
can be set according to the status of the laser diode. If the output drops under 40 % of the value stated on the
cluster label (because of a defect of the cluster or ageing of the diode) we recommend installing a new cluster.
According to the value of the output just being emitted by each individual laser diode, the emission of the laser diode is
regulated. This ensures that the value on the screen is correct and it is not necessary to use an external measuring device for
the cluster. Owing to the losses which occur on optical interfaces inside clusters, the maximum output that can be set may be
lower than the output stated on the cluster label
.
2.8 USE OF SAFETY EYEWEAR
According to applicable standards, both the therapist and patient must use safety eyewear which prevents from
damage to eyes in case of undesirable hitting by the laser beam. The protective eyewear supplied by BTL was
approved by the Czech Occupational Safety Research Institute and certified under the number 235/T-010/1999
SETUP OF LASER GENERATOR | PAGE 23 FROM 25
Page 24

3 APPENDIX
3.1 WARNING LABELS PLACED ON THE CASE OF THE DEVICE AND ON THE
LASER PROBE
3.1.1 LABEL PLACED ON THE CASE OF THE DEVICE, WARNING ABOUT OCCURRENCE OF VISIBLE AND
INVISIBLE RADIATION OF CLASS 3B
Maximum outputs:
60mW/685nm, 400mW/830nm
4x5
0mW/685nm, 4x400mW/830nm
Laser classified by:
IEC 601-2-22:1995
IEC 60825-1:1993/A2:2001
VISIBLE AND INVISIBLE
LASER RADIATION
AVOID EXPOSURE TO BEAM
CLASS 3B LASER PRODUCT
3.1.2 LABEL PLACED ON THE PROBE, WARNING ABOUT PROXIMITY OF APERTURE OF LASER OF THE
STATED WAVELENGTH, POWER AND LASER CLASS
STOP
LASER APERTURE
CLASS 3B
50mW 830nm
STOP
LASER APERTURE
CLASS 3B
400mW 830nm
STOP
LASER APERTURE
CLASS 3B
100mW 830nm
STOP
LASER APERTURE
CLASS 3B
30mW 685nm
STOP
LASER APERTURE
CLASS 3B
200mW 830nm
STOP
LASER APERTURE
CLASS 3B
50mW 685nm
STOP
LASER APERTURE
CLASS 3B
300mW 830nm
APPENDIX | PAGE 24 FROM 25
Page 25

3.1.3 LABEL PLACED ON THE LASER CLUSTER, WARNING ABOUT PROXIMITY OF APERTURE OF LASER OF
THE STATED WAVELENGTH, POWER AND LASER CLASS
LASER APERTURE
CLASS 3B
4x200mW 830nm
STOP
LASER APERTURE
CLASS 3B
4x200mW 830nm
4x50mW 685nm
LASER APERTURE
CLASS 3B
4x400mW 830nm
LASER APERTURE
CLASS 3B
4x50mW 68 5nm
STOP
STOP
LASER APERTURE
CLASS 3B
4x400mW 830nm
4x50mW 685nm
3.1.4 LABEL FOR MARKING OF THE LASER WORKPLACE, WARNING ABOUT PROXIMITY OF 3B-CLASS
LASER
STOP
STOP
LASER RADIATION
CLASS III. B
APPENDIX | PAGE 25 FROM 25
 Loading...