

Page 1
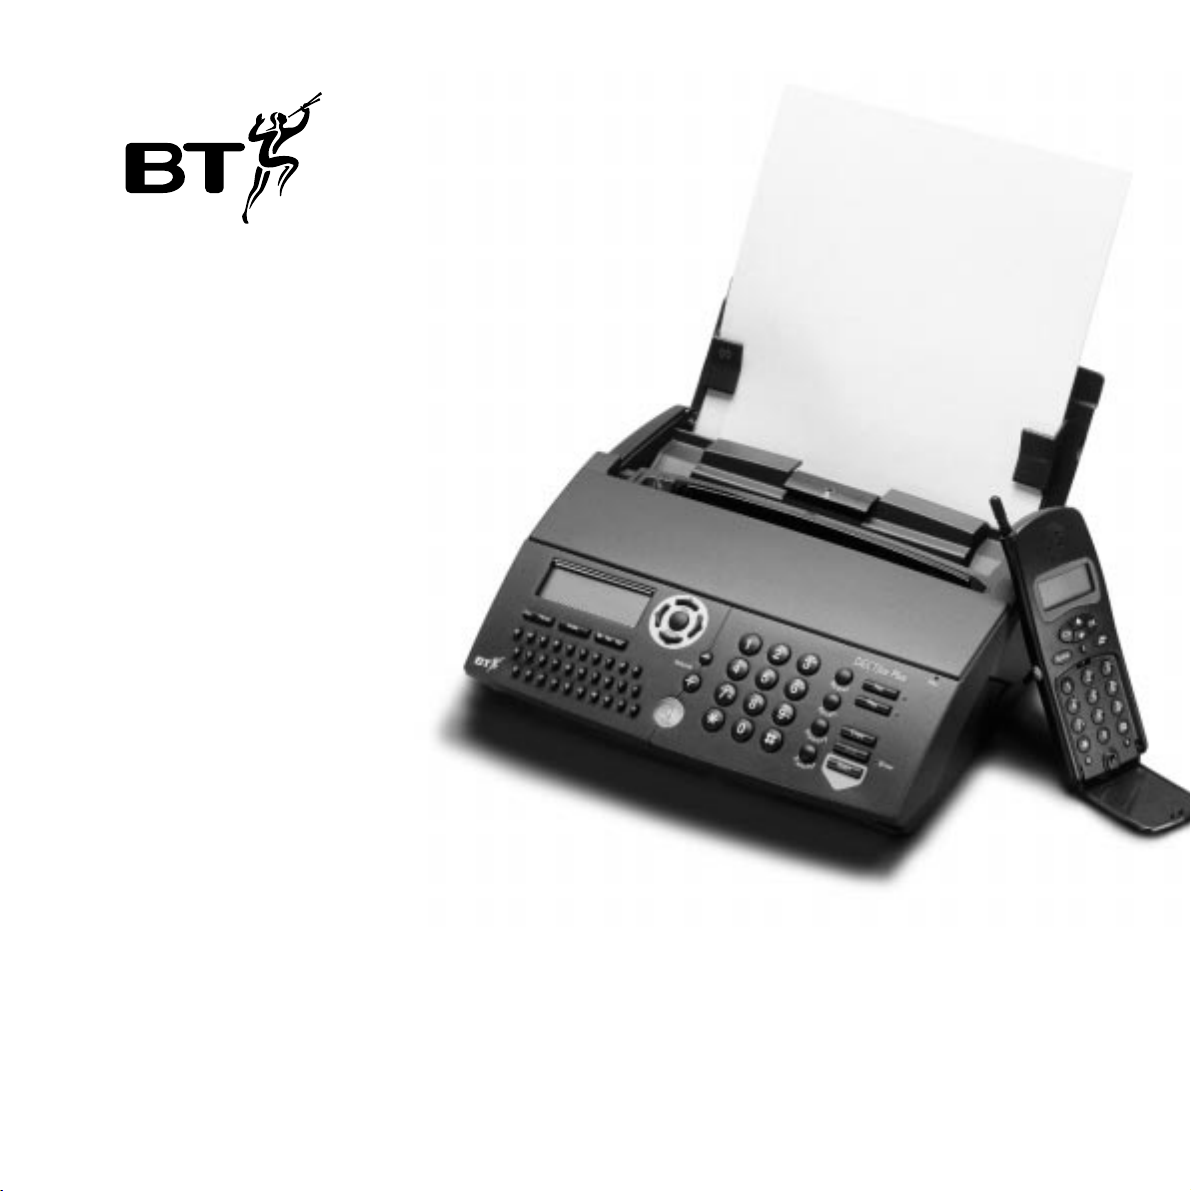
BT DECTfax Plus
Fax machine and digital telephone system
User guide
Page 2

Open this page for an ‘At a glance’ guide to your
DECTfax Plus
This equipment is not designed for
making telephone calls when the
power fails.
Alternative arrangements should be
made for access to emergency services.
Page 3

Page 4
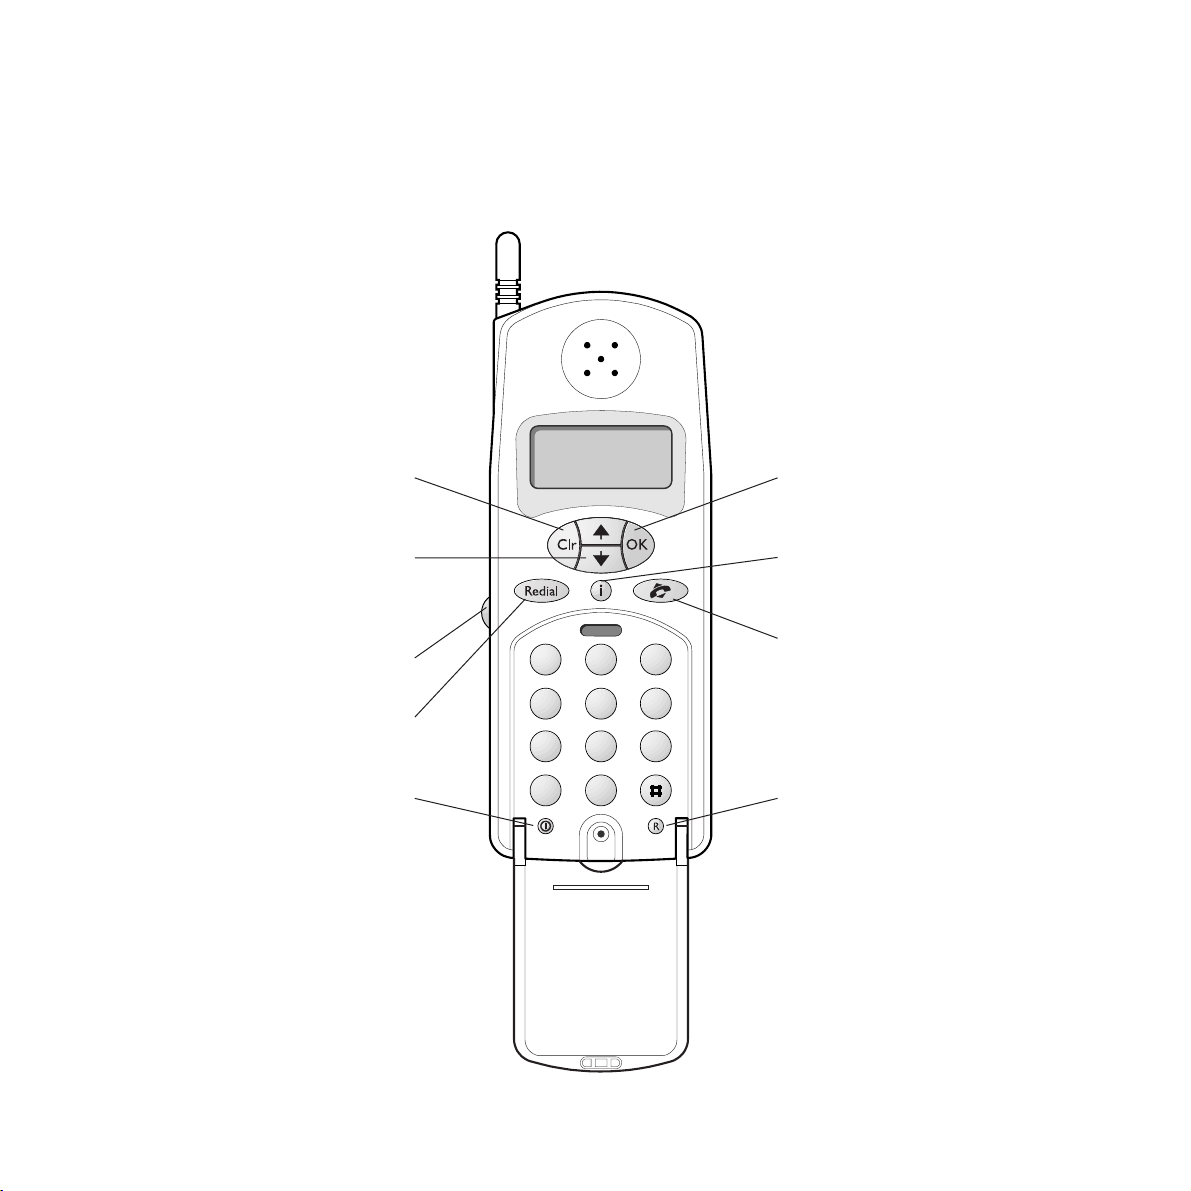
OK button
Used to access handset functions and
settings. Confirms entries.
Intercom button
Used to communicate in various ways
between handsets, and between
handsets and the base station.
Talk button
Press to make and receive (internal &
external) calls
Recall button
For use with switchboards and select
services, and inserts a pause within a
stored telephone number.
Clr button
Enables you to exit the current function
and edit numbers.
▲ and ▼buttons
Used to access the memory, scroll
through the directory and change
phone settings.
Cover release button
Press to open the keypad cover.
Redial button
Stores multiple numbers up to a
maximum of 200 digits.
On/Off button
Switches the handset on and off
3
At a glance
D
A
B
E
F
C
3
2
1
G
H
I
564
P
Q
R
S
897
0
✱
M
J
K
N
L
O
W
T
U
X
V
Y
Z
Page 5
D
4
Resolution button
Adjusts the resolution at which your DECTfax Plus
sends documents.
Erase button
Used to delete messages. Enables you to exit the
current function.
Tel Fax Tad button
Sets the machine to receive phone calls, phone calls
and faxes or phone calls, faxes and voice messages.
§©
buttons
Moves the cursor left and right and allows you to go
through the on-screen menus.
¶Ä
buttons
Scroll up and down through the on-screen menus.
OK Menu button
Accesses the on-screen function menus. Confirms an
entry option or change.
- button
Decreases the ringer volume and the loudspeaker
volume.
+ button
Increases the ringer volume and the loudspeaker volume.
Hands free button
Used to make calls through the loudspeaker without
using the handset.
Redial button
Automatic redial of the last number dialled.
Recall button
Inserts a pause within a telephone number when dialling
an external line through an internal switchboard.
Memory button
Used to store and dial numbers in the memory.
Transfer button
Used for intercom and call transfer functions.
Fax button
Prints out received faxes.
Play button
Plays your answering machine messages.
Copy button
Allows you to use the machine as a photocopier.
Stop button
Stops any operation in progress. Enables you to exit
the menu mode. Any changes which were not
confirmed will not be saved.
Start button
Sends faxes.
QWERTY keyboard
For entering names and text and for accessing
names.
A
B
E
F
C
3
2
1
G
H
I
P
Q
R
S
✱
M
J
K
N
L
564
897
O
W
T
U
X
V
Y
Z
0
Page 6

Page 7

5
Page 8

6
Hints and tips boxes
In this user guide, we’ve included helpful tips and
useful notes. These are shown in grey boxes.
At a glance 3
Introduction 7
Setting up 8
Using your fax machine 16
Using your handset 27
Using the answering machine 34
Using mailboxes 39
Using additional handsets 42
Additional features 46
Help 51
Technical information 54
Index 56
In this guide
Page 9

7
Introduction
Thank you for choosing a BT product.
We expect that you will have many years of
excellent service from it.
Your BT DECTfax Plus machine is designed
for ease of use and built to the high standards
demanded by BT.
Please read these instructions carefully
before use and retain this user guide for
future reference.
For your records
Date of purchase
Place of purchase
Serial number
(on the underside of the machine)
Purchase price
For warranty purposes, proof of purchase is
required, so please keep your receipt.
Equipment
Check your BT DECTfax Plus is complete
when you unpack it. You should have:
• BT DECTfax Plus machine
• Print ribbon*
• Smartcard (ink ribbon gauge)
• Power adaptor
• Telephone cable
• Radio module
• DECT handset
• Handset charger
• Paper
* The print ribbon supplied with your BT DECTfax
Plus is only a ‘starter ribbon’ and has a print life of
about 50 pages. Standard ribbons have a print life
of up to 230 pages.
Customer Helpline
If you have any problems with your DECTfax, call
the BT Helpline on 0845 603 1066.
Page 10
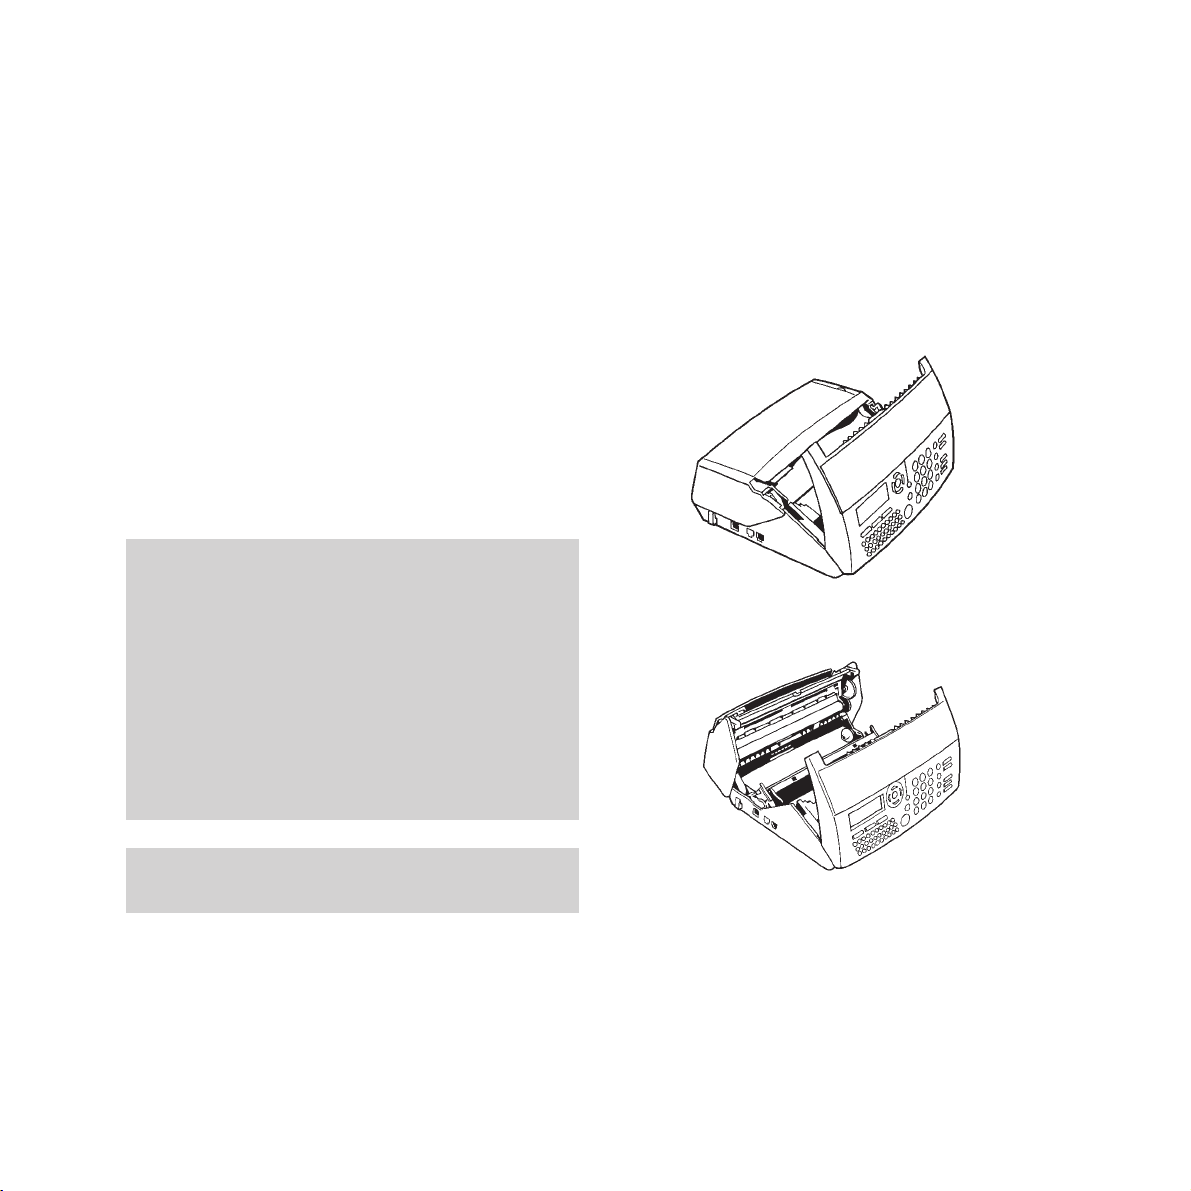
1 Pull the front cover towards you until it
clicks and holds itself open.
2 Press on the two green catches to release
the rear cover and tilt it backwards.
3 Without removing the clear securing band
and with the green end of the spool on the
left, place the ribbon roll into its housing
under the rear cover Push the right-hand
end of the spool against the spring and lower
the green end into place.
8
Setting up Follow these steps to get your BT DECTfax
Plus ready to use
1 Installing the print ribbon and
smar tcard
The print ribbon and the smartcard work
together, and the fax will not work without the
smartcard. The print ribbon prints onto paper
and the smartcard monitors how much ribbon
has been used.
Warning
Use only print ribbons that match the supplier’s
specifications. Using other types may result in
damage to the main machine and invalidate the
manufacturer’s warranty.
Documents printed by your machine may be read
from the used print ribbon. If certain documents are
to be kept confidential, you may want to remove the
print ribbon whenever the machine is unattended.
Print ribbons
To obtain new print ribbons call 0800 590009.
Page 11
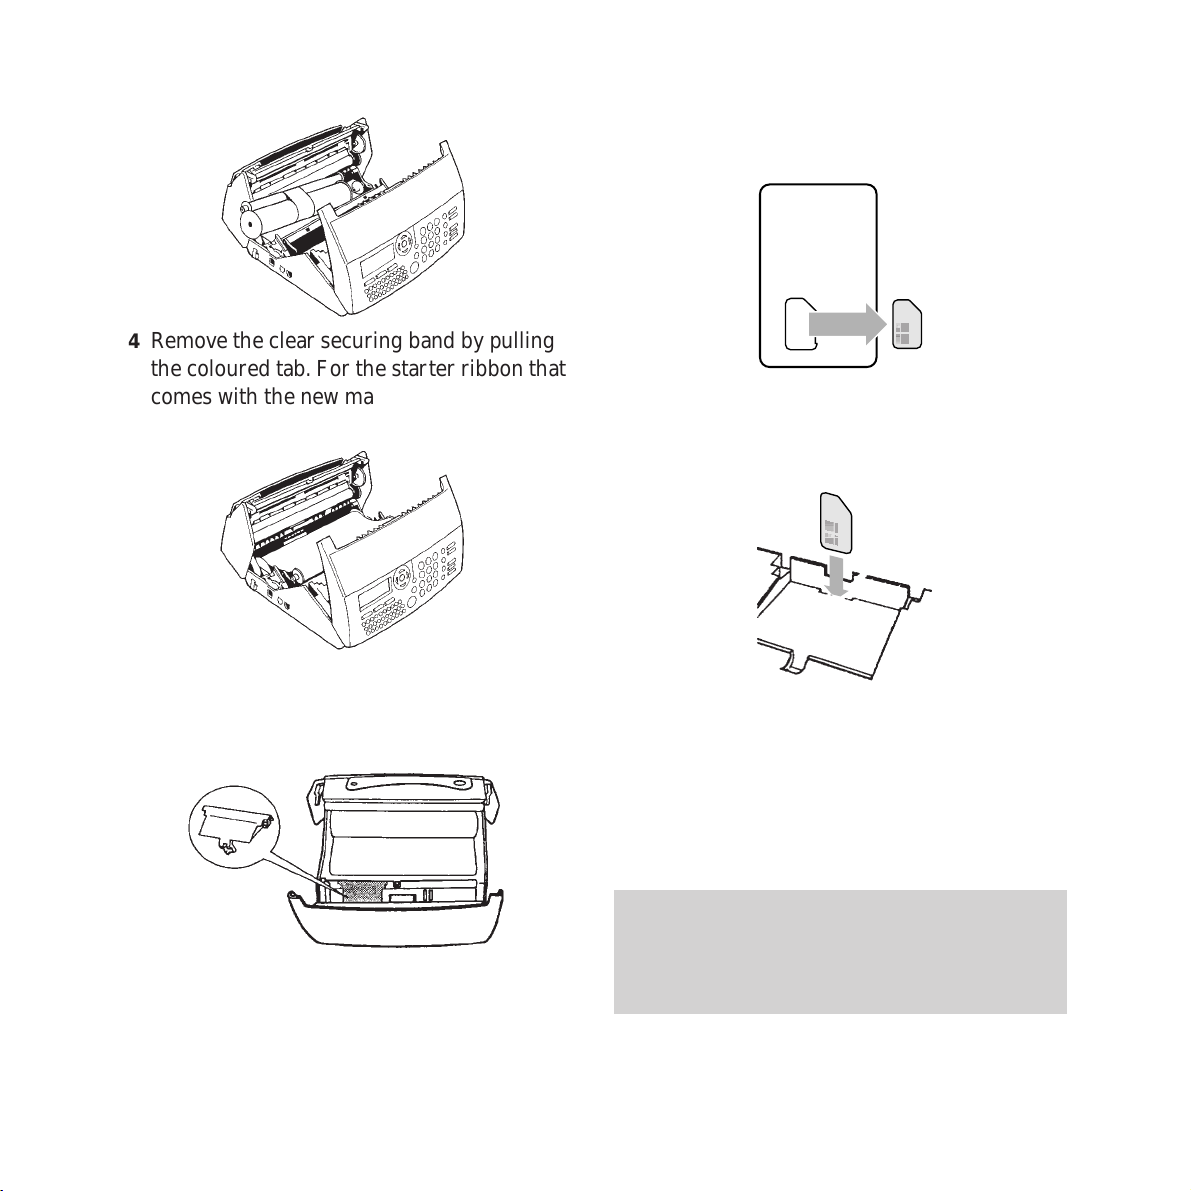
7 Press out the smartcard from the card
holding it.
8 Insert the smartcard into the slot with the
gold square facing towards you, and replace
the green cover.
9 When you have installed the print ribbon
and the smartcard, close the front cover
firmly, making sure both green clips are
securely in place. If the smartcard is
incorrectly installed, or not in place, the
display shows MISSING GAUGE.
Setting up
9
4 Remove the clear securing band by pulling
the coloured tab. For the starter ribbon that
comes with the new machine, remove the
foam packing piece.
5 Gently pull the smaller spool towards you
and place it in its housing - there are two
slots that hold it in place.
6 To install the smartcard, remove the green
cover by pressing on the arrow and sliding it
away from you.
The smartcard monitors how much print ribbon is
being used, and is always supplied with new print
ribbons. The fax machine will not work unless the
smartcard is installed.
Page 12
Setting up
10
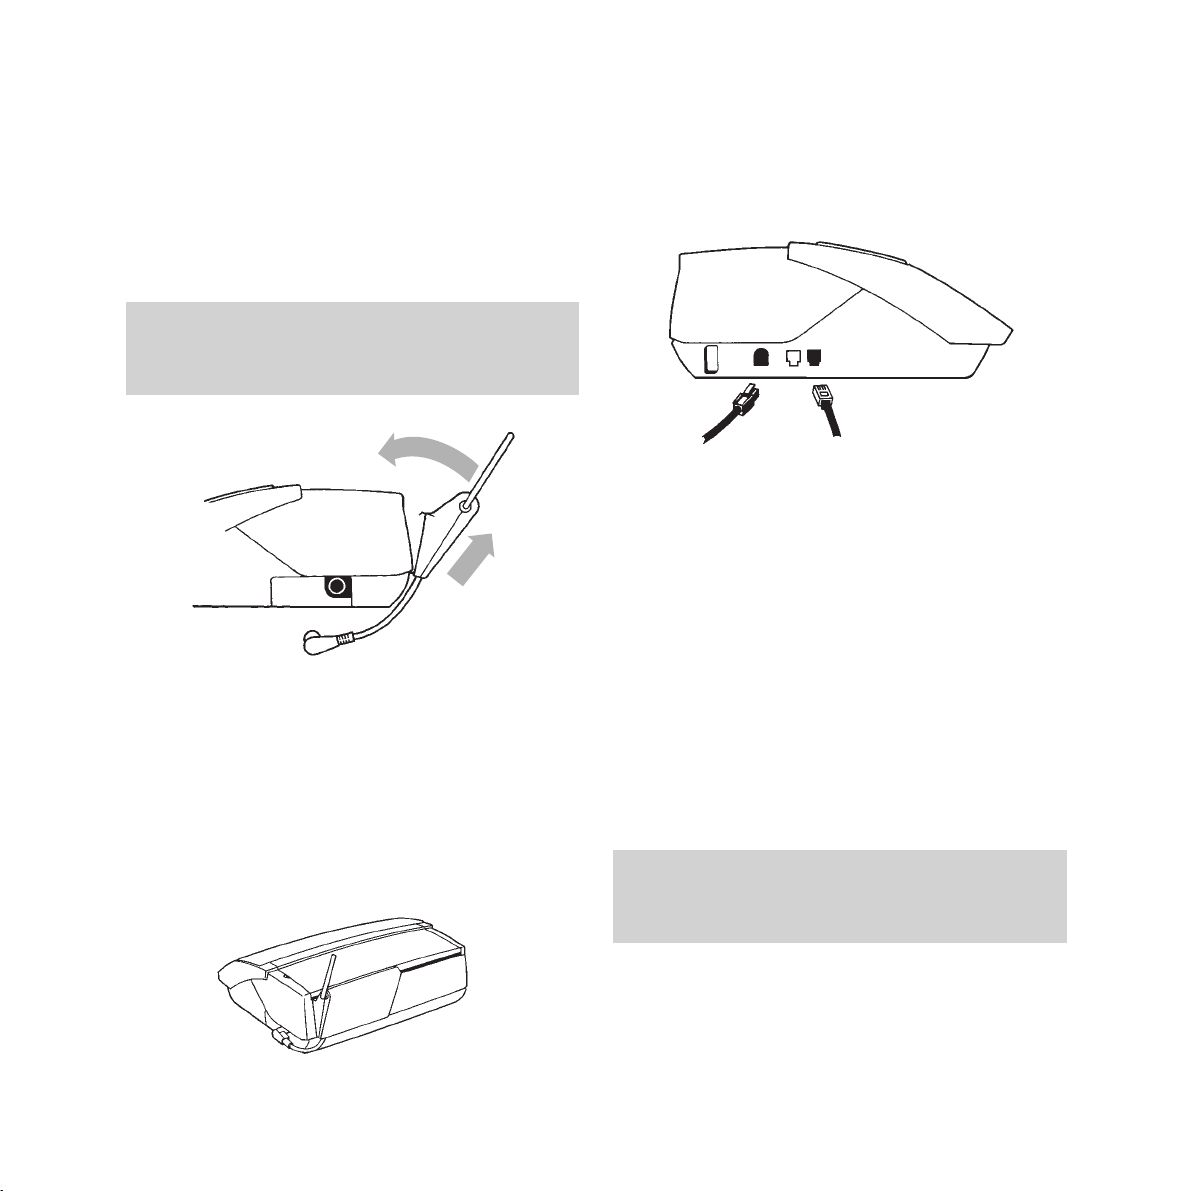
3 Connecting the radio module
The radio module acts as a transmitter and
receiver for radio signals to and from the
handset(s). It goes at the back of the machine
on the right-hand side as you face it.
1 Place the spring loaded clip at the bottom of
the module into the slot that runs along the
back of the machine.
2 Clip the top part into place by pulling the
module up and towards the machine.
3 Connect the cable to the socket on the side
of the machine.
4 Connecting your DECTfax Plus
to the telephone line and mains
power
1 Plug the telephone line cord into the socket
on the side of the machine, and connect the
other end into the telephone wall socket.
2 Plug the power adaptor into the side of the
machine.
3 Plug the mains power cable into the power
adaptor, then plug the lead from the power
adaptor into a convenient mains socket.
When the mains power is switched on the
display shows CHECK DATE to prompt you to
set the correct date and time. ‘Setting the
date and time’ on page 13 shows you how to
do this.
IMPORTANT
Do not place the power adaptor next to the radio
module.
IMPORTANT
Before installing the radio module, make sure the
machine is not plugged into the mains.
1
2
3
Page 13
Setting up
11
6 Charging the handset
The handset is powered by a rechargeable
NiCad battery. The charger uses a fast charge
system. For example, 10 minutes of charging
will give about 10 minutes of talk time. When
fully charged the battery should give up to 5
hours talk time and up to 50 hours standby.
When the handset is not in the charger, the
charging icon indicates the current level of
charge in the battery - 4 dots means the
handset is fully charged and 1 dot means the
charge is low.
a
b
eg 50% charge
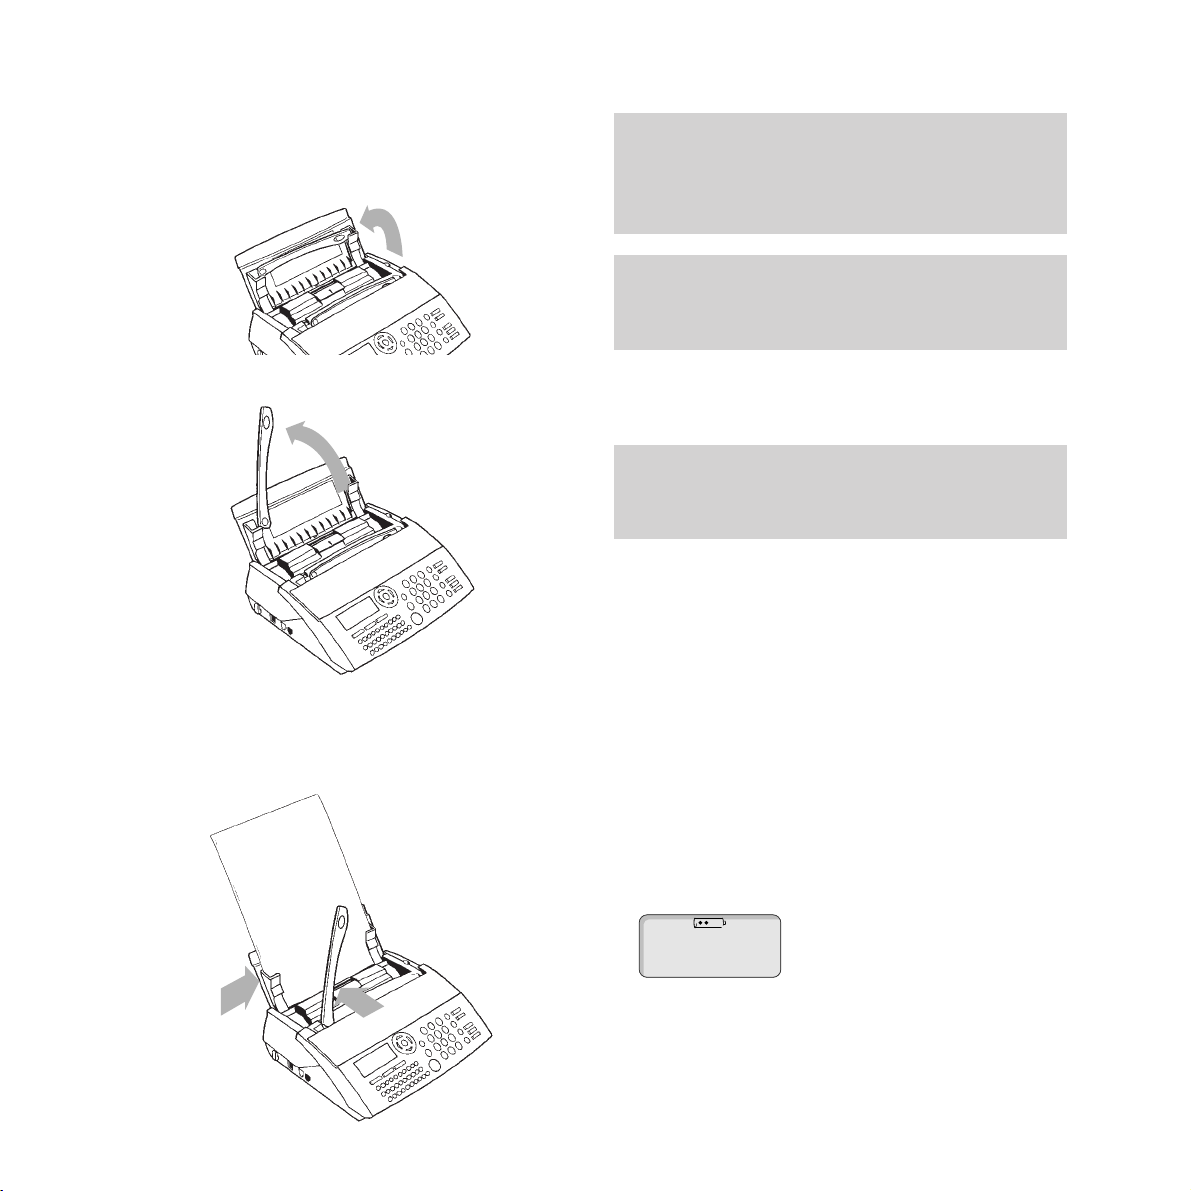
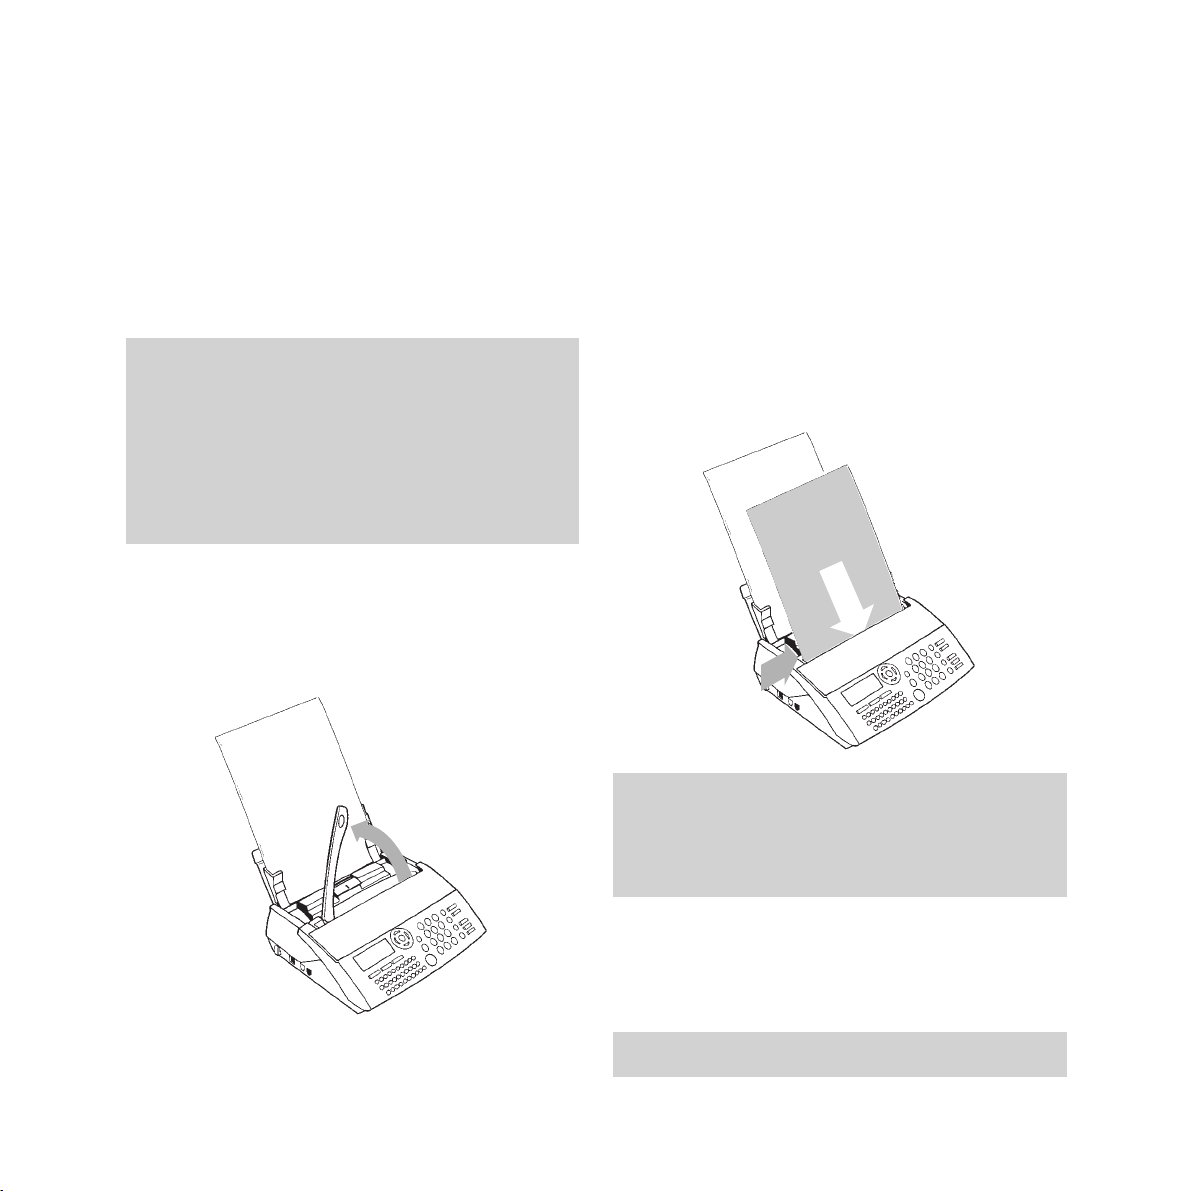
5 Inserting the output paper
1 Open the sheet feeder flap by lifting it up at
the side.
2 Lift the paper support bar.
3 Insert up to 30 sheets of paper between
the paper guides and adjust the left paper guide
(a) to the width of the paper . Press the clip (b)
and allow the paper to fall down into position.
IMPORTANT
The new handset may not be charged. It takes up to
12 hours to charge completely.
IMPORTANT
Use A4 paper of 80gsm. The paper should be nontransparent and not torn or crumpled.
IMPORTANT
It is important to have the document support bar
raised during printing to prevent paper feeding back
into the machine.
* Keep the document
support bar raised
when printing
Page 14
Setting up
12
1
Plug the charger into the mains.
2 Place the handset into the charger. The
handset display shows the moving charging
icon.
3 When the battery is fully charged the
charging icons stop moving and begin to
flash.
7 Customising your DECTfax Plus
Your BT DECTfax Plus can be customised to
suit your personal requirements. You can
customise your Dect/fax /plus in two ways;
Step by step - by using the
OK/Menu, and
¶
and
Ä
buttons to scroll through the on-screen
menus.
Direct access - by pressing the
OK/Menu button
and then entering the number of the required
function.
Most instructions in this user guide are based
on the ‘direct access’ method, which is a more
effective way of operating your fax machine.
To print out a list of all the functions of the
DECTfax Plus, which allows you to see them at
a glance, along with the function codes to carry
them out, see ‘Printing out the functions list’ on
page 47.
There are a number of buttons which are used
to access the functions of your DECTfax Plus:
Button What it’s used for
Accesses the function menus
Confirms an entry or option
and selects the current menu
Exits the function menus. Any
changes which were not
confirmed will not be saved
Scrolls up through the menus
Scrolls down through the menus
Moves the cursor right or selects
a displayed menu item
Moves the cursor left and deletes,
and takes you back through menu
layers
Enables you to exit the current
function or go back through
the menus
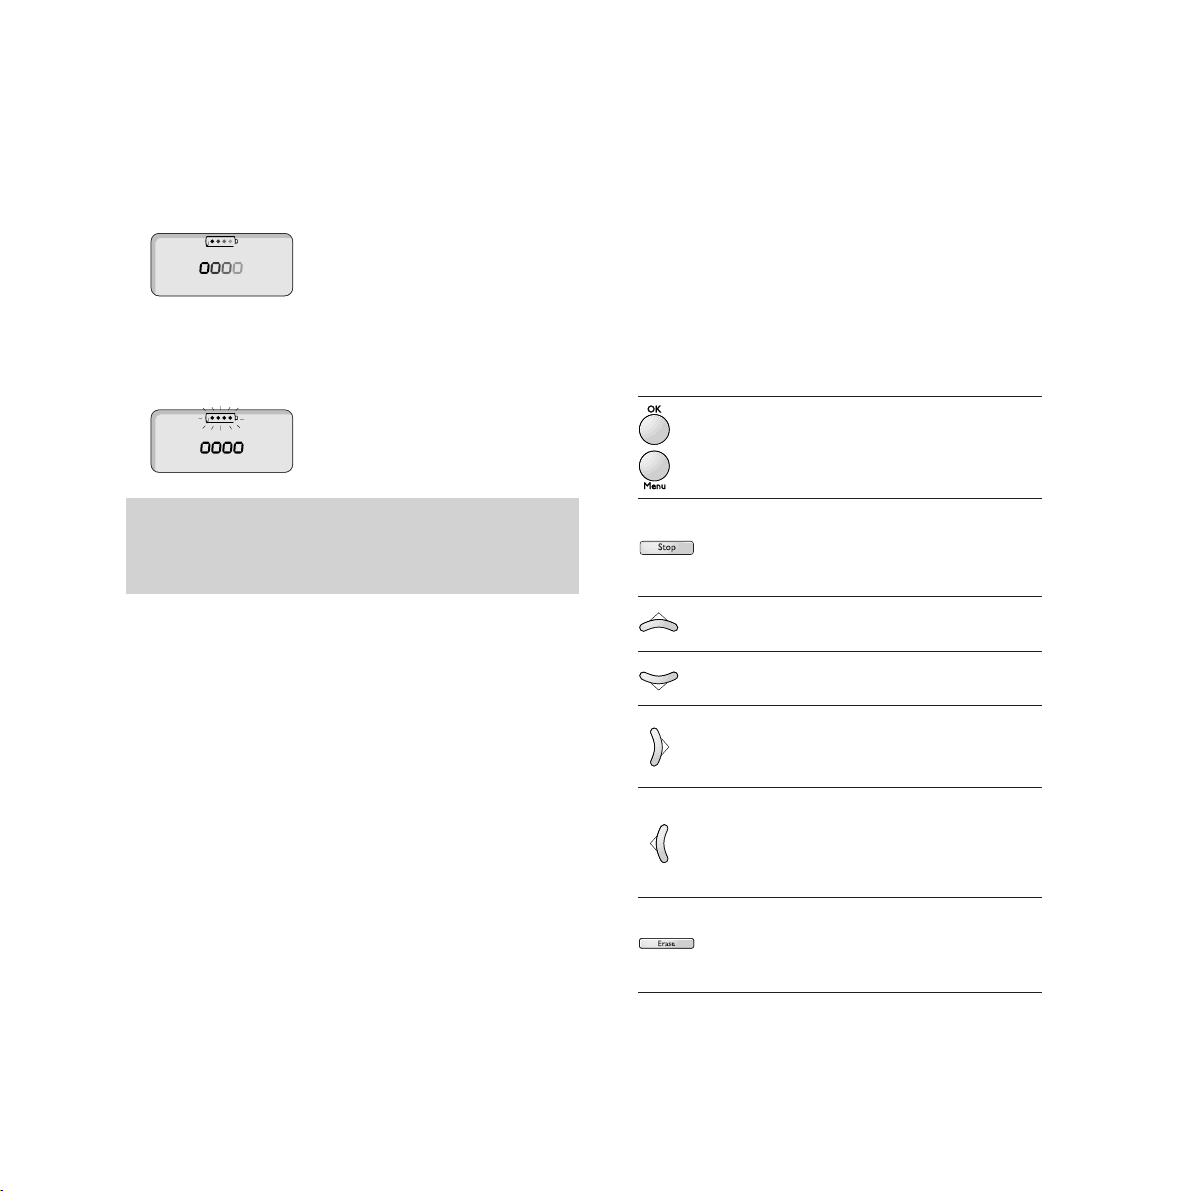
Battery low warning
If, during a call, the battery charge is running low,
the handset beeps every 4 seconds.
Page 15
Setting up
13
Date and time
It is important that your DECTfax Plus is
always set to the correct date and time.
This information is shown on the fax received
by the addressee and is required for faxes
programmed to be sent at a later date.
Setting the date and time
1 Press OK/Menu then 2 then 1 then
OK/Menu.
The display shows the date and time
currently programmed.
2 Use the keypad to enter the date. For
example, for 7th May 1998, 9.15, press
07 05
98 09 15.
3 Press OK/Menu to confirm the entry.
Your DECTfax Plus can now be used to send
and receive faxes.
Entering your own telephone/fax number
Your telephone/fax number can be printed at
the top of each fax you send and displayed by
the machine you are calling.
To enter your own telephone/fax number
1 Press OK/Menu then 2 then 2. The display
shows 22 NUMBER. Press
OK/Menu.
2 Use the keypad to enter your own number,
up to a maximum of 20 digits.
To enter a space, use the
© button; to enter
a +, use the +button on the alphabetic keypad.
3 Press OK/Menu to confirm the entry.
Entering your name
You can add your name (such as the name of
your company) to be printed at the top of each
fax you send.
To enter your name
1 Press OK/Menu then 2 then 3. The display
shows 23 NAME. Press
OK/Menu.
2 Enter your name using the alphabetic
keypad to type in the letters. You can enter a
maximum of 20 characters.
NOTE
Once the date and time have been set, if you want to
make a change press OK/Menu then 2 then 1 then
OK/Menu to access the date and time setting
function.
Use the §and © buttons to move left and right
through the display.
A
B
C
1
2
A
A
B
B
C
2
C
2
A
D
B
E
C
2
F
3
Page 16
Setting up
14
To set the dial mode
1 Press OK/Menu then 2 then 5. The display
shows 25 DIALLING. Press
OK/Menu.
2 Press the
¶
and Äbuttons to scroll through
the options.
3 Press OK/Menu to confirm the entry.
Ring settings
To set the number of rings before the
machine answers automatically
1 Press OK/Menu then 2 then 6. The display
shows 26 NO OF RINGS. Press
OK/Menu.
2 Use the keypad to enter the number you
require (2-9).
3 Press OK/Menu to confirm the entry.
To set the ring melody
1 Press OK/Menu then 2 then 7. The display
shows 27 RING MELODY. Press
OK/Menu.
You will hear the current ringing tone.
3 Press OK/Menu to confirm the entry.
Network and dial settings
Your BT DECTfax Plus has been preset to
work on a direct exchange line, or PSTN.
There is no need to alter this setting unless you
will be using the machine on an internal
network, or PABX. If this is the case:
To change the network setting
1 Press OK/Menu then 2 then 4. The display
shows 24 NETWORK. Press
OK.
2 Press the
¶
and Äbuttons to scroll through
the options.
3 Press OK/Menu to confirm the entry.
Your DECTfax Plus has two dialling modes:
TONE and PULSE. It is preset to TONE. This is
the correct setting for all direct lines and most
switchboards. For some switchboards it may be
necessary to set the machine to
PULSE dialling.
To delete a character use the §button.
To insert a space use the ©button.
G
A
H
B
C
I
4
2
J
A
K
B
L
C
5
2
M
A
B
N
C
2
O
6
P
A
2
Q
B
R
C
S
7
Page 17
Setting up
15
2
Press the ¶and Äbuttons to scroll through
the options. You can also select WITHOUT
RING to have no ringer tone at all.
3 Use the + and - buttons to select the volume.
There are 4 levels.
4 Press OK/Menu to confirm your
choices.When WITHOUT RING is selected the
TEL icon will flash constantly in the display.
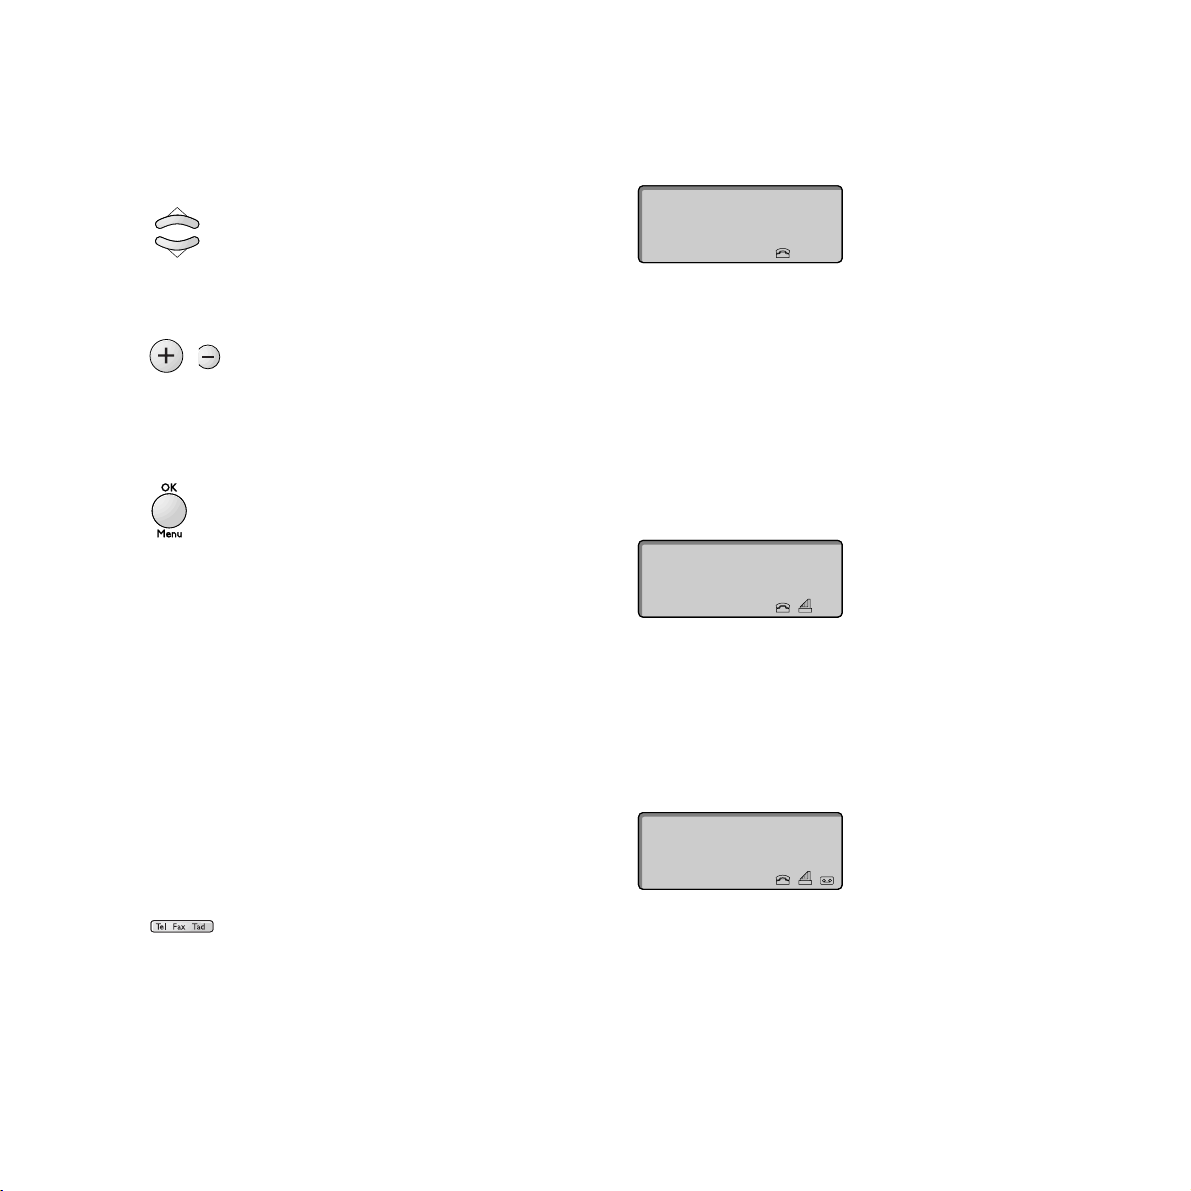
Setting the receive mode
You can set your DECTfax Plus to answer calls
automatically or manually. There are two auto
answer modes, to allow you to receive just
telephone calls and faxes or telephone calls,
faxes and voice messages.
To set the receive mode
• Press the Tel Fax Tad button to switch
between manual; phone and fax; and phone,
fax and answering machine.
Tel mode
When set to Tel mode, the display shows:
All calls must be answered manually. If the call
is a fax (you will hear beeps from the other fax
machine), wait a few seconds and the
basestation will automatically switch to fax
receive mode. If it does not, press # then
7 on
your handset to activate fax receive mode.
Tel/Fax mode
When set to Tel/Fax mode, the display shows:
Your DECTfax Plus will automatically
determine whether an incoming call is a phone
call or a fax call.
Tel/Fax/Tad mode
When set to Tel/Fax/Tad mode, the display shows:
If a call is unanswered, the call will be taken
first by the answering machine. If the call is a
fax it will be received automatically.
Your DECTfax Plus machine is now fully set
up for use. To make any changes to your
settings, simply repeat the procedures.
Page 18
16
Using your fax machine
Sending a fax
To send a fax
1 Open the sheet feeder flap (if not already
open) and raise the document support bar.
2 Place the document(s) face down into the
document feeder and adjust the left-hand
guide (a) to the width of the paper if
necessary. The display will show READY
when the documents are correctly placed.
3 Dial the fax number you require. You can
dial manually or use the DECTfax Plus
directory, see page 21.
WARNING
Do not put paper into the machine if:
- it has paper clips, staples or any metal
attachment
- it is wet with ink, paste or correcting fluid
- it is too thick or too thin and flimsy
- it has sellotape or other paper stuck on it
You can delete digits using the § button.
a
The document feeder will take a maximum of 5
sheets. If you are sending more than one sheet, the
feeder will automatically take from the bottom of the
pile.
Page 19

Resolution
You can adjust the resolution at which your
DECTfax Plus sends documents.
There are three settings:
Resolution Use with
Normal Documents which do not
(Default) contain fine detail eg
a page of text
Fine Documents which include
small characters or drawings
Photo Documents which include
pictures. Colours will be
shown in shades of grey.
To adjust the resolution
1 Place the document in the document feeder.
2 Press Fine Photo. An arrow will appear in
the display positioned above the word
FINE.
3 Press Fine Photo again to toggle between
the settings
FINE, PHOTO and NORMAL
Using your fax machine
17
4
Press Start. The display shows MEM PG 1,
then CALLED NUMBER and begins to send the
document.
If the number dialled is engaged, your
DECTfax Plus will automatically redial the
number, after a few minutes. You can redial the
number yourself by pressing the
Start button.
With call monitoring
1 Place the document to be sent in the sheet
feeder.
2 Press the Hands Free button. The display
shows HANDS FREE. You will hear the
dialling tone.
3 Dial the number you require.
4 Press Start to start sending the fax..
If there is an answering machine at the other end,
press Start towards the end of the outgoing message.
Page 20

Delayed send and broadcasting
This allows you to send a fax automatically at a
preset time, within the next 24 hours. It also
allows you to send a fax to up to 6 different
numbers.
To use delayed send and broadcasting
1 Place the document in the document feeder.
2 Enter the number that you want to send to.
3 If you want to send to more than one number
press the
© button. The display shows
CALLED PARTY 2. You can enter up to six
numbers using the
© button to go to the
next entry.
4 When you have finished entering the
numbers press the
OK/Menu button. The
display shows SEND AT and the current time,
with the first digit flashing so that you can
enter the time at which the fax is to be sent.
5 Enter the time, using the 24 hour clock at
which you want the fax to be sent then press
Using your fax machine
18
OK/Menu
. To send the fax immediately, just
press
OK/Menu without entering a time.
6 If you have entered only one fax number the
display shows three options (use the
Ä
button to see the third): MEMORY, PAPER
FEEDER and TYPE MESSAGE. If you have
entered more than one fax number the
display shows two options: MEMORY and TYPE
MESSAGE. If you choose MEMORY the fax that
you are sending will be scanned and sent
from memory.
7 If you choose PAPER FEEDER the fax will be
held in the paper feeder until the DECTfax
Plus is ready to transmit it.
8 If you choose TYPE MESSAGE you can type in
the text of your fax, up to 80 characters,
using the alpha keypad and dialling keypad
for numbers.
9 The display gives you two further options
when you have chosen MEMORY or TYPE
MESSAGE:
WITH HEADER PG
The document is sent
with a fax header sheet.
If selected, you are
prompted to type in text.
(Only available if the
document is to be sent
from the memory)
WITHOUT PAGE The document is sent
without a header sheet
If the number you want to call is stored in the
directory press the first letter of the name on the
alpha keypad. The first name starting with this
letter will be displayed. If this is not the one you
want, use the Äbutton to scroll to the required
name.
Page 21

Using your fax machine
19
10
Press the ¶and Äbuttons to scroll through
the options and press
OK/Menu to select the
option you require.
Call back
Call back allows you to interrupt a fax to speak
to the person at the other end.
To use call back
1 While the document is being sent or
received is complete, press
Hands Free.
The display will alternate between
TRANSMISSION, if a document is being sent, or
RECEPTION, if a document is being received
and
PHONE.
2 When the page that is being sent has gone
through, the other person’s telephone will
ring and if they pick up, your handset will
then ring.
3 Answer the handset as normal and speak.
Receiving a fax
You can set your DECTfax Plus to print faxes as
they are received or incoming faxes can be
stored in the memory, up to 20 Slerexe* pages,
and printed out at a later date. The default
setting is for memory receive to be switched on.
To switch off memory receive
When memory receive is off, you must ensure
paper is in the sheet feeder.
1 Press OK/Menu then 3 then 6. The display
shows 36 RX IN MEM.
2 Press OK/Menu. The display shows two
options:
YES Incoming faxes are stored in the
memory, even if there is paper in
the sheet feeder. This is the
default setting.
NO Incoming faxes are printed as
they are received. If there is no
paper in the sheet feeder, the
faxes are stored in the memory.
3 Use the
¶
and Äbuttons to select NO. Press
OK/Menu to confirm the change.
If you want to cancel a delayed send simply remove
the document from the feeder. Or if the document is
to be sent from the memory see
‘
To cancel a timed
job
’
on page 25.
To send the faxes immediately simply press Start
after entering the last number.
* Slerexe is the name for the standard fax page.
D
M
E
N
F
3
O
6
Page 22

To print out received faxes
When you have faxes stored in the memory
the
Fax button light will flash. You can print in
normal mode or economy mode.
Norm al
• Make sure you have paper in the sheet
feeder. Press the
Fax button. The stored
faxes will print out.
Economy
This allows you to print out messages reduced
by 50% vertically so that two pages fit onto one
A4 printout.
1 Press OK/Menu then 5 then 7. The display
shows FAXES INMEM.
2 Press OK/Menu. Select ECONOMY. You can
toggle between ECONOMY and NORMAL using
the
¶
and Äbuttons.
Using your fax machine
20
3
Press OK/Menu to confirm the setting and
the stored faxes are printed in reduced size.
If you have created any mailboxes, before
printing you will be asked to enter a mialbox
number.
4 Enter the mailbox number you want to print
from, or enter 0 to print from the main
memory.
5 Press OK/Menu to confirm the setting and
the stored faxes are printed in reduced size.
Fax memory full
When there are too many faxes in the memory
the machine can no longer store any additional
faxes. The display will show MEMORY FULL.
To clear space in the memory
• Press the Fax button. The stored faxes will
be printed and subsequently deleted from the
memory.
If you answer a call on a telephone that is on the
same line as the DECTfax Plus, and the call is a
fax, you activate the DECTfax Plus by pressing #
then 7 on the telephone keypad then hanging up the
telephone when you hear the tones from the
DECTfax Plus.
5
P
J
K
Q
L
R
S
7
Page 23

To insert a pause
With some switchboards, after dialling the
access code you may have to wait for a moment
while the switchboard picks up an outside line.
If so, press the
Recall button to insert a pause
before keying in the telephone number. A
pause is shown in the display as a /.
To dial a number stored in the memory
This can be to send a fax or to make a hands
free phone call.
1 Enter the first few letters of the recipient’s
name using the alphabetical keypad.
For example, if you want to call YOUNG enter
Y. The first name beginning with Y appears.
If it is not YOUNG,for example YATES use the
Ä
button to scroll through the entries or enter O
to display the first name beginning YO.
3 To send a fax, press Start and the fax will
automatically be sent to the required
number.
4 To make a hands free call, press the
Hands Free button.
Using the directory to store and
dial numbers
Your DECTfax Plus can store up to 50 names
and numbers in its directory. You can then
quickly dial a number from the directory after
entering its memory number or letter.
To store a number in the memory
1 Press OK/Menu then 1 then 1. The display
shows 11 ADD NAME.
2 Press OK/Menu. The displays shows NAME.
Enter the recipient’s name using the
alphabetic keypad.
3 Press OK/Menu. The displays shows TEL.
Enter the recipient’s number using the
numerical keypad.
4 Press OK/Menu to confirm your entry. The
display shows 11 ADD NAME.
5 Press OK/Menu to add another entry, or press
Stop to return to standby.
Using your fax machine
21
1 1
Page 24

delete, then press OK/Menu to delete it, then
OK/Menu again to confirm the deletion.
Send reports
You can set your DECTfax Plus to print out a
report of your fax transmissions.
There are three settings:
Report setting What is printed
ALWAYS a report is printed after
every fax
OFF no report will be printed
(this is the default detting).
ERROR ONLY a report will only be printed
to record a failed transmission
To change the send report setting
1 Press OK/Menu then 3 then 4. The display
shows 34 SEND REPORT
.
2 Press OK/Menu. The display shows the
current setting - the default setting is off.
Using your fax machine
22
To print out a list of names and numbers
stored in the directory
• Press OK/Menu then 1 then 2 then Start.
To edit entries in the directory
1 To edit an entry press OK/Menu then 1,
then
3. The display shows 13 MODIFY.
2 Press OK/Menu. The display shows MODIFY
and the last name in the directory. Use the
¶
and Äbuttons to scroll through the entries
until you reach the name you want to alter,
then use the
§
button to delete letters.
3 Press OK/Menu. The display shows the
number that was entered with that name,
which you can also modify.
4 To delete an entry press OK/Menu then 1,
then
4. The display shows 14 CANCEL.
5 Press OK/Menu. The display shows CANCEL
and the last name in the directory. Use the
¶
and Äbuttons to scroll through the
entries until you reach the entry you want to
A
B
1
C
2
D
E
1
F
3
G
H
1
I
4
G
D
E
H
F
3
I
4
Page 25

4 Press OK/Menu.
The display shows two options:
SINGLE POLLING
The document is deleted
after it has been polled
MULTI POLLING The document can be
polled indefinitely until
deleted from the memory
(see ‘To cancel a timed
job’ on page 25).
5 Use the
¶
and Äbuttons to scroll through
the options and press
OK to select the option.
6 Use the
¶
and Äbuttons to scroll through
the options: PAPERFEEDER (only with Single
Polling), MEMORY or TYPE MESSAGE.
7 Press OK to select the option displayed. If
you choose PAPERFEEDER the display
returns to standby and alternates with
DOC TOBE POLLED. When the machine that
is going to poll your document calls up, the
document will automatically be sent.
If you choose MEMORY the display will show
SINGLE POLLING. Press the
© button to
Using your fax machine
23
3 Use the
¶
and Äbuttons to scroll through
the options. Press
OK/Menu to confirm your
choice.
Activity Reports
The DECTfax Plus will record details of the
last 30 fax transactions.
To manually request fax details
• Press OK/Menu then 5 then 2 then OK/Menu.
Polling
Polling is an operation in which another fax
machine retrieves a fax from your machine, or
your machine retrieves a fax from another
machine.
To set up faxes to be polled by another
machine
1 Make sure the fax icon is displayed (see
‘Setting the receive mode’ on page xx).
2 Place a document into the sheet feeder.
3 Press OK/Menu then 3 then 3. The display
shows 33 SEND POLLING
.
To print out a report of the last activity, press
OK/Menu then 5 then 6 then Start.
J
A
K
B
L
5
C
2
D
D
E
E
F
3
F
3
Page 26

display the available options: SINGLE
POLLING and MULTI POLLING. Choose SINGLE
POLLING to delete the document from
memory after it has been polled; choose
MULTI POLLING for the document to be held
in the memory and polled by several fax
machines.
If you choose TYPE MESSAGE you can type in
the text of your fax, up to 80 characters,
using the alpha keypad and dialling keypad
for numbers.
7 The display shows NB PAGES. Enter the
number of pages to be transmitted.
8 Press Start. The display shows DOC TO BE
POLLED.
To poll faxes from another machine
1 Press OK/Menu then 3 then 2. The display
shows 32 RCVE POLLING
.
2 Press OK. The display shows CALLED PARTY.
3 Enter the fax number of the machine you
want to poll the document from.
If you want to poll from more than one
number press the
© button. The display
shows CALLED PARTY 2. You can enter up to
Using your fax machine
24
six numbers using the © button to go to the
next entry.
4 For immediate polling press Start.
Your DECTfax Plus calls the other machine.
5 To set your machine to poll at a specified
time, press
OK/Menu, enter the polling time
and press
OK/Menu to confirm the entry.
Timed jobs
You can set your DECTfax Plus to manage
timed jobs like delayed send, broadcasting and
polling. Your DECTfax Plus can print out a list
of timed jobs, cancel a job, carry out a timed
job immediately, modify a job or print out a
document waiting to be sent.
To print out a list of timed jobs
1 Press OK/Menu then 6 then 5. The display
shows 65 PRINT LIST.
The display will show the time and fax number of
the next job to be sent.
D
A
E
B
F
3
C
2
J
M
K
N
L
O
5
6
Page 27

To start a timed job immediately
1 Press OK/Menu then 6 then 1. The display
shows 61 START JOB.
2 Press OK/Menu to bring up the list of timed
jobs.
3 Use the
¶
and Äbuttons to scroll through
the jobs.
4 Press Start to perform the selected job.
To modify a timed job
1 Press OK/Menu then 6 then 2. The display
shows 62 MODIFY.
2 Press OK/Menu to bring up the list of timed
jobs.
3 Use the
¶
and Äbuttons to scroll through
the jobs. Press
OK/Menu to select the job to
be modified.
2 Press OK/Menu. A list showing the
characteristics of each job will print out.
To cancel a timed job
1 Press OK/Menu then 6 then 3. The display
shows 63 CANCEL JOB.
2 Press OK/Menu.
The different types of timed jobs displayed are:
TX Delayed send job
DOC Document to be polled by
another machine
POL Timed polling job
3 Use the
¶
and Äbuttons to scroll through
the jobs. Press
OK/Menu to select the job to
be cancelled.
4 Press OK/Menu to confirm your choice.
Using your fax machine
25
D
M
E
N
F
O
3
6
M
N
O
1
6
M
A
B
N
C
O
2
6
Page 28

Using your fax machine
26
4
Make the changes as necessary and press
the
OK/Menu button to confirm the changes.
To print out a timed job
1 Place paper in the printer sheet feeder.
2 Press OK/Menu then 6 then 4. The display
shows 64 PRINT DOC.
3 Press OK to bring up the list of timed jobs.
4 Use the
¶
and Äbuttons to scroll through the
jobs and press
Start to print the selected job.
It can be helpful to print out a document in order to
check it.
6
M
N
O
1
Page 29

27
Using your handset
Switching the handset on and off
Your handset must be switched on before you
can use it to make or receive calls.
To switch the handset on
1 Open the cover by pressing the catch on the
left-hand side of the handset.
2 Press and release the On/Off button. The
display shows the handset number. You can
now make and receive calls.
To switch the handset off
• Press and hold the On/Off button until the
screen goes blank. The handset is now
switched off. When switched off, the handset
cannot receive calls.
Making and receiving calls
When making a call, your handset must be in
radio contact with the base station; the display
will show the handset’s registration number,
for example - 1 -.
To make a call
1 If the handset is not switched on, press the
On/Off button.
2 Press the Talk button. The display shows the
Talk icon. The base unit display shows
HANDSET ON LINE.
3 Listen for a dialling tone and then dial the
number you require.
IMPORTANT
In order to use your DECTfax Plus handset the
radio module must be connected to the base unit
and the base unit must be connected to both the
telephone line and power socket (see steps 4 & 5 of
‘Setting up’ on pages 10 & 11).
IMPORTANT
The new handset may not be charged. It takes up to
12 hours to charge completely.
Page 30

Using your handset
28
4
To end the call, press the Talk button.
You can dial the number before pressing the
Talk button:
1 Dial the number you want to call.
Use the
Clr button to delete numbers to
make sure you don’t dial a wrong number.
2 Press the Talk button. The number entered
is dialled after a few seconds.
To receive a call
1 When your handset rings press the Talk
button.
2 Press the Talk button to hang up after the
call is over.
Answering mode
When the handset is on the charger you can
set it to answer and finish calls in two ways. In
mode 0 you must always press the
TALK
button to receive and finish the call; in mode 1
you simply lift the handset to receive the call
and replace it to finish the call.
To choose the mode
1 Press OK. The display shows F (function).
Then press
8. The display shows F8 and the
current mode setting (0 or 1).
2 Use the ▲ or the ▼ button to change the
mode.
3 Press OK to confirm your choice. The
handset beeps.
Earpiece volume
To adjust the volume in the earpiece
1 During a phone conversation, press ▲ to
increase the volume and
▼ to decrease it.
If you hear beeping from the handset while you are
using it, it means that the battery is running low
and needs charging.
If you hear fax tones when you answer the handset
pressing # then 7 will automatically transfer the
signal to the fax machine.
T
U
V
8
Page 31

Using your handset
29
Secrecy
While making a call you can stop the other
person hearing you talk to someone in the
same room as you.
1 During a call, press Clr on the handset.
You can now talk without the other caller
hearing you.
2 Press CLR again to switch secrecy off.
Last number redial
The handset will store your recently dialled
numbers (up to 200 digits in total).
1 Press the Redial button. The display will
show the last number dialled.
2 Use the ▲ or the ▼ button to scroll through
the numbers stored.
3 When you see the number you want to call,
press the
Talk button and the number will
dial automatically.
Ring melody and volume
You can choose from five ring melodies.
To change the ring melody
1 Press OK then 3. The display will show a
number from 1 to 5 and at the same time
play that melody.
2 Use the ▲ or the ▼ button to move from
melody to melody.
3 Press OK to confirm your choice.
To adjust the ring volume
Your DECTfax Plus handset has two ring
volume settings - loud and soft.
1 Press OK then 2.
2 Use the ▲ and the ▼ buttons to choose a
loud or a soft ring.
3 Press OK to confirm your choice.
D
E
F
3
A
B
C
2
Page 32

Alternatively you can use the ▲ or ▼ button
to scroll through the two-digit numbers.
3 Enter the telephone number you want to
store using the keypad. Press the
Clr button
to delete incorrectly entered digits.
4 Then press OK to confirm the entry. The
handset beeps and displays the stored
number. The handset returns to standby
after about 20 or 30 seconds, or you can
use the
Clr button to return to standby
immediately.
To change a stored number
1 Press the ▲ or the ▼ button.
2 Enter the two-digit memory number or
scroll through the stored numbers until you
reach the phone number you require.
If you are on a PABX exchange (switchboard) you
may need to have a pause in the stored number.
Use the R button for this. The pause is shown on the
display as .
0
0
eg
Using your handset
30
To switch off the ring tone
1 Press OK then 1.
2 By pressing the ▲ or the ▼ button you can
switch the ring tone off or on. When it is off
the display shows the
RINGER OFF icon.
3 Press OK to confirm your choice.
Using the handset directory
Each handset has a directory that can store up
to 20 numbers. Each number will have a twodigit reference number, from 00 to 19.
To store a number
1 Press the ▲ or the ▼ button. The display
shows MEM.
2 Enter the two-digit number under which you
want to store the phone number, for example
00, then press OK.
1
Page 33
Using your handset
31
3
Press OK when you have the number
displayed then use
Clr to delete the number.
4 Enter the new phone number.
5 Press OK again to confirm the change.
To dial a number from the directory
There are two ways to do this: you can display
either the two-digit reference number, or the
telephone number itself.
To display the telephone number
1 Press the ▲ or the ▼ button to access the
memory.
2 Use the ▲ and ▼ buttons to scroll through
the telephone numbers until you see the one
you want.
3 Press the Talk button and the number will
dial automatically.
To display the reference number
1 Press the ▲ or the ▼ button.
2 Enter the reference number you require, for
example
07.
3 Press the Talk button and the number will
dial automatically.
To dial a number from the base station
directory
1 Press the i button on the handset.
2 Use the ▲ and ▼ buttons to scroll through
the telephone numbers until you see the one
you want. (Names will not be displayed at
the handset).
3 Press the Talk button and the number will
dial automatically.
You can dial from the memory directly by entering
the two-digit reference number followed by #. For
example 07 then # will immediately dial that
telephone number.
The display shows up to 12 digits. If the number has
more than 12 digits, use the ✱ and # buttons to
scroll backwards and forwards through the number.
Page 34

Using your handset
32
Keypad tones
The handset is preset to have no keypad tones.
You can set it to loud or soft tones.
1 Press OK then 5.
2 Use the ▲ button to increase the volume.
The display will show 2 dashes or one or two
blocks.
3 Use the ▼ button to decrease the volume or
switch the tones off.
4 Press OK to confirm your choice.
Call timer
After you have finished a call you can check
the length of the call.
To check the duration of a call
1 When you have finished a call, press the Clr
button. The display shows the length of the
call in hours, minutes and seconds. The
display will return to normal after a few
seconds.
2 To clear the call duration, press the Clr
button again while the call duration is being
shown. The display will return to 00 00 00.
J
K
L
5
Page 35

33
Page 36

34
Answer mode
Your DECTfax Plus also operates as an
answering machine. The answering machine
has two basic modes:
Answer and The answering machine
record plays your outgoing
message and then callers
can leave a message
Answer only The answering machine
plays your outgoing
message then switches to
fax receive mode. Callers
can send a fax but not
leave a voice message.
Your DECTfax Plus is preset to Answer and
record mode.
To change the answer mode
1 Press OK/Menu then 4 then 5. The display
shows 45 ANS MODE.
2 Press OK/Menu. The display shows
451 RECORD UNIT and 452 ANSWER ONLY.
3 Use the ▲ and ▼ buttons to change between
the options. To set Answer and record
select 451 RECORD UNIT. To set Answer only
select 452 ANSWER ONLY.
4 Press OK/Menu to select the option..
To switch the answering machine on and off
• Press the Tel Fax Tad button until the
display shows the answering machine icon.
The answering machine is now switched on.
• To switch the answering machine off press
the
Tel Fax Tad button until the answering
machine icon is not visible in the display.
The answering machine is now switched off.
Using the answering machine
G
J
K
H
L
I
4
5
Page 37

Using the answering machine
35
Recording your outgoing message
Before you can use the answering machine you
need to record an outgoing message.
To record an outgoing message for Answer
and record mode
This message can be up to 20 seconds long.
1 At the base station - Press OK/Menu then 4
then 1. The display shows 41 RECORD OGM.
2 Press OK/Menu. The display shows
411 OGM.
3 Press OK/Menu. The display shows
PLEASE OFF HOOK OGM.
4 At the handset - Press the Talk button and
start speaking to record your outgoing
message. The display on the base station
shows RECORD and the recording time left in
seconds.
5 Press the Talk button on the handset to stop
recording. The base station replays the
recorded message before returning to
standby.
To record an outgoing message for
Answer only mode
This message can be up to 90 seconds long.
1 At the base station - Press OK/Menu then 4
then 1. The display shows 41 RECORD OGM.
2 Press OK/Menu. The display shows
411 OGM and 412 SIMPLE OGM.
3 Press the ▼ button to select 412 SIMPLE OGM.
4 Press OK/Menu to confirm the selection.
The display shows PLEASE OFF HOOK OGM.
5 At the handset - Press the Talk button and
start speaking to record your outgoing
message. The display on the base station
shows RECORD and the recording time left in
seconds.
6 Press the Talk button on the handset to stop
recording. The base station replays the
recorded message before returning to
standby.
G
H
I
4 1
G
H
I
4 1
Page 38

If you have any mailboxes set up, the base station
will ask you for a mailbox number. To play
messages in the main memory, press 0.
Using the answering machine
36
Listening to your messages
If you have received any messages the PLAY
light will light up and the display will show the
total number of messages received. If you have
received new messages the
PLAY light will
flash. You can listen to your messages either at
the base station or through your handset.
At the base station
To listen to your messages
• Press the PLAY button. Your messages are
played back to you.
During playback the display will show the
message number and the date and time that it
was received. New messages are played first.
To skip back and forward through your
messages
During playback you can use the §and
©
buttons to move backwards and forwards through
your messages.
• Press
©
once to skip to the next message.
• Press
©
twice or more to skip forward
through your messages.
• Press
§
once to go back to the start of the
current message.
• Press
§
twice or more to skip backwards
through your messages.
To delete single messages
• Press the Erase button while the message
is playing.
To delete all messages
1 Press the Erase button.
2 Press the PLAY button. All the stored
messages will be deleted.
At the handset
To listen to your messages
• Press i then 9. Your messages are played
back to you. When all your messages have
been played the machine beeps twice.
You cannot delete all messages if the red Play light
is flashing.
To stop playing the messages before they have
finished, press the Stop button.
W
X
Y
Z
9
Page 39

Using the answering machine
37
Protecting stored messages
You can prevent unauthorised access to you
messages at the base station.
To protect stored messages
1 Create a remote access code, if you have not
already done so (see ‘Remote Access’, page 46).
2 Press OK/Menu then 8 then 2. The display
shows 82 REMOTE ACCESS.
3 Press OK/Menu. The display shows WITH and
WITHOUT.
4 Use the
¶
button to select WITH.
5 Press OK/Menu to confirm the selection.
You will be asked to enter your Remote access
code before messages are played back.
Recording a memo message
You can record a message on your DECTfax
Plus using your DECT handset. The memo can
be up to 90 second long. Memos are replayed
as incoming messages.
To record a memo
1 At the base station - Press OK/Menu then 4
then 3. The display shows 43 RECORD MEMO.
2 Press OK/Menu. The display shows
PLEASE OFF HOOK RECORD MEMO.
3 At the handset - Press the Talk button and
start speaking to record your outgoing
message. The display on the base station
shows RECORD and the recording time left in
seconds.
4 Press the Talk button on the handset to stop
recording.
5 Press Stop at the base station to return to
standby. The
PLAY light will flash and the
display will show that a new message has
been recorded.
If you have any mailboxes set up, the base station
will ask you for a mailbox number. If you want to
record the memo in a mailbox, enter the relevant
number (1 - 5). If you want to record in the main
memory, press 0.
If you have not received any messages the machine
beeps.
T
A
U
B
V
8
C
2
G
D
E
H
F
I
4
3
Page 40

Using the answering machine
38
Operating the answering
machine from the handset
You are able to fully control your DECTfax
Plus answering machine through your handset
by pressing the keypad numbers.
• Press i then 9 on the handset to access the
answering machine.
While listening to your messages
Press To
Pause or restart listening
Skip to the next message
Restart listening to a message
Skip to the previous message
After listening to your messages
Press To
Replay all messages
Delete all messages
Record a new outgoing message
Stop recording the outgoing message
Listen to your outgoing message
Switch on the answering machine
Switch off the answering machine
• To finish operating the answering machine,
press the
TALK button.
To remotely access your answering machine see
‘Remote access’, on page 46.
J
K
L
5
M
N
O
6
G
H
I
4
G
G
H
I
4
4
H
I
J
K
L
5
J
1
5
T
D
U
V
8
3
D
E
F
3
W
P
X
Y
Z
9
7
W
X
Y
Z
9
K
L
E
F
Q
R
S
Page 41

6 Press OK/Menu. The display shows two
options:
WITH The security code is required to
access your mailbox.
WITHOUT The security code is not required
to access your mailbox.
Use the ¶and Äbuttons to switch between
the two options.
7 Press OK/Menu. The display shows 713 MBX
ANNOUNCE. You can now record an outgoing
message that is dedicated to this mailbox.
8 Press OK/Menu, the display shows PLEASE OFF
HOOK OGM.
This facility allows up to five people to have
their own individual addresses at which they
can receive fax or voice messages.
To create a mailbox
1 Press OK/Menu then 7 then 1. The display
shows 71 CREATE.
2 Press OK/Menu. Enter a mailbox number
between 1 and 5.
3 Press OK/Menu. The display shows 711
MAILBOX CODE. This is a security code which
you set to restrict access to your mailbox.
4 Press OK/Menu. Enter a four digit code
other than 0000.
5 Press OK/Menu. The display shows 712
REMOTE ACCESS.
39
Using mailboxes
P
Q
R
S
7 1
Page 42

Using mailboxes
40
9 At the handset - Press the Talk button
and start speaking to record your
outgoing message.
10Press the Talk button on the handset to stop
recording. The base station replays the
recorded message.
11 After replay, the display shows HANDSET NUM.
you can now dedicate a handset to this
mailbox to enable you to access voice
messages from a handset.
12 Press OK/Menu, the display shows HANDSET
NUM and 0. Enter the number of the handset
(this is shown in the handset display) or
leave it at 0 if you don’t want a dedicated
handset.
To delete a mailbox
1 Press OK/Menu then 7 then 2. The display
shows 72 CANCEL.
2 Press OK/Menu. Enter the number of the
mailbox you want to delete. When deleting a
mailbox, you don’t need to enter its security
code.
3 Press OK.
4 Press OK/Menu to confirm your choice.
To deposit faxes or messages in a mailbox
1 Your machine must be in Tel Fax mode or
Tad mode (see ‘Setting the receive mode’,
page 15).
2 The person calling you dials your number
and, after your DECTfax Plus has answered,
then presses
#, then 1, then your mailbox
number (
1-5) on their phone keypad. The
outgoing message for that mailbox will be
played and the caller can then leave a voice
message or send a fax.
To access messages in a mailbox
At the base station
1 Press the Play or Fax button as appropriate.
2 Enter your mailbox number then press
OK/Menu.
eg
The caller must be using a Touchtone™ telephone.
P
A
Q
B
R
C
S
7
2
A
B
C
2
Page 43

3 If you have locked the mailbox (selected
REMOTE ACCESS WITH) you will also need to
enter your four digit security code.
You will then hear your voice messages or
your faxes will print out.
From the handset
You can access voice messages in mailboxes
using the handset that has been dedicated to
that mailbox.
1 Press the I button then 9.
2 The handset accesses the recorded message
and plays it to you.
To send protected messages to a
remote fax mailbox
You will only be able to send protected
documents to a fax that has similar security
functions, for example, another BT DECTfax.
1 Press Menu then 7 then 3. The display
shows 73 TX MAILBOX.
2 Place the document to be sent into the
document.
3 Press OK/Menu.
Enter the fax number you want to send to
followed by their mailbox number, followed
Using mailboxes
41
by the start time and transaction type
(memory, paper feeder or alpha key), as for
a delayed send, followed by the number of
pages
3 Press Start and the message will be sent.
Polling from a remote mailbox
You can retrieve a document from the mailbox
of a compatible fax machine that has similar
security functions, for example another BT
DECTfax, as long as you know the mailbox
number and its access code.
1 Press OK/Menu then 7 then 4. The display
shows 74 MBX POLLING.
2 Press OK/Menu. Enter the fax number you
want to contact, followed by the mailbox
number, followed by the four digit access
code, followed by the transaction start time
3 Press OK/Menu to confirm the entries
The fax machine will be contacted and the
message(s) retrieved by your machine.
W
X
Y
Z
9
D
P
Q
E
F
R
S
7
3
G
P
Q
H
R
I
S
7
4
Page 44

42
Multiple registration
You can use up to 4 handsets with your
DECTfax Plus base station. A handset can be
registered with up to 4 DECT base stations.
For each handset to interact with the base
station, they must be registered with it. Your
handset is pre-registered with the base station
as handset number
1.
Once you have more than one handset
registered with your DECTfax Plus base
station, you can transfer calls from the base
station to a handset, or from one handset to
another.
To register a handset
A handset can be registered to the base station
only if the handset security code on the base
station matches the code on the handset. Both
these codes are preset to 0000, but you can
change the code at the base station to make it
possible to register a handset to the base only
with your authorisation.
If you want to keep the code as 0000 then you
can register handsets using the simple method.
If you want to change the code, or register a
handset to more than one base station,
handsets must be registered using the
customised method.
The simple method
Use this method if you have only one base
station and the handset security code is 0000.
1 At the handset press OK then 6. The
connection icon will flash.
2 At the base station press OK/Menu then 8
then 8. The display shows 88 HANDSET
REGIS
.
3 Press OK/Menu. The base unit searches for
handset to be registered. Once found, the
handset is assigned the next available
handset number. The handset display now
shows the handset number it has been
assigned and the connection icon will go out.
Using additional handsets
M
N
O
6
T
T
U
U
V
8
V
8
Page 45

The customised method
Use this method if you:
Have set the base station handset security
code to a number other than 0000.
Want to register a handset to more than one
base station.
Want to allocate a handset with a handset
number other than the next sequential one.
1 At the base station press OK/Menu then 8
then 8 then OK/Menu again.
2 At the handset press OK then 9, then use the
▲ and ▼ buttons to scroll to the first empty
location, indicated by a line of dashes in the
display.
3 Press OK. The telephone icon flashes in the
display.
4 After a few seconds the display shows four
dashes (- - - - ) to prompt you to enter the
handset security code
5 Enter the code that is on the base station,
either 0000 or whatever you have changed
it to.
6 Press OK and the display will show the
available handset numbers (
1-4).
7 Press the number you want on the keypad -
the display will show this number to indicate
that the handset is registered.
To change the handset security code
1 Press OK/Menu, then 8, then 7.
2 Press OK/Menu. The display shows OLD
CODE then
✱ ✱ ✱ ✱.
Enter the old code. This should be 0000, if it
has not already been changed.
3 The display shows NEW CODE then ✱ ✱ ✱ ✱.
Enter the new code. When the 4th digit has
been entered, the display returns to standby.
To register a handset to more than one
base station
Use ‘The customised method’ to register a
handset with up to 4 DECT base stations.
A handset registered to more than one base
station will stay ‘linked up’ to its current base
station as long as it is in range of it. As the
handset moves out of range, it will ‘link up’ with
the next base station it comes into range of.
Using additional handsets
43
T
T
U
U
V
8
W
X
Y
Z
9
V
8
P
T
U
Q
V
R
8
S
7
Page 46

Using additional handsets
44
To prioritise a base station
You can set a handset to give priority to a
particular base station, so that it will always
link up to that base station first if it is in range.
1 Press OK then 7 on the handset, then use
the
▲ and ▼ buttons to select the base
station number you want to prioritise.
2 Press OK to confirm your choice.
To deregister a handset
1 At the base station - press OK/Menu then 8
then 9. The display shows the handset
numbers that are registered.
2 Enter the number of the handset you want to
deregister (
1-4) then press OK/Menu to
confirm deregistration. If a handset is not
registered the display shows INIT - F6.
Transferring calls
To transfer a call from the base station to a
handset
You can make or receive a call at the base
station and transfer it to a handset.
1 At the base station - press OK/Menu then
Transfer. The base station display will show
HANDSET NUMBER.
3 Enter the number (1-4) of the handset you want
to transfer the call to. That handset will ring.
4 At the handset - when the handset rings,
press the
Talk button to take the call.
Transferring a call from one handset
to another
1 During a telephone call, tell the caller they
will be transferred and press the i button.
2 Enter the number (1-4) of the handset you
want to transfer the call to. That handset will
ring. If you want to ring all the handsets at
the same time, press the ✱ button.
A small square in the display indicates that no base
station is prioritised.
eg
eg
or
P
Q
R
S
7
W
T
U
X
V
Y
8
Z
9
A
B
C
2
A
B
C
2
✱
Page 47

45
3 At the other handset - press the Talk button
to connect the internal call. The two
handsets can now talk to each other while
the external caller is on hold.
4 At the first handset - press the Talk button to
end the internal call. Your external caller is
then transferred to the other handset.
Paging a handset
If you want to hail a handset or find out where
it is is, you can page it from the base station.
To page a handset fom the base station
1 At the base station, press OK/Menu then
Transfer. The base station display will show
HANDSET NUMBER.
2 On the keypad, enter the handset number
(
1-4) that you want to contact. If you want to
contact all the handsets at the same time,
press the ✱ button. The display will show
FIND HANDSET.
3 The base station will beep, and the
handset(s) you are contacting will ring.
4 At the handset being contacted, the display
will show a flashing
INTERCOM icon and the
handset will ring.
Call Monitor
When using a handset, it is possible to listen to
the conversation at the base station as well.
To listen to a call through the base station
1 At the handset- during a call press OK then 0.
The call can now be heard through the base
station loudspeaker.
2 To stop listening through the base station,
press
OK then 0 again.
eg
or
0
A
B
C
2
✱
0
Page 48

46
Remote access
Your DECTfax Plus enables you to access your
stored faxes and messages remotely (from
another phone) by dialling your number and
using the numerical keypad to control the
machine.
Remote access codes
To protect your messages you must set up a
remote access code. This acts as a ‘password’
you need to enter when accessing your
messages remotely.
Creating a code
1 Press OK/Menu then 2 then 8. The display
shows 28 REMOTE CODE.
2 Press OK/Menu. Enter the four digit code
3 Press OK/Menu to confirm your entry
Remote access of your fax machine
You can retrieve faxes from your DECTfax Plus
from another fax machine.
1 From another fax machine dial your phone
number.
2 Press the ✱ button during the announcement.
3 Enter your four-digit security code. Any
voice messages you have will be played,
followed by a series of beeps.
4 At the end of the message(s) and during the
beeps press
8 then 0. Your DECTfax Plus
will then transmit all the faxes received and
stored its memory.
Additional features
WARNING
When you remotely retrieve your faxes they are
automatically deleted from the memory.
T
A
U
B
V
C
8
2
✱
T
U
V
8 0
Page 49

Using your DECTfax Plus as a
photocopier
1 Make sure you have inserted some paper
into the output sheet feeder.
2 Place the document you want to copy face
down in the document sheet feeder (as if for
sending a fax).
3 Press Copy. The machine will copy the
document.
Printing out the functions list
This allows you to print out a list of all the
functions of your DECTfax Plus along with the
number codes to operate them.
To print out the functions list
1 Make sure there is some paper in the output
sheet feeder.
2 Press OK/Menu then 5 then 1. The display
shows 51 GUIDE.
3 Press OK/Menu. The functions list is printed
out.
Remote access of your answering machine
You can access your voice messages stored in
your DECTfax Plus from another telephone.
1 From another telephone dial your number.
2 Press the ✱ button during the announcement.
3 Enter your four-digit security code. Your
voice messages are played back to you,
followed by a series of beeps.
Remote access of your mailbox(es)
You can retrieve fax and voice messages stored
in your DECTfax Plus mailboxes.
1 From another telephone dial your number.
2 Press the # button then 1 then enter your
mailbox number during the announcement.
3 Enter your four-digit security code. Your
voice messages are played back to you.
If you want to retreive faxes, press
8 then 0
then Start during the beeps at the end of the
voice messages.
Additional features
47
After the document has been sent, the resolution
setting returns to NORMAL.
✱
1
T
U
V
8 0
T
A
U
B
V
C
8
2
Page 50

Additional features
48
Printing the fax directory
This allows you to print out the names and
numbers stored in the fax directory.
1 Press OK/Menu then 1 then 2. The display
shows 12 PRINT.
2 Press OK/Menu. The fax directory will print
out in alphabetical order.
Printing out settings
This shows you the configuration of the
machine’s operating mode at any given point
1 Press OK/Menu then 5 then 4. The display
shows 54 SETTINGS.
2 Press OK/Menu. The machine set-up
configuration will print out.
Alarm
You can set your DECTfax Plus to act as an
alarm.
To set the alarm
1 Press OK/Menu then 8 then 1. The display
shows 81 ALARM.
2 Press OK/Menu. The display shows START.
3 Press OK/Menu again. The display shows
SET HOUR and flashes the current time next
to the time to be set.
4 Set the time using the keypad.
5 Press OK/Menu to confirm the entry.
6 Press Stop to return to standby. The display
shows to indicate that the alarm is set.
7 When the alarm sounds, press the Stop
button to switch it off.
A
B
1
C
2
G
J
K
H
L
5
I
4
T
U
V
8 1
Page 51

Additional features
49
To cancel the alarm
1 Press OK/Menu then 8 then 1. The display
shows 81 ALARM.
2 Press OK/Menu. Press the
Ä
button to move
down to STOP.
3 Press OK/Menu to deactivate the alarm.
Ink gauge
To see how much print ribbon there is left
1 Press OK/Menu then 5 then 9. The display
shows 89 RIBBON GAUGE.
2 Press OK/Menu. The display shows what
percentage of the ribbon is left.
Caller Display
If you subscribe to a caller display service, the
DECTfax Plus will show the caller information
on its display and on the handset display.
Base display Handset display
Number INCOMING CALL NUMBER ONLY
alternating with
NUMBER/NAME
Number INCOMING CALL
——————
withheld alternating with
WITHHELD
Number INCOMING CALL 111111111111
unavailable alternating with
UNAVAILABLE
Operator INCOMING CALL 111111111111
alternating with
UNAVAILABLE
International INCOMING CALL 111111111111
alternating with
UNAVAILABLE
Payphone INCOMING CALL NUMBER
alternating with
NUMBER
Ringback INCOMING CALL NUMBER ONLY
alternating with
NUMBER/NAME
If the call is from a number stored in the
DECTfax Plus’s directory, the display will show
the name it belongs to rather than the number.
The handset display will only show the number.
The DECTfax Plus stores the date, time and
number or name of up to 10 calls - after 10 calls
have been stored it retains the last 10. If a new
T
U
V
8 1
W
J
K
X
L
Y
5
Z
9
Page 52

Additional features
50
call is from the same number as an earlier call
only the later call details will be stored. Number
Withheld, Number Unavailable, Operator and
International calls will not be stored.
The list of stored call details can be reviewed
from the base station and from the handset.
To review the list from the base station:
1 Press OK/Menu then Redial. The display
shows details of the last call.
2 Use the
¶
and Äkeys to scroll through the
list.
3 To call a number from the stored list press
the
Hands free button while the number is
displayed.
4 To fax to a number from the list press Start
while the number is displayed.
To review the list from the handset:
1 Press the i button then Redial. The display
shows details of the last call.
2 Use the
¶
and Äkeys to scroll through the
list.
3 To call a number from the stored list
press the
Talk button while the number is
displayed.
When displaying call details the display alternates
between the name (or number) and the date and
time of the call. It will also show a T to indicate a
telephone call, or, if the call was a fax and was
answered, an F.
Page 53

51
HelpIf you have any problems using your DECTfax, this section
will give you the most common, easy-to-follow solutions.
Fax Problem Solution
Blank unit display.
The unit does not answer
incoming calls after several rings.
Blank photocopies.
The telephone exchange does not
recognise the number dialled.
The terminal does not ring.
The telephone does not work.
One or more vertical black lines on
documents copied locally or sent.
The unit displays the following messages:
OUT OFPAPER
PRINTER COVER
PAPER JAM
OVERHEATING
GAUGE EMPTY
MISSING GAUGE
CHANGE RIBBON
REMOVE DOCUMENT
MEMORY FULL
Other
• Check that the power cord and the power adopter cord are properly connected
• The FAX icon may be off: check the receive mode (Manual/automatic).
• Check the number of rings.
• Configure the unit for “private network” (see the sections headed ‘Ring settings’ and
‘Network and dial settings’ in the ‘Setting up’ chapter).
• The document was positioned was positioned facing the wrong way round in the feeder.
• Check.that the the telephone cord is properly plugged in.
• Configure your unit for pulse dialling (see the section headed ‘Network and dial settings’
in the ‘Setting up’ chapter).
• The TEL icon is flashing: re-activate the ringing tone (see the section headed
‘Setting the ringing tone’ in the Setting up’ chapter).
• The mains may be down.
• Check that the telephone line cord is properly connected.
• Open the cover and clean the scanning sub-assembly located opposite the white roller
using a soft but not fluffy cloth dipped in surgical spirit. After cleaning, close the front
cover and make a local copy to check that the black lines have disappeared.
• Insert more paper in the paper feeder.
• Close the rear cover.
• Open the rear cover to access the paper circuit. Check that the rear cover is properly
secured after closing it.
• The last documents printed printed out are blackened; the printer’s temperature is too
high. Wait a few minutes for it to cool down
• You may have forgotten to replace the gauge smartcard when you put in the ink ribbon.
• Open the gauge housing flap and check that the gauge smartcard is inserted and
correctly positioned.
• No ink ribbon left: install a new ribbon and gauge.
• Open the front cover and check the document circuit.
• Print out faxes received and/or listen to the voice messages
(model with built-in Tad only).
• Disconnect your unit from the mains and reconnect it. If the problem persists, contact
our Helpline on 0845 603 1066.
Page 54

Help
52
Telephone Problem Solution
The radio link is not set up between
the base station and the handset.
The base station does not ring.
The dial tone is busy each time you
dial a number.
Your handset is equipped with a
rechargeable battery (NiCd).
The capacity of this battery may drop
slightly with time.
In that case:
The Handset screen displays:
INIT = F6
• Check that the handset battery is properly charged.
• Check that the the base station and handset are properly matched.
• Check that the base station power supply pack is not too close to the radio module.
• Check that the base station ringing is not switched off.
• Check that the dialing mode (Voice or Decimal Frequencies) is compatible with your
PABX.
• Check that you have inserted pauses after the 0 or 9 in your memorised numbers if your
line is connected to a PABX.
• Allow your handset to discharge completely and then put it on charge for at least
5 hours.
• You should perform this operation about every two months in order to increase the life
of your battery.
• If the problem persists despite these precautions, you may need to buy replacement
batteries from your distributor.
• Match the handset on a base station
Chapter: ‘To register a handset’.
Customer Helpline
If you have any problems with your DECTfax, call
the BT Helpline on 0845 603 1066.
Print ribbons
To obtain new print ribbons call 0800 590009.
Page 55

Help
53
BT sponsors two schemes which can join if you are
bothered by unwanted faxes and phone calls.
Fax preference scheme
BT is a sponsor of Fax Preference Service
(FPS) - a scheme to enable customers to
reduce unwanted faxes.
The main feature of the FPS is that while it
helps reduce the volume of unsolicited faxes, it
still allows you to receive faxes from
organisations with which you have a
contractual relationship.
To register for the FPS, BT customers should
ring 0541 554555.
Telephone preference scheme
BT is a sponsor of Telephone Preference
Service (TPS) - a scheme to enable customers
to reduce unwanted sales calls.
The main feature of the TPS is that while it
helps reduce the volume of unsolicited sales
calls, it still allows you to receive important
marketing calls from organisations with which
you have a contractual relationship.
To register for the TPS, BT customers should
ring 0800 398893.
Transmission report codes
The activity reports and send reports detail the
outcome of each transaction. In the event of an
error they will use one of the following codes:
Code Meaning and action
1 No answer; try again later
3 Call interrupted by user pressing
Stop
4 Invalid speed dial number.
Check number
5 Document feeder problem during
the call: paper jam or document
feeder malfunction
7 Bad line or remote terminal
malfunction. Try again
8 The document sent may not have
been received in full. Send again
and check with recipient
A Polling operation failed: no fax
back document on remote terminal
B There is a difference between the
number of pages logged for
sending and the number of pages
actually sent. Check the number
of pages
13 Memory full: fax could not be
received. Print out faxes stored in
the memory
Page 56

54
Choosing a position
Your DECTfax Plus should be kept clear of dust, moisture, high
temperature and vibration and should not be exposed to direct
sunlight. Don’t install it close to radiators or air-conditioning
outlets or in excessively warm, humid or dusty places.
Approval number
BABT Certificate Number/Approval Number for the DECTfax
Plus 606594 APPROVED for connection to telecommunication
system specified in the instructions for use subject to the
conditions set out in them.
Approval for use
This apparatus has been approved for the use of the following
facilities:
Terminal and subscriber identifier
Transmission status report (send report only)
Manual mode (associated telephone set)
Auto/Manual-answering
Fax switch
Polling RX (to poll a document from a distant fax)
Polling TX (prepare a document to be polled)
Delayed transmission – Time recorder and logs
Modem fax up to 14400 bps
Auto calling
Automatic redial (5 times, 5 minutes intervals)
Facsimile transmission and reception
Calls progressing mode
Series connection (TAM)
Automatic document feeder
16 shades of grey
DECT
TAD facility
Any other usage will invalidate the approval of the apparatus if as
a result, it then ceases to conform to the standards against which
approval was granted.
You may connect it –
• To direct exchange lines.
• To extensions with new plug and socket arrangements
provided with these direct exchange lines.
• To compatible switchboards.
You may NOT connect it –
• To shared service (party) lines.
The connection to the telecommunication system must be
unplugged before the earth is disconnected. The connection to
the telecommunication system must not be hardwired.
This apparatus may be used on telecommunications systems
employing loop disconnect or MF signalling.
Ringing delay
The maximum number of rings before automatic answering is 9.
How many phones you can have
Your exchange line provides only a small current to make your
telephone ring. Although you may have any number of sockets it
is important to limit the number of telephones and other items of
apparatus connected to the line by these sockets. This ensures
that each telephone will receive enough current to ring.
Every telephone or item of apparatus has a Ringer Equivalence
Number (REN). In most cases a standard line should provide
enough current for two or more telephones or items of
apparatus, if the REN’s add up to no more than 4.
DECTfax Plus has a REN of 1. Any telephone provided by BT
may be assumed to have a REN of 1 unless otherwise stated on
the base. Even where the number of telephones has been
limited, there is no guarantee that the different types of
telephone on the same line will ring.
Technical information
WARNING
The apparatus is only designed to be operated in a normal office
or domestic environment where the relative humidity does not
exceed 60%. It should not be used in bathrooms or near water.
Page 57

Voltage Drop
The voltage drop introduced between the PSTN and the
associated telephone is 2.0 Volts so therefore no additional series
equipment may be connected. The introduction of this voltage
drop may occasionally cause difficulties in making calls from the
associated telephone or problems in telephone conversation
being experienced by both parties to the call.
While operation may be possible initially, change to or
modernisation of the network taking place in the normal course
of events may result in the apparatus being connected to be
compatible, failure of the apparatus to work under these
circumstances may not be the responsibility of the network
operator.
In the unlikely event of such problems occurring, the user
should contact the supplier or maintainer of the apparatus.
Connecting to switchboards
Your DECTfax Plus is approved only for use with a compatible
switchboard including those which do not provide secondary
proceed indication.
If you do have a compatible switchboard, it cannot be guaranteed
that the DECTfax Plus will operate correctly under all possible
conditions of connection.
If you have any difficulties, contact BT on Freefone 0800 800 152
for business Customers or Freefone 0800 800 150 for
residential customers (9am to 5pm Monday to Friday).
Safety warnings
1 Interconnection circuits should be such that the equipment
continues to comply with the requirements of 4.2 of EN 41003
for TNV circuits and 2.3 of EN 60950 for SELV circuits, after
making connections between circuits.
2 Interconnection directly, or by way of other apparatus, of ports
marked “Safety Warning. See instructions for use” with ports
marked or not so marked may produce hazardous conditions
on the network. Advice should be obtained from a competent
engineer before such a connection is made.
3 When you operate this equipment, the electrical mains socket
should be near the equipment and be easily accessible.
How to connect the mains lead to a plug
Your apparatus comes complete with fitted plug. If however, it
becomes necessary to fit an alternative mains plug, the following
instructions must be adhered to.
Note
The wires in the mains lead are coloured in accordance with the
following code:
Blue: Neutral
Brown: Live
Read the instruction carefully before connecting the mains lead
to a plug. If in doubt, consult a qualified electrician.
As the colours of the wires in the mains lead of the apparatus
may not correspond with the coloured markings identifying the
terminals in your plug, proceed as follows:
• The wire which is coloured blue must be connected to the
terminal which is marked with the letter N or coloured black.
• The wire which is coloured brown must be connected to the
terminal which is marked with the letter L or coloured red.
Technical information
55
WARNING
To prevent fire or shock hazard, do not expose this product to
rain or any type of moisture.
WARNING
This equipment is not designed for making telephone calls when
the power fails.
Alternative arrangements should be made for access to
emergency services.
Note
The definition of RBS (Relevant branch system) for PSTN lines
is given in BS6789 section 6.1 (1986) clause 2.4.
Page 58

56
Activity reports 23
Additional handsets 42
Alarm
setting 48
cancelling 49
Answering machine 34
answer mode 34
answer delay 14
from handset 38
on/off 34
remote access 47
Answer only mode 35
Base station priority 44
Battery low 12
Broadcasting 18
Call back 19
Call timer 32
Call transfer 44
Caller Display 49
Charging the handset 11
Copying documents 47
Customising 12
Date and time 13
Delayed send 18
Dial mode 14
Directory
changing numbers 30
dialling numbers 31
dialling from base station 31
fax from base station 48
handset 30
storing numbers 21, 30
Document feeder 16
Document support bar 16
Duration of call 32
Fax number, entering your own 13
Fax preference scheme 53
Faxes
monitoring 17
printing 20
receiving 19
remote access 46
sending 16
Functions list, printing 47
Handset 26
Answering mode 28
Directory 30
Keypad tones 32
Making calls 27
On/off 27
Receiving calls 28
Registering 42
Security 43
Help 51
Helpline 52
Ink gauge 49
Last number redial 29
Mailboxes 39
accessing 40
creating 39
deleting 40
faxing to 40
Index
Page 59

Index
57
messages in
40
polling from 41
remote access 47
sending protected messages 41
Mains power 10
Memo messages 37
Memory
storing numbers 21
dialling from 21
edit 22
delete 22
Messages 36
deleting 36
playing 36
protecting 37
skip through 36
Monitoring a call 45
Name, entering 13
Network settings 14
Paging a handset 45
Paper
inserting 11
thickness 11
Pause 21
Photocopier 47
Polling 23
setting up to be polled 23
to poll from 24
from a mailbox 41
Print ribbon 8, 51
installing 8
purchasing new 8
security 8
Printing a fax 20
Radio module 10
Receive mode 15
Receiving faxes 19
Redial 29
Registering handsets 32
Remote access 46
Reports
send 23
settings 48
activity 23
report codes 53
Resolution 4, 17
Ringer
delay 54
melody 14, 29
volume 29
switching on/off 30
Secrecy 29
Send reports 22
Smart card, installing 9
Switchboards 55
Technical information 54
Tel mode 15
Tel/Fax mode 15
Tel/Fax/Tad mode 15
Telephone
line 10
calls 27
Telephone number, entering your own 13
Telephone preference scheme 53
Timed jobs 24
print list 26
print out 26
cancelling 25
modifying 25
Transferring calls 44
Transmission report codes 53
Volume
earpiece 28
ringer 29
Page 60

APPROVED for connection to
telecommunication systems specified
in the instructions for use subject to
the conditions set out in them
606594
CE compliant to 89/336/EEC
(EMC Directive) & 73/23/EEC
(Low Voltage Directive)
Offices in Europe, North America,
Japan and Asia Pacific.
The telecommunications services described in this publication
are subject to availability and may be modified from time to time.
Services and equipment are provided subject to British
Telecommunications plc’s respective standard conditions of contract.
Nothing in this publication forms any part of any contract.
Touchtone™ is a registered trade mark of
British Telecommunications plc in the UK.
© British Telecommunications plc 1998.
Registered Office: 81 Newgate Street, London EC1A 7AJ.
Registered in England No. 1800000.
Printed in France. DECTfax Plus (9/98).
Designed by The Art & Design Partnership Limited.
 Loading...