

Page 1
Userfriendly
Guide
Decor 400
Page 2
Decor 400
A
B
C
21
D
E
F
3
J
K
L
5
G
H
I
4
M
N
O
6
T
U
V
8
P
Q
R
S
7
W
X
Y
Z
9
0
✱
QuickdialRecall Redial
M1 M2 M3
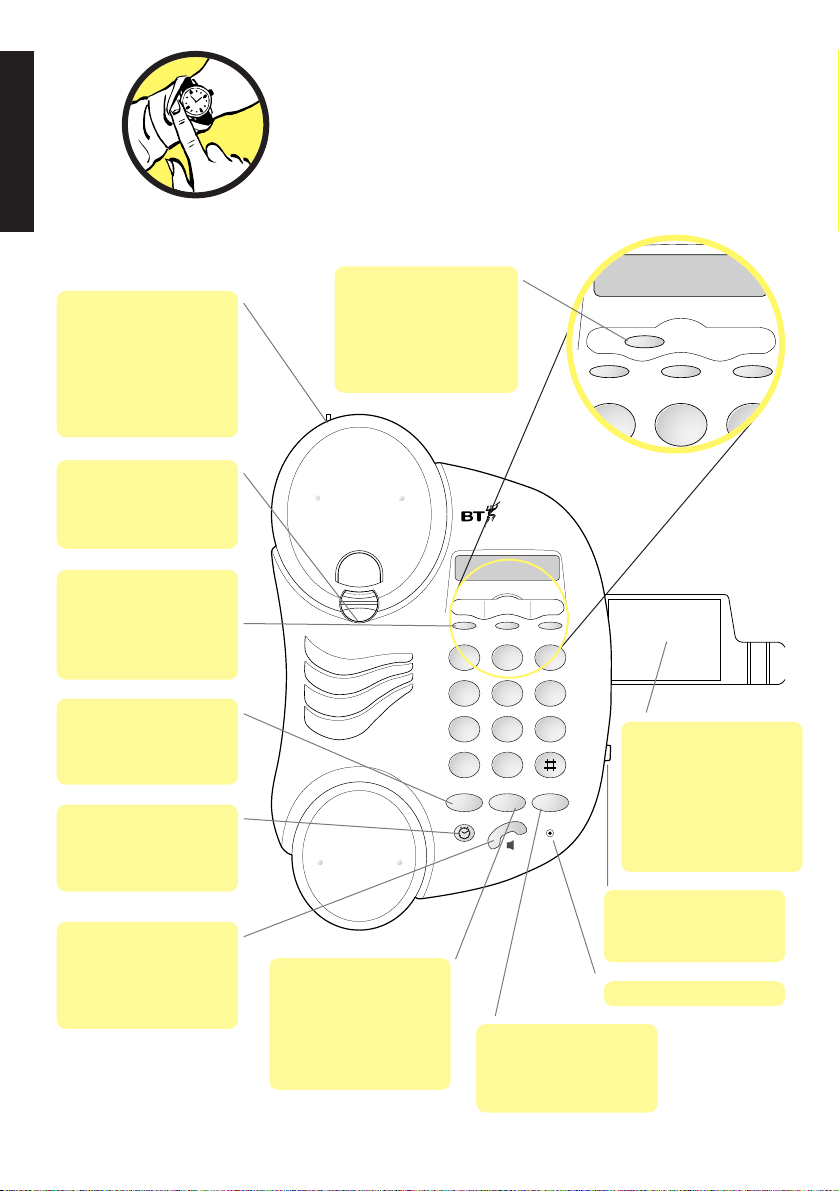
At a glance
2
One-touch
memory buttons
Press to dial a stored
number.
See page 7
Recall button
For use with PBXs and
Select Services.
See page 8
Store button
(Located under the ‘one-
touch’ memor y label.)
Use to store phone
numbers in the memor y.
See page 7
Handset hook
Keeps the handset in
place when the phone
has been wall-mounted
Timer button
Used to time your
outgoing calls.
See page 6
Handsfree button
Allows you to use the
phone without picking
up the handset.
See page 6
A
B
C
21
D
E
F
3
M1 M2 M3
Store
Handset park
When the Decor 400 is
wall-mounted, you can
hook the handset on
this if you need to
temporarily move away
from the phone.
At a glance
Quickdial memory
label
Lets you keep a
reference of one-touch/
quick dial numbers
stored in the memor y.
See page 7
Redial button
Redials the last number
dialled.
See page 6
Handsfree speaker
volume control
See page 6
Microphone
Quickdial button
Allows you to use up to
10 numbers stored in
the memories under
the keypad.
See page 7
Page 3
At a glance 2
Introduction 3
Installing your
Decor 400 4
Using your
Decor 400 6
Technical
information 9
Wa l l - m o un t in g 1 1
In this user guide, we’ve
included helpful tips and
useful notes. They are
shown in a yellow box.
Hints and tips
boxes
3
Contents
Introduction
Your Decor 400 is designed for
ease of use and made to the high
standards set by BT
We thank you for
making the right
choice and expect
that your phone will
give you many years
of quality ser vice.
Please read
the instructions
carefully before
use, and keep this
User Guide for
future reference.
Date of purchase:
Place of purchase:
Serial number:
(on base of the telephone)
Purchase price:
(for warranty purposes,
proof of purchase is
required, so please keep
your receipt)
For your records
Introduction
Page 4
The emergency services
can be contacted in the
UK by dialling 999. You
may also dial 112, which
is valid in any country
that is a member of the
European Community.
You may not be able to
make an emergency call
in certain situations:
• If the telephone line is
disconnected.
• If there is a fault on the
line from your phone or
on the network.
If your Decor 400 is
connected to a PBX
(switchboard), you may
have to dial an access
number before 999 to
contact the emergency
services.
Emergency calls
Installing your Decor 400
4
Installing your
Decor 400
Situate your Decor 400
close enough to a
phone socket so that
the cables will reach.
Do not stand it on
carpets or other
similar sur faces that
generate fibres.
Do not cover or
enclose the machine;
allow a free flow of air
to its sur faces.
Your Decor 400 can be
wall-mounted. See
‘Wall-mounting’ on
page 11.
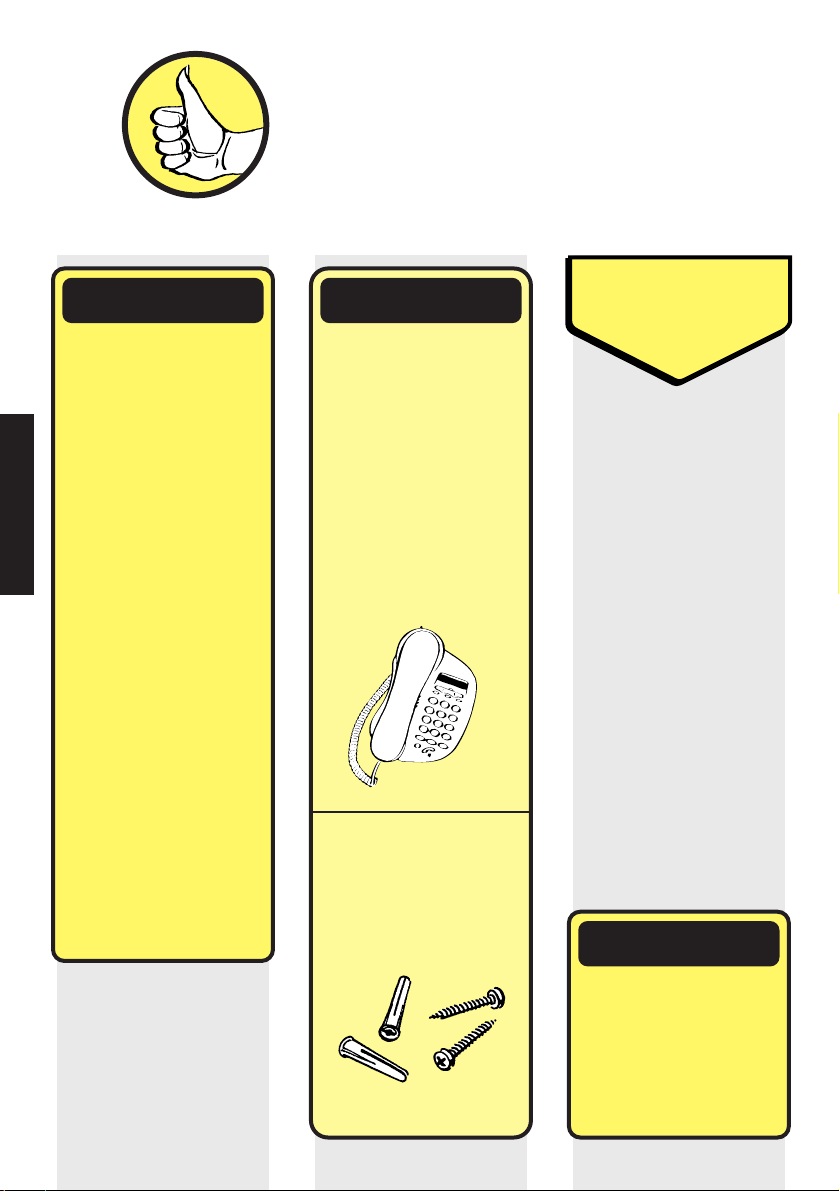
IMPORTANT
Check that your
Decor 400
is complete. When
you unpack you
must have:
Decor 400 phone
with telephone line
cable attached
Screws and wall plugs
for wall mounting
Situating your
Decor 400
✓
✓
Your Decor 400 is only
designed to be operated
in a normal office or
domestic environment.
It should not be used in
bathrooms or near water.
Warning
Page 5

5
Installing your Decor 400
If you do not have a
modern style socket,
call Freefone
0800 800 150
and ask for a BT
engineer to come and
fit the correct socket.
This is a chargeable
ser vice.
Check your
telephone wall
socket
Plug your Decor 400
into the wall socket
Set the
ringer volume
Your Decor 400 is
now ready for use
The ringer volume
switch is located on
the underside of your
Decor 400 and ef fects
the volume at which
your phone rings.
There are two settings:
HI
A loud ring; your
Decor 400 is preset to
this position.
LOW
A quiet ring.
HI
LO
Page 6

6
Using your
Decor 400
Using your Decor 400
To make a call
To receive a call
Lift the handset and
listen for a dialling tone.
Display shows:
Dial the number you
require.
To end the call,
replace the handset.
1
When the phone rings
pick up the handset
and speak.
1
1
2
you more freedom
while you are speaking
on the phone. You can
hear the callers voice
through the built-in
speaker. Adjust the
speaker volume with
the handsfree speaker
volume control on the
side of the phone.
To make a call
Press the HANDSFREE
button.
The HANDSFREE light
comes on and you can
hear a dialling tone.
Dial the number you
require.
Lift the handset or press
the HANDSFREE button.
To receive a call
When the phone rings,
press the HANDSFREE
button and speak.
Using the
Handsfree button
The Handsfree feature
allows you to use the
phone without picking
up the handset, giving
1
2
3
Lift the handset or press
the HANDSFREE button.
Press the REDIAL
button. The phone will
automatically dial the
last number dialled.
To redial the last
number dialled
1
2
To time the length
of a call
Your Decor 400 allows
you to time the length
of a call by simply
pressing the TIMER
button.
Lift the handset or
press the HANDSFREE
button and dial the
phone number you
require.
1
Redial
Page 7

Lift the handset or
press the HANDSFREE
button.
Press the ‘one-touch’
memor y button (M1,
M2 or M3) under
which the phone
number you require
is stored.
The phone number is
dialled automatically.
Your Decor 400 also
has 10 ‘two-touch’
memor y locations in
the keypad, which are
dialled by using the
QUICKDIAL button.
Lift the handset or press
the HANDSFREE button.
Press the STORE button.
Display shows E.
7
Using your Decor 400
need to dial all the
digits ever y time.
To store numbers in
the memor y you use
the STORE button.
This is located under
the ‘one-touch’ memory
label. Lift up the plastic
cover and label to reveal
the STORE button.
Lift the handset or press
the HANDSFREE button.
Press the STORE button.
Display shows E.
Dial the phone number
to be stored. Display
shows number dialled.
Press the STORE button.
Press the ‘one-touch’
memor y button (M1,
M2 or M3) under
which you want to
store the number.
The phone number is
now stored.
When the call is
answered, press the
TIMER button.
The display shows the
current duration of the
call in minutes and
seconds.
The timer will stop
automatically when
the handset is
replaced, or the
HANDSFREE button is
pressed to end the call.
To know the length of
the last call just press
the timer button.
Your Decor 400 has
three ‘one-touch’
memor y buttons.
These allow you to
store three numbers
that may be dialled at
the touch of a button.
You can store a phone
number on each of
these buttons and
dial the number by
pressing just one
button; so there is no
2
To store phone
numbers in the
‘one-touch’ memory
1
2
3
4
5
Each memory location
can store a maximum of
16 digits.
To dial a number
stored in the ‘one-
touch’ memory
1
2
To store phone
numbers in the
Quickdial memory
1
2
00:00
Store
Store
M1
M2
M1
E
M3
Store
E
Page 8

Press the QUICKDIAL
button.
Press the 0-9 location
under which the number
you require is stored.
The phone number is
dialled automatically.
When making a call, you
can store the number
you have just dialled.
Before replacing the
receiver press the
STORE button twice.
Press the 0-9 keypad
button under which
you want to store the
number.
The phone number
dialled is now stored.
Dial the phone
number to be stored.
Press the STORE button.
Display shows E.
Press the 0-9 keypad
button under which
you want to store the
number.
The phone number is
now stored.
Repeat these steps for
any other numbers you
want to store, using a
dif ferent 0-9 location
code for each one.
1
8
To store a phone
number you have
dialled
Stored numbers can include
switchboard and network
services that use the
✱and
#
buttons as well as the
PAUSE function.
Quickdial memory label
Use the memory directory
label to keep a record of
which 0-9 location code you
have used for each number.
1
2
5
Using your Decor 400
3
4
To dial a number
stored in the
Quickdial memory
Lift the handset or press
the HANDSFREE button.
3
2
To store a pause in
the memory
Some switchboards can
take a short time to pick
up an outside line. You
can insert a pause in the
middle of a number to
allow for this delay.
A pause can also be
stored as part of a
number in the memory.
When storing a phone
number in the ‘one-touch’
or Quickdial memories:
Enter the first par t of
the phone number (the
access code) which
gives you an outside
line. Follow the
procedure on how to
store a number.
See page 7.
Now enter a pause by
pressing the REDIAL
button.
Enter the remaining
part of the phone
number.
The phone number is
dialled automatically
with a pause of around
one second inser ted.
1
2
3
Using the
RECALL button
This button signals a
time break recall. If you
are connected to a PBX
(Private Branch
Exchange), contact your
PBX supplier for further
information.
Store
Quickdial
E
Store
Redial
Recall
Page 9

9
Technical
information
Your Decor 400 should
be kept free of dust,
moisture, high
temperature, vibration
and should not be
exposed to direct
sunlight. It should not
be used in bathrooms
or near water.
Environment
All items of telephone
equipment have a
Ringer Equivalence
Number (REN), which
is used to calculate the
number of items that
may be connected to
any one telephone line.
Your Decor 400 has a
REN of 1. A total REN
of 4 is allowed.If the
total REN of 4 is
exceeded, the
telephones may not
ring. With different
telephone types there
is no guarantee of
ringing, even when the
REN is less than 4.
How many phones
can you have?
Your Decor 400 is only
designed to be operated
in a normal office or
domestic environment
where the relative humidity
does not exceed 60%.
Warning
Your Decor 400 may
be connected to public
networks in the
United Kingdom.
It may also be
connected to switching
systems that use tone
(MF) signalling, with
timed break recall. If
in doubt, your switch
supplier or maintainer
should be able to of fer
help. Advice on
connection to BT
switching systems can
be obtained by dialling
BT Freefone
0800 800 152.
Generally your Decor
400 can be connected
to any switchboard
where a simple
modern telephone can
be used to make and
receive calls.
Connection
information
Technical information
Page 10

10
If you own your
Decor 400 - under
BT’s guarantee.
BT guarantees the
product for one year
provided that:
The goods have only
been used for their
intended purpose, and
have not been
subjected to misuse,
or been wilfully or
accidentally damaged.
The goods have not
been tampered with or
repaired by anyone
other than BT, its staff
or agents. If a fault
does occur in this
product, and you
bought the unit
yourself, provided that
you return it to the
place of purchase and
produce your receipt,
it will either be
repaired or replaced
free of charge. The
terms and conditions
of this guarantee do
not af fect your
statutor y rights.
If you own your
Decor 400 - outside
guarantee.
If your Decor 400
needs repair after the
guarantee period
has ended, it must
be repaired so as to
remain compliant
with the approval
requirements for
connection to the
telephone network.
We r ecommend that
you call BT on
Freefone 0800 800
150, or visit your
nearest BT shop, and
you will be informed
of our recommended
repair agents.
Guarantee Index
Technical information
BT phone socket 5
Dialling numbers
stored in the
one-touch memor y
7
Dialling numbers
stored in the
Quickdial memor y
8
Emergency calls 4
Guarantee 10
Handsfree dialling 6
Handsfree speaker
volume control
6
Installing 4
Making a call 6
Recall 8
Receiving calls 6
Redialling the last
number
6
Ringer volume 5
Storing numbers in
the one-touch memory
7
Storing numbers in
the Quickdial memory
7
Storing a pause in
the memor y
8
Timing a call 6
Wall-mounting 11
Page 11

11
Wall-mounting
Your Decor 400 can be
wall-mounted using
the screws and wall
plugs provided.
Use the wall-mounting
template opposite as a
guide for the drill
holes.
Before you wall-mount
your Decor 400, check
that:
• the wall can support the
weight of the phone;
• the position you choose
leaves suf ficient space
so that the phone is
clear of any obstruction
on the wall, such as a
shelf or cupboard.
Wall-mounting
template
Wall-mounting
3mm
hole
3mm
hole
73mm
1
2
3
4
5
Drive the screws into
the wall, leaving about
4mm free on which to
hang the phone.
Press the phone line
cable into the channel
on the bottom of the
phone, so that the
phone lies flat against
the wall.
Hang the holes on the
back of the phone over
the screwheads and
gently pull the phone
downward to make
sure it is securely in
place.
Rotate the handset
hook 180°, so that you
can hang up the
handset when the
phone is wall-mounted.
Drill two holes for the
screws and inser t the
wall plugs provided
(if required).
WALL
WALL PLUG SCREW
73mm
Page 12

Offices in Europe, North America,
Japan and Asia Pacific.
The Telecommunications services described in this publication
are subject to availability and may be modified from time to time.
Services and equipment are provided subject to British
Telecommunications plc’s respective standard conditions of contract.
Nothing in this publication forms any part of any contract.
Touchtone™is a registered trade mark of
British Telecommunications plc in the UK.
© British Telecommunications plc 1998.
Registered Office: 81 Newgate Street, London EC1A 7AJ.
Registered in England No. 1800000.
Printed in Malaysia. Decor 400 Issue No.1 (5/98).
Designed by The Art & Design Par tnership Limited.
CE compliant to 89/336/EEC
(EMC Directive) & 73/23/EEC
(Low Voltage Directive)
APPROVED for connection to
telecommunication systems specified
in the instructions for use subject to
the conditions set out in them
 Loading...