

Page 1
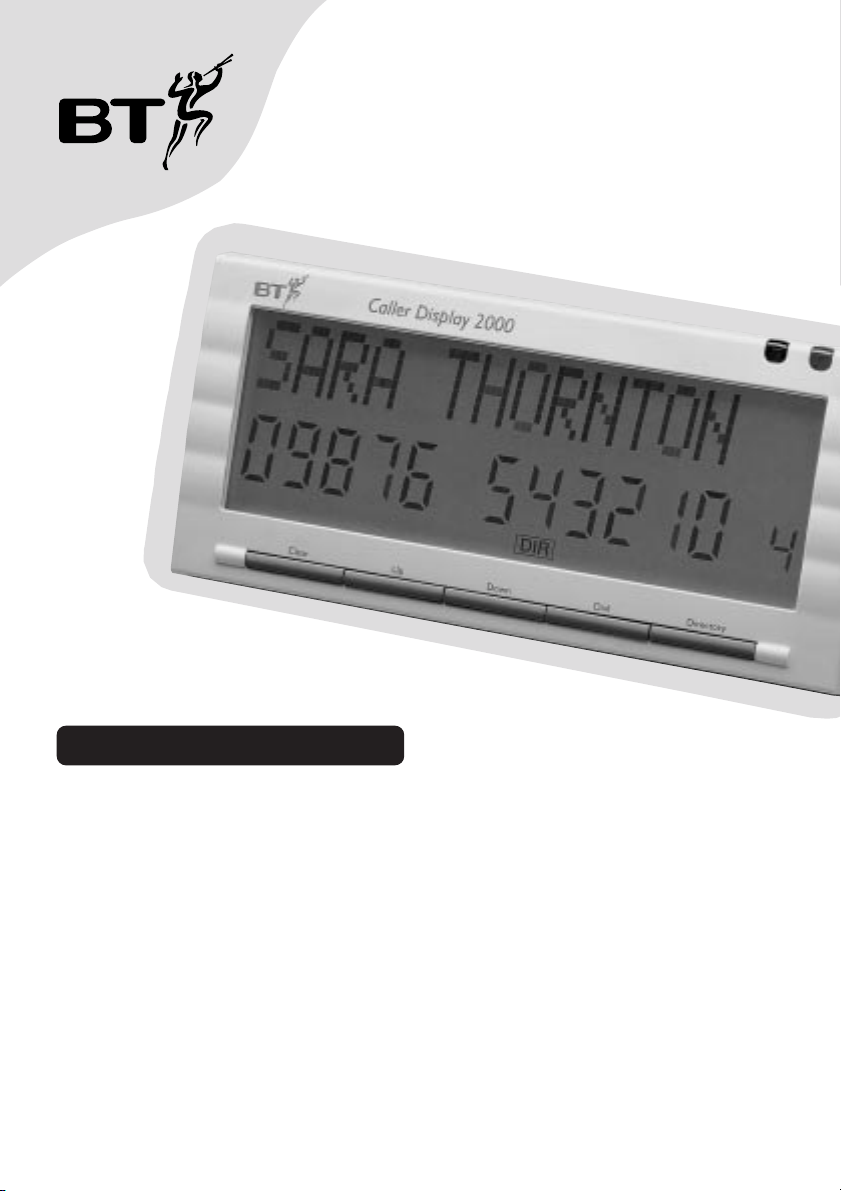
Caller Display 2000
Userfriendly
Guide
For use with BT’s Caller Display and Call Waiting Select Services
Caller Display and Call Waiting services require set-up by BT or your service provider and connection to a digital exchange.
Page 2

Lift flap
Page 3
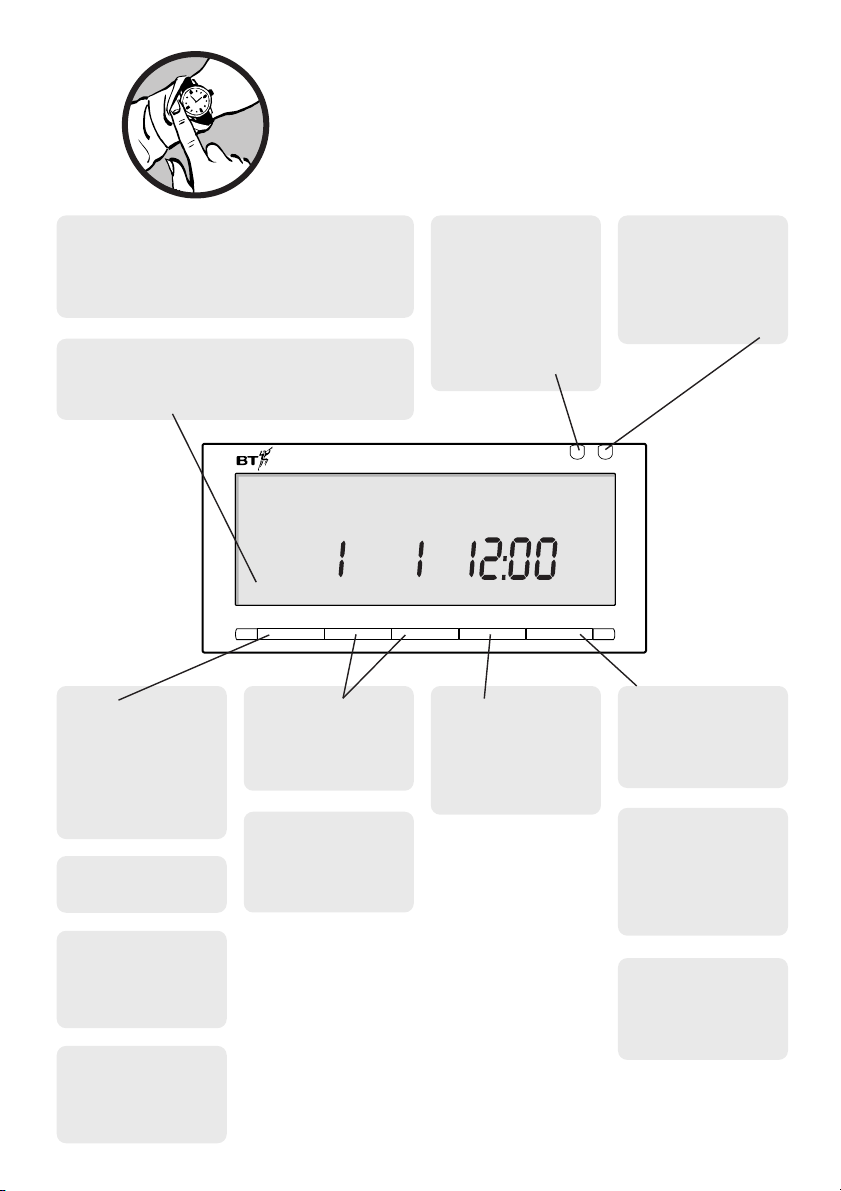
At a glance
Display
Shows Caller Display information,
stored names and numbers, time, date
and indoor/outdoor temperatures.
Also shows Battery Low warning for
up to two weeks before the batteries
goes flat.
FRIDAY 1999
Clear Up Down Dial Directory
Clear
Lets you delete
names and
numbers stored
in the calls list
and directory.
Toggles between
standby screens.
Clear + Up
Press together
to access the
contrast.
Down
Press to adjust
the contrast of
the display.
2
Up/Down
Press to scroll
through the calls
list and directory.
Up + Down
Press together to
exit directory
and/or calls list.
Green Call light
Flashes when you
receive a call
from one of the
numbers/names
stored in the
directory.
Caller Display 2000
DATE MONTH PM
Dial
Press to dial the
displayed number
from the directory
or calls list.
Red Call light
Flashes when you
receive a call
other than one in
the directory.
Directory
Used to access up
to 20 stored names
and numbers.
Directory + Dial
Press together to
store and edit
numbers in the
directory.
Directory + Up
Press together to
access the alarm
and clock set-up.
Page 4

Page 5
Contents
At a glance 2
Introduction 4
Setting up 5
Using your Caller Display 2000 9
Call Waiting 13
Using the directory 14
Using the clock 17
Help 20
Technical information 21
Index 23
Hints and tips boxes
In this user guide, we’ve included helpful tips
and useful notes. They are shown in a white box
like this.
3
Page 6

Introduction
Your Caller Display 2000 is designed
for ease of use and made to the high
standards set by BT
Thank you for
making the right
choice. You can
expect your Caller
Display 2000 to
provide many years
of quality service.
Please read the
instructions
carefully before
use and keep this
User Guide for
future reference.
For your records
Date of purchase:
Place of purchase:
Serial number:
(on the underside of
the unit)
Purchase price:
(for warranty purposes,
proof of purchase is
required, so please
keep your receipt)
4
Page 7
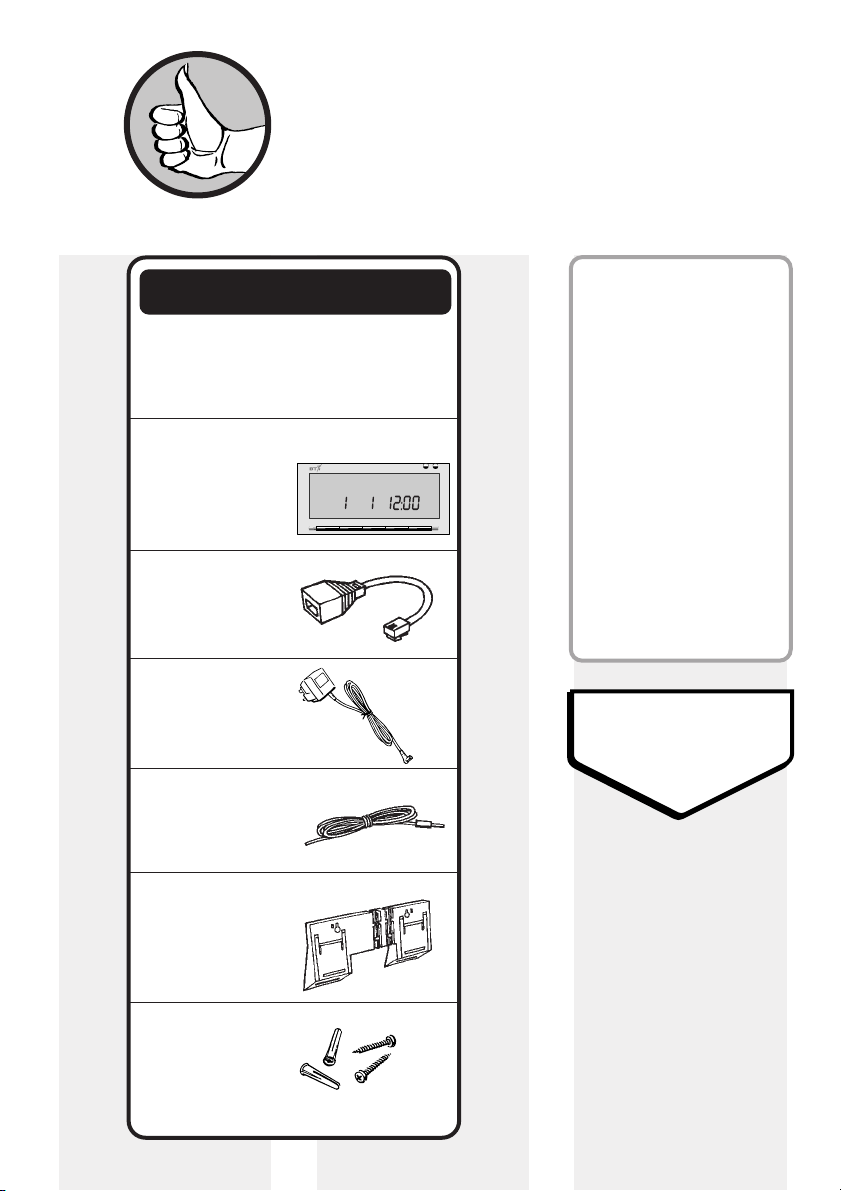
Setting up
Caller Display 2000
Clear Up Down Dial Directory
MONTH DATE PM
FRIDAY 1999
Follow these steps to get your
Caller Display 2000 ready to use
IMPORTANT
Check that your Caller Display
2000 is complete. When you
unpack you should have:
Caller Display 2000
with telephone line
cable attached
✓
Associated phone
line cord
✓
Mains power
adaptor
✓
Outside temperature
gauge
Have you subscribed
to BT’s Caller
Display and Call
Waiting Service?
To see callers’ phone
numbers on your
Caller Display 2000,
you must subscribe to
BT’s Caller Display
Service (and Call
Waiting Service for
waiting caller). For
more information,
call BT on Freefone
0800 800 150.
Situating your
Caller Display
2000
✓
Wa l l - m o un t in g
and stand up
bracket
✓
Screws and wall
plugs for wall
mounting
✓
Situate your Caller
Display 2000 within
3 metres of a phone
socket and 3 metres
of a mains power
socket.
Do not stand it on
carpets or other
similar surfaces
that generate fibres.
5
Page 8
Do not cover or
enclose the
machine. Allow a
free flow of air to
its surfaces.
Your Caller Display
2000 can be wall
mounted or free
standing.
For instructions see
page 8.
Check your
telephone wall
socket
If you do not have
a modern-style
socket, call
Freefone 0800
800 150 and ask
for a BT engineer
to come and fit the
correct socket.
This is a
chargeable service.
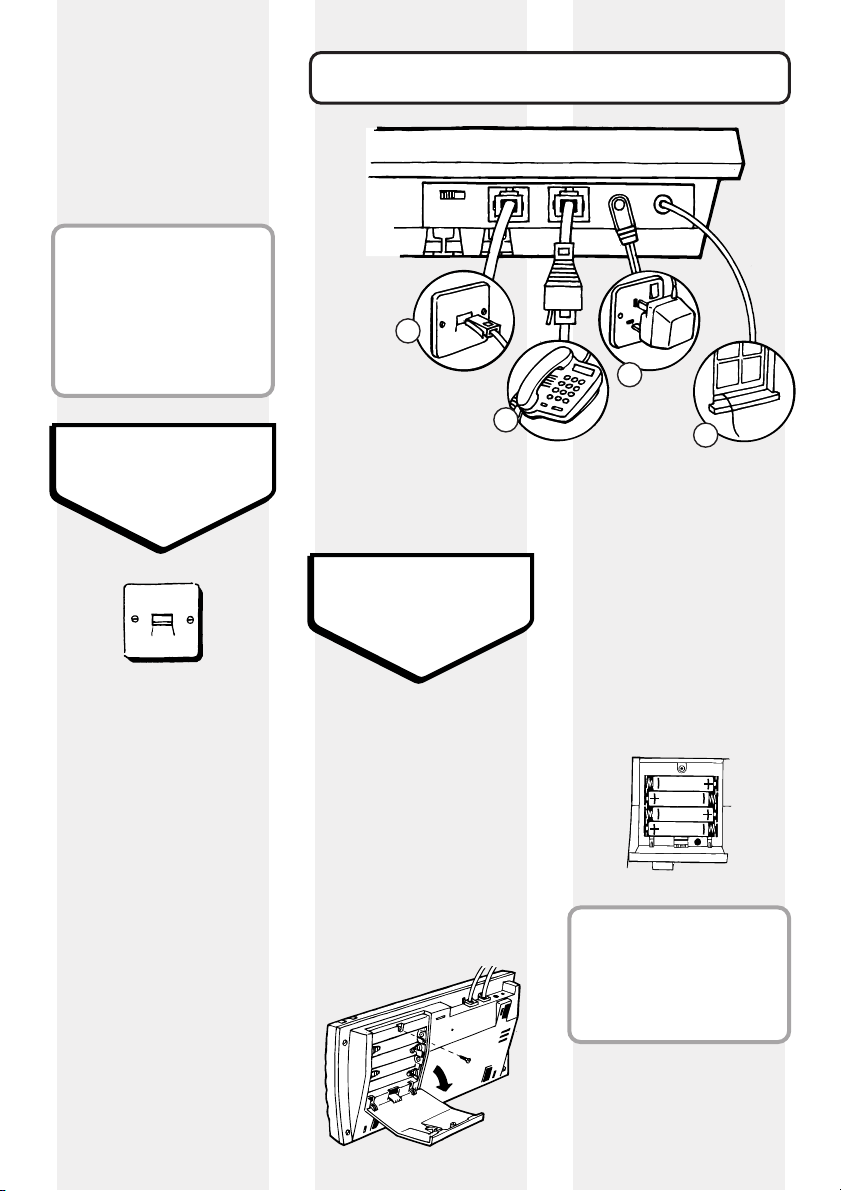
Installing your Caller Display 2000
2
Telephone
line socket
Associated
phone
Insert back-up
batteries
3
Open the battery
compartment at
the back of your
Caller Display 2000
by removing the
screw and pushing
the cover upward
from the bottom
edge.
1
Mains
4
Outside
temperature
gauge
Insert 4xAAA
alkaline batteries
(not included) as
shown in the
compartment, then
replace the cover.
Please note
If the mains power is
cut off, the batteries
will not power the
screen’s backlight.
6
Page 9

It is important to
BATT
It is important to
maintain the
maintain the
batteries in your
batteries in your
Caller Display 2000
Caller Display 2000
as information
as information
in the Calls List
in the Calls List
and Directory will
and Directory will
be lost if a power
be lost if a power
failure occurs and
failure occurs and
you do not have
you do not have
back up batteries
back up batteries
or if the batteries
or if the batteries
are flat.
are flat.
Battery low
indicator
When the batteries
are nearing the end
of their useful life,
the display shows
the battery low
symbol in lower
right hand corner.
The same symbol
is shown when the
batteries are
completely flat or
not inserted.
BT’s Caller Display
and Call Waiting
Services
Your Caller Display
2000 receives and
displays caller
information which
is transmitted over
the BT network.
The information
will include the
date and time the
call is received,
and in most cases,
the caller’s phone
number. It will
also display a
name if stored in
the directory.
Provided you are
using the phone
connected to your
Caller Display
2000, the display
will also show the
caller’s details while
you are engaged
on another call.
To enable your
Caller Display 2000
to show this
information, you
will first have to
subscribe to BT’s
Caller Display and
Call Waiting
services.
For information,
call:
Freefone 0800 800
150 for residential
customers.
Freefone 0800 800
152 for business
customers.
Information
displayed via other
UK networks
To enable your
Caller Display 2000
to display
information
transmitted via
another UK
network, you will
first have to
subscribe to that
network’s Caller
Display and Call
Waiting services.
Call your network
provider for more
information.
7
Page 10

To set the
Dial
temperature
reading to ⬚C
or ⬚F
Your Caller Display
2000 can tell you
the current
temperature
or outdoors.
indoors
For
outside temperature
you need to attach
the External
Thermometer lead
and place the end
outside.
1
Press the
CLEAR
button until the
display shows the
temperature.
Clear
To wall-mount
or
free stand
Your Caller Display
2000 can be wall
mounted using the
wall-mounting
bracket, screws and
wall plugs provided.
Lead length
– the position you
choose should
leave enough
length of cable to
plug into line and
power sockets at
ground level.
Wall mounted
Alternatively, make
2 marks 100mm
apart.
2
Drill 2 holes
suitable for the wall
plugs supplied,
then screw to the
wall through the
holes in the bracket.
3
Place your Caller
Display 2000 over
the bracket,
ensuring the two
lugs on the bracket
slot into the base
of the unit as
shown. Then slide
the unit towards
the wall until it
clicks into position.
2
Press the
DIAL
button to switch
between ⬚C and ⬚F.
3
Switch between the
inside and outside
temperature using
the
IN/OUT switch
(on the back of
your CD 2000).
8
1
Hold wall bracket
against the wall
ensuring it is level.
Then, with a pencil,
mark through holes
in the bracket for
drilling.
Free standing
Position 1
Position 2
Page 11

Using your Caller
Display 2000
Using the calls list
When your Caller
Display 2000
receives a call, it
automatically
stores the caller’s
information in the
calls list. This can
include the phone
number, date and
time of the call. If
you have stored a
caller’s number
and name in the
directory, the
caller’s name will
also be displayed.
The new calls
indicators flash
when there are
new calls for you
to view. See ‘New
calls lights’, page 10.
Your Caller Display
2000 can store a
maximum of 70
calls. When the list
is full, new calls
replace the oldest
information stored
in the list. If there
is a previous entry
with the same
information,
appears in the
display.
The display
automatically lights
up when there is a
new call and whenever any of the
buttons are pressed.
When your CD
2000 is in ‘standby’
mode, the display
scrolls through 3
different screens.
When phone is in
use the icon is
displayed
REPT
Setting the time
and date
The date and time
will be set
automatically the
first time you
receive a call,
provided you have
subscribed to the
Caller Display
service.
The date and time
can be set manually,
see page 18.
The Network does not
give the year, therefore
the year can only be
set manually, see
page 18.
9
Page 12

New calls lights
Caller Display 2000
Clear Up Down Dial Directory
DATE MONTH PM
BATT
SARA THORNTON
NEW
CALL
Up
Up
Down
Reading the
calls list
To exit from the
calls list
The green light
flashes if an
incoming call is
received from one
of the names/
numbers stored
in the directory.
The red light
flashes whenever
you have received
a new call where
the name/number
is not stored in the
directory.
The number of
new calls received
is displayed in the
lower right hand
corner of the
display.
1
Press the UP or
DOWN button.
or
Down
The display
alternates between
the number and the
date and time of the
most recent call.
2
Press the
DOWN
button again to
display the next
most recent call.
Continue pressing
to display older
calls.
3
Press the
UP
button to move
back through the
list. When you
have reached the
end, display shows
- END OF LIST -
.
Press and hold the
UP and DOWN
buttons together.
Adjusting the
contrast
You can adjust the
contrast to make
the screen lighter
or darker.
1
Press and hold the
CLEAR and UP
button together
until the
display shows
CONTRAST ADJUST
Clear
Up
.
10
Page 13

Down
2
Up
Down
Down
Clear
Press the DOWN
button until you
get the contrast
you want (up to 8
different choices).
3
Press CLEAR to exit.
To delete a single
number from the
calls list
1
Press the UP or
DOWN buttons to
display the number
you wish to delete.
To delete all the
numbers from the
calls list
1
Press the UP or
DOWN buttons to
display a number
in the calls list.
Dialling numbers
from the calls list
1
Press the UP or
DOWN buttons to
display the number
you wish to dial
from the calls list.
or
2
Press the
DIAL
button.
Dial
Up
or
2
Press the
CLEAR
button.
Clear
Display shows
DELETE?
3
Press the CLEAR
button again and
the number is
deleted.
2
Press and hold
down the
CLEAR
button until the
display shows
DELETE ALL?
3
Release the
CLEAR button
then press it again.
The list is deleted.
Please note
If you do not wish to
delete once
is shown, press any
button other than
CLEAR.
DELETE?
Display shows
PICKUP PHONE
3
Lift the handset of
any connected
telephone. Display
shows
Wait to be connected.
DIALLING
.
11
Page 14

Text messages
With some
incoming calls, the
telephone number
of the caller is not
available and
cannot therefore
be displayed.
In this case, your
Caller Display 2000
provides you with
some explanatory
information about
the type of call you
have received. This
comes in the form
of a text message
and will be one of
the following:
BT Network
generated
INTERNATIONAL
International – Call
received was from
outside the UK.
UNAVAILABLE
The caller’s exchange/
network/switchboard
does not offer a Caller
Display Service.
WITHHELD
The caller has stopped
their number from
being sent.
OPERATOR
The call has come via
the operator.
PAYPHONE
The caller is ringing
from a payphone.
RINGBACK
The telephone number
you set on
now free to receive
your call.
*
*
*
Ringback is
Other Network
operators may use
other text messages.
NO NUMBER
If your Caller
Display 2000 does
not recognise the
information
contained within
the caller display
message, it will
show
NO NUMBER
rather than risk
leaving a message
with a possible
mistake. It does
not mean that there
is a fault with your
Caller Display 2000.
If you continually
receive
NO NUMBER
messages, call BT
free on Freefone
0800 800 150 for
residential
customers or
Freefone 0800 800
152 for business
customers or your
network service
provider.
REPT
Repeat – will be
displayed if a call
from the same
number has been
received earlier.
It will be shown as
an icon at the
bottom right hand
corner of the screen.
*Some text messages
may have numbers
associated with them.
Your Caller Display
2000 will alternate
between the phone
number and the time
and date of call every
five seconds.
12
Page 15
Call Waiting
Call Waiting lets
you know when
someone else is
trying to get
through, even when
you're already on
the phone. Your
Caller Display 2000
displays the Call
Waiting icon
C/W
along with the
number and/or
text message.
Providing you are
using the phone
attached to your
Caller Display
2000, it will display
the caller’s details.
You can put your
existing caller on
hold and answer
the new call. You
can switch between
the two callers.
The calls list will
identify a Call
Waiting call by
displaying the Call
Waiting icon.
To use call
waiting
When the Call
Waiting icon is
displayed and you
hear the beeps in
the earpiece:
1
Press the
RECALL
button on your
telephone. This
puts your existing
call on hold and
answers the new
call.
2
Press the
RECALL
button to switch
between the two
callers. If one caller
hangs up, you are
automatically
connected to the
remaining caller.
Please note
If you are using a
phone on the same
line, but which is not
connected to your
Caller Display 2000,
and you hear the Call
Waiting beeps, your
Caller Display 2000
will not show or store
the caller’s details.
This also applies if
you are using a socket
doubler to connect a
telephone to your
Caller Display 2000.
The Call Waiting
information will be
displayed for 20 seconds
and then revert back
to the standby screen.
13
Page 16
Using the
Directory
Down
phone
numbers
Dial
directory
Your Caller Display
2000 can store up
to 20 names and
numbers in its
directory. You can
also transfer a
number from the
calls list into the
directory (see
‘Transferring
numbers from the
calls list’, page 15).
DIR
The icon is
displayed when in the
directory.
To store a number
and name in the
directory
1
Press and hold
the DIAL and
DIRECTORY
buttons together
until the display
shows the number
of entries e.g.,
10 ENTRIES
14
.
It then changes
to display
ENTER NUMBER
2
Press the
DOWN buttons to
.
UP or
scroll through the
digits until the first
digit of the number
you want to store
is flashing.
Up
or
3
Press the
DIAL
button to confirm
the digit.
4
Repeat steps 2 and
3 until number is
complete.
5
Press CLEAR to go
back and edit the
numbers displayed.
Clear Clear
6
Press the
DIRECTORY button
to confirm.
Display shows
ENTER NAME
7
Press the
DOWN buttons to
.
UP or
scroll through the
letters until the
first letter you
want to store is
flashing.
8
Press the
DIAL
button to confirm
each letter. You
can also press the
DIAL button again
for a space.
Page 17

9
Dial
Directory
Directory
Up
Down
Dial
Repeat steps 7
and 8 until name is
complete.
10
Press CLEAR to go
back and edit the
letters displayed.
11
Press the
DIRECTORY button
to confirm the final
name.
To enter another
number and name,
repeat steps 1-11.
To exit from the
directory
To transfer a
number from the
calls list into the
directory
1
Press the UP or
DOWN button to
display the number
you wish to transfer
from the calls list.
2
Press and hold
DIAL and
the
DIRECTORY
buttons together
until the display
shows
STORED
It then displays
ENTER NAME
.
To dial a number
stored in the
directory
1
Press the
DIRECTORY button.
The display shows
the most recently
viewed name and
number in the list.
Press the UP or
2
DOWN buttons to
.
display the number
you wish to dial.
Press and hold the
UP and DOWN
buttons together.
Up
Down
3
Repeat steps 7-11
on page 14 to enter
the name.
or
Press the
3
DIAL
button to dial the
number displayed.
Display shows
PICKUP PHONE
4
Lift the handset
.
on any connected
telephone. Display
shows
DIALLING
Wait to be
connected.
.
15
Page 18
Directory
Directory
To edit a number
and name in the
directory
1
Press the
DIRECTORY button.
2
Press the
DOWN buttons to
UP or
display the entry
you want to change.
3
Press and hold
DIAL and
the
DIRECTORY
buttons together
until the display
flashes the first
digit of the number.
4
Press the
DOWN buttons to
UP or
scroll through the
digits until the
first digit of the
number you want
is displayed.
5
Press the
DIAL
button to confirm
the digit which is
flashing
6
Repeat steps 4 and
5 until number is
complete.
7
Press the
DIAL
button to confirm
each digit.
8
Press
DIRECTORY
after the last digit
to confirm the full
phone number and
the first letter of
the name will flash.
Press the
9
DOWN buttons
UP or
to scroll through
the letters until
the first letter
you want to
store is flashing.
10
Press the DIAL
button to confirm
each letter.
11
Repeat steps 8 and
9 until name is
complete.
12
Press the
DIRECTORY button
to confirm the
name.
Use a blank to remove
any unwanted digits
or letters.
To delete a
number stored in
the directory
1
Press the
DIRECTORY button.
The display shows
the most recently
viewed name and
number in the list.
2
Press the UP or
DOWN buttons to
display the number
you wish to delete
from the directory.
3
Press the
CLEAR
button.
Clear
Display shows
DELETE?
4
Press the CLEAR
button again and
the number is
deleted.
16
Page 19

Your Caller Display
Directory
2000 has a full day,
date, month and
year calendar with
clock and alarm.
The correct time
is set automatically
with your first call.
The unit is pre-set
FRIDAY 1999
to
1-1 12:00
Please note
You can return to the
standby screen at any
time by pressing the
CLEAR button.
Using the clock
Setting the alarm, time and date
4
To set the alarm
1
Press and hold the
UP
and
DIRECTORY
buttons until the
display shows
ON
or
ALARM OFF
Up
2
Press the
DIRECTORY
ALARM
.
button. The display
flashes the currently
set hour.
Press the
DIRECTORY
button
to confirm. The
display flashes the
currently set minute.
5
Press the
DOWN button to
UP or
select the minute
you want the alarm
set to.
6
Press the
DIRECTORY
button
to confirm. Display
flashes
OFF
7
Press the
DOWN button to
select ONor
ALARM ON
.
UP or
OFF
or
.
3
Press the
DOWN button to
UP or
select the hour you
want the alarm set
to.
8
Press the
DIRECTORY
button to confirm.
9
Press the
CLEAR
button to exit.
17
Page 20

To stop the
Clear
Clear
alarm beeping
When the alarm
sounds, press the
CLEAR button to
stop the beeping.
To set date
and time
1
Press and hold
the UP and
DIRECTORY
buttons together
until the display
shows
ALARM ON
ALARM OFF.
or
4
Press the
DIRECTORY button
to confirm. Display
shows the date
flashing.
5
Press the
DOWN button until
UP or
the correct date is
displayed.
6
Press the
DIRECTORY button
to confirm. Display
shows the hour
flashing.
7
Press the
DOWN button until
UP or
the correct hour is
displayed.
8
Press the
DIRECTORY button
to confirm. Display
shows the minute
flashing.
11
Press the UP or
DOWN button to
display the correct
year.
12
Press the
DIRECTORY button
to confirm. Display
returns to standby
screen.
To switch
between 12/24
hour clock
You can select the
12 or 24 hour clock.
1
Press the
CLEAR
button until the
display shows the
day screen.
2
Press the
DIRECTORY
button 4 times
until the display
shows the month
flashing.
3
Press the
DOWN button until
the correct month
is displayed.
18
UP or
9
Press the
DOWN button until
UP or
the correct minute
is displayed.
10
Press the
DIRECTORY button
to confirm. Display
shows the year
setting.
2
Press and release
DIAL button to
the
set your preference
of the 12 hour or
24 hour clock.
Dial
Page 21

Help
If you have any problems using your
Caller Display 2000, look here first
for the most likely solutions
No dialling tone
on the attached
phone
Make sure the
telephone line cord
is plugged into the
telephone socket
at the back of the
unit and that the
telephone line cord
is connected to
your wall socket.
Check that no
other extension is
in use.
Display screen
not functioning
properly or goes
blank
Check whether
the power supply
and/or back-up
batteries are
installed correctly.
Try adjusting the
contrast of the
display. (See page
10 ‘Adjusting the
contrast of the
display’.)
Caller Display
messages are not
being received
In order to receive
and display
messages, you must
subscribe to the
BT Caller Display
Service. For more
information, call
BT on Freefone
0800 800 150 or
your service
provider.
The phone does
not ring
Check that the
ringer volume is
not switched off
on the attached
phone.
Check that no other
connected phones
are off the hook.
You may have
overloaded your
system with too
many telephones/
fax machine/
answering machines.
(See page 20 for
‘How many phones
can you have?’ in
Technical
Information.)
BT can supply a REN
booster to support up
to 8 separate pieces of
equipment connected
to your line.
Please note
The backlight may
buzz when lit. This is
not a fault.
19
Page 22

Technical
information
WARNING
Your Caller Display
2000 is designed to be
operated in a normal
office or domestic
environment only, where
the relative humidity
is no more than 60%.
Environment
Your Caller Display
2000 should be
kept free of dust,
moisture, high
temperature and
vibration, and it
should not be
exposed to direct
sunlight. It should
not be used in
bathrooms or near
water.
Maintaining your
Caller Display 2000
Clean with a soft
cloth.
Do not clean with
a wet cloth.
Do not clean with
abrasive materials
or solvents, as
these may damage
the unit.
Do not spray with
aerosol cleaner.
Do not place on
untreated antique
furniture.
How many phones
can you have?
Although you may
have any number
of sockets, it is
important to limit
the number of
phones and other
items connected
in order to ensure
that each phone
will ring.
All telephone
equipment has a
Ringer Equivalence
Number (REN),
which is used to
calculate how many
pieces of equipment
may be connected
to any one
telephone line.
Your Caller Display
2000 has a REN of 0.
Telephones
provided by BT
have a REN of 1,
unless otherwise
stated on the
underside of the
phone. Even where
the number of
telephones has
been limited there
is no guarantee
that different types
of phone on the
same line will ring,
even when the
REN is less than 4.
20
Page 23
You must not
connect more than
4 Caller Display
products to a single
line.
Network
connection
information
Your Caller Display
2000 is designed
to work with both
BT and other UK
networks,
including cable.
The equipment
operates in the
same way on all
networks, but on
some UK networks
the caller’s
information will
not be displayed
until after the first
ring.
The Caller Display
service does not function
when connected to most
switching systems.
Advice on
connection to BT
systems can be
obtained by dialling
BT Freefone 0800
800 152.
Guarantee
If you own your
Caller Display 2000
and it is under BT’s
guarantee:
BT guarantees the
product for one
year, provided that:
• The goods have
only been used
for their
intended purpose,
and have not
been subjected
to misuse or
been wilfully or
accidentally
damaged.
• The goods have
not been
tampered with or
repaired by
anyone other than
BT, its staff or its
agents.
If a fault does occur,
and you bought
the unit yourself,
it will be either
repaired or replaced
free of charge
provided you return
it to where you
purchased it and
produce your
receipt.
The terms and
conditions of this
guarantee do not
affect your
statutory rights.
If you own your Caller
Display 2000, but the
guarantee period has
expired:
If your Caller
Display 2000 needs
repair after the
guarantee period
has ended, it must
be repaired so as to
remain compliant
with the approval
requirements for
connection to the
telephone network.
For details of
BT’s recommended
repair agents,
please call
BT free of charge
on Freefone 0800
800 150, or visit
your nearest BT
shop.
21
Page 24

Index
Alarm
Setting 17
Stopping 18
Batteries
Installing 6
Low indicator 7
Caller Display 5,7
Calls list 9
Accessing 10
Deleting 11
Dialling 11
Exiting 10
Calls lights 10
Call Waiting 5,7,13
Clock 17
Switch between
12 & 24 hr 18
Connection to
other networks 21
Contrast 10
Date & time 9
Setting 18
Dial an entry 15
Edit an entry 16
Exiting 15
Storing names
and numbers 14
Guarantee 21
Help 19
Installation 6
Location 5
Maintenance 20
REN 20
Telephone socket 6
Temperature 8
Text messages 12
Technical
information 20
Time & date 9
Setting 18
Wall-mounting 8
Directory 14
Transfer a
number from
the calls list 15
Delete an entry 16
22
Page 25

23
Page 26

Offices in Europe, North America,
Japan and Asia Pacific.
The Telecommunications services described in this publication
are subject to availability and may be modified from time to time.
Services and equipment are provided subject to British
Telecommunications plc’s respective standard conditions of contract.
Nothing in this publication forms any part of any contract.
Touchtone™ is a registered trade mark of
British Telecommunications plc in the UK.
©British Telecommunications plc 1999.
Registered Office: 81 Newgate Street, London EC1A 7AJ.
Registered in England No. 1800000.
Printed in China. Caller Display 2000 Issue No.1 (5/99) 5.
Designed by The Art & Design Par tnership Limited.
CE compliant to 89/336/EEC
(EMC Directive) & 73/23/EEC
(Low Voltage Directive)
APPROVED for connection to
telecommunication systems specified
in the instructions for use subject to
the conditions set out in them
 Loading...