

Page 1

Designed to block nuisance calls
Quick User Guide
BT6590 Advanced Nuisance Call Blocker
Digital Cordless Phone with Answering Machine
Page 2

If you need some help, call us on 0800 145 6789* or go to bt.com/producthelp If you need some help, call us on 0800 145 6789* or go to bt.com/producthelp
Check box contents
Important
Only use the power supply, cables and rechargeable batteries supplied or this product might not work.
Using an unauthorised power supply will invalidate your guarantee and may damage your phone.
The item code for the mains power supply is 066270 (manufactured by Ten Pao International Ltd,
part number S003IB0750030).
Any replacement batteries must be of the same type. BT accepts no responsibilty for damage caused
to your product if you use any other type of batteries. Risk of explosion if the battery is replaced by
an incorrect type. Dispose of batteries according to the instructions.
Handset Base
Telephone line cord
(pre-installed)
Handset Charger
Mains power adaptor
(item code 066270)
2 x AAA Ni-MH 750 mAh
rechargeable batteries
(already in handset)
Mains power adaptor
(item code 066270)
2 x AAA Ni-MH 750 mAh
rechargeable batteries
(already in handset)
Contents for each additional handset (multipacks only)
Page 3

If you need some help, call us on 0800 145 6789* or go to bt.com/producthelp
3
Quick set up .................................5
Getting to know your phone
Finding your way around
your phone ................................ 16
Handset buttons ........................ 17
Base .......................................... 18
Using the phone
Block nuisance calls ................... 19
Block calls by type ..................... 19
Block calls by number ................ 20
The Block button ....................... 21
Making calls .............................. 23
Make an external call ................. 23
End a call................................... 23
Receive a call ............................. 23
Mute ......................................... 23
Incoming speech /
Handsfree volume...................... 24
Make a handsfree call ................. 24
Contacts .................................... 25
Store a contact (up to 200) ......... 25
View/dial a contact .................... 25
Caller Display and the Calls list .... 26
View and dial from the Calls list ... 26
Save a Calls list entry to
your contacts............................. 27
Set the time and date ................. 28
Set Parental control ................... 28
Answer machine ........................ 29
Message playback using
the handset ............................... 29
Message playback using the base 31
Help ..........................................32
General information
Guarantee ................................. 33
How to recycle your equipment .. 33
R&TTE Directive & Declaration
of Conformity ............................ 33
Contents
Page 4

Answer phone View Messages
Messages
Outgoing msg Ans. & record
Answer only
Record memo
Answer mode Answer on/off
Answer mode
Settings Text alert
Ans. & record
Answer only
Call screening
Auto on/of
Remote access
Call control Incoming calls Do Not Disturb
Block calls
Parental control Mobile calls
International
Premium rate calls
All dialled calls
VIP list
Change PIN
Clock/Alarm Alarm Alarm
Time AM/PM
Melody
Time and date Time AM/PM
Date
Time format 12 Hours or
24 Hours
Text Messages Write Message
Inbox
Drafts
Sent folder
Templates
Settings
Please Cal.., I’ll be th..,
What time.., I’ll call.., Happy Birt..)
Message alert
Service centres
Re-register
Speed Dial List 1. 1571 2-9 Empty (Edit or Delete)
Calling Features Call Diversion All calls
When busy
Not answered
Cancel Ringback
Call Waiting (Turn On, Turn Off, Check status)
Settings Sounds Ringing
Alert Tones
Handset tones
Display Contrast Level 1-5
Handset name
Call settings Auto answer
Auto end call
Auto join calls
First ring
(On or Off)
Base settings Ringing Ringtone
Volume (Ringer
Off or Level 1-5)
PBX Code
S/ware version
Registration Register
De-register
(Handset 1-5)
Change Sys. PIN
Auto-ECO (on/off)
Reset H/set settings
Base settings
Clear user data
Contacts menu
Accessed by pressing
the
button
Add new contact
Edit contact
Delete
Memory status
Calls list Menu
accessed by
pressing
Play message*
Save number
Delete call
Send text
Block number
Delete all
Menu map4
If you need some help, call us on 0800 145 6789* or go to bt.com/producthelp
* If a message has been left on the answer machine.
Page 5

Chapter
If you need some help, call us on 0800 145 6789* or go to bt.com/producthelp
1
1 The telephone line cord is already
fitted but don’t plug the other
end into the wall socket yet.
2 Plug the mains power adaptor
into the base, with the cable
clipped in the groove provided.
Turn the cable when clipping into
the groove so that the narrow
part fits between the clips before
turning the cable back to secure.
3 Plug the other end of the power
adaptor into the wall power
socket and switch on.
3
2
Quick set up guide
1 Plug in
5
Page 6

2 Activate the batteries
1. Activate the batteries by pulling the plastic tab away from the bottom
of the handset.
Rechargeable batteries
already fitted
Remove this tab
and charge batteries
for 16 hours before use.
2. The BT logo will appear on the screen, followed by the set up wizard
screen displaying Please set the time and date. Don’t follow these
instructions yet. Place your handset on the base to charge first.
Quick set up guide
If you need some help, call us on 0800 145 6789* or go to bt.com/producthelp
6
Set up
OK
Please set the
time and date.
Page 7

Quick set up guide
Set up
OK
Please set the
time and date.
Important
Charge the handset batteries for
16 hours or your phone might
not work.
16 hrs
3 Charge
Place the handset on the base and leave to charge for 16 hours.
7
If your screen
displays this
message, don’t
worry. This is
normal and will
continue to be
displayed until you
connect the phone
line cord in Step 4.
Hide
Line cord error.
Please check.
Page 8

Quick set up guide
4 Connect the phone line cord
After 16 hours, plug the phone line cord into the phone wall socket.
If you ever need to remove the
batteries, place your fingers in the
groove at the bottom of the handset
and lift the cover up to release it.
Then, gently ease the batteries out.
8
If you need some help, call us on 0800 145 6789* or go to bt.com/producthelp
Page 9

If you need some help, call us on 0800 145 6789* or go to bt.com/producthelp
5 Follow the set up wizard
Quick set up guide 9
Set up
OK
Please set the
time and date.
Set up
Save Back
Time
HH:MM
AM
AM/PM
Set the time and date
1. Select OK by pressing the Left option button
under the screen. The set up wizard will
begin. Follow the prompts to complete the set
up process.
Tip: when prompted to select OK you can
press the
button in the centre of the
keypad if you prefer.
2. Use the keypad to enter the time using the 12
hour clock format e.g. for 3:32 pm you need to
enter 03:32.
3. Press
press or to select AM or PM.
4. Press
enter the date in the format
DD/MM/YYYY.
5. Press Save. Saved is displayed.
Page 10

Quick set up guide
If you need some help, call us on 0800 145 6789* or go to bt.com/producthelp
10
Complete the set up tasks
6. If you wish to continue following the set
up wizard, select Yes . (If you don’t want to
follow the wizard, select No and you can
start using your phone straight away. You can
always set up tasks via the menu later).
Record your outgoing message
7. If you wish to complete this step, select Yes
(or No to continue to the next step).
8. Record message is highlighted, press Select.
9. Follow the voice prompt and speak your
message into the phone after the tone.
10. Select Save when you’ve finished.
11. Your message will be played back to you.
12. Select OK (or Delete if you want to replace it).
13. Select Done, to continue with the set
up wizard.
Set up
Yes No
Would you like
us to guide you
through some
set up tasks?
Set up
Yes No
Do you want to
record your
answer phone
outgoing
message now?
Page 11

If you need some help, call us on 0800 145 6789* or go to bt.com/producthelp
Set up
OK
Please use
Caller Display
to get access to
more features
Quick set up guide
Important
You need to have a Caller Display service
from your network provider to use Block
Calls, Visual Voicemail, Calls List, Text
Messaging and other Caller Display enabled
features. Charges may apply.
14. Select OK to move to the next step.
Set up call blocking
15. If you want to set up call blocking by call
type now, select Yes (or select No to continue
to the next step).
16. Select Set PIN and follow the instructions to
set up your 4 digit Access PIN for the first
time. This PIN will be the same one that you
will need for Remote Access as well. Press OK.
11
Set up
Do you want to
set up call
blocking now?
Yes No
Page 12
Quick set up guide12
If you need some help, call us on 0800 145 6789* or go to bt.com/producthelp
17. Use the or button to select Blocked or
Allowed for International calls then press
and repeat for Withheld number, No
Caller ID and Payphone and press Save when
finished.
Add contacts
18. If you want to add some contact numbers
now, select Yes (or select No to continue to
the next step).
International
< Blocked >
Withheld number
Allowed
By call type
Save Back
Set up
Do you want to
add some
contacts now?
Yes No
Page 13

If you need some help, call us on 0800 145 6789* or go to bt.com/producthelp
Quick set up guide
13
Add contact
Name
Home
Mobile
Save Back
I
Abc
19. Enter the contact name using the keypad and
press
. If you want to enter a space in
the name, press the
button.
20. Enter the home phone number. You can then
press
and enter a mobile number and
then a work number if you want to. If you
want to assign a ringtone for the contact,
press
then use the and buttons
to select the ringtone.
21. Select Save when you’ve finished.
Home
Mobile
Work
22. Select Ye s if you want to enter more contacts
or No if you don’t want to for now.
Follow steps 19, 20 and 21 above
for instructions on how to add a contact.
Set up
Do you want to
add another
contact?
Yes No
Page 14

23. Select OK to complete the set up wizard.
You can now start using your phone.
Please read the rest of this Quick User Guide
for instructions on how to use the most
popular features of your BT6590 phone.
If you’d like more detailed instructions and
information on features like internal calls and
remote access, a full user guide is available to
download from bt.com/producthelp
Set up
OK
Set up
complete.
Please read the
quick start
guide.
If you need some help, call us on 0800 145 6789* or go to bt.com/producthelp
Quick set up guide14
Page 15

If you need some help, call us on 0800 145 6789* or go to bt.com/producthelp
Quick set up guide
If you need some help, call us on 0800 145 6789* or go to bt.com/producthelp
6 Set up your additional
handsets (multi packs only)
1. For additional handsets and chargers: plug the mains power adaptor into
the back of the charger and plug the other end into the mains wall socket
and switch on the power.
2. Activate the batteries as explained on page 6. If you set the time and date
on the first handset then it will be shared with all other handsets in your
multi pack once you activate the batteries.
3. Place the handset on the charger to charge for 16 hours.
15
Page 16

If you need some help, call us on 0800 145 6789* or go to bt.com/producthelp
16
If you need some help, call us on 0800 145 6789* or go to bt.com/producthelp
Finding your way around your phone
Your BT6590 has an easy to use menu system.
When the handset is switched on and at the idle screen:
1. Select Menu by pressing the Left option button
to open the main menu.
2. Use the
or button to scroll through the available menu
options.
3. When the menu you want is displayed, select by pressing the Left option
button
or press .
4. Use the
or button to scroll through the available sub menu
options. When the sub menu you want is highlighted, select by pressing
the Left option button
or press .
Select the Back option if you want to return to the previous screen.
To exit a menu and return to the home screen, press
.
If no buttons are pressed for 30 seconds, the handset returns to the home
screen automatically.
Getting to know your phone
Page 17

17
Getting to know your phone
If you need some help, call us on 0800 145 6789* or go to bt.com/producthelp
Handset buttons
Left option button
See page 16.
Up/Volume
Move up through menu options,
increase volume, page 24.
Contacts
Access stored Contacts, page 25.
Talk/Handsfree
Make/receive calls, page 23.
Switch handsfree on/off, page 24.
Calls/Down
Enter calls list, page 26, decrease
volume, page 24 and move down
through menu options.
1 (Speed dial)
Press and hold to dial BT 1571
or a stored speed dial number.
Press and hold to turn handset
ringer on/off.
0
Press to enter a space.
Long press to enter a
Pause (P) in a number.
Call Block
Access call blocking features, page 21.
Right option button
In answer machine mode, deletes
current message playing.
OK
In idle mode, press to access a highlighted
event e.g. missed calls, answer phone messages
and text messages on the display.
R (Recall)
R (Recall) for use with some BT Calling Features
and when connected to a switchboard/PBX.
< / >
Left and right navigation buttons.
In text edit/entry mode, press to move cursor.
End call/on or off
End a call, page 23.
Press and hold to switch handset on/off.
In menu mode, press to return to home screen.
2-9 (Speed dial)
Press and hold buttons 2-9 to dial a stored
speed dial number.
Press and hold to lock/unlock keypad.
Toggle between upper/lower case characters.
Page 18

Getting to know your phone
If you need some help, call us on 0800 145 6789* or go to bt.com/producthelp
18
Base
Vol-
Decrease the speaker
volume during playback
and the call screening
volume during idle mode.
Vol+
Increase the speaker
volume during playback
and the call screening
volume during idle mode.
Find
Press to ring all
registered handsets,
helpful for finding a
missing handset.
Also used during the
registration process.
Play/Stop
When you have new
messages, the button
will flash. Press once to
play new messages and
again to stop playback.
Skip<<
During playback, press
once to skip back to
the start of the current
message. Press twice to
skip back to the start of
the previous message.
Skip>>
During playback, press to
skip forward to the start
of the next message.
Light indicator
Blue light on when the handset is in the
base charging. Flashes when the line is in use
or registration is taking place.
Answer On
Press to turn the answer
machine on or off.
When set to On, the
text ‘On’ will light up
on the button.
Delete
Press once to delete the
message during playback.
In idle mode, press to
delete all old messages.
Page 19

If you need some help, call us on 0800 145 6789* or go to bt.com/producthelp
19
If you need some help, call us on 0800 145 6789* or go to bt.com/producthelp
Using the phone
Block nuisance calls
For information on more Call control
settings, see the full online user guide at
bt.com/producthelp
Block calls by type
(e.g. withheld or international numbers)
1. Select Menu, scroll
to Call Control
and press Select.
You must subscribe to a Caller Display
service from your network provider for
the block nuisance calls feature to work.
Charges may apply. Please check with your
telephone service provider.
2. Follow the instructions to set your PIN for the
first time and select OK.
3. Incoming calls is highlighted, press Select.
4. Press
to highlight Block calls and press Select.
5. When By call type is highlighted, press Select.
8:00pm
Call
Control
Select Back
ANS
Call control
Select Back
Incoming calls
Parental control
VIP list
Change PIN
Page 20
Using the phone
If you need some help, call us on 0800 145 6789* or go to bt.com/producthelp
20
If you need some help, call us on 0800 145 6789* or go to bt.com/producthelp
6. Use the and buttons to select either Blocked
or Allowed for International calls and then press
and follow the same procedure for Withheld
number, No Caller ID and Payphone number,
then select Save.
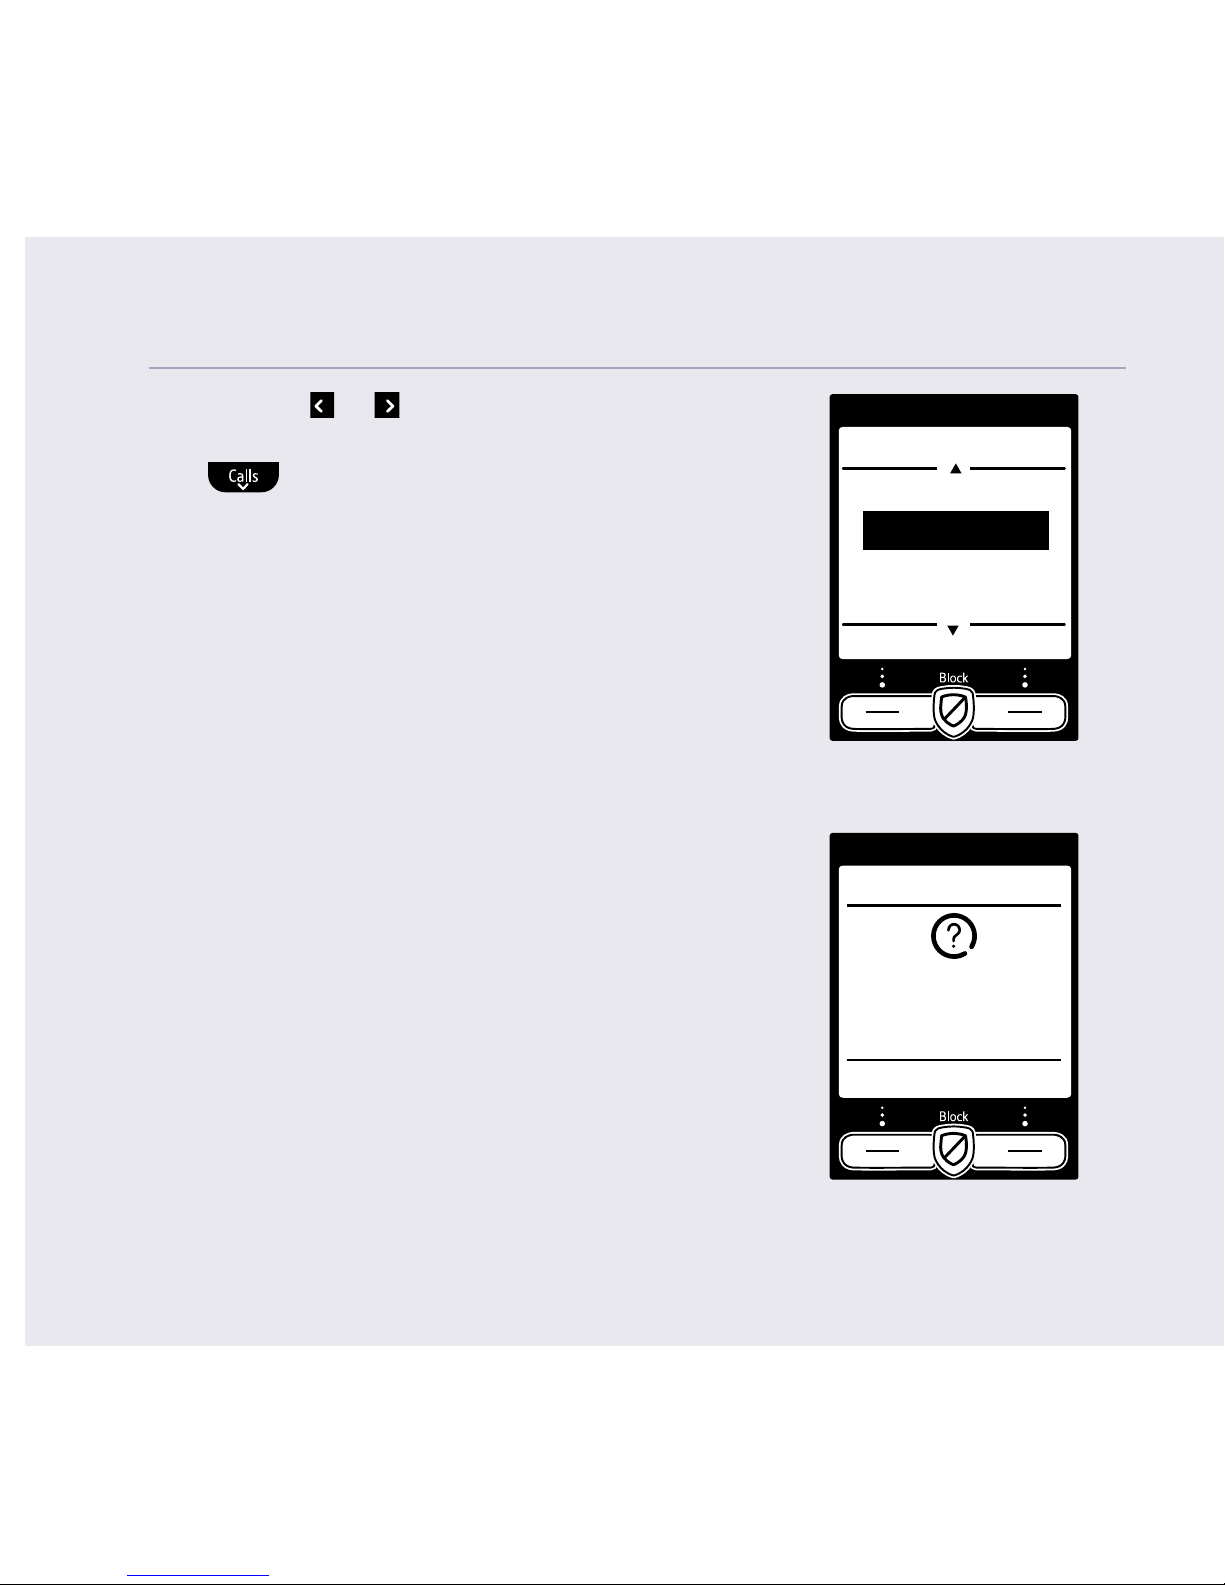
Block calls by number
1. Press Calls, highlight the number you wish to
block and select Options.
2. Scroll
to Block number and press Select.
3. Added to blocked numbers list is displayed.
Calls from numbers stored in your blocked calls list cannot leave a
message on your answer machine but calls blocked by call type can.
Calls that are blocked appear in your calls list with
in front of them.
International
< Allowed >
Withheld number
Allowed
By call type
Save Back
Calls list
Options Back
Jo & Will
10:17am Today
PPI Call
10:16am Today
Page 21

Using the phone 21
The Block button
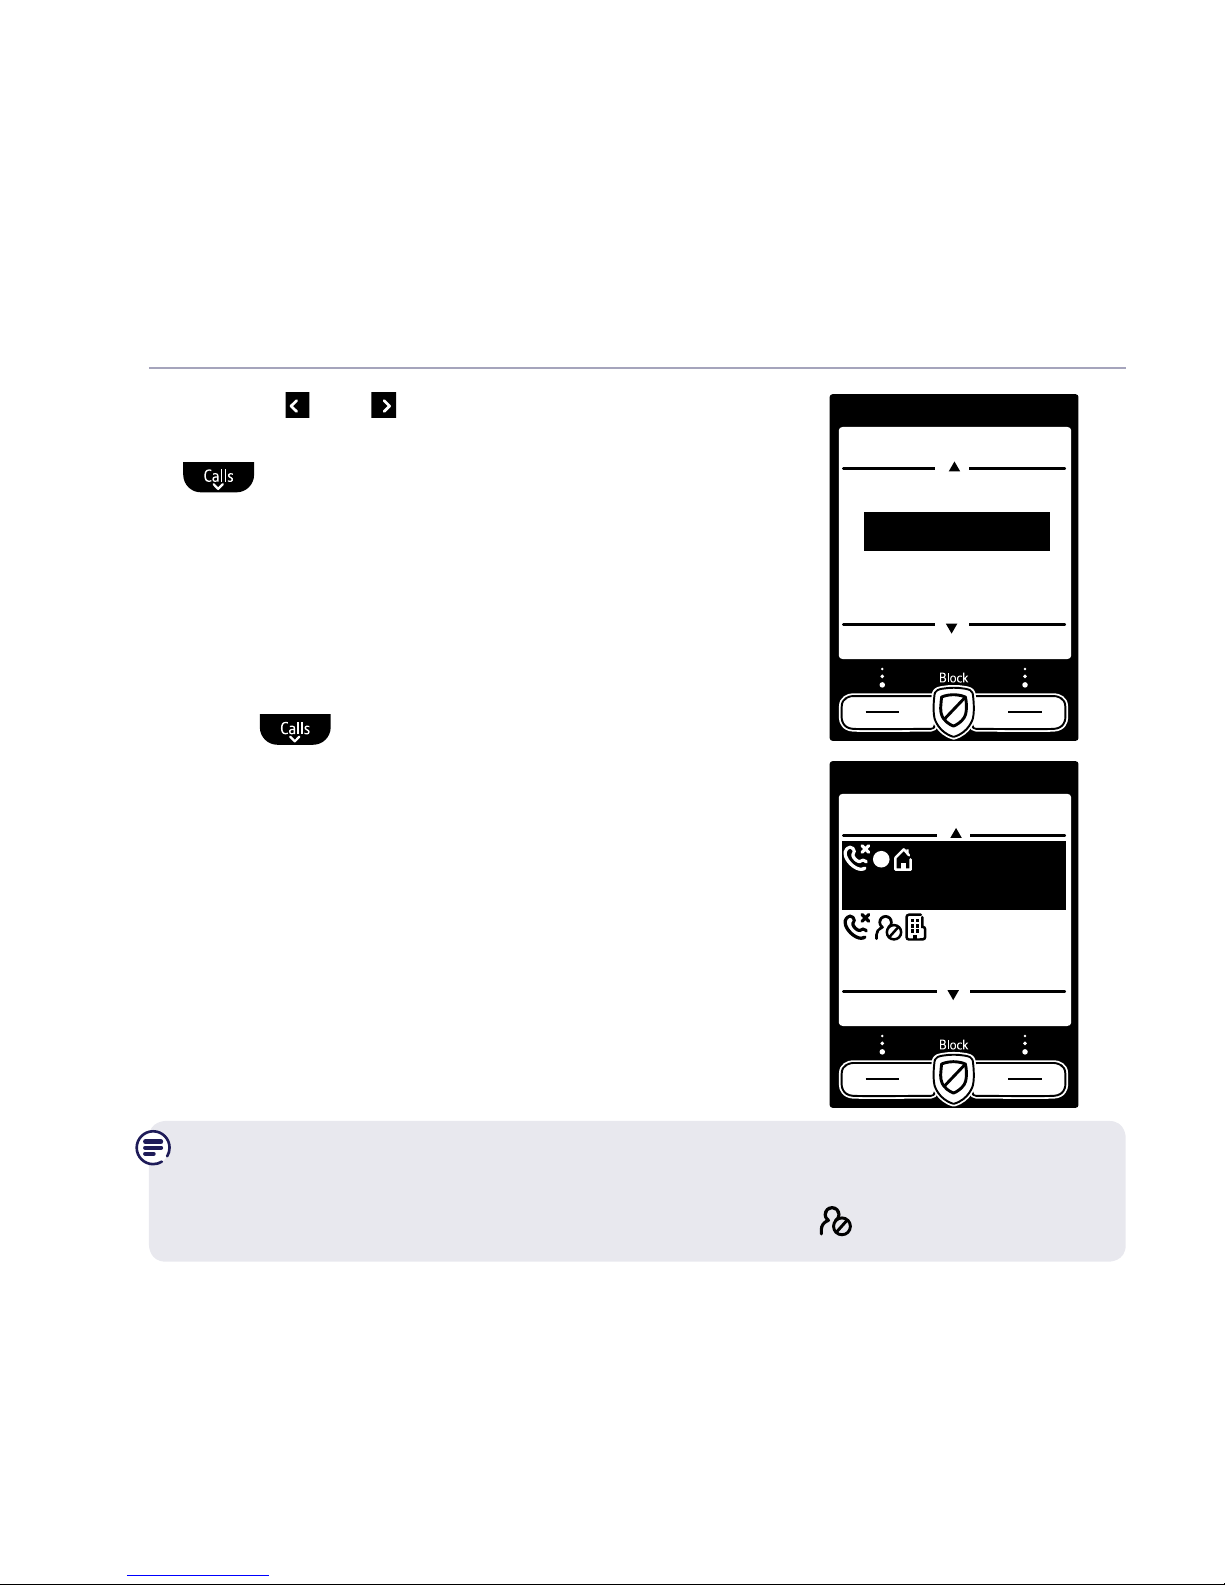
The block call button can be used in 3 ways:
1. Incoming call
When you have an incoming call, before pressing
the
to answer, look at the handset display
and you can see who is calling. If you don’t want
to take the call press the
on the handset and
the call will be transferred to the answering
machine for the caller to leave a message.
The number will be blocked and added to
the blocked calls list if Caller ID is displayed.
If the number calls again your phone will
just ring silently and the caller cannot leave
another message.
If you listen to the caller’s original message
and decide that the caller is not a nuisance
caller and you want to receive future calls from
them, you can remove them from the blocked
numbers list. Go to the Call Control menu and
delete their number from the blocked list,
you will need to enter your PIN to access the
blocked number list.
Added to blocked
numbers list
Mute
12:00pm
Mark
Mobile
Page 22

Using the phone
If you need some help, call us on 0800 145 6789* or go to bt.com/producthelp
22
2. During a call
If you have already answered the call and
you want to block the number press
, if the
number is displayed in the Caller ID, the display
will give you the option to select
Yes and the
number will be added to the blocked numbers
list and end the call, or select No to go back to
the caller.
3. In idle mode
Press
as a shortcut to the Call Control
menu. See the full user guide online for
detailed instructions.
End call and
block number?
Blocked numbers
Yes No
Page 23

If you need some help, call us on 0800 145 6789* or go to bt.com/producthelp
Using the phone 23
Making calls
Make an external call
1. Press
.
2. When you hear the dial tone, enter the number.
End a call
1. Press
. Or, press
to end the call and add
the caller’s number to the blocked numbers list.
Receive a call
When you receive a call, the phone rings
and the display shows Incoming call and
.
If you’ve got a caller display service, the display
shows the incoming call, caller’s number
(if available) or the caller’s name.
1. Press
to accept the call.
Mute
1. During a call, select Mute by pressing the Right
option button. The display shows Call muted
and your caller can’t hear you.
2. Select Unmute to return to your caller.
Enter number:
Options
Clear
0123
If you need some help, call us on 0800 145 6789* or go to bt.com/producthelp
8:00pm
Natalie
Work
Call muted
Options Unmute
ANS
Page 24
Using the phone24
If you need some help, call us on 0800 145 6789* or go to bt.com/producthelp
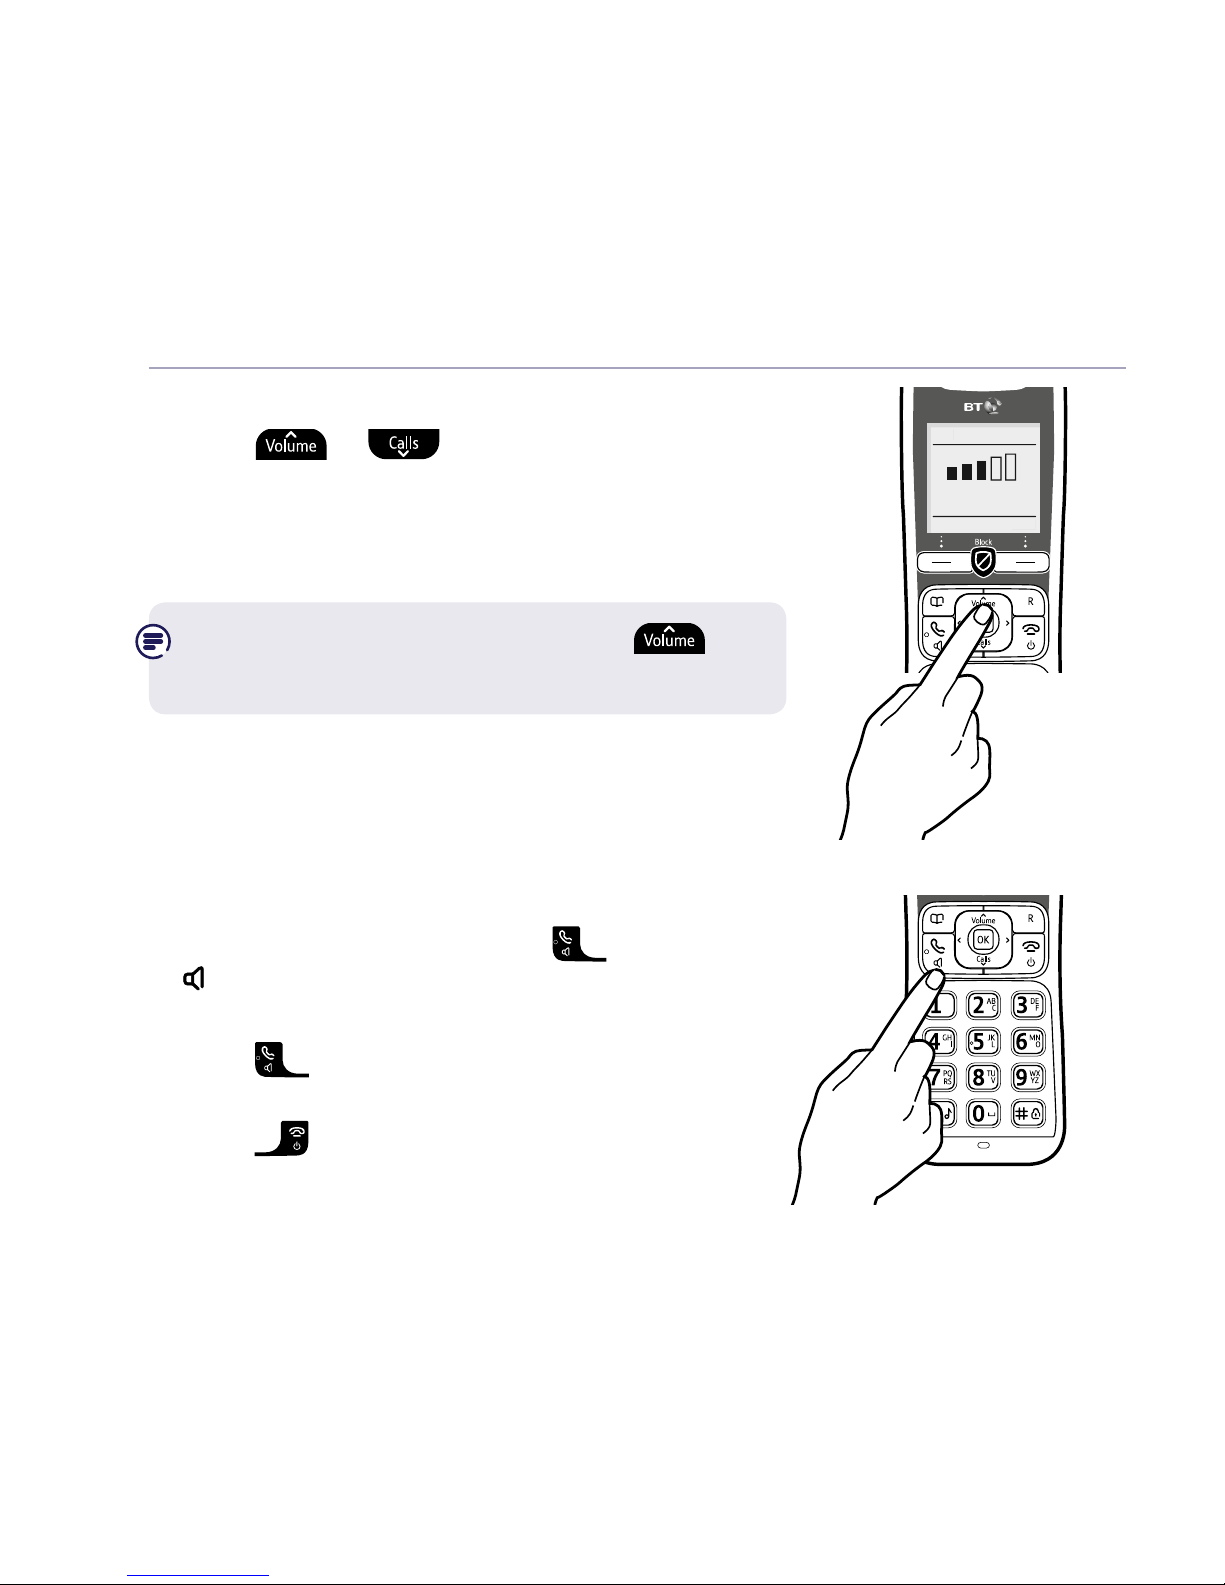
Incoming speech / Handsfree volume
1. Press
or to increase or decrease
the volume.
Subsequent presses will change the volume,
you will hear the volume level with each press.
From the idle screen, you can press
to change the Ringer volume settings too.
Make a handsfree call
1. Enter the number then press
twice.
is displayed. You hear your call over the
handset loudspeaker.
2. Press
to switch the call between the
earpiece and the loudspeaker.
3. Press
to end the call.
Call volume
Hide
Page 25

If you need some help, call us on 0800 145 6789* or go to bt.com/producthelp
Using the phone 25
Contacts
Store a contact (up to 200)
1. From the idle screen, press
.
2. Select Options. Add contact is highlighted,
press Select.
3. Enter the new contact name using the keypad
then press
and enter the home phone
number. You can then press
and enter a
mobile number and then a work number if you
want to. If you want to assign a ringtone for the
contact, press
then use the and
buttons to select the ringtone. Select Save
when you’ve finished. The display will show
Contact saved.
View/dial a contact
1. From the idle screen, press
to open
your contact list.
2. Press
or to scroll through and view
the entries.
3. To dial an entry, press
when the entry is
highlighted. If the entry has more than one
number saved under it you will need to highlight
the number you want and then press
again.
Add contact
Name
Home
Mobile
Save Back
I
Abc
If you need some help, call us on 0800 145 6789* or go to bt.com/producthelp
Contacts
Options Back
Mark
Mum
Dave
Tom
Page 26

Using the phone26
If you need some help, call us on 0800 145 6789* or go to bt.com/producthelp
Caller Display and the Calls list
For Block Calls, Caller Display and the Calls list, you must subscribe to a
Caller Display service for these features to work. Your network provider
may charge you for this service.
View and dial from the Calls list
(up to 50 incoming and 30 outgoing calls)
1. Press
or select Calls. The most recent entry
is at the top of the list. (If there are no entries
List empty will be displayed.)
2. Press
or to scroll through and view
the list.
3. To dial an entry, when the entry you want is
highlighted, press
.
Calls list
Options Back
Peter
4:18pm Fri
Laura
6:29pm 18 Apr
Page 27

If you need some help, call us on 0800 145 6789* or go to bt.com/producthelp
Using the phone 27
Save a Calls list entry to your contacts
1. Press
or select Calls, then press
or
to highlight the entry you want
and select Options.
2. Highlight Save number and press Select.
3. You now have two options:
i) To save this as a new contact, highlight
New contact and press Select. Highlight
the type of number, then press Select.
Enter the contact name and select Save.
ii) To add to an existing contact, highlight
Add to contact and press Select. Scroll to
highlight the entry you want and press Select.
Highlight the number type where you want to
save the number (Home, Work or Mobile) and
press Select.
Calls
Select Back
Save number
Delete call
Send text
Block number
If you need some help, call us on 0800 145 6789* or go to bt.com/producthelp
Save number
Select Back
New contact
Add to contact
Page 28

Using the phone28
Set the time and date
1. Select Menu, scroll to display Clock/Alarm
and press Select.
2. Press
to highlight Time and date and
press Select.
3. Enter the digits for the time, (you will also need
to select AM or PM if 12 hour format has been
set using
or ). Then press and enter
the date. Select Save.
Set Parental control
1. Select Menu, scroll to Call Control and
press Select.
2. Enter the access PIN and select OK. Press
to highlight Parental Control and press Select.
3. Press
or to select Allowed or Barred for
Mobile Calls, then press
and follow the
same procedure for International, Premium
rate and All dialled calls then select Save.
The display will show Parental control settings
saved. You will then be prompted to add some
VIPs if you haven’t already assigned any.
Clock/Alarm
Select Back
Alarm
Time and date
Time format
Mobile calls
< Allowed >
International
Allowed
Parental control
Save Back
If you need some help, call us on 0800 145 6789* or go to bt.com/producthelp
Page 29

Using the phone 29
Answer machine
Message playback using the handset
1. If there are messages, highlight the answer
phone icon on the idle screen and press
, or
i. Select Menu, Answer Phone is displayed,
press Select.
ii. View Messages will be displayed, press Select.
2. A list of your answer phone messages will be
displayed with the most recently received
highlighted at the top.
3. Use
or to scroll through the list to
highlight the message you wish to listen to and
press
.
i. If you have more than one message stored and
want to listen to them all, select Options.
Play all will be highlighted, press Select.
8:00pm
Menu Calls
Lounge
ANS
1 11
Gordon
6.30pm Sun
---End---
Messages
Select Back
Page 30

Using the phone
If you need some help, call us on 0800 145 6789* or go to bt.com/producthelp
30
4. As each message is played, the handset will display the number or the
name if you have Caller Display and a name/number match and the
time and date it was received. If you have any old (already listened to)
messages these will be played after your new messages.
During playback you have the following options:
or to adjust the playback volume.
to switch private playback through the handset to
handsfree playback.
or once to repeat the current message playing from the beginning.
Press
once or twice within a second to skip back to the
previous message.
or once to skip forward to the next message.
Delete or
to delete the current message playing.
At the end of playback, you will hear, “End of messages,” and the same
message will be displayed. The answer phone icon on the idle screen will
be renumbered to take into account any deleted messages.
Page 31

If you need some help, call us on 0800 145 6789* or go to bt.com/producthelp
Using the phone 31
Message playback using the base
Press
. If you have messages they will be played, new (unplayed)
messages first followed by old (played) messages.
During playback:
Press
to stop playback. The base will return to idle.
Press
to delete the message being played.
Press
to skip forward to the start of the next message.
Press
to skip back to the start of the current message.
Press
twice to skip back to the start of the previous message.
Press
to increase or decrease the playback volume level.
At the end of playback the base will return to idle mode and messages will
be renumbered to take into account any deleted messages.
If you need some help, call us on 0800 145 6789* or go to bt.com/producthelp
Page 32

If you need some help, call us on 0800 145 6789* or go to bt.com/producthelp
32 Help
Phone doesn’t work
• Have you activated the batteries correctly? See page 6.
• Check that the mains power is correctly connected.
No dial tone or line cord error message displayed on screen
• Is the telephone cord plugged into the base and phone wall socket?
• Check that the mains power is correctly connected.
• Only use the telephone cord supplied with the phone.
Can’t make or receive calls
• Check that the mains power is correctly connected.
• The batteries may need recharging.
• Check that product call barring is not active – see Parental control on page 28.
• Has there been a power cut? If so, place the handset back on the base for ten
seconds and try again. If it still doesn’t work, disconnect the batteries and mains
power for ten minutes, then reconnect and try again.
You have a dial tone, but the phone won’t dial out
• If you’re connected to a switchboard, check whether you need to dial an access
code, see the full user guide, go to bt.com/producthelp.
Handset doesn’t ring
• The ringer volume may be switched off, see page 24.
• Check that the mains power is correctly connected.
• Do Not Disturb may be switched on, see the full user guide, go to
bt.com/producthelp.
• Block nuisance calls may be switched on, see page 19.
• Make sure the handset is registered to the base, see the full user guide,
go to bt.com/producthelp.
Page 33

If you need some help, call us on 0800 145 6789* or go to bt.com/producthelp
33General information
For information on safety instructions, cleaning,
technical information or connecting to a switchboard,
please refer to the ‘General Information’ section in the
full user guide at bt.com/producthelp
Guarantee
Your BT6590 is guaranteed for a period of 12 months
from the date of purchase.
Subject to the terms listed below, the guarantee
will provide for the repair of, or at BT’s or its agent’s
discretion the option to replace the BT6590, or any
component thereof, (other than batteries), which is
identified as faulty or below standard, or as a result of
inferior workmanship or materials. Products over 28
days old from the date of purchase may be replaced
with a refurbished or repaired product.
The conditions of this guarantee are:
• The guarantee shall only apply to defects that
occur within the 12 month guarantee period.
• Proof of purchase is required.
• The equipment is returned to BT or its agent as
instructed.
This guarantee does not cover any faults or defects
caused by accidents, misuse, fair wear and tear, neglect,
tampering with the equipment, or any attempt at
adjustment or repair other than through approved agents.
This guarantee does not affect your statutory rights.
To find out what to do, if your phone is in or outside of
the 12 month guarantee, please look in the full user
guide at bt.com/producthelp
How to recycle your equipment
The symbol shown here and on the product
means that the product is classed as electrica
or electronic equipment, so DO NOT put it in
your normal rubbish bin.
It’s all part of the Waste Electrical and Electronic
Equipment (WEEE) Directive to recycle products in the
best way – to be kinder to the planet, get rid of dangerous
things more safely and bury less rubbish in the ground.
You should contact your retailer or supplier for advice
on how to dispose of this product in an environmentally
friendly way.
Warning
You won’t be able to call 999 from this phone if there’s
a power cut, so make sure you’ve got another way to
call for help in an emergency.
R&TTE Directive & Declaration
of Conformity
This product is intended for use within the UK for
connection to the public telephone network and
compatible switchboards.
This equipment complies with the essential requirements
for the Radio Equipment and Telecommunications
Terminal Equipment Directive (1999/5/EC).
For a copy of the Declaration of Conformity please refer
to bt.com/producthelp
Page 34

Page 35

Page 36

Offices worldwide
The services described in this publication are subject to availability
and may be modified from time to time. Services and equipment
are provided subject to British Telecommunications plc’s respective
standard conditions of contract. Nothing in this publication forms
any part of any contract.
© British Telecommunications plc 2016.
Registered Office: 81 Newgate Street, London EC1A 7AJ.
Registered in England No. 1800000.
Printed in China.
Designed by The Art & Design Partnership.
Available in other formats including braille, large print or audio CD.
If you would like a copy, please call 0800 145 6789*.
* Calls made from within the UK mainland network are free.
Mobile and international call costs may vary.
BT6590 (12/16) Issue 3
For a Better Future
We’re always looking to make our products last longer
and use less power, so we don’t have such a big impact
on the environment.
To find out about what we are doing, visit
bt.com/betterfuture
 Loading...