

Page 1

T PaperJet 30 UG – Issue 2 – Edition 2.1 – 17.02.05 – 6672
B
User Guide
BT PAPERJET 30
Page 2
T PaperJet 30 UG – Issue 2 – Edition 2.1 – 17.02.05 – 6672
B
Welcome…
to your BT PaperJet 30 plain paper inkjet
fax machine.
Combines phone, fax, copy, and SMS text message functions in one
compact machine.
Send a fax to an individual number or groups of up to 10.
Delayed sending so you can choose what time a fax is sent.
Adjustable contrast and resolution for fine detail, drawings and
photographs.
Receive text messages and send texts to compatible phones, mobiles,
fax machines and e-mail addresses.
Automatic redial feature keeps trying engaged numbers three more
times.
10 one-touch name and number directory and 50 Speed dial name and
number directory.
Redial the last 10 outgoing calls and last 20 incoming calls.
Page 3

T PaperJet 30 UG – Issue 2 – Edition 2.1 – 17.02.05 – 6672
B
This user guide provides you with all the
information you need to get the most from
your fax machine.
You must first set up your machine before you
can use it. This doesn’t take long as it is easy
to do. Just follow the simple instructions on
the next few pages or see the Quick Start
guide enclosed.
Need help?
If you have any problems setting up or using
your BT PaperJet 30, contact the Helpline on
0870 240 8026.
Alternatively, you may find the answer on the web at
www.bt.com/fax or in ‘Help’ at the back of this guide.
Got everything?
BT PaperJet 30 fax
Handset
Paper support tray
Mains power cable
Telephone line cord
Quick Start Guide
User Guide
Starter black ink cartridge
Page 4

T PaperJet 30 UG – Issue 2 – Edition 2.1 – 17.02.05 – 6672
B
4
In this guide
Getting started
Location . . . . . . . . . . . . . . . . . . . . . . . . . . . . . . . . 6
Setting up . . . . . . . . . . . . . . . . . . . . . . . . . . . . . . 6
Insert paper support tray . . . . . . . . . . . . . . . . . . . 7
Insert starter print cartridge . . . . . . . . . . . . . . . . . 8
Set date and time. . . . . . . . . . . . . . . . . . . . . . . . . 9
Fax name and number . . . . . . . . . . . . . . . . . . . . . 10
Getting to know your fax
Control panel . . . . . . . . . . . . . . . . . . . . . . . . . . . . 11
Document feeders . . . . . . . . . . . . . . . . . . . . . . . . 12
Using the phone
Making calls . . . . . . . . . . . . . . . . . . . . . . . . . . . . . 13
Handsfree. . . . . . . . . . . . . . . . . . . . . . . . . . . . . . . 13
Redial. . . . . . . . . . . . . . . . . . . . . . . . . . . . . . . . . . 13
Secrecy. . . . . . . . . . . . . . . . . . . . . . . . . . . . . . . . . 13
Call timer . . . . . . . . . . . . . . . . . . . . . . . . . . . . . . . 13
Using the directories
One touch directory . . . . . . . . . . . . . . . . . . . . . . . 14
Store . . . . . . . . . . . . . . . . . . . . . . . . . . . . . . . . . . 14
Dial . . . . . . . . . . . . . . . . . . . . . . . . . . . . . . . . . . . 14
Edit and delete . . . . . . . . . . . . . . . . . . . . . . . . . . . 15
Speed dial directory
Store . . . . . . . . . . . . . . . . . . . . . . . . . . . . . . . . . . 15
Dial . . . . . . . . . . . . . . . . . . . . . . . . . . . . . . . . . . . 16
Edit . . . . . . . . . . . . . . . . . . . . . . . . . . . . . . . . . . . 16
Delete . . . . . . . . . . . . . . . . . . . . . . . . . . . . . . . . . 16
Faxing
Inserting plain paper . . . . . . . . . . . . . . . . . . . . . . . 17
Inserting documents . . . . . . . . . . . . . . . . . . . . . . . 17
Contrast . . . . . . . . . . . . . . . . . . . . . . . . . . . . . . . . 17
Resolution . . . . . . . . . . . . . . . . . . . . . . . . . . . . . . 18
Sending faxes . . . . . . . . . . . . . . . . . . . . . . . . . . . . 18
Automatic redial . . . . . . . . . . . . . . . . . . . . . . . . . . 18
Delayed sending . . . . . . . . . . . . . . . . . . . . . . . . . . 18
Resend, change number or cancel a stored fax . . . 19
Send fax using redial. . . . . . . . . . . . . . . . . . . . . . . 20
Receiving faxes. . . . . . . . . . . . . . . . . . . . . . . . . . . 20
Set reception mode . . . . . . . . . . . . . . . . . . . . . . . 21
Polling . . . . . . . . . . . . . . . . . . . . . . . . . . . . . . . . . 21
Polling reception. . . . . . . . . . . . . . . . . . . . . . . . . . 21
Change/cancel a timed poll. . . . . . . . . . . . . . . . . . 21
Reports and lists
Reports. . . . . . . . . . . . . . . . . . . . . . . . . . . . . . . . . 23
Report meanings . . . . . . . . . . . . . . . . . . . . . . . . . 23
Transmission report . . . . . . . . . . . . . . . . . . . . . . . 24
Broadcast transmission report. . . . . . . . . . . . . . . . 24
Print now . . . . . . . . . . . . . . . . . . . . . . . . . . . . . . . 24
Lists . . . . . . . . . . . . . . . . . . . . . . . . . . . . . . . . . . . 25
Print installation information. . . . . . . . . . . . . . . . . 25
Set-up and Directory list . . . . . . . . . . . . . . . . . . . . 25
Caller Display
Calls list . . . . . . . . . . . . . . . . . . . . . . . . . . . . . . . . 26
View and dial . . . . . . . . . . . . . . . . . . . . . . . . . . . . 26
Caller information not available. . . . . . . . . . . . . . . 26
Copying
Copy document . . . . . . . . . . . . . . . . . . . . . . . . . . 27
SMS
Register . . . . . . . . . . . . . . . . . . . . . . . . . . . . . . . . 28
Cost of service
Activate . . . . . . . . . . . . . . . . . . . . . . . . . . . . . . . . 29
Sending texts . . . . . . . . . . . . . . . . . . . . . . . . . . . . 29
Save texts. . . . . . . . . . . . . . . . . . . . . . . . . . . . . . . 30
Set time limit for stored texts . . . . . . . . . . . . . . . . 30
Receiving texts . . . . . . . . . . . . . . . . . . . . . . . . . . . 30
. . . . . . . . . . . . . . . . . . . . . . . . . . . 28
Page 5

T PaperJet 30 UG – Issue 2 – Edition 2.1 – 17.02.05 – 6672
B
In this guide 5
Reading texts . . . . . . . . . . . . . . . . . . . . . . . . . . . . 30
Options while reading texts. . . . . . . . . . . . . . . . . . 31
Set subaddress . . . . . . . . . . . . . . . . . . . . . . . . . . . 31
Audible alert. . . . . . . . . . . . . . . . . . . . . . . . . . . . . 32
Delete, edit, forward and print . . . . . . . . . . . . . . . 32
Print list of texts . . . . . . . . . . . . . . . . . . . . . . . . . . 33
Print text configuration . . . . . . . . . . . . . . . . . . . . . 34
Additional settings
12 /24 hr format. . . . . . . . . . . . . . . . . . . . . . . . . . 35
Change date and time . . . . . . . . . . . . . . . . . . . . . 35
Position of fax header . . . . . . . . . . . . . . . . . . . . . . 35
Set language and country . . . . . . . . . . . . . . . . . . . 36
Adjust print area for received documents . . . . . . . 37
Received fax size. . . . . . . . . . . . . . . . . . . . . . . . . . 37
Silent reception . . . . . . . . . . . . . . . . . . . . . . . . . . 38
Number of rings before answer . . . . . . . . . . . . . . . 38
Ringer volume . . . . . . . . . . . . . . . . . . . . . . . . . . . 39
Distinctive ring . . . . . . . . . . . . . . . . . . . . . . . . . . . 39
Voice call alert . . . . . . . . . . . . . . . . . . . . . . . . . . . 40
Remote start code . . . . . . . . . . . . . . . . . . . . . . . . 40
Document in memory redial . . . . . . . . . . . . . . . . . 41
Dial and fax tones on/off. . . . . . . . . . . . . . . . . . . . 41
Dial and fax tones volume. . . . . . . . . . . . . . . . . . . 42
Beeps on/off . . . . . . . . . . . . . . . . . . . . . . . . . . . . . 42
Transmission speed. . . . . . . . . . . . . . . . . . . . . . . . 42
Error Correction Mode (ECM) . . . . . . . . . . . . . . . . 43
Help. . . . . . . . . . . . . . . . . . . . . . . . . . . . . . . . . . . 49
Error codes . . . . . . . . . . . . . . . . . . . . . . . . . . . . . . 51
Signals and on-screen messages . . . . . . . . . . . . . . 52
Paper jams . . . . . . . . . . . . . . . . . . . . . . . . . . . . . . 54
General information
Safety. . . . . . . . . . . . . . . . . . . . . . . . . . . . . . . . . . 56
General . . . . . . . . . . . . . . . . . . . . . . . . . . . . . . . . 56
Cleaning. . . . . . . . . . . . . . . . . . . . . . . . . . . . . . . . 56
Guarantee . . . . . . . . . . . . . . . . . . . . . . . . . . . . . . 59
For your records . . . . . . . . . . . . . . . . . . . . . . . . . . 60
Technical information
Switchboard compatibility. . . . . . . . . . . . . . . . . . . 61
R&TTE . . . . . . . . . . . . . . . . . . . . . . . . . . . . . . . . . 62
Sample standard page . . . . . . . . . . . . . . . . . . . . . 63
Install a new print cartridge
Type . . . . . . . . . . . . . . . . . . . . . . . . . . . . . . . . . . . 44
Replace . . . . . . . . . . . . . . . . . . . . . . . . . . . . . . . . 44
Clean and test nozzles . . . . . . . . . . . . . . . . . . . . . 46
Clean electrical contacts . . . . . . . . . . . . . . . . . . . . 46
Page 6
LINE
T PaperJet 30 UG – Issue 2 – Edition 2.1 – 17.02.05 – 6672
LINE
LINE
LINE
B
6
Getting started
WARNING
Do not place your BT PaperJet 30 in the
bathroom or other humid areas.
Location
You need to place your BT PaperJet 30 close enough to mains power
and telephone sockets so that the cables will reach.
Always choose a smooth, flat, horizontal surface. Avoid soft surfaces
such as carpets.
As documents come out at the front, make sure there are no
obstructions in front of the machine.
Setting up
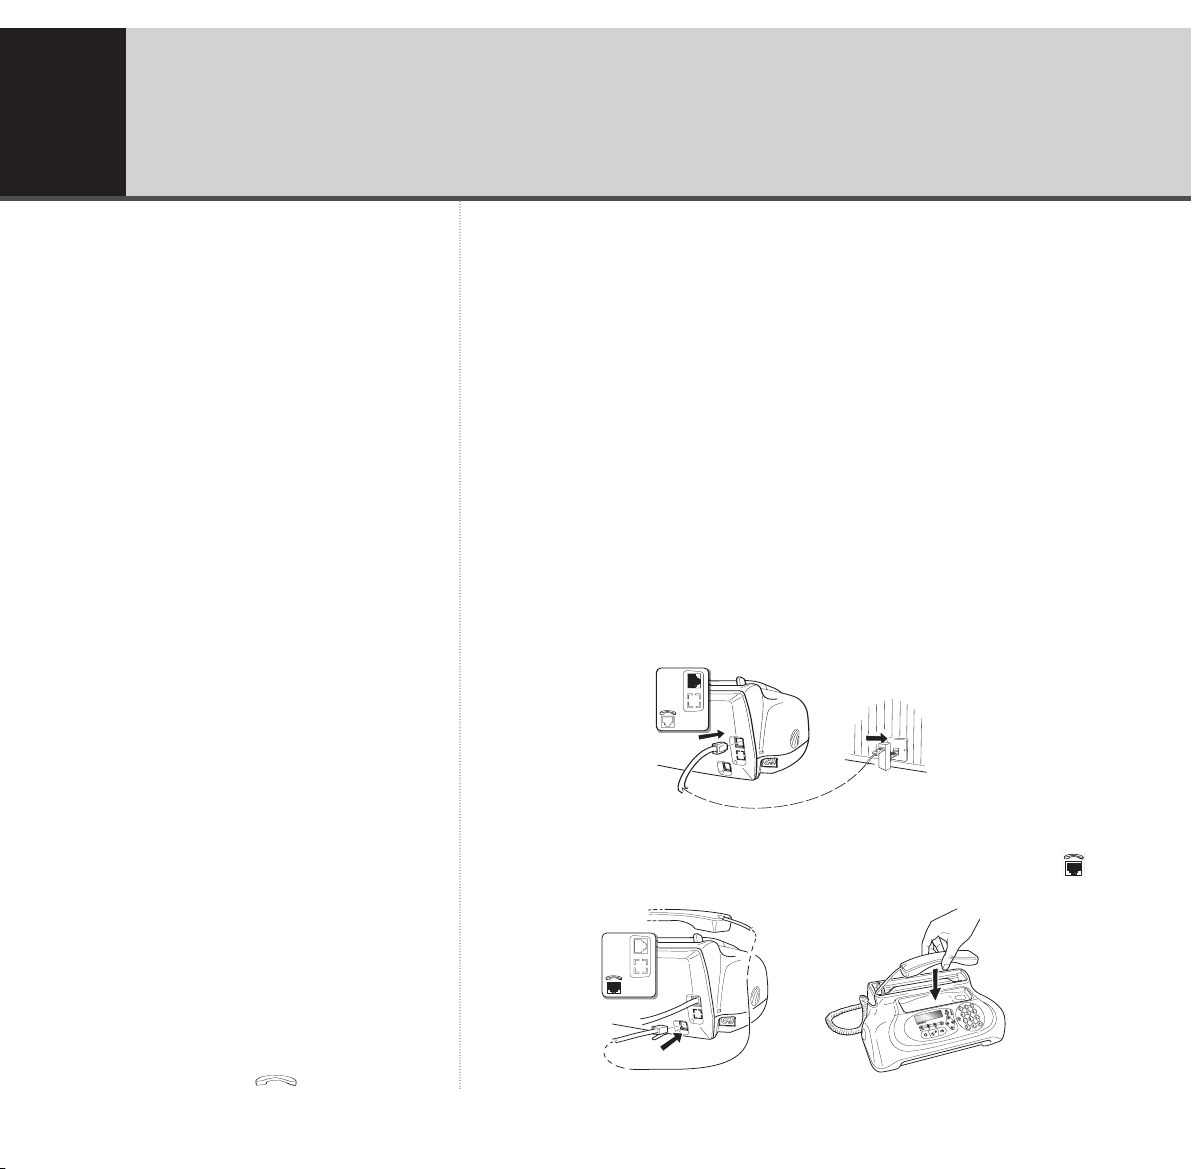
1. Connecting up
Plug the telephone line cord into the line socket at the rear of your
BT PaperJet 30 and plug the other end into the telephone wall socket.
Connect the telephone handset curly cable into the handset socket at
the back of your machine. Place the handset in the cradle.
Which socket?
Telephone line socket: LINE
Handset socket:
Page 7
T PaperJet 30 UG – Issue 2 – Edition 2.1 – 17.02.05 – 6672
B
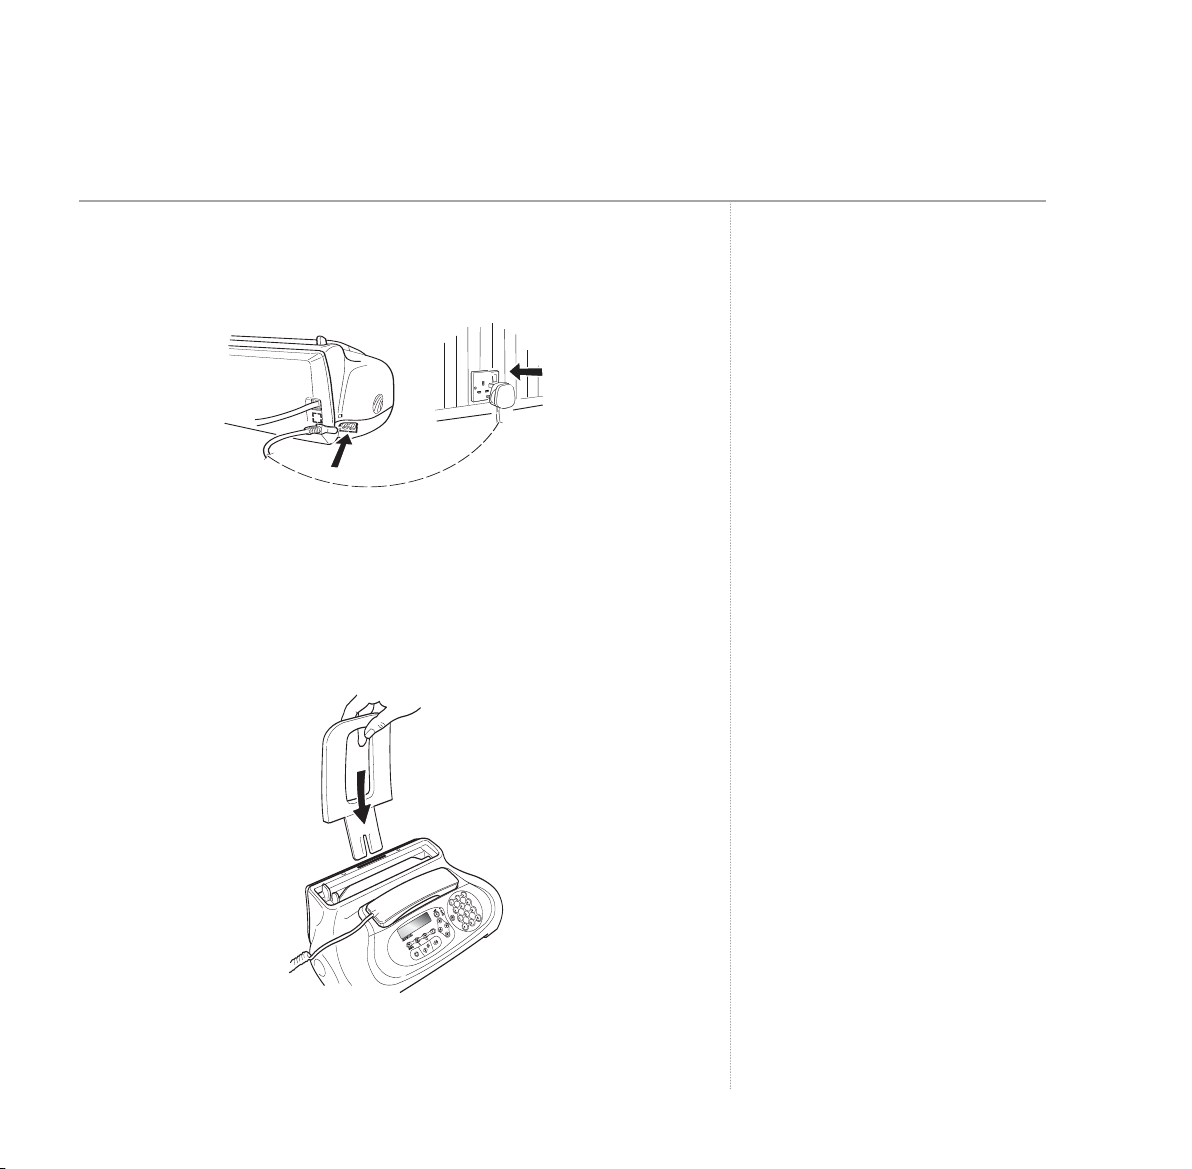
Plug the mains power cable into the machine, and the other end into the
mains power and switch on.
Your BT PaperJet 30 performs a start up check. The screen displays
AUTOMATIC
CHECK PRINT HEAD
on the top line and alternates between
on the bottom line.
SET DATE/TIME
and
Getting started 7
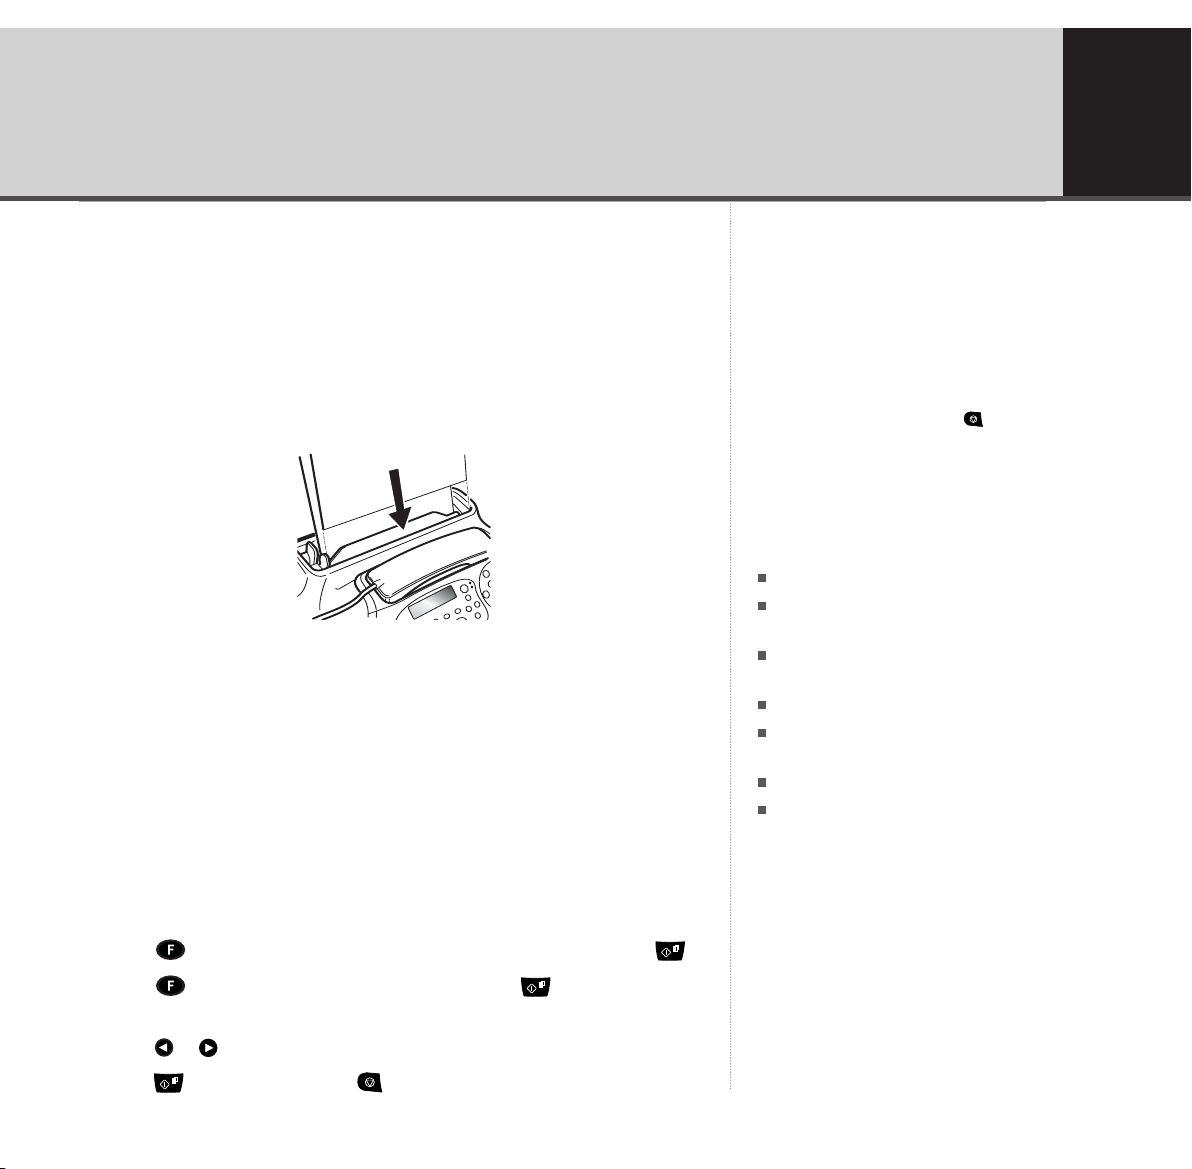
2. Insert paper support tray into the slots.
Page 8
T PaperJet 30 UG – Issue 2 – Edition 2.1 – 17.02.05 – 6672
B
Getting started8
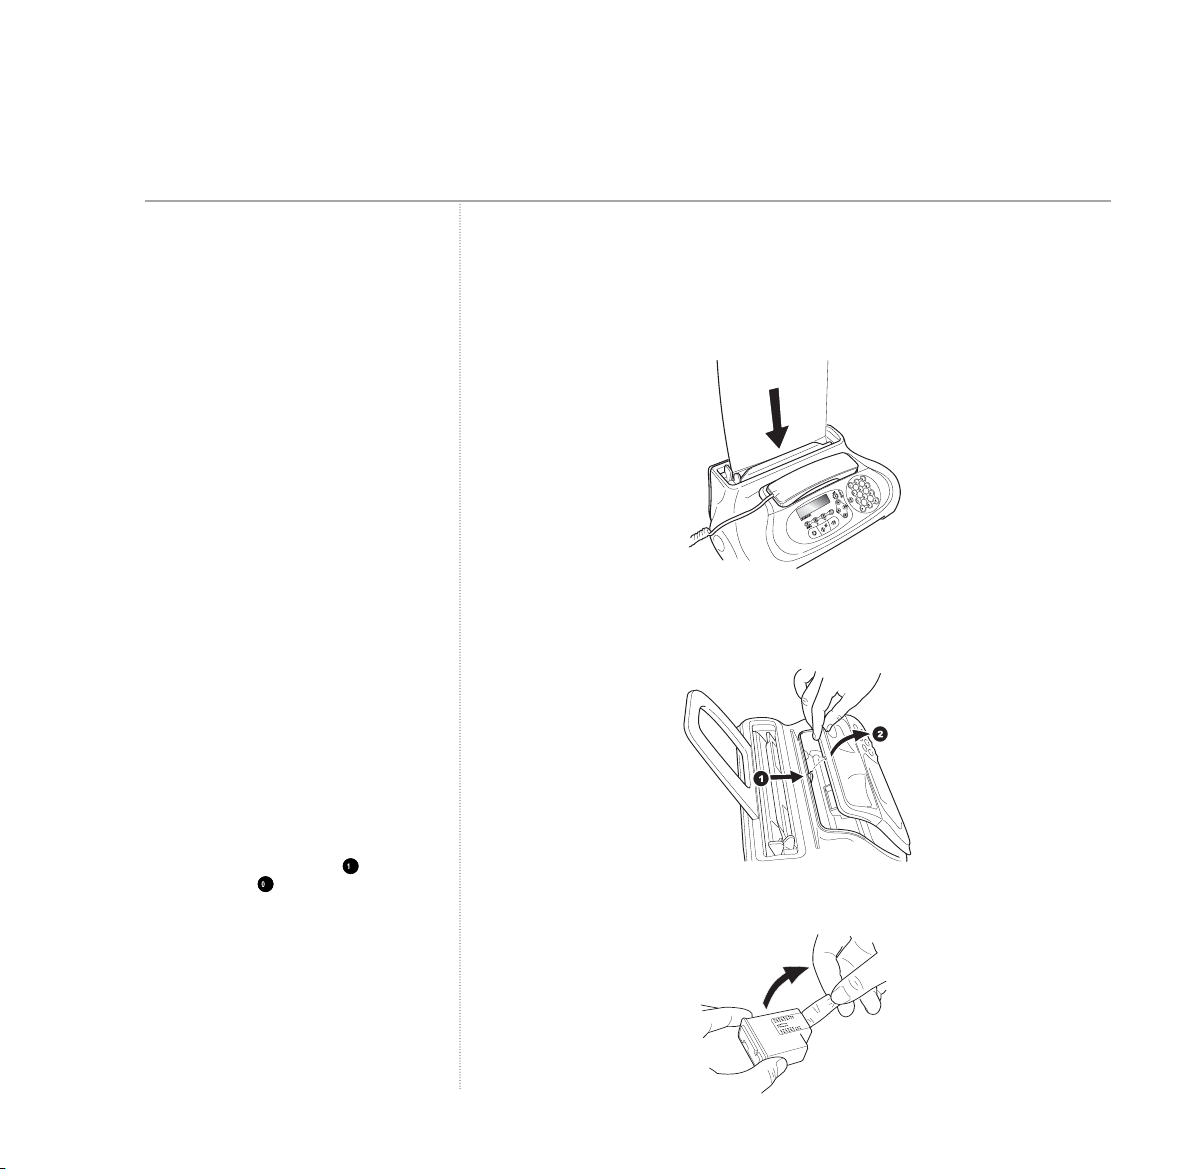
3. Insert paper into the paper tray.
Your BT PaperJet 30 can hold up to 40 sheets of 80g/m2 paper. To
prevent several sheets being drawn into the machine together, fan out
the paper first, then tap it down on a flat surface before inserting it into
the paper tray.
IMPORTANT TEST PRINT
Once the print cartridge has been installed
and the front cover closed, your BT PaperJet
30 will automatically clean the cartridge
nozzles and perform a test print.
Make sure a sheet of paper is loaded in
the plain paper feeder. The test page will
be printed and the display shows CHECK
PRINT OUT. 1 = EXIT 0 = REPEAT
Examine the test page. Check that the
numbered scale is not broken at any point
and that there are no horizontal white lines
within the black areas.
If everything seems OK, press . If there is
a problem, press to repeat the process.
If the test print is still not satisfactory, see
‘Clean print cartridge electrical contacts’ and
‘Clean print cartridge nozzles’, page 46.
The starter print cartridge allows you to
print up to 80 standard pages. Normal print
cartridges have a greater capacity and can
print up to 450 standard pages. See page 63
for a sample ‘standard page’.
.
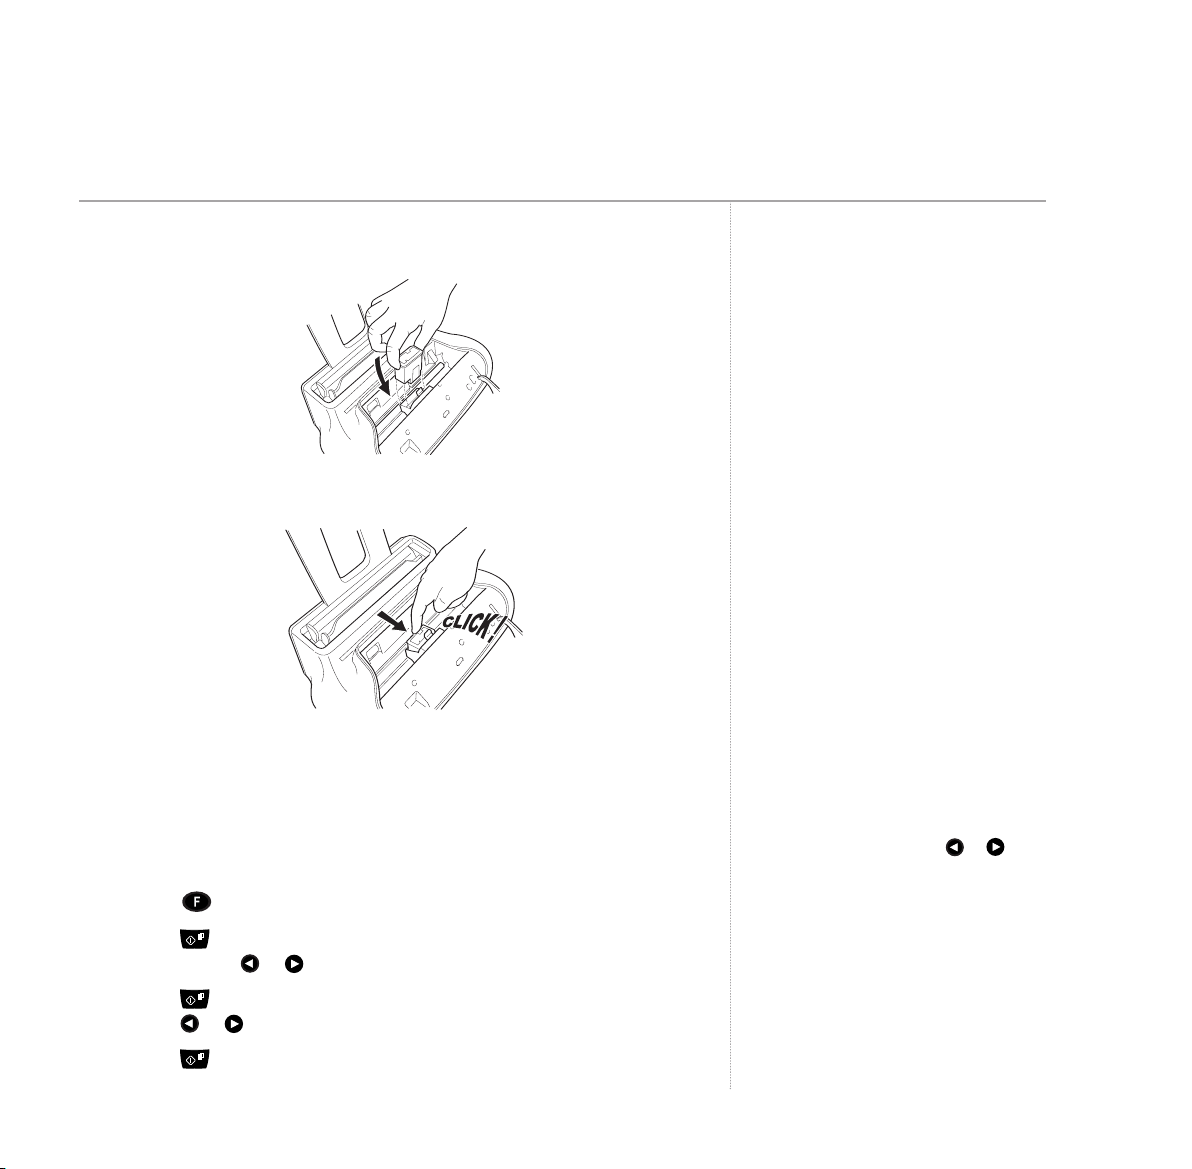
4. Insert the starter print cartridge.
Remove handset and open the front cover.
Peel protective film off cartridge, being careful not to touch the nozzles
or electrical contacts.
Page 9
T PaperJet 30 UG – Issue 2 – Edition 2.1 – 17.02.05 – 6672
B
Insert the cartridge into the holder with the metal contacts facing the
front of the machine.
Pull the cartridge forward until it clicks into place.
Getting started 9
Close the front cover and replace the handset.
4. Set date and time
You will need to set the date and time when you first switch on your
machine and whenever there is a power failure.
1. Press , display shows
2. Press to display
format press
FORMAT: DD/MM/YY
or to scroll through the options.
3. Press . Display shows
DATE AND TIME
24H
. To switch to the 12 hour format,
.
. To select a different
press or .
4. Press . Display shows
DD/MM/YY HH:MM
.
If you make a mistake, press or to
move the cursor to the digit you want and
enter the new one to overwrite it.
If you selected the 12 hour format, the
time display will show
p for pm.
Once set, the date and time can be changed,
see Change Date and Time, page 35.
a to indicate am and
Page 10
T PaperJet 30 UG – Issue 2 – Edition 2.1 – 17.02.05 – 6672
B
Getting started10
5. Use the keypad to enter the correct date and time, e.g.
. for 11 January 05, 9.30am. As each digit is entered, the
cursor moves to the next space.
6. Press to confirm then to return to standby.
5. Enter fax name and number
These will be printed on the top of each page received at the machine
you send a fax to.
Writing tips
To enter a space, press to move the
cursor.
To enter a special character, e.g. &, press
and to scroll through the options. For a
full guide to available symbols and characters,
see character map, page 29.
If you make a mistake, move the cursor to
the character you want and overwrite it with
a new one.
To delete the whole name, press .
If you want to include the international code
in your number press instead of the
zeros, The display will show +.
Connecting to a switchboard?
To set your switchboard/PBX connection,
see page 61.
The name can be up to 16 characters long and the number up to 20 digits.
1. Press until the display shows
2. Display shows
TYPE YOUR NAME
TEL LINE SET UP
.
. Press until the display shows
INSTALLATION
, then press .
3. Use the keypad to enter your name then press . Display shows
NUMBER
PHONE
.
4. Press then enter your fax machine’s phone number. Press
to confirm.
5. Press to return to standby.
Your BT PaperJet 30 is now ready for use.
Page 11
T PaperJet 30 UG – Issue 2 – Edition 2.1 – 17.02.05 – 6672
B
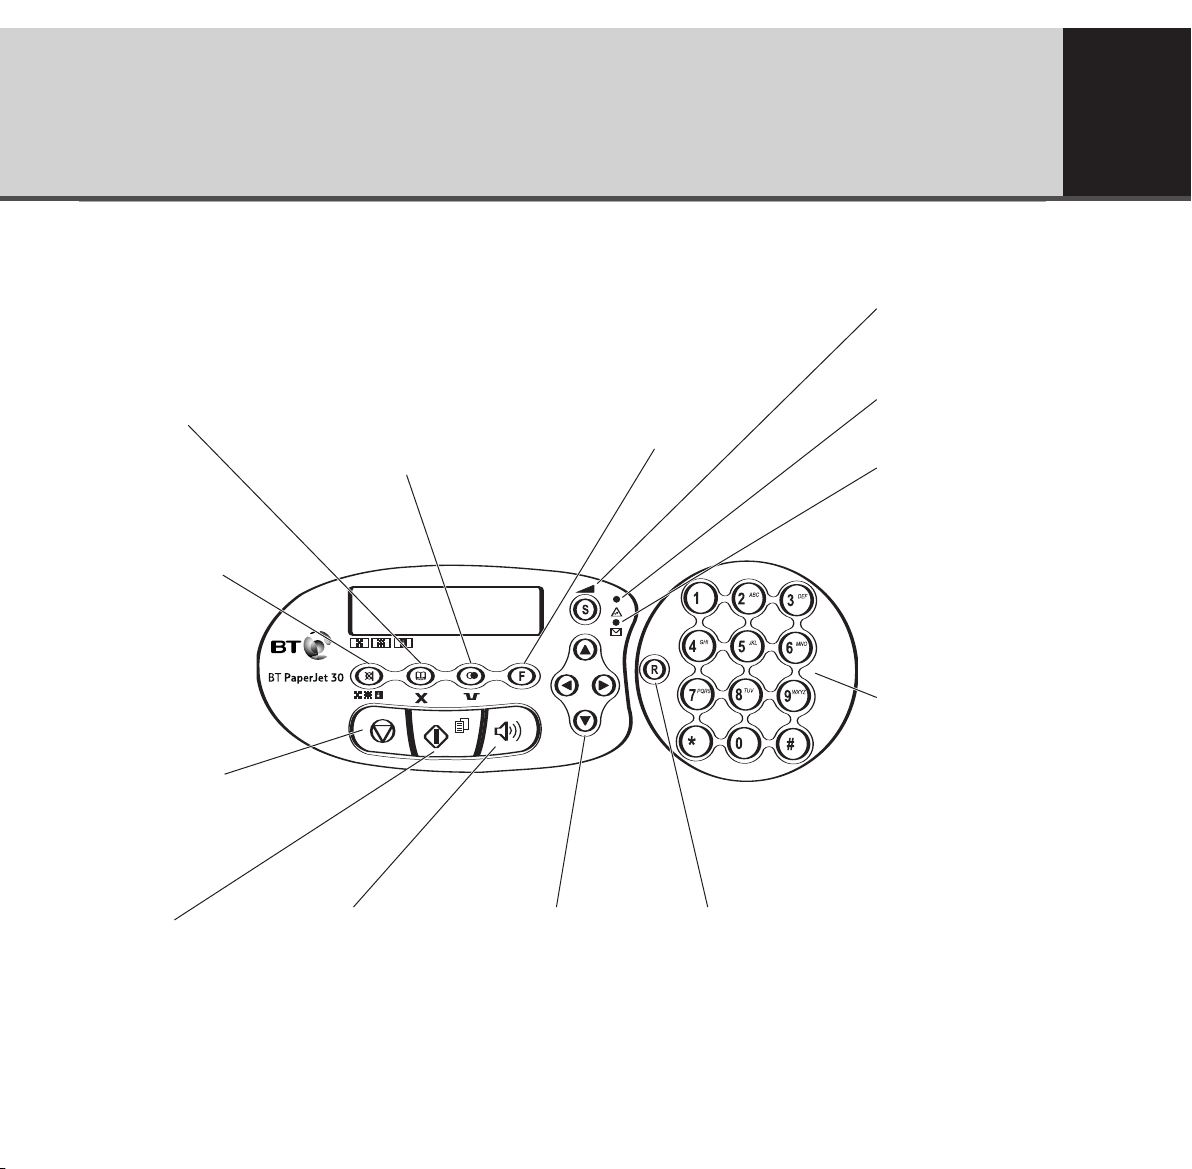
Getting to know your fax
Fax machine
Speed dial directory
Press to access Speed
Dial and One Touch
Directory numbers.
Also use to delete during
editing.
Resolution/Hold
When a document is
inserted in the feeder
tray, press to adjust
the faxing/copying
resolution. page 18.
During a telephone
conversation, press to
put the line on hold,
page 13.
Stop
Cancels a fax, copy
and SMS text
operation.
Turns off the Error
indicator light.
Returns your machine
to standby.
Calls lists//Pause
Displays the last 10 outgoing
fax and phone calls, page 20.
Displays the last 20 incoming
fax and phone calls, page 26.
Inserts a pause when dialling
or storing a number, page 15.
F (Function)
Press to open the main
menu.
Press to select further
menu options
displayed on screen.
11
(S)
Adjusts the speaker volume
when the speaker is active.
To access SMS (Text)
Error light
Indicates a fault when sending
or receiving a fax.
Message indicator
Flashes when you have
documents or text messages
ready to print.
Keypad
For dialling numbers and
entering names and numbers
in memory and writing texts.
Also, press and hold to dial
any one-touch numbers
stored, page 14.
Start
Press to begin
sending or receiving
a document.
Confirms menu options
on-screen.
Press to start copying
a document inserted in
the feeder tray.
Handsfree (SPEAKER)
Press to make calls via
the built-in loudspeaker,
page 13.
(UP/DOWN/LEFT/RIGHT)
Scroll through menus and
settings.
Move the cursor left and
right when entering names
and numbers.
R (Recall)
Used to access
switchboard functions
and with some BT Calling
Features.
Page 12
T PaperJet 30 UG – Issue 2 – Edition 2.1 – 17.02.05 – 6672
B
12
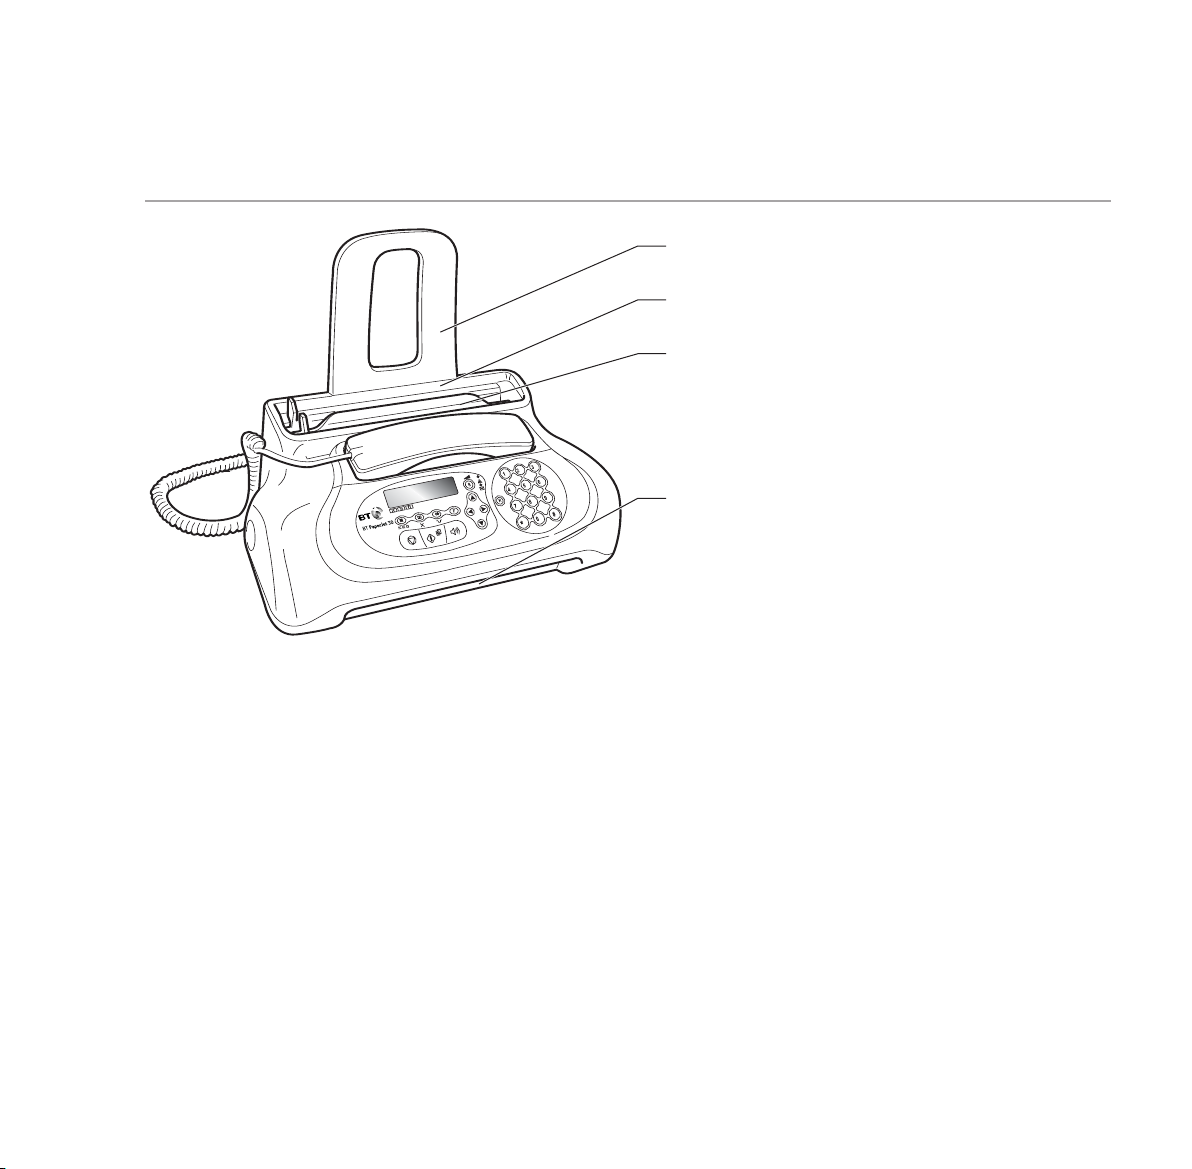
Getting to know your fax
Paper support tray
Plain paper feeder compartment
Automatic document feeder
Insert documents to be faxed or copied.
(Up to 5 sheets at a time.)
Received/copied documents
come out here
Page 13
T PaperJet 30 UG – Issue 2 – Edition 2.1 – 17.02.05 – 6672
B
Using the phone
Making calls
1. Lift the handset and enter the number.
2. To end a call, replace the handset.
Handsfree
1. Press . You will hear the dial tone.
2. Dial the number.
3. Press to end the call.
Redial
Redial one of the last 10 outgoing numbers or one of the last 20
incoming numbers.
1. Lift the handset or press .
2. Press . Display shows
press or .
3. Press then scroll or through the list to display the number
you want.
OUTCOMING CALLS
. If you want INGOING CALLS,
13
You can transfer a handsfree call to the
handset to keep your conversation private.
Just lift the handset off the hook.
When using Redial, do not put any
document in the automatic document
feeder.
4. Press .
Secrecy
You can put a caller on hold while you talk to someone else nearby.
While on hold, your caller cannot hear you. You and the caller will hear
an assurance tone whilst secrecy is on.
1. During a conversation, press . The display shows
PRESS HOLD
2. Press
.
again to resume your conversation.
LINE ON HOLD,
Call timer
During a phone call, the duration of the call is shown in the display.
Page 14
T PaperJet 30 UG – Issue 2 – Edition 2.1 – 17.02.05 – 6672
B
14
Using the directories
One-touch directory
You can store a name and number entry under each - button on
the keypad.
Numbers can be up to 64 digits long, names up to 16 characters.
If you make a mistake, move the cursor to
the character you want and overwrite it with
a new on.
To delete the whole name, press .
Print a directory list
You can print a list of the one-touch and
speed dial directories. See printing reports
and lists, page 25.
Store an entry
1. Press repeatedly until the display shows
2. Press
3. Press the button - you want to use to store the entry.
4. Enter the telephone/fax number you want and press .
5. The display shows
and press to confirm.
6. Display shows
one-touch button or to return to standby.
To change a one touch entry, simply overwrite the existing entry with
a new one.
Dial
repeatedly until the display shows
. Display shows
TYPE ONE TOUCH KEY 0-9
NAME
EDIT ANOTHER YES
FAX SET-UP
ONE TOUCH DIAL
.
. Use the keypad to enter the name you want
. Press to select another -
then press .
then press
1. Press and hold the - button you want until the number is displayed
and dialled.
2. Lift handset when instructed.
Page 15

T PaperJet 30 UG – Issue 2 – Edition 2.1 – 17.02.05 – 6672
B
Edit and delete
One touch entries are deleted by accessing
ONE TOUCH
in the FAX SET UP
menu and deleting the entry using the button. To edit, delete then
add new entry.
1. Press
and hold the - one touch button until the stored telephone
number is displayed.
2. Press then . The name is displayed.
3. Press then .
4. Press to return to standby.
Speed dial directory
You can store 50 name and number entries in the speed dial directory.
Dial each entry using a two-digit code - .
Numbers can be up to 64 digits long, names up to 16 characters.
Store an entry
Using the directories
If you make a mistake, move the cursor to
the character you want and overwrite it with
a new one.
To delete the whole name, press .
If you need to enter a pause into the
number you are storing press .
15
1. Press repeatedly until the display shows
2. Press
repeatedly until the display shows
. Display shows
TYPE SPEED NO. (01-50)
FAX SET-UP
then press .
CODED SPEED DIAL
.
3. Enter the two digit code you want, e.g. and press .
4. Enter the telephone/fax number you want and press .
5. The display shows
NAME
. Use the keypad to enter the name you want and
press to confirm.
6. Display shows
EDIT ANOTHER YES
. Press to select another speed dial
code or to return to standby.
To change a speed dial entry, simply overwrite the existing entry with a
new one.
then press
Page 16
T PaperJet 30 UG – Issue 2 – Edition 2.1 – 17.02.05 – 6672
B
16
Using the directories
Dial
1. Press to display
ADDRESS BOOK CODE OR < >
.
2. Enter the speed dial code, e.g. to display and dial the entry or press
or to scroll to the entry you want.
3. Lift handset when prompted.
Edit and delete speed dial entries
One touch entries are deleted by accessing
CODED SPEED DIAL
in the FAX
SET UP menu and deleting the entry using the button. To edit,
delete then add new entry.
1. Enter the two digit number of the entry that you wish to change.
2. Press then . The name is displayed.
3. Press then .
4. Press to return to standby.
View one touch and speed dial entries
1. Press then press or to scroll through the entries.
2. Press to dial a displayed number.
Page 17
T PaperJet 30 UG – Issue 2 – Edition 2.1 – 17.02.05 – 6672
B
Faxing
Inserting plain paper
To avoid pages being drawn in together, always fan out the pages first to
separate them, then tap down before placing them in the paper feeder.
Inserting documents for sending
Place up to 5 sheets into the automatic document feeder, making sure
the side to be sent is facing away from you.
When the document has been inserted properly, the display shows
DOCUMENT READY
Contrast
You can adjust the brightness for sending or copying light or dark
documents.
NORMAL should be suitable for most documents.
and the bottom line shows the contrast setting
NORMAL
17
The plain paper feeder holds up to
40 sheets of 70-110g/m2paper
The document feeder holds up to
5 sheets of 70 – 110g/m2paper.
If the document does not feed properly
into your BT PaperJet 30, press to eject
the page.
IMPORTANT
Do not insert into the document feeder:
Pages smaller than A5.
Newspaper pages (because of
printer’s ink).
Pages with staples or paperclips,
sticky tape or glue.
.
Creased or torn pages.
Wet paper or paper with wet
correction fluid.
Glossy or laminated paper.
Paper thicker than 110g/m
thinner than 70g/m
2
.
2
or
DARK when sending light originals and LIGHT when sending dark
Select
originals.
1. Press
2. Press to display
CONTRAST:NORMAL
3. Press or to switch between
repeatedly until the display shows
VARIOUS SETTINGS
then press until
is displayed.
NORMAL,DARK
FAX SET UP
and
4. Press to confirm and then to return standby.
then press .
LIGHT
.
Page 18
T PaperJet 30 UG – Issue 2 – Edition 2.1 – 17.02.05 – 6672
B
18
Faxing
If you make a mistake dialling, press (<>) to
move the cursor to the digit and overwrite it
with the correct one. Or press to delete
the whole number.
Resolution
Resolution is identified by an arrow in the bottom left hand corner of the
display when there is a document in the document feeder. The arrow
normally points at the standard resolution icon. The resolution can
be changed to Fine icon or Photo icon.
If sending text and drawings with fine detail, press until the arrow
appears above the fine resolution .
If sending photos, press until arrows appear above the fine and
photo resolution icons .
Sending faxes
1. Insert the document to be sent in the automatic document feeder.
The display shows
2. If required, set the contrast and resolution.
3. Dial the number – or use redial or the one touch or speed dial directories –
then press .
To cancel the fax during sending, press .
DOCUMENT READY
.
When the fax has been sent, the display shows
TX COMPLETED
.
Automatic redial
If your BT PaperJet 30 cannot get through to the other machine, it will
automatically redial the number up to 3 times.
Delayed sending
You can store a document in your machine’s memory and set a time for
it to be sent.
1. Insert the document to be sent and set the contrast and resolution if
required.
Page 19
T PaperJet 30 UG – Issue 2 – Edition 2.1 – 17.02.05 – 6672
B
2. Press repeatedly until the display shows
TX FROM MEMORY
then
press . The document is scanned.
3. When scanning is completed the document is assigned a reference
number, e.g. DOC.N.XXXX and the display shows
TYPE TIME HH:MM
.
4. Enter the time you want the fax to be sent, e.g. . for 6.20pm.
5. Press to confirm. Display shows
TYPE NUMBER NUM/TOUCH/SPEED
.
6. Enter the number or use the one-touch or speed dial directories.
7. Press .
You can now enter another number to send the same document to
another person.
Or
Press again to confirm. The display shows
AUTOMATIC MEMORY TX
.
Resend, change number or cancel a stored fax
1. Press repeatedly until the display shows
press . Display shows
ALREADY ENTERED
TX FROM MEMORY
.
then
Faxing
If the power fails, the document stored in
the memory will be cancelled.
19
2. Press display shows
PRINT SETTING?
3. Press or to switch between the options:
PRINT SETTING?
– press to print a status report of the last
fax stored in the memory. After printing, the fax
returns to standby.
CANCEL SETTING?
– press to cancel the document and return
to standby.
CHANGE PARAM?
– press to change the time the fax will
be sent.
4. Press to confirm. Display shows
TYPE NUMBER
.
5. Enter the number or use the one-touch or speed dial directories.
Page 20
T PaperJet 30 UG – Issue 2 – Edition 2.1 – 17.02.05 – 6672
B
20
Faxing
6. Press .
You can now enter another number to send the same document to
another person.
Or
Press again to confirm. The display shows
AUTOMATIC MEMORY TX
Send a fax using redial
You can redial any of the last 10 outgoing numbers or 20 incoming
numbers.
1. Insert a document in the automatic feeder and adjust the contrast or
resolution if required.
2. Press to display
INCOMING CALLS
or . Press .
3. Press or to scroll to the number you want.
4. Press to dial.
or to view
OUTGOING CALLS
, press
.
Low ink warning
When the print cartridge is close to running
out, the display shows INK LOW.
When there is no ink left, OUT OF INK is
displayed.
See page 44, Replace the print cartridge.
Deteriorating print quality?
If the print quality deteriorates, set your
BT PaperJet 30 to clean the print head and
nozzles and print a test page, see page 46.
Reception in memory
If you place a document to be faxed or copied
in the automatic feeder while receiving a
document, printing the received document
stops and it will be stored in the memory for
printing later. During reception the display
shows RX IN MEMORY.
Receiving faxes
Faxes are received automatically unless you change the reception mode.
You can set the way your BT PaperJet 30 receives documents.
MANUAL reception – you answer calls by lifting the handset and pressing
if you hear the fax tones.
AUTOMATIC reception – your machine automatically answers each call
expecting a fax.
PHONE/FAX – automatic reception with call recognition. Your machine
answers each call after the number of rings set. If it is a fax call the
document is received. If it is a voice call, you hear a tone and the display
LIFT HANDSET
shows
machine tries to receive a fax again.
. If you do not answer within 20 seconds, your
Page 21

T PaperJet 30 UG – Issue 2 – Edition 2.1 – 17.02.05 – 6672
B
Set reception mode
1. Press to display
2. Press or to scroll between the options
AUTOMATIC
.
RECEPTION MODE
then press .
MANUAL,PHONE/FAX
and
3. Press to select the setting displayed or to cancel.
Polling
Polling lets you call another fax machine to retrieve a document
automatically.
Polling is only available between compatible fax machines. Polling is
sometimes called Faxback.
Polling reception
When you know a document is ready to be polled from another machine:
1. Press
2. The display shows
repeatedly until the display shows
TYPE TIME HH:MM
. You can leave the current time for
polling right away or enter the time you want your machine to collect the
document.
POLLING RX
then press .
Faxing
When a document has been received, the
display shows DOC. IN MEMORY and then
prompts you to remove the document from
the feeder tray. Your machine will then print
the received fax.
The BT PaperJet 30 will hold about 20 pages
(depending on content) in its memory if the
paper has run out.
21
3. Press and enter the number to be dialled.
4. Press to confirm or to cancel.
Change/cancel a timed poll.
If you have set your machine to poll a document at a later time, you can
cancel it or change the time at which it starts to poll.
1. Press
repeatedly until the display shows
2. The display shows
ALREADY ENTERED
.
POLLING RX
then press .
Page 22

T PaperJet 30 UG – Issue 2 – Edition 2.1 – 17.02.05 – 6672
B
22
Faxing
3. Press . Press or to switch between:
CANCEL SETTING?
CHANGE PARAM?
– press to cancel polling.
– press . The display shows
Enter the new time you want your machine to collect
the document. Now press and change the
number to be dialled if necessary.
4. Press to confirm.
TYPE TIME HH:MM
.
Page 23

T PaperJet 30 UG – Issue 2 – Edition 2.1 – 17.02.05 – 6672
B
Reports and lists
Your BT PaperJet 30 can print out a list of faxes sent and received, speed
dial and one-touch entries and other useful information.
Reports
Power failure report – printed automatically after a power failure.
If there are documents stored in the memory, the report indicates the
number of pages lost.
Activity report – details of the last 42 faxes sent and received. Printed
automatically after every 32 actions or on request,
Last transmission report – information on the last fax sent or received.
You can set your machine to print automatically after each action or on
request,
see page 24.
Failed transmission report – printed automatically only when a fax has
failed to be sent or received. You can switch automatic printing on or off.
Last broadcast report – information about the last fax sent to a group,
see page 24.
Act. N Reference number for the sent or received fax.
Doc.N Reference number assigned by the machine for a document stored in the memory.
Type Type of action:
Dialled number Fax number you dialled.
Name Name of the person you called. Only displayed if it has been stored with the
Received Id Number and/or name (if available) of the fax machine that called you.
Date/Time Date and time the fax was sent/received.
Duration Time it took to send/receive the fax.
Pages Total number of pages sent/received.
Result OK – fax sent/received successfully
TX = fax sent
RX = fax received
RX POLL = polled fax received
number in the one-touch or speed dial directories.
ERROR CODE XX – if the fax was not sent/received successfully. See Error Codes,
page 51 for an explanation of the code number provided.
see page 24.
23
Page 24

T PaperJet 30 UG – Issue 2 – Edition 2.1 – 17.02.05 – 6672
B
24
Reports and lists
Transmission Report
Select the printing option you prefer.
1. Press
repeatedly until the display shows
2. Press then press
.
REPORT
repeatedly until the display shows
FAX SET-UP
then press .
FAILED TX
3. Press or to scroll through the options
FAILED TX REPORT
– automatically printed whenever a fax is not sent
successfully.
TX REPORT ALWAYS
TX REPORT OFF
– report is always printed after each fax sent.
– no report will be printed.
4. Press to confirm the option displayed then to return to standby.
Broadcast Transmission Report
Select the printing option you prefer – on or off.
1. Press
repeatedly until the display shows
2. Press then press
BROADC.REP.:ON
.
repeatedly until the display shows
FAX SET-UP
then press .
3. Press or to switch to
BROADC.REP.:OFF
.
4. Press to confirm the option displayed then to return to standby.
Print now
You can print a Last Transmission, Activity, Last Broadcast and Caller ID
list on request.
1. Press
repeatedly until the display shows
PRINT OUT REPORT
then
press .
2. Display shows
LAST TX REPORT
.
Page 25

T PaperJet 30 UG – Issue 2 – Edition 2.1 – 17.02.05 – 6672
B
3. Press or to scroll through the options:
LAST BROAD. REP, ACTIVITY REP, PRINT: ID LIST, PRINT OUT:EXIT
4. Press to confirm the option displayed. After printing out your
BT PaperJet 30 returns to standby.
Lists
You can print out a list containing the:
installation and set-up settings
one-touch directory
speed dial directory
Print Installation information
1. Press repeatedly until the display shows
press .
2. Press
press . Display shows
repeatedly until the display shows
PRINT INSTALL
INSTALLATION
PRINT INSTALL
.
then
then
Reports and lists
SMS text printing
To print the SMS text configuration of your
BT PaperJet 30, see page 34.
To print text messages, see page 33.
25
EXIT
3. Press to print. After printing out or selecting
your BT PaperJet 30
returns to standby.
Print Set-up and Directory list
1. Press repeatedly until the display shows
2. Press
press . Display shows
repeatedly until the display shows
PRINT SETTINGS
3. Press or to scroll through the other options
PRINT: SPEED DIAL
and
PRINT OUT: EXIT
FAX SET-UP
PRINT OUT SET-UP
.
PRINT: ONE TOUCH
.
then press .
then
4. Press to confirm the option displayed. After printing out your
BT PaperJet 30 returns to standby.
,
Page 26

T PaperJet 30 UG – Issue 2 – Edition 2.1 – 17.02.05 – 6672
B
26
Caller Display
IMPORTANT
To use Caller Display you must first
subscribe to the service from your network
provider. A quarterly fee is payable.
For more information on BT’s Calling
Features, call BT free on 0800 800 150.
Caller information not available.
With some incoming calls, the telephone
number of the caller is not available and
cannot therefore be displayed.
In this case your BT PaperJet 30 provides
you with some explanatory information.
UNAVAILABLE
The number is unavailable.
WITHHELD
The caller has withheld their number.
RINGBACK
Ringback call.
OPERATOR
The call has been made via the operator.
PAYPHONE
The caller is ringing from a payphone.
INTERNAT
International call.
1. Press . Display shows
2. Press then scroll or through the list.
3. Press to dial the displayed number. If making a phone call, lift the
Caller Display
If you subscribe to a Caller Display service you can see the number of the
person who is calling on the display screen.
Whether an incoming call is answered or not, the caller’s details including
the date and time of the call are stored in the Calls list.
Calls list
The Calls list contains information about your last 20 incoming callers.
If a call is received when the Calls list is full, the oldest entry will be
replaced with the new call.
View and dial a number from the calls list
If sending a fax, insert the document in the feeder tray first.
INCOMING CALLS
.
handset when prompted.
Page 27

T PaperJet 30 UG – Issue 2 – Edition 2.1 – 17.02.05 – 6672
B
Copying
You can copy original documents inserting them one page at a time in
the automatic feeder.
Make up to 9 copies of each page.
Copy a document
You can set the contrast and resolution as in fax documents.
Contrast: NORMAL
LIGHT for dark originals
DARK for light originals
Resolution: TEXT for normal typed documents
PHOTO if the page contains pictures or fine detail.
1. Insert one page of the document in the automatic feeder with the text
facing away from you. The display shows
2. Press . Display shows the settings for copy size, contrast and
resolution, e.g.
100%,NORMAL
and
printed. If you are happy with the standard settings just select the
numbers of copies you want - on the keypad and press . If you
want to change any of the settings follow steps 3 to 8.
DOCUMENT READY
TEXT
and the number of copies to be
.
IMPORTANT
Do not insert into the document feeder:
Pages smaller than A5.
Newspaper pages (because of
printer’s ink).
Pages with staples or paperclips,
sticky tape or glue.
Creased or torn pages.
Wet paper or paper with wet
correction fluid.
Glossy or laminated paper.
Paper thicker than 110g/m
thinner than 70g/m
2
or
2
.
27
3. Press to set the quality of copy. Press or to switch between the
options
HIGH QUAL
4. Press . The display shows
options:
140%,70%,50%
5. Press . The display shows
for best reproduction or
or
100%
ZOOM 100%
.
CONTRAST
. Press or to select the
: Press or to select the
NORMAL
for standard.
option you want.
6. Press . Press to select the resolution option you want.
7. Select the number of copies you want - .
8. Press to begin copying.
Pressing cancels copying at any time.
Deteriorating print quality?
If the print quality deteriorates, set your
BT PaperJet 30 to clean the print head and
nozzles and print a test page, see page 46.
Page 28

T PaperJet 30 UG – Issue 2 – Edition 2.1 – 17.02.05 – 6672
B
28
SMS
SMS stands for Short Messaging Service
IMPORTANT
You must subscribe to your Network
Provider’s Caller Display Service so that you
can use SMS text messaging. A quarterly fee
may be payable, please contact your
network provider for more details. When
you are using SMS text messaging you must
not withhold your telephone number or
the service will not allow you to connect.
BT have prefixed the Service Centre number
with ‘1470’, this will release your telephone
number only to the SMS Provider, even if
you normally have your number withheld.
You must have your network’s Caller Display
service activated on your line. To send an
SMS message, you must have the call number
of an SMS message provider entered in your
BT PaperJet 30. Some other network
provider lines may not be compatible with
this SMS service. If your BT PaperJet 30 is
connected to a switchboard, you may not be
able to use text message services.
You will not be able to receive text
messages until you have first sent a message.
The first sent message registers you with the
text service.
Voice text
Please note that the conversion can translate
common abbreviations and smileys etc.,
but to ensure maximum clarity of message
delivery, abbreviations etc. should be used
sparingly.
Some other network provider lines may not
be compatible with this SMS service.
SMS text messaging service
Welcome to the SMS Text Messaging service on your BT PaperJet 30.
The SMS Service is provided by BT.
Your BT PaperJet 30 can send and receive messages to and from any
mobile phone (from participating mobile networks) and compatible
landline telephones in the UK.
You may also send messages to landline phones that are NOT SMS
compatible. Messages to non-compatible lines will be connected to voice
text and delivered in spoken words to the telephone as a call.
The fixed line SMS is provided under BT’s terms and conditions for
telephone service. These can be found by visiting the BT.com website at:
http://www.bt.com/terms/tor.htm
Register for the SMS text messaging service
When you send your first SMS text message from your BT PaperJet 30
you will automatically be registered for the service.
On receipt of your first SMS through the service, the system will send
you a welcome SMS message back.
You may also register by sending the word REGISTER to 00000 upon
which you will receive a confirmation message.
Cost of the fixed line service
There is no subscription charge (other than the subscription to Caller
Display). Visit the BT.com website (www.bt.com) to find out how much it
costs to send a text message (depends on your call package).
Your BT PaperJet 30 lets you send and receive SMS text messages of up
to 160 characters using the alpha-numeric keypad.
Page 29

T PaperJet 30 UG – Issue 2 – Edition 2.1 – 17.02.05 – 6672
B
SMS Service centre numbers
Your BT PaperJet 30 is preset to send and receive text messages using
the BT service. If you want to use a different service you will need to
change the service centre numbers.
1. Press then or to scroll to
2. Press to display
3. Press to display
SERV. CENTRE NO.
TX SERV. CENTRE 1470P1709400
CONFIGURATION
.
.
You can delete this number using the button to enter a different one.
4. Press . Display shows
RX SERV. CENTRE 080058752
.
You can delete this number using the button to enter a different one.
5. Press .
6. Press to return to standby.
Sending texts
1. Press to display
SMS SEND
then to display
SMS TEXT
.
2. Use the keypad to write your text message.
3. When you have finished, press . Display shows
NUM/TOUCH/SPEED
.
TYPE NUMBER
and
4. Enter the number you want to send to and press .
5. Display shows
TERMINAL NO.:YES.
Unless you have been asked by your recipient to add a sub-address press
again to display
SEND: YES
. Press again to send the text.
If the person you are sending to has asked you to send to a specific
YES
subaddress then use or to display
RECIP. TERM.NO.: 9
. You can now change the default subaddress (9) to
the required number and press to display
and press start to display
SEND: YES
. Now press
to send.
Character map
Button Character
@ space 1 . /-
abcеджаз2Γ
d e f è È é 3 ∆ Φ
g h i ì4
jkl5Λ
m n o ñ ö Ø ò 6
p q rsß7Π Σ
tuvüù8
w x y z 9
+ &/ 0€£¥$¿ß ¡
space
SMS
Ξ Ψ
Θ
Ω
29
Page 30

T PaperJet 30 UG – Issue 2 – Edition 2.1 – 17.02.05 – 6672
B
30
SMS
Writing tips
Press to switch between upper and
lower case letters.
Press or to move the cursor to the
point you want or create a space.
Press to delete a character to the left of
the cursor.
The top left of the display shows you the
number of characters remaining, starting at
160 and counting down to 0.
If you save a copy of your text message it
will be stored in the SMS SENT folder so you
can send it to another recipient or change it.
If you press after writing a text or no
button is pressed for 2 minutes, your text is
automatically saved in the SMS WRITTEN
folder.
SENT SMS memory full
When the memory is full, the display shows
MEMORY FULL DELETE SENT SMS. You will
not be able to write any more texts. Delete
one or more messages from the memory,
page 32.
Power failure
If your BT PaperJet 30 is without power for
over one hour, all saved/stored text
messages will be lost. This will be listed in
the power failure report printed when the
power is restored.
WRITTEN SMS memory full
When the memory is full, the display shows
MEMORY FULL DELETE WRITTEN SMS.
You will not be able to write any more texts.
Delete one or more messages from the
memory, page 32.
If MEM ALMOST FULL DELETE REC. SMS
is displayed you have reached 28 messages
out of 30 max. It is advisable to read and
delete messages. See Delete texts page 33.
If MEM FULL. DELETE REC. SMS appears
the memory is full and you will not be able
to receive any more text messages until
you have deleted texts from the memory.
See Delete texts page 33.
7. During sending, your BT PaperJet 30 displays
TX COMPLETED
if successful or
TX ERROR
8. After sending, the display gives you the option to save the text Press or to switch between
SMS:
YES
TRANSMITTING
, then
if unsuccessful.
or NO. Press to confirm.
SAVE
Save texts
You can write a text and save it to send later.
1. Press then or to scroll to
WRITE SMS
.
2. Press and use the keypad to write your text message.
SAVED
3. When you have finished, press . Display shows
. Your text will
be saved in the SMS WRITTEN folder.
Receiving texts
Your BT PaperJet 30 can store up to 30 texts in the reception memory.
When you receive a text message, the icon on the display flashes and
SMS RECEPTION
shows
set your BT PaperJet 30 to give an audible alert,
. The indicator light also flashes. You can also
see page 32.
Reading texts
When the icon appears on the display and the message LED is
flashing, you have received one or more text messages.
1. Press to display
SMS RECEIVED
. The number of texts is also displayed
(max. 30).
2. Press to display
DISPLAY LIST
.
3. Press . The display starts with the newest text first and shows the
reference number and the sender’s number.
Page 31

T PaperJet 30 UG – Issue 2 – Edition 2.1 – 17.02.05 – 6672
B
Either
Press or once to scroll through the message and see all
the data.
Or
Press or to scroll through the list of texts.
Options while reading texts:
When you are reading a text you can scroll through a number of options:
Press to display options for the message.
Press or to scroll through the options:
SMS 31
DELETE
ANSWER
EDIT
PRINT
TEL CALL
To print all texts,
– press to delete the messages.
– press to answer a message.
and
SEND
– press to edit and/or forward the message.
– press to print information about the text.
– press to make a telephone call to the sender.
see page 33.
4. Press to return to standby.
Set subaddress
If you have another telephone which can receive text messages
connected to the same line, you can set the subaddress on your
BT PaperJet 30 so that it can receive messages separately from the
other phone.
A subaddress is an additional number - which is added to your
telephone number when sending a text.
1. Press then or to scroll to
CONFIGURATION
.
Page 32

T PaperJet 30 UG – Issue 2 – Edition 2.1 – 17.02.05 – 6672
B
32
SMS
9 is the default subaddress used by the BT
text service. Any texts sent to you without
the subaddress specified will go to
subaddress 9.
2. Press to display
3. Press or to display
4. Press . The display shows
SERV.CENTRE NO
TERMINAL NO
TERMINAL NO. (0-9) 9
.
.
.
5. Enter a one digit number - , different to the subaddress used by your
other phone (which probably use 9) so that your BT PaperJet 30 can
receive messages sent to it.
6. Press to confirm.
7. Press to return to standby.
8. When you change the subaddress of your BT PaperJet 30 you should
send a text to register the address with the BT text system.
Audible alert
Set your BT PaperJet 30 to give an audible alert whenever it receives at
text message. You can switch the audible alert on or off.
1. Press then or to scroll to
2. Press to display
SERV.CENTRE NO
CONFIGURATION
.
.
Message folders
The Sent and W
each hold up to 5 texts.
The Received Message folder can hold up to
30 texts.
When they are full, you must delete texts
before sending new ones.
ritten Message folders can
3. Press or to display
4. Press to display
SMS RX ADVICE
SMS RX ADVICE N
5. Press or to switch between options
.
.
N
= no, Y= yes.
6. Press to confirm the option displayed.
7. Press to return to standby.
Delete, edit, forward and print texts
You can view messages in the SENT, WRITTEN and RECEIVED folders
and then delete or edit and forward them.
1. Press then or to scroll to
SMS SENT XX
or
WRITTEN
or
RECEIVED
.
Page 33

T PaperJet 30 UG – Issue 2 – Edition 2.1 – 17.02.05 – 6672
B
2. Press to display
DISPLAY LIST
.
3. Press The display shows the reference number, and the sender’s
number.
Either
Press or once to scroll through the message and see all the data.
Or
Press or to scroll through the list of texts.
Options while reading texts:
When you are reading a text you can scroll through a number of options:
Press to display options for the message.
Press or to scroll through the options:
DELETE
ANSWER
SEND
– press to delete the messages.
– press to answer a message.
– press to forward the message
SMS
33
EDIT
– press to change the message then send it
PRINT
– press to print the texts.
4. Press to return to standby.
Print a list of texts
1. Press then or to scroll to
2. Press to display
3. Press or to scroll to
DISPLAY LIST
PRINT LIST
SMS SENT XX
.
.
or
WRITTEN
or
RECEIVED
4. Press to print details of all messages in the folder selected.
After printing, your machine returns to standby.
If there are no messages in the folder you
select, the display shows MEMORY EMPTY.
.
Page 34

T PaperJet 30 UG – Issue 2 – Edition 2.1 – 17.02.05 – 6672
B
34
SMS
Print text configuration
You can print details of your BT PaperJet 30’s text settings.
1. Press then or to scroll to
2. Press to display
3. Press or to display
SERV.CENTRE NO
PRINT CONFIG
CONFIGURATION
.
.
.
4. Press . After printing, your machine returns to standby.
Page 35

T PaperJet 30 UG – Issue 2 – Edition 2.1 – 17.02.05 – 6672
B
Additional settings
Change date and time
You can adjust the date and time manually.
1. Press until the display shows
2. Display shows
3. Press to display
or to scroll through the options.
4. Press . Display shows
press or .
5. Press . Display shows
6. Use the keypad to enter the correct date and time, e.g.
moves to the next space. You can use the or buttons to move the
cursor to make corrections.
If you have selected 12 hour format an
date and time to indicate morning or afternoon. If you want to change
a
or pplace the cursor under it and press the button to change it.
the
DATE AND TIME
FORMAT: DD/MM/YY
24H
for 11 January 05, 9.30am. As each digit is entered, the cursor
FAX SET-UP
.
. To select a different format press
. To switch to the 12 hour format,
DD/MM/YY HH:MM
25.03.04 1:23
then press .
.
a
or pwill appear between the
35
Position of your fax header.
Your BT PaperJet 30 is designed to send the fax header inside the text
area of a document received by other machines. If the information at the
top of a document received by another fax (i.e. your name, fax number,
date and time), is:
– not printed fully at the top of the page
or
– too low down the page
you can adjust the position on your BT PaperJet 30.
1. Press until the display shows
2. Press
repeatedly until the display shows
FAX SET-UP
then press .
VARIOUS SETTINGS
.
Page 36

T PaperJet 30 UG – Issue 2 – Edition 2.1 – 17.02.05 – 6672
B
36
Additional settings
3. Press repeatedly until the display shows
press or to display
HEADER OUTSIDE
HEADER INSIDE
.
. If required,
4. Press to confirm the option displayed.
Set language & country
You can choose which language your machine uses for the display and
set the country you are in.
1. Press then .
2. Press or to scroll through the language options. Press to select
the language displayed.
3. Display shows
CHOOSE COUNTRY
. Press .
4. Press or to scroll through the country options. Press to select
the country displayed.
5. Press to return to standby.
Country Language to be selected
UK ENGLISH
France FRANCAIS
Germany DEUTSCH
Italy ITALIANO
Portugal PORTUGUES
Spain
Sweden SVENSKA
Denmark DANSK
Holland NEDERLANDS
ESP
ANOL
Page 37

T PaperJet 30 UG – Issue 2 – Edition 2.1 – 17.02.05 – 6672
B
Adjust print area of received documents
Additional settings 37
1. Press repeatedly until the display shows
2. Press
repeatedly until the display shows
repeatedly until the display shows
REDUCTION: 94%
3. Press or to scroll through the other options
FAX SET-UP
then press .
PRINTER PARAMET
.
80%,76%,70%
. Press
and
4. Press to confirm the option displayed.
5. Press to return to standby.
Received fax size
To make sure that received documents which are longer than A4 size are
printed, you can set your machine to print the extra text on another sheet.
1. Press
2. Press
repeatedly until the display shows
repeatedly until the display shows
repeatedly until the display shows
SURPLUS:AUTO
FAX SET-UP
PRINTER
PARAMET
.
then press .
. Press
3. Press or to scroll through the options:
SURPLUS:ON
SURPLUS:OFF
SURPLUS AUTO
– your machine will always print surplus text on another sheet.
– surplus text will not be printed.
– surplus text will be printed on another sheet providing
the surplus exceeds 12mm.
OFF
.
4. Press to confirm the option displayed.
5. Press to return to standby.
Page 38

T PaperJet 30 UG – Issue 2 – Edition 2.1 – 17.02.05 – 6672
B
38
Additional settings
Silent reception
If your machine is set to AUTOMATIC or PHONE/FAX reception
(page 39) you can set it to receive documents without the ringer
modes
sounding.
In AUTOMATIC mode, your machine will never ring when an incoming
call is received.
In PHONE/FAX mode, the ringer does not sound but if you receive a
voice call, you will hear the voice call alert.
1. Press
2. Press to display
SILENT RX: NEVER
repeatedly to display
ENHANCED FEATUR
.
INSTALLATION
then press .
. Press until display shows
3. Press or to scroll through the options:
SILENT RX: NEVER
SILENT RX: ALWAYS
SILENT RX: DAILY
– the ringer is always on.
– the ringer is switched off.
– the ringer is off for the next 24 hours.
4. Press to confirm the option displayed.
5. Press to return to standby.
Number of rings before answer
If your machine is set to AUTOMATIC or PHONE/FAX reception mode,
it will answer calls after 4 rings. You can change this to 1-8 rings.
1. Press
2. Press
repeatedly until the display shows
repeatedly until the display shows
3. Press or to scroll through the options:
INSTALLATION
.
RING COUNT:04
01-08
.
.
4. Press to confirm the option displayed.
5. Press to return to standby.
Page 39

Ringer volume
There are 3 levels and Off.
T PaperJet 30 UG – Issue 2 – Edition 2.1 – 17.02.05 – 6672
B
Additional settings 39
1. Press
2. Press to display
3. Press
repeatedly until the display shows
VARIOUS SETTINGS
repeatedly until the display shows
4. Press or to scroll through the options:
and
VOLUME: LOW
RING VOLUME: OFF
.
FAX SET-UP
then press .
.
RING VOLUME: HIGH
RING VOLUME: MED,RING
.
5. Press to confirm the option displayed.
6. Press to return to standby.
Distinctive ring
If your network offers the possibility of having two or more numbers on
the same telephone line, each number will have a different ring pattern.
When you use the distinctive ring feature for the first time, your
BT PaperJet 30 will “learn” one of the patterns and will then react
differently to calls with that ring pattern.
When distinctive ringing is set to On, you can set your machine to
PHONE/FAX reception mode only. When you receive a call with the ring
pattern that your BT PaperJet 30 has learnt, it will always answer in fax
receive mode. If you receive calls with other ring patterns, your machine
will not auto answer in PHONE/FAX mode but ring normally.
1. Press
repeatedly until the display shows
INSTALLATION
then
press .
2. Press
3. Press
4. Press or to scroll to
5. Press . The display shows
repeatedly until the display shows
repeatedly until the display shows
CHANGE PATTERN
AUTODETECT.RING
ENHANCED FEATUR
DISTINC. RING:OFF
.
.
.
.
6. Ring your BT PaperJet 30 on the new number. When the display shows
RING DETECTED
. Press to return to standby.
Page 40

T PaperJet 30 UG – Issue 2 – Edition 2.1 – 17.02.05 – 6672
B
40
Additional settings
If connected to a switchboard, see page 61.
Voice call alert
If your BT PaperJet 30 is set to PHONE/FAX reception, it will
automatically alert you to voice calls with a 20 second tone. You can
change the duration of the tone, from 15 to 40 seconds.
1. Press
2. Press
repeatedly until the display shows
repeatedly until the display shows
3. Press or to scroll through the options:
INSTALLATION
.
FAX/TEL TIMER:20
15,20,30
or 40.
.
4. Press to confirm the option displayed.
5. Press to return to standby.
Remote start code
If you answer a call on an extension phone, before BT PaperJet 30 has
automatically answered, and then find it is a fax call, you can transfer the
call to the BT PaperJet 30 by pressing on the keypad of your phone.
You can change the 5 to another number 0-9 or
✱ if required. You can
also switch remote start off.
1. Press
press to display
repeatedly until the display shows
TEL. LINE SET-UP
2. Press again. The display shows
3. Press
repeatedly until the display shows
PUBL.LINE(PSTN
INSTALLATION
.
REMOTE START:ON
4. To switch the code off, press or to scroll to
confirm.
Or
To change the code press . The display shows
current code.
5. Enter the new code - or .
then
).
OFF
and press to
TYPE CODE
.
above the
Page 41

T PaperJet 30 UG – Issue 2 – Edition 2.1 – 17.02.05 – 6672
B
6. Press to confirm the option displayed.
7. Press to return to standby.
Resending of documents in memory
If a document stored in memory fails to be sent (for example, the
number was engaged), your BT PaperJet 30 will automatically retry up to
3 times at 2 minute intervals. If after all retries the fax has not been sent,
the document will normally be deleted from memory. You have the
option of retaining failed faxes in memory to enable you to try sending
them again without re-scanning. To do this you must enable the
document re-transmission feature.
Additional settings 41
1. Press
2. Press to display
3. Press
repeatedly until the display shows
VARIOUS SETTINGS
repeatedly until the display shows
4. Press or to switch between
OFF
FAX SET-UP
.
RETRANS DOC:OFF
and ON.
then press .
.
5. Press to confirm the option displayed.
6. Press to return to standby.
Dial and fax tones on/off
Your BT PaperJet 30 lets you hear the dial tones as well as the fax
tones when connecting to another fax machine. You can turn the sound
On or Off.
1. Press
press to scroll to
repeatedly until the display shows
LINE MONITOR:OFF
2. Press or to switch between
OFF
INSTALLATION
.
and ON.
then
3. Press to confirm the option displayed.
4. Press to return to standby.
Page 42

T PaperJet 30 UG – Issue 2 – Edition 2.1 – 17.02.05 – 6672
B
42
Additional settings
Dial and fax tones volume
You can adjust the volume for the line tones you hear when dialling and
connecting to another fax machine.
1. Press you hear the dial tone.
2. Press to adjust the volume which is displayed on the screen.
Beeps on/off
Your BT PaperJet 30 gives beeps to alert you to faults, errors etc. You can
switch these beeps to High, Med, Low or Off.
1. Press
2. Press to display
3. Press
repeatedly until the display shows
VARIOUS SETTINGS
repeatedly until the display shows
4. Press or to switch between
HIGH,MED,LOW
FAX SET-UP
.
BUZZER VOL:LOW
and
then press .
.
OFF
.
5. Press to confirm the option displayed.
6. Press to return to standby.
Transmission speed
Your BT PaperJet 30 is set to send faxes at 9600bps (9.6). If you
consistently fail to send faxes to a particular number it may help to
reduce the transmission speed to 4800bps (4.8).
1. Press
2. Press to display
Press
3.
repeatedly until the display shows
VARIOUS SETTINGS
repeatedly until the display shows
4. Press or to switch between
4.8
.
and
FAX SET-UP
SPEED 9.6
TX
9.6
.
then press .
.
5. Press to confirm the option displayed.
6. Press to return to standby.
Page 43

T PaperJet 30 UG – Issue 2 – Edition 2.1 – 17.02.05 – 6672
B
Error Correction Mode (ECM)
ECM is a standard system for correcting errors caused by interference on
the line. It works when your machine and the sending or receiving machine
E
both have ECM switched on. When this is the case
is displayed during
transmission.
The default setting for ECM on your BT PaperJet 30 is On. You can
switch the setting On or Off.
Additional settings 43
1. Press
2. Press to display
3. Press
4. Press or to switch between
repeatedly until the display shows
VARIOUS SETTINGS
.
repeatedly until the display shows
ON
and
OFF
5. Press to confirm the option displayed.
6. Press to return to standby.
FAX SET-UP
ECM:ON
.
.
then press .
Page 44

T PaperJet 30 UG – Issue 2 – Edition 2.1 – 17.02.05 – 6672
B
44
Install a new print cartridge
Print cartridge type
When replacing a print cartridge you will need type M2201, available
from 0870 240 7285.
Replace print cartridge
1. Remove the handset from its cradle.
2. Open the front cover.
3. Pull the print cartridge lever forward then lift the cartridge out.
4. Take the new print cartridge from its packaging and peel the film
covering the nozzles.
Page 45

T PaperJet 30 UG – Issue 2 – Edition 2.1 – 17.02.05 – 6672
B
5. Avoid touching the electrical contacts and nozzles.
6. Insert the new print cartridge with the electrical contacts facing towards
the front of the machine.
7. Push the print head forward until it clicks into place.
Install a new print cartridge
45
8. Close the cover and replace the handset.
9. When you have installed a new cartridge to replace one that has run out
of ink, your BT PaperJet 30 will automatically recognise a new cartridge
and the display shows
NEW PRINT HEAD? 1 = YES,0 = NO.Press 1
.
A test page will be printed. Examine the test page. Check that the
numbered scale is not broken at any point and that there are no
horizontal white lines within the black areas.
If everything seems OK, press . If there is a problem, press to
repeat the process.
Page 46

T PaperJet 30 UG – Issue 2 – Edition 2.1 – 17.02.05 – 6672
B
46
Install a new print cartridge
Clean print cartridge head and test the nozzles
If the print quality deteriorates, set your BT PaperJet 30 to clean the
print head and nozzles and print a test page.
1. Press
repeatedly until the display shows
HEAD MAINTENANCE
.
Press .
2. Display shows
NEW HEAD:ON
. Press or to switch to
NEW HEAD:OFF
Press .
3. Display shows
CLEANING:ON
. Press .
Your BT PaperJet 30 cleans the print head and the test page will be
printed.
Examine the test page. Check that the numbered scale is not broken at
any point and that there are no horizontal white lines within the black areas.
If you are not satisfied with the test page, repeat the process.
Press to cancel the test procedure at any time.
Clean print cartridge’s electrical contacts
.
1. Remove the handset from its cradle.
2. Open the front cover and wait for cartridge to stop moving.
Page 47

T PaperJet 30 UG – Issue 2 – Edition 2.1 – 17.02.05 – 6672
B
3. Disconnect your BT PaperJet 30 from the mains power.
4. Pull the print cartridge lever forward then lift the cartridge out.
Install a new print cartridge 47
5. Clean the electrical contacts inside the cartridge compartment using
a slightly damp cloth.
DO NOT TOUCH THE NOZZLES.
6. Now clean the electrical contacts on the cartridge with a slightly
damp cloth.
Page 48

T PaperJet 30 UG – Issue 2 – Edition 2.1 – 17.02.05 – 6672
B
Install a new print cartridge48
7. Replace the print cartridge and push until it clicks into place.
8. Close cover and replace the handset. Reconnect the mains power.
You will need to reset the date and time.
Page 49

T PaperJet 30 UG – Issue 2 – Edition 2.1 – 17.02.05 – 6672
B
Help
If the power fails
One-touch and speed dial directories are saved.
Documents stored in the memory as well as the date and time are not saved.
Printing stops before the job is finished
Check that the paper is not jammed.
Check that the front cover is fully closed.
Have you run out of paper? If receiving a fax, your machine can store up to 19 pages in its memory for printing later.
Cannot send a fax
There may be interference on the line.
Try sending the fax at a slower speed,
There may have been an error or a problem with the receiving machine. Check the display for an error message.
See Error Messages, page 43.
Reception in memory
see page 42.
49
If you place a document to be faxed or copied in the automatic feeder while receiving a document, printing of the
received document stops and it will be stored in the memory for printing later. During reception the display shows
RX IN MEMORY
Remove the document from the feeder to print the fax in memory.
Machine does not come on
Check that you have plugged it into the mains and that the power is switched on.
Document does not load
Check that it is an acceptable size and type of paper, see page 17.
.
Page 50

T PaperJet 30 UG – Issue 2 – Edition 2.1 – 17.02.05 – 6672
B
50
Help
Machine will not send a document
Check that the document is not jammed.
The line may be busy. Wait until it is free and try sending again.
Machine will not receive a document
Check the reception mode. If it is set for manual reception you must lift the handset and press to begin
reception,
see page 20.
Cannot copy a document
Check that the document is not jammed.
Remember when copying, you can only feed one sheet of paper at a time into the automatic feeder,
see page 27.
You may be using an unsuitable kind of paper,
see page 17.
Blank sheets are printed when copying
You may be copying the blank side of the page. Feed in pages with the side to be copied facing away from you.
Error code is listed in a report
If there has been a specific problem sending or receiving a fax you may see an error code listed in the transmission
or activity report. To check what has caused the problem,
see Error Codes below, page 51.
Cannot fix a recurring problem
Try unplugging your machine from the mains power, wait at least 10 seconds, then switch the power back on again.
If the fault continues, call the Helpline
0870 240 8026.
Page 51

T PaperJet 30 UG – Issue 2 – Edition 2.1 – 17.02.05 – 6672
B
Error Codes
Code Problem Solution
OK
(OK)
02
03
04
05
07
08
None Fax successful
Poor print quality. Check with sender about quality of original.
Could not connect to line. Check that your machine is plugged into the telephone
network. Check the handset is on the hook.
No answer from other machine or person. Check the number dialled is correct.
Error has occurred when re-sending a fax. Resend from the page indicated.
nn = the number of the page on which the
error occurred.
Resend pages nn – nn. (nn = the number Resend from the page indicated.
of the page on which the error occurred.
Document too long. Split the document to be sent into small sets of pages.
Scanner cannot read the document. Remove the document from the automatic feed and
reinsert it when it tries to connect.
Help
51
09
10
11
13
16
OCC
STOP pressed.
Problem during reception. Ask your sender to send the document again.
Printing error during reception. Correct the printing fault (e.g. out of ink) and wait for the
Document stored in memory but the document in the memory to be printed. Contact sender
memory was filled before completion. for the rest of the document.
Problem with polling. Call the sender and check their machine has been set up
correctly for polling.
Power failure on page nn. The power failed when sending or receiving a fax.
Resume transmission from the page indicated.
Line busy. Try again later.
Page 52

T PaperJet 30 UG – Issue 2 – Edition 2.1 – 17.02.05 – 6672
B
52
Help
Signals and On screen messages
Your BT PaperJet 30 provides audible alerts or messages on the display to inform you of the status of the machine
and for error messages. In some cases the error indicator light will also flash.
Audible alerts
Short tone – you have pressed the incorrect button when using the menu.
Long tone – fax has not been sent or received correctly.
Continuous tone – you must hang up the line.
Note: To turn off the ERROR LIGHT, press .
Display error messages
AUTOREDIAL NNN
CHECK DOCUMENT, PRESS (STOP)
Line busy, getting ready to redial the number.
Document not feeding in correctly. Take out and replace the document in the
automatic feeder and press to restore normal operation.
CHECK PAPER, PRESS (STOP)
CHECK PRINT HEAD
COPY INTERRUPTED
COVER OPEN
Out of paper. Add more and press .
Paper not being fed in correctly. Replace the paper in the feeder then press
to restore normal operation.
Print cartridge not detected or installed incorrectly. Install or re-install the
print cartridge.
Print nozzles need cleaning. See Clean print cartridge, page 46.
has been pressed during copying.
An error occurred during copying and it could not be printed.
Close the front cover.
Page 53

T PaperJet 30 UG – Issue 2 – Edition 2.1 – 17.02.05 – 6672
B
DOC IN MEMORY
MEMORY FULL
NOT PROGRAMMED
OUT OF INK
PAPER ERROR. PRESS (STOP)
POLL. RETRY NNN
REMOVE
DOCUMENT, PRESS (STOP)
RX ERROR
The document received is saved in the memory because an error occurred
during reception – e.g. paper jam, ink out etc) - preventing it from being
printed. Check and correct the problem.
One or more documents in the memory have filled the available capacity.
Check to see if there is fault with printing (e.g. paper out, paper jam etc)
and correct it.
You selected a one-touch or speed dial code that has not been set.
Insert a new cartridge, see page 44.
Paper jam during copying or receiving. Press . If the sheet is not
ejected automatically, remove it. See Paper Jams,
page 54
.
Polling reception connection not established. Your BT PaperJet is getting
ready to redial.
Paper jam during copying or sending. Press . If the sheet is not
ejected automatically, remove it.
See Paper Jams,
page 54
.
Scanning cancelled because was pressed.
Document not received correctly. Press to switch the error indicator
light off and acknowledge the message.
Help
53
RX IN MEMORY
SYSTEM ERROR NN
TX ERROR
Received rest of fax into memory because an error occurred during sending,
preventing it from being printed. The type of fault is displayed on the
bottom line.
A fatal error has occurred. Turn your machine off, wait for a few seconds,
then turn it back on again. If the problem continues, call the BT PaperJet
Helpline on 0870 240 8026.
Document not sent correctly. Press to switch off the error indicator
light and acknowledge the message. Send the fax again.
Page 54

T PaperJet 30 UG – Issue 2 – Edition 2.1 – 17.02.05 – 6672
B
54
Help
Paper jams
If sheets of plain paper get jammed, the display shows
PAPER ERROR PRESS
.
1. Press . If the jammed sheet does not eject automatically, carefully pull it out manually.
2. If the sheet is jammed inside the machine:
Turn off the mains power and take the handset off the cradle and open the front cover.
Move the print cartridge to the left hand side of the fax machine.
Release the paper feed roller by pulling the green lever forward as shown.
Page 55

T PaperJet 30 UG – Issue 2 – Edition 2.1 – 17.02.05 – 6672
B
Help 55
Remove the roller.
Remove the jammed paper.
Replace the roller by inserting one end into the locating hole on the left-hand side of the machine. Then with the
lever pointing forward press the right hand end down into the slot on the right.
Push the lever back into the upright position so that the roller cog wheel is engaged.
Close the cover and replace the handset. Reconnect the power and reset the date and time.
Page 56

T PaperJet 30 UG – Issue 2 – Edition 2.1 – 17.02.05 – 6672
B
Help56
Cleaning the scanner
Dust on the glass surface of the scanner may cause problems when scanning documents. To check if the scanner
is clean, make a copy of a blank piece of paper. If vertical lines appear on the copy, clean the scanner. If vertical
lines still appear, call the BT PaperJet Helpline
0870 240 8026.
1. Disconnect your BT PaperJet 30 from the mains power and remove the handset from its cradle.
2. Turn off the mains power and open the front cover.
3. Move the print cartridge to the left hand side of the fax machine.
4. Release the paper feed roller by pulling the green lever forward as shown.
Page 57

T PaperJet 30 UG – Issue 2 – Edition 2.1 – 17.02.05 – 6672
B
5. Remove the roller.
6. Clean the glass surface of the scanner with a soft, lint-free cloth.
Help 57
DO NOT POUR OR SPRAY CLEANING FLUID DIRECTLY ONTO THE GLASS SURFACE.
7. Replace the roller by inserting one end into the locating hole on the left-hand side of the machine. Then with the
lever pointing forward press the right hand end down into the slot on the right.
8. Push the lever back into the upright position so that the roller cog wheel is engaged.
9. Close the cover and replace the handset. Reconnect the power and reset the date and time.
Page 58

T PaperJet 30 UG – Issue 2 – Edition 2.1 – 17.02.05 – 6672
B
58
General information
Safety
General
Your BT PaperJet 30 should be placed on a level and stable surface at least 10cm away from other electrical
equipment.
Do not place it in direct sunlight or near a radiator, heater or air conditioning unit. Do not allow it to become
dusty or come into contact with water or chemicals.
Make sure air can circulate freely around your BT PaperJet 30. Do not cover or use in very enclosed spaces. Do
not place your machine on soft surfaces such as beds, duvets, cushions, sofas or carpets as there is a risk of
overheating.
Do not touch telephone wires or mains cables where the insulation is missing or damaged unless they have been
disconnected.
Do not attempt any repairs. This could expose you to high voltages or other risks. Contact the helpline for all
repairs.
Do not expose to rain or any other form of moisture. There is a risk of electric shock or fire. If any liquid is
accidentally spilled into your machine, immediately remove the mains power plug and have the BT PaperJet 30
inspected professionally.
Do not submerge any part of the product in water and do not use in damp conditions, such as bathrooms.
There is a slight chance that your BT PaperJet 30 could be damaged by an electrical storm. We recommend that
you unplug the power and telephone line cord for the duration of the storm.
Do not expose to fire, explosive or other hazardous conditions.
Cleaning
Unplug your BT PaperJet 30 from the mains and telephone line before cleaning. Do not use liquid or aerosol
cleaning agents such as sprays or polishes as these will damage the product.
Cleaning the exterior
Simply clean the casing with a damp (not wet) cloth or anti-static wipe. Never use a dry cloth as this may cause
a static shock.
Page 59

T PaperJet 30 UG – Issue 2 – Edition 2.1 – 17.02.05 – 6672
B
General information
Environmental
Do not expose to direct sunlight.
Do not stand your product on carpets or other surfaces which generate fibres, or place it in locations preventing
the free flow of air over its surfaces.
Do not submerge any part of your product in water and do not use it in damp conditions, such as bathrooms.
Do not expose your product to fire, explosive or other hazardous conditions.
There is a slight chance that your machine could be damaged by an electrical storm. We recommend that you
unplug the power a telephone line cord for the duration of the storm.
Guarantee
FOR ASSISTANCE CALL THE HELPLINE ON 0870 240 8026 quoting the model and serial number.
1. In the event that the Helpline is unable to resolve a problem over the phone, the following will apply:
I. The Helpline will require the customer to provide details of where the BT PaperJet 30 was purchased, date of
purchase and method of payment.
II. If the fax was purchased within 28 days a brand new replacement BT PaperJet 30 will be despatched by courier
to the customer.
59
III. If the product was purchased more than 28 days ago and within the guarantee period, a ‘loan’ BT PaperJet 30
will be despatched by courier to the customer.
2. If 1 (III) applies, the original fax will be repaired free of charge subject to the conditions in clause 5. BT’s normal
repair times for most faults is 14 days. If the fax is beyond economical repair we will replace it with a brand new
BT PaperJet 30. On completion of repair the customer will be contacted and give the option of the return of the
original repaired fax and free collection of the loan fax or at the customer’s choice, retention of the loan fax.
3. A new or loan fax will be delivered by courier. If a Helpline call is received by 4pm we can arrange an overnight
courier, but will agree a delivery time with the customer. On delivery of the new loan or repaired fax as
appropriate, the customer must promptly replace it in the box with the faulty fax or loan fax to enable the courier
to return the fax to BT.
4. If the customer decides to retain the loan fax, the balance of the original guarantee will transfer to this fax.
Page 60

T PaperJet 30 UG – Issue 2 – Edition 2.1 – 17.02.05 – 6672
B
60
General information
5. This guarantee does not cover the fair wear and tear or accidental damage or damage caused by improper
installation. The guarantee will not apply if upon inspection it is established that unauthorised repairs or
modifications have been made to the fax. In such circumstances the customer will be sent a condition report with
a choice of either (a) paying the cost of repair of the faulty fax or (b) the carriage charges incurred in having the
original fax returned un-repaired and the loan fax collected.
6. The liability of BT under the terms of the guarantee is limited to the exchange of the fax or the repair and return
of the original fax.
7. Excluded from this guarantee are accessories, consumables (e.g. ink cartridges).
8. This guarantee applies to the original customer only and is not transferable.
9. This guarantee does not affect the customer’s statutory rights
For your records
Date of purchase:
Place of purchase:
Serial number:
or guarantee purposes proof of purchase is
F
required so please keep your receipt.
Page 61

T PaperJet 30 UG – Issue 2 – Edition 2.1 – 17.02.05 – 6672
B
Technical information
How many fax machines/telephones can you have?
All items of telephone equipment have a Ringer Equivalence Number (REN), which is used to calculate the number
of items which may be connected to any one telephone line. Your BT PaperJet 30 has a REN of 1. A total REN of 4
is allowed. If the total REN of 4 is exceeded, the telephone may not ring.
With different fax/telephone types there is no guarantee of ringing, even when the REN is less than 4.
Switchboard compatibility
This product is intended for use within the UK for connection to the public telephone network and compatible
switchboards which support tone dialling and timed break recall. If in doubt please consult your service provider.
To set the switchboard dialling mode and access code
You must set your BT PaperJet 30 for connection to a switchboard.
1. Press
2. Display shows
3. Press or to switch between
select
repeatedly until the display shows
TEL. LINE
PRIV.LINE(PBX)
SET-UP
.
. Press .
PUBL.LINE (PSTN)
INSTALLATION
and
PRIV.LINE(PBX
then press .
). Press . For use with a switchboard
61
TONE
or
PULSE
4. Set Tone or Pulse dial mode for your switchboard. Press or to display
5. Press or to switch between
Recall, choose FLASH. If your access code is a digit(s), choose PREFIX. Press to confirm. If you choose PREFIX,
you are asked for the code. Enter the code using the keypad and press .
6. Set dial mode for the network (in the UK the network dial mode must be set to Tone). Press . Press or to
switch between
7. Press to confirm.
8. Press to return to standby.
Important: If you set the output mode to Flash, you simply need to press the button on your BT PaperJet 30
PSTN DIAL:TONE
to get an outside line. You can then dial the number you want as normal. When you are using an
outside line the display shows E for external call.
EXT. LINE PREFIX
and
PSTN DIAL:PULSE
or
EXT. LINE FLASH
.
. If your access code to get an outside line is
. Press .
Page 62

T PaperJet 30 UG – Issue 2 – Edition 2.1 – 17.02.05 – 6672
B
62
Technical information
If you have problems connecting to a switchboard, contact the BT PaperJet Helpline on 0870 240 8026.
R&TTE
This product is intended to be connected to analogue networks and private switching systems in the
United Kingdom.
This product complies with the essential requirements of the Radio Equipment and Telecommunications
Terminal Equipment Directive 1999/5/EC.
A copy of the certificate can be obtained from the Helpline
0870 240 8026.
Page 63

T PaperJet 30 UG – Issue 2 – Edition 2.1 – 17.02.05 – 6672
B
Technical information
Section 63
Page 64

T PaperJet 30 UG – Issue 2 – Edition 2.1 – 17.02.05 – 6672
B
Visit us at www.bt.com
Offices worldwide
The telecommunications services described in this publication
are subject to availability and may be modified from time to time.
Services and equipment are provided subject to British
Telecommunications plc’s respective standard conditions of
contract. Nothing in this publication forms any part of any contract.
© British Telecommunications plc 2005.
Registered Office: 81 Newgate Street, London EC1A 7AJ.
Registered in England No. 1800000.
BT PaperJet 30 UG (02/05) Issue 2 Edition 2.1
Designed and produced by The Art & Design P
Printed in Thailand.
255993V
artnership Ltd.
 Loading...