

Page 1

installation, start-up and
service instructions
SINGLE PA CKA GE RO OFT OP
ELECTRIC COOLING/GAS HEATING UNITS
CONTENTS
SAFETY CONSIDERATIONS . . . . . . . . . . . . . . . . . . . . . .1
INSTALLATION . . . . . . . . . . . . . . . . . . . . . . . . . . . . . . 1-14
I. Step 1 — Provide Unit Support. . . . . . . . . . . . . .1
II. Step 2 — Rig and Place Unit . . . . . . . . . . . . . . . .3
III. Step 3 — Field Fabricate Ductwork. . . . . . . . . . .7
IV. Step 4 — Make Unit Duct Connections . . . . . . .7
V. Step 5 — Install Flue Hood and Wind
Baffle . . . . . . . . . . . . . . . . . . . . . . . . . . . . . . . . . . .7
VI. Step 6 — Trap Condensate Drain . . . . . . . . . . . .8
VII. Step 7 — Install Gas Piping. . . . . . . . . . . . . . . . .8
VIII. Step 8 — Make Electrical Connections . . . . . . .8
IX. Step 9 — Make Outdoor-Air Inl et
Adjustments . . . . . . . . . . . . . . . . . . . . . . . . . . . . .9
X. Step 10 — Install Outdoor -Air Hood . . . . . . . . .11
XI. Step 11 — Install All Accessories. . . . . . . . . . .13
START-UP . . . . . . . . . . . . . . . . . . . . . . . . . . . . . . . . . 14-25
SERVICE . . . . . . . . . . . . . . . . . . . . . . . . . . . . . . . . . . 25-34
TROUBLESHOOTING. . . . . . . . . . . . . . . . . . . . . . . . 35-37
START-UP CHECKLIST. . . . . . . . . . . . . . . . . . . . . . . .CL-1
Page
581A
Sizes 155-240
Cancels: II 581A-155-2 II 581A-155-3
6/15/99
WARNING:
1. Improper installation, adjustment, alteration,
service, or maintenance can cause property
damage, personal injury, or loss of life. Refer to
the User’s Information Manual provided with
this unit for more details.
2. Do not store or use gasoline or other flammable
vapor s and l iq uids in t he vici nity of this or a ny
other appliance.
What to do if you smell gas:
1. DO NOT try to light any appliance.
2. DO NOT touch any electrical switch, or use any
phone in your buildi ng.
3. IMMEDIATELY call your gas supplier from a
neighbor’s phone. Follow the gas supplier’s
instructions.
4. If you cannot reach your gas supplier, call the
fire department.
SAFETY CONSIDERATIONS
Installation and servicing of air-conditioning equipment can
be hazardous due to system pressure and electrical components. Only trained and qualified service personnel should
install, repair, or service air-conditioning equipment.
Untrained personnel can perform the basic maintenance
functions of cleaning coils and filters and replacing filters.
All ot he r oper ati ons s hou ld be pe rfor med by tr ain ed se rvi ce
personnel. When working on air-conditioning equipment,
observe precautions in the literature, tags and labels
attached to the unit, and other safety precautions that may
apply.
Follow all sa fe ty codes. Wear safet y gl a sse s an d w o rk g lov e s.
Use quenching cloth for unbrazing operations. Have fire
extinguishers available for all brazing operations.
WARNING: Before performing service or maintenance operations on unit, turn off mail power s wi tch to
unit. electrical shock cou l d cause personal inju ry.
WARNING: Disconnect gas piping from unit when
pressure testing at pressure greater than 0.5 psig.
Pressures greater than 0.5 psig will cause gas valve
damage resulting in hazardous condition. If gas valve
is subjected to pressure greater than 0.5 psig, it must
be replaced before use. When pressure testing fieldsupplied gas piping at pre ssures of 0.5 ps ig or less, a
unit connected to such piping must be isolated by closing the manual gas valve(s).
IMPORTANT: Units have high ambient operating limits. If
limits are exceeded, the units will automatically lock the
compressor out of operation. Manual res et will be required to
resta r t th e compre ss o r.
INSTALLATION
I. STEP 1 — PROVIDE UNIT SUPPORT
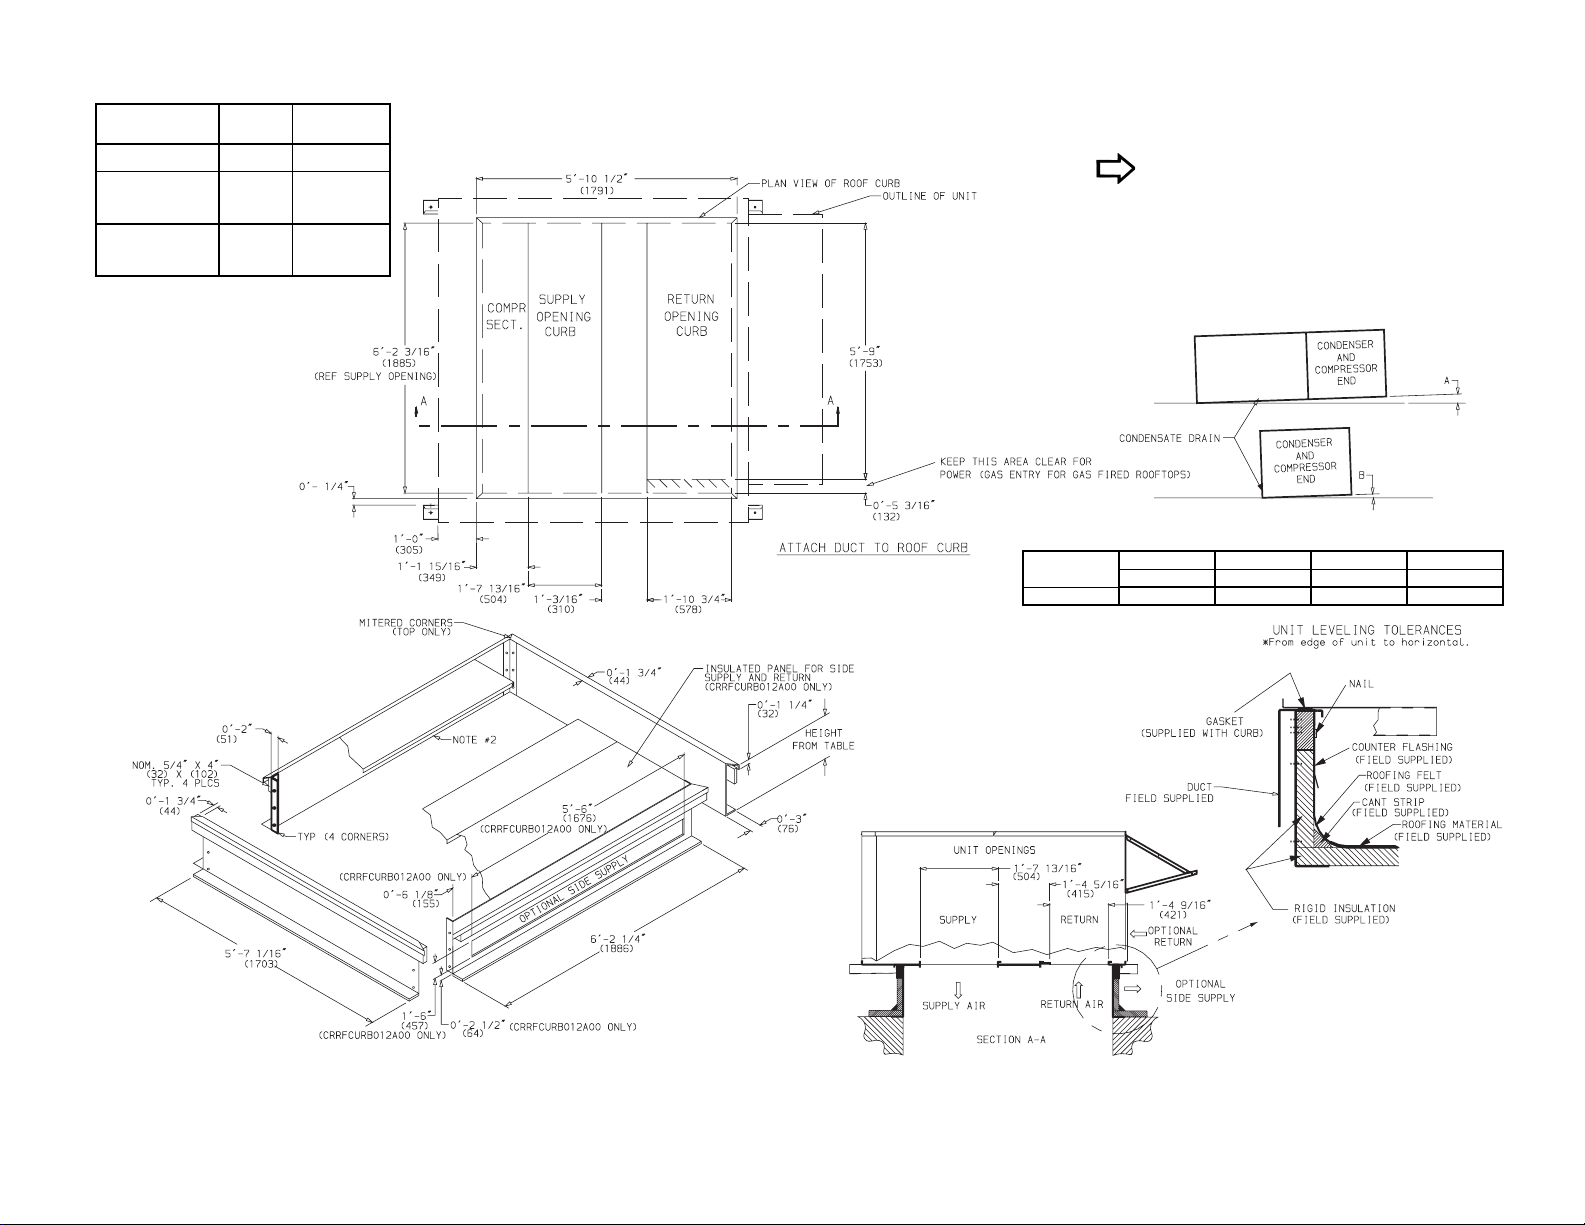
A. Roof Curb
Assemble or install accessory roof curb or horizontal supply
roof curb in accordance with instructions shipped with this
accessory. See Fig. 1 and 2. Install insulation, cant strips,
roofing, and counter flashing as shown. Ductwork can be
installed to roof curb or horizontal supply roof curb before
unit is set in place.
(Instructions continued on page 3.)
Page 2
—2—
PKG. NO. REF.
CRRFCURB010A00
CRRFCURB011A00
CRRFCURB012A00
CURB
HEIGHT
ft-in. (mm)
1-2
(305)
2-0
(610)
2-0
(610)
DESCRIPTION
Standard Curb
14” High
Standard Curb
for Units
Requiring High
Installation
Side Supply
and Return
Curb for High
Installation
NOTES:
1. Roof curb accessory is shipped disassembled.
2. Insulated panels: 1 in. thick neoprene coated 1
3. Dimensions in ( ) are in millimeters.
1
/2 lb density.
4. Direction of airflow.
5. Roof curb: 16 ga. (VA03-56) stl.
To pre vent the hazard of stagnant water build-up in the drain
NOTE:
pan of the indoor section, unit can only be pitched as shown.
Dimensions (degrees and inches)
UNIT
ALL
AB
DEG.IN.DEG.IN.
.28 .45 .28 .43
Fig. 1 — Roof Curb Details
Page 3
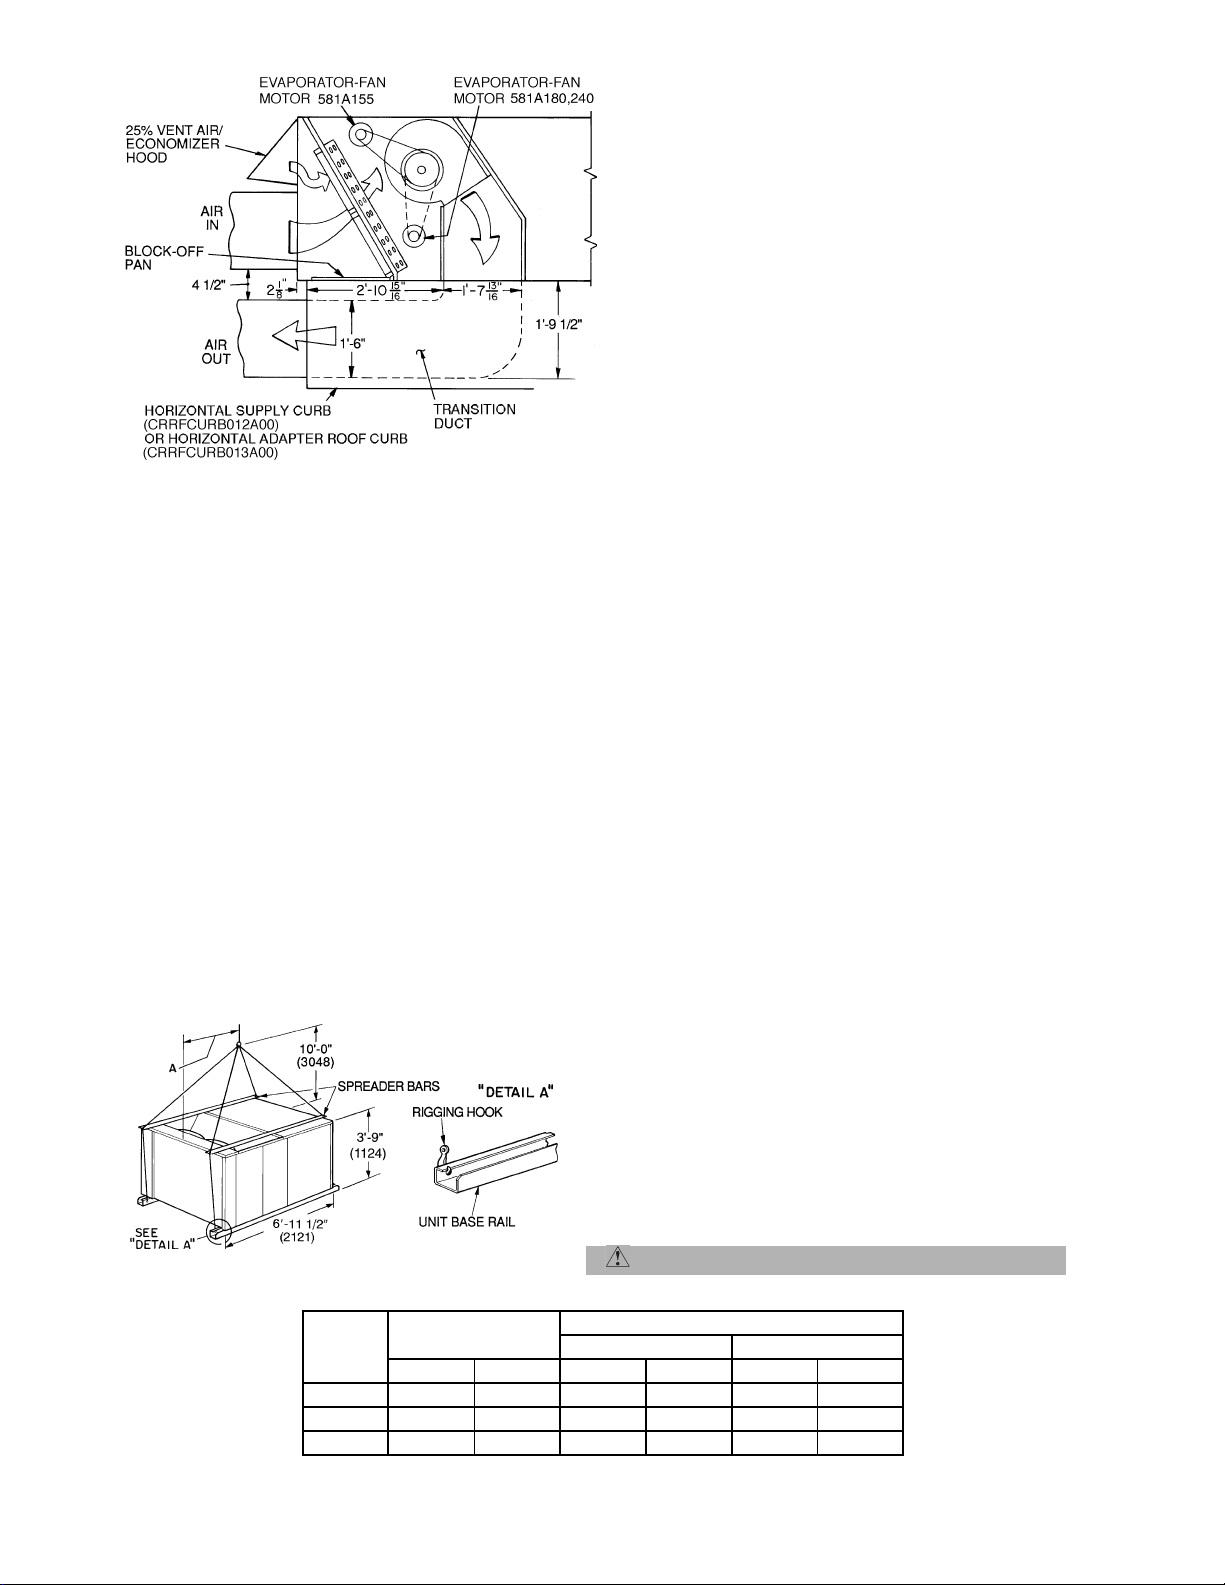
For preassembled horizontal adapter roof curb part no.
NOTE:
(CRRFCURB013A00), the accessor y kit includes a factory-designed,
high-static, regain transition duct. For horizontal curb part no.
CRRFCURB012A00, a field-supplied transition duct is required.
Fig. 2 — Horizontal Adapter Roof Curbs
and Roof Curbs
IMPORTANT: Curb or adapt er roof cur b must be lev el. Th is is
necessary to per mit unit drain to function properly. Unit leveling tolerance is ±
1
/16 in. per linear ft in any direction. Refer
to Accessory Roof Curb or Horizontal Supply Roof Curb
Installation Instructions for additional information as
required.
When accessory roof curb or horizontal supply roof curb is
used, unit may be installed on class A, B, or C roof covering
material.
IMPORTANT: The gasketing of the unit to the roof curb or
adapter roof curb is critical for a watertight seal. Install gasket with the roof curb or adapter as shown in Fig. 1. Improperly applied gasket can also result in air leaks and poor unit
performance.
B. Alternate Unit Support
When a curb or adapter cannot be used, install unit on a
noncombustible surface. Support unit with sleepers, using
unit curb support area. If sleepers cannot be used, support
long sides of unit with a minimum of 3 equally spaced 4-in. x
4-in. pads on each side.
II. STEP 2 — RIG AND PLACE UNIT
Inspect unit for transportation damage. File any claim with
tran sportat i on agency.
Do not drop unit; keep upright. Spreader bars are not
required if top crating is left on unit. Use spreader bars over
unit to prev ent sling or cabl e damage. Rollers may be used to
move unit across a roof. Level by usi n g unit frame as a reference; lev eling toler a n ce is ±
1
/16 in. per linear ft in any direction. See Fig. 3 for additional information. Unit operating
weight is shown in Table 1.
Four lifting holes are provided in ends of unit base rails as
shown in Fig. 3. Refer to ri ggi ng inst ruct ions on unit.
A. Positioning
Maintain clearance, per Fig. 4 and 5, around and above unit
to provide minimum distance from combustible materials,
proper airflow, and service access.
Do not install unit in an indoor location. Do not locate air
inlets near exhaust vents or other sources of contaminated
air. For proper unit operation, ade quate combustion a nd ventilation air must be provided in accordance with Section 5.3
(Air for Combustion and Ventilation) of the National Fuel
Gas Code, ANSI Z223.1 (American National Standards
Institute) .
Although unit is weatherproof, guard against water from
higher level runoff and overhangs.
Locate mechanical draft system flue assembly at least 4 ft
from any opening through which combustion products could
enter the building, and at least 4 ft from any adjacent building. When unit is located adjacent to public walkways, flue
assembly must be at leas t 7 ft above grade.
B. Roof Mount
Check building codes for weight distribution requirements.
Unit operating weight is shown in Table 1.
Instructions continued on page 8.
UNIT
581A
155
180
240
NOTES:
1. Dimensions in ( ) are in millimeters.
2. Refer to Fig. 4 and 5 for unit operating weights.
3. Remove boards at ends of unit and runners prior to rigging.
4. Rig by inser ting hook s in to uni t ba se rails as show n. Use c or n er pos t from
packaging to protect coil from damag e. Use bumper boards for spreader
bars on all units.
5. Weights do not include opti onal economi zer. Add 110 lb (50 kg) for econo mizer weight.
6. Weights given are for aluminum evaporator and condenser coil plate fins.
7. Add 75 lb (34 kg) for crating on 581A155 and 180 units. Add 135 lb (61 kg)
for crating on 581A240 units.
8. Add 150 lb (68 kg) for copper condens er coi l. Add 280 lb (127 kg ) for
copper condenser and evaporator coils.
CAUTION:
MAXIMUM SHIPPING
WEIGHT
lb kg ft-in. mm ft-in. mm
1725 782 6-11
1800 816 6-11
1900 862 6-11
AB
1
/
2
1
/
2
1
/
2
All panels must be in place when rigging.
DIMENSIONS
2121 4-0 1219
2121 3-2 964
2121 3-4 1016
Fig. 3 — Rigging Details
—3—
Page 4

—4—
STD UNIT
UNIT
WEIGHT
581A
Lb Kg Lb Kg Lb Kg Lb Kg Lb Kg Lb Kg ft-in. mm ft-in. mm ft-in. mm
155 1725 782 110 50 427 194 390 177 438 199 470 213 3-3 991 3-5 1051 1-10 559
180 1800 816 110 50 417 189 399 181 481 218 503 228 3-2 961 3-6 1070 1-10 559
ECONO-
MIZER
WEIGHT
CORNERACORNERBCORNERCCORNER
NOTES:
1. Refer to print for roof curb accessory dimensions.
2. Dimensions in ( ) are in millimeters.
D
DIM A DIM B DIM C
3. Center of Gravity.
4. Direction of airflow.
5. Ductwork to be attached to accessory roof curb only.
6. Minimum clearance:
• Rear: 7 ft- 0 in. (2134) for coil removal. This dim ension can be reduced
to 4 ft-0 in. (1219) if conditions permit coil removal from the top.
• 4 ft-0 in. (1219) to combustible surfaces, all four sides (includes between
units).
• Left side: 4 ft-0 in.(1219) for proper condenser coil airflow.
• Front: 4 ft-0 in. (1219) for control box access.
• Right side: 4 ft-0 in. (1219) for proper operation of damper and power
exhaust if so equipped.
• Top: 6 ft-0 in. (1829) to assure proper condenser fan operation.
• Bottom: 14 in. (356) to combustible surfaces (when not using curb).
• Control box side: 3 ft-0 in. (914) to ungrounded surfaces, non-combustible.
• Control box side: 3 ft-6 in. (1067) to block or concrete walls, or other
grounded surfaces.
POWER EXHAUST/
BAROMETRIC RELIEF
(ACCESSORY ONLY)
• Local codes or jurisdiction may prevail.
7. With the exception of clearance for the condenser coil and the damper/
power exhaust as stated in Note no. 6, a removable fence or barricade
requires no clearance.
8. Dimensions are from outsi de of corner post. Allow 0 ft-
side for top cover drip edge.
5
/16 in. (8) on each
581A180 ONLY
Fig. 4 — Base Unit Dimensions; 581A155 and 180
POWER EXHAUST/
BAROMETRIC RELIEF
(ACCESSORY ONLY)
FIELD
SUPPLIED
Page 5

—5—
UNIT STD. UNIT WEIGHT
581A240
NOTES:
1. Refer to print for roof curb accessory dimensions.
2. Dimensions in ( ) are in millimeters.
3. Center of Gravity.
4. Direction of airflow.
5. Ductwork to be attached to accessory roof curb only.
6. Minimum clearance:
• Rear: 7 ft-0 in. (2134) for coil removal. This dimensio n can be reduced to
4 ft-0 in. (1219) if conditions permit coil removal from the top.
• 4 ft-0 in. (1219) to combustible surfaces, all four sides (includes between
units).
• Left side: 4 ft-0 in.(1219) for proper condenser coil airflow.
• Front: 4 ft-0 in. (1219) for control box access.
• Right side: 4 ft-0 in. (1219) for proper operation of damper and power
exhaust if so equipped.
• Top: 6 ft-0 in. (1829) to assure proper condenser fan operation.
• Bottom: 14 in. (356) to combustible surfaces (when not using curb).
• Control box side: 3 ft-0 in. (914) to ungrounded surfaces, non-combustible.
• Control box side: 3 ft-6 in. (1067) to block or concrete walls, or other
grounded surfaces.
• Local codes or jurisdiction may prevail.
7. With the exception of clearance for the condenser coil and the damper/power
exhaust as stated in Note no. 6, a removable fence or barricade requires no
clearance.
8. Dimensions are fr om outside of cor ner post. Allow 0 ft -
side for top cover drip edge.
1900 lbs (862 kg) 110 lbs (50 kg)
ECONOMIZER
WEIGHT
5
/16 in. (8) on each
Fig. 5 — Base Unit Dimensions; 581A240
Page 6

T able 1 — Physical Data
UNIT 581A 155 180 240
NOMINAL CAPACITY (tons)
OPERATING WEIGHT (lb)
Unit
Al/Al*
Al/Cu*
Cu/Cu*
Economizer
Roof Curb†
COMPRESSOR
Quantity
Number of Refrigerant Circuits
Crankcase Heater Watts
Oil (oz) (Ckt 1, Ckt 2)
REFRIGERANT TYPE
Expansion Device
Operating Charge (lb oz)
Circuit 1**
Circuit 2
CONDENSER COIL
Rows...Fins/in.
Total Face Area (sq ft)
CONDENSER FAN
Nominal Cfm
Quantity...Diameter (in.)
Motor Hp...Rpm
Watts Input (Total)
EVAPORATOR COIL
Rows...Fins/in.
Total Face Area (sq ft)
EVAPORATOR FAN
Quantity...Size (in.)
Type Drive
Nominal Cfm
Std Motor Hp
Opt Motor Hp
Motor Nominal Rpm
Std Maximum Continuous Bhp
Opt Maximum Continuous Bhp
Motor Frame Size
Fan Rpm Range Low-Medium Static
Motor Bearing Type
Maximum Allowable Rpm
Motor Pulley Pitch Dia. Low-Medium Static
Nominal Motor Shaft Diameter (in.)
Fan Pulley Pitch Diameter (in.) Low-Medium Static
Nominal Fan Shaft Diameter (in.)
Belt, Quantity...Type... Length (in.) Low-Medium Static
Pulley Center Line Distance (in.)
Speed Change per Full Turn of
Movable Pulley Flange (Rpm)
Movable Pulley Maximum
Full Turns From Closed Position
Factory Speed
Factory Speed Setting (Rpm) Low-Medium Static
FURNACE SECTION
Rollout Switch Cutout Temp (F) ll
Burner Orifice Diameter (in...drill size)
Natural Gas
Thermostat Heat Anticipator Setting
Stage 1 (amps)
Stage 2 (amps)
Gas Input (Btuh)Stage 1
Efficiency (Steady State) (%)
Temperature Rise Range
Manifold Pressure (in. wg)
Natural Gas
Gas Valve Quantity
GasValvePressure Range (in. wg)
Stage 2
(psig)
High Static
High Static
High Static
High Static
Low-Medium Static
High Static
High Static
0.98 0.8 0.98 0.8 0.98 0.8
0.44 0.44 0.44 0.44 0.44 0.44
Field Gas C onnection Size (in.-FPT)
HIGH-PRESSURE SWITCH (psig)
Cutout
Reset (Auto.)
LOW-PRESSURE SWITCH (psig)
Cutout
Reset (Auto.)
FREEZE PROTECTION THERMOSTAT (F)
Opens
Closes
OUTDOOR-AIR INLET SCREENS
Quantity...Size (in.)
RETURN-AIR FILTERS
Quantity...Size (in.)
LEGEND
Al —
Bhp —
Cu —
TXV —
Aluminum
Brake Horsepower
Copper
Thermostatic Expansion Valve
12 15 20
1725 1800 1900
1875 1950 2050
2005 2080 2180
110 110 110
200 200 200
22 2
22 2
70 70 70
60,66 85,60 110,110
20.7 19.5 18.5
11.9 13.45 13.3
Cross-Hatched
1
/2...1050
2...10 X 10 2...12 x 12 2...12 x 12
3
4...15 4...15 4...15
10,500 10,500 14,200
3...22 3...22 2...30
/8-in. Copper Tubes, Aluminum Lanced, Aluminum Pre-Coated, or Copper Plate Fins
21.7 21.7 21.7
1100 1100 3400
Cross-Hatched 3/8-in. Copper Tubes, Aluminum Lanced or Copper Plate Fins, Face Split
4...15 4...15 4...15
17.5 17.5 17.5
Belt Belt Belt
5200 6000 8000
2.9 5 7.5
3.7
1725 1745 1745
R-22
TXV
Propeller Type
1
/2...1050 1...1075
Centrifugal Type
3.13 6.13 9.47 (208 v)
4.38
56H 184T 213T
834-1064 873-1021 1002-1151
1161-1426 1025-1200 1193-1369
Ball Ball Ball
1550 1550 1550
3.1/4.1 4.9/5.9 5.4/6.6
3.7/4.7 4.9/5.9 5.4/6.6
7
/
8
6.0 9.4 9.4
5.2 8.0 7.9
3
1
/
16
1...BX...42 1...BX...50 1...BX...54
1...BX...42 1...BX...48 1...B X...50
13.5-15.5 13.3-14.8 14.6-15.4
11/
8
17/
16
58 37 37
67 44 44
4†† 4†† 4††
3.5 3.5 3.5
978 965 1095
1327 1134 1303
190 190 190
0.1285...30/ 0.136...29 0.1285...30/ 0.136...29 0.1285...30/ 0.136...29
172,000/230,000 206,000/275,000 206,000/275,000
225,000/300,000 270,000/360,000 270,000/360,000
81 81 81
15-45/30-60 15-45/20-50 15-45/20-50
3.3 3.3 3.3
11 1
5.5-13.5 5.5-13.5 5.5-13.5
.235-.487 .235-.487 .235-.487
3
/
4
*Evaporator coil fin material/condenser coil fin material.
†Weight of 14-in. roof curb.
**Circuit 1 uses the lower portion of condenser coil and lower portion of evaporator coils, and
Circuit 2 uses the upper portion of both coils.
††Pulley has 6 turns. Due to belt and pulley, moveable pulley cannot be set to 0 to 1 turns open.
llRollout switch is manual reset.
3
/
4
426
320
27
44
30 ± 5
45 ± 5
Cleanable
2...20 x 25 x 1
1...20 x 20 x 1
Throwaway
4...20 x 20 x 2
4...16 x 20 x 2
(230 and 460 v)
13/
8
17/
16
3
/
4
10.33
—6—
Page 7

III. STEP 3 — FIELD FABRICATE DUCTWORK
On vertical units, secure all ducts to roof curb and building
structure. Do not connect ductwork to unit. Use flexible duct
connectors between unit and ducts as required. Adequately
insulate and weatherproof all ductwork located outdoors,
joints, and roof openings with counter flashing and mastic in
accordance with applicable codes. Insulate ducts passing
through unconditioned space, and use vapor barrier in accordance wit h the latest issue of SMACNA (Sheet Meta l and Air
Conditioning Contractors National Association) and ACCA
(Air Conditioning Contractors of America) minimum installation standards for heating and air conditioning systems.
Ducts passing through an unconditioned space must be insulated and covered with a vapor barrier.
A minimum clearance to combustibles of 1 in. for the first
24 in. of ductwork is required for all units with electric heat.
Cabinet return-air static shall not exceed –0.35 in. wg with
economizer or –0.45 in. wg without economizer.
IV. STEP 4 — MAKE UNIT DUCT CONNECTIONS
Unit is shipped for thru-the-bottom duct connections. Ductwork openings are shown in Fig. 1, 4, and 5. Duct
connections are shown in Fig. 6. Field-fabricated concentric
ductwork may be connected as shown in Fig. 7 and 8. Attach
all ductwork to roof curb and roof curb basepans. Refer to
installation instructions shipped with accessory roof curb for
more information.
WARNING: For vertical supply and return units,
tools or parts coul d drop into ductwork a nd cause an
injury. Install a 90 degree turn in the return ductwork
between the unit and the conditioned space. If a
90 degree elbow cannot be installed, then a grille of
sufficient strength and density should be installed to
prevent objects from falling into the conditioned space.
V. STEP 5 — INSTALL FLUE HOOD AND WIND BAFFLE
Flue hood, screen, and wind baffle are shipped secured
under main control box. To install, secure flue hood and
screen to access panel with screws provided. See Fig. 9. The
wind baffle is then installed over the flue hood.
NOTE: When properly installed, flue hood will line up with
combustion fan housing. See Fig. 10.
Do not drill in this area; damage to basepan may result in water
NOTE:
leak.
Fig. 6 — Air Distribution — Thru-the-Bottom
(581A180, 240 Unit Shown)
Do not drill in this area; damage to basepan may result in water
NOTE:
leak.
Fig. 7 — Concentric Duct Air Distribution
(581A180, 240 Unit Shown)
Dimensions A, A’, B and
NOTE:
B’ are obtained from field-supplied ceiling diffuser.
Shaded areas indicate block-off pans.
Fig. 8 — Concentric Duct Details
INLET
WIND
BAFFLE
LOUVERS
FLUE
SCREEN
Fig. 9 — Flue Hood Location
—7—
Page 8

INDUCED DRAFT
3/4" FPT DRAIN
CONNECTION
1-3/8"
DRAIN HOLE
INDOOR MOTOR ACCESS
FILTER
ACCESS
MOTOR
All field wiring must comply with NEC and local requirements. Insulate low-voltage wires for highest voltage contained within condui t when low-volta ge control wir es are run
in the same conduit as high-voltage wires .
COMBUSTION
FAN HOUSING
MAIN BURNER
SECTION
HEAT EXCHANGER
SECTION
Fig. 10 — Combustion Fan Housing Location
VI. STEP 6 — TRAP CONDENSATE DRAIN
See Fig. 4, 5, and 11 fore drain location. Plug is provided in
drain hole and must be removed when unit is operating. One
3
/4 in. half coupling is provided inside unit evaporat or section
for condensate drain connection. An 8
nipple and a 2 in. x
standard
3
/4 in. diameter elbow to provide a straight path
3
/4 in. diamet er pi pe ni ppl e are co uple d to
1
/2 in. x 3/4 in. diameter
down through holes in unit base rails (see Fig. 11 and 12). A
trap at least 4 inc hes deep must be used.
VII. STEP 7 — INSTALL GAS PIPING
The gas supply pipe enters the unit through the 1
diameter knockout provided. The gas connection to the unit
is made to th e
3
/4 in. FPT gas inlet on the gas manifold. Unit
1
/2 in.
is equipped for use with natural gas. Installation must conform with local building codes or, in the absence of local
codes, wi th the National Fuel Gas code, ANSI Z223.1.
Install field-supplied manual gas shutoff valve with a
1
/8 in.
NPT pressure tap for test gage connection at unit. Field gas
piping must include sediment trap and union. See Fig. 13.
Install sedim ent trap in riser leading to heating section. This
drip leg functions as a trap for dirt and condensate. Install
trap where condensate cannot freeze. Install this sediment
trap b y connecti ng a piping tee to riser lead ing to he ating
section, so that straight-through section of tee is vertical.
Then, connect capped n ipple in to lower end of t ee. Extend
capped nipple below level of gas contr ols.
Fig. 11 — Condensate Drain Details
(581A155 Shown)
Fig. 12 — Condensate Drain Piping Detai ls
WARNING: Do not pressure test gas supply while
connected to unit. Always disconnect union before
servicing.
IMPORTANT: Natural gas pressure at unit gas connection
must not be less than 5.5 in. wg or greater than 13.5 in. wg.
Size gas-supply piping for 0.5-in. wg maximum pressure
drop. Do not use supply pipe smaller than unit gas
connection.
VIII. STEP 8 — MAKE ELECTRICAL CONNECTIONS
A. Field Power Supply
Unit is factory wired for voltage shown on unit nam epl ate.
When installing units, provide a disconnect per NEC
(National Electrical Code) requirements of adequate size
(Table 2).
Fig. 13 — Field Gas Piping
—8—
Page 9

Route power and ground lines through control box end panel
or unit basepa n (s ee Fig. 4 and 5) to connections as shown on
unit wiring diag ram and Fig. 14.
CAUTION: The correct power phasing is critical in
the operation of the scroll compressors. An incorrect
phasing will cause the compressor to rotate in the
wrong direction. This may lead to premature compressor failure.
WARNING: The unit must be electrically grounded
in accordance with local codes and NEC ANSI/NFPA
70 (National Fire Protection Association).
Field wiring must conform to temperature limitations for
type “T” wire. All field wiring must comply with NEC and
local requirements.
Transformer no. 1 is wired for 230-v unit. If 208/230-v unit is
to be run with 208-v power supply, the transformer must be
rewired as follows:
1. Remove cap from red ( 208 v ) wi re.
2. Remove cap from orange ( 230 v ) spliced wire.
3. Replace oran ge wir e wi th red wire.
4. Recap both wires.
IMPORTANT: BE CERTAIN UNUSED WIRES ARE
CAPPED. Failure to do so may damage the transformers.
Operating voltage to compressor must be within voltage
range indicated on unit nameplate. On 3-phase units, voltages between phases must be balanced within 2%.
Unit failure as a result of operation on improper line voltage
or excessive phase imbalance constitutes abuse and may
cause damage to electrical components. Such operation
would invalidate any warrant y.
B. Field Control Wiring
The unit must have a separate electrical service with a fieldsupplied , w at e rp ro o f, fuse d di sconnect sw i tc h mou nted at, or
within sight fr o m , th e unit. R ef e r to the u n i t r a ti n g plate fo r
maximum fuse/circuit breaker size and minimum circuit
amps (ampacity) for wire sizing. Be sure disconnect switch
does not obst ruct unit rating plate.
The field-supplied disconnect switchbox may be mounted on
the unit over the high-voltage inlet hole in the control corner
panel.
Connect ground lead to chassis ground connection when
using separate ground wire. The unit has a terminal block
for fie l d power connect ions. Inst all conduit conne ctors in side
panel power supply knockout openings indicated in Fig. 4
and 5. Route power lines through connector to unit control
box.
Install a Bryant approved accessory thermostat assembly
according to the installation instructions included with the
accessory. Locate thermostat assembly on a solid wall in the
conditioned s pace to sense average temperature.
Route thermostat cable or equivalent single leads of colored
wire from subbase terminals through conduit in unit to lowvoltage connections as shown on unit label wiring diagram
and in Fig. 15.
NOTE: For wire runs up to 50 ft, use no. 18 AWG (American
Wire Gage) insulated wire (35 C minimum). For 50 to 75 ft,
use no. 16 AWG insulated wire (35 C minimum). For over
75 ft, use no. 14 AW G insulated wire (35 C Minimum).
All wire larger than no. 18 AWG cannot be directly connected
at the thermostat and will require a junction box and splice
at the thermostat.
Set heat antic i pator settings as follows:
VOLT AGE W1 W2
208/230
460
0.98 0.44
0.80 0.44
The room thermostat heat anticipator must be properly
adjusted to ensure proper heating performance. Set the heat
anticipator to settings based on the table above, by using an
ammeter to determine the exact setting for stages 1 and 2.
Failure to make a proper heat anticipator adjustment may
result in improper operation, discomfort to the occupants of
the conditioned space, and inefficient energy utilization;
however, the required setting m ay be changed slightly to provide a greater de gr ee of comfort for a particular installation.
Refer to Accessory Remote Control Panel instructions if
required.
STEP 9 — MAKE OUTDOOR-AIR INLET ADJUSTMENTS
A. Manual Outdoor-Air Damper
All units (except those equipped with a factory-installed
economizer) have a manual outdoor-air damper to provide
ventilation air.
Damper can be preset to admit up to 25% outdoor air into
return-air compartment. To adjust, loosen securing screws
and move damper to desired setting. Retighten screws to
secure damper (Fig. 16).
B. Optional Economizer
Economizer Mot or C ontrol Module (See Fig . 17-19)
The economizer control location is shown Fig. 17. For maxi-
mum benefit of outdoor air, set economizer motor control
module to the “D” setting (Fig. 18). The economizer motor
control module is located on the economizer motor. See
Fig. 19.
The maximum wire size for TB1 is 2/0.
NOTE:
EQUIP —
GND —
NEC —
TB —
LEGEND
Equipment
Ground
National Electrical Code
T erminal Board
Fig. 14 — Field Power Wiring Connections
Fig. 15 — Field Control Therm ostat Wiring
—9—
Page 10

Table 2 — Electrical Data
NOMINAL
UNIT
VOLTAGE
581A
(Standard
(Optional
LEGEND
FLA —
HACR —
IFM —
LRA —
MCA —
MOCP —
NEC —
OFM —
RLA —
*Fuse or HACR circuit breaker.
NOTES
1. In compliance with NEC requirements for multimotor and combination load equipment (refer
to NEC Articles 430 and 440), the overcurrent protective device for the unit shall be fuse or
HACR breaker. Canadian units may be fuse or circuit breaker.
2.
Unbalanced 3-Phase Supply Voltage
Never operate a motor where a phase imbalance in supply voltage is greater than 2%.
the following formula to determine the percent voltage imbalance.
% Voltage Imbalance
= 100 x
(3 Ph, 60
Hz)
208/230 187 253 20.7 156 19.3 123 3 0.5 1.7 2.9
015
IFM)
015
IFM)
017
025
460 414 508 10 70 10 62 3 0.5 0.8 2.9 4.2
208/230 187 253 20.7 156 19.3 123 3 0.5 1.7 3.7
460 414 508 10 70 10 62 3 0.5 0.8 3.7 4.8
208/230 187 253 32.1 195 20.7 156 3 0.5 1.7 5.0
460 414 508 16.4 95 10 70 3 0.5 0.8 5.0 7.9
208/230 187 253 42 239 33.6 225 2 1 6.6 7.5
460 414 508 19.2 125 17.3 114 2 1 3.3 7.5 13.0
Full Load Amps
Heating, Air Conditioning and
Refrigeration
Indoor (Evaporator) Fan Motor
Locked Rotor Amps
Minimum Circuit Amps
Maximum Overcurrent Protection
National Electrical Code
Outdoor (Condenser) Fan Motor
Rated Load Amps
:
max voltage deviation from average voltage
average voltage
VOLTAGE
RANGE
Min Max RLA LRA RLA LRA Qty Hp FLA (ea) Hp FLA FLA LRA FLA MCA MOCP*
COMPRESSOR
No. 1 No. 2
Use
7
457
POWER
EXHAUST
—
2.3—6.0
—
2.3—6.0
—
2.3—6.0
—
2.3—6.0
OFM IFM
8.8/
8.4—4.6—18.8
11.0/
10.5—4.6—18.8
15.8/
15.8—4.6—18.8
25.0/
25.0—4.6—18.8
EXAMPLE: Supply voltage is 460-3-60.
AB = 452 v
BC = 464 v
AC = 455 v
Average Voltage =
=
= 457
Determine maximum deviation from average voltage.
(AB) 457 – 452 = 5 v
(BC) 464 – 457 = 7 v
(AC) 457 – 455 = 2 v
Maximum deviation is 7 v.
Determine percent voltage imbalance.
% Voltage Imbalance = 100 x
= 1.53%
This amount of phase imbalance is satisfactory as it is below the maximum allowable 2%.
IMPORTANT:
utility company immediately.
452 + 464 + 455
3
1371
3
If the supply voltage phase imbalance is more than 2%, contact y our local electric
COMBUSTION
FAN MOTOR
0.57
0.57
0.30
0.30
0.57
0.57
0.30
0.30
0.57
0.57
0.30
0.30
0.57
0.57
0.30
0.30
59/59
64/63
29
31
61/61
66/65
30
32
82/82
86/86
41
43
124/124
129/129
61
63
POWER
SUPPLY
110/110
110/110
150/150
150/150
70/70
80/80
35
40
80/80
80/80
35
40
50
50
80
80
—10—
Page 11
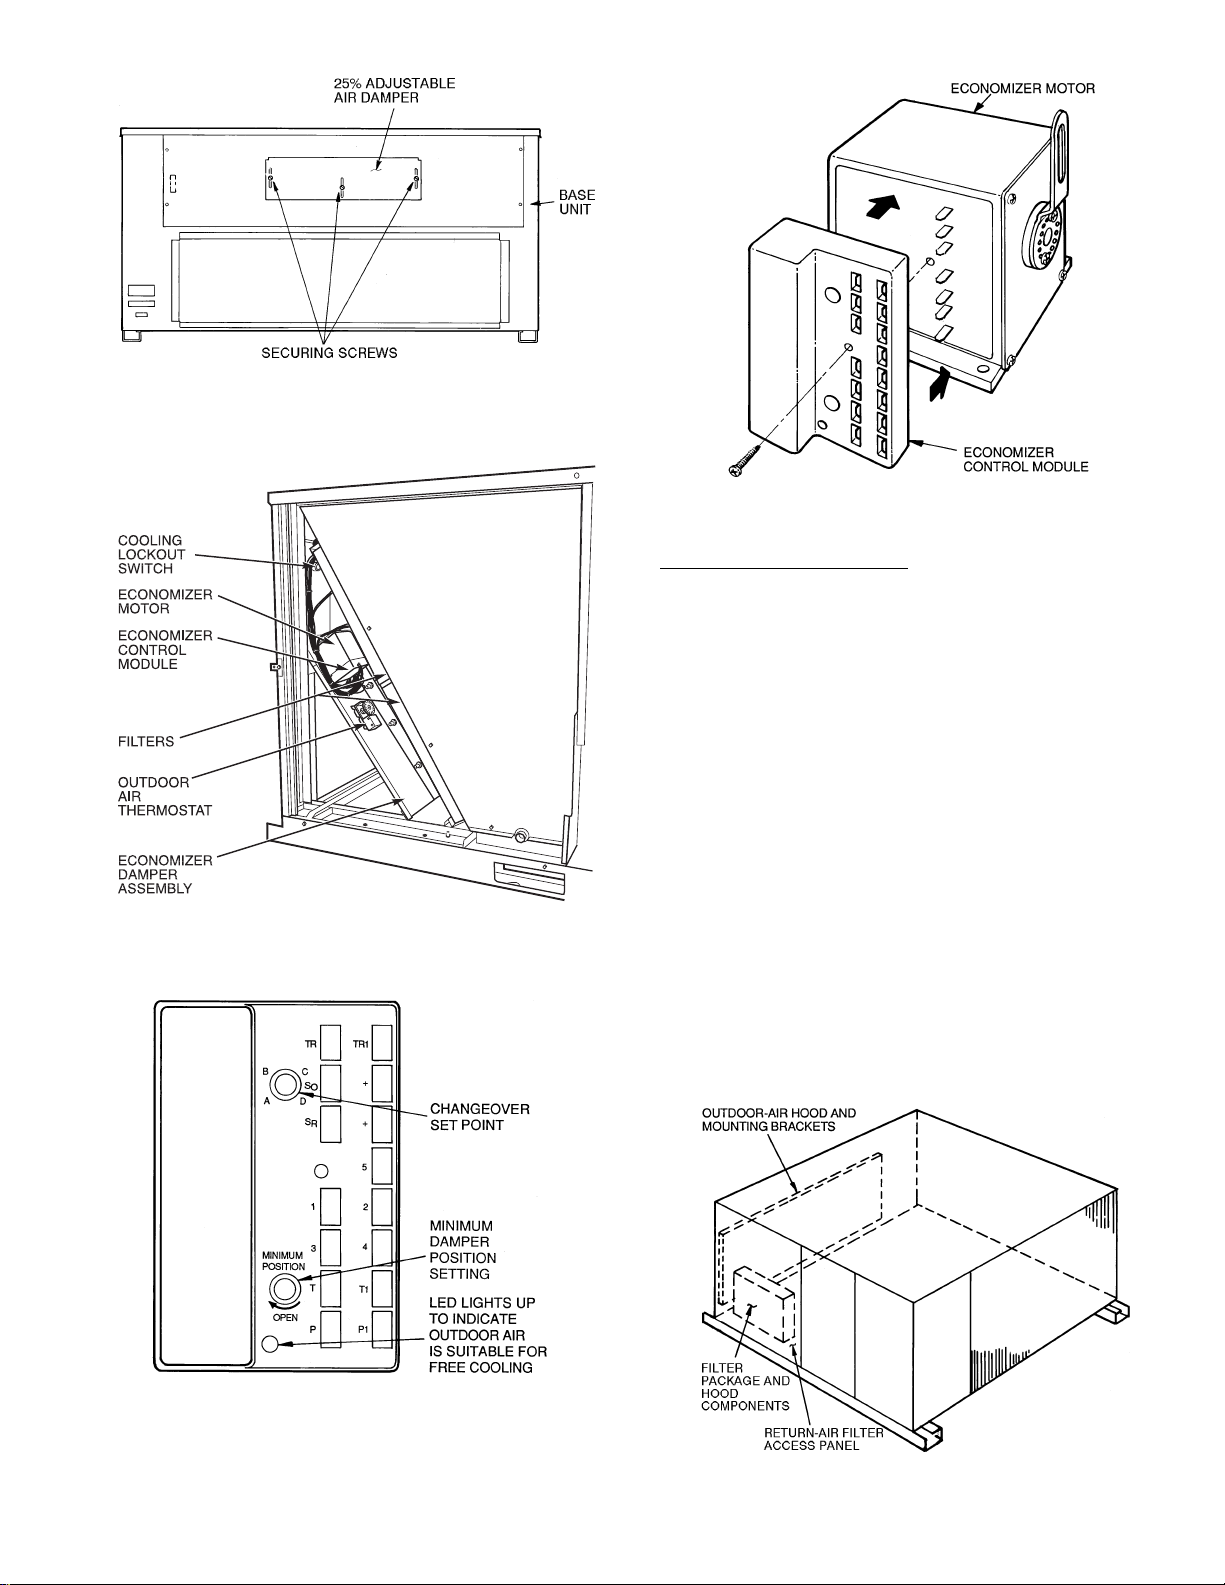
Fig. 16 — 25% Outdoor-Air Sect ion Details
Fig. 17 — Economizer Damper Assembl y-End View
Fig. 19 — Economizer Motor Control
Module Location
Damper Vent Position Setting
1. Set fan switch at ON position (continuous fan operation) and close night switch if used.
2. Set system selecto r swit ch at OFF position.
3. Turn damper adjustment knob located on control
module clockwise slowly until dampers assume
desired v e n t p os iti on. Do not manually operate econo-
mizer motor, since damage to motor will res ult.
X. STEP 10 — INSTALL OUTDOOR-AIR HOOD
The outdoor-air hood is common to 25% air ventilation and
econ omizer. If eco nomizer is used , all elec trica l connec tions
have been made and adjusted at the factory. Assemble and
install hood in the field.
NOTE: The hood top panel, upper and lower filter retainers,
hood drain pan, baffle (sizes 180 and 240), and filter support
bracket are secured opposite the condenser end of the unit.
The screens, hood side panels, remaining section of filter
support bracket, seal strip, and other hardware are in a
package located inside the return-air filter access panel
(Fig. 20).
1. Attach seal strip to upper filter retainer. See Fig. 21.
2. Assemble hood top panel, side panels, upper filter
retainer, and drain pan (see Fig. 22 ).
LEGEND
LED —
Light- Emitti ng Diode
Fig. 18 — Economizer Motor Control Mod ule
(Part Number W7459A)
Fig. 20 — Outdoor-Air Hood Component Locati on
—11—
Page 12

3. Secure lower filter retainer and long section of filter
support bracket to unit. See Fig. 22. Leave screws
loose on 180 and 240 units.
4. Slide baffle (sizes 180 and 240) behind lower filter
retainer and tighten screws.
5. Loosen sheet metal screws for top panel of base unitlocated above outdoor-air inlet opening, and remove
screws for hood side panels locat ed on the sides of the
outdoor-air inlet opening.
6. Match notches in hood top panel with unit top panel
screws. Insert hood flange between top panel flange
and unit. Tighten screws.
7. Hold hood side panel flanges flat against unit, and
install screws removed in Step 5.
Fig. 21 — Seal Strip Location
BAFFLE (180 AND 240 SIZES ONLY)
LOWER FILTER
RETAINER
FILTER SUPPORT
BRACKET
8. Insert outd oor-air inlet screens and spacer i n channel
created by lower filter retainer and filter support
bracket.
9. Attach remaining short section of filter support
bracket.
A. Enthalpy Control Installation
NOTE: The accessory outdoor-air enthalpy sensor must be
installed BEF OR E th e economizer hoods ar e installed on the
unit or hoods will have to be removed.
1. Remove and discard the factory-installed jumper
assembly containing the 800-ohm resistor on the
economizer control module (between terminals S
and +). See Fig. 18.
2. Remove black wire assembly containing the 620-ohm
resistor from between economizer control module terminal S
and the outdoor-air thermostat (O A T ). Place
O
this wire assembly (containing the 620-ohm resistor)
between economizer control module terminals S
and
R
+, replacing the jumper removed in Step 1. See
Fig. 18.
3. Disconnect the blue wire from the OAT.
4. Remove OAT from the outside of the economizer. See
Fig. 17.
5. Mount the enthalpy sensor (Fig. 23) to the economizer on the outside of the unit (in the same location
from which the OAT was removed) using the 2 screws
provided. See Fig. 17.
6. Reconnect the blue wire removed in Step 3 to the
enthalpy sen sor terminal +.
7. Cut the violet wire provided to desired length and
terminate with quick-connect terminal provided.
Route the violet wire from the enthalpy sensor terminal S, through the snap bushing, and to the economizer control module terminal S
. See Fig. 18.
O
8. Set changeover set point to the desired location. See
Fig. 24.
NOTE: For maximum benefit of outdoor air, set the enthalpy
control to the “A” setting. At this setting, when the relative
humidity is 50% and the outdoor air is below 74 F, the relay
contacts on the sens or will be closed.
9. Reinstall economizer hoods if removed.
IMPORTANT: Be sure all seal strips and RTV sealant are
intact. A watertight seal to inside of unit must be
maintained.
R
HOOD SIDE
HOOD TOP
PANEL
HOOD DRAIN PAN
UPPER FILTER RETAINER
The outdoor air hood comes with a baffle which is used on
NOTE:
sizes 180 and 240 only. Discard baffle for size 155 units.
PANELS (2)
FILTER SUPPORT
BRACKET
Fig. 22 — Outdoor-Air Hood Details
BAFFLE
(180 AND
240
ONLY)
LOWER
FILTER
RETAINER
Fig. 23 — Outdoor-Air and Return-Air
Enthalpy Sensor
—12—
Page 13

CONTROL
CURVE
RH —
A
B
C
D
CONTROL
POINT
(Appro x Deg)
AT 50% RH
73
68
63
58
Relative Humidity
Fig. 24 — Psychrometric Chart for Solid-State
Enth a lpy Control
B. Differential Enthalpy Control
NOTE: The accessory outdoor-air enthalpy sensor must be
installed BEF OR E the economizer hoods are installed on the
unit or hoods will have to be removed.
1. Remove and discard the factory-installed jumper
assembly containing the 800-ohm resistor on the
economizer control module (between terminals S
and +). See Fig. 18.
2. Disconnect black wire from economizer control module terminal S
and blue wire from the OAT (outdoor -
O
air thermostat).
3. Remove OAT and black wire assembly containing the
620-ohm resistor from the outside of the economizer
(see Fig. 17).
4. Mount the outdoor-air enthalpy sensor (first sensor)
to the economizer on the outside of the unit (in the
same location from which the OAT was removed)
using the 2 screw s pr ov ided. See Fig. 17.
5. Reconnect the blue wire removed in Step 2 to the
enthalpy sensor terminal +.
6. Cut the violet wire provided to desired length and
terminate with quick-connect terminal provided.
Route the viole t wi re from the enthalpy sensor ter minal S, through the snap bushing, and to the economizer control module terminal S
.
O
7. Mount the second enthalpy sensor in the return-air
duct (return-air sensor).
8. Route the blue wire (pr ov i ded) from term inal + on the
return-air enthalpy sensor to the economizer control
module terminal +.
9. Route the violet wire (provided) from terminal S on
the return-air enthalpy sensor to the economizer control module term inal S
.
R
10. Turn changeover set point dial clockwise past the “D”
setting, or the control will not operate on a differential. See Fig . 18.
11. Reinstall economizer hood if removed.
IMPORTANT: Be sure all seal strips and RTV sealant are
intact. A watertight seal to inside of unit must be
maintained.
XI. STEP 11 — INSTALL ALL ACCESSORIES
After all the factory-installed options have been adjusted,
install all field-installed accessories. Refer to the accessory
installation ins tructions included with each accessory.
A. Motormaster® I Control Installation (581A155 and 180
Only)
Install Field -Fabricated Wind Baffles
Wind baffles must be field-fabricated for all units to ensure
proper cooling cycle operation at low ambient temperatures.
See Fig. 25 for baffle details. Use 20-gage, galvanized sheet
metal, or similar corrosion-resistant metal for baffles. Use
field-su pp l ied screws to att ac h baf fl e s t o un i t. Sc r ews should
1
be
/4-in. diameter and 5/8-in. long. Drill required screw holes
for mounting baffles.
CAUTION: To avoid damage to the refrigerant coils
and electrical components, use recommended screw
sizes only. Use care when drilling holes.
Install Mot ormaster I Control s
Only one Motormaster I control is required per unit. The
Motormaster I control must be used in conjunction with the
Accessory 0° F Low Ambient Kit (purchas ed separately). The
Motormaster I device controls outdoor fan no. 1 while outdoor fans no. 2 and 3 are sequenced off by the Accessory 0° F
Low Ambient Kit.
Accessory 0° F Low Ambient Kit — Install the Ac cessory 0° F
Low Ambient Kit per instruction supplied with accessory.
R
Dimensions in ( ) are in mm.
NOTE:
Fig. 25 — Wind Baffle Details
—13—
Page 14

Sensor Assembly — Install the sensor assembly in the location shown in Fig. 26.
Motor Mount — To ensure proper fan height, replace the
existing motor mount with the new motor mount provided
with accessory.
Trans f ormer (460-v Unit s Only) — On 460 volt units, a transformer is required. The transformer is provided with the
accessory and must be field-installed.
Motormaste r® I Co n tr ol — Recomm ende d mounting location
is on the inside of the panel to the left of the control box. The
control should be mounted on the inside of the panel, vertically, with leads protruding from bottom of extrusion.
B. Motormaster III Control Installation (581A240)
Install Field -Fabricated Wind Baffles
Wind baffles must be field-fabricated for all units to ensure
proper cooling cycle operation at low ambient temperatures.
See Fig. 25 for baffle details. Use 20-gage, galvanized sheet
metal, or similar corrosion-resistant metal for baffles. Use
field-supplied screws to attach baffles to unit. Screws should
1
be
/4-in. diameter and 5/8-in. long. Drill require d screw hole s
for mounting baffles.
Replace Outdoor Motor
Replace outdoor-fan motor no. 1 with motor included in
accessory kit. Existing motor is not Motormaster III
compatible.
Install Motor ma st er III Cont ro ls
Only one Motorma st e r III cont rol is requ ire d per uni t.
Sensor — Install the sensor for thermistor input control in
the location shown in Fig. 26. Connect sensor leads to the
purple and grey control signal leads on the Motormaster III
cont ro l .
Signal Selection Switch — Remove the cover of the Motormaster III control. Set the switch to accept the thermistor
sensor input signal. Set the frequency to match the unit
power supply (60 Hz).
Motormaste r III Co ntrol — Recommended mounting location
is beneath the control box, mounted to the partition that separates the control box section from the indoor section.
NOTE: If unit power is supplied through the roof curb and
basepan of the unit, mount the Motormaster III control on
the corner post adjacent to the conduit running from the
basepan to the bottom of the control box.
CAUTION: To avoid damage to the refrigerant
coils and electrical components, use recommended
screw sizes only. Use care when drilling holes.
MOTORMASTER
SENSOR
LOCATION
HAIRPIN END
NOTES:
1. All sensors are located on the eighth hairpin up from the bottom.
2. Field installed tubing insulation is required to be installed over the
TXV (thermostatic expansion valve) bulb and capillary tube for
proper operation at low ambients. Tubing insulation is only required
on the po rtio n of suctio n line lo cated betw een indo or and ou tdoor
sectio n.
Fig. 26 — Motormaster I and M o to rmaster III Sensor
Locations
START-UP
Use the following information and Start-Up Checklist on
page CL-1 to check out unit PRIOR to start-up.
I. UNIT PREPARA TION
Check that unit has been installed in accordance with these
installation ins tructions and all applicable cod es.
II. SERVICE VALVES
Ensure that the liquid line service valve is open. Damage to
the compres sor could result i f it i s left closed.
III. COMPRESSOR MOUNTING
Compressors are internally spring mounte d. D o not loosen or
remove compressor holddown bolts.
IV. REFRIGERANT SERVICE PORTS
Each re frigeran t system h as a tot al of 3 Sch rader-type service gage ports. One port is located on the suction line, one
on the compressor discharge line, and one on the liquid line.
In addition Schrader-type valves are located underneath the
low-pressure switches. Be sure that caps on the ports are
tight.
V. COMPRESSOR ROTATION
It is important to be certain the compressors are rotating in
the proper direction. To determine whether or not compressors are rotat ing in the proper direction:
1. Connect service gages to suction and discharge pressure fitti n gs.
2. Energize the compressor.
3. The su ction pressu re should drop a nd the dischar ge
pressure should rise, as is norm a l o n an y sta rt -up.
If the suction pressure does not drop and the discharge pressure does not rise to normal levels:
1. Note that the evaporator fan is probably also rota ting
in the wrong direction.
2. Tu rn off power to the unit.
3. Reverse any two of the incoming power leads.
4. Tu rn on powe r to the com pr essor.
The suct ion and disc harge pr essur e levels sh ould now move
to their normal start-up levels.
—14—
Page 15

NOTE: When compressors are rotating in the wrong direction, the unit will have increased noise levels and will not
provide heating and coolin g.
After a few minutes of reverse operation, the scroll compressor internal overload protection will open, which will activate the unit’s lockout and requires a manual reset. Reset is
accomplished by turning the thermostat on and of f.
VI. INTERNAL WIRING
Check all electrical connections in unit contro l box es ; tighten
as required.
VII. CRANKCASE HEATER( S)
Crankcase heater(s) is energized as long as there is power to
the unit and the compressor is not operating.
IMPORTANT: Unit power must be on for 24 hours prior to
start-up. Otherwise, damage to compressor may result.
VIII. EVAPORATOR FAN
Fan belt and variable pulleys are factory-installed. Remove
tape from the fan pulley. See Tables 3-10 for Fan Performance Data. Be sure that fans rotate in the proper direction.
See Table 11 for air quantity limits. See Table 12 for Evaporator Fan Motor Specifications. See Table 13 for static pressure information for accessories and options. See T able 14 for
fan rpm at various mo tor pulley settings. To al ter fan perfor-
T able 3 — Fan Performance — 581A155225 (Low Heat Units with Stan dard Indoor Fan Motor)
AVAILABLE EXTERNAL STATIC PRESSURE (in. wg)
CFM
3750
4000
4250
4500
4750
5000
5250
5500
5750
6000
CFM
3750
4000
4250
4500
4750
5000
5250
5500
5750
6000
Bhp —
FIOP —
Watts —
*Stand ard low -med iu m stat ic dri ve rang e is 83 4 to 1064 r pm. A lter na te
high-static drive range is 1161 to 1426. Other rpms require a fieldsupplied drive.
NOTES:
1. Maximum continuous bhp for the standard motor is 3.13. The maxi-
Rpm Watts Bhp Rpm Watts Bhp Rpm Watts Bhp Rpm Watts Bhp Rpm Watts Bhp
753 915 1.05 838 1066 1.23 945 1278 1.47 1044 1500 1.73 1138 1731 1.99
755 991 1.14 865 1198 1.38 968 1414 1.63 1063 1639 1.89 1154 1873 2.15
788 1129 1.30 894 1341 1.54 992 1562 1.80 1084 1791 2.06 1172 2029 2. 33
822 1280 1.47 923 1497 1.72 1017 1722 1.98 1106 1956 2.25 1191 2196 2.53
857 1443 1.66 953 1666 1.92 1044 1896 2.18 1130 2133 2.45 1212 2377 2.73
891 1620 1.86 984 1847 2.12 1071 2082 2.39 1154 2323 2.67 1234 2572 2.96
927 1810 2.08 1015 20 43 2.35 1099 2282 2.62 1180 252 8 2.91 — — —
962 2014 2.32 1047 22 52 2.59 1129 2496 2.87 — — — — — —
998 2233 2.57 1080 24 76 2.85 — — — — — — — — —
1035 2466 2.84 — — — — — — — — — — — —
Rpm Watts Bhp Rpm Watts Bhp Rpm Watts Bhp Rpm Watts Bhp Rpm Watts Bhp
1226 1971 2.27 1311 2218 2.55 1391 2474 2.85
1240 2116 2.43 1322 2366 2.72 1401 2623 3.02 — — — — — —
1255 2274 2.61 1335 2526 2.91 — — — — — — — — —
1272 2444 2.81 1350 2700 3.10 — — — — — — — — —
1291 2628 3.02 — — — — — — — — — — — —
———————————————
———————————————
———————————————
———————————————
———————————————
LEGEND
Brake Horsepower
Factory-Installed Option
Input Watts to Motor
mum continuous watts is 2700. Do not adjust motor rpm such that
motor maximum bhp and/or watts is exceeded at the maximum
operating cfm.
0.20.40.60.81.0
AVAILABLE EXTERNAL STATIC PRESSURE (in. wg)
1.21.41.61.82.0
mance, see Evaporator Fan Performance Adjustment section
on page 26.
NOTE: A 3
1
/2-in. bolt and threaded plate are included in the
installer’s packet. They can be added to the motor support
channel belo w the m otor mounting plate to aid in raising the
fan motor.
IX. CONDENSER FANS AND MOTORS
Condenser fans and motors are factory set. Refer to Condenser-Fan Adjustment section (page 27) as required. Be
sure that fa ns rotate in the proper di rection.
X. RETURN-AIR FILTERS
Check that correct filters are installed in filter tracks (see
Table 1). Do not operate unit without return-air filters.
XI. OUTDOOR-AIR INLET SCREENS
Outdoor-air inlet screens must be in place before operating
unit.
XII. ACCESSORY ECONOMIZER ADJUSTMENT
Remove fil ter access panel. Ch eck that outdoor-air damper is
closed and return-air damper is open.
Economizer operation and adjustment are described in Base
Unit Operation section on page 24, and in Economizer
Adjustment section on page 28.
——————
2. Static pressure losses (i.e., economizer) must be added to external
static pre s su r e be for e ent ering Fan Performa nc e tabl e.
3. Interpolation is permissible. Do not extrapolate.
4. Fan performance is based on wet coils, clean filters, and
casing losses. See Table 13 for accessory/FIOP static pressure
information.
5. Extensive mo tor and drive testing on these units ensures that the full
bhp an d watts rang e of the motor can be util ized with confiden ce.
Using your fan motors up to the watts or bhp rating shown will not
result in nuisance tripping or premature motor failure. Unit warranty
will not be affected.
6. U se of a field- supplied mo tor may affect wir ing size. Co ntact your
Bryant representative for details.
—15—
Page 16

Table 4 — Fan Performance — 581A155225 (Low Heat Units with Optional Indoor Fan Motor)
AVAILABLE EXTERNAL STATIC PRESSURE (in. wg)
CFM
3750
4000
4250
4500
4750
5000
5250
5500
5750
6000
CFM
3750
4000
4250
4500
4750
5000
5250
5500
5750
6000
Bhp —
FIOP —
Watts —
*Stand ard low -med iu m stat ic dri ve rang e is 83 4 to 1064 r pm. A lter na te
high-static drive range is 1161 to 1426. Other rpms require a fieldsupplied drive.
NOTES:
1. Maximum continuous bhp for the optional motor is 4.38. The maxi-
Rpm Watts Bhp Rpm Watts Bhp Rpm Watts Bhp Rpm Watts Bhp Rpm Watts Bhp
753 942 1.08 838 1091 1.25 945 1298 1.49 1044 1 513 1.74 1138 1737 2.00
755 1020 1.17 865 1223 1.41 968 1433 1.65 1063 1652 1.90 1154 1878 2. 16
788 1159 1.33 894 1366 1.57 992 1581 1.82 1084 1803 2.07 1172 2032 2. 34
822 1311 1.51 923 1522 1.75 1017 1740 2.00 1106 1966 2.26 1191 2197 2.53
857 1474 1.70 953 1690 1.94 1044 1912 2.20 1130 2141 2.46 1212 2376 2.73
891 1650 1.90 984 1871 2.15 1071 2097 2.41 1154 2329 2.68 1234 2567 2.95
927 1840 2.12 1015 20 65 2.37 1099 2295 2.64 1180 253 0 2.91 1257 277 1 3.19
962 2042 2.35 1047 22 72 2.61 1129 2506 2.88 1207 274 5 3.16 1281 298 9 3.44
998 2259 2.60 1080 24 92 2.87 1159 2730 3.14 1234 297 3 3.42 1307 322 1 3.70
1035 2489 2.86 1114 2727 3.14 1189 2969 3.41 1262 3215 3.70 1333 3466 3.99
Rpm Watts Bhp Rpm Watts Bhp Rpm Watts Bhp Rpm Watts Bhp Rpm Watts Bhp
1226 1968 2.26 1311 2206 2.54 1391 2451 2.82 1468 2702 3.11 1543 2959 3.40
1240 2111 2.43 1322 2351 2.70 1401 2598 2.99 1476 2850 3.28 1549 3108 3.57
1255 2267 2.61 1335 2509 2.89 1412 2757 3.17 1486 3011 3.46 — — —
1272 2436 2.80 1350 2680 3.08 1425 2929 3.37 1497 3185 3.66 — — —
1291 2616 3.01 1366 2863 3.29 1440 3115 3.58 1510 3372 3.88 — — —
1310 2810 3.23 1384 3059 3.52 1456 3314 3.81 1525 3573 4.11 — — —
1332 3018 3.47 1403 3269 3.76 1473 3526 4.05 — — — — — —
1354 3238 3.72 1424 3492 4.02 1491 3751 4.31 — — — — — —
1377 3473 3.99 1445 3730 4.29 — — — — — — — — —
1401 3722 4.28 — — — — — — — — — — — —
LEGEND
Brake Horsepower
Factory-Installed Option
Input Watts to Motor
mum continuous watts is 3775. Do not adjust motor rpm such that
motor maximum bhp and/or watts is exceeded at the maximum
operating cfm.
0.20.40.60.81.0
AVAILABLE EXTERNAL STATIC PRESSURE (in. wg)
1.21.41.61.82.0
2. Static pressure losses (i.e., economizer) must be added to external
static pre s su r e be for e ent ering Fan Performa nc e tabl e.
3. Interpolation is permissible. Do not extrapolate.
4. Fan performance is based on wet coils, clean filters, and
casing losses. See Table 13 for accessory/FIOP static pressure
information.
5. Extensive mo tor and drive testing on these units ensures that the full
bhp an d watts rang e of the motor can be util ized with confiden ce.
Using your fan motors up to the watts or bhp rating shown will not
result in nuisance tripping or premature motor failure. Unit warranty
will not be affected.
6. U se of a field- supplied mo tor may affect wir ing size. Co ntact your
Bryant representative for details.
—16—
Page 17

T able 5 — Fan Performance — 581A180270 (Low Heat Units)
AVAILABLE EXTERNAL STATIC PRESSURE (in. wg)
CFM
4500
4800
5100
5700
6000
6300
6600
6900
7200
7500
CFM
4500
4800
5100
5700
6000
6300
6600
6900
7200
7500
CFM
4500
4800
5100
5700
6000
6300
6600
6900
7200
7500
Bhp —
FIOP —
Watts —
*Stand ard low -med iu m stat ic dri ve rang e is 87 3 to 1021 r pm. A lter na te
high-static drive range is 1025 to 1200. Other rpms require a fieldsupplied drive.
NOTES:
1. Maximum continuous bhp for the standard motor is 6.13. The maxi-
Rpm Watts Bhp Rpm Watts Bhp Rpm Watts Bhp Rpm Watts Bhp Rpm Watts Bhp
753 1307 1.53 761 1330 1.56 840 1572 1.84 912 1822 2.14 980 2080 2.44
747 1384 1.62 790 1515 1.78 866 1765 2.07 936 2023 2.37 1002 2289 2.68
741 1465 1.72 820 1718 2.01 893 1977 2.32 961 2243 2.63 1025 2516 2.95
810 1911 2.24 882 2182 2.56 950 2459 2.88 1014 2741 3.21 1075 3029 3.55
844 2164 2.54 914 2444 2.87 980 2730 3.20 1042 3021 3.54 1100 3317 3.89
879 2439 2.86 947 2729 3.20 1010 3023 3.55 1070 3322 3.90 1127 3626 4.25
915 2737 3.21 980 3035 3.56 1041 3338 3.91 1099 3645 4.28 1155 3957 4.64
950 3057 3.59 1013 3364 3.95 1072 3675 4.31 1129 3991 4.68 1183 4311 5.06
986 3401 3.99 1047 3717 4.36 1104 4037 4.74 1159 4361 5.11 1211 4689 5.50
1022 3770 4.42 1081 4095 4.80 1136 4423 5.19 1189 4755 5.58 1241 5091 5.97
Rpm W atts Bhp Rpm Watts Bhp Rpm Watts Bhp Rpm Watts Bhp Rpm Watts Bhp
1044 2345 2.75 1105 2619 3.07 1163 2899 3.40 1218 3187 3.74 1271 3481 4.08
1065 2561 3.00 1124 2841 3.33 1180 3127 3.67 1235 3420 4.01 1287 3720 4.36
1086 2795 3.28 1144 3082 3.61 1199 3375 3.96 1252 3674 4.31 1304 3979 4.67
1132 3324 3.90 1187 3624 4.25 1240 3929 4.61 1291 4241 4.97 1341 4558 5.35
1157 3619 4.24 1210 3925 4.60 1262 4239 4.97 1312 4557 5.34 1361 4880 5.72
1182 3935 4.62 1234 4249 4.98 1285 4569 5.36 1334 4894 5.74 — — —
1208 4274 5.01 1259 4595 5.39 1309 4922 5.77 — — — — — —
1235 4636 5.44 1285 4964 5.82 — — — — — — — — —
1262 5021 5.82 — — — — — — — — — — — —
Rpm Watts Bhp Rpm Watts Bhp Rpm Watts Bhp Rpm Watts Bhp Rpm Watts Bhp
1322 3781 4.43 1372 4088 4.79 1419 4400 5.16 1466 4719 5.53 1511 5042 5.91
1337 4025 4.72 1386 4337 5.09 1433 4655 5.46 1479 4978 5.84 — — —
1353 4290 5.03 1401 4607 5.40 1448 4930 5.78 — — — — — —
1388 4881 5.72 — — — — — — — — — — — —
———————————————
———————————————
———————————————
———————————————
———————————————
———————————————
LEGEND
Brake Horsepower
Factory-Installed Option
Input Watts to Motor
mum continuous watts is 5180. Do not adjust motor rpm such that
motor maximum bhp and/or watts is exceeded at the maximum
operating cfm.
0.2 0.4 0.6 0.8 1.0
AVAILABLE EXTERNAL STATIC PRESSURE (in. wg)
1.2 1.4 1.6 1.8 2.0
— — —— — —— — —— — —— — —
AVAILABLE EXTERNAL STATIC PRESSURE (in. wg)
2.22.42.62.83.0
2. Static pressure losses (i.e., economizer) must be added to external
static pre s su r e be for e ent ering Fan Performa nc e tabl e.
3. Interpolation is permissible. Do not extrapolate.
4. Fan performance is based on wet coils, clean filters, and
casing losses. See Table 13 for accessory/FIOP static pressure
information.
5. Extensive mo tor and drive testing on these units ensures that the full
bhp an d watts rang e of the motor can be util ized with confiden ce.
Using your fan motors up to the watts or bhp rating shown will not
result in nuisance tripping or premature motor failure. Unit warranty
will not be affected.
6. U se of a field- supplied mo tor may affect wir ing size. Co ntact your
Bryant representative for details.
—17—
Page 18

T able 6 — Fan Performance — 581A240270 (Low Heat Units)
AVAILABLE EXTERNAL STATIC PRESSURE (in. wg)
CFM
6,000
6,500
7,000
7,500
8,000
8,500
9,000
9,500
10,000
CFM
6,000
6,500
7,000
7,500
8,000
8,500
9,000
9,500
10,000
CFM
6,000
6,500
7,000
7,500
8,000
8,500
9,000
9,500
10,000
LEGEND
Bhp —
FIOP —
Watts —
*Stan dard low-medium static drive range is 1002 to 1151 rpm. Al ternate
high-static drive range is 1193 to 1369. Other rpms require a fieldsupplied drive.
NOTES:
1. Maximum continuous bhp for the standard motor is 9.47 (for 208-v
units) and 10 .33 ( f or 23 0 an d 460- v u ni ts) . T he maxi m um co nt inu ou s
watts is 7915 (for 208-v units) and 8640 (for 230 and 460-v units).
Do not adjust motor rpm such that motor maximum bhp and/or watts
is exceeded at the maximum operating cfm.
Rpm Watts Bhp Rpm Watts Bhp Rpm Watts Bhp Rpm Watts Bhp Rpm Watts Bhp
824 2607 3.09 894 2844 3.37 961 3085 3.66 1023 3330 3.95 1083 3578 4.24
881 3030 3.59 947 3266 3.88 1009 3507 4.16 1069 3751 4.45 1126 3998 4.74
939 3488 4.14 1001 3725 4.42 1060 3965 4.70 1116 4208 4.99 1170 4454 5.28
998 3982 4.72 1055 4218 5.00 1111 4458 5.29 1165 4701 5.58 1217 4946 5.87
1056 4512 5.35 1111 4748 5.63 1164 4988 5.92 1215 5230 6.20 1264 5474 6.49
1116 5077 6.02 1167 5314 6.30 1218 5553 6.59 1266 5795 6.87 1314 6039 7.16
1175 5678 6.74 1224 5915 7.02 1272 6154 7.30 1319 6395 7.59 1364 6639 7.88
1235 6315 7.49 1282 6552 7.77 1327 6791 8.06 1372 7033 8.34 1415 7276 8.63
1295 6988 8.29 1340 7225 8.57 1383 7465 8.86 1426 7706 9.14 1468 7949 9.43
Rpm Watts Bhp Rpm Watts Bhp Rpm Watts Bhp Rpm Watts Bhp Rpm Watts Bhp
1141 3829 4.5 4 1196 4082 4.84 12 49 43 37 5. 1 5 1301 4596 5 .4 5 1351 4856 5.76
1181 4247 5.0 4 1234 4499 5.34 12 85 47 53 5. 6 4 1334 5009 5 .9 4 1383 5267 6.25
1223 4702 5.5 8 1274 4953 5.88 13 23 52 05 6. 1 8 1371 5460 6 .4 8 1417 5716 6.78
1267 5194 6.1 6 1316 5443 6.46 13 63 56 94 6. 7 6 1409 5947 7 .0 6 1454 6202 7.36
1313 5721 6.7 9 1359 5970 7.08 14 05 62 20 7. 3 8 1449 6472 7 .6 8 1493 6726 7.98
1360 6285 7.4 6 1405 6533 7.75 14 49 67 83 8. 0 5 1491 7034 8 .3 4 1533 7286 8.64
1408 6885 8.1 7 1451 7132 8.46 14 94 73 81 8. 7 6 1535 7631 9 .0 5 — — —
1458 7521 8.9 2 1499 7768 9.22 15 40 80 16 9. 5 1 — — — — — —
1508 8193 9.7 2 1549 8440 10. 01 — — — — — — — — —
Rpm Watts Bhp Rpm Watts Bhp Rpm Watts Bhp Rpm Watts Bhp Rpm Watts Bhp
1399 5118 6.07 1446 5381 6.38 1492 5647 6.70 1537 5914 7.02 — — —
1429 5527 6.56 1475 5789 6.87 1520 6052 7.18 — — — — — —
1462 5974 7.09 1507 6234 7.40 1550 6495 7.71 — — — — — —
1498 6459 7.66 1540 6717 7.97 — — — — — — — — —
1535 6981 8.28 — — — — — — — — — — — —
———————————————
———————————————
———————————————
———————————————
Brake Horsepower
Factory-Installed Option
Input Watts to Motor
0.2 0.4 0.6 0.8 1.0
AVAILABLE EXTERNAL STATIC PRESSURE (in. wg)
1.2 1.4 1.6 1.8 2.0
AVAILABLE EXTERNAL STATIC PRESSURE (in. wg)
2.2 2.4 2.6 2.8 3.0
2. Static pressure losses (i.e., economizer) must be added to external
static pre s su r e be for e ent ering Fan Performa nc e tabl e.
3. Interpolation is permissible. Do not extrapolate.
4. Fan performance is based on wet coils, clean filters, and
casing losses. See Table 13 for accessory/FIOP static pressure
information.
5. Extensive mo tor and drive testing on these units ensures that the full
bhp an d watts rang e of the motor can be util ized with confiden ce.
Using your fan motors up to the watts or bhp rating shown will not
result in nuisance tripping or premature motor failure. Unit warranty
will not be affected.
6. U se of a field- supplied mo tor may affect wir ing size. Co ntact your
Bryant representative for details.
—18—
Page 19

Ta ble 7 — Fan Performance — 581A155300 (High Heat Units with Standard Indoor Fan Motor
AVAILABLE EXTERNAL STATIC PRESSURE (in. wg)
CFM
3750
4000
4250
4500
4750
5000
5250
5500
5750
6000
CFM
3750
4000
4250
4500
4750
5000
5250
5500
5750
6000
Bhp —
FIOP —
Watts —
*Stand ard low -med iu m stat ic dri ve rang e is 83 4 to 1064 r pm. A lter na te
high-static drive range is 1161 to 1426. Other rpms require a fieldsupplied drive.
NOTES:
1. Maximum continuous bhp for the standard motor is 3.13. The maxi-
Rpm Watts Bhp Rpm Watts Bhp Rpm Watts Bhp Rpm Watts Bhp Rpm Watts Bhp
753 915 1.05 844 1077 1.24 949 128 7 1.48 1047 1507 1.73 1139 1735 2.00
764 1006 1.16 872 1211 1.39 972 1425 1.64 1067 1648 1.90 1156 1880 2.16
798 1147 1.32 901 1357 1.56 997 1576 1.81 1089 1803 2.07 1175 2038 2.34
832 1301 1.50 931 1516 1.74 1024 1 739 2.00 1112 1970 2.27 1195 2209 2.54
868 1467 1.69 962 1688 1.94 1051 1 916 2.20 1136 2151 2.47 1217 2393 2.75
903 1648 1.89 994 1873 2.15 1079 2 106 2.42 1161 2345 2.70 1240 2590 2.98
939 1842 2.12 1026 2073 2.38 1109 2309 2.66 1188 2553 2.9 — — —
976 2050 2.36 1059 2286 2.63 1139 2528 2.91 — — — — — —
1012 2273 2.61 1093 2514 2.89 — — — — — — — — —
1049 2511 2.89 — — — — — — — — — — — —
Rpm Watts Bhp Rpm Watts Bhp Rpm Watts Bhp Rpm Watts Bhp Rpm Watts Bhp
1227 1973 2.27 1310 2218 2.55 1390 2471 2.84
1241 2120 2.44 1323 2368 2.72 1400 2623 3.02 — — — — — —
1258 2281 2.62 1337 2531 2.91 — — — — — — — — —
1275 2454 2.82 — — — — — — — — — — — —
1295 2642 3.04 — — — — — — — — — — — —
———————————————
———————————————
———————————————
———————————————
———————————————
LEGEND
Brake Horsepower
Factory-Installed Option
Input Watts to Motor
mum continuous watts is 2700. Do not adjust motor rpm such that
motor maximum bhp and/or watts is exceeded at the maximum
operating cfm.
0.2 0.4 0.6 0.8 1.0
AVAILABLE EXTERNAL STATIC PRESSURE (in. wg)
1.21.41.61.82.0
——
2. Static pressure losses (i.e., economizer) must be added to external
static pre s su r e be for e ent ering Fan Performa nc e tabl e.
3. Interpolation is permissible. Do not extrapolate.
4. Fan performance is based on wet coils, clean filters, and
casing losses. See Table 13 for accessory/FIOP static pressure
information.
5. Extensive mo tor and drive testing on these units ensures that the full
bhp an d watts rang e of the motor can be util ized with confiden ce.
Using your fan motors up to the watts or bhp rating shown will not
result in nuisance tripping or premature motor failure. Unit warranty
will not be affected.
6. U se of a field- supplied mo tor may affect wir ing size. Co ntact your
Bryant representative for details.
—
———
—19—
Page 20

T able 8 — Fan Performance — 581A155300 (High Heat Units wit h Optional Indoor Fan Motor)
AVAILABLE EXTERNAL STATIC PRESSURE (in. wg)
CFM
3750
4000
4250
4500
4750
5000
5250
5500
5750
6000
CFM
3750
4000
4250
4500
4750
5000
5250
5500
5750
6000
LEGEND
Bhp —
FIOP —
Watts —
*Stand ard low -med iu m stat ic dri ve rang e is 83 4 to 1064 r pm. A lter na te
high-static drive range is 1161 to 1426. Other rpms require a fieldsupplied drive.
NOTES:
1. Maximum continuous bhp for the optional motor is 4.38. The maxi-
Rpm Watts Bhp Rpm Watts Bhp Rpm Watts Bhp Rpm Watts Bhp Rpm Watts Bhp
753 942 1.08 844 1101 1.27 949 1306 1.50 1047 1520 1.75 1139 1 741 2.00
764 1035 1.19 872 1236 1.42 972 1444 1.66 1067 1661 1.91 1156 1885 2. 17
798 1177 1.35 901 1382 1.59 997 1594 1.83 1089 1814 2.09 1175 2041 2.35
832 1331 1.53 931 1540 1.77 1024 1757 2.02 1112 1980 2.28 1195 2209 2.54
868 1498 1.72 962 1711 1.97 1051 1932 2.22 1136 2158 2.48 1217 2390 2.75
903 1677 1.93 994 1896 2.18 1079 2120 2.44 1161 2350 2.70 1240 2585 2.97
939 1871 2.15 1026 20 93 2.41 1109 2321 2.67 1188 255 4 2.94 1264 279 3 3.21
976 2077 2.39 1059 23 04 2.65 1139 2536 2.92 1215 277 3 3.19 1289 301 5 3.47
1012 2298 2.64 1093 2529 2.91 1170 2765 3.18 1244 3005 3.46 1315 3250 3.74
1049 2533 2.91 1127 2768 3.18 1201 3008 3.46 1273 3252 3.74 1342 3500 4.03
Rpm Watts Bhp Rpm Watts Bhp Rpm Watts Bhp Rpm Watts Bhp Rpm Watts Bhp
1227 1970 2.27 1310 2206 2.54 1390 2448 2.82 1467 2696 3.10 1541 2951 3.39
1241 2116 2.43 1323 2353 2.71 1400 2597 2.99 1475 2847 3.27 1548 3102 3.57
1258 2274 2.62 1337 2513 2.89 1413 2759 3.17 1486 3010 3.46 — — —
1275 2445 2.81 1352 2687 3.09 1426 2934 3.37 1498 3187 3.67 — — —
1295 2629 3.02 1369 2873 3.30 1442 3122 3.59 1511 3377 3.88 — — —
1315 2826 3.25 1388 3073 3.53 1458 3324 3.82 1527 3581 4.12 — — —
1337 3037 3.49 1408 3286 3.78 1477 3540 4.07 — — — — — —
1360 3262 3.75 1429 3513 4.04 1496 3769 4.34 — — — — — —
1384 3500 4.03 1452 3755 4.32 — — — — — — — — —
1410 3753 4.32 — — — — — — — — — — — —
Brake Horsepower
Factory-Installed Option
Input Watts to Motor
mum continuous watts is 3775. Do not adjust motor rpm such that
motor maximum bhp and/or watts is exceeded at the maximum
operating cfm.
0.20.40.60.81.0
AVAILABLE EXTERNAL STATIC PRESSURE (in. wg)
1.21.41.61.82.0
2. Static pressure losses (i.e., economizer) must be added to external
static pre s su r e be for e ent ering Fan Performa nc e tabl e.
3. Interpolation is permissible. Do not extrapolate.
4. Fan performance is based on wet coils, clean filters, and
casing losses. See Table 13 for accessory/FIOP static pressure
information.
5. Extensive mo tor and drive testing on these units ensures that the full
bhp an d watts rang e of the motor can be util ized with confiden ce.
Using your fan motors up to the watts or bhp rating shown will not
result in nuisance tripping or premature motor failure. Unit warranty
will not be affected.
6. U se of a field- supplied mo tor may affect wir ing size. Co ntact your
Bryant representative for details.
—20—
Page 21

T able 9 — Fan Perform ance — 581A180360 (High Heat Units)
AVAILABLE EXTERNAL STATIC PRESSURE (in. wg)
CFM
4500
4800
5100
5700
6000
6300
6600
6900
7200
7500
CFM
4500
4800
5100
5700
6000
6300
6600
6900
7200
7500
CFM
4500
4800
5100
5700
6000
6300
6600
6900
7200
7500
Bhp —
FIOP —
Watts —
*Stand ard low -med iu m stat ic dri ve rang e is 87 3 to 1021 r pm. A lter na te
high-static drive range is 1025 to 1200. Other rpms require a fieldsupplied drive.
NOTES:
1. Maximum continuous bhp for the standard motor is 6.13. The maxi-
Rpm Watts Bhp Rpm Watts Bhp Rpm Watts Bhp Rpm Watts Bhp Rpm Watts Bhp
753 1307 1.53 786 1404 1.65 861 1644 1.93 932 1893 2.22 997 215 0 2.52
747 1384 1.62 818 1603 1.88 890 1852 2.17 958 2108 2.47 1022 2 373 2.78
775 1571 1.84 850 1822 2.14 920 2079 2.44 986 2344 2.75 1048 2 616 3.07
849 2054 2.41 918 2323 2.73 982 2598 3.05 1044 2879 3.38 1102 3166 3. 71
886 2329 2.73 952 2607 3.06 1015 2891 3.39 1074 3180 3.73 1130 3474 4.08
924 2628 3.08 987 2915 3.42 1047 3207 3.76 1105 3504 4.11 1160 3807 4.46
962 2951 3.46 1023 32 46 3.81 1081 3547 4.16 1136 385 3 4.52 1190 416 3 4.88
1000 3298 3.87 1059 3603 4.23 1115 3912 4.59 1168 4225 4.96 1220 4543 5.33
1038 3672 4.31 1095 3986 4.67 1149 4303 5.05 1201 4625 5.42 1251 4950 5.81
1077 4072 4.78 1131 4394 5.15 1184 4720 5.54 1234 5050 5.92 — — —
Rpm Watts Bhp Rpm Watts Bhp Rpm Watts Bhp Rpm Watts Bhp Rpm Watts Bhp
1060 2414 2.83 1119 2685 3.15 1175 2964 3.48 1230 3250 3.81 1282 3542 4.15
1082 2644 3.10 1140 2922 3.43 1195 3207 3.76 1248 3498 4.10 1299 3795 4.45
1106 2894 3.39 1163 3178 3.73 1216 3470 4.07 1268 3767 4.42 1319 4071 4.77
1157 3459 4.06 1211 3757 4.41 1262 4061 4.76 1312 4371 5.13 1360 4686 5.50
1184 3774 4.43 1236 4080 4.79 1287 4391 5.15 1335 4707 5.52 1382 5029 5.90
1212 4114 4.83 1263 4427 5.19 1312 4745 5.57 1359 5067 5.94 — — —
1241 4478 5.25 1290 4798 5.63 1338 5122 6.01 — — — — — —
1270 4866 5.71 — — — — — — — — — — — —
———————————————
———————————————
Rpm Watts Bhp Rpm Watts Bhp Rpm Watts Bhp Rpm Watts Bhp Rpm Watts Bhp
1332 3841 4.50 1381 4145 4.86 1428 4456 5.23 1473 4772 5.60 1518 5095 5.98
1349 4100 4.81 1397 4409 5.17 1443 4725 5.54 1488 5046 5.92 — — —
1367 4380 5.14 1414 4695 5.51 1460 5016 5.88 — — — — — —
1407 5007 5.87 — — — — — — — — — — — —
———————————————
———————————————
———————————————
———————————————
———————————————
———————————————
LEGEND
Brake Horsepower
Factory-Installed Option
Input Watts to Motor
mum continuous watts is 5180. Do not adjust motor rpm such that
motor maximum bhp and/or watts is exceeded at the maximum
operating cfm.
0.2040.60.81.0
AVAILABLE EXTERNAL STATIC PRESSURE (in. wg)
1.21.41.61.82.0
AVAILABLE EXTERNAL STATIC PRESSURE (in. wg)
2.22.42.62.83.0
2. Static pressure losses (i.e., economizer) must be added to external
static pre s su r e be for e ent ering Fan Performa nc e tabl e.
3. Interpolation is permissible. Do not extrapolate.
4. Fan performance is based on wet coils, clean filters, and
casing losses. See Table 13 for accessory/FIOP static pressure
information.
5. Extensive mo tor and drive testing on these units ensures that the full
bhp an d watts rang e of the motor can be util ized with confiden ce.
Using your fan motors up to the watts or bhp rating shown will not
result in nuisance tripping or premature motor failure. Unit warranty
will not be affected.
6. U se of a field- supplied mo tor may affect wir ing size. Co ntact your
Bryant representative for details.
—21—
Page 22

T able 10 — Fan Performance — 581A240360 (High Heat Units)
AVAILABLE EXTERNAL STATIC PRESSURE (in. wg)
CFM
6,000
6,500
7,000
7,500
8,000
8,500
9,000
9,500
10,000
CFM
6,000
6,500
7,000
7,500
8,000
8,500
9,000
9,500
10,000
CFM
6,000
6,500
7,000
7,500
8,000
8,500
9,000
9,500
10,000
Bhp —
FIOP —
Watts —
*Stan dard low-medium static drive range is 1002 to 1151 rpm. Al ternate
high-static drive range is 1193 to 1369. Other rpms require a fieldsupplied drive.
NOTES:
1. Maximum continuous bhp for the standard motor is 9.47 (for 208-v
units) and 10 .33 ( f or 23 0 an d 460- v u ni ts) . T he maxi m um co nt inu ou s
watts is 7915 (for 208 and 575-v units) and 8640 (for 230 and 460-v
units). Do not adjust motor rpm such that motor maximum bhp and/
or wat ts is exceeded at the maximum operating cfm.
Rpm Watts Bhp Rpm Watts Bhp Rpm Watts Bhp Rpm Watts Bhp Rpm Watts Bhp
868 2752 3.26 934 2987 3.54 997 3227 3.83 1058 3470 4.12 1115 3716 4.41
929 3201 3.80 991 3436 4.08 1051 3675 4.36 1108 3917 4.65 1162 4163 4.94
991 3687 4.37 1049 3923 4.65 1105 4161 4.94 1159 4403 5.22 1211 4647 5.51
1054 4211 5.00 1109 4447 5.28 1161 4686 5.56 1213 4926 5.84 1262 5170 6.13
1117 4773 5.66 1168 5009 5.94 1218 5247 6.22 1267 5488 6.51 1314 5731 6.80
1180 5373 6.37 1229 5609 6.65 1277 5847 6.94 1323 6088 7.22 1368 6331 7.51
1244 6011 7.13 1290 6247 7.41 1335 6485 7.69 1380 6726 7.98 1423 6968 8.27
1308 6687 7.93 1352 6924 8.21 1395 7162 8.50 1437 7402 8.78 1479 7644 9.07
1372 7401 8.78 1414 7638 9.06 1455 7876 9.34 1496 8117 9.63 1535 8358 9.92
Rpm Watts Bhp Rpm Watts Bhp Rpm Watts Bhp Rpm Watts Bhp Rpm Watts Bhp
1171 3965 4. 7 0 1224 421 6 5.00 1 27 6 4 46 9 5.30 1326 4726 5.61 137 4 4 98 3 5.91
1215 4410 5. 2 3 1266 465 9 5.53 1 31 6 4 91 1 5.83 1364 5165 6.13 141 1 5 42 1 6.43
1262 4894 5. 8 1 1311 514 2 6.10 1 35 8 5 39 2 6.40 1404 5645 6.70 144 9 5 89 9 7.00
1310 5415 6. 4 2 1357 566 3 6.72 1 40 3 5 91 2 7.01 1447 6164 7.31 149 0 6 41 6 7.61
1360 5976 7. 0 9 1405 622 2 7.38 1 44 9 6 47 1 7.68 1492 6721 7.97 153 3 6 97 3 8.27
1412 6575 7. 8 0 1455 682 1 8.09 1 49 7 7 06 8 8.39 1538 7318 8.68 — — —
1465 7212 8. 5 6 1506 745 7 8.85 1 54 7 7 70 5 9.14 — — — — — —
151978889.36————————————
———————————————
Rpm Watts Bhp Rpm Watts Bhp Rpm Watts Bhp Rpm Watts Bhp Rpm Watts Bhp
1422 5243 6.22 1468 5505 6.53 1513 5768 6.84
1456 5679 6.74 1501 5938 7.04 1544 6199 7.35 — — — — — —
1493 6155 7.30 1536 6412 7.61 — — — — — — — — —
1533 6670 7.91 — — — — — — — — — — — —
———————————————
———————————————
———————————————
———————————————
———————————————
LEGEND
Brake Horsepower
Factory-Installed Option
Input Watts to Motor
0.2 0.4 0.6 0.8 1.0
AVAILABLE EXTERNAL STATIC PRESSURE (in. wg)
1.2 1.4 1.6 1.8 2.0
AVAILABLE EXTERNAL STATIC PRESSURE (in. wg)
2.2 2.4 2.6 2.8 3.0
——————
2. Static pressure losses (i.e., economizer) must be added to external
static pre s su r e be for e ent ering Fan Performa nc e tabl e.
3. Interpolation is permissible. Do not extrapolate.4
4. Fan performance is based on wet coils, clean filters, and
casing losses. See Table 13 for accessory/FIOP static pressure
information.
5. Extensive mo tor and drive testing on these units ensures that the full
bhp an d watts rang e of the motor can be util ized with confiden ce.
Using your fan motors up to the watts or bhp rating shown will not
result in nuisance tripping or premature motor failure. Unit warranty
will not be affected.
6. U se of a field- supplied mo tor may affect wir ing size. Co ntact your
Bryant representative for details.
—22—
Page 23

Table 11 — Air Quantity Limits
UNIT
581A
155
180
240
MINIMUM
CFM
3600 6,000
4500 7,500
MAXIMUM
6000 10,000
CFM
Table 12 — Evaporator Fan Motor Specifications
UNIT
581A
(Standard
Motor)
(Optional
Motor)
Brake Horsepower
BHP —
155
155
180
240
NOMINAL
Hp
2.9 208 2700 85.8% 3.13 2.34 9.46
2.9 230 2700 85.8% 3.13 2.34 8.6
VOLTAGE
MAX
WATTS
2.9 460 2700 85.8% 3.13 2.34 4.3
3.7 208 3775 85.8% 4.38 3.27 10.5
3.7 230 3775 85.8% 4.38 3.27 10.5
3.7 460 3775 85.8% 4.38 3.27 4.8
5 208 5180 87.5% 6.13 4.57 15.8
5 230 5180 87.5% 6.13 4.57 15.8
5 460 5180 87.5% 6.13 4.57 7.9
7.5 208 7915 88.5% 9.47 7.06 22
7.5 230 8640 88.5% 10.33 7.71 22
7.5 460 8640 88.5% 10.33 7.71 13
Table 13 — Accessory/FIOP Economizer Static Pressure (in. wg)
UNIT
581A
155, 18 0
240
LEGEND NOTES:
bhp —
FIOP —
Brake Horsepower
Factory- I ns talled Opti on
UNIT
VOLTAGE
All
All
CFM
3,750 .03
4,000 .03
5,000 .05
6,000 .07
7,500 .10
6,000 .07
7,200 .09
9,000 .11
10,000 .12
1. The factory-assembled horizontal adapter substantially improves fan
perfor ma nc e. See F ig. 27.
2. Th e stati c pres sure mu st be adde d to exter nal sta tic pre ssur e. The
sum and the evap orator entering-air cfm should then be used in conjuncti on with the Fan Perfor mance table to d eterm ine blowe r rpm,
bhp, and watts.
EFF.
MAX
BHP
ECONOMIZER
PRESSURE DROP
MAX
BkW
MAX
AMPS
Table 14 — Fan RPM at Motor Pulley Setting*
1
581A 0
155†
155**
180†
180**
240†
240**
*Approximate fan rpm shown.
†Indicates standard drive package.
**In dicates alternate drive package.
††Due to belt and pulley style, pulley cannot be set to this number of turns open.
†† †† †† †† 1064 1035 1006 978 949 920 891 863 834
†† †† †† †† 1426 1393 1360 1327 1294 1261 1227 1194 1161
†† †† †† †† 1021 1002 984 965 947 928 910 891 873
†† †† †† †† 1200 1178 1156 1134 1112 1091 1069 1047 1025
†† †† †† †† 1151 1132 1114 1095 1077 1058 1040 1021 1002
†† †† †† †† 1369 1347 1325 1303 1281 1259 1237 1215 1193
/
2
11
1
/
2
22
1
/
2
—23—
33
1
/
2
44
1
/
2
55
1
/
2
6
Page 24

Fig. 27 — Fan Performance Using Accessory
Power Exhaust
XIII. GAS HEAT
Verify gas pressures before turning on heat as follows:
1. Turn off manual gas stop.
2. Connect pressure gage to supply gas pressure tap
(see Fig. 13).
3. Connect pressure gage to manifold pressure tap on
gas valve.
4. Turn on manual gas stop and set thermostat to
HEAT position. After the unit has run for several
minutes, verify that incoming pressure is 5.5 in. wg
or greater, and that the manifold pressure is
3.3 in. wg. If manifold pressure must be adjusted,
refer to Gas Valve Adjustme n t sect io n o n page 29 .
5. After unit has been in operation for 5 minutes, check
temperatu re rise ac ross t he heat exc hange rs . See unit
informative plate for correct rise limits of the heat
supplied. Air quantities may need to be adjusted to
bring the actual rise to within the a ll owable limits.
XIV. BASE UNIT OPERATION
A. Cooling, Units Without Economizer
When the rmostat calls f or cooling, term inals G and Y 1 are
energ ized. Th e indo or (evapo rator ) fan cont actor (I FC) an dcompressor contactor no. 1 (C1) are energized and evaporator-fan motor (IFM), compressor no. 1 and condenser fan
start. The condenser-fan motors run continuously while unit
is cooling. If the thermostat calls for a second stage of cooling
by energizing Y2, compressor contactor no. 2 (C2) is energize d a n d compressor no. 2 sta rts.
B. Heating, Units Without Economizer
NOTE: The 581A155-240 units have 2 stages of heat.
When the thermos tat calls for heating, power is sent to W on
the IGC (integrated gas unit controller) board. An LED
(light-emitting diode) on the IGC board will be on during
normal operation. A check is made to ensure that the rollout
switch and limit switch are closed and the induced-draft
motor is running . The induced-draft motor is then energized,
and when speed is proven with the hall effect sensor on the
motor, the ignition activation per i od begins. The burners will
ignite within 5 seconds.
If the burners do not light, there is a 22-second delay before
another 5-second attempt. If the burners still do not light,
this sequence is repeated for 15 minutes. After the 15 minutes have elapsed, if the burners still have not lighted, heating is locked out. To reset the control, break 24-v power to
the thermos tat.
When ignition occurs the IGC board will continue to monitor
the condition of the rollout and limit switches, the hall effect
sensor, as well as the flame sensor. If the unit is controlled
through a room thermostat set for fan auto.,45 seconds after
ignition occurs, the indoor-fan motor will be energized (and
the outdoor-air dampers will open to their minimum position). If for some reason the overtemperature limit opens
prior to the start of the indoor fan blower, on the next
attempt, the 45-second delay will be shortened to 5 seconds
less than the time from initiation of heat to when the limit
tripped. Gas will not be interrupted to the burners and heating will continue. Once modified, the fan on delay will not
change back to 45 seconds unless power is reset to the
control.
When additional heat is required, W2 closes and initiates
power to the second stage of the main gas valve. When the
thermo stat is sat isfied, W1 a nd W2 open and the gas v alve
closes, interrupting the flow of gas to the main burners. If
the call for W1 lasted less than 1 minute, the heating cycle
will not terminate until 1 minute after W1 became active. If
the unit is controlled through a room thermostat set for fan
auto., the indoor-fan motor will continue to operate for an
additional 45 seconds then stop (and the outdoor-air dampers will close). If the overtemperature limit opens after the
indoor motor is stopped within 10 minutes of W1 becoming
inactive, on the next cycle the time will be extended by
15 seconds. The maximum delay is 3 minutes. Once modified, the fan off delay will not change back to 45 seconds
unless power is reset to the control.
A LED indicator is provided on the IGC to monitor operation. The IGC is located by removing the side panel and
viewing the IGC through the view port located in the control
box access panel. See Fig. 28. During normal operation, the
LED is continuously on. See Table 15 for error codes.
T able 15 — IGC LED Indications
ERROR CODE LED INDICATION
Normal Operation
HardwareFailure
Fan On/Off Delay
Modified
Limit Switch Fault
Flame Sense Fault
Five Consecutive Limit
Switch Faults
Ignition Lockout Fault
Inducer Switch Fault
Rollout Switch Fault
Internal Control F ault
IGC —
LED —
NOTES:
1. There is a 3-second pause between error code displays.
2. If more than one error code exists, all applicable error codes will be
displ ayed in numerical sequence.
3. Error codes on the IGC will be lost if power to the unit is interrupted.
LEGEND
Integrated Gas Unit Contr oller
Light-Emitting Diode
On
Off
1 Flash
2 Flashes
3 Flashes
4 Flashes
5 Flashes
6 Flashes
7 Flashes
8 Flashes
C. Cooling, Units With Economizer
Upon a call for cooling, when outdoor ambient is above the
changeover control setting, the economizer damper moves to
VENT position. The compressors and evaporator and condenser fans energize and operate as per Coolin g , Units Wit hout Economiz er section on this page.
Upon a first call for cooling, when outdoor ambient is below
the changeover control setting, the evaporator fan starts and
the economizer is fully open. The compressors remain off.
—24—
Page 25

INDUCED DRAFT
MOTOR
FLUE BOX
COVER
MAIN BURNER
SECTION
MAIN GAS
VALVE
COMBUSTION
FAN HOUSING
INTEGRATED GAS
UNIT CONTROLLER
(HIDDEN)
CONTROL BOX
ACCESS PANEL
IGC LED
VIEW
PORT
FIELD GAS
CONNECTION
CERAMIC
BAFFLE
CLIP
HEAT EXCHANGER
TUBES
Upon a second-stage call for cooling, compressor no. 1 is
energized and mechanical cooling is integrated with economizer cooling. If the outdoor-air temperature drops below
50 F, a cooling lockout switch prevents the compressors from
running.
When supply-air temperature drops below a fixed set point,
the ec on om iz er da mp er mo dul a tes to ma int ain t he t em per ature at the fixed set point.
D. Freeze Protection Thermostats
A free ze pr ote cti on the rm ost at is loc ate d o n th e to p an d bottom of the evaporator coil. It detects frost build-up and locks
out the com pressors, allowing the coil to cle ar. Once frost has
melted, the compressors can be reenergized by resetting the
compressor lockout.
E. Heating, Units With Economizer
Outdoor-air damper stays at VENT position while evaporator fan is operating. Refer to Heating, Units without Economizer section on page 24 for heating sequence of operation.
SERVICE
WARNING: Before performing service or mainte-
nance operations on unit, turn off main power switch
to unit. Elect rical shock could cau se p ersonal injury.
I. CLEANING
Inspect unit inte rior at beginni ng of each heating and co oling
season and as operating conditions require. Remove unit top
panel and/or si de pa nels for access to unit interior.
A. Evaporator Coil
Clean as required with commercial coil cleaner. Wash both
sides of coil and flus h with clean water.
B. Condenser Coil
Clean condenser coil annually and as required by location
and outdoor-air conditions. Inspect coil monthly; clean as
required.
C. Condensate Drain
Check and clean each year at start of cooling season. In winter, keep drains and traps dry.
D. Filters
Clean or repl ac e a t st art of e ach hea tin g an d cool in g se as on,
or more often if operating co nditions requ ire . Refer to Table 1
for type and size.
E. Outdoor-Air Inlet Screens
Clean screens with steam or hot water and a mild detergent.
Do not use throwaway filters in place of screens. See Table 1
for quantity and size.
F. Main Burner
At the beginning of each heating season, inspect for deterioration or blockage due to corrosion or other causes. Observe
the main burner flames. Refer to Main Burners section on
page 29.
G. Flue Gas Passage ways
The flue collector box and heat exchanger cells may be
inspected by removing heat exchanger access panel (Fig. 4
and 5), flue box cover, and main burner assembly (Fig. 28).
Refer to Main Burners sect ion on page 29 for burner removal
sequence. If cleaning is required, remove heat exchanger baffles an d clean tu be s w i th a wire br ush.
Use caution with ceramic heat exchanger baffles. When
installing retaining clip, be sure the center leg of the clip
extends inward toward baffle. See Fig. 29.
H. Combustion-Air Blower
Clean periodically to assure proper airflow and heating efficiency. Inspect blower wheel every fall and periodically during heating season. For the first heating season, inspect
blower wheel bi-monthly to determine proper cleaning
frequency.
To inspect blower wheel, remove heat exchanger access
panel. Shine a flashlight into opening to inspect wheel. If
cleaning is required, remove motor and wheel assembly by
removing screws holding motor mounting pl ate to top of combustion fan hou sing ( F ig. 28). The motor and wheel assembly
will slide up and out of the fan housing. Remove the blower
wheel from the motor shaft and clean with a detergent or solvent. Replace motor and wheel assembly.
Fig. 28 — Typical Gas Heating Section
One baffle and clip will be in each upper tube of the heat
NOTE:
exchanger.
Fig. 29 — Removing Heat Exchanger Ceramic Baffles
and Clips
—25—
Page 26

II. LUBRICATION
A. Compressors
Each compressor is charged with the correct amount of oil at
the factory. Conventional white oil (Sontex 200LT) is used.
White oil is compatible with 3GS oil, and 3GS oil may be
used if the addition of oil is required. See compressor nameplate for original oil charge. A complete recharge should be
four ounces less than the original oil charge When a compressor is exchang ed in th e field it is poss ible that a major
portion of the oil from the replaced compressor may still be
in the system. While this will not affect the reliablity of the
replacement compressor, the extra oil will add rotor drag and
increa se power usage. To rem ove this excess oil , an access
valve may be added to the lower portion of the suction line at
the inlet of the compressor. The compressor should then be
run for 10 minutes, shut down and the access valve opened
until no oil flows. This should be repeated twic e to make sure
the proper oil level has been achieved.
B. Fan Shaft Bearings
For size 155 units, bearings are permanently lubricated. No
field lubrication is required. For size 180 and 240 units,
lubricate bearings at least every 6 months with suitable
bearing grease. Extended grease line is provided for far side
fan bearing (opposite drive side). Typical lubricants are
given below:
MANUFACTURER LUBRICANT
Texaco
Mobil
Sunoco
Texaco
*Preferred lubricant because it contains rust and oxidation inhibitors.
Regal AFB-2*
Mobilplex EP No. 1
Prestige 42
Multifak 2
C. Condenser and Evaporat or-Fan Motor Bearings
The condenser- and evaporator-fan motors have
permanently sealed bearings, so no field lubrication is
necessary.
III. EV APORATOR FAN PERFORMANCE ADJUSTMENT
(Fig. 30-32)
F an motor pulleys are fa cto ry set for speed show n in T able 1.
To change fan speeds:
1. Shut off unit power supply.
2. Size 155 only:
Loosen belt by loosening carriage nuts holding motor
mount assembly to fan scroll side plates (A and B).
Size 180, 240 only:
Loosen nuts on the 2 carriage bolts in the mounting
base. Install jacking bolt and plateunder motor base
(bolt and plate are shipped in installer’s packet).
Using bolt and p late, r aise motor to top of sli de and
remove belt. Secure motor in this position by tightening the nuts on the carriage bolts.
3. Loosen movable-pulley flange setscrew (see Fig. 30).
4. Screw movable flange toward fixed flange to increase
speed and away from fixed flange to decrease speed.
Increasin g fa n sp eed i ncre ases load on mot or. Do not
exceed maximum speed specified in Table 1.
See Table 11 for air quantity limits.
5. Set movable flange at nearest keyway of pulley hub
and tighten setscrew. (See Table 1 for speed change
for each full turn of pulley flange.)
6. Replace and tighten belts (see Belt Tension Adjustment section on page 27).
To align fan and motor pulleys:
1. Loosen fan pul ley setscrews .
2. Slide fan pulley along fan shaft.
3. Make angular alignment by loosening motor from
mounting plate.
IV. EVAPORATOR FAN SERVICE AND REPLACEMENT
A. 581A155 Units (See Fig. 31)
NOTE: To remove belts only, follow Steps 1-6.
1. Remove filter and supply-air sect ion panels.
2. Remove unit top panel.
3. Loosen carriage nuts A and B holding motor mount
assembly to fan scroll side plates.
4. L o osen screw C.
5. Rotate motor mount assembly (with motor attached)
as far as possible aw ay from evaporator coil.
6. Remove belt.
7. Rotate motor mount assembly back past original
position towa rd evap o rator co il .
8. Remove motor mounting nuts D and E (both sides).
9. Lift motor up thr oug h top of unit.
10. Reverse above procedure to reinstall motor.
11. Check and adjust belt tens ion as necessary.
B. 581A180 and 240 Units (See Fig. 32)
The 581A180 and 240 units use a fan motor mounting system that features a slide-out motor mounting plate. To
replace or service the motor, slide out the bracket.
1. Remove the evaporator-fan access panel and the
heating control access pan el.
2. Remove th e center post (located between the evapora tor fan and heating control access panels) and all
screws securing it.
3. Loosen nuts on the 2 carriage bolts in the motor
mounting base.
4. Using jacking bolt under motor base, raise motor to
top of slide and remove belt. Secure motor in this
position by tightening the nuts on the carriage bolts.
5. Remove the belt drive.
Fig. 30 — Evaporator-Fan Alignment and Adjustment
—26—
Page 27

Fig. 31 — 581A155 Evaporator-Fan Motor Adjustment
10. Disconnect wiring connections and remove the 4
mounting bolts.
11. Remove the motor.
12. To install the new motor, reverse St eps 1-11.
V. BEL T TENSION ADJUSTMENT
To adjust belt tension:
1. Loosen fa n mo t or bolts.
2. Size 155 Units:
Move motor mounting plate up or down for proper
belt tension (
1
/2 in. deflecti on w ith one finger).
Size 180 and 240 Units:
Turn motor jacking bolt to move motor mounting
plate up or down for proper belt tens ion (
3
/8 in. deflec-
tion at midsp an with one finger [9 lb forc e]).
3. Tighten nuts.
4. Adjust bolts and nut on mounting plate to secure
motor i n fixed po sition.
VI. CONDENSER-FAN ADJUSTMENT
A. 581A155 and 180 Units (Fig. 33)
1. Shut off unit power supply.
2. Remove access panel(s) closest to the fan to be
adjusted.
3. Loosen fan hub setscrews.
4. Adjust fan height on shaft using a straightedge
placed across the fan orifice.
5. Tighten setscrews and replace panel(s).
6. Turn on unit power.
B. 581A240 Units (Fig. 34)
1. Shut off unit power supply.
2. Remove fan top-grille assembly and loosen fan hub
screws.
3. Adjust fan height on unit, using a straightedge
placed across the fan orifice.
1
/2-in. bolt and threaded plate are included in the installer’s
A 3
NOTE:
packet. T hey sh ou ld be a dd ed to the m otor su pport ch annel b elow the
motor mounting plate to aid in ra is in g the motor. The pl ate part nu mber
is 50DP503842. The adjustment bolt is
3
/8 - 16 x 13/4-in. LG .
Fig. 32 — 581A180 and 240 Evaporator-Fan Motor Section
6. Remove jacking bolt and tapped jacking bolt plat e.
7. Remove the 2 screws that secure the motor mounting
plate to the motor support channel.
8. Remove the 3 screws from the end of the motor support channel that interfere with the motor slide path.
9. Slide out the motor and motor mounting plate.
—27—
Dimens io n is in inches.
NOTE:
Fig. 33 — Condenser Fan Adjustment, 581A155 and 180
Dimension is in in ches.
NOTE:
Fig. 34 — Condenser Fan Adjustment, 581A240
Page 28

4. Tighten setscrews and replace rubber hubcap to prevent hub from rusting to motor shaft.
5. Fill hub recess with permagum if rubber hubcap is
missing.
VII. ECONOMIZER ADJUSTMENT
See Tables 16 and 17 for checkout and outdoor air temperature simulation. Make certain the outdoor-air damper is
fully closed and the return-air damper is fully open before
completing the following steps:
1. Tu rn on powe r to the uni t.
2. Turn the thermostat fan switch to the ON position.
The damper will go to the vent position.
3. Adjust the vent position with the minimum damperposition adjustment on the economizer motor control
module. See Fig. 18.
4. Set t he syste m s electo r swi tch t o C OOL posi tion and
set the cooling temperature selector to its lowest
setting.
NOTE: The Cooling mode may also be simulated by
removing the thermostat wires from terminals Y1
and Y2 and installing a jumper between terminals R
and Y1. Refer to unit label diagram for terminal
locations.
T able 16 — Economizer Checkout Procedures
TEST PROCEDURE RESULTS
A. Disconnect power at
TR and TR1.
Disconnect jumper
between P and
P1. See Fig. 18.
B. Jumper TR to 1.
C. Jumper T1 to T.
D. Disconnect outdoor-air
thermostat connections
from S
Factory-instal led
800 ohm resistor
should remain connected
to S
E. Reconnect power to
terminals TR and TR1.
Disconnect fac tory-installed
resistor from terminals
S
R
and +.
O
and +.
R
1. LED (light-emitting diode)
should be off.
2. Motor is in closed position.
TEST PROCEDURE RESULTS
and +.
1. LED should be on.
2. M otor drives towa rd open.
T able 17 — High and Low Outdoor-Air Simulati on
TEST PROCEDURE RESULTS
A. Reconnect factory-installed
800 ohm resistor
between terminals
SR and +.
B. Connect 1200 ohm
checkout resistor between
terminals SO and +.
C. Turn set point potentiometer
to position A.
Low outdoor-air test results:
1. LED (light-emitting
diode)s hould be on.
D. Turn set point potentiometer
to position D.
E. Disconnect 1200 ohm
checkou t resistor.
2. M otor drives towa rd open.
High outdoor-air test results:
1. LED should be off.
2. M otor drive s towa rd cl os ed.
5. Set the outdoor-air thermostat (OAT), located in the
economizer section of the unit (s ee Fig. 17) to 75 F.
6. If the outdoor temperature is below 75 F, the economizer will control the mixed air with the mixed-air
sensor. If the outdoor air is above 75 F, place a j u m per
around the contacts of the OAT.
7. Jumper term inal T to terminal T1 on the module (see
Fig. 18). The economizer will go to the full open position. The outdoor-air damper will go to the full open
position, and the return-air damper will go to the full
closed position.
8. Adjust mechanical linkage, if necessary, for correct
positioning. If may be necessary to remove the filters
to adj u st the link age.
9. Remove the jumper from around the contacts of the
OAT if installed in Step 6. Remove the jumper from
terminals T and T1 installed in Step 7.
10. If the Cooling m ode was simulated to operate the unit
in Step 4, re move th e jumper and reconne ct the thermostat wire s to termi n a ls Y1 and Y2 .
VIII. POWER FAILURE
Dampers have a spring return. In event of power failure,
dampers will return to fully closed position until power is
restored. Do not manually operate damper motor.
IX. REFRIGERANT CHARGE
Amount of r efrigerant charg e is listed on unit nameplate and
in Table 1. Refer to Carrier GTAC II; Module 5; Charging,
Recovery, Recycling, and Reclamation section for charging
methods and procedures. Unit panels must be in place when
unit is operating during charging procedure.
NOTE: Do not use recycled refrigerant as it may contain
contaminants.
A. No Charge
Use standard evacuating techniques. After evacuating system, weigh in the specified amount of refrigerant (refer to
Table 1).
B. Low Charge Cooling
Using appropriate cooling charging chart (see Fig. 35), add
or remove refrigerant until conditions of the chart are met.
Note that charging chart is different from those normally
used. An accurate pressure gage and temperature-sensing
device is required. Charging is accomplished by ensuring the
proper amount of liquid sub-cooling. Measure liquid line
pressure at the liquid line service valve using pressure gage.
Connect temperature sensing device to the liquid line near
the liquid line service valve and insulate it so that outdoor
ambient temperature does not affect reading.
C. To Use the Cooling Charging Chart
Use the above temperature and pressure readings, and find
the intersection point on the cooling charging chart. If intersection point on chart is above line, add refrigerant. If intersection point on chart is below line, carefully recover some of
the charge. Recheck suction pressure as charge is adjusted.
NOTE: Indoor-air CFM must be within normal operating
range of unit. All outdo or fans must be operating.
The TXV (thermostatic expansion valve) is set to maintain
between 15 and 20 degrees of superheat at the compressors.
The valves are factory set and should not require
re-adjustment.
—28—
Page 29

BOTH CIRCUITS
REDUCE CHARGE IF BELOW CURVE
150
200
250
300
350
400
140
120
100
80
60
LIQUID TEMPERATURE AT LIQUID VALVE (DEG F)
40
50
ALL OUTDOOR FANS MUST BE OPERATING
ADD CHARGE IF ABOVE CURVE
100
LIQUID PRESSURE AT LIQUID VALVE (PSIG)
Fig. 35 — Cooling Charging Chart
X. GAS VALVE ADJUSTMENT
A. Natural Gas
The gas valve opens and closes in response to the thermostat
or limit control.
When power is supplied to valve terminals D1 and C2, the
main valve opens to its preset position.
The regular factory setting is stamped on the valve body
(3.3 in. wg).
To a djust re gulator :
1. Set thermos tat at setting for no ca l l for heat.
2. Turn main gas valve to OFF position.
1
3. Remove
/8-in. pipe plug from manifold or gas valve
pressure tap connection. Install a suitable pressuremeasuring device.
4. Set main gas valve to ON position.
5. Set thermos tat at setting to call for heat.
6. Remove screw cap covering regulator adjustment
screw (See Fig. 36).
7. Turn adjustment screw clockwise to increase pressure or counterclockwise to decrease pressure.
8. Once desired pressure is established, set thermostat
setting for no call for heat, turn off main gas valve,
remove pressure-measuring device, and replace
1
/8-in.
pipe plug and screw cap.
XI. MAIN BURNERS
For all applications, main burners are factory set and should
require no adjustment.
A. Main Burner Removal
1. Shut off (field- supplied) manual main gas valve.
2. Shut off power to unit.
3. Remove unit control box access panel, burner section
access panel , and center post (Fig. 4 and 5).
4. Disconnect gas piping from gas valve inlet.
5. Remove wires from gas valve.
6. Remove wires from rollout switch.
7. Remove sensor wire and ignitor cable from IGC
board.
8. Remove 2 screws securing manifold bracket to
basepan.
9. Remove 2 screws that hold the burner support plate
flange to the vestibule plate.
10. Lift burner assembly out of unit.
B. Cleaning and Adjustment
1. Remove burner rack from unit as described in Main
Burner Removal section above.
2. Inspect burners, and if dirty, remove burners from
rack.
3. Us ing a sof t bru sh, cle an bu rne rs an d cr osso ver p ort
as required.
4. Adjust spark gap. See Fig. 37.
5. Reinstall burners on rack.
6. Reinstall burner rack as described above.
XII. FILTER DRIER
Replace whenever refrigerant system is exposed to
atmosphere.
XIII. PROTECTIVE DEVICES
A. Compressor Protection
Overcurrent
Each compres sor has internal line break mo tor protection.
Overtemperature
Each compressor has an internal protector to protect it
against excessively high discharge gas temperatures.
Crankcase Heate r
The 581A units are equipped with a 70-watt crankcase
heater to prevent absorption of liquid refrigerant by oil in
the crankcase when the compressor is idle. The crankcase
heater is energized when ev er there is main power to the un it
and the compress or is not energized.
IMPORTANT: After prolonged shutdown or servicing, energize the crankcase heaters for 24 hours before starting the
compr essors.
Compressor L ockout
If any of the safeties (high-pressure, low-pressure, freeze
protection thermostat, compressor internal thermostat) trip,
or if there is loss of power to the compressors, the cooling
lockout (CLO) will lock the compressors off. To reset, manually move the ther mostat setting.
B. Evaporator Fan Motor Protection
On size 155 units, an internal protector with auto-reset is
included in the indoor fan motor as a protection against
overcurrent.
On size 180 and 240 units, a manual reset, calibrated trip,
magnetic circuit breaker protects against overcurrent. Do
not bypass connections or increase the size of the breaker to
correct trouble. Determine the cause and correct it before
reset ti ng the br ea k e r.
Fig. 36 — Gas Val ve
—29—
Page 30

C. Condenser-F an Motor Protection
Each condenser-fan motor is internally protected against
overtemperature.
D. High- and Low-Pressure Switches
If eit her sw itch t rips, or if th e com presso r over tempe ratur e
switch activates, that refrigerant circuit will be automatically locked out by the CLO. To reset, manually move the
thermostat setting.
E. Freeze Protection Ther mo stat (FPT)
An FPT is located on the top and bottom of the evaporator
coil. They detect frost build-up and turn off the compressor,
allowing the coil to clear. Once the frost has melted, the compressor can be reenergized by resetting the compressor
lockout.
XIV. RELIEF DEVICES
All units have relief devices to protect against damage from
excessive pressure s (i .e. , fir e) . T h es e d evi c e s pr ot e ct the hi gh
and low side.
XV. CONTROL CIRCUIT, 24-V
This control circuit is protected against overcurrent by a
3.2 amp circuit breaker. Breaker can be reset. If it trips,
determine cause of trouble befor e resetting
XVI. REPLACEMENT PARTS
A comp lete list of repla cement parts may be obtai ned from
any Carrier distributor upon request.
XVII. DIAGNOSTIC LEDS
The IGC control board has a LED for diagnostic purposes.
The IGC error codes are shown in Table 15.
—30—
Page 31

SEE
DETAIL
"C"
SEE
DETAIL
"C"
SEE
DETAIL
"C"
581A155225
581A180270, 581A240270, AND 581A155300
581A180360 AND 581A240360
Fig. 37 — Spark Gap Adjustment
—31—
Page 32

LEGEND
Fig. 38 — Typical Wiring Schematic and Fig. 39 — Typical Component Arrangement
AHA —
BKR W/AT —
BR —
C—
CAP —
CB —
CC —
CH —
CLO —
CLS —
COMP —
CR —
CT —
DM —
DU —
EQUIP —
FPT —
FU —
GND —
GVR —
HPS —
HS —
HV —
IDM —
NOTES:
1. Compressor and fan motors therma lly prot ected; 3-p hase motor s protec ted against primary single-phasing conditions.
2. If any of the original wire furnished must be replaced, it must be replaced with type 90 C
wire or its equivalent.
3. Jumpers are omitted when unit is equipped with economizer.
4. IFCB must trip amps is equal to or less than 140% full load amps.
5. On 208/230-v unit, TRAN1 is factory wired to ORN lead for 230-v power supply. If unit is
to run on 208-v power supply, TRAN1 must be rewired. Disconnect the BLK wi re on
TRAN1 and connect wire to 208-v RED wire. Insulate 230-v ORN wire.
6. The CLO locks out the compre ssor to prevent short cycling on compr essor overload
and safety devices. Before replacing CLO, check these devices.
7. Number(s) indicates the line location of used contacts. A bracket over (2) numbers signifies a single-pole, do uble-throw contact. An underlined number signifies a normally
closed contact. A plain (no line) number signifies a normally open conta
Adjustable Heat Anticipator
Breaks with Amp Turns
Burner Relay
Contactor, Compressor
Capacitor
Circuit Breaker
Cooling Compensator
Crankcase Heater
Compressor Lockout
Compressor Lockout Switch
Compressor Motor
Control R ela y
Current Transformer
Damper Motor
Dummy Terminal
Equipment
Freeze Protection Thermostat
Fuse
Ground
Gas Valve Relay
High-Pressure Switch
Hall Effect Sensor
High Voltage
Induced-Draft Motor
IFC —
IFCB —
IFM —
IGC —
L—
LED —
LOR —
LPS —
LS —
MAT —
MGV —
NEC —
OAT —
OFC —
OFM —
PL —
QT —
R—
RS —
SN —
SW —
TB —
TRAN —
Indoor (Evaporator) Fan Contactor
Indoor (Evaporator) Fan Circuit
Breaker
Indoor (Evaporator) Fan Motor
Integrated Gas Unit Controller
Light
Light-Emitting Diode
Lockout Relay
Low-Pressure Switch
Limit Switch
Mixed-Air Thermostat
Main Gas Valve
National Electrical Code
Outdoor-Air Thermostat
Outdoor (Condenser) Fan Contactor
Outdoor (Condenser) Fan Motor
Plug Assembly
Quadruple Terminal
Relay
Rollo ut Switch
Sensor
Switch
Terminal Block
Transformer
ct.
Terminal (Marked)
Terminal (Unmarked)
Terminal Block
Splice
Splice (Marked)
Splice (Field Supplied)
Factory Wiring
Field Control Wiring
Field Power Wiring
Accessory or Optional Wiring
T o Indicate Common Potential Only ,
Not To Represent Wiring
Fig. 38 — Typical Wiring Schematic (581A180, 208/230 V Shown)
—32—
Page 33

Fig. 38 — Typical Wiring Schematic (581A180, 208/230 V Unit Shown) (cont)
—33—
Page 34

ECONOMIZER OPTION/ACCESSORY
Fig. 39 — Typical Component Arrangement (581A180 Shown)
—34—
Page 35

PROBLEM CAUSE REMEDY
Compressor and condenser fan will
not star t.
Compressor will not start but
condenser fan r uns.
Compressor cycles (other than
normally satisfying thermostat).
Compressor operates continuously.
Excess ive head pressure.
Head pr essure too low.
Excessive suction pressure.
Suction pressure too low.
Compressor no. 2 will not run.
LEGEND
Thermostatic Exp ansion Valve
TXV —
TROUBLESHOOTING
Refer to Tables 18 and 19 for troubleshooting details .
Table 18 — Cooling Service Analysis
Power fa ilure. Call power company.
Fuse blown or circuit breaker tripped. Replace fuse or reset circuit breaker.
Defective thermostat, contactor, transformer,
or control relay.
Insufficient l ine volt age. Determine cause and correct.
Incorrect or f aulty wirin g. Check wiring diagra m and rewire correctly.
Thermostat setting too high. Lower thermostat setting below room
Faulty wiring or loose connections in
comp ressor circuit.
Compressor motor burned out, seized, or
internal overload open.
Defective overload. Determine cause and replace.
Compressor locked out. Determine cause for safety trip and reset
One leg of 3-phase power de ad. Replace fuse or reset circuit breaker.
Refrigerant overcharge or undercharge. Recover refrigerant, evacuate system, and recharge to
Defective compressor. Replace and determine caus e.
Insufficient l ine volt age. Determine cause and correct.
Blocked conden ser. Determi ne cause an d correct.
Defective overload. Determine cause and replace.
Defective thermostat. Replace thermostat.
Faulty condenser-fan motor. Repl ace.
Restriction in refrigerant system. Locate restriction and remove.
Dirty air filter. Replace filter.
Unit undersized for load. Decrease load or increase unit size.
Thermostat set too low. Reset thermo stat.
Low refrigerant charge. Locate leak, repai r, and recharge.
Air in system. Recover refrigerant, evacuate system, and recharge.
Condenser coil dirty or restricted. Clean coil or r emove restrictio n.
Dirty air filter. Replace filter.
Dirty condenser coil. Clean coil.
Refrigerant overcharged. Recover excess refrigerant.
Faulty TXV. 1. Check TXV bulb mounting and secure tightly to
Air in system. Recover refrigerant, evacuate system, and recharge.
Condenser air restricted or air short-cycling. Determine cause and correct.
Low ref rigerant c harge. Check for leaks, repair, and recharge.
Restriction in liquid tube. Remove restriction.
High heat load. Check for source and eliminate.
Faulty TXV. 1. Check TXV bulb mounting and secure tightly to
Refrigerant overcharged. Recover excess refrigerant.
Dirty air filter. Replace filter.
Low ref rigerant c harge. Check for leaks, repair, and recharge.
Metering device or low side restricted. Remove source of restriction.
Faulty TXV. 1. Check TXV bulb mounting and secure tightly to
Insuff icient evaporator airflow. Increase air quant ity. Chec k filter and replace if nece ssary.
T emperature too low in conditioned area. Reset thermostat.
Field-installed filter drier rest ricted. Replace.
Unit in economizer mode. Proper oper ation; no remedy necessary.
Replace component.
temperature.
Check wiring and repair or replace.
Determine cause. Replace compressor.
lockout.
Determine cause.
nameplate.
suction line.
2. Replace TXV if stuck open or closed.
suction line.
2. Replace TXV if stuck open or closed.
suction line.
2. Replace TXV if stuck open or closed.
—35—
Page 36

PROBLEM CAUSE REMEDY
Burners will not ignite .
Inadequate heating.
Poor flame characteristics.
Burners will not turn off.
LEGEND
Ground
GR —
Table 19 — Heating Service Analysis
Misaligned spark electrodes. Check flame ignition and sensor electrode positioning. Adjust
No gas at main burners. Check gas line for air; purge as necessary. After purging gas
Water in gas li ne. Drain water an d install drip leg to trap water .
No power to furnace. Check power supply, fuses, wiring, and circuit breaker.
No 24 v pow er supply to control circuit . Chec k transformer. Transformers wi th internal overcurrent
Miswired or loose connections. Check all wiring and wire nut connections.
Burned-o ut heat anticipator in thermost at. Replace thermostat.
Broken thermostat wires. Run continuity check. Replace wires if necessary.
Dirty air filter. Clean or replace filter as necessary.
Gas input to unit too low. Check gas pressure at manifold. Clock gas meter for input.
Unit undersized for application. Replace with proper unit or add additional unit.
Restricted airflow. Clean filter, replace filter, or remov e any restrictio ns.
Blower speed too low. Install alternate motor, if applicable, or adjust pulley to increase
Limit switch cycles main burners. Check rotation of blower, thermostat heat anticipator settings,
Too much outdoor air. Adjust minimum position.
Incomplete combustion (lack of combustion air)
result s in:
Aldehyde odor s, CO , sooting flame, or floating
flame.
Unit is locked into Heating mode fo r a one minut e
minimum.
as need ed .
line of air, allow gas t o dissipat e for at least 5 minutes before
attempting to relight unit.
Check gas valve.
protection require a cool-down period before resetting. Check
24-v circuit breaker; reset if necessary.
If too low, increase manifold pressure or replace with correct
orifices.
fan speed.
and temperature rise of unit. Adjust as needed.
Check economizer operation.
Check all screws around flue outl ets and b urner compartment.
Tighten as necessary.
Cracked heat exchan ger.
Overfired unit — redu c e inp ut, change orifices, or adjust gas
line or manifold pressure.
Check vent for restriction. Clean as necessary.
Check orifice to burner alignment.
Wait until mandatory one minute time period has elapsed or
power to unit.
—36—
Page 37

Refer to Fig. 40 for IGC trou bleshooting information.
LEGEND
IDM —
IGC —
NOTE:
Induced-Draft Motor
Integrated Gas Unit Controller
Thermostat Fan Sw itch in the “AUTO” position.
Fig. 40 — IGC Control (Heating and Cool ing)
—37—
Page 38

PACKAGED SERVICE TRAINING
Packaged Service Training programs are an excellent way to increase your knowledge of the equipment discussed in this manual, including:
• Unit Familiarization • Maintenance
• Installation Overview • Operating Sequence
A large selection of product, theory, and skills programs are available, using popular video-based formats and materials. All include video and /or slides, plus companion book.
Classroom Service Training which includes “hands-on” experience with the products in our labs can
mean increased confidence that really pays dividends in faster troubleshooting and fewer callbacks.
Course descriptions and schedules are in our catalog.
CALL FOR FREE CATALOG 1-80 0-962-9212
[ ] Packaged Service Training [ ] Classroom Service Training
Copyright 1999 Bryant Heating & Cooling Systems CATALOG NO. 5358-101
Page 39

Page 40

START-UP CHECKLIST
MODEL NO.: SERIAL NO.:
DATE: TECHNICIAN:
I. PRE-START-UP
VERIFY THAT ALL PACKING MATERIALS HAVE BEEN REMOVED FROM UNIT
VERIFY INSTALLATION OF INDOOR FAN MOTOR ADJUSTMENT BOLT (155) OR ADJUSTMENT BOLT AND PLATE
(180, 240 ONLY)
OPEN LIQUID LINE SERVICE VA LVE
VERIFY INSTALLATION OF ECONOMIZER HOOD
VERIFY INSTALLATION OF EXHAUST HOOD
VERIFY THAT CONDENSATE CONNECTION IS INSTALLED PER INSTRUCTIONS
VERIFY THAT ALL ELECTRICAL CONNECTIONS AND TERMINALS ARE TIGHT
VERIFY GAS PRESSURE TO UNIT GAS VAL VE IS WITHIN SPECIFIED RANGE
CHECK GAS PIPING FOR LEAKS
CHECK THAT INDOOR-AIR FILTER IS CLEAN AND IN PLACE
CHECK THAT OUTDOOR AIR INLET SCREEN IS IN PLACE
VERIFY THAT UNIT IS LEVEL
CHECK FAN WHEEL AND PROPELLER FOR LOCATION IN HOUSING/ORIFICE, AND VERIFY SETSCREWIS TIGHT
VERIFY THAT FAN SHEAVES ARE ALIGNED AND BELTS ARE PROPERLY TENSIONED
VERIFY THAT SCROLL COMPRESSOR IS ROTATING IN THE CORRECT DIRECTION
VERIFY THAT CRANKCASE HEATER HAS BEEN ENERGIZED 24 HOURS BEFORE START-UP
CUT ALONG DOTTED LINE
II. START-UP
ELECTRICAL
SUPPLY VOLTAGE L1-L2
COMPRESSOR AMPS — COMPRESSOR NO. 1 L1 L2 L3
— COMPRESSOR NO. 2 L1 L2 L3
SUPPLY FAN AMPS EXHAUST FAN AMPS
TEMPERATURES
OUTDOOR-AIR TEMPERATURE
RETURN-AIR TEMPERATURE
COOLING SUPPLY AIR
GAS HEAT SUPPLY AIR
PRESSURES
GAS INLET PRESSURE
GAS MANIFOLD PRESSURE STAGE NO. 1
REFRIGERANT SUCTION CIRCUIT NO. 1
REFRIGERANT DISCHARGE CIRCUIT NO. 1
VERIFY REFRIGERANT CHARGE USING CHARGING CHART ON PAGE 29.
GENERAL
ECONOMIZER MINIMUM VENT AND CHANGEOVER SETTINGS TO JOB REQUIREMENTS
L2-L3 L3-L1
F DB (Dry Bulb)
F DB F WB (W et Bulb)
F
F
IN. WG
IN. WG STAGE NO. 2 IN. WG
PSIG CIRC UIT NO. 2 PSIG
PSIG CI RCUIT NO. 2 PSIG
CUT ALONG DOTTED LINE
Copyright 1999 Bryant Heating & Cooling Systems
CL-1
CATALOG NO. 5358-101
 Loading...