

Brother XL-5232 Owner's Manual
ENGLISH
FRANÇAIS
DEUTSCH
ESPAÑOL
NEDERLANDS
ITALIANO
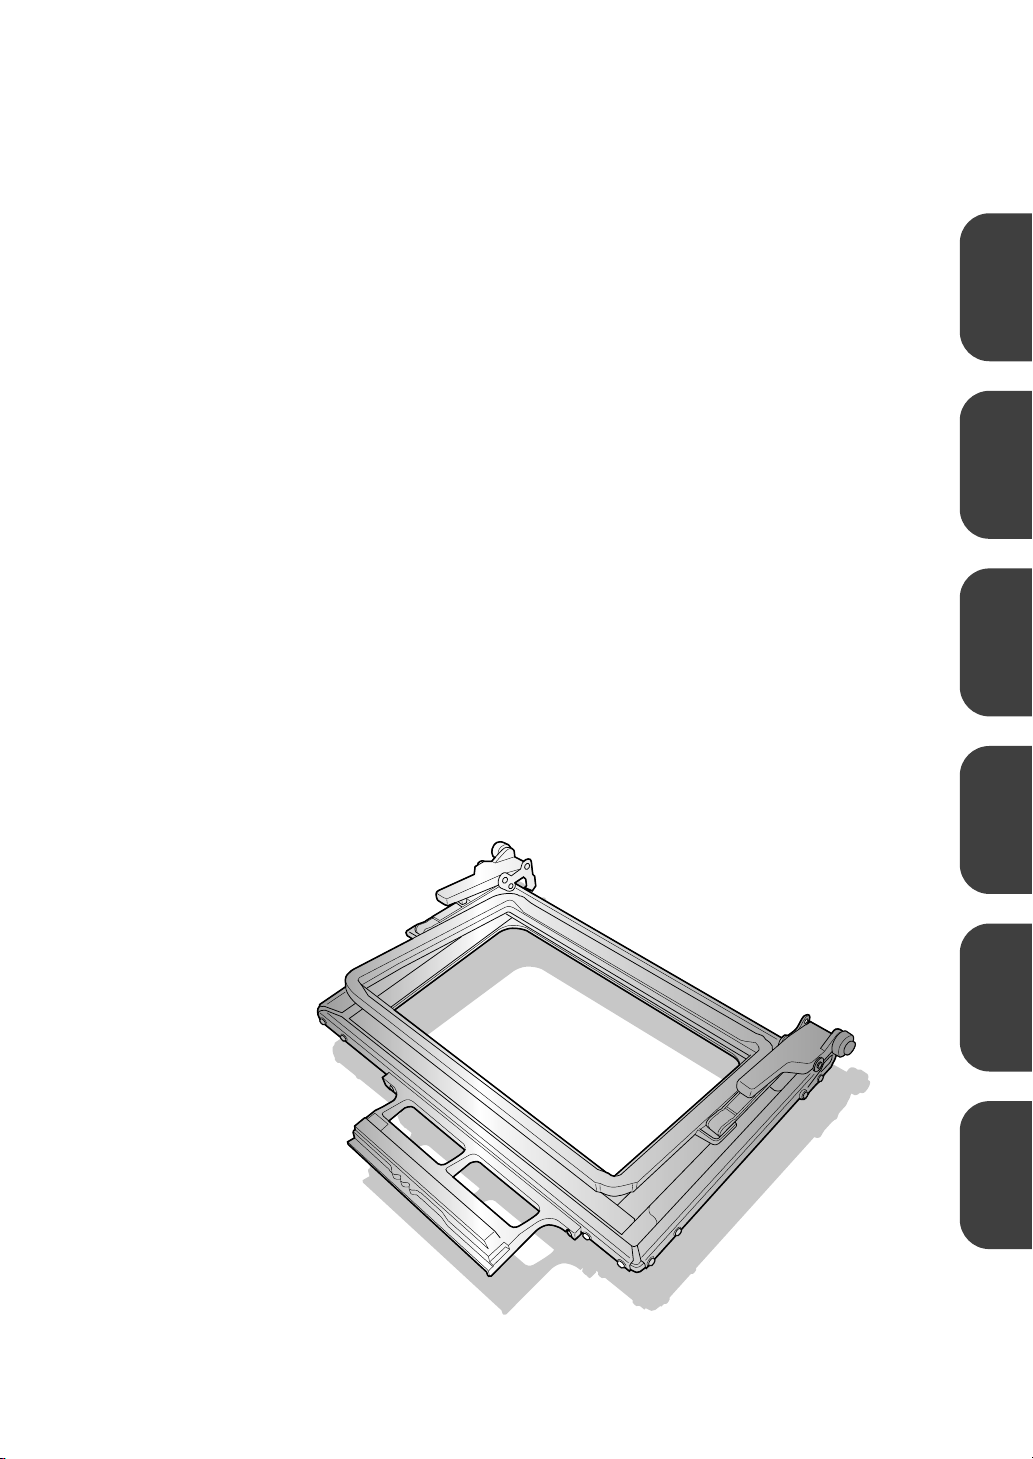
BORDER EMBROIDERY FRAME
CADRE DE BRODERIE D’ENCADREMENT
RAND STICKRAHMEN
BASTIDOR DE BORDADO DE BORDES
RANDBORDUURRAAM
TELAIO DA RICAMO PER BORDI
Operation Manual
Manuel d’instructions
Bedieningshandleiding
Manual de instrucciones
Bedieningshandleiding
Manuale d’istruzione


ENGLISH
CONTENTS
Accessories............................................................................................................................... 2
Embroidering with the Border Embroidery Frame...................................................................... 2
Sample Projects Using the Border Embroidery Frame .......................................................... 2
Selecting a Pattern .............................................................................................................. 3
Hooping the Fabric in the Border Embroidery Frame .......................................................... 5
Attaching the Border Embroidery Frame to the Embroidery Unit ......................................... 6
Embroidering the First Pattern ............................................................................................. 7
Removing the Border Embroidery Frame ............................................................................. 8
Embroidering the Next Pattern ............................................................................................ 8
1
Accessories
CAUTION
Note
Check that the following items are provided. If anything
is missing or damaged, contact your authorized dealer
or Brother Customer Service.
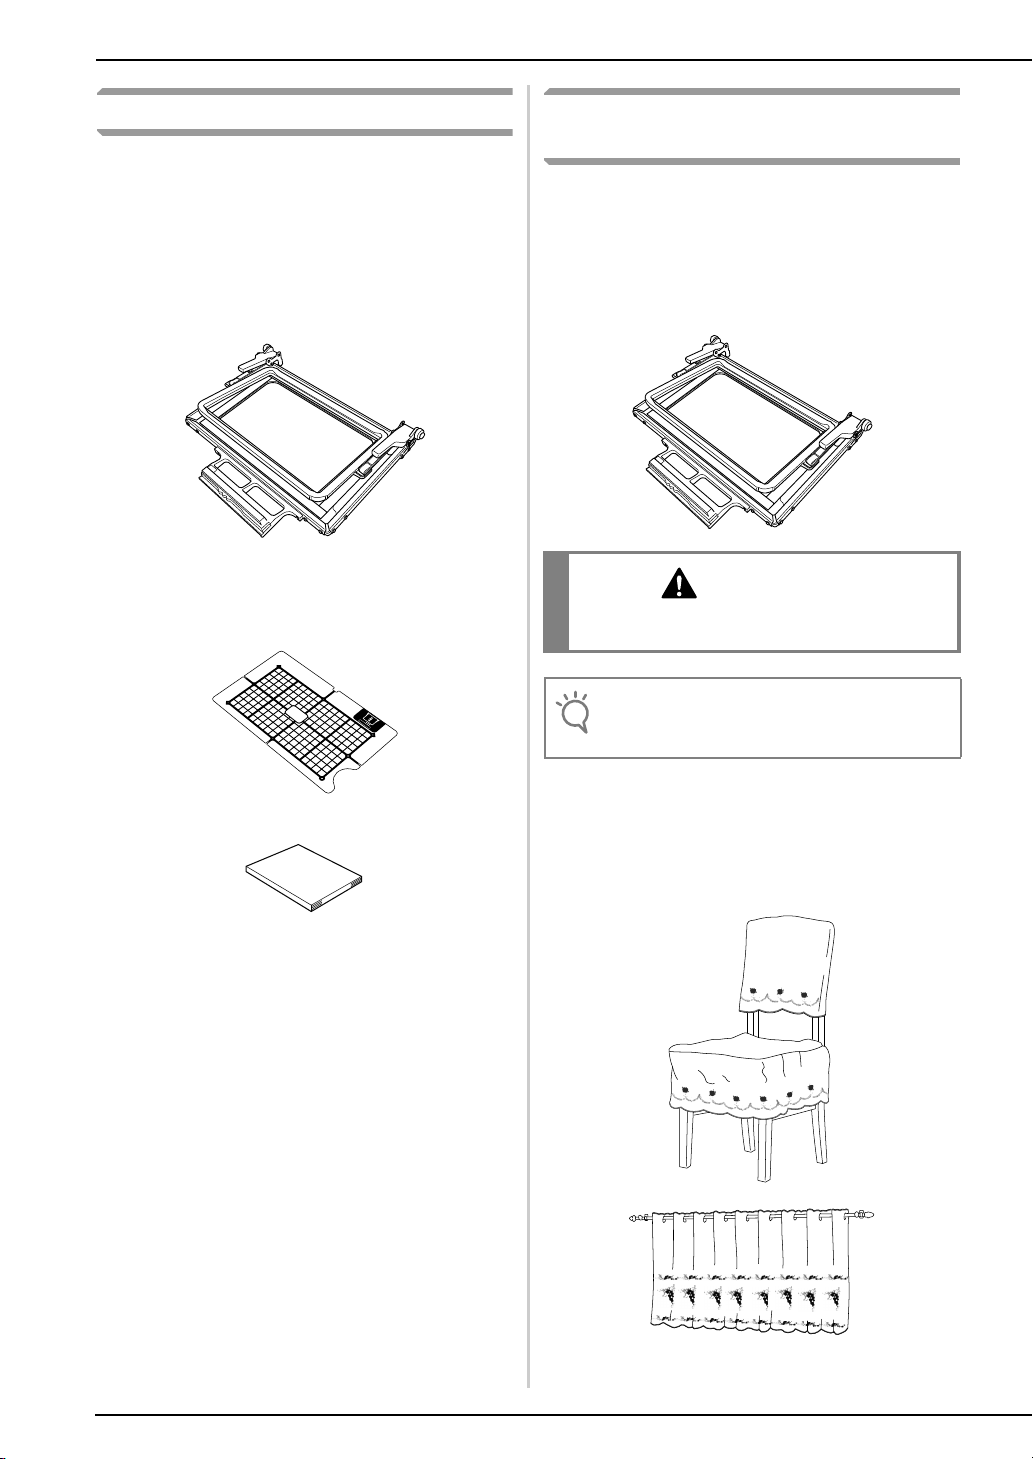
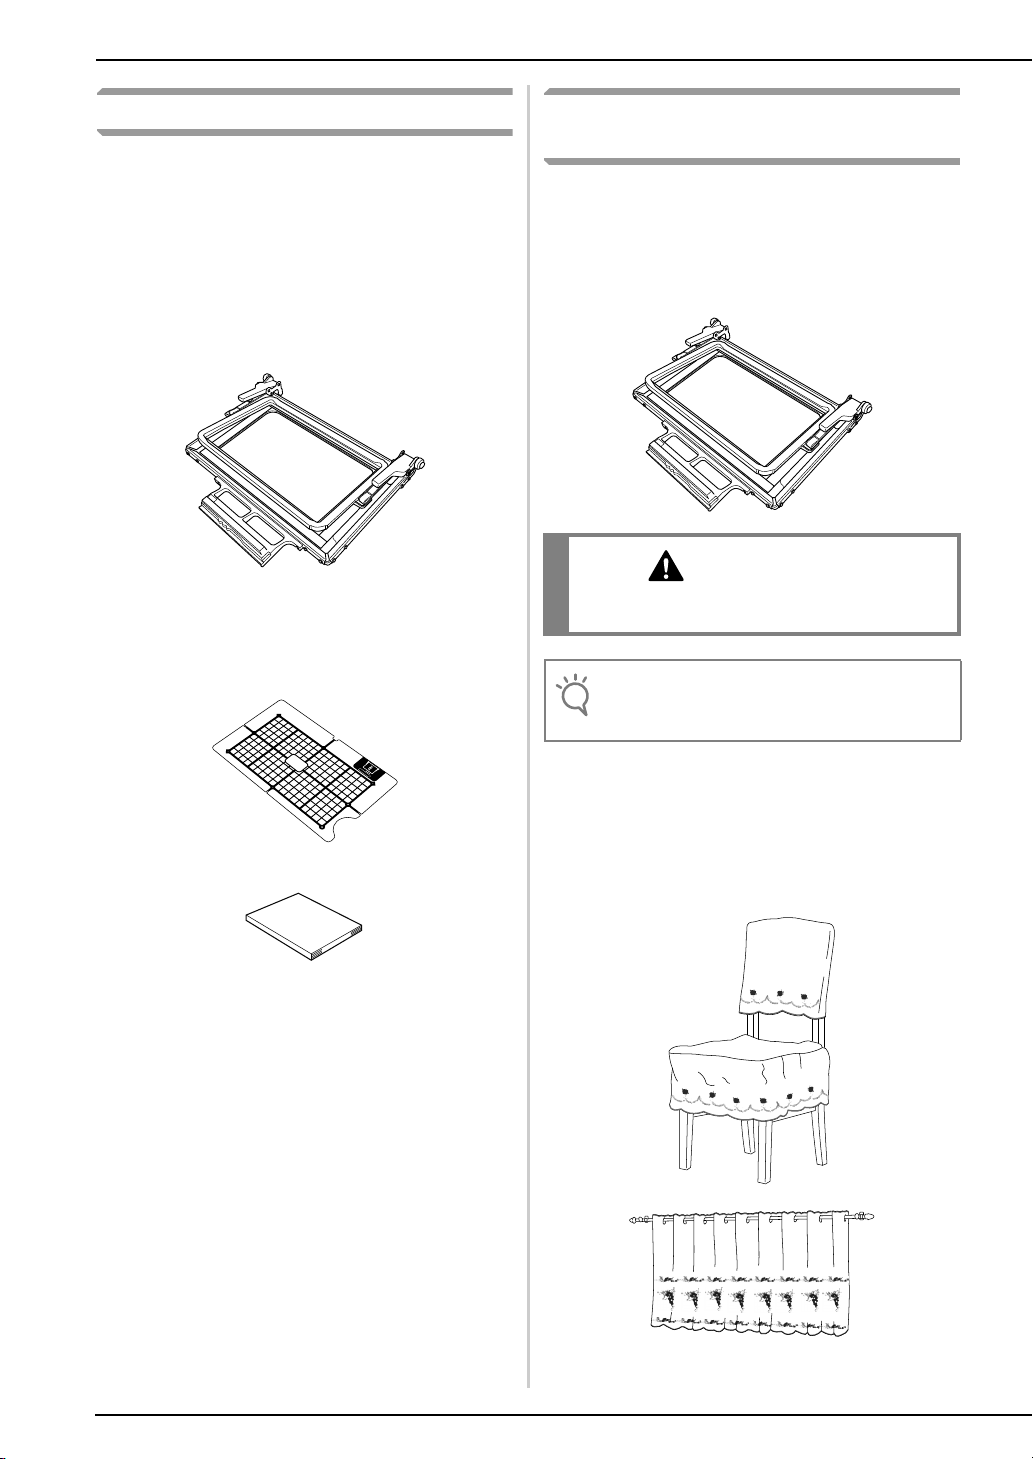
• Border embroidery frame
Since the sewing area can easily be changed
when the border embroidery frame is used,
repeated patterns can be sewn simply by sliding
the fabric. An area of 10 cm × 18 cm (approx.
4 inches × 7 inches) can be embroidered.
• Embroidery sheet
This embroidery sheet is for the border
embroidery frame. It is used to position the fabric
after the embroidering location is determined.
Embroidering with the Border
Embroidery Frame
Since the fabric can easily be repositioned and
rehooped if the border embroidery frame is used, this
frame is useful for embroidering repeated patterns
while sliding the fabric. An added feature of this
frame is that the pressure applied by the upper and
lower frames does not leave an indentation in the
fabric. An area of 10 cm × 18 cm (approx. 4 inches ×
7 inches) can be embroidered.
• Do not leave the border embroidery frame within
the reach of children, otherwise injuries may result.
• Operation manual (this guide)
• When the border embroidery frame is not being
used, unlock it before storing it.
■ Sample Projects Using the Border
Embroidery Frame
We recommend using the border embroidery frame
when embroidery repeated patterns at the edges of
items such as curtains, chair covers, bed covers,
tablecloths and blankets.
2
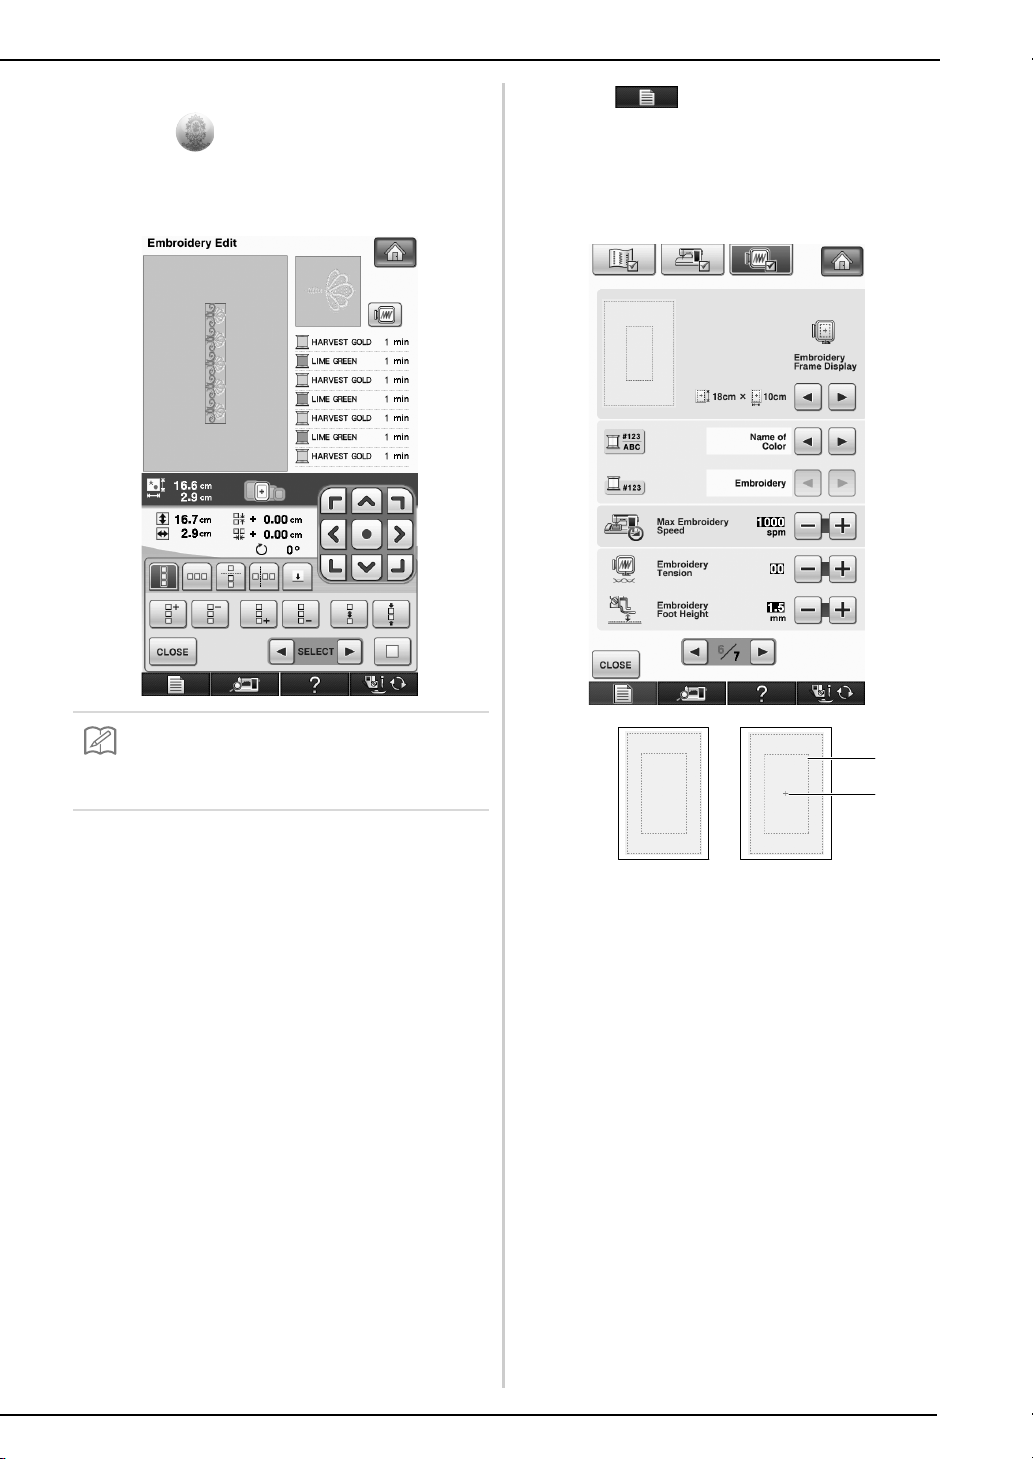
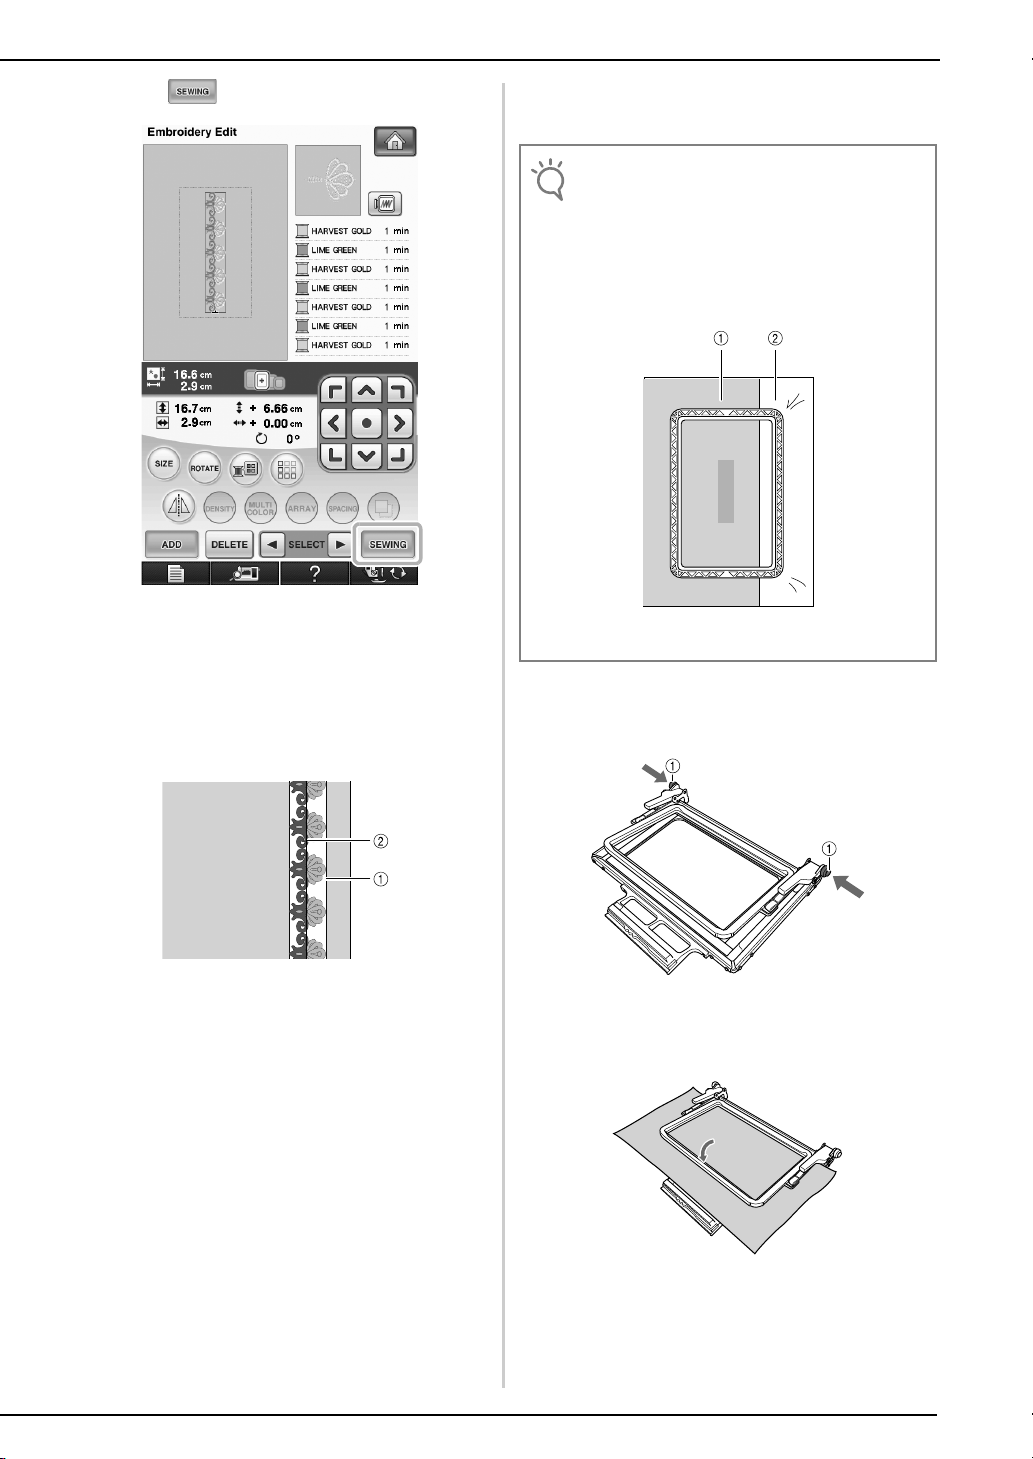
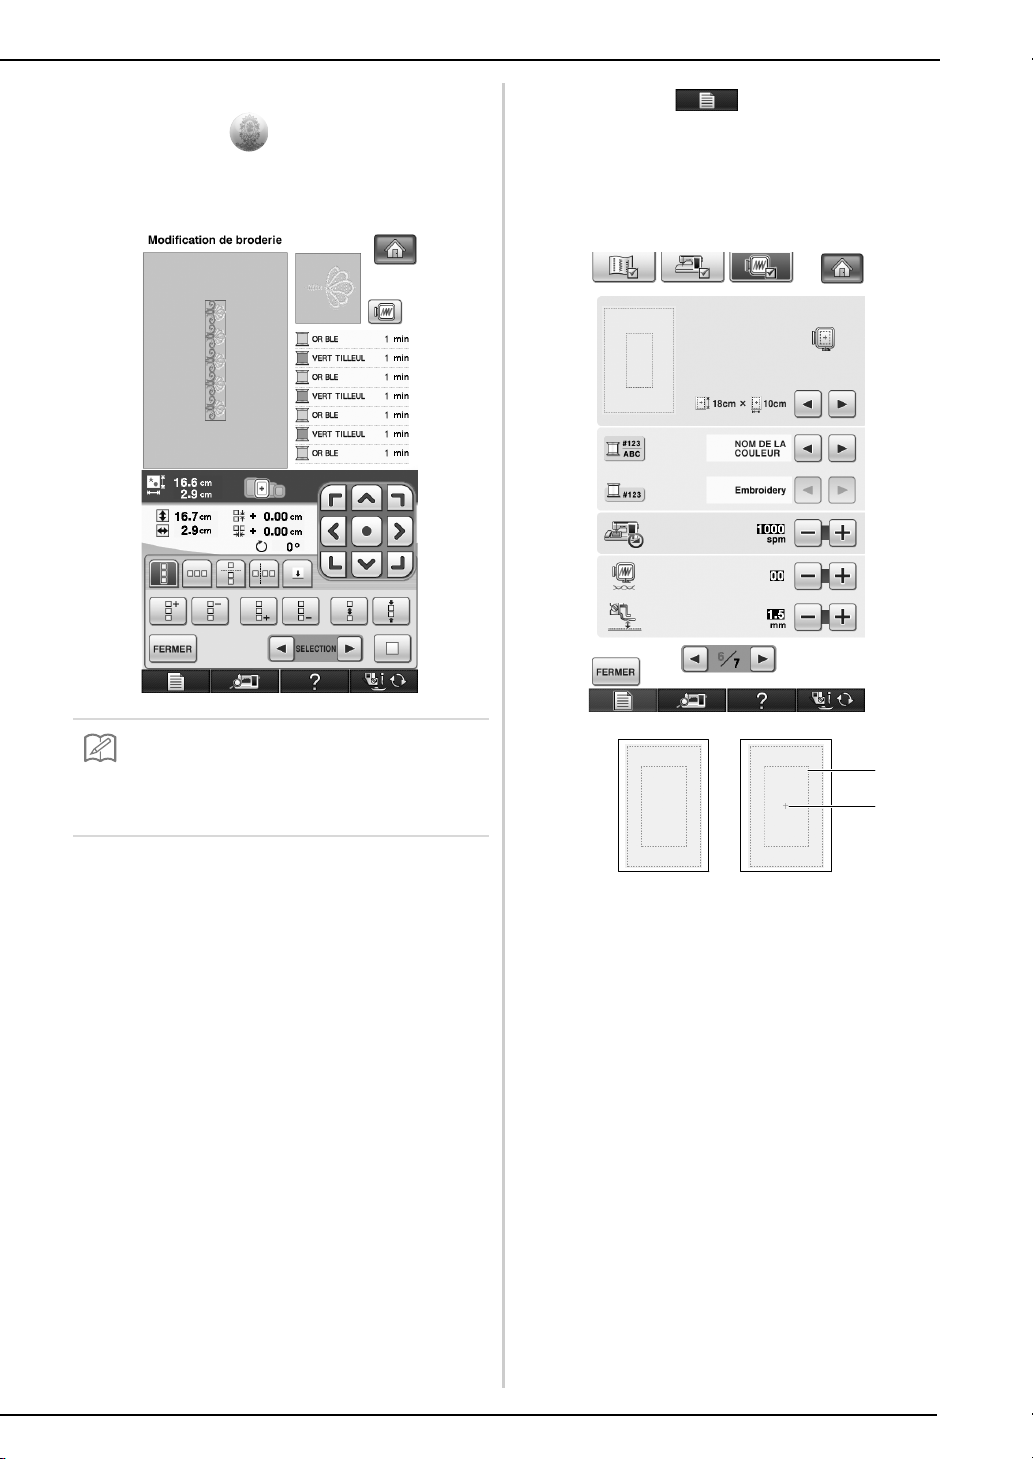
■ Selecting a Pattern
Memo
a
b
Select and select a pattern.
a
Combine the patterns and use the border
b
function to repeat the pattern.
Press .
c
From the embroidery frame display settings,
d
select one of the embroidery frame displays
for the border embroidery frame.
* Of the 14 settings available, there are two for border
embroidery frames.
• For details on the border function, refer to
“Designing Repeated Patterns” in chapter 6 of the
Operation Manual for the sewing machine.
a Border embroidery frame embroidering area
(18 cm × 10 cm)
b Center line
3
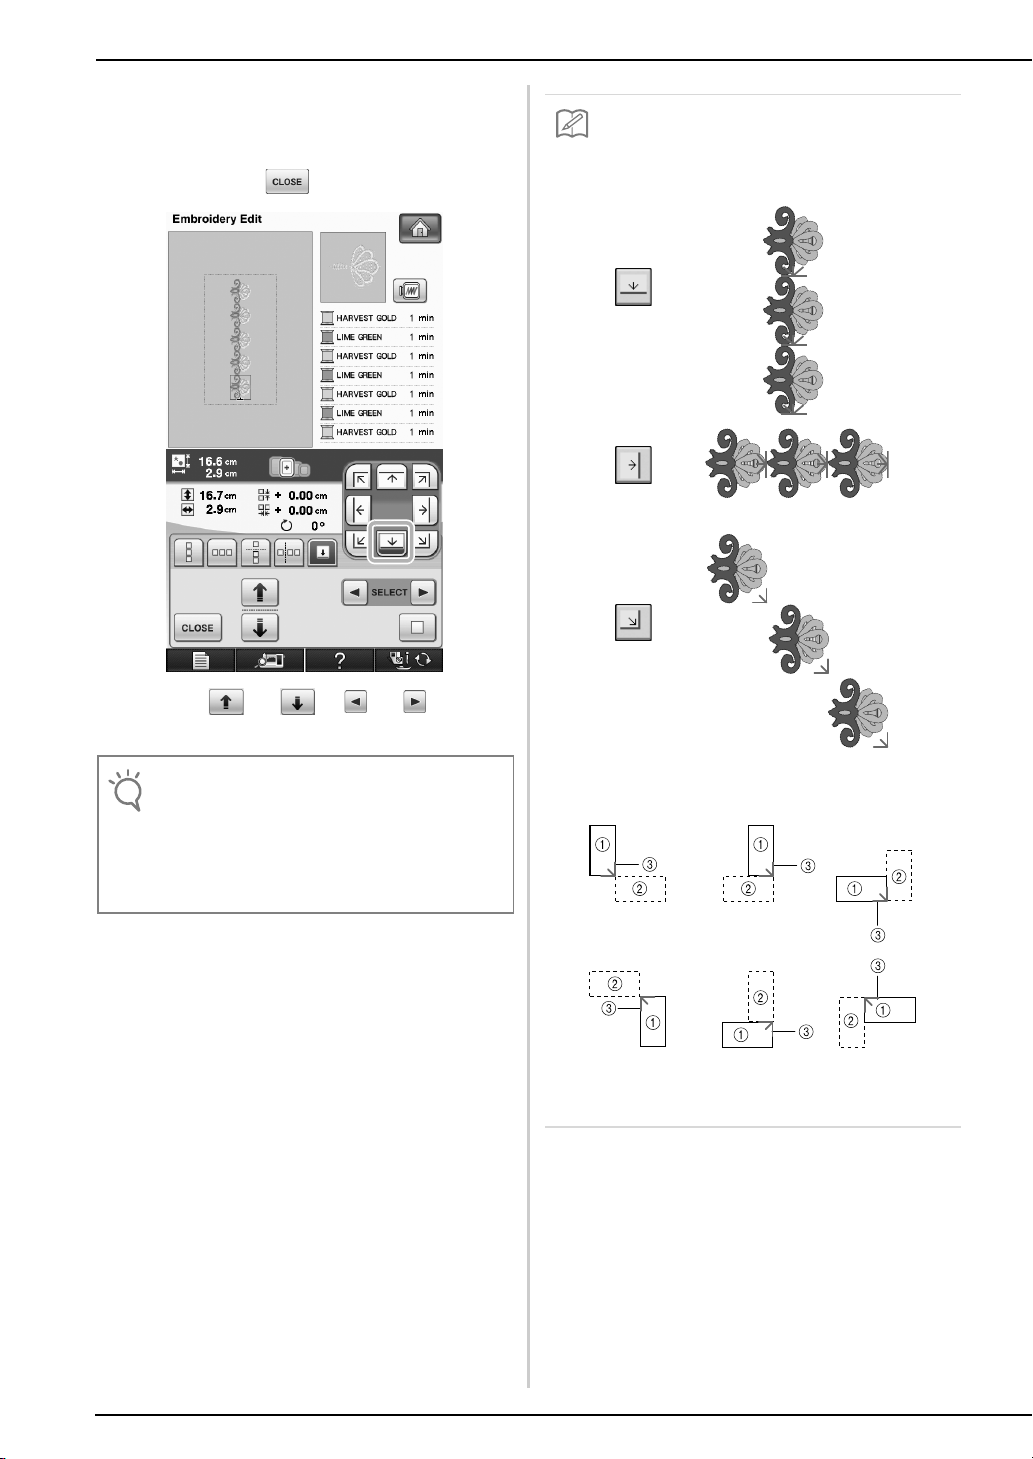
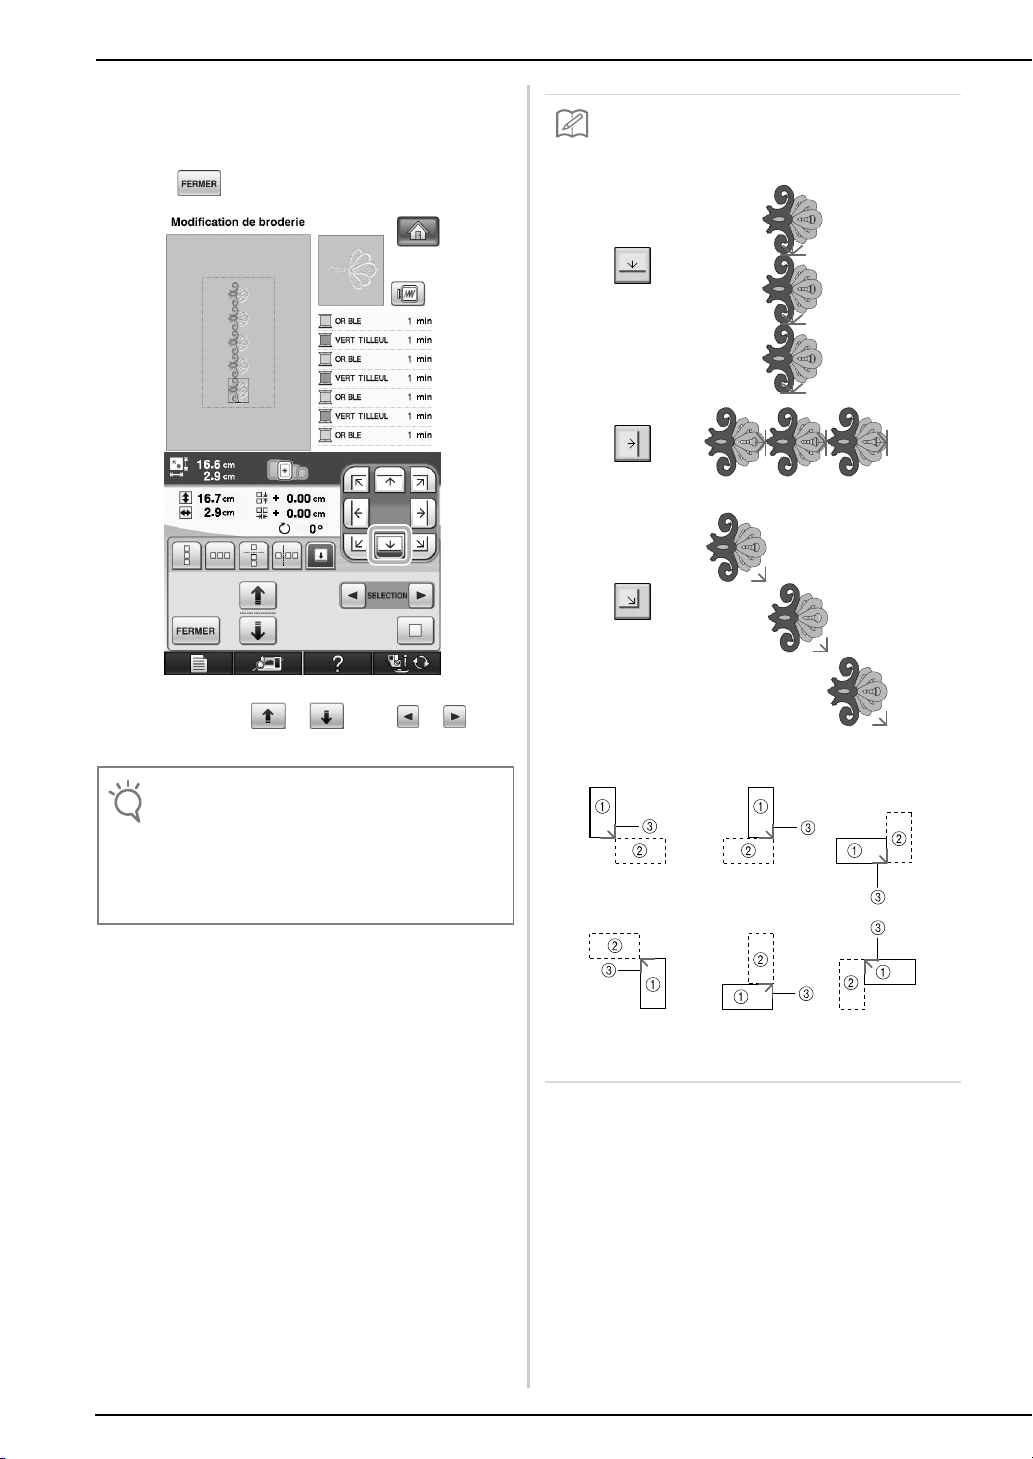
If necessary, add the thread mark. Since the
Note
Memo
e
pattern will be repeatedly embroidered from
the top to the bottom, add the thread mark at
the lower center of the pattern. When you are
finished, press .
• Select the location where the thread mark is to be
added according to the direction that the embroidery
is repeated.
→ Touch and , or and to highlight
the design for inserting thread marks.
• Do not add thread marks to character patterns.
• Add the thread mark to patterns that do not have a
point of alignment, such as rotated patterns or
patterns that are spaced apart. Patterns that can be
aligned visually can be embroidered cleanly without
the thread mark.
If the design direction is rotated, use the following
suggestions.
a First Pattern
b Second Pattern
c Thread mark
4
f
Note
Press .
Affix stabilizer material to the fabric to be
b
embroidered.
• When embroidering the edges of the fabric, affix
stabilizer material larger than the fabric, and then
firmly secure the fabric and excess part of the
stabilizer material within the border embroidery
frame (in the same way as when the normal
embroidery frame is used). Otherwise, misaligned
patterns may result.
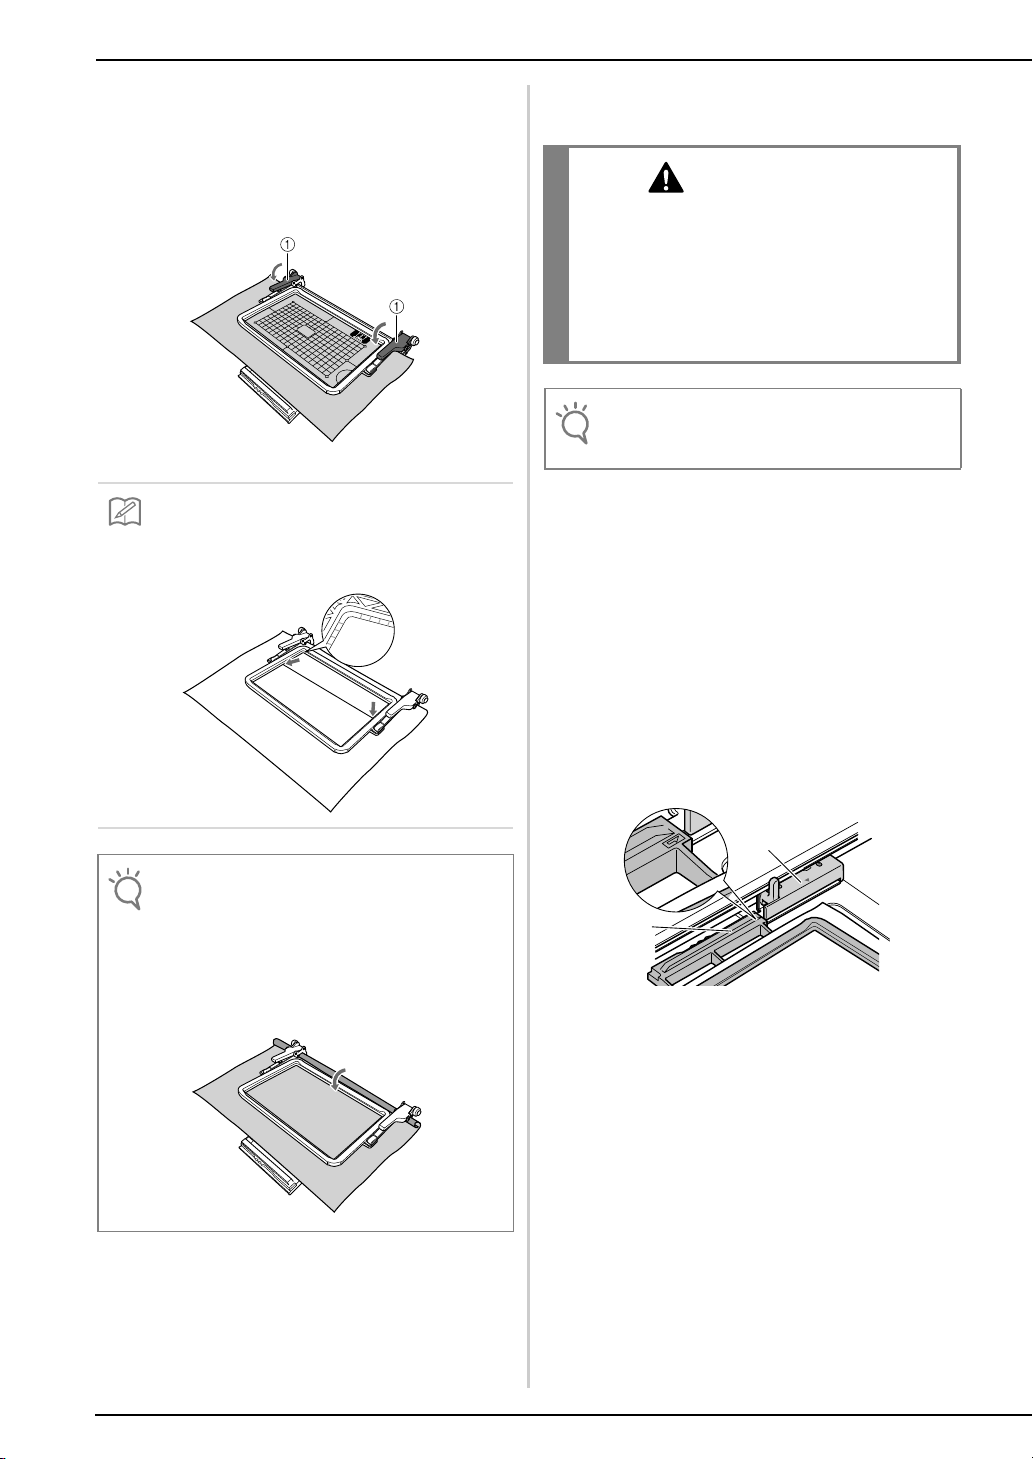
■ Hooping the Fabric in the Border
Embroidery Frame
With a chalk pen, mark the fabric with a line
a
drawn down the center of the area to be
embroidered.
a Pattern
b Mark (line)
a Fabric
b Stabilizer
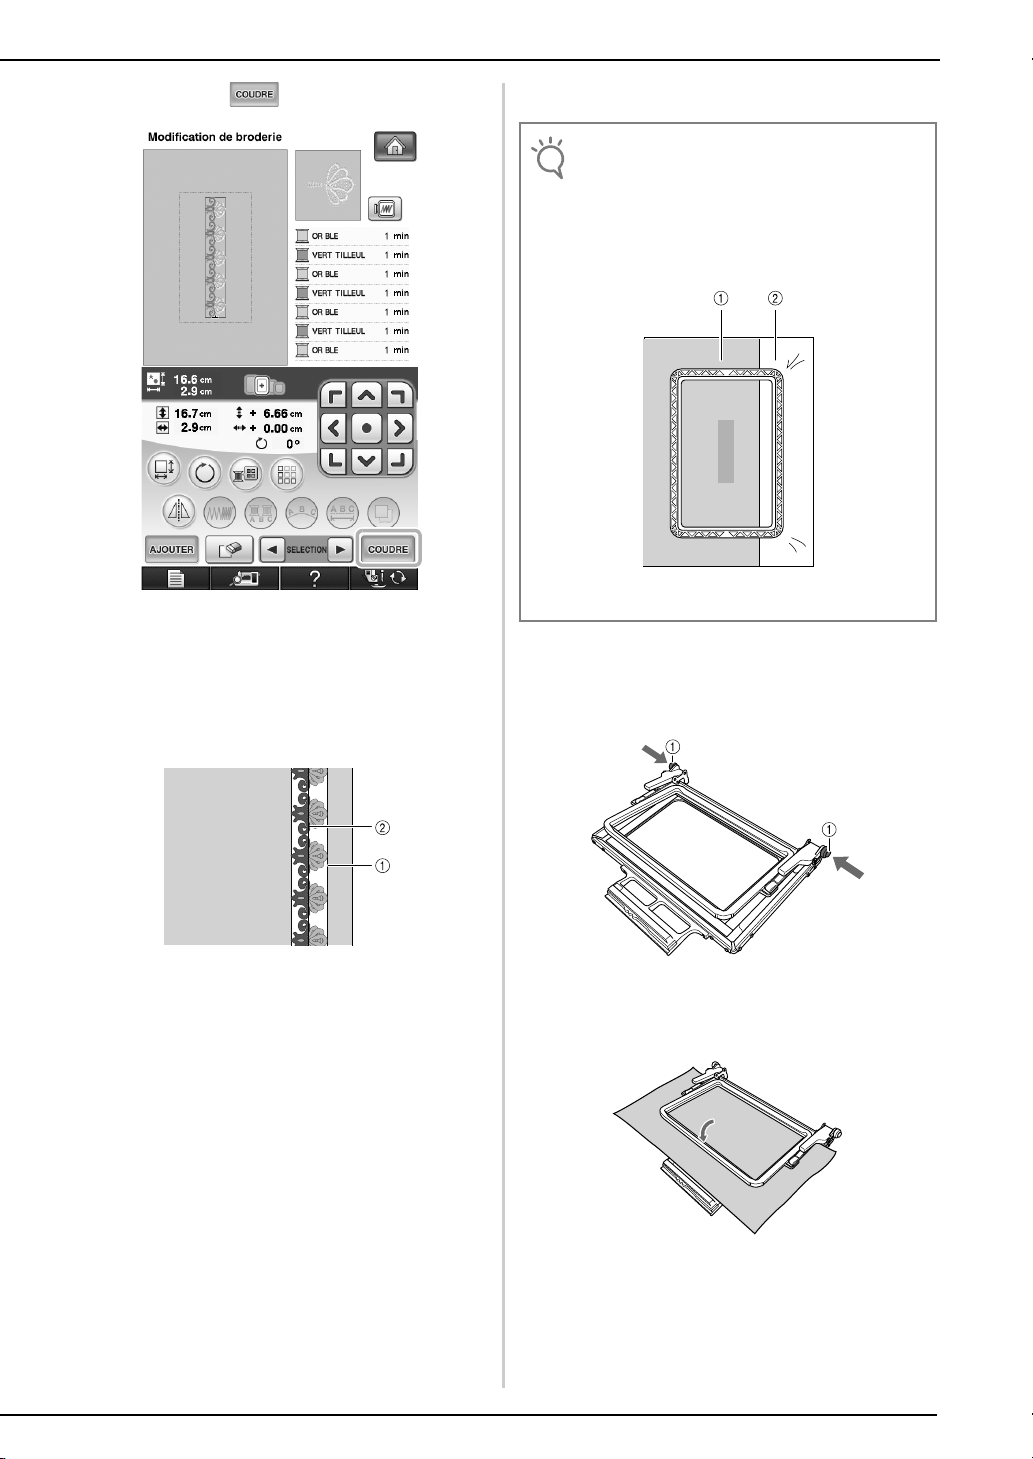
If the upper frame is locked down against the
c
lower frame, press the left and right lock
release buttons to unlock the upper frame.
a Lock release buttons
Lay the fabric between the upper and lower
d
frames.
5
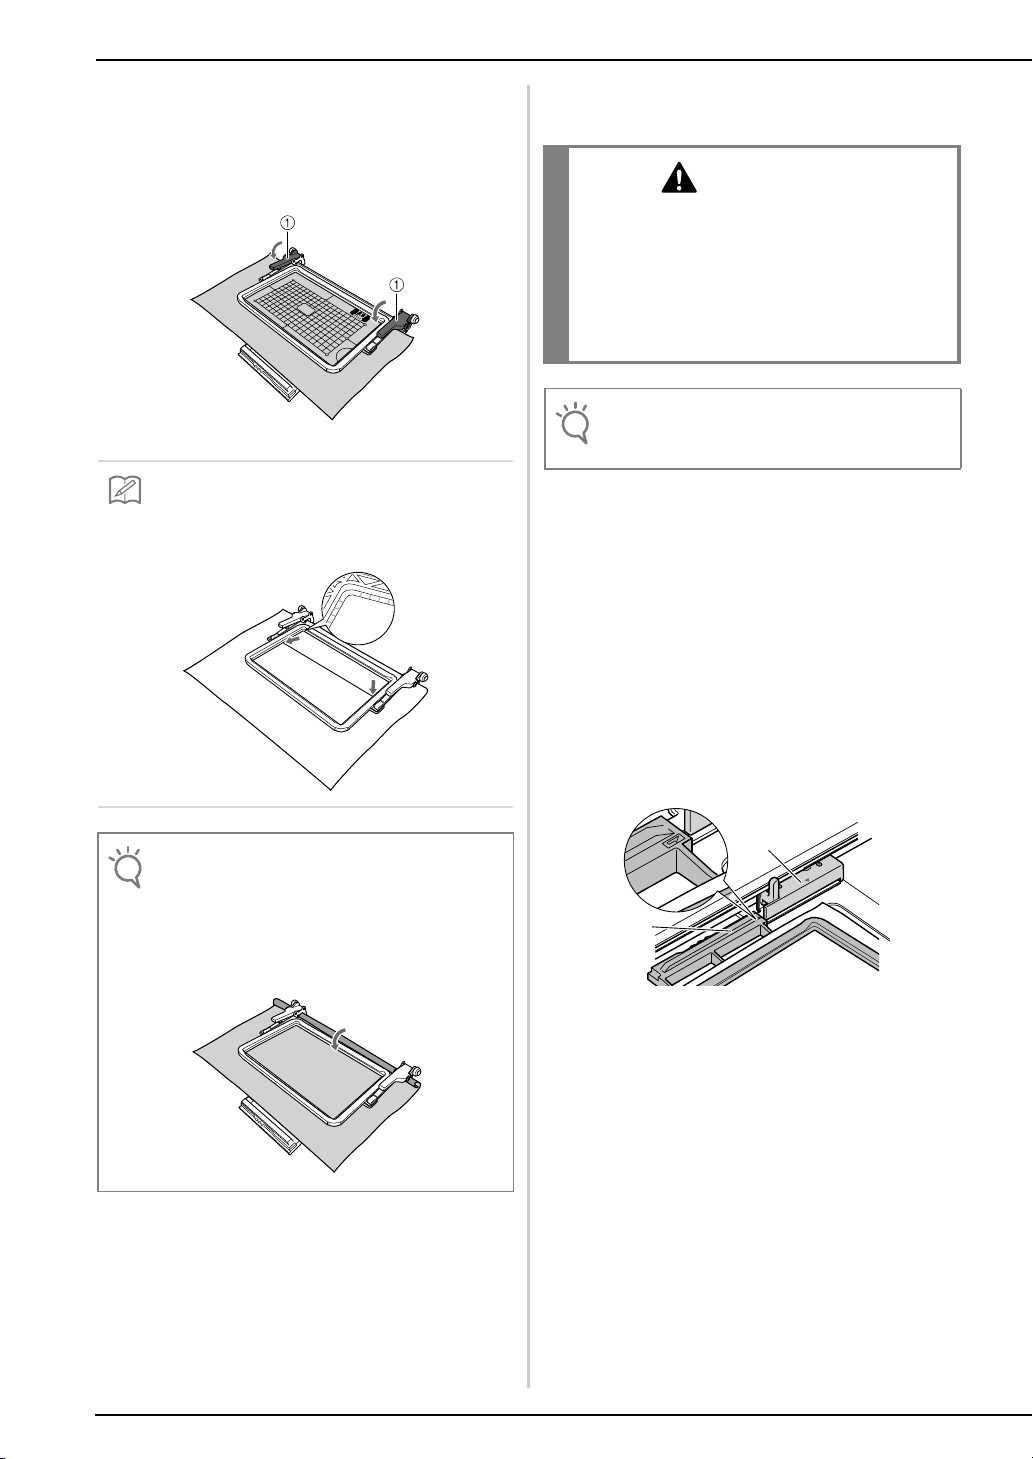
Place the embroidery sheet in the upper
Memo
Note
CAUTION
Note
a
b
e
frame, align the guide line on the embroidery
sheet with the mark (line) on the fabric, and
then press down on the left and right locking
levers until they click into place.
■ Attaching the Border Embroidery Frame to
the Embroidery Unit
• After firmly hooping the fabric in the border
embroidery frame, attach the frame to the
embroidery unit. Otherwise, the needle may break
and cause injuries.
• Before attaching the border embroidery frame to
the embroidery unit, make sure that the needle and
presser foot have been raised. Otherwise, the
needle may break and cause injuries.
a Locking levers
• The fabric can also be positioned in the border
embroidery frame by aligning the edge of the fabric
with the inner markings on the upper frame.
• If there is excess fabric after the center of the
embroidering area is aligned with the center of the
border embroidery frame, fold over the excess
fabric, place it on top of the upper frame, and then
press down on the levers. Be careful that the folded
excess fabric is not caught in the embroidering area.
• Before attaching the border embroidery frame, wind
the bobbin with thread and install it.
Make sure that the needle and presser foot
a
have been raised. If the needle has not been
raised, press the "Needle Position" button to
raise it. If the presser foot has not been raised,
press the "Presser Foot Lifter" button to raise
it.
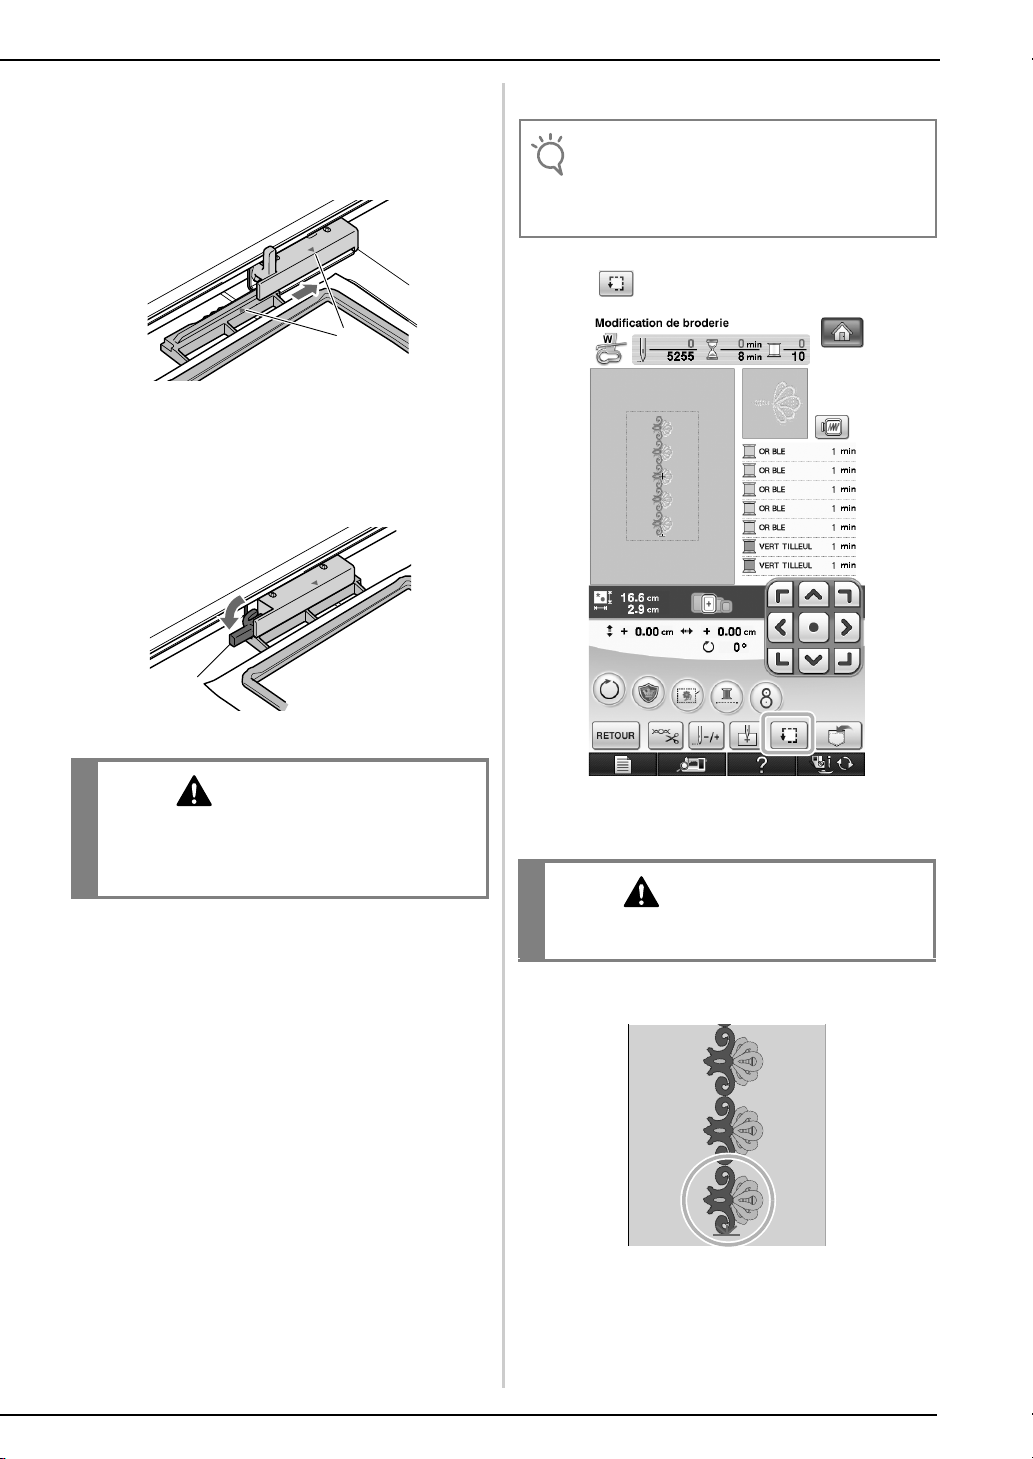
Make sure that the embroidery unit carriage
b
has moved to its initial position.
Align the guide on the border embroidery
c
frame with the right edge of the embroidery
frame holder.
a Embroidery frame holder
b Guide on border embroidery frame
6
Remove the embroidery sheet, and then pull
f
the four sides of the fabric to remove any
slack. Finally, check that the fabric is firmly
stretched.

Slide the border embroidery frame into the
CAUTION
a
Note
CAUTION
d
embroidery frame holder, making sure to
align the border embroidery frame's arrow
mark (U) with the embroidery frame holder's
arrow mark (U).
a Arrow marks
Lower the frame-securing lever so that it is
e
level with the border embroidery frame to
secure the border embroidery frame in the
embroidery frame holder.
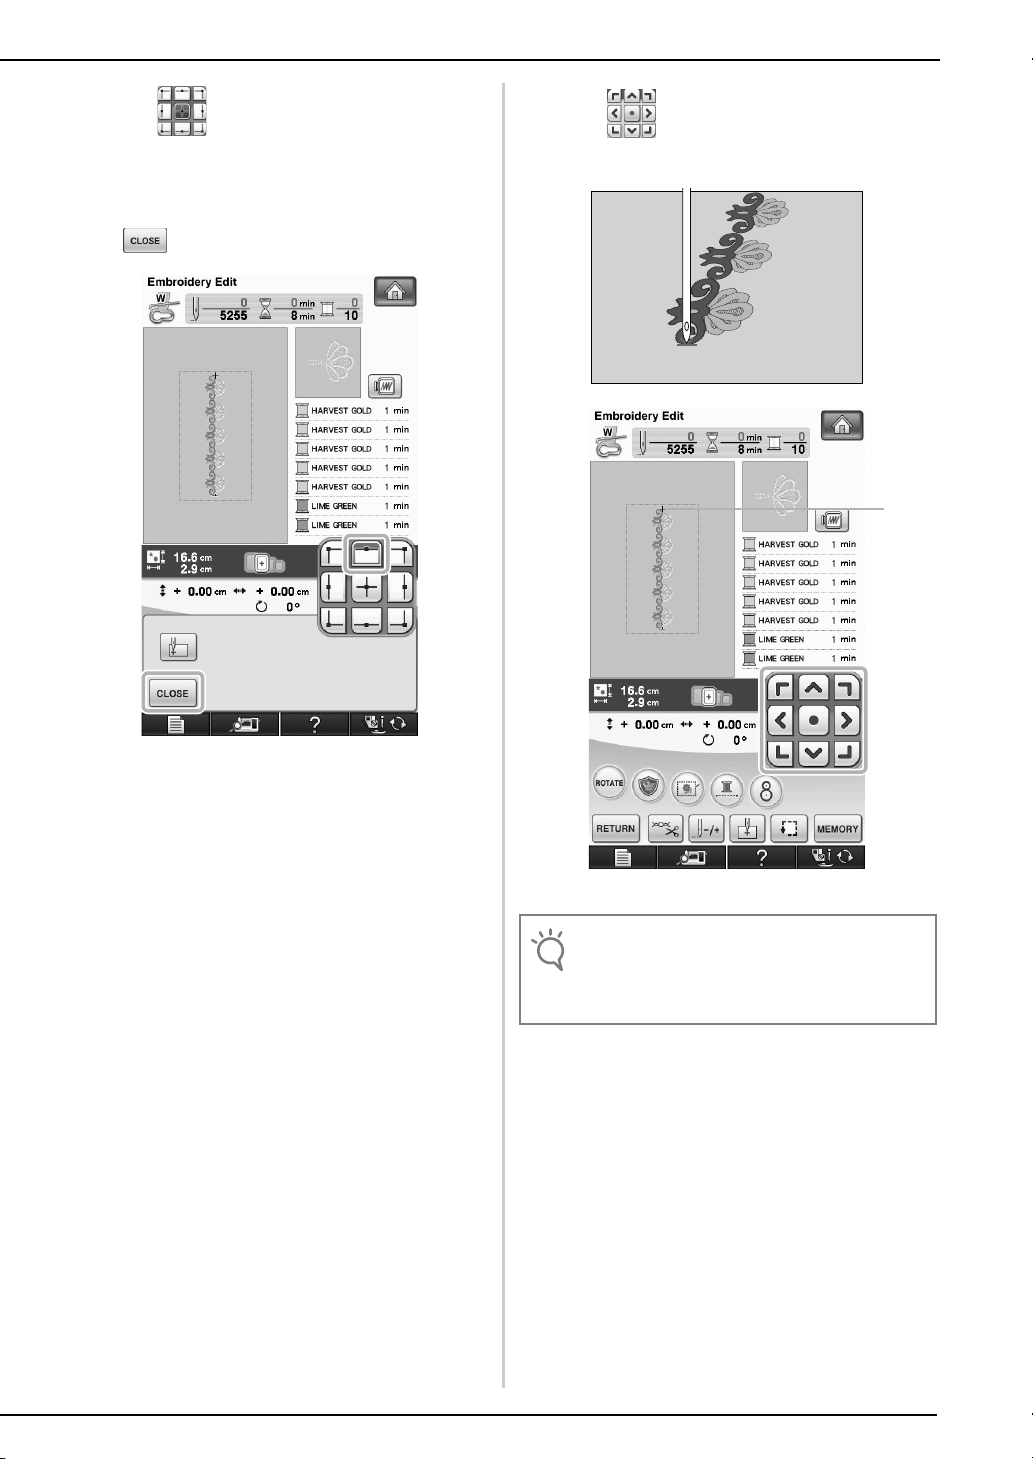
■ Embroidering the First Pattern
• When the border embroidery frame is used, the
embroidering time may be slightly longer than the
time that appears in the screen, depending on the
type of fabric and pattern that is used.
To check the embroidering area, press .
a
a
a Frame-securing lever
• If the frame-securing lever is not lowered, the
pattern may not embroider correctly or the presser
foot may strike the border embroidery frame and
cause injuries.
Thread the machine, and then start
b
embroidering.
• Do not touch the border embroidery frame while
embroidering.
→ When embroidering is finished, the thread mark is
sewn with the last thread color.
7

■ Removing the Border Embroidery Frame
Note
CAUTION
OFF
Note
• Before removing the border embroidery frame from
the embroidery unit, make sure that the embroidery
unit carriage has moved to its initial position.
Raise the frame-securing lever and pull the
a
border embroidery frame toward you.
• If the thread has become tangled and the
embroidery unit carriage does not move to its initial
position, even after the thread is cut, turn off the
machine, manually move the carriage, and then
remove the border embroidery frame.
• Only move the embroidery unit carriage when the
machine is turned off.
■ Embroidering the Next Pattern
Press both lock release buttons and slide the
a
fabric to align the embroidering area of the
next pattern, and rehoop the fabric in the
border embroidery frame.
• Adjust the position of the fabric so that the
embroidering area for the next pattern is within the
embroidering area of the embroidery sheet.
a Pattern embroidered first
b Position of pattern to be embroidered next
c Embroidering area of embroidery sheet
Attach the border embroidery frame to the
b
embroidery unit, and then press .
8
Use to select the needle position that
Note
a
c
will align with the thread mark at the end of
previous embroidery. For this example, align
the needle position with the upper center of
the next pattern. When you are finished, press
.
Use to align the needle position with
d
the point of the thread mark.
a Needle position
• After turning the handwheel to check the needle
position, press the "Needle Position" button to raise
the needle.
9
After aligning the needle position for the
Note
CAUTION
e
beginning of embroidering, remove the
thread mark.
• Remove the thread mark before starting to
embroider. Otherwise, the thread mark stitching may
be combined with the pattern stitching and become
difficult to remove.
Embroider the next pattern. To continue
f
embroidering a repeating pattern, repeat the
procedure starting with “Removing the
Border Embroidery Frame”.
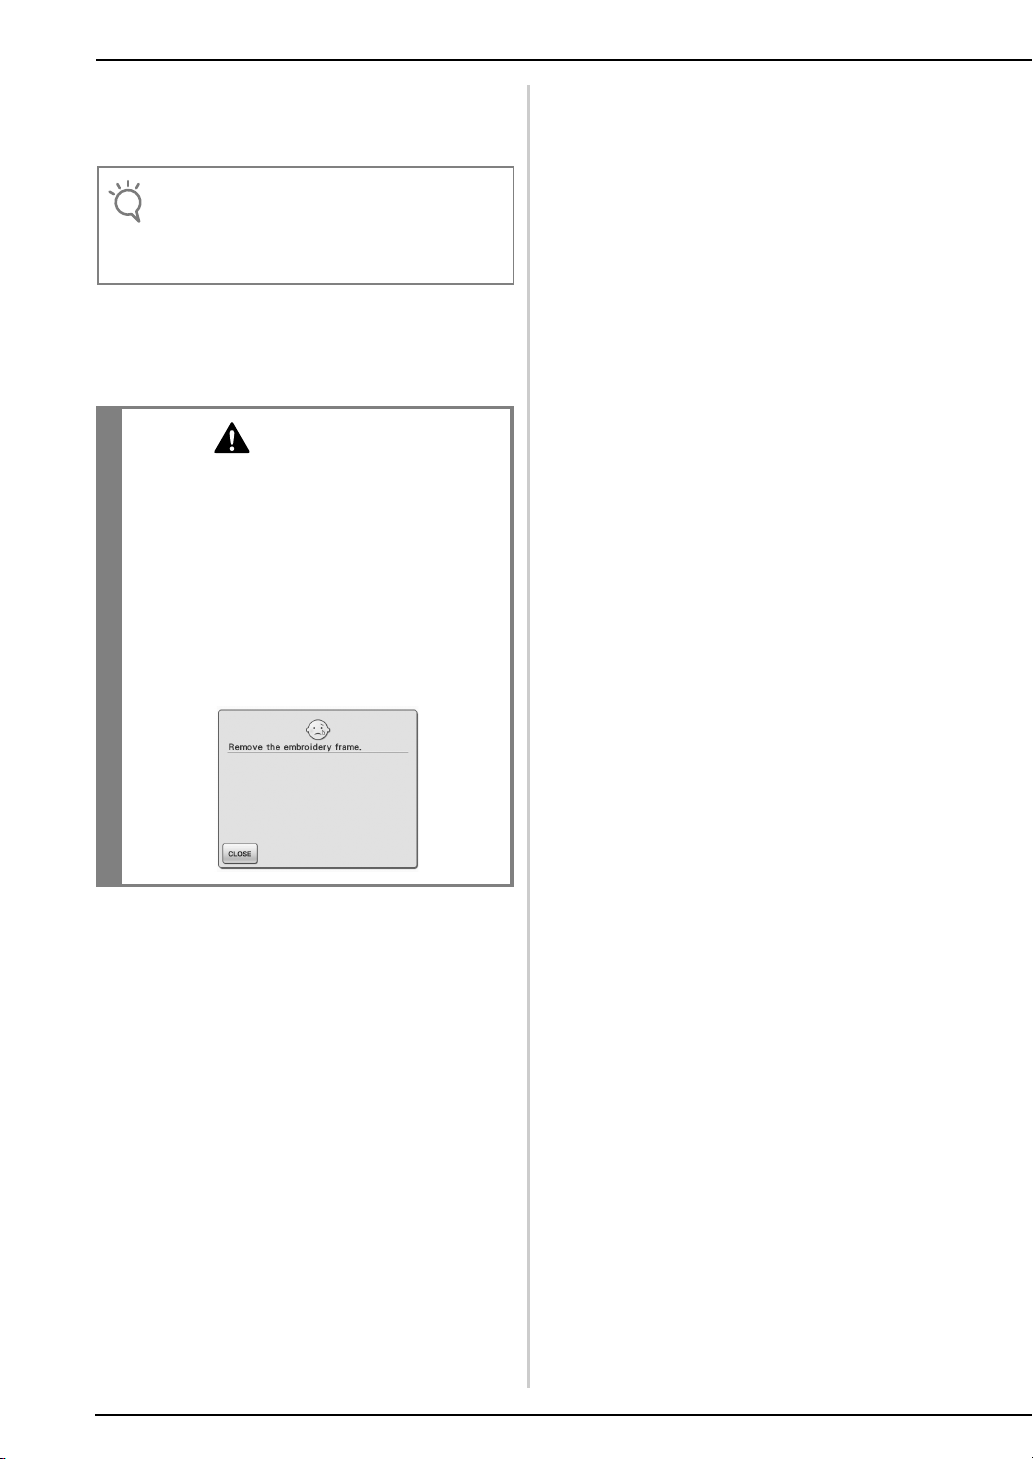
• If the sewing machine is turned off, then turned on
again with the border embroidery frame attached
or if you try to select a stitch from the Utility Stitch
screen or the Character/Decorative Stitch screen
while the border embroidery frame is attached, the
following message appears. If the border
embroidery frame is not fully removed from the
embroidery unit at this time, the border embroidery
frame may be hit by the presser foot when the
carriage of the embroidery unit is moved. When the
following message appears, fully remove the border
embroidery frame.
10

FRANÇAIS
TABLE DES MATIÈRES
Accessoires............................................................................................................................. 12
Broderie à l'aide du cadre de broderie de bord....................................................................... 12
Exemples de projets avec le cadre de broderie de bord ..................................................... 12
Sélection d’un motif .......................................................................................................... 13
Mise en place du tissu dans le cadre de broderie de bord .................................................15
Fixation du cadre de broderie de bord à l'unité de broderie .............................................. 16
Broderie du premier motif .................................................................................................17
Retrait du cadre de broderie de bord ................................................................................ 18
Broderie du motif suivant ..................................................................................................18
11
Accessoires
ATTENTION
Remarque
Vérifiez que les éléments suivants sont fournis. Si un
élément est manquant ou endommagé, contactez votre
revendeur agréé ou le service client Brother.
• Cadre de broderie de bord
Etant donné que la zone de couture peut
aisément être modifiée lorsque vous utilisez le
cadre de bordure, il est possible de coudre un
même motif en faisant simplement glisser le
tissu. Vous pouvez broder une zone de 10 cm ×
18 cm.
Broderie à l'aide du cadre de broderie
de bord
Etant donné que le tissu peut être facilement replacé si
le cadre de broderie de bord est utilisé, ce cadre est
utile pour broder des motifs répétés en faisant glisser le
tissu. Une fonction ajoutée de ce cadre est que la
pression appliquée par les cadres supérieur et inférieur
ne laisse pas de trace sur le tissu. Vous pouvez broder
une zone de 10 cm × 18 cm.
• Feuille de broderie
Cette feuille de broderie est destinée au cadre de
broderie de bord. Elle est utilisée pour placer le
tissu une fois que la zone à broder est
déterminée.
• Manuel d'instructions (ce guide)
• Ne laissez pas le cadre de broderie de bord à portée
des enfants pour éviter tout risque de blessure.
• Si le cadre de broderie de bord n'est pas utilisé,
déverrouillez-le avant de le ranger.
■ Exemples de projets avec le cadre de
broderie de bord
Nous vous recommandons d'utiliser le cadre de
broderie de bord pour broder des motifs répétés sur
les bords des tissus comme les rideaux, les
recouvrements de chaise, les couvertures, les
nappes et les draps.
12
■ Sélection d’un motif
Mémo
a
b
Sélectionnez et choisissez un motif.
a
Combinez les motifs et utilisez la fonction de
b
bordure pour répéter le motif.
Appuyez sur .
c
Dans les réglages de l'affichage du cadre de
d
broderie, sélectionnez un des affichages du
cadre de broderie de bord.
* Deux des 14 paramètres disponibles concernent les cadres
de broderie de bordure.
• Pour plus de détails sur la fonction de bordure,
reportez-vous à la section "Conception de motifs
répétés" du chapitre 6 du Manuel d'instructions de la
machine à coudre.
a Zone de broderie du cadre de broderie de bord
(18 cm × 10 cm)
b Ligne centrale
13
Au besoin, ajoutez un repère. Etant donné
Remarque
Mémo
e
que le motif sera répété tout au long du tissu,
ajoutez un repère au centre inférieur du
motif. Lorsque vous avez terminé, appuyez
sur .
• Sélectionnez l'emplacement où ajouter le repère en
fonction du sens de répétition de la broderie.
→ Appuyez sur et ou sur et pour
sélectionner le motif d'insertion de repères de fil.
• N'ajoutez pas de repères aux motifs de caractère.
• Ajoutez un repère aux motifs qui ne possèdent pas
de point d'alignement, comme les motifs pivotés ou
éloignés. Les motifs qui peuvent être alignés
visuellement peuvent être brodés proprement, sans
repère.
Si le sens du motif est pivoté, reportez-vous aux
propositions suivantes.
a Premier motif
b Second motif
c Repère
14
Appuyez sur .
Remarque
f
Fixez le renfort de broderie au tissu à broder.
b
• Lorsque vous brodez les bords du tissu, fixez un
renfort de broderie plus large que le tissu, fixez
fermement le tissu et le surplus de renfort dans le
cadre de broderie de bord (de la même manière que
lorsque vous utilisez le cadre de broderie normal).
Sinon, un décalage de motifs peut apparaître.
a Tissu
b Renfort
■ Mise en place du tissu dans le cadre de
broderie de bord
A l'aide d'une craie, tracez une ligne sur le
a
tissu jusqu'au centre de la zone de broderie.
a Motif
b Repère (ligne)
Si le cadre supérieur est verrouillé contre le
c
cadre inférieur, appuyez sur les boutons de
dégagement de gauche et de droite pour
déverrouiller le cadre supérieur.
a Boutons de dégagement
Posez le tissu entre les cadres supérieur et
d
inférieur.
15
Placez la feuille de broderie dans le cadre
Mémo
Remarque
ATTENTION
Remarque
a
b
e
supérieur, alignez les lignes de guidage de la
feuille de broderie avec le repère sur le tissu
et appuyez sur les leviers de verrouillage de
gauche et de droite jusqu'à ce qu'ils se
clipsent.
a Leviers de verrouillage
• Le tissu peut également être placé dans le cadre de
broderie de bord si vous alignez le bord du tissu et
les repères intérieurs du cadre supérieur.
■ Fixation du cadre de broderie de bord à
l'unité de broderie
• Une fois le tissu mis en place dans le cadre de
broderie de bord, fixez le cadre à l'unité de
broderie. Sinon, l'aiguille risque de casser et de
vous blesser.
• Avant de fixer le cadre de broderie de bord à l'unité
de broderie, assurez-vous que l'aiguille et le piedde-biche soient relevés. Sinon, l'aiguille risque de
casser et de vous blesser.
• Avant de fixer le cadre de broderie de bord, bobinez
la canette avec le fil et installez-la.
Veillez à ce que l'aiguille et le pied-de-biche
a
soient remontés. Si l'aiguille n'est pas relevée,
appuyez sur la touche “Positionnement
aiguille”pour la relever. Si le pied-de-biche
n'est pas relevé, appuyez sur la touche
“Releveur du pied-de-biche” pour le relever.
Veillez à ce que le chariot de l'unité de
b
broderie soit revenu en position initiale.
• S'il y a un surplus de tissu après que vous avez
aligné le centre de la zone de broderie avec le
centre du cadre de broderie de bord, repliez le
surplus, placez-le au dessus du cadre supérieur et
appuyez sur les leviers. Veillez à ce que le surplus
de tissu replié ne se trouve pas dans la zone de
broderie.
Retirez la feuille de broderie et tirez sur les
f
quatre côtés du tissu pour tendre les fils.
Ensuite, vérifiez que le tissu est fermement
tendu.
Alignez le guide sur le cadre de broderie de
c
bord et le côté droit du support du cadre de
broderie.
a Support du cadre de broderie
b Guide sur le cadre de broderie de bord
16
Faites glisser le cadre de broderie de bord sur
ATTENTION
a
Remarque
ATTENTION
d
le support du cadre de broderie pour aligner
le repère fléché du cadre (U) avec celui du
support (U).
a Repères fléchés
Abaissez le levier de sécurité du cadre au
e
même niveau que le cadre de broderie de
bord pour fixer le cadre au support.
■ Broderie du premier motif
• Lorsque vous utilisez le cadre de broderie de bord,
le temps de broderie peut être légèrement plus long
que le temps qui s'affiche à l'écran en fonction du
type de tissu et du motif utilisés.
Pour contrôler la zone de broderie, appuyez
a
sur .
a
a Levier de sécurité du cadre
• Si le levier n'est pas abaissé, le motif risque de ne
pas être brodé correctement ou le pied-de-biche
risque de heurter le cadre de broderie de bord et
vous pourriez vous blesser.
Enfilez le fil dans la machine et démarrez la
b
broderie.
• Ne touchez pas le cadre pendant que la machine
brode.
→ Lorsque la machine a terminé de broder, elle coud
le repère à l'aide de la dernière couleur de fil.
17

■ Retrait du cadre de broderie de bord
Remarque
ATTENTION
ARRET
Remarque
• Avant de retirer le cadre de la machine, assurezvous que le chariot de l'unité de broderie soit revenu
à sa position initiale.
Levez le levier de sécurité du cadre et tirez le
a
cadre vers vous.
• Si le fil est emmêlé et que la machine ne revient pas
à sa position initiale, même après que le fil est
coupé, mettez la machine hors tension, déplacez
manuellement le chariot et retirez le cadre de
broderie de bord.
• Ne déplacez le chariot que lorsque la machine est
hors tension.
■ Broderie du motif suivant
Verrouillez les boutons de dégagement et
a
faites glisser le tissu pour aligner la zone de
broderie du motif suivant et replacez le tissu
dans le cadre de broderie de bord.
• Ajustez la position du tissu afin que la zone de
broderie pour le motif suivant se trouve dans la zone
de broderie de la feuille de broderie.
a Premier motif brodé
b Position du motif à broder ensuite
c Zone de broderie de la feuille de broderie
Fixez le cadre à l'unité de broderie et appuyez
b
sur .
18
 Loading...