

Page 1
KNOWING YOUR SEWING
MACHINE
CONOZCA SU MÁQUINA DE
COSER
1
STRAIGHT AND ZIGZAG
STITCHING
COSTURA RECTA Y EN ZIG-ZAG
2
BUILT-IN STITCHES
PUNTADAS DE COSTURA
INCORPORADAS
3
SEWING BUTTONHOLES AND
BUTTONS
COSTURA DE OJALES Y
BOTONES
4
USING ATTACHMENTS AND
APPLICATIONS
USO DE ACCESORIOS Y
APLICACIONES
5
APPENDIX
ANEXO
6
Operation Manual
Manual de Instrucciones
Page 2

IMPORTANT SAFETY INSTRUCTIONS
When using this machine, basic safety precautions should always be taken, including the following:
Read all instructions before using.
DANGER - To reduce the risk of electric shock:
1. The machine should never be left unattended while plugged in. Always unplug the machine
from the electrical outlet immediately after using and before cleaning.
2. Always unplug the machine before you change the light bulb.
Replace the bulb with same type rated 15 watts.
WARNING - To reduce the risk of burns, fire, electric shock, or injury to persons:
1. Do not allow this machine to be used as a toy. Close attention is necessary when the machine is
used by or near children.
2. Use this machine only for its intended use as described in this manual. Use only accessories
recommended by the manufacturer as contained in this manual.
3. Never operate this machine if it has a damaged cord or plug, if it is not working properly, if it has
been dropped or damaged, or dropped into water. Return the machine to the nearest authorized
dealer or service center for examination, repair, electrical or mechanical adjustment.
4. Never operate the machine with any air openings blocked. Keep ventilation openings of the
machine and foot control free from the accumulation of lint, dust, and loose cloth.
5. Never drop or insert any object into any opening.
6. Do not use outdoors.
7. Do not operate where aerosol (spray) products are being used or where oxygen is being
administered.
8. To disconnect, turn the machine switch to the symbol “{” position which represents off, then
remove plug from outlet.
9. Do not unplug by pulling on cord. To unplug, grasp the plug, not the cord.
10. Keep fingers away from all moving parts. Special care is required around the machine needle.
11. Always use the proper needle plate. The wrong plate can cause the needle to break.
12. Do not use bent needles.
13. Do not pull or push fabric while stitching. It may deflect the needle, causing it to break.
14. Switch the machine to the symbol “{” position to turn it off when making any adjustments in the
needle area, such as threading needle, changing needle, threading bobbin, or changing presser
foot, and the like.
15. Always unplug the machine from the electrical outlet when removing covers, lubricating, or
when making any other user servicing adjustments mentioned in the instruction manual.
16. This sewing machine is not intended for use by young children or infirm persons without
supervision. (For Australia and New Zealand only)
17. Young children should be supervised to ensure that they do not play with this machine.
SAVE THESE INSTRUCTIONS
This machine is intended for household use.
1
Page 3

INSTRUCCIONES IMPORTANTES DE SEGURIDAD
Cuando utilice esta máquina, deberá tomar siempre medidas de seguridad, incluidas las que se
enumeran a continuación:
Lea las instrucciones antes de utilizar la máquina.
PELIGRO: Para reducir el riesgo de descarga eléctrica:
1. La máquina nunca deberá dejarse desatendida mientras esté enchufada. Saque siempre el enchufe
de la toma de corriente inmediatamente después de su uso y antes de proceder a su limpieza.
2. Desenchufe siempre la máquina antes de cambiar la bombilla.
Sustituya la bombilla por una del mismo tipo de 15 vatios.
PRECAUCIÓN: Para reducir el riesgo de quemaduras, incendio, descarga
eléctrica o lesiones:
1. No deje que se utilice la máquina como juguete. Deberá prestar especial atención cuando se utilice
cerca de niños o sea utilizada por ellos.
2. Utilice esta máquina sólo para los fines descritos en este manual. Emplee sólo los accesorios
recomendados por el fabricante en este manual.
3.
Nunca ponga la máquina en funcionamiento si el cable o el enchufe están dañados, si no funciona correctamente, si se
ha caído o está averiada, o si se ha caído dentro del agua. Lleve la máquina al distribuidor o centro de reparaciones
autorizado más cercano para su examen, reparación y realización de los ajustes eléctricos o mecánicos necesarios.
4. Nunca utilice esta máquina si las aberturas de ventilación están bloqueadas. Mantenga las
aberturas de ventilación y el pedal libres de pelusa, polvo y trocitos de tela.
5. Nunca deje que caigan objetos en ninguna de las aberturas, ni inserte nada en las mismas.
6. No la utilice en el exterior.
7. No la use en lugares donde se utilicen productos con aerosoles (atomizadores), ni en sitios donde
se esté administrando oxígeno.
8. Para desconectarla, coloque el interruptor de la máquina en la posición con el símbolo “{” que
indica apagado y, a continuación, desconecte el enchufe de la toma de corriente.
9.
No saque el enchufe de la corriente tirando del cable. Para desenchufarla, sujete el enchufe, no el cable.
10. Mantenga los dedos alejados de las piezas en movimiento. Se debe tener especial cuidado con la
zona de la aguja.
11. Utilice siempre la placa de la aguja correcta. Si utiliza una placa que no sea la adecuada, la aguja
podría romperse.
12. No utilice agujas dobladas.
13. No tire de la tela ni la empuje cuando esté cosiendo. Podría doblar la aguja y romperla.
14.
Cuando vaya a hacer algún ajuste en la zona de la aguja, como enhebrar la aguja, cambiarla, devanar la
bobina, cambiar el pie prensatela, etc., coloque la máquina en la posición con el símbolo “
15.
Desenchufe siempre la máquina de la toma de corriente cuando vaya a quitar alguna tapa, lubricar, o
cuando vaya a realizar cualquier tipo de ajuste de mantenimiento indicado en este manual de instrucciones.
16. Esta máquina de coser no está diseñada para ser utilizada por niños o personas enfermas sin la
supervisión de un adulto. (Solo para Australia y Neva Zelanda)
17. Es necesario vigilar a los niños pequeños para asegurarse de que no juegan con la máquina.
{
” para apagarla.
CONSERVE ESTAS INSTRUCCIONES
Esta máquina de coser está diseñada para el uso doméstico.
2
Page 4

FOR USERS IN THE UK, EIRE, MALTA AND CYPRUS ONLY
If this machine is fitted with a three-pin non-rewireable BS plug then please read the following.
IMPORTANT
If the available socket outlet is not suitable for the plug supplied with this equipment, it should be cut
off and an appropriate three pin plug fitted. With alternative plugs an approved fuse must be fitted in
the plug.
NOTE: The plug severed from the main leads must be destroyed as a plug with bared flexible cords is
hazardous if engaged in a live socket outlet. In the event of replacing the plug fuse, use a fuse
approved by ASTA to BS 1362, i.e. carrying the mark, rating as marked on plug.
Always replace the fuse cover. Never use plugs with the fuse cover omitted.
WARNING: DO NOT CONNECT EITHER WIRE TO THE EARTH TERMINAL WHICH IS MARKED
WITH THE LETTER ‘E’, BY THE EARTH SYMBOL OR COLOURED GREEN OR GREEN AND
YELLOW.
The wires in this main lead are coloured in accordance with the following code:
Blue Neutral
Brown Live
As the colours of the wiring in the main lead of this appliance may not correspond with the coloured
markings identifying the terminals in your plug, proceed as follows:
The wire which is coloured blue must be connected to the terminal which is marked with the letter
‘N’ or coloured black or blue.
The wire which is coloured brown must be connected to the terminal which is marked with the letter
‘L’ or coloured red or brown.
3
Page 5
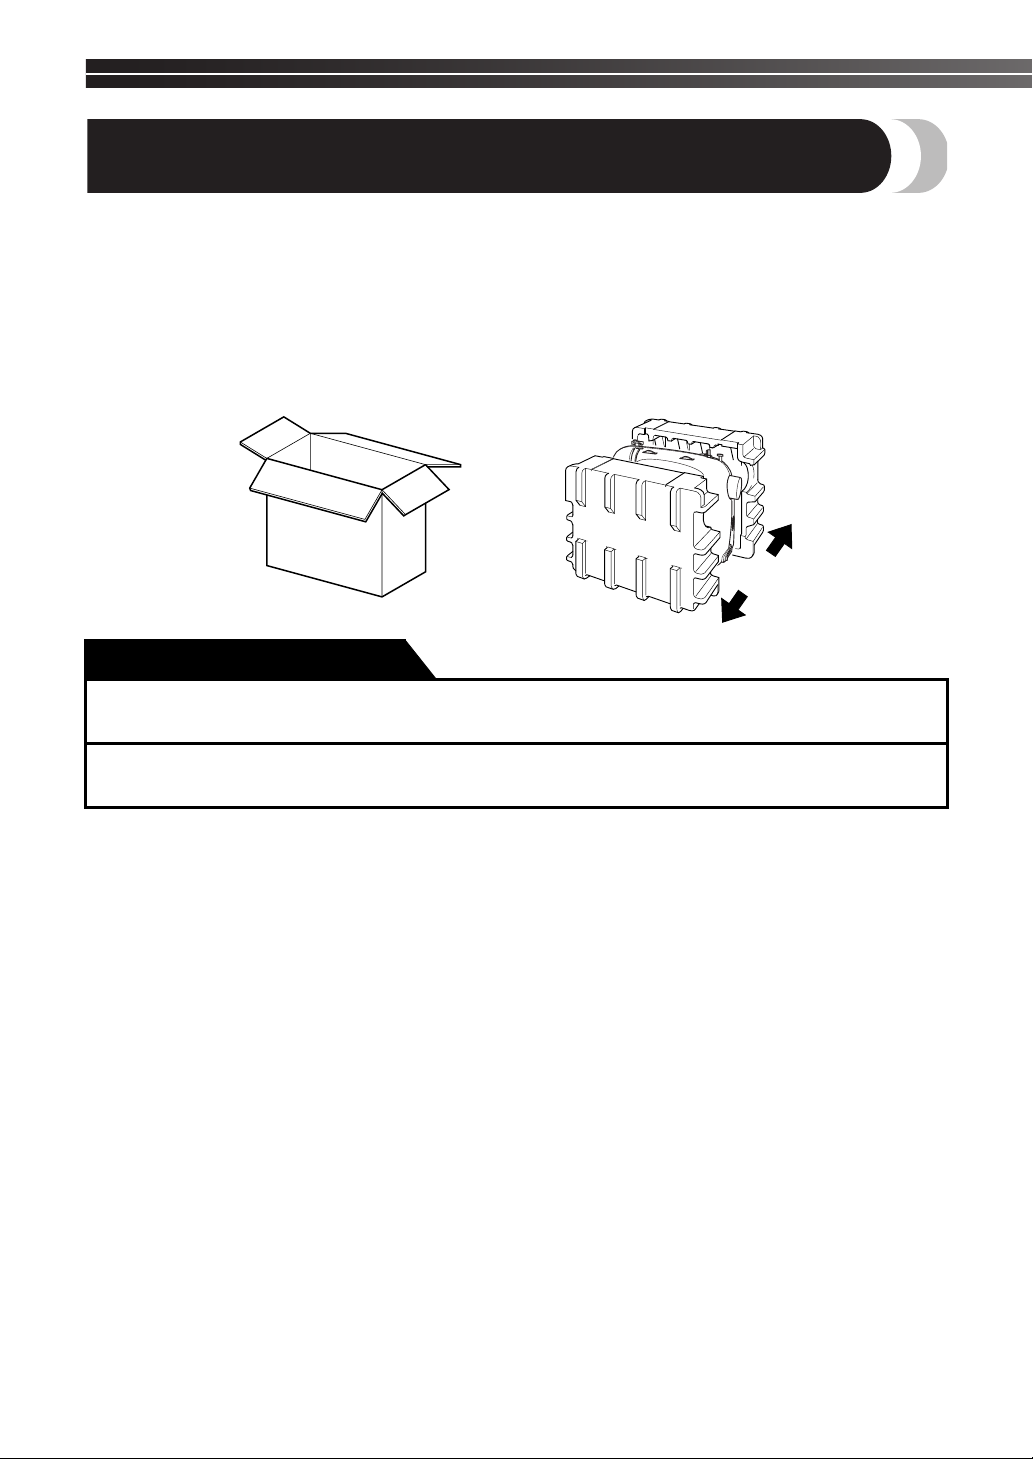
UNPACKING/REPACKING INSTRUCTIONS
INSTRUCCIONES PARA EL DESEMBALAJEY EL REEMBALAJE
Keep the carton and packing materials. You may have to take or send the machine to be repaired. If you do not
pack it properly, or do not use the right packing material, the machine could be damaged.
Please follow the diagram below to unpack and repack the machine.
Guarde el cartón y los materiales de embalaje. Puede que tenga que llevar o enviar la máquina al servicio de
reparaciones. Si no la empaqueta correctamente, o no utiliza el material de embalaje adecuado, la máquina
podría dañarse.
Para desembalar y reembalar la máquina, consulte el diagrama que se muestra a continuación.
IMPORTANT/IMPORTANTE
● This packing material is designed to prevent damage. Save this packing material if you need to
take or send this machine to be repaired.
● Este material de embalaje está diseñado para evitar daños. Guarde este material por si tuviera
que llevar o enviar la máquina al servicio de reparaciones.
PLEASE READ THESE INSTRUCTIONS BEFORE YOU USE THE MACHINE.
To use the machine safely
1. Make sure you watch the needle carefully while you are sewing. Do not touch the handwheel,
thread take-up lever, needle, or other moving parts.
2. Turn off the main power and unplug the cord in the following circumstances:
•When you have stopped using the machine
•When you are replacing or removing the needle or any other part
•If there is a power failure while you are using the machine
•If you are checking or cleaning the machine
•Leaving the machine unattended
3. Do not store anything on the foot controller.
4. Plug the machine directly into the wall. Do not use extension cords.
To give your machine a longer life
1. Do not store this machine in direct sunlight or in high humidity conditions. Do not use or store
the machine near a heater, iron, halogen lamp or other hot objects.
2. Use only mild soaps or detergents to clean the case. Benzene, thinner, and scouring powders
can damage the case and machine, and should never be used.
3. Do not drop or hit the machine.
4
Page 6

4. Always consult this manual before you replace or fit presser feet, the needle, or any other parts to
make sure you fit them correctly.
To repair or adjust the machine
If the machine breaks down or needs adjustment, first follow the troubleshooting table in the
Appendix to inspect and adjust the machine yourself. If the problem is still there, consult your local
authorized dealer.
For additional product information and updates, visit our web site at www.brother.com.
The contents of this manual and specifications of this product are subject to change without notice.
LEA ESTAS INSTRUCCIONES ANTES DE UTILIZAR LA MÁQUINA.
Para utilizar la máquina de forma segura
1. Esté siempre atento a la aguja mientras cose. No toque la rueda, el tirahilo, la aguja u otras piezas
móviles.
2. Apague la máquina y desenchufe el cable de la corriente en las situaciones siguientes:
• Cuando deje de utilizar la máquina.
• Cuando cambie o retire la aguja u otras piezas.
• Cuando se produzca un fallo eléctrico mientras está utilizando la máquina.
• Cuando revise o limpie la máquina.
• Cuando deje la máquina desatendida.
3. No deje ningún objeto encima del pedal.
4. Enchufe la máquina directamente a la toma de corriente de la pared. No utilice alargadores.
Para prolongar la duración de la máquina
1. No exponga la máquina a la luz solar directa ni la coloque en lugares con gran humedad. No
utilice o guarde la máquina cerca de una fuente de calor, plancha, lámpara halógena u otros
objetos candentes.
2. Utilice sólo detergentes o jabones suaves para limpiar la carcasa. Gasolina, diluyentes y polvos
desengrasantes pueden dañar la carcasa y la máquina, por lo que nunca debe utilizarlos.
3. No deje caer la máquina ni la golpee.
4. Consulte siempre este manual antes de sustituir o colocar el pie prensatela, la aguja o cualquier
otra pieza, para asegurarse de que se colocan de la forma adecuada.
Para reparar o ajustar la máquina
Si la máquina se estropea o es necesario ajustarla, consulte en primer lugar la tabla de solución de
problemas que figura en el Anexo para inspeccionarla y ajustarla usted mismo. Si el problema
continúa, póngase en contacto con su distribuidor autorizado más cercano.
Si desea obtener información adicional del producto y actualizaciones, visite nuestro sitio Web en
www.brother.com.
El contenido de este manual y las especificaciones de este producto están sujetos a cambios sin previo
aviso.
5
Page 7

—————————————————————————————————————————————————————————
—
CONTENTS
1. KNOWING YOUR SEWING MACHINE ........................................................10
THE MAIN PARTS .............................................................................................................10
ACCESSORIES ................................................................................................................... 12
Optional Accessories ...................................................................................................................................... 13
USING YOUR SEWING MACHINE ...................................................................................14
Connecting Plugs ............................................................................................................................................15
Main Power and Sewing Light Switch ............................................................................................................. 15
Foot Controller ................................................................................................................................................15
Checking the Needle ....................................................................................................................................... 16
Replacing the Needle ...................................................................................................................................... 16
Changing the Presser Foot ............................................................................................................................... 18
Flat Bed Attachment ........................................................................................................................................ 19
Using a Free-arm Style .................................................................................................................................... 19
THE CONTROLS ...............................................................................................................20
Pattern Selection Dial ...................................................................................................................................... 20
Patterns and Stitch Names ............................................................................................................................... 21
Stitch Length Dial ............................................................................................................................................24
Stretch Stitching ..............................................................................................................................................24
Stitch Width Dial ............................................................................................................................................ 25
Reverse Sewing Lever ...................................................................................................................................... 25
THREADING THE MACHINE ............................................................................................26
Winding the Bobbin ........................................................................................................................................ 26
Lower Threading ............................................................................................................................................. 28
Lower Threading (for models equipped with a quick-set bobbin) .................................................................... 30
Upper Threading ............................................................................................................................................. 32
Using the Needle Threader (for models equipped with a needle threader) ....................................................... 34
Drawing up the Lower Thread ......................................................................................................................... 36
Sewing with a Twin Needle ............................................................................................................................36
Thread Tension ............................................................................................................................................... 38
FABRIC, THREAD, AND NEEDLE COMBINATIONS .........................................................39
2. STRAIGHT AND ZIGZAG STITCHING .........................................................41
Please Read Before Sewing ............................................................................................................................. 41
Straight Stitching ............................................................................................................................................. 41
Zigzag Stitching .............................................................................................................................................. 43
l
3. BUILT-IN STITCHES ......................................................................................45
Blind Hem Stitching ........................................................................................................................................ 45
Shell Tuck Stitching ......................................................................................................................................... 46
Elastic Stitching ............................................................................................................................................... 46
Double Action Stitching .................................................................................................................................. 47
Heirloom Stitching .......................................................................................................................................... 48
Overedge Stitching ..........................................................................................................................................48
Feather Stitching ............................................................................................................................................. 49
Triple Zigzag Stretch Stitching ......................................................................................................................... 50
Decorative Stitching ........................................................................................................................................ 50
4. SEWING BUTTONHOLES AND BUTTONS ..................................................52
Making a Buttonhole (1-Step Automatic Buttonhole) ....................................................................................... 52
Adjusting Buttonholes ..................................................................................................................................... 54
Sewing Buttons ............................................................................................................................................... 55
6
Page 8

5. USING ATTACHMENTS AND APPLICATIONS .............................................56
Zipper Insertion ............................................................................................................................................... 56
Gathering ........................................................................................................................................................ 57
Darning ........................................................................................................................................................... 58
Appliqués ........................................................................................................................................................ 58
Monogramming and Embroidering .................................................................................................................. 59
OPTIONAL ACCESSORIES ................................................................................................62
Using the Walking Foot ................................................................................................................................... 62
Using the Quilting Foot ................................................................................................................................... 63
Using the 1/4-inch Quilting Foot ..................................................................................................................... 65
Using the Narrow Hemmer Foot ..................................................................................................................... 65
Using the Blind Stitch Foot .............................................................................................................................. 67
6. APPENDIX .....................................................................................................69
MAINTENANCE ................................................................................................................69
Changing the Light Bulb .................................................................................................................................. 69
Cleaning ......................................................................................................................................................... 70
Troubleshooting .............................................................................................................................................. 72
INDEX ...............................................................................................................................79
7
Page 9

—————————————————————————————————————————————————————————
—
CONTENIDO
1. CONOZCA SU MÁQUINA DE COSER ....................................................... 11
COMPONENTES PRINCIPALES ...................................................................................... 11
ACCESORIOS ............................................................................................................... 12
Accesorios opcionales ................................................................................................................................ 13
USO DE LA MÁQUINA DE COSER ................................................................................. 14
Conexión de enchufes ................................................................................................................................. 15
Interruptor de la alimentación y de luz de cosido .......................................................................................... 15
Pedal ......................................................................................................................................................... 15
Comprobación de la aguja ......................................................................................................................... 16
Cambio de la aguja ................................................................................................................................... 16
Cambio del pie prensatela .......................................................................................................................... 18
Unidad de cama plana ............................................................................................................................... 19
Uso del estilo de brazo libre ........................................................................................................................ 19
CONTROLES ................................................................................................................. 20
Selector de puntadas .................................................................................................................................. 20
Dibujos y nombres de las puntadas .............................................................................................................. 21
Control de longitud de puntada ................................................................................................................... 24
Costura elástica .......................................................................................................................................... 24
Control de anchura de puntada ................................................................................................................... 25
Pulsador de retroceso ................................................................................................................................. 25
ENHEBRADO DE LA MÁQUINA ..................................................................................... 26
Devanado de la bobina .............................................................................................................................. 26
Enhebrado del hilo inferior .......................................................................................................................... 28
Enhebrado del hilo inferior (para los modelos equipados con la bobina rápida) ............................................. 30
Enhebrado del hilo superior ........................................................................................................................ 32
Uso del enhebrador de aguja (para los modelos equipados con el enhebrador de aguja) ................................ 34
Procedimiento para tirar del hilo inferior ...................................................................................................... 36
Costura con aguja gemela .......................................................................................................................... 36
Tensión del hilo .......................................................................................................................................... 38
COMBINACIONES DE TELA, HILO Y AGUJA .................................................................. 39
2. COSTURA RECTA Y EN ZIG-ZAG ............................................................... 41
Lea lo siguiente antes de utilizar la máquina ................................................................................................. 41
Costura recta ............................................................................................................................................. 41
Costura en zig-zag ..................................................................................................................................... 43
3. PUNTADAS DE COSTURA INCORPORADAS ............................................... 45
Costura invisible para dobladillo ................................................................................................................. 45
Costura de concha ..................................................................................................................................... 46
Costura elástica .......................................................................................................................................... 46
Costura de doble acción ............................................................................................................................. 47
Puntada de adornos ................................................................................................................................... 48
Costura de sobreorilla ................................................................................................................................ 48
Costura de plumas ..................................................................................................................................... 49
Costura elástica en zig-zag triple ................................................................................................................. 50
Costura decorativa ..................................................................................................................................... 50
4. COSTURA DE OJALES Y BOTONES ............................................................ 52
Realización de un ojal (ojal automático de 1 paso) ....................................................................................... 52
Ajuste de ojales .......................................................................................................................................... 54
Costura de botones ..................................................................................................................................... 55
8
Page 10

5. USO DE ACCESORIOS Y APLICACIONES ................................................... 56
Costura de cremalleras ............................................................................................................................... 56
Fruncidos ................................................................................................................................................... 57
Zurcidos .................................................................................................................................................... 58
Aplicaciones .............................................................................................................................................. 58
Realización de monogramas y bordados ..................................................................................................... 59
ACCESORIOS OPCIONALES ......................................................................................... 62
Utilización del pie móvil .............................................................................................................................. 62
Utilización del pie para acolchados ............................................................................................................. 63
Utilización del pie para acolchados de 1/4 pulgadas ................................................................................... 65
Utilización del pie para dobladillos estrechos ............................................................................................... 65
Utilización del pie para puntada invisible ..................................................................................................... 67
6. ANEXO ....................................................................................................69
MANTENIMIENTO ........................................................................................................ 69
Cambio de la bombilla ............................................................................................................................... 69
Limpieza .................................................................................................................................................... 70
Solución de problemas ............................................................................................................................... 75
ÍNDICE .........................................................................................................................80
9
Page 11
KNOWING YOUR SEWING MACHINE / ———————————————————————————————————————
—
1
KNOWING YOUR SEWING MACHINE
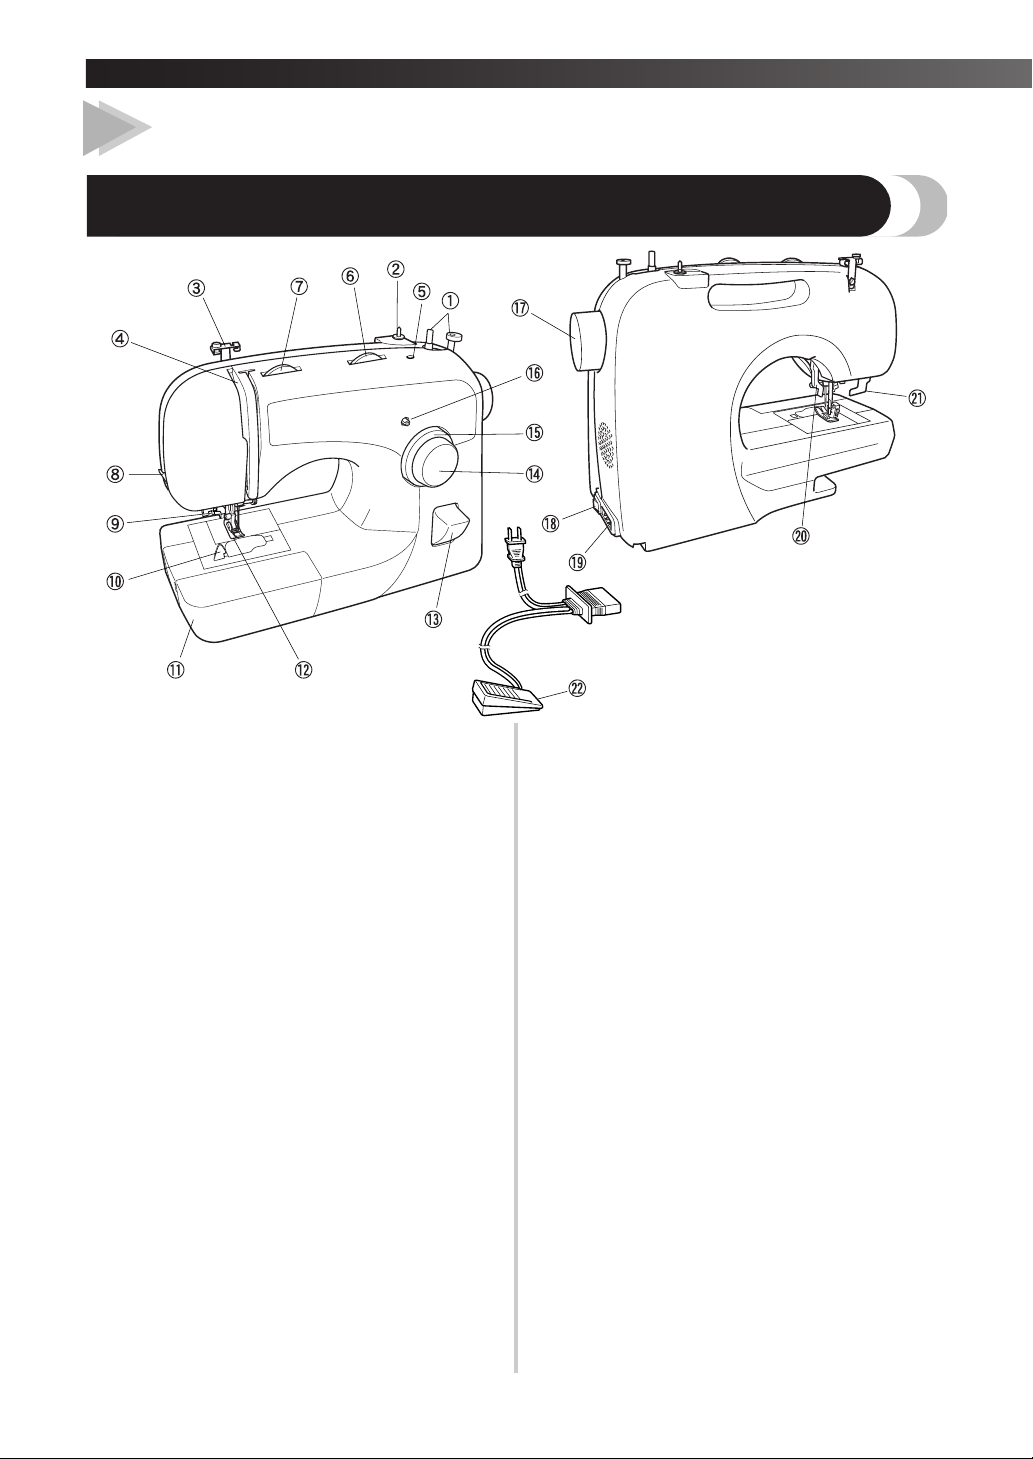
THE MAIN PARTS
1 Bobbin winder (page 26)
This winds the thread onto the bobbin for use as the
lower thread.
2 Spool pin (page 27, 32)
This holds the spool of thread.
3 Thread guide (page 27, 32)
This is used when winding the thread onto the bobbin
and then threading the machine.
4 Thread take-up lever (page 33)
5 Hole for extra spool pin (page 37)
This holds a second spool of thread for sewing with the
twin needle.
6 Stitch width dial (page 25)
This controls the stitch width.
7 Upper tension-control dial (page 38)
This controls the tension of the upper thread.
8 Thread cutter (page 43)
Pass the threads through the thread cutter to cut them.
9 Needle threader (page 34)
(This is only available on certain models.)
0 Quick-set bobbin (page 30)
(This is only available on certain models.)
A Flat bed attachment with accessory compartment
(page 19)
B Presser foot (page 18)
C Reverse sewing lever (page 25)
You can push this to stitch in the reverse direction.
D Pattern selection dial (page 20)
You can turn this in either direction to choose the stitch
you want.
E Stitch length dial (page 24)
This controls the stitch length.
F Buttonhole fine-adjustment screw (page 54)
G Handwheel
Used to manually raise and lower the needle.
H Main power and sewing light switch (page 15)
You can turn the main power and sewing light switch
on and off.
I Foot controller jack / socket (page 15)
Plug in the foot controller plug and connect the
machine to the power supply.
J Presser foot lever (page 32)
Used to raise and lower the presser foot.
Buttonhole lever (1-Step automatic buttonhole) (page 52)
K
Lower the buttonhole lever when sewing buttonholes.
L Foot controller (page 15)
You can use this to control the sewing speed, and to
start and stop sewing.
Parts Code for Zigzag Presser Foot: XC4901-051
Foot Controller: Model KD-1902
Parts Code:XC7359-022 (110/120V Area)
XC7438-222 (220/240V Area)
XC7456-222 (U.K.)
XC7455-022 (Australia, New Zealand)
10
Page 12
1
CONOZCA SU MÁQUINA DE COSER
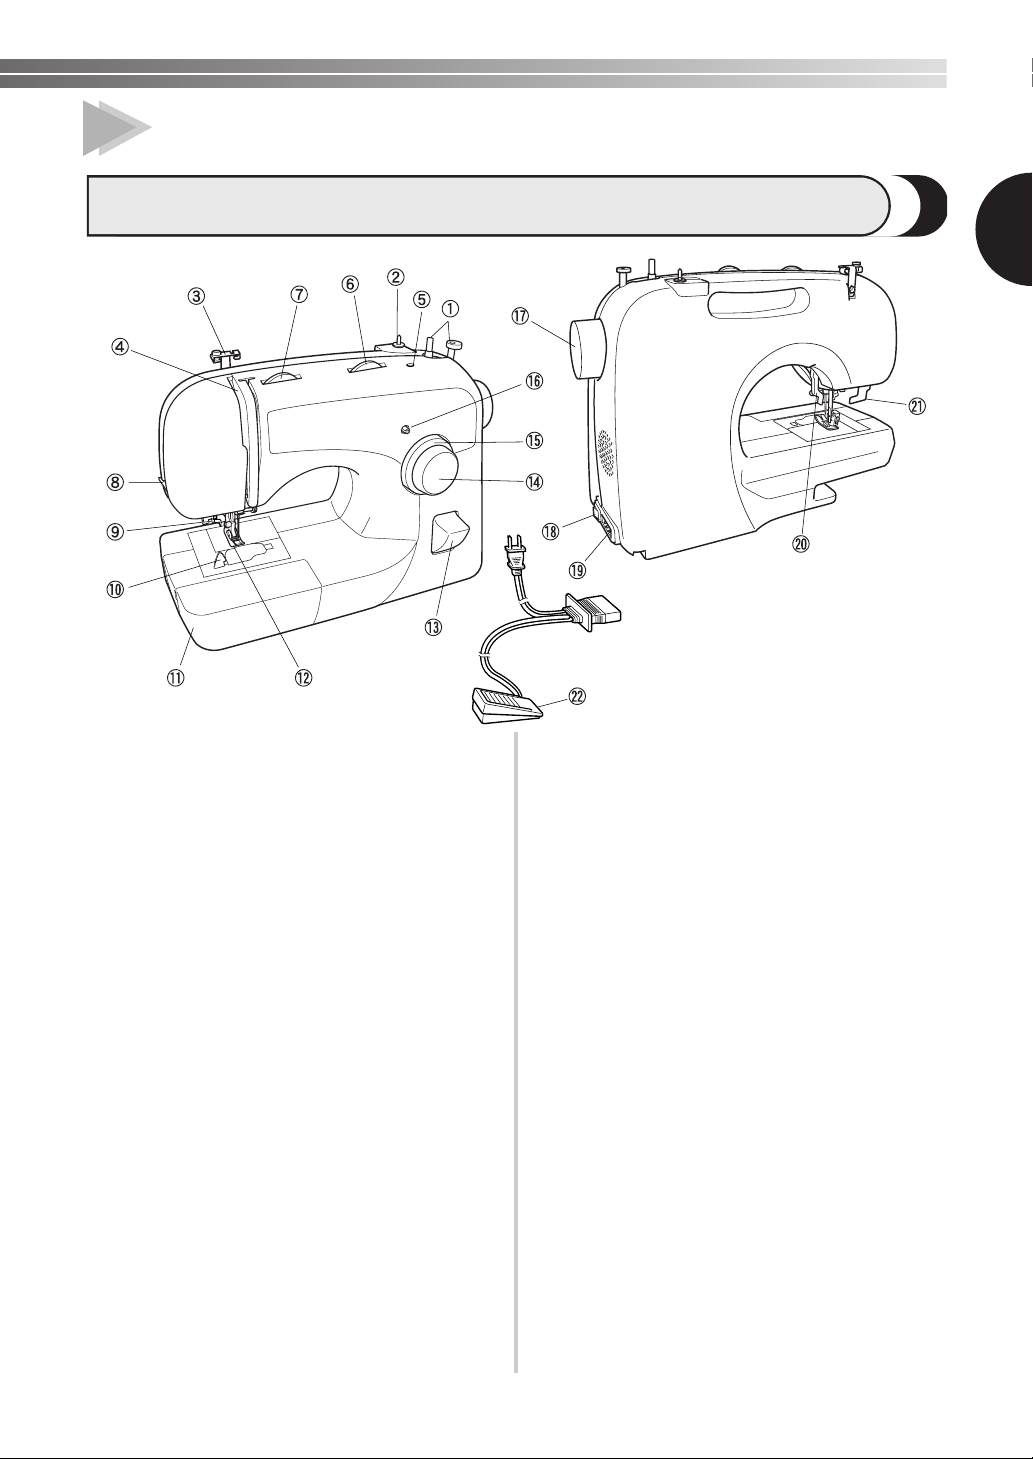
COMPONENTES PRINCIPALES
1
1 Devanadora de bobina (página 26)
Esta devanadora enrolla el hilo en la bobina que se
utiliza para el hilo inferior.
2 Portacarrete (página 27, 32)
Esta pieza sostiene el carrete de hilo.
3 Guía del hilo (página 27, 32)
Se utiliza para enrollar el hilo en la bobina y enhebrar la
máquina a continuación.
4 Tirahilo (página 33)
5 Orificio para el portacarrete adicional (página 37)
Esta pieza sostiene un segundo carrete de hilo para coser
con la aguja gemela.
6 Control de anchura de puntada (página 25)
Controla la anchura de las puntadas.
7 Disco de control de la tensión superior (página 38)
Este disco controla la tensión del hilo superior.
8 Cortador de hilo (página 43)
Para cortar los hilos, páselos por el cortador de hilo.
9 Enhebrador de aguja (página 34)
(Disponible sólo en ciertos modelos).
0 Bobina rápida (página 30)
(Disponible sólo en ciertos modelos).
A Unidad de cama plana con compartimento para
accesorios (página 19)
B Pie prensatela (página 18)
C Pulsador de retroceso (página 25)
Con este pulsador puede hacer puntadas en reversa.
D Selector de puntadas (página 20)
Puede mover este selector en cualquier dirección para
elegir el tipo de puntada que desee.
E Control de longitud de puntada (página 24)
Controla la longitud de las puntadas.
F Tornillo de ajuste fino de los ojales (página 54)
G Rueda
Permite subir y bajar la aguja de forma manual.
H Interruptor de la alimentación y de luz de cosido
(página 15)
Puede encender y apagar el interruptor de la
alimentación y de luz de cosido.
I Conexión o toma eléctrica para el pedal (página 15)
Enchufe la clavija del pedal y conecte la máquina a la
toma de corriente.
J Palanca del pie prensatela (página 32)
Permite subir y bajar el pie prensatela.
K Palanca para ojales (ojal automático de 1 paso)
(página 52)
Baje la palanca para ojales cuando vaya a coser ojales.
L Pedal (página 15)
Con este pedal puede controlar la velocidad de cosido y
comenzar o detener la costura.
Código de pieza del pie prensatela para zig-zag:
XC4901-051
Pedal: Modelo KD-1902
Código de pieza:
XC7359-022 (área de 110/120 V)
XC7438-222 (área de 220/240 V)
XC7456-222 (R.U.)
XC7455-022 (Australia, Nueva Zelanda)
11
Page 13
KNOWING YOUR SEWING MACHINE / CONOZCA SU MÁQUINA DE COSER ———————————————————————
—
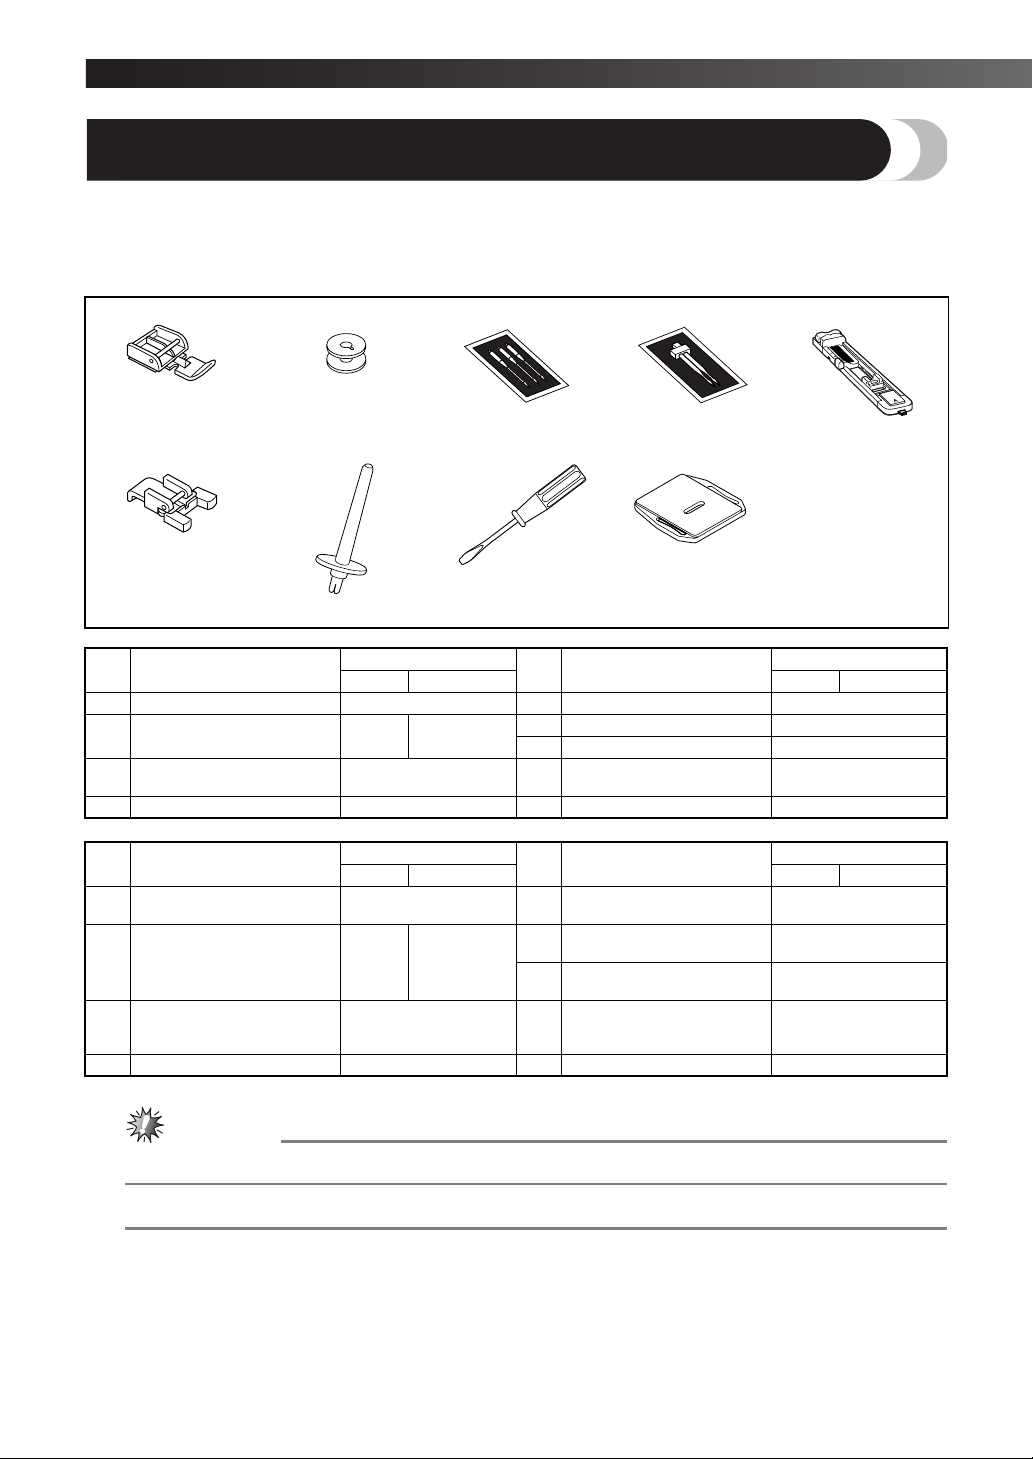
ACCESSORIES / ACCESORIOS
The following accessories are stored in the flat bed attachment. We have designed these accessories to help you
easily perform most sewing tasks.
Los siguientes accesorios se encuentran en la unidad de cama plana. Hemos diseñado estos accesorios para
ayudarle a realizar fácilmente la mayoría de las tareas de costura.
1. 2. 3. 4. 5.
6. 7. 8. 9.
No. Part Name
1 Zipper foot (1 pc.) X59370-021 5 Buttonhole Foot (1 pc.) XD1792-031
2 Bobbin (3 pcs.) SA156
Needle Pack (Regular Single
3
Needle HAX130 (3 pcs.))
4 Twin Needle (1 pc.) X57521-021 9 Darning Plate (1pc.) XC6063-021
Nº Nombre de la pieza
Pie para cremalleras (1
1
unidad)
2 Bobina (3 unidades) SA156
Paquete de agujas (agujas
3
simples normales HAX130 (3
unidades))
4 Aguja gemela (1 unidad) X57521-021 9 Placa de zurcir (1 unidad) XC6063-021
Part Code
USA Others USA Others
SFB:
XA5539-151
129583-021 8 Screwdriver (1 pc.) X55467-021
Código de la pieza
EE.UU. Otros EE.UU. Otros
X59370-021 5 Pie para ojales (1 unidad) XD1792-031
SFB:
XA5539-151
129583-021 8 Destornillador (1 unidad) X55467-021
No. Part Name
6 Button Sewing Foot (1 pc.) X59375-121
7 Extra Spool Pin (1 pc.) 130920-021
Nº Nombre de la pieza
Pie especial para botones
6
(1 unidad)
Portacarrete adicional
7
(1 unidad)
Part Code
Código de la pieza
X59375-121
130920-021
Note/Nota
● The included accessories vary depending on the machine model.
● Los accesorios incluidos varían según el modelo de la máquina.
12
Page 14
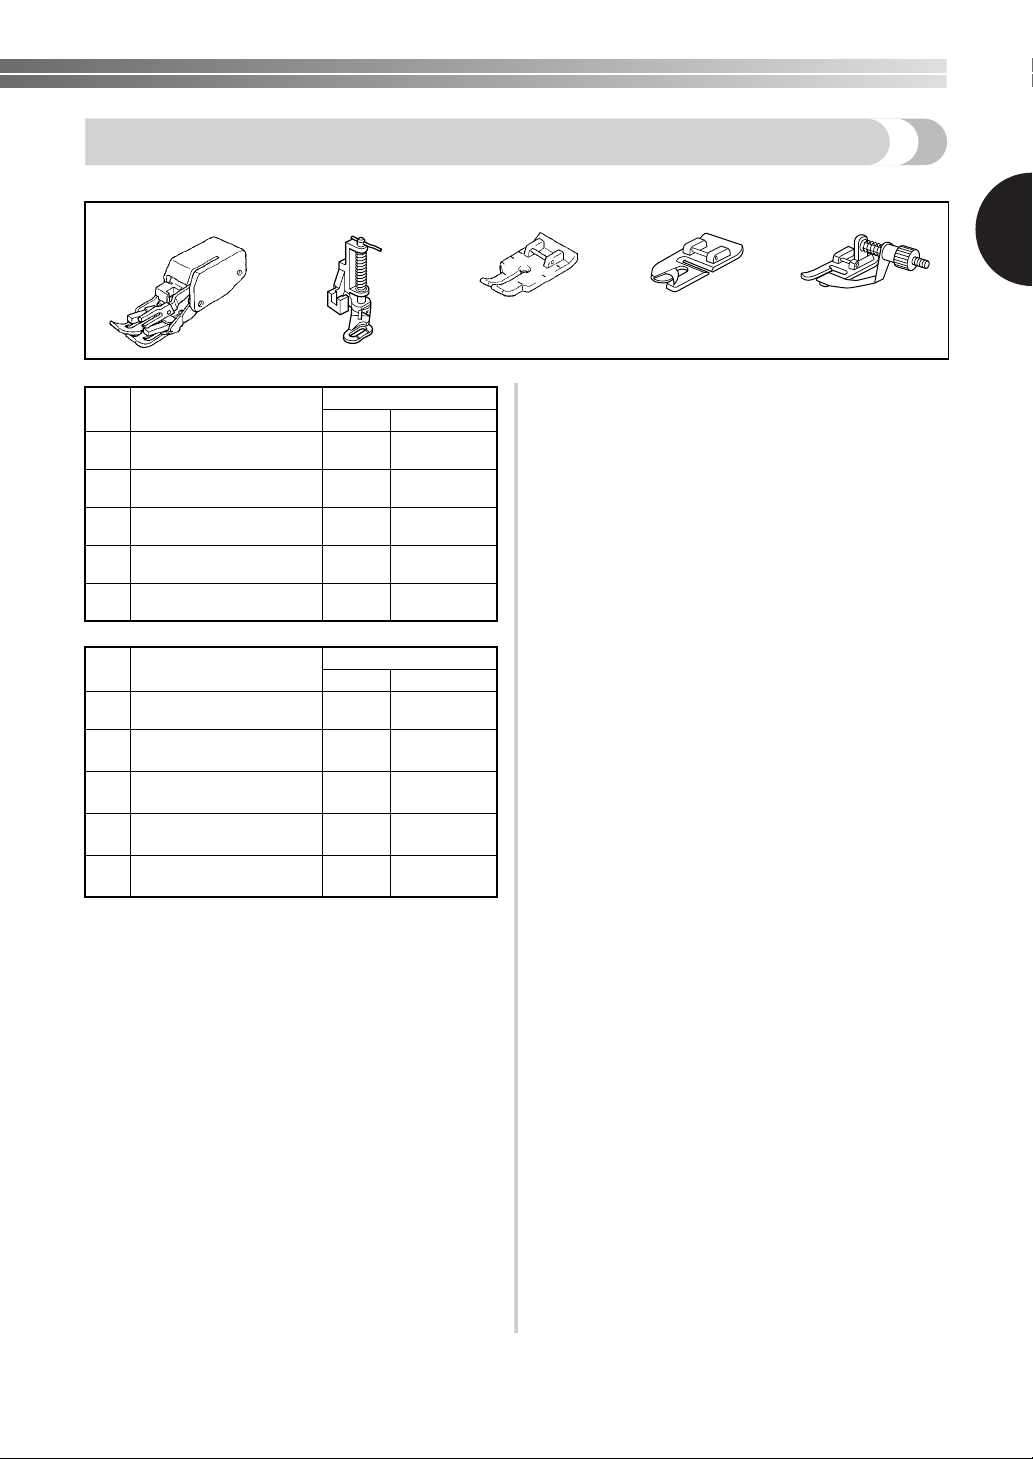
Optional Accessories / Accesorios opcionales
1. 2. 3. 4. 5.
1
No. Part Name
1 Walking Foot SA107
2 Quilting Foot SA129
3 1/4-inch Quilting Foot SA125
4 Narrow Hemmer Foot SA127
5 Blind Stitch Foot SA134
Nº Nombre de la pieza
1Pie móvil SA107
2 Pie para acolchados SA129
Pie para acolchados de
3
1/4 pulgadas
Pie para dobladillos
4
estrechos
5 Pie para puntada invisible SA134
U.S.A. Others
Código de la pieza
EE.UU. Otros
SA125
SA127
Part Code
F034N:
XC2165-002
F005N:
XC1948-002
F001N:
XC1944-002
F003N:
XC1945-002
F018N:
XC1976-052
F034N:
XC2165-002
F005N:
XC1948-002
F001N:
XC1944-002
F003N:
XC1945-002
F018N:
XC1976-052
13
Page 15
KNOWING YOUR SEWING MACHINE / CONOZCA SU MÁQUINA DE COSER ———————————————————————
—
USING YOUR SEWING MACHINE
USO DE LA MÁQUINA DE COSER
WARNING/AVISO
● Use only regular household electricity for the power source. Using other power sources may
result in fire, electric shock, or damage to the machine.
● Turn off the main power and remove the plug in the following circumstances:
• When you are away from the machine
• After using the machine
• When the power fails during use
• When the machine does not operate correctly due to a bad connection or a disconnection
• During electrical storms
●
Utilice solamente electricidad doméstica regular para la alimentación de la máquina. El uso de otras
fuentes de alimentación puede provocar incendios, descargas eléctricas o averías en la máquina.
● Apague la máquina y desenchufe el cable de la corriente en las situaciones siguientes:
• Cuando se aleje de la máquina
• Cuando haya terminado de utilizar la máquina
• Si se produce un fallo de tensión durante el funcionamiento
• Si la máquina no funciona correctamente debido a una mala conexión o a una desconexión
• Durante tormentas eléctricas
CAUTION/PRECAUCIÓN
● Do not use extension cords or multi-plug adapters with many other appliances plugged in to
them. Fire or electric shock may result.
● Do not touch the plug with wet hands. Electric shock may result.
●
When unplugging the machine, always turn off the main power first. Always grasp the plug to
remove it from the outlet. Pulling on the cord may damage the cord, or lead to fire or electric shock.
● Do not allow the power cord to be cut, damaged, modified, forcefully bent, pulled, twisted,
or bundled. Do not place heavy objects on the cord. Do not subject the cord to heat. These
things may damage the cord and cause fire or electric shock. If the cord or plug is damaged,
take the machine to your authorized dealer for repairs before continuing use.
● Unplug the power cord if the machine is not to be used for a long period of time, otherwise a
fire may result.
● No utilice cables alargadores ni adaptadores de varias clavijas con otros aparatos conectados.
Podría producirse un incendio o una descarga eléctrica.
● No toque el enchufe con las manos húmedas. Podría recibir una descarga eléctrica.
●
Desconecte siempre la máquina antes de desenchufar el cable de corriente. Sujete siempre el enchufe para sacarlo
de la toma de corriente. Si tira del cable podría dañarlo o provocar un incendio o una descarga eléctrica.
● No corte, estropee, cambie, doble, estire, tuerza o enrolle el cable. No coloque objetos pesados
sobre el cable. No exponga el cable al calor. Todo esto podría dañar el cable y provocar un
incendio o una descarga eléctrica. Si el cable está dañado, lleve la máquina a su distribuidor
autorizado para que la repare antes de volver a utilizarla.
● Desenchufe el cable de la corriente si no va a utilizar la máquina durante un largo período de
tiempo; de no hacerlo, podría producirse un incendio.
14
Page 16

Connecting Plugs
Conexión de enchufes
Connect the foot controller plug to the machine.
1
Enchufe la clavija del pedal a la máquina.
Connect the power supply plug to a wall outlet.
2
Conecte el enchufe en una toma de corriente de la pared.
Note/Nota
●
When leaving the machine unattended, the main
switch of the machine should be switched off or
the plug must be removed from the wall outlet.
● When servicing the machine, or when
removing covers or changing bulbs, the
machine must be unplugged.
(For U.S.A. only)
●
This appliance has a polarized plug (one blade
wider than the other). To reduce the risk of
electric shock, this plug is intended to fit in a
polarized outlet only one way. If the plug does
not fit fully in the outlet, reverse the plug.
If it still does not fit, contact a qualified
electrician to install the proper outlet. Do not
modify the plug in any way.
Main Power and Sewing Light
Switch
Interruptor de la alimentación
y de luz de cosido
This switch turns the main power and sewing light on or off.
Este interruptor enciende y apaga la alimentación y la
luz de cosido.
1
2
1 Turn on (toward the ‘I’ mark) / Encendido (hacia
la marca ‘I’)
2 Turn off (toward the ‘O’ mark) / Apagado (hacia
la marca ‘O’)
Foot Controller / Pedal
When you press the foot controller down lightly, the
machine will run at a low speed. When you press
harder, the machine’s speed will increase. When you
take your foot off the foot controller, the machine will
stop. You should make sure that nothing is placed on
the foot controller when the machine is not in use.
Cuando pise el pedal lentamente, la máquina funcionará
a baja velocidad. Al pisarlo más fuerte, la velocidad de
la máquina aumentará. La máquina se detendrá cuando
quite el pie del pedal. Debe asegurarse de que no haya
nada sobre el pedal cuando la máquina no esté en uso.
1
●
Cuando deje la máquina desatendida, debe
apagar el interruptor principal de la máquina
o quitar el enchufe de la toma de corriente.
●
Desenchufe la máquina cuando vaya a reparar
la máquina, retirar tapas o cambiar bombillas.
(Sólo para EE.UU.)
Este aparato tiene un enchufe polarizado (una
●
patilla más ancha que la otra). Para reducir el
riesgo de descarga eléctrica, este enchufe está
diseñado de forma que presenta una única posición
de ajuste a una toma polarizada. Si el enchufe no
se ajusta perfectamente a la toma, dele la vuelta.
Si el problema persiste, póngase en contacto con un
electricista cualificado para instalar una toma
adecuada. No realice modificaciones de ningún
tipo en el enchufe.
1
1 Foot controller / Pedal
15
Page 17
KNOWING YOUR SEWING MACHINE / CONOZCA SU MÁQUINA DE COSER ————————————————————————————
—
Note/Nota
CAUTION/PRECAUCIÓN
1
2
CAUTION/PRECAUCIÓN
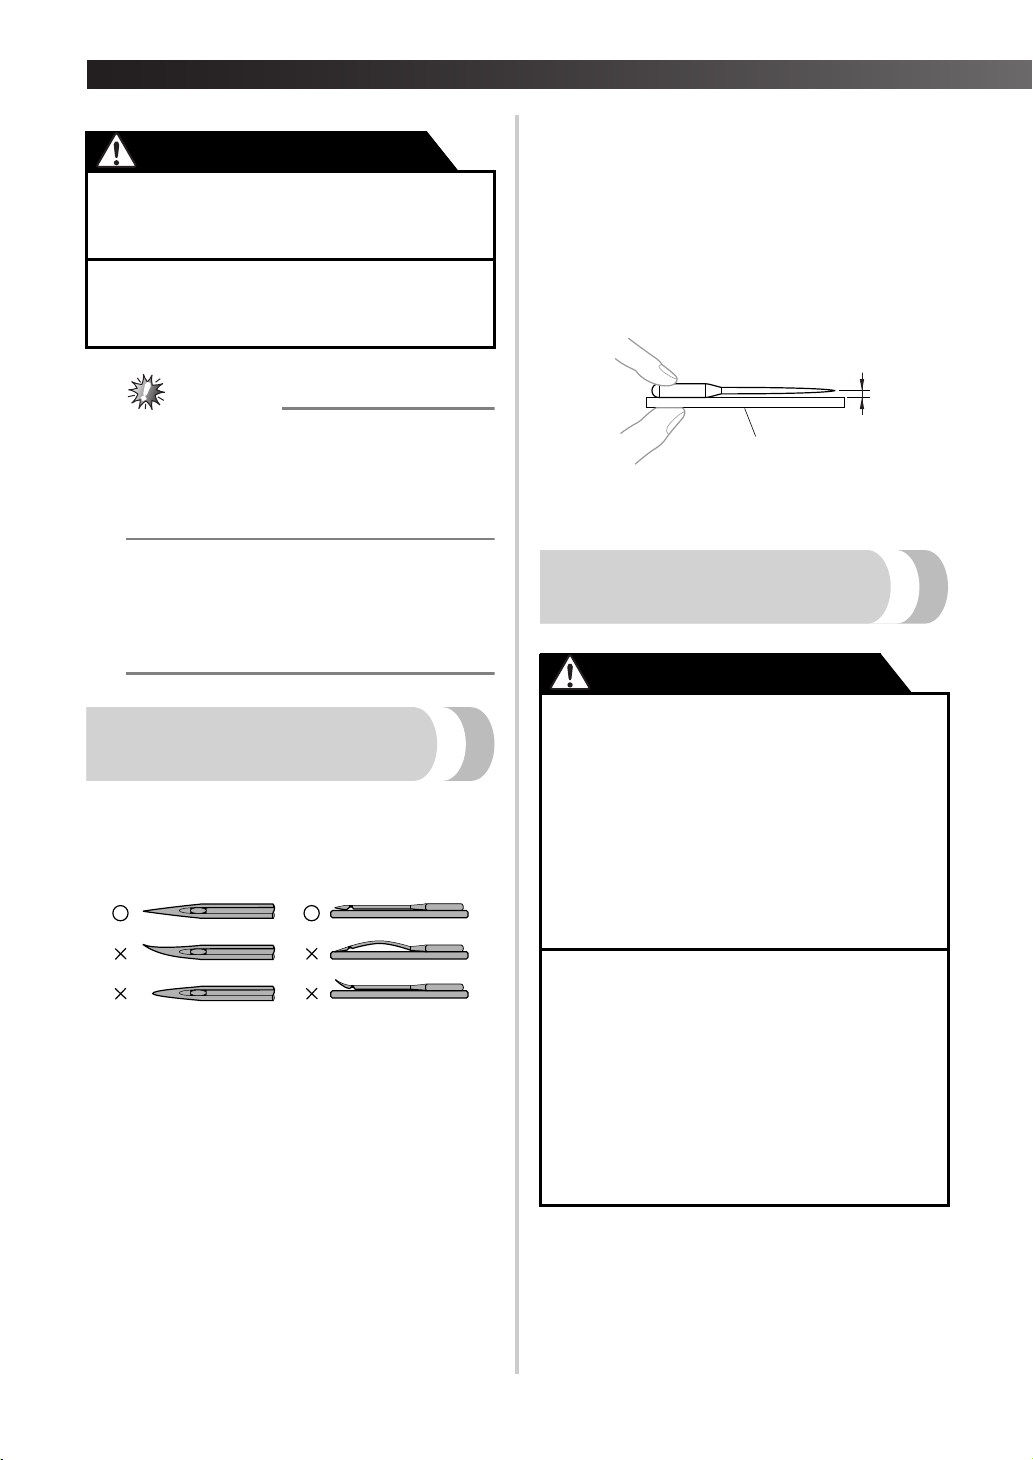
■ Checking the Needle Correctly /
Comprobación correcta de la aguja
Put the flat side of the needle on a flat surface.
● Do not allow pieces of cloth and dust to
build up on the foot controller. Doing so
could cause a fire or an electric shock.
● No deje que se acumulen trozos de tela ni
polvo en el pedal. Esto podría provocar un
Check the needle from the top and the sides.
Dispose of any bent needles safely.
Coloque la parte plana de la aguja sobre una
superficie lisa. Examine la aguja desde la parte
superior y los laterales. Deseche las agujas
dobladas de manera segura.
incendio o una descarga eléctrica.
(For U.S.A. only)
● Foot Controller: Model KD-1902
This foot controller can be used on the
following machine models:
XL-3750, XL-3500i, XL-2600i, LS-590
1 Parallel space / Espacio paralelo
Level surface (bobbin cover, glass, etc.) /
2
Superficie nivelada (tapa de la bobina, cristal, etc.)
(Sólo para EE.UU.)
● Pedal: Modelo KD-1902
Este controlador de pedal se puede utilizar
con los modelos de máquinas siguientes:
XL-3750, XL-3500i, XL-2600i, LS-590
Checking the Needle
Comprobación de la aguja
The sewing needle must always be straight and sharp
for smooth sewing.
La aguja de coser debe estar siempre recta y afilada
para una costura óptima.
Replacing the Needle
Cambio de la aguja
● Turn the main power switch off before
you change the needle. If you leave the
main power on and step on the foot
controller, the machine will start and you
may be injured.
● Only use sewing machine needles for
home use. Other needles may bend or
break and cause injury.
● Never sew with a bent needle. A bent
needle will easily break and cause injury.
● Antes de cambiar la aguja, apague la
máquina. Si deja la máquina encendida y
pisa el pedal, la máquina comenzará a
funcionar y podría lesionarse.
● Utilice sólo agujas de máquina de coser
para uso doméstico. Otras agujas podrían
doblarse o romperse, y causar lesiones.
● No cosa nunca con una aguja doblada.
Una aguja doblada puede romperse
fácilmente y causar lesiones.
16
Page 18
Remove the power supply plug from the outlet.
1
Quite el enchufe de la toma de corriente.
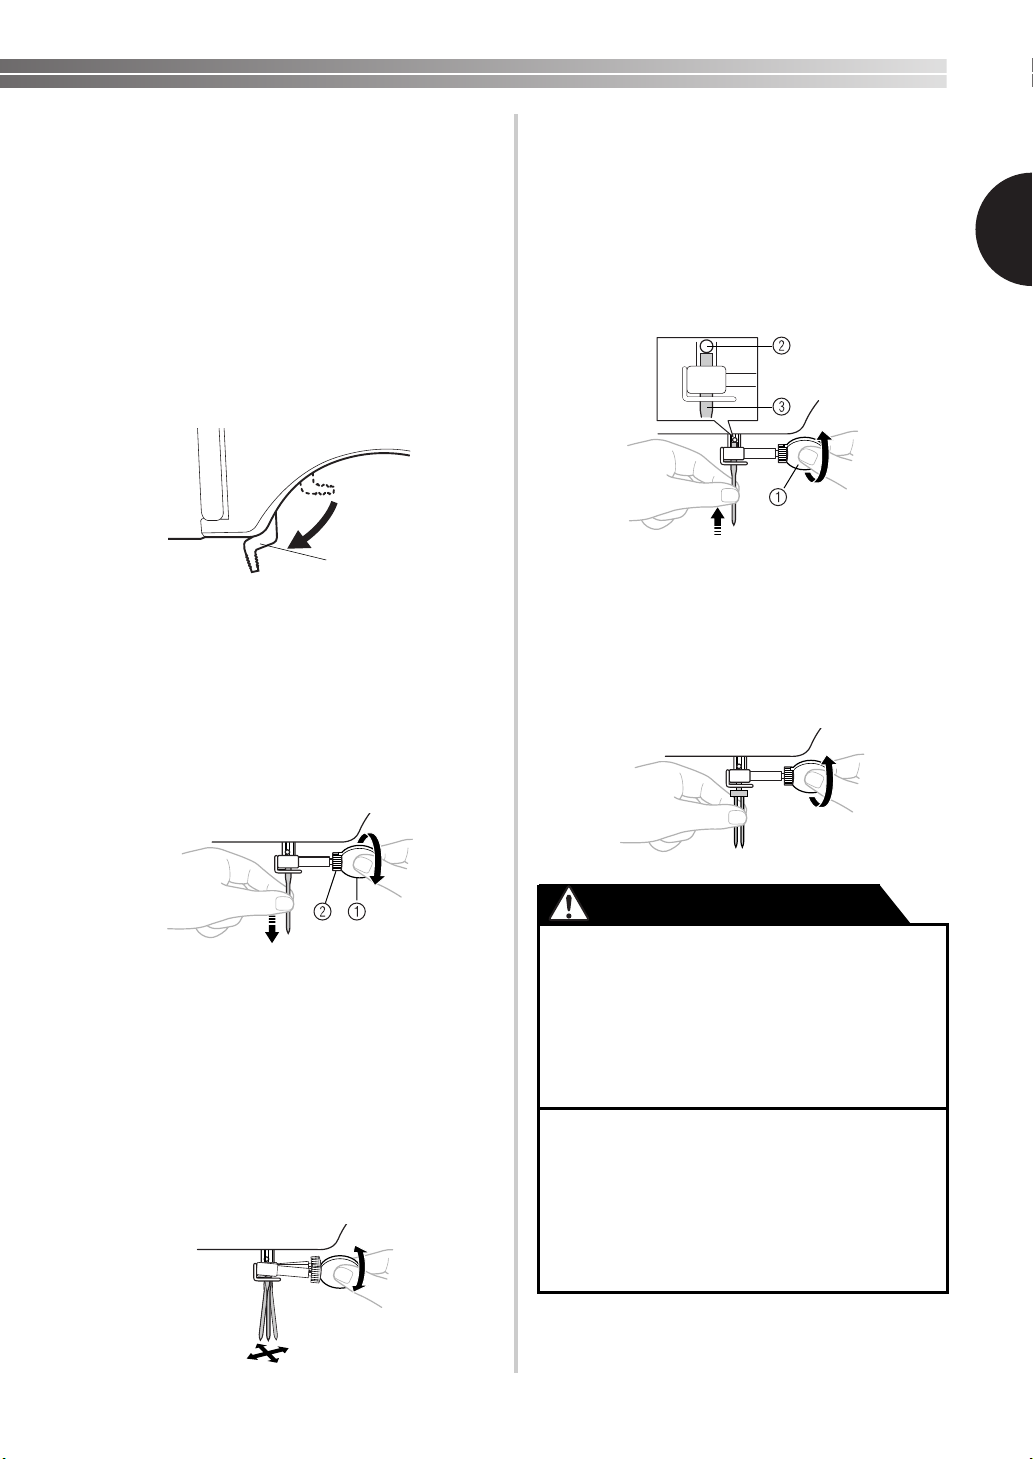
Raise the needle to its highest position by
2
turning the handwheel toward you
(counterclockwise) so that the mark on the
handwheel points directly up.
Suba la aguja a la posición más alta girando la
rueda hacia usted (hacia la izquierda), de manera
que la marca de la rueda apunte hacia arriba.
Lower the presser foot lever.
3
Baje la palanca del pie prensatela.
With the flat side of the needle toward the
5
back of the machine, insert the needle until it
touches the needle stopper. Next, tighten the
needle clamp using a coin or screwdriver.
Con la parte plana hacia la parte trasera de la
máquina, inserte la aguja hasta que toque el
tope para agujas. A continuación, apriete la
presilla de la aguja con la moneda o el
destornillador.
1
1
1 Presser foot lever / Palanca del pie prensatela
Hold the needle with your left hand, and then
4
use a coin or screwdriver to turn the needle
clamp screw counterclockwise to remove the
needle.
Sujete la aguja con la mano izquierda y, a
continuación, utilice una moneda o un
destornillador para girar el tornillo de la presilla
de la aguja hacia la izquierda y quitar la aguja.
1 Use a coin or screwdriver / Utilice una moneda o
un destornillador.
Needle clamp screw /
2
• Do not use excessive force when loosening
or tightening the needle clamp screw,
otherwise certain parts of the sewing
machine may be damaged.
No ejerza una fuerza excesiva para aflojar o
apretar el tornillo de la presilla de la aguja,
pues podría dañar algunas piezas de la
máquina de coser.
Tornillo de la presilla de la aguja
1 Use a coin or screwdriver / Utilice una moneda o
un destornillador.
2 Needle Stopper / Tope de la aguja
3 Needle / Aguja
Put the twin needle in the same way.
Coloque la aguja gemela siguiendo el mismo
procedimiento.
CAUTION/PRECAUCIÓN
● Make sure you insert the needle until it
touches the stopper, and securely tighten
the needle clamp screw with a coin or
screwdriver. If the needle is not fully
inserted, or if the needle clamp screw is
loose, the needle may break or the
machine may be damaged.
● Asegúrese de empujar la aguja hasta que
llegue al tope y apriete fuertemente el
tornillo de la presilla de la aguja con una
moneda o un destornillador. Si la aguja no
está totalmente insertada o el tornillo de la
presilla de la aguja está suelto, la aguja
podría romperse o la máquina averiarse.
17
Page 19
KNOWING YOUR SEWING MACHINE / CONOZCA SU MÁQUINA DE COSER ———————————————————————
—
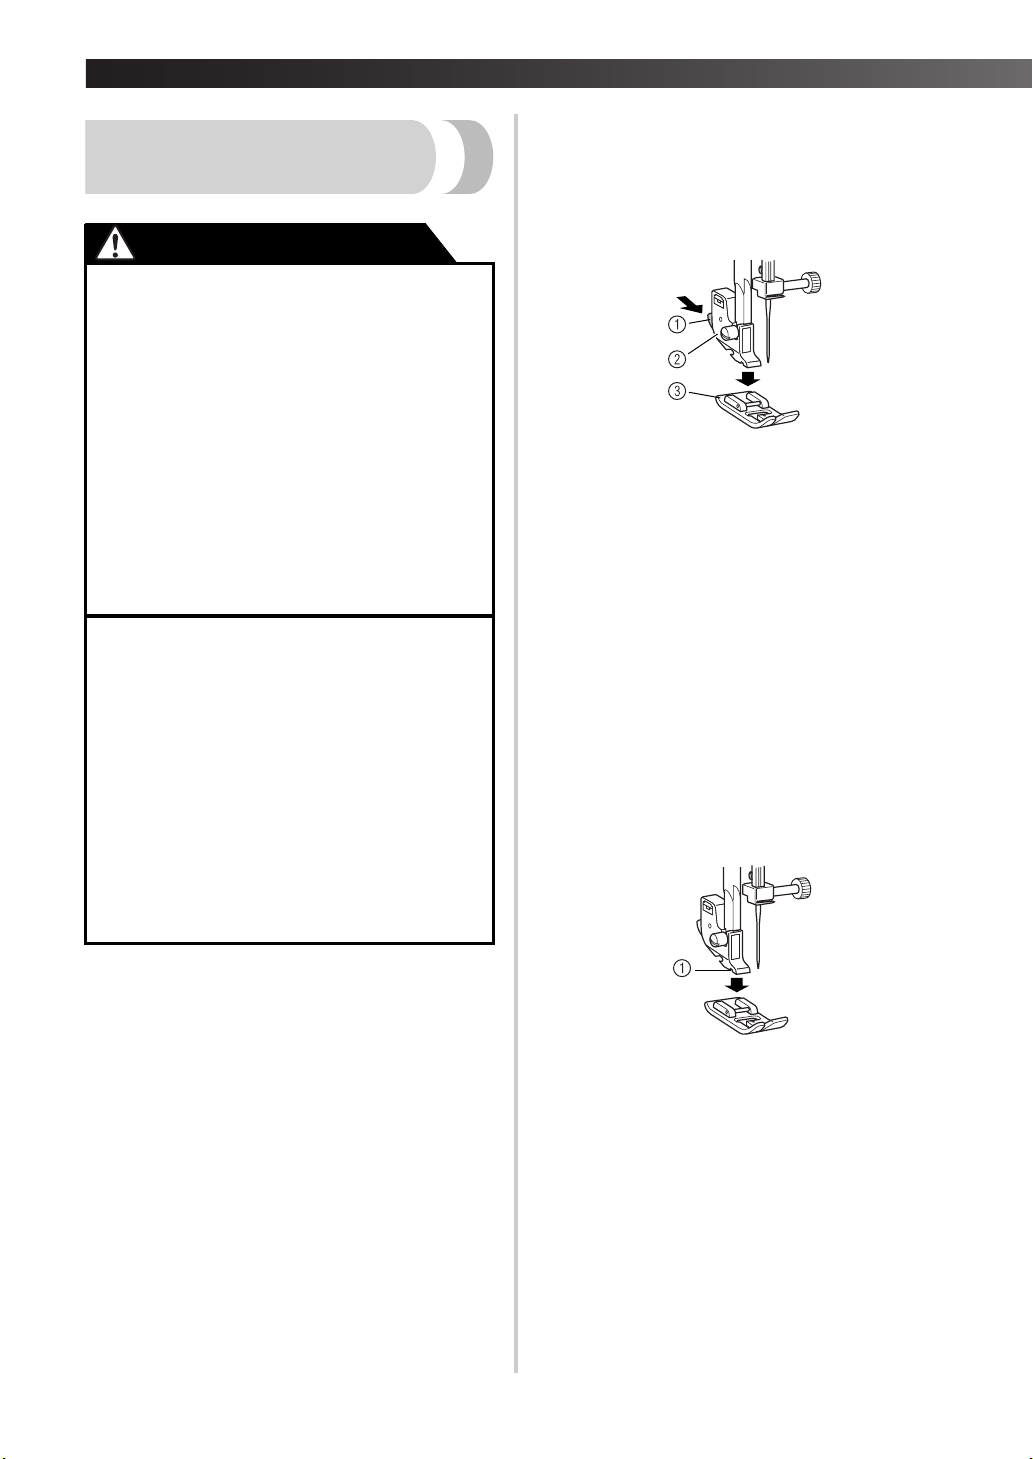
Press the black button at the back of the
Changing the Presser Foot
Cambio del pie prensatela
2
presser foot holder to release the presser foot.
Pulse el botón negro situado en la parte trasera
del soporte del pie prensatela para soltar el pie
prensatela.
CAUTION/PRECAUCIÓN
● Always turn off the power before you
change the presser foot. If you leave the
power on and step on the controller, the
machine will start and you may be
injured.
● Always use the correct presser foot for
the stitch pattern you have chosen. If you
use the wrong presser foot, the needle
may strike the presser foot and bend or
break, and may cause injury.
● Only use presser feet that have been
designed to be used with this machine.
Using any other presser foot may cause
accident or injury.
● Antes de cambiar el pie prensatela,
apague la máquina. Si deja la máquina
encendida y pisa el pedal, la máquina
comenzará a funcionar y podría
lesionarse.
● Utilice siempre el pie prensatela correcto
para la costura elegida. Si utiliza un pie
prensatela erróneo, la aguja puede
golpearlo y doblarse o romperse, y podría
causar lesiones.
● Utilice sólo el pie prensatela diseñado para
esta máquina. El uso de otro pie prensatela
puede causar lesiones o accidentes.
1 Black button / Botón negro
2 Presser foot holder / Soporte del pie prensatela
3 Presser Foot / Pie prensatela
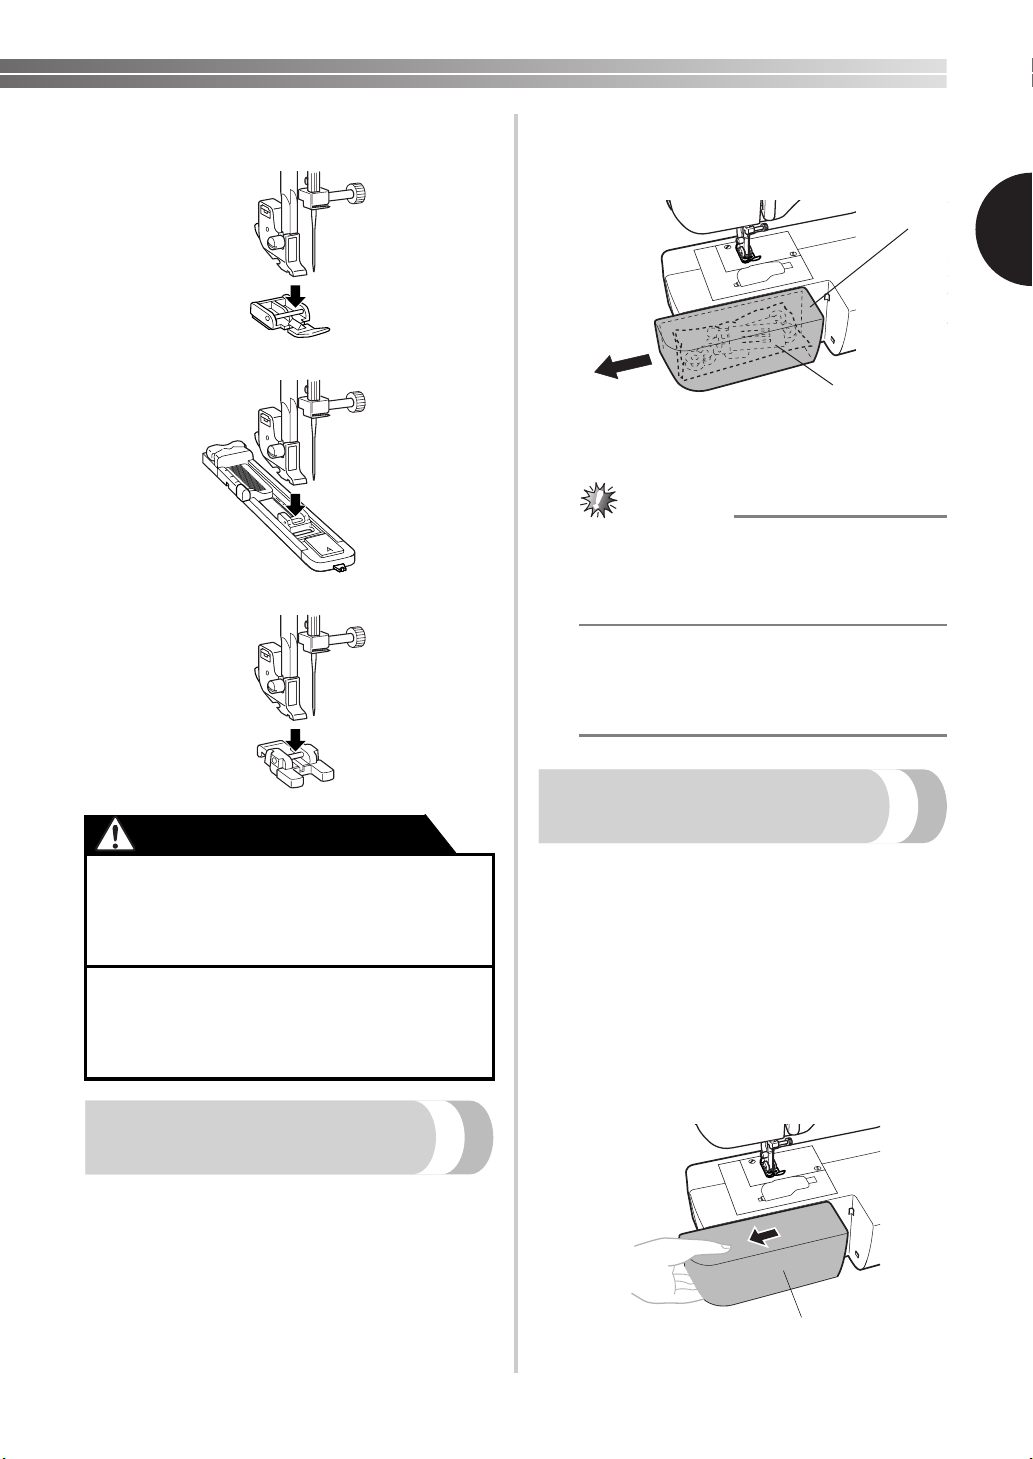
Put a different presser foot on the needle plate
3
so that the bar on the presser foot is in line
with the slot on the shank.
Coloque otro pie prensatela en la placa de la
aguja para que la varilla del pie quede
alineada con la ranura de la lengüeta.
Lower the presser foot lever and fix the
4
presser foot onto the shank. If the presser foot
is in the correct place, the bar should snap in.
Baje la palanca del pie prensatela y ajuste el
pie en la lengüeta. Si el pie prensatela está en el
lugar correcto, la varilla deberá ajustarse
perfectamente.
You will have to change the presser foot depending
on what you want to sew and how.
Deberá cambiar el pie prensatela según lo que desee
coser y cómo.
■ Snap-on Type / Tipo de ajuste
Raise the needle to its highest position by
1
turning the handwheel toward you
(counterclockwise), and then raise the presser
foot lever.
Suba la aguja a la posición más alta girando la
rueda hacia usted (hacia la izquierda) y suba la
palanca del pie prensatela.
18
1 Shank / Lengüeta
Page 20
■ Presser Foot Installation Orientation
Orientación para la instalación del pie prensatela
Slide the flat bed attachment to the left to open it.
1
Tire de la unidad de cama plana hacia la
izquierda para abrirla.
2
1 Flat bed attachment / Unidad de cama plana
2 Storage compartment / Compartimento para
almacenamiento
Note/Nota
● Put the accessories inside a bag, and then
store the bag inside the compartment. If the
accessories are not in a bag, they may fall
out and be lost or damaged.
● Coloque los accesorios en una bolsa y, a
continuación, guárdela en el compartimento.
Si los accesorios no se guardan en una
bolsa, se podrían caer, perder o dañar.
Using a Free-arm Style
1
1
CAUTION/PRECAUCIÓN
● If the presser foot is not installed with the
correct orientation, the needle may strike
the presser foot, which may bend or
break the needle and cause injury.
● Si el pie prensatela no está colocado con
la orientación correcta, la aguja puede
golpearlo y doblarse o romperse, y podría
causar lesiones.
Flat Bed Attachment
Unidad de cama plana
The accessories are stored in a compartment inside
the flat bed attachment.
Los accesorios se encuentran en un compartimento
dentro de la unidad de cama plana.
Uso del estilo de brazo libre
Free-arm sewing is convenient for sewing tubular
and hard-to-reach areas. To change your machine to
the free-arm style, lift out the flat bed attachment.
La costura de brazo libre es útil para zonas de costura
tubular y de difícil acceso. Para cambiar la máquina al
estilo de brazo libre, abra la unidad de cama plana.
Slide the flat bed attachment to the left to
1
release it.
Tire de la unidad de cama plana hacia la
izquierda para abrirla.
1
1 Flat bed attachment / Unidad de cama plana
19
Page 21
KNOWING YOUR SEWING MACHINE / CONOZCA SU MÁQUINA DE COSER ———————————————————————
—
THE CONTROLS / CONTROLES
To choose a stitch, simply turn the pattern selection
Pattern Selection Dial
Selector de puntadas
CAUTION/PRECAUCIÓN
●
When you use the pattern selection dial
to choose a pattern, turn the handwheel
toward you (counterclockwise) to set the
needle in the highest position. If the
needle is in the down position when you
turn the pattern selection dial, the
needle, presser foot or fabric may be
damaged.
● Cuando utilice el selector de puntadas
para elegir un dibujo, gire la rueda hacia
usted (hacia la izquierda) para colocar la
aguja en la posición más alta. Si la aguja
está en la posición baja, cuando gire el
selector de puntadas se podrían dañar la
aguja, el pie prensatela o la tela.
dial in either direction. The next section shows
recommended stitch lengths and widths.
Para elegir una puntada, simplemente gire el selector
de puntadas en cualquier dirección. En la sección
siguiente se muestran las longitudes y las anchuras de
puntada recomendadas.
2
1
1 Pattern selection dial / Selector de puntadas
2 Chosen pattern number / Número de dibujo
elegido
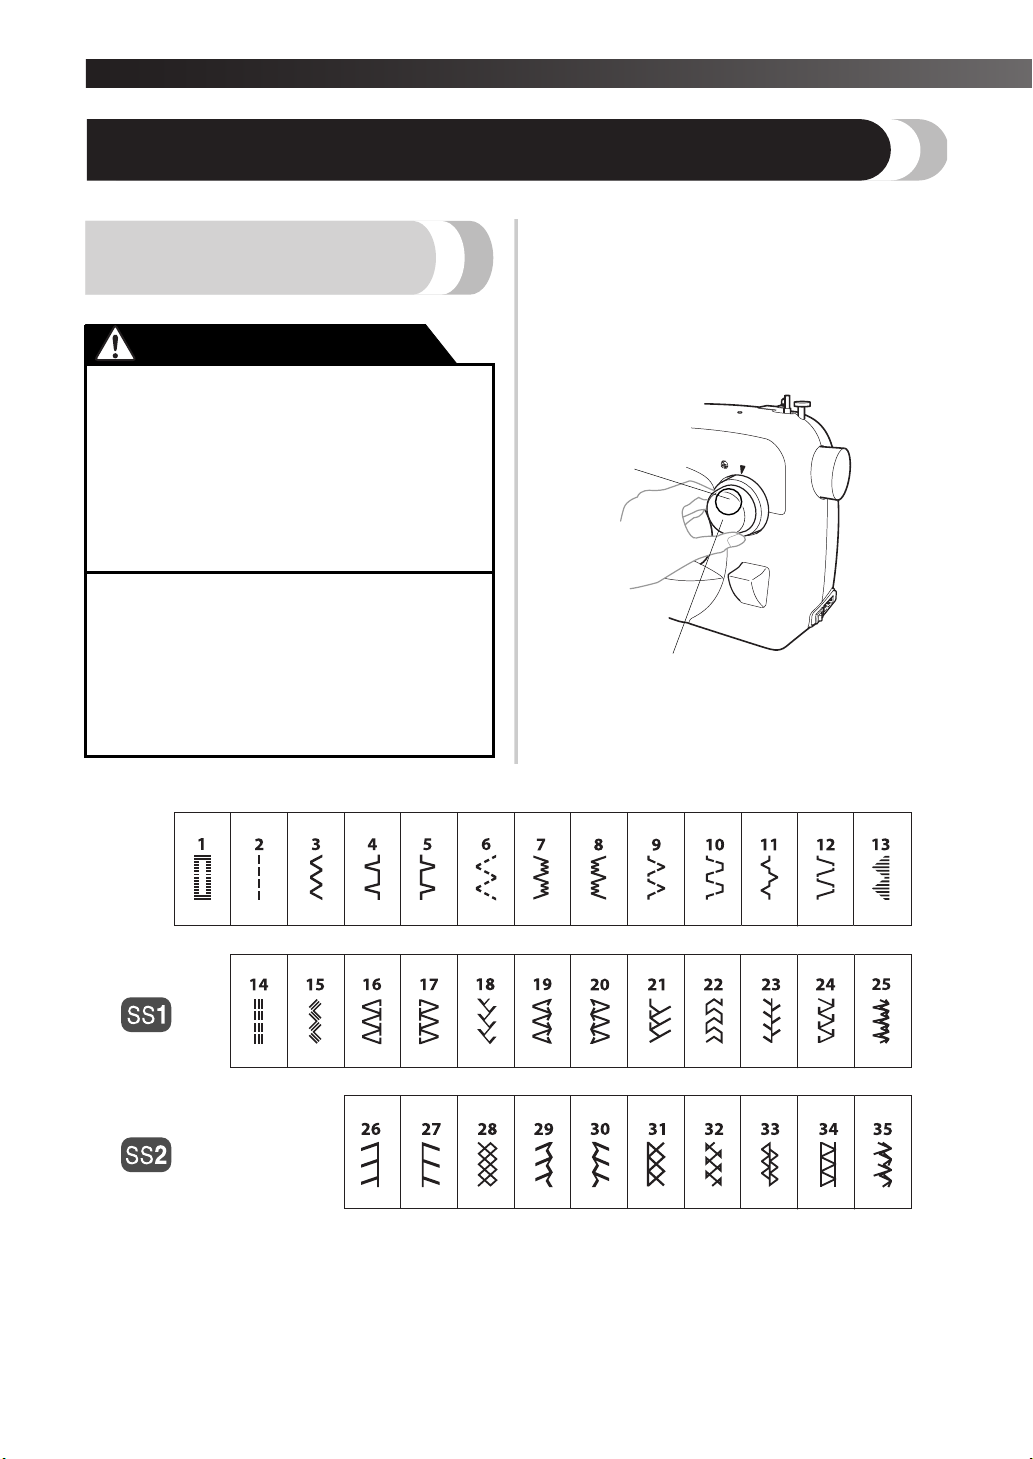
■ 35 Stitches (only available on certain models) / 35 Puntadas (disponible sólo en ciertos modelos)
20
Page 22

■ 25 Stitches / 25 puntadas
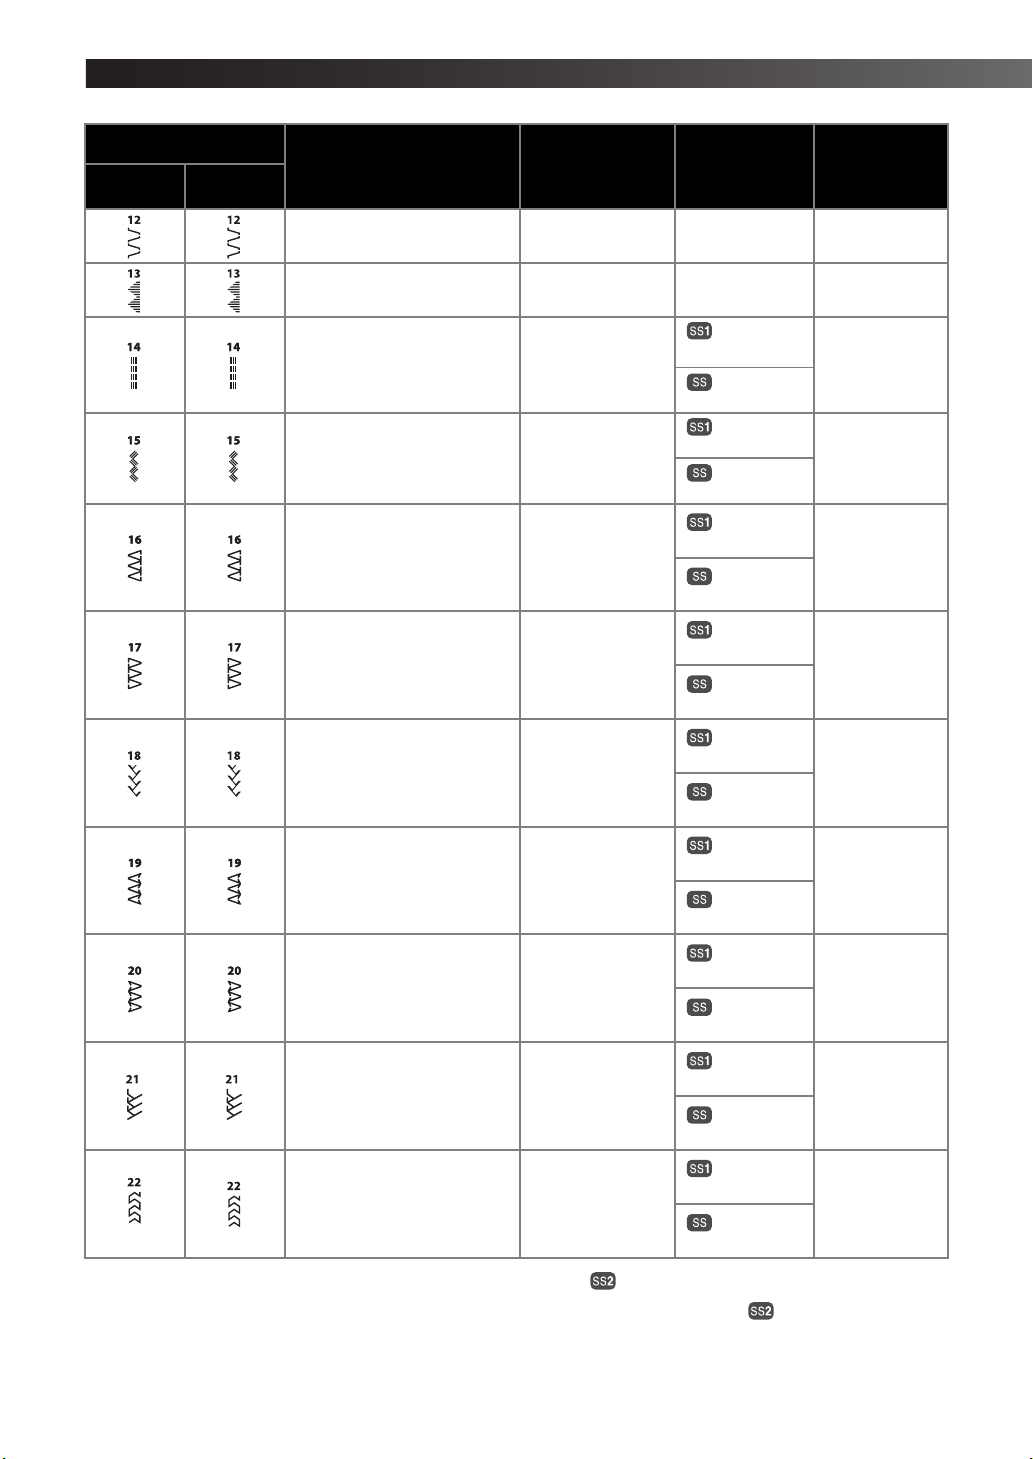
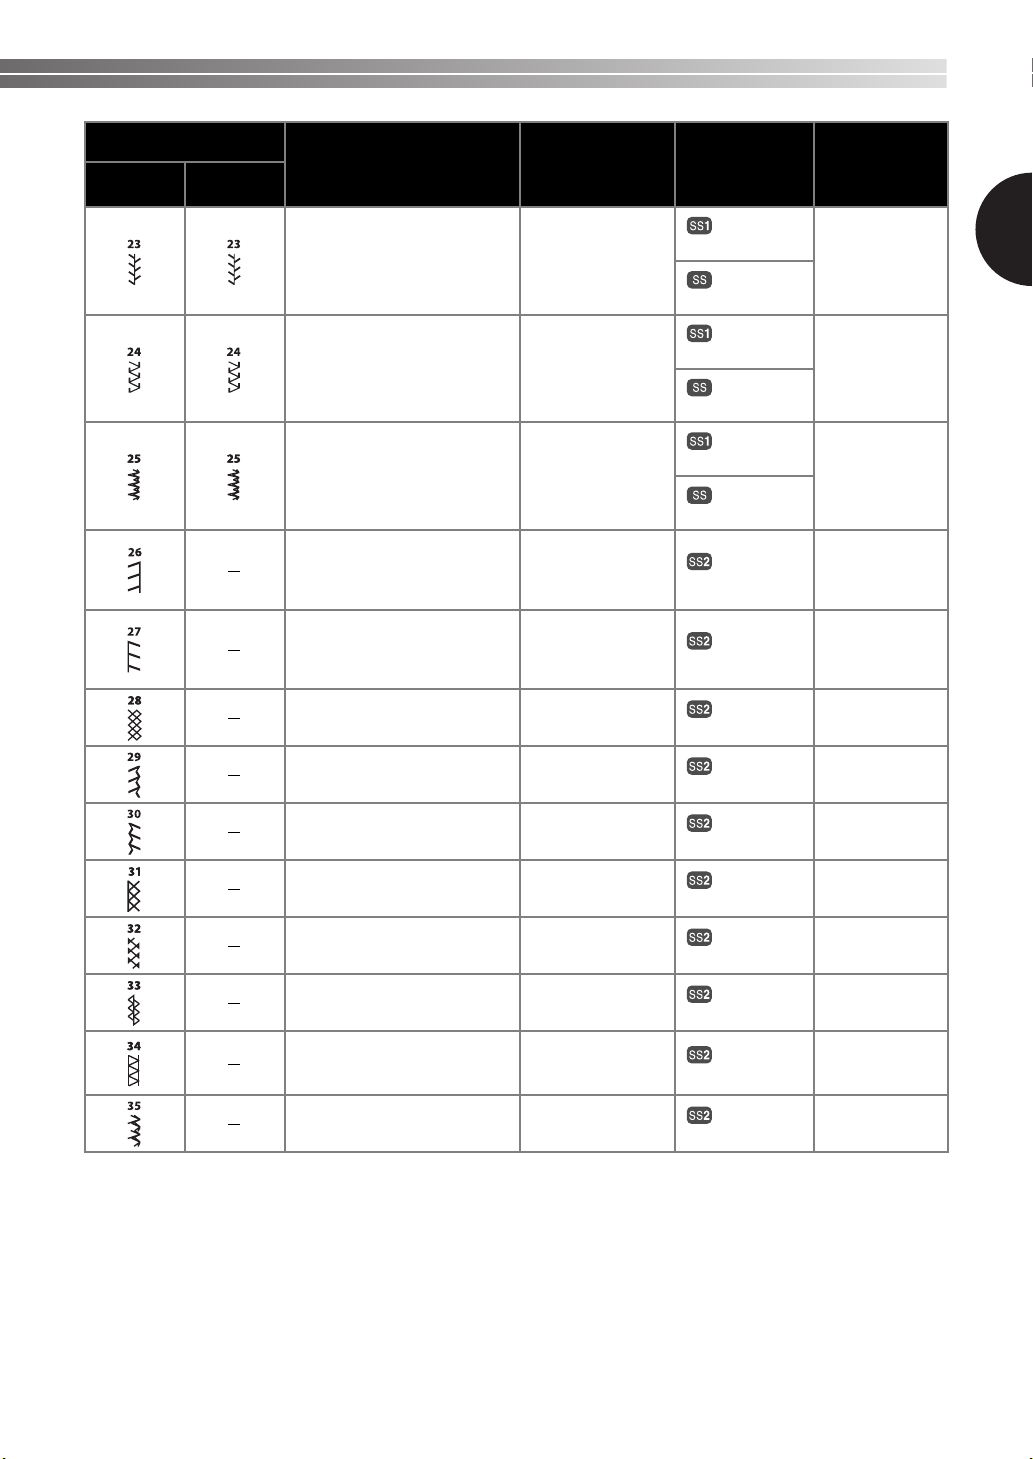
Patterns and Stitch Names / Dibujos y nombres de las puntadas
1
Pattern / Dibujo
Stitches
35
puntadas
Stitches
25
puntadas
Stitch Name
Nombre de la puntada
1-STEP AUTOMATIC
BUTTONHOLE
OJAL AUTOMÁTICO DE
1 PASO
STRAIGHT STITCH
PUNTADA RECTA
ZIGZAG STITCH
PUNTADA DE ZIG-ZAG
BLIND HEM STITCH
COSTURA INVISIBLE PARA
DOBLADILLO
SHELL TUCK STITCH
PUNTADA DE CONCHA
ELASTIC STITCH
PUNTADA ELÁSTICA
STRETCH BLIND HEM
STITCH
COSTURA INVISIBLE
ELÁSTICA
STRETCH BLIND HEM
STITCH
COSTURA INVISIBLE
ELÁSTICA
ELASTIC SHELL TUCK
STITCH
PUNTADA DE CONCHA
ELÁSTICA
DOUBLE ACTION STITCH
PUNTADA DE DOBLE
ACCIÓN
BRIDGING STITCH
PUNTADA DE PUENTE
Width (mm (inch))
Anchura [mm (pulg.)]
3-5
(1/8 – 3/16)
0-5 (0-3/16)
(Changes needle
position / Cambio
de posición de la
aguja)
0-5
(0-3/16)
3-5
(1/8-3/16)
3-5
(1/8-3/16)
3-5
(1/8-3/16)
3-5
(1/8-3/16)
3-5
(1/8-3/16)
3-5
(1/8-3/16)
3-5
(1/8-3/16)
3-5
(1/8-3/16)
Length (mm (inch))
Longitud [mm (pulg.)]
F- 1.5
(1/64-1/16)
1-4
(1/16-3/16)
F-4
(1/64-3/16)
F-2
(1/64-1/16)
F-3
(1/64-1/8)
F-2.5
(1/64-3/32)
F-1.5
(1/64-1/16)
F-1.5
(1/64-1/16)
F-3
(1/64-1/8)
F-3
(1/64-1/8)
F-3
(1/64-1/8)
Manual Page
Página del manual
52
41, 56, 58, 62,
63, 65
43, 55, 58, 62
45
46
46
45
45
48
47
47
21
Page 23
KNOWING YOUR SEWING MACHINE / CONOZCA SU MÁQUINA DE COSER ———————————————————————
—
Pattern / Dibujo
Stitches
35
puntadas
Stitches
25
puntadas
Stitch Name
Nombre de la puntada
RAMPART STITCH
PUNTADA DE MURALLA
TRIANGLE STITCH
PUNTADA TRIANGULAR
TRIPLE STRETCH STITCH
PUNTADA ELÁSTICA TRIPLE
TRIPLE ZIGZAG STRETCH
STITCH
PUNTADA ELÁSTICA EN
ZIG-ZAG TRIPLE
STRETCH OVERLOCK
STITCH
PUNTADA OVERLOCK
PESPUNTO
ELASTIC OVERLOCK
STITCH
PUNTADA OVERLOCK
ELÁSTICA
Width (mm (inch))
Anchura [mm (pulg.)]
3-5
(1/8-3/16)
3-5
(1/8-3/16)
0-5 (0-3/16)
(Changes needle
position / Cambio
de posición de la
aguja)
3-5
(1/8-3/16)
3-5
(1/8-3/16)
3-5
(1/8-3/16)
Length (mm (inch))
Longitud [mm (pulg.)]
F-3
(1/64-1/8)
F- 1.5
(1/64-1/16)
Fixed / Fija
2.5 (3/32)
Fixed / Fija
2.5 (3/32)
Fixed / Fija
2.5 (3/32)
Fixed / Fija
2.5 (3/32)
Fixed / Fija
2.5 (3/32)
Fixed / Fija
2.5 (3/32)
Fixed / Fija
2.5 (3/32)
Fixed / Fija
2.5 (3/32)
*
*
Manual Page
Página del manual
47
50
41
50
48
48
Fixed / Fija
FEATHER STITCH
PUNTADA DE PLUMAS
ARROWHEAD STITCH
PUNTADA DE FLECHA
ARROWHEAD STITCH
PUNTADA DE FLECHA
DECORATIVE STITCH
PUNTADA DECORATIVA
LEAF STITCH
PUNTADA DE HOJA
* The stitch can also be sewn when the stitch length dial is set to .
* También se puede coser la costura con el control de longitud de puntada ajustado en .
3-5
(1/8-3/16)
3-5
(1/8-3/16)
3-5
(1/8-3/16)
3-5
(1/8-3/16)
3-5
(1/8-3/16)
2.5 (3/32)
Fixed / Fija
2.5 (3/32)
Fixed / Fija
2.5 (3/32)
Fixed / Fija
2.5 (3/32)
Fixed / Fija
2.5 (3/32)
Fixed / Fija
2.5 (3/32)
Fixed / Fija
2.5 (3/32)
Fixed / Fija
2.5 (3/32)
Fixed / Fija
2.5 (3/32)
Fixed / Fija
2.5 (3/32)
49
48
48
50
50
22
Page 24
Pattern / Dibujo
Stitches
35
puntadas
Stitches
25
puntadas
Stitch Name
Nombre de la puntada
TREE STITCH
PUNTADA DE ÁRBOL
LEGS STITCH
PUNTADA DE HORQUILLA
DECORATIVE STITCH
PUNTADA DECORATIVA
STRETCH OVERLOCK
STITCH
PUNTADA OVERLOCK
PESPUNTO
STRETCH OVERLOCK
STITCH
PUNTADA OVERLOCK
PESPUNTO
SMOCKING STITCH
PUNTADA DE SMOCKING
Width (mm (inch))
Anchura [mm (pulg.)]
3-5
(1/8-3/16)
3-5
(1/8-3/16)
3-5
(1/8-3/16)
3-5
(1/8-13/64)
3-5
(1/8-13/64)
3-5
(1/8-13/64)
Length (mm (inch))
Longitud [mm (pulg.)]
Fixed / Fija
2.5 (3/32)
Fixed / Fija
2.5 (3/32)
Fixed / Fija
2.5 (3/32)
Fixed / Fija
2.5 (3/32)
Fixed / Fija
2.5 (3/32)
Fixed / Fija
2.5 (3/32)
Fixed / Fija
2.5 (3/32)
Fixed / Fija
2.5 (3/32)
Fixed / Fija
2.5 (3/32)
Manual Page
Página del manual
1
50
50
50
50
50
48
COMB STITCH
PUNTADA COMBINADA
COMB STITCH
PUNTADA COMBINADA
DECORATIVE STITCH
PUNTADA DECORATIVA
FAGOTING STITCH
VAINICA
DECORATIVE STITCH
PUNTADA DECORATIVA
DECORATIVE HEM STITCH
PUNTADA DE DOBLADILLO
DECORATIVO
DECORATIVE STITCH
PUNTADA DECORATIVA
3-5
(1/8-3/16)
3-5
(1/8-3/16)
3-5
(1/8-3/16)
3-5
(1/8-13/64)
3-5
(1/8-3/16)
3-5
(1/8-3/16)
3-5
(1/8-3/16)
Fixed / Fija
2.5 (3/32)
Fixed / Fija
2.5 (3/32)
Fixed / Fija
2.5 (3/32)
Fixed / Fija
2.5 (3/32)
Fixed / Fija
2.5 (3/32)
Fixed / Fija
2.5 (3/32)
Fixed / Fija
2.5 (3/32)
48
48
50
48
48
50
50
23
Page 25
KNOWING YOUR SEWING MACHINE / CONOZCA SU MÁQUINA DE COSER ———————————————————————
—
Stitch Length Dial
Control de longitud de puntada
Depending on the selected stitch, you may need to
adjust the stitch length for best results.
The numbers marked on the stitch length dial
represent the stitch length in millimeters (mm) (1/25
inch).
THE HIGHER THE NUMBER, THE LONGER THE
STITCH. With the “0” setting, material is not fed.
This is used when sewing a button.
The “F” range is for making a satin stitch (close
zigzag stitch), which is used for making buttonholes
and decorative stitches. The position needed for
making the satin stitch varies according to the
material and thread being used. To determine the
exact dial position, first test the stitch and length
settings on a scrap piece of fabric to observe the
feeding of the material.
Según el tipo de puntada seleccionado, es posible que
necesite ajustar la longitud de la puntada para
obtener los mejores resultados.
Los números indicados en el control de longitud de
puntada representan la longitud de la puntada en
milímetros (mm) (1/25 pulg.).
CUANTO MAYOR SEA EL NÚMERO, MÁS LARGA
SERÁ LA PUNTADA. Con el ajuste “0”, el material no
se arrastra. Este ajuste se emplea para coser botones.
El intervalo “F” está destinado a la costura para satén
(puntada en zig-zag pequeña), empleada para
realizar ojales y para costura decorativa. La posición
adecuada para la costura para satén varía según el
material y el hilo que se utilicen. A fin de determinar
la posición exacta del control, realice primero una
prueba de la puntada y la longitud elegidas en un
retal para observar el avance del material.
.
2
1
3
1
CAUTION/PRECAUCIÓN
● If the stitches are bunched together,
lengthen the stitch length and continue
sewing. Do not continue sewing without
lengthening the stitch length, otherwise
the needle may break and cause injury.
● Si las puntadas quedan amontonadas,
alargue la puntada y continúe con la
costura. No siga cosiendo sin alargar la
puntada, pues la aguja podría romperse y
causar lesiones.
Stretch Stitching
Costura elástica
Raise the needle to its highest position by turning the
handwheel toward you (counterclockwise) so that
the mark on the handwheel points directly up.
Suba la aguja a la posición más alta girando la rueda
hacia usted (hacia la izquierda), de manera que la
marca de la rueda apunte hacia arriba.
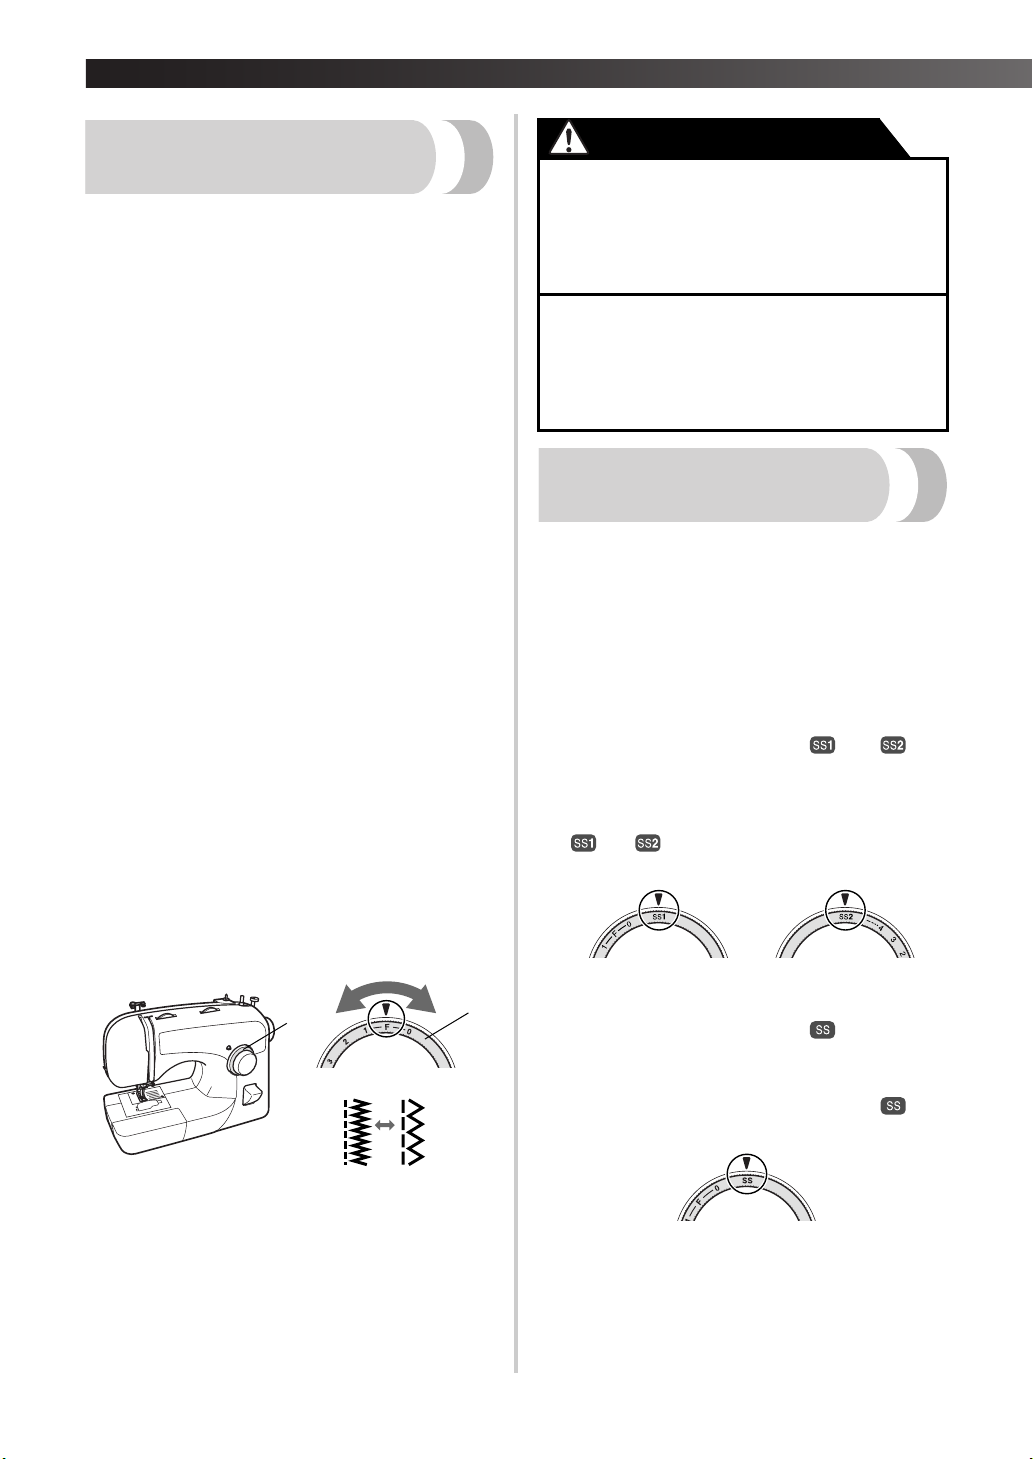
■ 35 Stitches / 35 puntadas
Selecting a Stretch Stitch
Setting the stitch length dial to “ ” or “ ”
changes the selected pattern to a stretch stitch.
Selección de un tipo de puntada elástica
Si se ajusta el control de longitud de puntada en
“ ” o “ ”, la puntada seleccionada cambia a
un tipo de puntada elástica.
■ 25 Stitches / 25 puntadas
Selecting a Stretch Stitch
Setting the stitch length dial to “ ” changes the
selected pattern to a stretch stitch.
Selección de un tipo de puntada elástica
Si se ajusta el control de longitud de puntada en “ ”, la
puntada seleccionada cambia a un tipo de puntada elástica.
1 Stitch length dial / Control de longitud de puntada
2 Shorter / Más corta
3 Longer / Más larga
24
Page 26

Stitch Width Dial
Reverse Sewing Lever
Control de anchura de puntada
Raise the needle to its highest position by turning the
handwheel toward you (counterclockwise) so that
the mark on the handwheel points directly up.
The numbers marked on the dial represent the stitch
width.
THE HIGHER THE NUMBER, THE WIDER THE
STITCH.
Suba la aguja a la posición más alta girando la rueda
hacia usted (hacia la izquierda), de manera que la
marca de la rueda apunte hacia arriba.
Los números indicados en el control representan la
anchura de la puntada.
CUANTO MAYOR SEA EL NÚMERO, MÁS ANCHA
SERÁ LA PUNTADA.
Note/Nota
●
When the Straight or Triple Stretch Stitch is
selected, the needle position can be changed
from left to right by adjusting the stitch width dial.
● Cuando se selecciona la puntada recta o la
puntada elástica triple, puede cambiarse la
posición de la aguja de izquierda a derecha
.
mediante el control de anchura de puntada.
Pulsador de retroceso
You can use reverse sewing for back tacking and
reinforcing seams.
To sew in reverse, push the reverse sewing lever in
as far as possible and hold it in that position while
you lightly push the foot controller. To sew forward,
release the reverse sewing lever. The machine will
then sew forward.
Con el pulsador de retroceso puede hilvanar en
reversa y reforzar costuras.
Para coser en reversa, empuje el pulsador de
retroceso todo lo posible y manténgalo en esa
posición mientras pisa ligeramente el pedal. Para
coser hacia delante, suelte el pulsador de retroceso.
La máquina coserá hacia delante.
1
1 Reverse sewing lever / Pulsador de retroceso
1
1
1 Stitch width dial / Control de anchura de puntada
25
Page 27

KNOWING YOUR SEWING MACHINE / CONOZCA SU MÁQUINA DE COSER ———————————————————————
—
THREADING THE MACHINE /
ENHEBRADO DE LA MÁQUINA
Winding the Bobbin / Devanado de la bobina
CAUTION/PRECAUCIÓN
● Only use bobbins (part code: SA156, SFB (XA5539-151)) that have been designed for this
sewing machine. Using other bobbins may cause damage to the machine.
● We designed the bobbin that comes with this machine. If you use bobbins from other models,
the machine will not work properly. Only use the bobbin that comes with this machine or
bobbins of the same type (part code: SA156, SFB (XA5539-151)).
● Utilice sólo bobinas (código de pieza: SA156, SFB (XA5539-151)) diseñadas para esta máquina
de coser. El uso de otras bobinas puede dañar la máquina.
● Hemos diseñado la bobina que se proporciona con esta máquina. Si utiliza bobinas de otros
modelos, la máquina no funcionará correctamente. Utilice sólo la bobina suministrada con esta
máquina o bobinas del mismo tipo (código de pieza: SA156, SFB (XA5539-151)).
Actual size
Tamaño real
11.5 mm
(7/16 inch)
11,5 mm
(7/16 pulg.)
This model
Este modelo
Other models
Otros modelos
26
1
2
1Pre-tension disk/ Disco pretensor
2Bobbin winder shaft / Eje de la devanadora de bobina
Page 28

Put the spool of thread on the spool pin and
1
pass the thread around the pre-tension disk.
Coloque el carrete de hilo en el portacarrete y
pase el hilo alrededor del disco pretensor.
CAUTION/PRECAUCIÓN
If the spool of thread is not in the right place,
●
the thread may tangle on the spool pin.
● Si el carrete no está colocado en el lugar
correcto, el hilo puede engancharse en el
portacarrete.
Pass the end of the thread through the hole on
2
the bobbin from the inside of the bobbin.
Pase el extremo del hilo por el orificio de la
bobina desde el interior de la misma.
Put the bobbin onto the bobbin winder shaft and
3
slide the bobbin winder shaft to the right. Turn
the bobbin clockwise, by hand, until the spring
on the shaft slides into the groove of the bobbin.
Coloque la bobina en el eje de la devanadora de
bobina y desplácelo hacia la derecha. Gire con
la mano la bobina hacia la derecha hasta que el
resorte del eje entre en la ranura de la bobina.
While holding the end of the thread, gently press
4
the foot controller to wind the thread around the
bobbin a few times. Then stop the machine.
Mientras sujeta el extremo del hilo, pise suavemente
el pedal para enrollar el hilo alrededor de la bobina
unas cuantas veces. Después pare la máquina.
Trim the excess thread above the bobbin.
5
Recorte el hilo sobrante de la bobina.
Press the foot controller to start.
6
Presione el pedal para comenzar.
1
2
1
1 Spring on the shaft / Resorte del eje
2 Groove of the bobbin / Ranura de la bobina
Note/Nota
● Make sure that the thread between the
spool and the bobbin is pulled tight.
● Compruebe que el hilo entre el carrete y la
bobina está tenso.
When the bobbin seems full and begins
7
spinning slowly, take your foot off the foot
controller.
Cuando la bobina parece llena y empieza a
girar despacio, deje de pisar el pedal.
Cut the thread, slide the bobbin winder shaft
8
to the left and remove the bobbin.
Corte el hilo, mueva el eje de la devanadora de
bobina hacia la izquierda y retire la bobina.
27
Page 29

KNOWING YOUR SEWING MACHINE / CONOZCA SU MÁQUINA DE COSER ———————————————————————
—
Note/Nota
● The needle bar does not move when you
slide the bobbin winder shaft to the right.
● Immediately after winding the bobbin, it is
normal to hear the sound of the clutch
engaging when beginning to sew or turning
the handwheel.
● Al desplazar el eje de la devanadora de
bobina hacia la derecha, la varilla de la
aguja no se mueve.
● Inmediatamente después de enrollar la
bobina, es normal oír el sonido del pedal
cuando comienza a coser o gira la rueda.
CAUTION/PRECAUCIÓN
Make sure you follow the instructions
●
carefully. If you do not cut the excess
thread completely before winding the
bobbin, when the thread runs low it may
tangle around the bobbin and cause the
needle to break.
● Asegúrese de seguir las instrucciones con
precisión. Si no corta el hilo sobrante
totalmente antes de enrollar la bobina, es
posible que cuando quede poco hilo este
se enganche alrededor de la bobina y se
rompa la aguja.
CAUTION/PRECAUCIÓN
● Not winding the bobbin properly may
cause the thread tension to loosen, and
may break the needle.
Un devanado incorrecto de la bobina
puede disminuir la tensión del hilo y
romper la aguja.
1
1 Wound evenly / Enrollado uniforme
2 Wound poorly / Enrollado deficiente
2
Lower Threading
Enhebrado del hilo inferior
• For more details on using the quick-set bobbin, see
page 30.
Si desea más información sobre el uso de la bobina
rápida, consulte la 30.
CAUTION/PRECAUCIÓN
● Not winding the bobbin properly may
cause the thread tension to loosen, and
may break the needle.
Un devanado incorrecto de la bobina
puede disminuir la tensión del hilo y
romper la aguja.
1
1 Wound evenly / Enrollado uniforme
2 Wound poorly / Enrollado deficiente
●
The bobbin was designed specifically for
this sewing machine. If bobbins from other
models are used, the machine will not
operate correctly. Use only the enclosed
bobbin or bobbins of the same type
(part code: SA156, SFB (XA5539-151)).
La bobina ha sido diseñada
específicamente para esta máquina de
coser. Si se utilizan bobinas de otros
modelos, la máquina no funcionará bien.
Utilice sólo la bobina suministrada o
bobinas del mismo tipo (código de pieza:
SA156, SFB (XA5539-151)).
Actual size
11.5 mm
(7/16 inch)
11,5 mm
(7/16 pulg.)
Tamaño real
This model
Este modelo
2
Other models
Otros modelos
28
Page 30

CAUTION/PRECAUCIÓN
CAUTION/PRECAUCIÓN
Make sure you turn the power off while
●
threading the machine. If you accidentally
step on the foot controller and the machine
starts to sew, you could be injured.
● Asegúrese de apagar la máquina cuando
vaya a enhebrar. Si pisa el pedal sin
querer y la máquina empieza a coser,
podría resultar lesionado.
Raise the needle to its highest position by
1
turning the handwheel toward you
(counterclockwise) and raise the presser foot
lever.
Suba la aguja a la posición más alta girando la
rueda hacia la izquierda y suba la palanca del
pie prensatela.
Slide the button and open the cover.
2
Mueva el deslizador y abra la tapa.
12
● Make sure you set the bobbin so the
thread unrolls in the right direction. If
the thread unrolls in the wrong direction,
it may cause the thread tension to be
incorrect or break the needle.
● Asegúrese de colocar la bobina de modo
que el hilo se desenrolle en la dirección
correcta. En caso contrario, la tensión del
hilo podría ser incorrecta o se podría
romper la aguja.
• Make sure that the thread is correctly
inserted through the tension-adjusting spring
of the bobbin case. If it is not inserted, reinsert the thread.
Asegúrese de que el hilo se ha introducido
correctamente en el resorte de ajuste de
tensión de la caja de la bobina. Si no se ha
introducido, vuelva a intentarlo.
1
1 Cover / Tapa
2 Slide button / Deslizador
Put the bobbin in so the thread comes out in
3
the direction shown by the arrow.
Coloque la bobina de modo que el hilo salga en
la dirección que indica la flecha.
• Only use bobbins that were designed to be
used with this machine.
Utilice solamente bobinas diseñadas para
esta máquina.
1 Tension-adjusting spring / Resorte de ajuste de
tensión
Hold the end of the thread, push the bobbin
4
down with your finger, pass the thread
through the slit, and then pull out a short
length of thread, as shown.
Sostenga el extremo del hilo, empuje la bobina
hacia abajo con el dedo, pase el hilo por la
ranura y, a continuación, extraiga un poco de
hilo, como se indica.
1
29
Page 31

KNOWING YOUR SEWING MACHINE / CONOZCA SU MÁQUINA DE COSER ———————————————————————
—
Reattach the bobbin cover. Put the left tab in
5
place (see arrow 1), and then press lightly on
the right side (see arrow 2) until the cover
clicks into place.
Vuelva a colocar la tapa de la bobina. Inserte la
pestaña izquierda (véase la flecha 1) y, a
continuación, presione ligeramente el lado
derecho (véase la flecha 2) hasta encajar la
tapa en su lugar.
2
1
• Replace the cover so that the end of the
thread comes out from the left side of the
cover (as shown by the line in the
illustration).
Vuelva a colocar la tapa de manera que el
extremo del hilo salga por el lado izquierdo
(como indica la línea de la ilustración).
Lower Threading (for models
equipped with a quick-set bobbin)
Enhebrado del hilo inferior (para los
modelos equipados con la bobina rápida)
This feature is only available on certain models.
Esta función está disponible sólo en ciertos modelos.
CAUTION/PRECAUCIÓN
CAUTION/PRECAUCIÓN
● The bobbin was designed specifically for
this sewing machine. If bobbins from other
models are used, the machine will not
operate correctly. Use only the enclosed
bobbin or bobbins of the same type
(part code: SA156, SFB (XA5539-151)).
La bobina ha sido diseñada
específicamente para esta máquina de
coser. Si se utilizan bobinas de otros
modelos, la máquina no funcionará bien.
Utilice sólo la bobina suministrada o
bobinas del mismo tipo (código de pieza:
SA156, SFB (XA5539-151)).
Actual size
11.5 mm
(7/16 inch)
11,5 mm
(7/16 pulg.)
Tamaño real
This model
Este modelo
Other models
Otros modelos
CAUTION/PRECAUCIÓN
● Be sure to turn off the power. If you
accidentally step on the foot controller
and the machine begins to operate, injury
could result.
● Asegúrese de apagar la máquina. Si pisa
el pedal sin querer y la máquina empieza
a funcionar, podría resultar lesionado.
● Winding the bobbin improperly may
cause the thread tension to loosen,
breaking the needle and resulting in
injury.
Un devanado incorrecto de la bobina
puede disminuir la tensión del hilo, romper
la aguja y causar lesiones.
1
1 Wound evenly / Enrollado uniforme
2 Wound poorly / Enrollado deficiente
2
30
Page 32

Follow steps 1 and 2 from “Lower Threading”.
1
Siga los pasos 1 y 2 indicados en “Lower
Threading”.
Put the bobbin in, feed the end of the thread
2
through the slit, and then pull the thread to cut it.
Coloque la bobina, pase el extremo del hilo por la
ranura y, a continuación, tire del hilo para cortarlo.
• Only use bobbins that were designed to be
used with this machine.
Utilice solamente bobinas diseñadas para
esta máquina.
CAUTION/PRECAUCIÓN
Make sure you set the bobbin so the
●
thread unrolls in the right direction. If
the thread unrolls in the wrong direction,
it may cause the thread tension to be
incorrect or break the needle.
1 Tension-adjusting spring / Resorte de ajuste de
tensión
Reattach the bobbin cover. Put the left tab in
3
place (see arrow 1), and then press lightly on
the right side (see arrow 2) until the cover
clicks into place.
Vuelva a colocar la tapa de la bobina. Inserte la
pestaña izquierda (véase la flecha 1) y, a
continuación, presione ligeramente el lado
derecho (véase la flecha 2) hasta encajar la
tapa en su lugar.
2
1
1
1
●
Asegúrese de colocar la bobina de modo que
el hilo se desenrolle en la dirección correcta.
En caso contrario, la tensión del hilo podría
ser incorrecta o se podría romper la aguja.
1
1 Cutter / Cuchilla
• Make sure that the thread is correctly
inserted through the tension-adjusting spring
of the bobbin case. If it is not inserted, reinsert the thread.
Asegúrese de que el hilo se ha introducido
correctamente en el resorte de ajuste de
tensión de la caja de la bobina. Si no se ha
introducido, vuelva a intentarlo.
• You can begin sewing immediately without
drawing up the bobbin thread. If you want to
draw up the bobbin thread before you start
to sew, follow the procedure in “Drawing up
the Lower Thread” (page 36).
Puede comenzar a coser inmediatamente sin
tener que tirar del hilo de la bobina. Si desea
tirar del hilo de la bobina antes de empezar a
coser, siga el procedimiento indicado en
“Drawing up the Lower Thread” (page 36).
31
Page 33

KNOWING YOUR SEWING MACHINE / CONOZCA SU MÁQUINA DE COSER ———————————————————————
—
Upper Threading / Enhebrado del hilo superior
1 Spool pin / Portacarrete
2 Thread guide (back) / Guía del hilo (parte trasera)
3 Thread guide (front) / Guía del hilo (parte delantera)
4 Thread take-up lever / Tirahilo
5 Mark on the handwheel / Marca de la rueda
Raise the needle to its highest position by
2
CAUTION/PRECAUCIÓN
● Make sure you thread the machine
properly. Otherwise, the thread could
tangle and break the needle.
● Asegúrese de enhebrar la máquina
correctamente. En caso contrario, el hilo se
podría enganchar y la aguja podría
romperse.
IMPORTANT:
1
Raise the presser foot using the presser
foot lever.
IMPORTANTE:
Suba el pie prensatela con la palanca del pie
prensatela.
turning the handwheel toward you
(counterclockwise) so that the mark on the
handwheel points directly up.
Suba la aguja a la posición más alta girando la
rueda hacia usted (hacia la izquierda), de manera
que la marca de la rueda apunte hacia arriba.
• If the needle is not correctly raised, the
sewing machine can not be threaded. Be
sure to turn the handwheel so that the mark
on the wheel points up before threading the
sewing machine.
Si la aguja no está levantada correctamente,
la máquina no se podrá enhebrar. Antes de
enhebrar la máquina, asegúrese de girar la
rueda para que la marca señale hacia arriba.
Pull up the spool pin and put a spool of thread
3
on this pin.
Tire del portacarrete y coloque un carrete de hilo.
1
1 Presser foot lever / Palanca del pie prensatela
32
CAUTION/PRECAUCIÓN
● If the spool of thread is in the wrong
place, or is set incorrectly, the thread
may tangle on the spool pin and cause
the needle to break.
● Si el carrete de hilo no está en el lugar
correcto o no está bien colocado, es
posible que el hilo se enganche en el
portacarrete y rompa la aguja.
Page 34

Feed the upper thread as previously shown.
4
Pass the thread through both thread guides:
the back one first, and then the front one.
Pase el hilo superior como se anteriores ha
mostrado anteriormente. Pase el hilo por las dos
guías: primero la trasera y, después, la
delantera.
Make sure you guide the thread through the
5
thread take-up lever from right to left.
Asegúrese de guiar el hilo de derecha a
izquierda por el tirahilo.
1
1
1 Thread take-up lever / Tirahilo
IMPORTANT:
7
Thread the needle from front to back leaving a
thread tail of about 5 cm (2 inch).
IMPORTANTE:
Enhebre la aguja desde la parte delantera a la
trasera, dejando un trocito de hilo de unos 5 cm
(2 pulg.).
• If your sewing machine is equipped with a
needle threader, use the needle threader to
thread the needle (see next section).
Si su máquina tiene enhebrador, utilícelo
para enhebrar la aguja (consulte la sección
siguiente).
1
Put the thread behind the guide above the
6
needle.
Coloque el hilo detrás de la guía por encima de
la aguja.
• The thread can easily be passed behind the
needle bar thread guide by holding the
thread in your left hand, then feeding the
thread with your right hand.
Para pasar fácilmente el hilo por detrás de la
guía del hilo de la varilla de la aguja, sujételo
con la mano izquierda y hágalo avanzar con
la derecha.
1 Needle bar thread guide / Guía del hilo de la
varilla de la aguja
1 5 cm (2 inch) / 5 cm (2 pulg.)
Note/Nota
●
If the thread take-up lever is lowered, the
upper thread can not be wrapped around the
thread take-up lever. Make sure you raise the
presser foot lever and the thread take-up
lever before you feed the upper thread.
● If you incorrectly feed the thread you may
cause sewing problems.
●
Si el tirahilo está en posición baja, el hilo superior
no se podrá enrollar a su alrededor. Asegúrese
de levantar la palanca del pie prensatela y el
tirahilo antes de pasar el hilo superior.
● Si no pasa el hilo de manera correcta,
pueden producirse problemas al coser.
33
Page 35

KNOWING YOUR SEWING MACHINE / CONOZCA SU MÁQUINA DE COSER ———————————————————————
—
While lowering the needle threader lever,
Using the Needle Threader (for models
equipped with a needle threader)
Uso del enhebrador de aguja (para los modelos
3
hook the thread onto the guide.
Mientras baja la palanca del enhebrador de
aguja, enganche el hilo en la guía.
equipados con el enhebrador de aguja)
This feature is only available on certain models.
Esta función está disponible sólo en ciertos modelos.
Turn the power off and lower the presser foot
1
lever.
Apague la máquina y baje la palanca del pie
prensatela.
Raise the needle to its highest position by
2
turning the handwheel toward you
(counterclockwise) so that the mark on the
handwheel points directly up.
Suba la aguja a la posición más alta girando la
rueda hacia usted (hacia la izquierda), de manera
que la marca de la rueda apunte hacia arriba.
1 Needle holder / Soporte de la aguja
2 Needle threader lever / Palanca del enhebrador
de aguja
Note/Nota
● When you use the needle threader, make
sure the needle holder is in the highest
position, otherwise the hook may be
damaged.
aguja a l
1
2
3
1 Needle holder / Soporte de la aguja
2 Needle threader lever / Palanca del enhebrador
de aguja
3 Guide / Guía
Pull down the needle threader lever as much
4
as possible, and then turn the lever toward the
back of the machine (away from you). Make
sure that the hook passes through the eye of
the needle and grabs the thread.
Baje al máximo la palanca del enhebrador de
aguja y, a continuación, gire la palanca hacia
la parte trasera de la máquina (en el sentido
contrario a donde se encuentra). Asegúrese de
que el ganchillo pasa por el ojo de la aguja y
agarra el hilo.
● Cuando utilice el enhebrador, asegúrese de
que el soporte de la aguja está en la posición
más alta, de lo contrario, el ganchillo podría
dañarse.
34
1
1 Hook / Ganchillo
2 Thread / Hilo
1
2
• Hold the thread in front of the needle to
make sure that the hook grabs it.
Mantenga el hilo delante de la aguja para
asegurarse de que lo agarra con el ganchillo.
Page 36

While lightly holding the thread, turn the
5
needle threader lever toward the front of the
machine (toward you). The hook will pull the
thread through the needle.
Mientras sujeta el hilo, gire la palanca del
enhebrador de aguja hacia la parte delantera
de la máquina (hacia usted). El ganchillo tirará
del hilo a través de la aguja.
Raise the needle threader lever and pull out
6
about 5 cm (2 inch) of thread through the
needle toward the back of the sewing
machine.
Suba la palanca del enhebrador y saque unos 5
cm (2 pulg.) de hilo por la aguja hacia la parte
trasera de la máquina de coser.
CAUTION/PRECAUCIÓN
● The needle threader can only be used
with home sewing machine needles size
75/11-100/16. Check the table on
page 39 for the appropriate needle and
thread combinations. If you are using
transparent nylon mono-filament thread,
you can only use needles in the range of
90/14-100/16.
● You can not use the needle threader if
you are using decorative threads or
special needles, such as the twin needle
and wing needle.
When using these needles or threads you
will need to thread the needle by hand.
Make sure the main power switch is off
when threading.
● El enhebrador sólo se puede utilizar con
agujas de tamaño 75/11-100/16 para
máquinas de coser destinadas a uso
doméstico. Consulte la tabla de la
página 39 para ver las combinaciones
correctas de hilo y aguja. Si usa hilo de
nylon monofilamento transparente, sólo
podrá utilizar agujas dentro de la gama
90/14-100/16.
● Con hilos decorativos o agujas especiales
como, por ejemplo, la aguja gemela y la
aguja bastidor, no puede utilizar el
enhebrador.
Si utiliza otro tipo de hilo o aguja, pase
manualmente el hilo por el ojo de la aguja.
Cuando enhebre a mano, asegúrese de
que el interruptor de la alimentación está
apagado.
1
35
Page 37

KNOWING YOUR SEWING MACHINE / CONOZCA SU MÁQUINA DE COSER ———————————————————————
—
■ Quick-set Bobbin Threading
Drawing up the Lower Thread
Procedimiento para tirar del
hilo inferior
While lightly holding the end of the upper
1
thread, slowly turn the handwheel toward you
(counterclockwise) by hand to lower and then
raise the needle.
Mientras sujeta un extremo del hilo superior,
gire lentamente la rueda a mano hacia usted
(hacia la izquierda) para bajar y, a
continuación, subir la aguja.
This is only available on certain models.
Enhebrado con la bobina rápida
Disponible sólo en ciertos modelos.
You can begin sewing immediately without
drawing up the bobbin thread. When sewing
gathers or darts, you can draw up the lower
thread by hand so that some thread will be left
over. Before you draw up the lower thread, put
the bobbin back in.
Puede comenzar a coser inmediatamente sin tener
que tirar del hilo de la bobina. Al coser zurcidos o
pinzas, puede tirar del hilo inferior manualmente
para que sobre un poco de hilo. Antes de tirar del
hilo inferior, vuelva a colocar la bobina.
Pass the thread along the slit in the direction
1
of the arrow, and leave it there without
cutting it.
Pase el hilo por la ranura en la dirección de la
flecha y no lo corte.
Pull on the upper thread to draw up the lower
2
thread.
Saque el hilo superior para tirar del inferior.
Pull out about 10 cm (4 inch) of both threads
3
and put them toward the back of the machine
under the presser foot.
Tire de los dos hilos unos 10 cm (4 pulg.) y
colóquelos en la parte trasera de la máquina,
debajo del pie prensatela.
• The bobbin cover should still be removed.
Deberá quitar la tapa de la bobina.
Draw up the lower thread as described in the
2
previous steps
1 to 3.
Tire del hilo inferior como se indica en los pasos
anteriores del
1 al 3.
Replace the bobbin cover.
3
Vuelva a colocar la tapa de la bobina.
Sewing with a Twin Needle
Costura con aguja gemela
We have designed your machine so you can sew
with this needle and two top threads. You can use
the same color or two different colors of thread for
making decorative stitches.
La máquina está diseñada para que pueda coser con
esta aguja y dos hilos superiores. Puede utilizar hilo
de un mismo color o de diferentes colores para
realizar puntadas decorativas.
1 Upper thread / Hilo superior
2 Lower thread / Hilo inferior
36
Page 38

CAUTION/PRECAUCIÓN
●
Use only twin needles that have been made for
this machine (part code: X57521-021). Other
needles could break and damage the machine.
●
When using the twin needle, make sure the stitch
width is not set above 3 since this may cause the
needle to hit the needle plate and break.
● Make sure that the needle does not strike
the presser foot.
● Do not sew with bent needles. The
needle could break and injure you.
● When using the twin needle, make sure
you use the zigzag presser foot only.
● Utilice sólo las agujas gemelas diseñadas
para esta máquina (código de pieza:
X57521-021). Otras agujas podrían
romperse y causar averías en la máquina.
●
Cuando utilice agujas gemelas, compruebe que la
anchura de puntada no está ajustada por encima de 3
ya que la aguja podría golpear la placa y romperse.
● Asegúrese de que la aguja no golpea el
pie prensatela.
● No cosa con agujas dobladas. Podrían
romperse y causar lesiones.
●
Cuando utilice agujas gemelas, asegúrese de
que sólo utiliza el pie prensatela para zig-zag.
■ Twin Needle Threading
Enhebrado de agujas gemelas
You should thread each needle separately.
Deberá enhebrar cada aguja por separado.
Thread the left needle.
1
Enhebre la aguja izquierda.
Follow the same instructions for threading a
single needle (see page 32).
Siga las mismas instrucciones que para el enhebrado
de una aguja sencilla (consulte la página 32).
Thread the right needle.
2
Enhebre la aguja derecha.
Thread the right needle in the same way that
you threaded the left needle using the thread
from the spool on the extra spool pin, but do
not pass the thread through the guide above
the needle before you pass it through the eye
of the right needle.
Enhebre la aguja derecha igual que la
izquierda utilizando el hilo del carrete del
portacarrete adicional, pero sin pasar el hilo
por la guía encima de la aguja; páselo antes a
través del ojo de la aguja derecha.
1
■ Attaching the Twin Needle
Colocación de la aguja gemela
Attach the twin needle in the same way as a
single needle (see page 16). The flat side of the
needle should face toward the back and the
rounded side should face toward you.
Coloque la aguja gemela del mismo modo que las
agujas sencillas (consulte la página 16). La parte
plana de la aguja debe estar colocada hacia la
parte trasera y la parte redondeada, hacia usted.
■ Attaching the Extra Spool Pin
Colocación del portacarrete adicional
Put the extra spool pin in the hole on the top of the machine.
Put the second spool of thread onto the extra spool pin.
Coloque el portacarrete adicional en el agujero de
la parte superior de la máquina. Coloque el segundo
carrete de hilo en el portacarrete adicional.
1 Left needle thread passes through the needle bar
thread guide / El hilo de la aguja izquierda pasa a
través de la guía del hilo de la varilla de la aguja
Right needle thread passes in front of the needle bar
2
thread guide /
delante de la guía del hilo de la varilla de la aguja
3 Needle bar thread guide / Guía del hilo de la
varilla de la aguja
El hilo de la aguja derecha pasa
Note/Nota
Models Equipped with a Needle Threader
You can not use the needle threader to thread
●
the twin needle. Instead, thread the twin
needle by hand, from front to back. Using the
needle threader may damage the machine.
Modelos equipados con un enhebrador de aguja
●
No se puede utilizar el enhebrador con agujas
gemelas. En su lugar, la aguja gemela debe
enhebrarse a mano, de delante a atrás. El uso del
enhebrador podría causar averías en la máquina.
37
Page 39

KNOWING YOUR SEWING MACHINE / CONOZCA SU MÁQUINA DE COSER ———————————————————————
—
Solution / Solución
Thread Tension
Tensión del hilo
Reduce the tension by turning the upper
tension control dial to a lower number.
Reduzca la tensión girando el disco de control
The tension of the thread will affect the quality of
your stitches. You may need to adjust it when you
change fabric or thread.
La tensión del hilo afectará a la calidad de las
puntadas. Cuando cambie de tela o de hilo, es
posible que necesite ajustar la tensión del hilo.
Memo/Recuerde
de la tensión superior a un número inferior.
■ Upper Tension is too Loose
El hilo superior está demasiado flojo
Loops appear on the back of the fabric.
Aparecerán ondas en el revés de la tela.
2
5
● We recommend that you do a test sample
on scrap of a fabric before you start to sew.
1
4
3
5
● Antes de comenzar a coser, recomendamos
que haga una prueba en un retal.
■ Correct Tension / Tensión adecuada
Correct tension is important as too much or too
little tension will weaken your seams or cause
puckers on your fabric.
Una tensión adecuada es importante, puesto que
un exceso o defecto de la misma afectará a la
calidad de la costura y la tela podría fruncirse.
2
3
4
1 Surface of fabric / Superficie de la tela
2 Back of fabric / Revés de la tela
3 Upper thread / Hilo superior
4 Lower thread / Hilo inferior
5 Loops appear on back of fabric / Ondas en el
revés de la tela
Solution / Solución
Increase the tension by turning the upper
tension control dial to a higher number.
Aumente la tensión girando el disco de control
de la tensión superior a un número superior.
1
3
4
1 Surface of fabric / Superficie de la tela
2 Back of fabric / Revés de la tela
3 Upper thread / Hilo superior
4 Lower thread / Hilo inferior
■ Upper Tension is too Tight
El hilo superior está demasiado tenso
Loops will appear on the surface of the fabric.
Aparecerán ondas en la superficie de la tela.
2
1
3
5
4
1 Surface of fabric / Superficie de la tela
2 Back of fabric / Revés de la tela
3 Upper thread / Hilo superior
4 Lower thread / Hilo inferior
5 Loops appear on surface of fabric / Ondas en la
superficie de la tela
Note/Nota
● If the upper thread is not threaded correctly
or the bobbin is not installed correctly, it
may not be possible to set the correct thread
tension. If the correct thread tension cannot
be achieved, rethread the upper thread and
insert the bobbin correctly.
● Si el hilo superior no está enhebrado
correctamente o la bobina no está colocada
correctamente, quizá no sea posible ajustar
la tensión adecuada del hilo. Si no puede
ajustar la tensión adecuada, vuelva a
enhebrar el hilo superior e inserte la bobina
4
3
5
correctamente.
38
Page 40

FABRIC, THREAD, AND NEEDLE COMBINATIONS
COMBINACIONES DE TELA, HILO Y AGUJA
Fabric Type
Broadcloth Cotton
Medium
weight
fabrics
Lightweight
fabrics
Heavyweight
fabrics
Stretch
fabrics
For top stitching
Tipo de tela
Telas
medianas
Telas
ligeras
Telas
pesadas
Telas
elásticas
Para costuras sobrepuestas
Taffeta
Flannel,
Gabardine
Lawn, Batiste Cotton
Georgette
Challis, Satin Silk
Denim Cotton
Corduroy
Tweed Silk
Jersey
Tricot
Paño Algodón
Tafetán
Franela,
gabardina
Lino, Batista Algodón
Punto Georgette
Challis, satén Seda
Tejano Algodón
Pana
Tweed Seda
Tejido de punto
Punto de lana
Thread
Type Size
Thread synthetic
mercerized
Silk or silk
finished
Thread synthetic
mercerized
Thread synthetic
mercerized
Thread for knits
Thread synthetic
mercerized
Silk
Tipo Medida
Hilo sintético
mercerizado
Seda o acabados
de seda
Hilo sintético
mercerizado
Hilo sintético
mercerizado
Hilo para punto
calado
Hilo sintético
mercerizado
Seda
Hilo
Size of Needle
60
–80
75/11–90/14
50–80
60
–80
50
–80
30
–50
50
50
–60
30 90/14–100/16
60
–80
–80
50
60
–80
50
–80
30
–50
50
50–60
30 90/14–100/16
65/9–75/11
90/14–100/16
Ball point needle
(golden colored)
75/11–90/14
Medida de la
aguja
75/11–90/14
65/9–75/11
90/14–100/16
Aguja de punta
redonda
(color dorado)
75/11–90/14
1
39
Page 41

KNOWING YOUR SEWING MACHINE / CONOZCA SU MÁQUINA DE COSER ———————————————————————
—
Memo/Recuerde
● For clear nylon thread, always use needle 90/14 - 100/16.
● You can also use the same thread for the bobbin thread and upper threading.
● Con hilo de nylon transparente debe utilizarse siempre una aguja entre 90/14 y 100/16.
● También se puede usar el mismo hilo para el hilo de la bobina y el hilo superior.
CAUTION/PRECAUCIÓN
● Make sure you follow the needle, thread, and fabric combinations listed in the table.
Using the wrong combination, such as heavyweight fabric like denim with a small needle
(65/9-75/11), may bend or break the needle. The wrong combination may also cause the
seam to be uneven, the fabric to pucker, or the machine to skip stitches.
● Asegúrese de seguir las combinaciones de aguja, hilo y tela que se indican en la tabla.
El uso de una combinación incorrecta, por ejemplo, una aguja pequeña (entre 65/9 y 75/11)
para una tela pesada como el tejano, podría romper o doblar la aguja. Una combinación
incorrecta también podría causar que la costura fuera irregular, la tela podría fruncirse y la
máquina podría dejar puntadas sueltas.
40
Page 42

2
STRAIGHT AND ZIGZAG STITCHING
COSTURA RECTA Y EN ZIG-ZAG
Please Read Before Sewing /
Lea lo siguiente antes de utilizar la máquina
CAUTION/PRECAUCIÓN
To avoid being injured, watch the needle carefully while you are using the machine. Keep
●
your hands away from moving parts.
● Do not stretch or pull the fabric during sewing, otherwise the needle may be damaged and
you may be injured.
● Do not use bent or broken needles, otherwise you may be injured.
● Take care that the needle does not hit basting pins or other objects during sewing. The needle
may break and you may be injured.
● Always use the correct presser foot. If you use the wrong presser foot, the needle may hit the
presser foot and bend or break and you may be injured.
● When you turn the handwheel by hand, always turn it toward you (counterclockwise).
Turning it the other way may cause the thread to tangle and damage the needle or fabric, and
you may be injured.
● Para evitar lesiones, observe con atención la aguja mientras utiliza la máquina. Mantenga las
manos alejadas de las piezas en movimiento.
● No estire ni empuje la tela durante la costura, pues la aguja podría dañarse y producir lesiones.
● No utilice agujas dobladas o rotas, ya que podría resultar lesionado.
● Tenga cuidado de que la aguja no golpee las patillas de hilvanado ni otros objetos durante la
costura. La aguja podría romperse y usted podría resultar lesionado.
● Utilice siempre el pie prensatela adecuado. Si utiliza un pie prensatela erróneo, la aguja puede
golpearlo y doblarse o romperse, y podría causar lesiones.
● Al girar la rueda a mano, gírela siempre hacia usted (hacia la izquierda). Si la gira en sentido
contrario, el hilo podría engancharse y causar daños en la aguja o la tela, y podría lesionarse.
2
Straight Stitching / Costura recta
Stitch Name
Nombre de la
puntada
Straight Stitch
Puntada recta
Triple Stretch
Stitch
Puntada elástica
triple
Pattern
Dibujo
Length
[mm (inch)]
Longitud
[mm (pulg.)]
1-4
(1/64-3/16)
Fixed /
Fixed /
Fija
Fija
2.5 (3/32)
2.5 (3/32)
[mm (inch)]
Anchura [mm
Width
(pulg.)]
5-0*
(3/16-0)
*Turn the stitch width dial to adjust the needle
position. Setting the dial to 5 selects the left
needle position; setting the dial to 0 selects the
right needle position.
Gire el control de anchura de puntada para ajustar
la posición de la aguja. El ajuste del control en 5
selecciona la posición izquierda para la aguja,
mientras que el ajuste 0 selecciona la posición
derecha.
41
Page 43

STRAIGHT AND ZIGZAG STITCHING / COSTURA RECTA Y EN ZIG-ZAG —————————————————————————
—
■ Starting Sewing / Comienzo de la costura
Turn the pattern selection dial to choose the
1
stitch number you want. You also need to set
the pattern selection dial to the Straight Stitch
or Triple Stretch Stitch.
Utilice el selector de puntadas para elegir el
número de puntada que desea. También debe
ajustar el selector de puntadas en la puntada
recta o la puntada elástica triple.
Raise the needle to its highest position and lift
2
the presser foot lever.
Suba la aguja a la posición más alta y levante
la palanca del pie prensatela.
Pull the upper thread though the toes of the
3
presser foot.
Pase el hilo superior por la punta del pie
prensatela.
Put the fabric under the presser foot and
4
position the needle 1 cm (3/8 inch) from the
edge of the fabric.
Coloque la tela debajo del pie prensatela y sitúe
la aguja a 1 cm (3/8 pulg.) del borde de la
tela.
Lower the presser foot.
5
Baje el pie prensatela.
To back tack, push down the reverse sewing
6
lever as far as possible, and then press the foot
controller to start reverse sewing. Release the
foot controller to stop sewing.
Para hilvanar en reversa, empuje hacia abajo el
pulsador de retroceso todo lo posible y, a
continuación, pise el pedal para comenzar la
costura en reversa. Suelte el pedal para dejar
de coser.
Release the reverse sewing lever and start
7
sewing in the forward direction by pressing
the foot controller.
Suelte el pulsador de retroceso y pise el pedal
para comenzar a coser hacia delante.
• You can use reverse sewing for locking the
end of seams and to strengthen a stitch.
Puede utilizar la costura en reversa para
rematar costuras y reforzar puntadas.
CAUTION/PRECAUCIÓN
● Make sure the needle does not hit a pin
or any other object during sewing. The
thread could tangle or the needle could
break, and you may be injured.
● Asegúrese de que la aguja no golpea las
patillas ni ningún otro objeto durante la
costura. El hilo podría engancharse y la
aguja podría romperse, y causar lesiones.
■
■ Changing Sewing Direction
Cambio de la dirección de costura
Stop the machine at the point where you want to
1
change direction with the needle still in the fabric.
Pare la máquina donde desee cambiar la
dirección de la costura, con la aguja en la tela.
Raise the presser foot and turn the fabric to its
2
new direction using the needle as a pivot.
Suba el pie prensatela y gire la tela hacia la
nueva dirección con la aguja como eje.
42
Lower the presser foot and start sewing in the
3
new direction.
Baje el pie prensatela y comience a coser en la
nueva dirección.
Page 44

■ Finishing Sewing
Finalización de la costura
You can use stitching to lock the threads at the
end of the seam or to strengthen a stitch.
Mediante puntadas puede rematar los hilos al final
de la costura o reforzar puntadas.
Stitch to the end of the seam and stop.
1
Cosa hasta el final y detenga la costura.
Push the reverse sewing lever and stitch
2
backwards for 1 cm (3/8 inch) from the end of
the fabric.
Empuje el pulsador de retroceso y cosa hacia atrás
1 cm (3/8 pulg.) desde el extremo de la tela.
To prepare the machine for the next seam,
4
pull about 10 cm (4 inch) of thread through
the toes of the presser foot toward the back of
the machine.
Para preparar la máquina para la siguiente
costura, pase el hilo unos 10 cm (4 pulg.) por la
punta del pie prensatela hacia la parte trasera
de la máquina.
■ Top Stitching and Stretch Materials
Costuras sobrepuestas y telas elásticas
You can use a straight stitch for top stitching and
sewing lightweight fabrics.
You can use a triple stretch stitch for sewing
stretch fabrics.
Puede utilizar la puntada recta para costuras
sobrepuestas y la costura en telas ligeras.
La puntada elástica triple es adecuada para coser
telas elásticas.
Zigzag Stitching
Costura en zig-zag
2
■ Removing the Material from the Machine
Extracción del material de la máquina
Stop the machine.
1
Pare la máquina.
Lift the presser foot, raise the needle to its
2
highest position, and then pull the fabric out
gently to the left hand side.
Levante el pie prensatela, suba la aguja a la
posición más elevada y, a continuación, tire del
tejido con suavidad hacia la izquierda.
• Raise the needle to its highest position and
make sure that the thread take-up lever is
also in its highest position.
Suba la aguja a la posición más alta y
asegúrese de que el tirahilo también lo esté.
Cut both threads with the thread cutter on the
3
left hand side of the machine
Corte los dos hilos con el cortador de hilo
situado en la parte izquierda de la máquina.
.
Stitch Name
Nombre de la
puntada
Zigzag Stitch
Puntada de
zig-zag
■ Zigzag Stitch / Puntada de zig-zag
Turn the pattern selection dial to the Zigzag
Stitch, and then start sewing.
Coloque el selector de puntadas en la puntada de
zig-zag y, a continuación, comience a coser.
Pattern
Dibujo
Length
[mm (inch)]
Longitud
[mm (pulg.)]
F-4
(1/64-3/16)
Width
[mm (inch)]
Anchura [mm
(pulg.)]
0-5
(0-3/16)
1 Thread cutter / Cortador de hilo
43
Page 45

STRAIGHT AND ZIGZAG STITCHING / COSTURA RECTA Y EN ZIG-ZAG —————————————————————————
—
We recommend that you sew using the Straight
Stitch at the beginning and end of zigzag stitches.
(This acts as a reinforcement stitch.)
Recomendamos la costura con puntada recta al
principio y al final de la costura en zig-zag.
(Esta costura actúa como costura reforzada).
■ Satin Stitch / Puntada para satén
Setting the Zigzag Stitch length in the “F” range
produces a satin stitch (close zigzag stitch). The
Satin Stitch can be used for making buttonholes
and decorative stitches. Set the pattern selection
dial to the Zigzag Stitch, set the stitch length in
the “F” range, and set the stitch width dial
between 0 and 5.
El ajuste de la longitud de la puntada en zig-zag
en el intervalo “F” produce una puntada para
satén (puntada en zig-zag pequeña). La costura
para satén se puede utilizar para realizar ojales y
para costura decorativa. Coloque el selector de
puntadas en la puntada en zig-zag, ajuste la
longitud de puntada en el intervalo “F” y ajuste el
control de anchura de puntada entre 0 y 5.
44
Page 46

3
BUILT-IN STITCHES
PUNTADAS DE COSTURA INCORPORADAS
Blind Hem Stitching
Costura invisible para
dobladillo
Set the pattern selection dial to the Blind Hem
3
Stitch or Stretch Blind Hem Stitch, and then
set the stitch length.
Coloque el selector de puntadas en la puntada
invisible o la puntada invisible elástica, y luego
ajuste la longitud de puntada.
Stitch Name
Nombre de la
puntada
Blind Hem
Stitch
Costura
invisible para
dobladillo
Stretch Blind
Hem Stitch
Costura
invisible
elástica
Stretch Blind
Hem Stitch
Costura
invisible
elástica
You can use the Blind Hem Stitch to finish the edge
of a project, like the hem of a pair of trousers,
without the stitch showing. Use the Blind Hem Stitch
when sewing on non-stretch fabrics, and the Stretch
Blind Hem Stitch for stretch fabrics.
La costura invisible para dobladillo puede utilizarse
para terminar el borde de una labor de costura, como
el dobladillo de unos pantalones, sin que se vea la
puntada. Utilice la puntada invisible para coser en
telas no elásticas, y la puntada invisible elástica para
telas elásticas.
Both threads should be the same color as the
1
fabric.
Los hilos deben ser del mismo color que la tela.
Fold back the hem, as shown in Fig. A. Then
2
fold the edge of the fabric as in Fig. B. Leave a
6 mm (15/64 inch) overlap at the edge.
Doble hacia atrás el dobladillo, como se
muestra en la figura A. Después, doble el borde
de la tela como se indica en la figura B. Deje un
solapa de 6 mm (15/64 pulg.) en el borde.
Pattern
Dibujo
Length
[mm (inch)]
Longitud
[mm (pulg.)]
F-2
(1/64-1/16)
F-1.5
(1/64-1/16)
F-1.5
(1/64-1/16)
Width
[mm (inch)]
Anchura [mm
(pulg.)]
3-5
(1/8-3/16)
3-5
(1/8-3/16)
3-5
(1/8-3/16)
Sew on the fold as in Fig. C.
4
Cosa en el pliegue como se indica en la figura C.
When the fabric is unfolded you will have a
5
Blind Hem Stitch as shown in Fig. D.
Cuando la tela esté desdoblada, tendrá una
puntada invisible como se muestra en la figura D.
2
3
AB
1
1
2
2
CD
2
1 Right side of fabric / Tela del derecho
2 Wrong side of fabric / Tela del revés
3 10 mm (3/8 inch) / 10 mm (3/8 pulg.)
4 5 mm (3/16 inch) / 5 mm (3/16 pulg.)
1
Note/Nota
● The Stretch Blind Hem Stitch is useful for
stretch fabrics.
● La puntada invisible elástica es útil para telas
elásticas.
3
1
4
45
Page 47

BUILT-IN STITCHES / PUNTADAS DE COSTURA INCORPORADAS —————————————————————————————
—
Shell Tuck Stitching
Costura de concha
Stitch Name
Nombre de la
puntada
Shell Tuck
Stitch
Puntada de
concha
The Shell Tuck Stitch can be used to sew a picot
(lace-like) edge on lightweight fabric.
La puntada de concha puede utilizarse para coser
bordes con puntilla (parecido al encaje) en telas ligeras.
Set the pattern selection dial to the Shell Tuck
1
Stitch.
Ajuste el selector de puntadas en la puntada de
concha.
Adjust the thread tension so that it is tighter
2
than normal.
Ajuste la tensión del hilo para que esté más
tenso de lo normal.
Place the fabric under the presser foot so that
3
it will be sewn along the bias, with the straight
stitches sewn on the seamline and the zigzag
stitches sewn slightly over the folded edge.
Coloque la tela debajo del pie prensatela para
coserla al bies con puntadas rectas en la línea
de costura y con puntadas en zig-zag
ligeramente por encima del borde doblado.
Pattern
Dibujo
Length
[mm (inch)]
Longitud
[mm (pulg.)]
F-3
(1/64-1/8)
Width
[mm (inch)]
Anchura [mm
(pulg.)]
3-5
(1/8-3/16)
Elastic Stitching
Costura elástica
Stitch Name
Nombre de la
puntada
Elastic Stitch
Puntada
elástica
You can use the Elastic Stitch for mending, sewing
elastic or joining fabric. Each is explained below.
Set the pattern selection dial to the Elastic Stitch.
La puntada elástica puede utilizarse para zurcir, coser gomas
o unir trozos de tela. A continuación se explica cada opción.
Ajuste el selector de puntadas en la puntada elástica.
■ Mending / Zurcido
Set the stitch length dial between “F” and 2.5.
1
Ajuste el control de longitud de puntada entre
“F” y 2,5.
Place the reinforcement fabric under the area
2
you want to mend.
Coloque la tela de refuerzo debajo del área que
desee zurcir.
Following the line of the tear, sew using the
3
Elastic Stitch as shown.
Siga la línea de la zona rasgada y cosa
utilizando la puntada elástica como se muestra.
Pattern
Dibujo
Length
[mm (inch)]
Longitud
[mm (pulg.)]
F-2.5
(1/64-3/32)
Width
[mm (inch)]
Anchura [mm
(pulg.)]
3-5
(1/8-3/16)
Sew at a slow speed.
4
Cosa a una velocidad baja.
46
Page 48

■ Sewing Elastic / Costura de gomas
Place the elastic on the fabric.
1
Coloque la goma en la tela.
Double Action Stitching
Costura de doble acción
As you sew, stretch the elastic in front of and
2
behind the presser foot.
A medida que cosa, vaya estirando la goma
por delante y detrás del pie prensatela.
■ Joining Fabric / Unión de trozos de tela
You can use the Elastic Stitch to join two pieces of
fabric together and it is very effective when
sewing knitted fabrics. If you are using nylon
thread, the stitch will not be visible.
La puntada elástica puede emplearse para unir dos
trozos de tela y resulta muy eficaz a la hora de
coser tejidos de punto. Si utiliza hilo de nylon, la
puntada no se verá.
Stitch Name
Nombre de la
puntada
Double Action
Stitch
Puntada de
doble acción
Bridging Stitch
Puntada de
puente
Rampart Stitch
Puntada de
muralla
These stitches are used for joining two pieces of
fabric, such as when making patchwork. Set the
pattern selection dial to the Double Action Stitch,
Bridging Stitch, or Rampart Stitch.
Estos tipos de puntadas se utilizan para unir dos
trozos de tela, por ejemplo, en la costura de
patchwork. Ajuste el selector de puntadas en la
puntada de doble acción, la puntada de puente o la
puntada de muralla.
Pattern
Dibujo
Length
[mm (inch)]
Longitud
[mm (pulg.)]
F-3
(1/64-1/8)
F-3
(1/64-1/8)
F-3
(1/64-1/8)
Width
[mm (inch)]
Anchura
[mm (pulg.)]
3-5
(1/8-3/16)
3-5
(1/8-3/16)
3-5
(1/8-3/16)
3
Put the edge of the two pieces of fabric together
1
and center them under the presser foot.
Coloque juntos los bordes de los dos trozos de
tela y céntrelos debajo del pie prensatela.
Sew them together using the Elastic Stitch.
2
Make sure you keep the two fabric edges close
together.
Cósalos utilizando la puntada elástica. Asegúrese
de tener los dos bordes de tela muy juntos.
47
Page 49

BUILT-IN STITCHES / PUNTADAS DE COSTURA INCORPORADAS —————————————————————————————
—
Heirloom Stitching
Puntada de adornos
Stitch Name
Nombre de la
puntada
Smocking
Stitch
Puntada de
smoking
Fagoting
Stitch
Vainica
Decorative
Stitch
Puntada
decorativa
These stitches are used to join two pieces of fabric
while leaving a space between their edges.
Este tipo de puntada se utiliza para unir dos trozos de
tela, dejando un espacio entre sus bordes.
Fold over the edges of the two pieces of fabric
1
for the hem and baste the edges to a thin
piece of paper leaving a small space between
them.
Doble los bordes de los dos trozos de tela para
el dobladillo e hilvánelos a un papel fino,
dejando un pequeño espacio entre ellos.
Set the pattern selection dial to the Smocking
2
Stitch, Fagoting Stitch, or Decorative Stitch.
Ajuste el selector de puntadas en la puntada de
smocking, la vainica o la puntada decorativa.
Stitch along the edge, pulling both threads
3
slightly when beginning to sew.
Cosa a lo largo del borde, tirando ligeramente
de los dos hilos cuando comience a coser.
Use thicker than normal threads for sewing.
Utilice hilos más gruesos de lo normal para la
costura.
After sewing, remove the basting and the
4
paper. Finish by tying knots on the reverse
side at the beginning and the end of the
seams.
Cuando haya terminado la costura, quite el
hilvanado y el papel. Para finalizar, haga
nudos en el revés, al principio y al final de las
costuras.
Pattern
Dibujo
Length
[mm (inch)]
Longitud
[mm (pulg.)]
Fixed /
2.5 (3/32)
Fixed /
2.5 (3/32)
Fixed /
2.5 (3/32)
[mm (inch)]
[mm (pulg.)]
Fija
(1/8-13/64)
Fija
(1/8-13/64)
Fija
Width
Anchura
3-5
3-5
3-5
(1/8-3/16)
1
1.5 mm
1 First needle drop / Primera entrada de la aguja
Overedge Stitching
Costura de sobreorilla
Stitch Name
Nombre de la
puntada
Elastic Shell
Tuck Stitch
Puntada de
concha elástica
Stretch
Overlock
Stitch
Puntada
overlock
pespunto
Elastic
Overlock
Stitch
Puntada
overlock
elástica
Arrowhead
Stitch
Puntada de
flecha
Arrowhead
Stitch
Puntada de
flecha
Comb Stitch
Puntada
combinada
Comb Stitch
Puntada
combinada
Pattern
Dibujo
Length
[mm (inch)]
Longitud
[mm (pulg.)]
F-3
(1/64-1/8)
Fixed /
Fixed /
Fixed /
Fixed /
Fixed /
Fixed /
Fixed /
Fixed /
Fixed /
Fixed /
Fija
Fija
Fija
Fija
Fija
Fija
Fija
Fija
Fija
Fija
2.5 (3/32)
2.5 (3/32)
2.5 (3/32)
2.5 (3/32)
2.5 (3/32)
2.5 (3/32)
2.5 (3/32)
2.5 (3/32)
2.5 (3/32)
2.5 (3/32)
Width
[mm (inch)]
Anchura
[mm (pulg.)]
3-5
(1/8-3/16)
3-5
(1/8-3/16)
3-5
(1/8-3/16)
3-5
(1/8-3/16)
3-5
(1/8-3/16)
3-5
(1/8-3/16)
3-5
(1/8-3/16)
48
Page 50

You can use these stitches to join together seams and
finish them in one operation. The Overlock Stitches are
also useful for sewing stretch materials while the
Arrowhead Stitch is ideal for sewing the edge of a blanket.
Con estos tipos de puntadas es posible unir costuras y
terminarlas en una sola operación. Las puntadas
overlock también resultan útiles para coser telas
elásticas, mientras que la puntada de flecha es idónea
para coser los bordes de una manta.
Set the pattern selection dial to an overedge
1
stitch.
Ajuste el selector de puntadas en la puntada de
sobreorilla.
Put the fabric under the presser foot so that the
2
seamline (or arrowhead point) is approximately
3 mm (1/8 inch) to the left of the center of the
presser foot. This stitch works best with a seam
allowance of approximately 5 mm (3/16 inch)
as this allows the right (zigzag) side of the stitch
to overlock the cut edge of the fabric.
Ponga la tela debajo del pie prensatela de
forma que la línea de costura (o punta de flecha)
esté a unos 3 mm (1/8 pulg.) a la izquierda del
centro del pie prensatela. Esta puntada tiene los
mejores resultados con un margen de costura de
unos 5 mm (3/16 pulg.), puesto que esto
permite que el derecho (zig-zag) de la puntada
quede por encima del borde de corte de la tela.
A finished Elastic Overlock Stitch is shown in the
illustration below.
En la ilustración siguiente se muestra una puntada
overlock elástica terminada.
Feather Stitching
Costura de plumas
Stitch Name
Nombre de la
puntada
Feather Stitch
Puntada de
plumas
Use the Feather Stitch as a decorative top stitch when
embroidering or when hemming blankets, tablecloths, or draperies.
La puntada de plumas puede emplearse como costura
sobrepuesta decorativa para el bordado o para los
dobladillos de mantas, manteles y paños.
Set the pattern selection dial to the Feather Stitch.
1
Ajuste el selector de puntadas en la puntada de plumas.
Pattern
Dibujo
Length
[mm (inch)]
Longitud
[mm (pulg.)]
Fixed / Fixed
2.5 (3/32)
Fixed / Fixed
2.5 (3/32)
Width
[mm (inch)]
Anchura
[mm (pulg.)]
3-5
(1/8-3/16)
3
If the seam allowance is wider than the stitch
3
pattern, trim away any excess fabric after stitching.
Si el margen de costura tiene una anchura
superior al dibujo de la puntada, corte y quite
toda la tela sobrante después de la costura.
Place the fabric right side up and sew 1 cm
2
(3/8 inch) from the edge of the fabric.
Coloque la tela con el derecho hacia arriba y
cosa 1 cm (3/8 pulg.) desde el borde de la tela.
Trim close to the stitching.
3
Corte cerca de la costura.
The stitch will prevent the fabric from unravelling.
La costura impedirá que la tela se deshilache.
49
Page 51

BUILT-IN STITCHES / PUNTADAS DE COSTURA INCORPORADAS —————————————————————————————
—
Triple Zigzag Stretch Stitching
Costura elástica en zig-zag triple
Stitch Name
Nombre de la
puntada
Triple Zigzag
Stretch Stitch
Puntada
elástica en zig-
zag triple
This stitch can be used wherever a zigzag stitch
would be used to sew heavyweight stretch fabrics.
The Triple Zigzag Stretch Stitch can also be used as a
decorative top stitch. Set the pattern selection dial to
the Triple Zigzag Stretch Stitch.
Esta puntada puede emplearse en aquellos casos en
los que se utilizaría una puntada en zig-zag para
coser telas elásticas pesadas. La puntada elástica en
zig-zag triple también puede utilizarse como costura
sobrepuesta decorativa. Ajuste el selector de puntadas
en la puntada elástica en zig-zag triple.
Pattern
Dibujo
Length
[mm (inch)]
Longitud
[mm (pulg.)]
Fixed / Fixed
2.5 (3/32)
Fixed / Fixed
2.5 (3/32)
Width
[mm (inch)]
Anchura
[mm (pulg.)]
3-5
(1/8-3/16)
Decorative Stitching
Costura decorativa
Stitch Name
Nombre de la
puntada
Triangle Stitch
Puntada
triangular
Decorative
Stitch
Puntada
decorativa
Leaf Stitch
Puntada de
hoja
Tree Stitch
Puntada de
árbol
Legs Stitch
Puntada de
horquilla
Decorative
Stitch
Puntada
decorativa
Stretch
Overlock
Stitch
Puntada
overlock
pespunto
Stretch
Overlock
Stitch
Puntada
overlock
pespunto
Decorative
Stitch
Puntada
decorativa
Decorative
Hem Stitch
Puntada de
dobladillo
decorativo
Decorative
Stitch
Puntada
decorativa
Pattern
Dibujo
[mm (inch)]
Longitud
[mm (pulg.)]
(1/64-1/16)
2.5 (3/32)
2.5 (3/32)
2.5 (3/32)
2.5 (3/32)
2.5 (3/32)
2.5 (3/32)
2.5 (3/32)
2.5 (3/32)
2.5 (3/32)
2.5 (3/32)
2.5 (3/32)
2.5 (3/32)
2.5 (3/32)
2.5 (3/32)
2.5 (3/32)
Length
F-1.5
Fixed /
Fixed /
Fixed /
Fixed /
Fixed /
Fixed /
Fixed /
Fixed /
Fixed /
Fixed /
Fixed /
Fixed /
Fixed /
Fixed /
Fixed /
[mm (inch)]
[mm (pulg.)]
Fija
Fija
Fija
Fija
Fija
Fija
Fija
Fija
Fija
Fija
Fija
(1/8-13/64)
Fija
(1/8-13/64)
Fija
Fija
Fija
Width
Anchura
3-5
(1/8-3/16)
3-5
(1/8-3/16)
3-5
(1/8-3/16)
3-5
(1/8-3/16)
3-5
(1/8-3/16)
3-5
(1/8-3/16)
3-5
3-5
3-5
(1/8-3/16)
3-5
(1/8-3/16)
3-5
(1/8-3/16)
50
Page 52

These stitches can be used for decorative top
stitching and for smocking. Set the pattern selection
dial to the Triangle Stitch, Leaf Stitch, etc.
Estos tipos de puntadas se pueden emplear para
costura sobrepuesta decorativa y costura de
smocking. Ajuste el selector de puntadas en la
puntada triangular, la puntada de hoja, etc.
3
51
Page 53

SEWING BUTTONHOLES AND BUTTONS / COSTURA DE OJALES Y BOTONES ——————————————————————
—
4
SEWING BUTTONHOLES AND BUTTONS
COSTURA DE OJALES Y BOTONES
Making a Buttonhole
(1-Step Automatic Buttonhole)
Realización de un ojal
(ojal automático de 1 paso)
Length
Pattern
Dibujo
[mm (inch)]
Longitud
[mm (pulg.)]
F-1.5
(1/64-1/16)
Memo/Recuerde
● We recommend that you practice making a
buttonhole on a scrap piece of fabric before
you try it on an actual garment.
● When making buttonholes on soft fabrics,
place a stabilizer material on the underside
of the fabric.
● Es aconsejable que practique la realización
de ojales en una retal de prueba antes de
intentarlo en la prenda real.
● Para realizar ojales en telas suaves, coloque
un material estabilizador debajo de la tela.
Making a buttonhole is a simple process that
provides reliable results.
La realización de un ojal es un proceso sencillo con
resultados fiables.
■ Making a Buttonhole
Realización de un ojal
Using tailor’s chalk, mark the position and
1
length of the buttonhole on the fabric.
Con un trozo de tiza, marque en la tela la
posición y la longitud del ojal.
Width
[mm (inch)]
Anchura
[mm (pulg.)]
3-5
(1/8-3/16)
1
Foot
Pie
Buttonhole
Foot
Pie para
ojales
Attach the buttonhole foot and set the pattern
2
selection dial to “F”.
Coloque el pie para ojales y ajuste el selector de
puntadas en “F”.
You need to sew the front bar tack first. Lower
3
the presser foot to align the marks on the foot
with the mark on the fabric.
Primero tiene que coser la tachuela delantera.
Baje el pie prensatela para alinear las marcas
del pie con la marca del tejido.
Open the button plate and insert the button.
4
Abra la placa para botones e inserte el botón.
1 Starting mark on the fabric / Marca de comienzo
en el tejido
2 Marks on the foot / Marcas del pie
3 Button plate / Placa para botones
Lower the buttonhole lever and push it back
5
slightly.
Baje la palanca para ojales y empújela hacia
atrás un poco.
While gently holding the upper thread, start
6
the machine.
Mientras sujeta suavemente el hilo superior,
ponga a funcionar la máquina.
1 Marks on fabric / Marcas sobre el tejido
52
Page 54

The bar tacks of the buttonhole are sewn in
7
the order shown.
Las tachuelas del ojal se cosen en el orden que
se muestra.
3
24
1
Stop the machine when buttonhole stitching is
8
finished.
Pare la máquina cuando termine de coser el
ojal.
■ Making a Buttonhole on Stretch Fabrics
Realización de un ojal en tejidos elásticos
When sewing buttonholes on stretch fabric, the
buttonhole stitching is sewn over a gimp thread.
Para coser ojales en un tejido elástico se utiliza hilo
galón.
Set the stitch width to match the diameter of
3
the gimp thread.
Ajuste la anchura de la puntada según el
diámetro del hilo galón.
Lower the presser foot and start sewing.
4
Baje el pie prensatela y comience a coser.
Once sewing is completed, gently pull the
5
gimp thread to remove any slack, and then
trim off the excess.
Una vez finalizada la costura, tire suavemente
del hilo galón para que no queden hilos flojos y
recorte el hilo sobrante.
4
Using tailor’s chalk, mark the position of the
1
buttonhole on the fabric, and then attach the
buttonhole foot and set the pattern selection
dial to “F”.
Con un trozo de tiza, marque la posición del
ojal sobre el tejido y, a continuación, coloque el
pie para ojales y ajuste el selector de puntadas
en “F”.
1
1 Marks on fabric / Marcas sobre el tejido
Hook the gimp thread onto the back end of
2
the buttonhole foot, bring the two gimp
thread ends to the front of the foot, insert
them into the grooves, and then temporarily
tie them there.
Enganche el hilo galón en el extremo posterior
del pie para ojales, coloque los dos extremos
del hilo galón delante del pie, insértelos en las
ranuras y átelos provisionalmente.
53
Page 55

SEWING BUTTONHOLES AND BUTTONS / COSTURA DE OJALES Y BOTONES ——————————————————————
—
If the left side is too open or tight compared
Adjusting Buttonholes
Ajuste de ojales
If the stitching on the two sides of the buttonhole is
not the same, you can make the following
adjustments.
Si la costura en los dos lados del ojal no es igual,
puede realizar los siguientes ajustes.
Set the stitch length dial between "F" and 1.5
1
and sew the buttonhole on a scrap piece of
fabric to observe how the material is fed.
Ajuste el control de longitud de puntada entre
"F" y 1,5 y cosa el ojal en un retal para
observar cómo se arrastra el material.
If the right side of the buttonhole is too open
2
or tight, adjust the feeding of the material
with the stitch length dial.
Si el lado derecho del ojal está demasiado
abierto o apretado, ajuste el avance del
material con el control de longitud de puntada.
1
4
with the right side, adjust the buttonhole fineadjustment screw as described below.
Si el lado izquierdo está demasiado abierto o
apretado en comparación con el lado derecho,
ajuste el tornillo de ajuste fino para ojales como
se indica a continuación.
If the left side is too open, turn the buttonhole
fine-adjustment screw with a large screwdriver
– direction.
in the
If the left side is too tight, turn the buttonhole
fine-adjustment screw with a large screwdriver
in the
+ direction.
Si el lado izquierdo está demasiado abierto,
gire el tornillo de ajuste fino para ojales con un
destornillador grande en la dirección
Si el lado izquierdo está demasiado apretado,
gire el tornillo de ajuste fino para ojales con un
destornillador grande en la dirección
• This adjustment ensures both sides of the
buttonhole are the same.
Este ajuste asegura que ambos lados del ojal
sean iguales.
–.
+.
2
1 Right side / Lado derecho
2 Shorter / Más corta
3 Longer / Más larga
After obtaining a satisfactory feed on the right
3
side, stitch the buttonhole and observe the
feeding.
Tras obtener el avance satisfactorio del material
en el lado derecho, cosa el ojal y observe el
avance.
3
2
1
3
4
1 Stitch length dial / Control de longitud de puntada
2 Buttonhole fine-adjustment screw / Tornillo de
ajuste fino de los ojales
3 Left side / Lado izquierdo
4 Buttonhole appearance / Aspecto del ojal
4
54
Page 56

Sewing Buttons
Costura de botones
Stitch
Name
Nombre
puntada
Zigzag
Puntada
zig-zag
1
Pattern
Dibujo
de la
Stitch
de
Measure the distance between the
buttonholes and mark the fabric. Then set the
pattern selection dial to the Zigzag Stitch, and
set the width you want.
Mida la distancia entre los ojales y marque la
tela. Después ponga el selector de puntadas en
la puntada en zig-zag, y ajuste la anchura que
desee.
Length
[mm (inch)]
Longitud
[mm (pulg.)]
F
(1/64)
Width
[mm (inch)]
Anchura
[mm (pulg.)]
Any
Cualquiera
Foot
Pie
Button
Sewing
Foot
Pie
especial
para
botones
Other
Otro
Darning
Plate
Placa
de
zurcir
Turn on the machine.
5
Conecte la alimentación de la máquina.
Put a button between the foot and the fabric and
6
make sure that the needle enters the holes
without hitting the button. If it hits, see step 1.
Coloque un botón entre el pie y la tela, y
asegúrese de que la aguja entra en los orificios
sin golpear el botón. Si golpeara, consulte el
1.
paso
At a slow speed, sew about 10 stitches.
7
Cosa unas 10 puntadas a una velocidad baja.
4
Turn off the machine.
2
Desconecte la alimentación de la máquina.
Change the foot to the button sewing foot.
3
Quite el pie que hay colocado y ponga el pie
especial para botones.
Place the darning plate on the needle plate.
4
Coloque la placa de zurcir en la placa de la
aguja.
Remove the material from the machine. Cut
8
the upper and lower threads and tie both
threads at the back of the material.
Retire el material de la máquina. Corte los hilos
superior e inferior, y haga un nudo con ambos
hilos en la parte trasera del material.
CAUTION/PRECAUCIÓN
● Make sure the needle does not hit the
button during sewing. The needle may
break and you may be injured.
●
Asegúrese de que la aguja no golpea el botón
durante la costura. La aguja podría romperse y
usted podría resultar lesionado.
55
Page 57

USING ATTACHMENTS AND APPLICATIONS / USO DE ACCESORIOS Y APLICACIONES ——————————————————
—
5
USING ATTACHMENTS AND APPLICATIONS
USO DE ACCESORIOS Y APLICACIONES
Zipper Insertion
Costura de cremalleras
Stitch
Name
Nombre
de la
puntada
Straight
Stitch
Puntada
recta
You can use the zipper foot to sew different types of
zippers, and can easily position it to the right or left
side of the needle.
When sewing the right side of the zipper, attach the
shank to the left pin of the zipper foot. When sewing
the left side of the zipper, attach the shank to the
right pin of the zipper foot.
El pie para cremalleras puede utilizarse para coser
diferentes tipos de cremalleras y se puede colocar
fácilmente a la derecha o a la izquierda de la aguja.
Al coser el lado derecho de la cremallera, coloque la
lengüeta en la patilla izquierda del pie para
cremalleras. Cuando cosa el lado izquierdo de la
cremallera, coloque la lengüeta en la patilla derecha
del pie para cremalleras.
Pattern
Dibujo
1
Length
[mm (inch)]
Longitud
[mm (pulg.)]
2-3
(1/16-1/8)
Width
[mm (inch)]
Anchura
[mm (pulg.)]
2.5
(center /
centro)
(3/32)
2
Foot
Pie
Zipper
Foot
Pie para
cremalleras
Turn off the machine and raise the presser
1
foot.
Desconecte la alimentación de la máquina y
suba el pie prensatela.
Set the pattern selection dial to the Straight
2
Stitch. Set the stitch length between 2
(1/16 inch) and 3 (1/8 inch). Set the stitch
width at 2.5 (3/32 inch) to move the needle
into the correct position.
Ajuste el selector de puntadas en la puntada
recta. Ajuste la longitud de la puntada entre
2 (1/16 pulg.) y 3 (1/8 pulg.). Ajuste la
anchura de la puntada en 2,5 (3/32 pulg.)
para mover la aguja hasta la posición correcta.
To attach the zipper foot, lower the presser foot
3
lever either on the left or right pin of the zipper
foot.
Para fijar el pie para cremalleras, baje la
palanca del pie prensatela de la patilla
izquierda o derecha del pie para cremalleras.
Fold the edge of the material 2 cm (3/4 inch)
4
and place the zipper under the folded section.
Lower the needle into the notch located either
on the left or right side of the zipper foot.
Doble el borde del material 2 cm (3/4 pulg.) y
coloque la cremallera debajo de la zona
doblada.
Baje la aguja para introducirla en la muesca del
lado izquierdo o derecho del pie para
cremalleras.
1 Zipper foot / Pie para cremalleras
3
2 Right pin for sewing the left side of the zipper /
Patilla derecha para coser el lado izquierdo de la
cremallera
3 Left pin for sewing the right side of the zipper /
Patilla izquierda para coser el lado derecho de la
cremallera
56
CAUTION/PRECAUCIÓN
● Turn the handwheel by hand to make
sure the needle does not hit the zipper
foot before you start sewing. Choosing a
different stitch will cause the needle to
hit the presser foot and break, and you
may be injured.
● Antes de comenzar a coser, gire la rueda
a mano para comprobar que la aguja no
golpea el pie para cremalleras. Si elige
una puntada diferente, la aguja golpeará
el pie prensatela y se romperá, pudiendo
resultar lesionado.
Page 58

Sew from the bottom of the zipper toward the
5
top on both sides. The needle should be
positioned on the zipper side of the foot for
best results.
Cosa desde la parte inferior de la cremallera
hacia la parte superior en ambos lados. Para
obtener los mejores resultados, la aguja debe
colocarse en el lado de la cremallera del pie.
Gathering / Fruncidos
Stitch Name
Nombre de la puntada
Pattern
Dibujo
Length
[mm (inch)]
Longitud
[mm (pulg.)]
To sew the opposite side of the zipper, first
6
turn the machine off and raise the presser foot
lever. Release the zipper foot by pressing the
button located at the back of the foot, then fit
the foot on the other side of the zipper.
Continue sewing using the pin on that side of
the zipper foot.
Para coser el lado contrario de la cremallera,
primero apague la máquina y levante la
palanca del pie prensatela. Suelte el pie para
cremalleras presionando el botón que se
encuentra en la parte posterior del pie, después
coloque el pie para cremalleras al otro lado de
la cremallera. Continúe cosiendo utilizando la
muesca de ese lado.
Straight Stitch
Puntada recta
Set the pattern selection dial to Straight
1
Stitch.
Ajuste el selector de puntadas en la puntada
recta.
Loosen the tension of the upper thread so that
2
the lower thread lies on the underside of the
material.
Afloje la tensión del hilo superior de forma que
el hilo inferior descanse sobre la cara inferior
del material.
Sew a single row (or many rows) of straight
3
stitches.
Cosa una sola fila (o muchas filas) de puntadas
rectas.
Pull the lower threads to gather the material.
4
Tire de los hilos inferiores para fruncir el
material.
4 (3/16)
5
CAUTION/PRECAUCIÓN
Make sure the needle does not hit the
●
zipper during sewing. If the needle hits
the zipper, the needle may break and you
may be injured.
● Asegúrese de que la aguja no golpea la
cremallera durante la costura. Si la aguja
golpeara la cremallera, podría romperse y
usted lesionarse.
57
Page 59

USING ATTACHMENTS AND APPLICATIONS / USO DE ACCESORIOS Y APLICACIONES ——————————————————
—
Repeat this motion until the darn section is
6
Darning / Zurcidos
filled with parallel lines of stitching.
Repita este movimiento hasta que la zona para
zurcir quede rellenada de líneas paralelas de
Stitch
Name
Nombre
de la
puntada
Pattern
Dibujo
Length
[mm (inch)]
Longitud
[mm (pulg.)]
Foot
Pie
Other
Otro
puntadas.
Zigzag
Straight
Stitch
Puntada
recta
Any
Cualquiera
Presser
prensatela
Foot
Pie
para
Darning
Plate
Placa
de
zurcir
zig-zag
Turn off the machine.
1
Place the darning plate on the needle plate,
then turn on the machine.
Appliqués / Aplicaciones
Desconecte la alimentación de la máquina.
Coloque la placa de zurcir en la placa de la
aguja, y después conecte la alimentación de la
máquina.
Stitch Name
Nombre de la
puntada
Zigzag Stitch
Puntada de
zig-zag
Pattern
Dibujo
Length
[mm (inch)]
Longitud
[mm (pulg.)]
F-2
(1/64-1/16)
Width
[mm (inch)]
Anchura
[mm (pulg.)]
Any
Cualquiera
You can create an applique by cutting a different
piece of fabric into a shape and using it as a
decoration.
Set the pattern selection dial to the Straight
2
Stitch.
Ajuste el selector de puntadas en la puntada
recta.
Puede crear una aplicación si corta un trozo diferente
de tela con forma y lo utiliza como motivo decorativo.
Baste the cut design to the fabric.
1
Hilvane el diseño de corte a la tela.
Put the section you want to darn under the
3
presser foot together with fabric for
reinforcement.
Coloque la zona que desee zurcir bajo el pie
prensatela, junto con tela de refuerzo.
Carefully sew around the edge of the design
2
with a zigzag stitch.
Cosa con cuidado alrededor del borde del
diseño con una costura de zig-zag.
Lower the presser foot.
4
Baje el pie prensatela.
Begin sewing by alternating between gently
5
drawing the work away from you and pulling
it toward you.
Comience a coser alternando entre alejar y
acercar poco a poco la labor.
58
Page 60

Cut away any fabric that is left outside the
3
stitching.
Corte toda la tela que quede fuera de la
costura.
Remove the basting, if necessary.
4
Quite el hilvanado, si fuera necesario.
Memo/Recuerde
● Make reinforcing straight stitches at the
beginning and the end of the zigzag
stitching.
● Realice puntadas rectas de refuerzo al
comienzo y al final de la costura de zig-zag.
CAUTION/PRECAUCIÓN
Be careful that the needle does not hit a
●
pin during sewing. The needle could
break, and you may be injured.
● Tenga cuidado de que la aguja no golpee
ningún alfiler durante la costura. La aguja
podría romperse y causar lesiones.
Monogramming and
Embroidering
Realización de monogramas y
bordados
■ Preparing for Monogramming and Embroidering
Preparación para coser monogramas y bordados
Turn off the machine.
1
Place the darning plate on the needle plate,
then turn on the machine.
Desconecte la alimentación de la máquina.
Coloque la placa de zurcir en la placa de la
aguja, y después conecte la alimentación de la
máquina.
Set the pattern selection dial to Zigzag Stitch.
2
Ajuste el selector de puntadas en la puntada de
zig-zag.
Draw the lettering (for monogramming) or
3
design (for embroidering) on the surface of
the fabric.
Dibuje las letras (para el monograma) o el diseño
(para el bordado) en la superficie de la tela.
Stretch the fabric between embroidery hoops
4
as firmly as possible, with the underside of the
fabric on the bottom of the inside hoop.
Estire la tela entre los aros de bordado lo más
firmemente posible, con la cara inferior de la
tela colocada sobre la parte inferior del aro
interior.
Put the work under the needle and lower the
5
presser bar with the foot removed.
Ponga la labor de costura debajo de la aguja y
baje la barra del pie prensatela con el pie
quitado.
5
Stitch
Name
Nombre
de la
puntada
Zigzag
Stitch
Puntada
de
zig-zag
Pattern
Dibujo
Length
[mm
(inch)]
Longitud
[mm
(pulg.)]
Any
Cualquiera
Width
[mm
(inch)]
Anchura
[mm
(pulg.)]
Any
Cualquiera
Foot
Pie
None
Ninguno
Other
Otro
Darning
Plate
Placa
de
zurcir
59
Page 61

USING ATTACHMENTS AND APPLICATIONS / USO DE ACCESORIOS Y APLICACIONES ——————————————————
—
Pull the lower thread up through the starting
6
position by turning the handwheel and make a
few holding stitches.
Tire del hilo inferior hacia arriba a través de la
posición inicial; para ello, gire la rueda y
realice unas cuantas puntadas de sujeción.
Grip the hoop with your thumbs and
7
forefingers while pressing the fabric with your
middle and third fingers and supporting the
outside of the hoop with your little fingers.
Agarre el aro con los dedos pulgar e índice
mientras presiona la tela con los dedos corazón
y anular, y sujeta la parte exterior del aro con
los meñiques.
■ Monogramming / Monogramas
Sew by moving the hoop slowly along the
1
lettering at a constant speed.
Cosa moviendo los aros lentamente a lo largo
de las letras a una velocidad constante.
Secure with a few straight stitches at the end
2
of the last letter.
Asegure con unas cuantas puntadas rectas al
final de la última letra.
CAUTION/PRECAUCIÓN
Keep fingers away from moving parts,
●
especially needles.
● Mantenga los dedos alejados de las piezas
en movimiento, especialmente las agujas.
60
CAUTION/PRECAUCIÓN
● Keep fingers away from moving parts,
especially needles.
● Mantenga los dedos alejados de las piezas
en movimiento, especialmente las agujas.
Page 62

■ Embroidering / Bordados
Stitch the outline of the design by moving the
1
embroidery hoop.
Cosa el contorno del diseño moviendo el aro de
bordado.
Fill in the design alternating from the outline
2
of the design to the inside and from the inside
to the edge of the outline until the design is
completely filled in. Keep the stitching close
together.
Rellene el diseño alternando desde su contorno
hasta la parte interior y viceversa, hasta que el
diseño quede totalmente relleno. Cosa las
puntadas lo más juntas posible.
CAUTION/PRECAUCIÓN
● Keep fingers away from moving parts,
especially needles.
● Mantenga los dedos alejados de las piezas
en movimiento, especialmente las agujas.
Memo/Recuerde
● You can make long stitches by moving the
embroidery hoop rapidly and short stitches
by moving it slowly.
● Puede hacer puntadas largas moviendo el
aro de bordado rápidamente, y puntadas
cortas moviéndolo lentamente.
Secure with a few straight stitches at the end
3
of the design.
Asegure con unas cuantas puntadas rectas al
final del diseño.
5
61
Page 63

USING ATTACHMENTS AND APPLICATIONS / USO DE ACCESORIOS Y APLICACIONES ——————————————————
—
OPTIONAL ACCESSORIES / ACCESORIOS OPCIONALES
Loosen the presser foot screw to remove the
Using the Walking Foot
Utilización del pie móvil
3
presser foot holder.
Afloje el tornillo del pie prensatela para retirar
el soporte del pie.
Stitch Name
Nombre de la
puntada
Straight Stitch
Puntada recta
Zigzag Stitch
Puntada de
zig-zag
This foot is very useful for sewing materials such as
vinyl cloth, synthetic leather, thin leather, etc. These
materials are difficult to feed when sewing. The
walking foot prevents these materials from
crumpling, slipping or sticking between the presser
foot and the material.
Este pie resulta muy útil para coser materiales como la
tela de vinilo, el cuero sintético, el cuero fino, etc.
Estos materiales son difíciles de mover durante la
costura. El pie móvil impide que estos materiales se
arruguen, deslicen o queden pegados entre el pie
prensatela y el material.
Pattern
Dibujo
Length
[mm (inch)]
Longitud
[mm (pulg.)]
1-4
(1/16-3/16)
1-4
(1/16-3/16)
Width
[mm (inch)]
Anchura
[mm (pulg.)]
2-3
(1/16-1/8)
0-5
(0-3/16)
Note/Nota
● Only use the walking foot with straight or
zigzag stitches. Do not use other patterns.
Reverse stitches can not be sewn with the
walking foot.
2
3
1
1 Use a coin or screwdriver / Utilice una moneda o
un destornillador.
2 Presser foot holder / Soporte del pie prensatela
3 Presser foot screw / Tornillo del pie prensatela
Attach the forked section of the connecting
4
lever to the needle clamp, and fit the walking
foot to the presser bar.
Coloque la zona ahorquillada de la palanca de
conexión en la presilla de la aguja, y el pie
móvil en la barra del pie prensatela.
1
2
● Utilice el pie móvil únicamente con puntadas
rectas o de zig-zag. No utilice otros dibujos.
No es posible coser puntas en reversa con el
pie móvil.
Turn off the machine.
1
Desconecte la alimentación de la máquina.
Raise the needle and the presser foot.
2
Levante la aguja y el pie prensatela.
62
3
1 Forked part of operation lever / Parte ahorquillada
de la palanca de operaciones
2 Presser bar holder / Soporte del pie prensatela
3 Needle clamp / Presilla de la aguja
Page 64

Lower the presser foot lever and then tighten
5
the presser foot screw.
Baje la palanca del pie prensatela y, a
continuación, apriete el tornillo del pie.
Using the Quilting Foot
Utilización del pie para
acolchados
1
1 Presser foot screw / Tornillo del pie prensatela
CAUTION/PRECAUCIÓN
● Use a coin or screwdriver to tighten the
screw securely. If the screw is loose, the
needle may hit the presser foot and you
may be injured.
● Before you start sewing, make sure you
turn the handwheel toward you
(counterclockwise) to check that the
needle does not hit the presser foot.
● Be careful not to touch the needle,
otherwise you may be injured.
Stitch
Name
Nombre
de la
puntada
Straight
Stitch
Puntada
recta
The Quilting Foot is useful for darning and
free-motion machine quilting.
El pie para acolchados resulta útil para zurcidos y
y acolchados con la máquina en marcha libre.
1
2
3
Pattern
Dibujo
Turn off the machine.
Desconecte la alimentación de la máquina.
Raise the needle and the presser foot.
Levante la aguja y el pie prensatela.
Loosen the presser foot screw to remove the
presser foot holder.
Afloje el tornillo del pie prensatela para retirar
el soporte del pie.
Length
[mm (inch)]
Longitud
[mm (pulg.)]
Any
Cualquiera
Width
[mm (inch)]
Anchura
[mm (pulg.)
2.5
(3/32)
other
Otro
]
Darning
Plate
Placa de
zurcir
5
● Utilice una moneda o un destornillador
para apretar firmemente el tornillo. Si el
tornillo está suelto, la aguja podría
golpear el pie prensatela y usted podría
resultar lesionado.
● Antes de comenzar a coser, asegúrese de
girar la rueda hacia usted (hacia la
izquierda) para comprobar que la aguja
no golpea el pie prensatela.
● Tenga cuidado de no tocar la aguja pues,
de lo contrario, podría resultar lesionado.
Note/Nota
● When sewing with the walking foot, sew at
medium to low speeds.
● Cuando cosa con el pie móvil, utilice una
velocidad de cosido entre media y baja.
2
3
1
1 Use a coin or screwdriver / Utilice una moneda o
un destornillador.
2 Presser foot holder / Soporte del pie prensatela
3 Presser foot screw / Tornillo del pie prensatela
63
Page 65

USING ATTACHMENTS AND APPLICATIONS / USO DE ACCESORIOS Y APLICACIONES ——————————————————
—
Attach the quilting foot, making sure that part
4
A shown in the illustration is above the
needle clamp screw. Then lower the presser
foot lever and tighten the presser foot screw.
Coloque el pie para acolchados, asegurándose
de que la parte A que se muestra en la
ilustración está por encima del tornillo de la
presilla de la aguja. A continuación, baje la
palanca del pie prensatela y apriete el tornillo
del pie.
• Make sure that the needle clamp screw is
firmly tightened.
Compruebe que el tornillo de la presilla de la
aguja está firmemente apretado.
A
1
1 Presser foot screw / Tornillo del pie prensatela
2 Needle clamp screw / Tornillo de la presilla de la
aguja
2
CAUTION/PRECAUCIÓN
Put the darning plate on the needle plate.
5
Turn on the machine.
Coloque la placa de zurcir en la placa de la
aguja. Conecte la alimentación de la máquina.
Set the pattern selection dial to the Straight
6
Stitch.
Ajuste el selector de puntadas en la puntada
recta.
• Before starting to sew, draw the quilting
design on the fabric.
Antes de comenzar a coser, dibuje el diseño
de acolchado en la tela.
Use both hands to keep the fabric firmly
7
stretched and move the fabric to sew over the
drawn design.
Utilice las dos manos para mantener la tela bien
estirada y muévala para coser sobre el diseño
dibujado.
Be careful not to touch the needle,
●
otherwise you may be injured.
● Use a coin or screwdriver to tighten the
presser foot holder screw securely. If the
screw is loose, the needle may hit the
presser foot and you may be injured.
● Before you start sewing, make sure you
turn the handwheel toward you
(counterclockwise) to check that the
needle does not hit the presser foot.
● Tenga cuidado de no tocar la aguja pues,
de lo contrario, podría resultar lesionado.
● Utilice una moneda o un destornillador
para apretar firmemente el tornillo del
soporte del pie prensatela. Si el tornillo
está suelto, la aguja podría golpear el pie
prensatela y usted podría resultar
lesionado.
● Antes de comenzar a coser, asegúrese de
girar la rueda hacia usted (hacia la
izquierda) para comprobar que la aguja
no golpea el pie prensatela.
64
1
1 Quilting design / Diseño de acolchado
The length of the stitch depends on how
8
quickly you move the fabric and on the
machine’s sewing speed. Sew while moving
the fabric slowly.
La longitud de la puntada depende de la
rapidez con que mueva la tela y de la velocidad
de cosido de la máquina. Cosa mientras mueve
la tela lentamente.
Page 66

Using the 1/4-inch Quilting Foot
Utilización del pie para
acolchados de 1/4 pulgadas
■ Achieving an Accurate Seam Allowance
Cómo conseguir un margen de costura preciso
1
2
3
Stitch Name
Nombre de la
puntada
Straight Stitch
Puntada recta
You can use the 1/4-inch Quilting Foot to sew seams
when piecing together a quilt.
Usted podrá utilizar el pie para acolchados de 1/4
pulgadas para coser costuras al juntar las piezas de
un acolchado.
Pattern
Dibujo
Length
[mm (inch)]
Longitud
[mm (pulg.)]
2-2.5
(1/16-3/32)
Width
[mm (inch)]
Anchura
[mm (pulg.)]
2.5 (center
/
centro
)
(3/32)
1
1 Seam allowance 6.5 mm (1/4 inch) / Margen de
costura de 6,5 mm (1/4 pulg.)
Turn off the machine.
1
Desconecte la alimentación de la máquina.
1 Beginning of stitching / Comienzo de la costura
2 Align this mark with the edge of the fabric. /
Alinee esta marca con el borde de la tela.
3 End of stitching / Final de la costura
4 Align this mark with the edge of the fabric. /
Alinee esta marca con el borde de la tela.
■ Stitching the Top of a Quilt
Cosido en la parte superior de un acolchado
1
2
1 Top of fabric / Parta superior de la tela
2 Seam 3.2 mm (1/8 inch) / Margen de costura de
3,2 mm (1/8 pulg.)
Using the Narrow Hemmer
Foot
Utilización del pie
para dobladillos estrechos
4
5
Set the pattern selection dial to the Straight
2
Stitch. Set the stitch length between 2
(1/16 inch) and 2.5 (3/32 inch). Set the stitch
width at 2.5 (3/32 inch) (center).
Ajuste el selector de puntadas en la puntada
recta. Ajuste la longitud de la puntada entre 2
(1/16 pulg.) y 2,5 (3/32 pulg.). Ajuste la
anchura de la puntada en 2,5 (3/32 pulg.)
(centro).
Attach the 1/4-inch Quilting Foot.
3
Turn on the machine.
Coloque el pie para acolchados de 1/4 pulgadas.
Conecte la alimentación de la máquina.
Position the presser foot over the fabric and
4
sew as shown in the illustration below.
Coloque el pie prensatela sobre la tela y
comience a coser según se muestra en la
ilustración siguiente.
Stitch Name
Nombre de la
puntada
Straight Stitch
Puntada recta
You can use the Narrow Hemmer Foot for binding
lightweight fabrics and for narrow rolled hems.
El pie para dobladillos estrechos se puede utilizar para coser
juntas en telas ligeras y dobladillos enrollados estrechos.
1 Right side of fabric / Tela del derecho
2 Wrong side of fabric / Tela del revés
Pattern
Dibujo
Length
[mm (inch)]
Longitud
[mm (pulg.)]
Any
Cualquiera
1
Width
[mm (inch)]
Anchura
[mm (pulg.)]
2.5 (center
/ centro)
(3/32)
2
65
Page 67

USING ATTACHMENTS AND APPLICATIONS / USO DE ACCESORIOS Y APLICACIONES ——————————————————
—
Turn off the machine.
1
Desconecte la alimentación de la máquina.
Attach the Narrow Hemmer Foot and then set
2
the pattern selection dial to the Straight Stitch.
Set the stitch width at 2.5 (3/32 inch) (center).
Coloque el pie para dobladillos estrechos y, a
continuación, ajuste el selector de puntadas en
la puntada recta. Ajuste la anchura de la
puntada en 2,5 (3/32 pulg.) (centro).
Connect the foot controller so that both hands
3
are free to guide the material.
Turn on the machine.
Conecte el pedal de manera que pueda guiar el
material con las dos manos libres.
Conecte la alimentación de la máquina.
Position the fabric (wrong side facing up)
4
under the presser foot. Lower the needle 3 mm
(1/8 inch) from the edges of the fabric, lower
the presser foot, and then sew 2 or 3 stitches.
Coloque la tela (con el revés hacia arriba) debajo
del pie prensatela. Baje la aguja 3 mm (1/8
pulg.) desde los bordes de la tela. A continuación,
baje el pie prensatela y cosa 2 ó 3 puntadas.
Holding both threads, pass them through the
6
curled part of the presser foot and pull them
toward the back of the presser foot. Wrap the
fabric around the curled part of the presser foot
in the same way. Position the edge of the fabric
just behind the needle and lower the presser foot.
Sujetando ambos hilos, páselos por la parte ondulada
del pie prensatela y llévelos hasta la parte trasera del
pie. Coloque la tela alrededor de la parte ondulada
del pie prensatela de la misma manera. Sitúe el borde
de la tela justo detrás de la aguja y baje el pie.
Without allowing the fabric to stick out from
7
the right side of the presser foot, lightly pull
on the thread while slowly sewing.
Sin permitir que se salga la tela por el lado
derecho del pie prensatela, tire ligeramente del
hilo mientras cose lentamente.
1
3 mm
(1/8 inch)
3 mm
(1/8 inch)
1 Needle / Aguja
Raise the needle and the presser foot, then
5
hold the ends of the upper and lower thread
to prevent them from being pulled out of the
fabric and pull the fabric out from the front of
the presser foot.
Suba la aguja y el pie prensatela, sujete los
extremos de los hilos superior e inferior para
que no se salgan de la tela y, después, tire de
ella desde la parte delantera del pie.
After sewing 2 (3/4 inch) to 3 cm (1 1/8 inch)
8
of the fabric, release the thread and guide the
fabric from the front of the presser foot with
your left hand. Keep a uniform amount of
fabric wrapped around the presser foot curl
until the seam is completed.
Después de coser entre 2 (3/4 pulg.) y 3 cm
(1 1/8 pulg.) de la tela, suelte el hilo y guíe la tela
con la mano izquierda desde la parte delantera
del pie prensatela. Mantenga la misma cantidad
de tela colocada alrededor de la parte ondulada
del pie prensatela hasta que termine la costura.
66
Page 68

■ If too Little Fabric is Wrapped around the Curl,
then a Threefold Seam is not being Sewn
Si hay muy poca tela colocada alrededor de la
parte ondulada, no se podrá coser una costura
triple
Using the Blind Stitch Foot
Utilización del pie para
puntada invisible
Pull the fabric held in your right hand to the left in
order to increase the amount of fabric wrapped in
the presser foot curl. At the same time, carefully
guide the fabric to the right with your left hand.
Tire de la tela que tiene en la mano derecha hacia la
izquierda para aumentar la cantidad de tela
colocada en la parte ondulada del pie prensatela. Al
mismo tiempo, guíe con cuidado la tela hacia la
derecha con la mano izquierda.
■ If too Much Fabric is Wrapped around the Curl,
then a Wide Threefold Seam is being Sewn
Si hay demasiada tela colocada alrededor de la
parte ondulada, se coserá una costura triple ancha
Pull the fabric held in your right hand to the right in
order to decrease the amount of fabric wrapped in
the presser foot curl. At the same time, carefully
guide the extra fabric to the left with your left hand.
Tire de la tela que tiene en la mano derecha hacia la
derecha para reducir la cantidad de tela colocada en
la parte ondulada del pie prensatela. Al mismo
tiempo, guíe con cuidado la tela que sobra hacia la
izquierda con la mano izquierda.
Stitch Name
Nombre de
la puntada
Straight
Stitch
Puntada
recta
Zigzag
Stitch
Puntada de
zig-zag
Blind Hem
Stitch
Costura
invisible
para
dobladillo
Stretch
Blind Hem
Stitch
Costura
invisible
elástica
Stretch
Blind Hem
Stitch
Costura
invisible
elástica
This foot comes in handy not only for blind hem
stitching, but also for sewing fabric edges and seams.
Este pie resulta útil no sólo para la costura invisible para
dobladillo, también para coser bordes de tela y costuras.
■ When Edge Stitching / Para coser bordes
Turn off the machine.
1
Desconecte la alimentación de la máquina.
Attach the Blind Stitch Foot.
2
Turn on the machine.
Coloque el pie para puntada invisible.
Conecte la alimentación de la máquina.
Pattern
Dibujo
Length
[mm (inch)]
Longitud
[mm (pulg.)]
Any
Cualquiera
1-4
(1/16-3/16)
F-2
(1/64-1/16)
F-1.5
(1/64-1/16)
F-1.5
(1/64-1/16)
Width
[mm (inch)]
Anchura
[mm (pulg.)]
Any
Cualquiera
0-5
(0-3/16)
3-5
(1/8-3/16)
3-5
(1/8-3/16)
3-5
(1/8-3/16)
5
Position the needle the distance you want the
3
stitch to be from the edge of the fabric, and
then lower the needle in that position.
Coloque la aguja a la distancia que desee que
esté la puntada del borde de la tela y, a
continuación, baje la aguja en esa posición.
67
Page 69

USING ATTACHMENTS AND APPLICATIONS / USO DE ACCESORIOS Y APLICACIONES ——————————————————
—
Turn the foot guide screw and carefully adjust
4
to guide the fabric.
Gire el tornillo de la guía del pie y ajuste con
cuidado para guiar la tela.
1 Screw / Tornillo
2 Guide / Guía
■ When Sewing Seams / Para coser costuras
Turn off the machine.
1
Desconecte la alimentación de la máquina.
Attach the Blind Stitch Foot.
2
Turn on the machine.
Coloque el pie para puntada invisible.
Conecte la alimentación de la máquina.
Set the pattern selection dial to the Straight
3
Stitch, and then set the stitch width at 2.5
(3/32 inch) (center). Align the foot guide with
the needle position.
Ajuste el selector de puntadas en la puntada
recta y, después, ajuste la anchura de la
puntada en 2,5 (3/32 pulg.) (centro). Alinee la
guía del pie con la posición de la aguja.
Set the pattern selection dial to the Zigzag
4
Stitch.
Ajuste el selector de puntadas en la puntada de
zig-zag.
Lower the presser foot and begin sewing.
6
Baje el pie prensatela y comience a coser.
■ When Blind Hem Stitching
Para coser costuras invisibles para dobladillo
3
4
1
1 With medium weight fabrics / Con telas medianas
2 With heavyweight fabrics / Con telas pesadas
3 Right side of fabric / Tela del derecho
4 Wrong side of fabric / Tela del revés
3
4
2
When Blind Hem Stitching using the Blind Stitch
Foot, turn the screw to adjust the guide to the folded
hem.
Para coser costuras invisibles para dobladillo
utilizando el pie para puntada invisible, gire el tornillo
para ajustar la guía al dobladillo.
• For more details on Blind Hem Stitching, see
page 45.
Si desea información sobre la costura
invisible para dobladillo, consulte la
página 45.
1
Place the fabric under the foot so the foot
5
guide is aligned between both edges of the
fabric.
Coloque la tela debajo del pie de manera que
la guía del pie quede alineada entre ambos
bordes de la tela.
68
2
3
1 Screw / Tornillo
2 Guide / Guía
3 Folded hem / Dobladillo
Page 70

6
APPENDIX
ANEXO
MAINTENANCE / MANTENIMIENTO
Changing the Light Bulb
Cambio de la bombilla
CAUTION/PRECAUCIÓN
● Turn off the main power switch and
unplug the machine before you change
the light bulb. If the main power switch is
on when you change the light bulb, you
may get an electric shock. If the machine
is on and you step on the foot controller,
you may be injured.
● To avoid burns, let the light bulb cool
down before you change it.
● Apague el interruptor de la alimentación y
desenchufe la máquina antes de cambiar
la bombilla. Si el interruptor de la
alimentación está en la posición de
encendido cuando cambie la bombilla,
podría recibir una descarga eléctrica. Si la
máquina está encendida y pisa el pedal,
podría resultar lesionado.
● Para evitar quemarse, deje que la bombilla
se enfríe antes de cambiarla.
Remove the power supply plug from the
1
outlet.
Quite el enchufe de la toma de corriente.
Loosen the screw on the back of the sewing
2
head. Then remove the light cover from the
machine.
Afloje el tornillo situado en la parte trasera del
cabezal de costura. A continuación, retire la
tapa de la bombilla de la máquina.
Replace the sewing light bulb.
3
Sustituya la bombilla de costura.
1
2
3
1 Bulb / Bombilla
2 Loosen / Aflojado
3 Tighten / Apretado
Put the light cover back on and fasten the screw.
4
Vuelva a colocar la tapa de la bombilla y
apriete el tornillo.
6
69
Page 71

APPENDIX / ANEXO ————————————————————————————————————————————————
—
Using a coin, remove the two screws.
5
Cleaning / Limpieza
Lift up the needle plate as shown in the
illustration, and then slide the needle plate to
the left to remove it.
CAUTION/PRECAUCIÓN
Make sure you unplug the machine
●
before you clean it, otherwise you risk
Quite los dos tornillos con una moneda.
Levante la placa de la aguja como se indica en
la ilustración y, a continuación, deslícela hacia
la izquierda para extraerla.
getting an electric shork or being injured.
● Asegúrese de que desenchufa la máquina
antes de proceder a su limpieza; de no
hacerlo podría recibir una descarga
eléctrica o resultar lesionado.
Switch the machine off and unplug it.
1
Apague la máquina y desenchúfela.
Raise the needle and the presser foot.
2
Levante la aguja y el pie prensatela.
Loosen the presser foot screw and the needle
3
clamp screw to remove the presser foot
holder and the needle.
Afloje el tornillo del pie prensatela y el de la
presilla de la aguja para retirar el soporte del
pie y la aguja.
1 Use a coin or screwdriver / Utilice una moneda o
un destornillador
Grasp the bobbin case, and then lift it out to
6
the left.
Coja la caja de la bobina y tire de ella hacia la
izquierda.
Grasp both sides of the needle plate cover,
4
and then slide it toward you to remove the
needle plate cover.
Agarre la cubierta de la placa de la aguja por
ambos lados y, a continuación, deslícela hacia
usted para retirarla.
1
1 Needle plate cover / Cubierta de la placa de la
aguja
70
Use the cleaning brush or a vacuum cleaner to
7
remove any dust from the race and its
surrounding area.
Utilice el cepillo de limpieza o una aspiradora
para eliminar todo el polvo de la pista y la zona
de alrededor.
1 Cleaning brush / Cepillo de limpieza
2 Race / Pista
• Do not apply oil to the bobbin case.
No ponga aceite lubricante en la caja de la
bobina.
Page 72

Insert the bobbin case so that the projection
8
on the bobbin case aligns with the spring.
Coloque la caja de la bobina de manera que su
proyección quede alineada con el resorte.
1 Projection / Proyección
2 Spring / Resorte
Install the needle plate, sliding it to the right
9
to secure it, and then tighten the screws.
Coloque la placa de la aguja, deslícela hacia la
derecha para fijarla y, después, apriete los
tornillos.
Make sure that the tab on the left side of the
needle plate is aligned with the notch in the
bobbin case.
Asegúrese de que la pestaña que hay a la
izquierda de la placa de la aguja queda
alineada con la muesca de la caja de la
bobina.
Install the needle plate cover.
0
Coloque la cubierta de la placa de la aguja.
Insert the tabs on the needle plate cover into
the notches in the needle plate, and then slide
the cover back into position.
Introduzca las pestañas de la cubierta de la
placa de la aguja en las muescas de la placa de
la aguja y, a continuación, vuelva a colocar la
cubierta.
CAUTION/PRECAUCIÓN
● Never use a bobbin case that is
scratched; otherwise the upper thread
may become tangled, the needle may
break, or sewing performance may
suffer. For a new bobbin case (part code:
XC8993-021), contact your nearest
authorized service center.
● Make sure that you fit the bobbin case
properly, otherwise the needle may
break.
● Nunca utilice una caja de bobina que esté
rayada, pues de hacerlo es posible que el
hilo superior se enganche, la aguja se
rompa o se deteriore el rendimiento de la
costura. Si desea una caja de bobina
nueva (código de pieza: XC8993-021),
póngase en contacto con el servicio de
reparaciones autorizado más cercano.
● Asegúrese de que ajusta la caja de la
bobina correctamente pues, de lo
contrario, la aguja podría romperse.
6
1 Tab / Pestaña
2 Notch / Muesca
3 Screws / Tornillos
3
71
Page 73

APPENDIX / ANEXO ————————————————————————————————————————————————
—
Troubleshooting
If the machine stops working properly, check the following possible problems.
If the problem is still there, contact your retailer or the nearest authorized service center.
Symptom Possible cause How to put it right Reference
The machine is not plugged in. Plug the machine in. page 15
The sewing
machine does
not work.
The needle
breaks.
The upper
thread breaks.
The main power switch is turned off. Turn on the main power switch. page 15
The bobbin-winder shaft is pushed
to the right.
You have not used the foot controller properly.
The needle is not fitted properly. Fit the needle properly. page 16
The needle clamp screw is loose.
The needle is bent or blunt. Replace the needle. page 16
You have not used the right combination of fabric, thread and needle.
The presser foot you are using is not
appropriate for the type of stitch that
you want to sew.
The upper thread tension is too tight. Loosen the upper thread tension. page 38
You are pulling the fabric too much. Lightly guide the fabric.
You have not fitted the spool properly.
The area around the hole in the needle plate is scratched.
The area around the hole in the
presser foot is scratched.
The bobbin case is scratched.
You have not used a bobbin that has
been designed for this machine.
You have not threaded the upper thread
properly. (For example, you have not fitted the spool properly, or the thread has
come out of the guide above the needle.)
There are knots or tangles in the
thread.
The needle is not appropriate for the
thread you are using.
The upper-thread tension is too tight. Loosen the upper thread tension. page 38
The thread is tangled.
The needle is bent or blunt. Replace the needle. page 16
You have not inserted the needle
properly.
Move the bobbin-winder shaft to the
left.
Use the foot controller properly. page 15
Use a coin or screwdriver to firmly
tighten the screw.
Choose a thread and needle that are
appropriate for the type of fabric.
Attach the presser foot that is correct for
the type of stitch that you want to sew.
page 27
page 17
page 39
–
–
Fit the spool properly. page 32, 37
Replace the needle plate.
Contact your retailer or the nearest
authorized service center.
Replace the presser foot.
Contact your retailer or the nearest
authorized service center.
Replace the bobbin case.
Contact your retailer or the nearest
authorized service center.
Incorrect bobbins will not work
properly. Only use a bobbin that has
been designed for this machine.
Correct the upper threading. page 32
Remove any knots or tangles.
Choose a needle that is appropriate
for the type of stitch.
Remove the tangled thread. If the
thread is tangled in the bobbin case,
clean the bobbin case.
Insert the needle properly. page 17
–
–
–
page 26
–
page 39
page 70
72
Page 74

Symptom Possible cause How to put it right Reference
Replace the needle plate.
Contact your retailer or the nearest
authorized service center.
Replace the presser foot.
Contact your retailer or the nearest
authorized service center.
Replace the bobbin case.
Contact your retailer or the nearest
authorized service center.
Incorrect bobbins will not work
properly. Only use a bobbin that has
been designed for this machine.
Wind the bobbin properly. page 26
Replace the bobbin.
Remove the tangled thread and
clean the bobbin case.
Incorrect bobbins will not work
properly. Only use a bobbin that has
been designed for this machine.
Correct the upper threading. page 32
Wind the bobbin thread properly. page 26
Choose a thread and needle that are
appropriate for the type of fabric.
Attach the presser foot holder properly.
Adjust the tension of the upper thread.
Incorrect bobbins will not work
properly. Only use a bobbin that has
been designed for this machine.
Thread the upper thread and wind
the bobbin thread properly.
Fit the spool properly. page 32, 37
Choose a thread and needle that are
appropriate for the type of fabric.
Sew with stabiliser material under
the fabric.
Adjust the tension of the upper
thread.
page 28-33
The upper
thread breaks.
The lower
thread is tangled
or breaks.
The thread tension is incorrect.
The fabric is
wrinkled.
The area around the hole in the needle plate is scratched.
The area around the hole in the
presser foot is scratched.
The bobbin case is scratched, or has
a burr on it.
You have not used a bobbin that has
been designed for this machine.
You have not wound the bobbin
thread properly.
The bobbin is scratched or does not
turn smoothly.
The thread is tangled.
You have not used a bobbin that has
been designed for this machine.
Bobbin is set incorrectly. Reset the bobbin thread correctly. page 28-31
You have not threaded the upper
thread properly.
You have not wound the bobbin
thread properly.
You have not threaded the right
combination of thread and needle
for the fabric you are using.
You have not attached the presser
foot holder properly.
The thread tension is incorrect.
You have not used a bobbin that has
been designed for this machine.
Bobbin is set incorrectly. Reset the bobbin thread correctly. page 28-31
You have not threaded the upper
thread properly or fitted the bobbin
properly.
You have not fitted the spool properly.
You have not used the right
combination of fabric, thread and
needle.
The needle is bent or blunt. Replace the needle. page 16
If you are sewing thin fabric, the
stitch is too thick.
The thread tension is incorrect.
–
–
–
page 26
–
page 70
page 26
page 39
–
page 38
page 26
page 39
–
page 38
6
73
Page 75

APPENDIX / ANEXO ————————————————————————————————————————————————
—
Symptom Possible cause How to put it right Reference
Stitches are
skipped.
There is a highpitched noise
while sewing.
The needle
threader can not
be used.
The stitch is not
sewn correctly.
The fabric does
not feed.
The sewing light
bulb does not
come on.
You have not threaded the upper
thread properly.
You have not used the right combination of fabric, thread and needle.
The needle is bent or blunt. Replace the needle. page 16
You have not inserted the needle
properly.
Dust has accumulated under the
needle plate or in the bobbin case.
Dust has built up in the feed dogs or
in the bobbin case.
You have not threaded the upper
thread properly.
The bobbin case is scratched.
You have not used a bobbin that has
been designed for this machine.
You have not moved the needle
holder to its highest position.
You have not inserted the needle
properly.
The presser foot that you are using is
not correct for the type of stitch.
The thread tension is incorrect.
The thread is tangled.
The stitch is too fine. Lengthen the stitch length.
The darning plate is fitted on the
needle plate.
You have not used the right combination of fabric, thread and needle.
The thread is tangled.
The sewing light bulb is damaged. Replace the sewing light bulb. page 69
Correct the upper threading. page 32
Choose a thread and needle that are
appropriate for the type of fabric.
Insert the needle properly. page 16
Remove the needle plate cover and
clean the plate and the bobbin case.
Clean the bobbin case. page 70
Correct the upper threading. page 32
Replace the bobbin case.
Contact your retailer or the nearest
authorized service center.
Incorrect bobbins will not work
properly. Only use a bobbin that has
been designed for this machine.
Turn the handwheel toward you
(counterclockwise) to raise the needle holder to the highest position.
Insert the needle properly. page 17
Attach the presser foot that is correct
for the type of stitch that you want to
sew.
Adjust the tension of the upper
thread.
Remove the tangled thread. If the
thread is tangled in the bobbin case,
clean the bobbin case.
page 39
page 70
–
page 26
page 34
–
page 38
page 70
–
Remove the darning plate.
Choose a thread and needle that are
appropriate for the type of fabric.
Remove the tangled thread. If the
thread is tangled in the bobbin case,
clean the bobbin case.
–
page 39
page 70
74
Page 76

Solución de problemas
Si la máquina deja de funcionar correctamente, compruebe los posibles problemas que se exponen a continuación.
Si el problema continúa, póngase en contacto con su proveedor o con el servicio de reparaciones autorizado más
cercano.
Síntoma Causa posible Solución Referencia
La máquina no está enchufada. Enchufe la máquina. página 15
Ponga el interruptor de la
alimentación en la posición de
encendido.
Mueva el eje de la devanadora hacia
la izquierda.
Utilice el pedal correctamente. página 15
Coloque la aguja correctamente. página 16
Utilice una moneda o un
destornillador para apretar
firmemente el tornillo.
Cambie la aguja. página 16
Elija un hilo y una aguja que sean
adecuados para el tipo de tela.
Coloque el pie prensatela adecuado
para el tipo de costura que desea
realizar.
Coloque el carrete correctamente.
Cambie la placa de la aguja.
Póngase en contacto con su
proveedor o con el servicio de
reparaciones autorizado más
cercano.
Cambie el pie prensatela.
Póngase en contacto con su
proveedor o con el servicio de
reparaciones autorizado más
cercano.
Cambie la caja de la bobina.
Póngase en contacto con su
proveedor o con el servicio de
reparaciones autorizado más
cercano.
Las bobinas incorrectas no
funcionarán correctamente. Utilice
sólo bobinas diseñadas para esta
máquina.
página 15
página 27
página 17
página 39
–
página 32,
37
–
–
–
página 26
La máquina de
coser no
funciona.
La aguja se
rompe.
El interruptor de la alimentación está
en la posición de apagado.
El eje de la devanadora de bobina
está hacia la derecha.
No ha utilizado el pedal
correctamente.
La aguja no está colocada
correctamente.
El tornillo de la presilla de la aguja
está suelto.
La aguja está doblada o poco
afilada.
No ha utilizado la combinación
correcta de tela, hilo y aguja.
El pie prensatela que utiliza no es
adecuado para el tipo de costura que
desea realizar.
El hilo superior está demasiado tenso. Afloje la tensión del hilo superior. página 38
Está tirando demasiado de la tela. Guíe la tela con suavidad. –
No ha colocado el carrete
correctamente.
La zona alrededor del orificio en la
placa de la aguja está rayada.
La zona alrededor del orificio en el
pie prensatela está rayada.
La caja de la bobina está rayada.
No ha utilizado una bobina diseñada
para esta máquina.
6
75
Page 77

APPENDIX / ANEXO ————————————————————————————————————————————————
—
Síntoma Causa posible Solución Referencia
No ha enhebrado el hilo superior
correctamente. (Por ejemplo, no ha
colocado el carrete correctamente o
el hilo se ha salido de la guía por
Corrija el enhebrado del hilo
superior.
página 32
encima de la aguja.)
El hilo tiene nudos o está enredado. Elimine todos los nudos o enredos. –
El hilo superior
se rompe.
La aguja no es adecuada para el hilo
que está utilizando.
El hilo superior está demasiado tenso. Afloje la tensión del hilo superior. página 38
Elija la aguja adecuada para el tipo
de costura.
página 39
Retire el hilo enganchado. Si el hilo
El hilo está enganchado.
está enganchado en la caja de la
página 70
bobina, limpie la caja.
La aguja está doblada o poco
afilada.
No ha insertado la aguja
correctamente.
Cambie la aguja. página 16
Inserte la aguja correctamente. página 17
Cambie la placa de la aguja.
La zona alrededor del orificio en la
placa de la aguja está rayada.
Póngase en contacto con su
proveedor o con el servicio de
reparaciones autorizado más
–
cercano.
Cambie el pie prensatela.
La zona alrededor del orificio en el
pie prensatela está rayada.
El hilo superior
se rompe.
Póngase en contacto con su
proveedor o con el servicio de
reparaciones autorizado más
cercano.
–
Cambie la caja de la bobina.
La caja de la bobina está rayada o
tiene pelusa.
Póngase en contacto con su
proveedor o con el servicio de
reparaciones autorizado más
–
cercano.
Las bobinas incorrectas no
No ha utilizado una bobina diseñada
para esta máquina.
funcionarán correctamente. Utilice
sólo bobinas diseñadas para esta
página 26
máquina.
El hilo inferior
está enredado o
se rompe.
No ha devanado el hilo de la bobina
correctamente.
La bobina está rayada o no gira
fácilmente.
El hilo está enganchado.
No ha utilizado una bobina diseñada
para esta máquina.
Devane el hilo de la bobina
correctamente.
página 26
Cambie la bobina. –
Retire el hilo enganchado y limpie la
caja de la bobina.
página 70
Las bobinas incorrectas no
funcionarán correctamente. Utilice
sólo bobinas diseñadas para esta
página 26
máquina.
La bobina no está bien ajustada.
Ajuste el hilo de la bobina
correctamente.
página 28-
31
76
Page 78

Síntoma Causa posible Solución Referencia
La tensión del
hilo no es
correcta.
La tela está
arrugado.
Las puntadas
quedan sueltas.
Al coser se
escucha una
especie de
pitido.
No ha enhebrado el hilo superior
correctamente.
No ha devanado el hilo de la bobina
correctamente.
No ha enhebrado la combinación
correcta de hilo y aguja para la tela
que está utilizando.
No ha colocado el soporte del pie
prensatela correctamente.
La tensión del hilo no es correcta. Ajuste la tensión del hilo superior. página 38
No ha utilizado una bobina diseñada
para esta máquina.
La bobina no está bien ajustada.
No ha enhebrado el hilo superior
correctamente o ha colocado la
bobina de forma incorrecta.
No ha colocado el carrete
correctamente.
No ha utilizado la combinación
correcta de tela, hilo y aguja.
La aguja está doblada o poco
afilada.
Si se están cosiendo telas finas, la
puntada es demasiado gruesa.
La tensión del hilo no es correcta. Ajuste la tensión del hilo superior. página 38
No ha enhebrado el hilo superior
correctamente.
No ha utilizado la combinación
correcta de tela, hilo y aguja.
La aguja está doblada o poco
afilada.
No ha insertado la aguja
correctamente.
Se ha acumulado polvo debajo de la
placa de la aguja o en la caja de la
bobina.
Se ha acumulado polvo en los dientes
de arrastre o en la caja de la bobina.
No ha enhebrado el hilo superior
correctamente.
La caja de la bobina está rayada.
No ha utilizado una bobina diseñada
para esta máquina.
Corrija el enhebrado del hilo
superior.
Devane el hilo de la bobina
correctamente.
Elija un hilo y una aguja que sean
adecuados para el tipo de tela.
Coloque el soporte del pie prensatela
correctamente.
Las bobinas incorrectas no
funcionarán correctamente. Utilice
sólo bobinas diseñadas para esta
máquina.
Ajuste el hilo de la bobina
correctamente.
Enhebre el hilo superior y devane el
hilo de la bobina correctamente.
Coloque el carrete correctamente.
Elija un hilo y una aguja que sean
adecuados para el tipo de tela.
Cambie la aguja. página 16
Cosa utilizando un material
estabilizador debajo de la tela.
Corrija el enhebrado del hilo
superior.
Elija un hilo y una aguja que sean
adecuados para el tipo de tela.
Cambie la aguja. página 16
Inserte la aguja correctamente. página 16
Retire la cubierta de la placa de la
aguja y limpie la placa y la caja de la
bobina.
Limpie la caja de la bobina. página 70
Corrija el enhebrado del hilo
superior.
Cambie la caja de la bobina.
Póngase en contacto con su
proveedor o con el servicio de
reparaciones autorizado más
cercano.
Las bobinas incorrectas no
funcionarán correctamente. Utilice
sólo bobinas diseñadas para esta
máquina.
página 32
página 26
página 39
–
página 26
página 28-
31
página 28-
33
página 32,
37
página 39
–
página 32
página 39
página 70
página 32
–
página 26
6
77
Page 79

APPENDIX / ANEXO ————————————————————————————————————————————————
—
Síntoma Causa posible Solución Referencia
No se puede
utilizar el
enhebrador de
aguja.
Al coser, el
resultado de las
puntadas no es el
correcto.
No se ha movido el soporte de la
aguja a su posición más alta.
No ha insertado la aguja
correctamente.
El pie prensatela que está utilizando
no es el correcto para el tipo de
puntada.
La tensión del hilo no es correcta. Ajuste la tensión del hilo superior. página 38
El hilo está enganchado.
Gire la rueda hacia usted (hacia la
izquierda) para subir el soporte de la
página 34
aguja a la posición más alta.
Inserte la aguja correctamente. página 17
Coloque el pie prensatela adecuado
para el tipo de costura que desea
–
realizar.
Retire el hilo enganchado. Si el hilo
está enganchado en la caja de la
página 70
bobina, limpie la caja.
Las puntadas son demasiado finas. Alargue la longitud de las puntadas. –
La tela no se
desliza bien.
La placa de zurcir está colocada en
la placa de la aguja.
No ha utilizado la combinación
correcta de tela, hilo y aguja.
Retire la placa de zurcir. –
Elija un hilo y una aguja que sean
adecuados para el tipo de tela.
página 39
Retire el hilo enganchado. Si el hilo
El hilo está enganchado.
está enganchado en la caja de la
página 70
bobina, limpie la caja.
La bombilla de
costura no se
La bombilla de costura está dañada. Sustituya la bombilla de costura. página 69
enciende.
78
Page 80

INDEX
Numerics
1/4-inch quilting foot ....................................................65
1-Step Automatic Buttonhole
A
Accessories ...................................................................12
optional ........................................................... 13, 62
Appliqués
B
Blind hem stitching .......................................................45
Blind stitch foot
Bobbin
Buttonhole
Buttonhole fine-adjustment screw
Buttons
C
Cleaning .......................................................................70
Connecting plugs
D
Darning ........................................................................58
Darning plate
Decorative stitching
Double action stitching
Drawing up the lower thread
E
Elastic stitching .............................................................46
Embroidering
F
Fabric, thread, and needle combinations ...................... 39
Feather stitching
Flat bed attachment
Foot controller
Free-arm style
G
Gathering ......................................................................57
H
Handwheel ...................................................................32
Heirloom stitching
L
Light bulb
Light switch
Lower threading
M
Main parts .....................................................................10
Main power
Maintenance
Monogramming
.....................................................................58
.............................................................67
winding ..................................................................26
adjusting .................................................................54
making ....................................................................52
sewing .................................................................... 55
.......................................................... 15
............................................55, 58, 59, 64
......................................................50
................................................................59
............................................................49
......................................................19
..............................................................15
...............................................................19
........................................................48
changing .................................................................69
..................................................................15
............................................................28
quick-set bobbin .............................................. 30, 36
..................................................................15
.................................................................69
............................................................59
.................................10, 52
.................................54
.................................................47
........................................36
N
Narrow hemmer foot ....................................................65
Needle
checking .................................................................16
combinations with fabric and thread ........................39
replacing .................................................................16
Needle threader
O
Overedge stitching ........................................................48
P
Pattern selection dial .....................................................20
Patterns
Presser foot
changing .................................................................18
Q
Quick-set bobbin ................................................... 30, 36
Quilting foot
R
Race
cleaning ..................................................................70
Repacking instructions
Reverse sewing lever
S
Satin stitch ....................................................................44
Shell tuck stitching
Spool pin
extra .......................................................................37
Stitch length dial
Stitch width dial
Stitches
built-in ....................................................................45
names .....................................................................21
Straight stitching
Stretch stitching
T
Thread cutter ................................................................43
Thread tension
Threading
lower ............................................................... 28, 30
needle threader .......................................................34
twin needle .............................................................37
upper ......................................................................32
Triple zigzag stretch stitching
Troubleshooting
Twin needle
attaching ..........................................................17, 37
sewing ....................................................................36
U
Unpacking instructions ...................................................4
Upper tension control dial
Upper threading
W
Walking foot .................................................................62
Z
Zigzag stitching ............................................................. 43
Zipper insertion
............................................................34
.........................................................................21
.................................................................63
....................................................4
.....................................................25
........................................................46
...............................................................27, 32
...........................................................24
............................................................25
...........................................................41
............................................................24
..............................................................38
........................................50
............................................................72
............................................38
............................................................32
............................................................56
79
Page 81

—————————————————————————————————————————————————————————
—
ÍNDICE
A
Accesorios ....................................................................12
opcionales ....................................................... 13, 62
Aguja
cambio ...................................................................16
combinaciones con tela y aguja ...............................39
comprobación .........................................................16
Aguja gemela
colocación .......................................................17, 37
costura ....................................................................36
Alimentación
Aplicaciones
B
Bobina
devanado ................................................................26
Bobina rápida
Bombilla
cambio ...................................................................69
Bordados
Botones
costura ....................................................................55
C
Combinaciones de tela, hilo y aguja .............................39
Componentes principales
Conexión de enchufes
Control de anchura de puntada
Control de longitud de puntada
Cortador de hilo
Costura de concha
Costura de cremalleras
Costura de doble acción
Costura de plumas
Costura de sobreorilla
Costura decorativa
Costura elástica
Costura elástica en zig-zag triple
Costura en zig-zag
Costura invisible para dobladillo
Costura recta
D
Dibujos .........................................................................21
Disco de control de la tensión superior
E
Enhebrado
aguja gemela ...........................................................37
enhebrador de aguja ...............................................34
hilo inferior ......................................................28, 30
hilo superior ............................................................32
Enhebrado del hilo inferior
bobina rápida ...................................................30, 36
Enhebrado del hilo superior
Enhebrador de aguja
Estilo de brazo libre
F
Fruncidos ...................................................................... 57
................................................................15
.................................................................58
........................................................ 30, 36
......................................................................59
..............................................11
..................................................15
..................................... 25
....................................24
............................................................43
........................................................46
..................................................56
...............................................47
........................................................49
...................................................48
........................................................50
......................................................24, 46
...................................50
........................................................43
...................................45
.................................................................41
.........................38
...........................................28
..........................................32
.....................................................34
......................................................19
I
Instrucciones para el desembalaje ...................................4
Instrucciones para el reembalaje
Interruptor de luz
L
Limpieza .......................................................................70
M
Mantenimiento .............................................................69
O
Ojal
ajuste ......................................................................54
creación ..................................................................52
Ojal automático de 1 paso
P
Pedal ............................................................................15
Pie móvil
Pie para acolchados
Pie para acolchados de 1/4 pulgadas
Pie para dobladillos estrechos
Pie para puntada invisible
Pie prensatela
cambio ...................................................................18
Pista
limpieza ..................................................................70
Placa de zurcir
Portacarrete
adicional .................................................................37
Procedimiento para tirar del hilo inferior
Pulsador de retroceso
Puntada de adornos
Puntada para satén
Puntadas
incorporadas ........................................................... 45
nombres ..................................................................21
R
Realización de monogramas .........................................59
Rueda
...........................................................................32
S
Selector de puntadas .....................................................20
Solución de problemas
T
Tensión del hilo ............................................................38
Tornillo de ajuste fino de los ojales
U
Unidad de cama plana ..................................................19
Z
Zurcidos .......................................................................58
..........................................................15
......................................................................62
......................................................63
..........................................55, 58, 59, 64
...........................................................27, 32
....................................................25
......................................................48
........................................................44
.................................................75
.....................................4
..................................... 11, 52
............................65
.......................................65
.............................................67
......................36
...............................54
80
Page 82

ENGLISH/SPANISH
885-S28/S29
XD1794-221
Printed in China
2
 Loading...