

Page 1

User's Guide
TD-4550DNWB
© 2019 Brother Industries, Ltd. All rights reserved.
Page 2

Home > Table of Contents
Table of Contents
Before You Use Your Brother Machine ............................................................................................... 1
Definitions of Notes ........................................................................................................................................ 2
General Precautions ...................................................................................................................................... 3
Trademarks and Licenses..............................................................................................................................4
Open Source Licensing Remarks .................................................................................................................. 5
Important Note ............................................................................................................................................... 6
Set Up Your Printer ............................................................................................................................... 7
Parts Description............................................................................................................................................8
LCD Overview .............................................................................................................................................. 10
Install the Coin Cell Battery..........................................................................................................................13
Set the Date and Time ................................................................................................................................. 15
Load the RD Roll..........................................................................................................................................16
Check the Sensor Position...........................................................................................................................19
Connect the Power Cord..............................................................................................................................22
Turn Power On/Off ....................................................................................................................................... 23
Install Software.................................................................................................................................... 24
Install Printer Drivers and Software on a Computer.....................................................................................25
Available Applications......................................................................................................................... 26
Connect the Printer to a Computer .............................................................................................................. 27
Connect the Printer to a Computer Using a USB Cable..................................................................... 28
Connect the Printer to a Computer Using Wi-Fi ................................................................................. 29
Connect the Printer to a Computer Using a Wired LAN ..................................................................... 31
Connect the Printer to a Computer Using Bluetooth Connection ....................................................... 32
Create Labels and Print Using Computer ......................................................................................... 33
Create Labels Using P-touch Editor (Windows)...........................................................................................34
Main Window of P-touch Editor Express Mode (Windows) ................................................................ 35
Main Window of P-touch Editor Professional Mode (Windows) ......................................................... 36
Main Window of P-touch Editor Snap Mode (Windows)..................................................................... 37
Print Labels Using P-touch Editor (Windows) .............................................................................................. 38
Create Labels and Print without Installing Software and Drivers ................................................................. 39
Print Using USB Interface (Mass Storage Mode)............................................................................... 40
Print Image Data without Using the Printer Driver.............................................................................. 41
Print Labels Distributed to Multiple Printers to Reduce Printing Time (Windows)........................................ 42
Print Barcode Labels Using Crop Print (Windows) ...................................................................................... 44
Barcodes Compatible with Crop Print (Windows) .............................................................................. 45
Barcode Document Compatible with Crop Print (Windows)............................................................... 46
Print Barcode Labels Using Crop Print (Windows)............................................................................. 48
Print Labels Using the Printer Driver (Windows)..........................................................................................50
Print Labels Using Printer's LCD....................................................................................................... 51
Create Labels Using P-touch Editor (Windows)...........................................................................................52
Transfer the Template to P-touch Transfer Manager (Windows) ................................................................. 53
Transfer Templates or Other Data from the Computer to the Printer (Windows) ......................................... 54
Call Up the Transferred Template on the Printer's LCD and Print................................................................ 58
Print Labels Using Barcode Scanner or Other Devices (P-touch Template) ................................. 60
i
Page 3

Home > Table of Contents
P-touch Template Operations Overview....................................................................................................... 61
Create Labels Using P-touch Editor (Windows)...........................................................................................62
Transfer the Template to P-touch Transfer Manager (Windows) ................................................................. 63
Transfer Templates or Other Data from the Computer to the Printer (Windows) ......................................... 64
Specify the Barcode Scanner Settings (Windows)....................................................................................... 68
Connect the Printer to a Barcode Scanner Using Bluetooth (Windows) ...................................................... 69
Connect the Printer to a Barcode Scanner Using USB Host Interface ........................................................ 70
Try the P-touch Template Function Using the Barcode List......................................................................... 71
Print the Transferred Templates Directly (Standard Template Printing) ............................................. 72
Print the Transferred Templates After Changing (Advanced Templated Printing)..............................76
Print the Templates Related to a Database (Database Lookup Printing) ........................................... 80
Print the Transferred Templates in Serialized Number (Numbered (Serialized Number) Printing) .... 84
List of Barcodes for Specifying Settings............................................................................................. 88
Print Labels Using Mobile Devices.................................................................................................... 91
Install Mobile Apps ....................................................................................................................................... 92
Connect the Printer to a Mobile Device........................................................................................................ 93
Transfer Templates Created on a Computer to the Printer Using a Mobile Device ..................................... 95
Transfer Templates to the Printer (P-touch Transfer Manager) (Windows) ................................... 96
Transfer Templates to the Printer Using P-touch Transfer Manager (Windows).......................................... 97
Notes on Using P-touch Transfer Manager (Windows)...................................................................... 98
Transfer Templates from the Computer to the Printer (Windows) ...................................................... 99
Backup Templates or Other Data Saved in the Printer (Windows)................................................... 107
Delete Printer Data (Windows)......................................................................................................... 108
Create Transfer Files and Transfer Package Files (Windows) ......................................................... 109
Distribute Templates to be Transferred to Users Without Using P-touch Transfer Manager (Windows) ....111
Store or Manage Templates (P-touch Library) ................................................................................115
Edit Templates Using P-touch Library (Windows) ...................................................................................... 116
Print Templates Using P-touch Library (Windows)..................................................................................... 117
Search Templates Using P-touch Library (Windows)................................................................................. 118
Network .............................................................................................................................................. 120
Learn about Network Management Software and Utilities ......................................................................... 121
Update ................................................................................................................................................ 122
Update P-touch Editor (Windows)..............................................................................................................123
Update the Firmware.................................................................................................................................. 125
Printer Settings ................................................................................................................................. 127
Change Printer Settings Using the Printer Setting Tool (Windows) ........................................................... 128
Communication Settings of the Printer Setting Tool (Windows) ....................................................... 130
Device Settings of the Printer Setting Tool (Windows) ..................................................................... 137
P-touch Template Settings of the Printer Setting Tool (Windows) .................................................... 143
Paper Size Setup of Printer Setting Tool (Windows) ........................................................................ 145
Apply Setting Changes to Multiple Printers (Windows)..............................................................................150
Change Printer Settings Using Web Based Management ......................................................................... 151
Set or Change a Login Password for Web Based Management...................................................... 152
Confirm Printer Settings ............................................................................................................................. 153
Change Printer Settings Using the Printer ................................................................................................. 154
Set the Menu Security ...................................................................................................................... 155
ii
Page 4

Home > Table of Contents
Settings Tables ................................................................................................................................. 156
Routine Maintenance ........................................................................................................................ 160
Clean Your Printer ...................................................................................................................................... 161
Replace the Coin Cell Battery .................................................................................................................... 163
Troubleshooting................................................................................................................................ 166
If You Are Having Difficulty with Your Machine .......................................................................................... 167
Error and Maintenance Indications ............................................................................................................ 168
Printing Problems.......................................................................................................................................170
Version Information .................................................................................................................................... 176
Reset the Printer ........................................................................................................................................ 177
Appendix............................................................................................................................................ 178
Specifications ............................................................................................................................................. 179
Software Development Kit.......................................................................................................................... 181
Auto Media Configuration........................................................................................................................... 182
Auto Media Configuration Overview................................................................................................. 183
Use the Auto Media Configuration Function..................................................................................... 184
Options.......................................................................................................................................................185
Clean Other Printer Components ..................................................................................................... 186
Change the Label Peeler Options .................................................................................................... 189
Change the Cutting Options ............................................................................................................. 190
Brother Numbers........................................................................................................................................191
iii
Page 5

Home > Before You Use Your Brother Machine
Before You Use Your Brother Machine
• Definitions of Notes
• General Precautions
• Trademarks and Licenses
• Open Source Licensing Remarks
• Important Note
1
Page 6
Home > Before You Use Your Brother Machine > Definitions of Notes
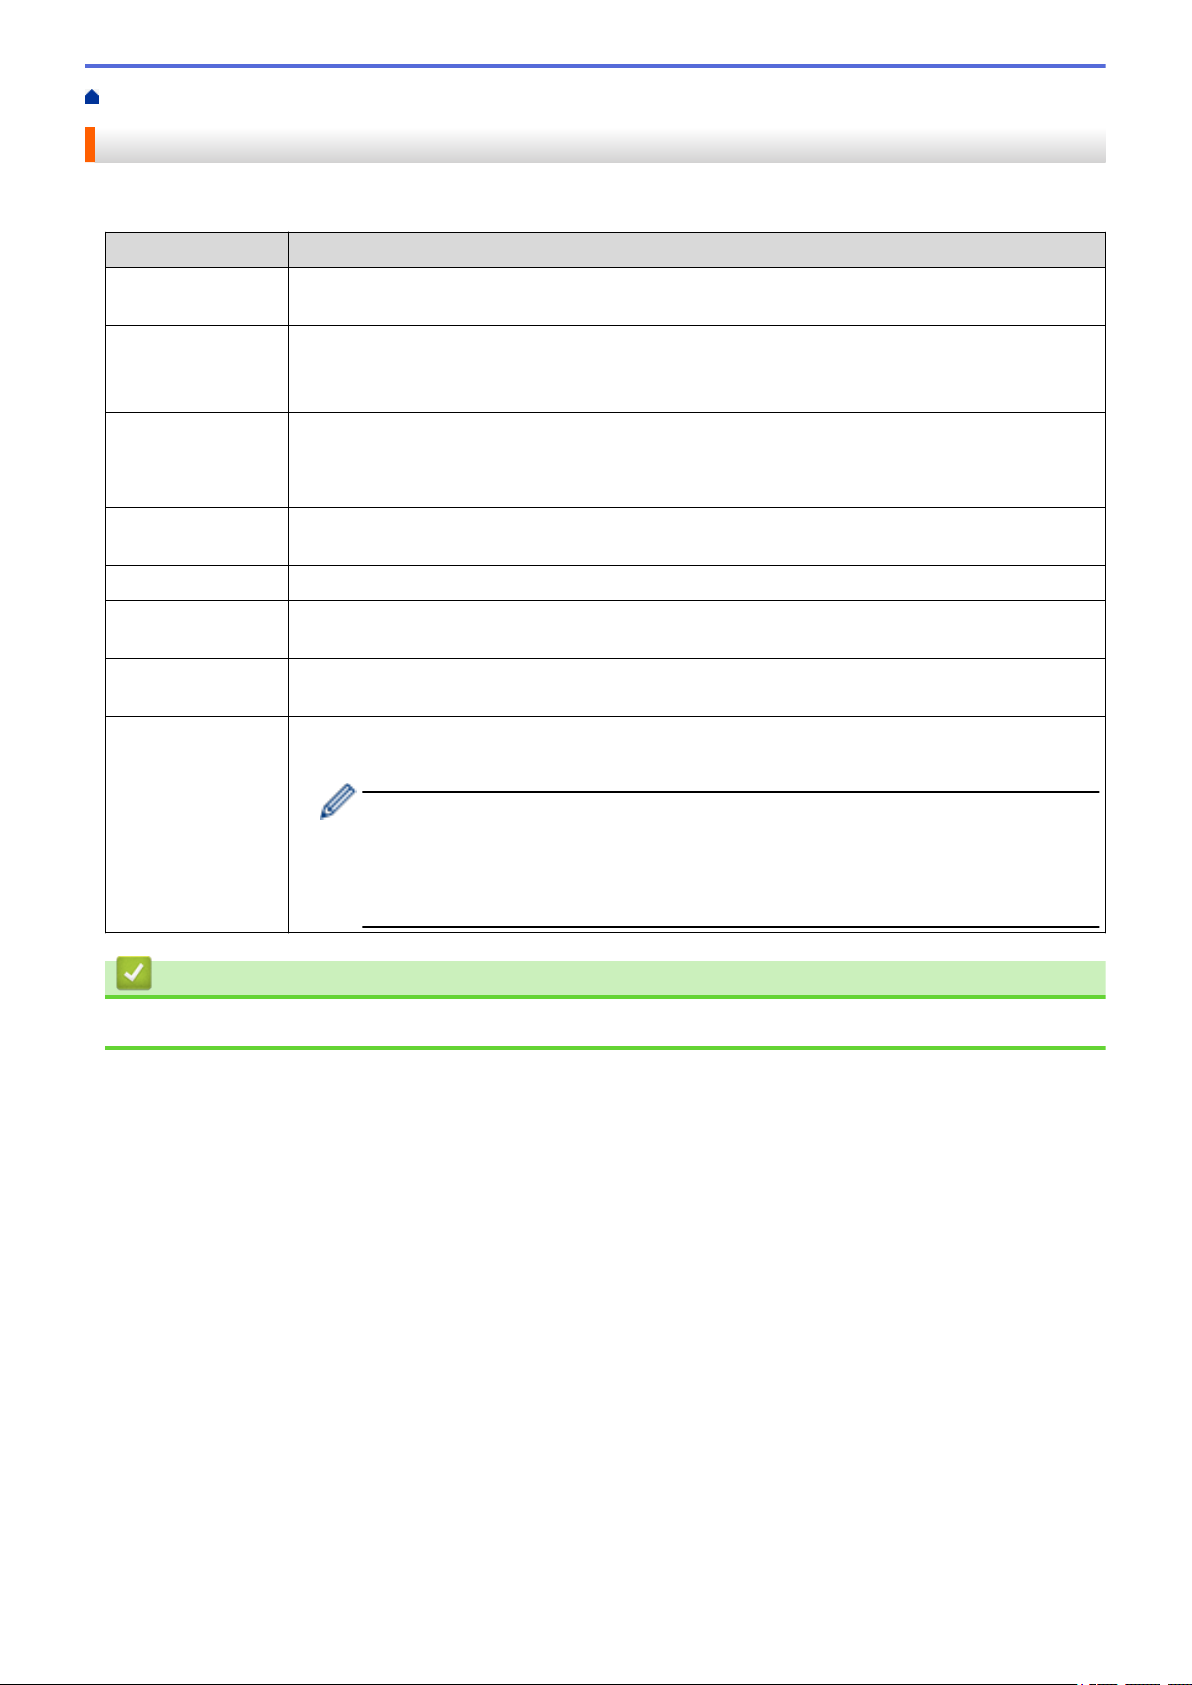
Definitions of Notes
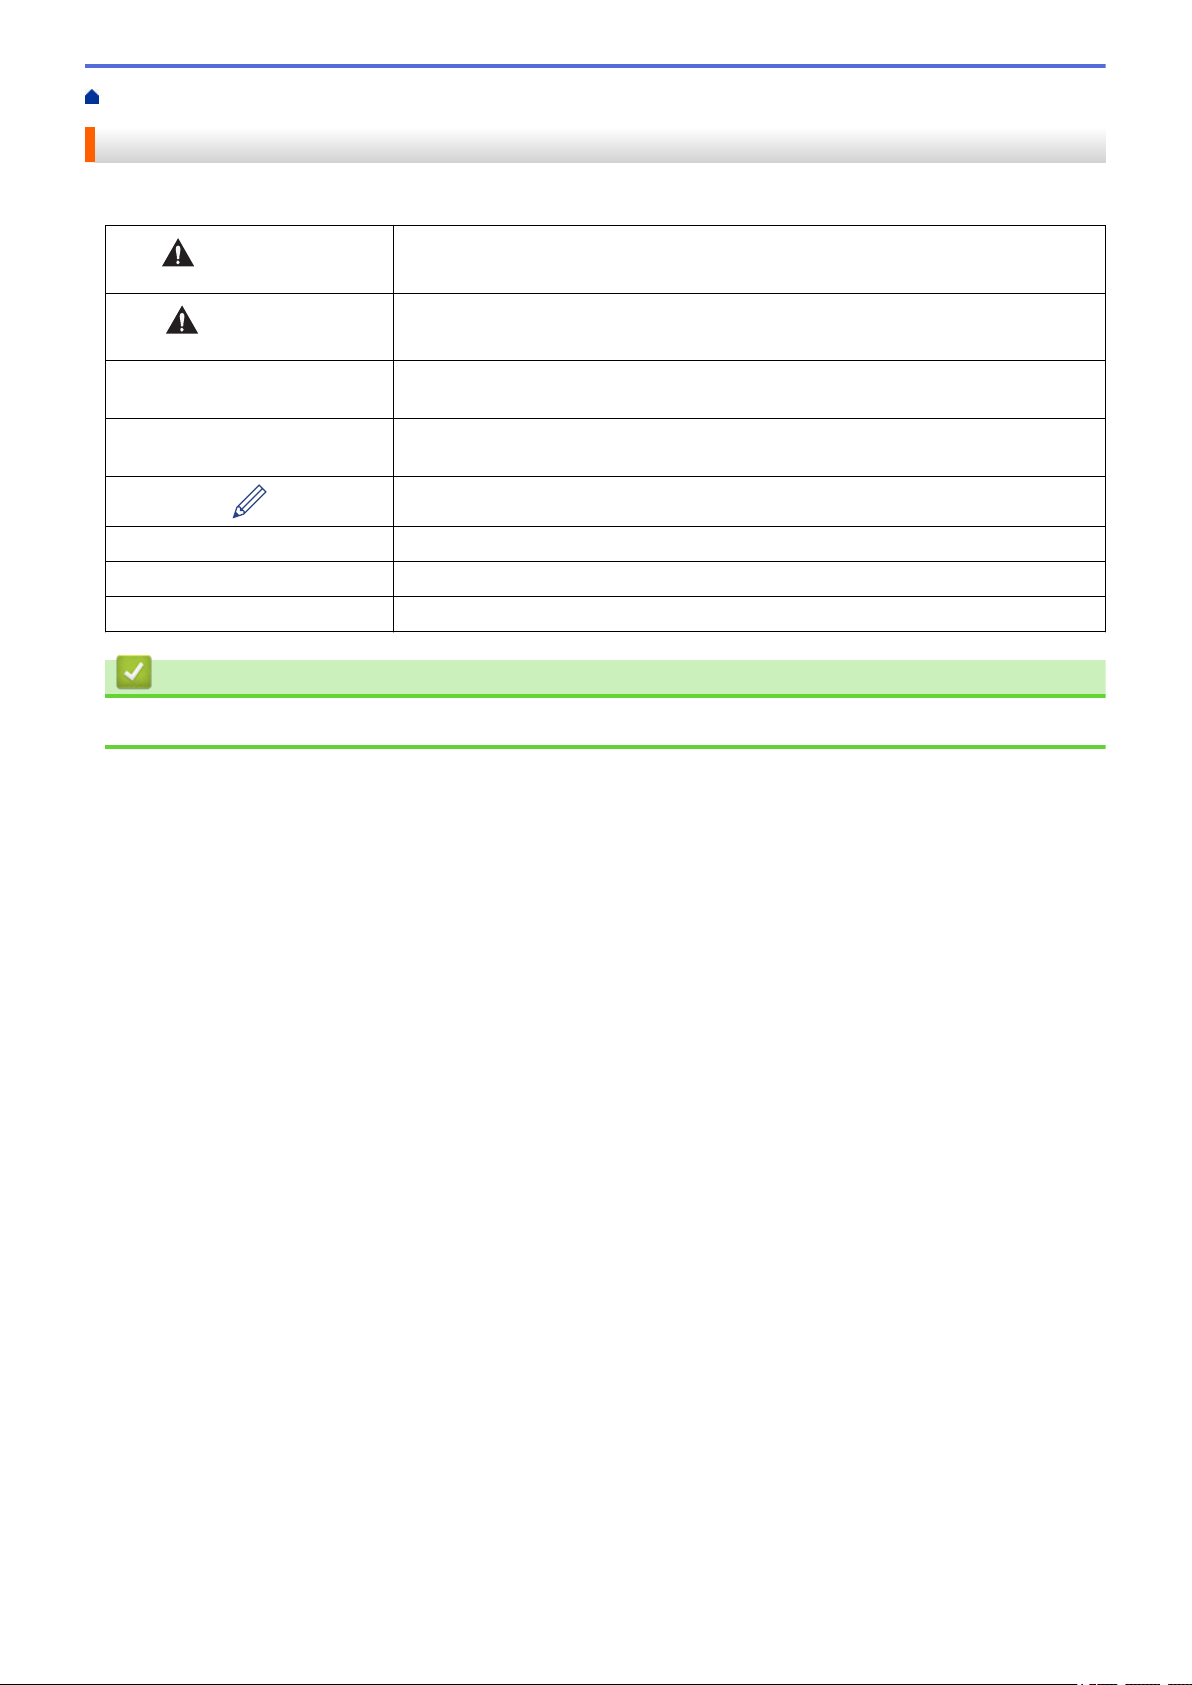
We use the following symbols and conventions throughout this User's Guide:
WARNING
CAUTION
IMPORTANT
NOTE
Bold Bold style identifies buttons on the machine's control panel or computer screen.
Italics Italicized style emphasizes an important point or refers you to a related topic.
Courier New
WARNING indicates a potentially hazardous situation which, if not avoided, could
result in death or serious injuries.
CAUTION indicates a potentially hazardous situation which, if not avoided, may
result in minor or moderate injuries.
IMPORTANT indicates a potentially hazardous situation which, if not avoided, may
result in damage to property or loss of product functionality.
NOTE specifies the operating environment, conditions for installation, or special
conditions of use.
Tips icons indicate helpful hints and supplementary information.
Courier New font identifies messages shown on the machine's LCD.
Related Information
• Before You Use Your Brother Machine
2
Page 7
Home > Before You Use Your Brother Machine > General Precautions
General Precautions
RD Rolls
• Use Brother accessories and supplies (indicated by the mark).
• If the label is affixed to a wet, dirty, or oily surface, it may peel off easily. Before affixing the label, clean the
surface to which the label is affixed.
• Store the RD Roll in a cool and dark place and use it soon after opening the package.
• Do not expose the RD Roll to direct sunlight, high temperature, high humidity, wind, or dust as it may cause
labels to peel off or discolor.
• Scratching the printed surface of the label with your fingernails or metal objects, or touching the printed
surface with wet hands, can cause the color to change or fade.
• DO NOT affix labels to people, animals, or plants. Never affix labels to public or private property without
permission.
• As the last label of the RD Roll may not be printed correctly, each roll contains more labels than is indicated
on the package.
• When a label is removed after being affixed to a surface, a portion of the label may remain.
• When a label is affixed, it may be difficult to remove the label.
• For warnings and safety precautions, see the Product Safety Guide.
Related Information
• Before You Use Your Brother Machine
3
Page 8

Home > Before You Use Your Brother Machine > Trademarks and Licenses
Trademarks and Licenses
• Android and Google Chrome are trademarks of Google LLC.
• The Bluetooth® word mark and logos are registered trademarks owned by the Bluetooth SIG, Inc. and any
use of such marks by Brother Industries, Ltd. is under license.
• QR Code is a registered trademark of DENSO WAVE INCORPORATED.
• Epson ESC/P is a registered trademark of Seiko Epson Corporation.
• Mac, Safari, iPad, iPhone, and iPod touch are trademarks of Apple Inc.
• Wi-Fi® is a registered trademark of Wi-Fi Alliance®.
• Wi-Fi Protected Setup™ is a trademark of Wi-Fi Alliance®.
• Mozilla and Firefox are registered trademarks of the Mozilla Foundation.
• QR Code Generating Program Copyright © 2008 DENSO WAVE INCORPORATED.
• BarStar Pro Encode Library (PDF417, Micro PDF417, DataMatrix, MaxiCode, AztecCode, GS1 Composite,
GS1 Databar, Code93, MSI/Plessey, POSTNET, Intelligent Mail Barcode)
Copyright © 2007 AINIX Corporation. All rights reserved.
• Blue SDK
Copyright © 1995-2018 OpenSynergy GmbH.
All rights reserved. All unpublished rights reserved.
• Portions of this software are copyright © 2014 The FreeType Project (
Any trade names and product names of companies appearing on Brother products, related documents
and any other materials are all trademarks or registered trademarks of those respective companies.
www.freetype.org). All rights reserved.
Related Information
• Before You Use Your Brother Machine
4
Page 9

Home > Before You Use Your Brother Machine > Open Source Licensing Remarks
Open Source Licensing Remarks
This product includes open source software.
To see the Open Source Licensing Remarks, go to your model's Manuals page on the Brother support website
at support.brother.com.
Related Information
• Before You Use Your Brother Machine
5
Page 10

Home > Before You Use Your Brother Machine > Important Note
Important Note
• The contents of this document and the specifications of this product are subject to change without notice.
• Brother reserves the right to make changes without notice in the specifications and materials contained
herein and shall not be responsible for any damages (including consequential) caused by reliance on the
materials presented, including but not limited to typographical and other errors relating to the publications.
• Screen images in this document may differ depending on your computer's operating system, your product
model, and software version.
• Before using the printer, make sure you read all the documents included with the printer for information about
safety and operation.
• The printer shown in the illustrations may be different from your printer.
• The available supplies may vary depending on your country.
• We recommend using the latest version of P-touch Editor.
Related Information
• Before You Use Your Brother Machine
6
Page 11

Home > Set Up Your Printer
Set Up Your Printer
• Parts Description
• LCD Overview
• Install the Coin Cell Battery
• Set the Date and Time
• Load the RD Roll
• Check the Sensor Position
• Connect the Power Cord
• Turn Power On/Off
7
Page 12
Home > Set Up Your Printer > Parts Description
3
2
1
13
14
9 7
5
6
4
8101112
Parts Description
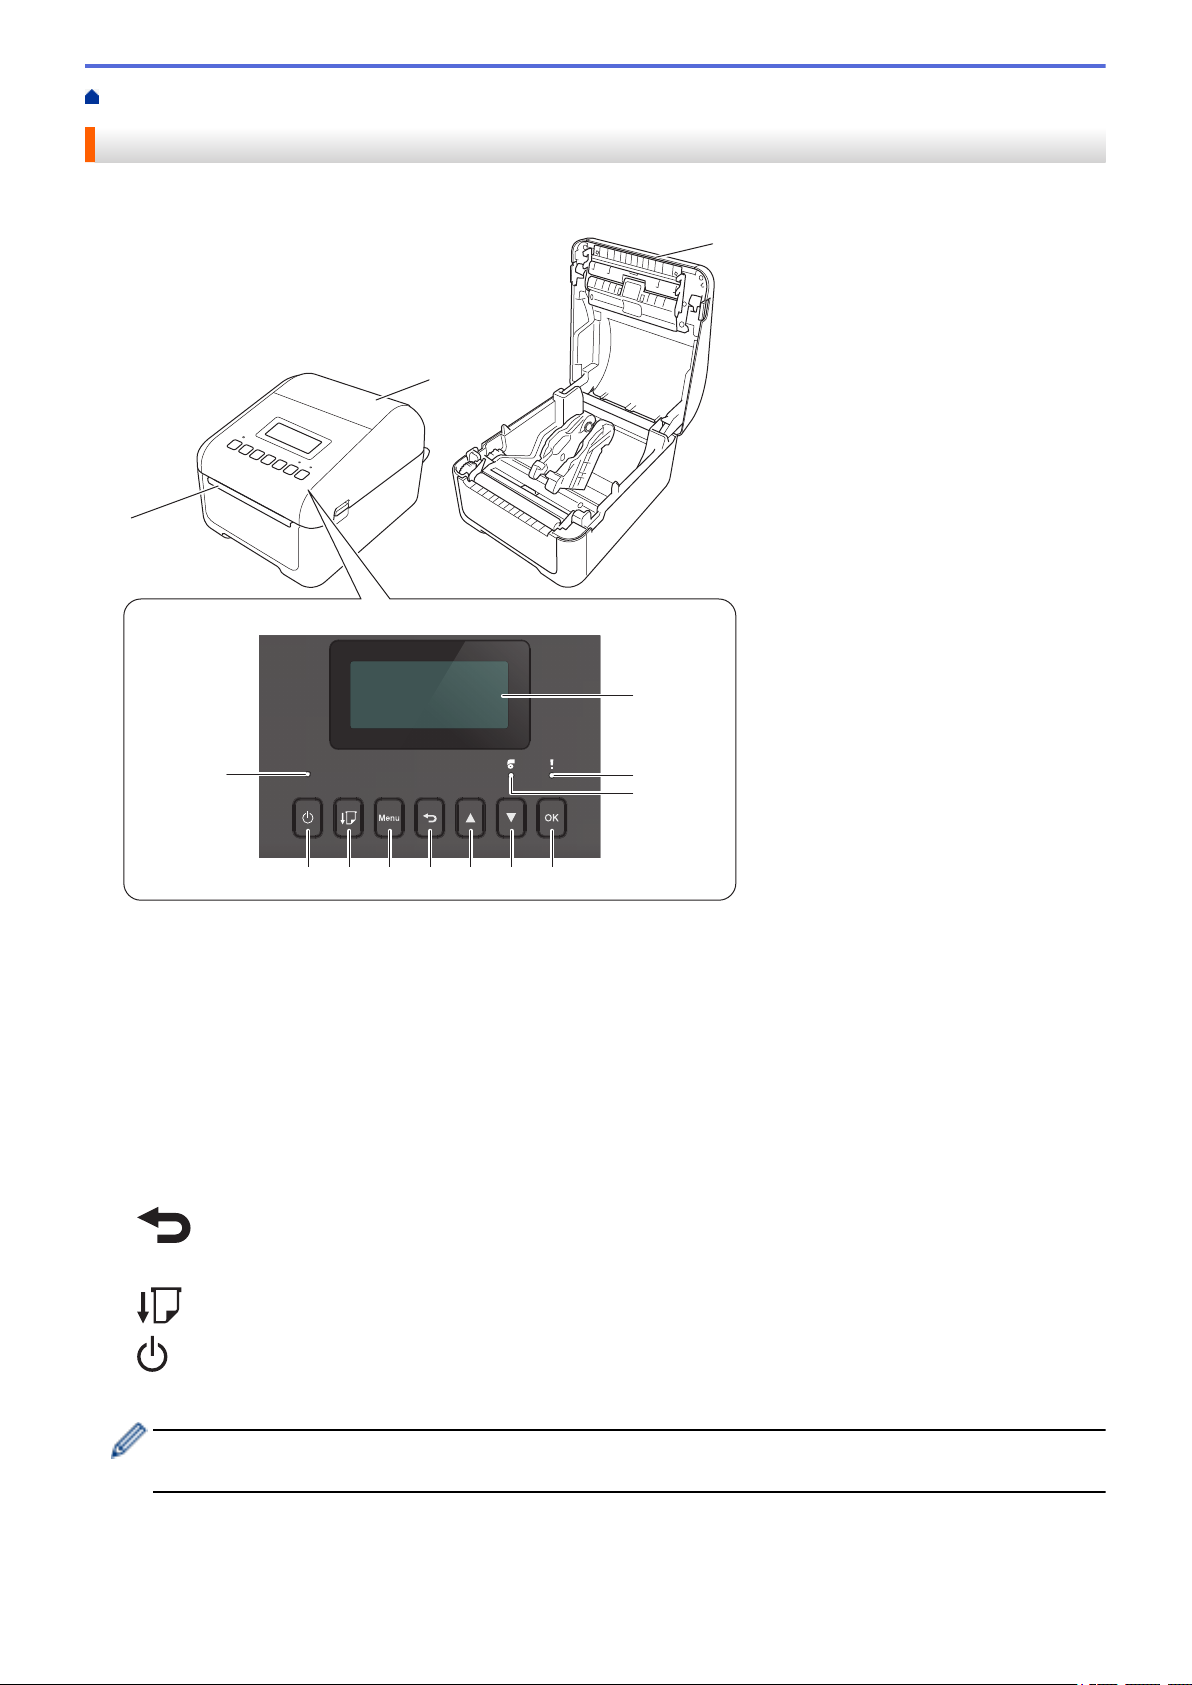
Front
1. Label Output Slot
2. Roll Compartment Cover
3. Tear Bar
4. LCD
5. Status LED
6. Roll LED
7. OK Button
8. b (Down) Button
9. a (Up) Button
10.
(Back) Button
11. Menu Button
12.
(Feed) Button
13. (Power) Button
14. Power LED
To pause printing, press any button. Press the button again to resume printing. Printing can be paused only
after each full page has been printed and cannot be paused on the final page or between pages.
8
Page 13
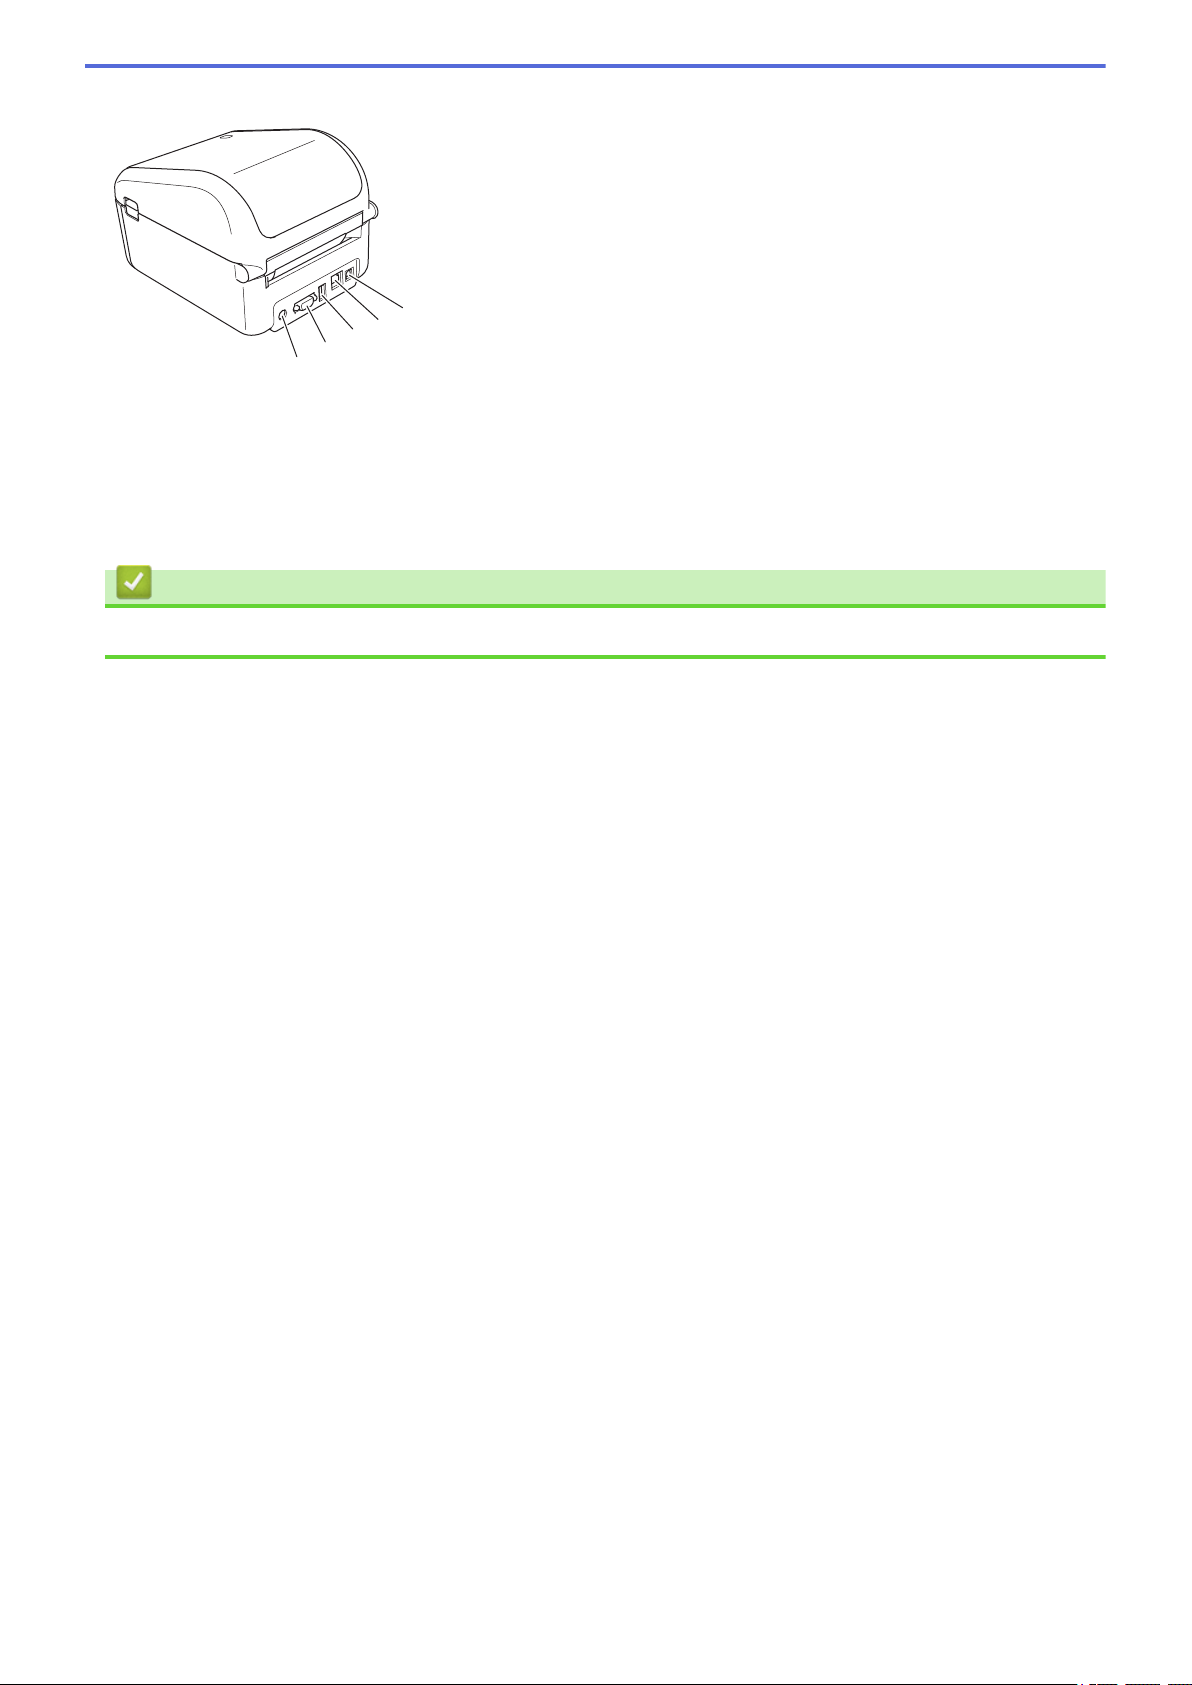
Rear
1
3
4
5
2
1. Power Port
2. Serial Port
3. USB Host Port
4. LAN Port
5. USB Port
Related Information
• Set Up Your Printer
9
Page 14
Home > Set Up Your Printer > LCD Overview
7
8
1 2 3 4 5 6
9
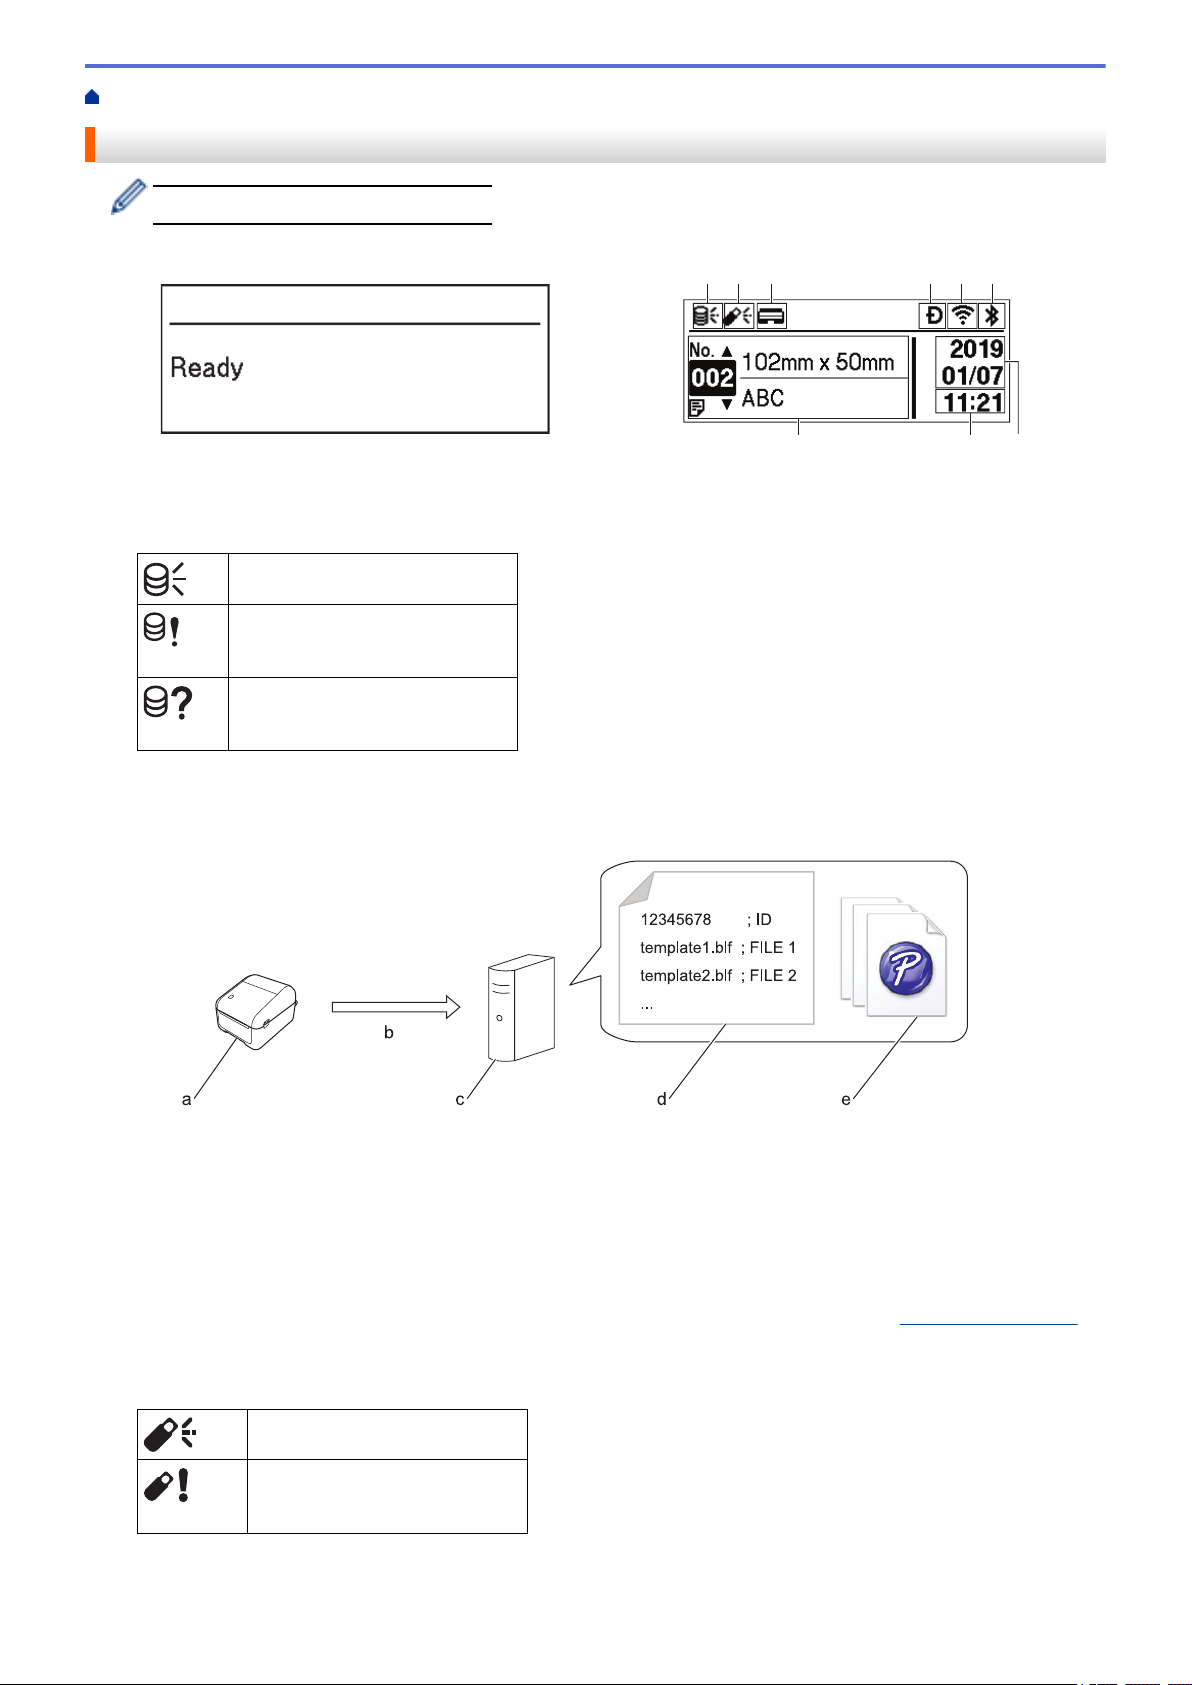
LCD Overview
A protective film is applied to the LCD.
1. Update icon (Network)
Indicates that updated templates, databases, and other data are available.
There is new data.
There is incomplete update data.
(flashing)
Cannot connect to the server.
(flashing)
• Remote Data Update (FTP)
Allows you to connect your printer to the FTP server to perform template and database updates, and to
execute commands to distribute update data among multiple printers connected to a network.
a. Printer (FTP Client)
b. Retrieval of update data from the FTP server
c. FTP Server
d. Settings file (updateinfo.ini)
e. Files you want to update, such as template and database files (BLF/BIN files)
For more information regarding how to update, visit the Brother support website at
2. Update icon (USB Flash Drive)
Indicates that updated templates, databases, and other data are available.
support.brother.com.
There is new data.
(flashing)
• Local Data Update (USB Flash Drive)
There is remaining update data.
10
Page 15
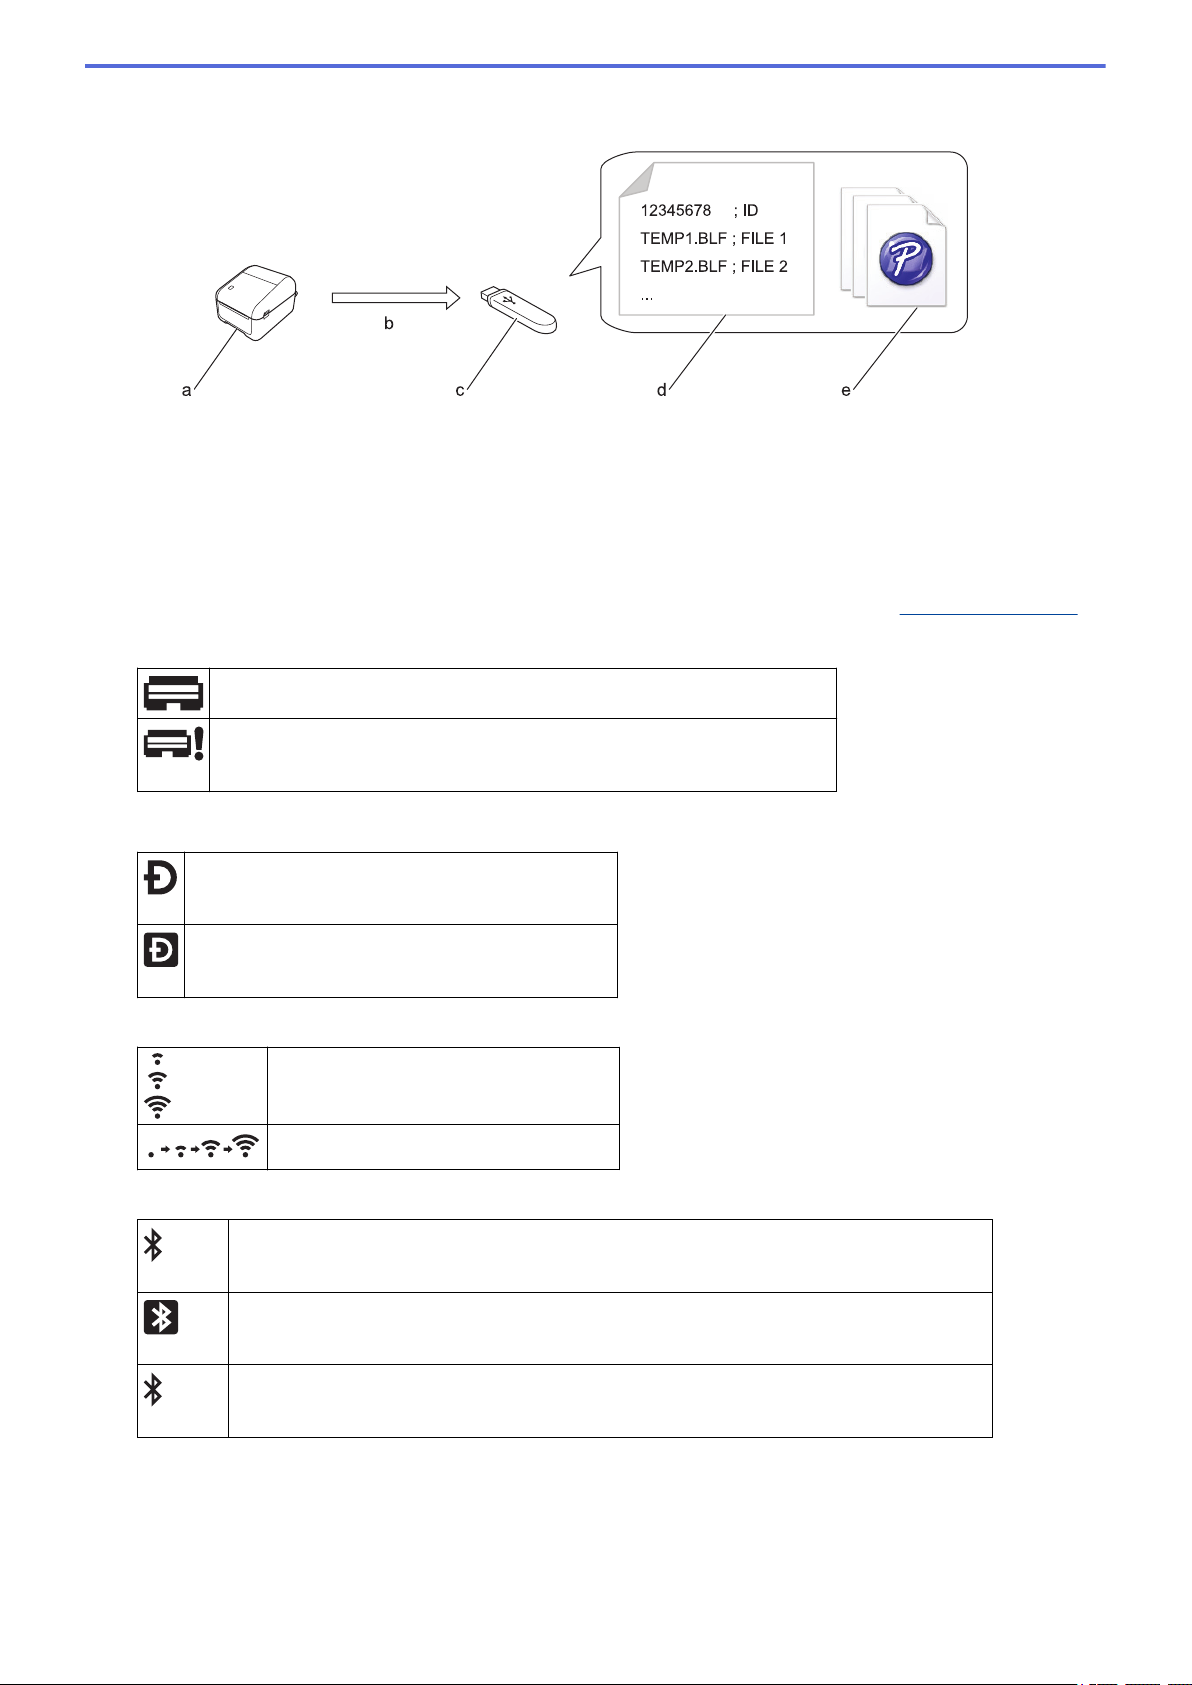
Allows you to perform template and database updates and execute commands after reading the files from
a USB Flash Drive connected to the printer.
a. Printer
b. Retrieval of update data
c. USB Flash Drive
d. Settings file (UPDATE.INI)
e. Files you want to update, such as template and database files (BLF/BIN files)
For more information regarding how to update, visit the Brother support website at
3. Print Head Status icon
support.brother.com.
Normal state.
The Print Head is disconnected or there is a problem with the Print Head.
4. Wireless Direct icon
Wireless Direct mode is on.
Your printer is not connected to the mobile device.
Wireless Direct mode is on.
Your printer is connected to the mobile device.
5. WLAN icon
Your printer is connected to the network.
Your printer is searching for the network.
6. Bluetooth icon
Bluetooth mode is on.
Your printer is not connected to the mobile device.
(flashing)
7. Date display
8. Time display
9. Template
Bluetooth mode is on.
Your printer is connected to the mobile device.
The Auto Reconnect function is on, but your printer is not connected to the mobile device.
11
Page 16

NOTE
The printer may malfunction if you try to configure it while it is processing or printing a print job.
Related Information
• Set Up Your Printer
12
Page 17
Home > Set Up Your Printer > Install the Coin Cell Battery
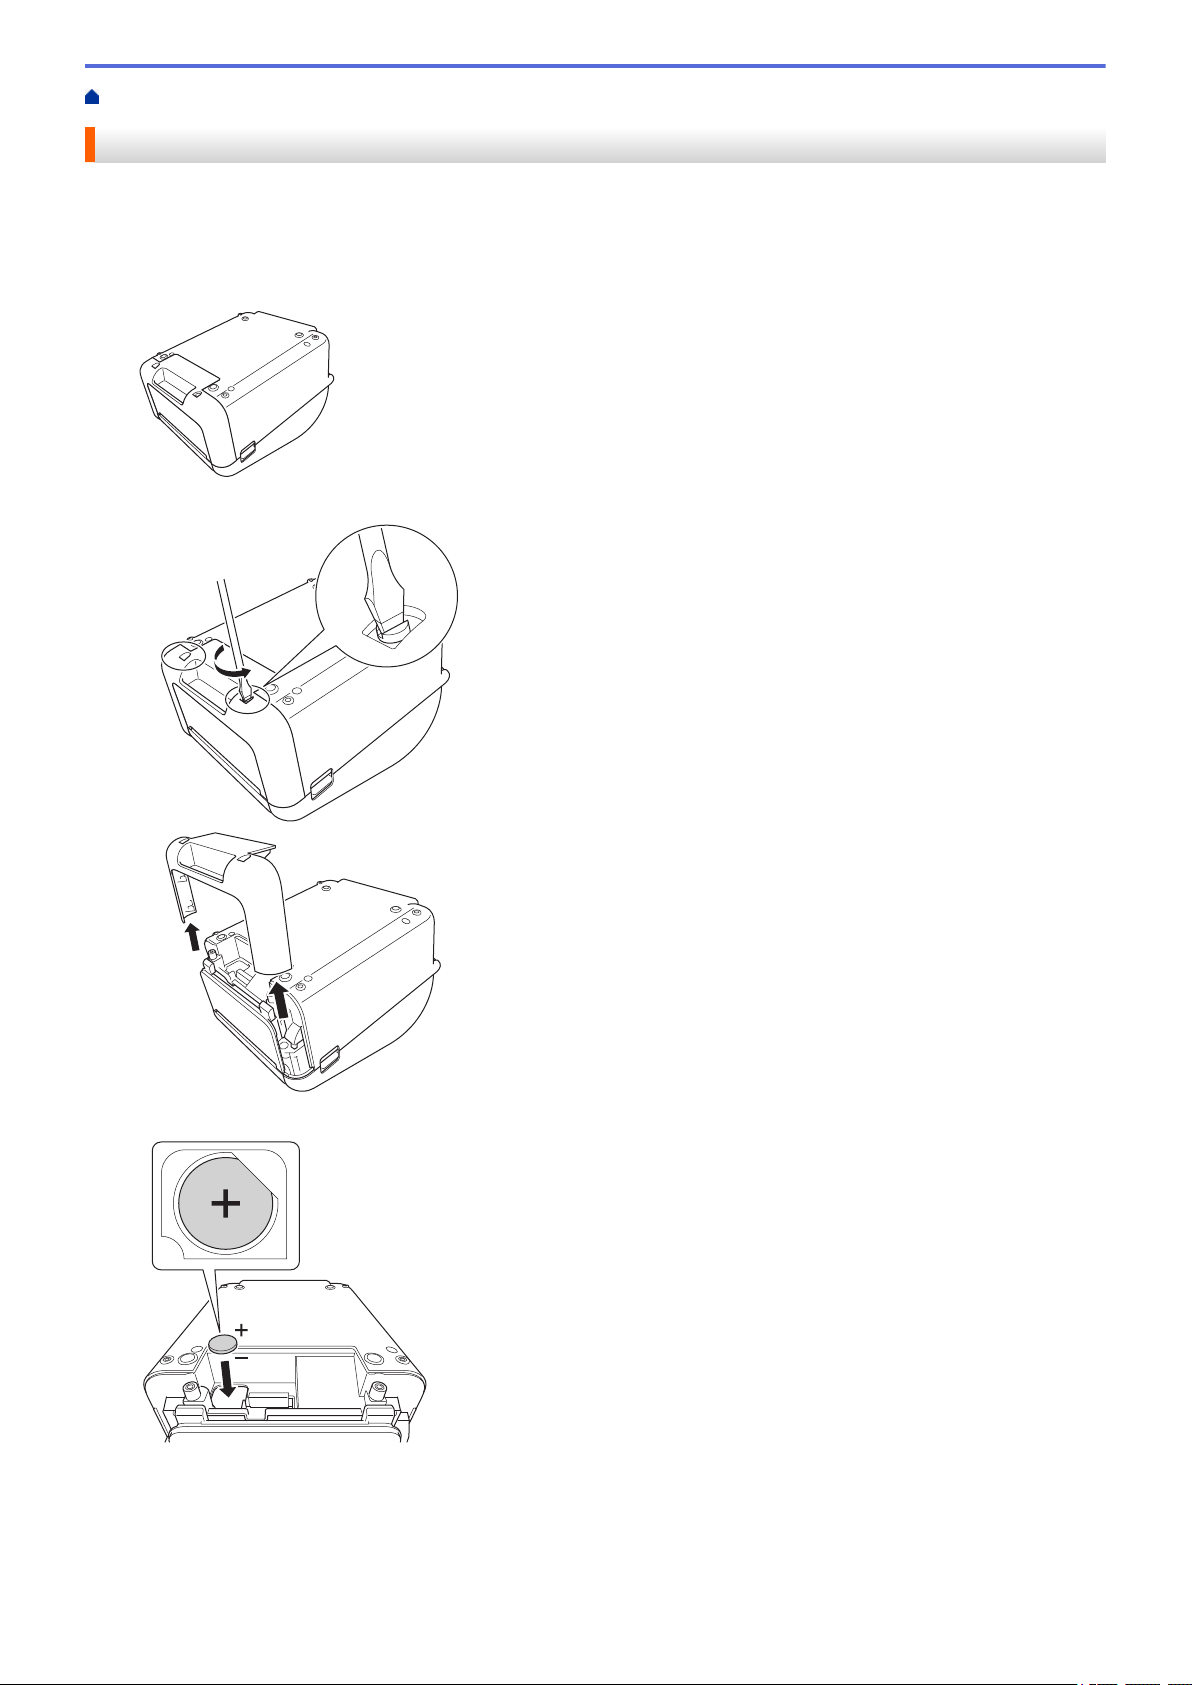
Install the Coin Cell Battery
A coin cell battery is used as a backup power supply to maintain the settings for the internal clock. Battery power
is consumed even if the printer is not in use.
1. Make sure you disconnect the printer from the AC power outlet.
2. Turn over the printer.
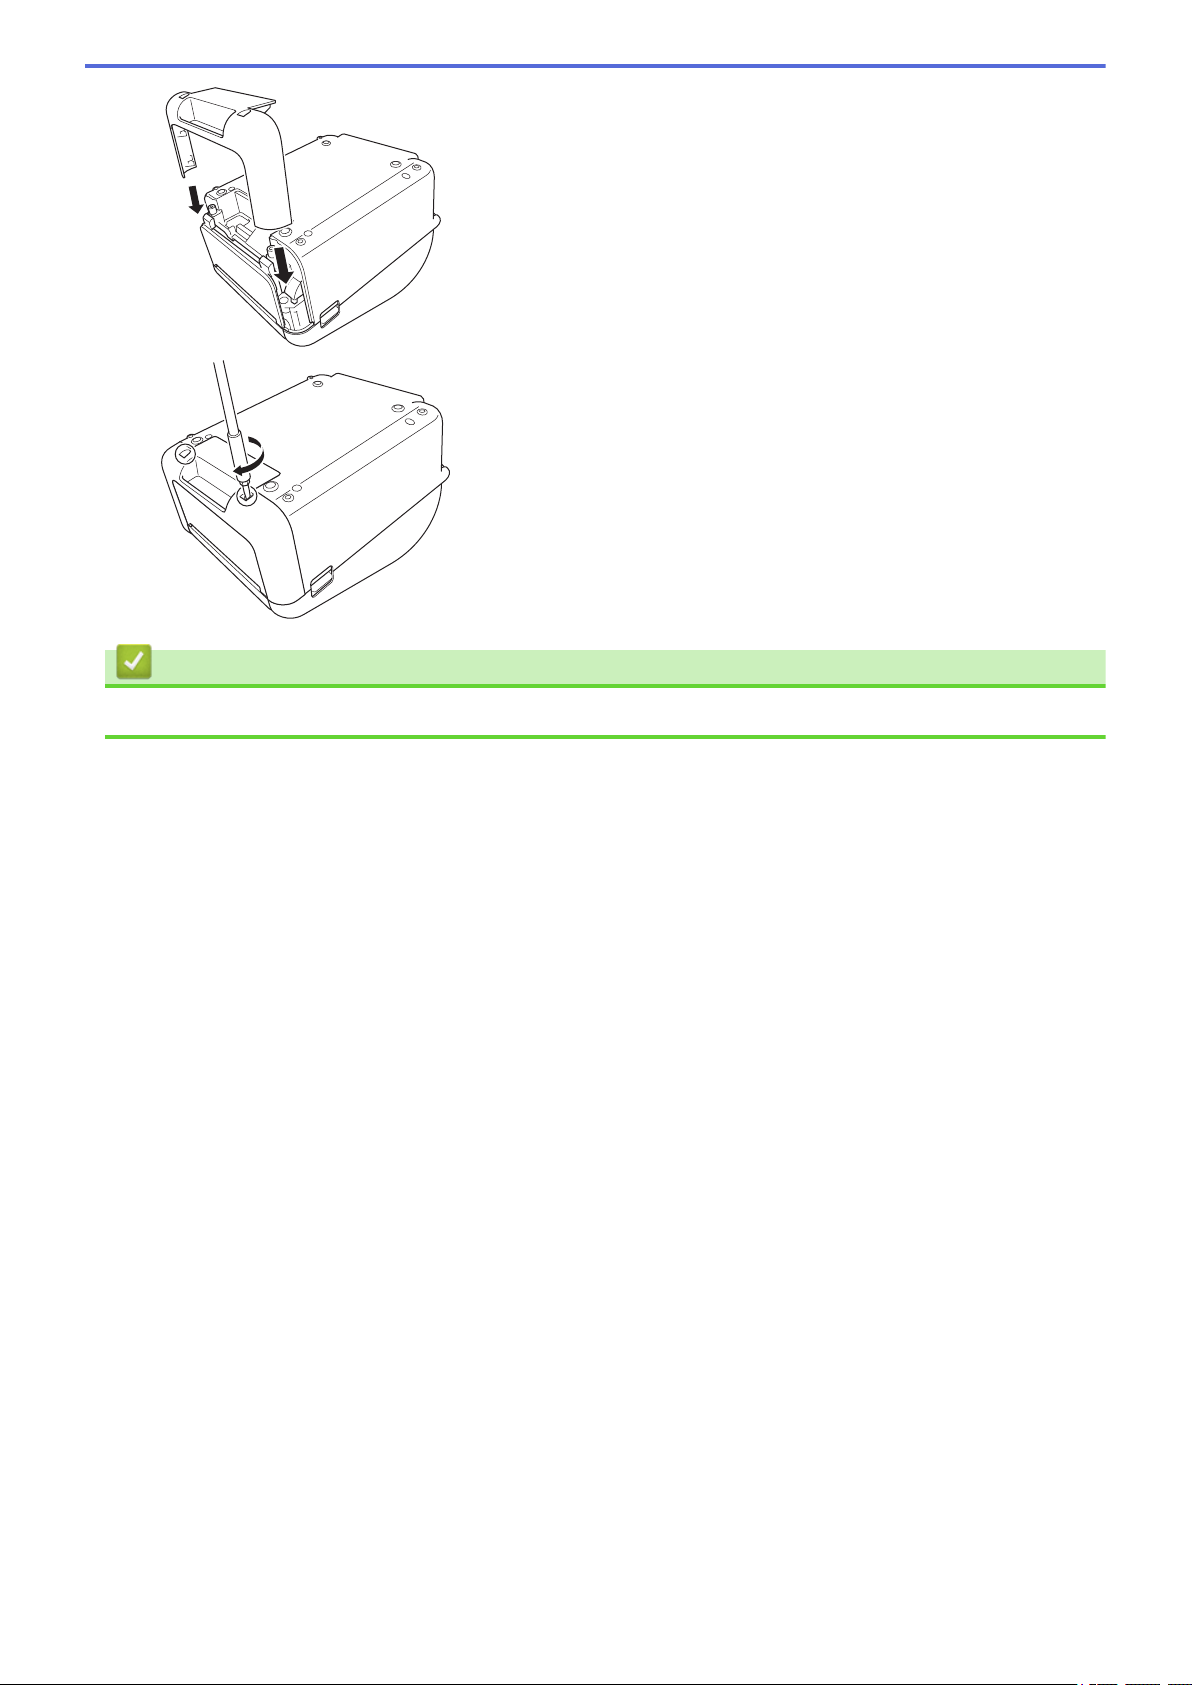
3. Remove the front cover base using a flathead screwdriver.
4. Insert the coin cell battery in place and make sure the battery is level and its positive side is facing up.
5. Reattach the front cover base using a flathead screwdriver.
13
Page 18
Related Information
• Set Up Your Printer
14
Page 19
Home > Set Up Your Printer > Set the Date and Time
Set the Date and Time
1. Press Menu.
2. Press a or b to select the following:
a. Select [Settings]. Press OK.
b. Select [Set Clock]. Press OK.
3. Press a or b to set the year, and then press OK. Repeat this step for setting the month and day.
4. Press a or b to set the hour, and then press OK. Repeat this step for setting the minute.
5. Press a or b to select [AM], [PM], or [24], and then press OK.
To change the date and time format, select [Administration] > [Date Format] or
[Administration] > [Time Format], and then specify the settings.
6. Press .
Related Information
• Set Up Your Printer
15
Page 20
Home > Set Up Your Printer > Load the RD Roll
Load the RD Roll
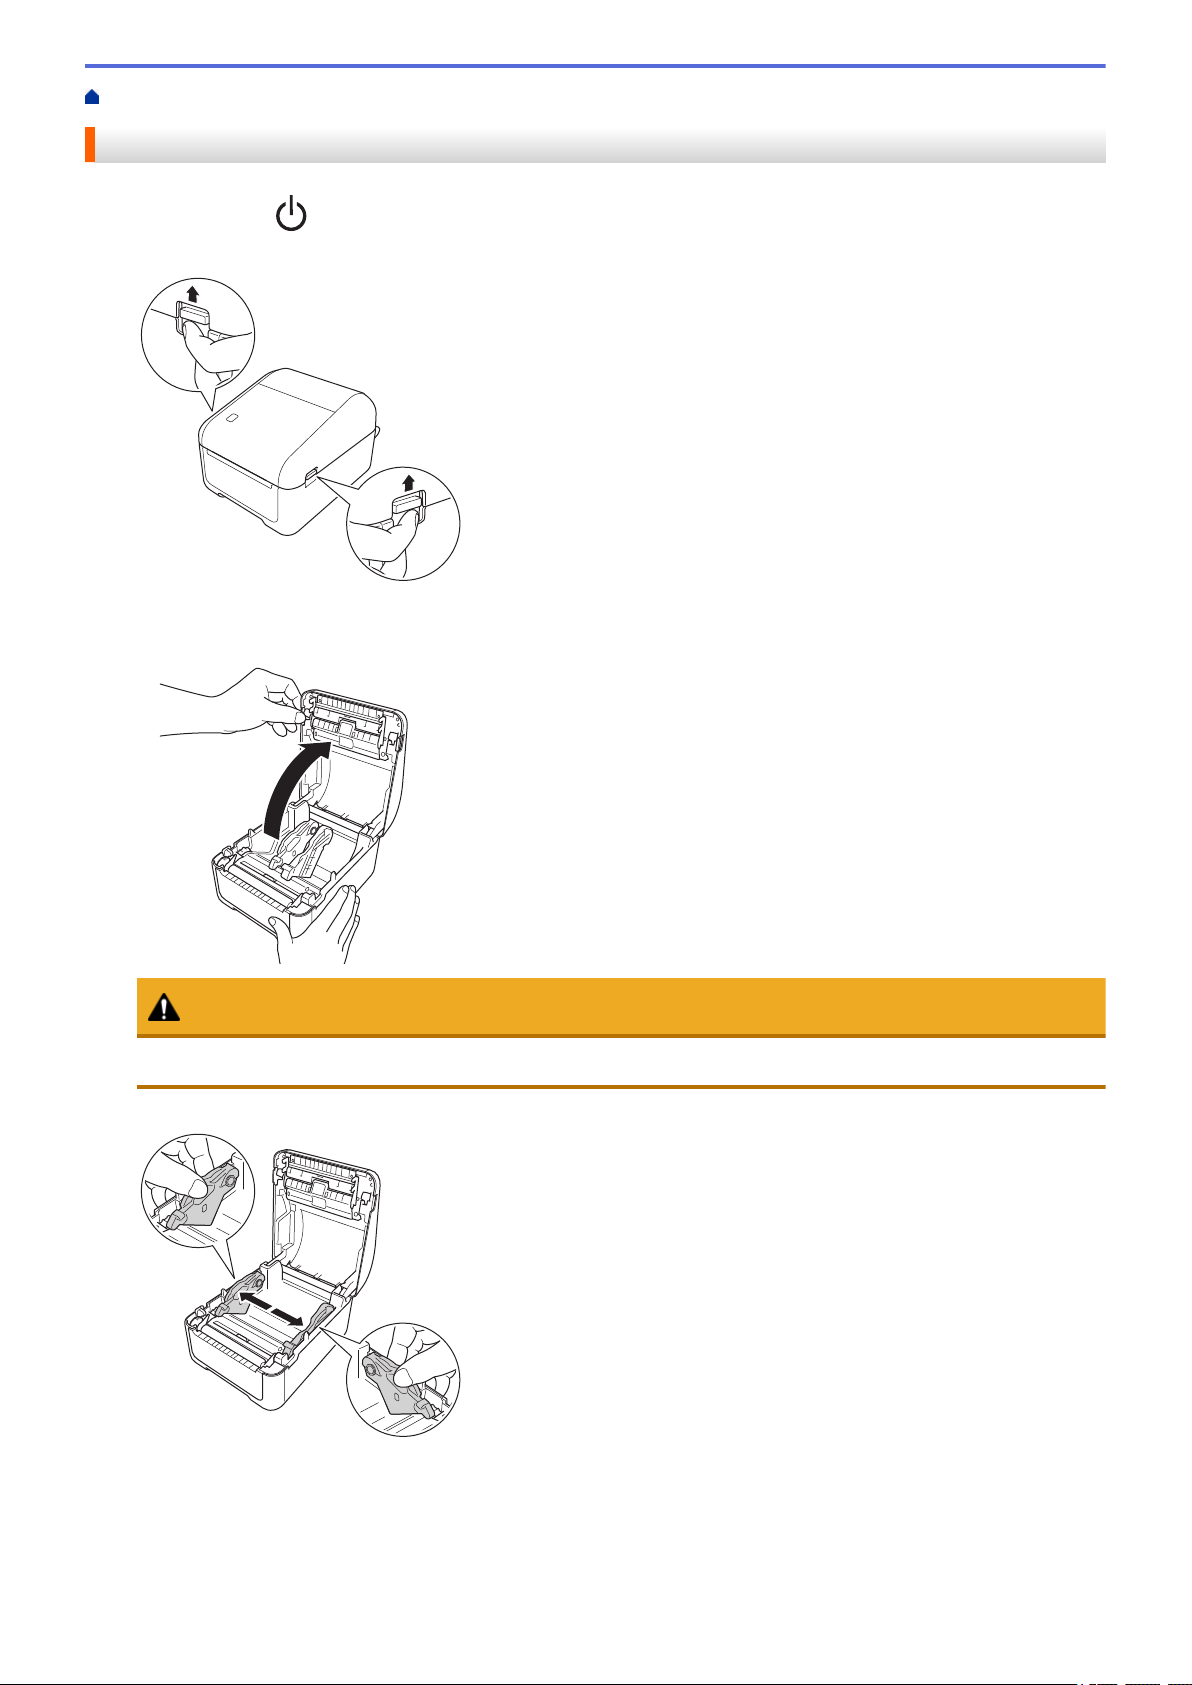
1. Press and hold to turn off the printer.
2. Pull up the release levers on both sides of the printer to unlock the Roll Compartment Cover.
3. Hold the printer by the front, and firmly lift the Roll Compartment Cover to open it.
CAUTION
Do not directly touch the Tear Bar with your hands. Doing so may result in injury.
4. Slide both Roll Guides outwards.
16
Page 21
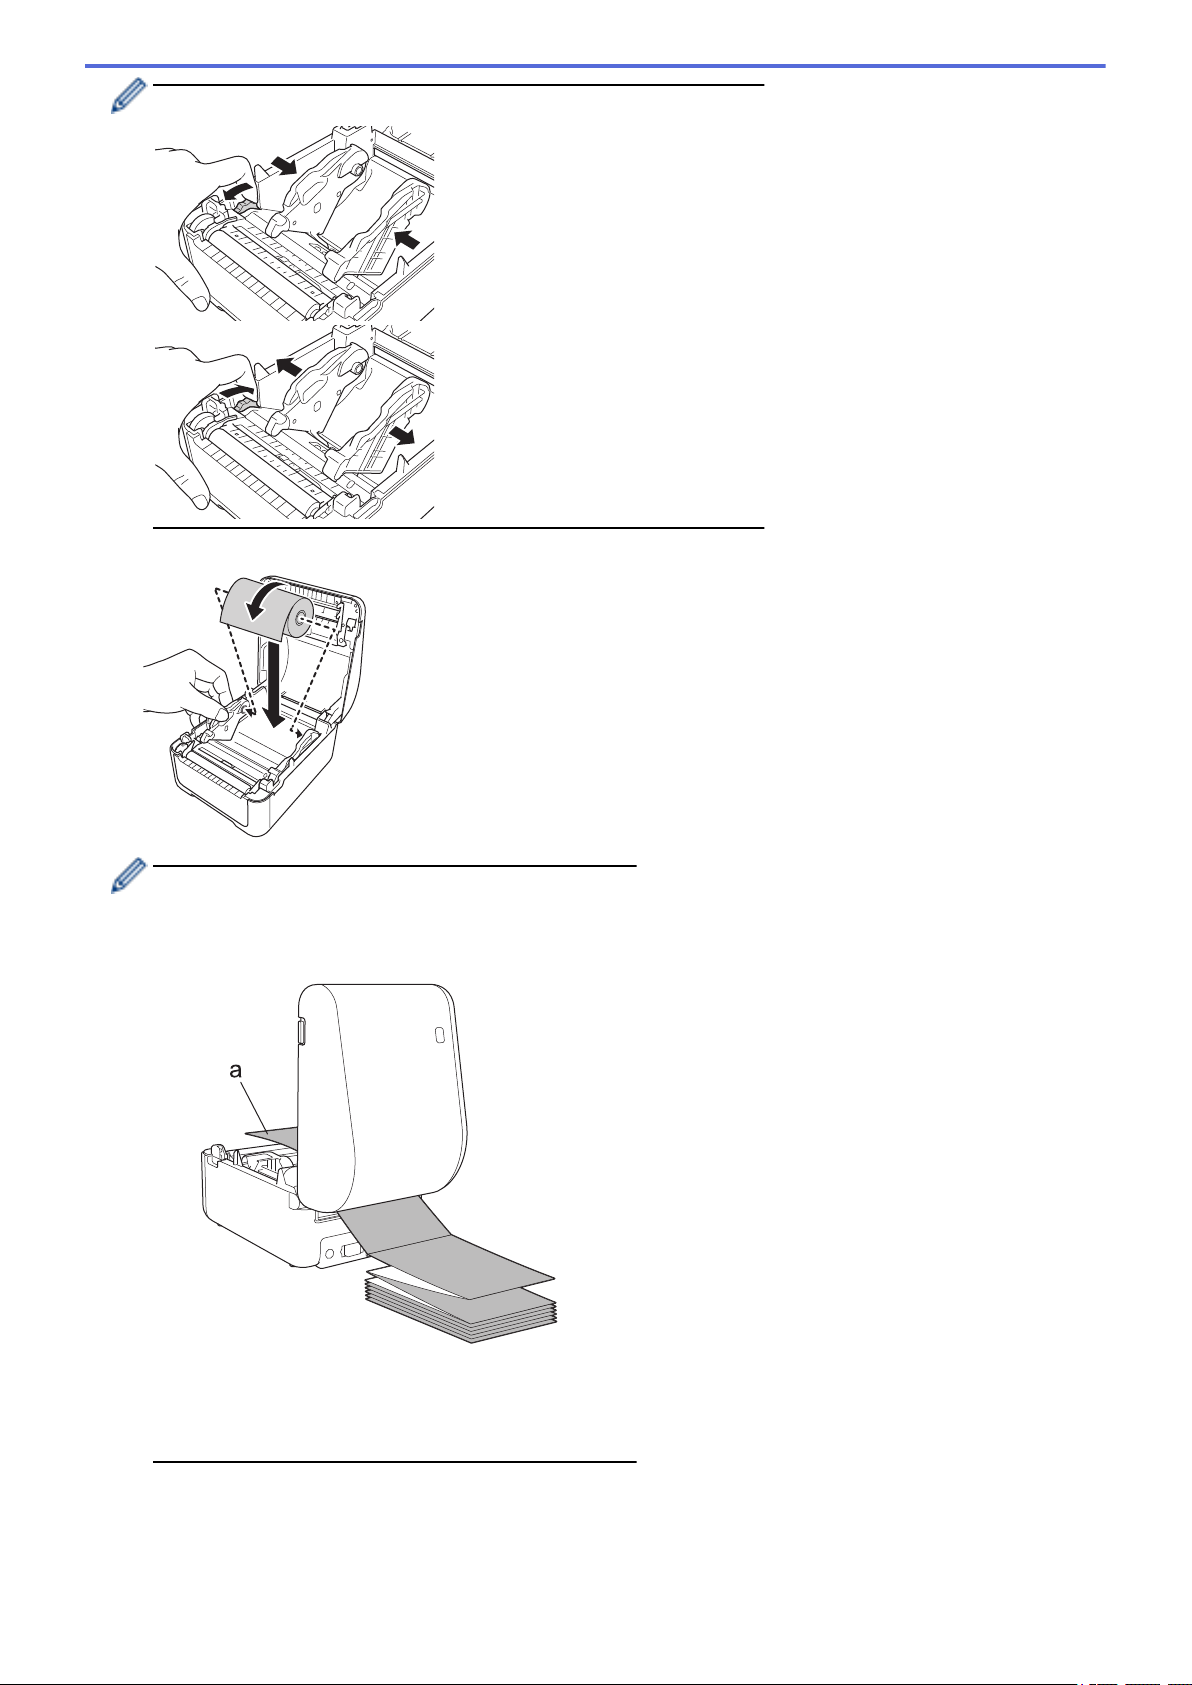
Rotate the adjuster dial toward you to lock the Roll Guides into place.
5. Insert the roll so that the label print side is facing up, as shown in the illustration.
• For fanfold paper
Insert the fanfold paper as shown in the illustration.
a. Print side
Adjust the Roll Guides when using fanfold paper.
6. Feed the end of the roll under the Media Guide Tips (1).
Position the end of the paper slightly out of the Label Output Slot.
17
Page 22
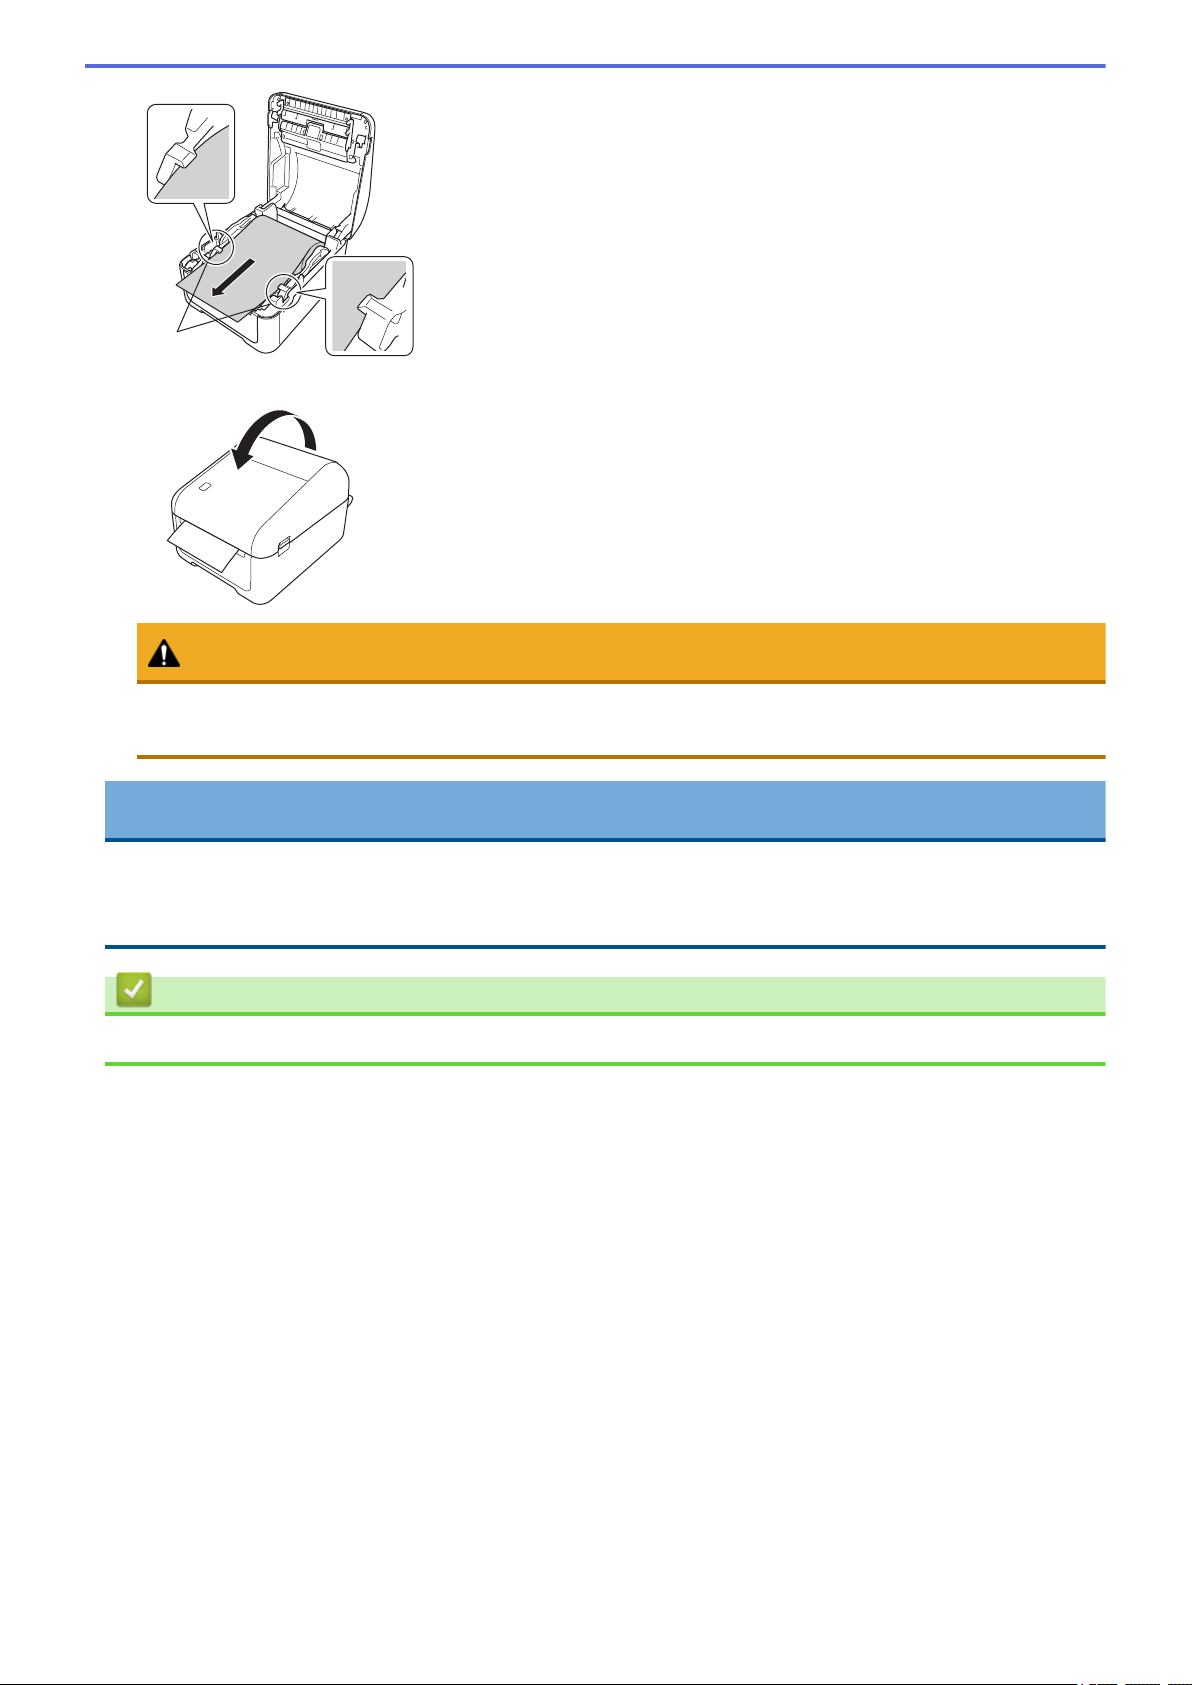
1
7. Close the Roll Compartment Cover until it locks into place.
CAUTION
Be careful when closing the Roll Compartment Cover. There is a risk of injury if your finger gets pinched
between the upper and lower parts of the cover.
IMPORTANT
• Do not leave any printed labels in the printer. Doing so will cause label jams.
• When not in use, remove any rolls from inside the printer and close the Roll Compartment Cover to
prevent dust and debris from accumulating in the printer.
Related Information
• Set Up Your Printer
18
Page 23
Home > Set Up Your Printer > Check the Sensor Position
2
3
1
Check the Sensor Position
When using RD or other types of rolls, you must check the sensor position based on the type of paper you are
using. You can use other types of rolls in addition to the RD Rolls.
>> Die-cut Labels With No Black Mark
>> Die-cut Labels With Black Mark
>> Receipt Paper With No Black Mark
>> Media With a Black Mark
>> Media With Holes
>> Wristband
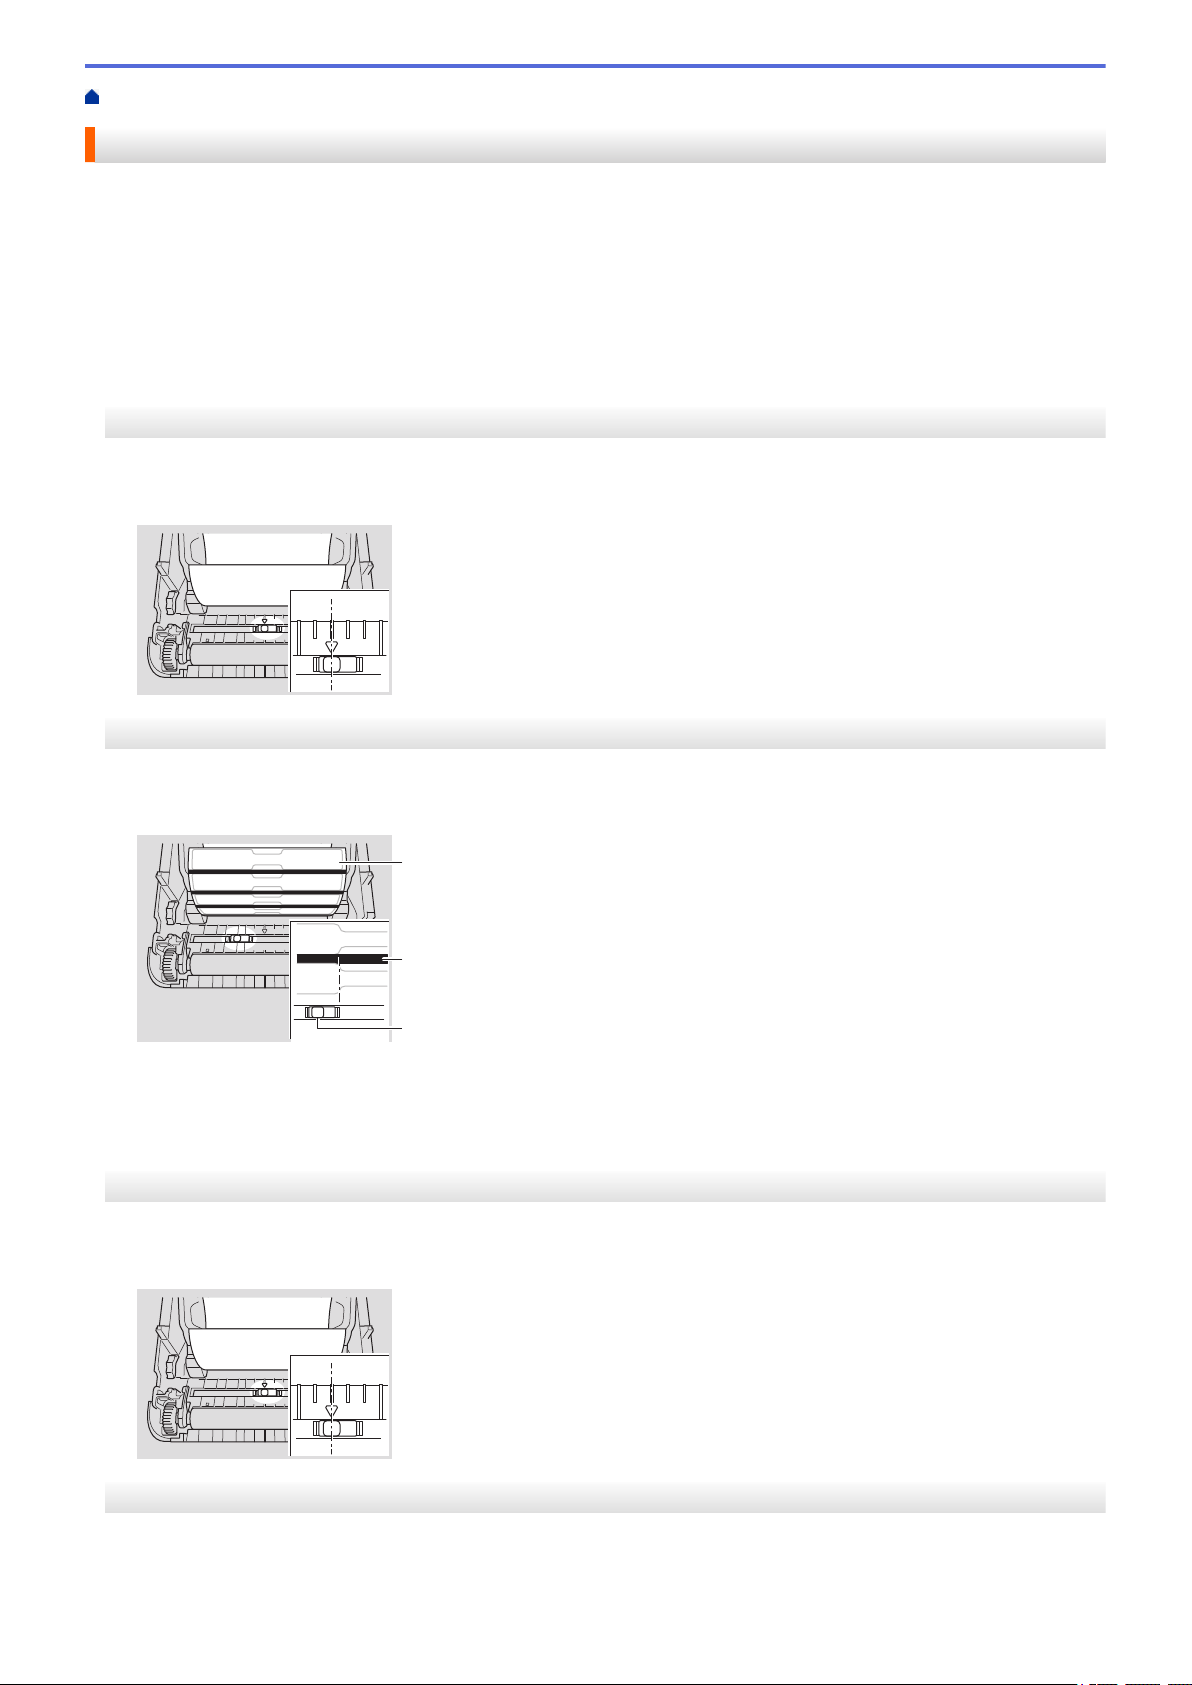
Die-cut Labels With No Black Mark
The transmissive/gap sensor detects the beginning of the label and feeds the label to the correct position.
• Align the slider with b on the printer.
Die-cut Labels With Black Mark
The reflective/black mark sensor detects the mark and feeds the media to the correct position.
• Align the slider as shown in the illustration.
1. Back of media
2. Black mark
3. Reflective/black mark sensor
Receipt Paper With No Black Mark
The reflective/black mark sensor detects if paper roll is finished.
• Align the slider with b on the printer.
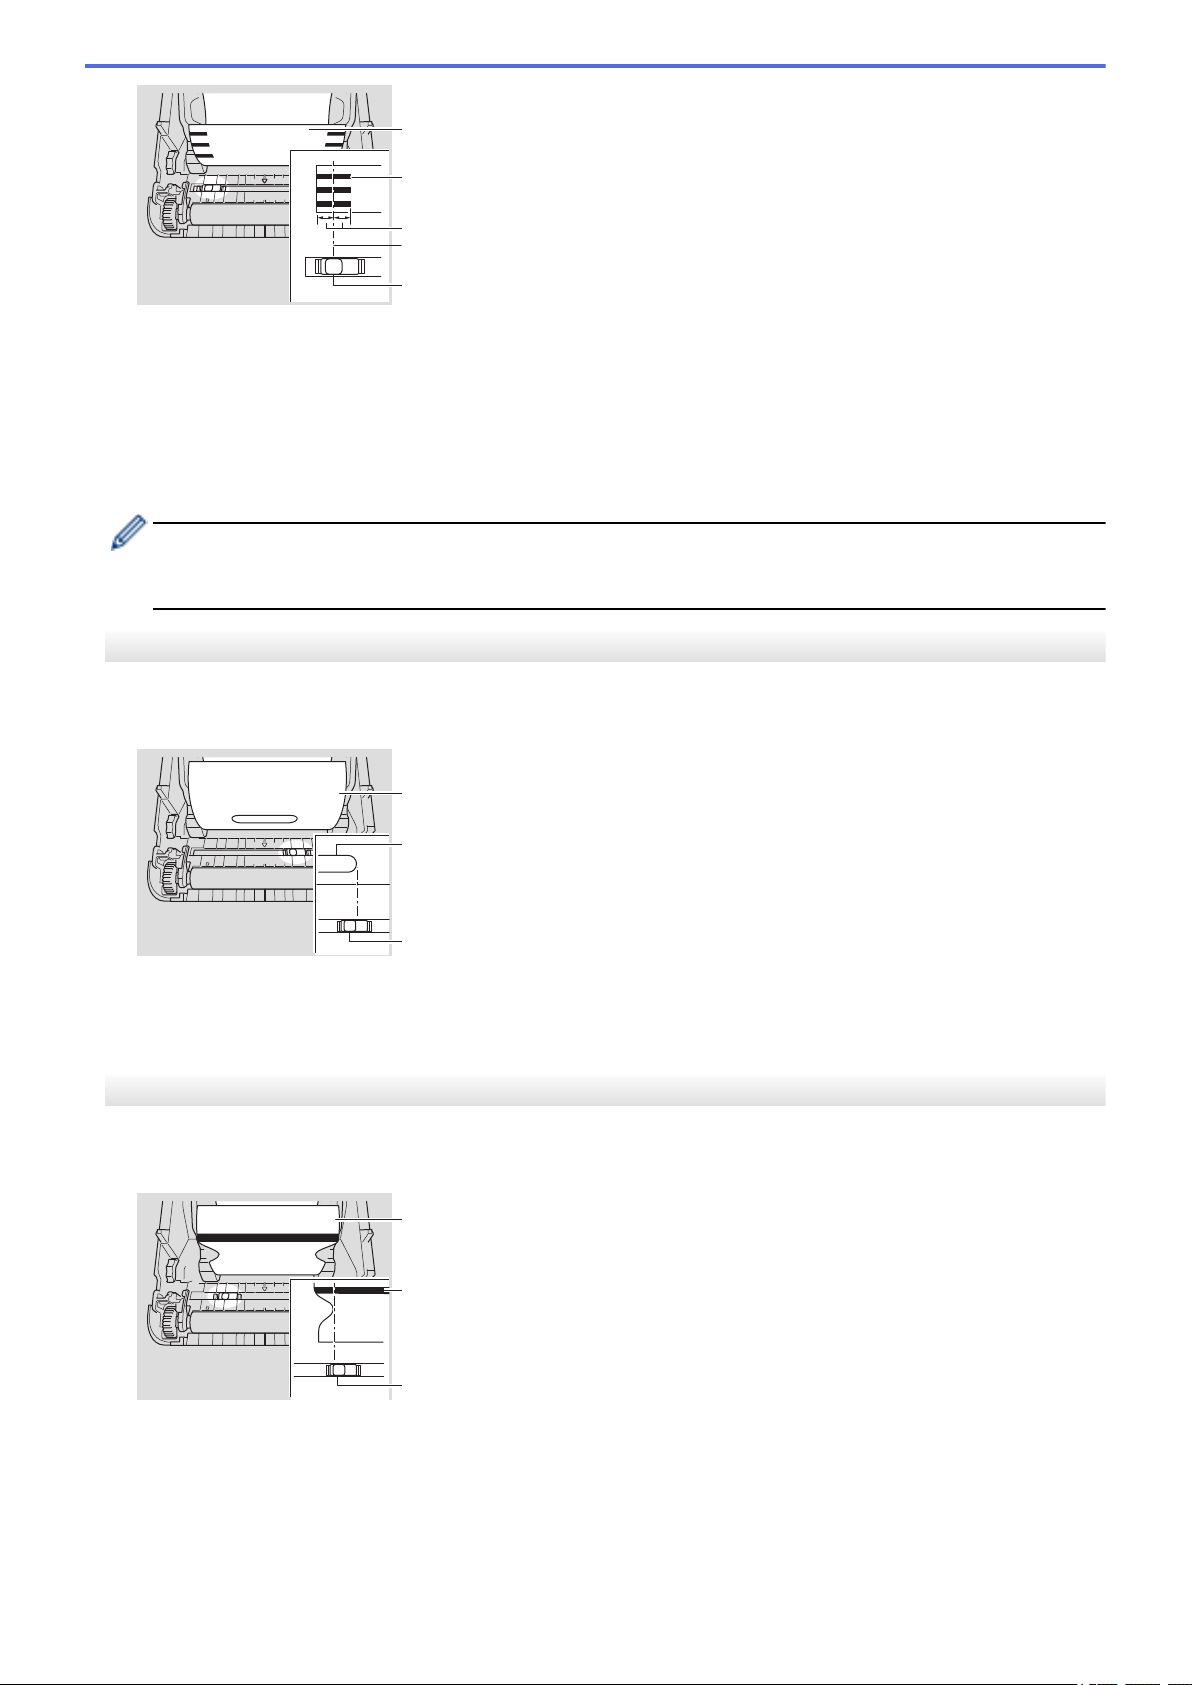
Media With a Black Mark
The reflective/black mark sensor detects the mark and feeds the media to the correct position.
• Align the slider with the center of the black mark on the paper.
19
Page 24
1
2
3
4
5
1. Back of media
2
3
1
3
1
2
2. Black mark
3. 0.16" (4 mm) or more
Make sure there is at least 0.16" (4 mm) on the left and right of the center of the black mark.
4. Center of the black mark
5. Reflective/black mark sensor
When using media with the maximum width of 4.65" (118 mm), make a black mark at least 0.47" (12 mm)
long in from either the left or right edge of the paper so that the reflective/black mark sensor can detect the
black mark. If the black mark is too short, it cannot be detected by the reflective/black mark sensor.
Media With Holes
The reflective/black mark sensor detects the hole and feeds the media to the correct position.
• Align the slider as shown in the illustration.
1. Back of media
2. Hole in media
3. Reflective/black mark sensor
Wristband
The reflective/black mark sensor detects the mark and feeds the media to the correct position.
• Align the slider as shown in the illustration.
1. Back of media
2. Black mark
3. Reflective/black mark sensor
20
Page 25

Related Information
• Set Up Your Printer
Related Topics:
• Auto Media Configuration
21
Page 26
Home > Set Up Your Printer > Connect the Power Cord
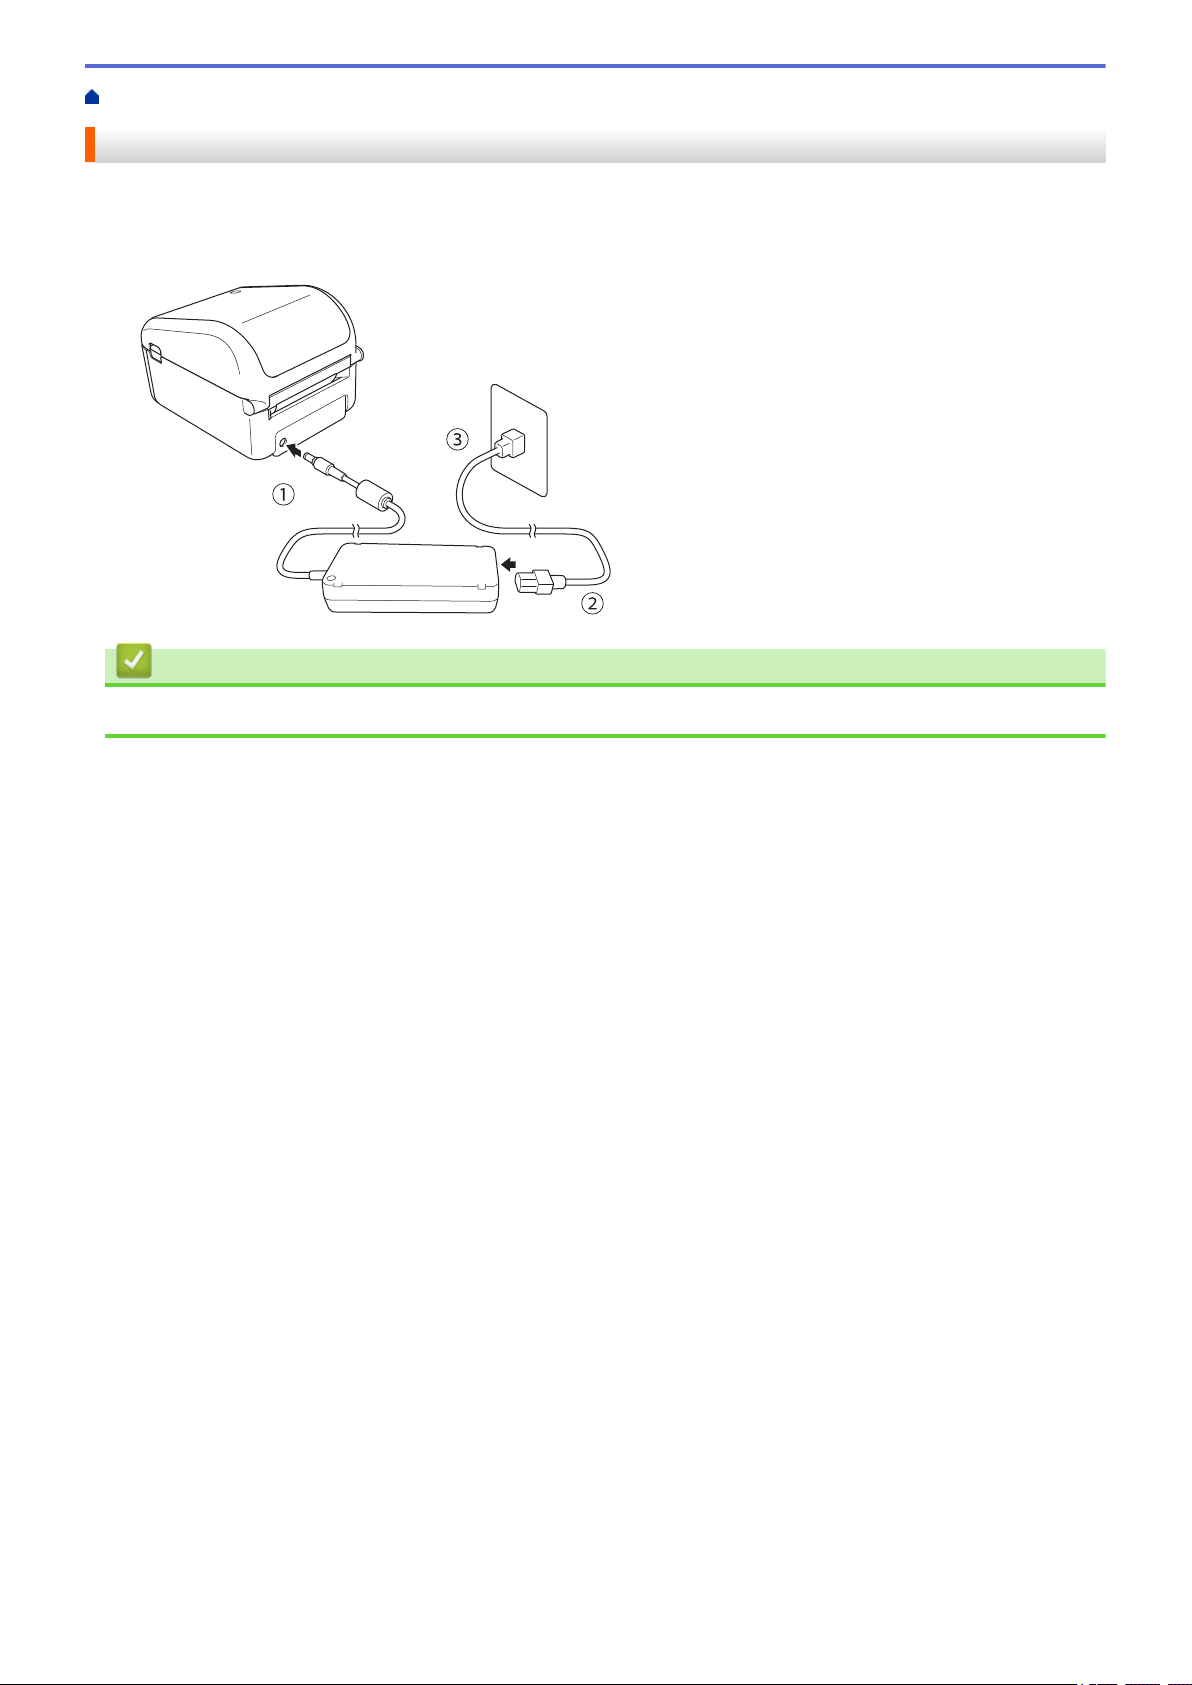
Connect the Power Cord
1. Connect the AC Adapter to the printer.
2. Connect the AC Power Cord to the AC Adapter.
3. Plug the AC Power Cord into a grounded AC power outlet.
Related Information
• Set Up Your Printer
22
Page 27
Home > Set Up Your Printer > Turn Power On/Off
Turn Power On/Off
• To turn on the printer, press .
Press to align the end of the roll.
The Power LED turns green.
• To turn the printer off, press and hold until the Power LED turns off.
NOTE
When turning off the printer, do not disconnect the AC Adapter and AC Power Cord until the Power LED
turns off.
Related Information
• Set Up Your Printer
23
Page 28

Home > Install Software
Install Software
• Install Printer Drivers and Software on a Computer
• Connect the Printer to a Computer
24
Page 29
Home > Install Software > Install Printer Drivers and Software on a Computer
Install Printer Drivers and Software on a Computer
To print from your computer, install the printer drivers, P-touch Editor, and other applications to your computer.
1. Go to install.brother and download the Software/Documentation installer.
2. Double-click the downloaded installer, and follow the on-screen instructions to proceed with the installation.
To connect the printer to a computer using a wireless connection, we recommend the following:
• When you turn on the printer for the first time after purchasing it or after resetting it, the printer enters
the mode for configuring the wireless settings. Start the installation after turning on the printer.
• Make a note of the SSID (network name) and password (network key) of the wireless network in
advance. If you cannot find this information, contact your network administrator or wireless access
point/router manufacturer.
• To connect the printer to a computer using Wireless Direct, select USB connection during the
installation. At the end of the installation, click the link for Wireless Direct.
3. Close the dialog box when the installation is complete.
To use the printer with a different connection method than the one selected during installation, use the
installer again to reinstall the software and printer drivers, and select the new connection method.
Related Information
• Install Software
• Available Applications
25
Page 30
Home > Install Software > Install Printer Drivers and Software on a Computer > Available Applications
Available Applications
Available Applications for Windows
Application Features
P-touch Editor Allows you to design and print custom labels using built-in drawing tools to create various font
and text styles, import images, and insert barcodes.
P-touch Transfer
Manager
P-touch Library Manages and prints P-touch Editor templates.
P-touch Update
Software
Printer Setting Tool Specifies the printer's settings from a computer.
BRAdmin Light Finds the printer on your network and allows you to configure basic settings from your
BRAdmin
Professional
Font Manager Allows you to transfer fonts to the printer and delete fonts from the printer. Transferred fonts can
Allows you to transfer templates and other data to the printer and save backups of your data on
the computer.
This application is installed with P-touch Editor.
You can use P-touch Library to print templates.
This application is installed with P-touch Editor.
Updates software to the latest version.
computer.
Finds the printer on your network and allows you to configure advanced settings and updates
from your computer.
be accessed and printed using various print commands.
• About font usage permission
When using fonts, you must abide by all terms and conditions set forth by each
rightful font owner. Before downloading fonts, you must confirm that you have
legitimate licences to use the fonts and comply with their terms and conditions;
otherwise you may not download fonts.
Related Information
• Install Printer Drivers and Software on a Computer
26
Page 31

Home > Install Software > Connect the Printer to a Computer
Connect the Printer to a Computer
• Connect the Printer to a Computer Using a USB Cable
• Connect the Printer to a Computer Using Wi-Fi
• Connect the Printer to a Computer Using a Wired LAN
• Connect the Printer to a Computer Using Bluetooth Connection
27
Page 32

Home > Install Software > Connect the Printer to a Computer > Connect the Printer to a Computer Using a
USB Cable
Connect the Printer to a Computer Using a USB Cable
1. Make sure the printer is turned off before connecting the USB cable.
2. Connect the USB cable to the USB Port on the back of the printer, and then to your computer.
3. Turn on the printer.
Related Information
• Connect the Printer to a Computer
28
Page 33

Home > Install Software > Connect the Printer to a Computer > Connect the Printer to a Computer Using
Wi-Fi
Connect the Printer to a Computer Using Wi-Fi
The following Wi-Fi connection methods are available:
>> Infrastructure Mode
>> Wireless Direct
>> WPS (Wi-Fi Protected Setup™)
Infrastructure Mode
Infrastructure Mode allows you to connect the printer to a computer via a wireless access point/router.
• Before You Begin
Configure the Wi-Fi settings of your printer to communicate with your wireless access point/router. After the
printer is configured, computers on your network will have access to the printer.
- To connect the printer to your network, we recommend contacting your system administrator before
installation. You must confirm your Wi-Fi settings before you proceed with this installation.
- To configure the Wi-Fi settings again, or if the status of the Wi-Fi connection for your printer is unknown,
reset the Wi-Fi settings of the printer.
- When you turn on the printer for the first time after purchasing it or after resetting it, the printer enters
the mode for configuring the wireless settings. Start the installation after turning on the printer.
- To achieve the best results with normal everyday printing, use the printer as close to the wireless
access point/router as possible with minimal obstructions. Large objects and walls between the two
devices as well as interference from other electronic devices can affect communication, or the data
transfer speed of your printing.
1. Write down the SSID (network name) and password (network key) of your wireless access point/router.
2. Turn on the printer.
3. Start the installation and follow the on-screen instructions.
If the network selection screen appears, select the SSID that you wrote down.
When the connection between the printer and your wireless access point/router is established, computers on
the same network as the printer have access to the printer.
Wireless Direct
Wireless Direct allows you to connect the printer to your computer directly without a wireless access point/router;
the printer serves as a wireless access point.
1. Follow the on-screen instructions to select connecting via USB and proceed with the installation.
2. Set the printer to Wireless Direct mode.
• From the LCD menu:
a. Press Menu.
b. Press a or b to select the following:
i. Select [WLAN]. Press OK.
ii. Select [WLAN (On/Off)]. Press OK.
c. Press a or b to select [On]. Press OK.
d. Press a or b to select the following:
i. Select [WLAN]. Press OK.
ii. Select [Network Mode]. Press OK.
e. Press a or b to select [Direct Mode]. Press OK.
29
Page 34

appears on the LCD.
• Using a Windows computer:
a. Launch the Printer Setting Tool on your computer.
b. Click the Communication Settings button.
c. Click General > Communication Settings.
d. Confirm the Infrastructure and Wireless Direct or Wireless Direct option is selected for the
Selected Interface setting, and then confirm the Wireless Direct tab.
e. Click Apply to set the printer to Wireless Direct mode.
f. Exit the Printer Setting Tool.
3. Use your computer to select the SSID of your printer. Make sure your computer and the printer are connected
via wireless connection.
The printer must be added to the computer. Follow the on-screen instructions to add the printer.
• The default SSID and password are as follows:
- SSID: "DIRECT-*****_TD-4550DNWB" where ***** is the last five digits of the product serial number.
- Password: 455***** where ***** is the last five digits of the product serial number.
• The Communication Settings menu in the Printer Setting Tool also allows you to apply the network
settings changes to multiple printers.
• You cannot connect to the Internet on your computer via Wi-Fi while using Wireless Direct.
If your printer is connected successfully, changes to .
WPS (Wi-Fi Protected Setup™)
If your wireless access point/router supports WPS, wireless settings and connections can be configured quickly.
1. Confirm that your wireless access point/router has the WPS symbol.
2. Place your printer within the range of your wireless access point/router.
The range may differ depending on your environment. See the instructions provided with your wireless
access point/router.
3. Press Menu.
4. Press a or b to select the following:
a. Select [WLAN]. Press OK.
b. Select [WPS Button Push]. Press OK.
You can also configure the setting using the PIN code by selecting [WPS PIN Code]. For more
information, see the instructions provided with your wireless access point/router.
5. Press a or b to select [Start]. Press OK.
6. Press the WPS button on your wireless access point/router.
When the connection is established, the WLAN icon appears on the printer's LCD.
• Computers on the same network as the printer have access to the printer.
• Your printer tries to connect using WPS for two minutes. If OK is pressed during that time, the printer
continues trying to connect for an additional two minutes.
Related Information
• Connect the Printer to a Computer
30
Page 35

Home > Install Software > Connect the Printer to a Computer > Connect the Printer to a Computer Using a
Wired LAN
Connect the Printer to a Computer Using a Wired LAN
To use a static IP address to connect your printer with a wired LAN connection, install the printer drivers and
Printer Setting Tool, and then specify the wired LAN connection settings.
Network Cable
Use a straight-through Category 5 (or greater) twisted-pair cable for 10BASE-T or 100BASE-TX Fast Ethernet
Network.
IMPORTANT
Do not connect this product to any LAN connection that is subject to overvoltages.
1. If on-screen instructions appear during the installation, make sure the printer is turned off before connecting
the LAN cable.
2. Connect the LAN cable to the LAN Port on the back of the printer.
3. Turn on the printer.
Related Information
• Connect the Printer to a Computer
31
Page 36

Home > Install Software > Connect the Printer to a Computer > Connect the Printer to a Computer Using
Bluetooth Connection
Connect the Printer to a Computer Using Bluetooth Connection
1. Press Menu.
2. Press a or b to select the following:
a. Select [Bluetooth]. Press OK.
b. Select [Bluetooth (On/Off)]. Press OK.
3. Press a or b to select [On]. Press OK.
appears on the LCD.
4. Follow the on-screen instructions to proceed with the installation.
5. When the search results appear, select the printer.
If your printer is connected successfully,
Related Information
• Connect the Printer to a Computer
changes to .
32
Page 37

Home > Create Labels and Print Using Computer
Create Labels and Print Using Computer
• Create Labels Using P-touch Editor (Windows)
• Print Labels Using P-touch Editor (Windows)
• Create Labels and Print without Installing Software and Drivers
• Print Labels Distributed to Multiple Printers to Reduce Printing Time (Windows)
• Print Barcode Labels Using Crop Print (Windows)
• Print Labels Using the Printer Driver (Windows)
33
Page 38

Home > Create Labels and Print Using Computer > Create Labels Using P-touch Editor (Windows)
2
1
3
4
Create Labels Using P-touch Editor (Windows)
To use your printer with your computer, install P-touch Editor and the printer driver.
For the latest drivers and software, go to your model's Downloads page on the Brother support website at
support.brother.com.
1. Start the P-touch Editor
• Windows 10/Windows Server 2016:
Click Start > Brother P-touch > P-touch Editor 5.2, or double-click the P-touch Editor 5.2 icon on the
desktop.
• Windows 8/Windows 8.1/Windows Server 2012/Windows Server 2012 R2:
Click the P-touch Editor 5.2 icon on the Apps screen, or double-click the P-touch Editor 5.2 icon on the
desktop.
• Windows 7/Windows Server 2008/Windows Server 2008 R2:
Click Start > All Programs > Brother P-touch > P-touch Editor 5.2, or double-click the P-touch Editor
5.2 icon on the desktop.
P-touch Editor starts.
2. Do one of the following:
• To open an existing layout, click Open (1).
• To connect a preset layout to a database, select the check box next to Connect Database (2).
• To create a new layout, double-click the New Layout pane (3), or click the New Layout pane (3) and then
click →.
• To create a new layout using a preset layout, double-click a category button (4), or select a category
button (4) and then click →.
.
To change how P-touch Editor starts, click Tools > Options in the P-touch Editor menu bar to display the
Options dialog box. On the left side, select the General heading, and then the setting you want in the
Operations list box under Startup Settings.
Related Information
• Create Labels and Print Using Computer
• Main Window of P-touch Editor Express Mode (Windows)
• Main Window of P-touch Editor Professional Mode (Windows)
• Main Window of P-touch Editor Snap Mode (Windows)
34
Page 39

Home > Create Labels and Print Using Computer > Create Labels Using P-touch Editor (Windows) > Main
1 12
3
4
Window of P-touch Editor Express Mode (Windows)
Main Window of P-touch Editor Express Mode (Windows)
Express mode allows you to quickly create layouts including text and images.
1. Edit Toolbars
2. Print Button
3. Operation Mode Selection Buttons
4. Property Palettes
Related Information
• Create Labels Using P-touch Editor (Windows)
35
Page 40

Home > Create Labels and Print Using Computer > Create Labels Using P-touch Editor (Windows) > Main
1 2
3
4
3
Window of P-touch Editor Professional Mode (Windows)
Main Window of P-touch Editor Professional Mode (Windows)
Professional mode allows you to create layouts using a wide-range of advanced tools and options.
1. Print Menu
2. Property Palettes
3. Edit Toolbars
4. Operation Mode Selection Buttons
Related Information
• Create Labels Using P-touch Editor (Windows)
36
Page 41

Home > Create Labels and Print Using Computer > Create Labels Using P-touch Editor (Windows) > Main
Window of P-touch Editor Snap Mode (Windows)
Main Window of P-touch Editor Snap Mode (Windows)
Snap mode allows you to capture all or a portion of your computer screen display and print it as an image.
Related Information
• Create Labels Using P-touch Editor (Windows)
37
Page 42

Home > Create Labels and Print Using Computer > Print Labels Using P-touch Editor (Windows)
Print Labels Using P-touch Editor (Windows)
>> Express Mode
>> Professional Mode
>> Snap Mode
Express Mode
Configure the settings in the Print screen before printing.
• Click File > Print from the menu bar, or click (Print).
Professional Mode
Configure the settings in the Print screen before printing.
• Click File > Print from the menu bar, or click .
Click to start printing without changing the settings.
Snap Mode
• Enter the text, and then click .
Related Information
• Create Labels and Print Using Computer
38
Page 43

Home > Create Labels and Print Using Computer > Create Labels and Print without Installing Software and
Drivers
Create Labels and Print without Installing Software and Drivers
• Print Using USB Interface (Mass Storage Mode)
• Print Image Data without Using the Printer Driver
39
Page 44

Home > Create Labels and Print Using Computer > Create Labels and Print without Installing Software and
Drivers > Print Using USB Interface (Mass Storage Mode)
Print Using USB Interface (Mass Storage Mode)
The mass storage feature allows you to send a file to the printer using the USB interface, without installing a
printer driver.
This feature is useful for:
• Applying printer settings saved in a command file (BIN file format) and adding templates (BLF file format) into
your printer without using any software tools. Both types of files must be distributed by an administrator.
• Executing commands without installing the printer driver.
• Using a device with an operating system (including non-Windows operating systems) supporting a USB host
feature to print and transmit data.
1. Confirm that the printer is turned off.
2. Press and hold OK and
Mode] appears on the LCD.
3. Connect the computer or mobile device to the printer via USB.
The printer’s mass storage area appears as a folder on the computer or device's screen.
If the mass storage area does not appear automatically, see the instructions for the operating system of
your computer or mobile device for information about accessing the mass storage area.
4. Drag and drop the file you want to copy to the mass storage area.
5. Press OK.
The commands in the command file are executed, and the Status LED flashes once in green. When finished,
the Power LED lights in green.
6. To turn off mass storage mode, turn off the printer.
at the same time until the Power LED lights in green and [Mass Storage
NOTE
• When the printer is turned off, mass storage mode is deactivated and any files in the mass storage area
are deleted.
• This feature supports only BIN and BLF files.
• Do not create folders in the mass storage area. If a folder is created, files in the folder cannot be
accessed.
• The capacity of the mass storage area is 16 MB.
• If multiple files are copied, the commands may not be executed.
• Only USB connection is available while the printer is in mass storage mode.
• Do not access other files in the mass storage area when executing a copied file.
Related Information
• Create Labels and Print without Installing Software and Drivers
40
Page 45

Home > Create Labels and Print Using Computer > Create Labels and Print without Installing Software and
Drivers > Print Image Data without Using the Printer Driver
Print Image Data without Using the Printer Driver
• The mass storage feature supports the JPEG image printing.
• The Object Push Profile (OPP) is used for printing via a Bluetooth connection.
• The printer converts a color JPEG image to a black and white image using a dithering process.
• When sending a black and white JPEG image, the dithering process may produce a fuzzy image.
• To improve the image quality, try to turn off any preprocessing of the JPEG image.
• Only JPEG images can be printed. (Limited to files with the .jpg extension.)
• The maximum file size is 16 MB.
(2 MB when the mass storage feature is used.)
• The maximum resolution is as follows:
- Height × Width = 36000 × 1280 dots
If these limits are exceeded, the data received by the printer is discarded and not printed.
• Print is at 1 pixel = 1 dot.
• The printer performs binary processing (simple binary) to print the image.
• The image is printed with the height-to-width proportions of the received data.
Related Information
• Create Labels and Print without Installing Software and Drivers
41
Page 46

Home > Create Labels and Print Using Computer > Print Labels Distributed to Multiple Printers to Reduce
67 67
66
200
Printing Time (Windows)
Print Labels Distributed to Multiple Printers to Reduce Printing Time (Windows)
When printing a large number of labels, printing can be distributed among multiple printers, via USB or network
connection, to reduce printing time.
• The Distributed Printing function can only be used with printers of the same model number.
• The number of pages is divided among the selected printers. If the specified number of pages cannot
be evenly divided among the printers, it is divided in the order of the printers as shown.
• It may not be possible to detect information for a printer connected via a USB hub or print server. Before
printing, enter the settings manually, and check if the printer can be used for printing.
• Depending on whether a router is used and the security features in use, such as a firewall, it may not be
possible to use this function.
• We recommend performing a connection test for your operating environment. Contact your information
technology manager or administrator for assistance.
1. In P-touch Editor, click File > Print.
2. Click Properties.
3. Click the Advanced tab, select the Distributed Printing check box, and then click Settings.
4. Select the printers you want to use for distributed printing.
The Distributed Printing Settings dialog box appears.
42
Page 47

If multiple printers are connected, you can find the printer you want using its port name. The xxxxxxxxxxxx
in BRNxxxxxxxxxxxx in the port name indicates the MAC address/Ethernet address of the printer. The MAC
address/Ethernet address can be checked by printing the printer setup information.
5. Right-click the selected printer or printers, and then click Settings. From the Paper Size drop-down list,
select the label size.
If multiple printers have been selected, the same label size setting is applied to all selected printers.
6. Click OK to close the label size setting dialog box.
7. Click OK to close the Distributed Printing Settings dialog box.
The setup is completed.
8. Click OK to close the Properties dialog box.
9. Start printing.
Related Information
• Create Labels and Print Using Computer
43
Page 48

Home > Create Labels and Print Using Computer > Print Barcode Labels Using Crop Print (Windows)
A
B
A
B
C
Z
C
D00XXU001 D00VXY004 D00ZXX003
D00XXU001
D00XXU001
D00XXU002 D00X0X001 D00ZXX004
D00XXU003 D00X0X002 D00KYX001
D00XXU004 D00X0X003 D00KYX002
D00VXY001 D00X0X004 D00KYX003
D00VXY002 D00ZXX001 D00KYX004
D00VXY003 D00ZXX002 D00XXX001
XXXXXXXX
xxxxxxxxxxxxxxxxxxxxx
xxxxxxxxxxxxxxxxxxxxx
xxxxxxxxxxxxxxxxxxxxx
xxxxxxxxxxxxxxxxxxxxx
xxxxxxxxxxxxxxxxxxxxx
xxxxxxxxx
D00XXU001
D00XXU002
D00XXU003
D00XXX001
Z
Print Barcode Labels Using Crop Print (Windows)
You can print one or multiple barcodes from an A4 or Letter size PDF file. The Crop Print feature automatically
identifies and then individually crops and prints the barcodes you specify.
• The Crop Print function is available only when printing from the Windows printer driver, and cannot be
executed using P-touch Editor.
• The accuracy of the Crop Print feature depends on the user's environment, printing material, and label
content.
Clear, black-and-white barcodes are recommended.
Some labels may not print correctly or may differ from the original data if the conditions are not optimal.
For more information, visit the Brother support website at
support.brother.com.
Related Information
• Create Labels and Print Using Computer
• Barcodes Compatible with Crop Print (Windows)
• Barcode Document Compatible with Crop Print (Windows)
• Print Barcode Labels Using Crop Print (Windows)
44
Page 49

Home > Create Labels and Print Using Computer > Print Barcode Labels Using Crop Print
(Windows) > Barcodes Compatible with Crop Print (Windows)
Barcodes Compatible with Crop Print (Windows)
Barcode Specification
Property
Vertical width 0.2" (5 mm) (minimum)
Horizontal width The narrowest bar: 0.02" (0.5 mm) (minimum)
Margin 10 times the narrowest bar width (minimum)
Color Black
Background color White
Cell width (widest bar) 0.02" (0.5 mm) (minimum)
Specification
• Code 39/ Code 3 of 9
• ITF/ ITF-14/ Interleaved 2 of 5
• GS1-128 (UCC/ EAN-128)
• Codabar (Code 2 of 7, NW-7)
• CODE 93
• CODE 128
• UPC-A
• UPC-E
• JAN-8/ EAN-8
• JAN-13/ EAN-13
• QR code
• Datamatrix / GS1 Datamatrix
• PDF417
• MaxiCode
1
1
1
1
Related Information
• Print Barcode Labels Using Crop Print (Windows)
1 available for shipping labels
45
Page 50

Home > Create Labels and Print Using Computer > Print Barcode Labels Using Crop Print
D00XXU001 D00VXY004 D00ZXX003
D00XXU002 D00X0X001
D00XXU003 D00X0X002
D00XXU004 D00X0X003
D00VXY001 D00X0X004
D00VXY002 D00ZXX001
D00VXY003 D00ZXX002
D00XXU001
D00XXU002 D00X0X001
D00XXU003 D00X0X002 D00KYX001
D00XXU004 D00X0X003 D00KYX002
D00VXY001 D00X0X004 D00KYX003
D00VXY002 D00ZXX001 D00KYX004
D00VXY003 D00ZXX002 D00XXX001
(Windows) > Barcode Document Compatible with Crop Print (Windows)
Barcode Document Compatible with Crop Print (Windows)
To use the Crop Print function, create a barcode document and save it as a PDF file.
Make sure the final barcode PDF meets the following requirements:
Barcode Conditions for Product Labels
Item
Total barcode
Condition
Between 1-99 barcodes
number
Barcode type Use only barcodes compatible with the Crop Print feature.
Barcode position Make sure barcodes are not tilted or on an angle. They must be parallel with the top and bottom
of each page.
Make sure barcodes start in the top left corner and run down the column, continuing at the top of
the next column to the right.
Barcode Layout for Product Labels
Correct Barcode Layout
Incorrect Barcode Layout
Not identified
(not aligned along the top margin)
Barcode Conditions for Shipping Labels
Item
Total barcode number Between 1-9 barcodes
Barcode type Use only barcodes compatible with the Crop Print feature.
Barcode position Make sure barcodes are straight.
Barcode Layout for Shipping Labels
Cropping is performed when any of the following conditions are satisfied:
• The label is surrounded by ruled lines.
• The label includes horizontal lines that extend the entire width of the label.
• The label includes vertical lines that extend the full height of the label.
Condition
46
Page 51

Correct Barcode Layout
Related Information
• Print Barcode Labels Using Crop Print (Windows)
47
Page 52

Home > Create Labels and Print Using Computer > Print Barcode Labels Using Crop Print
(Windows) > Print Barcode Labels Using Crop Print (Windows)
Print Barcode Labels Using Crop Print (Windows)
Make sure your printer is connected to a computer or mobile device via a USB cable or network connection.
1. Open the barcode document PDF file you want to print.
2. Click File > Print.
3. Click the Printer drop-down list, and then select your printer.
4. In the Page Sizing & Handling section, select the Actual Size radio button.
5. Under Orientation, select the Portrait radio button.
6. Click Properties.
7. Click the Basic tab, and do one of the following:
• For Die-cut labels, clear the Cut Every check box.
• For Continuous Rolls, select the Cut Every check box.
8. Click the Crop Print tab, and select the Automatically print individual labels with barcodes. check box.
9. Select the Extract individual labels with barcodes option for product labels or select the Crop barcodes,
text, and other objects option for shipping labels.
10. Click the Label/Paper Size drop-down list, and then select your label or paper size.
If you select the Crop barcodes, text, and other objects option, only 4 inch (102 mm) width paper is listed.
Select the closest label size to match the original size of the crop data. We recommend testing a sample
before printing a large number of labels.
48
Page 53

11. Click OK.
12. Print from the application's print screen.
• Do not enlarge or reduce the size of the barcode sheet. The barcodes may not be identified correctly.
• When printing from Acrobat Reader, do the following:
- In the Page Sizing & Handling section, clear the Choose paper source by PDF page size check
box.
- Under Orientation, select the Portrait radio button.
Related Information
• Print Barcode Labels Using Crop Print (Windows)
49
Page 54

Home > Create Labels and Print Using Computer > Print Labels Using the Printer Driver (Windows)
Print Labels Using the Printer Driver (Windows)
1. Connect the printer to a computer.
2. Open the document you want to print.
3. Select the print command in your application.
4. Select your printer, and then click the printing properties or preferences button.
The printer driver window appears.
5. Change the printer settings, if needed.
6. Click OK.
7. Complete your print operation.
The printer starts printing. When printing is finished, the printer reverts to the mode selected before printing
started.
Related Information
• Create Labels and Print Using Computer
50
Page 55

Home > Print Labels Using Printer's LCD
Print Labels Using Printer's LCD
• Create Labels Using P-touch Editor (Windows)
• Transfer the Template to P-touch Transfer Manager (Windows)
• Transfer Templates or Other Data from the Computer to the Printer (Windows)
• Call Up the Transferred Template on the Printer's LCD and Print
51
Page 56

Home > Print Labels Using Printer's LCD > Create Labels Using P-touch Editor (Windows)
2
1
3
4
Create Labels Using P-touch Editor (Windows)
To use your printer with your computer, install P-touch Editor and the printer driver.
For the latest drivers and software, go to your model's Downloads page on the Brother support website at
support.brother.com.
1. Start the P-touch Editor
• Windows 10/Windows Server 2016:
Click Start > Brother P-touch > P-touch Editor 5.2, or double-click the P-touch Editor 5.2 icon on the
desktop.
• Windows 8/Windows 8.1/Windows Server 2012/Windows Server 2012 R2:
Click the P-touch Editor 5.2 icon on the Apps screen, or double-click the P-touch Editor 5.2 icon on the
desktop.
• Windows 7/Windows Server 2008/Windows Server 2008 R2:
Click Start > All Programs > Brother P-touch > P-touch Editor 5.2, or double-click the P-touch Editor
5.2 icon on the desktop.
P-touch Editor starts.
2. Do one of the following:
• To open an existing layout, click Open (1).
• To connect a preset layout to a database, select the check box next to Connect Database (2).
• To create a new layout, double-click the New Layout pane (3), or click the New Layout pane (3) and then
click →.
• To create a new layout using a preset layout, double-click a category button (4), or select a category
button (4) and then click →.
.
To change how P-touch Editor starts, click Tools > Options in the P-touch Editor menu bar to display the
Options dialog box. On the left side, select the General heading, and then the setting you want in the
Operations list box under Startup Settings.
Related Information
• Print Labels Using Printer's LCD
52
Page 57

Home > Print Labels Using Printer's LCD > Transfer the Template to P-touch Transfer Manager (Windows)
Transfer the Template to P-touch Transfer Manager (Windows)
1. Start the P-touch Editor .
• Windows 10/Windows Server 2016:
Click Start > Brother P-touch > P-touch Editor 5.2, or double-click the P-touch Editor 5.2 icon on the
desktop.
• Windows 8/Windows 8.1/Windows Server 2012/Windows Server 2012 R2:
Click the P-touch Editor 5.2 icon on the Apps screen, or double-click the P-touch Editor 5.2 icon on the
desktop.
• Windows 7/Windows Server 2008/Windows Server 2008 R2:
Click Start > All Programs > Brother P-touch > P-touch Editor 5.2, or double-click the P-touch Editor
5.2 icon on the desktop.
P-touch Editor starts.
2. Open the template you want or create a label layout.
3. Click File > Transfer Template > Transfer.
The P-touch Transfer Manager window appears. A template is transferred to the Configurations folder.
Related Information
• Print Labels Using Printer's LCD
53
Page 58

Home > Print Labels Using Printer's LCD > Transfer Templates or Other Data from the Computer to the
Printer (Windows)
Transfer Templates or Other Data from the Computer to the Printer (Windows)
You can transfer templates, databases, and images from the computer to the printer.
To transfer templates from a mobile device to the printer, see Related Information.
1. Connect the printer and the computer via a USB cable, and then turn on the printer.
The printer model name appears next to a printer icon in the folder view.
If you select the printer in the folder view, the current templates and other data stored in the printer appear.
If a printer is disconnected or offline, it does not appear in the folder view.
2. Select the printer you want to transfer the template or other data to.
3. Right-click the Configurations folder, select New, and then create a new folder.
54
Page 59

4. Do one of the following:
• Drag the template or other data you want to transfer and place it in the new folder.
• To transfer multiple templates or other data, drag the files you want to transfer, and then place them in the
new folder. Each file is assigned a key number (memory location in the printer) when it is placed in the
new folder.
Data type
Template 255 Each template can contain a maximum of 255 objects.
Database 255 • Only CSV files can be transferred.
Image (transferred
symbols)
Maximum number of
transferable items
255 • Only BMP files can be transferred.
Restriction details
• Each CSV file can contain a maximum of 65000
records.
• Monochrome BMP files are recommended.
• The size limit is 2560 x 2560 pixels.
55
Page 60

Data type Maximum number of
transferable items
Restriction details
• Wide images may be cropped.
• You can confirm the available space in the transfer file memory by printing the Printer Setting Report.
See Available memory in the report for the available space. The available space appearing in
Available memory: ****B may be different from the actual available space.
• You can view the templates and other data by selecting:
- The folder in the Configurations folder
- All Contents
- One of the categories under Filter, such as Layouts
5. To change the key number assigned to an item, right-click the item, select the Key Assign menu, and then
select the key number you want.
• Except for the data in databases, all data transferred to the printer is assigned a key number.
• If the template or other data transferred to the printer has the same key number as another template
already saved in the printer, the new template overwrites the old one. You can confirm the assigned
template numbers saved in the printer by backing up the templates or other data.
• If the printer memory is full, remove one or more templates from the printer's memory.
6. To change the template names or other data you want to transfer, click the item you want, and then type the
new name.
The number of characters used for the template names may be limited depending on the printer model.
7. Select the folder containing the templates or other data you want to transfer, and then click Transfer.
56
Page 61

A confirmation message appears.
• You can also transfer individual items to the printer without adding them to a folder. Select the template
or other data you want to transfer, and then click Transfer.
• Multiple items and folders can be selected and transferred in one operation.
8. Click OK.
The selected items are transferred to the printer.
Related Information
• Print Labels Using Printer's LCD
Related Topics:
• Transfer Templates Created on a Computer to the Printer Using a Mobile Device
57
Page 62

Home > Print Labels Using Printer's LCD > Call Up the Transferred Template on the Printer's LCD and Print
Call Up the Transferred Template on the Printer's LCD and Print
Transferred or preset templates can be printed by the printer using the LCD menu without connecting to a
computer or mobile device.
>> Print a Template not Linked to a Database
>> Print a Template Linked to a Database
Print a Template not Linked to a Database
1. Make sure the LCD is in the template mode as shown below.
If it is not, set it to the template mode.
a. Press Menu.
b. Press a or b to select the following:
i. Select [Template Settings]. Press OK.
ii. Select [Template Mode]. Press OK.
c. Press a or b to select [On]. Press OK.
2. Press a or b to select a template, and then press OK.
The number of labels assigned to the selected template prints. To change this number for future use, go to
[Template Settings] and set the [Confirm Print] option to [On].
The next time you print, the print settings screen will appear, allowing you to change the number of labels
using a and b.
• To display a print preview, press Menu on the print settings screen twice, and then press OK.
• To display the object in the template, press Menu on the print settings screen once, and then press OK.
To return to the print settings screen, press
or OK.
Print a Template Linked to a Database
1. Make sure the LCD is in the template mode as shown below.
58
Page 63

If it is not, set it to the template mode.
a. Press Menu.
b. Press a or b to select the following:
i. Select [Template Settings]. Press OK.
ii. Select [Template Mode]. Press OK.
c. Press a or b to select [On]. Press OK.
2. Press a or b to select a template, and then press OK.
3. Press a or b to select the database, and then press OK.
The LCD displays the template mode screen.
The number of labels assigned to the selected template prints. To change this number for future use, go to
[Template Settings] and set the [Confirm Print] option to [On].
The next time you print, the print settings screen will appear, allowing you to change the number of labels
using a and b.
• To display a print preview, press Menu on the print settings screen twice, and then press OK.
• To display the object in the template, press Menu on the print settings screen once, and then press OK.
To return to the print settings screen, press
or OK.
Related Information
• Print Labels Using Printer's LCD
59
Page 64

Home > Print Labels Using Barcode Scanner or Other Devices (P-touch Template)
Print Labels Using Barcode Scanner or Other Devices (P-touch Template)
• P-touch Template Operations Overview
• Create Labels Using P-touch Editor (Windows)
• Transfer the Template to P-touch Transfer Manager (Windows)
• Transfer Templates or Other Data from the Computer to the Printer (Windows)
• Specify the Barcode Scanner Settings (Windows)
• Connect the Printer to a Barcode Scanner Using Bluetooth (Windows)
• Connect the Printer to a Barcode Scanner Using USB Host Interface
• Try the P-touch Template Function Using the Barcode List
60
Page 65

Home > Print Labels Using Barcode Scanner or Other Devices (P-touch Template) > P-touch Template
Operations Overview
P-touch Template Operations Overview
P-touch Template mode allows you to insert data into text and barcode objects from a downloaded template
using other devices connected to the printer.
• P-touch Template mode is also compatible with other input devices like a scale, testing machine,
controller, or a programmable logic device.
• For more information, see the P-touch Template Manual/ Command Reference (English only). You can
download the latest version from the Brother support website at support.brother.com/manuals.
Basic Operations
Standard Template Printing
Download frequently used templates or images and scan a barcode to select which one to print.
Advanced Template Printing
Download a template and scan a barcode to print a copy or to insert the scanned data into a different
template.
Database Lookup Printing
Download a database linked to a template and scan a barcode to find a record to insert into the template and
print.
See Related Information.
Advanced Operations
Numbered (Serialized Number) Printing
Increment printed text or barcodes in any downloaded template.
See Related Information.
Related Information
• Print Labels Using Barcode Scanner or Other Devices (P-touch Template)
Related Topics:
• Print the Transferred Templates Directly (Standard Template Printing)
• Print the Transferred Templates After Changing (Advanced Templated Printing)
• Print the Templates Related to a Database (Database Lookup Printing)
• Print the Transferred Templates in Serialized Number (Numbered (Serialized Number) Printing)
61
Page 66

Home > Print Labels Using Barcode Scanner or Other Devices (P-touch Template) > Create Labels Using
2
1
3
4
P-touch Editor (Windows)
Create Labels Using P-touch Editor (Windows)
To use your printer with your computer, install P-touch Editor and the printer driver.
For the latest drivers and software, go to your model's Downloads page on the Brother support website at
support.brother.com.
1. Start the P-touch Editor
• Windows 10/Windows Server 2016:
Click Start > Brother P-touch > P-touch Editor 5.2, or double-click the P-touch Editor 5.2 icon on the
desktop.
• Windows 8/Windows 8.1/Windows Server 2012/Windows Server 2012 R2:
Click the P-touch Editor 5.2 icon on the Apps screen, or double-click the P-touch Editor 5.2 icon on the
desktop.
• Windows 7/Windows Server 2008/Windows Server 2008 R2:
Click Start > All Programs > Brother P-touch > P-touch Editor 5.2, or double-click the P-touch Editor
5.2 icon on the desktop.
P-touch Editor starts.
2. Do one of the following:
• To open an existing layout, click Open (1).
• To connect a preset layout to a database, select the check box next to Connect Database (2).
• To create a new layout, double-click the New Layout pane (3), or click the New Layout pane (3) and then
click →.
• To create a new layout using a preset layout, double-click a category button (4), or select a category
button (4) and then click →.
.
To change how P-touch Editor starts, click Tools > Options in the P-touch Editor menu bar to display the
Options dialog box. On the left side, select the General heading, and then the setting you want in the
Operations list box under Startup Settings.
Related Information
• Print Labels Using Barcode Scanner or Other Devices (P-touch Template)
62
Page 67

Home > Print Labels Using Barcode Scanner or Other Devices (P-touch Template) > Transfer the Template
to P-touch Transfer Manager (Windows)
Transfer the Template to P-touch Transfer Manager (Windows)
1. Start the P-touch Editor .
• Windows 10/Windows Server 2016:
Click Start > Brother P-touch > P-touch Editor 5.2, or double-click the P-touch Editor 5.2 icon on the
desktop.
• Windows 8/Windows 8.1/Windows Server 2012/Windows Server 2012 R2:
Click the P-touch Editor 5.2 icon on the Apps screen, or double-click the P-touch Editor 5.2 icon on the
desktop.
• Windows 7/Windows Server 2008/Windows Server 2008 R2:
Click Start > All Programs > Brother P-touch > P-touch Editor 5.2, or double-click the P-touch Editor
5.2 icon on the desktop.
P-touch Editor starts.
2. Open the template you want or create a label layout.
3. Click File > Transfer Template > Transfer.
The P-touch Transfer Manager window appears. A template is transferred to the Configurations folder.
Related Information
• Print Labels Using Barcode Scanner or Other Devices (P-touch Template)
63
Page 68

Home > Print Labels Using Barcode Scanner or Other Devices (P-touch Template) > Transfer Templates or
Other Data from the Computer to the Printer (Windows)
Transfer Templates or Other Data from the Computer to the Printer (Windows)
You can transfer templates, databases, and images from the computer to the printer.
To transfer templates from a mobile device to the printer, see Related Information.
1. Connect the printer and the computer via a USB cable, and then turn on the printer.
The printer model name appears next to a printer icon in the folder view.
If you select the printer in the folder view, the current templates and other data stored in the printer appear.
If a printer is disconnected or offline, it does not appear in the folder view.
2. Select the printer you want to transfer the template or other data to.
3. Right-click the Configurations folder, select New, and then create a new folder.
64
Page 69

4. Do one of the following:
• Drag the template or other data you want to transfer and place it in the new folder.
• To transfer multiple templates or other data, drag the files you want to transfer, and then place them in the
new folder. Each file is assigned a key number (memory location in the printer) when it is placed in the
new folder.
Data type
Template 255 Each template can contain a maximum of 255 objects.
Database 255 • Only CSV files can be transferred.
Image (transferred
symbols)
Maximum number of
transferable items
255 • Only BMP files can be transferred.
Restriction details
• Each CSV file can contain a maximum of 65000
records.
• Monochrome BMP files are recommended.
• The size limit is 2560 x 2560 pixels.
65
Page 70

Data type Maximum number of
transferable items
Restriction details
• Wide images may be cropped.
• You can confirm the available space in the transfer file memory by printing the Printer Setting Report.
See Available memory in the report for the available space. The available space appearing in
Available memory: ****B may be different from the actual available space.
• You can view the templates and other data by selecting:
- The folder in the Configurations folder
- All Contents
- One of the categories under Filter, such as Layouts
5. To change the key number assigned to an item, right-click the item, select the Key Assign menu, and then
select the key number you want.
• Except for the data in databases, all data transferred to the printer is assigned a key number.
• If the template or other data transferred to the printer has the same key number as another template
already saved in the printer, the new template overwrites the old one. You can confirm the assigned
template numbers saved in the printer by backing up the templates or other data.
• If the printer memory is full, remove one or more templates from the printer's memory.
6. To change the template names or other data you want to transfer, click the item you want, and then type the
new name.
The number of characters used for the template names may be limited depending on the printer model.
7. Select the folder containing the templates or other data you want to transfer, and then click Transfer.
66
Page 71

A confirmation message appears.
• You can also transfer individual items to the printer without adding them to a folder. Select the template
or other data you want to transfer, and then click Transfer.
• Multiple items and folders can be selected and transferred in one operation.
8. Click OK.
The selected items are transferred to the printer.
Related Information
• Print Labels Using Barcode Scanner or Other Devices (P-touch Template)
Related Topics:
• Transfer Templates Created on a Computer to the Printer Using a Mobile Device
67
Page 72

Home > Print Labels Using Barcode Scanner or Other Devices (P-touch Template) > Specify the Barcode
(A)
Scanner Settings (Windows)
Specify the Barcode Scanner Settings (Windows)
Before connecting the barcode scanner to the printer, specify the barcode scanner settings using the P-touch
Template Settings (in the Printer Setting Tool).
1. Connect the printer and the computer via a USB cable, and then turn on the printer.
2. Start the Printer Setting Tool.
• Windows 10/Windows Server 2016:
Click Start > Brother > Printer Setting Tool.
• Windows 8/Windows 8.1/Windows Server 2012/Windows Server 2012 R2:
Click the Printer Setting Tool icon on the Apps screen.
• Windows 7/Windows Server 2008/Windows Server 2008 R2:
Click Start > All Programs > Brother > Label & Mobile Printer > Printer Setting Tool.
3. Click the P-touch Template Settings button.
4. Select the settings you want, and then click Set.
• By default, printing begins when the code "^FF" is scanned from a barcode using a barcode scanner.
(This can be changed with the settings highlighted by (A) in the previous image.)
If the Received Data Size option is selected with the number of bytes setting, the template is printed
after the specified number of bytes have been scanned.
• Because the print mode setting returns to raster mode each time you print from the computer, you must
change the setting to template mode again.
• If you turn off the printer and then turn it on again, the printer starts up in template mode.
Related Information
• Print Labels Using Barcode Scanner or Other Devices (P-touch Template)
68
Page 73

Home > Print Labels Using Barcode Scanner or Other Devices (P-touch Template) > Connect the Printer to
a Barcode Scanner Using Bluetooth (Windows)
Connect the Printer to a Barcode Scanner Using Bluetooth (Windows)
We recommend using a reliable high-quality barcode scanner and checking the barcode scanner specifications
before selecting a model.
Recommended barcode scanner selection criteria: Bluetooth Version 2.1 + EDR (Class 1) models supporting
SPP or OPP profiles
• For P-touch Template mode, templates must first be downloaded from a computer to the printer using
P-touch Transfer Manager.
• The barcode scanner should be programmed to use the English keyboard. For beginners, the barcode
scanner should be programmed to scan data with no prefix or suffix characters. For advanced users,
the prefix and suffix characters can be scanned and used as commands with the printer for creating
customized templates.
• Contact the manufacturer for more information on how to use and program a specific barcode scanner
model.
• Follow the recommendations of the manufacturer of your Bluetooth-equipped devices, such as barcode
scanners, and install any necessary hardware and software.
• The Bluetooth connection settings are saved even after the printer is turned off.
1. Press Menu.
2. Press a or b to select the following:
a. Select [Bluetooth]. Press OK.
b. Select [Bluetooth (On/Off)]. Press OK.
3. Press a or b to select [On]. Press OK.
appears on the LCD.
4. Pair the printer with the barcode scanner via Bluetooth.
If the PIN of the printer is required, the default PIN is the last four digits of the product serial number. You can
change the PIN using the Communication Setting Tool.
• If the Request Secure Simple Pairing (SSP) settings during pairing check box is not selected in the
Bluetooth tab of Communication Settings, a Bluetooth pass key for a Bluetooth device appears on the
LCD and the Bluetooth connection is made.
• If the Request Secure Simple Pairing (SSP) settings during pairing check box is selected in the
Bluetooth tab of Communication Settings, a Bluetooth pass key appears on the LCD. Press OK on the
printer. As the displayed Bluetooth pass key is entered to the Bluetooth device, the Bluetooth connection
is made.
When a connection has been established, the printer remains connected until it is turned off, preventing it from
connecting to another device.
Related Information
• Print Labels Using Barcode Scanner or Other Devices (P-touch Template)
69
Page 74

Home > Print Labels Using Barcode Scanner or Other Devices (P-touch Template) > Connect the Printer to
a Barcode Scanner Using USB Host Interface
Connect the Printer to a Barcode Scanner Using USB Host Interface
We recommend using a reliable high-quality barcode scanner and checking the barcode scanner specifications
before selecting a model.
Recommended barcode scanner selection criteria: HID-class models identified as a keyboard
• For P-touch Template mode, templates must first be downloaded from a computer to the printer using
P-touch Transfer Manager.
• The barcode scanner should be programmed to use the English keyboard. For beginners, the barcode
scanner should be programmed to scan data with no prefix or suffix characters. For advanced users,
the prefix and suffix characters can be scanned and used as commands with the printer for creating
customized templates.
• Contact the manufacturer for more information on how to use and program a specific barcode scanner
model.
• Connect a barcode scanner to the printer's USB host port.
Related Information
• Print Labels Using Barcode Scanner or Other Devices (P-touch Template)
70
Page 75

Home > Print Labels Using Barcode Scanner or Other Devices (P-touch Template) > Try the P-touch
Template Function Using the Barcode List
Try the P-touch Template Function Using the Barcode List
• Print the Transferred Templates Directly (Standard Template Printing)
• Print the Transferred Templates After Changing (Advanced Templated Printing)
• Print the Templates Related to a Database (Database Lookup Printing)
• Print the Transferred Templates in Serialized Number (Numbered (Serialized Number)
Printing)
• List of Barcodes for Specifying Settings
71
Page 76

Home > Print Labels Using Barcode Scanner or Other Devices (P-touch Template) > Try the P-touch
Template Function Using the Barcode List > Print the Transferred Templates Directly (Standard Template
Printing)
Print the Transferred Templates Directly (Standard Template Printing)
You can download frequently used templates or images, and scan a barcode to select which one to print.
Example:
• For more information on the barcodes scanned using various settings, see Related Information.
• Grouped objects are converted and sent as an image.
1. Use P-touch Transfer Manager to transfer a template or label layout from the computer to the printer.
For more detailed information, see Related Information.
2. When you transfer data to the Configurations folder in P-touch Transfer Manager, select the folder
containing the data you want to transfer.
You can add a custom folder under Configurations, and drag-and-drop a transferred template into the
custom folder to manage different sets of templates.
When a template is transferred to the Configurations folder in P-touch Transfer Manager, the Key Assign
number is automatically assigned.
• For basic operations, you can specify a Key Assign number between 1 and 10.
• For advanced operations, you can specify a Key Assign number between 1 and 255 for any templates
downloaded into the printer but you must scan different barcodes to select and print them.
For more information, see the P-touch Template Manual/ Command Reference (English only). You can
download the latest version from the Brother support website at
3. Select the transferred template, and then click Transfer to download the template to the Key Assign number
in the printer.
4. Scan the following barcode:
• P-touch template command (Initialize + begin specifying settings)
5. From the following barcode list, scan each barcode to send a command or setting to the printer:
• Basic settings
Auto cut on (Cut every one label) + Cut at end on
Auto cut on (Cut every two labels) + Cut at end on
support.brother.com/manuals.
Auto cut off + Cut at end on Auto cut off + Cut at end off
Number of copies
72
Page 77

• Settings can be made with multiple commands.
• If no settings have been made by scanning the barcode commands, a template is printed using the Ptouch Template settings. The default P-touch Template settings are to print a single copy with Auto Cut
turned on.
For more information on P-touch Template Settings, see the P-touch Template Manual/ Command
Reference (English only). You can download the latest version from the Brother support website at
support.brother.com/manuals.
6. Specify the number of copies you want.
a. Scan the following barcode:
Number of copies
b. Scan the following barcodes to specify a three-digit number:
Example:
Specify numbers by scanning the following barcodes: 7; [0][0][7], 15; [0][1][5]
• For entering numbers
1
3 4
5 6
7 8
9 0
2
00
To change the setting for the number of copies, repeat these steps.
7. Scan one of the following barcodes with the same number as the Key Assign number for the label layout you
want:
• Preset template number
73
Page 78

Preset template 1 Preset template 2
Preset template 3 Preset template 4
Preset template 5 Preset template 6
Preset template 7 Preset template 8
Preset template 9 Preset template 10
The specified label is printed.
Related Information
• Try the P-touch Template Function Using the Barcode List
• Lock Labels for Editing
Related Topics:
• List of Barcodes for Specifying Settings
• Transfer Templates from the Computer to the Printer (Windows)
74
Page 79

Home > Print Labels Using Barcode Scanner or Other Devices (P-touch Template) > Try the P-touch
Template Function Using the Barcode List > Print the Transferred Templates Directly (Standard Template
Printing) > Lock Labels for Editing
Lock Labels for Editing
To protect frequently used templates from unwanted edits, convert a text object in the label layout to an image.
After converting the label layout to an image, the text cannot be changed.
1. In the P-touch Editor Layout window, right-click the text object, and then click Properties.
2. Click the Expanded tab, and then select the Text Cannot Be Edited check box.
• If the Expanded tab does not appear, click Tools > Options > General, and then select the Display
Expanded Tabs of Object Properties check box in the Others section.
• When the Text Cannot Be Edited check box is cleared, the object is converted back to editable text.
Related Information
• Print the Transferred Templates Directly (Standard Template Printing)
75
Page 80

Home > Print Labels Using Barcode Scanner or Other Devices (P-touch Template) > Try the P-touch
Template Function Using the Barcode List > Print the Transferred Templates After Changing (Advanced
Templated Printing)
Print the Transferred Templates After Changing (Advanced Templated Printing)
You can download a template and scan a barcode to print a copy or insert the scanned data into a different
template.
• For more information on the barcodes scanned using various settings, see Related Information.
• If a barcode has a different protocol than the barcode template already registered with the printer, you
may be unable to create or print the barcode.
• Depending on the Barcode Scanner model, some barcode symbols and protocols may not be supported
by this printer.
1. Use P-touch Transfer Manager to transfer a template or label layout from the computer to the printer.
For more detailed information, see Related Information.
NOTE
It is important to design a template to meet the barcode symbology or protocol requirements, especially
for the label size and barcode position in the label to fit the maximum number and type of characters
being inserted from the barcode scanner. A barcode in the template cannot be created or scanned if the
barcode with the inserted data does not fit entirely within the label printable image area.
2. When you transfer data to the Configurations folder in P-touch Transfer Manager, select the folder
containing the data you want to transfer.
You can add a custom folder under Configurations, and drag-and-drop a transferred template into the
custom folder to manage different sets of templates.
When a template is transferred to the Configurations folder in P-touch Transfer Manager, the Key Assign
number is automatically assigned.
You can specify a Key Assign number between 1 and 10 for any templates downloaded into the printer.
3. Select the transferred template, and then click Transfer to download the template to the Key Assign number
in the printer.
4. Scan the following barcode:
• P-touch template command (Initialize + begin specifying settings)
5. From the following barcode list, scan each barcode to send a command or setting to the printer:
• Basic settings
76
Page 81

Auto cut on (Cut every one label) + Cut at end on Auto cut on (Cut every two labels) + Cut at end on
Auto cut off + Cut at end on Auto cut off + Cut at end off
Number of copies
• Settings can be made with multiple commands.
• If no settings have been made by scanning the barcode commands, a template is printed using the Ptouch Template settings. The default P-touch Template settings are to print a single copy with Auto Cut
turned on.
For more information on P-touch Template Settings, see the P-touch Template Manual/ Command
Reference (English only). You can download the latest version from the Brother support website at
support.brother.com/manuals.
6. Specify the number of copies you want.
a. Scan the following barcode:
Number of copies
b. Scan the following barcodes to specify a three-digit number:
Example:
Specify numbers by scanning the following barcodes: 7; [0][0][7], 15; [0][1][5]
• For entering numbers
1
3 4
5 6
2
7 8
77
Page 82

9 0
00
To change the setting for the number of copies, repeat these steps.
7. Scan the following barcode:
• Select template
8. Scan the following barcodes with the same number (three digits) as the Key Assign number used for the
downloaded template to be printed:
Example:
Specify numbers by scanning the following barcodes: 7; [0][0][7], 15; [0][1][5]
• For entering numbers
1
3 4
5 6
7 8
9 0
2
00
The downloaded template is selected after the three digit numbers have been scanned.
78
Page 83

You can use P-touch Editor to create and print a label with a single barcode.
Example:
9. Scan a barcode containing the data you want inserted into the barcode object in the selected downloaded
template.
Example:
10. Scan the following barcode to send the command to start printing:
• Begin printing
The barcode in the printed template contains the data from the barcode scanned.
Example:
Related Information
• Try the P-touch Template Function Using the Barcode List
Related Topics:
• List of Barcodes for Specifying Settings
• Transfer Templates from the Computer to the Printer (Windows)
79
Page 84

Home > Print Labels Using Barcode Scanner or Other Devices (P-touch Template) > Try the P-touch
A
Template Function Using the Barcode List > Print the Templates Related to a Database (Database Lookup
Printing)
Print the Templates Related to a Database (Database Lookup Printing)
You can download a database linked to a template, scan a barcode as a keyword to find a record containing the
keyword, and then insert the record into the template to print.
• For more information on the barcodes scanned using various settings, see Related Information.
• The printer has reserved the leftmost column (A) of a downloaded linked database for this operation,
therefore the keyword scanned from a barcode must be in this column of the database.
• For the printer to find keywords successfully, the data in the leftmost column (A) must exactly match the
keywords scanned from a barcode.
• P-touch Editor and the printer can read only one line of data in each field of a linked database so we do
not recommend using databases with two or more lines of data in the leftmost column (A).
1. Use P-touch Editor to create a template and connect to a database file.
• You can link as many columns to a text and barcode objects in the template as needed.
• Make sure the keywords are included in the leftmost column (A) but do not link any text or barcode
object in the template with field (A) if you do not need the data on the printed label.
• For more information on specifying the settings, refer to the P-touch Editor Help menu.
2. Use P-touch Transfer Manager to transfer a template or label layout from the computer to the printer.
For more information, see Related Information.
The linked database file will also be transferred.
When a template is transferred to the Configurations folder in P-touch Transfer Manager, the Key Assign
number is automatically assigned.
You can add a custom folder under Configurations, and drag-and-drop a transferred template into the
custom folder to manage different sets of templates.
3. Select the transferred template, and then click Transfer to download the template to the Key Assign number
in the printer.
4. Scan the following barcode:
• P-touch template command (Initialize + begin specifying settings)
5. From the following barcode list, scan each barcode to send a command or setting to the printer:
• Basic settings
Auto cut on (Cut every one label) + Cut at end on
Auto cut on (Cut every two labels) + Cut at end on
80
Page 85

Auto cut off + Cut at end on Auto cut off + Cut at end off
Number of copies
• Settings can be made with multiple commands.
• If no settings have been made by scanning the barcode commands, a template is printed using the Ptouch Template settings. The default P-touch Template settings are to print a single copy with Auto Cut
turned on.
For more information on P-touch Template Settings, see the P-touch Template Manual/ Command
Reference (English only). You can download the latest version from the Brother support website at
support.brother.com/manuals.
6. Specify the number of copies you want.
a. Scan the following barcode:
Number of copies
b. Scan the following barcodes to specify a three-digit number:
Example:
Specify numbers by scanning the following barcodes: 7; [0][0][7], 15; [0][1][5]
• For entering numbers
1
3 4
5 6
7 8
2
9 0
81
Page 86

00
To change the setting for the number of copies, repeat these steps.
7. Scan the following barcode:
• Select template
8. Scan the following barcodes with the same number (three digits) as the Key Assign number used for the
downloaded template to be printed:
Example:
Specify numbers by scanning the following barcodes: 7; [0][0][7], 15; [0][1][5]
• For entering numbers
1
3 4
5 6
7 8
9 0
2
00
The downloaded template is selected after the three digit numbers have been scanned.
You can use P-touch Editor to create and print a label with a single barcode.
Example:
9. Scan a barcode containing the keyword to look up in the downloaded database.
Example:
82
Page 87

10. Scan the following barcode to send the command to start searching the downloaded database for the
scanned keyword:
• Delimiter
11. Scan the following barcode to send the command to start printing:
• Begin printing
You can use P-touch Editor to create and print a label with a single barcode.
Example:
The printer prints the template with the data inserted from the database record, found with the scanned
keyword.
Related Information
• Try the P-touch Template Function Using the Barcode List
Related Topics:
• List of Barcodes for Specifying Settings
• Transfer Templates from the Computer to the Printer (Windows)
83
Page 88

Home > Print Labels Using Barcode Scanner or Other Devices (P-touch Template) > Try the P-touch
Template Function Using the Barcode List > Print the Transferred Templates in Serialized Number (Numbered
(Serialized Number) Printing)
Print the Transferred Templates in Serialized Number (Numbered (Serialized Number) Printing)
You can increase text numbers or barcodes up to 999 when printing downloaded templates. Select text or
barcode objects to increment while printing.
>> Text Numbering (Serializing)
>> Barcode Numbering (Serializing)
>> Print with Numbering (Serializing) Advanced Operation
Text Numbering (Serializing)
1. Use P-touch Editor to create or open a template and select a text object you want to increment while printing.
2. Highlight or drag the cursor over a group of numbers and letters within the text object you want to increment
(maximum of 15).
The selected group is called the Numbering field.
3. Right-click the Numbering field, and select the Numbering option.
Barcode Numbering (Serializing)
1. Use P-touch Editor to create or open a template and select a barcode object you want to increment while
printing.
2. Right-click the barcode object, and select the Properties option.
The Bar Code Properties window appears.
84
Page 89

3. Highlight or drag the cursor over a group of numbers and letters within the barcode object you want to
increment (maximum of 15).
The selected group is called the Numbering field.
The Numbering button is enabled after a group of numbers and letters are highlighted.
4. Click the Numbering button, and then click OK.
85
Page 90

Print with Numbering (Serializing) Advanced Operation
^NN
^ID
1. Use P-touch Transfer Manager to transfer a template or label layout from the computer to the printer.
For more information, see Related Information.
2. Scan the following barcode:
• Number of serialized copies
3. Scan the following barcodes with the number of copies you want to print (three digits):
Example:
For five copies, specify the three digit numbers by scanning barcodes for [0][0][5]
• For entering numbers
1
3 4
5 6
7 8
9 0
2
00
4. Follow the P-touch Template mode basic operation procedures to start printing.
• The Numbering field increments by one number or letter with each printed label, and the count is
permanently saved in the printer.
• To reset a text or barcode object back to the original value, scan the following barcode:
- Initialize template data
86
Page 91

Related Information
• Try the P-touch Template Function Using the Barcode List
Related Topics:
• List of Barcodes for Specifying Settings
• Transfer Templates from the Computer to the Printer (Windows)
87
Page 92

Home > Print Labels Using Barcode Scanner or Other Devices (P-touch Template) > Try the P-touch
Template Function Using the Barcode List > List of Barcodes for Specifying Settings
List of Barcodes for Specifying Settings
• When using the barcodes in this list, set the Trigger for P-touch Template Printing and Command
Prefix Character options to the factory settings in the P-touch Template Settings tool.
• Make sure you print the barcodes at a high resolution so that the barcode scanner can read them
correctly to print the labels you want.
• P-touch template command (Initialize + begin specifying settings)
• Basic settings
Auto cut on (Cut every one label) + Cut at end on
Auto cut off + Cut at end on Auto cut off + Cut at end off
Number of copies
• For entering numbers
These are used when specifying the number of copies printed and when selecting a template number. Scan
barcodes to specify a three-digit number, such as [0][0][7] or [0][1][5]. The setting is applied when three digits
have been specified. To change settings, scan the “Number of copies” barcode again when changing the
number of copies or scan the “Select template” barcode again when changing the template number, and then
scan the barcodes for the new three-digit number.
1
Auto cut on (Cut every two labels) + Cut at end on
2
3 4
5 6
7 8
88
Page 93

9 0
^NN
^ID
00
• Preset template number
Preset template 1
Preset template 2
Preset template 3 Preset template 4
Preset template 5 Preset template 6
Preset template 7 Preset template 8
Preset template 9 Preset template 10
• Select template
• Number of serialized copies
• Delimiter
• Initialize template data
• Begin printing
89
Page 94

Related Information
• Try the P-touch Template Function Using the Barcode List
90
Page 95

Home > Print Labels Using Mobile Devices
Print Labels Using Mobile Devices
• Install Mobile Apps
• Connect the Printer to a Mobile Device
• Transfer Templates Created on a Computer to the Printer Using a Mobile Device
91
Page 96

Home > Print Labels Using Mobile Devices > Install Mobile Apps
Install Mobile Apps
Brother offers various applications for use with your printer, including applications to print directly from your
iPhone, iPad, iPod touch, and Android™ mobile devices, and applications to transfer data wirelessly, such as
templates, symbols, and databases created using a computer, to your stand-alone printer.
• Download these free Brother apps from Google Play or App Store:
Application Features
Print SDK Download the Software Development Kit (SDK) from the Brother Developer
Center (brother.com/product/dev).
Mobile Transfer Express This application allows you to use a mobile device to download databases and
label data, which were created on a computer using P-touch Editor and saved to a
cloud service, and send them to your printer.
Mobile Deploy Allows you to perform updates for the settings and firmware of printers using a
mobile device.
This software will send printer update files pre-uploaded to DropBox or an
HTTP(S) server to target printers.
Related Information
• Print Labels Using Mobile Devices
92
Page 97

Home > Print Labels Using Mobile Devices > Connect the Printer to a Mobile Device
Connect the Printer to a Mobile Device
>> Connect Using Wireless Direct
>> Connect Using Bluetooth
Connect Using Wireless Direct
• When using a mobile device, change any necessary settings using the application before printing. The
settings vary by application.
• Before connecting a mobile device, you can specify detailed settings by connecting the printer to a
computer and using the Printer Setting Tool.
• To connect, you will need a USB cable (sold separately).
1. Set the printer to Wireless Direct mode using one of the following options, and then connect the printer to
your computer using a USB cable:
• From the LCD menu:
a. Press Menu.
b. Press a or b to select the following:
i. Select [WLAN]. Press OK.
ii. Select [WLAN (On/Off)]. Press OK.
c. Press a or b to select [On]. Press OK.
d. Press a or b to select the following:
i. Select [WLAN]. Press OK.
ii. Select [Network Mode]. Press OK.
e. Press a or b to select [Direct Mode]. Press OK.
appears on the LCD.
• Using a Windows computer:
a. Launch the Printer Setting Tool on your computer.
b. Click the Communication Settings button.
c. Click General > Communication Settings.
d. Confirm the Infrastructure and Wireless Direct or Wireless Direct option is selected for the
Selected Interface setting, and then confirm the Wireless Direct tab.
e. Click Apply to set the printer to Wireless Direct mode.
f. Exit the Printer Setting Tool.
2. From your mobile device's Wi-Fi settings screen, select your wireless network's SSID, the SSID of the printer,
and then enter the password.
• The default SSID and password are as follows:
- SSID: "DIRECT-*****_TD-4550DNWB" where ***** is the last five digits of the product serial number.
- Password: 455***** where ***** is the last five digits of the product serial number.
• You can connect the printer to a mobile device in the Infrastructure mode via a wireless access point/
router.
If your printer is connected successfully, changes to .
Connect Using Bluetooth
1. Press Menu.
2. Press a or b to select the following:
93
Page 98

a. Select [Bluetooth]. Press OK.
b. Select [Bluetooth (On/Off)]. Press OK.
3. Press a or b to select [On]. Press OK.
appears on the LCD.
4. From your mobile device's Bluetooth settings screen, select your printer.
If your printer is connected successfully, changes to .
Related Information
• Print Labels Using Mobile Devices
94
Page 99

Home > Print Labels Using Mobile Devices > Transfer Templates Created on a Computer to the Printer
Using a Mobile Device
Transfer Templates Created on a Computer to the Printer Using a Mobile Device
Make sure Mobile Transfer Express is installed on your mobile device.
Use P-touch Transfer Manager to save template data created using P-touch Editor, in the BLF and PDZ format.
Then, you can use Mobile Transfer Express to send the saved file from your mobile device to the printer and print
the file.
1. Save the template data using P-touch Transfer Manager.
For more information, see Related Information.
2. Follow one of these methods to use a file with your mobile device:
• Save the file using a cloud storage service, and then use the sharing function of the mobile device's
operating system to share the file.
• Send the file as an email attachment from the computer to the mobile device, and then save the file to the
mobile device.
3. Connect the printer to your mobile device, and then start Mobile Transfer Express.
The template data appears.
4. Select the template you want to print, and then transfer the template to the printer.
To download a file from a cloud storage service to your mobile device, you must connect your mobile device
using Infrastructure Mode. By connecting your mobile device to the printer using Infrastructure Mode, you
can also quickly transfer downloaded files (BLF files only).
Related Information
• Print Labels Using Mobile Devices
Related Topics:
• Create Transfer Files and Transfer Package Files (Windows)
95
Page 100

Home > Transfer Templates to the Printer (P-touch Transfer Manager) (Windows)
Transfer Templates to the Printer (P-touch Transfer Manager) (Windows)
• Transfer Templates to the Printer Using P-touch Transfer Manager (Windows)
• Distribute Templates to be Transferred to Users Without Using P-touch Transfer Manager
(Windows)
96
 Loading...