

Brother TD2020ZU1 User Manual
USER’S GUIDE
TD-2020
TD-2120N
TD-2130N
Before using this printer, be sure to read this User's
Guide.
We suggest that you keep this manual in a handy
place for future reference.
Please visit us at http://solutions.brother.com/,
where you can get product support and answers to
frequently asked questions (FAQs).
Version A
UK ENG
Introduction
CAUTION
NOTE
NOTE
Thank you for purchasing the Brother TD-2020/2120N/2130N. The TD-2020/2120N/2130N
(hereafter referred to as "the printer") is a powered desktop thermal printer. Be sure to read the
User’s Guide, Product Safety Guide, Quick Reference Guide, Software User’s Guide and Network
User’s Guide (TD-2120N/2130N only) before using the printer. We suggest that you keep these
documents in a handy place for future reference.
The following documents are included on the CD-ROM.
User's Guide
Software User's Guide
Network User's Guide (TD-2120N/2130N only)
Symbols Used in This Document
The following symbols are used throughout this document.
This symbol indicates instructions that may result in injuries or damage if they are ignored or
incorrectly followed.
This symbol indicates information or directions that should be followed.
Ignoring them may result in damage or failed operations.
This symbol indicates notes that provide information or directions that can help you better
understand and use the product more efficiently.
About This Document
This document (PDF) is included on the CD-ROM.
If Adobe® Reader® is used to view this document on a computer, the pointer changes to
when the pointer is placed on a link. Click the link to open the corresponding page.
For information on using Adobe
®
Reader®, see the help file included with Adobe® Reader®.
i

Table of Contents
1 Getting Started 1
General Description...............................................................................................1
Power Supply.........................................................................................................3
Connecting to an AC Power Socket ................................................................3
Installing the Printer Driver and Software ..............................................................4
Installer Screen................................................................................................5
USB Cable Connection....................................................................................5
Wired LAN Connection (TD-2120N/2130N only).............................................7
Registering Paper Size Information With the Printer ............................................. 9
Uninstalling the Printer Driver .............................................................................. 10
2Printing 12
Operation Panel................................................................................................... 12
Indicators ....................................................................................................... 12
Button Functions............................................................................................ 13
Inserting the RD Roll............................................................................................ 15
Checking the Sensor Position ....................................................................... 17
Cutting Roll Paper .........................................................................................18
Printing the Printer Setup Information.................................................................. 19
Connecting the Computer and Printer ................................................................. 21
USB Cable Connection..................................................................................21
Wired LAN Connection (TD-2120N/2130N only)...........................................21
Printing Solutions................................................................................................. 22
Printing ................................................................................................................ 23
Making Prints Lighter or Darker ..................................................................... 23
Printer Driver Options ..........................................................................................24
3 Printer Setting Tool 25
About the Printer Setting Tool..............................................................................25
Before Using the Printer Setting Tool ............................................................ 25
Using the Printer Setting Tool.............................................................................. 25
Communication Settings (TD-2120N/2130N only)............................................... 27
Settings Dialog Box ....................................................................................... 27
Menu Bar .......................................................................................................29
Wired LAN/Wireless LAN Tabs ..................................................................... 31
Bluetooth Tab ................................................................................................ 33
Applying Setting Changes to Multiple Printers ..............................................33
Device Settings ....................................................................................................34
Settings Tabs................................................................................................. 35
Menu Bar .......................................................................................................40
P-touch Template Settings .................................................................................. 41
P-touch Template ..........................................................................................41
P-touch Template Settings Dialog Box..........................................................42
Paper Size Setup.................................................................................................44
Paper Size Setup Dialog Box ........................................................................44
ii

Distributing Paper Formats............................................................................47
4 Other Functions 48
Mass Storage Functions ......................................................................................48
Mass Storage Feature ................................................................................... 48
Using the Mass Storage Feature...................................................................48
Web Based (Web Browser) Management (TD-2120N/2130N only) ....................49
Software Development Kit ...................................................................................50
5 Maintaining the Printer 51
Print Head Maintenance ......................................................................................51
Platen Roller Maintenance...................................................................................51
Media Exit Maintenance ......................................................................................52
Label Peeler (Optional) Maintenance (TD-2120N/2130N only)...........................52
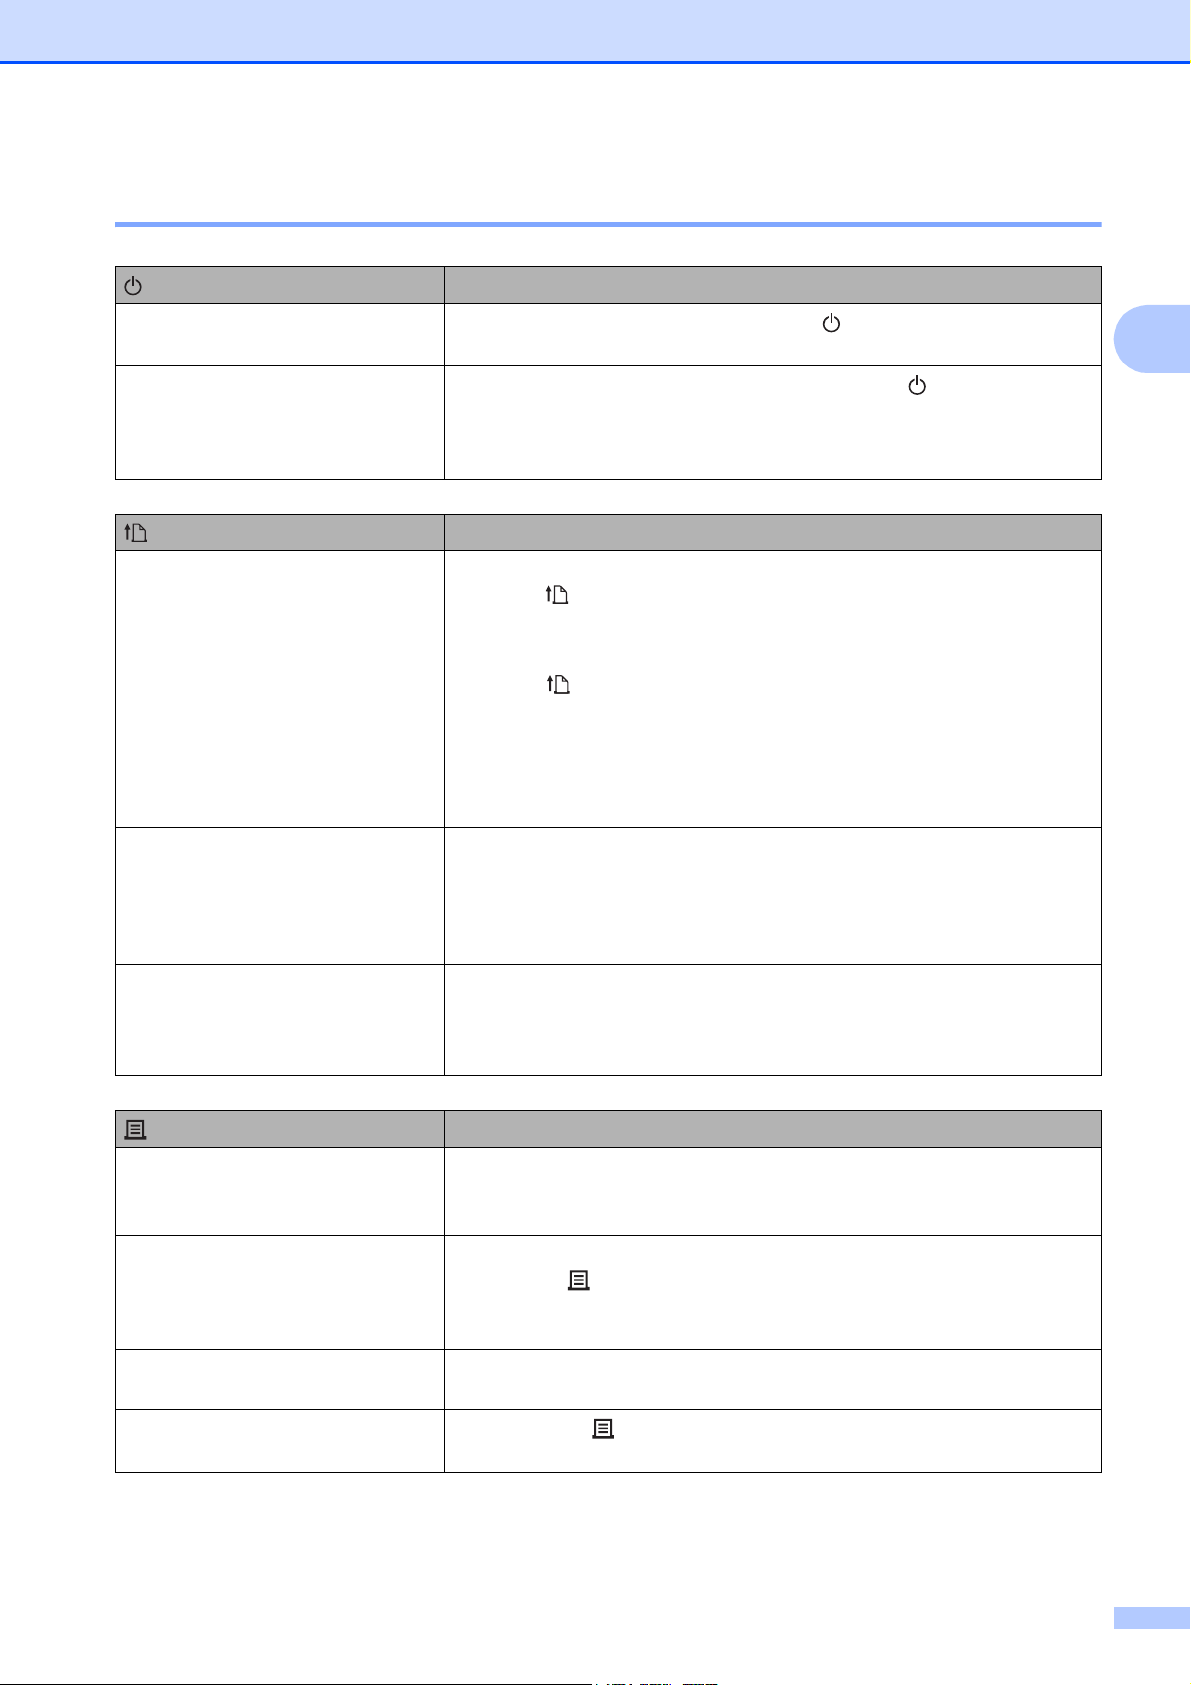
6 Indicators 53
Indicators ............................................................................................................. 53
7 Troubleshooting 55
Overview..............................................................................................................55
Troubleshooting.............................................................................................55
Error Messages for Touch Panel Display (Optional)
(TD-2120N/2130N Only)............................................................................63
8 Specifications 65
Product Specifications .........................................................................................65
9 Using the RJ25 to DB9M Serial Adapter (Optional:PA-SCA-001) 68
Connecting the Computer and Printer With the RJ25 to DB9M Serial Adapter...68
Product Specifications .........................................................................................68
10 Using the Touch Panel Display (Optional:PA-TDU-001)
(TD-2120N/2130N only) 69
General Description .............................................................................................69
LCD...................................................................................................................... 69
Screen ...........................................................................................................69
Touch Panel.........................................................................................................70
Information About Replacing the Touch Panel ..............................................71
Printing With the Touch Panel Display ................................................................ 73
Touch Panel Display Settings..............................................................................74
Specifying Settings From the Touch Panel Display.......................................74
Creating a Label Layout.......................................................................................78
Creating a Template ......................................................................................78
Linking a Database to a Template.................................................................80
Transferring the Label Layout to the Printer ........................................................82
iii

Selecting the Touch Panel............................................................................. 83
Selecting the Data Assigned to Keys on the One-Touch Panel ....................84
Creating a One-Touch Panel ......................................................................... 85
Printing the Label.................................................................................................85
Printing Using the Basic Control Panel.......................................................... 85
Printing Using the One-Touch Panel .............................................................87
Printing Using a Barcode Reader .................................................................. 88
Label Layouts on the Printer (Checking, Deleting and Log) ................................89
Replacing the Time/Date Battery......................................................................... 89
Frequently Asked Questions................................................................................91
Product Specifications .........................................................................................92
11 Using the WLAN Interface (Optional:PA-WI-001)
(TD-2120N/2130N only) 93
Installing the Printer Driver and Software ............................................................93
Before Making a Wireless LAN Connection ..................................................93
Choosing Your Wireless Installation Method ....................................................... 94
Configuration Using the Installer CD-ROM and Temporarily Using a USB
Cable ......................................................................................................... 94
One-Push Configuration Using WPS............................................................. 99
Connecting the Computer and Printer by Wireless LAN.................................... 102
Product Specifications .......................................................................................103
12 Using the Bluetooth Interface (Optional:PA-BI-001)
(TD-2120N/2130N only) 104
Connecting the Computer and Printer by Bluetooth .......................................... 104
Using Bluetooth to Communicate When Printing ........................................105
Product Specifications .......................................................................................105
13 Using the Label Peeler (Optional:PA-LP-001)
(TD-2120N/2130N only) 106
Inserting the RD Roll.......................................................................................... 106
Printer Driver Settings ................................................................................. 109
After Printing ................................................................................................ 110
Product Specifications .......................................................................................110
14 Using the Rechargeable Li-ion Battery/Battery Base
(Optional:PA-BT-4000LI/PA-BB-001) (TD-2120N/2130N only) 111
Installing the Rechargeable Li-ion Battery.........................................................111
Charging the Rechargeable Li-ion Battery.........................................................112
Tips on Using the Rechargeable Li-ion Battery .................................................113
Battery Level of the Rechargeable Battery..................................................114
Battery Indicator................................................................................................. 115
Product Specifications .......................................................................................115
iv

v
1
NOTE
CAUTION
1
2
3
4
5
6
7
8
9
10
11
12
13
14
15
11
16
Getting Started 1
General Description 1
Front 1
1 POWER indicator
2 (Power) button
3 Media exit
4 RD Roll compartment top cover
5 STATUS indicator
6 (Feed) button
7 (Print) button
8 Cover release lever
9 Tear bar
When the printer is purchased, the tear bar
cover is installed.
• Before using the printer, remove the cover over
the tear bar.
1
• Do not dispose of the removed cover.
In order to avoid injuries when the printer is not
being used, attach the cover to the tear bar.
The tear bar is sharp. To avoid injury, do not
touch the tear bar.
10 Print head
11 Transmissive/gap sensor
12 Media guide
13 Media tip guide
14 Media guide adjustment lever
15 Platen roller
16 Reflective/black mark sensor
1
Chapter 1
1
3
2
4
1
3
2
4
5
6
Back
(TD-2020)
(TD-2120N/2130N) 1
Options (TD-2120N/2130N only) 1
1
Touch panel display (PA-TDU-001)
WLAN interface (PA-WI-001)
Bluetooth interface (PA-BI-001)
Label peeler (PA-LP-001)
Battery base (PA-BB-001)
RJ25 to DB9M serial adapter
(PA-SCA-001)
Rechargeable lithium-ion battery
(PA-BT-4000LI)
4 bay battery charger (PA-4BC-4000)
1 External media feed slot
2 Serial port
3 Power connector
4 Mini-USB port
5 USB host port
(TD-2120N/2130N only)
6 Ethernet network port
(TD-2120N/2130N only)
2
Getting Started
1
2
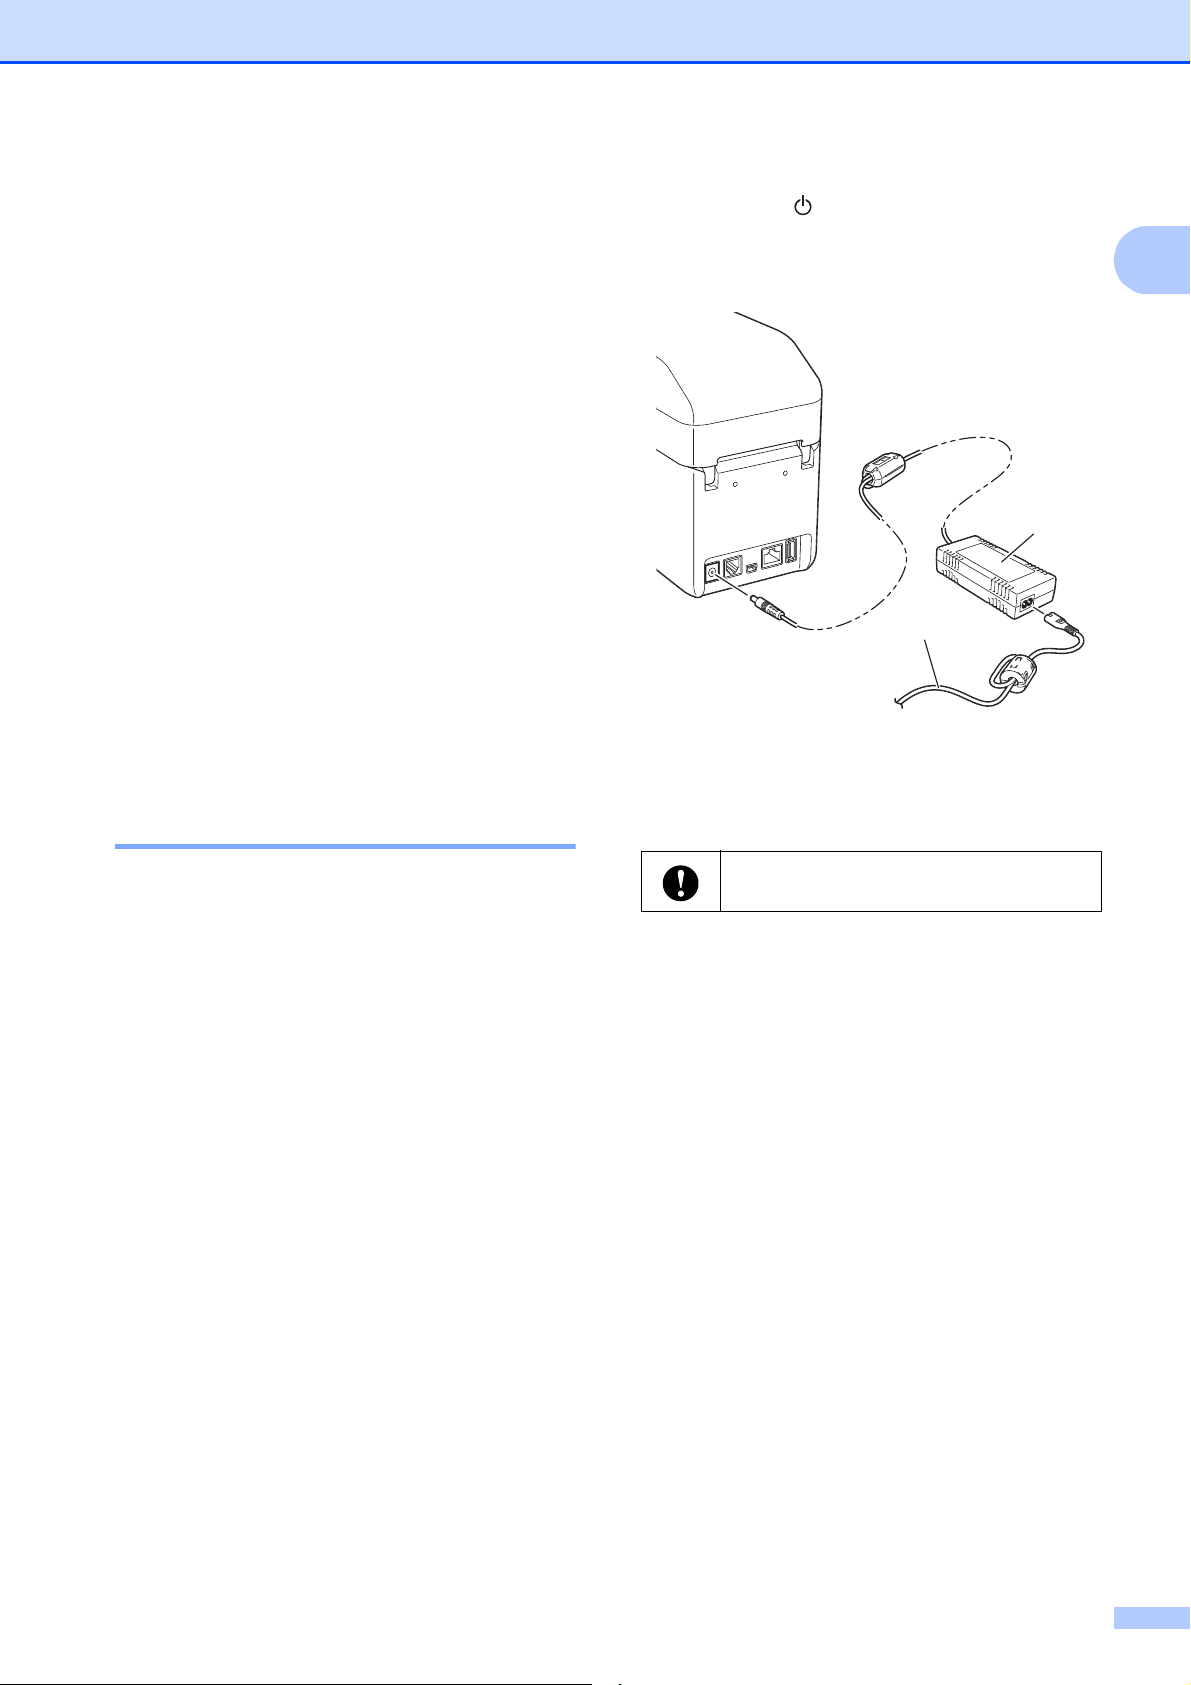
Power Supply 1
This printer is powered by either the AC
adapter (included) or the rechargeable Li-ion
battery (optional, TD-2120N/2130N only).
Use the power supply appropriate for your
intended use.
The AC adapter supplies power directly to the
printer, making it suitable for high-volume
printing.
With the rechargeable Li-ion battery installed,
this printer can be used in locations that do
not have AC power.
For details on using the rechargeable Li-ion
battery, see Using the Rechargeable Li-ion
Battery/Battery Base (Optional:PA-BT4000LI/PA-BB-001) (TD-2120N/2130N only)
on page 111.
Connecting to an AC Power Socket 1
d Press the (Power) button of the printer
to turn it on. The POWER indicator lights
in green, and the printer is in standby.
1 AC adapter
2 AC power cord
1
Connect the AC adapter to the printer, and
then plug the AC power cord into an AC
power socket to power the printer. Connect
the AC adapter in the same way when
recharging the rechargeable Li-ion battery.
a Connect the AC adapter to the printer.
b Connect the AC power cord to the AC
adapter.
c Connect the AC power cord to a nearby
AC power socket (100 - 240 V,
50/60 Hz).
Do not use the cords while they are
bundled.
3
Chapter 1
Installing the Printer Driver and Software
The printer driver and software can be
installed using any of the following three
methods:
USB cable connection (page 5)
Wired LAN connection
(TD-2120N/2130N only) (page 7)
Wireless LAN connection
(TD-2120N/2130N only) (if the WLAN
interface is attached)
In order to use a wireless LAN connection,
the WLAN interface (optional) must be
attached to the printer. For details on
attaching the WLAN interface (optional), see
its instruction manual.
For details on making a wireless LAN
connection, see Using the WLAN Interface
(Optional:PA-WI-001) (TD-2120N/2130N
only) on page 93.
If you are using Windows
default program to open PDF files is Adobe
1
Reader
®
before using the CD-ROM.
®
8, make sure the
®
Otherwise PDF files may not open and links
within PDF files may not work correctly. In
addition, make sure the default web browser
is Internet Explorer
®
before using the
CD-ROM. Otherwise links to websites may
not work.
Before starting the installation, make
sure that you are logged on with
administrator rights.
Windows
®
7 is used in the following
procedures. The installation procedure may
differ depending on the operating system
being used. If an operating system other than
Windows
®
7 is being used, read the
procedures with the screens replaced with
the corresponding screens for your operating
system. In addition, the installation procedure
is subject to change without notice.
4
Getting Started
NOTE
NOTE
1
2
3
4
5
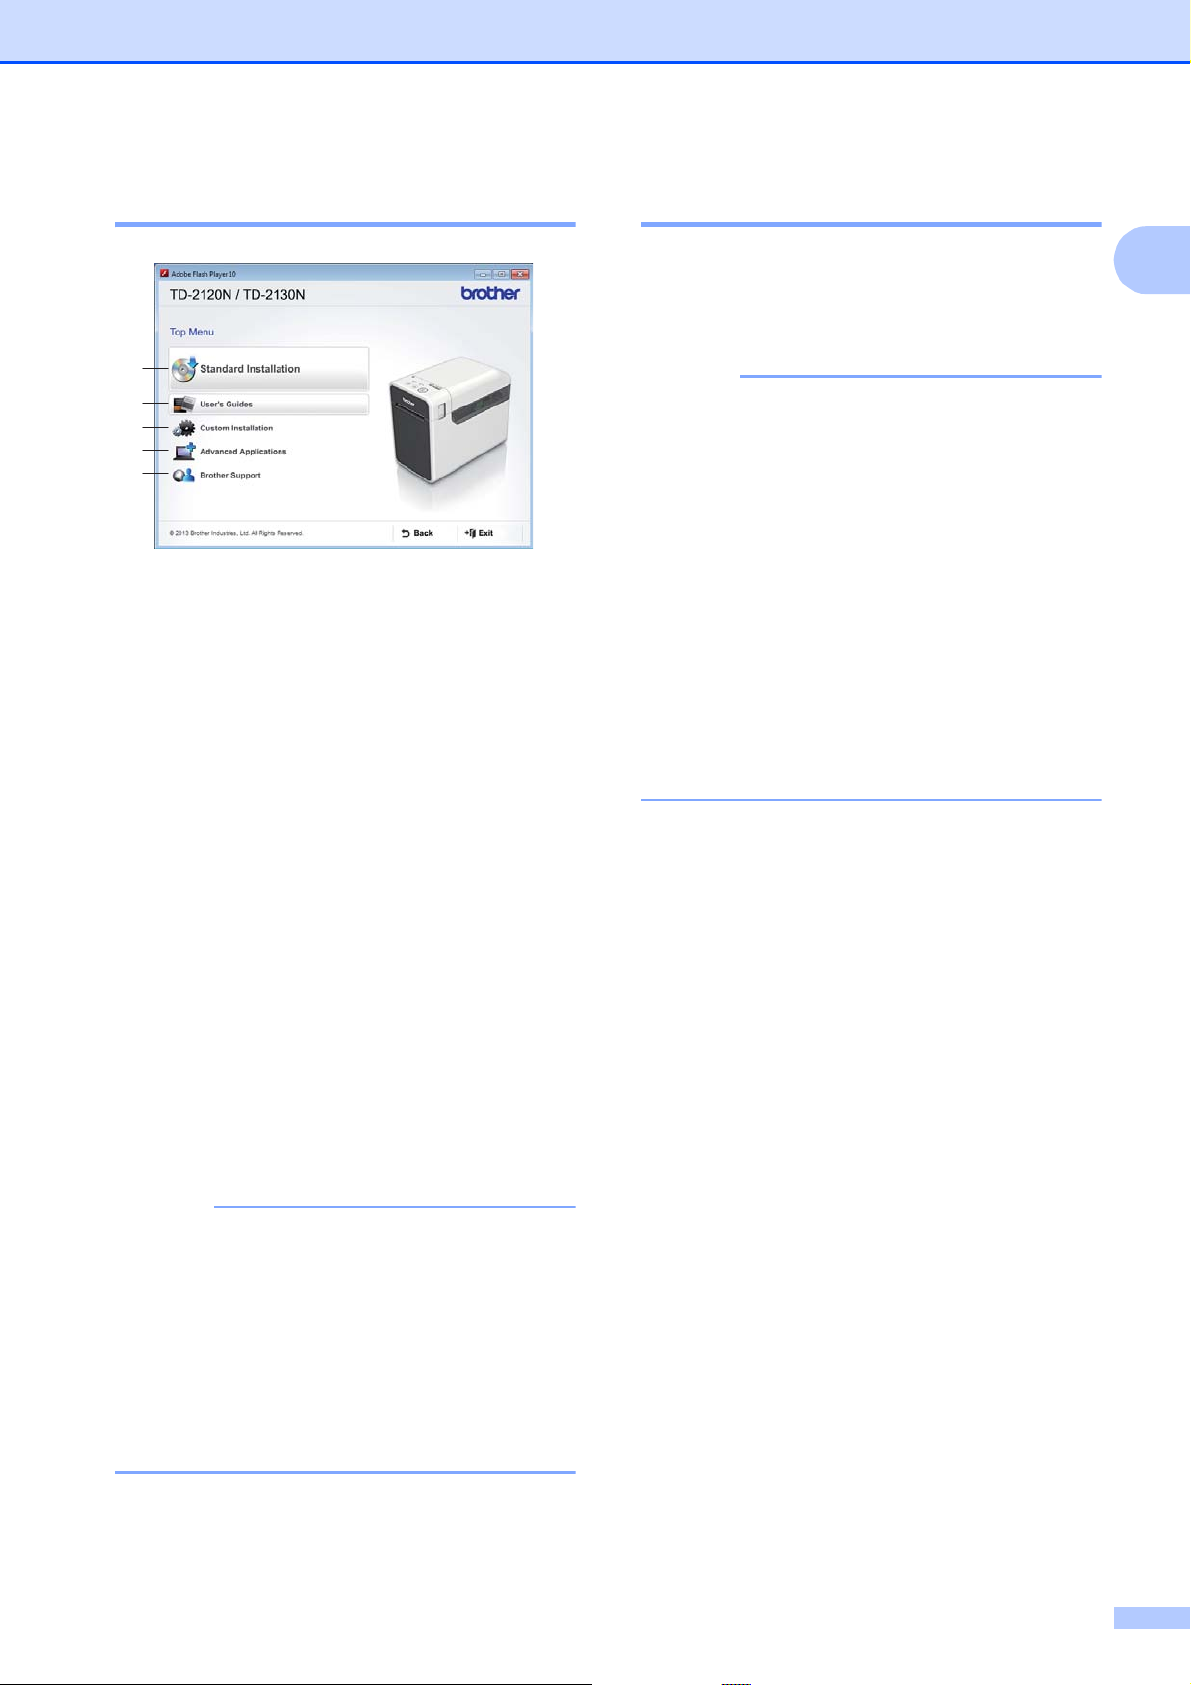
Installer Screen 1
1 Standard Installation
Installs P-touch Editor 5.0, the printer driver,
P-touch Update Software, Printer Setting Tool,
the User's Guide, the Software User's Guide
and the Network User's Guide
(TD-2120N/2130N only).
2 User’s Guides
Displays or installs the User's Guide, the
Software User's Guide and the Network User's
Guide (TD-2120N/2130N only).
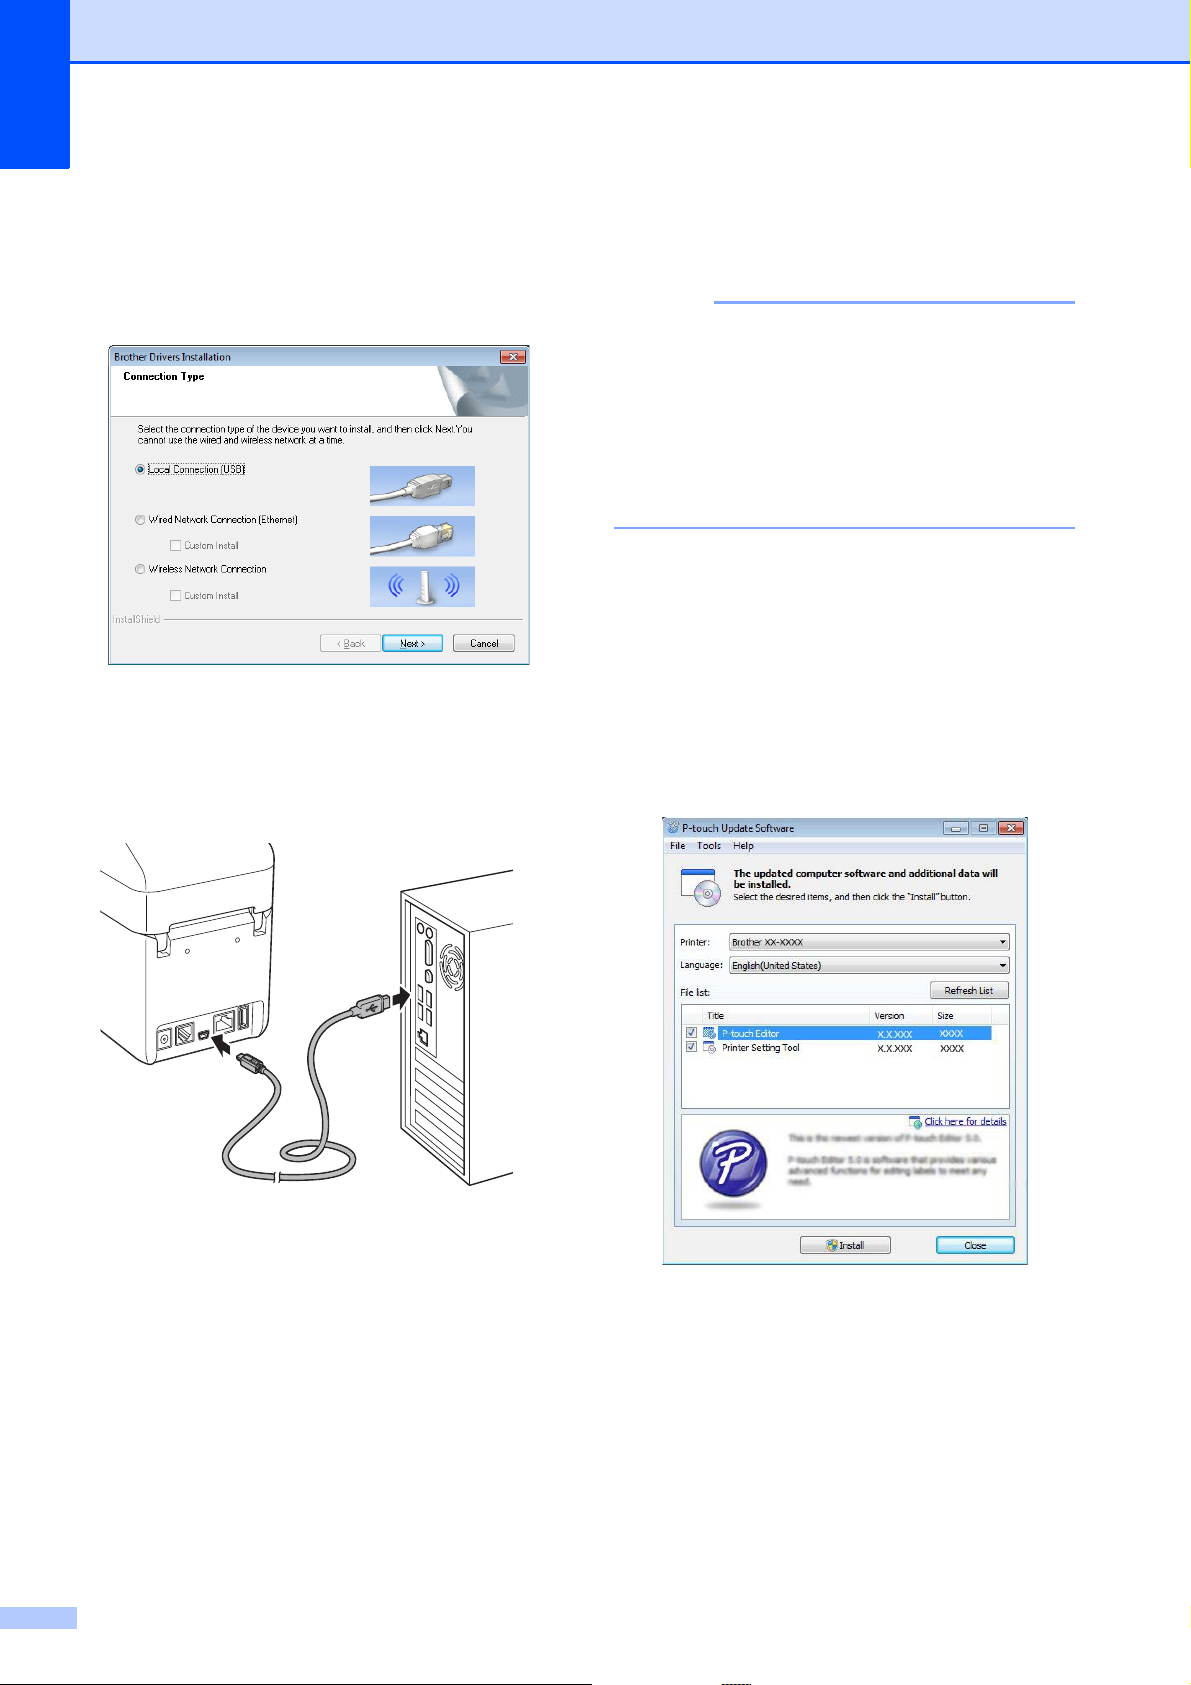
USB Cable Connection 1
a Insert the installer CD-ROM into your
CD-ROM drive. If the language screen
appears, choose your language.
• For Windows® XP/Windows
®
Vista
/Windows®7:
If the installer screen does not
automatically appear, display the contents
of the CD-ROM drive folder, and then
double-click [start.exe].
• For Windows
®
8:
If the installer screen does not
automatically appear, click [Run
start.exe] in the [Start] screen, or display
the contents of the CD-ROM drive folder
from the desktop, and then double-click
[start.exe].
b Click [Standard Installation].
1
3 Custom Installation
Allows P-touch Editor 5.0, the printer driver,
P-touch Update Software and Printer Setting
Tool to be individually selected for installation.
4 Advanced Applications
Installs the BRAdmin Light utility
(TD-2120N/2130N only), or displays the
Brother Developer Center.
5 Brother Support
Displays the support website (Brother
Solutions Center).
c Read the licence agreement, and click
[Agree] if you agree to the terms and
conditions.
d Click [Install] to start the installation,
and then follow the on-screen
instructions.
• The following installation procedures are
for “Standard Installation”.
• If this printer is connected to a computer
by a USB cable, “Printer Setting Tool”
can be used to specify various printer
settings. In order to use “Printer Setting
Tool” to specify printer settings, the printer
driver must be installed.
5
Chapter 1
NOTE
e With TD-2120N/2130N:
When the screen for selecting the
connection method appears, select
[Local Connection (USB)], and then
click [Next].
f When instructed, connect the printer to
the computer with the USB cable and
turn on the printer.
Installation automatically begins.
To not check for new software
versions or update them, click [No],
and then go to step i.
If you click [No] here, you can run P-touch
Update Software at a more convenient
time to check for new software versions
and update them. Double-click the
P-touch Update Software icon on the
desktop. (Your computer must be
connected to the Internet.)
h P-touch Update Software will start.
If an application appears under [File
list], there is a new version of the
application. If the check box is
selected and [Install] is clicked, that
application can be installed. Wait
until a message appears indicating
that the installation has finished.
g P-touch Update Software can be used
to check for updates. If [OK to use
P-touch Update Software to update
the software to the newest version?
(An Internet connection is required to
update.)] appears, click [Yes] or [No].
To check for new versions of the
software and to update them, click
[Yes], and then go to step h.
6
If no application appears under [File
list], the application currently
installed on the computer is the
newest version. There is no need to
update. Click [Close].
Getting Started
NOTE
NOTE
i When the screen for the online user
registration appears, click [OK] or
[Cancel].
If you clicked [OK], you will go to the
online user registration page before
finishing the installation
(recommended).
If you clicked [Cancel], installation
continues.
j Click [Finish].
The installation is now complete.
When you are asked to restart the
computer, click [Restart].
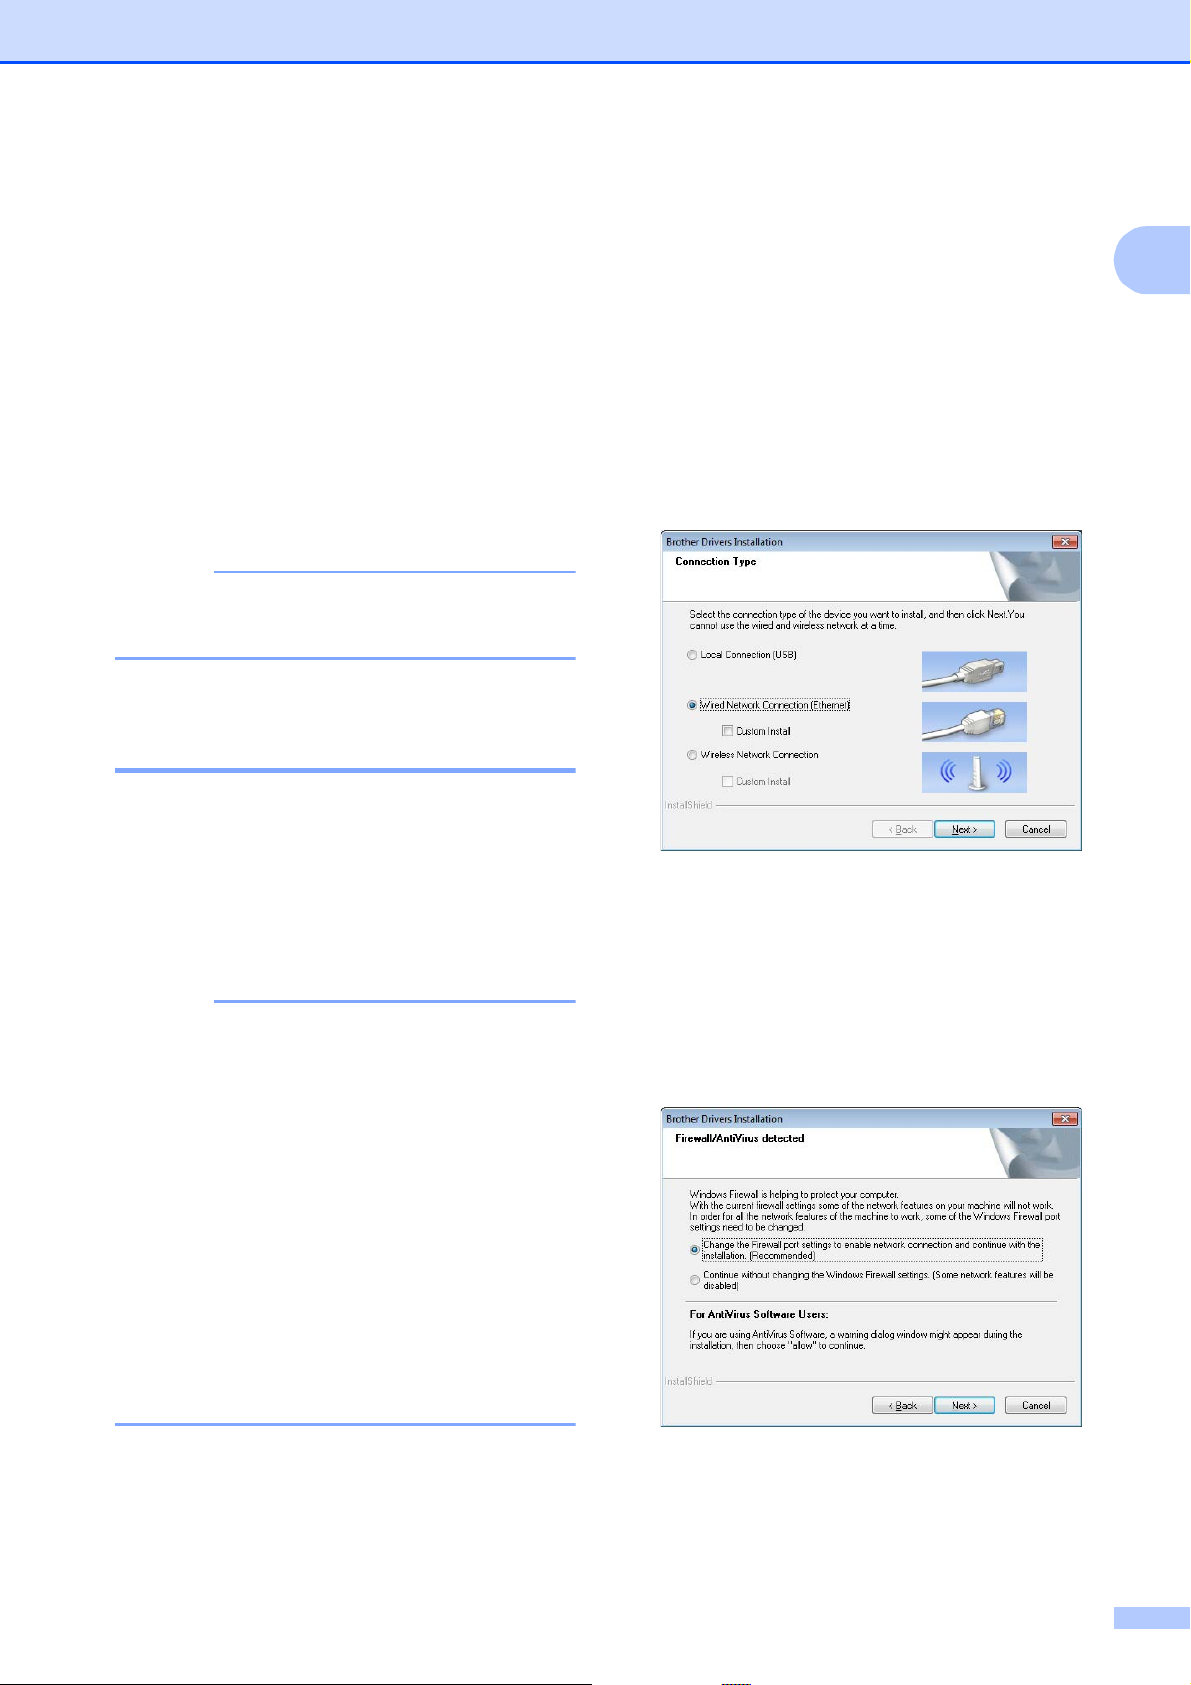
Wired LAN Connection (TD-2120N/2130N only) 1
d Read the licence agreement, and click
[Agree] if you agree with the terms and
conditions.
e Click [Install] to start the installation,
and then follow the on-screen
instructions.
f When the screen for selecting the
connection method appears, select
[Wired Network Connection
(Ethernet)], and then click [Next].
1
a Connect the LAN cable to the printer,
and then turn on the printer.
b Insert the installer CD-ROM into your
CD-ROM drive. If the language screen
appears, choose your language.
• For Windows® XP/Windows
®
Vista
If the installer screen does not
automatically appear, display the contents
of the CD-ROM drive folder, and then
double-click [start.exe].
• For Windows
If the installer screen does not
automatically appear, click [Run
start.exe] in the [Start] screen, or display
the contents of the CD-ROM drive folder
from the desktop, and then double-click
[start.exe].
/Windows®7:
®
8:
g When the [Firewall/AntiVirus
detected] screen appears, select
[Change the Firewall port settings to
enable network connection and
continue with the installation.
(Recommended)], and then click
[Next].
c Click [Standard Installation].
If you are not using the Windows®
Firewall, allow access using UDP ports
137 and 161.
7
Chapter 1
NOTE
NOTE
NOTE
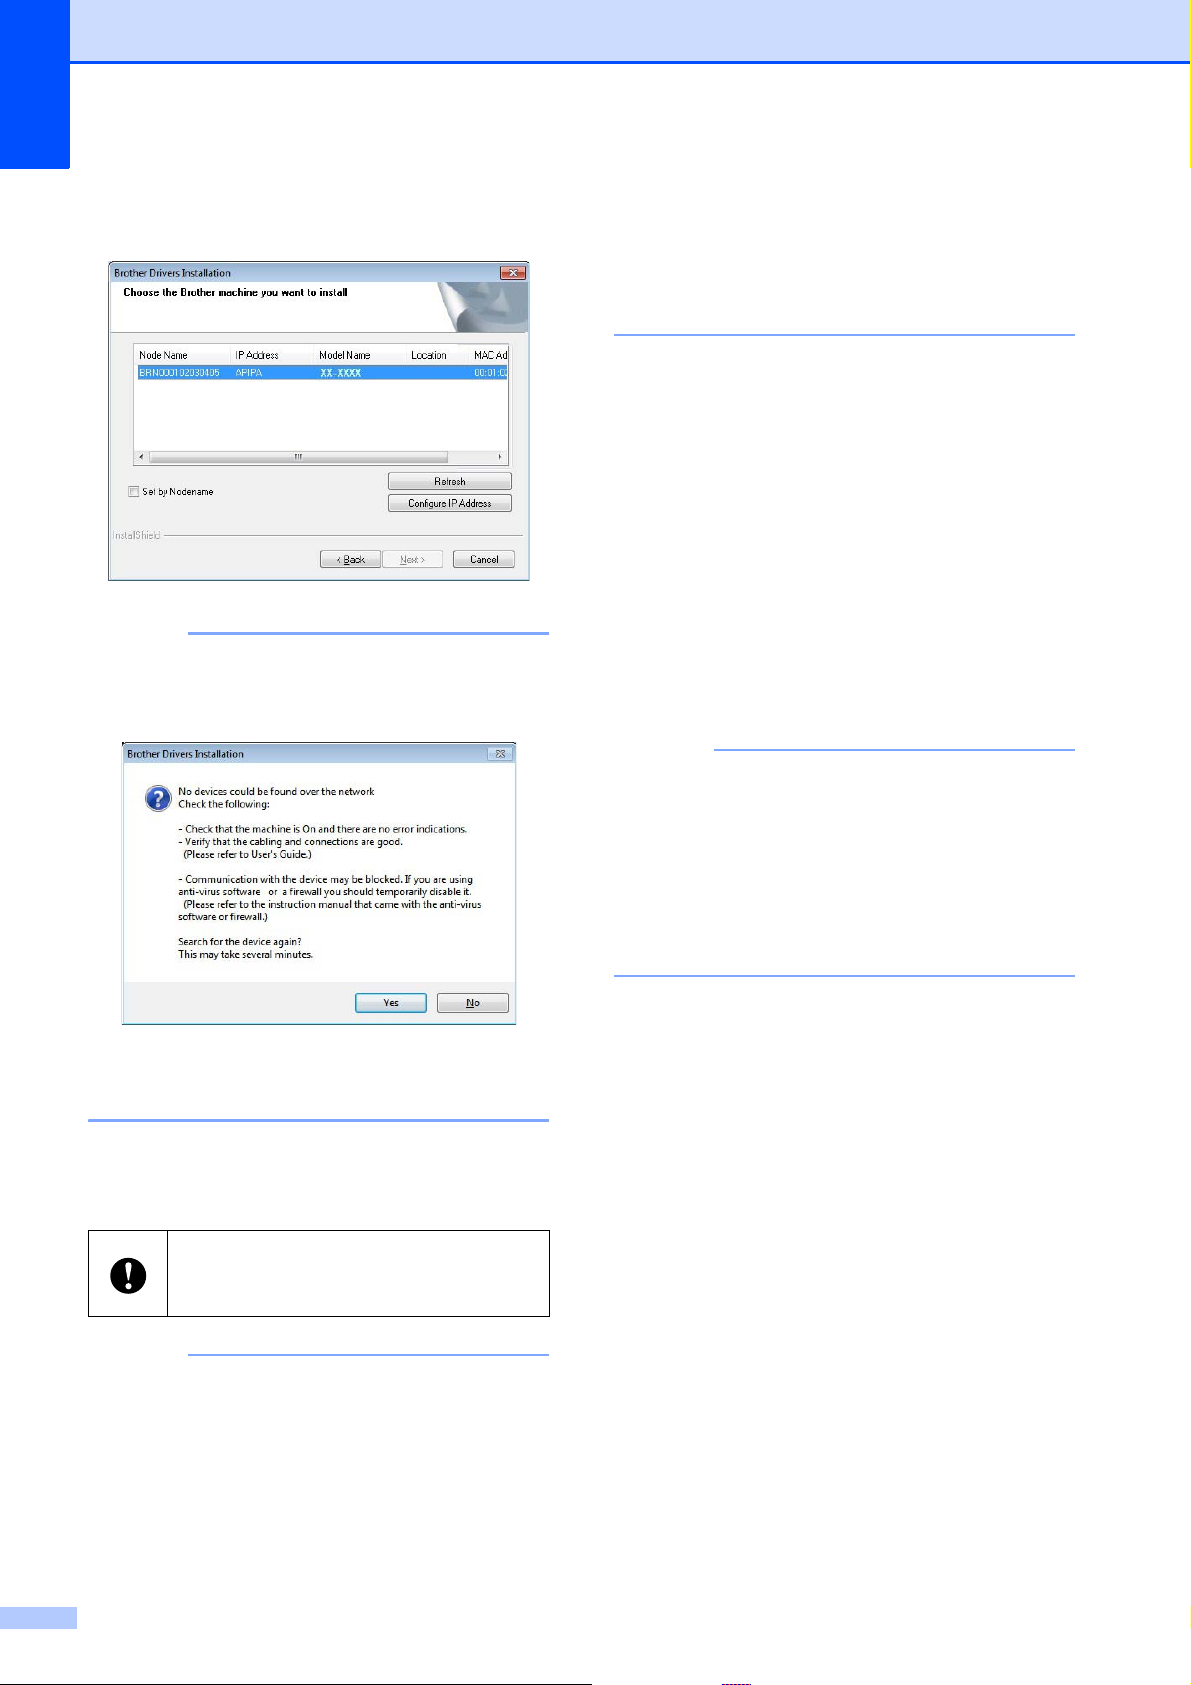
h Select the printer from the list, and then
click [Next].
If this printer was not detected, the
following screen appears.
• Depending on your security settings, a
Windows Security or antivirus software
window may appear when the printer or its
software is being used. Allow or permit the
installer to continue.
j P-touch Update Software can be used
to check for updates. If [OK to use
P-touch Update Software to update
the software to the newest version?
(An Internet connection is required to
update.)] appears, click [Yes] or [No].
To check for new versions of the
software and to update them, click
[Yes], and then go to step k.
To not check for new software
versions or update them, click [No],
and then go to step l.
Follow the on-screen instructions to check
the settings.
i Installation of the printer driver and
software begins.
DO NOT cancel any of the screens
during the installation. It may take a few
seconds for all screens to appear.
If you click [No] here, you can run P-touch
Update Software at a more convenient
time to check for new software versions
and update them. Double-click the
P-touch Update Software icon on the
desktop. (Your computer must be
connected to the Internet.)
• For Windows Vista®/Windows®7/
Windows
®
8 users:
When the [Windows Security] screen
appears, select the check box, and then
click [Install] to complete the installation
correctly.
8
Getting Started
NOTE
k P-touch Update Software will start.
If an application appears under [File
list], there is a new version of the
application. If the check box is
selected and [Install] is clicked, that
application can be installed. Wait
until a message appears indicating
that the installation has finished.
Registering Paper Size Information With the Printer
Paper size information must be registered
with the printer for proper operation.
a Connect the computer to the printer with
a USB cable.
b With [Paper Size Setup] of the installed
“Printer Setting Tool”, specify the size
information (label width and length, label
spacing, etc.) for the media to be used,
and then add the paper format.
Settings can also be adjusted for
[Printing Reference Point
Adjustment] and [Energy Rank], and
[Import] or [Export] can be clicked to
perform the corresponding operations
with the added paper size information
list.
1
1
If no application appears under [File
list], the application currently
installed on the computer is the
newest version. There is no need to
update. Click [Close].
l When the screen for the online user
registration appears, click [OK] or
[Cancel].
If you clicked [OK], you will go to the
online user registration page before
finishing the installation
(recommended).
If you clicked [Cancel], installation
continues.
m Click [Finish].
The installation is now complete.
c Click [Register Paper Size With
Printer] from the [Option] button in the
[Paper Size Setup] dialog box to
register the paper size information with
the printer. For details, see Paper Size
Setup on page 44.
When you are asked to restart the
computer, click [Restart].
9

Chapter 1
Uninstalling the Printer Driver
Read “TD-XXXX” in the following steps as
your model name.
Perform this procedure only if printing from
the TD-XXXX is no longer necessary or when
re-installing the TD-XXXX printer driver.
Windows® XP 1
a If the printer is connected to the
computer and is turned on, press and
hold the (Power) button to turn it off.
b Click [Start] - [Control Panel] -
[Printers and Other Hardware] -
[Printers and Faxes].
c Select [Brother TD-XXXX] and click
[File] - [Delete], or right-click the icon
and click [Delete].
d Click [File] - [Server Properties]. The
[Print Server Properties] window
appears.
d Right-click the [Printers] window, and
then click [Run as administrator] -
1
[Server Properties...].
If the authorisation confirmation window
appears, click [Continue].
If the [User Account Control] window
appears, type in the password, and then
click [OK].The [Print Server
Properties] window appears.
e Click the [Drivers] tab, select [Brother
TD-XXXX], and then click [Remove...].
f Select [Remove driver and driver
package], and then click [OK].
g Close the [Print Server Properties]
window. The printer driver has been
uninstalled.
Windows® 7 1
a If the printer is connected to the
computer and is turned on, press and
hold the (Power) button to turn it off.
b Click - [Devices and Printers].
e Click the [Drivers] tab, and then select
[Brother TD-XXXX].Click [Remove].
f Close the [Print Server Properties]
window. The printer driver has been
uninstalled.
Windows Vista
®
a If the printer is connected to the
computer and is turned on, press and
hold the (Power) button to turn it off.
b Click - [Control Panel] - [Hardware
and Sound] - [Printers].
c Select [Brother TD-XXXX] and click
[Delete this printer], or right-click the
icon and click [Delete].
c Select [Brother TD-XXXX] and click
[Remove device], or right-click the icon
and click [Remove device].
If a User Account Control message
appears, type in the password, and then
click [Yes].
d Select [Fax] or [Microsoft XPS
1
Document Writer] in the [Devices and
Printers] window, and then click [Print
server properties], which appeared on
the menu bar.
e Click the [Drivers] tab, and then click
[Change Driver Settings]. If a User
Account Control message appears, type
in the password, and then click
[Yes].Select [Brother TD-XXXX], and
then click [Remove...].
10

f Select [Remove driver and driver
package], and then click [OK]. Follow
the on-screen instructions.
g Close the [Print Server Properties]
window. The printer driver has been
uninstalled.
Windows® 8 1
a If the printer is connected to the
computer and is turned on, press and
hold the (Power) button to turn it off.
b Click [Control Panel] in [Apps] screen -
[Hardware and Sound] - [Devices and
Printers].
Getting Started
1
c Select [Brother TD-XXXX] and click
[Remove device], or right-click the icon
and click [Remove device].
If a User Account Control message
appears, type in the password, and then
click [Yes].
d Select [Fax] or [Microsoft XPS
Document Writer] in the [Devices and
Printers] window, and then click [Print
server properties], which appeared in
the menu bar.
e Click the [Drivers] tab, and then click
[Change Driver Settings]. If a User
Account Control message appears, type
in the password, and then click
[Yes].Select [Brother TD-XXXX], and
then click [Remove...].
f Select [Remove driver and driver
package], and then click [OK]. Follow
the on-screen instructions.
g Close the [Print Server Properties]
window. The printer driver has been
uninstalled.
11
Printing 2
1
234
5
2
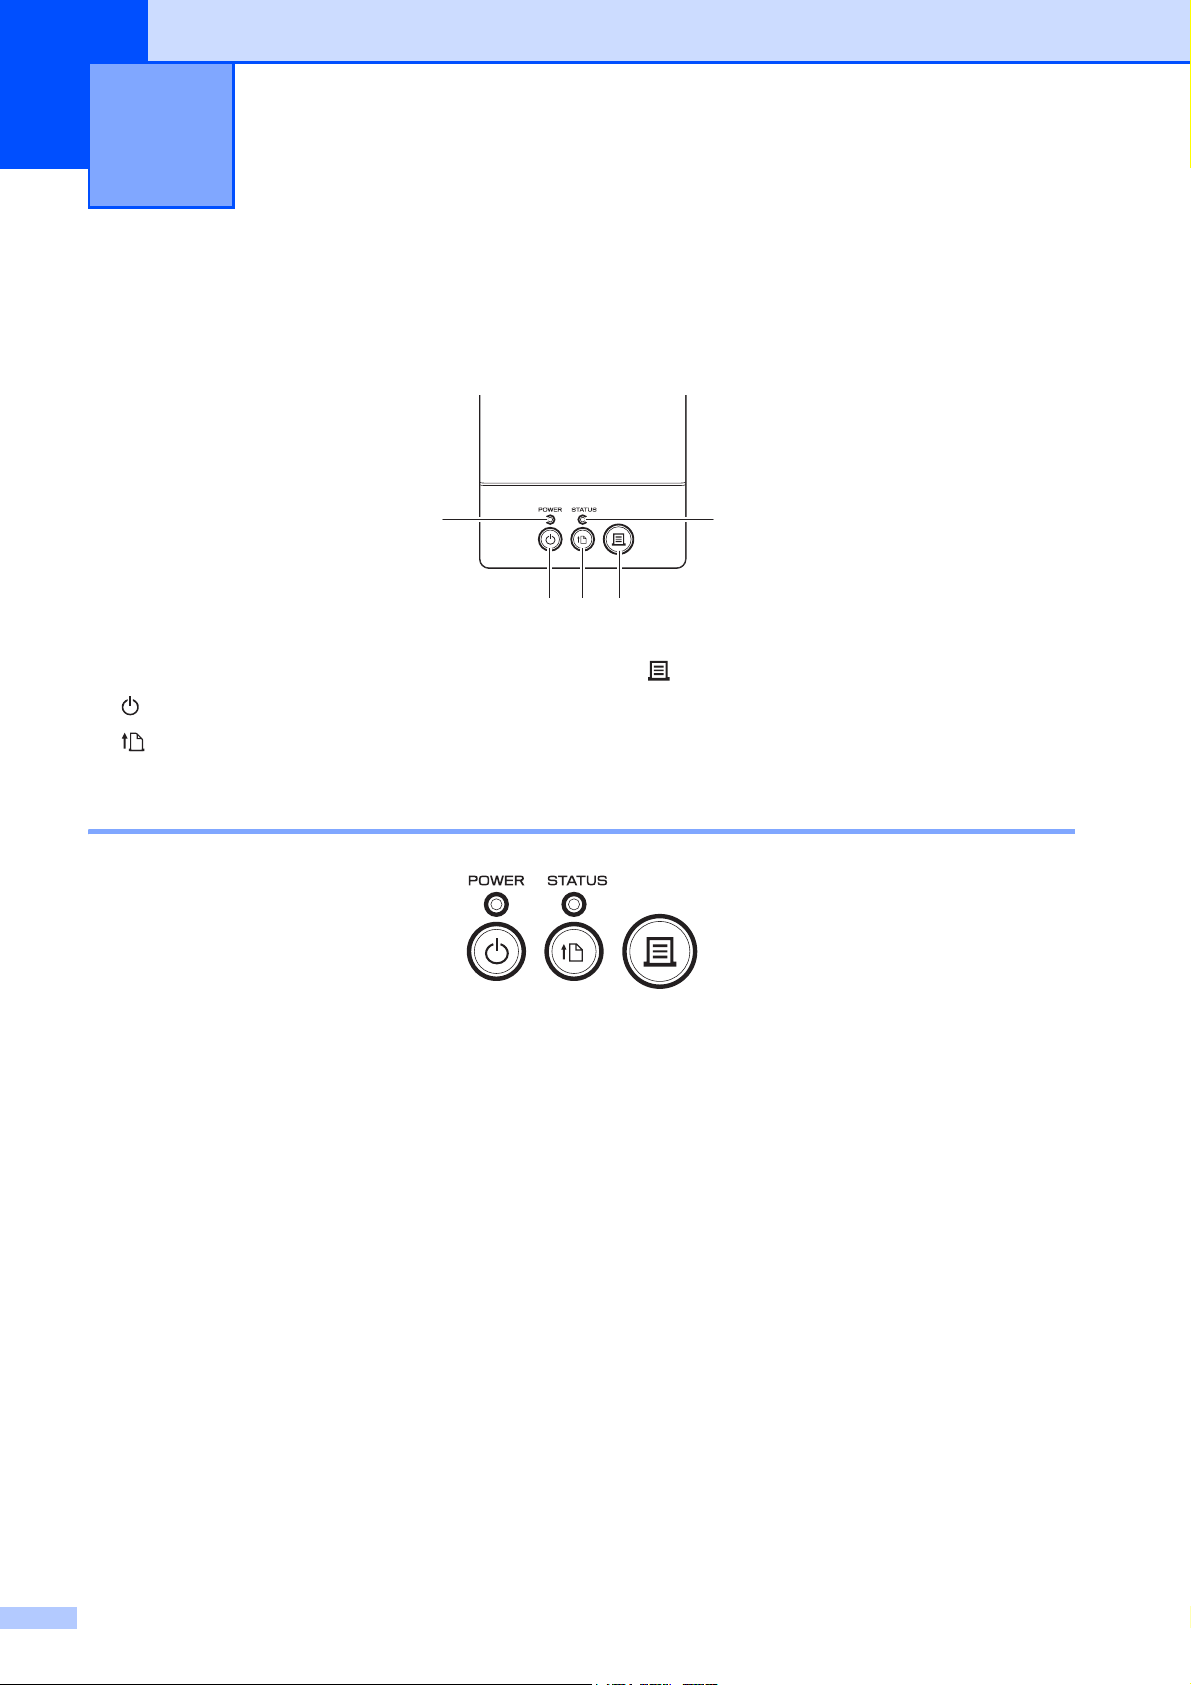
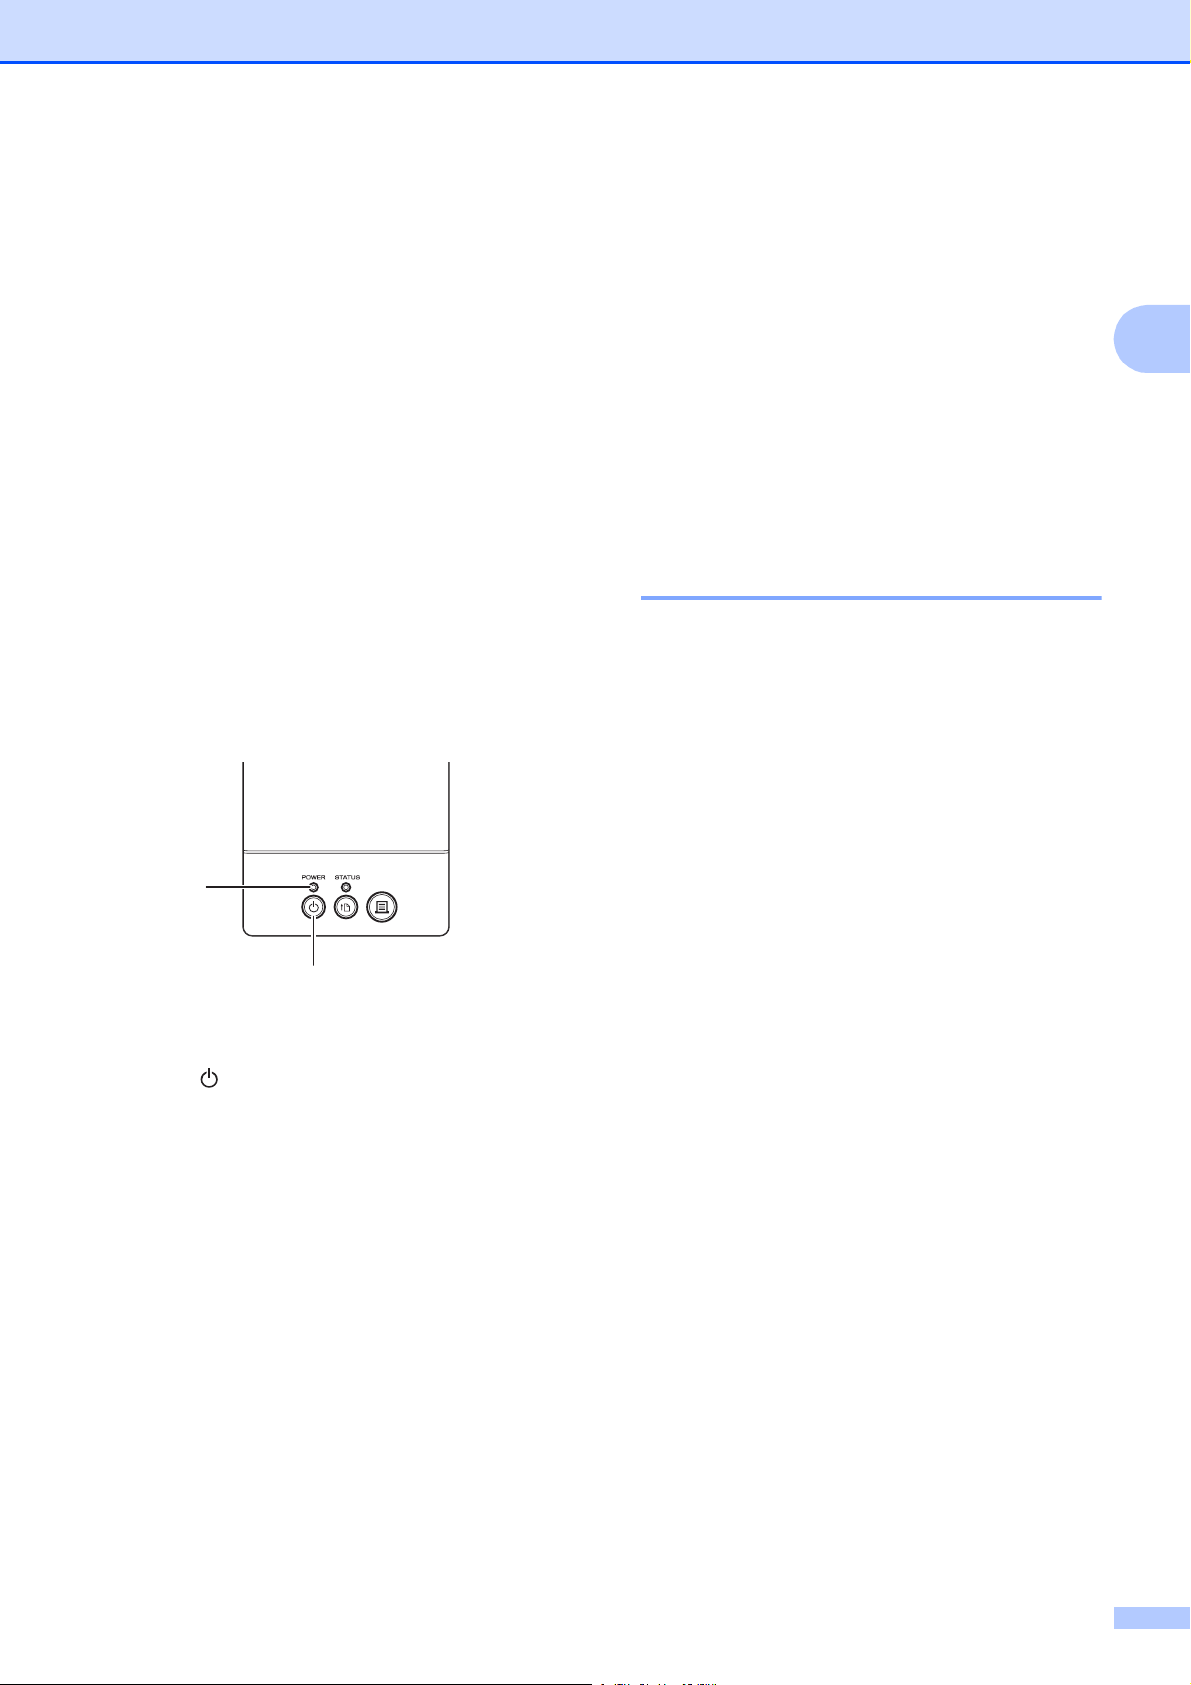
Operation Panel 2
The operation panel consists of the following buttons and indicators.
1 POWER indicator
2 (Power) button
3 (Feed) button
4 (Print) button
5 STATUS indicator
Indicators 2
The indicators light and blink to indicate the printer’s status. Each indicator may light or blink in
green, red or orange. For details, see Indicators on page 53.
12
Printing
Button Functions 2
(Power) button functions
Turn the printer on
Turn the printer off
(Feed) button functions
Feed the paper When the paper type is set to [Die-cut Label] or [Media With Marks]:
Establish a wireless LAN
connection (WPS)
(TD-2120N/2130N only)
Operation
While the printer is turned off, press the (Power) button. The
POWER indicator turns on.
While the printer is turned on, press and hold the (Power) button
until the POWER indicator turns off. (If the [Auto Power Off] function
is specified in [Device settings] of “Printer Setting Tool”, the printer
will turn off automatically after the specified period of inactivity.)
Operation
Press the (Feed) button to automatically feed the paper to the print
position.
When the paper type is set to [Continuous Length Tape]:
Press the (Feed) button to feed the paper about 25.4 mm.
The default setting is [Continuous Length Tape].
Use [Paper Size Setup] of “Printer Setting Tool” to register the paper
size information with the printer. For details, see Registering Paper
Size Information With the Printer on page 9.
With the wireless LAN connection enabled, press and hold (5
seconds) this button to easily establish a wireless LAN connection and
install the printer driver. However, your WLAN access point/router
must support Wi-Fi Protected Setup (WPS). For details, see One-Push
Configuration Using WPS on page 99.
2
Enable/disable Bluetooth mode
(TD-2120N/2130N only)
(Print) button functions
Perform the specified operation With the printer idle, press this button to perform the operation
Print the printer setup information Make sure that a roll is installed, and then hold down (at least 1
Execute a file stored in the mass
storage area
Resetting the incrementing field
With the wireless LAN connection disabled, press and hold (5
seconds) this button to switch between enabling and disabling the
Bluetooth connection. For details, see Connecting the Computer and
Printer by Bluetooth on page 104.
Operation
specified in [Device settings] of
see Print Key Function on page 36.
second) the (Print) button to begin printing the printer setup
information. For details, see Printing the Printer Setup Information
on page 19.
With the printer in mass storage mode, press this button to execute a
command file stored in the mass storage area.
Hold down the (Print) button for at least 5 seconds, until the
POWER and STATUS indicators blink 3 times in orange.
“Printer Setting Tool”. For details,
13

Chapter 2
Functions using multiple
buttons
Start up the printer in mass
storage mode
Operation
While holding down the (Print) button, press and hold the (Power)
button to start up the printer in mass storage mode. For details, see
Mass Storage Functions on page 48.
14
Printing
NOTE
1
1
1
Inserting the RD Roll 2
Use genuine Brother roll media.
Genuine Brother fanfold media is not
available at this time.
a Press and hold the (Power) button to
turn the printer off.
Press the cover release lever (1) on
either side and lift up to open the RD
Roll compartment top cover.
c Insert an RD Roll into the RD Roll
compartment, and then close the RD
Roll compartment top cover.
For an RD Roll
1 Insert the RD Roll so that the
labels feed with the side to be
printed on facing up (1), as
shown.
2
b Open the media guides by lifting up the
media guide adjustment lever (1) and
pulling the media guides outwards.
The media guides are shipped fully open
from the factory.
Use RD Rolls with an outer roll
dimension of 127 mm or less. Use
RD Rolls designed for TD series
printers. Regardless of the size,
some RD Rolls may not be usable.
Insert the RD Roll facing the correct
direction. If the RD Roll is not
inserted correctly, the printer will not
print on the correct side of the paper
or label.
When using media with the labels
rolled up on the inside, insert the roll
in the opposite direction to that
shown in sub-step 1 of step c so
that the print side of the labels will
face up.
15
Chapter 2
1
2
1
1
2 While lifting up the media guide
adjustment lever (1), push in
both media guides (2) to fit the
width of the paper.
5 Close the RD Roll compartment
top cover by pressing down on
the centre, until it clicks into
place.
For fanfold paper
3 Feed the end of the RD Roll
under the media tip guides (1).
direction shown.
1 Insert the fanfold paper in the
16
4 Position the end of the paper
centred over the platen roller
and slightly out of the media
exit.
1Print side
Printing
NOTE
1
2 Feed the end of the fanfold
paper under the media tip
guides (1).
3 Position the end of the paper
centred over the platen roller
and slightly out of the media
exit.
4 Close the RD Roll compartment
top cover by pressing down on
the centre, until it clicks into
place.
d Press the (Power) button to turn the
printer on.
If the paper size information for the die-cut
labels being used has been registered
with the printer, pressing the (Feed)
button will position the label at the correct
starting position. For details, see
Registering Paper Size Information With
the Printer on page 9.
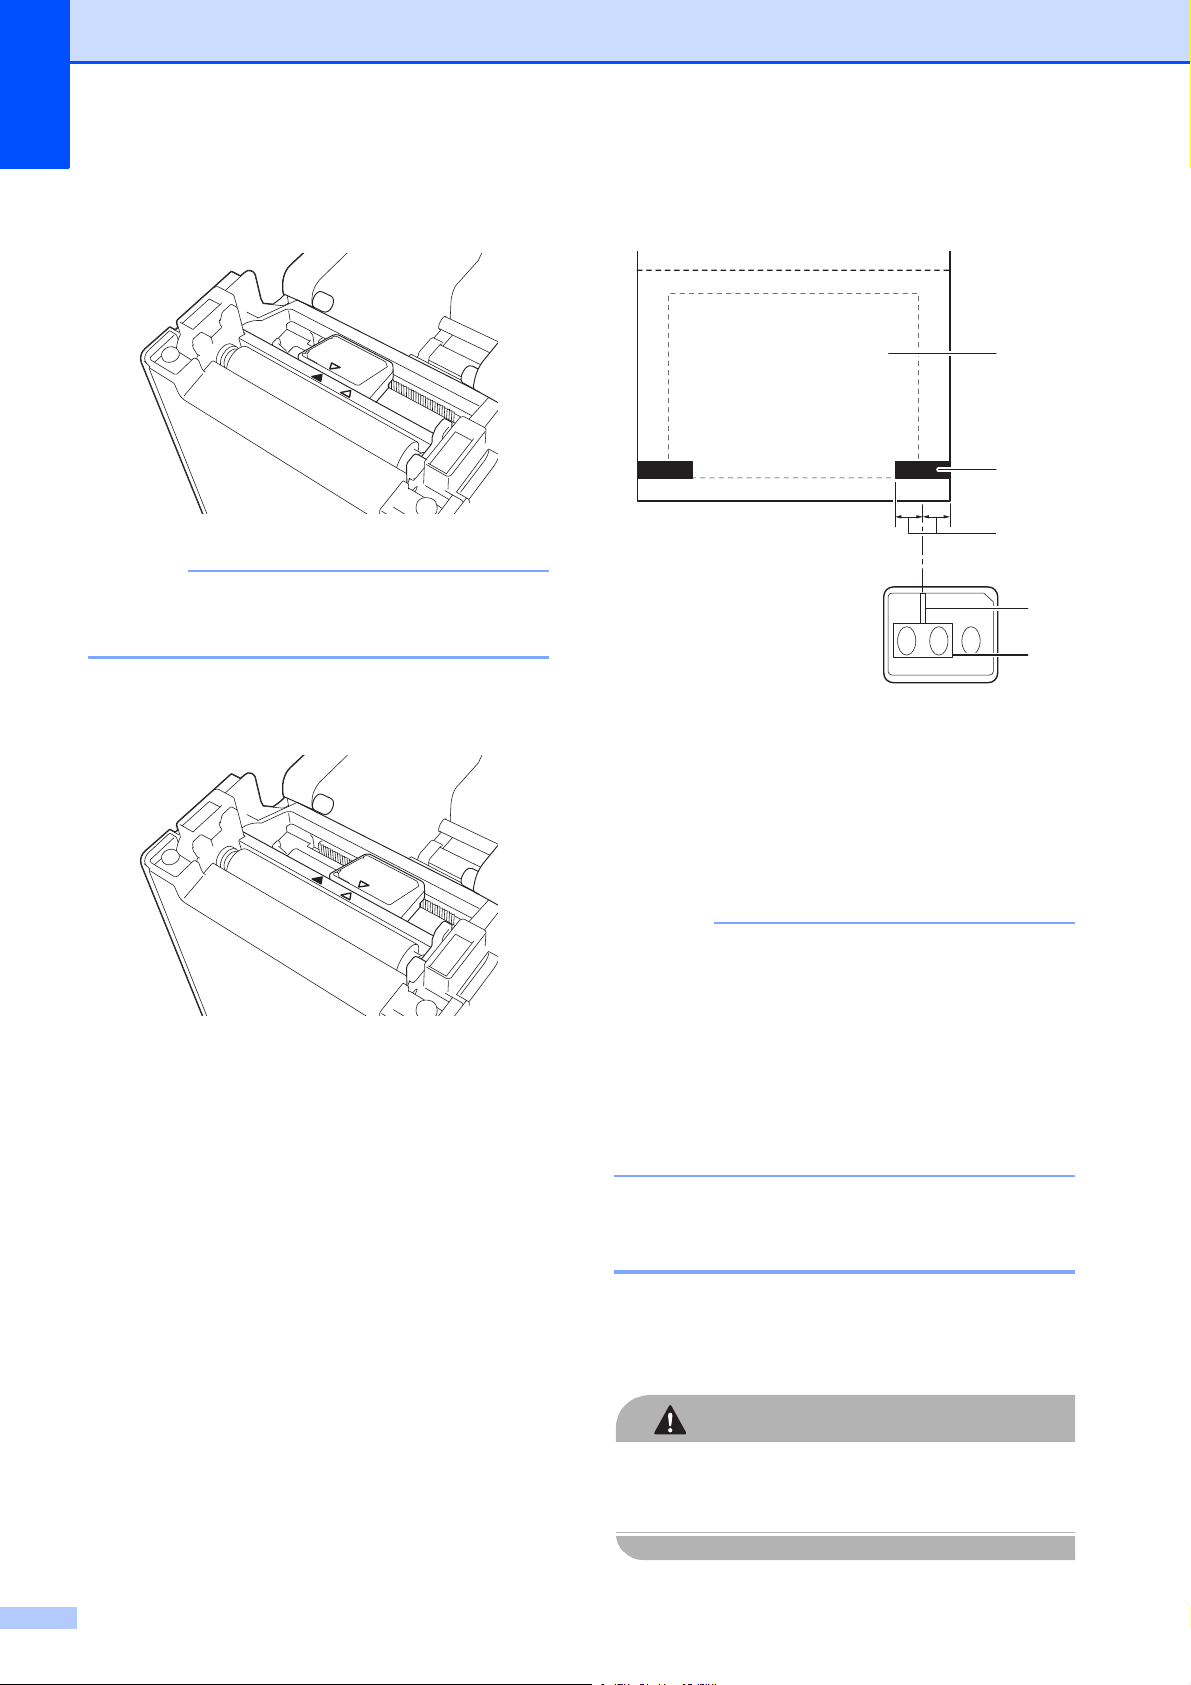
Checking the Sensor Position2
Check the sensor position for the type of
paper being used.
With die-cut labels that have no black
mark, the transmissive/gap sensor
detects the beginning of the label and
feeds the label to the correct position.
With receipt paper that has no black mark,
the reflective/black mark sensor detects if
paper has run out.
With media that has a black mark, the
reflective/black mark sensor detects the
mark and feeds the media to the correct
position.
With no black mark
2
Die-cut labels
Align on the sensor with on the printer. (See
Figure 1.)
Receipt paper
Width of 25 mm
or more
Width less than
25 mm
With a black mark
Align the black mark on the paper with the
centerline of the reflective/black mark sensor.
(See Figure 3.)
Make sure that there is at least 4 mm of the black
mark on the left and right of the centerline for the
reflective/black mark sensor.
Align on the sensor with
on the printer. (See Figure 1.)
Align on the sensor with
on the printer. (See Figure 2.)
17
Chapter 2
NOTE
NOTE
CAUTION
Figure 1 2
The sensor is at this position immediately
after the printer is purchased.
Figure 2 2
Figure 3 2
1
2
3
4
5
1 Back of media
2 Black mark
3 4 mm or more
4 Centre line
5 Reflective/black mark sensor
When using receipt paper with the
maximum width of 63 mm, make a black
mark at least 9 mm long in from either the
left or right edge of the paper so that the
reflective/black mark sensor can detect
the black mark. If the black mark is too
short, it cannot be detected by the
reflective/black mark sensor.
Cutting Roll Paper 2
Roll paper can be cut using the printer’s tear
bar. Pull one edge of the ejected paper up
and diagonally toward the other edge.
The tear bar is sharp. To avoid injury, do not
touch the tear bar.
18

Printing
NOTE
NOTE
Printing the Printer Setup Information 2
You can use the (Print) button to print a report that lists the following printer settings:
Program version
Printer usage history
Missing dot test pattern
List of transferred data
Communication settings
• You can use [Device settings] of “Printer Setting Tool” to set, in advance, which items will
be printed. For details, see Printer Information Report on page 36.
• The node name will also appear in the communication settings. The default node name is
“BRWxxxxxxxxxxxx”. (“xxxxxxxxxxxx” is based on your printer’s MAC address/Ethernet
address.)
a Make sure that a roll of 58 mm receipt paper has been loaded, and the RD Roll compartment
top cover is closed.
b Turn on the printer.
c Hold down (for at least 1 second) the (Print) button until the POWER indicator starts
blinking in green and the printer setup information is printed.
2
• For printing the printer setup information, we recommend using 58 mm receipt paper.
The length required for printing differs depending on the information to be printed.
• The printer setup information can also be printed from [Device settings] of “Printer Setting
Tool”. For details, see Print Information Report on page 41.
19

Chapter 2
Printer Setup Information Printing Sample 2
The printing sample is for illustrative purposes only.
20
Printing
Connecting the Computer and Printer
The printer can be connected to your
computer using any of the methods listed
below.
USB cable connection
Wired LAN connection (TD-2120N/2130N
only)
Serial cable connection
Wireless LAN connection
(TD-2120N/2130N only)
Bluetooth connection (TD-2120N/2130N
only)
For details on connecting with the serial
cable, see Connecting the Computer and
Printer With the RJ25 to DB9M Serial Adapter
on page 68.
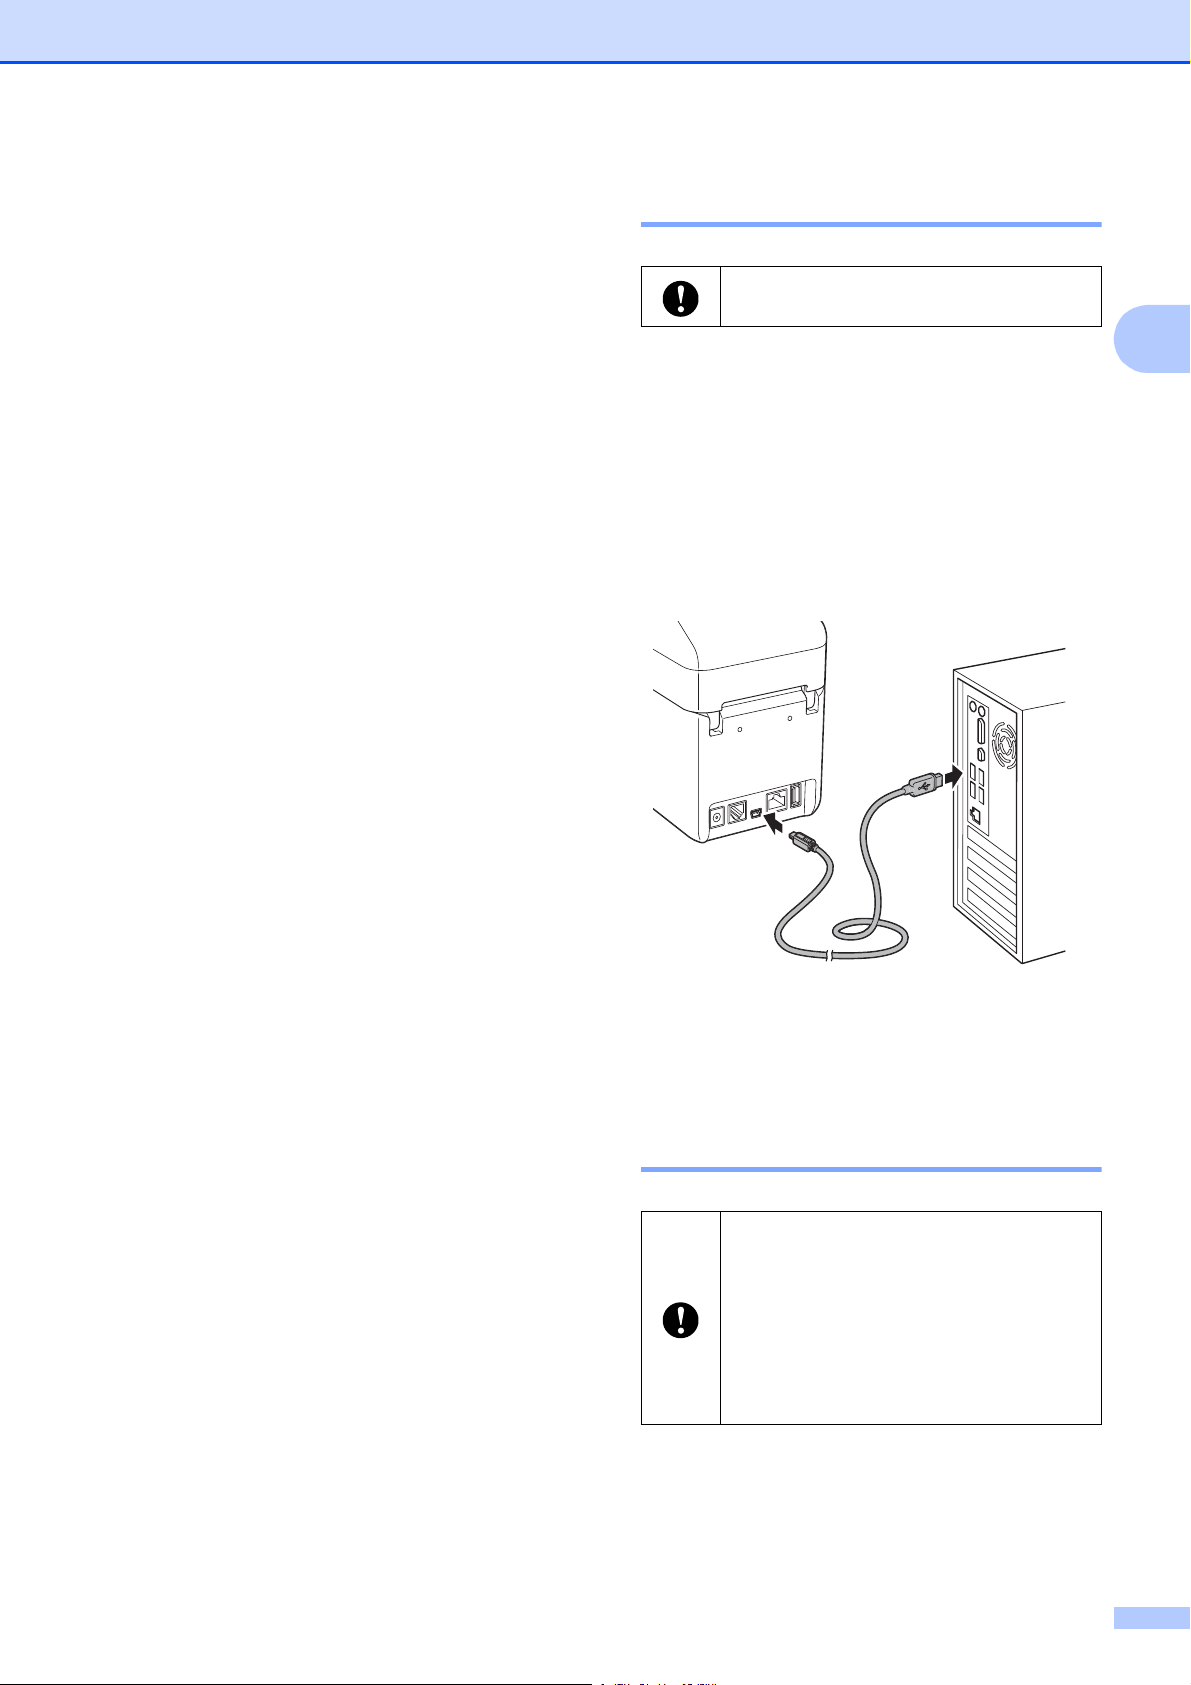
USB Cable Connection 2
2
Before connecting the printer to the
computer, install the printer driver.
2
a Before connecting the USB cable, make
sure that the printer is turned off.
b Connect the printer end of the USB
cable to the mini-USB port on the back
of the printer.
c Connect the other end of the USB cable
to the USB port on the computer.
For details on connecting with a wireless
LAN, see Connecting the Computer and
Printer by Wireless LAN on page 102.
For details on connecting with Bluetooth, see
Connecting the Computer and Printer by
Bluetooth on page 104.
d Turn on the printer.
Wired LAN Connection (TD-2120N/2130N only) 2
In order for the printer to use a static IP
address to communicate through a
wired LAN connection, the printer driver
and “Printer Setting Tool” must first be
installed, and the wired LAN connection
settings must be specified. For details,
see Installing the Printer Driver and
Software on page 4.
a Before connecting the LAN cable, make
sure that the printer is turned off.
21

Chapter 2
NOTE
b Connect the LAN cable to the ethernet
network port on the back of the printer,
and then turn on the printer.
• The printer’s communication settings can
be changed with [Communication
settings] in “Printer Setting Tool”. For
details, see Communication Settings
(TD-2120N/2130N only) on page 27.
• By using “Printer Setting Tool”, the
communication settings can be changed
and easily applied to multiple printers. For
details, see Applying Setting Changes to
Multiple Printers on page 33.
Printing Solutions 2
Your printer can be used with several
versions of the Windows
In most situations, the printer requires driver
software to communicate with your computer.
These drivers can be installed using the
setup CD-ROM. We recommend that you
visit the website to make sure that you have
the latest version of the drivers. The latest
versions can be downloaded from the Brother
Solutions Center website
(http://solutions.brother.com/).
®
operating systems.
22
Printing
1
2
Printing 2
There are various methods for printing with
this printer. The following describes the
procedure for printing from a computer.
a Start P-touch Editor 5.0, and then open
the document to be printed.
For P-touch Editor 5.0 users: Refer to
the Software User’s Guide included on
the CD-ROM.
b Check that the printer has the correct
power source. (Make sure that the AC
adapter is connected to an AC power
socket or that a fully charged
rechargeable Li-ion battery is installed.)
c Turn on the printer. The POWER
indicator lights in green.
g Click [Print] in the computer program’s
menu.
The POWER indicator blinks in green to
indicate that the printer is receiving data,
and the document is printed.
h Turn the printer off. The POWER
indicator turns off.
If you will continue using the printer, it is
unnecessary to turn it off each time.
Making Prints Lighter or Darker 2
You can make prints lighter or darker by
adjusting the print density setting in the
printer driver’s dialog box or “Printer Setting
Tool”. (See Print Density on page 36)
When using the rechargeable battery,
changing the print density setting may result
in slight changes in printing speed and the
number of pages that can be printed on a
single charge.
2
1 POWER indicator
2 (Power) button
d Connect the printer to a computer.
For details on the connection methods
and procedures, see Connecting the
Computer and Printer on page 21.
e Insert the RD Roll.
For details, see Inserting the RD Roll
on page 15.
Be sure to use genuine Brother roll
media.
f If necessary, change the print settings
using either the printer driver or the
Printer Setting Tool on page 25.
23

Chapter 2
NOTE
Printer Driver Options 2
You can configure various settings in the
printer driver’s dialog box, such as paper
size, number of copies, print quality, etc.
You can also use “Printer Setting Tool”
to configure more advanced settings.
For details, see Printer Setting Tool
on page 25.
24
 Loading...