

Page 1
2.10
Basic operation
Answering calls manually
In any reception mode, you can always answer calls manually if you have an
optional handset installed. Just pick it up, as you would if using a normal phone.
If you hear someone speaking to you, use your
optional handset to speak back.
If you hear fax tones ( beep beep beep ),
press
START
and hang up the optional handset.
The fax machine will begin receiving a fax.
Note: Don t try to answer a call by pressing
MONITOR/CALL
. The monitor function is
for dialing only.
Answering fax calls using another phone, not the fax machine
If you have one phone line ringing to several phones in your office and you have an
optional handset attached to your fax, there s no need to run to the fax machine to
answer every call. If you happen to answer a fax call while you re at another
extension, put the handset down, but don t hang up. Walk to the fax machine and
pick up the optional handset.Then press
START
.
After you press
START
, hang up both the fax machine s optional handset and the
second telephone s handset. Because remote fax machines will wait several seconds
to hear reception tones from your unit, you have about 30 seconds to walk to your
fax, pick up the handset, and press
START
.
While using an optional handset for your call, if you press
COPY RESET
, the
LCD
shows the current fax reception mode. Press
COPY RESET
again to return to the
TEL
mode.
Reception modes
Your fax machine has five different reception modes Tel Ready, Fax Ready,
Fax/Tel Ready, Tel/Fax Ready and Ans/Fax Ready.W ell explain each of these in
this section.
T el Ready mode
Use it if: You want to use the same line for both fax and phone calls
and
On that line,you re using at least one other phone which is not
connected to your fax machine
or
You have an optional handset installed on your fax machine
In this mode: Your fax machine never answers calls automatically. You must
answer each call as described in Answering calls manually (this
page, left column).
Fax Ready mode
Use it if: Your fax machine uses its own phone line and doesn t share it with a
phone or an answering machine.
In this mode: Your fax machine answers each call and attempts to receive a fax.
Fax/Tel Ready mode
The Fax/Tel Ready mode is a combination of the Fax Ready and Tel Ready modes.
Use it if: An optional handset is installed on your fax machine
and
You re using the machine as both a fax machine and a telephone
In this mode: Your fax machine receives faxes silently but also alerts you when a
regular voice call comes in. (Your fax machine also beeps once at the
end of each reception.)
If a voice call comes in, your fax machine detects it and sounds a
special ring.If you hear it, answer using your optional handset.
Note: This Fax/Tel Ready mode won t turn off ringers on other telephones in your
house or office. Other phones won t distinguish between fax and voice calls.
Receiving faxes
Page 2
2.11
Basic operation
T el/Fax Ready mode
The Tel/Fax Ready mode is a combination of the Tel Ready and Fax Ready modes.
Use it if: An optional handset is installed on your fax machine
and
You re using the machine as both a telephone and a fax machine
In this mode: Your fax machine rings the number of times you ve identified in the
user settings (the default setting is two times). If you don t use the
optional handset to answer the call, your fax machine answers the
call. If a caller sends a fax, your machine begins receiving it. If a
voice call comes in, your machine detects it and sounds a special
ring,telling you to answer using the optional handset.
Ans/Fax Ready mode
Use it if: You re using an answering machine that s connected directly to your
fax machine.
In this mode: An answering machine connected to your fax machine answers each
call. If a voice call comes in, the answering machine begins to record
the incoming message. If your fax machine hears a fax tone,it
begins receiving the fax message.
Using an answering machine with your fax machine
To connect your answering machine to your fax mac hine:
1
Set the fax machine for Ans/Fax Ready, as described on right column.
2
Set your answering machine to answer calls after no more than two rings.
(See the answering machine s instructions if necessary.)
3
Create a new outgoing message on your answering machine.
Here s a suggested message:
Hello! You ve reached [your name or telephone number].To leave a voice
message,please wait for the beep. To send a fax,press
START
on your fax
machine.Thanks for calling!
Important: Your answering machines outgoing message must be no longer
than 10 seconds.
Detection of silent fax machines
Some older fax machines don t send fax tones when transmitting, which can cause
problems when using an answering machine with your fax.
But your fax machine can accommodate these silent machines without disrupting
your answering machine operation.
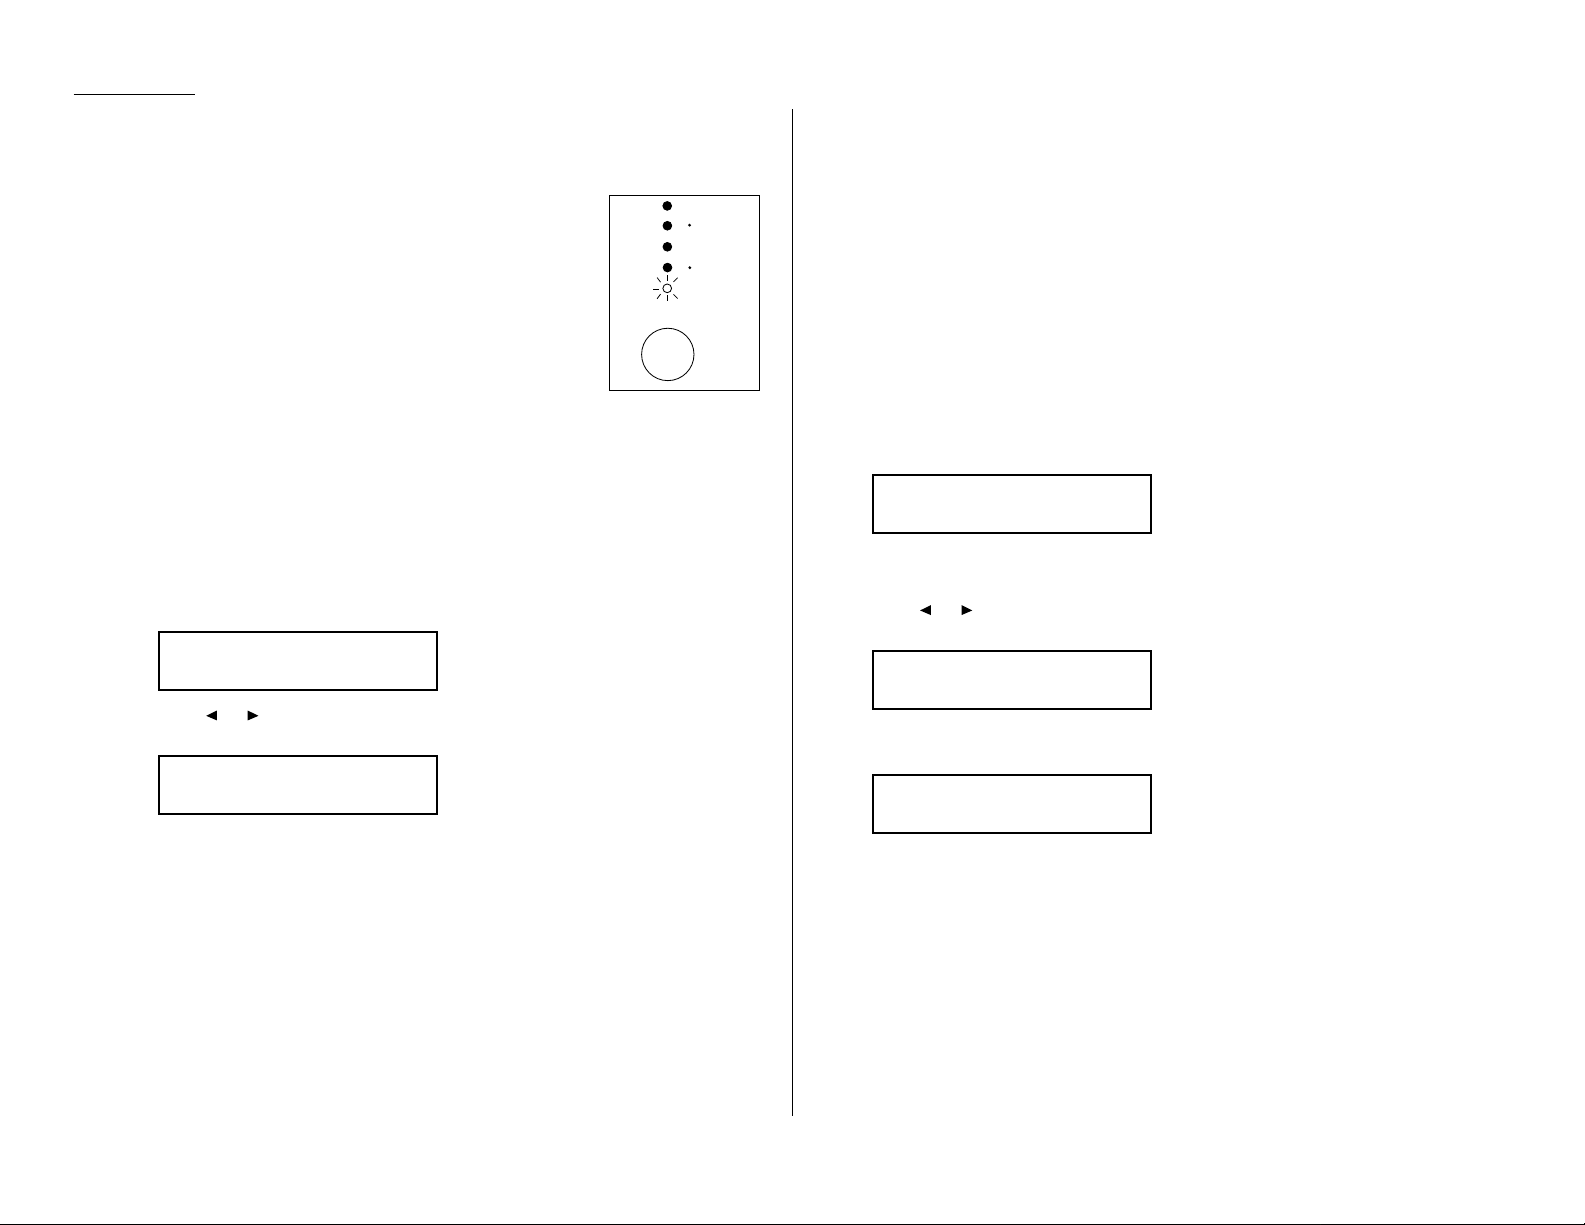
How to select the fax reception mode:
1
Press Program key,I, and then press
ENTER
seven times.The
LCD
shows your
current fax reception mode:
2
Press or until your desired reception mode is appeared.
3
Press
ENTER
to save the setting.
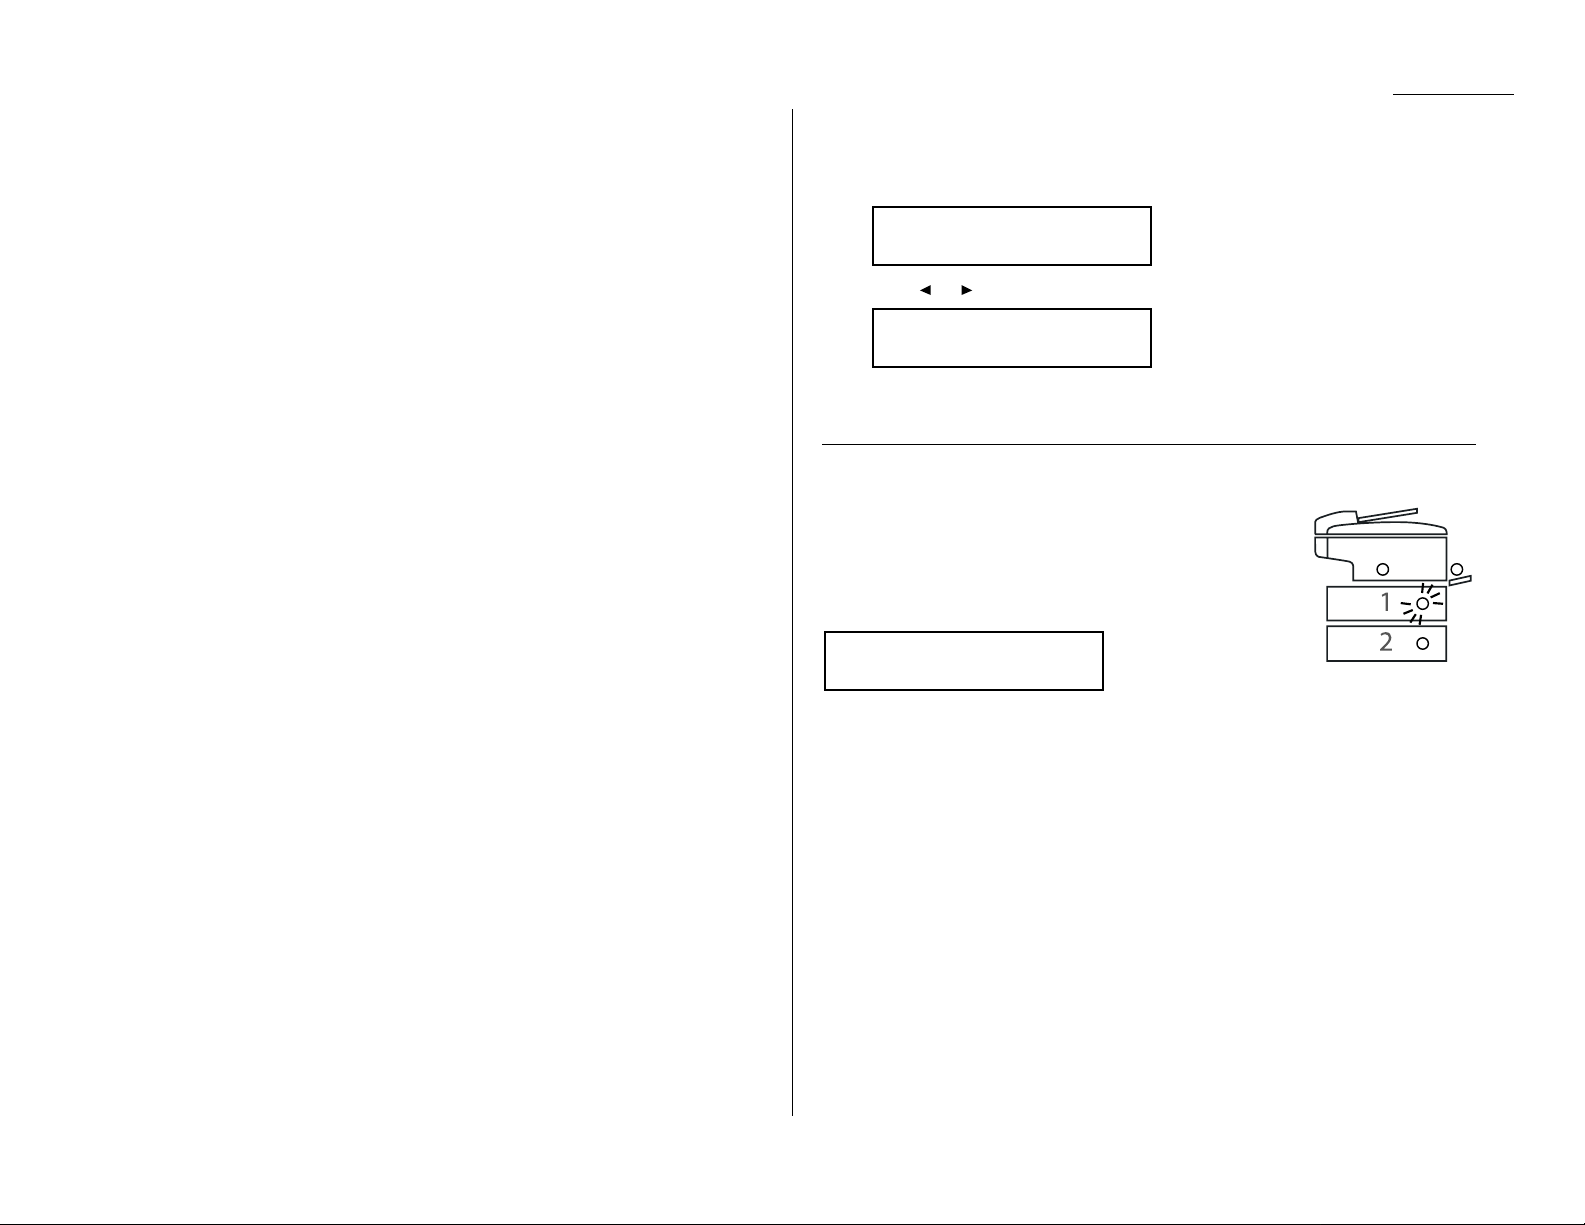
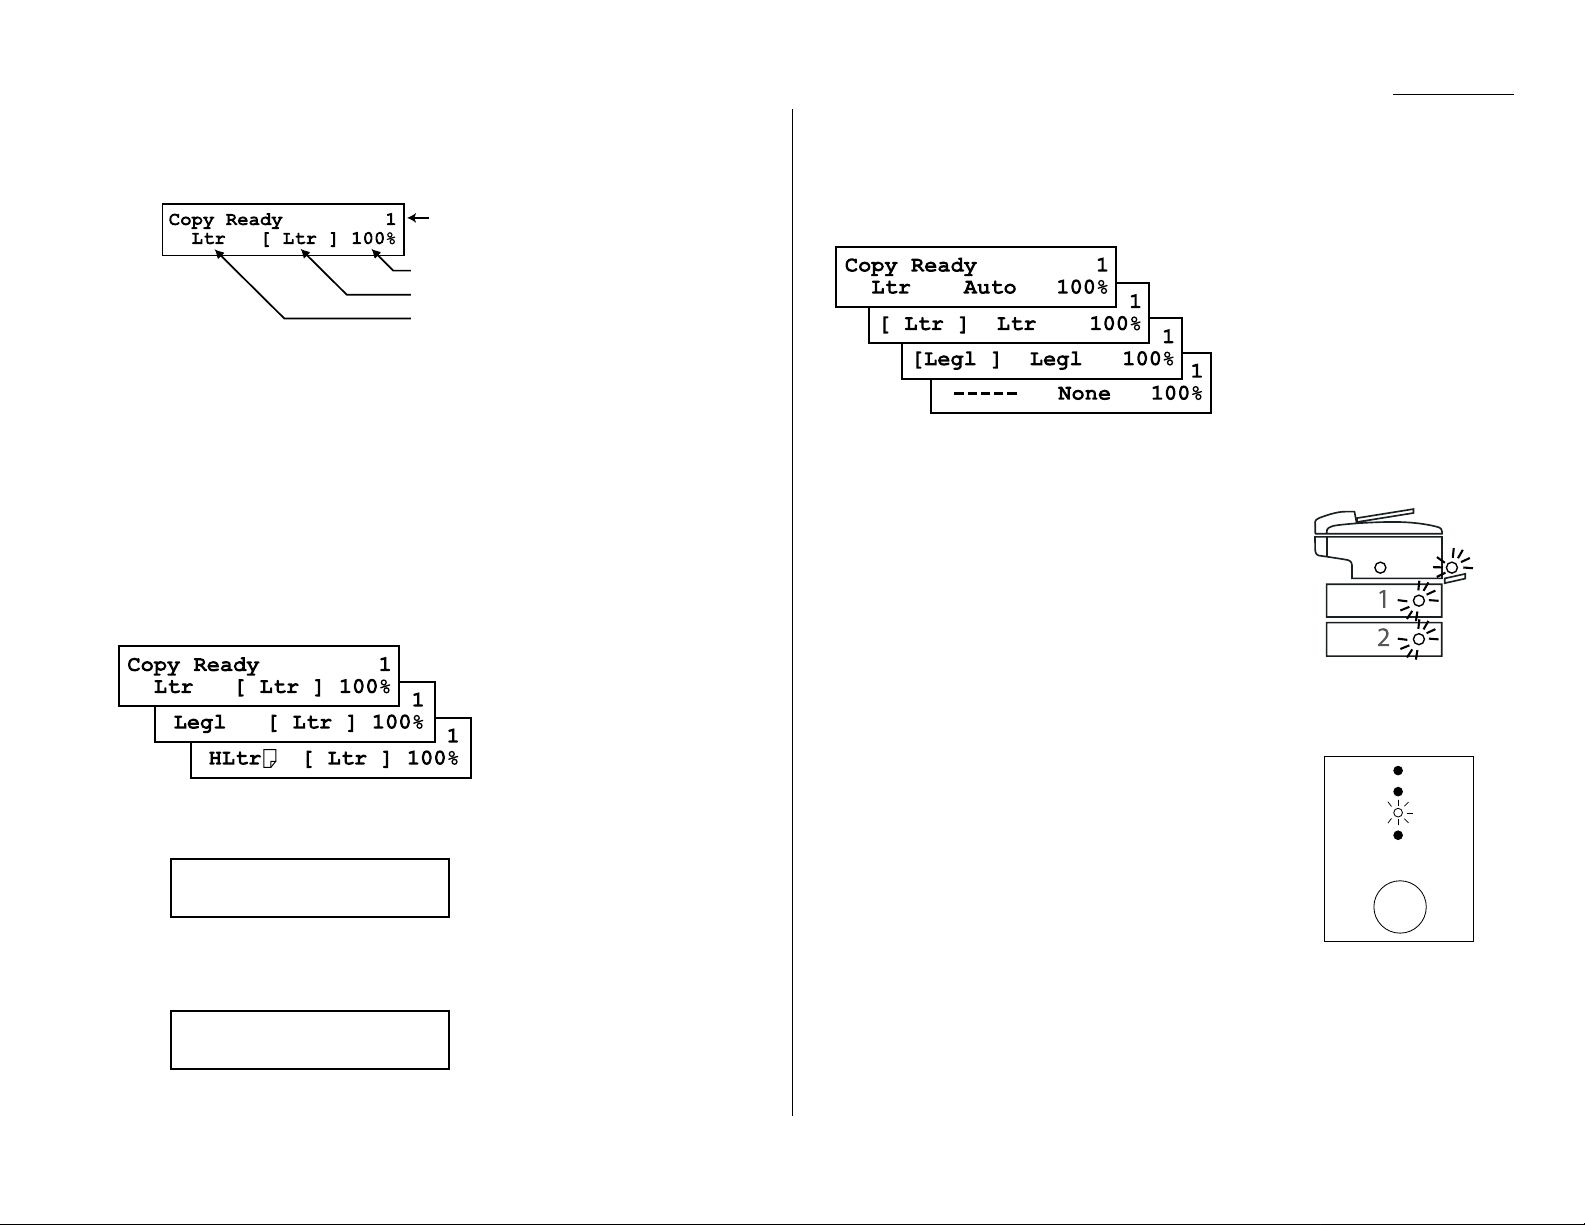
If the paper runs out while fax reception
When your machine runs out of paper, it beeps, the red light
of the printer status lights glows and the
LCD
shows which
source has run out of paper the 1st cassette, 2nd cassette
(optional) or the bypass tray.
In this example, the machine runs out of paper in 1st cassette:
Helpful Tip: If the letter, legal or half-letter sized paper has been set in the bypass
tray, your machine uses it when running out of paper in the paper
cassette(s) during fax reception.Your machines bypass tray can hold
up to 50 sheets of the paper.
Your fax machine cannot print fax messages without paper. But it can still receive
documents into its memory, as described in the section below.
Out-of-paper reception
If your machine runs out of paper, it stores up to 250 fax receptions in its memory.
This is called out-of-paper reception. Once you refill the paper supply ,the fax
machine prints the stored messages automatically.
Note: The number of pages (not receptions) your fax machine can store for
out-of-paper reception will vary. It depends on:
Your machine s memory capacity
Types of documents being sent to your machine
Resolution of documents being sent to your machine
1st Cassette
Please Supply Paper
Fax/Tel Ready
←←/→→
/Enter
Fax Ready
←←/→→
/Enter
Page 3
2.12
Basic operation
Your machines copier features
Your machine has the following copier features:
Single copy (see the right column on this page)
Stacking multiple copies (see page 2.12)
Sorting multiple copies (see page 2.12)
Enlarged or reduced copies (see page 2.13)
Negative/positive copy (Reverse black and white areas) (see page 2.16)
Combine copy (see page 2.17)
Ultra copy mode (see page 2.17)
Basic copy procedure
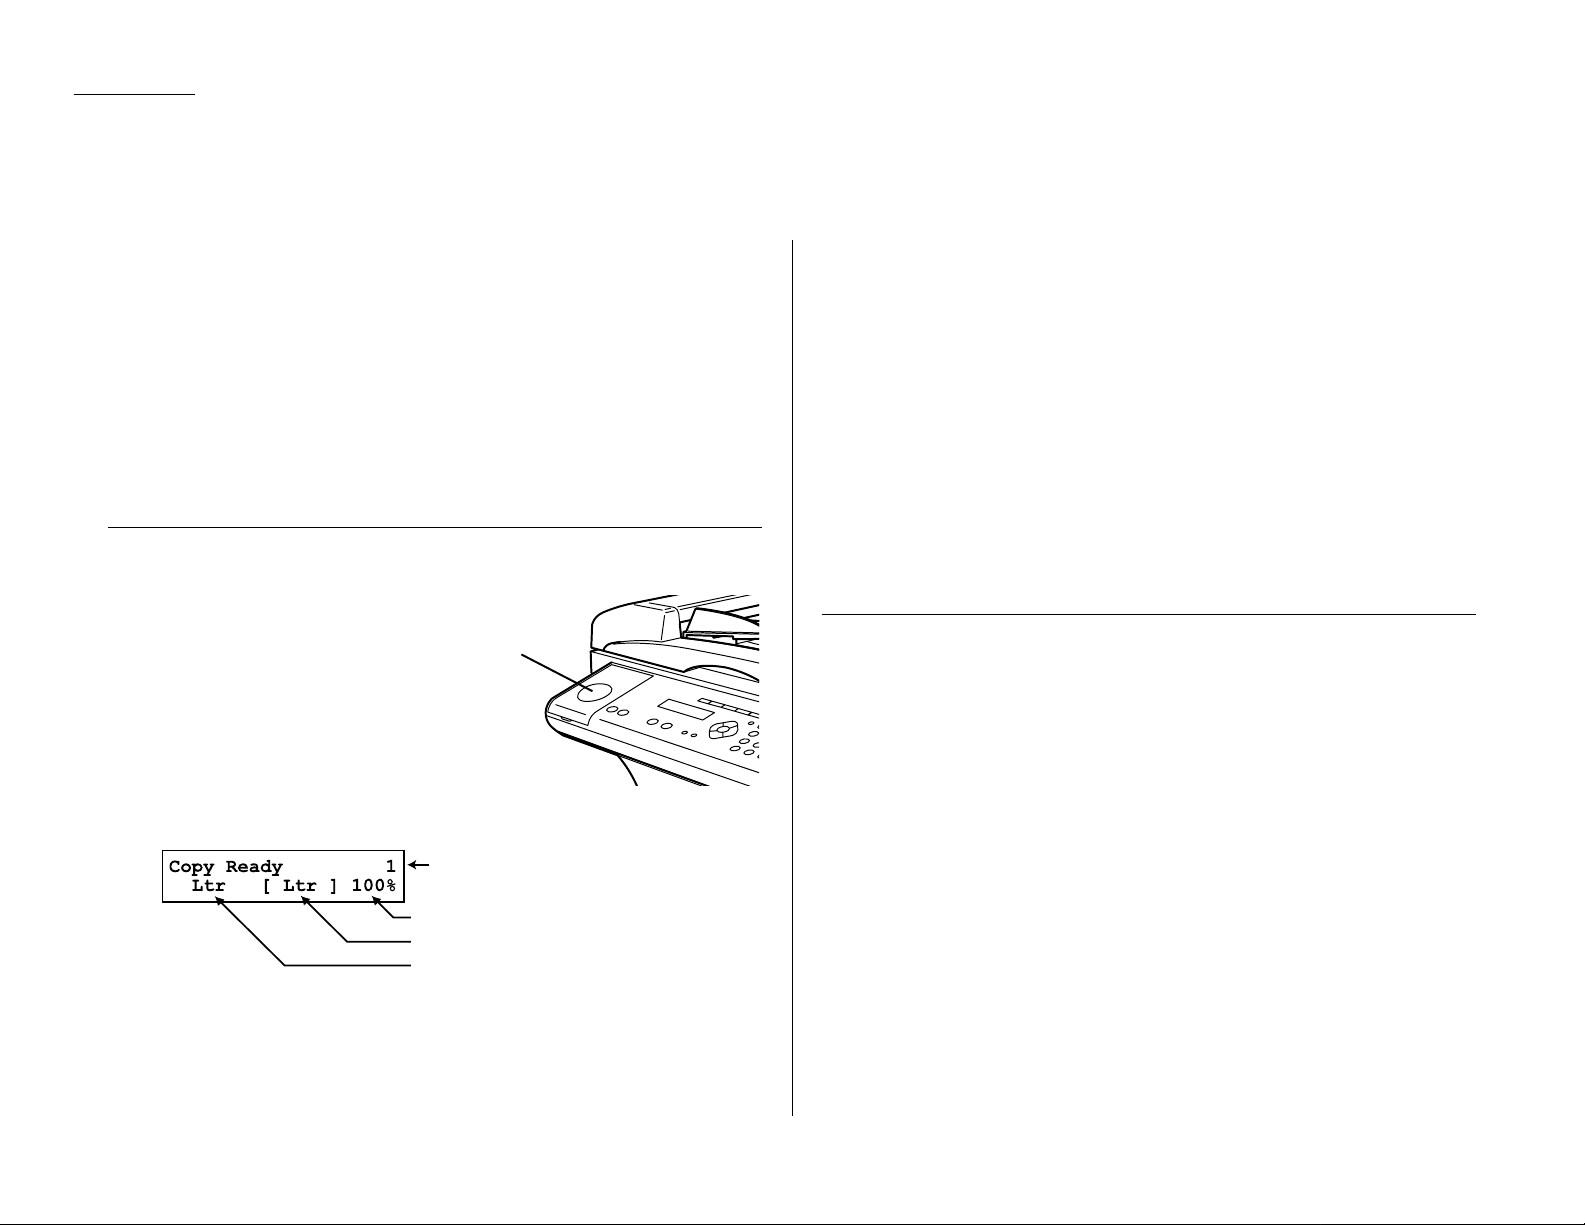
1
Press
COPY/FAX
to change to
Copy mode.
When the machine is in the Copy mode,the
LCD
shows:
Note: For details about each item,see Making copy settings, page 2.15
2
Place your original document in ADF face up,or on the FBS glass face
down just as you would to send a fax.
3
Enter the document size by pressing the
DOCUMENT SIZE
.
4
As needed, set the following:
Select document type and adjust image contrast
Enter the number of copies
Set copy reduction or enlargement ratio
Note: For details about each item,see Making copy settings, page 2.15.
5
Press
START
.
Note: To reset the copy parameter to default setting, press
COPY RESET
.
Note: To stop the copying, press
STOP
.
Single copy
1
Press
COPY/FAX
to change to Copy mode.
2
Place your original document in ADF face up,or on the FBS glass face
down just as you would to send a fax.
3
If you are using FBS glass,enter the document size by pressing the
DOCUMENT SIZE
.
4
As needed, set the following:
Select document type and adjust image contrast
Set copy reduction or enlargement ratio
Note: If you want to enlarge copy, use the
FBS
glass.
5
Press
START
.
Number of copies
Copy reduction or enlargement ratio
Recording paper size
Document size
COPY/FAX key
Making copies
Page 4

2.13
Basic operation
Stacking multiple copies
1
Press
COPY/FAX
to change to Copy mode.
2
Turn the sort setting off.(See page 2.16.)
Note: The default setting of sorting is on.
3
Place your original document in ADF face up,or on the FBS glass face
down just as you would to send a fax.
4
Enter the document size by pressing the
DOCUMENT SIZE
.
5
Using the numeric keypad to enter the number of copies you want (up to 99).
6
As needed, set the following:
Select document type and adjust image contrast
Set copy reduction or enlargement ratio
Note: For details about each items, see Making copy settings, page 2.15.
7
Press
START
.
Note: To stop the copying, press
STOP
.
Sorting multiple copies (using ADF)
Note: You cannot use the FBS glass for sorting multiple copies.
1
Press
COPY
/
FAX
to change to Copy mode.
2
Make sure the sort setting is turned on. (See page 2.16.)
3
Place your original document in ADF face up,just as you would to send a
fax.
4
Enter the document size by pressing the
DOCUMENT SIZE
.
5
Using the numeric keypad to enter the number of copies you want (up to 99).
6
As needed, set the following:
Select document type and adjust image contrast
Set copy reduction ratio
Note: For details about each items, see Making the copy settings, page 2.15.
7
Press
START
.
Note: To stop the copying, press
STOP
.
Enlarged or reduced copies
Your fax machine is capable of enlargement and reduction when copying.
Note: The copy enlargement and reduction rate setting is available only for copy-
ing,not for faxing.
Important: Copy enlargement is available only for copying using the
FBS
; it is not
available for copying using the
ADF
.
1
Press
COPY/FAX
to change to Copy mode.
2
Place your original document in ADF face up,or on the FBS glass face
down just as you would send a fax.
Note: If you want to enlarged copy, use
FBS
glass.
3
Enter the document size by pressing the
DOCUMENT SIZE
.
4
Choose an enlargement or reduction ratio using or of the cursor key.
You can reduce to 78%, 64 % or 50 % of the original size
OR
You can enlarge to 129% or 200 %
OR
Press
ZOOM
to turn the
ZOOM
light on, and adjust the ratio at 1% steps using
or of the cursor key. Y ou can enter the ratio between 50% and 200%.
OR
Directly enter any percentage between 50 % and 200 % by following procedure.
1. Press #.
2. Using the numeric key to enter your desired ratio (50 to 200).
3. Press # again.
129%: Half-letter (5.5″ 8.5″)→ Letter (8.5″ 11″)
78%: Legal (8.5″ 14″)→ Letter (8.5″ 11″)
Helpful Tip: You can set the copy reduction or enlargement ratio to Auto .
(See Setting copy auto, page 4.7.) If the Auto is set and you
set the document size by pressing
DOCUMENT SIZE
, the machine
automatically reduce or enlarge the original size (you entered)
to fit on the paper size you selected.
5
As needed, set the following:
Select document type and adjust image contrast
Enter the number of copies
6
Press
START
.
Note: To reset the copy parameter to default setting, press
COPY RESET
.
Note: To stop the copying, press
STOP
.
Page 5
2.14
Basic operation
Using the bypass tray
When you need to use a size of paper not currently loaded in your machine s paper
cassette(s), or when you want to use a special type of paper (such as transparency
film), use the bypass tray.
Important: If loading transparency (OHP) film into the bypass tray,be sure that
the sheet is designed for laser printers and not for copiers.Also, be
sure that the film does not have a paper backing and/or a leading
strip. If it does,remove the paper backing and/or strip before inserting.Only film should go in, not film with any backing or strip.
1
Either insert the document in the
ADF
or place it on the
FBS
glass.
2
Set the paper in the bypass tray.
See the table of Acceptable paper size and cassette capacity on page 1.8 and
Loading paper in bypass tray on page 1.10 for more information.
Note: Place the original document in the same orientation as the paper in
the paper source (which you ll select in step 5, below).
3
Press
PAPER SIZE
to select the bypass tray until the
light of the bypass tray of the printer status lights on
the control panel glows.
4
If necessary, select desired resolution, contrast,
reduction/enlargement ratio.
5
Press
START
to begin the copying process.
Memory overflow message
If you ve stored too much information in your machine s memory, a Memory
Overflow message may appear on the
LCD
:
This appears because (1) too many pages have been stored in the memory, or (2)
the pages that are stored have too much information on them for your fax machine
to remember.
If this message appears,press
START
to tell your machine to copy as many pages in
memory, or press
CANCEL
to delete from memory all pages stored during the current
operation (but not previous operations).
Note: If you don t operate your machine within 60 seconds, the machine will auto-
matically print the document stored in the memory during the current
operation.
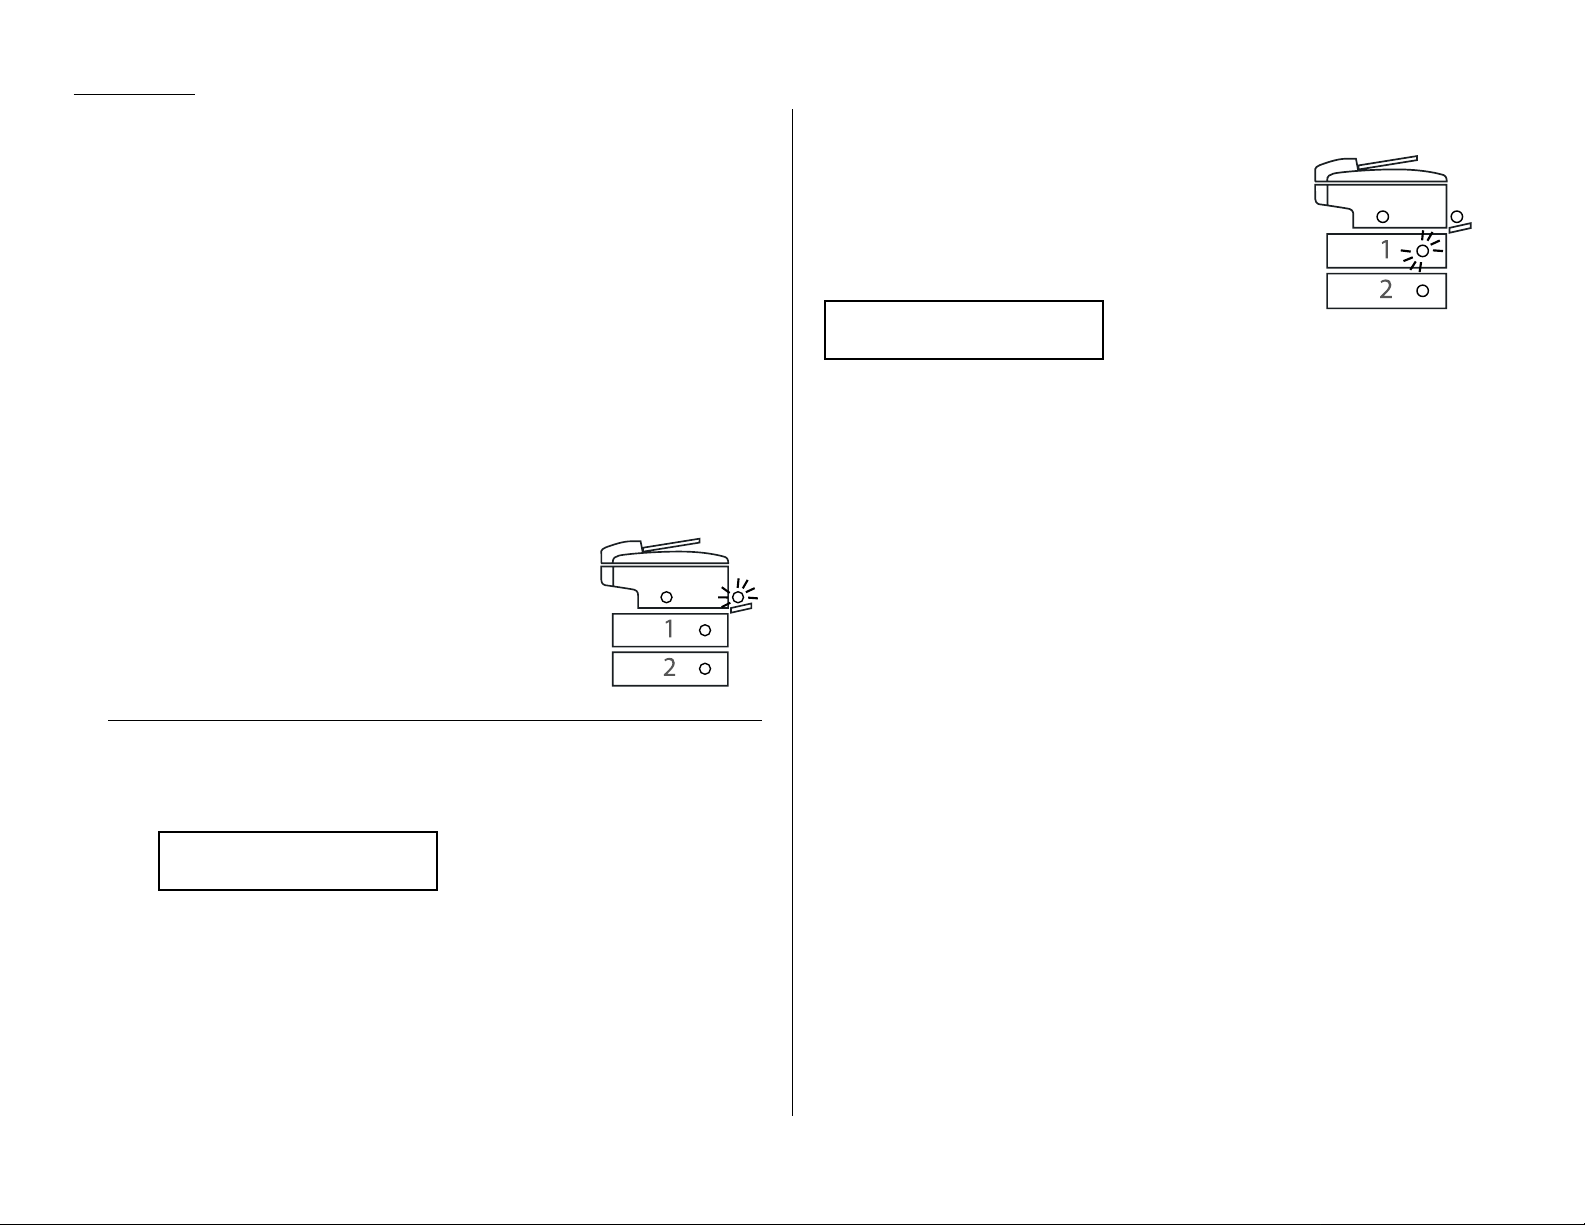
If the paper runs out while copying
When your machine runs out of paper, it beeps, the red light
of the printer status lights glows and the
LCD
shows which
source has run out of paper the 1st cassette, 2nd cassette
(optional) or the bypass tray.
In this example, the machine runs out of the paper in the 1st
cassette:
If you want to cancel the current copying job,press
STOP
. Otherwise, supply the
paper to displayed paper source to resume the copying.
1st Cassette
Please Supply Paper
Memory Overflow
Start Or Cancel
Page 6
2.15
Basic operation
Making copy settings
When the machine is in the Copy mode,the
LCD
shows:
Number of pages
Use the numeric keypad to enter the desired number of copies for the document.
Copy reduction or enlargement rate
Your fax machine can make enlarged and reduced copies. For more information,see
Enlarged or reduced copies, page 2.13.
Document size
To select the document size manually,press
DOCUMENT SIZE
repeatedly until your
desired document size appears.Y ou can c hoose the Letter,Legal or Half letter:
Note: When the document size is set to Auto (see Setting copy auto, page 4.7)
you may see the
LCD
as below:
[ ] means the machine automatically select the document size.
Note: According to the magnification ratio or recording paper size, the document
size will be not displayed:
Recording paper size
As default, your machine selects the paper source automatically, however if you
wish to select the paper source manually, press
PAPER SIZE
repeatedly until your
desired paper size is displayed.The
LCD
toggles the paper size in the 1st cassette,
2nd cassette (if installed), the bypass tray and Auto select mode.
Note: If the bypass tray has no paper, the
LCD
shows None for the paper size of
the bypass tray.
Note: When you choose the auto paper select mode,the
LCD
shows Auto and the all LED of the paper source will
be lit.
However, if the bypass tray has no paper and the
optional 2nd paper cassette has not been installed,
the machine will show the [(paper size)] instead
of Auto although you select auto paper select mode.
And it lights the LED of the paper source that can be
used only.
Select Document type
PHOTO
Select this mode when copying photographs or
drawings.
PHOTO/TEXT
Select this mode when copying documents
containing photographs or drawings with letters.
TEXT
Select this mode when copying letters.
To select the document type, press
DOCUMENT
repeatedly.
A glowing
LED
indicates the machine is using the setting named by that
LED
.
PHOTO
DOCUMENT
PHOTO
/TEXT
TEXT
RESOLUTION
Copy Ready 1
----- Ltr 50%
Copy Ready 1
[ Ltr ] Ltr 100%
Number of copies
Copy reduction or enlargement ratio
Recording paper size
Document size
Page 7
2.16
Basic operation
Adjust image contrast
Setting the contrast allows you to compensate for any excessive light or darkness,of
the document pages you are copying.
To change the contrast setting, press
CONTRAST
repeatedly.
A glowing
LED
indicates the machine is using the setting named
by that
LED
.
Note: To avoid confusing the Light and Dark settings, just
remember Light lightens and Dark darkens t o
keep it straight.
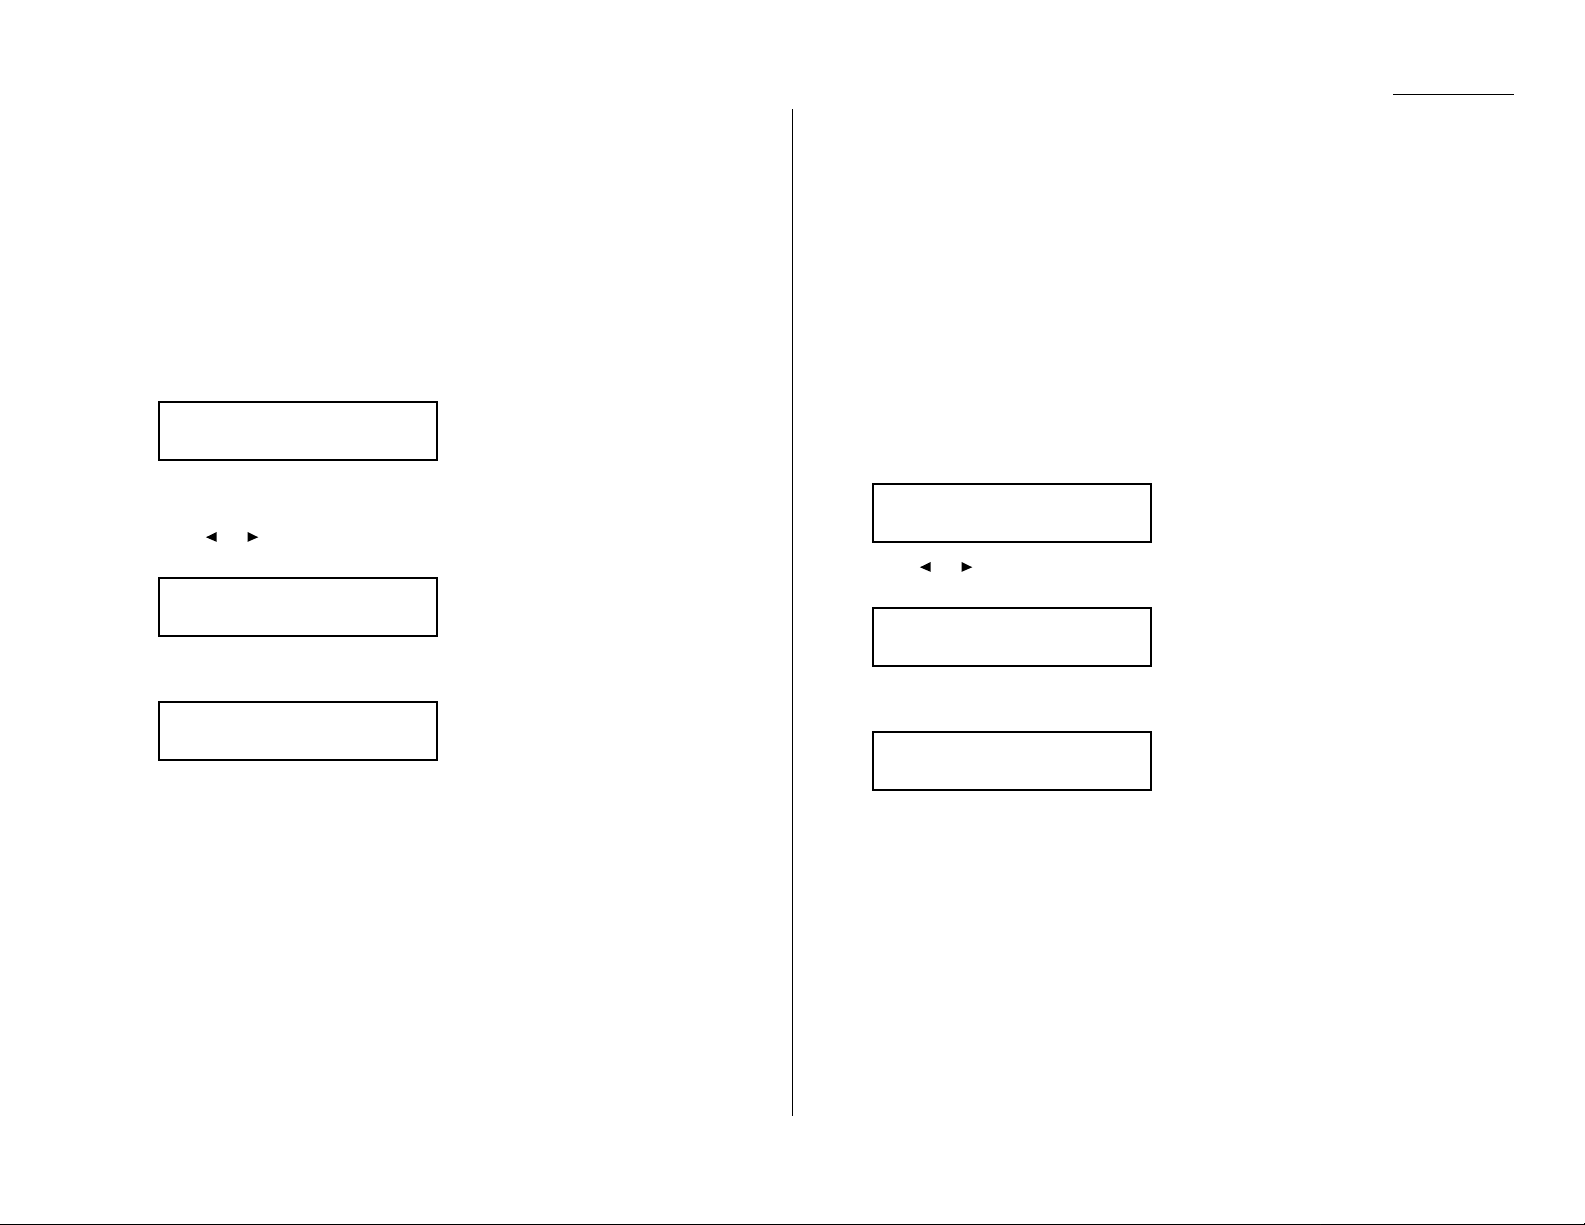
Sort copy setting
Default setting: On
Helpful tip: If you frequently turn this feature off and on, you can set a Soft key
(see page 3.17) to turn on or off by simply pressing that key.
1
Press Program key,B,3,0,6.
2
Press
ENTER
.
The
LCD
shows the current setting:
3
Press or until the setting you want appears.
In this example, we ve chosen Off.
4
Press
ENTER
to save the setting.
Special copy function
Negative/Positive (reversing black and white areas)
If using this feature, the black and white areas of the original are reversed.
Note: You cannot combine this feature with Reduced or Enlarged copies.
Helpful tip: If you programmed a Soft key to turn on or off this feature, simply
pressing that key will turn on or off this feature.
1
Make sure the machine is in the Copy mode.
2
Place your original document in ADF face up,or on the FBS glass face down.
3
Enter the document size by pressing the
DOCUMENT SIZE
.
4
Press
ADVANCED FUNCTIONS
,
ENTER
. The
LCD
shows the current setting:
Note: This feature is Off for default setting. However,you can turn on it for
the default. (See page 4.7.)
5
Press or until the setting you want appears.
In this example, we ve chosen On.
6
Press
ENTER
to save the setting.The machine returns to the standby mode
with following display:
7
As needed, set the following:
Select document type and adjust image contrast
Enter the number of copies
8
Press
START
.
Note: To reset the copy parameter to default setting, press
COPY RESET
.
Note: To stop the copying, press
STOP
.
Copy <Nega/Posi> 1
Ltr [ Ltr ] 100%
Nega/Posi :On
←←/→→
/Enter
Nega/Posi :Off
←←/→→
/Enter
Sort Copy :Off
←←/→→
/Enter
Sort Copy :On
←←/→→
/Enter
CONTRAST
NORMAL
LIGHT
DARK
Page 8
2.17
Basic operation
Combine
Note: This feature is available only for MFX-1600 model.
This feature allows you to copying from four one-sided originals to one sheet of
paper.
1
Make sure the machine is in the Copy mode.
2
Place your original document in ADF face up,or on the FBS glass face down.
3
Enter the document size by pressing the
DOCUMENT SIZE
.
4
Press
ADVANCED FUNCTIONS
twice,
ENTER
. The
LCD
shows the current setting:
Note: This feature is Off for default setting. However,you can turn on it for
the default. (See page 4.7.)
5
Press or until the setting you want appears.
In this example, we ve chosen On.
6
Press
ENTER
to save the setting.The machine return to the standby mode
with following display:
7
As needed, set the following:
Select document type and adjust image contrast
Enter the number of copies
Set copy reduction or enlargement ratio
8
Press
START
.
Note: To reset the copy parameter to default setting, press
COPY RESET
.
Note: To stop the copying, press
STOP
.
Ultra copy mode
Note: This feature is available only for MFX-1600 model.
Note: The enlargement/Reduction copy is not available with this mode.
Note: This mode needs more memory than normal mode. So when you try to make
many copies at a time, the memory overflow may occur.
This feature allows you to copying with more high quality resolution.
1
Make sure the machine is in the Copy mode.
2
Place your original document in ADF face up,or on the FBS glass face down.
3
Enter the document size by pressing
DOCUMENT SIZE
.
4
Press
ADVANCED FUNCTIONS
three times,
ENTER
. The
LCD
shows the current
setting:
5
Press or until the setting you want appears.
In this example, we ve chosen On.
6
Press
ENTER
to save the setting.The machine return to the standby mode
with following display:
7
As needed, set the following:
Select document type and adjust image contrast
Enter the number of copies
8
Press
START
.
Note: To reset the copy parameter to default setting, press
COPY RESET
.
Note: To stop the copying, press
STOP
.
Copy <Ultra Copy> 1
Ltr [ Ltr ] 100%
Ultra Copy :On
←←/→→
/Enter
Ultra Copy :Off
←←/→→
/Enter
Copy <Combine> 1
Ltr [ Ltr ] 100%
Combine :On
←←/→→
/Enter
Combine :Off
←←/→→
/Enter
Page 9

2.18
Basic operation
Copy protection
With such a versatile copier built right into your fax machine,you might want to
make sure it doesn t become too tempting to unauthorized copying that could
deplete your machine s supplies more rapidly. So, to limit the use of your fax
machine to only sending and receiving faxes in other words,to activate copy pro-
tection:
1
Press Program key,B,3,0,5,
ENTER
.
2
Press or until the setting you want appears.
In this example, we ve chosen On.
3
Press
ENTER
to save the setting.
Whenever someone tries to change the machine to Copy mode,the machine will
sound a brief alarm tone and display:
To turn copy protection to use the machines copying function, repeat steps 1-3, in
step 2, you press so that the display shows:
Copy Protect :Off
←←/→→
/Enter
Fax Ready
Copy Off
Copy Protect
** Complete **
Copy Protect :On
←←/→→
/Enter
Copy Protect :Off
←←/→→
/Enter
Page 10

2.19
Basic operation
Your fax machine can also be used as a phone, if you have an optional handset
installed.The following is a brief look at the machine s telephone features.
Dialing a telephone number
1
Pick up the optional handset.You will hear a dial tone .
2
Dial the number by the using numeric keypad.
or
Press the one-touch key. (See One-touch phone dialing, on page 3.4.)
or
Press
SPEED DIAL/TEL INDEX
once, then press the three digit speed-dial num-
ber. (See Phoning via speed-dial, on page 3.7.)
or
Press
TEL INDEX/TEL INDEX
twice, then search the name you want to call using
the cursor key. (See Easy dial directory dialing, page 3.9.)
3
When the other person answers,begin speaking.
On-hook dialing
Because your machine has a monitor speaker, you can dial without picking up the
optional handset. For hands-free dialing:
1
Press
MONITOR/CALL
. You ll hear a dial tone (unless you have set your speaker
volume to Off; see page 1.8), and the
LCD
shows:
2
Dial the number you want. Use either the numeric keypad, a one-touch key, a
speed-dial number or telephone index to dial.
Important: Your machines monitor speaker is not a speaker phone. If a person
answers the call, pick up the handset to speak.
Note: If the call fails,press
MONITOR/CALL
to hang up.
Redial
1
Lift the optional handset to get a dial tone.
2
Press
REDIAL/PA USE
.The
LCD
will show:
3
Your machine can remember the latest 10 dial numbers. Press or until
the dial number you want to redial appears.
4
Press
START
.
When the other person answers,use the optional handset to speak to that
person.
Call request
You can send or receive a fax message and have a regular phone conversation on the
same call.
For more information on how to use this function,see page 3.25.
Changing the dialing type
If,with your machine set for pulse dialing, you must enter tones (
DTMF
) during a
call, press
DIALING OPTIONS
once (the ! symbol will be shown on the
LCD
).Your
machine now will tone dial all subsequent numbers.
Note: Using this key enables tone transmission from the numeric keypad after the
call is connected.When you hang up the call, your machine will return to
pulse dialing for the next call.
Dialing in the event of a power failure
Your fax machine can only receive telephone calls even in the event of a power failure, if an optional handset is attached. But it cannot send or receive a fax document.
V iew Redial History
0:1234567890
** Tel Mode **
_
Using your fax machine as a phone
Page 11
2.20
Basic operation
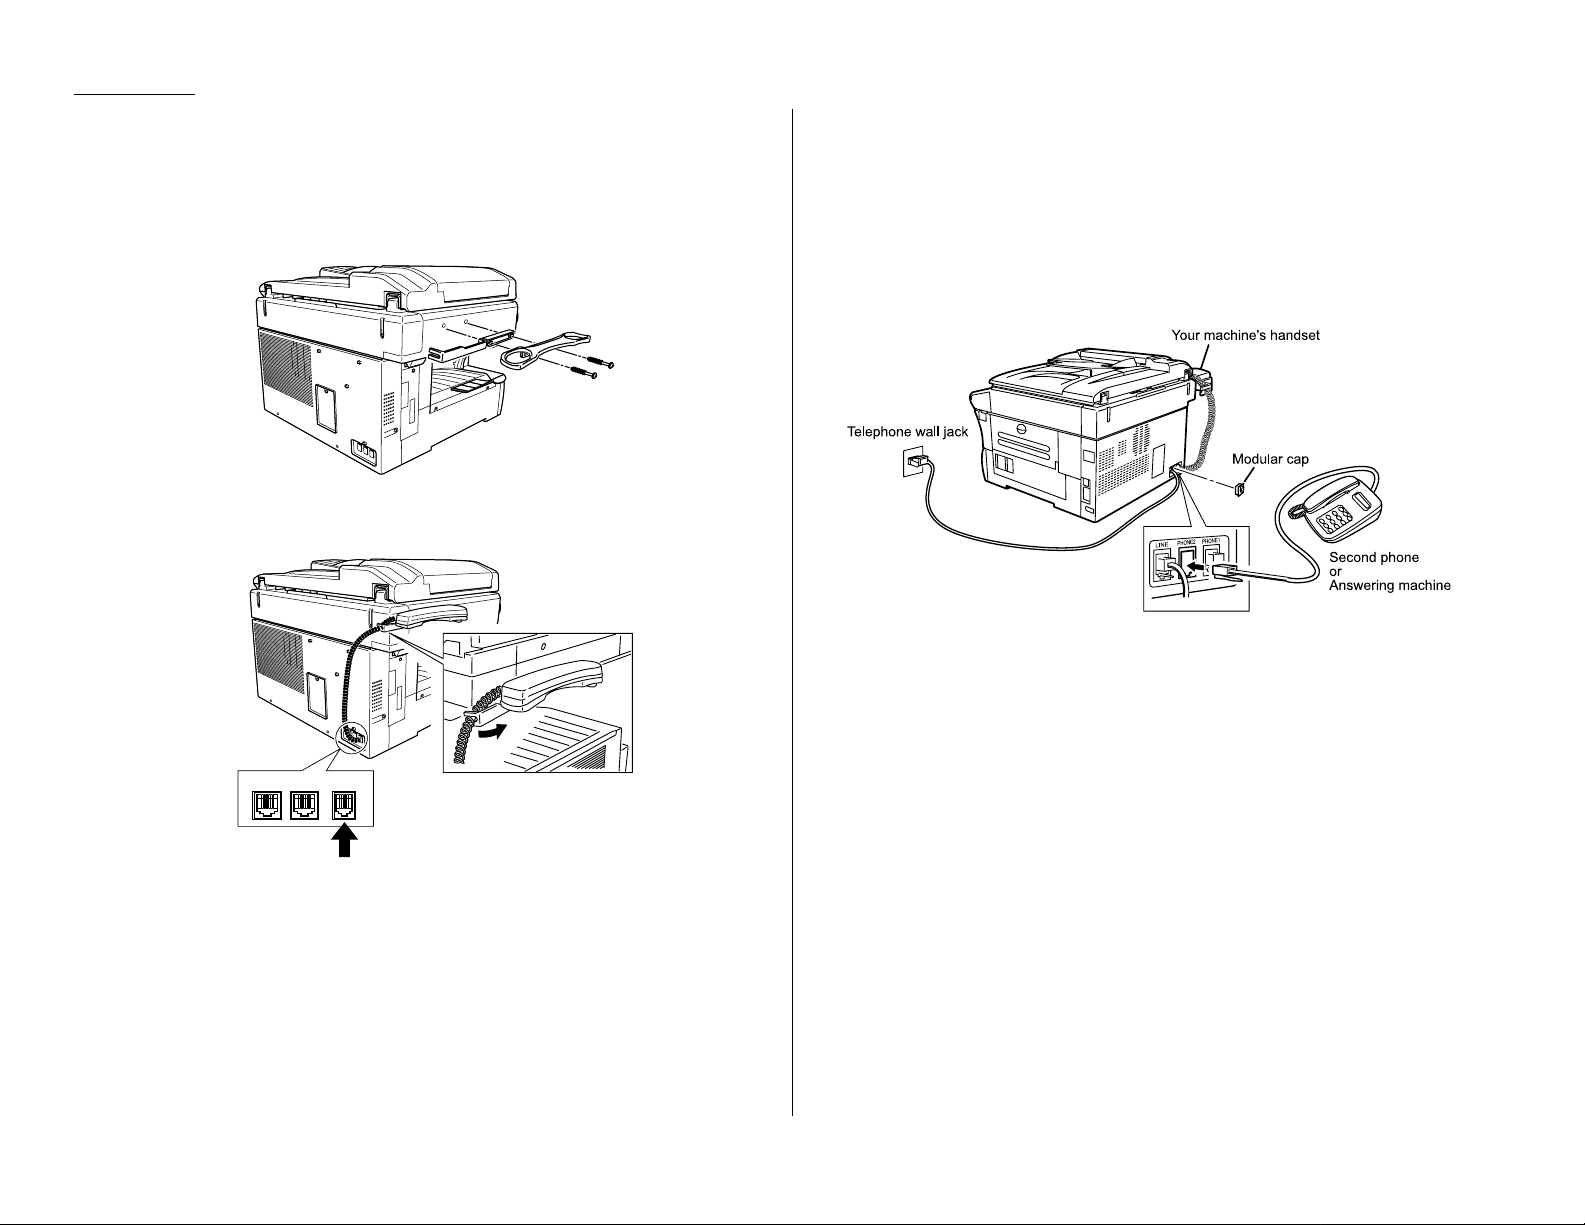
Attaching an optional handset
You may purchase an optional handset for your fax machine. Here is how to attach
the handset.
1
Using a Phillips-head screwdriver, attach the handset cradle to the left
side of your machine,using the screws included with the cradle.
2
Plug one end of the handset cord (it s curled) into the
PHONE
1 jack on the rear
side of your machine.
3
Plug the other end of the handset cord into the jack on the handset. If connected to a phone line, your fax machine is now off-hook.
Note: The handset has a small flash button which you can press while
holding the handset, putting the fax machine back on-hook until you
can hang up the handset properly in step 4.
4
Place the telephone handset onto the handset cradle.The cradle will press the
handset s flash button, hanging up the handset.
Attaching a second phone
Want to attach a second phone (even a cordless model!) to your fax machine, so they
can share the same phone jack? No problem.
Before we go further, let s explain the idea.Youre plugging the second phone s
phone line into your machine s
PHONE
2 jack, not the wall phone jack. In such a
setup, only your machine connects to the wall.The second phone receives phone signals through your machine.
Now,let s proceed
1
If your second phone is already plugged into a wall phone jack,disconnect it
from that jack. Hold onto the phone plug; you ll need it in step 2.
Note: Of course, if your second phone is a model which requires AC power,
as is true for the base of a cordless phone, don t unplug it from its AC
power jack!
2
Using the plug mentioned in step 1, plug the phone cable from your second
phone into the
PHONE
2 jack on the left side of your fax machine.
LINE
PHONE1PHONE2
Page 12

2.21
Basic operation
This page intentionally blank.
Page 13

This chapter describes
convenient features of your
machine.
Autodialer . . . . . . . . . . . . . . . . . . . . . . . . . . . . . . . . . . . . . . . . . . . . . . . . . . . . . . . . . . 3.1
Broadcasting . . . . . . . . . . . . . . . . . . . . . . . . . . . . . . . . . . . . . . . . . . . . . . . . . . . . . . . 3.10
Delayed transmission . . . . . . . . . . . . . . . . . . . . . . . . . . . . . . . . . . . . . . . . . . . . . . . . 3.11
Batch transmission . . . . . . . . . . . . . . . . . . . . . . . . . . . . . . . . . . . . . . . . . . . . . . . . . . 3.12
Polling . . . . . . . . . . . . . . . . . . . . . . . . . . . . . . . . . . . . . . . . . . . . . . . . . . . . . . . . . . . . 3.15
Special features . . . . . . . . . . . . . . . . . . . . . . . . . . . . . . . . . . . . . . . . . . . . . . . . . . . . 3.17
Security features . . . . . . . . . . . . . . . . . . . . . . . . . . . . . . . . . . . . . . . . . . . . . . . . . . . 3.50
Advanced Features
Page 14

Your fax machine s autodialer stores your most frequently called phone and fax
numbers for instant recall so you don t have to remember them. Its something like
an electronic phone book.
Autodialer basics
How do you autodial?
There are two kinds of autodialer numbers.The difference between the two is how
you dial them:
Type
How to dial Amount stored
One-touch Press one of the keys,marked 01 55 55
on the left side of the control panel
Speed-dial Press
SPEED DIAL/TEL INDEX
followed by a 145
three-digit identifier, from 001 to 145
Total amount of numbers stored 200
Location
ID
s and the EasyDial directory
When you store numbers in your autodialer, you can give these numbers descriptive
names,such as Chicago office or Billing department .Your machine calls this
name a Location ID.
Your machine s autodialer sorts these location IDs alphabetically. Using your
EasyDial directory, you can look up these numbers by their descriptive names, just
as if you were using a phone book.
Well explain how to store the numbers and location
ID
s in the next few pages.
The EasyDial directory is discussed in detail on page 3.9.
Special Dialing Characters
Your fax machine allows you to enter special dialing characters when programming
the autodialer. These characters include hyphens,which make phone numbers easier to read, and special characters needed for international calls.
The chart below briefly describes each of these characters.It also tells you what
keys to press on your fax machine to store those characters in your autodialer:
Char. What it does Keystroke(s)
–
Makes long numbers easier to read.
DIALING OPTIONS
(once)
Doesn t change fax machine operation.
/
(Has no effect in the United States.)
DIALING OPTIONS
(twice)
!
Tells your fax machine to pause until it
DIALING OPTIONS
(3 times)
hears a dial tone.
Enters a pause. Each pause lasts two
seconds (or whatever length you set; see
REDIAL
/
PA USE
[after you enter
–/
page 4.5). Each pause uses two of the
at least one other character]
characters you can store in one phone
number.
If your fax machine is on a pulse (not
tone-dialing) line, switches from pulsedialing to tone (
DTMF
)-dialing.Use after
DIALING OPTIONS
(4 times)
–!
the actual phone number but before any
characters (such as a long-distance
carrier s access code) which must be in
DTMF
tone. Do not use on a tone line.
Advanced features
3.1
Autodialer
Page 15

Call groups
As you set up your autodialer, you may also want to set up call groups.These are sets
of phone numbers that make it easy to send the same fax to many different locations. For example,one call group may include all of your clients in one city, another
group may include all of your employees and another may include all your vendors.
Your fax machine can store as many as 200 numbers in up to 32 call groups.
See also Call group dialing, page 3.8.
Using one-touch keys
Your fax machine stores up to 55 one-touch numbers using the keys marked 01 55.
Entering or changing a one-touch number
1
Press Program key,A,1,0,1,
ENTER
. The
LCD
shows the empty one-touch
number.
Note: If a one-touch number other than 01 appears on the
LCD
, it means
that you have already entered a number for 01.
2
Press the one-touch key in which you want to store a number or change a
previously stored number. Here, we ve selected 02 and the
LCD
shows either:
or
Note: If you want to select a different one-touch key,press that key now.
3
Press
ENTER
. Depending on whether you already have a number entered for
this one-touch number, the
LCD
now shows either:
or
4
Use the numeric keypad to enter the number exactly as your machine should
dial it, including whatever access codes your phone system requires. (You may
want to review Special dialing characters, page 3.1.) The number can be up
to 40 characters in length:
Your
LCD
can show only 20 characters at a time.To view characters beyond
those 20, press to scroll to the left or to scroll to the right.
5
When the number is as you want it, press
ENTER
to store it.
6
The
LCD
now shows either:
or
You now have the option to enter (or change) an alternative number.Your fax
machine will dial this alternative number during a transmission after all
redial attempts to the regular number fail. If the alternative number also
fails,the fax alarm beeps to alert you to a problem.
Note: You can enter one alternative number for one speed-dial or one-touch
number you entered.Your fax holds a maximum of 10 alternative
numbers in all, that is, only 10 speed-dials or one-touch numbers can
have the alternative number. After you have entered the alternative
numbers for 10 speed-dials or one-touch numbers,your machine will
no longer show this display.
If you want to enter (or change) an alternative number, enter it now.
The number can be up to 40 characters long.
If you do not want to enter or change an alternative number ,go on to step 7.
7
Press
ENTER
.
8
The
LCD
now shows:
or
The machine is n ow pro mptin g you fo r a name a Locati o n ID so you ll be
able to find it in the EasyDial directory (see page 3.9).
If you do want to enter or change this Location ID, go on to step 9.
If you do not want to enter or change this Location
ID
, skip to step 10.
9
Enter the Location
ID
by using the one-touch keys.(If necessary,review
Entering characters , page 1.12.) A numbers Location
ID
may be up to 24
characters in length.
10
Press
ENTER
to save the setting and continue.
11
The
LCD
now displays:
or
You may now assign this number to up to 32 call groups. (If necessary, review
Call groups, left column.)
02:Group No.
2,6_
02:Group No.
_
02:Name ;Lower
S. W.Region Office_
02:Name ;Upper
_
02:Alt. No.
9-1-555-987-6553_
02:Alt. No.
_
02:Fax Number
9-/1-5559292039_
02:Fax Number
9-1-555-987-6543_
02:Fax Number
_
Select One-Touch
02:9-1-555-987-6543
Select One-Touch
02:No Number Stored
Select One-Touch
01:No Number Stored
Advanced features
3.2
Page 16

Advanced features
If you do want to enter or change the call group number ,go on to step 12.
If you do not want to enter or change this number s call group, go to step 13.
12
Use the numeric keypad to enter the call groups for this number. There are 32
possible call groups,numbered 1 32.
Here, we ve entered 3 to assign this one-touch number to Call Group 3:
If you want to assign the number to more than one call group,insert a
comma after each number (except the last one) by pressing
GROUP
.
For example, if you enter 3,
GROUP
,1,6,
GROUP
,2,7to assign this one-touch
number to Call Groups 3, 16 and 27, the
LCD
shows:
Helpful tip: To assign this number to all 32 call groups,enter 0 (zero).
13
Press
ENTER
.
The
LCD
will display the next empty one-touch number.
If you want to enter this one-touch number, go back to step 3.
If you do not want to enter any more one-touch numbers, press
STOP
to finish.
If you do not want to enter the currently displayed one-touch number but do
want to enter another one-touch number ,go back to step 2.
Use the autodialer labels in your fax s packaging to write down the stored numbers
for easy reference.
Erasing a one-touch number
1
Press Program key,
A
,1,0,2,
ENTER
. The
LCD
shows the one-touch number
you have already entered:
Note: If the one-touch number that appears is other than 01, it means that
01 is empty .
2
Press the key for the one-touch number you want to erase.
Here, we ve selected 02:
3
If you want to erase a number stored in a different one-touch key than what
appears on the
LCD
, press that key now.
4
Press
ENTER
. The
LCD
shows:
Important: If you want to quit without erasing the one-touch number
you ve selected, press
CANCEL
. The fax will return to step 2.
5
Press
ENTER
to erase the number.
To erase another one-touch number,repeat steps 2 5. Or press
STOP
to return to
standby mode.
Printing a list of one-touch numbers
Forgot which number is stored in whic h one-touc h key? Just print a list of your onetouch numbers. The list includes each keys number,the Location ID(if any),
fax/telephone number and group number(s) you ve stored in the key.
To print a list of one-touch numbers, press Program key,E,1,0,6,
ENTER
.
Erase One-Touch
** Complete **
02:Erase One-Touch
Check Enter/Cancel
Select One-Touch
02:9-1-555-987-6543
Select One-Touch
01:9-1-555-345-6789
02:Group No.
3,16,27_
02:Group No.
3_
3.3
Page 17

Advanced features
One-touch fax dialing
To dial a fax call using a one-touch number:
1
Place the the document in the
ADF
, or on the
FBS
glass.
2
If you are using the
FBS
glass,enter the document size by pressing the
DOCUMENT SIZE
.
3
Adjust resolution and contrast if necessary.
4
Press the one-touch key in which you ve stored the number.
What happens next depends on whether you specified memory transmission or
real time transmission:
If you specified Quick Memory transmission:
Your fax machine scans the first page of your document into memory, then dials
the other fax machine.
While dialing,your machine scans the other documents into memory.
The
LCD
shows the Location
ID
and the document s width and resolution settings:
Note: If the entry doesn t have a Location
ID
, the number appears.
When the other machine answers,your fax transmits the scanned document
directly from memory. (To review Quick memory transmission,see page 2.3.)
If you specified normal memory transmission:
Your fax machine scans your entire document into memory first, then dials the
other fax machine.
The
LCD
shows the Location IDand the document s width and resolution settings:
Note:If the entry doesn t have a Location ID, the number appears.
When the other machine answers,your fax transmits the document directly from
memory. (To review Memory transmission,see page 2.3.)
If you specified real time transmission:
Your fax machine dials the other fax machine.
The
LCD
shows the Location IDand the document s width and resolution settings:
Note: If the entry doesn t have a Location ID, the number appears.
When the other machine answers,your fax feeds the document through its scan-
ner, transmitting as it goes. (To review Real time transmission, see page 2.3.)
One-touch phone dialing
To dial a phone call using a one-touch number, you must have an optional handset
attached to your machine.(Contact your authorized Muratec dealer to order an
optional handset.)
To make the call:
1
Obtain a dial tone by doing one of the following:
Lift the handset
Press
MONITOR
/
CALL
to use the monitor speaker
2
Press the one-touch key in which you ve stored the number. As the machine
dials,it shows the number on the
LCD
:
Note: Remember that your fax machine s monitor speaker is not a speakerphone.
If you dialed by using the monitor speaker, pick up the handset to speak to
the person that answers.
Note: If the call fails,and you used
MONITOR/CALL
to dial, press
MONITOR/CALL
to
hang up.
** Tel Mode **
9-555-2842_
Plano Office
A4 Normal
Plano Office
A4 Normal
Plano Office
A4 Normal
3.4
Page 18

Advanced features
Using speed-dial numbers
Your fax machine will store up to 145 speed-dial numbers, designated by three-digit
identifier codes from 001 through 145.
Entering or changing a speed-dial number
1
Press Program key,A,2,0,1,
ENTER
. The
LCD
shows an empty speed-dial
number:
Note: If a speed-dial number other than 001 appears on the
LCD
, it means
you have already entered a number for 001.
2
Use the numeric keypad to enter the desired speed-dial number s three-digit
identifier code. Here, we ve entered 005 and the
LCD
shows either:
or
Important: When entering the identifier code for speed-dial numbers less
than 100, you must enter leading zeros to make three digits.
For example ,001-099.
3
If you want to select a different speed-dial number, press that number s threedigit identifier code now.That number appears on the
LCD
.
4
Press
ENTER
. Depending on whether you already have a number entered for
this speed-dial number, the
LCD
now shows either:
or
5
Use the numeric keypad to enter the number exactly as your machine should
dial it, including whatever access codes your phone system requires. (You may
want to review Special dialing characters, page 3.1.)
The number can be up to 40 characters in length:
Your display can show only 20 characters at a time.To view characters beyond
those 20, press to scroll to the left or to scroll to the right.
6
When the number appears as you want it, press
ENTER
to store it.
7
The
LCD
now displays either:
or
You now have the option to enter (or change) an alternative number.Your fax
machine will dial this alternative number during a transmission after all
redial attempts to the regular number fail. If the alternative number also
fails,the fax alarm beeps to alert you to a problem.
Note: You can enter one alternative number for one speed-dial or one-touch
number you entered.Your fax holds a maximum of 10 alternative
numbers in all, that is, only 10 speed-dials or one-touch numbers can
have the alternative number. After you have entered the alternative
numbers for 10 speed-dials or one-touch numbers,your machine will
no longer show this display.
If you do want to enter (or change) an alternative number ,enter it now.
This number can be up to 40 characters long.
If you do not want to enter or change an alternative number ,go on to step 8.
8
Press
ENTER
.
9
The
LCD
now shows:
or
The machine is n ow pro mptin g you fo r a name a Locati o n ID so you ll be
able to find it in the EasyDial directory (see page 3.9).
If you do want to enter or change this number s Location ID, go on to step 10.
If you don t want to enter or change this numbers Location
ID
, skip to step 11.
10
Enter the Location IDby using the one-touch keys.(If necessary,review
Entering characters , page 1.12) A numbers Location
ID
may be up to 24
characters in length.
11
Press
ENTER
to save the setting and continue.
12
The
LCD
now shows:
or
You may now assign this number to up to 32 call groups. (If necessary, review
Call groups, page 3.8.)
If you do want to enter or change the call group number ,go on to step 13.
005:Group No.
1,4,12_
005:Group No.
_
005:Name ;Lower
W est Coast Sales_
005:Name ;Upper
_
005:Alt. No.
9-1-555-789-3556_
005:Alt. No.
_
005:Fax Number
9-1-555-567-1234_
005:Fax Number
9-555-397-0123_
005:Fax Number
_
Enter Speed-Dial No.
005:9-555-397-0123
Enter Speed-Dial No.
005:No Number Stored
Enter Speed-Dial No.
001:No Number Stored
3.5
Page 19

Advanced features
If you do not want to enter or change this number s call group, skip to step 14.
13
Use the numeric keypad to enter the call groups for this number. There are 32
possible call groups,numbered 1 32.
Here, we ve entered 6 to assign this speed-dial number to Call Group 6:
If you want to assign the number to more than one call group,insert a comma
after each number (except the last one) by pressing
GROUP
.
Here, we ve entered 6,
GROUP
,1,7,
GROUP
,3,0to assign this speed-dial num-
ber to Call Groups 6, 17 and 30:
Helpful tip: To assign this number to all 32 call groups,enter 0 (zero).
14
Press
ENTER
.
The
LCD
will display the next empty speed-dial number.
If you want to enter this speed-dial number, go back to step 4.
If you do not want to enter any more speed-dial numbers, press
STOP
to finish.
If you do not want to enter the currently displayed speed-dial number but do
want to enter another speed-dial number,go back to step 2.
Erasing a speed-dial number
1
Press Program key,A,2,0,2,
ENTER
. The
LCD
shows the speed-dial number
you have already entered:
Note: If the speed-dial number that appears is other than 001, it means
that 001 is empty .
2
Use the numeric keypad to enter the three-digit identifier for the speed-dial
number you want to erase.Here, we ve selected 005:
3
If you want to erase a different speed-dial number than the one that appears
on the
LCD
, enter that number now.
4
Press
ENTER
. The
LCD
shows:
Note: If you want to quit without erasing the speed-dial number you ve
selected, press
CANCEL
. The fax will return to step 2.
5
Press
ENTER
to erase the number.
To erase another speed-dial number,repeat steps 2 5. Or press
STOP
to return to
standby mode.
Printing a list of speed-dial numbers
You can easily print a list of your speed-dial numbers. The list includes each number s
three-digit identifier, the Location ID(if any), number and any group numbers
you ve stored for that speed-dial number .
To print a list of speed-dial numbers, press Program key,E,1,0,7,
ENTER
.
Erase Speed-Dial
** Complete **
005:Erase Speed-Dial
Check Enter/Cancel
Enter Speed-Dial No.
005:9-1-555-987-6543
Enter Speed-Dial No.
001:9-555-584-6950
005:Group No.
6,17,30_
005:Group No.
6_
3.6
Page 20

Fax dialing via speed-dial
To dial a fax call using a speed-dial number:
1
Place the document in the
ADF
, or on the
FBS
glass.
2
If you are using the
FBS
glass,enter the document size by pressing the
DOCUMENT SIZE
.
3
Adjust resolution and contrast if necessary.
4
Press
SPEED DIAL
/
TEL INDEX
. The
LCD
shows:
5
Use the numeric keypad to enter the three-digit identifier (such as 018, in this
example) for the speed-dial number you want to dial. The
LCD
shows the
Location ID(or fax number) you stored:
6
Press
START
.
What happens next depends on whether you specified memory transmission or real
time transmission:
If you specified quick memory transmission:
Your fax machine scans the first page of your document into memory, then dials
the other fax machine.
While dialing,your machine scans the other documents into memory.
The
LCD
shows the Location
ID
and the document s width and resolution settings:
Note: If the entry doesn t have a Location
ID
, the number appears.
When the other machine answers,your fax transmits the scanned document
directly from memory. (To review Quick memory transmission,see page 2.3.)
If you specified normal memory transmission:
Your fax machine scans your entire document into memory, then dials the other
fax machine.
The
LCD
shows the Location
ID
and the document s width and resolution settings:
Note: If the speed-dial entry doesn t have a Location
ID
, the number appears.
When the other machine answers,your fax will transmit the document directly
from memory. (To review Memory transmission,see page 2.3.)
If you specified real time transmission:
Your fax machine dials the other fax machine.
The
LCD
shows the Location IDand the document s width and resolution settings:
Note: If the speed-dial number doesn t have a Location ID, the number appears.
When the other machine answers,your fax feeds the document through its scan-
ner, transmitting as it goes. (To review the Real time transmission, see page 2.3)
Phoning via speed-dial
To dial a phone call using a speed-dial number, you must have an optional handset
attached to your machine.To make the call:
1
Obtain a dial tone by doing one of the following:
Lift the handset
Press
MONITOR
/
CALL
to use the monitor speaker
2
Press
SPEED DIAL/TEL INDEX
.The
LCD
shows:
3
Use the numeric keypad to enter the three-digit identifier for the speed-dial
number you want to dial. As the machine dials, it shows the number on the
LCD
:
Note: Remember that your fax machine s monitor speaker is not a speakerphone.
If you dialed using the monitor speaker, pick up the handset to speak to the
person that answers!
Note: If the call fails,and you used
MONITOR/CALL
to dial, press
MONITOR/CALL
to
hang up.
** T el Mode **
9-555-5783_
** T el Mode **
S_
Plano Office
A4 Normal
Plano Office
A4 Normal
Plano Office
A4 Normal
Plano Office
S018_
Enter Speed-Dial No.
S_
Advanced features
3.7
Page 21

Call group dialing
If you frequently send the same fax message to more than one location, store the
group number into the one-touch key or speed-dial number. (If necessary, see Using
a one-touch keys and Using speed-dial numbers , in previous page.)
After you store the group number, you can send the same fax to many different locations using
GROUP
key.
Send a fax via call group
Note: The call group dialing can be used only with memory transmission.
1
Place the document in the
ADF
, or on the
FBS
glass.And adjust resolution and
contrast if necessary.
2
If you are using the
FBS
glass,enter the document size by pressing the
DOCUMENT SIZE
.
3
Press
GROUP
.
4
Use the numeric keypad to enter the group number you want to send a fax.
Note: If you want to send a fax to several groups at a time, press
BROADCAST
then repeat steps 2 3. Also,you can include the one-touch location,
speed-dial location and up to 30 manually dialed number. (See
Broadcasting, page 3.10.)
5
Press
START
.
Printing a call group directory
Your machine can also print a call group directory.This lists all your stored autodialer
numbers by Location IDand lists the groups to which these numbers belong.
The directory divides the call groups into four banks,01 09 (the list shows 00), 10 19
(the list shows 10), 20 29 (the list shows 20) and 30 32 (the list shows 30). If you specify call group 0 (which puts the number in all call groups), the directory shows all
numbers (see right column).
For example ,the directory might show:
In this list, one-touch number 01 ([01]) is in groups 4, 10 and 14; one-touch number
02 ([02]) is in group 1; one-touch number 03 ([03]) is in groups 20 and 32; speed-dial
number 001 (S001) is in call groups 2 and 4; speed-dial number 002 (S002) is in
groups 7, 10 and 21; and speed-dial number 003 (S003) is in all groups, 1 to 32.
To print a call group directory,press Program key,E,1,0,9,
ENTER
.
[01] Carson Co 4 0 4
[02] Tex. Ofc. 1
[03] e.e.gummi 0 2
S001 And Sew I 2 4
S002 KC Enterp 7 0 1
S003 Katz Cat 12345678901234567890123456789012
00 10 20 30No. Location
Enter Group No.
G
Advanced features
3.8
Page 22

Advanced features
EasyDial directory dialing
EasyDial directory dialing makes your autodialer even more like an electronic
phone book. EasyDial sorts and displays numbers alphabetically according to their
Location IDs,so you can find them and dial them easily.
To dial using EasyDial:
1
For a regular phone call:Pick up the optional handset.
Note: To make a regular phone call from your machine, you must have an
optional handset attached.
For a fax call:Place the document in
ADF
, or on the
FBS
glass.And adjust reso-
lution and contrast if necessary.
2
Press
SPEED DIAL/TEL INDEX
twice.The
LCD
shows the first listing in your fax
machine s EasyDial directory:
The EasyDial directory sorts entries alphabetically in the following order:
(1) by alphabet, (2) by number and (3) by symbol.
If the listing that appears is the one you want to dial, skip to step 4.
Otherwise, proceed to next step.
3
Scroll through the listings to find the one you want.You do this by pressing
the following cursor key:
or to select the character set alphabet, number or symbol for
the first character of the Location ID.
or to check different listings within that character set.
Note: The scrolling is open-ended. For example, when you run out of
listings beginning with alphabet
A
, pressing or automatically
moves you into listings beginning with other characters.
4
When the
LCD
displays the name you want to dial,press
START
.
If you ve set the document in the ADF, your machine will start the fax
transmission.
If you ve set the document on the FBS glass, enter you document size by
pressing
DOCUMENT SIZE
, then press
START
.Your machine will start the fax
transmission.
If you make a regular phone call, speak after a person answered.
If an EasyDial call fails
If an EasyDial call fails,what happens next depends upon the kind of call it was.
If it was a fax call
Your fax machine automatically redials the number according to the redial inter-
val you ve set. It keeps trying until either of the following occurs:
It successfully reaches the other number
It has attempted the number of redials programmed and has still not connected
(see Changing redial settings, page 4.5).
If it was a regular phone call
You ll have to redial manually:
1
Lifting the optional handset.
2
Press
REDIAL/PA USE
.The
LCD
will show:
3
Your machine can remember the last 10 dial numbers you ve dialed.
Press or until the dial number you want to redial appears.
4
Press
START
.
V iew Redial History
0:1234567890
Telephone Index [A]
ABC Company :[01]
3.9
Page 23

Advanced features
The fastest way to fax one document to many recipients is to broadcast it.
In an ordinary broadcast, you send the fax as you normally would, except you just
add more fax numbers.Y ou can enter up to 230 numbers:
30 manually-dialed numbers AND
200 autodialer numbers OR 1 call group with all 200 autodialer numbers
You can broadcast using any function that requires a fax number to be
entered. That means you can send a delayed broadcast, program a polling broad-
cast and even broadcast to hub units for F-Code relay broadcast initiation. All of
these are explained in this chapter.
To send a broadcast fax:
1
Insert the document and make any necessary adjustments as you would for a
regular fax transmission.
2
Press
BROADCAST
.
3
Enter the first fax number,as usual. Use either a one-touch number,a speeddial number, a call group or a regular number dialed from the numeric keypad.
4
To add more fax numbers ,press
BROADCAST
between each one to insert a
comma.Then enter the number as described in step 3 (pressing
GROUP
inserts its
own comma).You can send to up to 230 numbers for a broadcast.
Important: Do not insert a comma after the last fax number.
Note: If you enter characters by mistake,press
CANCEL
to erase them.
5
Press
START
.Your fax machine scans the document into memory and then
sends it to each number or call group you ve entered.
Delayed broadcasting
What if you want the broadcast to take place later? Thats the purpose of setting up
a delayed broadcast.
Note: Delayed commands are discussed on pages 2.8 and 2.9.And you may want
to read Delayed transmission on page 3.11 before proceeding.
1
Follow steps 1 4 of Broadcasting basics (left column).
2
Press
ADVANCED FUNCTIONS,ENTER
.
3
Use the numeric keypad to enter the day of the month and time (in 24-hour
format) when you want the broadcast to occur.
Here, we ve scheduled it for 10:15 PMon the 30th.
4
Press
ENTER
to save the setting.
5
Press
START
.Your machine will scan your document into the memory and
return to standby mode, while showing this on the
LCD
:
This means your fax machine is reserved for the delayed broadcast you
just programmed, but it can still be used to send and receive faxes if your
broadcast document is stored in memory.
Making changes to broadcasts
If you need to make changes in a broadcast after setting it up,use the
REVIEW COMMANDS
function. See Reviewing or canceling parts of a broadcast, page
2.8.
** Reserved **
Jun 01 2000 17:17
Delayed
Enter Time: 3
0/22:15
Press Start
[03],S098,G12,9-555_
3.10
Broadcasting
Page 24

Advanced features
Take advantage of lower evening and weekend long-distance rates with delayed
transmission. Your fax machine can store up to 99 delayed commands, each of which
you can program up to 31 days in advance.
Important: If you program all 99 delayed transmission commands, no further
memory transmission is possible until one or more of the commands is
completed. (To review Memory transmission, see page 2.3.) However,if
all 99 delayed commands are programmed, you can always transmit
with the Real time transmission from ADF (see page 2.3).
Setting up a delayed transmission
Important: Your machine only remembers the day of the month that it s supposed
to send a delayed transmission. It does not remember the month
itself.So if you want to send a transmission at 5:05PMon June 26,
don t program the transmission sooner than 5:06
PM
on May 26.
To set up a delayed transmission:
1
Insert the document and make any necessary adjustments.
2
Press
ADVANCED FUNCTIONS
. The
LCD
shows:
3
Press
ENTER
.The
LCD
shows the current day of the month, followed by the
current time (in 24-hour format):
4
Use the numeric keypad to enter the day of the month and the time when you
want the fax to send the delayed transmission.
Note: Press to move the cursor left, or to move it right.
Here, we ve set the transmission to occur on the 11th at 11:05
PM
:
5
When the date and time are entered, press
ENTER
to save the delayed trans-
mission.The
LCD
shows:
6
Enter the fax number for the delayed transmission document.You can either
press a one-touch key, enter a speed-dial number or use the numeric keypad
to enter the fax number.
7
Press
START
. Your machine returns to standby mode, while showing this on
the
LCD
:
This means your fax machine is reserved for the delayed transmission you
just programmed.
If you set the machine for memory transmission, it will scan the document
into memory, after which you can use the machine normally.
If you set the machine for non-memory transmission (real time transmis-
sion), the machine can receive faxes but can t transmit until your delayed
command has been performed.
Important: If you specified the delayed non-memory transmission (real
time transmission), do not remove the document in
ADF
. If the
document is removed from
ADF
before a delayed command com-
pletes,it cancels the delayed real time transmission.
** Reserved **
Jan 29 2000 17:17
Enter Fax Number
_
Delayed
Enter Time: 1 1/23:05
Delayed
Enter Time: 0
6/17:16
1.Delayed
←←/→→
/Enter
3.11
Delayed transmission
Page 25

Advanced features
Batch transmission allows you to store multiple documents in an electronic basket
throughout the day and then fax that entire basket to one location.
To do this, just tell the machine when and where the transmission should go. When
that date and time arrives,your machine will transmit each document in the batch
box to the remote fax machine.Y ou can store up to 40 documents (eac h document
can include one page or many pages) into your machines five electronic batch boxes.
Creating or modifying a batch box
Before sending a batch transmission, you have to create batch boxes in your fax
machine.The steps below also let you modify existing batch boxes.
To create or modify a batch box:
1
Press Program key,C,5,0,1,
ENTER
. Depending on whether you already
have a number entered for batch box 1, the
LCD
shows:
or
2
Use the numeric keypad to enter the number (15) of the batch box you want
to create or modify. Here, we ve pressed 3 and see either:
or
3
If you want to select a different batch box than the one displayed on the
LCD
,
use the numeric keypad to enter the batch box number now.
4
Press
ENTER
. The
LCD
now shows either:
or
5
Use the numeric keypad to enter the fax number exactly as your machine
should dial it, including whatever access codes your phone system requires.
(You may want to review Special dialing characters, page 3.1.) The number
can be up to 40 characters in length:
Your display can show only 20 characters at a time.To view characters beyond
those 20, press to scroll to the left or to scroll to the right.
6
When the number appears as you want it, press
ENTER
. The
LCD
now shows:
7
Instruct your fax to send from this batch box in one of the following ways:
Option 1: Once at a certain time on a certain day of the month (For exam-
ple: Do this at 5:05 PMon the 30th. ) Use the numeric keypad
to enter the date and time (24-hour format) the machine should
send the documents from the batch box:
Option 2: At a certain time each day you press the key (For example: Do
this at 5:05 PMtoday. ) Use the numeric keypad to enter 0, 0
(00),and then the time when the fax should send the documents
from the batch box:
Note: To change a digit in the date or the time,press to move the cursor
left or to move it right. Then enter the correct number .
8
When the date and time are set, press
ENTER
.
9
The
LCD
now shows:
or
The machine now asks you to name this batch box.
If you do not want to enter or change this batch boxs name, skip to step 11.
10
Enter the name by using the one-touch keys.(If necessary,review Entering
characters , page 1.12) A batch boxs name may be up to 24 characters in
length.
3:Name ;Lower
Bookkeeping_
3:Name ;Upper
_
3:Transmit T ime
Enter Time: 0
0/17:05
3:Transmit T ime
Enter Time: 3
0/17:05
3:Transmit T ime
Enter Time: 2 6/14:00
3:Fax Number
9-1-555-871-9052_
3:Fax Number
9-555-2110_
3:Fax Number
_
Select Batch Box
3:9-555-2110
Select Batch Box
3:No Number Stored
Select Batch Box
1:9-1-555-345-6789
Select Batch Box
1:No Number Stored
3.12
Batch transmission
Page 26

Advanced features
11
Press
ENTER
to save the batch box information.
To create or modify another batch box,repeat steps 2 11.
To finish,press stop.
Printing a list of batch boxes
You can easily print a list of your batch boxes. The list includes each boxs identifier
number, the Location
ID
, fax number and date/time the transmission should start.
To print the list,press Program key,
E
,1,1,5,
ENTER
.
Storing a document for batch transmission
Your fax machine can store up to 40 documents (each document can include one
page or many pages) in each batch box until the date and time you designate the
batch transmission to take place.Once the batch documents are transmitted, they
are automatically erased from the machine s memory.
Note: For this operation to work,two things must be true:
The batch box must exist on your fax machine.
You must know the batch boxs one-digit number (15).
To store a document in a batch box for batc h transmission:
1
Insert the document and make any necessary adjustments.
2
Press
ADVANCED FUNCTIONS
five times and then press
ENTER
. The
LCD
shows:
3
Use the numeric keypad to enter the one-digit number for the batch box you
want to use.Here, we ve entered 5 to indicate batch box 5.
Note: Tx is a common abbreviation for transmission.
4
Press
ENTER
. The
LCD
shows:
Important: Your machine gives each document in a batch box a file number,
shown as 1 above. You will need to know this file number should
you later wish to erase or print the stored document. Each
batch box holds up to 40 files (1-40).
5
Press
START
.The machine displays Reserved on the top line of the
LCD
.
This means the document is stored in memory.
Printing a list of stored batch documents
You can print a list of the documents stored in your machine s batch boxes. This list
provides you with the documents file numbers so you can erase or print them as
needed.
To print the list,press Program key,
E
,1,1,6,
ENTER
.
Printing a document stored in a batch box
To print a document stored in a batch box:
1
Press Program key,
D
,3,0,3,
ENTER
. The
LCD
shows:
2
Use the numeric keypad to enter the number (15)of the batch box storing the
document you want to print.Here,we ve entered 1 to indicate batch box 1.
3
Press
ENTER
. The
LCD
shows:
4
Use the numeric keypad to enter the document s file number (1 40).
5
Press
ENTER
.
Your fax machine prints the document, then returns to standby mode.
1:Batch Document
Enter File No. :_
Batch Document
Enter Box No. :_
Press Start
Box :5 File : 1
Batch Tx
Enter Box No. : 5
Batch Tx
Enter Box No. :_
3.13
Page 27

Advanced features
Erasing a document stored in a batch box
To erase a document stored in a batch box on your fax mac hine:
1
Press Program key,
D
,2,0,3,
ENTER
. The
LCD
shows:
2
Use the numeric keypad to enter the number (15)of the batch box storing the
document you want to erase.Here, we ve entered 1 to indicate batch box 1.
3
Press
ENTER
. The
LCD
shows:
4
Use the numeric keypad to enter the document s file number (1 40).
5
Press
ENTER
. The fax machine now gives you one last chance to change your
mind before erasing the document.
Important: To quit the operation without erasing this or any document,
press
STOP
. The machine returns to standby mode.
6
Press
ENTER
. The fax machine erases the document you ve chosen, then
returns to standby mode.
Erasing an empty batch box
Batch boxes must be empty to be erased. If a box has documents stored in it, then
you first have to erase those documents.See left column.
To erase an empty batch box:
1
Press Program key,C,5,0,2,
ENTER
. The
LCD
shows:
or
2
Use the numeric keypad to enter the number (15) of the batch box you want
to erase. Here, we ve pressed 2 and see:
3
If you want to erase a different batch box than what appears on the
LCD
, enter
that batch boxs number now.
4
Press
ENTER
. If the batch box is empty, the
LCD
shows:
Important: If you select a batch box whic h is notempty,the machine beeps
and briefly shows:
Erase any documents stored in the batch box (see left column),
then go back to step 3.
Important: If you w ant to quit without erasing the batch box youve
selected, press
CANCEL
. The fax will return to step 2.
Important: If you want to quit without erasing any batch box, press
STOP
.
The machine returns to standby mode.
5
Press
ENTER
to erase the batch box.
To erase another batch box,repeat steps 2 5.To finish, press
STOP
.
Erase Batch Box
** Complete **
Select Batch Box
Document Stored
2:Erase Batch Box
Check Enter/Cancel
Select Batch Box
2:9-1-972-5559900
Select Batch Box
1:9-5551023
Select Batch Box
1:No Number Stored
1:Batch Document
Check Enter/Stop
1:Batch Document
Enter File No. :_
Batch Document
Enter Box No. :_
3.14
Page 28

Advanced features
Polling allows someone to fax a document to you without having to make the call or
pay for it.There are several kinds of polling:
Regular polling Your fax retrieves a document from a remote fax machine.
F-Code polling Your fax retrieves a document stored as a file in the remote fax
machine.To do this, you must be communicating with another F-code-compatible
fax machine.For more information on F-Code polling,see F-Code communication,
pages 3.35.
Note: For polling to work,the remote machine must also be set up to be polled.
Regular polling
To set up your machine for regular polling:
1
Make sure the document is inserted in the remote fax machine.
2
Press
ADVANCED FUNCTIONS
twice and then press
ENTER
. The
LCD
shows:
3
Enter the remote fax machine s number by either pressing a one-touch key,
entering a speed-dial number or using the numeric keypad.
4
To perform the regular polling now, skip to step 8.
To perform delayed regular polling,go on to step 5.
5
Press
ADVANCED FUNCTIONS,ENTER
. The
LCD
shows:
6
Use the numeric keypad to enter the date and time (use the 24-hour format)
when your machine should perform the delayed regular polling.
7
Press
ENTER
.
8
Press
START
.
When your machine polls for documents,it dials the number and, upon making contact with the other machine,begins receiving the document as if the other machine
had placed the call.
Being polled
Not only can you poll, but you can also be polled.To set up a document for regular
polling:
1
If your fax machine is set for Tel Ready reception, change it to the reception
mode except the Tel Ready.
Important: Your machine can t be polled if it s in Tel Ready mode.
2
Insert the document.
3
Adjust resolution and contrast if necessary. (Your fax machine will be transmitting to the machine doing the polling.)
4
Press Program key,D,1,0,1,
ENTER
.
Your fax will scan the document into memory and return to standby mode.
Once the remote fax machine polls the document you stored, your fax machine automatically erases the document from memory.
Printing a stored polling document
To print a document youve stored for regular polling without erasing it,
press Program key,
D
,3,0,1,
ENTER
.
Erasing a stored polling document
To erase a document youve stored for regular polling from your machine s memory,
press Program key,D,2,0,1,
ENTER
.
Limiting polling access to your fax machine
When you set the passcode, a calling fax which doesn t present the proper passcode cannot poll from your fax.
Important: The passcodeyou use for polling operation is not the same as the pro-
tection passcode (see page 3.50).
Delayed
Enter Time: 1 5/17:05
Enter Fax Number
_
3.15
Polling
Page 29

Advanced features
Note: If you re using the Block Junk Fax feature (see pages 3.54 3.55), even
incoming calls which meet the passcode test must come from phone numbers you ve approved.
To set your fax machines passcode:
1
Decide on the four-digit passcode (0001 9999) you want to use. Write it down,
and put it in a safe place.
2
Press Program key,
B
,2,1,3,
ENTER
. The
LCD
shows the current code:
3
Use the numeric keypad to enter the desired four-digit passcode .
4
Press
ENTER
to save the setting.
Note: To turn off the limiting polling, change the passcode to 0000 by repeating
steps 1 4 and entering 0000 in step 3.
Passcode
Passcode : 5 627
Passcode
Passcode : 0 000
3.16
Page 30

Advanced features
Your fax machine has numerous special features to make your communication easier. Well cover them here.
Soft keys
Soft Keys are shortcut keys. You can program the soft keys on the control panel to
turn on or off any function with just the touch of a button.Your machine has three
Soft Keys. If the light above any one of these keys glows, that means the setting
programmed into that key is active.
These keys are programmed at the factory to turn the following functions on or off:
Confirmation report (see page 3.22)
Memory transmission (see page 2.3)
Monitor / Call request (see pages 2.6 and 3.25)
Note: The keys that are programmed at the factory turn the functions above them
on and off,but only for the next transmission that you send from your fax
machine.Once that transmission is complete,your machine returns to its
default setting.
But instead of using the Soft Keys to control the functions above, you can program
them to turn other functions on or off.These functions are:
Energy saving (see page 4.9)
Fax & Copy (see page 3.21)
Send TTI (see pages 1.18 and 4.2)
Security reception (see page 3.50)
Cover page (see page 3.23)
Sort copy (see pages 2.13 and 2.16)
Negative / Positive copy (see page 2.16)
Combine (only for MFX-1600) (see page 2.17)
Copy / Fax mode (see page 1.11)
Note: And instead of just turning the function on or off for the next transmission,
as the factory-set keys do, changing the Soft Key settings actually sets the
default for your fax machine.(These default settings can be changed, if
necessary.They are not permanent.)
Setting the Soft Key
1
Press Program key,B,1,0,3,
ENTER
. The
LCD
shows:
. . . or indicates another function you ve stored into this key.
2
Press or until the Soft Key (1-3) you want to change appears. In this
example, we ve chosen 3.
3
Press
ENTER
.The
LCD
shows:
4
Press or until the function appears that you want to program into the
key. In this example, we ve chosen Cover page.
5
Press
ENTER
to save the setting.
The
LCD
will display the next Soft Key.
If you do want to set this Soft Key, go back step 3.
If you do not want to set the currently displayed Soft Key but do want to set
another Soft Key, go back to step 2.
If you do not want to set any more Soft Keys,press
STOP
to finish.
Now you can use the labels included in your machines original packaging to label
the Soft Key function you just set.
3:Cover Page
←←/→→
/Enter
3:Monitor/Call
←←/→→
/Enter
Select Soft Key No.
1:Report
3.17
Special features
Page 31

Advanced features
Macro keys
If you perform the same operation repeatedly, you can automate the operation using
a macro.A macro is a series of the several steps that you group together as a single
command to accomplish the operation automatically.
A macro key faithfully records up to 60 steps that you performed to teach the macro.
You can teach the Macro keys to carry out any of the following jobs, but you cannot
teach the operation regarding the machine settings.
Note: One Macro key can hold only one job. It cannot combine two or more jobs.
Copy:
All copy settings
Printouts:
Machine settings list (page 4.10)
Fax settings list (page 4.10)
Copy settings list (page 4.10)
Activity journal (page 3.22)
Delayed commands list (page 2.9)
Delayed commands documents (page 2.9)
One-touch list (page 3.3)
Speed-dial list (page 3.6)
Programmable one-touch numbers list (page 3.49)
Call group directory (page 3.8)
Blocked numbers list (page 3.55)
Sample cover page (page 3.24)
Department time list (page 3.57)
List of F-Code boxes (page 3.30)
List of documents stored in F-Code boxes (page 3.30)
Batch transmission documents (page 3.13)
Batch box list (page 3.13)
List of stored batch documents (page 3.13)
F-Code Box (bulletin box) documents (page 3.31)
Macros list (page 3.20)
Stored polling documents (page 3.15)
Security receive documents (page 3.51)
Document storage:
Regular polling documents (page 3.15)
F-Code polling documents (pages 3.30 3.31)
Communications functions:
Delayed transmission (explained on pages 3.11)
Broadcasting (page 3.10)
Regular polling (pages 3.15 3.16)
Batch transmission (pages 3.12 3.14)
F-Code transmission (page 3.34)
F-Code polling (page 3.35)
Programming the Macro key
1
Press
MACRO PROGRAM,ENTER
. The
LCD
shows:
2
Press the Macro key (
M
1 orM2) you want to program or change.In this exam-
ple, we ve chosen
M
2.
3
Press
ENTER
. If you chose the key already programmed, proceed to step 4.
Otherwise, skip to step 5.
4
The
LCD
shows:
If you want to overwrite the operation already programmed, press
ENTER
.
If you want to overwrite only the jobs name, press
CANCEL
and go to step 9.
If you do not want to overwrite the key you have choice, press
STOP
.
5
The
LCD
of stand-by mode appears,which means the machine is ready to register the steps into the Macro key.
Note: It keeps beeping during the job registration in order to make notice of
the registration mode.
Fax Ready
Jun 1 2000 13:30
Overwrite?
Check Enter/Cancel
Select Macro Key
M2:No Number Stored
Select Macro Key
M1:No Number Stored
3.18
Page 32

Advanced features
6
Press the keys exactly as you operate the job you want to program into the
Macro key.
Note: You can program up to 60 steps.When it comes over 60 steps, your fax
machine asks if you register the operations you have entered. If you
want to register them, press
ENTER
. If not, press
STOP
.
Note: If you want to cancel the operations you have set,press
MACRO PROGRAM,STOP
and then go back to step 1.
Example 1: To program some operations for copy:Press
COPY/FAX
to change
the copy mode, and set number of the copies,paper size, contrast, resolution,
reduction/enlargement rate and sort setting as you want.
Note: See Making copies (pages 2.12 2.18) for detail operations.
Example 2: To program the operations for printing the one-touch numbers
list: Press Program key,
E
,1,0,6,
ENTER
.
7
If you programmed
ENTER
or
START
into the operation, proceed to step 8.
Otherwise, press
MACRO PROGRAM
and skip to step 9.
8
If you want to start immediately after pressing the Macro key when you use
it, press
ENTER
. If not, press
CANCEL
.
Note: If you want to confirm the settings or operations in the Macro key
before you start it, press
CANCEL
here.
9
The
LCD
now shows:
or
The machine now asks you to name this job.
If you do not want to enter or change this job s name, skip to step 11.
10
Enter the name by using the one-touch keys.(If necessary,review Entering
characters , page 1.12) A jobs name may be up to 130 characters in length.
11
Press
ENTER
to save the setting.
Copying with the Macro key
To copy using a Macro key:
1
Insert the document.
2
Press the Macro key in which you ve stored the copy command.
3
Press
START
, if you have not registered
START
in the Macro key.
Printing lists using the Macro key
To print a list using a Macro key:
1
Press the Macro key in which is programmed for the printing lists.
2
Press
ENTER
, if you have not registered
ENTER
in the Macro key.
Storing fax documents with the Macro key
To store a fax document for either polling or F-Code polling using a Macro key:
1
Insert the document.
2
Press the Macro key which is programmed for the storing operation you
want to use.
3
Press
ENTER
, if you have not registered
ENTER
in the Macro key.
Fax dialing with the Macro key
To dial a fax call using a Macro key:
1
Insert the document.
2
Press the Macro key in which you ve stored the fax communication command.
3
Press
START
, if you have not registered
START
in the Macro key.
Your fax will perform the operation now, or at whatever time you programmed.
If you programmed this key to delay its operation, the
LCD
shows:
If you programmed this key to perform the operation immediately after you press it,
the
LCD
shows the number:
9-1-972-555-4335
A4 Normal
** Reserved **
Jan 29 2000 17:17
M2: Name ;Upper
Delayed_
M2:Name ;Upper
_
Include Start/Enter?
Check Enter/Cancel
3.19
Page 33

Advanced features
Erasing a Macro key
1
Press
MACRO PROGRAM
twice,
ENTER
. The
LCD
shows:
2
Press the Macro key (M1 orM2) you want to erase.Here, we ve chosen M2.
3
Press
ENTER
. The
LCD
shows:
Important: If you w ant to quit without erasing the Macro key youve
selected, press
CANCEL
. The machine will return to step 2.
4
Press
ENTER
to erase the job.
To erase another Macro key,repeat steps 2 4. Or press
STOP
to return to standby
mode.
Printing a list of your Macro keys
Your fax machine can print a list of the Macro keys.
The list includes:
(1) each key s Macro key number
(2) the name of the job stored in the Macro key
To print a list of Macro keys, press Program key,E,1,1,7,
ENTER
.
Setting the speed for Macros
You can adjust the speed of one step in the Macro key.
1
Press
MACRO PROGRAM
three times,
ENTER
. The
LCD
shows:
2
Press or until the mode you want appears.The possible settings are:
3
Press
ENTER
to save the setting.
Macro Speed :Fast
←←/→→
/Enter
Macro Speed :Slow
←←/→→
/Enter
Macro Speed :Norm
←←/→→
/Enter
Macro Speed :Norm
←←/→→
/Enter
Erase Macro
** Complete **
Erase Macro
Check Enter/Cancel
Select Macro Key
M2:Batch box list
Select Macro Key
M1:Activity journal
3.20
Page 34

Advanced features
Fax & Copy
With the Fax & Copy feature turned on, your machine asks if you want to make a
copy of a document each time it transmits that document from memory.
Note: The Fax & Copy function cannot be used for real time transmission,and
when the copy protection feature is set to on.
Note: Quick Memory transmission (see page 2.3) and the F ax & Copy function
cannot be used at the same time. If both are turned on, Quick Memory will
not work.
Note: The Fax & Copy feature will use the same resolution you set for the trans-
mission for the copy s scanning resolution.
Setting the Fax & Copy function
1
Press Program key,
B
,1,0,6,
ENTER
.
2
Press or until the mode you want appears.
In this example, we ve chosen On.
3
Press
ENTER
to save the setting.
4
Press
STOP
to return to standby mode.
Using the Fax & Copy function
1
Place the document and select resolution and contrast you require.
Note: With this function, you cannot select normal and halftone resolution.
2
Enter the fax number. Either press a one-touch key, enter a speed-dial number ,
call group number or use the numeric keypad to enter the fax number.
If you entered the fax number using a one-touch key, skip to step 4.
Otherwise, go on to step 3.
3
Press
START
.
4
The
LCD
changes copy mode and asks the number of copies you want to make.
5
Use the numeric keypad to enter the number of copies you want for each page
in the document. Choose from 01 to 99 copies.
Note: If you want to quit without transmitting and copying the document,
press
STOP
.The machine returns to standby mode.
6
Press
START
to begin the transmission and copying process.
Helpful tip: If you do not wish to make a copy, press
CANCEL
in step 4.The
LCD
will
show:
To cancel the making copy,press
START
.The machine start transmission process without copying the document.
If you press
STOP
, the machine return to step 4.
Setting the activity journal
Just as a checkbook records your daily financial transactions,your fax machine
keeps an activity journal which records its 100 most recent fax transactions. The
activity journal lists the following information for each transaction:
Assigned number, starting each day at 001
Remote location called
Resolution mode
Starting date and time
Duration, in minutes and seconds
Length, in number of pages
Department code (see page 3.56)
Result of the call If preceded by an asterisk (*), this signifies an
ECM
communication (see page 4.1)
Any special operations For example,a fax call made using an optional handset
will appear as Manual
Your fax machine will print the activity journal automatically after 100 transactions.To toggle this automatic printing on or off:
1
Press Program key,C,1,0,1,
ENTER
. The
LCD
shows:
Journal AutoPrt.:Off
←←/→→
/Enter
Canceled Copying
Start/Stop
Fax & Copy 1
Ltr [ Ltr ] 100%
Fax & Copy :On
←←/→→
/Enter
Fax & Copy :Off
←←/→→
/Enter
3.21
Page 35

Advanced features
2
Press or until the mode you want appears.
Here, we ve chosen On.
3
Press
ENTER
to save the setting.
Printing an activity journal manually
To print an activity journal immediatelywithout waiting for 100 transmissions to be
completed, press Program key,
E
,1,0,4,
ENTER
.
Setting the printing order of the activity journal
Your fax machine prints the activity journal for every fax transaction. For example,
if your machine has to redial a call, it will list those redials on the journal.
If you want to list those activities in the order of their assigned numbers,you can
change the printing order of the activity journal.To change the printing order:
1
Press Program key,C,1,0,2,
ENTER
. The
LCD
shows:
2
Press or until the mode you want appears.
If you want the activity journal to print in the order of assigned number,
choose On .
Otherwise, the machine will list every fax transaction of the same command
and same location.
Here, we ve chosen On.
3
Press
ENTER
to save the setting.
Setting the reports: TCRs and RCRs
Your fax machine can print reports of transmissions and receptions.
There are two different reports: a transmit confirmation report (
TCR
) and a receive
confirmation report (
RCR
).You can receive a
TCR
after sending a fax to any Group 3 fax
machine,but the
RCR
function works only when you send a fax to a compatible Muratec
machine.(Consult your authorized Muratec dealer with any questions about such
compatibility.) Choose the type of report you want, based on the fax machines to
which you re transmitting.
What the reports tell you
TCR
The
TCR
lists the following information for each communication:
Date and time of the
TCR
s printout
Remote location called
Resolution mode
Starting date and time
Duration, in minutes and seconds
Length, in number of pages
Result of the call
Any special operations For example,a fax call made using an optional handset
will appear as Manual
Sample of the document An image of the first page of the document
If an error occurs,the
TCR
tells you the remote location which was called,the error
code and error message (see pages 5.9 5.11).
RCR
The
RCR
lists the following information for each communication:
Date and time
Remote location called
Assigned number, starting each day at 001
Resolution mode
Duration, in minutes and seconds
Length, in number of pages
Result of the call Either OKor an error code (see pages 5.9 5.10)
Journal Line Up :On
←←/→→
/Enter
Journal Line Up :Off
←←/→→
/Enter
Journal AutoPrt.:On
←←/→→
/Enter
3.22
Page 36

Advanced features
To set the printing one of these reports:
1
Press Program key,C,1,0,3,
ENTER
. The
LCD
shows:
2
Press or until the setting you want appears.
Here, we ve chosen
RCR
.
3
Press
ENTER
to save the setting.The
LCD
shows:
Your machine is asking if it should print the selected report automatically
after every fax you send.
4
Press or until the setting you want appears.
Here, we ve chosen On.
5
Press
ENTER
to save the setting.
To turn the confirmation report feature on or off for onlythe next fax transmission,
press
REPORT
.
What happens next depends on the setting you chose:
If the light above the
REPORT
key glows,the fax machine will print the
confirmation report automatically.
If the light above the
REPORT
key doesn t glow, the fax machine will not print a
confirmation report.
After you send this transmission, your machine returns to the setting you chose in
step 2, above.
Cover page
Your fax machine can store a cover page to send at the beginning of each outgoing
fax.This page includes the current date and time, your Location IDand your fax
number (as stored in the
TTI
) and a message of up to 40 characters in length.The
information appears in a box similar to this:
Turning the cover page on
1
Press Program key,
C
,2,0,1,
ENTER
. The
LCD
shows:
2
To tell the fax machine it shouldsend a cover page before each document you
transmit, press or until On appears on the
LCD
.
Note: To tell the machine not to send a cover page, press or until Off
appears on the
LCD
and press
STOP
.
3
Press
ENTER
to save the setting.
Now the cover page feature is working but your message line (shown in the example
as We appreciate your business.Thank you! ) is blank. To enter that message,see
Entering the cover page message, next page.
Cover Page :On
←←/→→
/Enter
Cover Page :Off
←←/→→
/Enter
Fax Message From:
Jun 1 2000 14:00
Name: And Sew It Goes Co.
Fax Number: 972-555-2009
[We appreciate your business. Thank you!]
Auto Print :On
←←/→→
/Enter
Auto Print :Off
←←/→→
/Enter
R C R Selected
←←/→→
/Enter
T C R Selected
←←/→→
/Enter
3.23
Page 37

Entering the cover page message
1
Press Program key,C,2,0,2,
ENTER
.
2
Use the one-touch keypad to enter a message for the cover page.Enter the
message the same way you entered your fax name during EasyStart.The
message can be up to 40 characters in length.
Important: As in EasyStart,enter letters and other non-numeric characters
by using the one-touch keys.
3
When the message appears as you want it, press
ENTER
to save it.
Printing the cover page
To confirm that the cover page is set correctly,print a sample cover page from your
fax machine.Press Program key,E,1,1,1,
ENTER
.
OneLine + distinctive ring detection
Many phone companies now offer their customers a special service which makes it
possible for one phone line to do the work of two.
With this service,you physically still have one phone line, but, electronically,you
have two phone numbers .Y our phone recognizes these different numbers and rings
differently for each one.
For example ,this makes it easy for you to have both a business number and a home
number on one phone line, so you can answer one with Jane Doe Consulting, and
the other with Hello. This works because you can tell the difference between the
distinctive patterns of the two rings.
Your fax machine is also smart enough to tell the difference between two different
numbers that are ringing it. All you have to do is set up your machine for the
OneLine + distinctive ring detection (
DRD
) feature.
In order to use OneLine +
DRD
, your phone company must set up your distinctive
ring service.When it does, it will assign a ring pattern. For example,the standard
telephone ring is 2 seconds on (ringing) and 4 seconds off (silent), after which it
repeats itself.
Your fax has eight possible distinctive ring patterns for use with OneLine +
DRD
.
One of them should work with your phone company s
DRD
service.This chart lists
the patterns:
Pattern One complete ring pattern (seconds)
A
0.8 on, 0.4 off, 0.8 on, 4.0 off
B
0.4 on, 0.2 off, 0.4 on, 0.2 off, 0.8 on, 4.0 off
C
0.3 on, 0.2 off, 1.0 on, 0.2 off, 0.3 on, 4.0 off
D
1.0 on, 0.5 off, 1.0 on, 3.5 off
E
0.5 on, 0.5 off,0.5 on, 0.5 off, 1.0 on, 3.0 off
F
0.5 on, 0.5 off, 1.0 on, 0.5 off, 0.5 on, 3.0 off
G
0.4 on, 0.6 off, 0.4 on, 4.6 off
H
1.5 on, 0.5 off,0.5 on, 3.5 off
For example:pattern Cis 0.3 seconds ringing,0.2 seconds silent, 1 second ringing,
0.2 seconds silent, 0.3 seconds ringing and 4 seconds silent. Then it goes back to the
first 0.3-second ring and starts over.
Advanced features
3.24
Page 38

Advanced features
To use
DRD
on your fax machine:
1
Contact your phone company to make sure it has set up
DRD
service for you. If
possible, also find out which distinctive ring pattern the phone company has
assigned you.
2
When your machine is MFX-1200;Press Program key,B,2,1,4,
ENTER
.
When your machine is MFX-1600;Press Program key,B,2,1,5,
ENTER
.
The
LCD
shows:
3
Press or until the mode you want appears.
Here, we ve chosen On.
4
Press
ENTER
.
5
Press or until the pattern you want appears.
Here, we ve chosen C.
6
Press
ENTER
to set your machine to the displayed ring pattern.
Important: If your telephone company gives you only very general ring pattern
specifications,or if you encounter a problem while using your
machine s
DRD
feature, please try
ALL
of the listed ring patterns.
If you still have a problem after trying all of the patterns, please call
the Muratec Customer Support Center. (From the United States, call
800-347-3296.
Important: With your machine set for using
DRD
, it won t respond to any ring pattern other than the one you selected above.To reset the fax so it will
respond once again to normal rings,repeat steps 2 4, above except,
in step 3, toggle it to Off. Your fax will now respond normally.
Call request
You can send or receive a fax message and have a regular phone conversation on the
same call (although, not at the same time).This is called a call request. It doesn t
matter whether you re sending the fax or receiving it. You may fax first and then
talk, or talk first and then fax.
Important: For this feature to work, the remote fax machine must have a similar
call-request capability.Your machine must also have an optional
handset attached.
Faxing/receiving first, then talking
To send or receive a fax first and then talk:
1
While your fax machine is sending or receiving the fax, press
MONITOR/CALL
.
2
At the remote fax machine,the ringer will sound after that machine receives
each page.
3
If someone answers at the remote fax machine,your fax machine will ring
several times.If so, pick up the optional handset. In a few seconds, the line
will open and you can begin your conversation.
T alking first,then sending a fax
To talk first and then send a fax:
1
When you ve finished your phone conversation, don t hang up.
2
Insert the document you want to fax.
3
Adjust the resolution and contrast if necessary.
4
Tell the person at the other fax machine to press
START
and to hang up
his/her handset. Don t hang up your handset yet!
5
When you hear fax tones,press
START
and hang up your fax machine s
optional handset.Your fax machine will send the document.
T alking first,then receiving a fax
To talk first and then receive a fax:
1
When you ve finished your phone conversation, don t hang up.
2
Tell the person at the other fax machine to press
START
and to hang up
his/her handset. Don t hang up your handset yet!
3
When you hear fax tones,press
START
and hang up your machine s optional
handset.Your machine will receive the document and print it out.
Ring Pattern :C
←←/→→
/Enter
Ring Pattern :A
←←/→→
/Enter
DRD :On
←←/→→
/Enter
DRD :Off
←←/→→
/Enter
3.25
Page 39

Responding to a call request
If someone requests a call from you during a fax communication, you ll hear a long
ring after the receiving machine has received each page.To answer the call request:
1
Lift your machine s optional handset, and listen for a few seconds.You may
hear a brief series of fax tones.
2
Shortly, the line will open and the person at the other end of the line will
answer. You and the other person now can have a normal phone conversation.
The power of QuadAccess
fi
Your fax machine s QuadAccess feature sharply reduces the time you might spend
waiting for the machine to finish its work.QuadAccess is a more powerful version of
what already is a pretty powerful feature, called dual access.While a fax with normal
dual access allows you to do two things at once,QuadAccess allows you to do four
operations at once. For example,even if the machine is (1) printing a copy, (2) trans-
mitting from memory and (3) scanning documents for a different memory
transmission, you can still (4) program the machine.
Note: If your machine is MFX-1200:
The MFX-1200 cannot printing and scanning at same time.
If you try to scanning the document during the machine is printing,the
following message will be shown:
If the machine is printing the lists,the machine will scan the document
after the printing is finished.
If the machine is printing the stored document or received document,
the machine will pause the current printing job and it will give priority
to scanning the document.After scanning is finished, the machine
resumes the printing job.
F-Code Boxes
F-Code: an introduction
The
ITU-T
, the United Nations agency that standardizes international telecommunications,has created a fax industry standard for using sub-addressing and
password-based communication. One name for this standard is F-Code, and that s
what we ll call it in these instructions and on your machine s display.
How sub-addressing works
To help understand sub-addressing, think about how someone in a large company
receives mail. For example,mail for the Accounting department is first delivered to
the company s main mailroom.Then the mailroom routes the mail to Accounting.
That s the idea behind sub-addressing. Your fax and another F-Code-compatible fax
exchange special signals to indicate just where the fax really should go.Its as if the
sending fax is saying, Deliver this to room 48, and the receiving fax does just that.
Your machine has up to 50 mailboxes for these special deliveries.When someone
sends an F-Code fax to you, your machine receives it into one of those 50 mailboxes
whichever box the sender chooses.
Sending F-Code securely
For greater security,you can set up a password with each F-Code sub-address,
which lets you use secure transmission, polling and relay broadcasting when communicating with any other F-Code compatible fax machine.
Guidelines for using F-Code
(1) To use
ITU-T
sub-addressing,you must create F-Code boxes in your machine
(2) Your machine holds up to 50 of these boxes
(3) Your machine stores up to 30 documents into each F-Code box (each document
can include one or more pages)
Creating or modifying an F-Code box
Choosing the F-Code box type
Before you set up an F-Code box, first decide how your callers will use it as a
bulletin box, a security box or a relay box.
Bulletin box Stores documents that people in remote locations retrieve by
polling the box. For example, your sales branches could call in at any time to get
a printout of your latest prices that you ve stored in a bulletin box.
A bulletin box stores both scanned and retrieved documents,and it holds its
contents indefinitely (as long as the unit has
AC
power).
Security box Receives and stores F-Code secure communications.
OK: Will Scan Soon
Advanced features
3.26
Page 40

Relay box Receives documents, then relays them to other machines.The
machine that relays the document is called a hub . Your fax machine can either
send to a hub or it can be a hub.
4 elements of an F-Code box
Each F-Code box has the following four elements:
(1) F-Code box number (01-50)
(2) F-Code box name (up to 16 characters)
(3) F-Code sub-address (up to 20 characters - can include numbers and the * and #
characters only)
(4)I.
D
. Code (4 digits)
You will choose the information for each of these elements, and enter it into your
machine.The following steps will walk you through entering and changing that
information.
To create or modify an F-Code box:
1
Keep pen and paper with you as you follow these steps.As you decide on a
sub-address and enter it into your machine,write it down. Remember to:
(1) write down which box goes with which sub-address, (2) write down any
passwords or I.D. codes you enter,(3) keep these printed records in a safe
place.
2
Press Program key,C,4,0,1,
ENTER
. Depending on whether you already
have a name entered for F-Code box 01, the
LCD
shows:
or
3
Use the numeric keypad to enter the two-digit number (01-50) of the F-Code
box you want to create or modify. Here, we ve entered 0, 3 and see either:
or
4
If want to select a different F-Code box than the one that appears on the
LCD
,
use the numeric keypad to enter the two-digit F-Code box number now.
5
Press
ENTER
.What you do next depends on whether you re creating or
modifying the F-Code box:
If creating skip to step 7.
If modifying the
LCD
asks you to enter the proper I.D. code.The
LCD
shows:
6
Use the numeric keypad to enter the 4-digit
I
.
D
. code (not the
ITU-T
sub-
address and not the
ITU
-Tpassword) and then press
ENTER
.
Note: If you enter an invalid
I
.D. code, the fax machine rejects the attempt
and aborts this operation.
7
The machine is now asking you to name this F-Code box.The
LCD
shows:
or
If you do not want to enter or change this F-Code boxs name, skip to step 9.
If you do want to enter or change this F-Code boxs name, go on to step 8.
8
Enter the name by using the one-touch keys.(If necessary,review Entering
characters , page 1.12) An F-Code boxs name can be up to 16 characters in
length.
9
Press
ENTER
to save the boxs name and continue. The
LCD
shows:
or
The fax machine now asks for this F-Code box s sub-address.This is the
numerical identifier you must enter in order to communicate with any remote
F-Code compatible fax.
If you do not want to change an existing sub-address,skip to step 11.
10
Use the numeric keypad to enter the sub-address to identify this F-Code box.
The sub-address can be up to 20 characters in length and include any
combination of numbers and the * and # characters (but no other nonnumeric characters).
Note: No other F-Code box in this machine can have the same sub-address
as the one you enter here.
11
Press
ENTER
to save the sub-address.
Note: If you entered a sub-address already being used by another F-Code
box, the machine beeps and briefly displays:
The machine now returns you to step 10. Please enter a different
number for your F-Code box s sub-address.
03:Sub-Address No.
Sub-Address In Use
03:Sub-Address No.
654321_
03:Sub-Address No.
123456_
03:Sub-Address No.
_
03:Box Name;Upper
Muratec America_
03:Box Name;Upper
_
03:Set F-Code Box
Enter I.D. Code: ****
Select F-Code Box
03:Muratec America
Select F-Code Box
03:No Number Stored
Select F-Code Box
01:NY Branch Office
Select F-Code Box
01:No Number Stored
Advanced features
3.27
 Loading...