

Brother mfc-j1205w, mfc-j1215w User Manual

Online User's Guide
MFC-J1205W
MFC-J1215W
© 2021 Brother Industries, Ltd. All rights reserved.

Home > Table of Contents
Table of Contents
Before You Use Your Machine ............................................................................................................. 1
Definitions of Notes ........................................................................................................................................ 2
Notice - Disclaimer of Warranties (USA and Canada) ................................................................................... 3
Trademarks .................................................................................................................................................... 4
Open Source Licensing Remarks .................................................................................................................. 5
Copyright and License ...................................................................................................................................6
Important Notes.............................................................................................................................................. 7
Introduction to Your Machine............................................................................................................... 8
Before Using Your Machine ........................................................................................................................... 9
Control Panel Overview ...............................................................................................................................10
LED Patterns and Indications ...................................................................................................................... 12
Access Brother Utilities (Windows) .............................................................................................................. 13
Uninstall the Brother Software and Drivers (Windows) ...................................................................... 14
USB Port Location on Your Brother Machine............................................................................................... 15
Paper Handling.................................................................................................................................... 16
Load Paper................................................................................................................................................... 17
Load Paper in the Paper Tray ............................................................................................................ 18
Unprintable Area ................................................................................................................................ 31
Paper Settings....................................................................................................................................32
Acceptable Print Media ...................................................................................................................... 35
Load Documents .......................................................................................................................................... 41
Load Documents on the Scanner Glass ............................................................................................ 42
Unscannable Area.............................................................................................................................. 43
Print ...................................................................................................................................................... 44
Print from Your Computer (Windows)........................................................................................................... 45
Print a Photo (Windows)..................................................................................................................... 46
Print a Document (Windows).............................................................................................................. 47
Cancel a Print Job (Windows) ............................................................................................................ 48
Print More Than One Page on a Single Sheet of Paper (N in 1) (Windows)...................................... 49
Print as a Poster (Windows)............................................................................................................... 50
Print on Both Sides of the Paper Manually (Manual 2-sided Printing) (Windows) ............................. 51
Print as a Booklet Manually (Windows).............................................................................................. 54
Print a Color Document in Grayscale (Windows) ............................................................................... 56
Prevent Smudged Printouts and Paper Jams (Windows) .................................................................. 57
Use a Preset Print Profile (Windows) ................................................................................................. 58
Change the Default Print Settings (Windows) .................................................................................... 61
Print Settings (Windows) .................................................................................................................... 62
Print from Your Computer (Mac) ..................................................................................................................66
Print Using Brother iPrint&Scan (Windows/Mac) ......................................................................................... 67
Print Photos or Documents Using Brother iPrint&Scan (Windows/Mac)............................................ 68
Print More Than One Page on a Single Sheet of Paper Using Brother iPrint&Scan (N in 1)
(Windows) .......................................................................................................................................... 70
Print a Color Document in Grayscale Using Brother iPrint&Scan (Windows/Mac) ............................ 71
Print an Email Attachment............................................................................................................................ 72
Scan...................................................................................................................................................... 73
i

Home > Table of Contents
Scan Using the Buttons on Your Brother Machine....................................................................................... 74
Scan Using the Buttons on Your Brother Machine ............................................................................. 75
Scan to an Editable Text File Using OCR........................................................................................... 78
Save Scanned Data as an Email Attachment .................................................................................... 79
Web Services for Scanning on Your Network (Windows 7, Windows 8.1, and Windows 10) ............ 80
Scan Using Brother iPrint&Scan (Windows/Mac) ........................................................................................ 84
Scan from Your Computer (Windows)..........................................................................................................85
Scan Using Nuance™ PaperPort™ 14SE or Other Windows Applications......................................... 86
Scan Using Windows Fax and Scan .................................................................................................. 91
Scan from Your Computer (Mac).................................................................................................................. 94
Copy ..................................................................................................................................................... 95
Copy Overview.............................................................................................................................................96
Copy a Document .......................................................................................................................................97
Copy Using Brother Mobile Connect............................................................................................................98
Copy an ID Card................................................................................................................................. 99
Make Page Layout Copies (N in 1 or Poster)................................................................................... 100
Copy Settings ................................................................................................................................... 102
Network .............................................................................................................................................. 104
Supported Basic Network Features ........................................................................................................... 105
Configure Network Settings ....................................................................................................................... 106
Configure Network Settings Using the Control Panel....................................................................... 107
Wireless Network Settings ......................................................................................................................... 108
Use the Wireless Network ................................................................................................................ 109
Use Wireless Direct.......................................................................................................................... 116
Enable/Disable Wireless LAN .......................................................................................................... 119
Print the WLAN Report..................................................................................................................... 120
Network Features.......................................................................................................................................123
Print the Network Configuration Report............................................................................................ 124
Reset the Network Settings to Factory Settings............................................................................... 125
Brother Management Tools........................................................................................................................ 126
Security .............................................................................................................................................. 127
Before Using Network Security Features ................................................................................................... 128
Configure Certificates for Device Security ................................................................................................. 129
Supported Security Certificate Features .......................................................................................... 130
Step by Step Guide for Creating and Installing a Certificate ............................................................ 131
Create a Self-signed Certificate ....................................................................................................... 132
Create CSR and Install a Certificate from a Certificate Authority (CA) ............................................ 133
Import and Export the Certificate and Private Key ........................................................................... 137
Manage Multiple Certificates ............................................................................................................ 140
Use SSL/TLS .............................................................................................................................................141
Introduction to SSL/TLS ................................................................................................................... 142
Manage Your Network Machine Securely Using SSL/TLS...............................................................145
Print Documents Securely Using SSL/TLS ...................................................................................... 150
Mobile Connect ................................................................................................................................. 152
AirPrint .......................................................................................................................................................153
AirPrint Overview.............................................................................................................................. 154
Before Using AirPrint (macOS) ........................................................................................................ 155
ii

Home > Table of Contents
Print Using AirPrint ........................................................................................................................... 156
Scan Using AirPrint (macOS)........................................................................................................... 159
Mopria® Print Service................................................................................................................................. 160
Brother Mobile Connect .............................................................................................................................161
Brother iPrint&Scan for Windows and Mac ................................................................................... 162
Brother iPrint&Scan Overview for Windows and Mac ................................................................................ 163
Troubleshooting................................................................................................................................ 164
Error and Maintenance LED Indications .................................................................................................... 165
Printer Jam or Paper Jam .......................................................................................................................... 170
Paper is Jammed Inside the Machine .............................................................................................. 171
If You Are Having Difficulty with Your Machine .......................................................................................... 173
Paper Handling and Printing Problems ............................................................................................ 174
Other Problems ................................................................................................................................ 180
Network Problems ............................................................................................................................ 181
AirPrint Problems ............................................................................................................................. 188
Check the Machine Information .................................................................................................................189
Reset Your Machine................................................................................................................................... 190
Routine Maintenance ........................................................................................................................ 191
Replace the Ink Cartridges......................................................................................................................... 192
Clean Your Brother Machine ...................................................................................................................... 195
Clean the Scanner............................................................................................................................ 196
Clean the Print Head from Your Brother Machine ............................................................................ 197
Clean the Print Head Using Web Based Management .................................................................... 198
Clean the Print Head from Your Computer (Windows).....................................................................199
Clean the Outside of the Machine .................................................................................................... 201
Clean the Machine's Printer Platen .................................................................................................. 202
Clean the Paper Feed Rollers .......................................................................................................... 203
Clean the Base Pad ......................................................................................................................... 204
Clean the Paper Pick-up Rollers ...................................................................................................... 205
Check Your Brother Machine .....................................................................................................................206
Check the Print Quality..................................................................................................................... 207
Monitor Machine Status from Your Computer (Windows) ................................................................ 208
Monitor Machine Status Using Brother iPrint&Scan (Windows/Mac) ............................................... 213
Check the Print Alignment from Your Brother Machine.............................................................................. 215
Check the Print Alignment Using Web Based Management......................................................................216
Change the Print Options to Improve Your Print Results ........................................................................... 217
Pack and Ship Your Machine ..................................................................................................................... 218
Machine Settings............................................................................................................................... 220
Change Machine Settings Using Web Based Management ...................................................................... 221
What is Web Based Management?.................................................................................................. 222
Access Web Based Management .................................................................................................... 223
Set or Change a Login Password for Web Based Management...................................................... 225
General Settings............................................................................................................................... 226
In the Event of Power Failure (Memory Storage).......................................................................................232
Appendix............................................................................................................................................ 233
Specifications ............................................................................................................................................. 234
iii

Home > Table of Contents
Supply Specifications ................................................................................................................................. 238
Brother Help and Customer Support..........................................................................................................239
iv

Home > Before You Use Your Machine
Before You Use Your Machine
• Definitions of Notes
• Notice - Disclaimer of Warranties (USA and Canada)
• Trademarks
• Open Source Licensing Remarks
• Copyright and License
• Important Notes
1
Home > Before You Use Your Machine > Definitions of Notes
Definitions of Notes
We use the following symbols and conventions throughout this User's Guide:
WARNING
CAUTION
IMPORTANT
NOTE
Bold Bold style identifies buttons on the machine's control panel or computer screen.
Italics Italicized style emphasizes an important point or refers you to a related topic.
Related Information
• Before You Use Your Machine
WARNING indicates a potentially hazardous situation which, if not avoided, could
result in death or serious injuries.
CAUTION indicates a potentially hazardous situation which, if not avoided, may
result in minor or moderate injuries.
IMPORTANT indicates a potentially hazardous situation which, if not avoided, may
result in damage to property or loss of product functionality.
NOTE specifies the operating environment, conditions for installation, or special
conditions of use.
Tips icons indicate helpful hints and supplementary information.
Electrical Hazard icons alert you to possible electrical shock.
2

Home > Before You Use Your Machine > Notice - Disclaimer of Warranties (USA and Canada)
Notice - Disclaimer of Warranties (USA and Canada)
BROTHER’S LICENSOR(S), AND THEIR DIRECTORS, OFFICERS, EMPLOYEES OR AGENTS
(COLLECTIVELY BROTHER’S LICENSOR) MAKE NO WARRANTIES, EXPRESS OR IMPLIED, INCLUDING
WITHOUT LIMITATION THE IMPLIED WARRANTIES OF MERCHANTABILITY AND FITNESS FOR A
PARTICULAR PURPOSE, REGARDING THE SOFTWARE. BROTHER’S LICENSOR(S) DOES NOT
WARRANT, GUARANTEE OR MAKE ANY REPRESENTATIONS REGARDING THE USE OR THE RESULTS
OF THE USE OF THE SOFTWARE IN TERMS OF ITS CORRECTNESS, ACCURACY, RELIABILITY,
CURRENTNESS OR OTHERWISE. THE ENTIRE RISK AS TO THE RESULTS AND PERFORMANCE OF THE
SOFTWARE IS ASSUMED BY YOU. THE EXCLUSION OF IMPLIED WARRANTIES IS NOT PERMITTED BY
SOME STATES IN THE USA AND SOME PROVINCES IN CANADA. THE ABOVE EXCLUSION MAY NOT
APPLY TO YOU.
IN NO EVENT WILL BROTHER’S LICENSOR(S) BE LIABLE TO YOU FOR ANY CONSEQUENTIAL,
INCIDENTAL OR INDIRECT DAMAGES (INCLUDING DAMAGES FOR LOSS OF BUSINESS PROFITS,
BUSINESS INTERRUPTION, LOSS OF BUSINESS INFORMATION, AND THE LIKE) ARISING OUT OF THE
USE OR INABILITY TO USE THE SOFTWARE EVEN IF BROTHER’S LICENSOR HAS BEEN ADVISED OF
THE POSSIBILITY OF SUCH DAMAGES. BECAUSE SOME STATES IN THE USA AND SOME PROVINCES IN
CANADA DO NOT ALLOW THE EXCLUSION OR LIMITATION OF LIABILITY FOR CONSEQUENTIAL OR
INCIDENTAL DAMAGES, THE ABOVE LIMITATIONS MAY NOT APPLY TO YOU. IN ANY EVENT BROTHER’S
LICENSOR’S LIABILITY TO YOU FOR ACTUAL DAMAGES FROM ANY CAUSE WHATSOEVER, AND
REGARDLESS OF THE FORM OF THE ACTION (WHETHER IN CONTRACT, TORT (INCLUDING
NEGLIGENCE), PRODUCT LIABILITY OR OTHERWISE), WILL BE LIMITED TO $50.
Related Information
• Before You Use Your Machine
3

Home > Before You Use Your Machine > Trademarks
Trademarks
Apple, App Store, AirPrint, Mac, iPad, iPhone, iPod touch, macOS, iPadOS and Safari are trademarks of Apple
Inc., registered in the United States and other countries.
Nuance and PaperPort are trademarks or registered trademarks of Nuance Communications, Inc. or its affiliates
in the United States and/or other countries.
Wi-Fi® and Wi-Fi Alliance® are registered trademarks of Wi-Fi Alliance®.
WPA™, WPA2™, and Wi-Fi Protected Setup™ are trademarks of Wi-Fi Alliance®.
Android, Google Play and Google Chrome are trademarks of Google LLC.
Intel is a trademark of Intel Corporation in the U.S and/or other countries.
The Bluetooth® word mark is a registered trademark owned by the Bluetooth SIG, Inc. and any use of such
marks by Brother Industries, Ltd. is under license. Other trademarks and trade names are those of their
respective owners.
Mopria® and the Mopria® logo are registered and/or unregistered trademarks and service marks of Mopria
Alliance, Inc. in the United States and other countries. Unauthorized use is strictly prohibited.
Each company whose software title is mentioned in this manual has a Software License Agreement specific to its
proprietary programs.
Software Trademarks
FlashFX® is a registered trademark of Datalight, Inc.
FlashFX® Pro™ is a trademark of Datalight, Inc.
FlashFX® Tera™ is a trademark of Datalight, Inc.
Reliance™ is a trademark of Datalight, Inc.
Reliance Nitro™ is a trademark of Datalight, Inc.
Datalight® is a registered trademark of Datalight, Inc.
Any trade names and product names of companies appearing on Brother products, related documents
and any other materials are all trademarks or registered trademarks of those respective companies.
Related Information
• Before You Use Your Machine
4

Home > Before You Use Your Machine > Open Source Licensing Remarks
Open Source Licensing Remarks
This product includes open-source software.
To view Open Source Licensing Remarks and Copyright Information, go to your model's Manuals page at
support.brother.com.
Related Information
• Before You Use Your Machine
5

Home > Before You Use Your Machine > Copyright and License
Copyright and License
©2021 Brother Industries, Ltd. All rights reserved.
This product includes software developed by the following vendors:
This product includes the “KASAGO TCP/IP” software developed by ZUKEN ELMIC, Inc.
Copyright 1989-2020 Datalight, Inc., All Rights Reserved.
FlashFX® Copyright 1998-2020 Datalight, Inc.
Related Information
• Before You Use Your Machine
6

Home > Before You Use Your Machine > Important Notes
Important Notes
• Check support.brother.com for Brother driver and software updates.
• To keep your machine performance up to date, check support.brother.com for the latest firmware upgrade.
Otherwise, some of your machine's functions may not be available.
• Do not use this product outside the country of purchase as it may violate the wireless telecommunication and
power regulations of that country.
• When replacing or disposing of your machine, Brother strongly recommends resetting it to its factory settings
to remove all personal information.
• Windows 10 in this document represents Windows 10 Home, Windows 10 Pro, Windows 10 Education and
Windows 10 Enterprise.
• Windows Server 2008 in this document represents Windows Server 2008 and Windows Server 2008 R2.
• In this User's Guide, the illustrations of the MFC-J1205W are used unless otherwise specified.
• The screens in this User's Guide are for illustration purposes only and may differ from the actual screens.
• Unless otherwise specified, the screens in this manual are from Windows 10 and macOS v10.15.x. Screens
on your computer may vary depending on your operating system.
• The contents of this guide and the specifications of this product are subject to change without notice.
• In this document XXX-XXXX represents your machine's model name.
Related Information
• Before You Use Your Machine
Related Topics:
• Reset Your Machine
7

Home > Introduction to Your Machine
Introduction to Your Machine
• Before Using Your Machine
• Control Panel Overview
• LED Patterns and Indications
• Access Brother Utilities (Windows)
• USB Port Location on Your Brother Machine
8

Home > Introduction to Your Machine > Before Using Your Machine
Before Using Your Machine
Before attempting any printing operation, confirm the following:
• Make sure you have installed the correct software and drivers for your machine.
• For USB cable users: Make sure the interface cable is physically secure.
Selecting the correct type of paper
For high quality printing, it is important to select the correct type of paper. Be sure to read the information about
acceptable paper before buying paper, and to determine the printable area depending on the settings in the
printer driver or in the application you use to print.
Firewall (Windows)
If your computer is protected by a firewall and you are unable to network print or network scan, you may need to
configure the firewall settings. If you are using the Windows Firewall and you installed the drivers using the steps
in the installer, the necessary firewall settings have been already set. If you are using any other personal firewall
software, see the User's Guide for your software or contact the software manufacturer.
Related Information
• Introduction to Your Machine
9
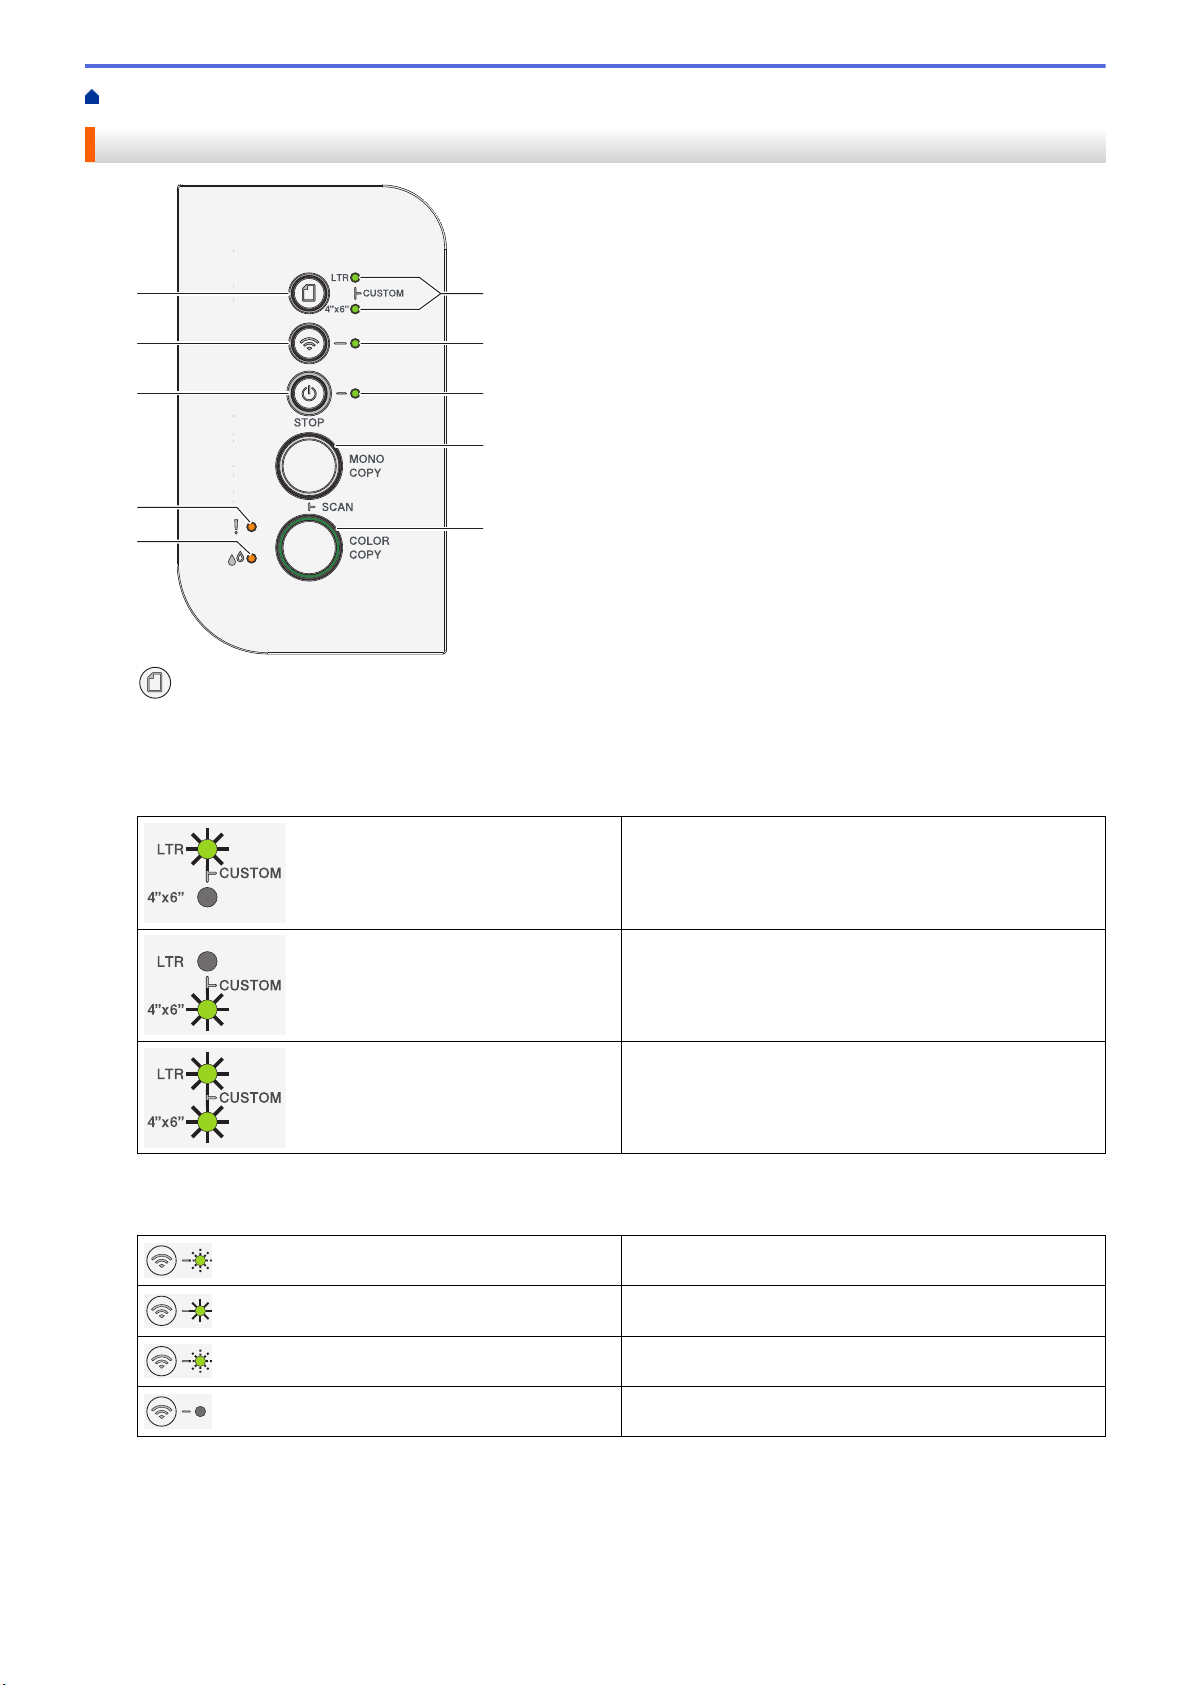
Home > Introduction to Your Machine > Control Panel Overview
4
10
9
1
7
8
2
3
6
5
Control Panel Overview
1.
2. LTR LED/4" x 6" LED
3. Wi-Fi LED
(Paper)
Press this button to set the Paper Size and Paper Type settings.
Indicates the Paper Size and Paper Type setting selected.
• Indicates the wireless network status.
• Paper type: Plain
• Paper size: Letter
(For printing standard documents)
• Paper type: Other glossy
• Paper size: 4” x 6”
(For printing photos)
Custom Settings
Connecting (Blinking)
4. Power LED
Indicates the machine's status.
5. MONO COPY
• Press to start making copies in black and white.
Connected (Lit)
Disconnected (Blinking slowly)
Off
10

• Press simultaneously with COLOR COPY to start scanning documents (in color or black and white,
depending on the scan setting).
• Press simultaneously with (STOP) to access the Reset Mode.
6. COLOR COPY
• Press to start making copies in full color.
7. Ink LED
Indicates when the machine detects an ink error or is in Maintenance Mode.
8. Warning LED
Indicates when the machine detects an error or is in Reset Mode.
9.
10. (Wi-Fi)
(STOP) Power On/Off
• Press to stop an operation.
• Press to exit from a selected mode.
• Press
Press and hold down (STOP) to turn off the machine and cancel all of the remaining operations. The
Power LED blinks and stays on for a few seconds before turning itself off.
If you turn off the machine using
quality. To prolong print head life, provide better ink efficiency, and maintain print quality, keep your
machine connected to a power source at all times.
• Press the button by itself or simultaneously with another button to configure the wireless settings or print
network reports. Use only when the machine is idle.
• Press this button and COLOR COPY simultaneously to restart the Wi-Fi if you cannot connect to your
wireless network.
• Press simultaneously with
(STOP) to turn on the machine.
(STOP), it will still clean the print head periodically to maintain print
(STOP) to access the Wi-Fi Mode.
Related Information
• Introduction to Your Machine
11
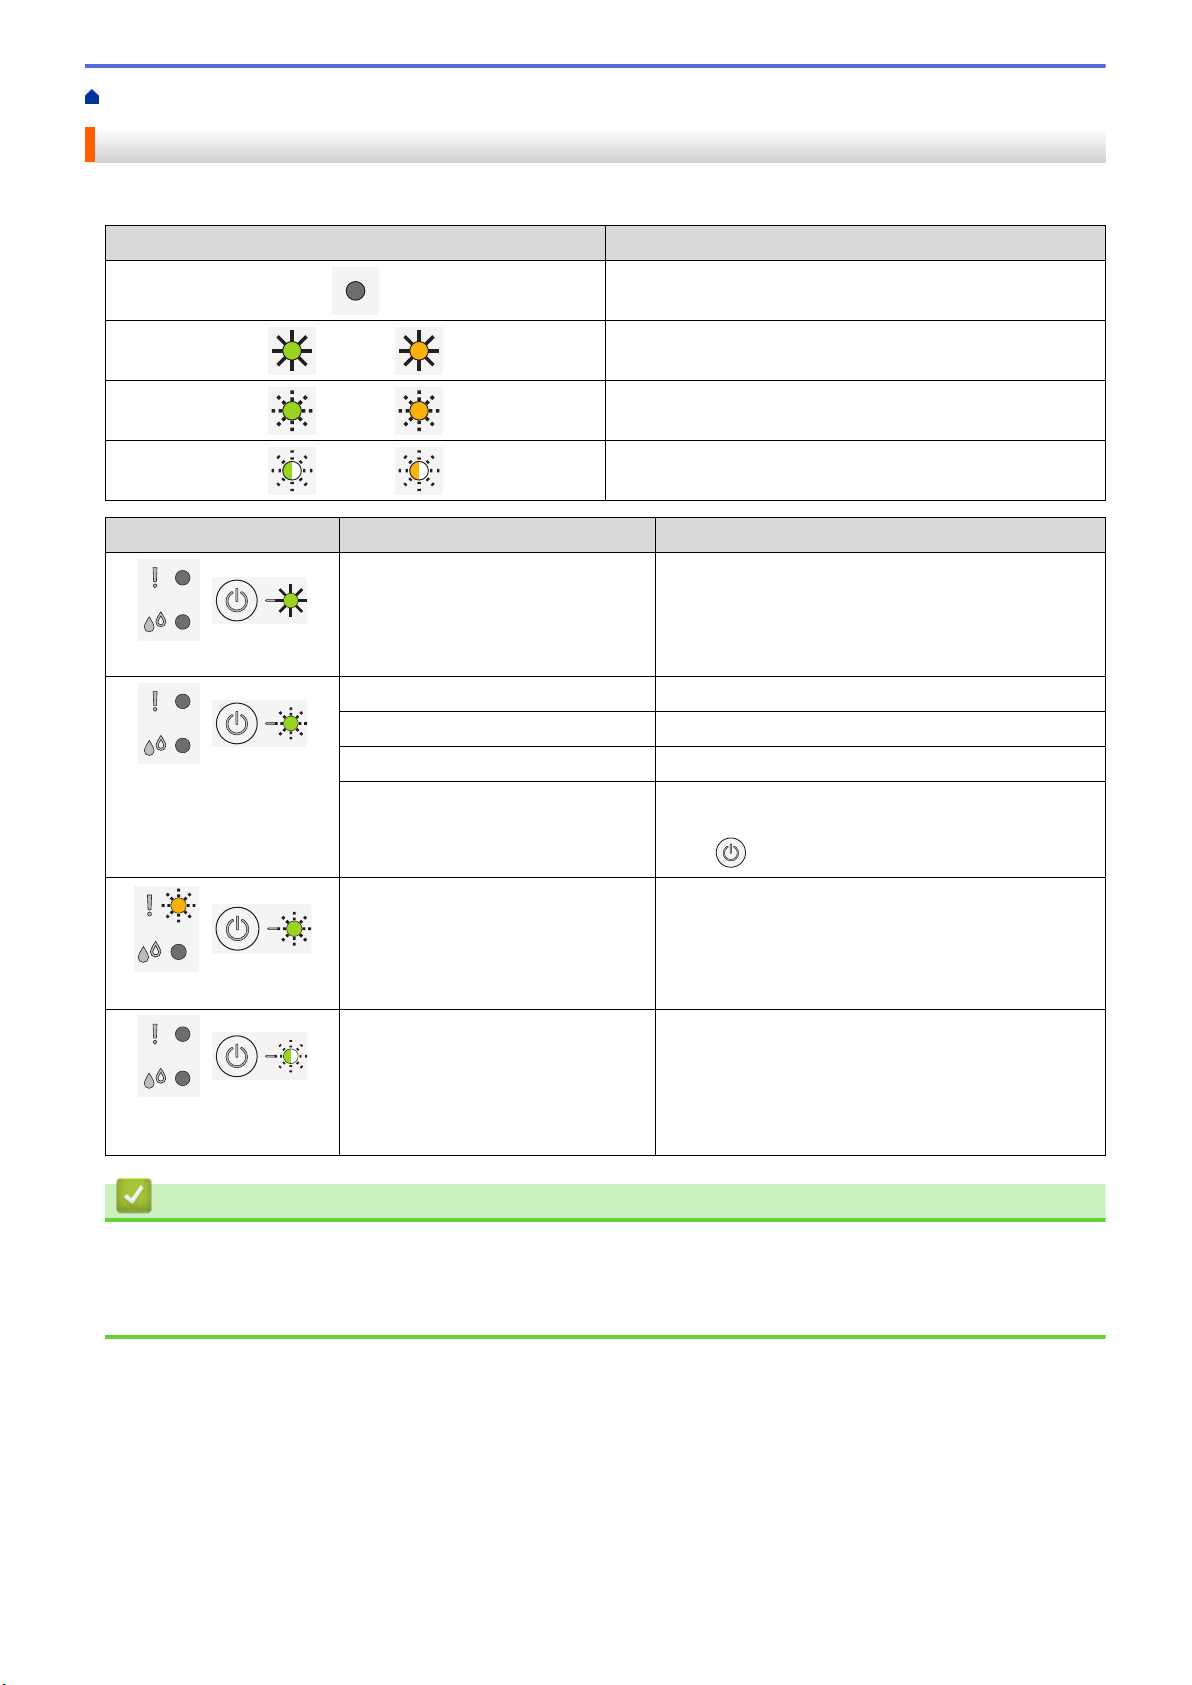
Home > Introduction to Your Machine > LED Patterns and Indications
LED Patterns and Indications
The LEDs on your machine's control panel light up or blink to indicate machine status.
LED Description
The LED is off.
The LED is lit.
The LED is blinking.
The LED is blinking slowly and faintly.
LED Status Description
Standby The machine is ready to print.
(Lit)
Busy The machine is processing a print job.
Warming Up (Low Temperature) The machine is warming up.
Cooling Down (High Temperature) The machine is cooling down.
(Blinking)
Data Remaining There is print data in the machine's memory. To
Job Canceled The machine is canceling the print job.
(Blinking alternately)
Sleep In Sleep mode (Power Save mode), the machine
(Blinking slowly and
faintly)
Related Information
• Introduction to Your Machine
cancel the job and clear it from machine memory,
press (STOP).
acts as if it is turned off, but it can still receive data.
When you send a print job, the machine wakes up.
Related Topics:
• Error and Maintenance LED Indications
12
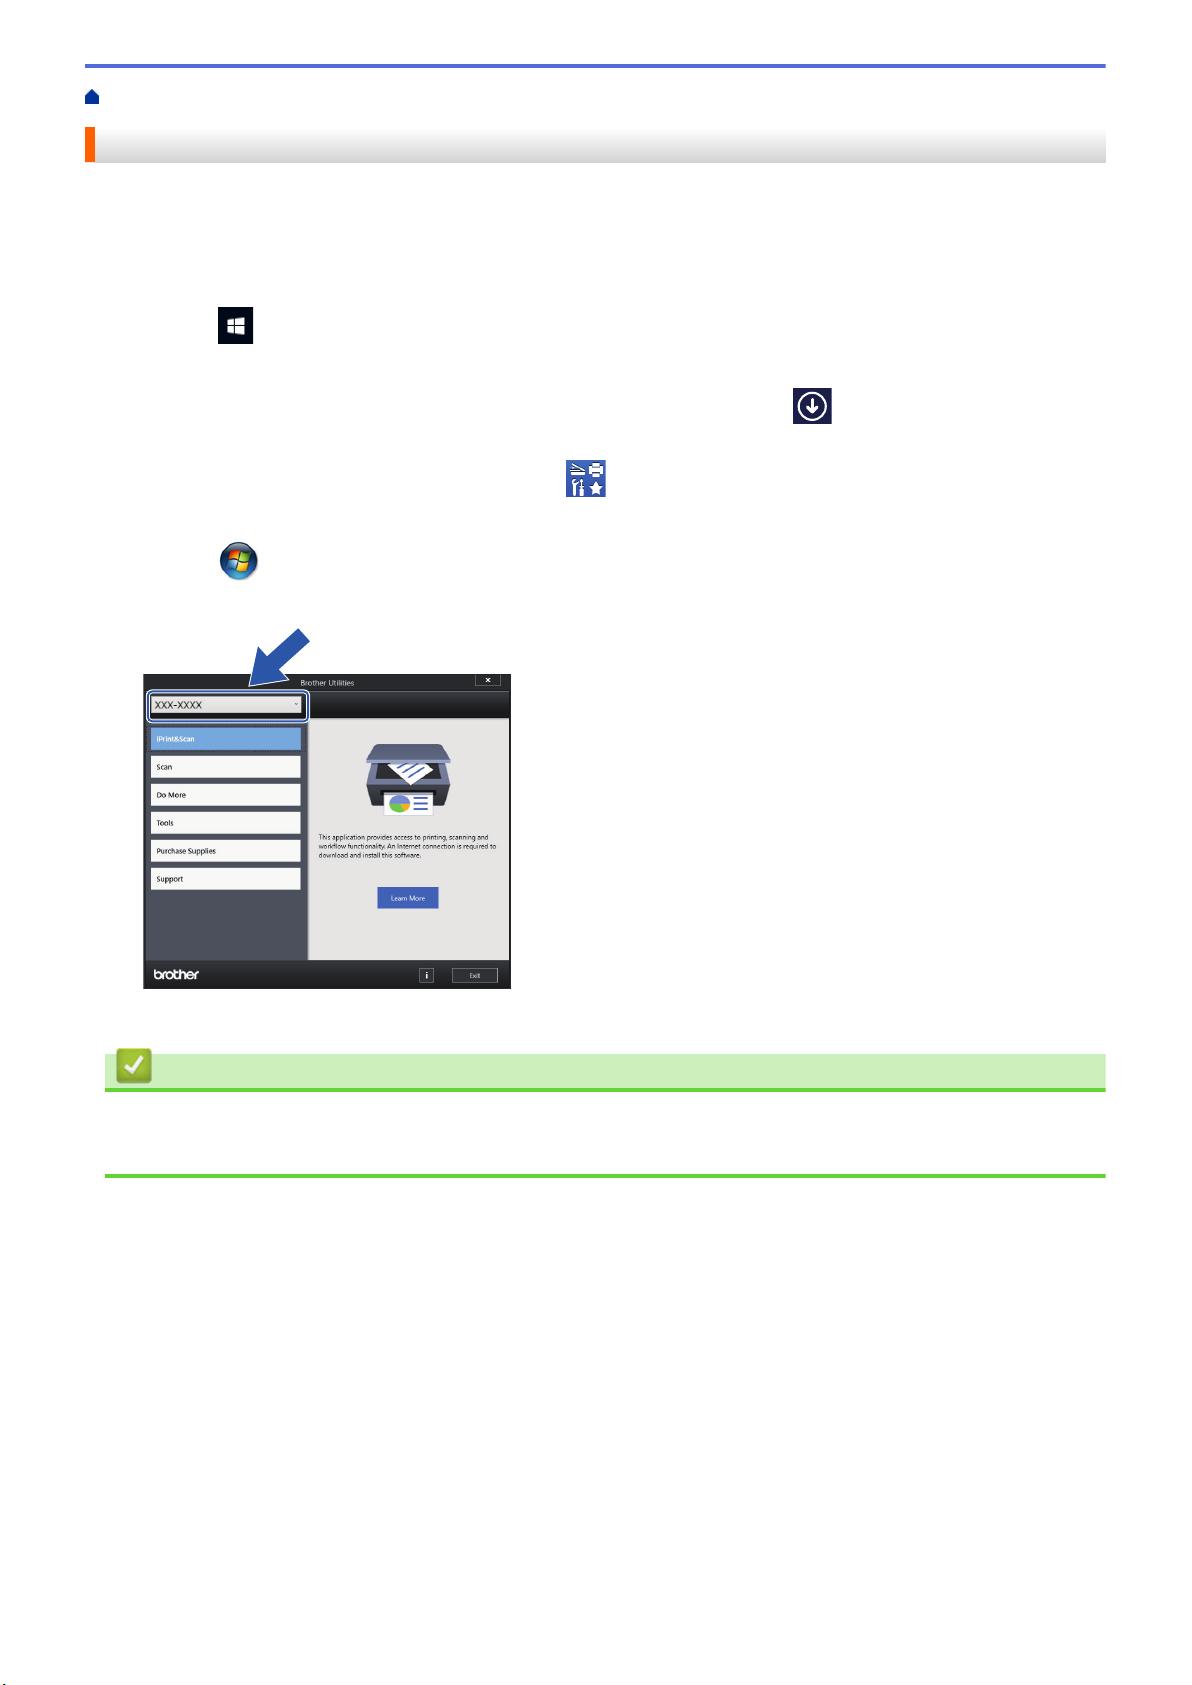
Home > Introduction to Your Machine > Access Brother Utilities (Windows)
Access Brother Utilities (Windows)
Brother Utilities is an application launcher that offers convenient access to all Brother applications installed on
your computer.
1. Do one of the following:
• Windows 10
Click
• Windows 8.1
Move your mouse to the lower left corner of the Start screen and click (if using a touch-based
device, swipe up from the bottom of the Start screen to bring up the Apps screen).
When the Apps screen appears, tap or click (Brother Utilities).
• Windows 7
Click
2. Select your machine.
> Brother > Brother Utilities.
(Start) > All Programs > Brother > Brother Utilities.
3. Select the operation you want to use.
Related Information
• Introduction to Your Machine
• Uninstall the Brother Software and Drivers (Windows)
13

Home > Introduction to Your Machine > Access Brother Utilities (Windows) > Uninstall the Brother Software
and Drivers (Windows)
Uninstall the Brother Software and Drivers (Windows)
1. Do one of the following:
• Windows 10
Click
• Windows 8.1
Move your mouse to the lower left corner of the Start screen and click (if using a touch-based
device, swipe up from the bottom of the Start screen to bring up the Apps screen).
When the Apps screen appears, tap or click
• Windows 7
Click (Start) > All Programs > Brother > Brother Utilities.
2. Click the drop-down list, and then select your model name (if not already selected). Click Tools in the left
navigation bar, and then click Uninstall.
Follow the instructions in the dialog box to uninstall the software and drivers.
> Brother > Brother Utilities.
(Brother Utilities).
Related Information
• Access Brother Utilities (Windows)
14
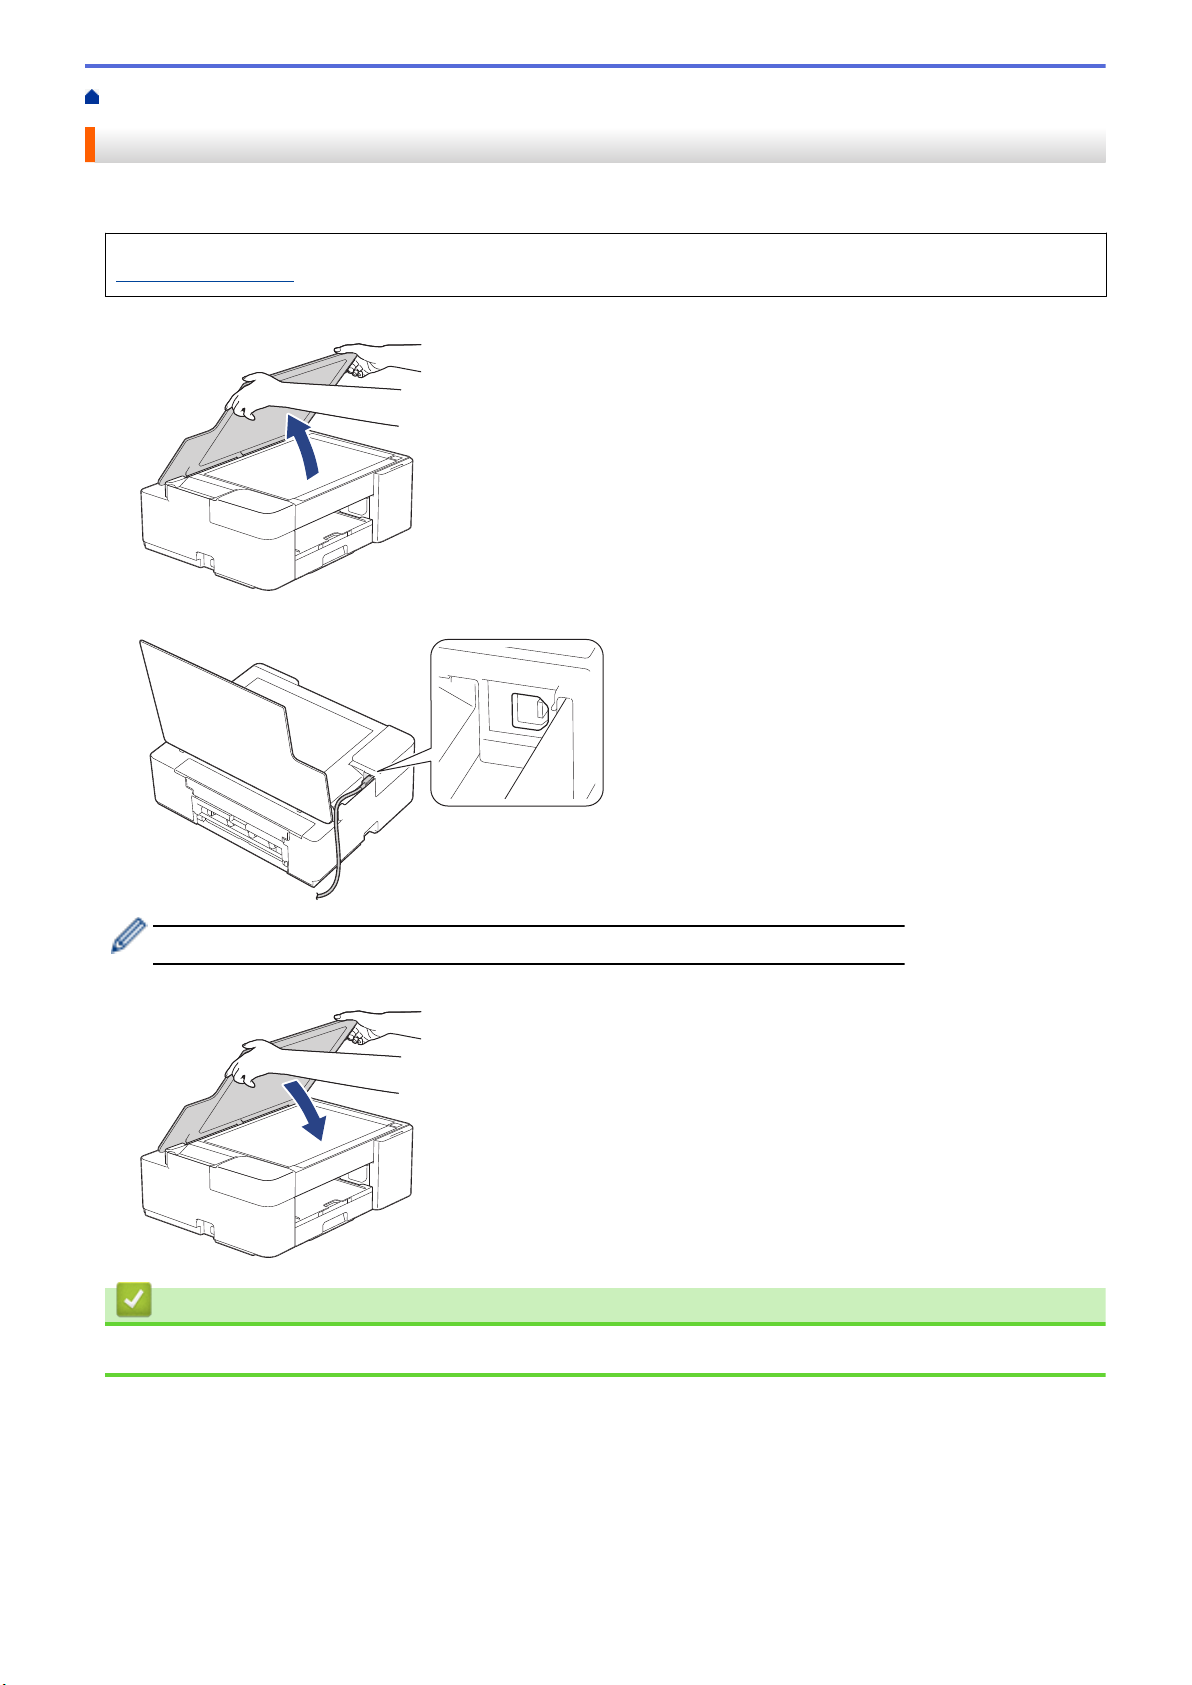
Home > Introduction to Your Machine > USB Port Location on Your Brother Machine
USB Port Location on Your Brother Machine
The USB port is located under the document cover.
To install the driver and software necessary to use your machine, go to your model's Downloads page at
support.brother.com.
1. Lift the document cover.
2. Locate the correct port under the document cover as shown.
Carefully guide the cable through the cable channel and out the back of the machine.
3. Gently close the document cover.
Related Information
• Introduction to Your Machine
15

Home > Paper Handling
Paper Handling
• Load Paper
• Load Documents
16

Home > Paper Handling > Load Paper
Load Paper
• Load Paper in the Paper Tray
• Unprintable Area
• Paper Settings
• Acceptable Print Media
• Error and Maintenance LED Indications
• Paper Handling and Printing Problems
17

Home > Paper Handling > Load Paper > Load Paper in the Paper Tray
Load Paper in the Paper Tray
• Load Cut-Sheet Paper or Photo 2L Paper in the Paper Tray
• Load Legal Size Paper in the Paper Tray
• Load Photo Paper in the Paper Tray
• Load Envelopes in the Paper Tray
18
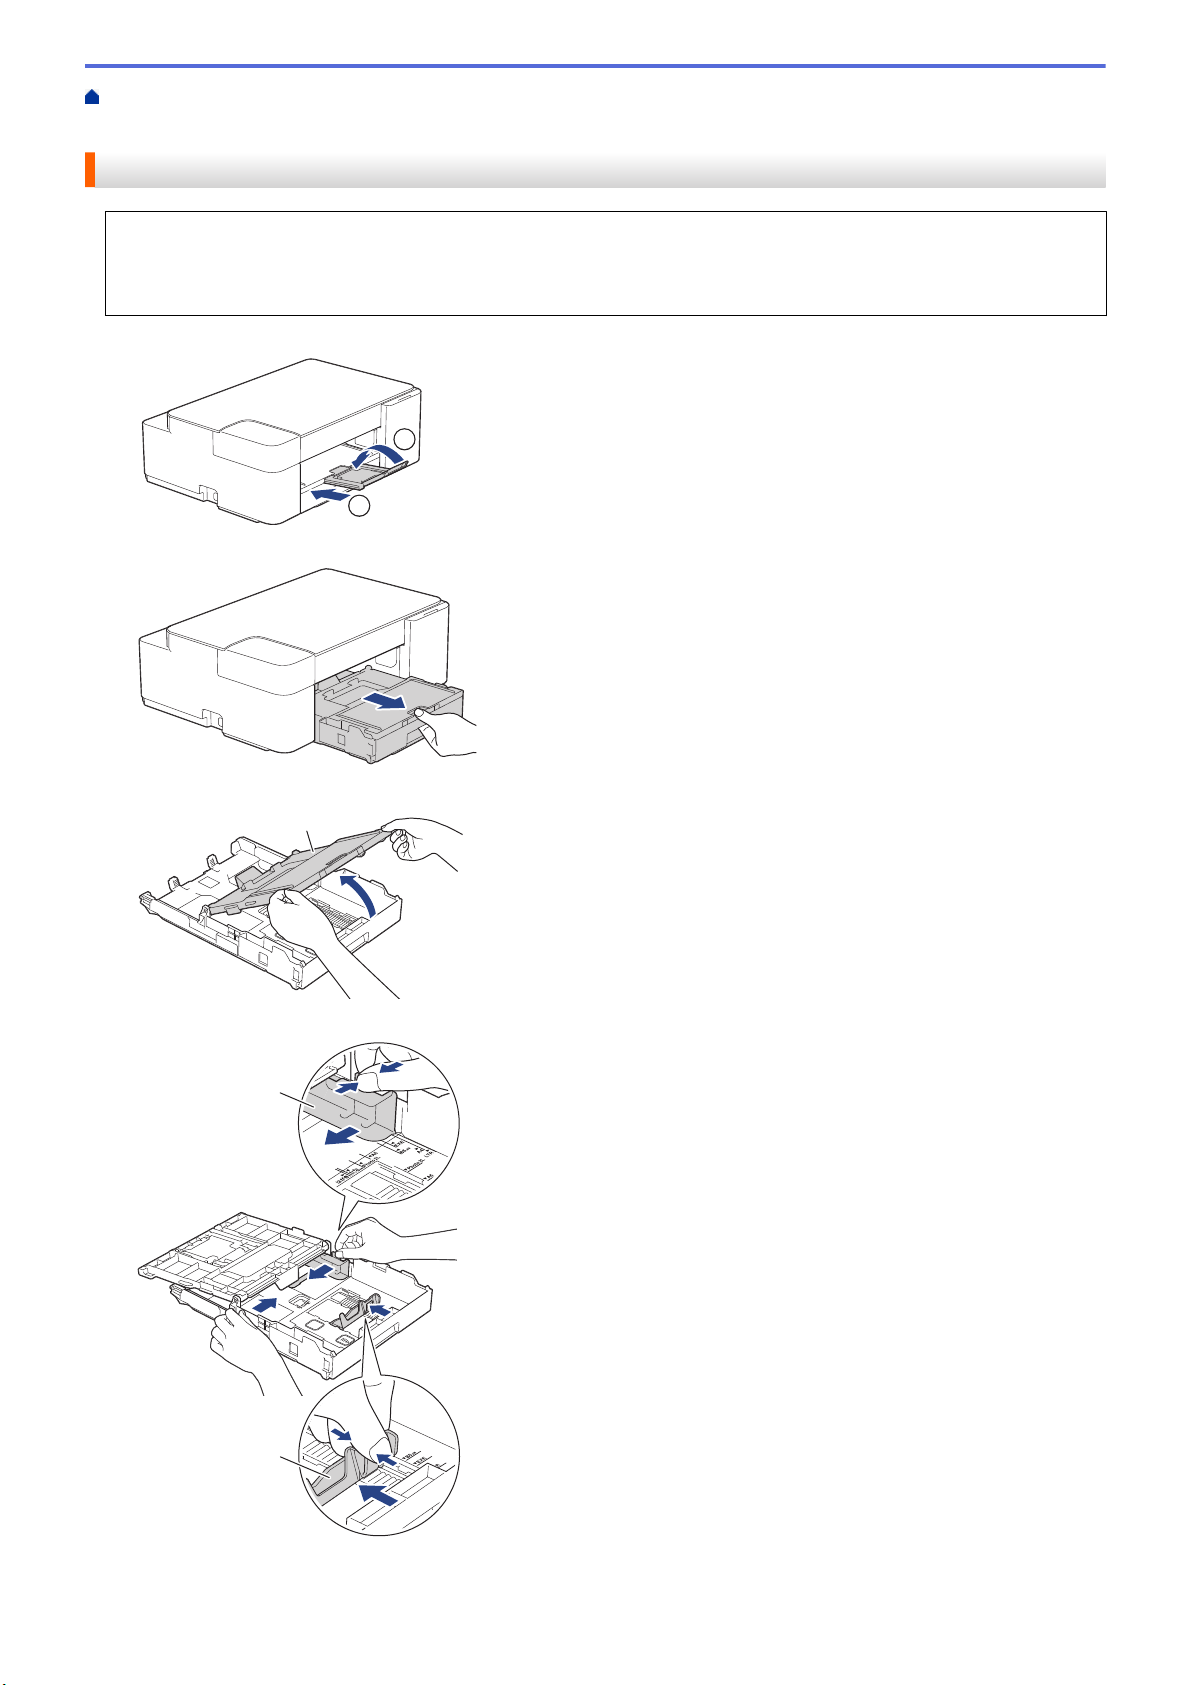
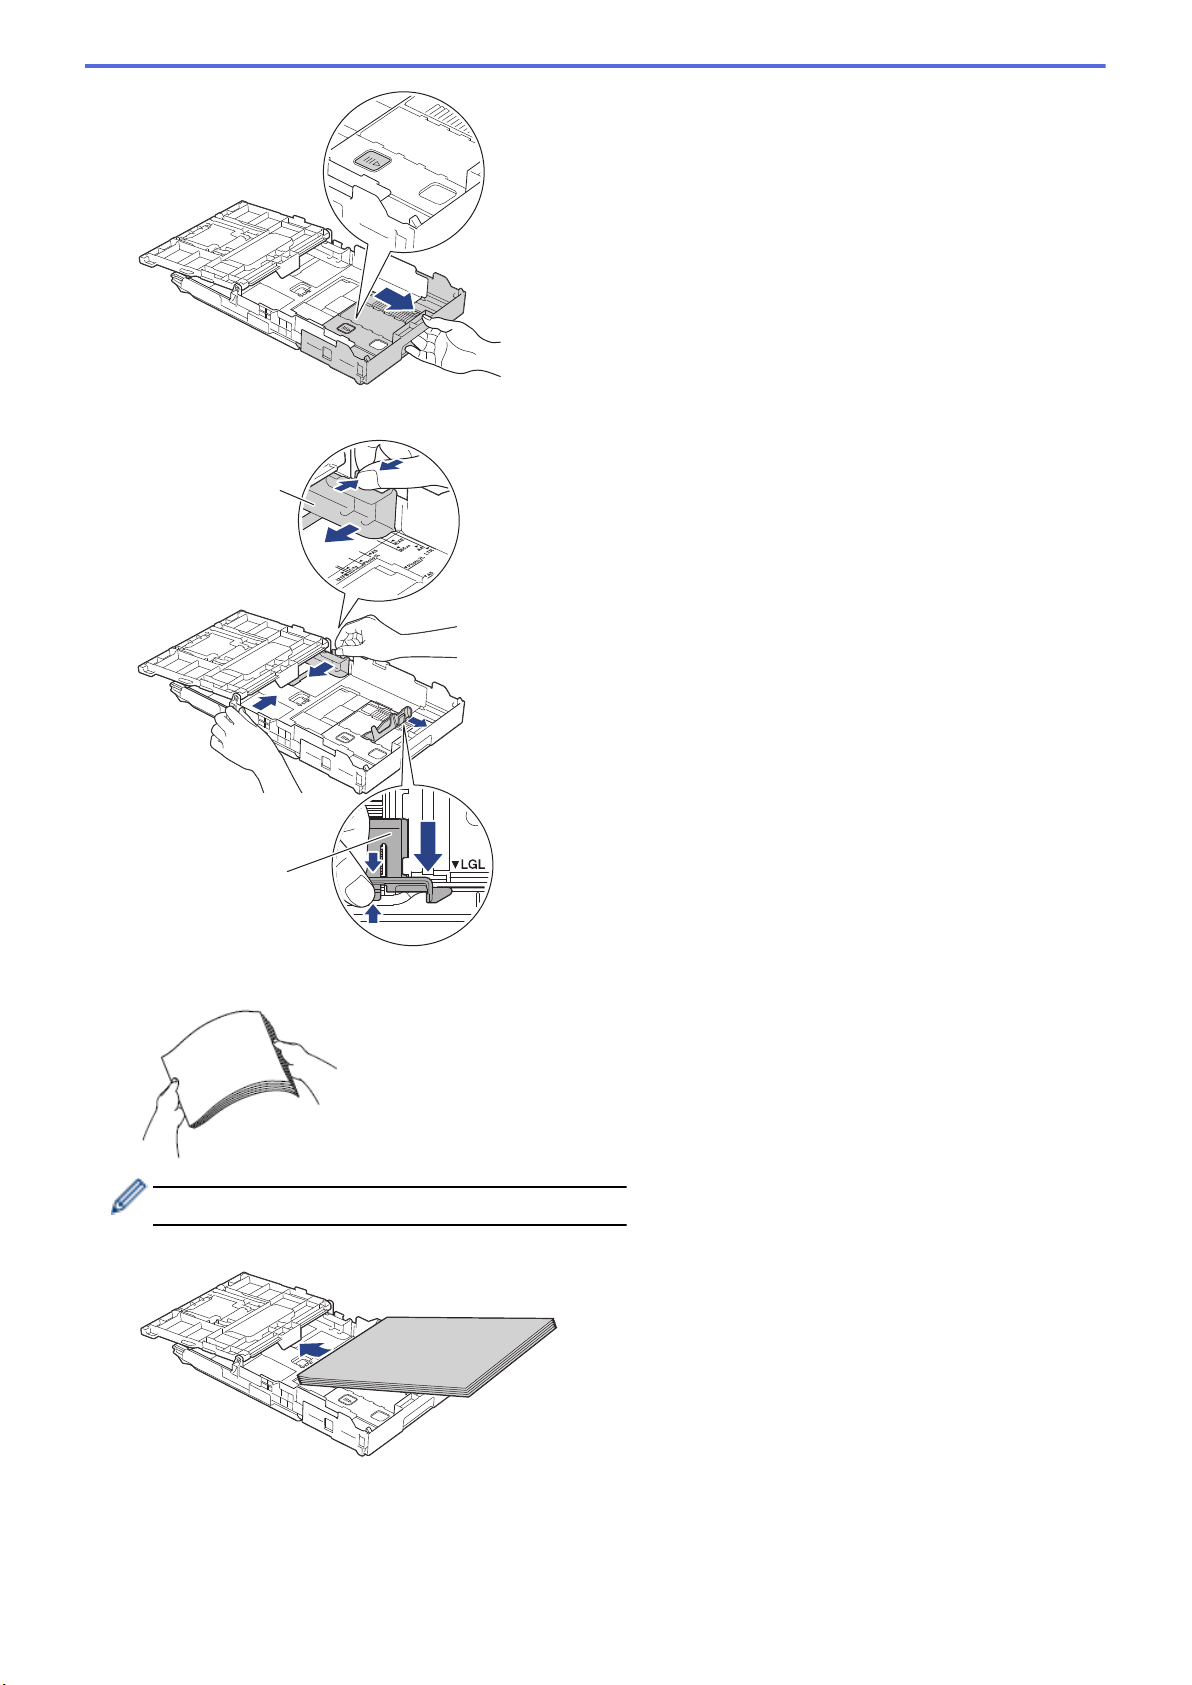
Home > Paper Handling > Load Paper > Load Paper in the Paper Tray > Load Cut-Sheet Paper or Photo
2
1
1
1
2
2L Paper in the Paper Tray
Load Cut-Sheet Paper or Photo 2L Paper in the Paper Tray
• Load only one size and type of paper in the paper tray at a time.
• When you load a different paper size in the tray, you must change the Paper Size setting in the machine or
the paper size setting on your computer.
1. If the paper support flap (1) is open, close it, and then close the paper support (2).
2. Pull the paper tray completely out of the machine.
3. Lift the output paper tray cover (1).
4. Gently press and slide the paper width guides (1) and then the paper length guide (2) to fit the paper size.
5. Fan the stack of paper well to avoid paper jams and misfeeds.
19

Always make sure the paper is not curled or wrinkled.
1
1
6. Gently load paper in the paper tray with the printing surface face down.
Make sure the paper is flat in the tray and the paper length guide (1) touches the edges of the paper.
IMPORTANT
• Be careful not to push the paper in too far; it may lift at the back of the tray and cause paper feed
problems.
• Loading more than 20 sheets of Photo 2L (5" x 7")/(13 x 18 cm) paper may cause paper jams.
To add paper before the tray is empty, remove the paper from the tray and combine it with the paper you
are adding. Always fan the stack of paper well to prevent the machine from feeding multiple pages.
7. Gently adjust the paper width guides (1) to fit the paper.
Make sure the paper width guides touch the edges of the paper.
8. Close the output paper tray cover.
20
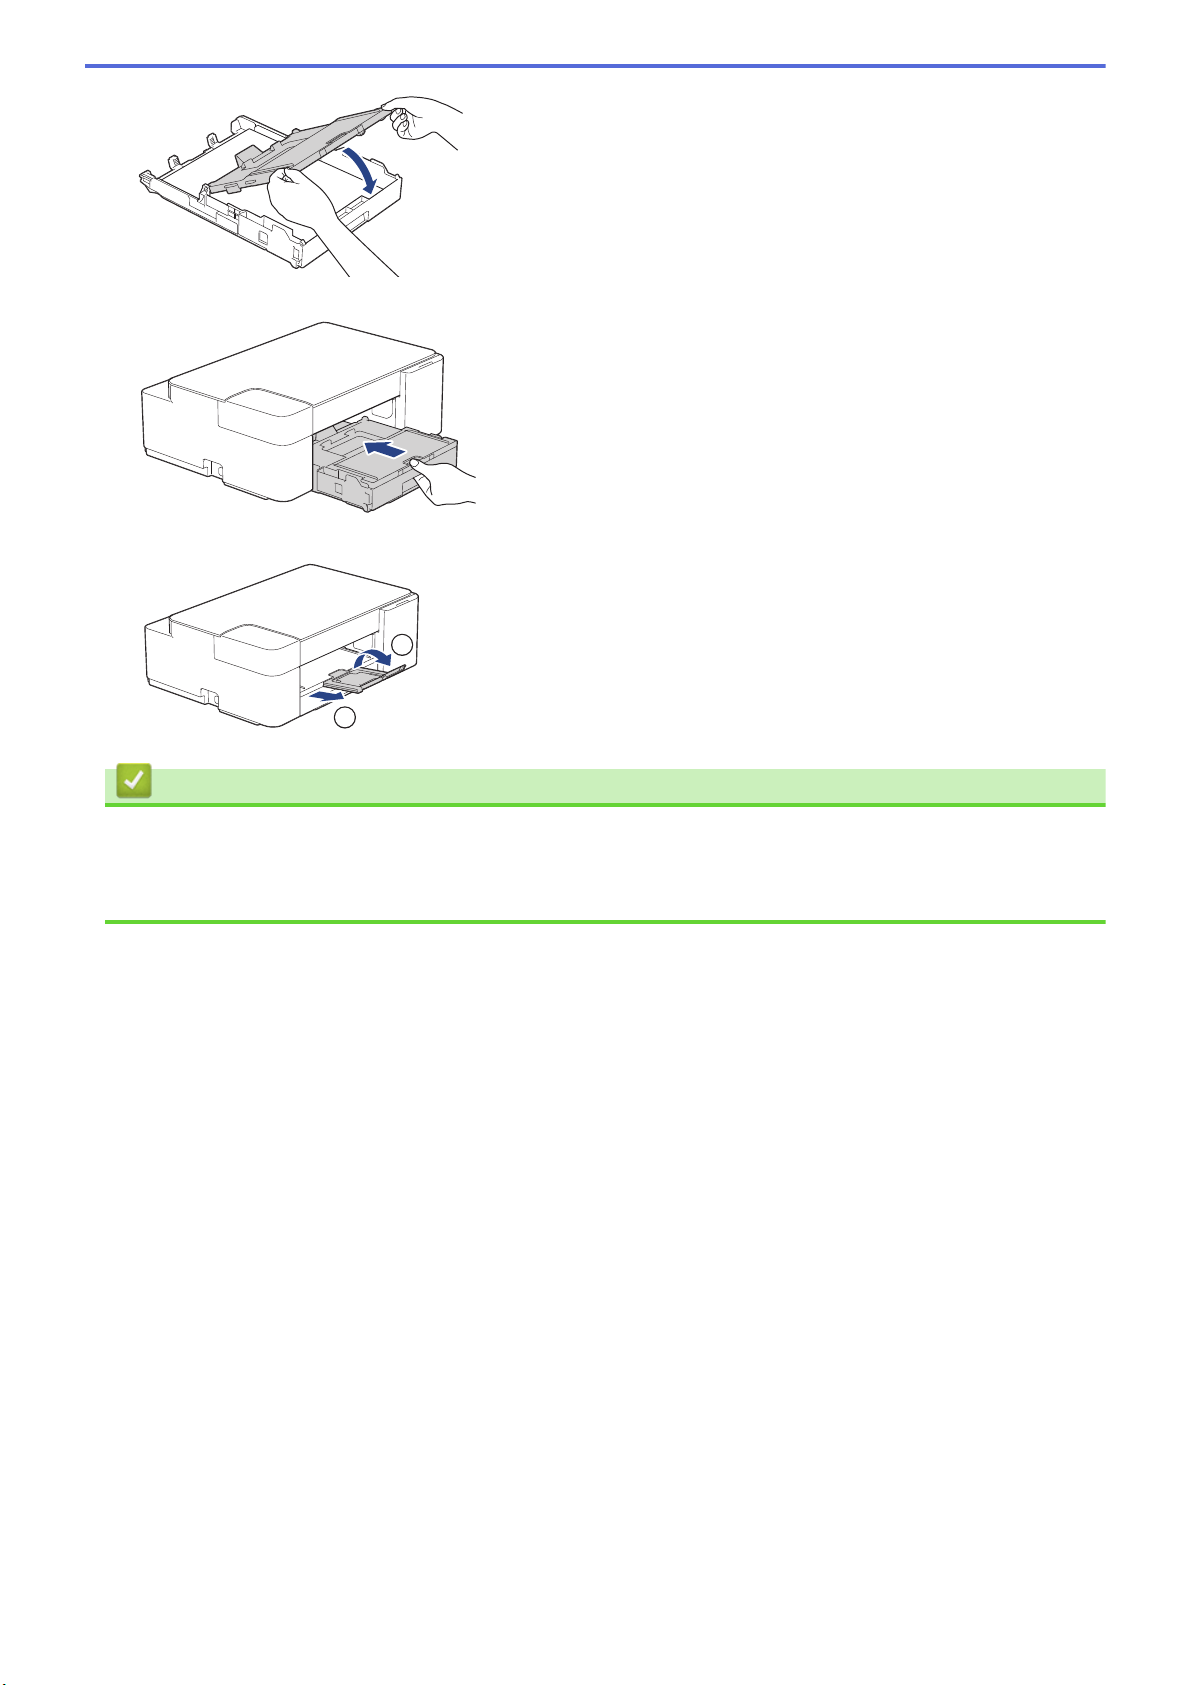
9. Slowly push the paper tray completely into the machine.
1
2
10. Pull out the paper support (1) until it locks into place, and then unfold the paper support flap (2).
Related Information
• Load Paper in the Paper Tray
Related Topics:
• Choose the Right Print Media
21
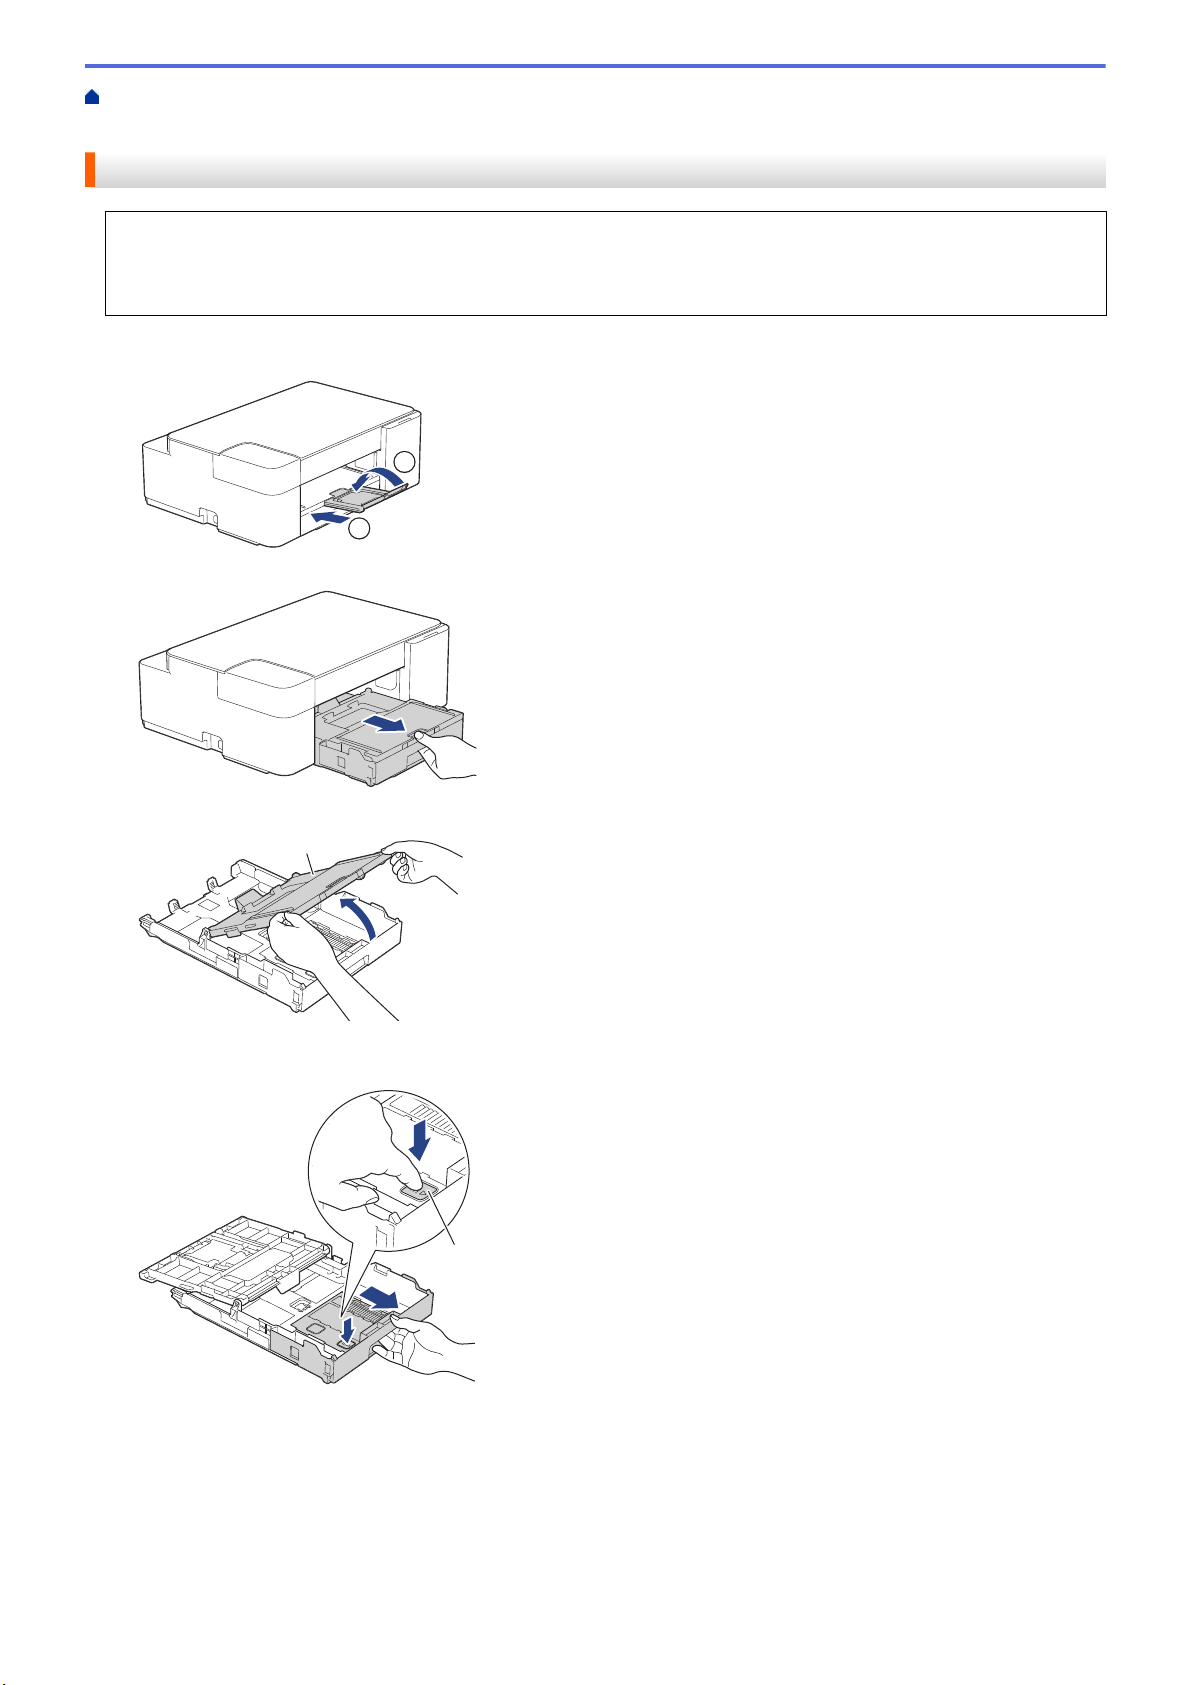
Home > Paper Handling > Load Paper > Load Paper in the Paper Tray > Load Legal Size Paper in the
2
1
1
1
Paper Tray
Load Legal Size Paper in the Paper Tray
• Load only one size and type of paper in the paper tray at a time.
• When you load a different paper size in the tray, you must change the Paper Size setting in the machine or
the paper size setting on your computer.
1. If the paper support flap (1) is open, close it, and then close the paper support (2).
2. Pull the paper tray completely out of the machine.
3. Lift the output paper tray cover (1).
4. Press the square paper tray expansion button (1) and slide out the paper tray until the square paper tray
expansion button locks into the square LGL hole.
22
5. Gently press and slide the paper width guides (1) and the paper length guide (2) to fit the paper size.
1
2
6. Fan the stack of paper well to avoid paper jams and misfeeds.
Always make sure the paper is not curled or wrinkled.
7. Gently load paper in the paper tray with the printing surface face down.
Make sure the paper is flat in the tray and the paper length guide (1) touches the edges of the paper.
23
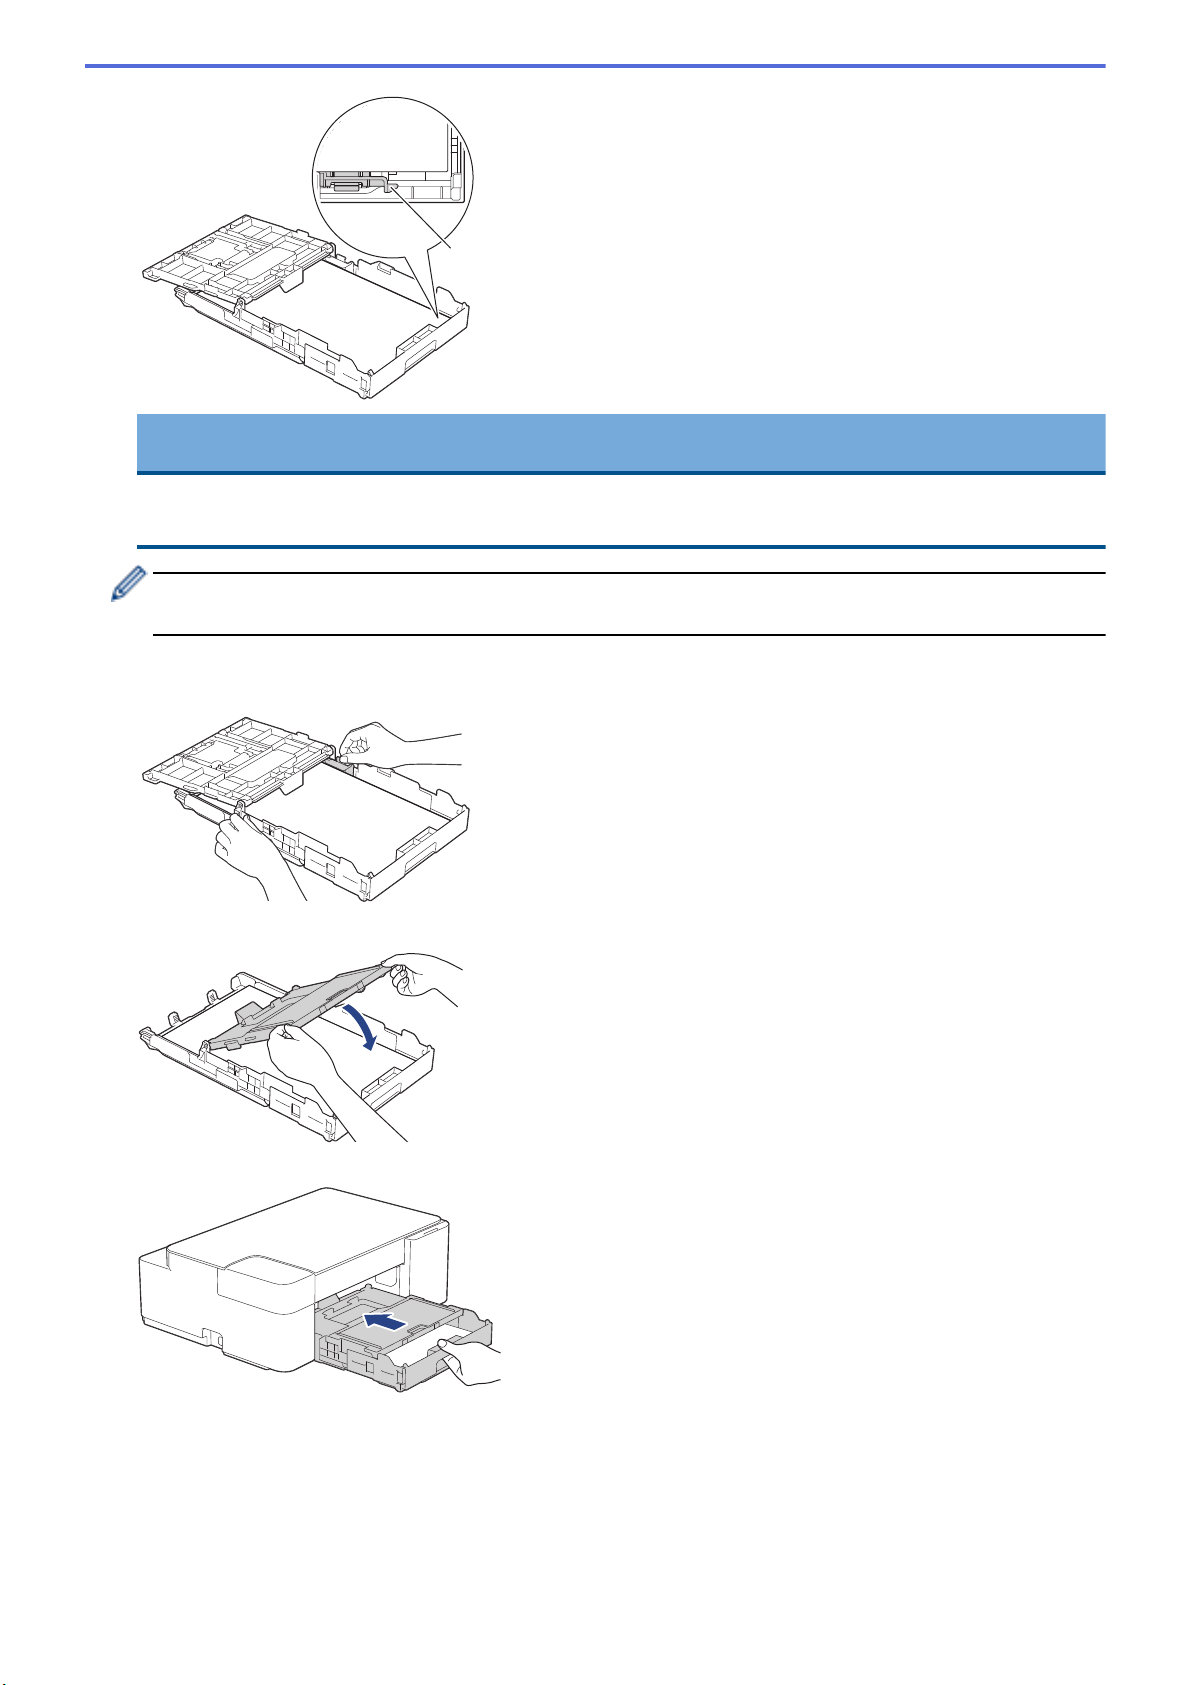
1
IMPORTANT
Be careful not to push the paper in too far; it may lift at the back of the tray and cause paper feed
problems.
To add paper before the tray is empty, remove the paper from the tray and combine it with the paper you
are adding. Always fan the stack of paper well to prevent the machine from feeding multiple pages.
8. Gently adjust the paper width guides to fit the paper.
Make sure the paper guides touch the edges of the paper.
9. Close the output paper tray cover.
10. Slowly push the paper tray completely into the machine.
11. Pull out the paper support (1) until it locks into place, and then unfold the paper support flap (2).
24

2
1
Related Information
• Load Paper in the Paper Tray
25
 Loading...