


Software User’s Guide
Version 0
TWN-ENG
Applicable models
Note
This User’s Guide applies to the following models.
FAX-2840
Definitions of notes
We use the following icons throughout this User’s Guide:
Notes tell you how you should respond to a situation that may arise or give
tips about how the operation works with other features.
Compilation and publication notice
Under the supervision of Brother Industries, Ltd., this manual has been compiled and published, covering the
latest product’s descriptions and specifications.
The contents of this manual and the specifications of this product are subject to change without notice.
Brother reserves the right to make changes without notice in the specifications and materials contained
herein and shall not be responsible for any damages (including consequential) caused by reliance on the
materials presented, including but not limited to typographical and other errors relating to the publication.
©2012 Brother Industries, Ltd.
IMPORTANT NOTE
This product is approved for use in the country of purchase only. Do not use this product outside the
country of purchase as it may violate the power regulations of that country.
In this manual, the screens in this manual are from MFC models, since FAX models and MFC models have
identical features. Where they display 'MFC' in this manual, please read 'MFC-xxxx' as 'FAX-xxxx'.
Before using this manual, please be sure to install available drivers and software from the download page
for your machine in the Brother Solutions Center (http://solutions.brother.com/). You can download printer
drivers and Remote Setup from the Brother Solutions Center.
Windows
Edition and Windows
Windows Vista
Windows
®
XP in this document represents Windows® XP Professional, Windows® XP Professional x64
®
XP Home Edition.
®
in this document represents all editions of Windows Vista®.
®
7 in this document represents all editions of Windows® 7.
i

Table of Contents
Section I Machine operation keys
1 Using the control panel 2
Using the printer keys ................................................................................................................................2
Job Cancel...........................................................................................................................................2
Section II Windows
®
2Printing 4
Using the Brother printer driver..................................................................................................................4
Printing a document...................................................................................................................................5
Manual duplex (two-sided) printing............................................................................................................6
Guidelines for printing on both sides of the paper ...............................................................................6
Manual duplex printing ........................................................................................................................6
Simultaneous scanning, printing and faxing ..............................................................................................7
Printer driver settings.................................................................................................................................8
Accessing the printer driver settings..........................................................................................................9
Basic tab ..................................................................................................................................................10
Paper Size .........................................................................................................................................10
Orientation .........................................................................................................................................10
Copies ...............................................................................................................................................11
Media Type........................................................................................................................................11
Resolution..........................................................................................................................................12
Print Settings .....................................................................................................................................12
Multiple Page.....................................................................................................................................12
Manual duplex (two-sided)/ Booklet ..................................................................................................13
Paper Source ....................................................................................................................................14
Advanced tab...........................................................................................................................................15
Scaling...............................................................................................................................................15
Reverse Print.....................................................................................................................................15
Use Watermark..................................................................................................................................16
Watermark Settings ...........................................................................................................................16
Header-Footer Print...........................................................................................................................18
Toner Save Mode ..............................................................................................................................18
Administrator .....................................................................................................................................18
Other Print Options............................................................................................................................19
Density Adjustment............................................................................................................................19
Improve Print Output .........................................................................................................................19
Skip Blank Page ................................................................................................................................20
Print Profiles tab ......................................................................................................................................21
Edit a Profile ......................................................................................................................................21
Support ....................................................................................................................................................23
Tray Settings tab......................................................................................................................................25
Status Monitor..........................................................................................................................................27
Monitoring the machine’s status ........................................................................................................27
ii

3Remote Setup 29
Remote Setup..........................................................................................................................................29
Section III Apple Macintosh
4 Printing and Faxing 32
Features in the printer driver (Macintosh)................................................................................................32
Manual duplex (two-sided) printing..........................................................................................................33
Guidelines for printing on both sides of the paper .............................................................................33
Manual duplex printing ......................................................................................................................33
Simultaneous scanning, printing and faxing ............................................................................................34
Choosing page setup options ............................................................................................................34
Choosing printing options ..................................................................................................................36
Cover Page........................................................................................................................................36
Layout................................................................................................................................................37
Print Settings .....................................................................................................................................38
Removing the Printer driver for Macintosh ..............................................................................................42
Status Monitor..........................................................................................................................................43
Updating the machine’s status ..........................................................................................................43
Hiding or showing the window ...........................................................................................................43
Quitting the window ...........................................................................................................................44
Sending a fax...........................................................................................................................................45
Using the Addresses panel................................................................................................................48
5Remote Setup 51
Remote Setup..........................................................................................................................................51
A Index 53
iii

Section I
Machine operation keys
Using the control panel 2
I

1
Using the control panel 1
Using the printer keys 1
You can access the following features from your machine’s control panel.
Job Cancel 1
To cancel the current print job, press Stop/Exit. You can clear the data that is left in the machine’s memory
by pressing Stop/Exit.
1
2

Section II
Windows
Printing 4
Remote Setup 29
®
II

2
Note
Printing 2
The screens in this section are from Windows®XP. Screens on your PC may vary depending on your
operating system.
Using the Brother printer driver 2
A printer driver is software that translates data from the format used by a PC into the format needed by a
particular printer, using a printer command language or page description language.
The printer drivers are available from the download page for your model on the Brother Solutions Center at:
http://solutions.brother.com/
2
4

Printing
Note
Printing a document 2
When the machine receives data from your computer, it begins printing by picking up paper from the paper
tray. The paper tray can feed many types of paper and envelopes. (For information about the Paper Tray and
Recommended paper, see Basic User’s Guide.)
a From your application, choose the Print command.
If any other printer drivers are installed on your computer, choose Brother FAX-XXXX* as your printer
driver from the Print or Print Settings menu in your software application, and then click OK to begin
printing.
*(Where XXXX is your model name.)
• (Macintosh) See Features in the printer driver (Macintosh) uu page 32.
• You can choose the paper size and orientation in your application software.
If your application software does not support your custom paper size, choose the next largest paper size.
Then adjust the print area by changing the right and left margins in your application software.
2
5

Printing
Manual duplex (two-sided) printing 2
The supplied printer driver supports manual duplex printing.
Guidelines for printing on both sides of the paper 2
If the paper is thin, it may wrinkle.
If paper is curled, turn over the stack, straighten it and then put it back in the paper tray or manual feed slot.
If the paper is not feeding properly, it may be curled. Remove the paper, straighten it and turn over the
stack.
When you use the manual duplex function, it is possible that there may be paper jams or poor print quality.
If there is a paper jam, see Basic User’s Guide: Error and maintenance messages. If you have a print
quality problem, see Basic User’s Guide: Improving the print quality.
Manual duplex printing 2
The machine prints all the even-numbered pages on one side of the paper first. Then, the printer driver
instructs you (with a pop-up message) to reinsert the paper. Before reinserting the paper, straighten it well,
or you may get a paper jam. Very thin or thick paper is not recommended.
2
6

Printing
Note
Simultaneous scanning, printing and faxing 2
Your machine can print from your computer while sending or receiving a fax in memory, or while scanning a
document into the computer. Fax sending will not be stopped during the computer printing. However, when
the machine is copying or receiving a fax on paper, it pauses the computer printing operation, and then
continues printing when copying or fax receiving has finished.
Even if Toner Low or Toner Ended is displayed on the LCD, fax sending and scanning are available.
2
7

Printing
Note
Printer driver settings 2
For Macintosh users see Printing and Faxing uu page 32.
You can change the following printer settings when you print from your computer:
Paper Size
Orientation
Copies
Media Type
Resolution
Print Settings
Multiple Page
Duplex / Booklet
Paper Source
Scaling
Reverse Print
Use Watermark
Header-Footer Print
Toner Save Mode
2
Administrator
Density Adjustment
Improve Print Output
Skip Blank Page
Print Profiles
The following pages provide an overview of the printer driver settings. For more information, see the Help text
in the printer driver.
8
Printing
Note
Accessing the printer driver settings 2
a (For Windows
®
XP)
Click Start, and then Printers and Faxes.
®
(For Windows Vista
)
Click the button, Control Panel, Hardware and Sound, and then Printers.
(For Windows
®
7)
Click the button and then click Devices and Printers.
b (For Windows
®
XP and Windows Vista®)
Right-click the Brother FAX-XXXX Printer icon (where XXXX is your model name) and select
Properties. The printer properties dialog box appears.
®
(For Windows
7)
Right-click the Brother FAX-XXXX Printer icon (where XXXX is your model name) and select
Printer properties. The printer properties dialog box appears.
c (For Windows
®
XP and Windows Vista®)
Choose the General tab and then click Printing Preferences....
The printer driver dialog box appears.
®
(For Windows
7)
Choose the General tab and then click Preferences....
The printer driver dialog box appears.
2
To configure the tray settings, choose the Tray Settings tab.
9
Printing
Basic tab 2
You can also change the Page Layout settings by clicking the illustration on the left side of the Basic tab.
2
(4)
(1)
(2)
(3)
a Choose Paper Size, Orientation, Copies, Media Type, Resolution and Print Settings (1).
b Choose Multiple Page and Duplex / Booklet (2).
c Choose Paper Source (3).
d Confirm your current settings in the window (4).
e Click OK to apply your chosen settings.
To return to the default settings, click Default, then OK.
Paper Size 2
From the drop-down box choose the Paper Size you are using.
Orientation 2
Orientation selects the position of how your document will be printed (Portrait or Landscape).
10
Printing
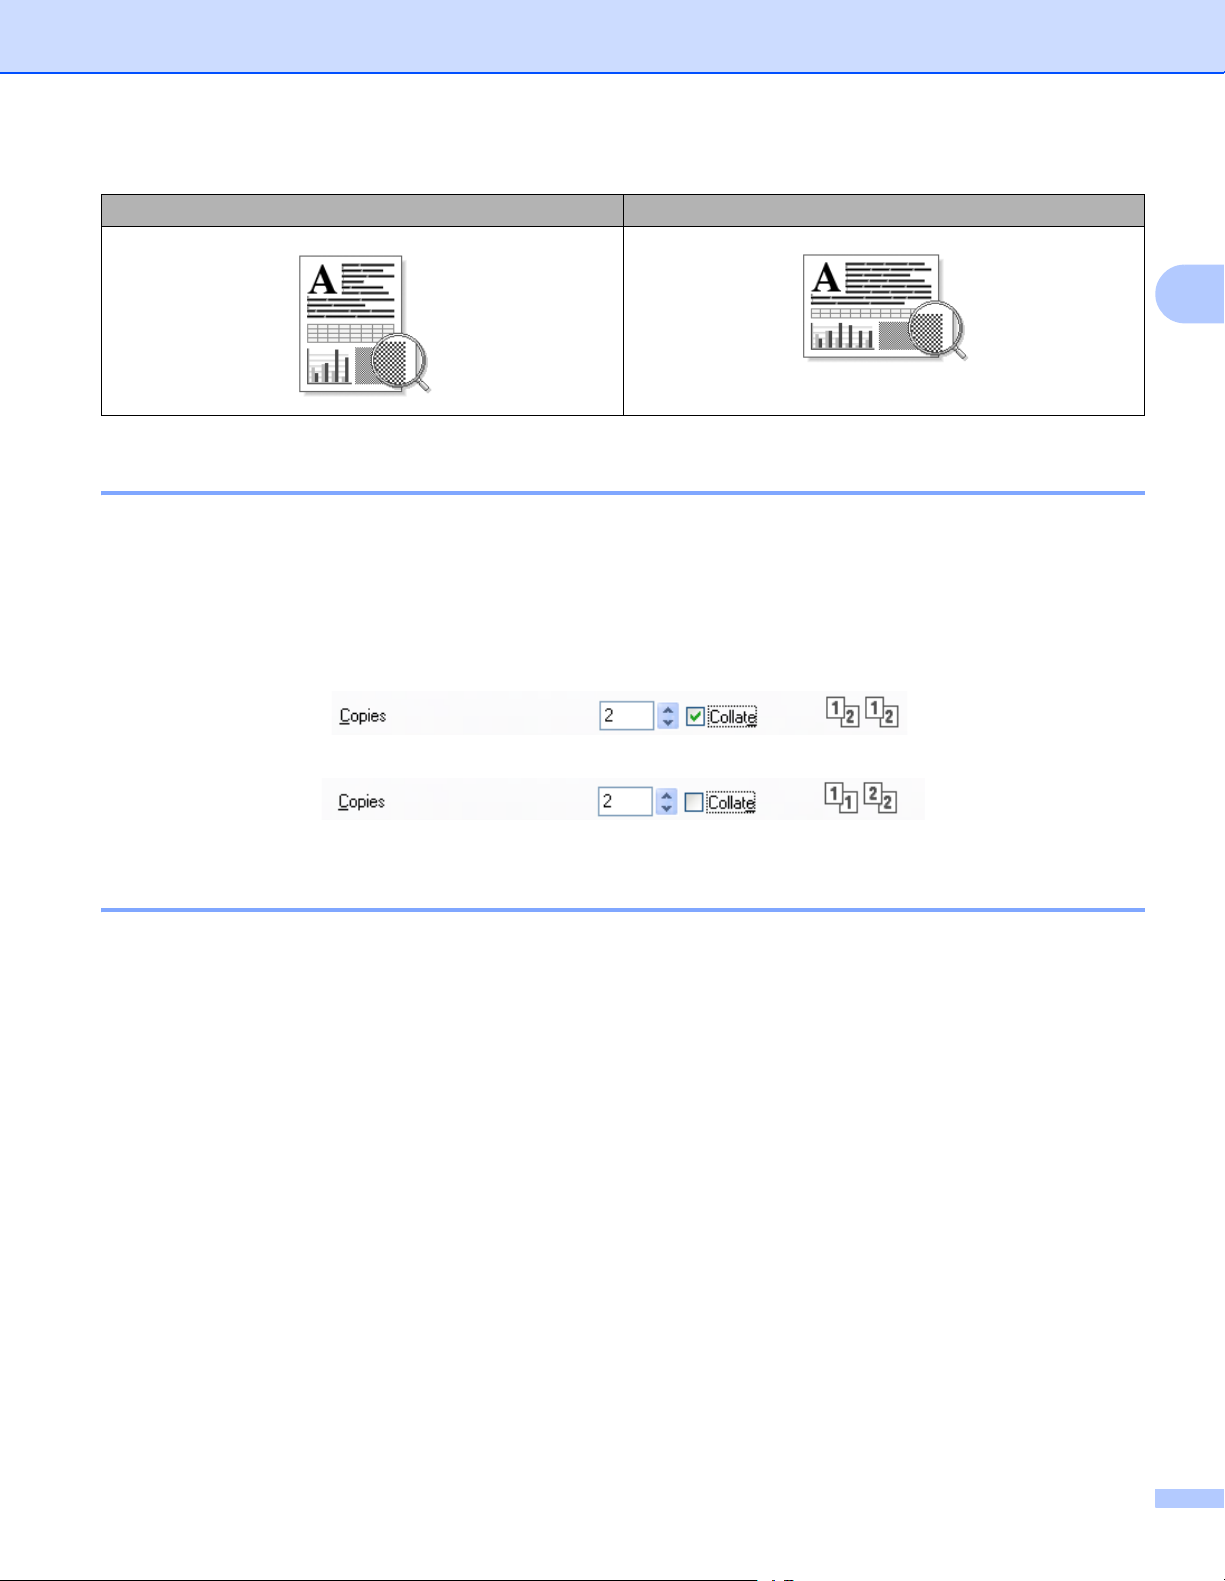
Portrait (Vertical) Landscape (Horizontal)
Copies 2
The copies selection sets the number of copies that will be printed.
Collate
With the Collate check box selected, one complete copy of your document will be printed and then
repeated for the number of copies you selected. If the Collate check box is not selected, then each page
will be printed for all the copies selected before the next page of the document is printed.
2
Media Type 2
You can use the following types of media in your machine. For the best print quality, select the type of media
that you wish to use.
Plain Paper
Thin Paper
Thick Paper
Thicker Paper
Bond Paper
Envelopes
Env. Thick
Env. Thin
Recycled Paper
Label
11
Printing
Note
Note
• When using ordinary plain paper (60 to 105 g/m2, 16 to 28 lb) choose Plain Paper. When using heavier
weight paper or rough paper choose Thick Paper or Thicker Paper. For bond paper, choose
Bond Paper.
• When printing on envelopes choose Envelopes. If the toner is not fixed to the envelope correctly when
Envelopes has been selected, choose Env. Thick. If the envelope is crumpled when Envelopes has
been selected, choose Env. Thin.
Resolution 2
You can choose the resolution as follows.
300 dpi
600 dpi
HQ 1200
2
The print speed will change depending on what print quality setting you choose. Higher print quality takes
longer to print, while lower print quality takes less time to print.
Print Settings 2
You can change the print settings as follows:
Graphics
This is the best mode for printing documents that contain graphics.
Text
This is the best mode for printing text documents.
Manual
You can change the settings manually by choosing Manual and clicking the Manual Settings... button.
You can set brightness, contrast and other settings.
Multiple Page 2
The Multiple Page selection can reduce the image size of a page allowing multiple pages to be printed on
one sheet of paper or enlarge the image size for printing one page on multiple sheets of paper.
Page Order
When N in 1 option is selected, the page order can be selected from the drop-down list.
Border Line
When printing multiple pages onto one sheet, with the Multiple Page feature, you can choose to have a
solid border, dashed border or no border around each page on the sheet.
12

Printing
Print cut-out line
When 1 in NxN pages option is selected, the Print cut-out line option can be selected. This option allows
you to print a faint cut-out line around the printable area.
Manual duplex (two-sided)/ Booklet 2
When you want to print a booklet or do manual duplex printing, use this function.
None
Disable duplex printing.
Duplex (Manual)
When you want to do duplex printing, use this option.
• Duplex (Manual)
The machine prints all the even-numbered pages first. Then the printer driver will stop and show the
instructions required to re-install the paper. When you click OK the odd-numbered pages will be printed.
When you choose Duplex (Manual), the Duplex Settings... button becomes available to select. You can
set the following settings in the Duplex Settings dialog box.
2
• Duplex Type
There are four types of duplex binding directions available for each orientation.
• Binding Offset
When you check Binding Offset, you can also specify the offset for binding in inches or millimeters.
Booklet (Manual)
Use this option to print a document in booklet format using duplex printing; it will arrange the document
according to the correct page numbers and allows you to fold at the center of the print output without
having to change the order of the pages.
• Booklet (Manual)
The machine prints all the even-numbered sides first. Then the printer driver will stop and show the
instructions required to re-install the paper. When you click OK the odd-numbered sides will be printed.
When you choose Booklet (Manual), the Duplex Settings... button becomes available to select. You can
set the following settings in the Duplex Settings dialog box.
• Duplex Type
There are two types of duplex binding directions available for each orientation.
• Booklet Printing Method
When Divide into Sets is selected:
This option allows you to print the whole booklet into smaller individual booklet sets, it still allows you
to fold at the center of the smaller individual booklet sets without having to change the order of the
pages. You can specify the number of sheets in each smaller booklet set, from 1 to 15. This option can
help when folding the printed booklet that has a large number of pages.
• Binding Offset
When you check Binding Offset, you can also specify the offset for binding in inches or millimeters.
13

Printing
Paper Source 2
You can choose Auto Select, Tray1 or Manual and specify separate trays for printing the first page and for
printing from the second page onwards.
2
14

Printing
Advanced tab 2
(1)
(2)
(3)
(4)
(5)
(6)
(7)
2
Change the tab settings by clicking one of the following selections:
Scaling (1)
Reverse Print (2)
Use Watermark (3)
Header-Footer Print (4)
Toner Save Mode (5)
Administrator (6)
Other Print Options (7)
Scaling 2
You can change the print image scaling.
Reverse Print 2
Check Reverse Print to reverse the data to flip it upside down.
15
Printing
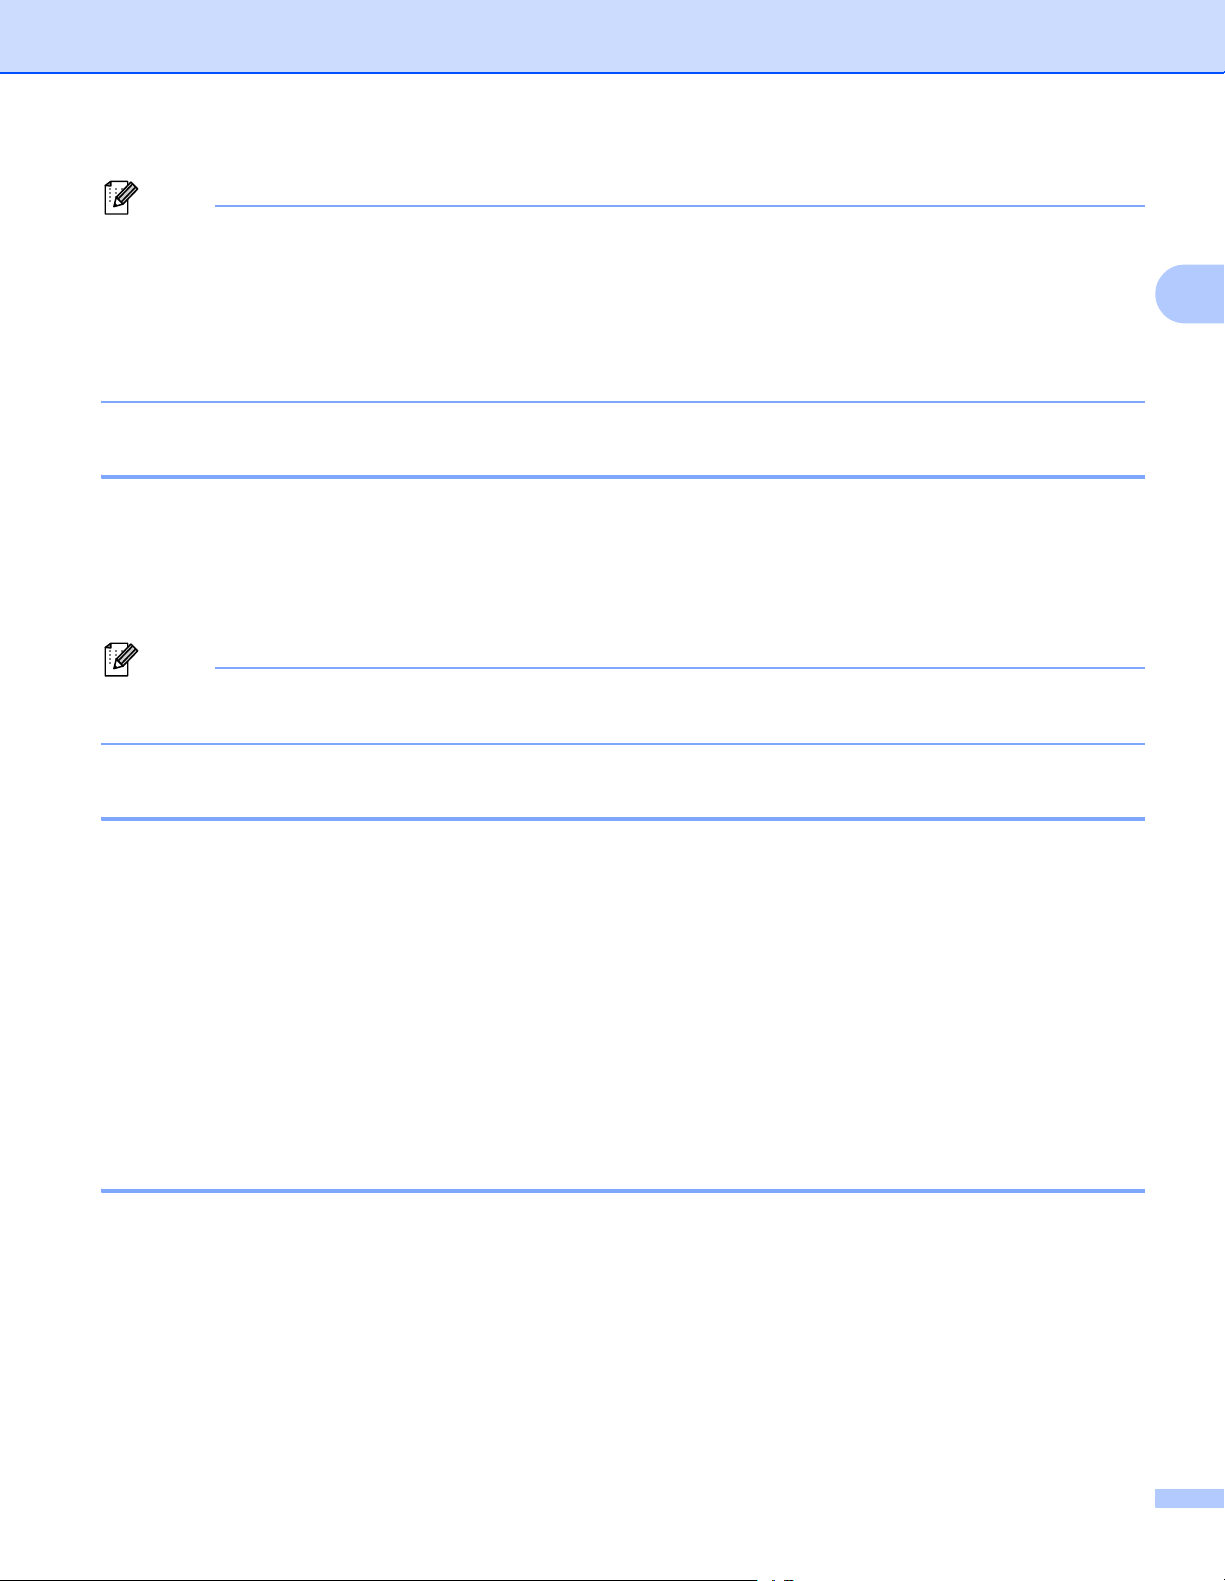
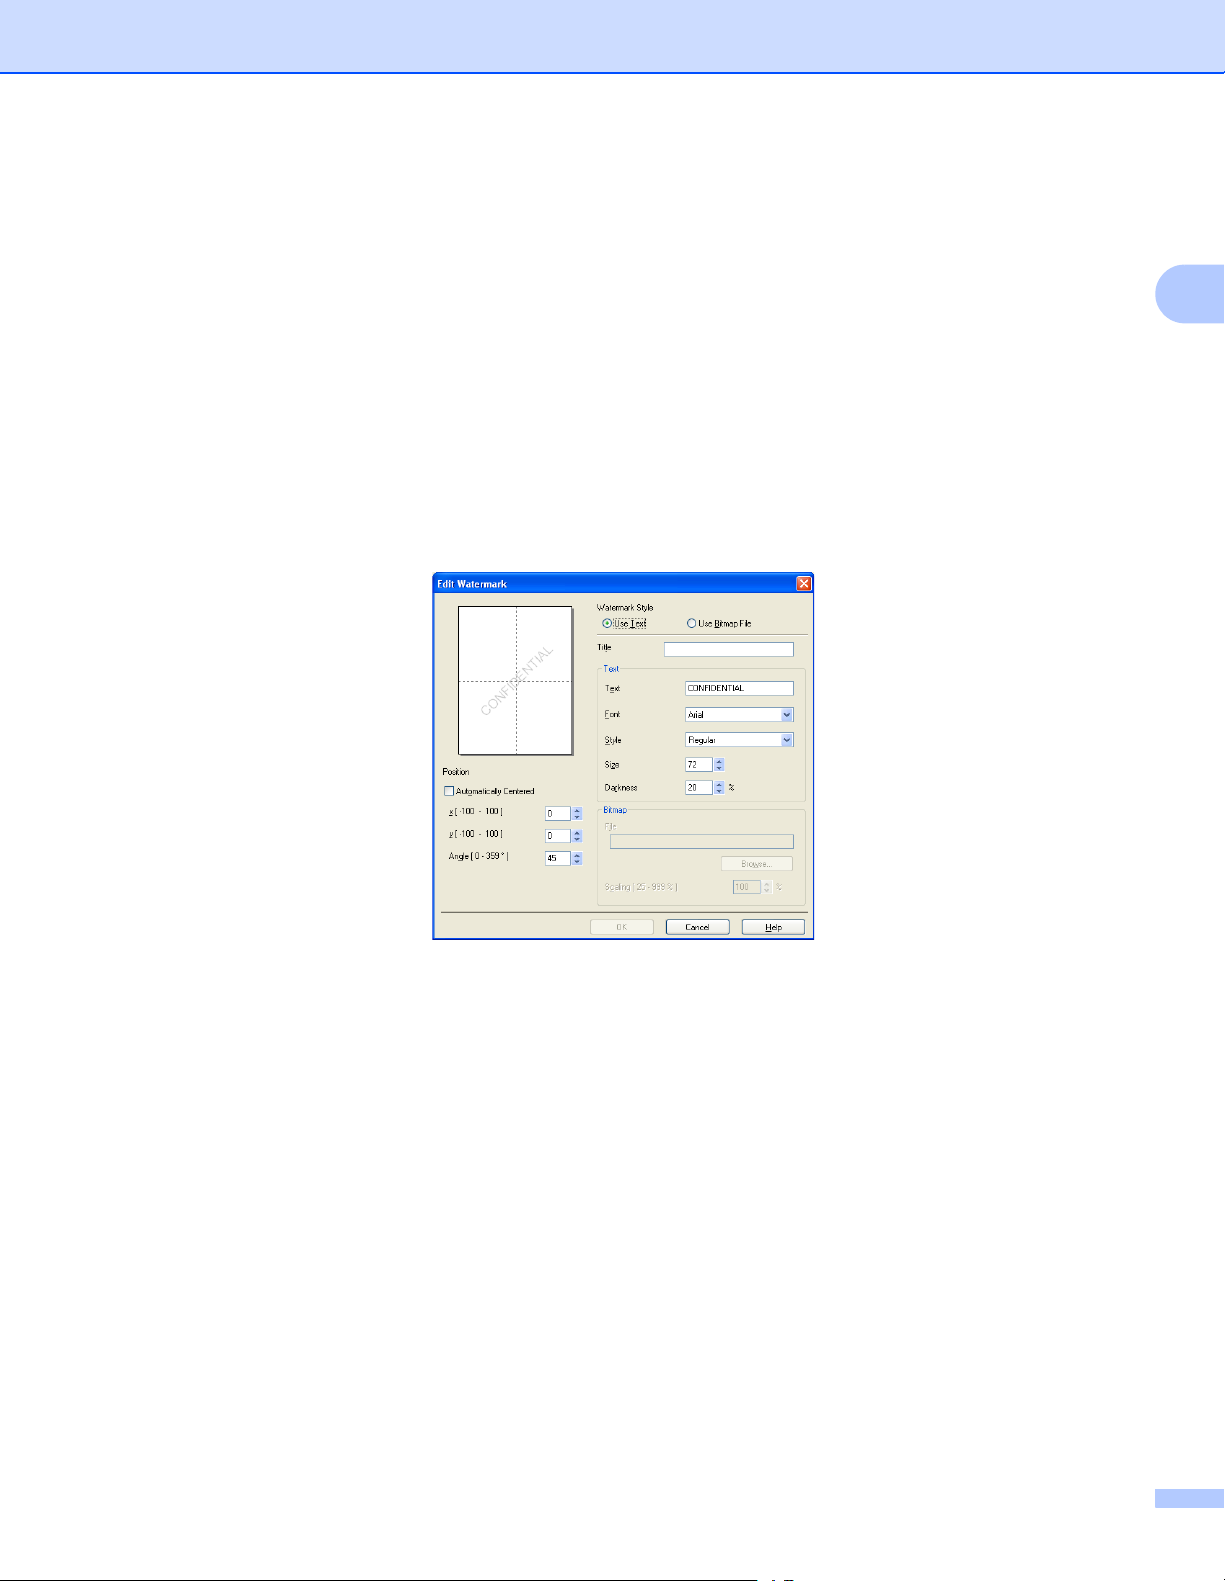
Use Watermark 2
You can put a logo or text into your document as a watermark. You can choose one of the preset Watermarks,
or you can use a bitmap file that you have created. Check Use Watermark and then click the Settings...
button.
2
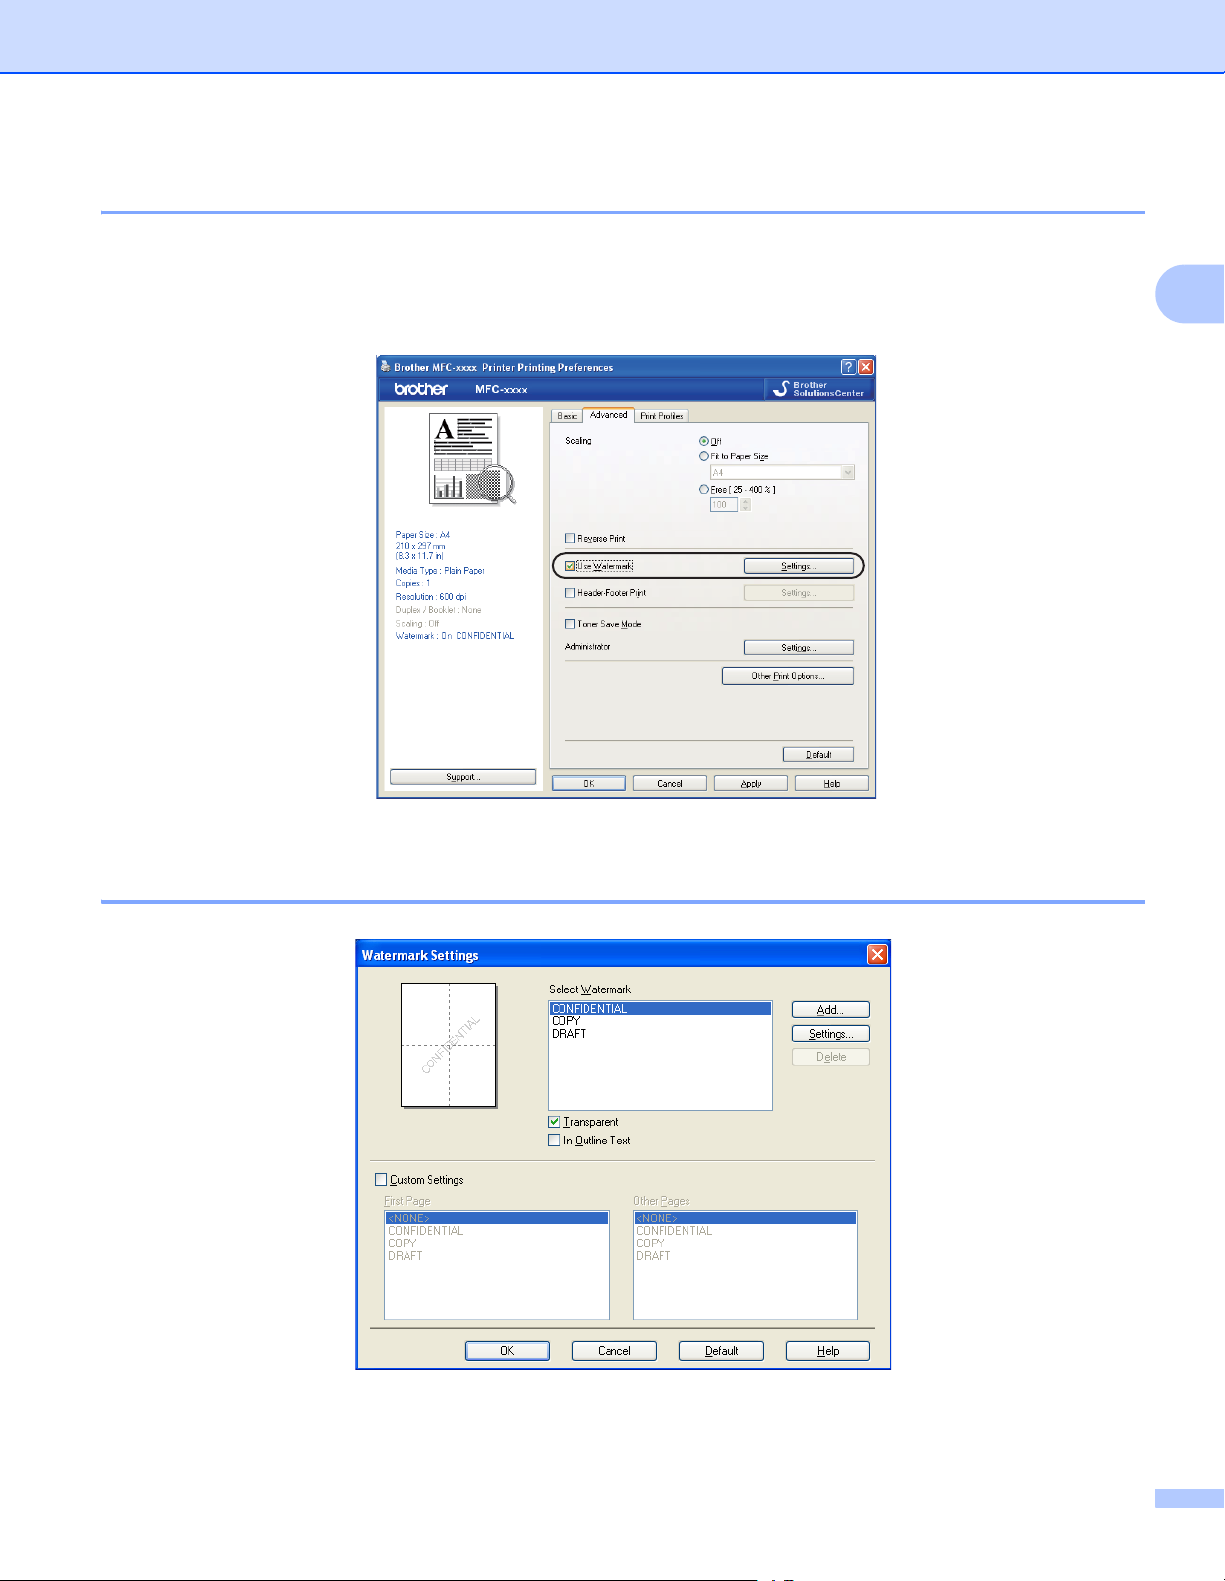
Watermark Settings 2
16
Printing
Transparent 2
Check Transparent to print the watermarked image in the background of your document. If this feature is not
checked then the watermark will be printed on top of your document.
In Outline Text 2
Check In Outline Text if you only want to print an outline of the watermark. It is only available when you
choose a text watermark.
Custom Settings 2
You can choose which watermark to print on the first page or on the other pages.
Click the Add button to add the watermark settings and then choose Use Text or Use Bitmap File in
Watermark Style.
2
You can change the additional watermark’s size and position on the page by selecting the watermark, and
clicking the Settings button.
Title
Enter a title you like in the field.
Text
Enter your Watermark Text into the Text box, and then choose the Font, Style, Size and Darkness.
Bitmap
Enter the file name and location of your bitmap image in the File box, or click Browse to search for the
file. You can also set the scaling size of the image.
Position
Use this setting if you want to control the position of the watermark on the page.
17
Printing
Note
Note
Header-Footer Print 2
When this feature is enabled, it will print the date and time on your document from your computer’s system
clock and the PC login user name or the text you entered. By clicking Settings, you can customize the
information.
ID Print
If you select Login User Name, your PC login user name will be printed. If you select Custom and enter
the text in the Custom edit box, the text you entered will be printed.
Toner Save Mode 2
You can conserve toner use with this feature. When you set Toner Save Mode to On, prints appears lighter.
The default setting is Off.
• We do not recommend Toner Save Mode for printing photo or grayscale images.
• Toner Save Mode is not available for HQ 1200 resolution.
2
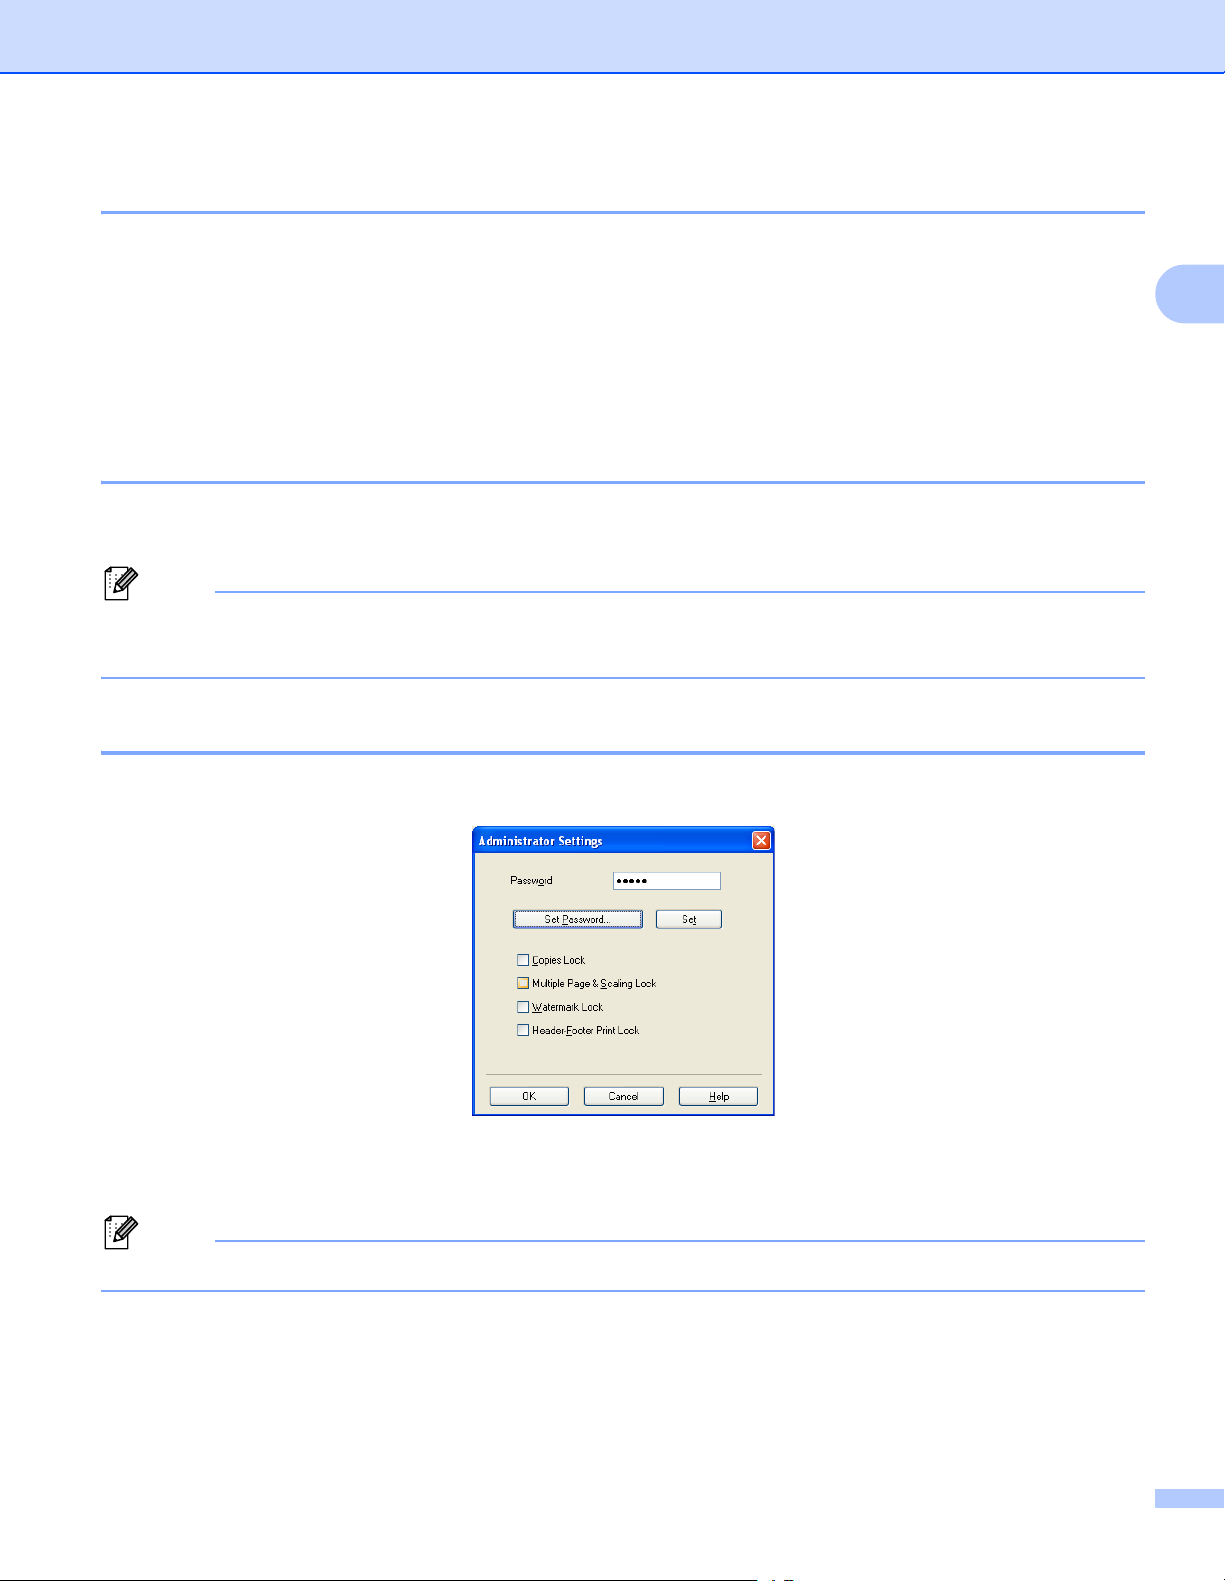
Administrator 2
Administrators have the authority to limit access to functions such as scaling and watermark.
Password
Enter the password into this box.
Click Set Password... to change the password.
Copies Lock
Lock the copy pages selection to prevent multiple copy printing.
Multiple Page & Scaling Lock
Lock the scaling setting and multiple page setting to prevent changes being made.
18
Printing
Note
Note
Note
Watermark Lock
Lock the current settings of the Watermark option to prevent changes being made.
Header-Footer Print Lock
Lock the current settings of the Header-Footer Print option to prevent changes being made.
Other Print Options 2
You can set the following in Printer Function:
Density Adjustment
Improve Print Output
Skip Blank Page
Density Adjustment 2
Increase or decrease the print density.
Improve Print Output 2
This feature allows you to improve a print quality problem.
Reduce Paper Curl
If you choose this setting, the paper curl may be reduced.
If you are printing only a few pages, you do not need to choose this setting. We recommend that you
change the printer driver setting in Media Type to the thin setting.
2
This operation will decrease the temperature of the machine’s fusing process.
Improve Toner Fixing
If you choose this setting, the toner fixing on paper may be improved. If this selection does not provide
enough improvement, change the printer driver setting in Media Type to a thick setting.
This operation will increase the temperature of the machine’s fusing process.
Reduce Ghosting
If you are using the machine in a high humidity environment this setting may reduce ghosting on the paper.
Do not use this setting if the ambient humidity is below 30% or ghosting may increase.
This feature may not reduce ghosting for all types of paper. Before you buy a lot of paper, test a small
quantity to make sure that the paper is suitable.
19

Printing
Note
Skip Blank Page 2
If Skip Blank Page is checked, the printer driver automatically detects blank pages and excludes them from
printing.
This option does not work when you choose the following options:
• Use Watermark
• Header-Footer Print
• Nin1 or 1 in NxN Pages in Multiple Page
• Duplex (Manual) or Booklet (Manual)
2
20
Printing
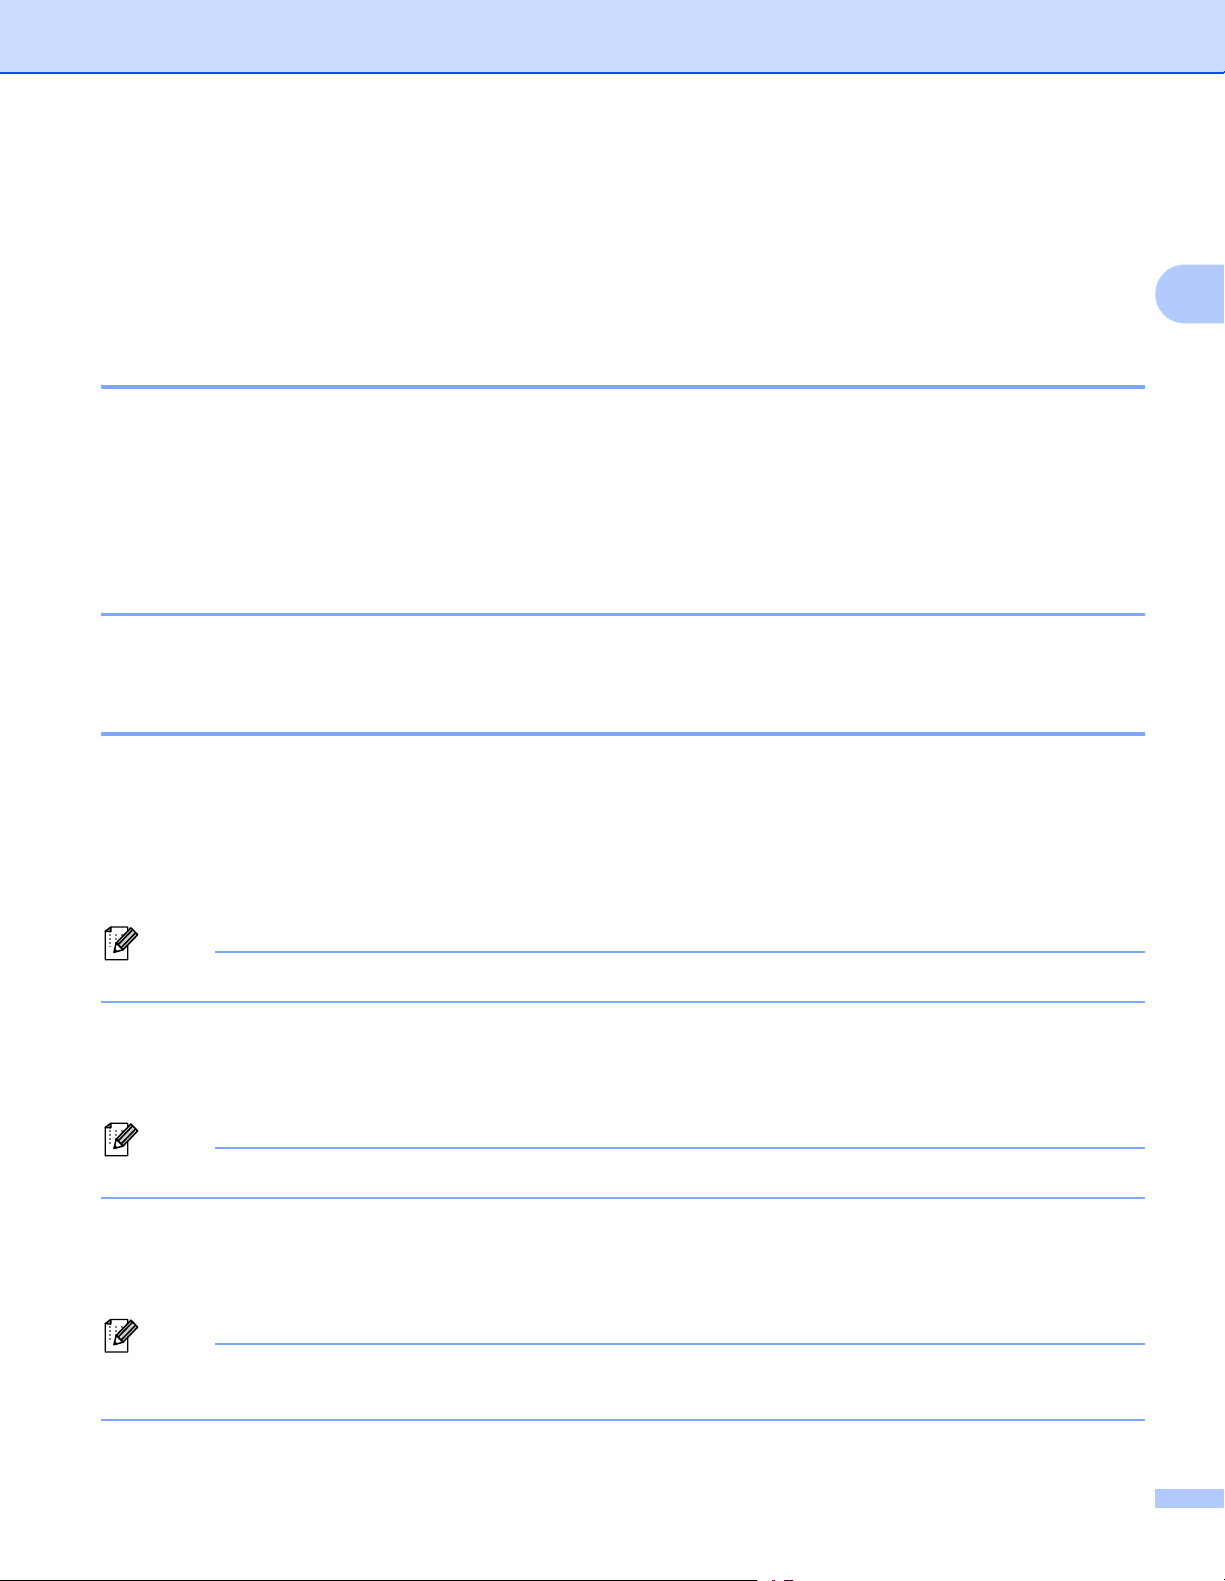
Print Profiles tab 2
Print Profiles are editable presets designed to give you quick access to frequently used printing
configurations.
5
1
2
2
Print profile list box (1)
Edit a profile (2)
You can edit and save a new print profile.
Restore default profiles (3)
Click to restore all the default print profiles.
Always show Print Profiles tab first. (4)
Current print profile view (5)
3
4
a Choose your profile from the print profile list box.
b If you want to display the Print Profiles tab at the front of the window from the next time you print, check
Always show Print Profiles tab first.
c Click OK to apply your chosen profile.
Edit a Profile 2
The Save your profile changes dialog box appears by clicking Edit a profile.
a Choose an icon you want to use from the Icon list.
21

Printing
Note
b Enter the desired title in Name.
c Choose the print profile you want to overwrite, then click OK.
You can overwrite the preset print profiles.
2
22

Printing
Support 2
Click Support... in the Printing Preferences dialog box.
2
1
2
3
4
5
Brother Solutions Center (1)
The Brother Solutions Center (http://solutions.brother.com/
) is a Web site offering information about your
Brother product including FAQs (Frequently Asked Questions), User’s Guides, driver updates and tips for
using your machine.
23

Printing
Genuine Supplies Website (2)
You can visit our Web site for original/genuine Brother supplies by clicking this button.
Brother CreativeCenter (3)
You can visit our Web site for free and easy online solutions for business and home users by clicking this
button.
Check Setting (4)
You can check the current driver settings.
About (5)
This will show the list of the printer driver files and version information.
2
24

Printing
Note
Tray Settings tab 2
To access the Tray Settings tab, see Accessing the printer driver settings uu page 9.
You can define the paper size for each paper tray and auto detect the serial number in the Tray Settings tab
as follows.
(5)
(6)
(2)
(1)
(4)
(3)
2
Paper Source Setting (1)
This feature lists the paper size assigned to each tray. The settings applied in Paper Size (2) and Update
(4) are displayed.
Paper Size (2)
This setting allows you to define which paper size is used for the tray and manual feed slot. Highlight the
paper source you want to define and then choose the paper size from the drop-down list. Click Update (4)
to apply the setting to the tray.
Default Source (3)
This setting allows you to choose the default paper source that your document will be printed from. Choose
the Default Source from the drop-down list and click Update (4) to save your setting. The Auto Select
setting will automatically pull paper from any paper source (tray or manual feed slot) that has a defined
paper size that matches your document.
Update (4)
The Update function reflects the Paper Size (2) setting in Paper Source Setting (1).
25

Printing
Note
Serial No. (5)
By clicking Auto Detect (6), the printer driver will query the machine and display its serial number. If it fails
to receive the information, the screen will display “---------------”.
Auto Detect (6)
The Auto Detect function obtains the machine’s serial number by initiating communication between the
PC and the machine.
The Auto Detect function is not available under the following machine conditions:
• The machine’s power switch is Off.
• The cable is not connected to the machine correctly.
2
26

Printing
Note
Status Monitor 2
The Status Monitor utility is a configurable software tool for monitoring the status of one or more devices,
allowing you to get immediate notification of error messages such as paper empty or paper jam.
You can check the device status at anytime by double-clicking the icon in the tasktray or by choosing
Status Monitor located in Start/All Programs/Brother/FAX-XXXX on your PC.
(Windows
®
7)
2
If you have set the Enable Status Monitor on startup during installation, you will find the button or the
Brother Status Monitor icon on the taskbar.
To show the Brother Status Monitor icon on your taskbar, click the button. The Brother Status Monitor
icon will appear in the small window. Then drag the icon to the taskbar.
There is also a link to the Troubleshooting and Brother Genuine Supplies Web site. Click Visit the Genuine
Supplies website button for more information on Brother genuine supplies.
• For more information about using the Status Monitor software, right-click the Brother Status Monitor icon
and choose Help.
• The automatic software update feature is active when the status monitor feature is active. With the update
feature you can receive both Brother applications and machine firmware updates automatically.
Monitoring the machine’s status 2
The Status Monitor icon will change color depending on the machine’s status.
A green icon indicates the normal stand-by condition.
27

Printing
A yellow icon indicates a warning.
A red icon indicates a printing error has occurred.
There are two locations where you can display the Brother Status Monitor on your PC - in the tasktray or
on the desktop.
2
28
3
Remote Setup 3
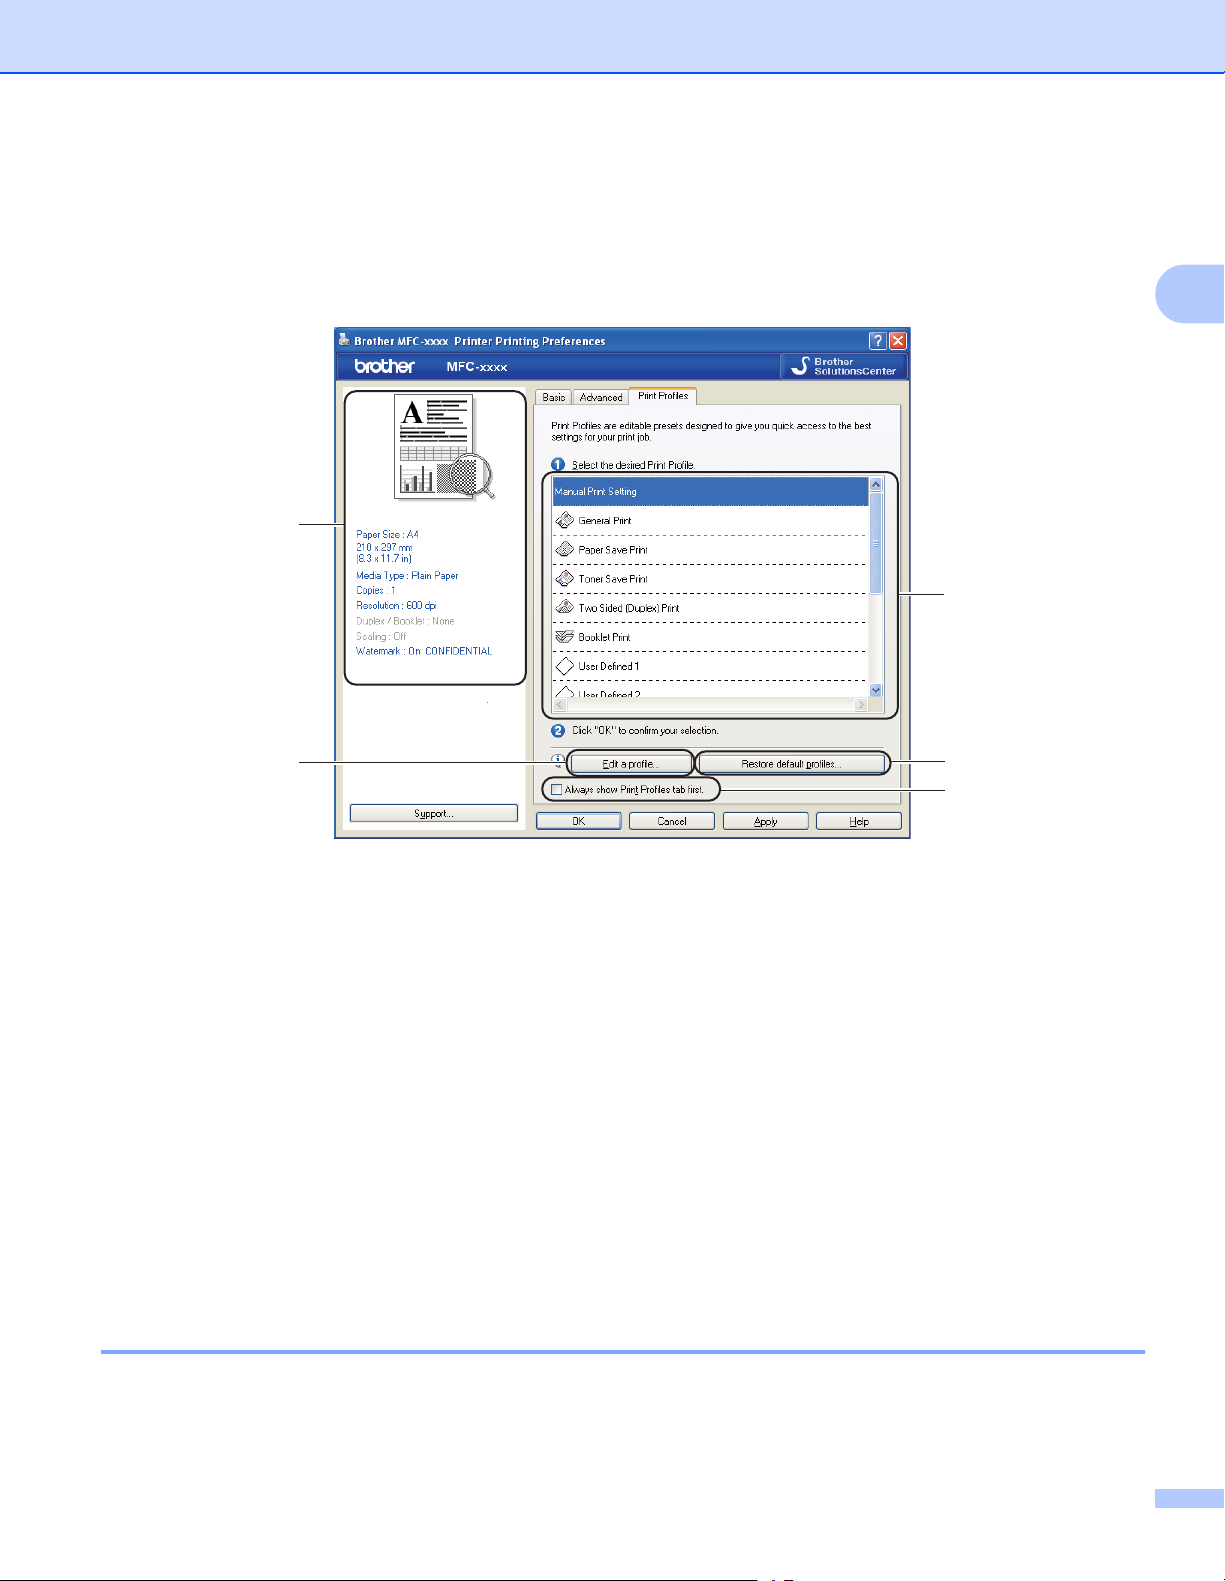
Remote Setup 3
The Remote Setup program lets you configure many machine settings from a Windows® application. When
you start this application, the settings on your machine will be downloaded automatically to your PC and
displayed on your PC screen. If you change the settings, you can upload them directly to the machine.
Click the Start button, All Programs, Brother, FAX-XXXX and Remote Setup.
3
OK
Lets you start uploading data to the machine and exit the Remote Setup application. If an error message
is displayed, enter the correct data again and then click OK.
Cancel
Lets you exit the Remote Setup application without uploading data to the machine.
Apply
Lets you upload data to the machine without exiting the Remote Setup application.
Print
Lets you print the chosen items on the machine. You cannot print the data until it is uploaded to the
machine. Click Apply to upload the new data to the machine and then click Print.
Export
Lets you save the current configuration settings to a file.
29

Remote Setup
Note
Import
Lets you read the settings from a file.
You can use the Export button to save Quick Dial or all your settings for your machine.
3
30

Section III
Apple Macintosh III
Printing and Faxing 32
Remote Setup 51

4
Note
Printing and Faxing 4
Features in the printer driver (Macintosh) 4
This machine supports Mac OS X 10.5.8 - 10.6.x - 10.7.x.
The screens in this section are from Mac OS X 10.5. The screens on your Macintosh will vary depending
on your operating system version.
4
32

Printing and Faxing
Manual duplex (two-sided) printing 4
The supplied printer driver supports manual duplex printing.
Guidelines for printing on both sides of the paper 4
If the paper is thin, it may wrinkle.
If paper is curled, turn over the stack, straighten it and then put it back in the paper tray or manual feed slot.
If the paper is not feeding properly, it may be curled. Remove the paper, straighten it and turn over the
stack.
When you use the manual duplex function, it is possible that there may be paper jams or poor print quality.
If there is a paper jam, see Basic User’s Guide: Error and maintenance messages. If you have a print
quality problem, see Basic User’s Guide: Improving the print quality.
Manual duplex printing 4
The machine prints all the even-numbered pages on one side of the paper first. Before reinserting the paper,
straighten it well, or you may get a paper jam. Very thin or thick paper is not recommended.
4
33

Printing and Faxing
Note
Simultaneous scanning, printing and faxing 4
Your machine can print from your computer while sending or receiving a fax in memory, or while scanning a
document into the computer. Fax sending will not be stopped during the computer printing. However, when
the machine is copying or receiving a fax on paper, it pauses the computer printing operation, and then
continues printing when copying or fax receiving has finished.
Even if Toner Low or Toner Ended is displayed on the LCD, fax sending and scanning are available.
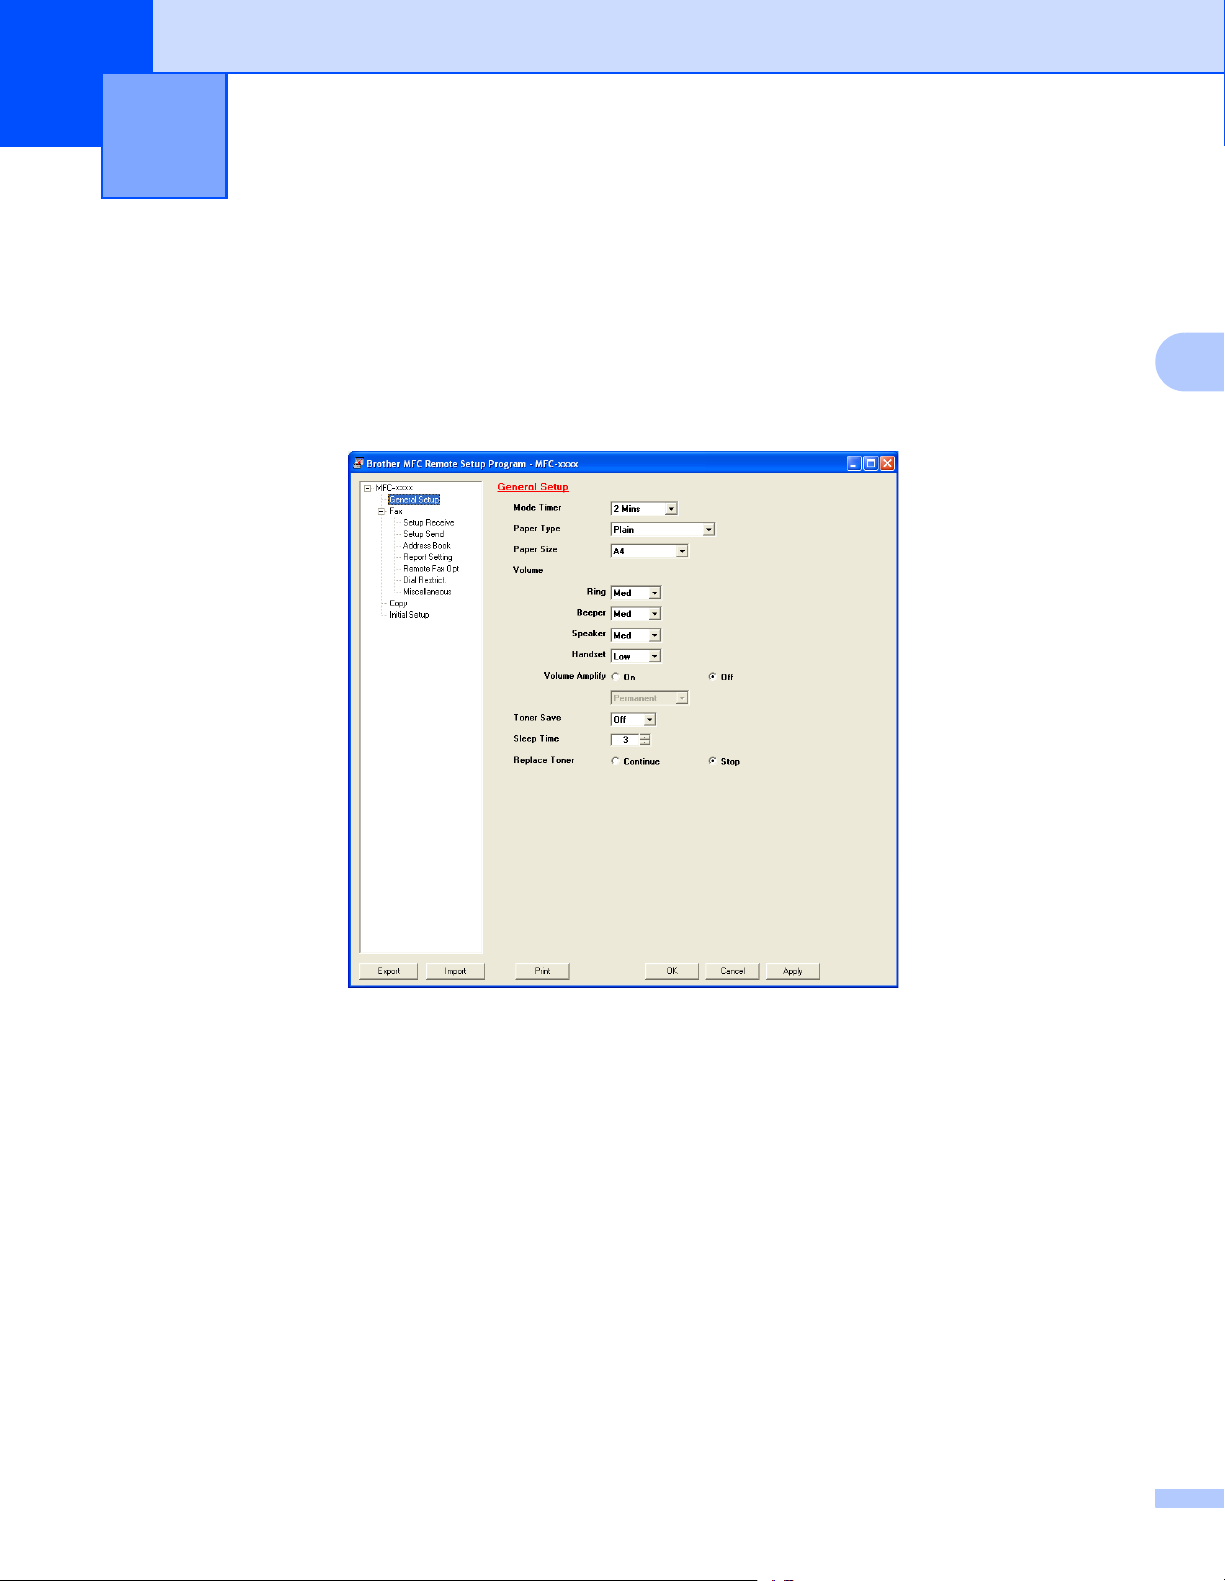
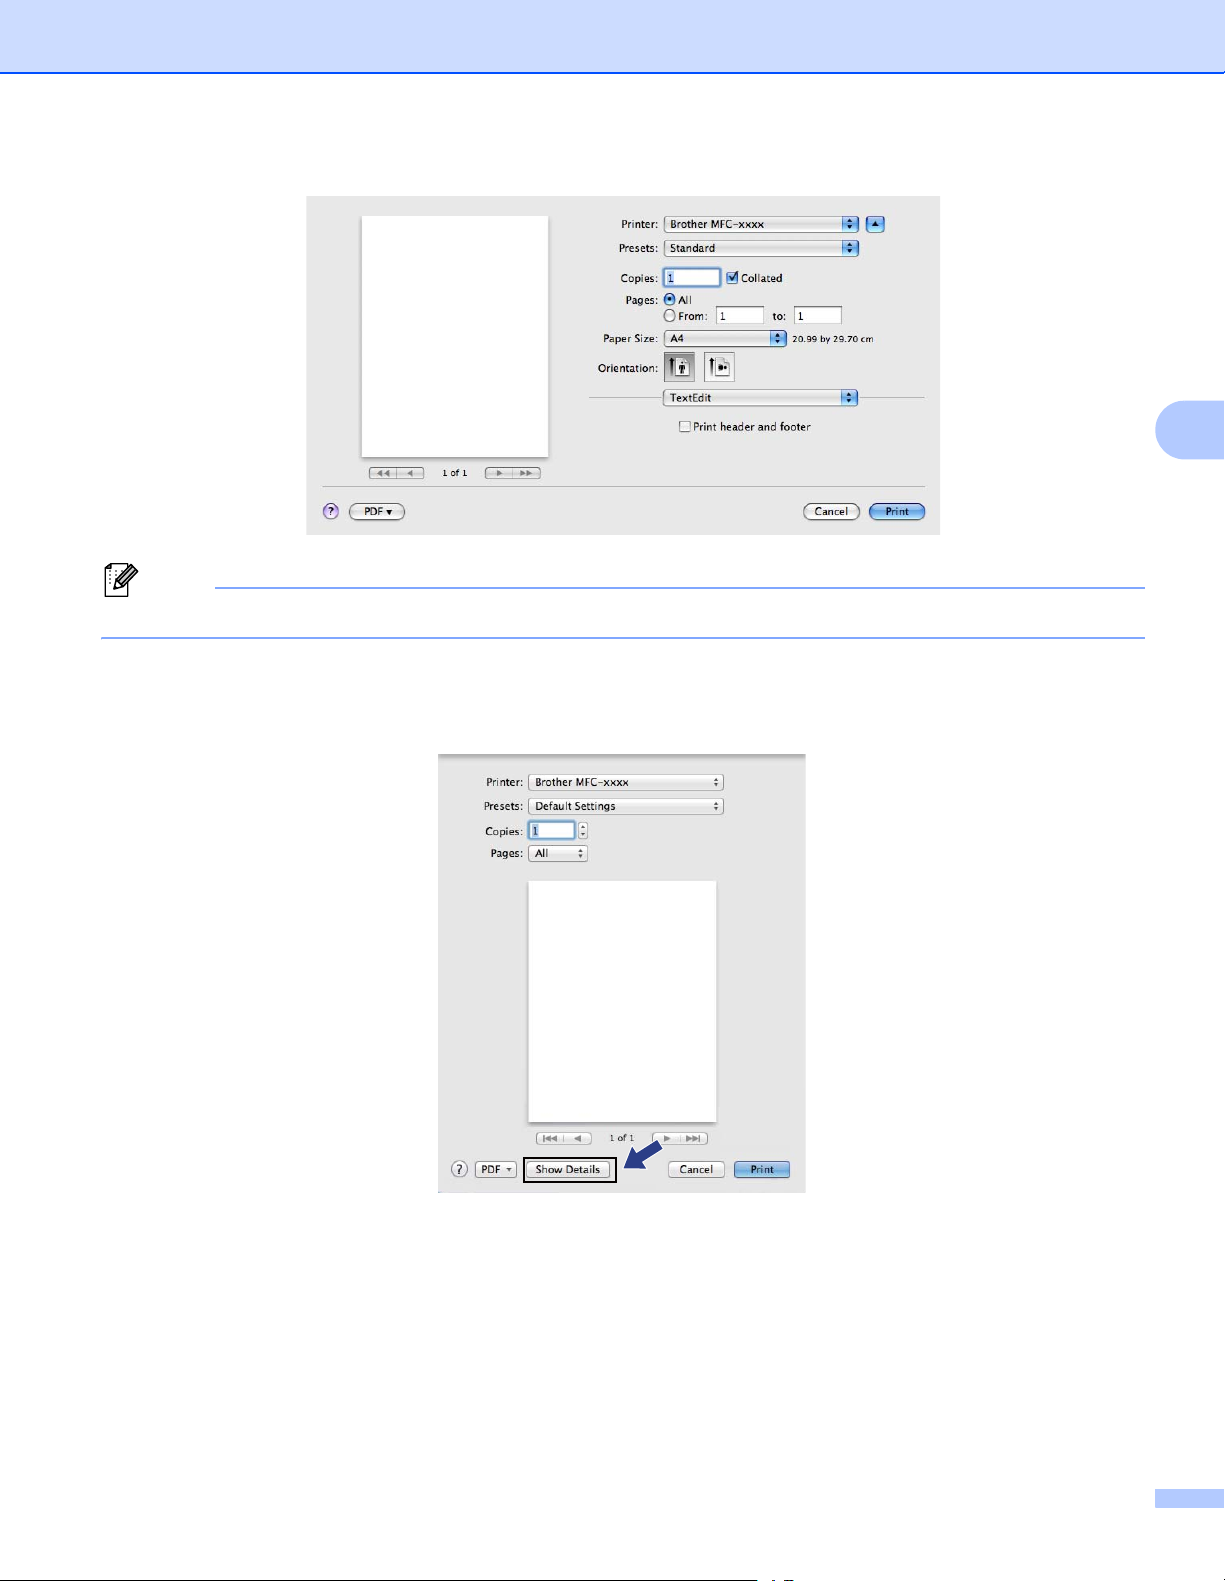
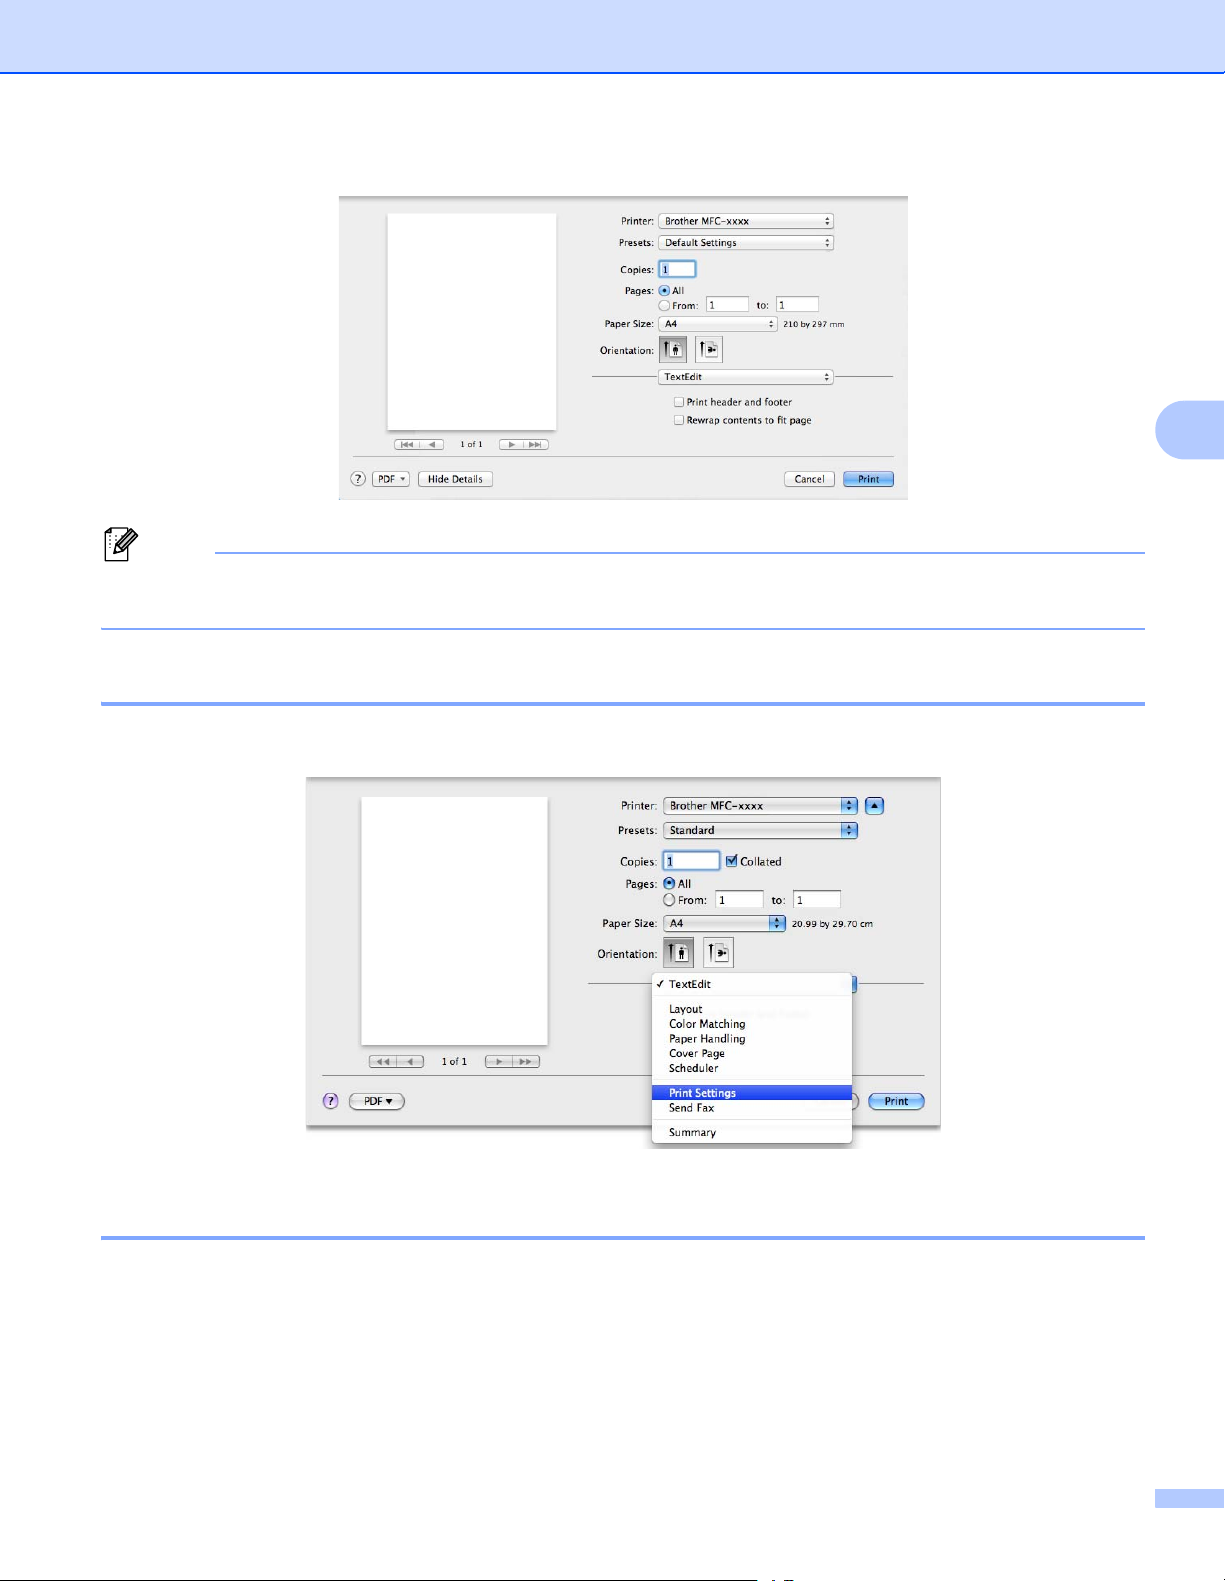
Choosing page setup options 4
You can set the Paper Size, Orientation and Scale.
a From an application such as TextEdit, click File, then Page Setup. Make sure Brother FAX-XXXX
(where XXXX is your model name.) is chosen in the Format for pop-up menu. You can change the
settings for Paper Size, Orientation and Scale, then click OK.
4
b From an application such as TextEdit, click File, then Print to start printing.
(Mac OS X 10.5.8 to 10.6.x)
For more page setup options, click the disclosure triangle beside the Printer pop-up menu.
34
Printing and Faxing
Note
You can save the current settings as a preset by choosing Save As from the Presets pop-up menu.
(For Mac OS X 10.7.x)
4
For more page setup options, click Show Details.
35
Printing and Faxing
Note
You can save the current settings as a preset by choosing Save Current Settings as Preset from the
Presets pop-up menu.
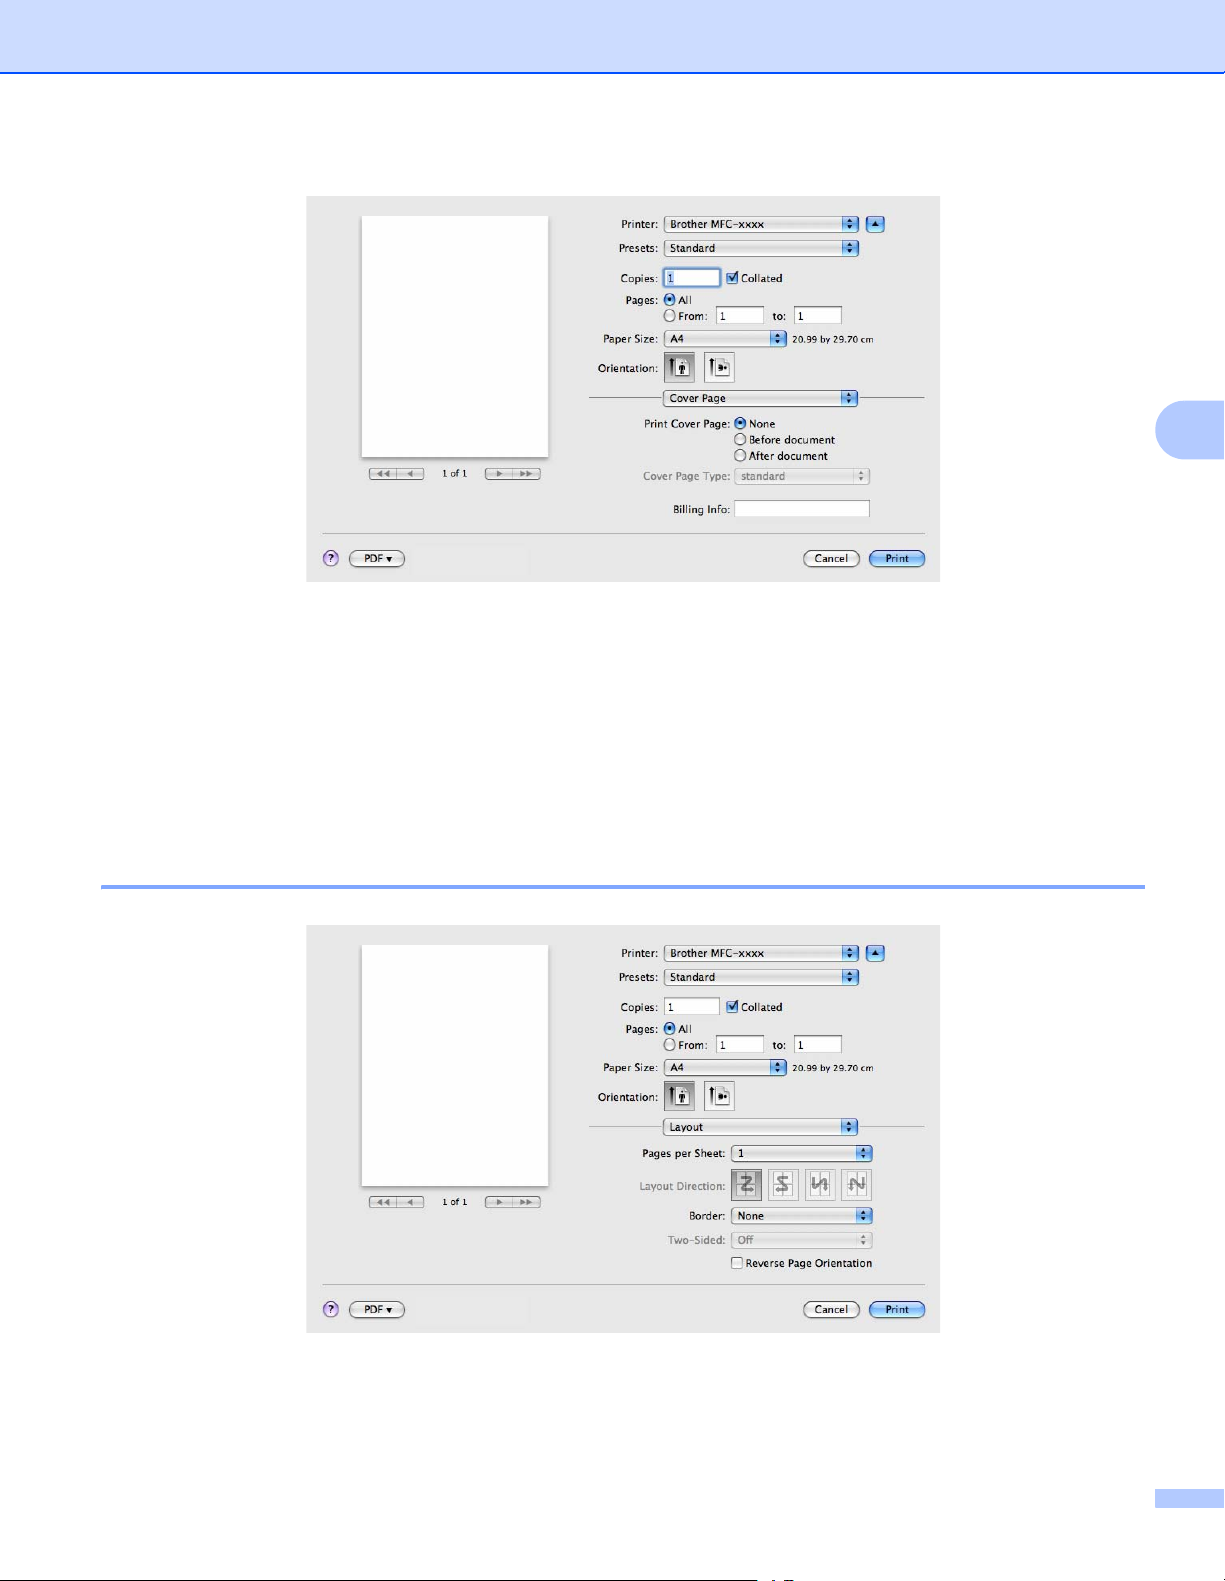
Choosing printing options 4
4
To control special printing features, choose the options you want to change from the Print dialog box.
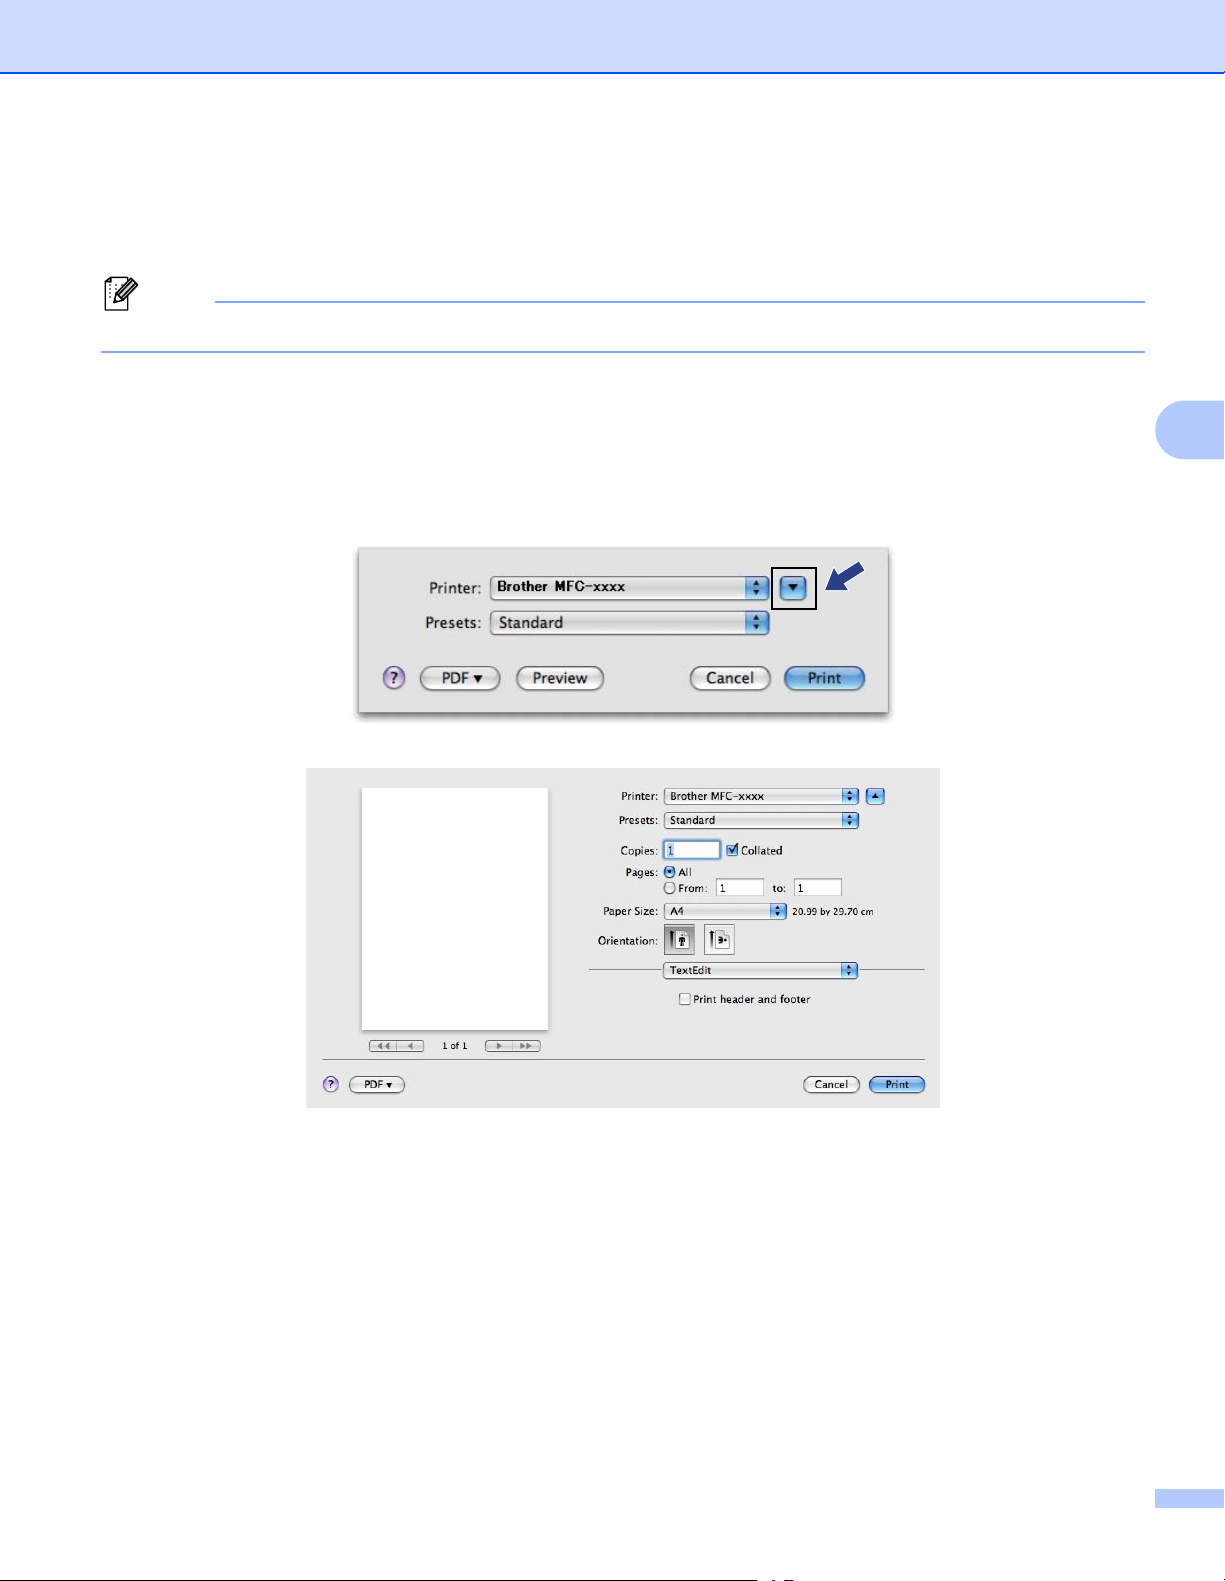
Cover Page 4
You can choose the following cover page settings:
36
Printing and Faxing
Print Cover Page
If you want to add a cover page to your document, use this function.
Cover Page Type
4
Choose a template for the cover page.
Billing Info
If you want to add the billing information to the cover page, enter text in the Billing Info box.
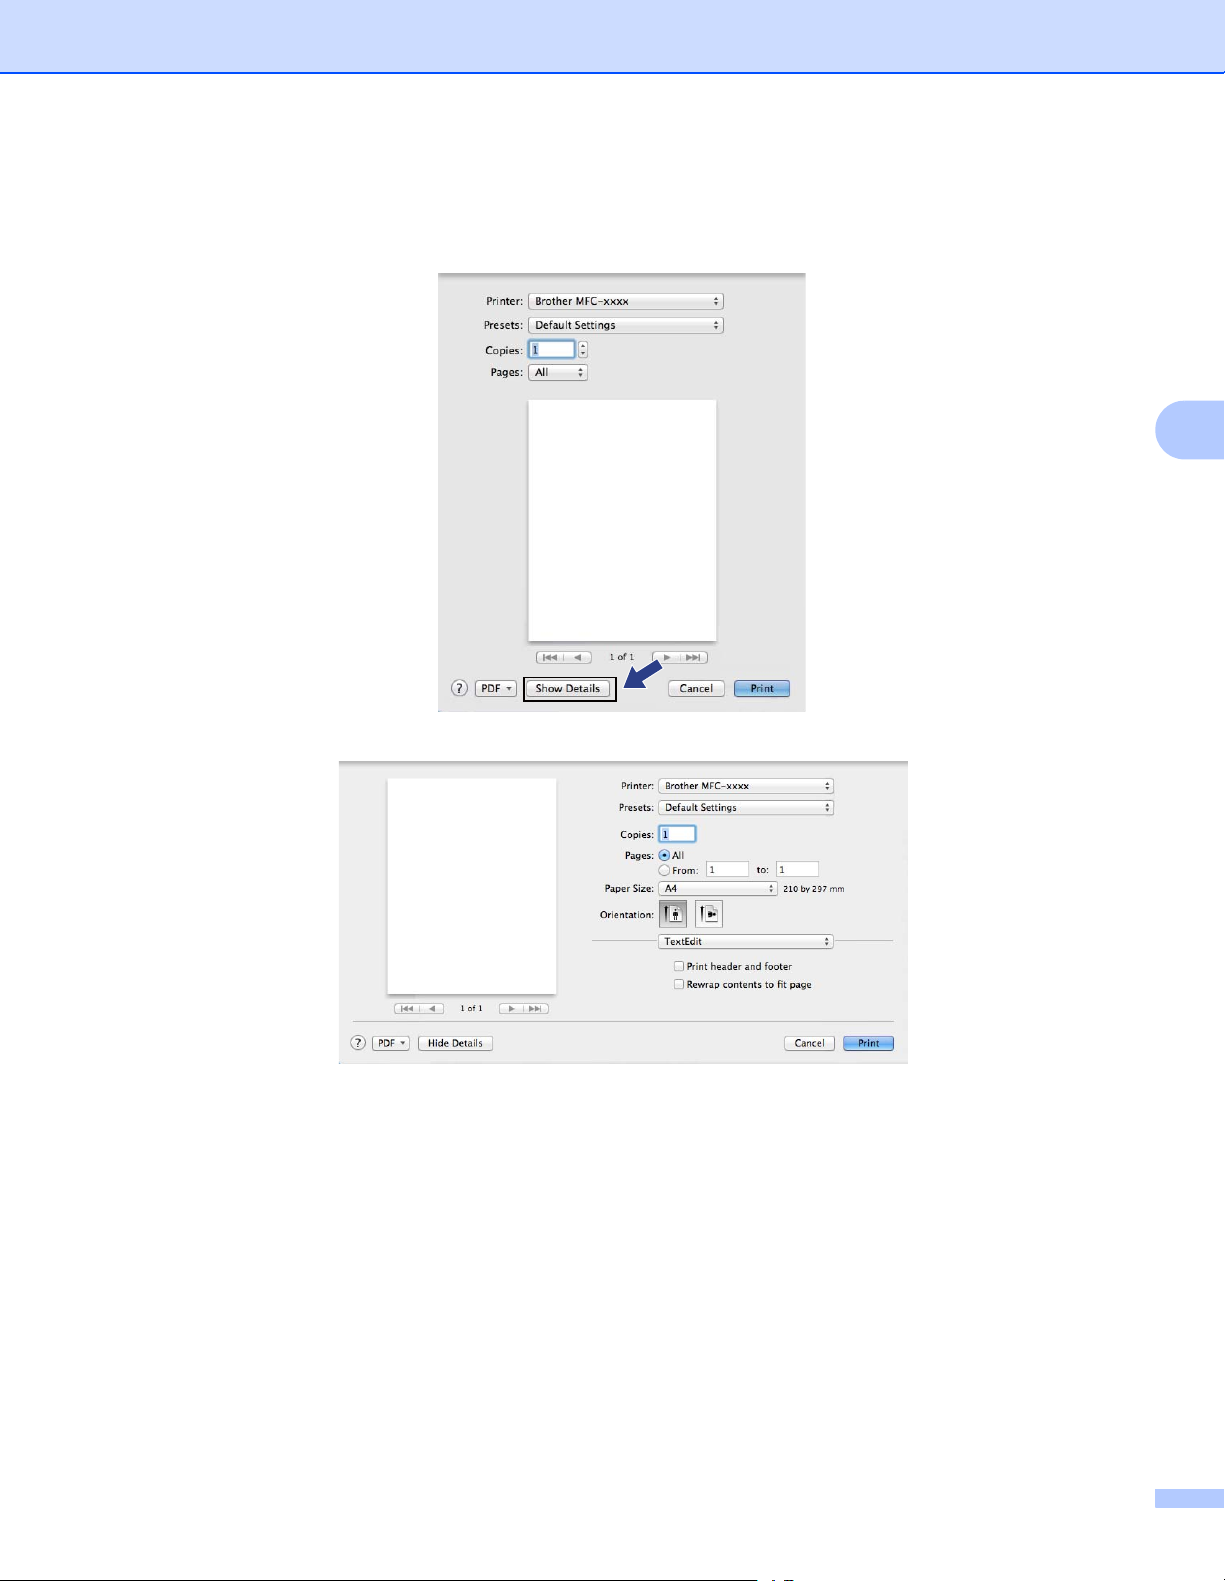
Layout 4
Pages per Sheet
The Pages per Sheet selection can reduce the image size of a page by allowing multiple pages to be
printed on one sheet of paper.
37

Printing and Faxing
Note
Layout Direction
When you specify the pages per sheet, you can also specify the direction of the layout.
Border
If you want to add a border, use this function.
Reverse Page Orientation
Check Reverse Page Orientation to reverse the data from up to down.
Flip horizontally (Mac OS X 10.6.x to 10.7.x)
Check Flip horizontally to print as a reflection flipped left-to-right.
If you want to do manual duplex printing, see Duplex Printing uu page 41.
Print Settings 4
You can change settings by choosing a setting in the Print Settings list:
4
Media Type
You can change the media type to one of the following:
• Plain Paper
• Thin Paper
• Thick Paper
• Thicker Paper
• Bond Paper
• Envelopes
• Env. Thick
• Env. Thin
38

Printing and Faxing
Note
• Recycled Paper
• Label
Resolution
You can change the resolution as follows:
• 300 dpi
• 600 dpi
• HQ 1200
Paper Source
You can choose Auto Select, Tray 1 or Manual.
Advanced print settings
When you click the triangle mark (c) beside Advanced, the advanced print settings appear.
4
Toner Save Mode
You can conserve toner use with this feature. When you set Toner Save Mode to On, print appears lighter.
The default setting is Off.
• We do not recommend Toner Save Mode for printing Photo or Gray Scale images.
• Toner Save Mode is not available for HQ 1200 resolution.
Graphics Quality
You can change the print quality as follows:
• Graphics
The Graphics mode prioritizes contrast. Choose this setting for printing text and figures, such as
business and presentation documents. You can represent sharp contrasts between shaded areas.
• Text
This is the best mode for printing text documents.
39

Printing and Faxing
Note
Note
Note
Improve Print Output
This feature allows you to improve a print quality problem.
• Reduce Paper Curl
If you choose this setting, the paper curl may be reduced.
If you are printing only a few pages, you do not need to choose this setting. We recommend that you
change the printer driver setting in Media Type to a thin setting.
This operation will decrease the temperature of the machine’s fusing process.
• Improve Toner Fixing
If you choose this setting, the toner fixing on paper may be improved. If this selection does not provide
enough improvement, change the printer driver setting in Media Type to a thick setting.
This operation will increase the temperature of the machine’s fusing process.
• Reduce Ghosting
If you are using the machine in a high humidity environment this setting may reduce ghosting on the
paper. Do not use this setting if the ambient humidity is below 30% or ghosting may increase.
This feature may not reduce ghosting for all types of paper. Before you buy a lot of paper, test a small
quantity to make sure that the paper is suitable.
Other Print Options
• Skip Blank Page
If Skip Blank Page is checked, the printer driver automatically detects blank pages and excludes them
from printing.
4
40

Printing and Faxing
Duplex Printing 4
Manual duplex
Select Paper Handling.
Choose Even Only and print, and then reload the printed paper into the tray (blank side face down in Tray
1) or manual feed slot (blank side face up in Manual). Choose Odd Only and print.
4
41

Printing and Faxing
Removing the Printer driver for Macintosh 4
a Log in as an ‘Administrator’.
b From the Apple menu, choose System Preferences. Click Print & Fax or Print & Scan, then choose
the printer you want to remove and remove it by clicking the - button.
4
42

Printing and Faxing
Status Monitor 4
The Status Monitor utility is a configurable software tool for monitoring the status of the machine, letting you
see error messages such as paper empty or paper jam at pre-set update intervals. You can check the device
status by launching Brother Status Monitor. Follow these steps:
For Mac OS X 10.5.8
a Run the System Preferences, select Print & Fax, then choose the machine.
b Click the Open Print Queue..., then click Utility. Status Monitor will start up.
For Mac OS X 10.6.x to 10.7.x
a Run the System Preferences, select Print & Fax or Print & Scan, then choose the machine.
b Click the Open Print Queue..., then click Printer Setup. Select the Utility tab then click
Open Printer Utility. Status Monitor will start up.
Updating the machine’s status 4
If you want the latest machine status while the Status Monitor window is open, click the icon. You can
set the interval at which the software will update the machine status information. Go to the menu bar, Brother
Status Monitor and choose Preferences.
4
Hiding or showing the window 4
After starting the Status Monitor, you can hide or show the window. To hide the window, go to the menu bar,
Brother Status Monitor and choose Hide Status Monitor. To show the window, click the
Brother Status Monitor icon in the dock.
43

Printing and Faxing
Quitting the window 4
Click Brother Status Monitor in the menu bar and then choose Quit Status Monitor from the pop-up menu.
4
44
Printing and Faxing
Note
Sending a fax 4
You can send a fax directly from a Macintosh application.
Fax documents will be sent in Black and White only.
a Create a document in a Macintosh application.
b From an application such as TextEdit, click File, then Print.
(Mac OS X 10.5.8 to 10.6.x)
For more page setup options, click the disclosure triangle beside the Printer pop-up menu.
4
45
Printing and Faxing
(For Mac OS X 10.7.x)
For more page setup options, click Show Details.
4
46
Printing and Faxing
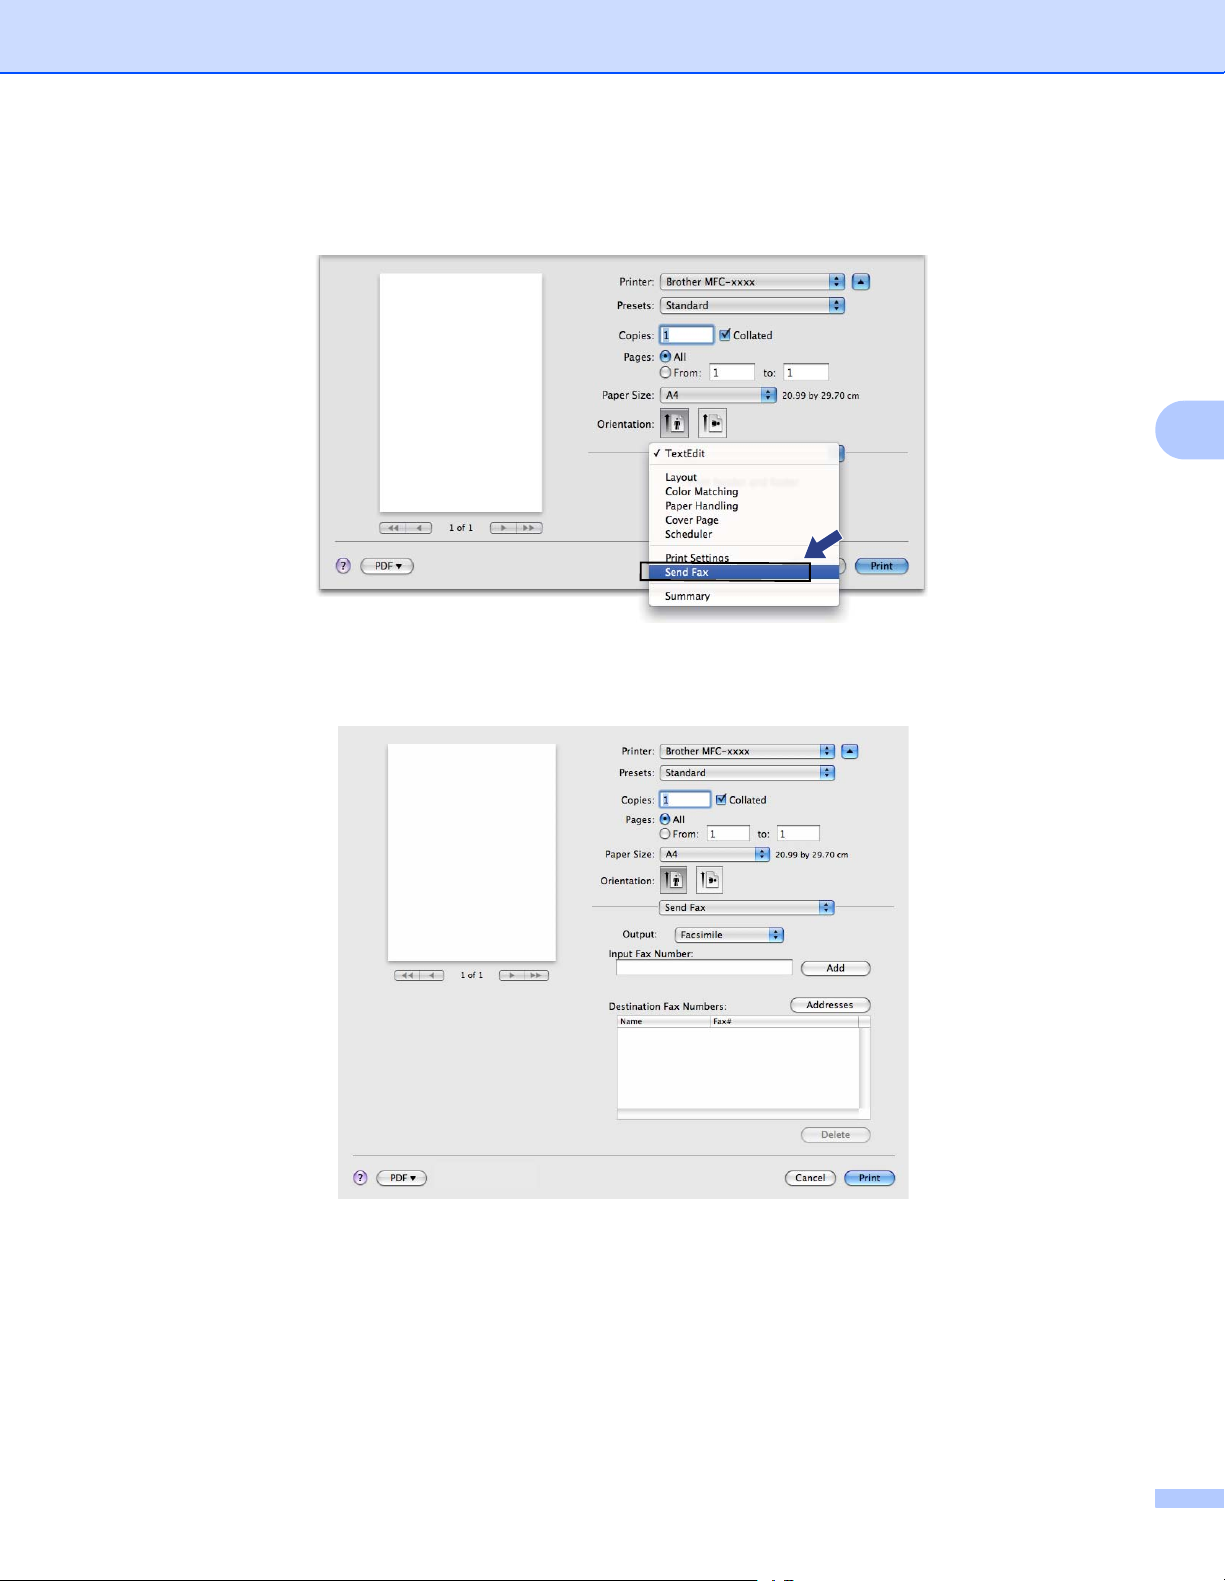
c Choose Send Fax from the pop-up menu.
d Choose Facsimile from the Output pop-up menu.
4
e Enter a fax number in the Input Fax Number box, and then click Print to send the fax.
47
Printing and Faxing
Note
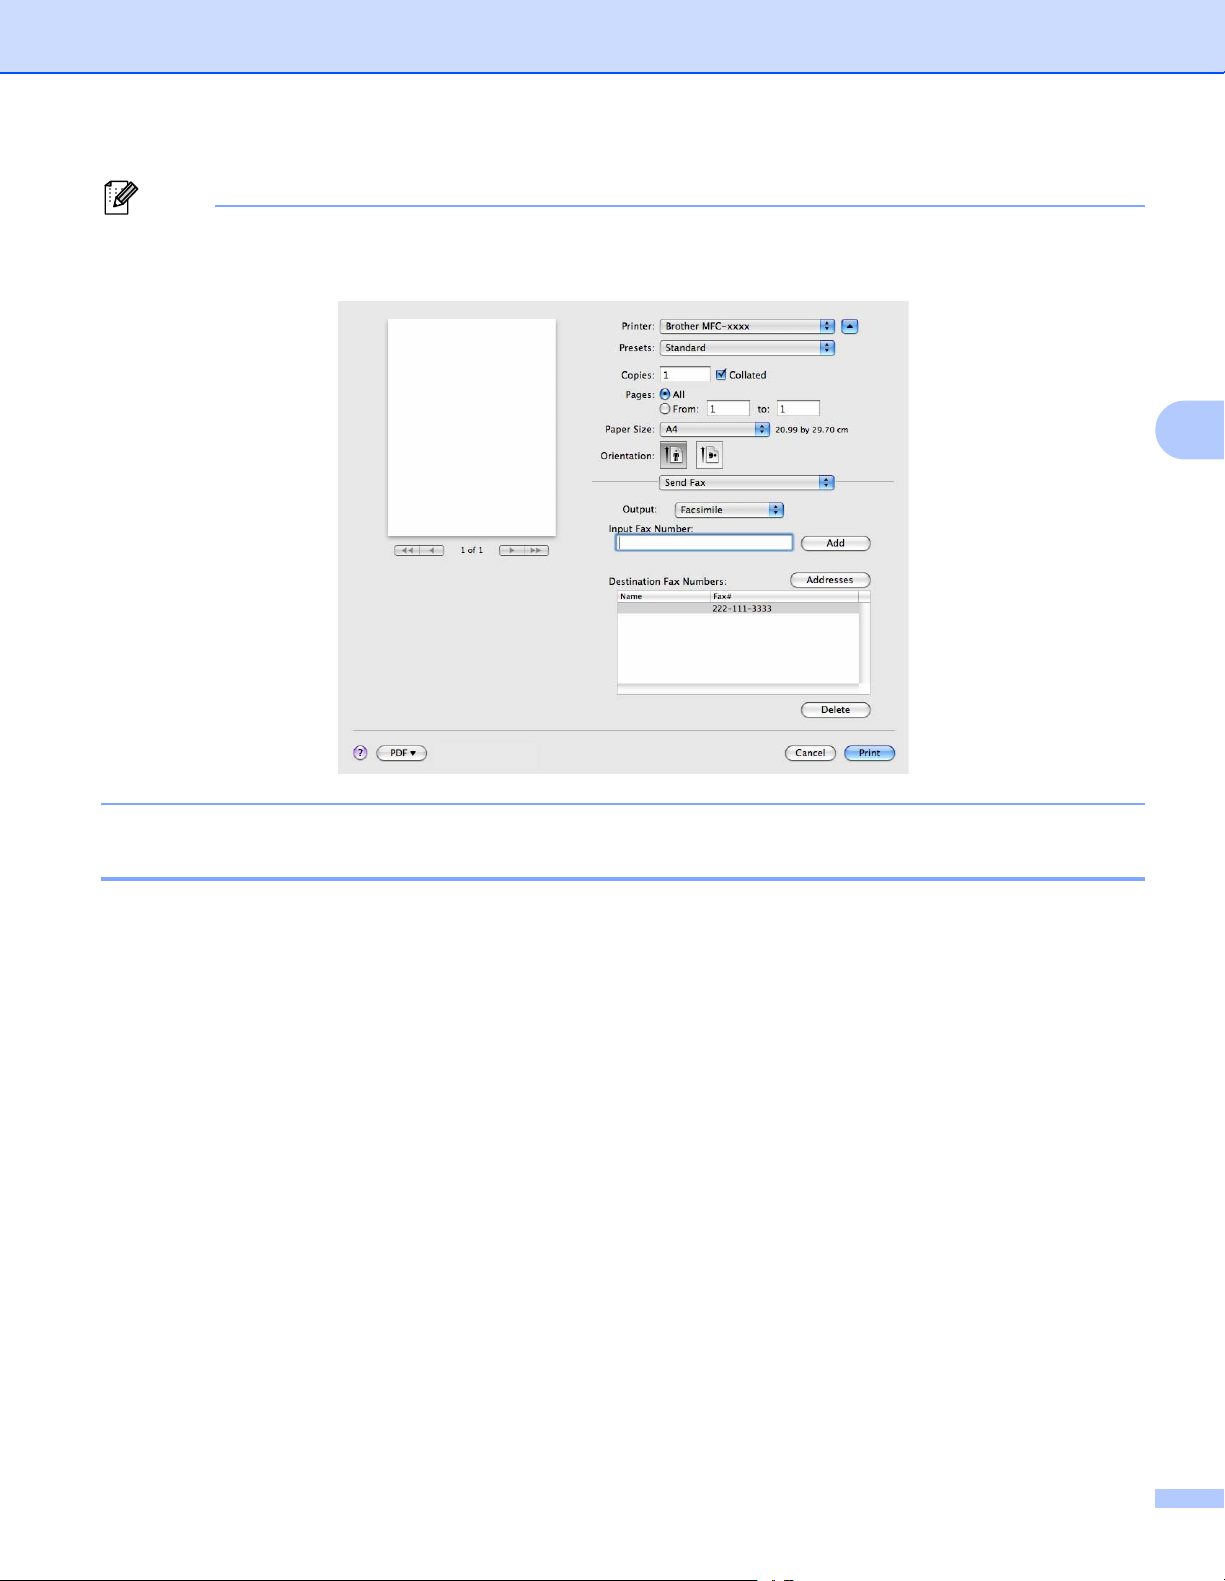
If you want to send a fax to more than one number, click Add after entering the first fax number. The
destination fax numbers will be listed in the dialog box.
4
Using the Addresses panel 4
You can choose a fax number using the Addresses button.
48

Printing and Faxing
a Click Addresses.
4
b Choose the fax number from the Addresses panel and then click To.
49
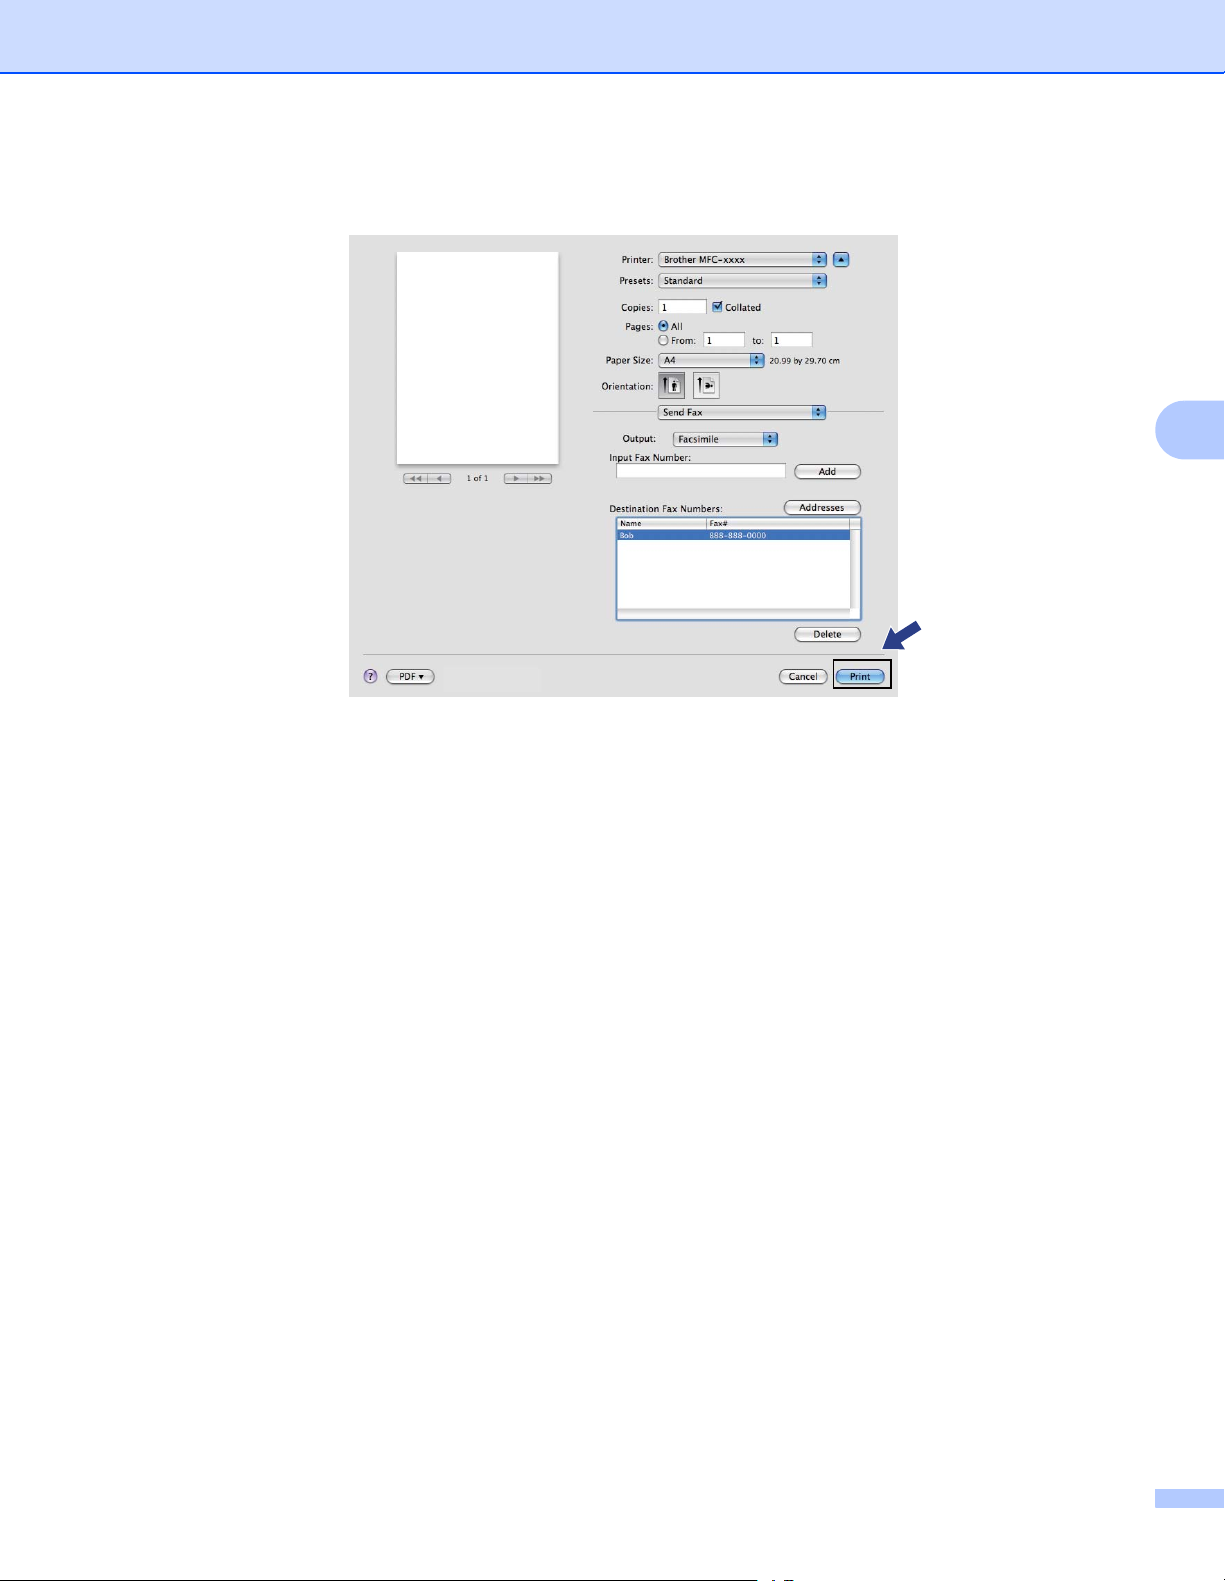
Printing and Faxing
c When you have chosen your fax, click Print.
4
50
5
Note
Remote Setup 5
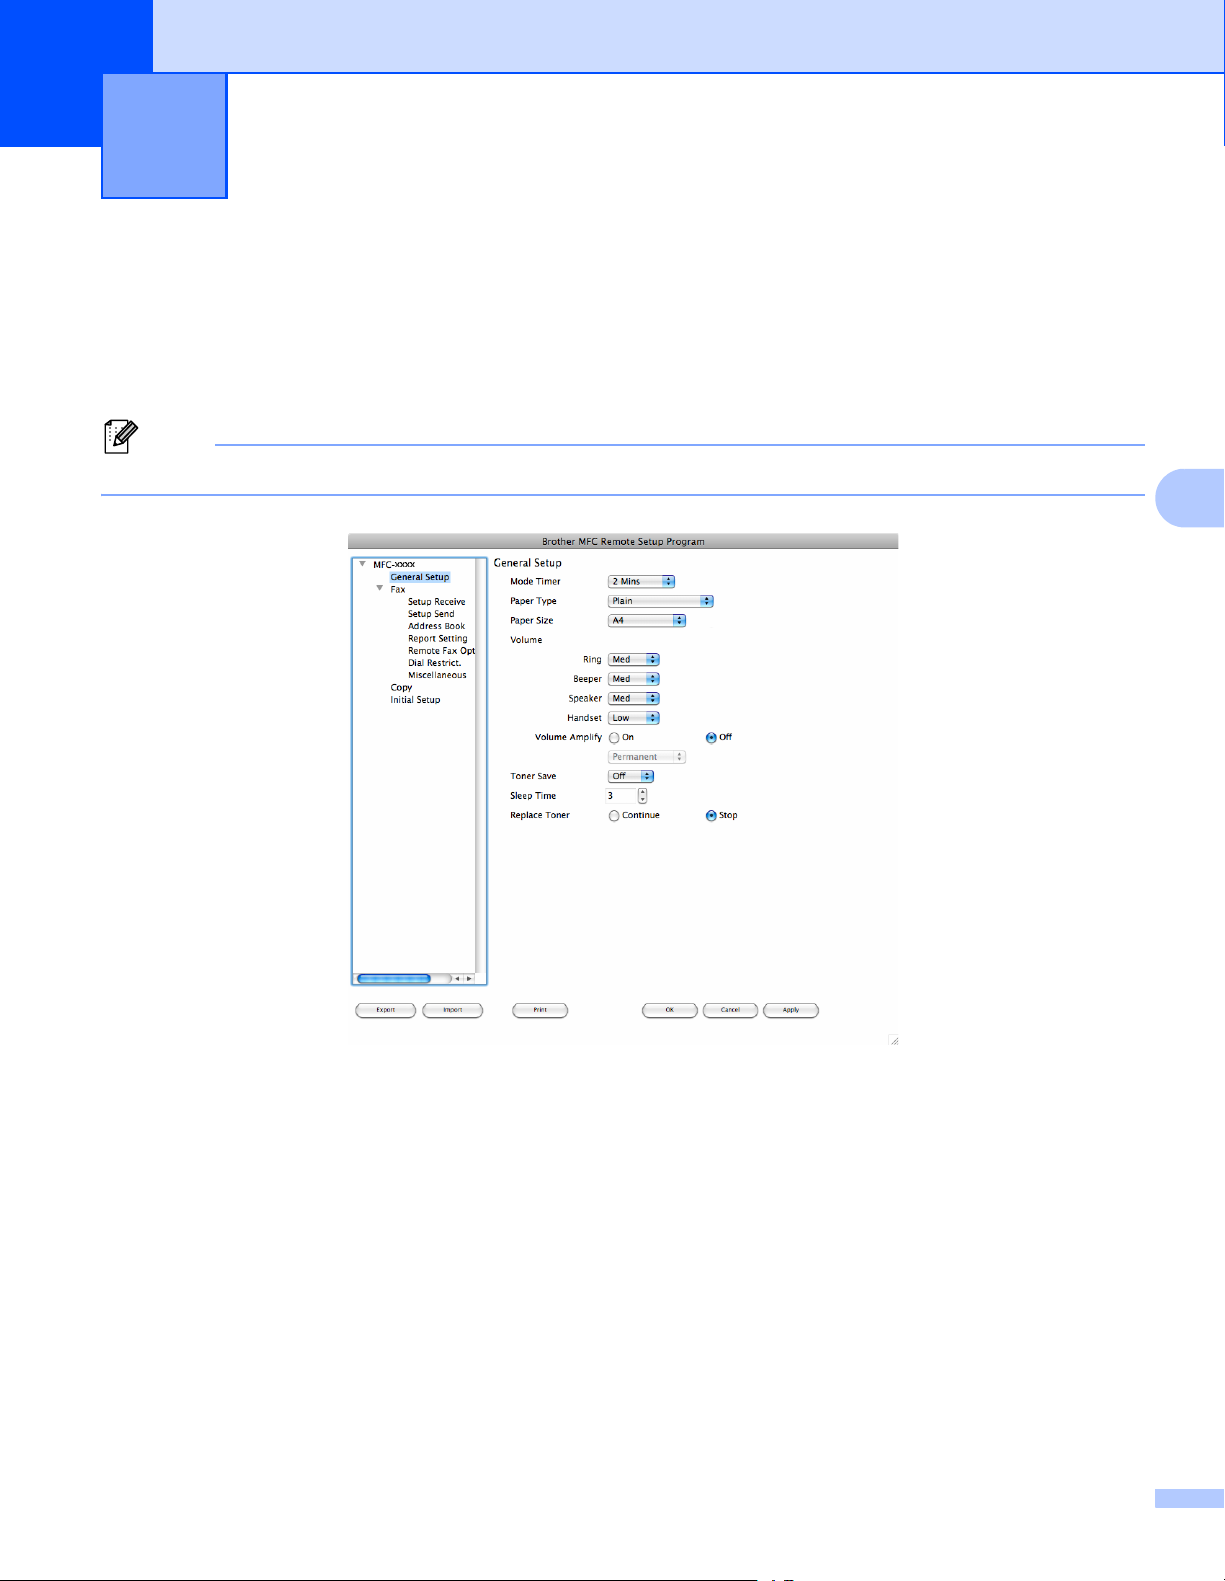
Remote Setup 5
The Remote Setup application lets you configure many machine settings from a Macintosh application.
When you access this application, the settings on your machine will be downloaded automatically to your
Macintosh and displayed on your Macintosh screen. If you change the settings, you can upload them directly
to the machine.
The RemoteSetup application icon is in Macintosh HD/Applications/Brother.
5
OK
Lets you start uploading data to the machine and exit the Remote Setup application. If an error message
is displayed, enter the correct data again and then click OK.
Cancel
Lets you exit the Remote Setup application without uploading data to the machine.
Apply
Lets you upload data to the machine without exiting the Remote Setup application.
Print
Lets you print the chosen items on the machine. You cannot print the data until it is uploaded to the
machine. Click Apply to upload the new data to the machine and then click Print.
51

Remote Setup
Note
Export
Lets you save the current configuration setting to a file.
Import
Lets you read the setting from a file.
You can use the Export and Import buttons to save Quick Dial or all your settings for your machine.
5
52

A
Index
A
Administrator .......................................................15, 18
D
Drivers
Macintosh
printer
.................................................................. 32
Windows
printer .................................................................... 4
®
E
Edit a Profile .............................................................. 21
F
FAX (PC-FAX)
Macintosh
address book
sending
...................................................... 48
............................................................... 45
H
T
Tray Settings ............................................................. 25
W
Watermark ..........................................................15, 16
A
Header-Footer Print ............................................15, 18
P
Password .................................................................. 18
Print
Macintosh
Manual duplex printing
Printer driver
Windows
Booklet printing ................................................... 13
Manual duplex printing
Print Profiles
....................................................... 32
®
.............................................................. 21
........................................ 41
........................................ 13
R
Remote Setup
Macintosh
Windows
.............................................................. 51
®
.............................................................. 29
S
Status Monitor
Macintosh
Windows
Support
.............................................................. 43
®
.............................................................. 27
..................................................................... 23
53

Visit us on the World Wide Web
http://www.brother.com/
These machines are approved for use in the country of purchase only. Local Brother companies or their dealers will only support
machines purchased in their own countries.
 Loading...