

Page 1
MFC-665CW
Windows Vista™ Installation Guide
Before you can use the machine, you must set up the hardware and install the driver. Please
read the ‘Quick Setup Guide’ and this ‘Windows Vista™ Installation Guide’ for set up and
installation instructions.
STEP 1
Setting Up the Machine
Please follow the steps in STEP 1 Setting Up the Machine in the Quick
Setup Guide first. Then return to STEP 2 Installing the driver &
software in this installation guide.
STEP 2
Installing the Driver & Software
Please follow the steps in this Windows Vista™ Installation Guide for
driver & software installation instructions.
Setup is Complete!
Keep the ‘Quick Setup Guide’, ‘Windows Vista™ Installation Guide’ and the supplied CD-ROM
in a convenient place for quick and easy reference at all times.
Page 2
1
Symbols used in this guide
Warning
Warnings tell you what to do
to prevent possible personal
injury.
Improper Setup
Improper Setup icons alert
you to devices and
operations that are not
compatible with the machine.
Note
Notes tell you how you should
respond to a situation that
may arise or give tips about
how the current operation
works with other features.
Quick Setup Guide
Indicates reference to the
Quick Setup Guide.
Caution
Cautions specify procedures
you must follow or avoid to
prevent possible damage to
the machine or other objects.
Page 3

Table of Contents
Before Starting
Before using this manual.............................................................................................................................. 2
Supplied CD-ROM for Windows Vista™ ...................................................................................................... 2
Installing the Driver & Software
For USB Interface Users............................................................................................................................. 4
For Wired Network Interface Users............................................................................................................. 8
For Wireless Network Interface Users ...................................................................................................... 13
Connecting your wireless machine and wireless network together and installing the printer driver in
infrastructure mode.............................................................................................................................. 13
Using the SecureEasySetup™ software to configure your machine for a wireless network................ 15
Using the Setup Wizard from the control panel LAN menu for wireless network configuration ........... 17
For Network Users
BRAdmin Light utility .................................................................................................................................. 23
Installing the BRAdmin Light configuration utility.................................................................................. 23
Setting your IP address, Subnet Mask and Gateway using BRAdmin Light ......................................... 23
How to set the machine’s network settings to wireless LAN or wired LAN ................................................ 24
Restoring the network settings to factory default .......................................................................................24
Entering Text.............................................................................................................................................. 25
Other Information
Using ScanSoft™ PaperPort™ 11SE with OCR by NUANCE™ ............................................................... 26
Computer requirements ............................................................................................................................. 27
1
Page 4
Before Starting
1
1
This manual is for Windows Vista™ users only. This installation guide explains how to install the MFL-Pro Suite
software and multifunction drivers for Windows Vista™ and other information about Windows Vista™. Before
installing the driver and software, please follow the steps in the Getting Started section and
STEP1 Setting Up the Machine in the Quick Setup Guide. After you complete the initial setup, follow the steps
in this guide for installing the MFL-Pro Suite and drivers. You can also find other information about the machine
in the Quick Setup Guide.
Before using this manual
See the Quick Setup Guide first.
2
You can find the information listed below on the Windows Vista™ CD-ROM.
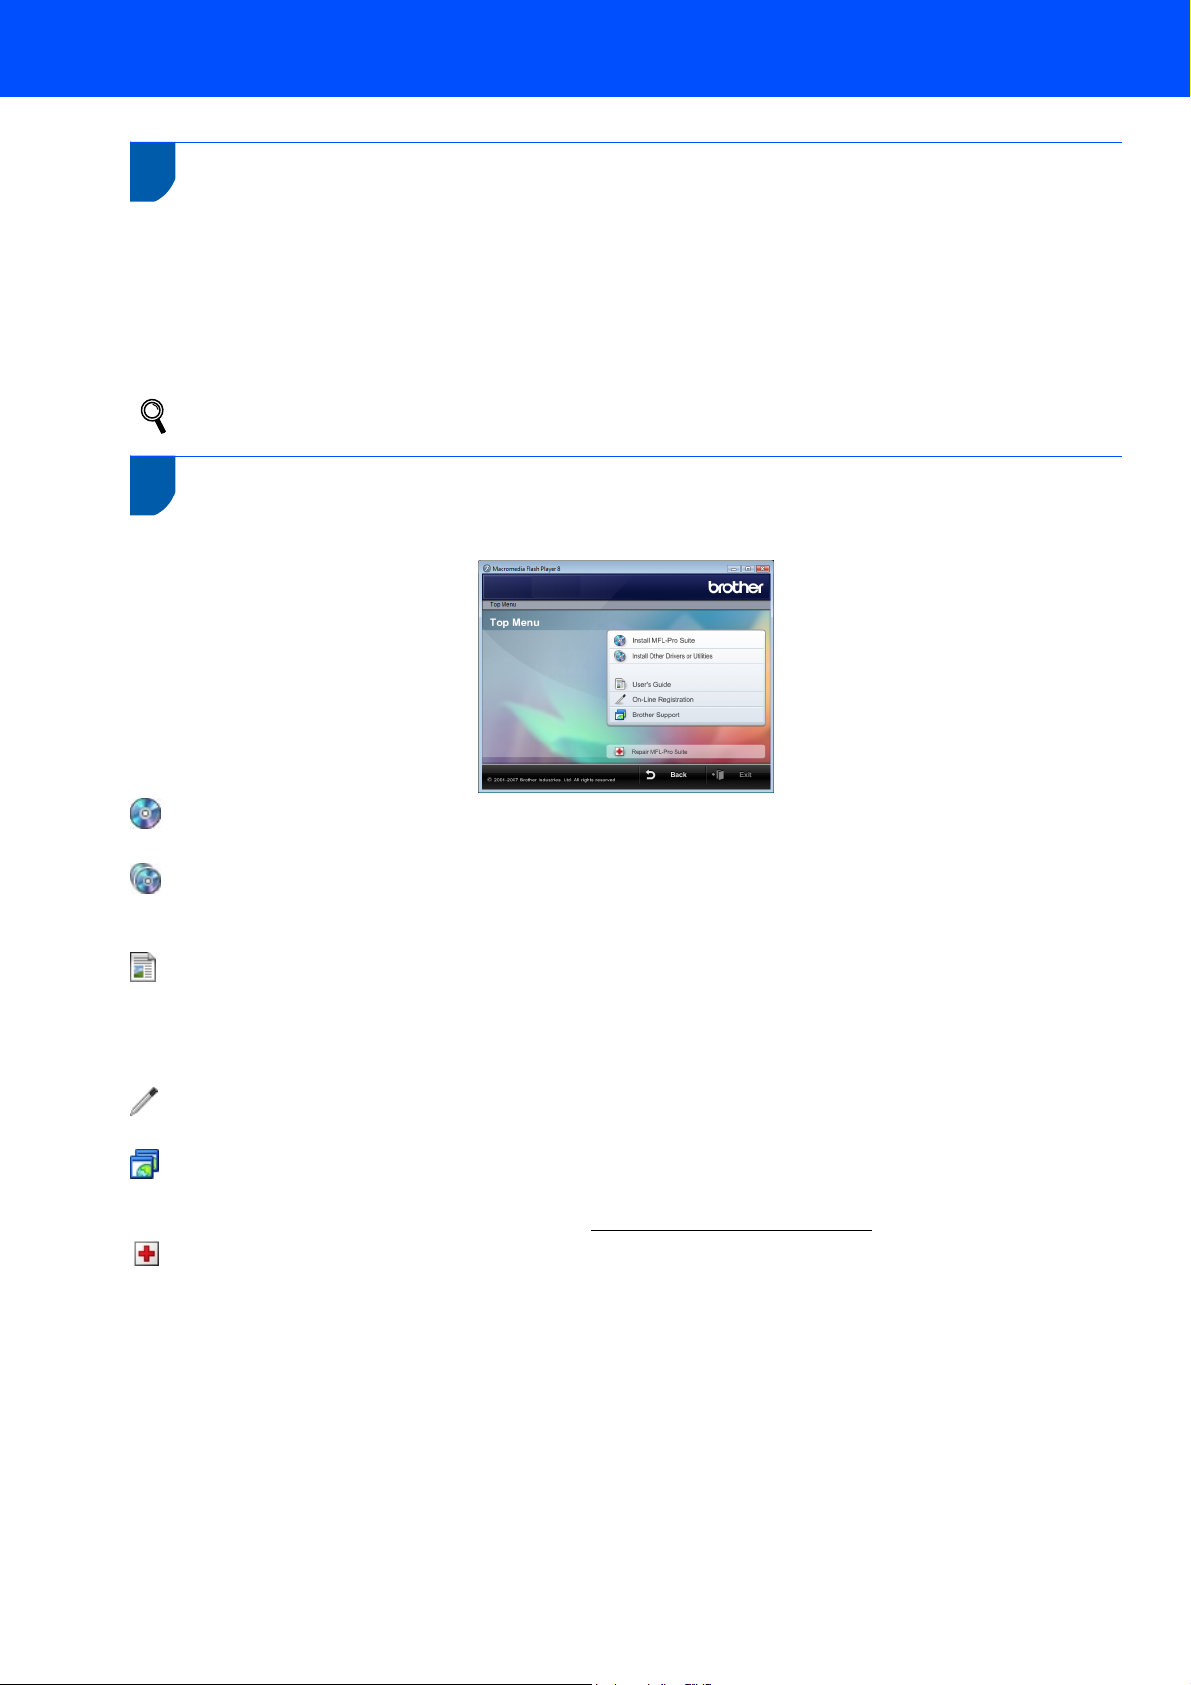
Supplied CD-ROM for Windows Vista™
Install MFL-Pro Suite
You can install the MFL-Pro Suite software and multifunction drivers.
Install Other Drivers or Utilities
You can install additional MFL-Pro Suite software utilities, install without ScanSoft™ PaperPort™ 11SE with OCR
by NUANCE™, or install the printer driver only.
User’s Guide
View the Software User’s Guide and Network User’s Guide (only available for models with built-in network) in
HTML format or PDF format. You can also view the manuals in PDF format by accessing the Brother Solutions
Center. The Software User’s Guide includes instructions for features available when connected to a computer. (eg.
Printing and scanning details)
On-Line Registration
Register your machine from the Brother Product Registration page.
Brother Support
View contact information for Brother Customer Service and how to find a Brother Authorized Service Center. View
our web site for original/genuine Brother supplies at http://www.brother.com/original/
for Supplies Information.
Repair MFL-Pro Suite (USB only)
If an error occurred during the installation of the MFL-Pro Suite, use this selection to automatically repair and
re-install the MFL-Pro Suite.
2
Page 5

STEP 2
Follow the instructions on this page for the interface you are going to use.
For the latest drivers, documentation, and to find the best solution for your problem, access the Brother Solution Center
directly from the CD-ROM / Driver or visit http://solutions.brother.com
Installing the Driver & Software
.
Windows
For USB Interface Users .................................................................................................. 4
For Wired Network Interface Users ................................................................................ 8
For Wireless Network Interface Users .......................................................................... 13
®
3
Page 6

STEP 2
1
1
®
USB
Windows
DO NOT connect the interface cable.
Connecting the interface cable is done when
installing the driver.
Important
Make sure that you have finished the
instructions from STEP 1 Setting Up the
Machine in the Quick Setup Guide.
Installing the Driver & Software
For USB Interface Users
Improper Setup
Windows
®
3 Put the supplied CD-ROM for Windows Vista™
into your CD-ROM drive.
If the model name screen appears, choose
your machine. If the language screen appears,
choose your language.
4 The CD-ROM main menu will appear. Click
Install MFL-Pro Suite.
Note
• Please close any applications running before
installing MFL-Pro Suite.
• Make sure there are no memory cards in the
media drive of the machine.
Installing the driver and connecting the machine
to your computer.
1 Unplug the machine from the AC outlet and
from your computer, if you already connected
an interface cable.
2 Turn on your computer.
You must be logged on with Administrator
rights.
If this window does not appear, use Windows®
Explorer to run the start.exe program from the
root folder of the Brother CD-ROM.
Note
When the User Account Control screen appears,
click Allow.
4
Page 7
Installing the Driver & Software
Windows
®
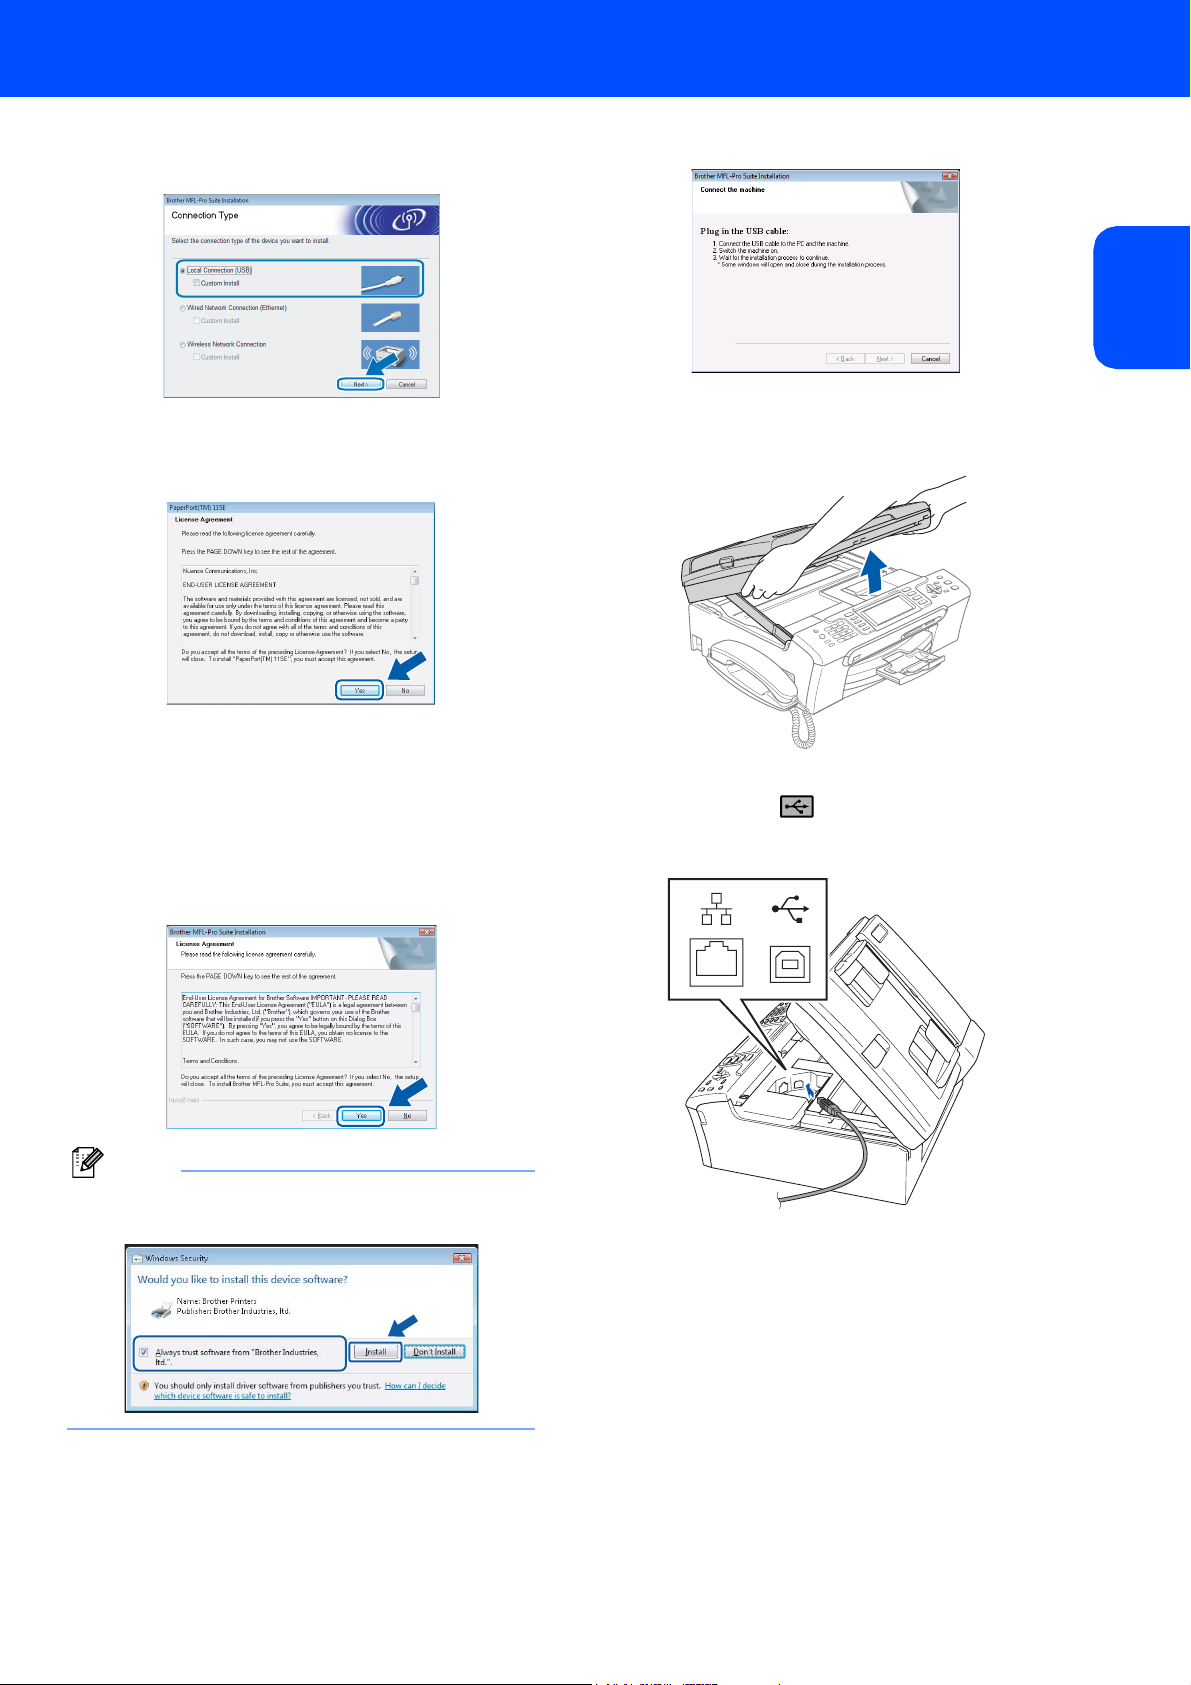
5 Choose Local Connection, and then click
Next. The installation continues.
6 After reading and accepting the ScanSoft™
PaperPort™ 11SE License Agreement, click
Yes.
9 When this screen appears, go to the next step.
10 Using both hands, use the plastic tabs on both
sides of the machine to lift the scanner cover
until it locks securely into the open position.
®
USB
Windows
7 The installation of ScanSoft™ PaperPort™
11SE will automatically start and is followed by
the installation of MFL-Pro Suite.
8 When the Brother MFL-Pro Suite Software
License Agreement window appears, click
Yes if you agree to the Software License
Agreement.
Note
When this screen appears, click the check box and
click Install to complete the installation properly.
11 Insert the USB cable into the USB socket
marked with a symbol. You will find the
USB socket inside the machine on the right as
shown below.
5
Page 8
STEP 2
Installing the Driver & Software
Windows
®
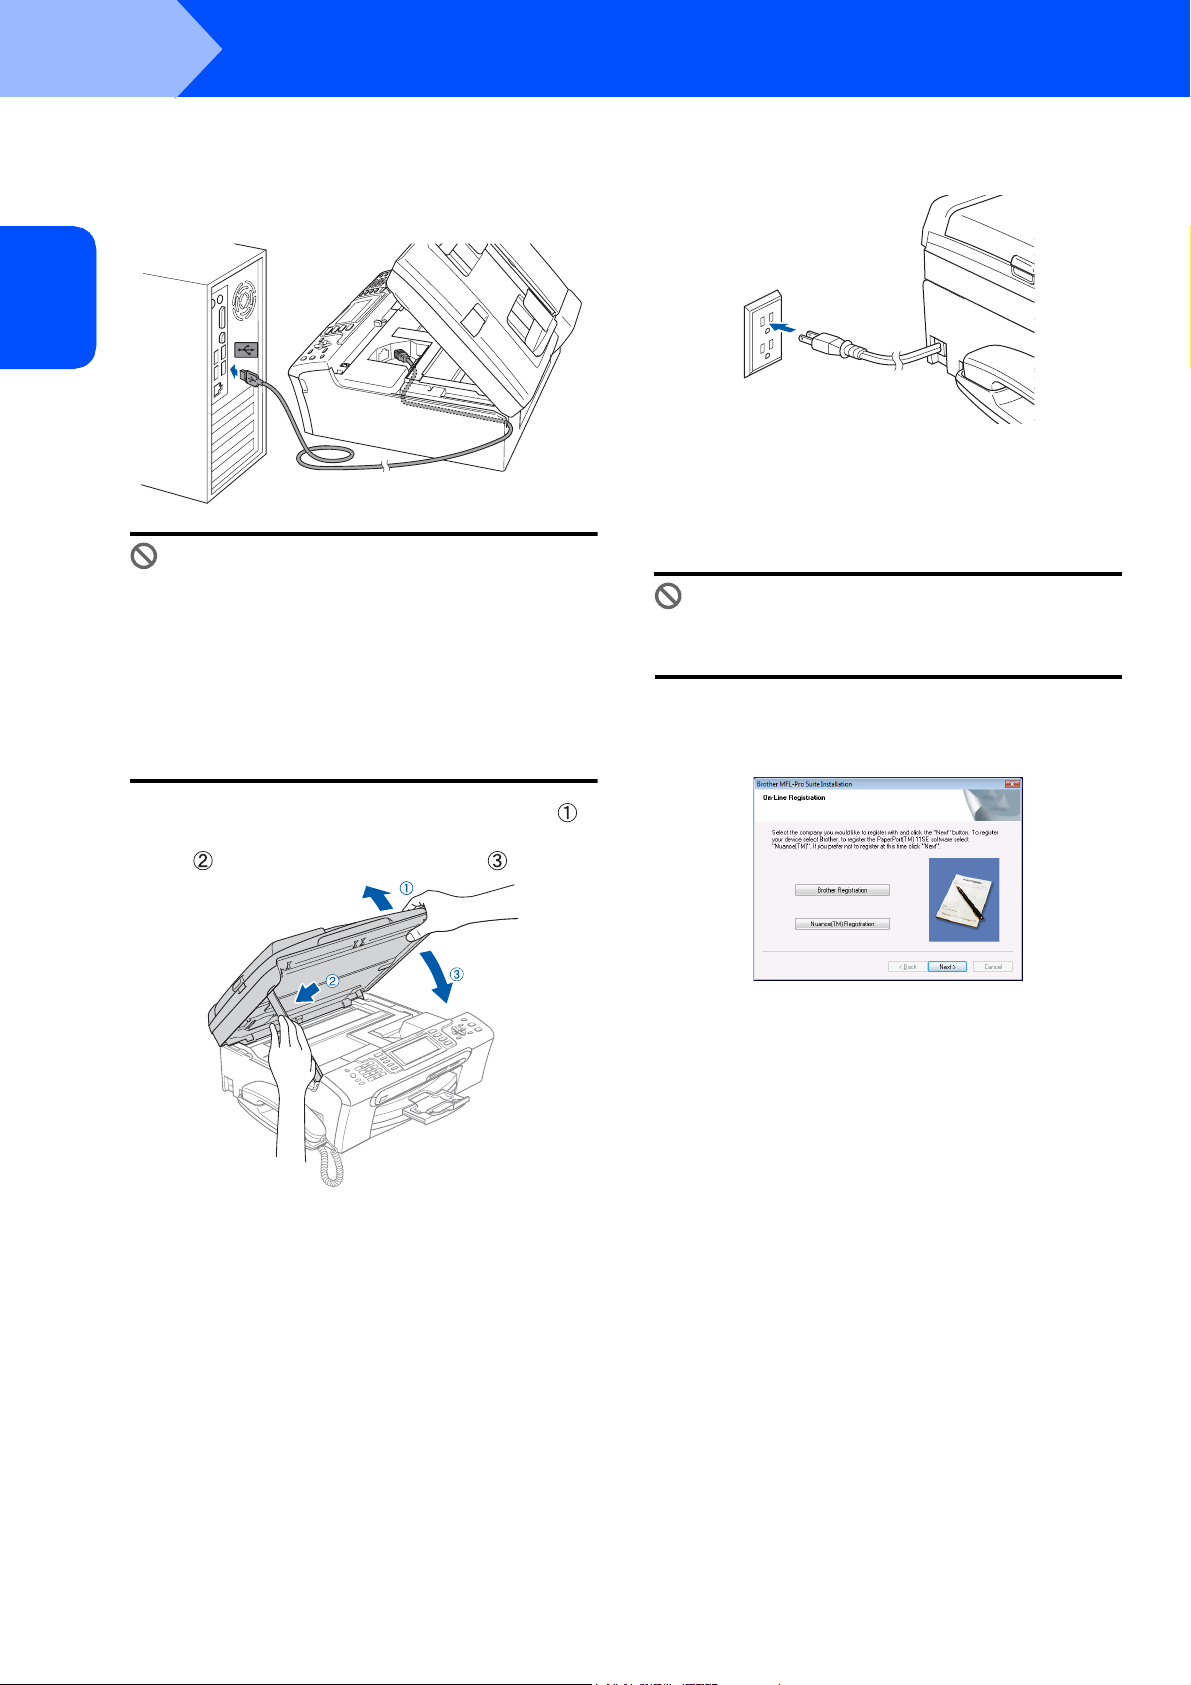
12 Carefully route the USB cable through the
trench and out the back of the machine as
shown below and connect the cable to your
computer.
®
USB
Windows
14 Turn on the machine by connecting the power
cord.
The installation of the Brother drivers will
automatically start. The installation screens
appear one after another. Please wait, it will
take a few seconds for all the screens to
appear.
Improper Setup
• DO NOT connect the machine to a USB port on
a keyboard or a non-powered USB hub.
Brother recommends that you connect the
machine directly to your computer.
• Make sure that the cable does not restrict the
cover from closing, or an error may occur.
• Make sure you use a USB 2.0 cable that is no
longer than 6 feet long (2 meters).
Improper Setup
DO NOT try to cancel any of the screens during
this installation.
15 When the On-Line Registration screen is
displayed, make your selection and follow the
on-screen instructions.
13 Lift the scanner cover to release the lock ( ).
Gently push the scanner cover support down
( ) and close the scanner cover ( ).
6
Page 9

Installing the Driver & Software
16 Click Finish to restart your computer. After
restarting the computer, you must be logged on
with Administrator rights.
Note
After restarting the computer, the Installation
Diagnostics will run automatically. If the
installation is unsuccessful, the installation results
window will be shown. If the Diagnostics shows a
failure, please follow the on-screen instructions or
read the on-line help and FAQs in
Start/All Programs/Brother/MFC-665CW
Windows
®
Windows
®
USB
The MFL-Pro Suite has been installed
completely.
Note
MFL-Pro Suite includes the Printer Driver,
Scanner Driver, Brother ControlCenter3,
ScanSoft™ PaperPort™ 11SE.ScanSoft™
PaperPort™ 11SE is a document management
application for scanning and viewing documents.
7
Page 10
STEP 2
Installing the Driver & Software
Windows
®
2
For Wired Network Interface Users
Important
Make sure that you have finished the
instructions from STEP 1 Setting Up the
Machine in the Quick Setup Guide.
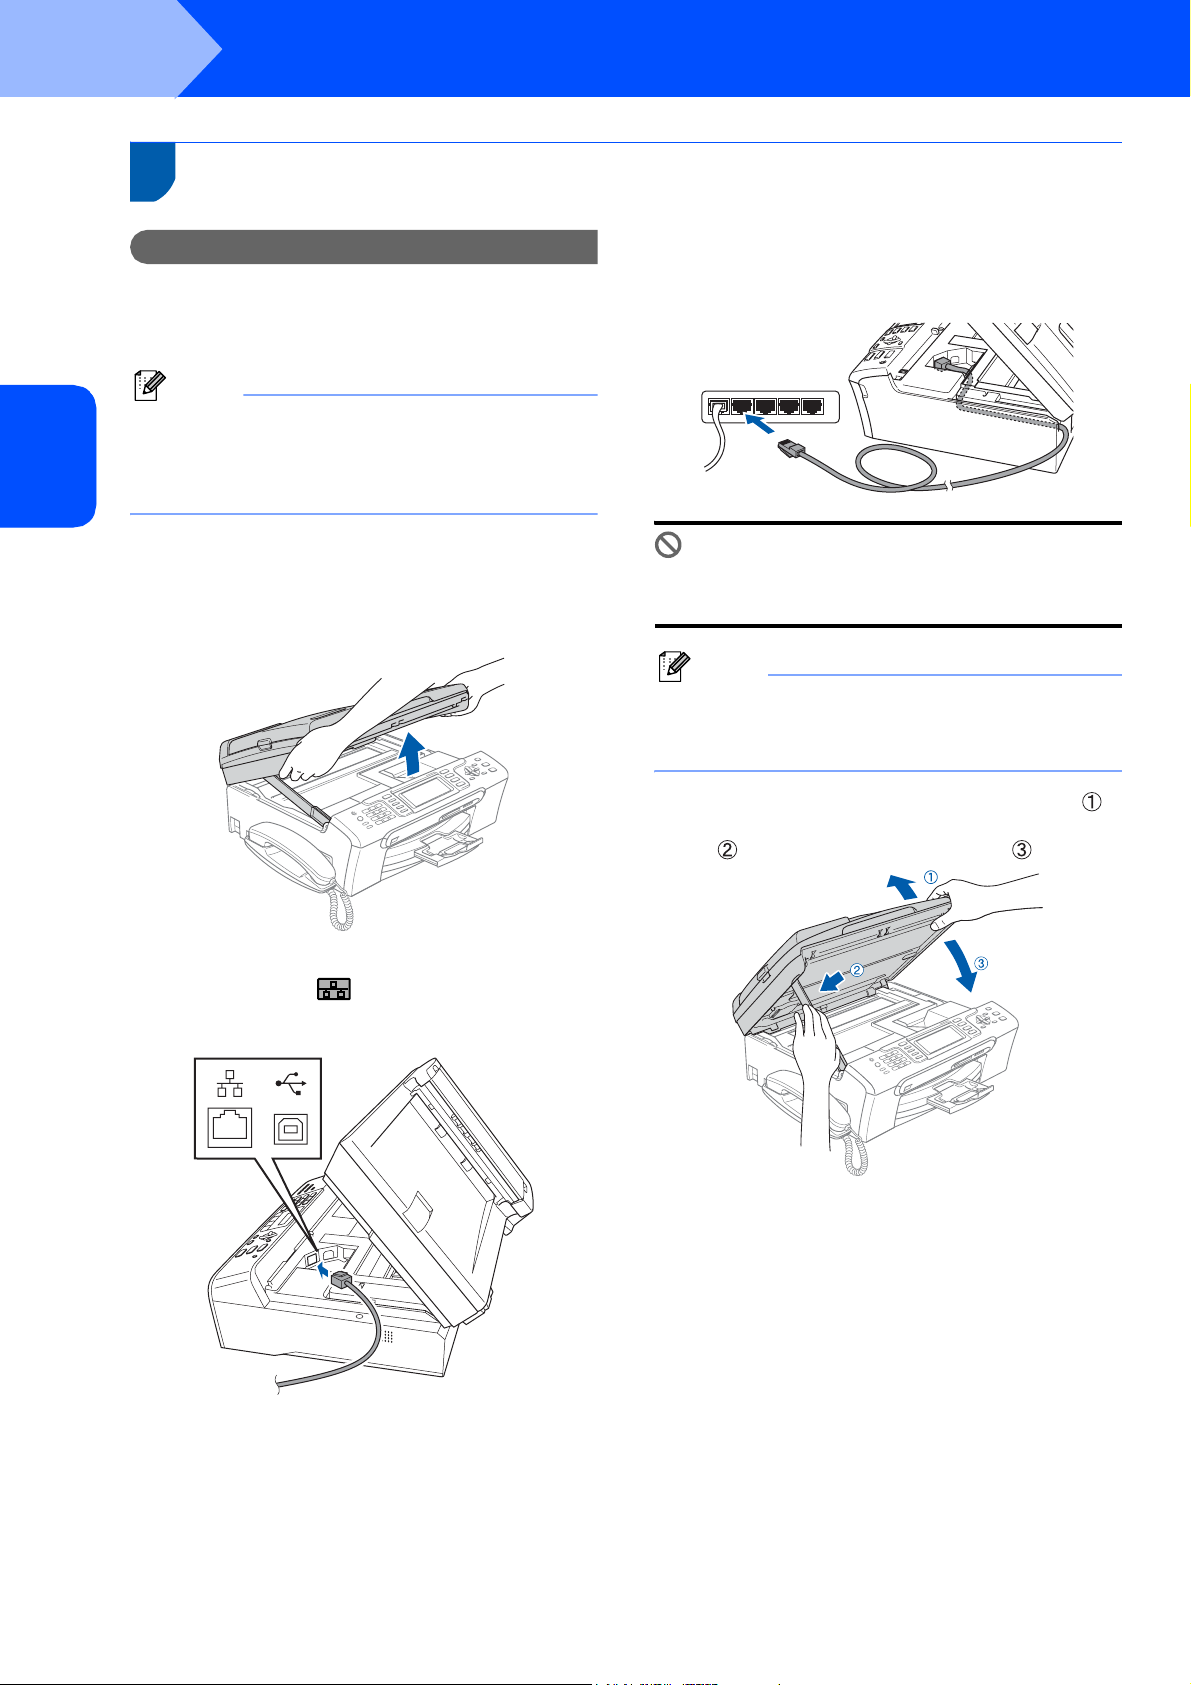
4 Carefully route the network cable through the
trench and out the back of the machine.Then,
connect the cable to your network.
Note
®
Network
Windows
• Please close any applications running before
installing MFL-Pro Suite.
• Make sure there are no memory cards in the
media drive of the machine.
1 Unplug the machine from the AC outlet.
2 Using both hands, use the plastic tabs on both
sides of the machine to lift the scanner cover
until it locks securely into the open position.
Improper Setup
Make sure that the cable does not restrict the
cover from closing, or an error may occur.
Note
If both USB and LAN cables are being used, guide
both cables through the trench with one on top of
the other.
5 Lift the scanner cover to release the lock ( ).
Gently push the scanner cover support down
( ) and close the scanner cover ( ).
3 Insert the network cable into the LAN socket
marked with a symbol. You will find the
LAN socket inside the machine on the left as
shown below.
8
Page 11

Installing the Driver & Software
Windows
®
6 Turn on the machine by connecting the power
cord.
Improper Setup
If you have previously set up your machine for
a wireless network and then want to set it up
on a wired network, you should check that the
machine’s Network I/F is Wired LAN. The
wireless network interface will become
inactive with this setting.
On your machine, press Menu.
Press a or b to choose LAN and press OK.
Press a or b to choose Network I/F and
press OK.
Press a or b to choose Wired LAN and
press OK.
7 Turn on your computer.
You must be logged on with Administrator
rights.
Close any applications running before installing
the MFL-Pro Suite.
9 The CD-ROM main menu will appear. Click
Install MFL-Pro Suite.
If this window does not appear, use Windows®
Explorer to run the start.exe program from the
root folder of the Brother CD-ROM.
Note
When the User Account Control screen appears,
click Allow.
10 Choose Wired Network Connection, and
then click Next.
®
Network
Windows
Note
Before installation, if you are using personal
firewall software, disable it. After the installation,
restart your personal firewall software.
8 Put the supplied CD-ROM into your CD-ROM
drive. If the model name screen appears,
choose your machine. If the language screen
appears, choose your language.
11 After reading and accepting the ScanSoft™
PaperPort™ 11SE License Agreement, click
Yes.
9
Page 12

STEP 2
Installing the Driver & Software
Windows
®
12 The installation of ScanSoft™ PaperPort™
11SE will automatically start and is followed by
the installation of MFL-Pro Suite.
13 When the Brother MFL-Pro Suite Software
License Agreement window appears, click
Yes if you agree to the Software License
Agreement.
®
14 The installation of the Brother drivers will
automatically start. The installation screens
appear one after another. Please wait, it will
take a few seconds for all the screens to
appear.
Improper Setup
DO NOT try to cancel any of the screens during
this installation.
Note
When this screen appears, click the check box and
Network
Windows
click Install to complete the installation properly.
Note
• If the machine is configured for your network,
choose the machine from the list, and then click
Next.
This window will not appear if there is only one
machine connected on the network, it will be
chosen automatically.
15 When the Brother and ScanSoft On-Line
Registration screen is displayed, make your
selection and follow the on-screen instructions.
If your machine shows APIPA in the IP Address
field, click Configure IP Address and enter an IP
address for your machine that is suitable for your
network.
• If the machine is not yet configured for use on your
network, the following screen appears.
Click OK.
The Configure IP Address window will appear.
Enter an IP address for your machine that is
suitable for your network by following the
on-screen instructions.
16 Click Finish to restart your computer.
After restarting the computer, you must be
logged on with Administrator rights.
10
Page 13

Installing the Driver & Software
Note
After restarting the computer, the Installation
Diagnostics will run automatically. If the
installation is unsuccessful, the installation results
window will be shown. If the Diagnostics shows a
failure, please follow the on-screen instructions or
read the on-line help and FAQs in
Start/All Programs/Brother/MFC-665CW.
17 Once you are sure that you can print after the
installation, restart your Firewall software.
Firewall settings on your PC may reject the
necessary network connection for Network
Scanning and PC-Fax.
If you are using the Windows
the instructions below. If you are using
personal firewall software, see the User's
Guide for your software or contact the software
manufacturer.
1 Click the Start button, Control Panel,
Network and Internet, Windows Firewall
and click Change settings.
2 When the User Account Control screen
appears, do the following.
Users who have administrator rights:
Click Continue.
®
Firewall follow
Windows
4 Click the Exceptions tab.
5 Click the Add port... button.
6 To add port 54925 for network scanning,
enter the information below:
1) In Name: Enter any description, for
example “Brother Scanner”.
2) In Port number: Enter “54925”.
3) Make sure UDP is selected.
Then click OK.
1
2
®
®
Network
Windows
Users who do not have administrator
rights:
Enter the administrator password and
click OK.
3 Make sure that Windows Firewall on the
General tab is set to On.
3
7 Click the Add port... button.
8 To add port 54926 for Network PC-Fax,
enter the information below:
1) In Name: Enter any description, for
example “Brother PC-Fax”.
2) In Port number: Enter “54926”.
3) Make sure UDP is selected.
Then click OK.
9 Make sure that the new setting is added and
is checked, and then click OK.
11
Page 14

STEP 2
®
Network
Windows
Installing the Driver & Software
10 If you still have trouble with your network
connection such as Network Scanning or
Printing, check the
File and Printer Sharing box in the
Exceptions tab and then click OK.
The MFL-Pro Suite has been installed
completely.
Windows
®
Note
MFL-Pro Suite includes the Printer Driver,
Scanner Driver, Brother ControlCenter3,
ScanSoft™ PaperPort™ 11SE.ScanSoft™
PaperPort™ 11SE is a document management
application for scanning and viewing documents.
12
Page 15

Installing the Driver & Software
Windows
®
3
For Wireless Network Interface Users
Connecting your wireless machine and wireless network together and installing the printer driver in infrastructure mode
First you must configure the wireless network settings of your machine to communicate with your network access
point (router). After the machine is configured to communicate with your access point (router) computers on your
network will have access to the machine. To use the machine from these computers, you will need to install the
MFL-Pro Suite. The following steps will guide you through the configuration and installation process.
To achieve optimum results with normal every day document printing, place the Brother machine as close to the
network access point (router) as possible with minimal obstructions. Large objects and walls between the two
devices as well as interference from other electronic devices can affect the data transfer speed of your documents.
Due to these factors, wireless may not be the best method of connection for all types of documents and
applications. If you are printing large files, such as photos or multi-page documents with mixed text and large
graphics, you may want to consider choosing wired Ethernet for a faster data transfer, or USB for the fastest
throughput speed.
Important
The following instructions will offer two methods for installing your Brother machine in a wireless
network environment. Both methods are for infrastructure mode, using a wireless router or access
point that uses DHCP to assign IP addresses. If your wireless router/access point supports
SecureEasySetup™ follow the steps on page 15 Using the SecureEasySetup™ software to configure
your machine for a wireless network. If your wireless router/access point does not support
SecureEasySetup™ follow the steps on page 17 Using the Setup Wizard from the control panel LAN
menu for wireless network configuration. To set up your machine in any other wireless environment
you can find instructions in the Network User’s Guide on the CD-ROM.
®
Windows
Network
Wireless
You can view the Network User’s Guide by following the instructions below.
1 Turn on your PC. Insert the Brother CD-ROM into your CD-ROM drive.
2 If the model name screen appears, click your model name.
3 If the language screen appears, click your language. The CD-ROM main menu will appear.
4 Click the User’s Guide.
5 Click the Network User’s Guide.
13
Page 16

STEP 2
Confirm your network environment
The setup process will be different depending on your network environment.
Installation using SecureEasySetup™
®
Installing the Driver & Software
Windows
®
Wireless
Windows
If your wireless access point (A) supports SecureEasySetup™, you do not need to use a computer to configure the machine.
Network
The access point (router) and your machine can automatically negotiate using the SecureEasySetup™ procedure.
For instructions, go to page 15.
Infrastructure Mode
If your wireless access point (A) does not support SecureEasySetup™, follow the instructions on page 17.
14
Page 17

Installing the Driver & Software
Windows
Using the SecureEasySetup™ software to configure your machine for a wireless network
®
Important
Make sure that you have finished the
instructions from STEP 1 Setting Up the
Machine in the Quick Setup Guide.
The SecureEasySetup™ software allows you to
configure the wireless network easier than
configuring it manually. By pushing a button on the
wireless router or access point, you can complete
setup and secure the wireless network. Your router or
access point must also support SecureEasySetup™.
See the user’s guide for your wireless LAN router or
access point for instructions to configure your
machine for a wireless network. If your wireless router
or access point does not support SecureEasySetup™
go to page 17 for installation instructions.
Note
Routers or access points that support
SecureEasySetup™ have the
SecureEasySetup™ symbol as shown below.
Improper Setup
If you have previously configured the wireless
settings of the machine you must reset the
network (LAN) settings before you can
configure the wireless settings again.
On your machine, press Menu.
Press a or b to choose LAN and then
press OK.
Press a or b to choose Factory Reset, and
then press OK.
Press 1 twice for Yes to accept the change.
2 Place the Brother machine close to the
SecureEasySetup™ router or access point
(less than 5 m/16 feet).
3 Push the SecureEasySetup™ button on your
wireless router or access point. See the user’s
guide for your wireless router or access point
for instructions.
4 On your machine, press Menu.
Press a or b to choose LAN and press OK.
Press a or b to choose Network I/F and
press OK.
Press a or b to choose WLAN and press OK.
The wired network interface will become
inactive with this setting.
5 When the LAN menu becomes available,
press Menu.
Press a or b to choose LAN and press OK.
Press a or b to choose Setup WLAN and
press OK.
Press a or b to choose SecureEasySetup
and press OK.
®
Windows
Network
Wireless
1 Turn on the machine by connecting the power
cord.
6 The wireless network connection status using
the SecureEasySetup™ software will be
displayed: Connecting WLAN, Connected or
Connection Error.
Connecting WLAN is displayed when the
print server is trying to make connections to
your router or access point. Wait till either
Connected or Connection Error is
displayed.
Connected is displayed when the print server
is successfully connected to your router or
access point. You can now use your machine
in a wireless network.
15
Page 18

STEP 2
®
Installing the Driver & Software
Connection Error is displayed when the
print server has not successfully connected to
your router or access point. Try starting from
step 2 again. If the same message is displayed
again, reset the print server back to the default
factory settings and try again. (See Restoring
the network settings to factory
default on page 24.)
Wireless setup is now complete. A four
level indicator on the bottom of your
machine’s LCD will show the wireless
signal strength of your access point or
router. To install the MFL-Pro Software
suite, continue to step 12 on page 19.
Windows
®
Wireless
Windows
Network
16
Page 19

Installing the Driver & Software
Using the Setup Wizard from the control panel LAN menu for wireless network configuration
Important
Make sure that you have finished the
instructions from STEP 1 Setting Up the
Machine in the Quick Setup Guide.
These instructions will install your Brother machine in
a typical small office or home wireless network
environment in infrastructure mode, using a wireless
router or access point that uses DHCP to assign IP
addresses.
If you want to setup your machine in any other
wireless environment you can find instructions in the
Network User’s Guide on the CD-ROM.
You can view the Network User’s Guide by following
the instructions below.
1 Turn on your PC. Insert the Brother CD-ROM
labeled Windows Vista™ into your CD-ROM drive.
2 If the model name screen appears, click your
model name.
3 If the language screen appears, click your
language. The CD-ROM main menu will appear.
4 Click the User’s Guide.
5 Click the Network User’s Guide.
Note
If the window does not appear, use Windows®
Explorer to run the setup.exe program from the
root directory of the Brother CD-ROM.
Before you begin, you must know your wireless
network setting.
1 Write down the wireless network settings of
your access point or wireless router.
SSID (Service Set ID or Network name)
_________________________
WEP Key (if needed)
________________________
WPA/WPA2-PSK (TKIP or AES) (if needed)
_________________________
The WEP key is for 64 bit encrypted networks
or 128 bit encrypted networks and can contain
both numbers and letters. If you do not know
this information you should see the
documentation provided with your access point
or wireless router. This key is a 64-bit or 128-bit
value that must be entered in an ASCII or
HEXADECIMAL format.
For example:
64 bit ASCII: Uses 5 text characters. e.g. “Hello”
(this is case sensitive)
64 bit
Hexadecimal:
128 bit ASCII: Uses 13 text characters. e.g.
128 bit
Hexadecimal:
WPA/WPA2-PSK is a Wi-Fi
Pre-share key, which lets the Brother wireless
machine associate with access points using
TKIP or AES encryption (WPA-Personal).
WPA/WPA2-PSK (TKIP or AES) uses a
Pre-Shared Key (PSK) that is more than 8 and
less than 63 characters in length.
See the Network User’s Guide for more details.
Uses 10 digits of hexadecimal
data. e.g. “71f2234aba”
“Wirelesscomms” (this is case
sensitive)
Uses 26 digits of hexadecimal
data. e.g.
“71f2234ab56cd709e5412aa3ba”
®
Protected Access
Windows
®
Windows
®
Network
Wireless
17
Page 20

STEP 2
Installing the Driver & Software
Windows
®
®
Windows
2 Turn on the machine by connecting the power
cord.
Improper Setup
If you have previously configured the wireless
settings of the machine you must reset the
network (LAN) settings before you can
configure the wireless settings again.
On your machine, press Menu.
Network
Wireless
Press a or b for LAN and press OK.
Press a or b to choose Factory Reset, and
then press OK.
Press 1 twice for Yes to accept the change.
3 On your machine, press Menu.
Press a or b to choose LAN and press OK.
Press a or b to choose Network I/F and
press OK.
Press a or b to choose WLAN and press OK.
The wired network interface will become
inactive with this setting.
4 When the LAN menu becomes available,
press Menu.
Press a or b to choose LAN and press OK.
Press a or b to choose Setup WLAN and
press OK.
Press a or b to choose Setup Wizard and
press OK.
This will start the wireless setup wizard.
5 The machine will search for available SSIDs. If
a list of SSIDs is displayed, use the a or b
keys to choose the SSID you wrote down in
step 1, then press OK. Go to step 8.
Note
It will take a few seconds to display a list of
available SSIDs.
If your access point is set to not broadcast the
SSID you will have to manually add the SSID
name. Go to step 6.
6 Select <New SSID> using a or b and
press OK. Go to step 7.
7 Enter the SSID you wrote down in step 1 using
the dial pad to choose each letter or number.
You can use the and keys to move the
cursor left and right. For example, to enter the
letter a, press the 2 key on the dial pad once.
To enter the number 3, press the 3 key on the
dial pad seven times.
The letters appear in this order: lower case,
upper case, numbers and then special letters.
(For more information, see Entering
Text on page 25.)
Press OK when you have entered all the
characters.
8 Press a or b to choose Infrastructure,
then press OK.
Use the a, b and OK keys to choose one of
the options below: If your network is configured
for Authentication and Encryption you must
match the settings used for your network.
No Authentication or Encryption: Choose
Open System, press OK then choose None
for Encryption Type and press OK. Then
press 1 for Yes to apply your settings. Go to
step 11.
No Authentication with WEP Encryption:
Choose Open System, press OK then use the
a or b to choose WEP for the
Encryption Type and press OK. Go to
step 9.
Authentication with WEP Encryption:
Choose Shared Key, press OK. Go to step 9.
Authentication with WPA/WPA2-PSK (TKIP
or AES) Encryption: Choose WPA/WPA2-
PSK, press OK. Go to step 10.
9 Choose the appropriate key number and
press OK. Enter the WEP key you wrote down
in step 1 using the dial pad to choose each
letter or number. You can use the and
keys to move the cursor left and right. For
example, to enter the letter a, press the 2 key
on the dial pad once. To enter the number 3,
press the 3 key on the dial pad seven times.
The letters appear in this order: lower case,
upper case, numbers and then special letters.
(For more information, see Entering
Text on page 25.)
Press OK when you have entered all the
characters, then press 1 for Yes to apply your
settings. Go to step 11.
Most access points and routers can store
more than one key, but they will only use
one at any time for authentication and
encryption.
18
Page 21

Installing the Driver & Software
Windows
®
10 Press a or b to choose TKIP or AES for
Encryption Type and press OK.
Enter the WPA/WPA2-PSK password you
wrote down in step 1 using the dial pad to
choose each letter or number. You can use the
and keys to move the cursor left and
right. For example, to enter the letter a, press
the 2 key on the dial pad once. To enter the
number 3, press the 3 key on the dial pad
seven times.
The letters appear in this order: lower case,
upper case, numbers and then special letters.
(For more information, see Entering
Text on page 25.)
Press OK when you have entered all the
characters, then press 1 for Yes to apply your
settings. Go to step 11.
11 Your machine will now try to connect to your
wireless network using the information you
have entered. If successful, Connected will
appear briefly on the LCD.
If your machine does not successfully connect
to your network, you should repeat steps 4 to
10 to make sure you have entered the correct
information.
13 Put the supplied CD-ROM into your CD-ROM
drive. If the model name screen appears,
choose your machine. If the language screen
appears, choose your language.
14 The CD-ROM main menu will appear. Click
Install MFL-Pro Suite.
If this window does not appear, use Windows®
Explorer to run the start.exe program from the
root folder of the Brother CD-ROM.
Note
When the User Account Control screen appears,
click Allow.
®
Windows
Network
Wireless
The machine will automatically acquire the
correct TCP/IP address information from your
access point (router) if DHCP is enabled
(DHCP is normally enabled as default for most
access point routers).
If your access point does not have DHCP
enabled you will need to manually configure
the IP address, subnet mask and gateway of
the machine to suit your network. See the
Network User’s Guide for details.
Wireless setup is now complete. A four
level indicator on the bottom of your
machine’s LCD will show the wireless
signal strength of your access point or
router. To install the MFL-Pro Software
suite, continue to step 12.
12 Turn on your computer.
You must be logged on with Administrator
rights.
Close any applications running before installing
the MFL-Pro Suite.
15 Choose Wireless Network Connection, and
then click Next.
16 Click on Checked and confirmed check box,
and then click Next.
Note
Before installation, if you are using personal
firewall software, disable it.
19
Page 22

STEP 2
Installing the Driver & Software
Windows
®
®
Windows
17 After reading and accepting the ScanSoft
PaperPort
Yes.
®
SE License Agreement, click
18 The installation of PaperPort
automatically start and is followed by the
installation of MFL-Pro Suite.
19 When the Brother MFL-Pro Suite Software
License Agreement window appears, click
Yes if you agree to the Software License
Agreement.
Network
Wireless
®
11SE will
®
• If the machine is not yet configured for use on your
network, the following screen appears.
Click OK.
The Configure IP Address window will appear.
Enter an IP address for your machine that is
suitable for your network by following the
on-screen instructions.
20 The installation of the Brother drivers will
automatically start. The installation screens
appear one after another. Please wait, it will
take a few seconds for all the screens to
appear.
Improper Setup
• DO NOT try to cancel any of the screens during
this installation.
• If your wireless settings fail, an error message
will appear during the installation of MFL-Pro
Suite and the installation will be terminated. If
you encounter this failure, please go to step 1
and setup the wireless connection again.
Note
• If the machine is configured for your network,
choose the machine from the list, and then click
Next.
This window will not appear if there is only one
machine connected on the network, it will be
chosen automatically.
If your machine shows APIPA in the IP Address
field, click Configure IP Address and enter an IP
address for your machine that is suitable for your
network.
21 When the Brother and ScanSoft On-Line
Registration screen is displayed, make your
selection and follow the on-screen instructions.
22 Click Finish to restart your computer.
After restarting the computer, you must be
logged on with Administrator rights.
20
Page 23

Installing the Driver & Software
Note
After restarting the computer, the Installation
Diagnostics will run automatically. If the
installation is unsuccessful, the installation results
window will be shown. If the Diagnostics shows a
failure, please follow the on-screen instructions or
read the on-line help and FAQs in
Start/All Programs (Programs)/Brother/
MFC-665CW.
23 Once you are sure that you can print after the
installation, restart your Firewall software.
Firewall settings on your PC may reject the
necessary network connection for Network
Scanning and PC-Fax.
1 Click the Start button, Control Panel,
Network and Internet, Windows Firewall
and click Change settings.
2 When the User Account Control screen
appears, do the following.
Users who have administrator rights:
Click Continue.
Windows
4 Click the Exceptions tab.
5 Click the Add port... button.
6 To add port 54925 for network scanning,
enter the information below:
1) In Name: Enter any description, for
example “Brother Scanner”.
2) In Port number: Enter “54925”.
3) Make sure UDP is selected.
Then click OK.
®
Windows
®
Network
Wireless
Uses who do not have administrator
rights:
Enter the administrator password and
click OK.
3 Make sure that Windows Firewall on the
General tab is set to On.
1
2
3
7 Click the Add port... button.
8 To add port 54926 for Network PC-Fax,
enter the information below:
1) In Name: Enter any description, for
example “Brother PC-Fax”.
2) In Port number: Enter “54926”.
3) Make sure UDP is selected.
Then click OK.
9 Make sure that the new setting is added and
is checked, and then click OK.
21
Page 24

STEP 2
®
Network
Wireless
Windows
Installing the Driver & Software
10 If you still have trouble with your network
connection such as Network Scanning or
Printing, check the File and Printer
Sharing box in the Exceptions tab and then
click OK.
The MFL-Pro Suite has been installed
completely.
Windows
®
Note
MFL-Pro Suite includes the Printer Driver,
Scanner Driver, Brother ControlCenter3,
ScanSoft™ PaperPort™ 11SE.ScanSoft™
PaperPort™ 11SE is a document management
application for scanning and viewing documents.
22
Page 25

For Network Users
1
1
The BRAdmin Light is a utility for initial setup of Brother network connected devices. It can also search for Brother
products on your network, view the status and configure basic network settings, such as IP address.
For more information on BRAdmin Light, visit us at http://solutions.brother.com
BRAdmin Light utility
.
Note
If you require more advanced printer management, use the latest Brother BRAdmin Professional utility version
that is available as a download from http://solutions.brother.com
.
Installing the BRAdmin Light configuration utility
Note
The default password for the print server is
‘access’. You can use BRAdmin Light to change
this password.
1 Click Install Other Drivers or Utilities on the
menu screen.
2 Click BRAdmin Light and follow the on-screen
instructions.
Setting your IP address, Subnet Mask and Gateway using BRAdmin Light
Note
If you have a DHCP/BOOTP/RARP server in your
network, you don’t have to do the following
operation. Because the print server will
automatically obtain its IP address.
1 Start BRAdmin Light. It will search for new
devices automatically.
2 Double-click the unconfigured device.
3 When the User Account Control screen
appears, click Allow.
3 Choose STATIC for the Boot Method. Enter
the IP Address, Subnet Mask and Gateway,
and then click OK.
4 The address information will be saved to the
machine.
23
Page 26

For Network Users
2
How to set the machine’s network settings to wireless LAN or wired LAN
To connect your Brother machine to a wireless or
wired network you must configure the machine from
the machine’s control panel for the network type you
are using.
For wireless LAN
On your machine, press Menu.
Press a or b to choose LAN and press OK.
Press a or b to choose Network I/F and
press OK.
Press a or b to choose WLAN and press OK.
The wired network interface will become inactive with
this setting.
Press Stop/Exit.
It will take about a minute for the LAN menu on the
LCD to become available again.
For wired LAN
On your machine, press Menu.
Press a or b to choose LAN and press OK.
Press a or b to choose Network I/F and
press OK.
Press a or b to choose Wired LAN and press OK.
The wireless network interface will become inactive
with this setting.
Press Stop/Exit.
3
To restore all network settings of the internal
Print/Scan server to factory default, please follow the
steps below.
Restoring the network settings to factory default
1 Make sure the machine is not operating, then
disconnect all the cables from the machine
(except power cable).
2 Press Menu.
3 Press a or b to choose LAN.
Press OK.
4 Press a or b to choose Factory Reset.
Press OK.
5 Press 1 to select Yes.
6 Press 1 to select Reboot.
7 The machine will restart, re-connect cables
once this is complete.
24
Page 27

For Network Users
4
Entering Text
When you are setting certain menu selections, such as the Station ID, you may need to enter text into the
machine. Most number keys have three or four letters printed on keys. The keys for 0, # and l do not have
printed letters because they are used for special characters.
By pressing the proper number key repeatedly, you can access the character you want.
For setting a wireless network
Press
Key
2 abcABC2a
3 de fDEF3d
4 gh iGHI4g
5 jklJKL5j
6 mn oMNO6m
7 pqr sPQRS
8 tuvTUV8t
9 wxyzWXYZ
one
time
two
times
three
times
four
times
five
times
six
times
seven
times
eight
times
Putting spaces
To enter a space in a fax number, press once between numbers. To enter a space in a name, press twice
between characters.
Making corrections
If you entered a letter incorrectly and want to change it, press to move the cursor under the incorrect
character, press Clear/Back. Re-enter the correct character. You can also back up and insert letters.
Repeating letters
If you need to enter a letter that is on the same key as the letter before, press to move the cursor right before
you press the key again.
Special characters and symbols
Press l, # or 0 repeatedly until you see the special character or symbol you want. Press OK to select it.
Press l for (space) ! ” # $ % & ’ ( ) l + , - . /
Press # for : ; < = > ? @ [ ] ^ _
Press 0 for \ { | } ~ 0
25
Page 28

Other Information
1
1
ScanSoft™ PaperPort™ 11SE for Brother is a document management application. You can use PaperPort™
11SE to view scanned documents.
PaperPort™ 11SE has a sophisticated, yet easy-to-use filing system that will help you organize your graphics and
text documents. It allows you to mix or ‘stack’ documents of different formats for printing, faxing or filing.
Using ScanSoft™ PaperPort™ 11SE with OCR by NUANCE™
To view the complete ScanSoft™ PaperPort™ 11SE Getting Started Guide, choose Help from PaperPort™
11SE menu bar and click Getting Started Guide.
When you install MFL-Pro Suite, ScanSoft™ PaperPort™ 11SE for Brother is installed automatically. You can
access ScanSoft™ PaperPort™ 11SE through the ScanSoft™ PaperPort™ 11SE program group located in
Start/All Programs/ScanSoft PaperPort 11SE on your PC.
26
Page 29

Other Information
2
Computer requirements
Minimum System Requirements and Supported PC Software Functions
Operating Systems Supported Functions Interface Minimum
Processor
Windows
®
Windows
Vista™
Printing,
PC-FAX
1
,
Scanning,
Removable Disk
USB,
USB
10/100
2
BASE-TX
(Ethernet),
1 GHz 32-bit (x86)
or 64-bit (x64)
processor
Wireless
802.11 b/g
1
PC FAX supports black and white faxing only.
2
Removable disk is a function of PhotoCapture Center®.
For the latest driver updates, visit at www.brother.com.
All trademarks, brand and product names are property of their
respective companies.
Recommended
RAM
Required
HARD Disk
Space
1.0 GB 1.0 GB
27
Page 30

Trademarks
The Brother logo is a registered trademark of Brother Industries, Ltd.
Microsoft, MS-DOS and Windows are registered trademarks of Microsoft Corporation in the U.S. and other countries.
Windows Vista is either a registered trademark or trademark of Microsoft Corporation in the United States and/or other
countries.
Nuance, the Nuance logo, PaperPort and ScanSoft are trademarks or registered trademarks of Nuance Communications, Inc.
or its affiliates in the United States and/or other countries.
All other terms and brand and product names mentioned in this Windows Vista™ Setup Guide are registered trademarks of
their respective companies.
Compilation and Publication
This manual has been compiled and published, under the supervision of Brother Industries Ltd., covering the latest product
descriptions and specifications.
The contents of this manual and the specifications of this product are subject to change without notice.
Brother reserves the right to make changes without notice in the specifications and materials contained herein and shall not be
responsible for any damages (including consequential) caused by reliance on the materials presented, including but not limited
to typographical and other errors relating to the publication.
This product is designed for use in a professional environment.
Copyright and License
© 2007 Brother Industries, Ltd. © 1998-2007 TROY Group, Inc. © 1983-2007 PACIFIC SOFTWORKS INC. This product
includes the “KASAGO TCP/IP” software developed by Elmic Systems, Inc. © 2007 Devicescape Software, Inc. ALL RIGHTS
RESERVED.
Page 31

USA/CAN
 Loading...