

Page 1
Page 2

Page 3

Brother Cool Laminator LX-1200
Fax-Back System
Brother Customer Service has installed an easy-to-use Fax-Back System, so you can get instant answers to
common technical questions and product information for all Brother products. This system is available 24
hours a day, 7 days a week. You can use the system to send faxes to any fax machine, not just the one
from which you are calling.
If you can't resolve a difficulty with your laminator using this manual, call our Fax-Back System, and follow
the voice prompts to receive faxed instructions about using the system and an index of Fax-Back subjects.
Canada: 1-800-681-9838
Brother on the World Wide Web
You can find more information about Brother products, from product specification sheets to Frequently
Asked Questions (FAQs), on the World Wide Web. Visit us at
http://www.brother.com
ENGLISH
For Customer Service
In Canada: 1-800-853-6660 (voice)
In Montreal: 1-514-685-6464 (voice)
Corporate Headquarters
Brother Bulletin Board: 1-514-685-2040
1 rue Hôtel de Ville
Dollard-des-Ormeaux,
Québec, Canada H9B 3H6
- 1 -
Page 4

Ordering Accessories and Supplies
ENGLISH
For best quality results use only genuine Brother accessories, available at most Brother retailers. If you
cannot find the accessory you need and you have a Visa or MasterCard credit card, you can order
accessories directly from Brother.
In Canada: 1-800-668-2768 (voice)
Description Model Number Price
Double-side Laminate
12” wide film cartridge (40m/131.2ft. long) LC-D12 $179.99
12” wide refill roll (40m/131.2ft. long) LC-D12R $119.99
9” wide film cartridge (20m/65.6ft. long) LC-D9 $59.99
9” wide refill roll (20m/65.6ft. long) LC-D9R $44.99
4.8” wide film cartridge (20m/65.6ft. long) LC-D5 $46.99
4.8” wide refill roll (20m/65.6ft. long) LC-D5R $36.99
Adhesive Back Laminate
12” wide film cartridge (10m/32.8ft. long) LC-A12 $154.99
12” wide refill roll (10m/32.8ft. long) LC-A12R $119.99
9” wide film cartridge (20m/65.6ft. long) LC-A9 $104.99
9” wide refill roll (20m/65.6ft. long) LC-A9R $79.99
4.8” wide film cartridge (20m/65.6ft. long) LC-A5 $69.99
4.8” wide refill roll (20m/65.6ft. long) LC-A5R $59.99
Magnetic Back Laminate
9” wide film cartridge (4m/13.1ft. long) LC-M9 $179.99
9” wide refill roll (l0m/32.8ft. long) LC-M9R $249.99
4.8” wide film cartridge (4m/13.lft. long) LC-M5 $119.99
4.8” wide refill roll (10m/32.8ft. long) LC-M5R $159.99
Other Accessories
Replacement Ceramic Side Cutters (2 blades) SC-2 $24.99
Replacement Corner Cutter Tray CC-3 $24.99
- 2 -
Page 5
Table of Contents
Getting started.................................................................................................................................................4
Features..........................................................................................................................................................4
Precautions......................................................................................................................................................5
Package list.....................................................................................................................................................6
Part names......................................................................................................................................................7
Outside of the machine...............................................................................................................................7
Inside of the machine..................................................................................................................................7
Control Panel...............................................................................................................................................8
Film Cartridge..............................................................................................................................................8
Setup...............................................................................................................................................................9
Turning the machine on/off..........................................................................................................................9
About Auto Power Saver.............................................................................................................................9
Operating the machine..................................................................................................................................10
Document Size..............................................................................................................................................13
The Auto Sheet Feeder.............................................................................................................................14
The Auto Cross Cutting System................................................................................................................14
How to define the cutting position (creating borders).....................................................................................15
Auto Cutter Mode - Border........................................................................................................................15
Auto Cutter Mode - No Border...................................................................................................................15
Auto Cutter Mode - Cutter Off (for sensitive documents)...........................................................................15
Auto Cutter Mode - Extra Border...............................................................................................................16
How to use Continuous mode........................................................................................................................17
Manual feeding and manual cutting...............................................................................................................19
Corner cutting................................................................................................................................................20
Corner cutter dust box...............................................................................................................................21
About film rolls...............................................................................................................................................22
Film-supply maintenance..........................................................................................................................22
Replacing the film cartridge...........................................................................................................................23
Installing/replacing the film roll in the cartridge..............................................................................................25
Using 9” (A4) or 4.8” (A6) film cartridges.......................................................................................................29
Regular maintenance and troubleshooting....................................................................................................32
Regular maintenance................................................................................................................................32
Paper jams................................................................................................................................................32
Replacing the side cutter units..................................................................................................................35
Replacing the corner cutter trimmer tray...................................................................................................37
Troubleshooting.............................................................................................................................................38
Specifications................................................................................................................................................39
Index..............................................................................................................................................................40
ENGLISH
- 3 -
Page 6

Getting started
Thank you for purchasing a Brother Cool Laminator. This machine has been designed to be easy to use, but
ENGLISH
can be utilized to its fullest potential by taking some time to read this owner’s manual.
Features
· Depending upon the type of film used, this machine turns a variety of documents into professional, self-
adhesive stickers, dual-sided, coated lamination sheets, magnetic signs etc.
· In addition to output from computers and word processors, you can laminate hand-written sheets,
clippings from magazines, photographs or any other type of document.
· Your documents are perfectly coated to protect them from water, dust, tearing, yellowing, and to create a
professional, high quality finish.
· No heat is used. The unique cold pressure method and specially formulated adhesives make the
operation safe, easy and fast.
· You can start laminating immediately after turning the power on (no warm-up time is necessary).
· This machine has an auto sheet feeder and auto cross cutting mechanism. It automatically detects the
width and length of your document and precisely trims the excess laminate from your square or
rectangular finished documents.
· The film is easily installed and replaced.
· The LX-1200 supports document widths of up to 11.7” (A3 - 297mm).
- 4 -
Page 7

Precautions
To avoid personal injury or damage to the machine, please pay close attention to the CAUTION and
WARNING notices in this manual. They are here for your safety, as well as to point out actions that might
cause damage to your machine.
WARNING:
- Do not attempt to repair or disassemble this equipment yourself. The warranty will be voided if
this machine is not repaired by authorized service personnel.
- Do not touch the blades inside of the machine.
- Use only the AC adapter that was supplied with the machine. Using the wrong AC adapter may
damage the machine and will void the warranty.
CAUTION:
- Do not pull the power cord. To disconnect it, always grasp the plug itself.
- Do not place the machine under direct exposure to sunlight and other sources of heat,
excessive moisture, or dust.
- If any liquid is spilled onto the machine, immediately unplug the machine from its power source
and consult with authorized service perso nne l.
- Unplug the machine during a lightning storm.
- Do not place heavy objects on the machine.
- Keep the back and sides of the machine clear of obstructions to prevent overheating.
- Use only a soft, dry cloth to clean the machine (do not use chemicals, solvents, or detergents).
- To avoid electrical interference, do not place the machine close to a radio receiver or
television.
- Do not turn the machine off while operating except in the event of a malfunction.
- Turn the machine off in the event of a malfunction.
- If you use adhesive laminate film, do not attach the laminated output to one’s skin, or the
sensitive surface of objects.
- The laminated documents are not easily digested. Great care should be taken to prevent
accidental ingestion by infants or the elderly.
- The laminate film contains UV resistance materials. However, the color of the documents may
fade if the documents are printed with liquid type ink. Solid type ink is recommended to
prevent the document from fading.
- The laminated document may be wrinkled or damaged if it is placed under a heavy object.
- Do not place the magnetic back laminate output close to floppy disks or audio tapes. The data
on the disks or tapes may be damaged.
- Brother can not be held liable for loss or damage of items used in the laminator machine.
- Under the terms of an agreement with Xyron, Inc., the purchase or other acquisition of this
product confers no right or license to use the product in the Retroreflective Field.
- Laminating thermal paper may cause the print to fade.
- When a document is first laminated it may feel sticky to the touch. This stickiness is caused by
silicone that is used in processing the film.
- Discard the machine or laminated output according to local regulations. If you are not sure of
them, call your local Sanitation Department.
ENGLISH
IMPORTANT OPERATIONAL PRECAUTIONS:
- Select Cutter Off Mode when laminating sensitive or irregularly shaped documents.
- Do not insert your precious and valuable items into the machine.
- Do not laminate any photograph which cannot be replaced.
- 5 -
Page 8
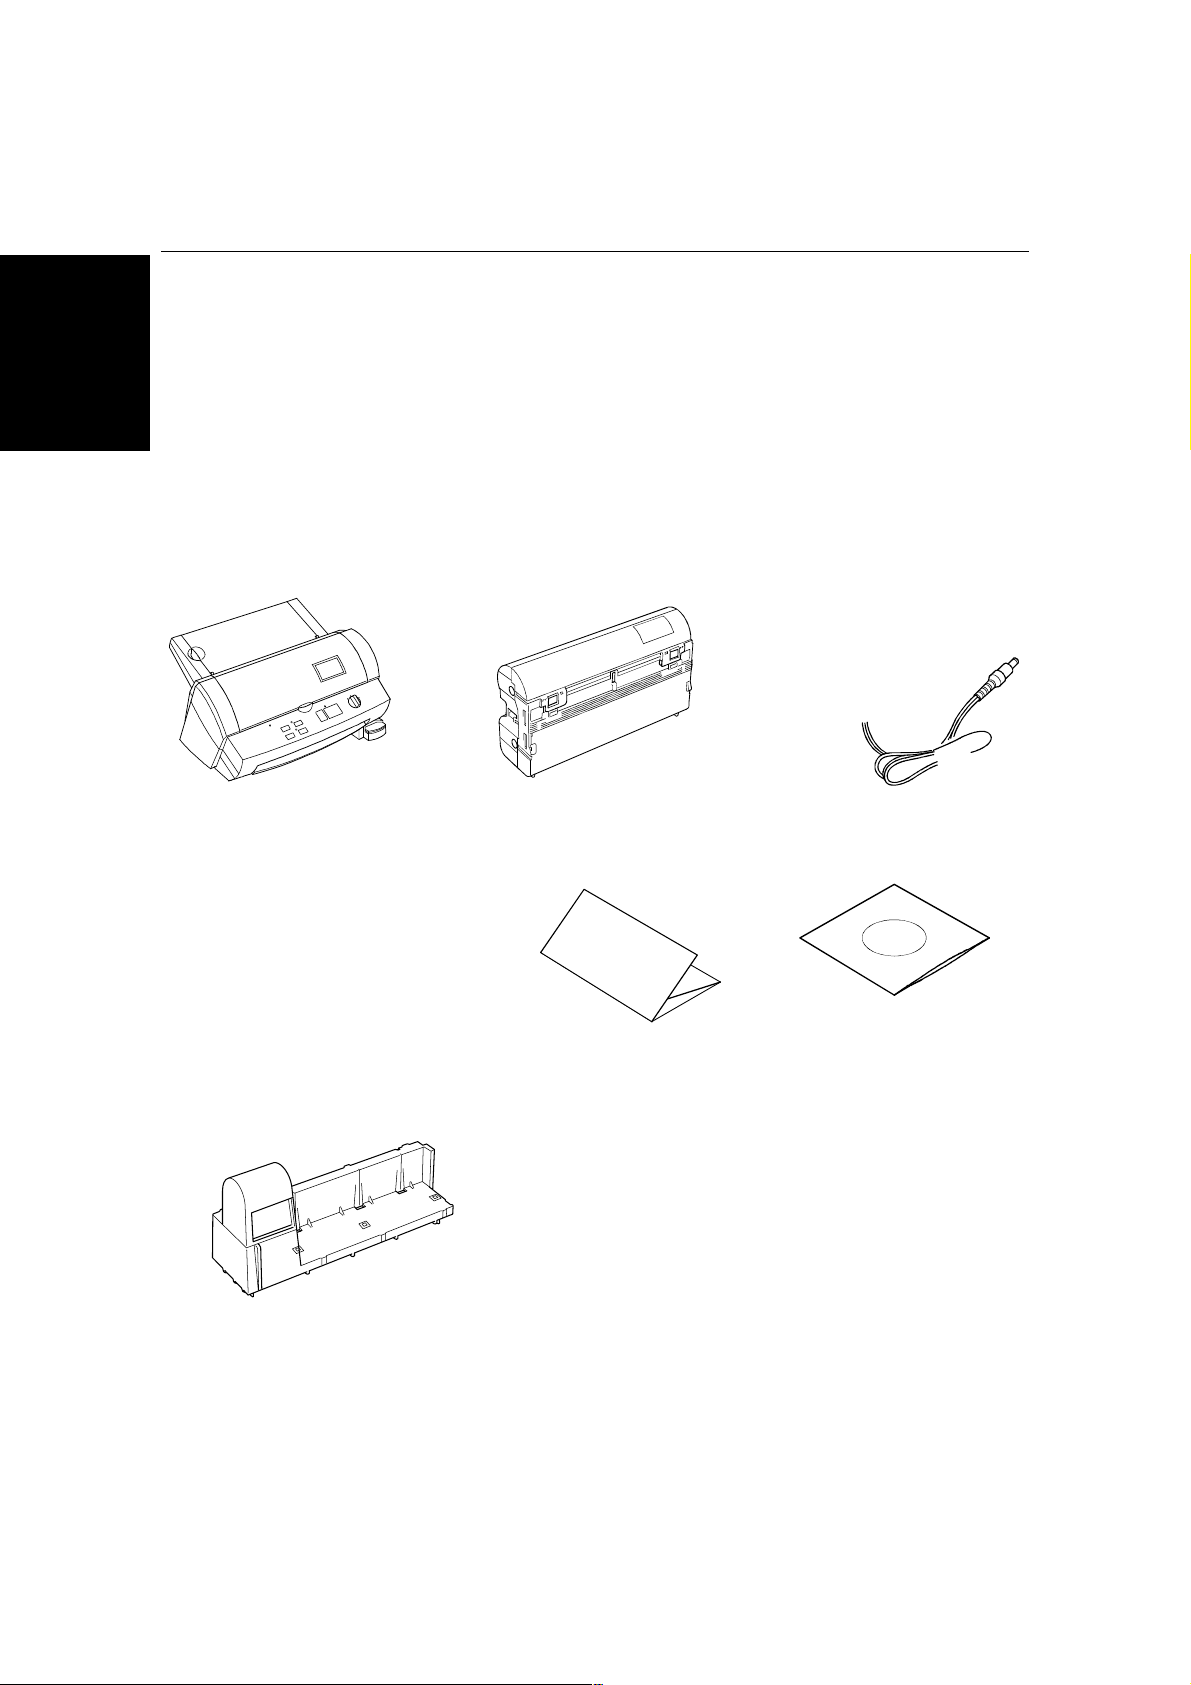
Package list
ENGLISH
1 Machine 1
2 Film cartridge 1 (Double side laminate type)
(Starter cartridge includes 13.1’ or 4m of film)*
3 AC adapter 1
4 Owner’s manual 1
5 Compatible accessory list 1
6 Supplemental PC software (CD-ROM) 1
7 Cartridge adapter 1
* The film cartridge is already installed into the machine.
1
23
456
7
- 6 -
Page 9
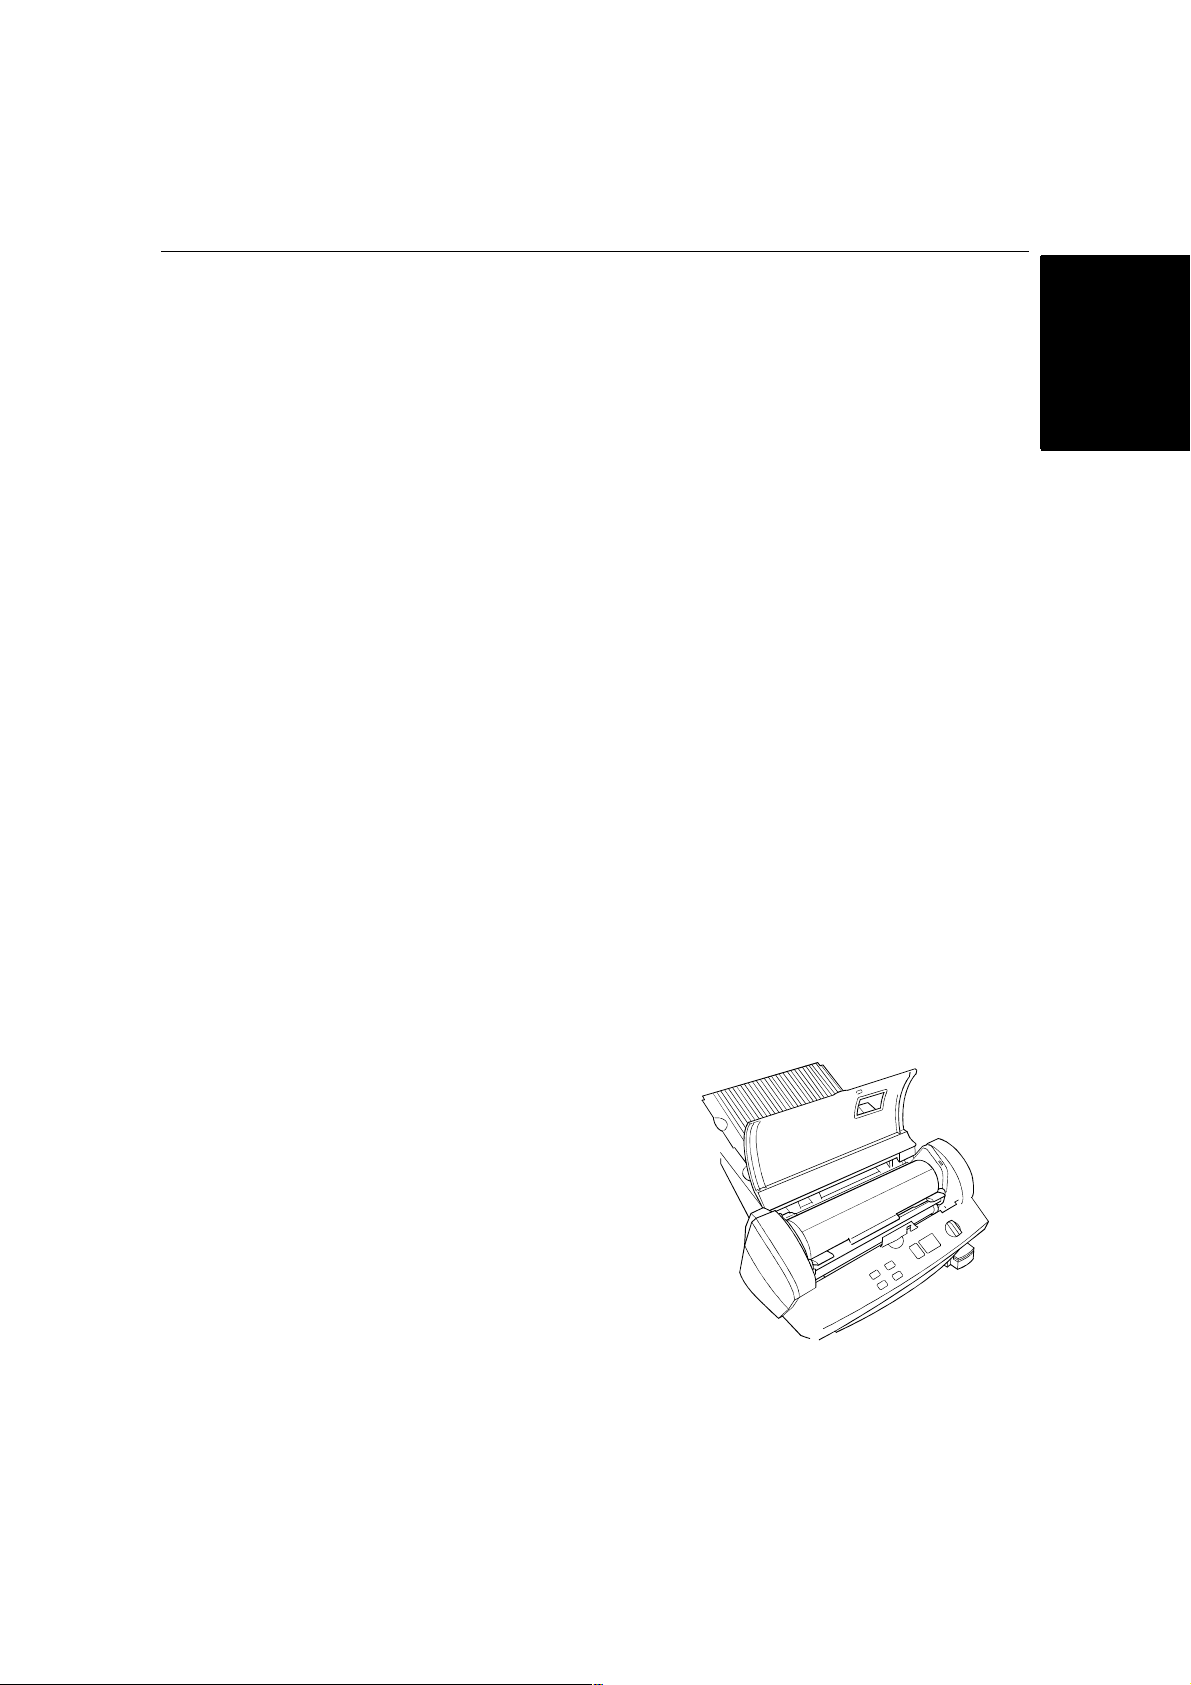
Part names
Outside of the machine
DC connector Located on the left, backside of the machine. Aperture for the
Top cover For replacing the film cartridge and cutter units.
Viewing window Located on the top cover. Allows you to make sure that the
Document tray Where documents to be laminated are placed.
Document supporter Supports the document being laminated.
Document guide Aligns the left edge of the paper for proper document insertion.
Document tray cover Easily lifts for the removal small sized documents.
Control panel Power switch and function button area.
Document output Location where the document exits the machine.
Corner cutter slot Allows you to trim the corners of your document after laminating.
Corner cutter trimmer tray The corner of your laminated document is placed on this tray to
Corner cutter dust box Collects trimmings from the corner cutter.
AC adapter Plugs into an electrical outlet and the DC connector on the
Inside of the machine
Film cartridge Contains the roll film. The label on the cartridge identifies the film
Roller holder lever Locks/releases the roller holder.
Roller holder Holds the roller unit.
Side cutter arm Arm for the side (vertical) cutter unit.
Side cutter units Blades for side (vertical) cutting.
Top/bottom cutter units Blades for top/bottom (horizontal) cutting.
Roller Feeds the document into the unit.
AC adapter.
correct type of film cartridge is loaded into the machine.
ENGLISH
Corners of a document are automatically trimmed after insertion
into the corner cutter slot.
position it into the corner cutter slot.
machine.
type.
You can use 12.0 inch (A3), 9.0 inch (A4) or 4.8 inch (A6) width
LC cartridges with this machine.
- 7 -
Page 10

Control Panel
ENGLISH
POWER DIAL ON/OFF Turns the machine on/off.
Cut Cuts the document in the current position.
Feed Manually feeds the laminate and/or the document.
Continuous Use this feature to laminate multiple documents.
Extra Border Use this feature to create an extra border on one-side of your
document (i.e. area for 3-hole punch).
Start Starts an operat ion.
Stop Stops an operation.
Border The machine will trim the film with about a 0.18” (4.5mm) margin
from each edge of the document. - Leaves a margin of laminate.
No Border The machine will trim the film with a margin that is approximately
0.06” (1.5mm) from each edge of the document. - Trims the
laminate close to the document.
Cutter Off Turns the cutting mode off.
Error Indicates a malfunction of machine.
- 8 -
Page 11

Setup
Turning the machine on/off
ENGLISH
(1)Connect the plug of the AC adapter into the
DC connector.
(2)Plug the AC adapter into an electrical outlet.
POWER
StartStop
Cutter Off
ONON OFF
Border
No Border
Cutter Off, Border or No Border. The green
light on top of the Start button will light up. If
the machine does not respond, check the
connection of the AC adapter.
To turn the machine off, turn the power dial to
POWER OFF.
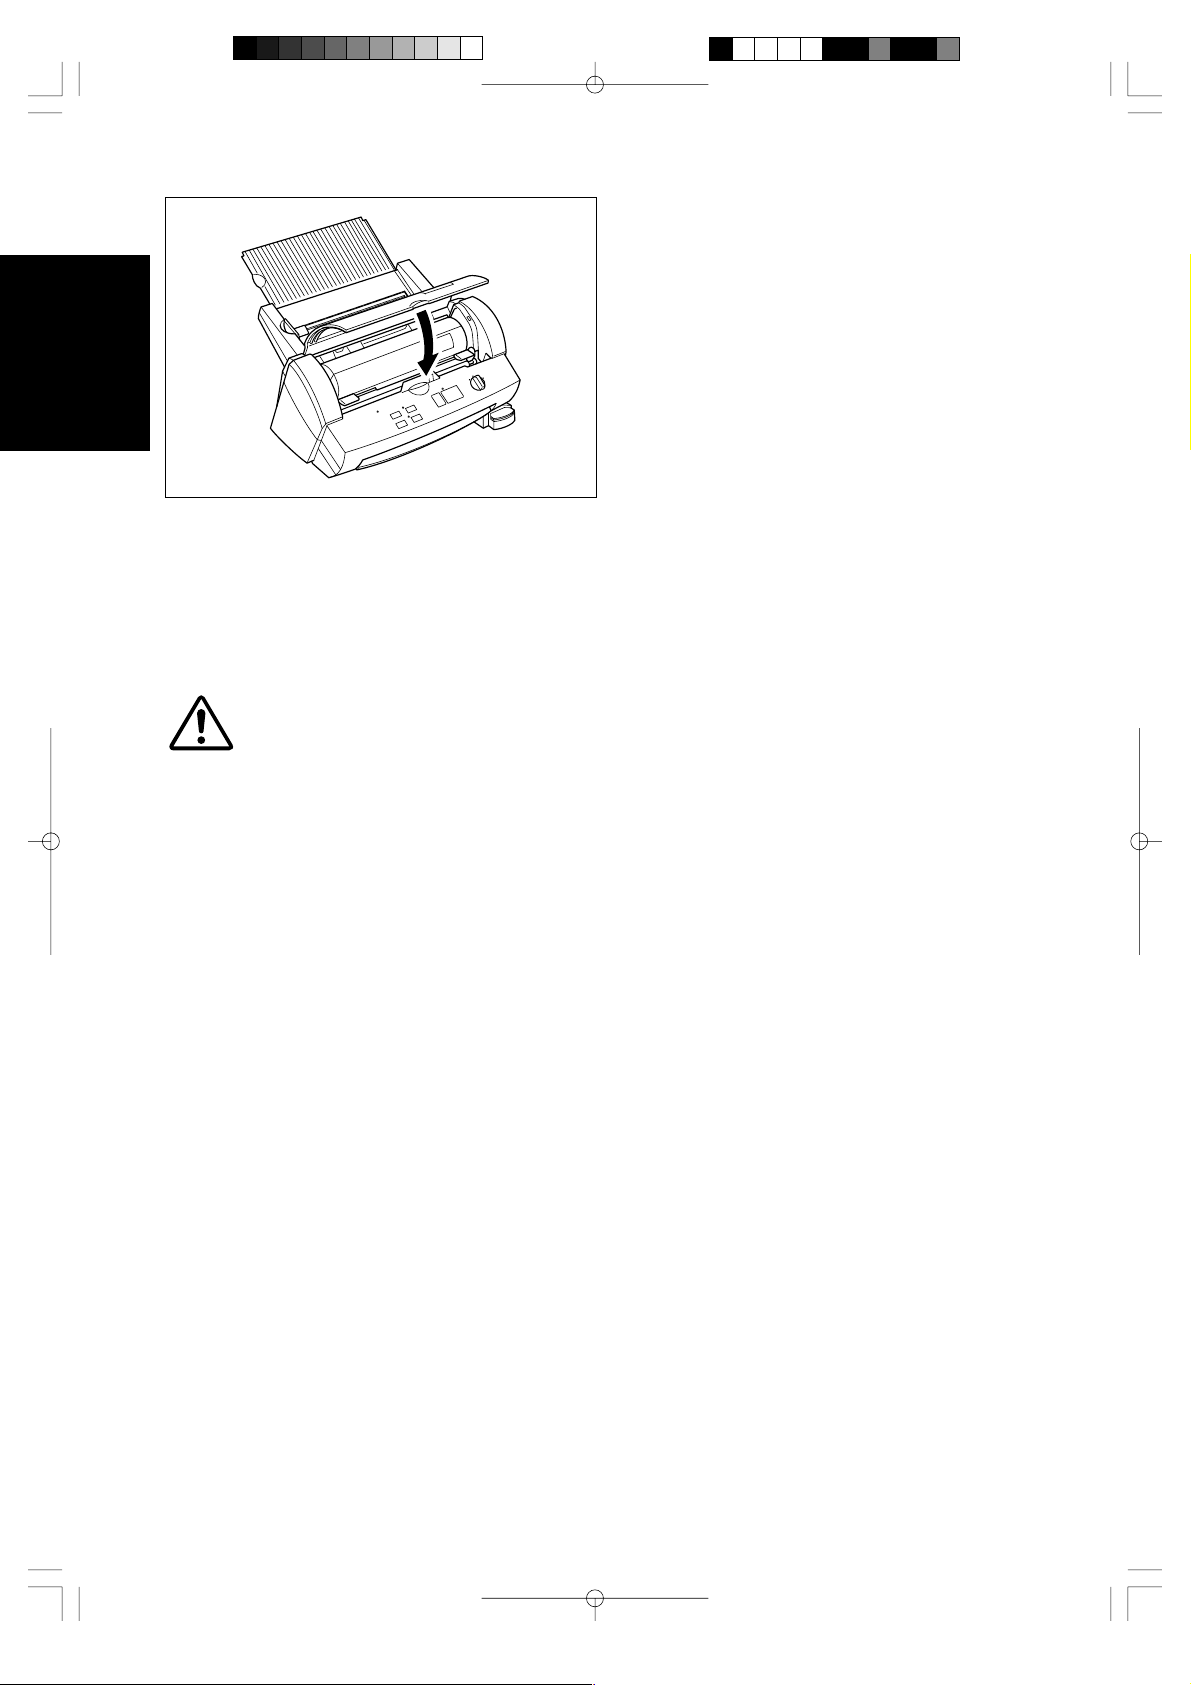
(4)Press the Feed button until you can see the
edge of the film to remove any slack from the
film.
WARNING:
Do not plug your machine into an electrical outlet until it has been completely assembled.
Do not try to disassemble or repair this equipment yourself. Service should be performed by
authorized personnel only. Warranties will be voided if the unit is repaired by unauthorized
technicians.
Never touch the surface of the blades when installing the film cartridge.
CAUTION:
Do not turn the machine off during the laminating process.
The machine should be turned off during operation only in the event of a malfunction.
(3)Turn the power dial on the control panel to
About Auto Power Saver
This machine has an Auto Power Off function. If the machine is left idle for approx. 5 minutes, the machine
will automatically turn off. In order to turn the machine back on, please turn the POWER dial to POWER
OFF, and then turn the machine on by selecting the cutter mode: Cutter Off, Border or No Border.
- 9 -
Page 12
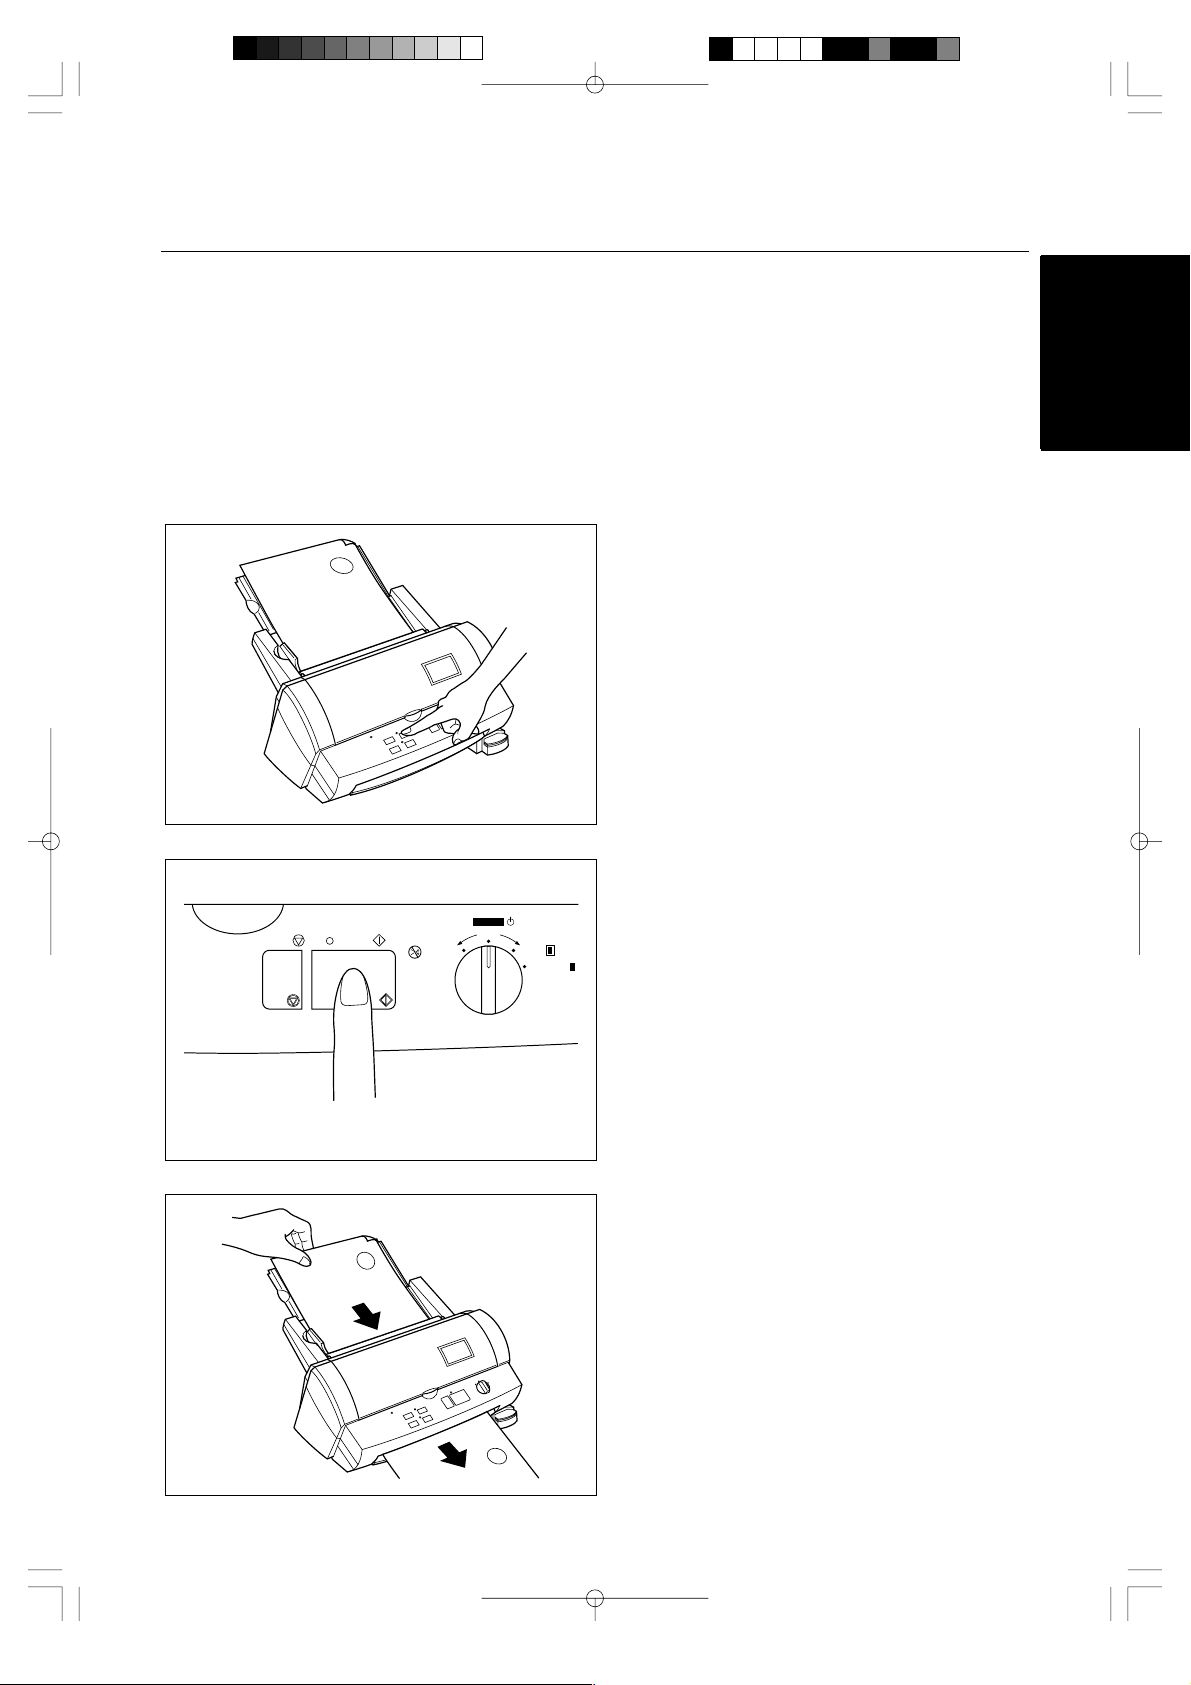
Operating the machine
Laminate documents, create magnetic signs, and create adhesive stickers:
ENGLISH
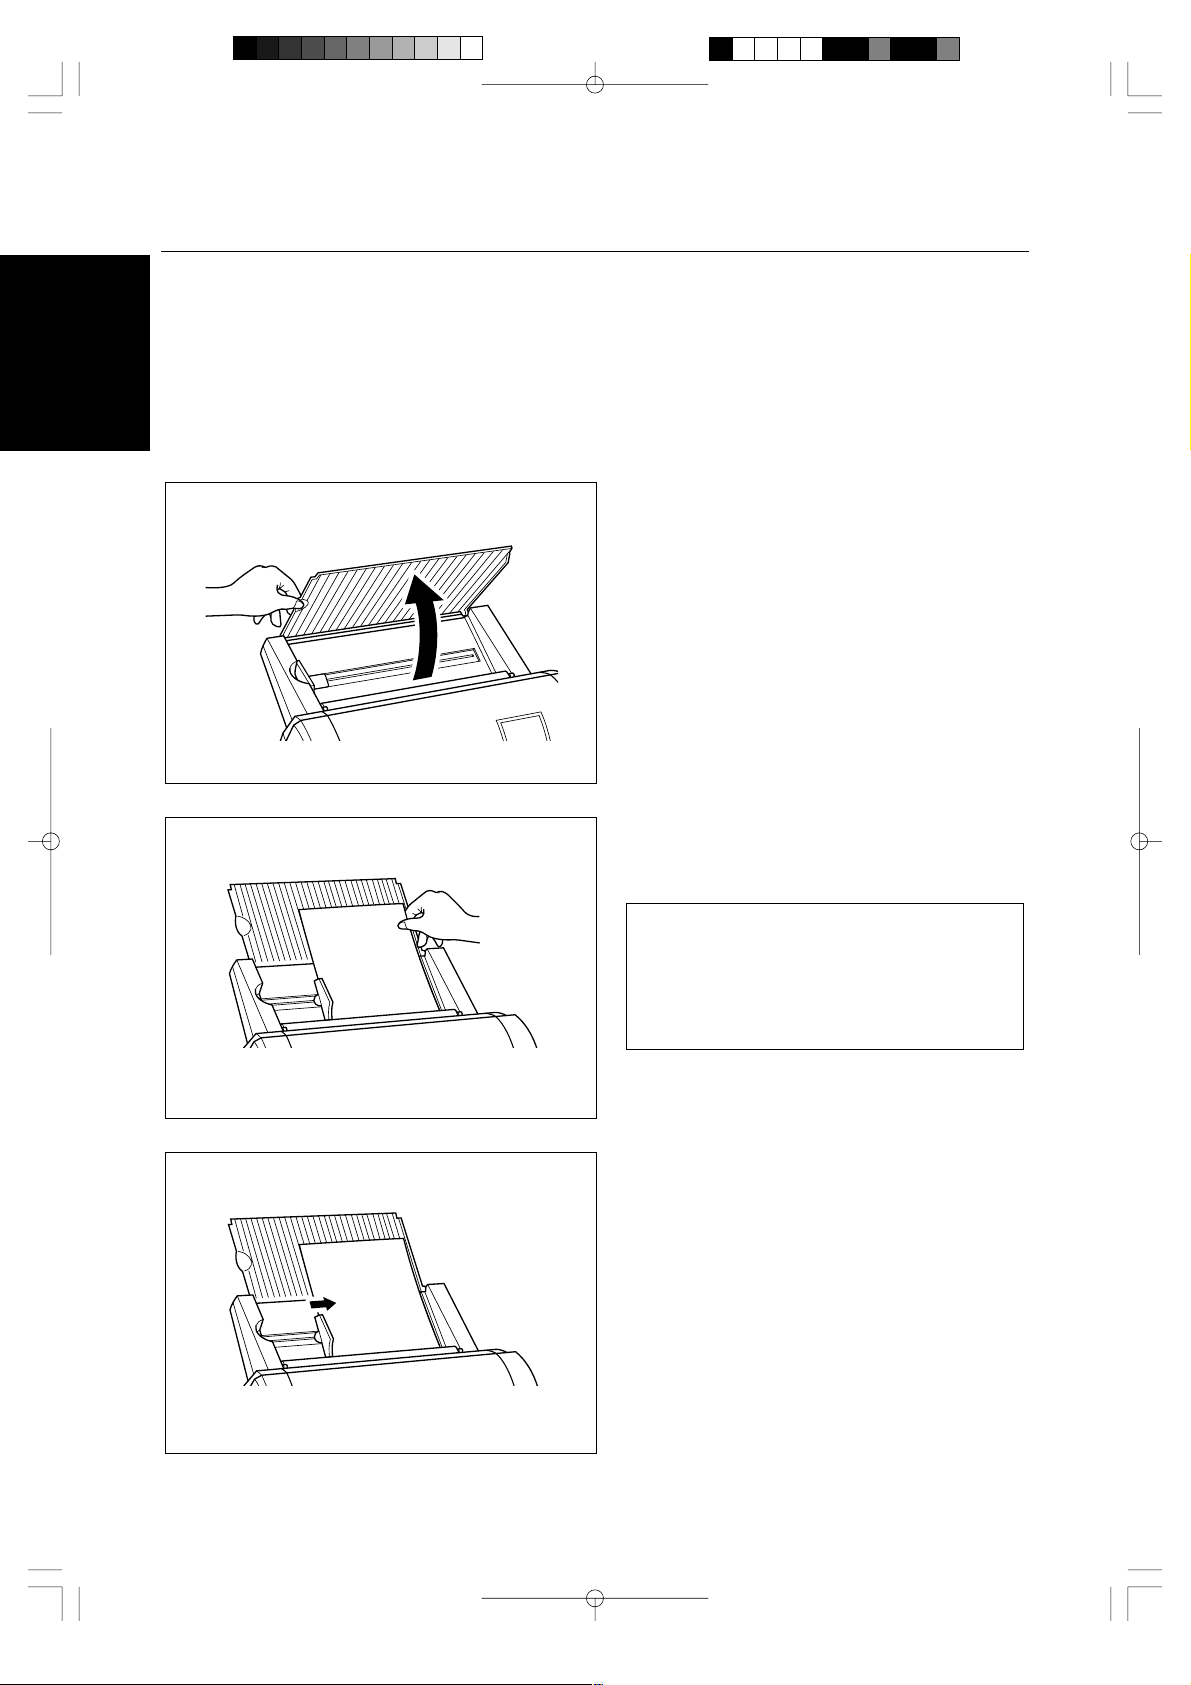
(1)Open the document supporter.
(2)Load the document to be laminated onto the
document tray. Insert the document face up.
TIP
When using the adhesive laminating film,
documents can be placed face down on the
document tray to apply the adhesive to the
front of the document (Great for Window
Stickers).
(3)Align the paper with the tab on the right and
slide the document guide until it touches the
left edge of the document. When laminating an
irregularly shaped document, always position
the longest edge of the document to the right.
- 10 -
Page 13

Start
Cutter Off
POWER
ONON OFF
Border
No Border
ENGLISH
- 11 -
Page 14
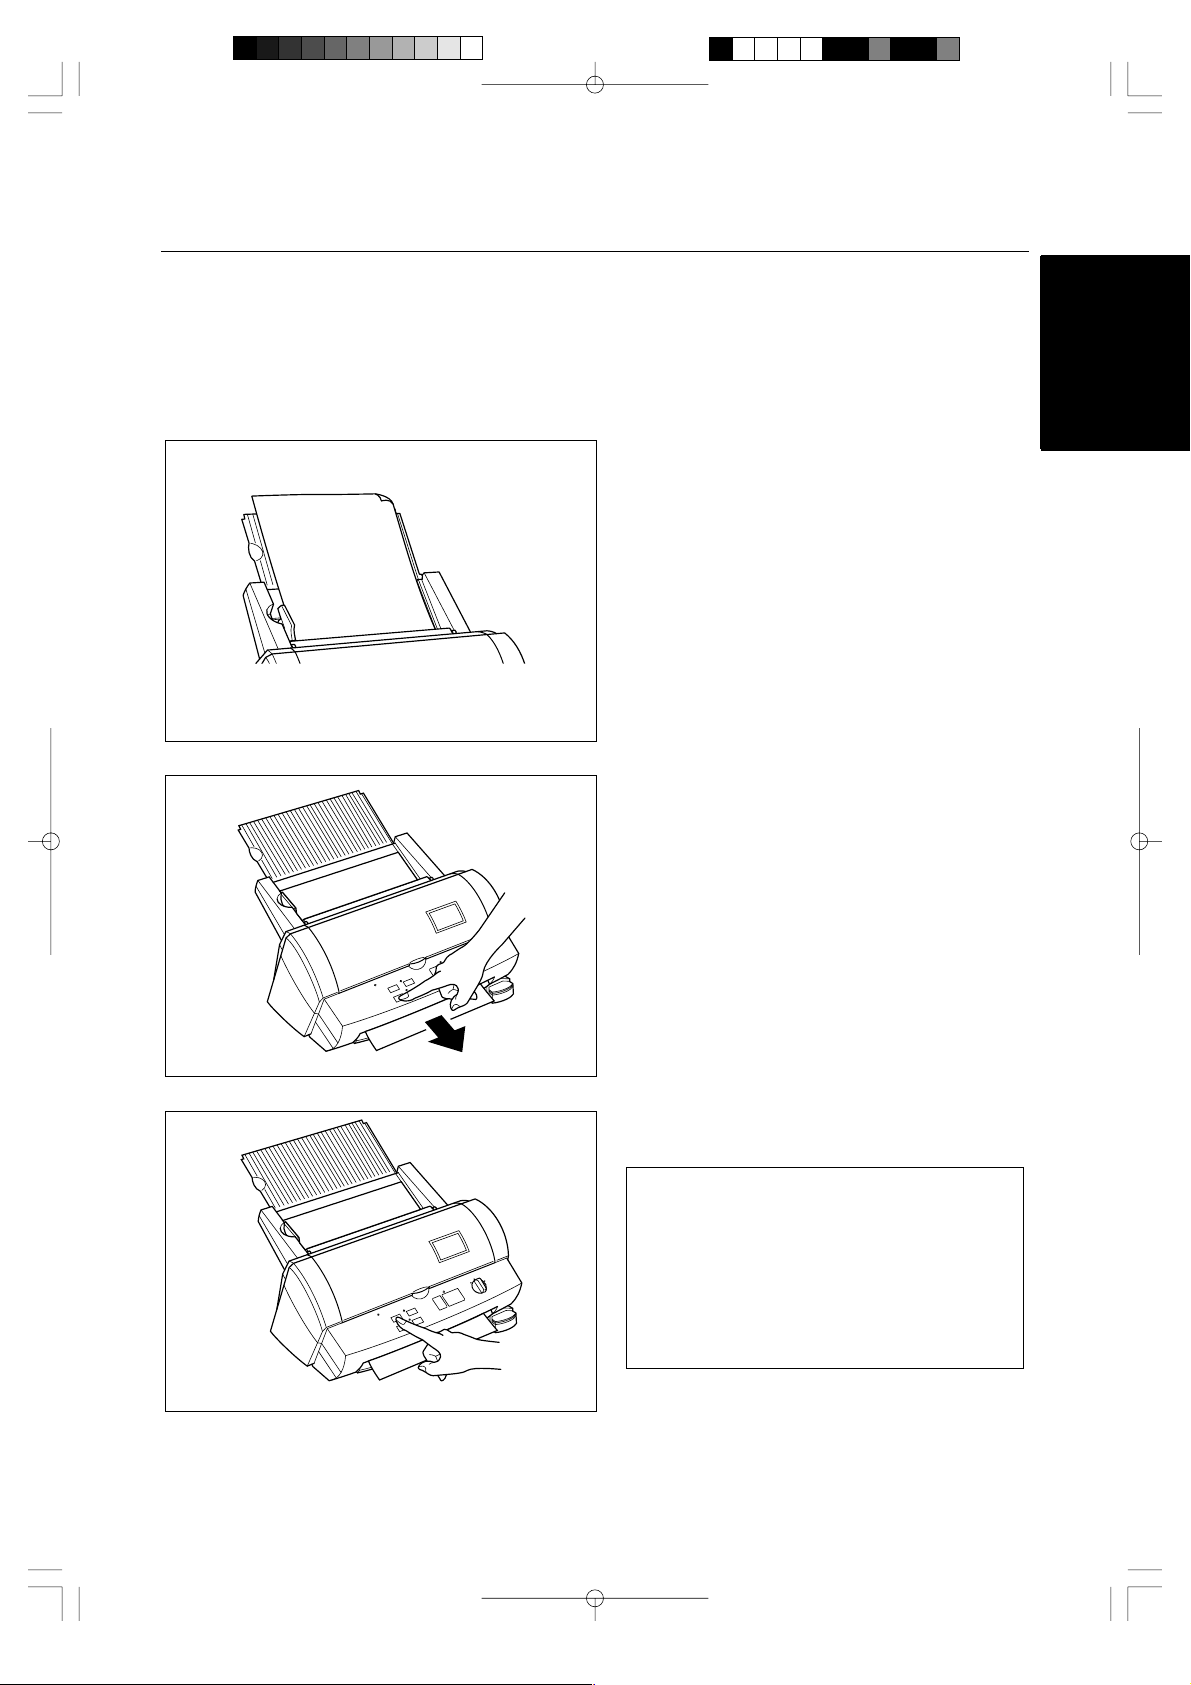
ENGLISH
r
y
g
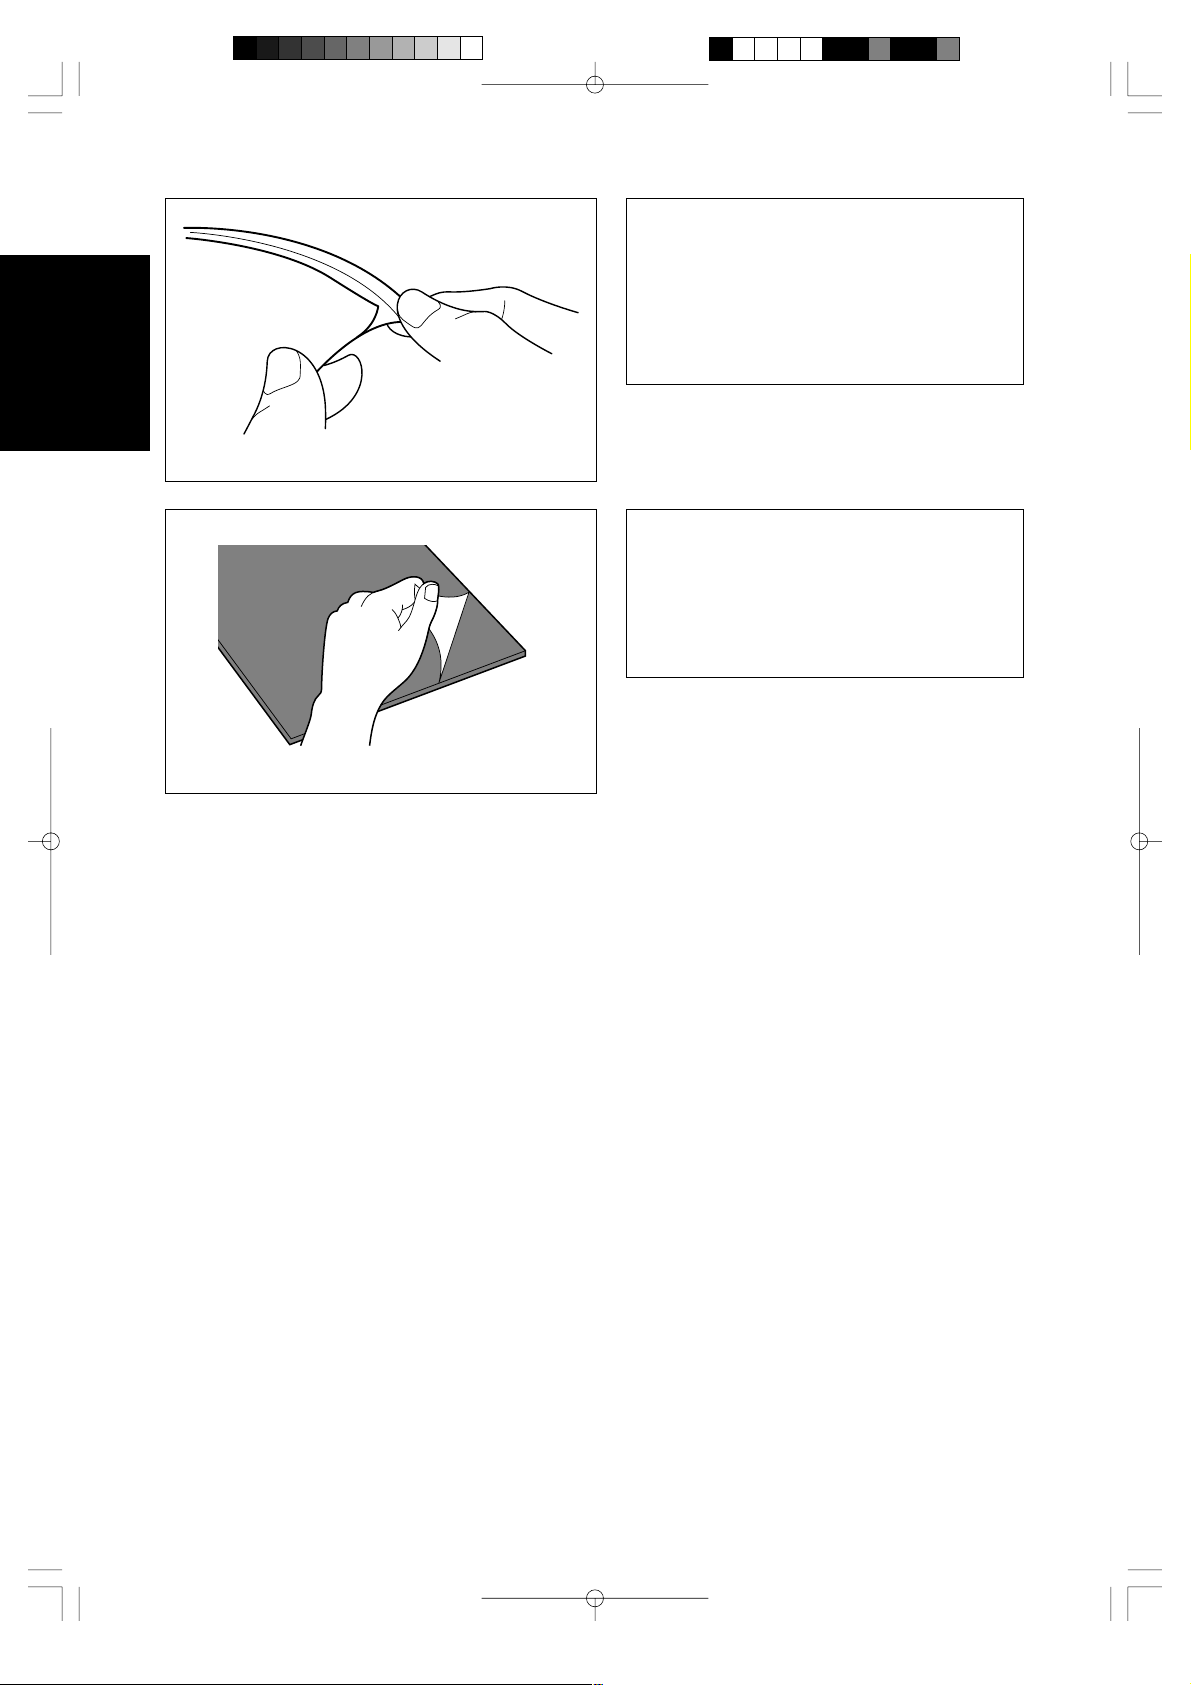
Note
If you use the adhesive laminate film, the
back surface of the laminated output is a liner
which will need to be peeled off. To mount
the laminated document on a surface for
display, peel off the liner as illustrated.
For easy peeling, there is a crack in the line
approx. 1” from the right side.
Note
If you use the magnetic back laminate film,
ou can place the output on metal surfaces.
There is a liner on the back surface of the
laminated output (magnet side). Please peel
the liner off gently as illustrated before placin
the output sheet on a metal surface.
- 12 -
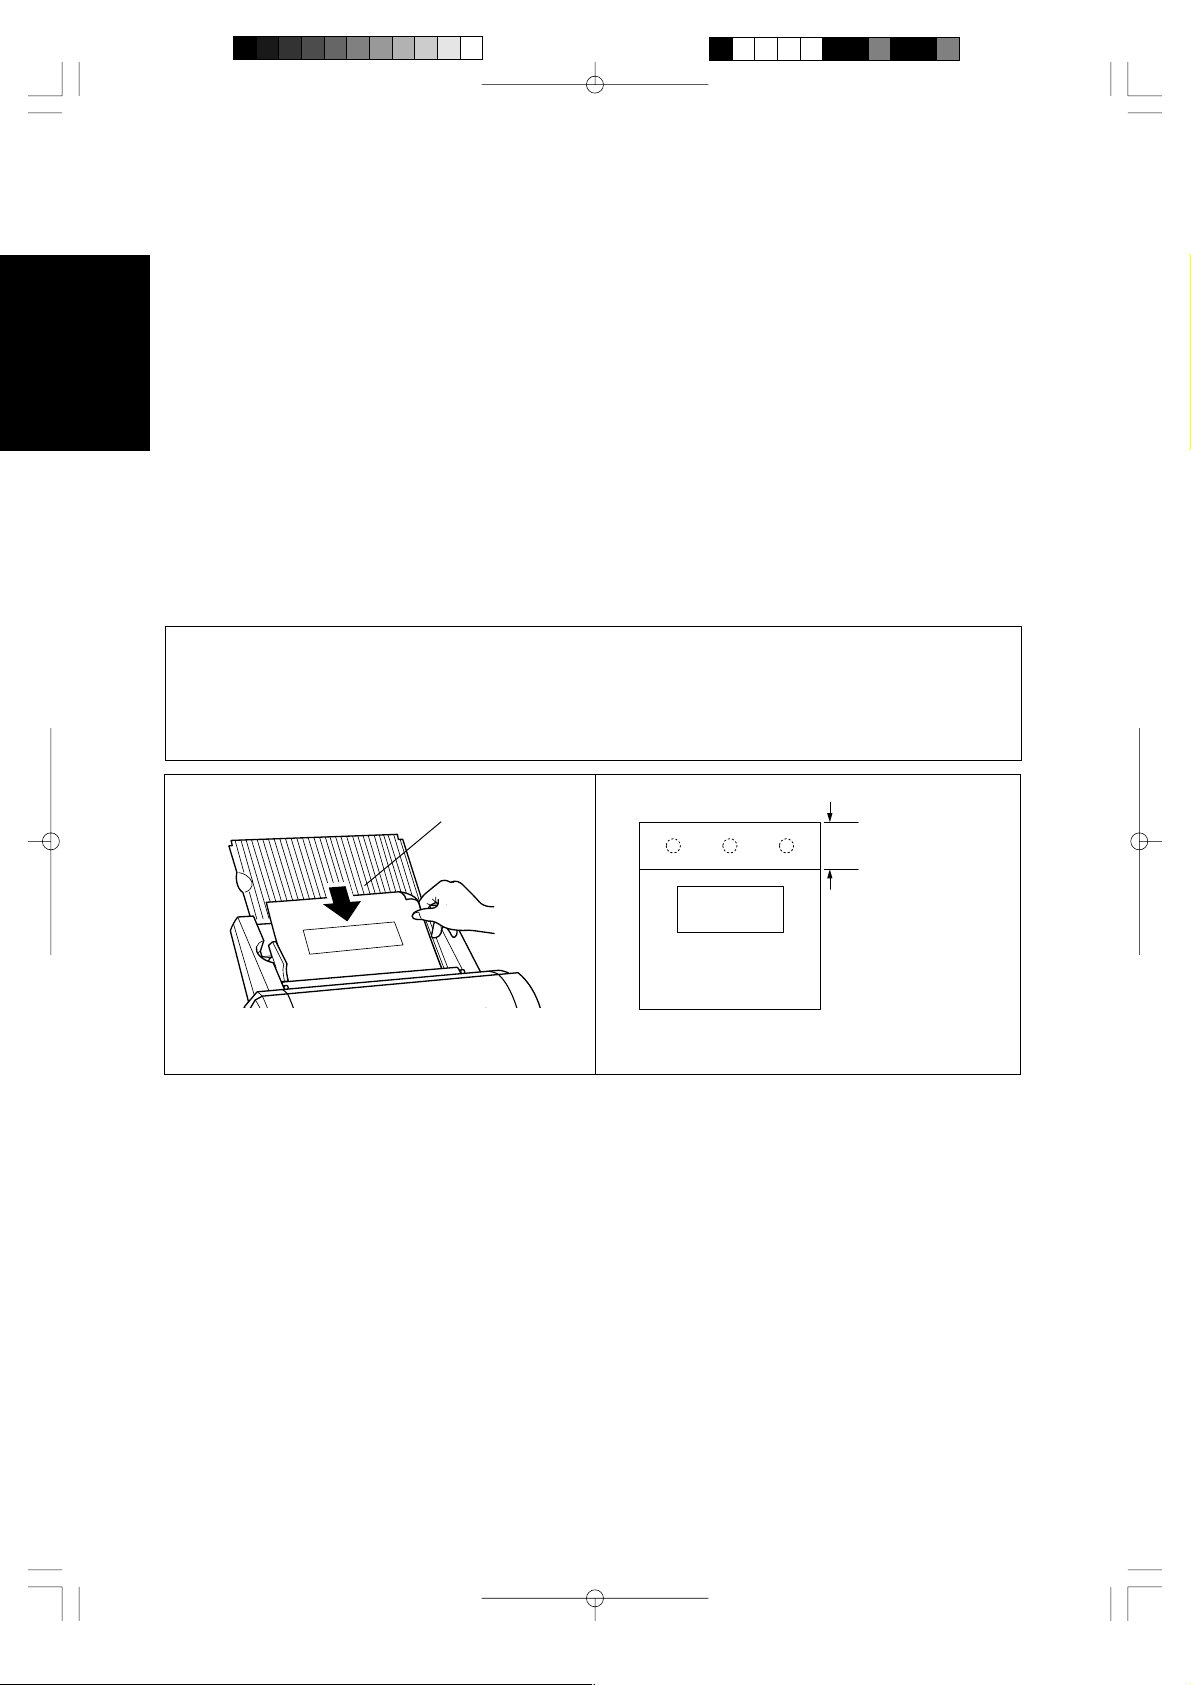
Page 15
Document Size
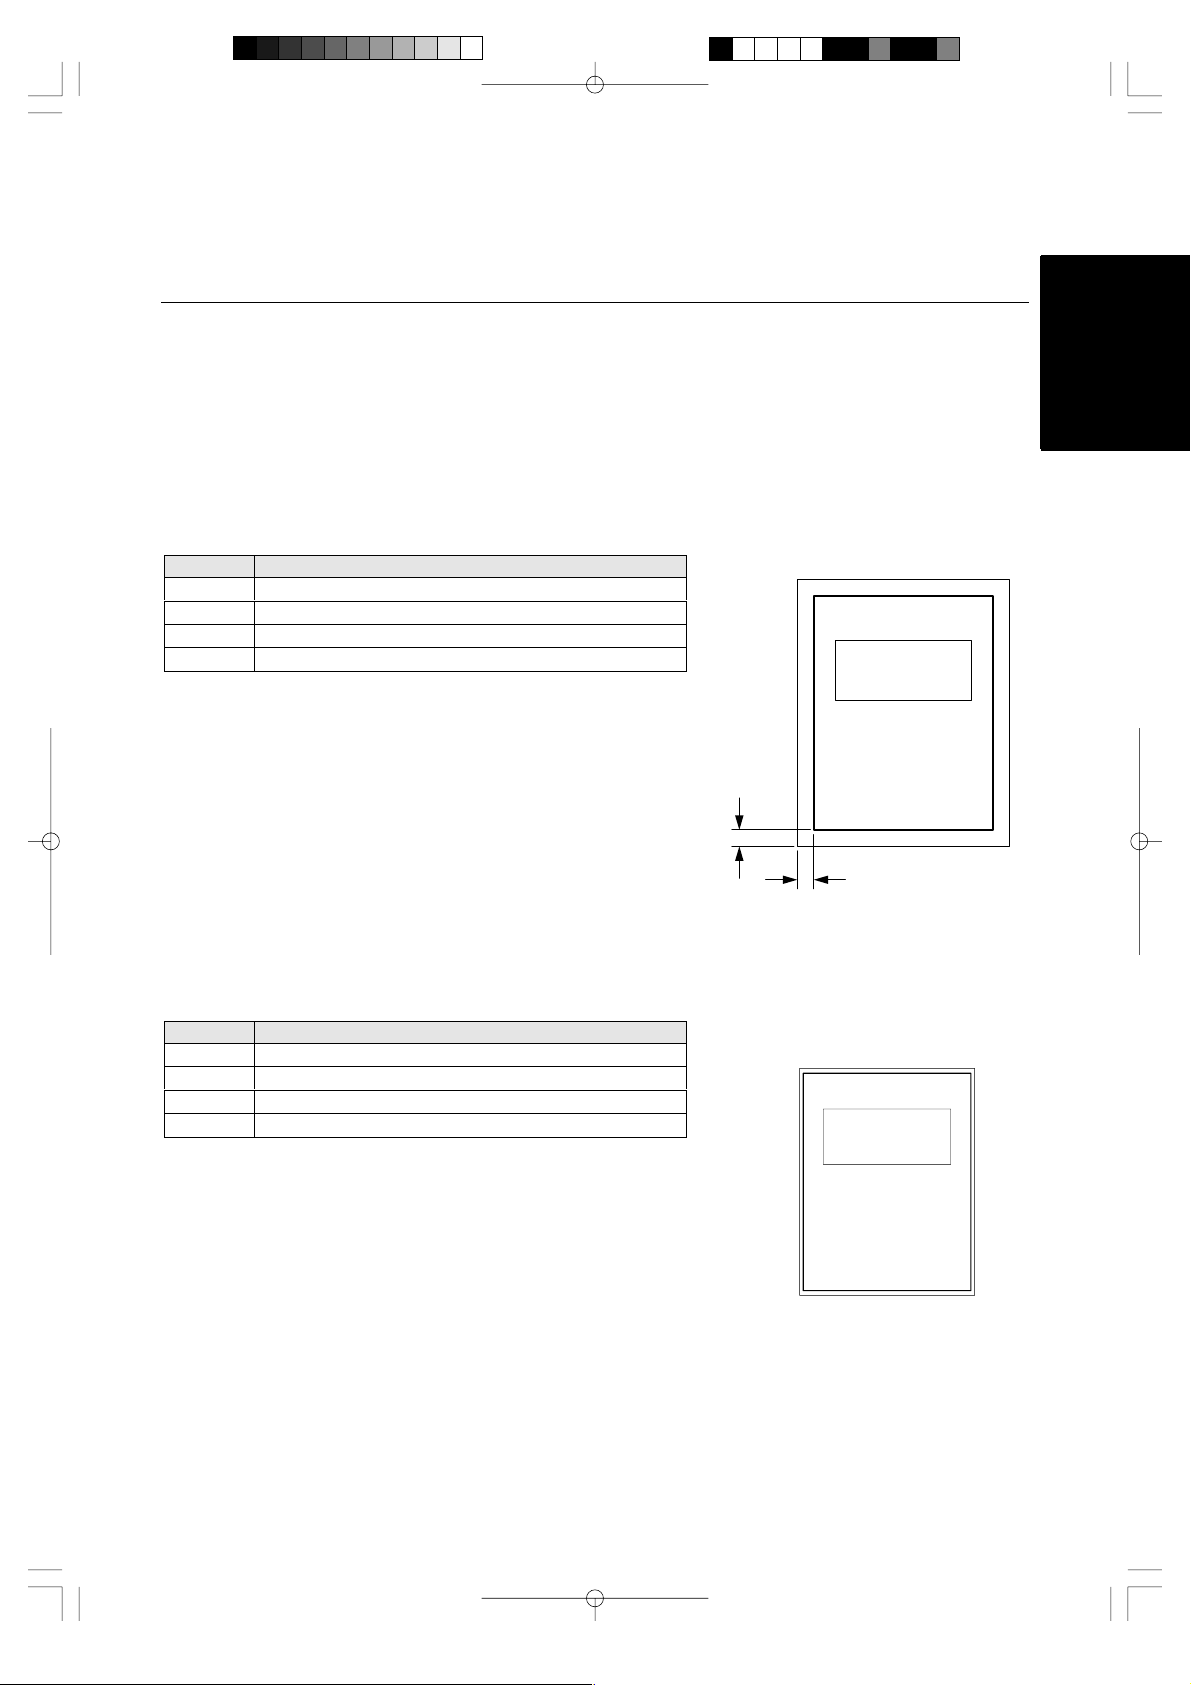
The size of the document that you wish to laminate should not be larger (or smaller) than the width that your
machine can accommodate. The document should be between 2.0 and 11.7 inches (50 and 297 mm) wide.
The minimum paper length should be 3.5 inches (90 mm). The paper thickness should be between 17 lbs.
to 40 lbs. (0.004” and 0.008”). Only one document at a time can be loaded onto the document tray.
Type of cartridge 12.0 inch cartridge 9.0 inch cartridge 4.8 inch cartridge
Maximum 11.7” (297 mm) 8.5” (216 mm) 4.3” (108 mm)Paper width
Minimum 2.0” (50 mm) 2.0” (50 mm) 2.0” (50 mm)
Paper length Minimum 3.5” (90 mm) 3.5” (90 mm) 3.5” (90 mm)
Paper thickness 0.004” - 0.008” 0.004” - 0.008” 0.004” - 0.008”
Business card-size paper should be inserted vertically into the machine as illustrated below.
ENGLISH
Note
If you place a small document into the machine incorrectly, it can be removed by lifting the document
tray cover as illustrated.
When laminating a document longer than 18.5” (470 mm), the machine will pause after laminating 18.5”. To
continue the process just press the Start button.
CAUTION:
Do not insert documents that are curled, wrinkled, folded or ripped into the machine. Documents
must be free of staples, paper clips, glue, correction fluid and sticky tape. Do not insert fabric
material into the machine.
- 13 -
Page 16

The Auto Sheet Feeder
The Auto Sheet Feeder automatically feeds your document into the machine, one sheet at a time. Load only
a single document at a time onto the document tray.
ENGLISH
The Auto Cross Cutting System
The Auto Cross Cutting System automatically detects the width and length of the inserted document. The
built-in mechanism precisely trims each side of the square or rectangular document.
IMPORTANT INFORMATION:
- Select Cutter Off Mode when laminating sensitive or irregularly shaped documents.
- 14 -
Page 17
How to define the cutting position
(creating borders)
The Auto Cross Cutting System automatically detects the size of your document and trims each edge of
your square or rectangular document. The cutting position can be adjusted to create a margin on each
edge of the laminated document
.
Auto Cutter Mode – Border
This mode is ideal for protecting documents from water or dust.
To create a margin on each edge of your square or rectangular document…
(1)Change the position of the Power dial to Border.
(2)Place the document in the document tray and press Start. The document will be cut with about a 0.18”
(4.5 mm) margin of laminate on each edge of the paper.
Cutting Position
Top
Bottom
Right
Left
Auto Cutter Mode – No Border
This mode is ideal for making stickers.
To generate a document without a margin of laminate on each edge…
(1)Change the position of the Power Dial to No Border.
(2)Place the document in the document tray and press Start. The document will be trimmed with a very
small margin of laminate (approximately 0.04^ - 0.06^ (1 - 1.5mm) from each edge of the document).
Top of paper 0.18^± 0.06^ ( 4.5mm ±1.5mm)
Bottom of paper 0.18^± 0.06^ ( 4.5mm ±1.5mm)
Right edge of paper 0.18^± 0.06^ ( 4.5mm ±1.5mm)
Left edge of paper 0.18^± 0.06^ ( 4.5mm ±1.5mm)
Document
0.18” (4.5mm)
0.18” (4.5mm)
ENGLISH
Cutting Position
Top
Bottom
Right
Left
T op of paper 0.06^ ± 0.06^ (1.5mm ± 1.5 mm)
Bottom of paper 0. 06^ ± 0.06^ (1.5mm ± 1.5 mm)
Right edge of paper 0.04^ ± 0.06^ (1.0mm ± 1.5 mm)
Left edge of paper 0.04^ ± 0. 06^ (1.0mm ± 1.5 mm)
Document
Auto Cutter Mode – Cutter Of f (for sensitive documents)
Use this mode to prevent any part of the document from being cut away during the finishing process. Cutter
Mode will sense the beginning and the end of your document and automatically leave a wide margin of extra
laminate, which you may manually trim.
(1)When Cutter Off Mode is selected, the machine will laminate the document without trimming the
edges. The document is processed and ejected from the machine.
(2)Press Cut to manually cut the laminate and remove the document from the machine.
- 15 -
Page 18
Auto Cutter Mode - Extra Border
s
s
This mode is ideal for making documents for filing purposes.
ENGLISH
The Extra Border will always be generated on the last part of the document to be fed through the
machine. You can choose 0.8” (20 mm) or 1.2” (30 mm) extra margin.
Change the width of the Extra Border by pressing the Extra Border button. The first time it is
pressed, the extra border will be set to 0.8” (20 mm), the next time 1.2” (30 mm) and the next time the
extra border mode will be turned off (as well as the Extra Border LED).
Off ® 0.8” (20 mm) ® 1.2” (30 mm) ® Off
To create an extra 0.8” (20 mm) margin on your document...
(1) Place the document in the document tray and press the Extra Border button once. The Extra Border
green LED will light.
(2) Press Start. The document will be laminated with a 0.8” (20 mm) Extra Border.
To create an extra 1.2” (30 mm) margin on your document...
(1) Place the document in the document tray and press Extra Border button twice. The Extra Border green
LED will blink.
(2) Press Start. The document will be laminated with a 1.2” (30 mm) Extra Border.
Note
Selected Extra Border mode will remain on until the power is turned off or the Extra Border mode i
turned off. To turn the Extra Border mode off, press the Extra Border button until the Extra Border LED i
no longer lit.
To create an extra border for hole punching an 8.5” ´ 11” document, place the document in the tray
landscape with the side to have the extra border on the top (see illustration).
The Extra Border will appear
on this edge of the document
Document
Document
0.8” (20 mm) or
1.2” (30 mm)
- 16 -
Page 19
How to use Continuous mode
Continuous mode can reduce the wasted film between documents when laminating multiple documents.
(1) Set the first document on the document tray
1
and press the Continuous button. The gree n
Continuous LED will light.
ENGLISH
(2) Press Start. The machine will start to laminate
your document. When the end of the
POWER
StartStop
Cutter Off
ONON OFF
Border
No Border
document is detected the laminating process
pauses and the buzzer sounds.
(3) Place the next document in the document tray.
The next document will automatically be fed
2
after approximately 7 seconds.
1
- 17 -
Page 20

Note
If a new document is not placed in the feeder within 7 seconds, the machine will restart and finish the
ENGLISH
current document.
If Start button is pressed after placing the next document in the feeder, the laminating process will restart
without waiting 7 seconds.
If Stop button is pressed before placing next document in the feeder, the Continuous mode is paused.
Press Start to restart the operation.
(4) Continue with step (3) until you are finished laminating documents. If a document is not placed in the
feeder within 7 seconds, the machine will finish laminating the document in the machine and then return
to normal mode.
Note
The Feed and Extra Border buttons will not work while the machine is in Continuous mode.
Do not change the setting of the Cutter Mode during Continuous mode.
To create an extra border with continuous mode, select the extra border mode before turning on the
continuous mode. All documents laminated will have an extra border. To turn off the extra border, turn off
continuous mode first and then turn off the extra border mode.
- 18 -
Page 21
Manual feeding and manual cutting
You can manually feed and cut the document using the Cool Laminator.
(1)Place the document in the document tray.
(2)Press the Feed button to feed the document
manually. The Feed button is a self-repeating
key. The document will continue to be fed until
the Feed button is released. Keep pressing
the Feed button until you see the end of the
document.
ENGLISH
(3)Press the Cut button. The document will be cut
at its current position.
Note
-For safety, the exact cutting position is not
visible from outside of the machine.
-To avoid accidentally cutting through your
document, it is recommended that you press
the Cut button only after the document has
been completely ejected from the machine.
-Never remove a document from the machine
by force. If necessary, use scissors.
- 19 -
Page 22

Corner cutting
After laminating, you can round each corner of the document.
ENGLISH
(1)Carefully insert a corner of the document all
the way into the corner-cutter slot so that the
corner of the laminated document is flush with
the sides of the corner cutter.
(2)The machine will automatically trim the corner
of the document.
(3)Remove the document from the slot.
Note
The maximum thickness of the original document (before lamination) that the corner cutter unit can cut is
0.008” (30 lbs. paper).
Do not use the corner cutter to trim magnetic back output.
- 20 -
Page 23

Corner cutter dust box
The trimmings from the corner cutter are collected
in the corner cutter dust box located just below the
corner cutter slot. Pull the dust box towards you to
discard the trimmings and place the box back into
its original position.
Note
The trimmings created during the inspection
process at the factory may still be in the corner
cutter dust box.
ENGLISH
- 21 -
Page 24

About film rolls
There are a variety of different types of film rolls that have been designed to meet your needs.
ENGLISH
This machine supports 12.0 inch (A3), 9.0 inch (A4) or 4.8 inch (A6) width cartridges.
Use only Brother authorized film cartridges or film refills. The above mark appears on all packages of
authorized film cartridges or film refills that are compatible with the machine. Brother cannot be held
responsible for any problem arising from the use of unauthorized supplies.
Depending upon the type of film used, this machine turns a variety of documents into professional, doublesided lamination sheets, adhesive stickers or magnetic signs. Please refer to the compatible accessory list
packaged with this machine for details.
This machine is supplied with a Double Sided Lamination Film Cartridge. For other types of film rolls, please
contact your local Brother dealer.
Note
To use a 9.0” or 4.8” cartridge with this machine, first install the cartridge adapter into the machine.
Please refer to page 29.
Film-supply maintenance
A red marker appears when the film supply is running out. Please replace the film roll as soon as you
notice this red marker. The red tape will appear approximately 39.4” (1000 mm) from the end of the roll.
If the red marker appears, replace the film immediately. Please refer to ‘Replacing the film cartridge’ on
page 23 or ‘Installing/replacing the film roll in the cartridge on page 25 to refill the film cartridge.
The starter cartridge produces about 11 US letter size sheets (landscape direction) in continuous mode. A
regular roll double-sided laminate film produces about 168 US letter size sheets (landscape direction) in
continuous mode.
Please refer to the compatible accessory list on page 1 for other supply information.
Note
A red tape will appear when the laminate film is reaching the end.
If this red tape appears, replace the film immediately. This red tape can simply be peeled off your
original document without causing damage.
Attempting to laminate another document after the red marker appears may result in a damaged and/or
cut document.
- 22 -
Page 25
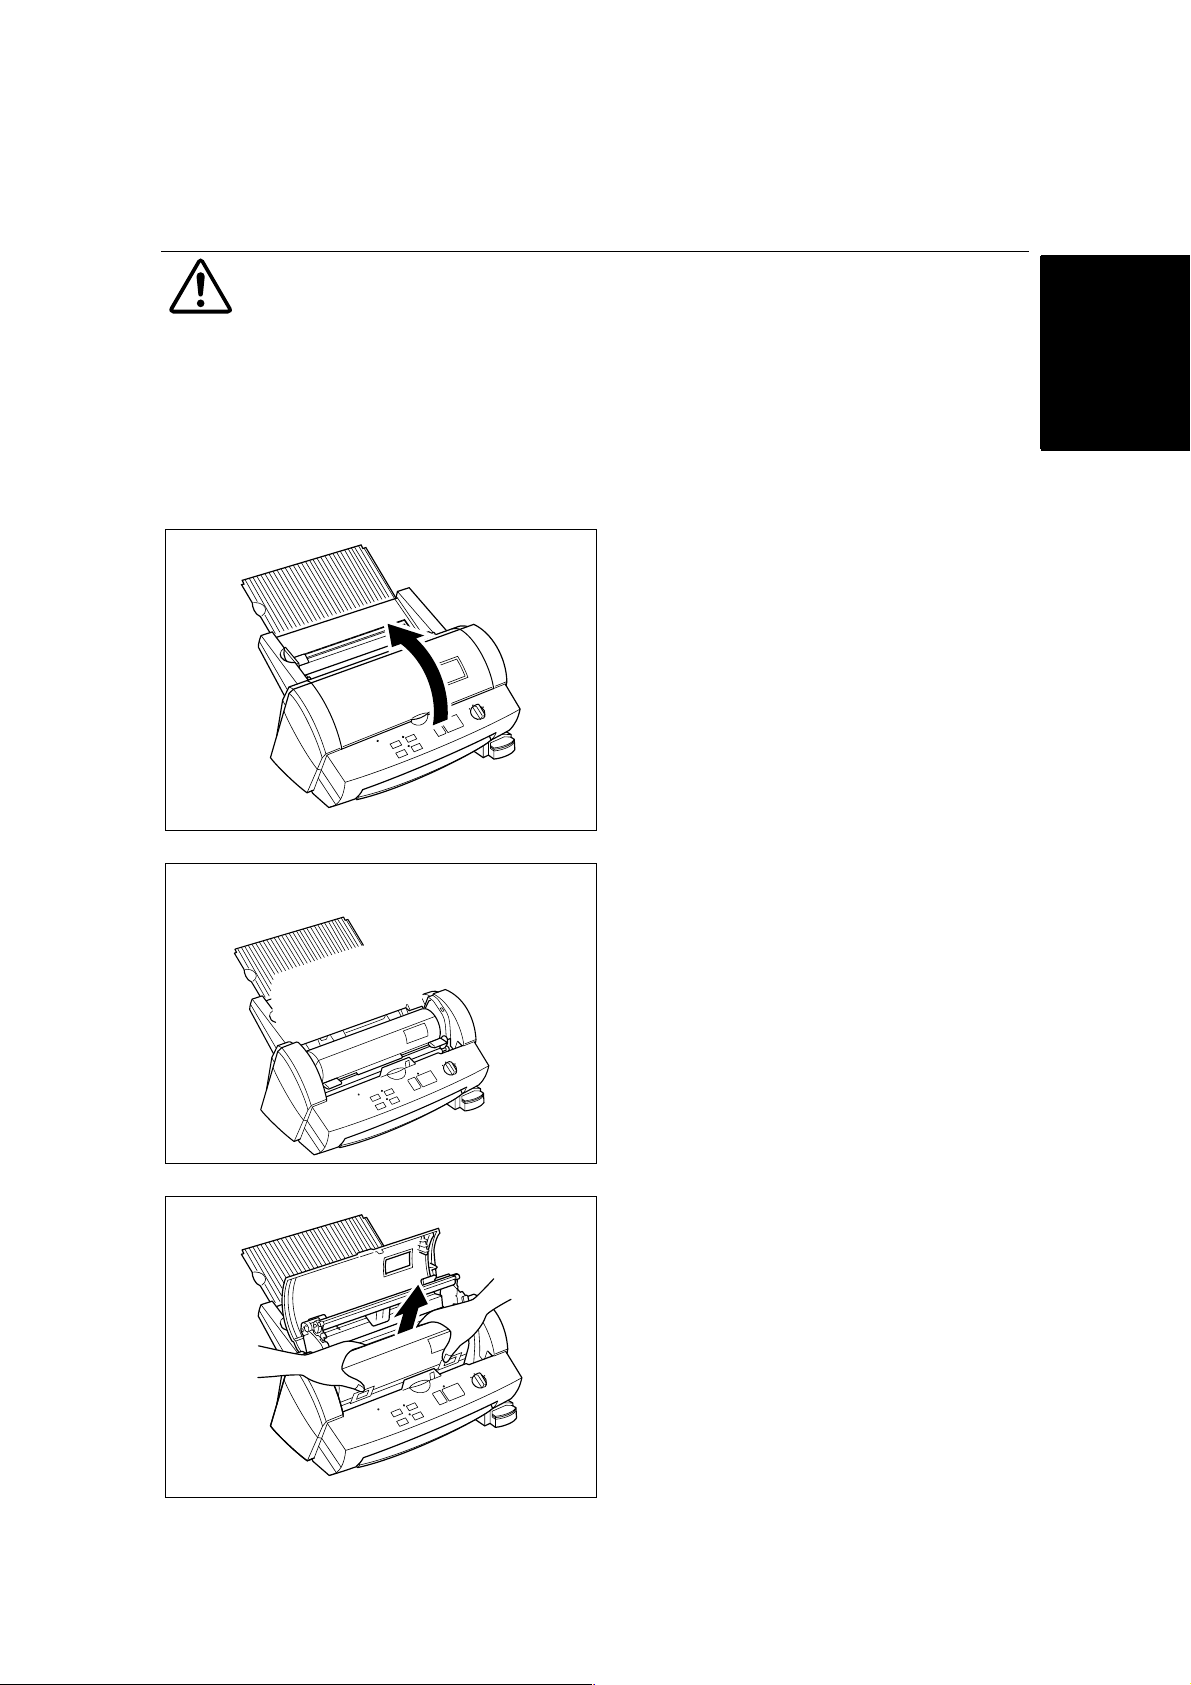
Replacing the film cartridge
WARNING:
Never touch the surface of the blades when installing/replacing the film cartridge.
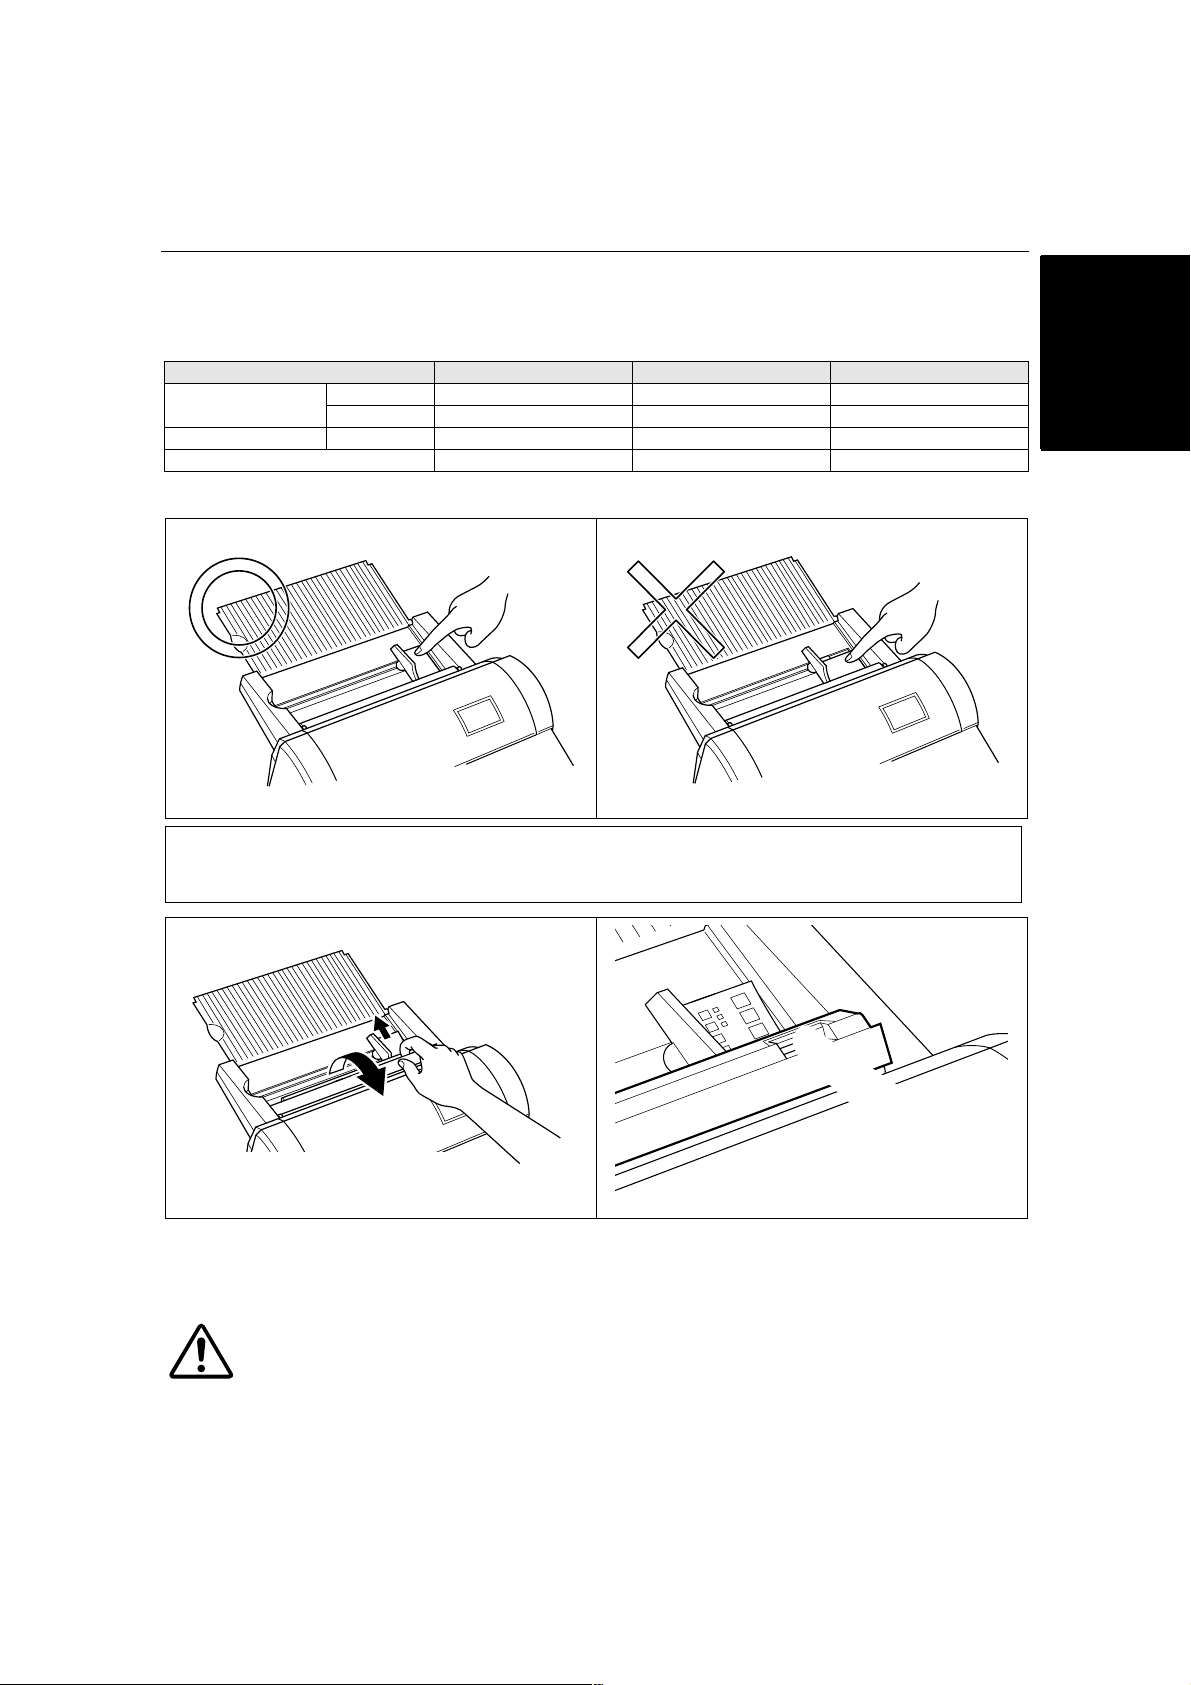
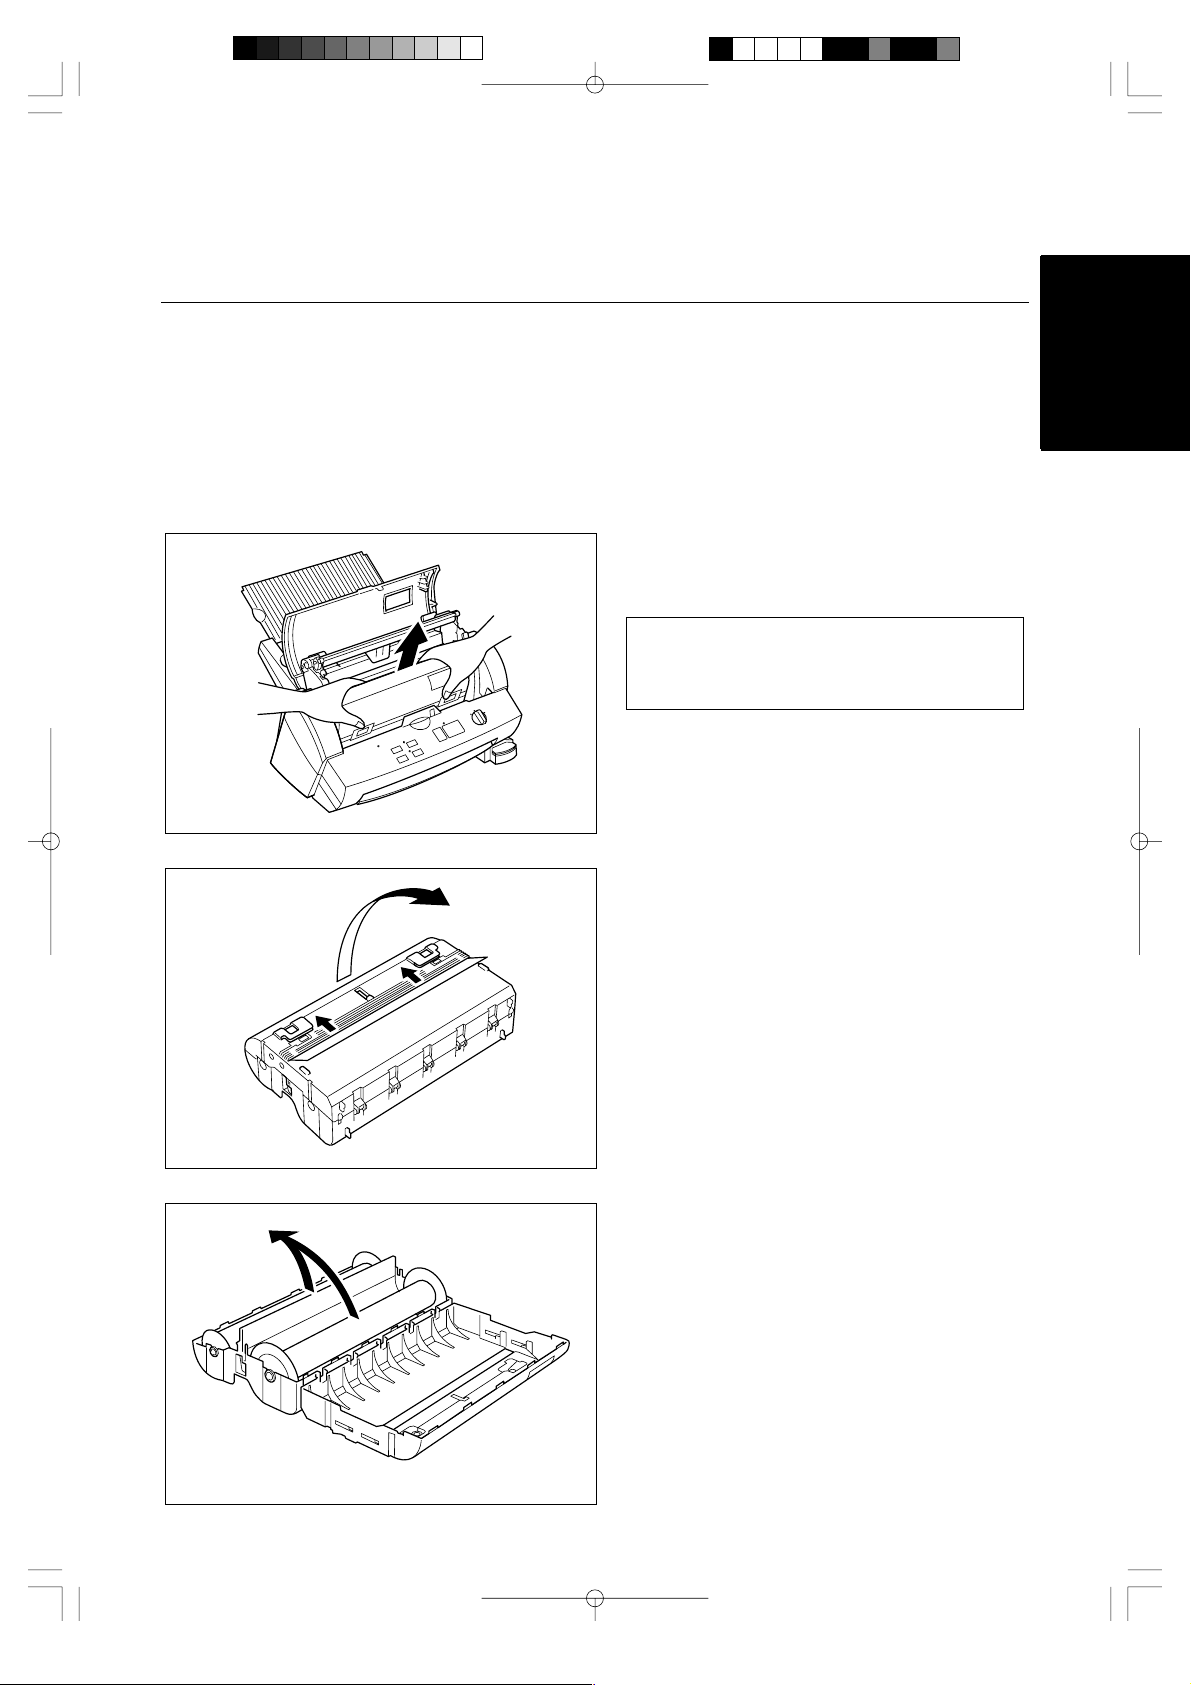
(1)Turn the POWER dial to Off and open the top
cover.
ENGLISH
(2)Pull the roller holder levers up and lift the
roller holder upwards.
(3)Remove the film cartridge taking care not to
grab the cartridge by the shutter.
- 23 -
Page 26

ENGLISH
(4)Carefully install the new film cartridge, square
end down, film slit facing towards the front of
the machine.
Note
-Make sure that the shutter of the cartridge is
completely closed before installing the
cartridge.
-Check the position of the top edge of the film
before installing cartridge. It should be
aligned with the cutting line of the cartridge.
If necessary, cut away any excess film.
-Make sure that the top edge of the film lays
across the lower roller.
(5)Return the roller holder to its original position
and press the roller holder levers as illustrated
until it is secured into position. You will hear
the roller holder click into place.
(6)Close the top cover.
(7)Turn the POWER dial to Cutter Off, Border or
No Border. Press the Feed button until you
can see the edge of the film to remove any
slack from the film.
Note
-The type of the currently installed cartridge can be viewed through the window in the top cover.
-Store the film cartridge at below 113°F (45°C).
- 24 -
Page 27
Installing/replacing the film roll in the
cartridge
Cartridges can be recycled by replacing the film roll. Be sure to use Brother-authorized LC film refills only.
Refill cartridges using the following instructions:
(1) Remove the film cartridge from the machine
being careful not to grab the cartridge by the
shutter.
Note
If the film is stuck, turn on the machine and
press the Cut button to remove the excess
film.
ENGLISH
(2) Open the film cartridge by sliding the shutter in
the direction of the arrows until it locks into
place. Open the film cartridge by gently
separating the clear top cover from the gray
bottom cover.
(3) Remove the old film roll from the cartridge.
- 25 -
Page 28

ENGLISH
s
(4) Take the new refill roll of film from the sealed
package. Remove the separator sheet.
Holding the yellow colored plastic side holders
of the film roll. Place the film into the cartridge
as illustrated. The film can only be placed into
the cartridge in the correct direction.
Note
Remove the separator sheet between film roll
before placing the rolls into the cartridge.
Do not grasp the rolls when installing.
9” and 4.8” refill rolls may have different side
holders. Please refer to the directions that are
packed with the refill roll.
(5) Remove the side holders (yellow color) of the
film roll.
(6) Close the film cartridge. Making sure that the
leading edge of the film sticks out of the film
slit.
- 26 -
Page 29
(7) Press on the two shutter buttons marked
"PUSH" to release the shutter.
(8) The top edge of film should be aligned with the
cutting line of the cartridge. If any film extends
beyond the cutting line, cut away the excess
film as illustrated before installing the cartridge
into the machine.
ENGLISH
(9) Install the cartridge into the machine.
(10) Return the roller holder to its original position
and press the roller holder levers as
illustrated. You will hear the roller holder click
into place.
- 27 -
Page 30
ENGLISH
(1 1) Close the top cover.
(12) Turn the POWER dial to Cutter Off, Border or
No Border. Press the Feed button until you
can see the edge of the film to remove any
slack from the film.
CAUTION:
To prevent the film from drying out, never open the sealed pack until you are ready to install the
cartridge.
- 28 -
Page 31

Using 9” (A4) or 4.8” (A6) film cartridges
(1) Turn the POWER dial to OFF and open the top
cover.
ENGLISH
(2) Pull the roller holder levers up and lift the roller
holder upwards.
(3) Remove the film cartridge carefully.
- 29 -
Page 32

ENGLISH
(4) Place the cartridge adapter into the machine
as illustrated.
(5) Place the 9.0 inch or 4.8 inch cartridge into the
machine.
When using the 4.8 inch cartridge, align the
cartridge to the right side of the machine.
(6) Return the roller holder to its original position
and press the roller holder levers as illustrated.
You will hear the roller holder click into place.
- 30 -
Page 33

(7) Close the top cover.
(8) Turn the POWER dial to Cutter Off, Border or
No Border. Press the Feed button until you
can see the edge of the film to remove any
slack from the film.
ENGLISH
- 31 -
Page 34

Regular maintenance and troubleshooting
You can keep your machine in optimum condition by cleaning it on a regular basis.
ENGLISH
Regular maintenance
Avoid small debris and objects
Be careful not to let anything slip into the machine, especially metal objects such as paper clips and staples.
For optimum lamination results, do not place the machine and cartridges in a dusty environment.
Cleaning
Never use volatile liquids such as thinner or benzene to clean the exterior surface of the machine. Use only
a soft cloth dampened with a diluted mild detergent solution for the exterior. Use ONLY a soft, dry cloth for
cleaning the interior.
Paper jams
The machine will sound an alarm if a document jams while going through the feeder.
The Error indicator will blink and the buzzer will sound.
Clearing a document jam
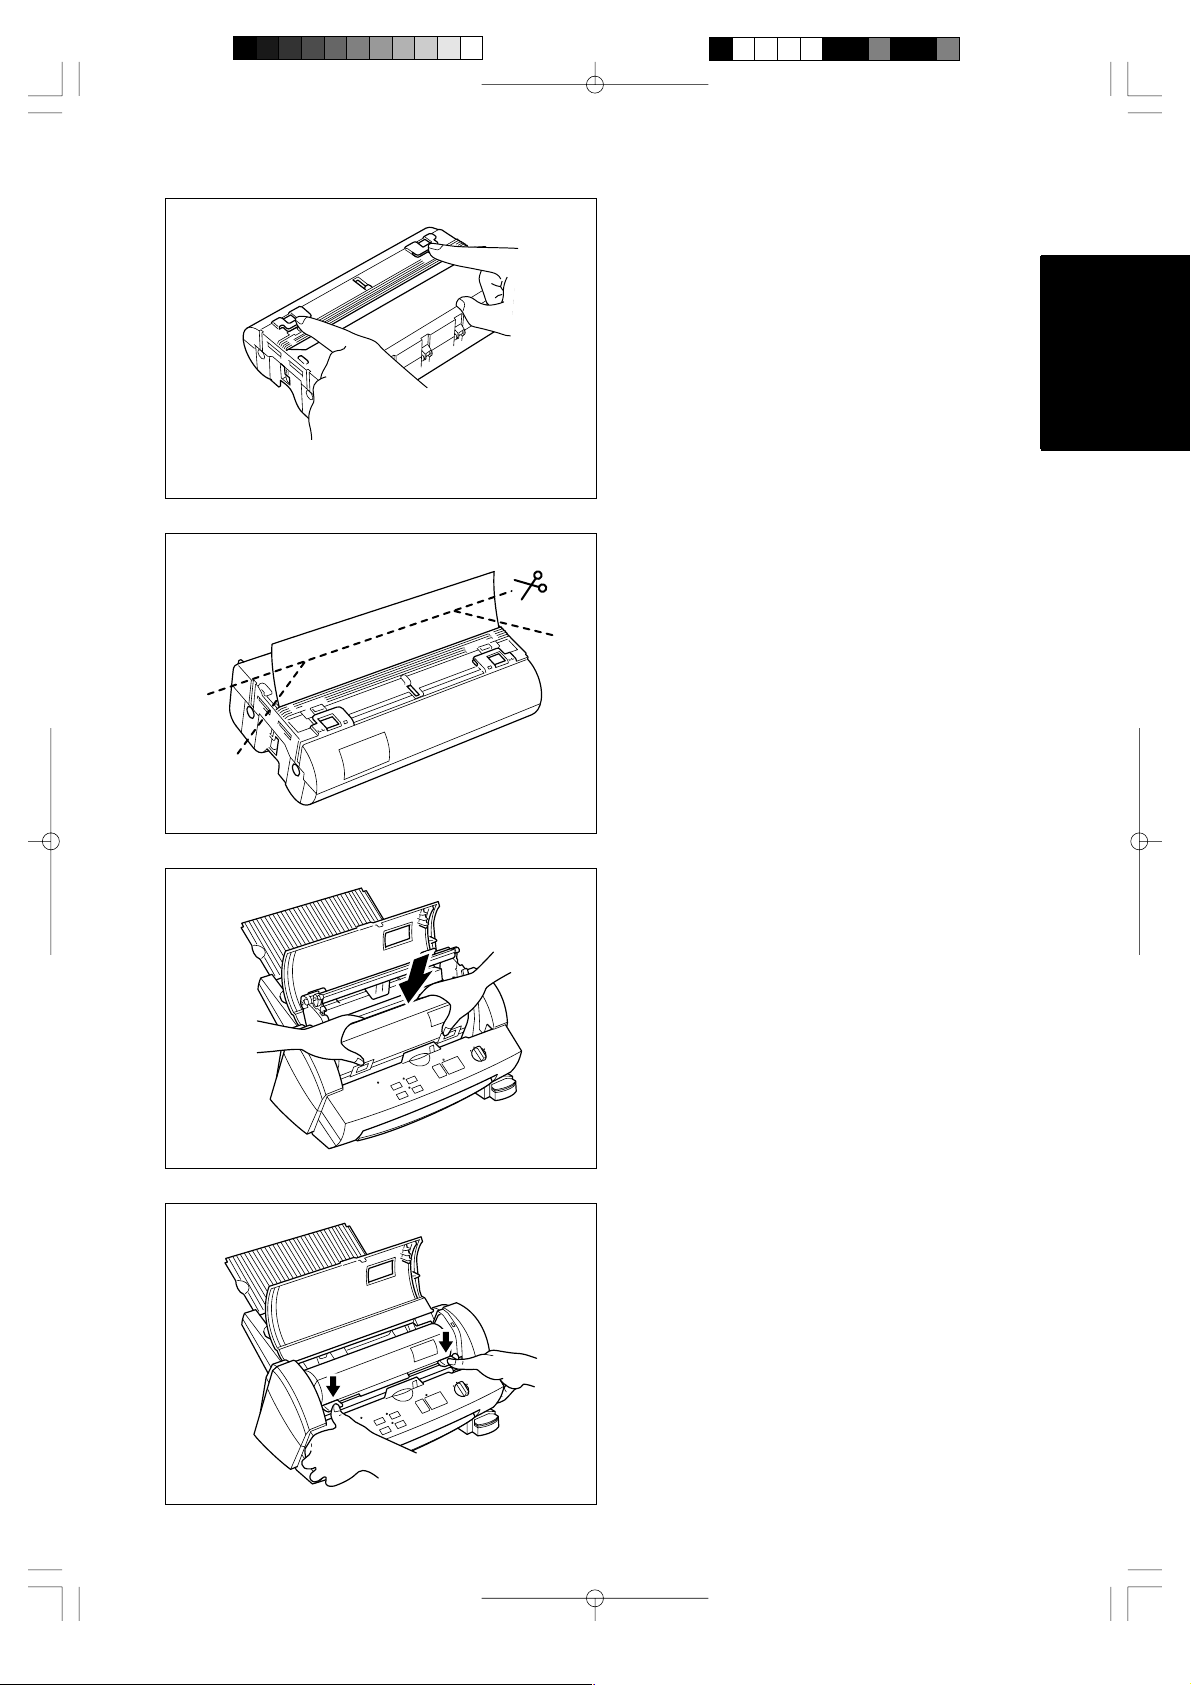
(1)Turn the machine off.
(2)Open the top cover.
(3)Pull the roller holder levers up and lift the
roller holder upwards.
- 32 -
Page 35

(4)Remove the film cartridge from the machine.
e
(5)Open the cartridge shutter and remove the
document from the film slit of the cartridge.
Note
Do not pull the document from the opposit
side.
ENGLISH
(6)Re move any excess la minating fil m by cutting
along the engraved “cutting line” on the
cartridge before reinserting the cartridge.
Note
Make sure that the shutter of the cartridge is
closed. If open, push the shutter buttons to
close the shutter.
(7)Place the film cartridge into the machine.
Note
Make sure that the film is installed correctly.
- 33 -
Page 36

ENGLISH
(8)Return the roller holder levers to its original
position. Push until it clicks into place.
(9)Close the top cover.
(10)Press the Feed button until you can see the
edge of the film to remove any slack from the
film.
CAUTION:
Do not touch the surface of the blade when removing a jammed document. This procedure must
be done with great care to avoid personal injury.
- 34 -
Page 37

Replacing the side cutter units
Cutter performance will decline as blades become dull through use or become coated with adhesives.
Follow these steps to replace the side cutter units.
CAUTION:
Do not touch the surface of the blade when replacing the cutter units. Handle the blades with
great care to avoid personal injury.
Side cutter units (SC-2)
(1)Turn the machine off.
(2)Open the top cover.
(3)Pull the roller holder levers up and lift the roller
holder upwards.
ENGLISH
(4)Push the yellow colored tab of side cutter unit
to release the lock as illustrated.
- 35 -
Page 38

ENGLISH
(5)Slide the old side cutter towards the center of
the machine. Remove the side cutter.
(6)Place the new side cutter on the metal bar and
slide it towards the side of the machine.
(7)When the cutter is in the correct position lift
the tab and bring it upwards towards the front
of the machine to lock the side cutter into
place.
Repeat this procedure for both cutters.
(8)Return the roller holder levers to its original
position.
Note
If side cutter units are not installed properly,
the roller holder will not return to its original
position.
Make sure that film cartridge is installed
properly after returning the roller holder to its
original position.
- 36 -
Page 39

(9)Close the top cover.
(10)Press the Feed button until you can see the
edge of the film to remove any slack from the
film.
Replacing the corner cutter trimmer tray
The cutter performance will decline as the blade becomes dull.
You can improve the performance of the blade by replacing the corner cutter trimmer tray.
You can use both sides of the corner cutter trimmer tray. To use the other side simply remove the corner
cutter trimmer tray as shown below and reinsert it with the other side up. Install a new corner cutter trimmer
tray after both sides are worn.
ENGLISH
Use the following operation to replace the corner cutter trimmer tray when necessary.
Corner Cutter Trimmer Tray (CC-3)
(1) Remove the corner cutter trimmer tray as
illustrated.
(2) Install the new corner cutter trimmer tray.
Note
Use Brother authorized cutter units (SC-2 or CC-3) only.
Other cutter units, (top/bottom cutter unit and the upper blade of the corner cutter) are not user
replaceable. Please consult your dealer if these cutter units become dull or damaged.
- 37 -
Page 40

Troubleshooting
ENGLISH
the machine has been
turned on.
The document will not
feed into the machine and
the alert bu zze r so un ds
(two times).
laminating a document,
the Error indicator is
blinking and the alert
buzzer sounds
The laminator stops while
laminating a document,
the Start LED is blinking.
Output quality is poor.
The document will not
feed straight.
The extra laminate
around the document is
not trimmed after
processing.
The cutting positi on is not
accurate (top/bottom)
Documents ma de w ith th e
Adhesive L am ina tion wil l
not stick.
The Error indicator blinks
and the alert buzzer
sounds when the
machine is turned on.
The Error indicator blinks
and the alert buzzer
sounds when the top
cover is closed
The power dial cannot be
turned.
The film has creases or
bubbles.
Problem Cause Solution
The AC adapter is not connected properly. Check that the machine is plugged into a power source.Nothing happens after
The top cover is not completely closed. Close the top cover.
The document was not properly placed into
the machine.
The document is too thick or too thin. The minimum and maximum thickness of paper that can be
The document is wrinkled or curled. Curled, wrinkled documents cannot be laminated.
The width of the documen t is too narrow or
too wide.
The document is too small. Documents must be at least 3.5” (90mm) long .
The width of film cartridge is narrower than
inserted document.
There is no more film in the cartridge. Change the film cartridge.The laminator stops while
The document is jammed. Remove the jammed document.
The document length is more than 18.5”
(470mm) long.
The document is too thick or too thin. The minimum and maximum thickness of paper that can be
The document is wrinkled or curled. Curled, wrinkled documents cannot be laminated.
The document i s too small. Docume nts must be at least 2.0” (50mm) wide and 3.5”
The document is not set properly. Set the document properly.
The cutter units are not installed properly. Check to see if the cutter units are installed in the
The cutter units have been d amaged. Replace the cutter units. You can replace the side cutter
Cutter Off Mode is selected. Change the setting of the POWER switch.
The paper sensor is damaged. Please consult your dealer.
Adhesive film has not bee n loaded into the
machine.
The liner of the adhesive film has not been
peeled away.
You are trying to place the adhesive document
on a surface that is dirty or rough.
The film cartridge is not installed prop erly or
an incompatible film cartridge is installed.
The proper AC adapter is not being used. Use a Brother authorized AC adapter.
The film cartridge is not installed prop erly or
an incompatible film cartridge is installed.
The side cutter units are not installed properly. Check the side cutter units and install them properly.
The refill is not installed correctly in the
cartridge.
Remove the document and place it correctly in the
document tray. Press Start again.
used with this machine are 0.004” (17 lbs.) - 0.008” (40 lbs.).
The width of the document mus t be between 2 .0” (50mm)
and 11.7” (297mm).
Install the proper film cartridge.
Press the Start button to continue the process.
used with this machine are 0.004” (17 lbs.) - 0.008” (40 lbs.).
(90mm) long.
machine properly.
units and Corner Cutter Trimmer Tray.
It is not possible to repl ace the to p/bottom c utters. If thes e
cutter units do not work properly, please consult your
dealer.
Use Brother Adhesive Film Roll LC-A12, LC-A9 or LC-A5.
Remove the liner using the crack and peel on the back of
the document.
Wipe the surface clean or try a different surface.
Install the film cartridge properly.
Use Brother authorized film cartridges and film refills only.
Install the film cartridge properly.
Use Brother authorized film cartridge and film refills only.
Check to make sure the refill is installed correctly and
press the Feed button until the creases and bubbles
disappear (should be okay after a few i nches of film h ave
been fed).
- 38 -
Page 41

Specifications
Model number: LX-1200
Processing method: Cold pressure method
Power supply: AC adapter (included)
USA 120V±10% (60Hz)
Output DC 18V 700mA
Min./max. width of document: 2.0” – 11.7” (50mm – 297mm)
Min. length of document: 3.54” (90 mm)
Min./max. thickness of document: 0.004” - 0.008” (0.1mm/3.9MIL – 0.2mm/7.9MIL)
Film: Refillable cartridge film
Film type: LC-D12/D12R (12.0”/A3 width double-side laminate)
LC-A12/A12R (12.0”/A3 width adhesive laminate)
LC-D9/D9R (9.0”/A4 width double-side laminate)
LC-A9/A9R (9.0”/A4 width adhesive laminate)
LC-M9/M9R (9.0”/A4 width magnetic-back laminate)
LC-D5/D5R (4.8”/A6 width double-side laminate)
LC-A5/A5R (4.8”/A6 width adhesive laminate)
LC-M5/M5R (4.8”/A6 width magnetic-back laminate)
Max number of output/cartridge: LC-D12: About 86 sheets/11” ´ 17” paper
(continuous mode) LC-D12R: About 86 sheets/11” ´ 17” paper
LC-A12/A12R: About 20 sheets/11” ´ 17” paper
LC-D9/A9: About 68 sheets/Letter paper
LC-D5/A5 About 121 sheets/4” ´ 6” paper
LC-M9 About 13 sheets/Letter paper
LC-M5 About 21 sheets/4” ´ 6” paper
Document feed speed: 0.98”/sec. (25mm/sec.)
Cutting system: Built-in cutting system with paper size detection
Side cutter units (replaceable)
Top/bottom cutter unit (non-replaceable)
Corner cutter unit (replaceable –
cutter trimmer tray only)
Life of the cutter: Side cutter units About 984 feet (300m)
Top/Bottom cutter unit About 5000 sheets (used with
adhesive with laminate film)
Corner cutter unit (Upper) 20,000 times
Corner cutter trimmer tray 3,000 times
Noise level: 35 dB (stand-by mode)
Unit dimensions: 468mm (W) * 387mm (D) * 273mm (H) (18.3” * 15.2” * 10.8”)
Unit weight (not including film
cartridge and AC adapter) 8.3kg (18.3lbs.)
ENGLISH
- 39 -
Page 42

Index
ENGLISH
A
AC adapter .................................................6,9,38
Adhesive back laminate film............................. 12
Adhesive sticker...............................................22
Alert buzzer ......................................................38
Auto Cross Cutting System..........................14,15
Auto Cut Mode Border......................................15
Auto Cut Mode Cutter Off.........................5,15,38
Auto Cut Mode No Border................................ 15
B
Border............................................................ 8,15
Business card-size paper................................. 13
Buzzer ..............................................................11
C
Cartridge............................................................. 8
Cartridge cover.................................................25
Compatible accessory list...................................6
Control panel................................................... 7,8
Corner cutter.....................................................20
Corner cutter dust box...................................7,21
Corner cutter slot...........................................7,20
Corner Cutter Trimmer Tray.......................... 7.37
Corner cutter unit.............................................. 20
Cut button...........................................................8
Cutter unit....................................................35,38
Cutting line.....................................................8,27
Cutting Position ................................................15
D
DC connector...................................................7,9
Dial...................................................................15
Document guide ............................................7,10
Document jam ..................................................32
Document output................................................ 7
Document supporter......................................7,10
Document tray..................................... 7,10,11,16
Dust box ...........................................................21
F
Feed button.....................................8,19,24,34,37
Film cartridge...................6,22,23,24,25,26,33,38
Film cartridge cover.............................................8
Film refill............................................................22
Film roll ...................................................22,25,26
Film slit...........................................................8,33
Function button...................................................7
M
Margin...............................................................15
N
No Border............................................................8
O
Owner’s manual..................................................6
P
Paper jam..........................................................32
Paper length......................................................13
Paper thickness.................................................13
Paper width.......................................................13
Plastic side holder..........................................8,26
Power dial........................................................8,9
Professional, self-adhesive stickers..................22
R
Roll film..........................................................7,26
Roller...................................................................7
Roller holder....................................7,24,32,35,36
Roller holder lever.................7,23,24,32,34,35,36
Roller unit.......................................................7,24
E
Electrical outlet...................................................9
- 40 -
Page 43

S
Setup..................................................................9
Shutter............................................8,24,25,27,33
Shutter button...........................................8,27,33
Side cutter ........................................................36
Side cutter arm ...................................................7
Side cutter unit..........................................7,35,36
Side holder........................................................26
Start button...............................................9,11,38
Start/Stop button.................................................8
Stickers.............................................................38
Supplemental PC software (CD-ROM) ..............6
T
The Auto Cross Cutting System........................14
The Auto Sheet Feeder ....................................14
Top cover.............................. 7,23,24,32,34,37,38
Top/bottom cutter units.......................................5
Type of paper....................................................13
V
Viewing window..................................................5
ENGLISH
- 41 -
Page 44

Table of Contents
ENGLISH
Appendix (About PrintMasster Gold Software)..............................................................................................43
Getting Started..............................................................................................................................................45
System Requirements...............................................................................................................................45
Starting PrintMaster Gold in Windows 95/98.............................................................................................45
Starting PrintMaster Gold in Windows 3.1x or Windows for Workgroups..................................................45
Installing PrintMaster Gold........................................................................................................................46
Launching PrintMaster Gold after installing...............................................................................................46
Removing PrintmMaster Gold...................................................................................................................46
Reinstalling PrintMaster Gold....................................................................................................................47
Viewing/Printing PrintMaster Gold user's manual..........................................................................................48
How to install the Adobe Acrobat Reader..................................................................................................48
How to open the manual...........................................................................................................................48
The World of PrintMaster Gold......................................................................................................................49
THE HUB SCREEN...................................................................................................................................49
The workspace..........................................................................................................................................50
Menu Bar...................................................................................................................................................50
The Global Toolbar....................................................................................................................................51
Text Toolbar...............................................................................................................................................51
Add Toolbar...............................................................................................................................................52
Modify Toolbar...........................................................................................................................................53
Place Toolbar.............................................................................................................................................53
Status bar..................................................................................................................................................54
- 42 -
Page 45

Appendix (About PrintMaster Gold Software)
Mindscape and PrintMaster are registered trademarks and the Mindscape logo is a trademark of The
Learning Company all logos abd trademarks are the property of Mattel Interactive.
Adobe and Acrobat are trademarks of Adobe system Incorporated.
Windows is a registered trademark of Microsoft corp. in the U.S. and other countries.
IBM is a registered trademark of International Business Machine, Inc.
You don’t need a computer to use the Cool Laminator. However, if you have a computer and printer, the
bundled PC software, PrintMaster Gold makes it easy to produce beautiful projects you'll love to show
around. Simply choose from PrintMaster Gold's selection of beautiful, ready-to-print designs, make any
changes you want, and you're ready to print. It's really that easy!
Note:
Each time when you use PrintMaster, you will have to insert the PrintMaster Gold CD-ROM to your PC.
If you have any technical problems with this software, please contact the technical service department of the
software company The Learning Company.
The list of Technical Support is as follows.
Country Location
USA Online Support Request Form: www.expressit.com
Technical Support Email: help@tlcsupport.com
(Note : the web site is spelled: TLCSUPPORT.COM)
Online Technical Library: www.support.expressit.com
24 Hour Fax: 319-395-9600
Technical Support Call Center: 319-247-3333
Business Hours: 8:00 AM - 6:00 PM (CST)
Mailing Address
Mattel Interactive
1700 Progress Drive
PO Box 100-TS
Hiawatha, IA 52233-0100 USA
Attn: Printmaster 4 Publishing Suite
UK Tech Support e-mail: uksupport@learningco.com
Phone: 09062165432 (Calls cost 25p/min & may be
monitored/recorded. Correct at Apr 1999)
Facsimile: 09062165433 (All calls cost 25p/min.
Correct at Apr 1999)
Mail:
The Learning Company
PO Box 121
Crawley
RH11 9YP
ENGLAND
Attn: Printmaster 4 Publishing Suite
AUSTRALIA Phone: 61-2-9899-2277
Facsimile:61-2-9899-2348
Mail:
Unit 6
372 Eastern Valley Way
Chatswood
NSW 2067
Australia
ENGLISH
- 43 -
Page 46

GERMANY Keltenring 12
ENGLISH
FRANCE 122, avenue de General Leclerc
NETHERLAND PO Box 94791
82041 Oberhaching
Germany
Tel: ++49 89/ 613 092 35
Fax: ++49 89/14827-411
E-mail: hotline@learningco.com
92514 Boulonge Cedex
France
Tel: +33 1 55 38 48 58
E-mail: supportfr@learningco.com
Web: http://www.tlc-edusoft.fr
1090 GT Amsterdam
The Netherlands
Tel: 0900 8524357
E-mail: nsupport@learningco.com
- 44 -
Page 47

Getting Started
Before installing, check the system requirements listed below to make sure your computer is able to work
with PrintMaster Gold.
System Requirements
PrintMaster Gold performs on any computer with the following features:
· IBM PC with a 486DX2 66 MHz (or higher)
· Windows 95, Windows 98, Windows 3.1x/Windows for Workgroups (running in 386 Enhanced Mode)
· 8Mb or more of RAM (16Mb recommended)
· 30Mb or more of free hard disk space
· Double-speed or better CD-ROM drive
· Microsoft mouse or 100% compatible
· Sound Blaster or 100% compatible sound card (recommended)
· Hayes or 100% compatible modem (optional)
Print Support: PrintMaster Gold provides the highest resolution output possible on all back & white or color
printers supported by Windows. Be sure you have enough color ink cartridges before printing. We suggest
you print out your projects on the best paper (usually glossy) your printer will support.
Graphics Support: PrintMaster Gold provides a large selection of spectacular full color CGM, TIFF, PSD,
and JPG images and works with all other popular graphic formats: PCX, TIF, GIF, WMF, BMP, and Kodak
Photo CD.
Font Support: PrintMaster Gold will work with any other True Type fonts that are installed in Windows.
ENGLISH
Starting PrintMaster Gold in Windows 95/98
Follow these step-by-step instructions to install PrintMaster Gold onto your hard disk.
When running under Windows 95 or 98, the PrintMaster Gold CD-ROM provides support for the autorun
feature as described below:
1. Insert the PrintMaster Gold CD-ROM into your CD-ROM drive and the installation program will
automatically start.
2. Proceed to the next section entitled, Installing PrintMaster Gold.
If the Windows 95 or 98 autorun is not currently enabled on your system, then begin the PrintMaster Gold
installation as follows:
1. From the Start menu click Run.
2. At the command line specify the drive letter where the PrintMaster Gold CD-ROM is located and type
INSTALL (Example: D:INSTALL). Press ENTER or click OK to proceed.
3. Proceed to the next section entitled, Starting PrintMaster Gold.
Starting PrintMaster Gold in Windows 3.1x or Windows for Workgroups
Follow these step-by-step instructions to install PrintMaster Gold onto your hard disk.
1. Open the Program Manager's File menu and select Run.
2. Specify the drive where the CD-ROM is located and type INSTALL (Example: D:INSTALL) for the
Command Line and press ENTER or cli ck OK to proceed.
3. Proceed to the next section entitled, Installing PrintMaster Gold.
- 45 -
Page 48

Installing PrintMaster Gold
1. Click the Install button or press ENTER to continue the installation.
ENGLISH
The PrintMaster Gold Installation screen appears with the default drive and directory, which you may
change or accept as shown.
2. Click Continue or press ENTER to install PrintMaster Gold into the default directory, C:\PMW. or Click
the Custom button to install PrintMaster Gold into the drive and directory of your choice.
Launching PrintMaster Gold after installing:
In Windows 95/98:
1. Start Windows in the usual manner. The installation process creates a new menu group for PrintMaster
Gold in the Program section of the Start menu.
2. Click Start on the bottom left side of the window.
3. Click Programs, then open the PrintMaster Gold group and click the PrintMaster Gold icon.
NOTE:
You can also double-click the PrintMaster Gold icon in the PrintMaster Gold group window.
To use the autorun feature in Windows 95/98:
1. Start windows in the usual manner.
2. Insert the PrintMaster Gold CD-ROM. The autorun feature in Windows 95/98 will automatically start the
program.
3. Click Run to proceed past the title screen.
In Windows 3.1x
1. Open the Program Manager and double-click the PrintMaster Gold subdirectory.
2. Double-click the PrintMaster Gold icon.
Removing PrintMaster Gold
To remove an existing version of PrintMaster Gold from your computer, use the Uninstall feature. If you
have a previous version of PrintMaster Gold, we suggest you remove it first.
NOTE:
Removing PrintMaster Gold will also remove any previous projects and address books you have created
in the PMW directory. If you would like to save these, please save the files into another directory.
In Windows 95/98
1. Click the Start button at the bottom left of the screen. A popup menu will appear.
2. Find your PrintMaster Gold group submenu. In it, click the Remove PrintMaster Gold icon.
3. Follow the on-screen instructions. PrintMaster Gold will be removed from your hard drive.
Or,
1. Start Windows 95/98.
2. Insert the PrintMaster Gold CD-ROM.
3. When the PrintMaster Gold opening screen appears, click Remove. Then, follow the on screen
directions.
In Windows 3.1x
1. Find the PrintMaster Gold group on the Program Manager.
2. Double-click the group to open its contents.
3. Double-click the Uninstall icon.
4. Follow the on-screen instruction. PrintMaster Gold will be removed from your hard drive.
- 46 -
Page 49

Reinstalling PrintMaster Gold
Though unlikely, PrintMaster Gold files may become corrupted and the program may not run properly. If so,
you can reinstall PrintMaster Gold, which cleans out all old files and restores original functionality.
In Windows 95/98
1. Start Windows 95/98.
2. Insert the PrintMaster Gold CD-ROM.
3. When the PrintMaster Gold opening screen appears, click Reinstall, then follow the on-screen
instructions.
NOTE:
Reinstalling will delete all of your stored projects in Your Own file.
In Windows 3.1
1. In the PrintMaster Program group, click Install.
2. Follow the onscreen directions. PrintMaster Gold will reinstall all programs and art files over the old files.
NOTE:
Reinstalling will delete all of your stored projects in Your Own file.
ENGLISH
- 47 -
Page 50

Viewing/Printing PrintMaster Gold user's
e
ENGLISH
manual
The full contents of user's manual is stored in the PrintMaster Gold CD-ROM.
Please install the Adobe Acrobat Reader to see the online manual.
How to install the Adobe Acrobat Reader
1. Double click the file Ar32e301 in the Acrobat 3 folder on the CD-ROM.
2. Please proceed the operation.
System Requirements.
X86- based personal computer (386 minimum 486, pentium, or pentium pro recommended)
Microsoft Windows 3.1x, 95, 98
4MB application RAM
5MB hard disk space plus 7MB additional temporary disk space available during installation.
How to open the manual
1. Double click the file manual.pdf in the PrintMaster Gold CD-ROM. The full contents of manual will be
displayed on the screen.
Note
The program Acrobat Reader should in installed on your PC to open the file. Please refer to the abov
section.
- 48 -
Page 51

The World of PrintMaster Gold
This section introduces you to the PrintMaster Gold environment. As soon as you open the program, you'll
notice PrintMaster Gold has several interrelated areas, each with it's own individual purpose and look. Each
area-including the Hub, Art Gallery, Sentiments Gallery, With Help Designer, and Workspace-offers you
different tools to help create a unique card, calendar, or newsletter. If you are a new user, we suggest you
first browse through the features in each area to get a basic understanding of the creative possibilities in
PrintMaster Gold.
THE HUB SCREEN
After you launch PrintMaster Gold, the first thing you will see is the Hub screen. The Hub is where you can
choose the kind of help you want creating a project, choose to work on a Ready Made, view art in the Art
Gallery, or launch your Internet browser and go to the PrintMaster Gold Web site.
Once you have decided on the type of project you would like to work on, click one of the buttons above to go
there. You can always return to the Hub by closing the project you are working on, or clicking Back in the
With Help windows.
Ready Made
Click here to view the
Ready Made Gallery of
projects created by the
PrintMaster team of
Designers.
Y our Pro jects
Click here to go to your
own Ready Made Gallery
folder where you can
view all the projects
you've created.
With Help
Click here to get stepby-step help from the
PrintMaster Designer.
Brand New
Click here to start any
project from scratch.
ENGLISH
Art Gallery
Click here to browse
and choose any of
the thousands of
graphics, drawings,
photos, and pictures
in the Art Gallery.
Address Book
Click here to go to the
Address Book where
you can create your
personal name and
address list.
Internet
Click here to launch
your Internet Browser
and go to the
PrintMaster Gold web
site.
- 49 -
Exit
Click here to quit
the program.
Page 52

The workspace
The Workspace is your own personal drafting board, with all the text, drawing, and editing tools you'll need
to make a beautiful project. Here, you can put the finishing touches on your project, add new pictures, type
ENGLISH
in your personal message, and print.
Below, we will introduce you to the main menu bar and the five toolbars in the Workspace. We suggest you
browse through them to get an idea of the possibilities, then jump right in and start designing.
Menu Bar
Global Toolbar
Text Toolbar
Layout Area
Table Top
Place Toolbar
Status Area
Add Toolbar Modify Toolbar
Menu Bar:
Like most Windows applications, PrintMaster Gold has a menu bar at the top of the screen. The menu bar
provides access to all PrintMaster Gold command features, including File, Edit, View, Format, and Sound
functions.
Use your mouse (or the ALT key) to pull down these menus to see their contents. (See the section entitled:
Mouse and Keyboard Conventions later on in this guide for more details).
- 50 -
Page 53

The Global Toolbar
The Global Toolbar, which is displayed across the top of the Workspace, provides quick mouse access to
some of the most commonly used PrintMaster Gold actions such as closing the current project, going to the
Ready Made Gallery, starting a With Help project, and starting a Brand New project. These buttons are also
one-step alternatives to using the menu bar for saving, printing, viewing Print Preview, cutting, Pasting, and
others. To hide or display the Global toolbar, access the View menu, then Toolbars/Global Bar.
With Help
Click here to go
to the With Help
Close
Click
here to
return
to the
Hub.
Ready Made
Click here to
go to the
Ready Made
Gallery.
Designer, where
you will be
prompted, stepby-step, to
create your own
personalized
project.
Text Toolbar
Brand New
Click here to
start a new
project from
scratch.
Save
Click here to
save the curren t
project. If you
have not already
provided a file
name for your
project, you will
be prompted to
do so at this
point.
Print
Click here
to send
your
project to
your
printer.
Cut
Click here to
remove the
selected text
and/or
graphic to the
Clipboard.
Print
Preview
Click here to
preview your
project before
printing.
Copy
Click here
to copy the
selected
text and/or
graphic to
the
Clipboard.
Check Spelling
Click here to
check the
spelling of the
text in your
project.
Paste
Click here to
insert a copy of
the clipboard
contents into
your project.
Select
Previous
Object
Click here
to select the
object in the
previous
Layer.
Undo
Click here to
quickly undo
changes in
editing,
formatting, and
other actions.
To quickly undo
multiple actions,
click this button
more than
once.
Redo
Click here to
reverse changes
made using the
Undo button.
Select Next
Object
Click here
to select the
object in the
next layer.
ENGLISH
The Text toolbar is where you can make adjustments to the text in your project. Notice that whenever you
click on text in your project, the Text toolbar will be immediately updated. You can also use this toolbar to
bold, italicize, stretch, bend, or align your text.
To hide or display the Text toolbar, access the View menu, then Toolbars/Text Bar.
Font
Shows the name
of the font that is
currently selecte d.
Font size
Shows the size of
the font that is
currently selected.
Bold, Italic, and Underline
To make any character bold,
italic, or underlined, highlight the
character and click on the
appropriate button.
Text Shape
Click here to sele ct one
of many shapes for
your text. Note: your
text shape selection will
affect all of the text in
the active text box.
Stretch text
This option is great for large text.
Click here to have PrintMaster
Gold automatically adjust the text
size to fill the limits of a text box.
Flush Left
Alignment
Aligns the text
in a paragraph
to the left side
of the text box.
Flush Right
Alignment
Aligns the text in
a paragraph to
the right side of
the text box.
Center Alignment
Aligns the text in a
paragraph to the
center of the text
Justified
Alignment
Stretch the
text so it aligns
to both the
right and left
sides of the
- 51 -
Page 54

Add Toolbar
r
The Add toolbar holds all the tools you need to add graphics, sentiments, and your own art to your project.
ENGLISH
To hide or display the Add toolbar, access the View menu, the Toolbar/Add Bar.
Add a picture Click here to go to the PrintMaster Art Gallery. In the Art Gallery, you can
choose from thousands of graphics, pictures, photos, and borders for your project. Select o
Double-click a picture preview in the Art Gallery and your selection will be placed on your
project in the Workspace.
Add a Sentiment Click here to view the thousands of fun, sentimental, warm, and serious
sentiments we've gathered in the Sentiments Gallery. Search by type or keyword for the
sentiment you want, then select the sentiment and it will be inserted into your project
automatically.
Text Box Click here to add text to your project. After clicking this button, your cursor
will turn into a 'text' crosshair. You can then either drag (with the mouse button down)
across the project to create a text box, or just click once on the project and start typing.
Line Click this tool to draw a straight line on your project. To keep your line horizontal,
perpendicular, or at a 45-degree angle, hold down the shift key while you drag the
cursor across your project.
Rectangle Use this tool to create a rectangle on your project. by holding down the shift
key, your box will be held to a perfect square.
Ellipse Use this tool to create an ellipse. By holding down the shift key, your drawi ng wi ll
be held to a perfect circle.
Shape Click on this tool to view a wide selection of shapes you can place on your
- 52 -
Page 55

Modify Toolbar
Use the Modify toolbar to make adjustments to your art and text. With these tools, you can easily change
the color of text and pictures, change line widths, add shadows, and crop pictures.
To hide or display the Modify toolbar, access the View menu, then Toolbars/Modify Bar.
Color Use the tool to add color to your pictures and text. First select the picture or text you
want to color, then select this tool. You will then see a selection of colors t o choose from.
Line Width Use this tool to change the line width of your drawing or the outside border of a
shape.
Line Color Use this tool to change color of the border line of a picture.
Shadow Use this tool to add a shadow to your text or shapes.
Shadow Color Use this tool to choose the color of the shadow behind your text or shapes.
Crop Use this tool to crop out the part of a picture or shape you do not want to see. Just select
the picture you want to crop, click on this tool, and then move the handles on the picture to only
show the part you want to see. Or, you can move the picture within its 'window'. The picture will
still be intact, but you will only be able to see a portion of it.
ENGLISH
Place Toolbar
The Place toolbar is a selection of automatic tools for working with all objects in PrintMaster Gold. With
these tools, you can easily select pictures partially hidden behind another, group together objects you want
to move as one, or flip pictures horizontally and vertically.
To hide or display the Place toolbar, access the View menu, then Toolbars/Place Bar.
Forward One Click this tool once to bring the active object up one level.
Backward One Click this tool once to push the active object back one level.
Send to Front Click this tool to bring the active object to the top of a stack of overlapping
objects.
Send to Back Click this tool to send the active object to the bottom of a stack of overlapping
objects.
Group Use this tool to group several objects together. First select all the pieces you want to
group by clicking on them one by one while holding down the shift key, then click on group. The
grouped objects will now act as one.
Ungroup Click this tool to ungroup several objects you have previously grouped.
Mirror This tool flips the active object horizontally.
Flip This tool flips the active object vertically.
Center on Page This tool centers the active object in the middle (half way between the top and
bottom and left and right sides) of the project.
- 53 -
Page 56

Status bar
The Status toolbar is displayed at the bottom of the PrintMaster Gold window. Use this area to change your
ENGLISH
view of your project or to check the accuracy of your measurements.
To hide or display the Status toolbar, access the View menu, then Toolbars/Status Bar.
View Side Window Click either the
left arrow or the right arrow to see the
different sides of your project. You
can also click directly in the middle of
the View Side window to see a popup menu of different views.
Note: only available in cards,
brochures, and newsletters.
View Size Window Click the
Plus or Minus magnifying glass
to view your project closer or
farther away. You can also click
in the middle to view a pop-up
menu of different viewing sizes.
Note: You can zoom in to your
project in the workspace by typing
the plus (+) key and zoom out by
typing the minus (-) key on the
number pad of your keyboard.
Zoom to Area - This option changes the cursor into a magnifying glass,
allowing you to drag across just the area you want to view close-up.
1. Select this option and position the magnifying glass to the left and above
of the object you want to magnify.
2. Hold down the left mouse button and drag the magnifying glass across
and down the layout screen until the item of focus is enclosed in a box. Then
release the mouse button.
Select Dimensions This window
shows the dimensions of the currently
selected text box or picture. Click on
this window for more size options.
Location This window shows the
cursor's location on the project page.
If a picture is selected, the location
window will show the picture's upper
left corner location. The first number
indicates the cursor or picture's
location on the top ruler, while the
second number shows the cursor or
picture's location on the left ruler.
Click on this window for more
position options.
Rotation Angle This
window displays the
angle of rotation of the
object selected. The
number will increase or
decrease as you rotate
the object. Click on this
window to custom rotate
the object.
- 54 -
Page 57

Page 58

Page 59

Table des matières
Prise en main.................................................................................................................................................. 2
Caractéristiques.............................................................................................................................................. 2
Précautions..................................................................................................................................................... 3
Liste des équipements.................................................................................................................................... 4
Désignation des pièces .................................................................................................................................. 5
Extérieur de la machine ............................................................................................................................. 5
Intérieur de la machine............................................................................................................................... 5
Panneau de commande ............................................................................................................................. 6
Cartouche de film ....................................................................................................................................... 6
Installation ...................................................................................................................................................... 7
Mise sous tension/hors tension de lappareil ............................................................................................. 7
Fonctionnement de la machine ...................................................................................................................... 8
Taille de document.........................................................................................................................................11
Le chargeur automatique ......................................................................................................................... 12
Système de coupe automatique............................................................................................................... 12
Comment définir lemplacement de coupe (création de marges)................................................................. 13
Mode de coupe automatique Border (marge) ....................................................................................... 13
Mode de coupe automatique No Border (sans marge) ......................................................................... 13
Mode de coupe automatique Cutter Off (désactivé)
(pour les documents sensibles ou de forme irrégulière) ..........................................................................13
Mode de coupe automatique - Extra Border (Marge en plus) .................................................................. 14
Comment utiliser le mode continu (Continuous)........................................................................................... 15
Alimentation manuelle et coupe manuelle.................................................................................................... 17
Arrondisseur dangles................................................................................................................................... 18
Collecteur de découpe ............................................................................................................................. 19
A propos des rouleaux de film...................................................................................................................... 20
Contrôle de lapprovisionnement en film.................................................................................................. 20
Remplacement de la cartouche de film ........................................................................................................ 21
Installation/remplacement du rouleau de film dans la cartouche..................................................................23
Emploi dune cartouche 9 (A4) ou 4.8 (A6) ................................................................................................ 27
Entretien périodique et dépistage des pannes ............................................................................................. 30
Entretien périodique ................................................................................................................................. 30
Bourrages papier...................................................................................................................................... 30
Remplacement des lames de coupe verticale ......................................................................................... 33
Remplacement du plateau de coupe darrondis....................................................................................... 35
Dépistage des pannes.................................................................................................................................. 36
Spécifications ............................................................................................................................................... 38
FRANÇAIS
- 1 -
Page 60

Prise en main
Merci d’avoir acheté une machine à plastifier à froid Cool Laminator Brother. Cette machine est
spécialement conçue pour être facile d’emploi mais vous pourrez tirer pleinement parti de toutes ses
fonctionnalités en prenant quelques instants pour lire ce guide d’utilisation.
Caractéristiques
· Suivant le type de film utilisé, cette machine peut transformer une variété de documents en
autocollants, en feuilles plastifiées sur deux faces, etc. d’aspect professionnel.
· Outre les tirages obtenus avec votre ordinateur ou votre machine à traitement de texte, vous pouvez
FRANÇAIS
plastifier des feuilles écrites à la main, des coupures de presse, des photographies, des télécopies ou
tout autre type de document.
· Vos documents sont ainsi parfaitement plastifiés pour les protéger de l’eau, de la poussière, du
jaunissement et des déchirures et pour leur donner un aspect de qualité professionnel .
· Cette machine ne nécessite aucune chaleur. Elle met en oeuvre une méthode de pression à froid
inédite et des adhésifs spécialement formulés pour rendre l’opération sûre, simple et rapide.
· Vous pouvez commencer la plastification dès la mise sous tension de l’appareil (il n’est pas requis de
préchauffage).
· La machine est dotée d’un chargeur automatique et d’un mécanisme de coupe automatique. Une
fonction d’auto-détection de largeur et de longueur permet de garantir le dimensionnement précis de
vos documents grâce au mécanisme intégré.
· Le film est facile à installer et à remplacer.
· Prise en charge d’une largeur maximale de 11,7” (A3 – 297 mm).
- 2 -
Page 61

Précautions
Pour éviter les risques de blessure et pour ne pas endommager l’appareil, veuillez noter les mises en
garde et les avertissements contenus dans le présent guide. Ils y figurent pour votre sécurité et pour vous
signaler des manipulations susceptibles d’endommager votre machine.
AVERTISSEMENT :
- Ne tentez pas de réparer ou de démonter la machine vous-même. La garantie sera annulée si
cette machine n’est pas révisée par un technicien agréé.
- Ne mettez pas les doigts sur les lames à l’intérieur de la machine.
ATTENTION :
- Ne tirez pas sur le câble d’alimentation électrique. Pour débrancher la machine, tirez sur la
prise et non sur le câble.
- N’exposez pas la machine à un ensoleillement direct ou à une autre source de chaleur, à une
humidité excessive ou à la poussière.
- Si vous renversez du liquide sur la machine, débranchez son câble d’alimentation électrique
et contactez un technicien agréé.
- Débranchez la machine en cas d’orage.
- Ne posez pas d’objets lourds sur la machine.
- N’obstruez ni l’arrière ni les pans latéraux de la machine afin d’éviter toute surchauffe.
- Pour nettoyer la machine, employez un chiffon propre et sec (n’employez ni produits
chimiques, ni diluants ou détergents).
- Pour éviter toute perturbation électrique, ne placez pas la machine près d’un récepteur radio
ou d’un poste de télévision.
- Ne mettez pas la machine hors tension en cours d’opération sauf si elle présente un
problème de fonctionnement.
- Lors de la plastification de documents délicats ou de forme irrégulière, désactivez le mode de
coupe automatique.
- Mettez la machine hors tension si elle présente un problème de fonctionnement.
- Si vous utilisez un film de plastification à dos adhésif, n’apposez pas le tirage plastifié sur
l’épiderme ou sur des surfaces délicates.
- Eloignez les documents plastifiés des jeunes enfants, afin d’éviter tout problème d’ingestion.
- Le film plastifié contient des substances résistantes aux ultraviolets. Toutefois, la couleur des
documents pourra passer si les documents sont imprimés à l’encre liquide. Il est
recommandé d’utiliser de l’encre de type solide pour empêcher les couleurs d’un document
de passer.
- Désactivez le mode de coupe automatique lors de la plastification de documents importants
ou délicats.
- N’insérez pas d’objets de valeur ou précieux dans la machine.
- Un document peut se gondoler ou se détériorer s’il est placé sous un objet lourd.
- Ne placez pas de documents plastifiés
cassettes. Vous risqueriez d’altérer les données contenues sur ces supports.
- D’après les termes du contrat avec Xyron, l’achat ou toute autre acquisition de ce produit ne
confère aucun droit ou autorisation d’utiliser le produit dans le domaine de la rétroreflexion.
- Le fait de plastifier du papier thermique est susceptible d’entraîner un jaunissement de
l’impression.
- Une fois un document plastifié, il peut paraître poisseux au toucher. Cela est dû à la silicone
utilisée dans le traitement du film. Cet effet s’estompera avec l’exposition à l’air.
- Nous vous déconseillons de plastifier des photographies que vous ne pouvez pas remplacer.
- Renseignez-vous auprès des autorités légales de votre région en ce qui concerne le
recyclage de la machine et de ses consommables, pour de plus amples renseignements.
à dos magnétique à proximité de disquettes ou de
FRANÇAIS
- 3 -
Page 62

Liste des équipements
1 LX-1200 1
2 Cartouche de film* 1 (Laminé double face)
3 Adaptateur secteur 1
4 Guide d’utilisation 1
5 Liste d’accessoires compatibles 1
6 Logiciel PC auxiliaire (CD-ROM) 1
7 Adaptateur de cartouche 1
* Une cartouche de film est déjà installée dans la machine.
FRANÇAIS
1
4
2 3
5 6
- 4 -
Page 63

Désignation des pièces
Extérieur de la machine
Connecteur DC Situé à gauche au dos de la machine. Pour le branchement de
l’adaptateur secteur.
Capot supérieur Pour remplacer la cartouche de film et les lames de coupe.
Fenêtre de visualisation Située sur le capot supérieur. Permet de vérifier que le type de
film adéquat est chargé dans l’appareil.
Porte-documents L’endroit où vous devez placer les documents à plastifier.
Support de document Soutient le document à insérer.
Guide de document Permet d’aligner le bord gauche du papier pour garantir
l’insertion correcte du document.
Cache de porte-documents Se soulève facilement pour retirer les documents de petite taille.
Panneau de commande Interrupteur d‘alimentation et zone des touches de fonction.
Sortie de document Endroit où le document est éjecté de la machine.
Fente de coupe d’arrondis Vous permet de couper les coins de votre document à l’issue de
la plastification. Les coins d’un document sont coupés
automatiquement lorsqu’il est inséré dans la fente de coupe
d’arrondis.
Plateau de coupe d’arrondis Le coin du document plastifié est placé sur ce plateau afin de le
positionner dans la fente de coupe d’arrondis.
Collecteur de découpe Recueille les découpes de coupe d’arrondis.
Adaptateur secteur S’enfiche dans une prise électrique et dans le connecteur DC de
la machine.
Intérieur de la machine
Cartouche de film Contient le rouleau de film. L’étiquette figurant sur la cartouche
permet d’identifier le type de film.
Cette machine permet l’emploi de cartouches LC d’une largeur
12,0 pouces (A3), 9,0 pouces (A4) ou 4,8 pouces (A6).
Levier de blocage Permet de bloquer/débloquer le porte-rouleau.
Porte-rouleau Sert de support au rouleau.
Bras de lame verticale Bras de la lame de coupe verticale.
Lames de coupe verticale Lames destinées à la coupe verticale.
Lames de coupe sup/inf. Lames destinées à la coupe supérieure/inférieure (horizontale).
Rouleau Alimente le document dans l’appareil.
FRANÇAIS
Guide de document
Cache de
porte-documents
Connecteur DC
Capot supérieur
Support de document
Panneau de commande
Sortie de document
Porte-documents
Fenêtre de visualisation
Collecteur de découpe
Fente de coupe
en coin
Plateau de coupe
d’arrondis
Lames de coupe
supérieure/inférieure
- 5 -
Bras de lame latérale
Cartouche de film
Porte-rouleau
Rouleau
Lames de
coupe latérale
Bouton de blocage
Page 64

Panneau de commande
BOUTON D’ALIMENTATION Met la machine sous tension ou hors tension.
Touche Cut Coupe le document à la position courante.
Touche Feed Permet d’alimenter le film plastifié et/ou le document.
Touche Continuous Servez-vous de cette touche pour plastifier plusieurs documents.
Extra Border (Marge en +) Servez-vous de cette touche pour créer une marge
Touche Start Permet de lancer une opération.
Touche Stop Permet d’arrêter une opération.
Border (marge) La machine coupera le film en laissant une marge d’environ
FRANÇAIS
No Border (sans marge) La machine coupera le film en laissant une marge d’environ
Cutter Off Désactive le mode de coupe automatique.
Error Signale une anomalie de la machine.
supplémentaire sur un côté de votre document (par ex. la zone
de perforation à 3 trous).
0,18” (4,5 mm) sur tous les bords du document - (laisse une
marge de film plastifié).
0,06” (1,5 mm) sur tous les bords du document – (coupe le film
plastifié au ras du document.)
Error
Cartouche de film
Ligne de coupe Coupe l’excès de film au niveau de cette ligne pour permettre
Volet Soulève le volet pour ouvrir le couvercle de la cartouche de film.
Bouton de volet Verrouille le couvercle de la cartouche de film et ramène le volet
Fente de film Le bord supérieur du film apparaît dans la fente.
Bouton de volet
Cut Continuous
Feed
Extra Border
StartStop
POWER
Cutter Off
d’installer la cartouche correctement.
à sa position d’origine.
Volet
Recharges de film en option
ONON OFF
Border
No Border
Fente de film
Ligne de coupe
- 6 -
Page 65

Installation
Mise sous tension/hors tension de
l’appareil
(1) Branchez la prise de l’adaptateur secteur au
connecteur DC.
FRANÇAIS
(2) Branchez l’adaptateur secteur à une prise
électrique.
POWER
StartStop
Cutter Off
ONON OFF
Border
No Border
de commande en position Cutter Off, Border
ou No Border. Le témoin vert au dessus de la
touche Start s’allume. Dans le cas contraire,
vérifiez le branchement de l’adaptateur
secteur.
Pour mettre la machine hors tension, tournez
le bouton d’alimentation sur POWER OFF.
AVERTISSEMENT :
Ne branchez pas la machine à une prise électrique tant qu’elle n’est pas entièrement
assemblée.
N’essayez pas de démonter ou de réparer la machine vous-même. Toute révision est à confier à
un technicien agréé. La garantie sera annulée si la machine n’est pas révisée par un technicien
agréé.
Ne mettez jamais les doigts sur la surface des lames au moment de l’installation de la cartouche
de film.
ATTENTION :
Ne mettez pas la machine hors tension lors d’une opération de plastification.
La machine ne doit être mise hors tension en cours d’opération que si elle présente une
anomalie de fonctionnement.
(3) Amenez le bouton d’alimentation du panneau
- 7 -
Page 66

Fonctionnement de la machine
Confection de pochettes, d’autocollants, etc.
FRANÇAIS
(1) Ouvrez le support de document.
(2) Chargez le document à plastifier sur le porte-
documents. En principe, les documents sont
à charger face imprimée dessus.
CONSEIL
Les documents placés face imprimée dessous
sur le porte-documents permettent la création
d’autocollants à apposer sur une fenêtre.
(3) Alignez le papier à droite et faites coulisser le
guide de document jusqu’à ce qu’il soit en
contact avec le bord gauche du document.
Positionnez toujours le bord le plus long du
document sur la droite.
- 8 -
Page 67

Start
Cutter Off
StartStop
POWER
ONON OFF
Border
No Border
Cutter Off
POWER
ONON OFF
Border
No Border
(4) Amenez le bouton d’alimentation sur Cutter
Off, Border ou No Border afin de sélectionner
le mode de coupe souhaité.
Voir la rubrique “Comment définir
l’emplacement de coupe” à la page 13.
(5) Appuyez sur Start.
Le document est alimenté dans la machine.
Celle-ci lance automatiquement la détection
des bords supérieurs et latéraux du
document. La touche Start clignote en vert
pendant l’opération de plastification. Le bord
supérieur du film sera coupé
automatiquement .
Nota
La machine émet un bip sonore si le
document n’est pas chargé correctement.
Rechargez le document et appuyez de
nouveau sur la touche Start.
FRANÇAIS
(6) Le document est transmis vers la sortie de
document pour être éjecté une fois
l’opération terminée.
ATTENTION :
N’essayez pas de retirer ou de tirer sur le document une fois le processus lancé.
Ne mettez pas la machine hors tension en cours d’opération sauf si elle présente une anomalie
de fonctionnement.
Ne mettez pas le document suivant sur le porte-documents tant que l’opération en cours n’est
pas terminée, sauf si vous avez sélectionné le mode continu (Continuous). Veuillez consulter les
instructions traitant du mode continu à la page 15.
Nota
Pour arrêter l’opération, appuyez sur Stop. Appuyez de nouveau sur Start pour relancer l’opération ou
servez-vous des touches Feed et Cut pour alimenter/couper le document en mode manuel.
Pour éviter de couper votre document au mauvais endroit accidentellement, vous devez appuyer sur la
touche Cut et la maintenir enfoncée pendant plus de 0,5 seconde.
- 9 -
Page 68

FRANÇAIS
s
e
e
u
e
r
Nota
Si vous utilisez un film plastifié à do
magnétique, vous pourrez apposer l
document plastifié sur n’importe quell
surface métallique. La surface magnétique d
film est dotée d’une pellicule qui doit êtr
décollée avant d’apposer votre document su
la surface métallique, comme illustré.
Nota
Si vous utilisez un film laminé à dos adhésif,
le dos du document plastifié sera enduit
d’une pellicule à décoller.
Veuillez décoller la pellicule comme illustré
au moment d’apposer l’autocollant.
- 10 -
Page 69

Taille de document
z
La surface de document que vous désirez plastifier ne doit pas être plus longue (ou plus étroite) que la
surface de plastification acceptée par votre machine. La largeur du document doit être comprise entre 2,0”
et 11,7” (50 et 297 mm). La longueur minimum pour le papier doit être de 3,5” (90 mm). L'épaisseur du
papier doit être comprise entre 17 lbs. et 40 lbs. (0,004” et 0,008”). Un seul document à la fois peut être
chargé dans le chargeur de documents.
Type de cartouche
Maximum 11,7” (297 mm) 8,5” (216 mm) 4,3” (108 mm)Largeur du papier
Minimum 2,0” (50 mm) 2,0” (50 mm) 2,0” (50 mm)
Longueur du papier Minimum 3,5” (90 mm) 3.5” (90 mm) 3,5” (90 mm)
Epaisseur du papier 0,004” – 0,008” 0,004” – 0,008” 0,004” – 0,008”
Le papier au format de carte de visite est à insérer verticalement dans la machine comme illustré cidessous.
Nota
Si vous introduisez un document de petit formant dans la machine de façon incorrecte, vous pouve
l’ôter facilement en soulevant le cache de porte-documents comme illustré.
Cartouche 12,0” (A3) Cartouche 9,0” (A4)
Cartouche 4,8” (A6)
FRANÇAIS
Lors de la plastification d’un document de plus de 18.5” de long (470 mm), la machine s’arrête une fois le
document plastifié sur 18.5” (470 mm). Pour poursuivre l’opération, il vous suffit d’appuyer sur Start.
ATTENTION :
N’introduisez pas de documents gondolés, écornés, froissés ou déchirés dans la machine. Les
documents ne doivent présenter ni agrafe, ni trombone, ni trace de colle, de fluide correcteur ou
de ruban adhésif. N’introduisez pas de supports en tissu dans la machine.
- 11 -
Page 70

Le chargeur automatique
Le chargeur automatique alimente automatiquement votre document dans la machine. Veuillez noter
toutefois que vous ne pourrez pas mettre plusieurs feuilles à la fois dans le chargeur. Insérez les feuilles
une par une.
Système de coupe automatique
Le système de coupe automatique détecte automatiquement la largeur et la longueur du document introduit
dans la machine. Le mécanisme intégré coupe chaque bord du document avec précision.
FRANÇAIS
- 12 -
Page 71

Comment définir l’emplacement de
coupe (création de marges)
Le système de coupe automatique détecte automatiquement la taille de votre document et coupe chaque
bord. L’emplacement de la coupe peut être ajusté afin de créer une marge sur chaque bord du document
plastifié
Mode de coupe automatique – Border (marge)
Ce mode convient tout particulièrement à la confection de pochettes ou pour protéger des
documents contre l’eau ou la poussière.
Pour créer une marge sur chaque bord de votre document…
(1) Tournez le bouton d’alimentation pour l’amener sur Border.
(2) Placez le document sur le porte-documents et appuyez sur Start. Le document sera coupé en laissant
.
une marge d’environ 0,18” (4,5 mm) sur chaque bord du papier.
Position de coupe
Sup. Bord s u p . du papier 0,18” ± 0,06” (4,5 mm ±1,5 mm)
Inf. Bord i n f . d u papier 0,18” ± 0,06” (4,5 mm ±1,5 mm)
Droite Bo r d d r o i t du papier 0,18” ± 0,06” (4,5 mm ±1,5 mm)
Gauche Bord gauche du papier 0,18” ± 0,06” (4,5 mm ±1,5 mm)
0,18” (4,5 mm)
Document
FRANÇAIS
0,18” (4,5 mm)
Mode de coupe automatique – No Border (sans marge)
Ce mode convient tout particulièrement à la confection d’adhésifs.
Pour produire un document sans marge sur les bords …
(1) Tournez le bouton d’alimentation pour l’amener sur No Border.
(2) Placez le document sur le porte-documents et appuyez sur Start. Le document sera coupé sans laisser
de marge (à environ 0,04” – 0,06” (1,0 mm - 1,5 mm) de chaque bord du document).
Position de coupe
Sup. Bor d sup. d u papier 0,06” ± 0,06” (1,5 mm ± 1,5 mm)
Inf. Bor d i n f . du papier 0,06” ± 0,06” (1,5 mm ± 1,5 mm)
Droite Bord dr o i t d u papier 0,04” ± 0,06” (1,0 mm ± 1,5 mm)
Gauche Bord gauche du papier 0,04” ± 0,06” (1,0 mm ± 1,5 mm)
Document
Mode de coupe automatique – Cutter Off (désactivé)
(pour les documents sensibles ou de forme irrégulière)
Sélectionnez ce mode pour empêcher la coupe d’une portion quelconque du document pendant la
plastification.
(1) Lorsque le mode de coupe automatique est désactivé (Cutter Off), la machine plastifie le document
sans couper les bords. Le document est simplement plastifié puis éjecté de l’appareil.
(2) Appuyez sur la touche Cut pour couper le document manuellement.
- 13 -
Page 72

Mode de coupe automatique - Extra Border (Marge en plus)
Ce mode convient tout particulièrement pour la confection de documents à des fins d’archivage.
La marge supplémentaire sera toujours créée sur la dernière portion du document alimentée dans
la machine. Vous pouvez opter pour une marge supplémentaire de 0,8” (20 mm) ou de 1,2” (30 mm).
Modifiez la largeur de la marge supplémentaire en appuyant sur la touche Extra Border. La première
fois que cette touche est appuyée, la marge supplémentaire est réglée sur 0,8” (20 mm), la
deuxième fois, elle est réglée sur 1,2” (30 mm) et la fois suivante l’option de marge supplémentaire
est désactivé
FRANÇAIS
- 14 -
Page 73

Comment utiliser le mode continu
(Continuous)
Le mode continu vous permet de réduire la quantité de film résiduel entre chaque document quand vous en
plastifiez plusieurs à la suite.
(1) Placez le premier document sur le porte-
1
documents et appuyez sur la touche
Continuous. Le témoin vert Continuous
s’allume.
FRANÇAIS
(2) Appuyez sur Start. L’appareil lance la
POWER
StartStop
Cutter Off
2
ONON OFF
Border
No Border
plastification du document. Une fois la fin du
document détectée, l’opération est
suspendue et l’appareil émet un bip sonore.
(3) Placez le document suivant sur le porte-
documents. Il sera alimenté automatiquement
au bout d’environ 7 secondes.
1
- 15 -
Page 74

Nota
S’il n’est pas mis de nouveau document sur le porte-documents au bout de 7 secondes, la machine
redémarrera et finira la plastification du document en cours.
En mode continu, vous n’avez pas besoin de réappuyer sur Start entre chaque document, cela évite un
temps d’attente de 7 secondes en mode normal.
Si le bouton Start est pressé après avoir placé le document suivant dans le chargeur, la plastification
démarrera sans avoir à attendre 7 secondes.
(4) Répétez l’étape (3) jusqu’à ce que tous vos documents soient plastifiés. Si un document n’est pas mis
sur le porte-documents dans les 7 secondes, l’appareil finira la plastification du document en cours et
FRANÇAIS
reviendra au mode normal.
Nota
Vous ne pouvez utiliser les modes Alimentation ou Bordures en mode continu.
Ne pas remplacer les cutters en mode continu.
- 16 -
Page 75

Alimentation manuelle et coupe
manuelle
Pour une parfaite maîtrise, votre machine à plastifier à froid vous permet d’alimenter et de couper le
document manuellement.
(1) Placez le document sur le porte-documents.
FRANÇAIS
(2) Appuyez sur Feed pour alimenter le
document manuellement. La touche Feed
est auto-répétitive. Le document continuera
d’être alimenté tant que la touche Feed ne
sera pas relâchée.
(3) Appuyez sur touche Cut. Le document sera
coupé à la position courante.
Nota
-Par sécurité, la posiiton de coupe exacte n’est
pas visible depuis l’extérieur de la machine.
-Pour éviter toute coupe accidentelle du
document, il vous est conseillé de
n’appuyer
sur touche Cut qu’une fois le document
éjecté de la machine.
-Ne faites jamais usage de force pour sortir
un document de la machine. En cas de
besoin, employez des ciseaux.
- 17 -
Page 76

Arrondisseur d’angles
A l’issue de la plastification, vous pouvez couper chaque coin du document.
FRANÇAIS
(1) Insérez un coin du document dans la fente
de coupe d’arrondis.
(2) La machine coupe automatiquement le coin
du document.
(3) Retirez le document de la fente.
Nota
L’épaisseur maximale du document d’origine (avant plastification) admissible par la lame de coupe en
coin est de 0,008” (0,2 mm).
Ne pas utiliser l’arrondisseur d’angle avec le film à dos magnétique.
- 18 -
Page 77

Collecteur de découpe
Les découpes produites par la lame de coupe
d’arrondis sont recueillies dans le collecteur de
découpe qui se trouve juste en dessous de la
fente de coupe d’arrondis. Tirez le collecteur vers
vous pour jeter les découpes et remettez le
collecteur à sa position d’origine.
FRANÇAIS
- 19 -
Page 78

A propos des rouleaux de film
Il existe différents types de rouleaux de film spécialement conçus pour répondre à vos besoins.
Cet appareil peut prendre en charge des cartouches d’une largeur 12,0 pouces (A3), 9,0 pouces (A4) ou
4,8 pouces (A6).
N’utilisez que des cartouches ou recharges de film agréées Brother. Le logo ci-dessus figure sur tous les
FRANÇAIS
emballages des cartouches ou recharges de film compatibles avec la machine. Brother décline toute
responsabilité en cas de problème découlant de l’usage de fournitures non agréées.
Suivant le type de film utilisé, cette machine transforme toute une variété de documents en autocollants, en
feuilles plastifiées double face, etc. d’aspect professionnel. Veuillez consulter la liste d’accessoires
compatibles livrée avec la machine pour obtenir un complément d’information à ce sujet.
Cette machine est livrée avec une cartouche de film de plastification double face. Pour vous procurer
d’autres types de rouleaux de film, veuillez consulter votre revendeur local Brother.
Nota
Pour pouvoir utiliser des cartouches au format 9,0” (A4) ou 4,8” (A6) avec cette machine, vous devez
d’abord installer l’adaptateur de cartouche. Veuillez vous reporter à la page 27.
Contrôle de l’approvisionnement en film
Un indicateur rouge apparaît lorsque le rouleau de film touche à sa fin. Veuillez remplacer le rouleau de film
dès que vous constatez la présence de cet indicateur. La bande rouge apparaît en principe à environ 39,4”
(1000 mm) de la fin du rouleau.
Si la bande rouge apparaît, remplacez le film immédiatement. Pour remplacer la cartouche de film, veuillez
consulter la rubrique “Remplacement de la cartouche de film” à la page 21 ou “Installation/remplacement
du rouleau de film dans la cartouche” à la page 23.
La cartouche de départ imprime approximativement 11 feuilles format lettre américain (direction paysage)
en mode continu.
Un rouleau regulier de laminage double face reproduit approximativement 168 feuilles format lettre
américain (direction paysage) en mode continu.
Veuillez consulter la liste d’accessoires compatibles pour obtenir un complément d’information sur les
autres fournitures.
Nota
Un indicateur rouge apparaît lorsque le rouleau de film touche à sa fin. Veuillez remplacer le rouleau de
film dès que vous constatez la présence de cet indicateur rouge. Cet indicateur rouge peut être décollé
de votre document sans l’endommager.
Si vous essayez de plastifier un autre document alors que l’indicateur rouge est visible, vous risquez
d’endommager et/ou de couper votre document.
- 20 -
Page 79

Remplacement de la cartouche de film
AVERTISSEMENT :
Ne mettez jamais les doigts sur la surface des lames lors de l’installation ou du remplacement
de la cartouche de film.
(1) Tournez le bouton d’alimentation sur Off pour
mettre la machine hors tension et ouvrez le
capot supérieur.
FRANÇAIS
(2) Relevez les leviers de blocage et soulevez le
porte-rouleau.
(3) Sortez la cartouche de film avec précaution.
Nota
Pressez le bouton Cut pour rembobiner la
cartouche de film si nécessaire.
- 21 -
Page 80

FRANÇAIS
(4) Installez la nouvelle cartouche de film avec
soin.
Nota
-Vérifiez que le volet de la cartouche est
complètement fermé au moment de
l’installation de la cartouche.
-Vérifiez la position du bord supérieur du film
avant d’installer la cartouche. Il doit être
aligné avec la ligne de coupe de la
cartouche. Au besoin, coupez tout excès de
film.
-Assurez-vous que l’extrémité du film s’insère
bien le long du rouleau situé le plus bas.
(5) Ramenez le porte-rouleau à sa position
d’origine et abaissez les leviers de blocage
comme illustré jusqu’à ce que le porterouleau s’enclenche en position. Vous
entendrez un clic.
(6) Rabattez le capot supérieur.
(7) Tournez le bouton d’alimentation sur Cutter
Off, Border ou No Border. Appuyez sur la
touche Feed jusqu’à ce que vous puissiez
voir le bord du film afin de bien tendre le film.
Nota
- L’état de la cartouche installée peut être contrôlé par le biais de la fenêtre de visualisation ménagée
dans le capot supérieur.
- Stockez les cartouches de film au-dessous de 45°C (113º F).
- 22 -
Page 81

Installation/remplacement du rouleau de
film dans la cartouche
Les cartouches peuvent être recyclées en remplaçant le rouleau de film. Veillez à n’utiliser que des
recharges de film LC agréées Brother. Rechargez les cartouches en suivant les instructions suivantes :
(1) Sortez la cartouche de film de l’appareil.
FRANÇAIS
(2) Poussez le volet de la cartouche de film en
suivant les flèches jusqu’au blocage et
ouvrez délicatement le couvercle de la
cartouche.
(3) Sortez le rouleau de film usagé de la
cartouche.
- 23 -
Page 82

FRANÇAIS
e
s
(4) Sortez le rouleau de film neuf de son
emballage scellé. En tenant le rouleau par
les poignées en plastique de couleur jaune,
installez le film dans la cartouche comme
illustré ci-contre. Le film ne peut être inséré
dans la cartouche que dans un sens.
Nota
Retirez la feuille qui sépare les rouleaux d
films avant d'installer les rouleaux.
Ne tenez pas les rouleaux proprement dit
lorsque vous les installez.
(5) Otez les poignées latérales (de couleur
jaune) du rouleau de film en faisant pression
sur les bossages et en tirant pour extraire les
poignées.
(6) Refermez la cartouche de film. Vérifiez que le
bord du film dépasse par la fente de la
cartouche.
- 24 -
Page 83

(7) Appuyez sur les boutons pour fermer le volet.
(8) Vérifiez la position du bord supérieur du film.
Il doit être aligné avec la ligne de coupe de la
cartouche.
Au besoin, coupez tout excès de film avant
d’installer la cartouche.
FRANÇAIS
(9) Installez la cartouche dans la machine.
(10)Ramenez le porte-rouleau à sa position
d’origine et abaissez les leviers de blocage
comme illustré. Vous entendrez le porterouleau s’enclencher en place.
- 25 -
Page 84

FRANÇAIS
(11) Rabattez le capot supérieur.
(12)Tournez le bouton d’alimentation sur Cutter
Off, Border ou No Border. Appuyez sur la
touche Feed jusqu’à ce que vous puissiez
voir le bord du film afin de bien tendre le film.
ATTENTION :
Pour empêcher le film de sécher, n’ouvrez l’emballage scellé qu’une fois que vous êtes prêt à
installer le film dans la cartouche.
- 26 -
Page 85

Emploi d’une cartouche 9” (A4) ou 4,8”
(A6)
(1) Tournez le bouton d’alimentation sur OFF et
ouvrez le capot supérieur.
FRANÇAIS
(2) Relevez les leviers de blocage et soulevez le
porte-rouleau.
(3) Retirez la cartouche de film avec précaution.
- 27 -
Page 86

FRANÇAIS
9,0”
(A4)
(4) Positionnez l’adaptateur de cartouche dans
l’appareil comme illustré.
(5) Placez la cartouche 9,0” (A4) ou 4,8” (A6)
dans l’appareil.
En cas d’emploi d’une cartouche 4,8” (A6),
alignez la cartouche avec le côté droit de
l’appareil.
4,8”
(A6)
(6) Ramenez le porte-rouleau à sa position
d’origine et abaissez les leviers de blocage
comme illustré. Vous entendrez le porterouleau s’enclencher en position. Appuyez
encore sur le porte-rouleau afin de
l’immobiliser dans son logement.
- 28 -
Page 87

(7) Rabattez le capot supérieur.
(8) Tournez le bouton d’alimentation sur Cutter
Off, Border ou No Border. Appuyez sur la
touche Feed jusqu’à ce que vous puissiez
voir le bord du film afin de bien tendre le film.
FRANÇAIS
- 29 -
Page 88

Entretien périodique et dépistage des
pannes
Vous garderez votre machine en parfait état de marche en la nettoyant régulièrement.
Entretien périodique
Evitez les petits objets et détritus
Prenez soin de ne rien laisser entrer dans la machine, surtout pas d’objets métalliques tels que des
trombones ou des agrafes.
FRANÇAIS
Nettoyage
N’employez jamais de produits volatils tels que des diluants ou de l’alcool à brûler pour nettoyer la surface
extérieure de la machine. Utilisez un chiffon doux légèrement imprégné d’une solution de détergent doux.
Bourrage papier
La machine émet un bip sonore si un document se coince en cours d’alimentation dans le chargeur.
Un message d’erreur clignotera en même temps qu’un bip sonore.
Elimination d’un bourrage
(1) Mettez la machine hors tension.
(2) Ouvrez le capot supérieur.
(3) Relevez les leviers de blocage et soulevez le
porte-rouleau.
- 30 -
Page 89

(4) Retirez la cartouche de film de la machine.
Nota
Le cas échéant, employez des ciseaux ou
la touche Cut pour extraire le film coincé et
retirer la cartouche de film.
(5) Retirer la cartouche et l’ouvrir pour dégager
le document qui s’y trouve.
Nota
Ne tirez pas sur le document depuis le côté
opposé.
FRANÇAIS
(6) Retirez tout excès de film en coupant le long
de la “ligne de coupe” gravée sur la
cartouche avant de réinstaller la cartouche
dans la machine.
Nota
Vérifiez que le volet de la cartouche est bien
fermé. S’il est ouvert, poussez le bouton du
volet pour le fermer.
(7) Installez la cartouche de film dans la
machine.
Nota
Vérifiez que le film est installé correctement.
- 31 -
Page 90

FRANÇAIS
(8) Ramenez les leviers de blocage à leur
position d’origine jusqu’à ce que le porterouleau s’enclenche en position.
(9) Rabattez le capot supérieur.
(10)Pour tendre le film, appuyez sur la touche
Feed jusqu’à ce que le bord du film devienne
visible.
ATTENTION :
Ne mettez pas les doigts sur la surface des lames lors du retrait d’un document coincé.
Procédez avec prudence durant l’élimination d’un bourrage afin d’éviter tout risque de blessure.
- 32 -
Page 91

Remplacement des lames de coupe verticale
La performance de coupe diminuera au fil de l’usure des lames ou lorsqu’une couche d’adhésif se sera
déposée sur les lames. Suivez les consignes ci-dessous pour remplacer les lames de coupe.
ATTENTION :
Ne mettez pas les doigts sur la surface de la lame au moment du remplacement des lames de
coupe. Manipulez les lames avec précaution pour éviter tout risque de blessure.
Lames de coupe verticale (SC-2)
(1) Eteignez la machine.
(2) Ouvrez le capot supérieur.
FRANÇAIS
(3) Relevez les leviers de blocage et soulevez le
porte-rouleau.
(4) Poussez la languette jaune de la lame de
coupe verticale pour la débloquer comme
illustré.
- 33 -
Page 92

FRANÇAIS
(5) Faites coulissez la lame de coupe verticale
usagée vers la droite/la gauche. Retirez la
lame de coupe verticale.
(6) Faites coulisser la lame de coupe verticale
neuve de façon à l’immobiliser dans le portelame de coupe verticale.
(7) Relevez la languette pour verrouiller la lame
de coupe verticale en position.
(8) Ramenez les leviers de blocage à leur
position d’origine.
Nota
Si les lames de coupe latérale ne sont pas
installées correctement, le porte-rouleau ne
peut pas regagner sa position d’origine.
Veillez à ce que la cartouche de film soit
positionnée correctement dans son
logement au moment de remettre le porterouleau à sa position d’origine.
- 34 -
Page 93

(9) Rabattez le capot supérieur.
(10)Pour bien tendre le film, appuyez sur la
touche Feed jusqu’à ce que le bord du film
devienne visible.
Remplacement du plateau de coupe d’arrondis
La performance de coupe diminuera au fil de l’usure des lames.
Vous pouvez l’améliorer en remplaçant le plateau de coupe d’arrondis.
Le plateau de coupe d’arrondis est utilisable des deux côtés. Avant d’installer un plateau de coupe
d’arrondis neuf, essayez de retirer le plateau de coupe comme illustré ci-dessous et réintroduisez-le en le
changeant de côté.
FRANÇAIS
Suivez les consignes ci-dessous pour remplacer le plateau de coupe d’arrondis lorsque le besoin se
présente.
Plateau de coupe d’arrondis (CC-3)
(1) Retirez le plateau de coupe d’arrondis
comme illustré.
(2) Installez le plateau de coupe d’arrondis neuf.
Nota
Utilisez toujours des lames de coupe agréées Brother (SC-2 ou CC-3).
Les autres lames de coupe (lame de coupe supérieure/inférieure et lame supérieure de coupe en
coin) ne sont pas remplaçables. Veuillez contacter votre revendeur si ces lames sont endommagées.
- 35 -
Page 94

Dépistage des pannes
g
Problème Origine Solution
L’adaptateur secteur n’est pas branché
correctement.
L’adaptateur secteur utilisé est incorrect. Servez-vous d’un adaptateur secteur agréé Brother.
Le capot supérieur n’est pas fermé
correctement.
Le document n’est pas positionné
correctement.
Le document est trop épais ou trop mince. L’épaisseur du papier utilisé avec cette machine doit
Le document est écorné ou gondolé. Les documents gondolés ou écornés ne peuvent pas
Le document est trop large. La largeur du document doit être inférieure à 0,2” (50
Le document est trop petit. Les documents doivent faire au moins 3,5” (90 mm) de
eur du film est plus étroite que cell e
La lar
du document inséré.
Le film est épuisé. Remplacez la cartouche de film.La plastification s’arrête
Le document est coincé. Otez le document coincé.
La longueur du document est supérieure à
” (470 mm).
18,5
Le document est trop épais ou trop fin. L’épaisseur du papier utilisé avec cette machine doit être
Le document est écorné ou gondolé. Les documents écornés ou gondolés ne peuvent pas
Le document est trop petit. Les documents doivent faire au moins 0,2
Le guide de document n’est pas réglé
correctement.
Les lames de coupe ne sont pas install ées
correctement.
Les lames de coupe sont endommagées. Remplacez les lames de coupe. Vous pouvez
Le mode cutter off est sélectionné. Changez le réglage du sélecteur de coupe
Le détecteur de papier est défectueux. Veuillez contacter votre revendeur.
FRANÇAIS
Rien ne se passe une
fois que la machine est
allumée.
Le document n’est pas
alimenté correctement et
la machine émet un
signal d’alarme (deux
bips sonores).
et un message d
apparaît en même temps
qu
’un bip sonore.
La machine s’arrête en
cours de plastification
d’un document, le témoin
Start clignote.
La qualité du pelliculage
n’est pas satisfaisante.
Le document est
alimenté de travers.
Le document n’est pas
coupé à l’issue du
pelliculage.
L’emplacement de coupe
n’est pas précis (coupe
supérieure/inférieure)
’erreur
Vérifiez que la machine est branchée à une source
d’alimentation sous tension.
Fermez le capot supérieur.
Repositionnez le document correctement et appuyez
de nouveau sur la touche Start.
être comprise entre 0,004
être plastifiés.
) et 11,7” (297 mm).
mm
long.
Installez une cartouche de film au format adéquat.
Appuyez sur Start pour continuer l’opération.
compris e en t r e 0,004
être plastifiés.
large et 3.5
Réglez le guide de document correctement.
Vérifiez l’installation des lames de coupe dans la
machine.
remplacer les lames de coupe verticale et le plateau
de coupe d’arrrondis.
Les lames de coupe inférieure/supérieure ne peuvent
pas être remplacées. Si ces lames ne fonctionnent pas
correctement, veuillez contacter votre revendeur.
automatique.
” (90 mm) de long.
” (17 lbs.) et 0,008” (40 lbs.).
” (17 lbs.) et 0,008” (40 lbs.).
” (50 mm) de
- 36 -
Page 95

Problème Origine Solution
g
g
Les autocollants ne
collent pas.
Un message d’erreur
clignote et le signal
sonore retentit quand on
allume la machine.
Un message d’erreur
clignote et le signal
sonore retentit quand le
capot supérieur est
fermé.
Le bouton START ne
fonctionne pas.
Ce n’est pas du film adhésif qui es t chargé
dans la machine.
Le dos de l’adhésif n’a pas été décollé. Retirez la pellicule de protection.
La surface sur laquelle doit adhérer
l’autocollant est sale ou rugueuse.
La cartouche de film n’est pas installée
correctement ou bien elle n’est pas
compatible.
Ce n’est pas l’adaptateur secteur adéquat
qui est utilisé.
La cartouche de film n’est pas installée
correctement ou bien elle n’est pas
compatible.
Les cutters ne sont pas installés
correctement.
Utilisez un rouleau de film adhésif Brother LC-A12, LCA9 ou LC-A5.
Essuyez la surface ou essayez une autre surface.
Installez la cartouche de film correctement.
Utilisez toujours des cartouches et des rechar
agréées Brother.
Utilisez un adaptateur secteur agréé Brother.
Installez la cartouche de film correctement.
Utilisez toujours des cartouches et des rechar
film agréées Brother.
Vérifier la mise en place des cutters et réinstallez-les
correctement si besoin est.
es de film
es de
FRANÇAIS
- 37 -
Page 96

Spécifications
Modèle : LX-1200
Méthode de plastification : Par pression à froid
Alimentation : Adaptateur secteur (fourni)
Sortie CC 18 V 700 mA
Largeur mini./maxi. du doc. : 2,0” – 11,7” (50 mm - 297 mm)
Longueur mini. du doc. : 3,54” (90 mm)
Epaisseur mini./maxi. du doc. : 0,004” – 0,008” (0,1 mm/3,9MIL - 0,2 mm/7,9MIL)
Film : Film en cartouche remplaçable
Type de film : LC-D12/D12R (laminé double face de A3 de largeur)
LC-A12/A12R (laminé à dos adhésif de A3 de largeur)
FRANÇAIS
Nombre maxi. d’impressions/cartouche : LC-D12/D12R: Approximativement 86 feuilles/papier 11” ´ 17”
Vitesse d’alimentation du doc. : 0,98”/sec. (25 mm/sec.)
Système de coupe : Système de coupe intégré avec détection de la taille du papier
Durée de vie des lames : Lame de coupe verticale 984 ft (300 mm)
Niveau de bruit : 35 dB (mode veille)
Dimensions de la machine : 18,3” (L)* 15,2” (P)* 10,8” (H) (468 mm * 387 mm * 273 mm)
Poids de la machine (cartouche de film
et adaptateur secteur non compris) 8,3 kg (18,3 lbs)
LC-D9/D9R (laminé double face de A4 de largeur)
LC-A9/A9R (laminé à dos adhésif de A4 de largeur)
LC-M9/M9R (format A4 plastification face magnétique)
LC-D5/D5R (laminé double face de A6 de largeur)
LC-A5/A5R (laminé à dos adhésif de A6 de largeur)
LC-M5/M5R (format A6 plastification face magnétique)
LC-A12/A12R: Approximativement 20 feuilles/papier 11” ´ 17”
LC-D9/D9R: Approximativement 68 feuilles/format lettre
LC-D5/D5R: Approximativement 121 feuilles/papier 4” ´ 6”
LC-M9: Approximativement 13 feuilles/format lettre
LC-M5: Approximativement 21 feuilles/papier 4” ´ 6”
Lames de coupe verticale (remplaçables par l’utilisateur)
Lame de coupe supérieure/inférieure (non remplaçable par
l’utilisateur)
Plateau de coupe d’arrondis (remplaçable par l’utilisateur –
inférieur uniquement)
Lame de coupe sup./inf. 5,000 feuilles environ (avec un film
laminé à dos adhésif)
Lame de coupe d’arrondis (sup.) 20,000 coupes
Plateau de coupe d’arrondis 3,000 coupes
- 38 -
Page 97

Table des Matières
Annexe (A propos du logiciel PrintMaster Gold)........................................................................................... 40
Prise en main................................................................................................................................................ 42
Configuration minimale requise................................................................................................................ 42
Démarrage de PrintMaster Gold sous Windows 95/98............................................................................ 42
Démarrage de PrintMaster Gold sous Windows 3.1x ou Windows pour Workgroups............................. 42
Installation de PrintMaster Gold...............................................................................................................43
Lancement de PrintMaster Gold à l’issue de l’installation........................................................................ 43
Suppression de PrintMaster Gold............................................................................................................ 43
Réinstallation de PrintMaster Gold........................................................................................................... 44
Affichage/Impression du guide d’utilisation de PrintMaster Gold.................................................................45
Comment installer Adobe Acrobat Reader............................................................................................... 45
Comment ouvrir le guide..........................................................................................................................45
FRANÇAIS
- 39 -
Page 98

Annexe (A propos du logiciel PrintMaster
Gold)
Mindscape et PrintMaster sont des marques déposées et le logo Mindscape est une marque de The
Learning Company.
Adobe et Acrobat sont des marques de Adobe system Incorporated.
Windows est une marque déposée de Microsoft Corp. aux Etats-Unis et dans d’autres pays.
IBM est une marque déposée de International Business Machine, Inc.
Vous n’avez pas besoin d’un ordinateur pour vous servir de la machine à plastifier à froid. Toutefois, si vous
disposez d’un ordinateur et d’une imprimante, le logiciel pour PC livré avec la machine PrintMaster Gold
permet la réalisation de superbes documents à plastifier que vous aurez plaisir à montrer et à distribuer. Il
vous suffit de choisir un modèle prêt à l’emploi dans la vaste collection proposée par PrintMaster Gold, d’y
FRANÇAIS
apporter toute modification éventuelle souhaitée et de lancer l’impression. C’est un véritable jeu d’enfant !
Nota:
Chaque fois que vous utilisez PrintMaster, vous devrez insérer le CD-ROM PrintMaster Gold dans votre
ordinateur.
Si vous rencontrez des problèmes techniques dans le cadre de l’exploitation de ce logiciel, veuillez
contacter le service technique de l’éditeur de logiciel The Learning Company.
La liste des Centres d’assistance technique gérés par The Learning Company est la suivante :
Pays Implantation
Etats-Unis Formulaire de demande de soutien en ligne: www.expressit.com
E-mail Assistance technique: help@tlcsupport.com
Logithèque technique en ligne: www.support.expressit.com
Fax à la demande 24/24: 319-395-9600
Télécentre d’assistance technique: 319-247-3333
Heures ouvrées: de 08h00 à 18h00 (CST)
Adresse postale:
Mattel Interactive
1700 Progress Drive
PO Box 100-TS
Hiawatha, IA 52233-0100 USA
Attn: Printmaster 4 Publishing Suite
Royaume-Uni E-mail Assistance technique: uksupport@learningco.com
Téléphone: 09062165432 (Les appels coûtent 25 p/min et peuvent être
surveillés/enregistrés. Informations correctes en avril 1999)
Télécopie: 09062165433 (Les appels coûtent 25 p/min. Informations
correctes en avril 1999)
Adresse postale:
The Learning Company
PO Box 121
Crawley
RH11 9YP
ANGLETERRE
Attn: Printmaster 4 Publishing Suite
- 40 -
Page 99

AUSTRALIE Téléphone: 61-2-9899-2277
Télécopieur: 61-2-9899-2348
Adresse postale:
Unit 6
372 Eastern Valley Way
Chatswood
NSW 2067
Australie
ALLEMAGNE Keltenring 12
82041 Oberhaching
Allemagne
Tél.: ++49 89/613 092 35
Fax: ++49 89/14827-411
E-mail: hotline@learningco.com
FRANCE 122, avenue de General Leclerc
92514 Boulonge Cedex
France
Tél.: +33 1 55 38 48 58
E-mail: supportfr@learningco.com
Web: http://www.tlc-edusoft.fr
PAYS-BAS PO Box 94791
1090 GT Amsterdam
Pays-Bas
Tél.: 0900 8524357
FRANÇAIS
E-mai: nsupport@learningco.com
- 41 -
Page 100

Prise en main
Avant l’installation, vérifiez la configuration minimale requise indiquée ci-dessous pour vous assurer que
votre ordinateur est en mesure de travailler avec PrintMaster Gold.
Configuration minimale requise
PrintMaster Gold fonctionnera sur tout système doté des caractéristiques suivantes :
· PC IBM ou compatible doté d’un processeur 486DX2 66 MHz (ou supérieur)
· Windows 95, Windows 98, Windows 3.1x/Windows pour Workgroups
· (tournant en mode 386 étendu)
· Au moins 8 Mo de RAM (16 Mo recommandés)
· Au moins 30 Mo d’espace libre sur le disque dur
FRANÇAIS
· Lecteur de CD-ROM X2 ou plus
· Souris Microsoft ou 100 % compatible
· Carte son Sound Blaster ou 100 % compatible (recommandée)
· Modem Hayes ou 100 % compatible (faculltatif)
Imprimantes prises en charge : PrintMaster Gold donne des tirages de la plus haute résolution avec
toutes les imprimantes couleur ou noir & blanc supportées par Windows. Veillez à disposer de
suffisamment de cartouches d’encre avant de lancer l’impression. Nous vous conseillons d’imprimer vos
tirages sur la qualité optimale de papier prise en charge par votre imprimante (il s’agira en principe d’une
variété de papier glacé).
Graphiques pris en charge : PrintMaster Gold permet la création d’une grande variété d’images couleurs
de superbe qualité aux formats CGM, TIFF, PSD et JPG et travaille avec tous les autres formats de
graphique les plus répandus PCX, TIF, GIF, WMF, BMP et Kodak Photo CD.
Polices prises en charge : PrintMaster Gold peut travailler avec toutes les polices True Type installées
sous Windows.
Démarrage de PrintMaster Gold sous Windows 95/98
Suivez la procédure ci-dessous pour installer PrintMaster Gold sur votre disque dur.
Si vous travaillez sous Windows 95 ou 98, le CD-ROM PrintMaster Gold prévoit une fonction d’exécution
automatique décrite ci-après :
1. Insérez le CD-ROM PrintMaster Gold dans votre lecteur de CD-ROM ; le programme d’installation
démarrera automatiquement.
2. Passez à la section suivante, intitulée “Installation de PrintMaster Gold”.
Si la fonction d’exécution automatique sous Windows 95 ou 98 est inhibée sur votre système, lancez
l’installation de PrintMaster Gold en procédant comme suit :
1. Dans le menu Démarrer, cliquez sur Exécuter.
2. Sur la ligne de commande, indiquez la lettre de l’unité dans laquelle se trouve le CD-ROM PrintMaster
Gold et tapez INSTALL (Exemple : D:INSTALL). Appuyez sur ENTREE ou cliquez sur OK pour
continuer.
3. Passez à la section suivante intitulée. “Installation de PrintMaster”.
Démarrage de PrintMaster Gold sous Windows 3.1x ou Windows pour Workgroups
Suivez la procédure ci-après pour installer PrintMaster Gold sur votre disque dur.
1. Ouvrez le menu Fichier du Gestionnaire de programmes et sélectionnez Exécuter.
2. Indiquez la lettre de l’unité dans laquelle se trouve le CD-ROM et tapez INSTALL (Exemple :
D:INSTALL) sur la ligne de commande et appuyez sur ENTREE ou cliquez sur OK pour continuer.
3. Passez à la section suivante intitulée Installation de PrintMaster Gold.
- 42 -
 Loading...