

Page 1

MAIMIJAL
brother»
CONTENTS
Chapter 1. SETUP & PREPARATION BE!-i л<(-. ( >!■:
Chapter 2. THE CONTROL PANEL KEY.'-i
Chapter 3. HOW TO USE ON-SCREEN PKi \s\\u\i
(OSP) AND HELP KEY
Chapter 4. TELEPHONE FUNCTION SE'i П su s
Chapter 5. USING THE UNIT AS A TELI.^^i Ю \ !■.
Chapter 6. SENDING FAXES
Chapter 7. RECEIVING FAXES AND OTIП- R C \!4.S
Chapter 8. HOW TO USE COPY FUNCTIOaS
Chapter 9, POLLING
ChapterlO. PASSWmD
Chapterll. PRINTING REPORTS AND IAS 1M
Chapterl2. REGULAR MAINTENANCE A\i)
TROUBLESHOOTING
Chapterl3. IMPORTANT INFORMATION
Chapterl4. INDEX
ChapterlS. SPECIFICATIONS
I n t e l l i F A X
Page 2

Fu^'i YOiie mmHMMmu
SmmjES FOR YO;UO
iWlELiJFAX ■ SiMi/9Fl)ll^/93yM/1S00i
PAPER
Your lntelliFAX^900/950M/980M/1500M is a plain
paper fax machine, therefore it will work with
almost all plain paper.
However please be aware that plain paper types
or grades can vary; and different types or grades
of plain paper do play a part in the quality of
output.
Almost any type of “copy or xerographic” plain
paper will give you good output.
For the best quality output we recommend a
“laser printer” plain paper, which is also readily
available in the market and competitively priced.
N
nUSES ^
Plain
THE BENEFITS ARE
PLAIN TO SEE
PLAIM PAPER BENEFITS
■ Easy to handle and copy
■ Easy to write on
■ No print fading
■ No more curled faxes
Page 3

Thank you for purchasing a Brother fax machine. This fax machine has been designed
to be simple to use, but you can utilize it to its fullest potential by taking some time to
read this owner’s manual. You will be ready to use the fax machine as soon as you read
the first four chapters. Then you can refer to topics in the remaining chapters, as
needed.
Structure of the Manual
■ Chapters 1-4
How to set up the fax machine and what you need to know before you use it.
■ Chapters 5-7
Basic operations, how to send and receive faxes.
■ Chapters 8-11
Advanced operations.
Finding Information in the Owner’s Manual
• Use the table of contents. This side of the manual is coded so you can find topics
easily.
• If there is a key on the fax machine you are not familiar with, refer to chapter
2.
• To find information about a function, refer to the “Function Selection Table” in
chapter 3.
• If you have trouble, refer to chapter 12 on how to troubleshoot.
• Use the chapter 14 index.
Test Sheet Procedure
Please fill out the TEST SHEET and fax it to 1-908-469-4547 as your first transmission.
This will verify that your fax machine is properly installed.
When this document is received at Brother Diagnostic Center, a confirmation sheet will
be sent back to your machine from Brother Automatic Fax Back Response System. Be
sure to set up your “Station ID”. (See page 4-3.)
FAX NO. : 1-908-469-4547 (Fax Transmission Only)
TEL NO. : 1-800-284-4FAX (Voice Phone Only)
1-800-284-4329
Page 4

Page 5

4
I
CONTENTS
FOR YOUR INFORMATION
Chapter t.
Chapter 3,
Chapter 4,
Chapter 5,
❖ SETUP & PREPARATION BEFORE USE 1-1
Choosing a Suitable Place for Your Fax Machine..........................................1-1
The Good Places
And the Bad Places...................................................................................1-1
Packing List.....................................................................................................1-2
Setting up Your Fax Machine
• Multi Line Connections (PBXs)
• Connecting to a Private Branch Exchange................................................1-5
....................................................................................
.........................................................................
...............................................................
1-1
1-2
1-5
❖ THE CONTROL PANEL KEYS 2-1
ONE-TOUCH AREA......................................................................................2-2
TELEPHONE AREA......................................................................................2-3
USER SETTING AREA.................................................................................2-4
USER SETTING AREA.................................................................................2-5
❖ HOW TO USE ON-SCREEN PROGRAMMING (OSP)
AND HELP KEY 3-1
User-friendly Programming............................................................................3-1
On-screen Programming (OSP)
Function Selection Table
Current Setting Chart
Using the Function Mode to Access On-Screen Programming (OSP)............3-4
Displays for On-Screen Programming (OSP).................................................3-5
Help Key (Only for FAX-950M/980M/1500M).............................................3-5
How to print a Help List
How to Enter Text in Function Mode
How to Enter Special Characters, Symbols and Punctuation Marks in the
Function Mode................................................................................................ 3-8
......................................................................................
......................................................................
................................................................................
...............................................................................
.............................................................
3-1
3-1
3-3
3-5
3-7
❖ TELEPHONE FUNCTION SETTINGS 4-1
Setting the Dialing Mode (Tone/Pulse)
Setting the Beeper Sound Level......................................................................4-1
Setting the Date and Time............................................................................. 4-2
Setting the Station ID......................................................................................4-3
Storing One-Touch Dial Numbers
• Types of Numbers.....................................................................................4-6
• Chain Dialing............................................................................................4-6
Storing Speed-Dial Numbers
• When You Wish to Change the Stored One-Touch and Speed-Dial
Numbers (During Step 5 on Page 4-5,7)...................................................4-8
• Memory Storage........................................................................................4-8
Setting up Number Groups (Only for FAX-950M/980M/1500M)
..........................................................................
..........................................................
..................................................................
.................
4-1
4-4
4-7
4-8
❖ USING THE UNIT AS A TELEPHONE 5-1
Manual Dialing.............................................................................................. 5-1
One-Touch Dialing.........................................................................................5-1
Speed Dialing................................................................................................ 5-1
• Using Keys with the Telephone
• On Hook Dialing...................................................................................... 5-1
Telephone Index..............................................................................................5-2
...............................................................
5-1
Page 6

CONTENTS
ehiipter e. ❖ SENDING FAXES 6-1
A) BASIC FAX TRANSMISSIONS.............................................................6-1
The Size of Your Documents
How to Set the Document.........................................................................6-1
^ ' : V The Auto Document Feeder (ADF)........................................................... 6-2
Getting Ready to Send Faxes
Resolution............................................................................................6-2
Contrast................................................................................................6-2
Sending a Fax Automatically....................................................................6-3
; . ^ Sending a Fax Manually.............................................................................6-4
• Dialing a Number.................................................................................6-4
• Talking to the Other Party When Sending a Fax
Automatic and Manual Re-dialing............................................................6-5
Setting the Auto Re-dial
• Possible Settings When You Send a Fax Manually.............................6-5
• Printing Page Headers..........................................................................6-6
Sending a Fax by Using Quick-Scan (Memory Transmission)
(Only for FAX-950M/980M/1500M).......................................................6-6
• If You Get a MEMORY FULL Message When Trying to Send
a Fax by Using Quick-Scan
Delayed Transmission...............................................................................6-7
III
■■
ii; Interrupting the Timer and Polled Job
V ,. ■ 7" Sending a Fax with Call Reservation.......................................................6-17
Setting the Daily Timer (for Delayed Transmissions)
Broadcasting (Only for FAX-950M/980M/1500M)
• Getting Familiar with the Broadcasting Function.................................6-8
Canceling a Job.........................................................................................6-9
B) FAX TRANSMISSION OPTIONS........................................................6-11
Setting the Overseas Mode.....................................................................6-11
Setting Your Fax Machine for Multiple Resolution Transmission..........6-12
Gray Scale...............................................................................................6-13
Sending a Fax with a Cover Page
• The Comments Section on the Cover Page........................................6-14
Customizing Your Cover Page Comment...............................................6-15
Setting Cover Page ON/OFF
• Sending an Automatic Cover Page
• Using the Call Reservation Function
Next-FAX Reservation (Only for FAX-950M/980M/1500M)
ECM (Error Correction Mode) Feature
(Only for FAX-950M/980M/1500M).....................................................6-19
^ RECEIVING FAXES AND OTHER CALLS 7-1
A) BASIC SETUP TO RECEIVE FAXES
Selecting an Answer Mode.......................................................................7-1
Manual Reception (MANUAL mode)
Automatic Fax Reception (AUTO mode).................................................7-2
Setting the Ring Delay............................................................................ 7-2
The F/T Switch (F7T Mode).....................................................................7-3
Setting the F/T Ring Time........................................................................7-4
...................................................................
....................................................................6-2
...............................
...........................................................................
.................................................................
...............................
.................................
.......................................................
...........................................................
..................................................................
....................................................
.................................................
...............
....................................................
......................................................
6-1
6-4
6-5
6-6
6-7
6-8
6-9
6-14
6-16
6-17
6-18
6-18
7-1
7-2
Page 7

« ‘
Chapter S,
Chapter 9,
Chapter 10.
CON
Smoothing............................................................................................. 7-4
Speaker Volume
Ring Volume.............................................................................................7-5
Print Reduction......................................................................................... 7-6
Printer Alarm
Receive into the Memory..........................................................................7-8
B) REMOTE ACTIVATION.........................................................................7-9
• Connecting an External or Extension Telephone to the Unit
Using Remote Codes............................................................................... 7-9
• Limitation of Using External (or Extension) Phones
Registering Remote Codes......................................................................7-10
C) CONNECTION TO A TELEPHONE ANSWERING DEVICE (TAD) 7-11
The TAD Mode...................................................................................... 7-11
• Connecting an External TAD to the Unit
• Sequence of TAD Mode Reception
D) DISTINCTIVE RINGING (Only for FAX-950M/980M/1500M)
Distinctive Ringing.................................................................................7-13
What Is Distinctive Ringing?.............................................................7-13
Can My Fax Machine Utilize Distinctive Ringing?
Can I Change the Setting Later?........................................................7-13
How Will the Fax Machine Treat All Other Distinctive Ringing?
How Does the Distinctive Ringing Function Work?
What’s the Advantage of Using the Distinctive Ringing Function? ..7-13
Setting the Distinctive Ringing Function................................................7-14
While You Are Setting the Distinctive Ringing Function:
Once You Have Finished Setting the Distinctive Ringing Function:. 7-15
How to Turn the Distinctive Ringing Function ON or OFF
❖ HOW TO USE COPY FUNCTIONS 8-1
Making a Copy................................................................................................8-1
Making Multiple Copies (Only for FAX-950M/980M/1500M)
• What To Do When You Get a “MEMORY FULL” Message
while Making Copies...........................................................................8-3
❖ POLLING 9-1
• What Is Polling?.......................................................................................9-1
• How Does It Work?..................................................................................9-1
• When to Use Polling?...............................................................................9-1
Polling Another Fax Machine
Setting up Polled Waiting...............................................................................9-2
Secure Polling.................................................................................................9-3
Polling Another Fax Machine with Secure Code............................................9-3
Setting up Polled Waiting with Secure Polling...............................................9-4
Delayed Polling...............................................................................................9-4
Setting up for Polled Waiting with Quick-Scan
(Only for FAX-950M/980M/1500M)
❖ PASSWORD 10-1
• What is Password?..................................................................................10-1
• How Does it Work?................................................................................10-1
.......................................................................................
............................................................................................
...............
.........................
...........................................
...................................................
.........
..........................
.....
........................
...............
...................
.....................
.........................................................................
.............................................................
7-5
7-7
7-10
7-11
7-12
7-13
7-13
7-13
7-13
7-15
7-16
8-2
9-2
9-4
7-9
Page 8

CONTENTS
Chapter IL
Chapter 12i
Chapter IS,
{JhapterlW
■li::;:...
❖ PRINTING REPORTS AND LISTS 11-1
❖ REGULAR MAINTENANCE AND TROUBLESHOOTING 12-1
❖ IMPORTANT INFORMATION 13-1
❖ INDEX 14-1
❖ SPECIFICATIONS 15-1
• What is Password Plus?..........................................................................10-1
Sending a Fax With a Password....................................................................10-2
Receive Password..........................................................................................10-3
Printing the All Dial List...............................................................................11-2
Activity Report Interval.................................................................................11-3
Transmission Verification (Xmit) Report
Memory Status List (Only for FAX-950M/980M/1500M)...........................11-5
Regular Maintenance.................................................................................................................... 12-1
Paper Jams.................................................................................................... 12-2
Fixing a Document Jam
Fixing a Recording Paper Jam
Troubleshooting.............................................................................................12-4
Error Messages........................................................................................12-4
Other Problems.......................................................................................12-5
Standard Telephone and FCC Notices (Only applies to 120V model)
Important Safety Instructions........................................................................................................13-3
• PC-91 Printing Cartridge
..........................................................................
........................................................................
.....................................................
................................................................
..........
11-4
12-2
12-2
13-1
15-2
Page 9

i?
Never install telephone wiring during a lightning storm.
Never install telephone jacks in wet locations unless the jack is
specifically designed for wet locations.
Never touch uninsulated telephone wires or terminals unless the
telephone line has been disconnected at the network interface.
Use caution when installing or modifying telephone lines.
Avoid using a telephone (other than a cordless type) during an
electrical storm. There may be a remote risk of electric shock
from lightning.
Do not use the telephone to report a gas leak in the vicinity of the
leak.
Page 10

ll^Si
BÉTUP & PREFV\RAÎION BEFORE USE
■Il
liiiiilli
1. SETUP & PREPARATION BEFORE USE
Choosing a Suitable Place for Your Fax Machine
Use the following list as a guide to find a suitable place for your fax machine.
The Good Places*.,
Place your fax machine on a fiat, stable surface, such as a desk.
Select a place that is free of vibration and shocks.
Locate it near a telephone jack and a standard, grounded power outlet.
For PLUGGABLE EQUIPMENT, the socket-outlet should be installed near the equipment and
should be easily accessible.
iiiiiiiillE
And the Bad Places...
Avoid setting it up in a high-traffic area,
Avoid setting up the machine near heaters, air conditioners, water, chemicals, or refrigerators.
Do not select a place that exposes your fax machine to direct sunlight, excessive heat, moisture,
or dust.
Do not connect your fax machine to electrical outlets controlled by wall switches or automatic
timers. Disruption of power can wipe out information in the unit’s memory.
Do not connect your fax machine to electrical outlets on the same circuit as large appliances or
other equipment that might disturb the power supply.
Avoid interference sources, such as speakers or the base units of cordless phones.
v\l.
1-1
Page 11
Packing List
Please check to see that you have the following items:
Setting up Your Fax Machine
REPARATION BEFORE USE
.
............ .....................................
Follow these steps to set up your fax machine:
1. Attach the wire extensions.
2. Install the printing car
tridge.
1) Open the top cover.
2) Press the blue button.
The printer head will pop
up.
3) If a used cartridge is still in
the machine, take it out.
Top cover
4) Tighten Ribbon in Cartridge
carefully.
Page 12
SETUP & PREPARATION BEFORE USE
5) Carefully install a new car
tridge inserting the marked
side first,
Make sure that the cartridge
gear rest in the white gear
holders.
6) Push down the printer head
slowly and completely.
Make sure it latches.
7) Close the top cover.
3. Install the Cassette.
The paper cassette can hold about 200 sheets of paper {201bs).
1) Raise the paper cassette slightly and pull it toward you to remove.
2) Take off the cover.
3) Push the paper plate down
until it locks into position.
4) Adjust the paper setting to
letter or legal position de
pending on what size you
are using.
5} Place up to 200 sheets of
plain paper into the cassette.
1-3
Page 13
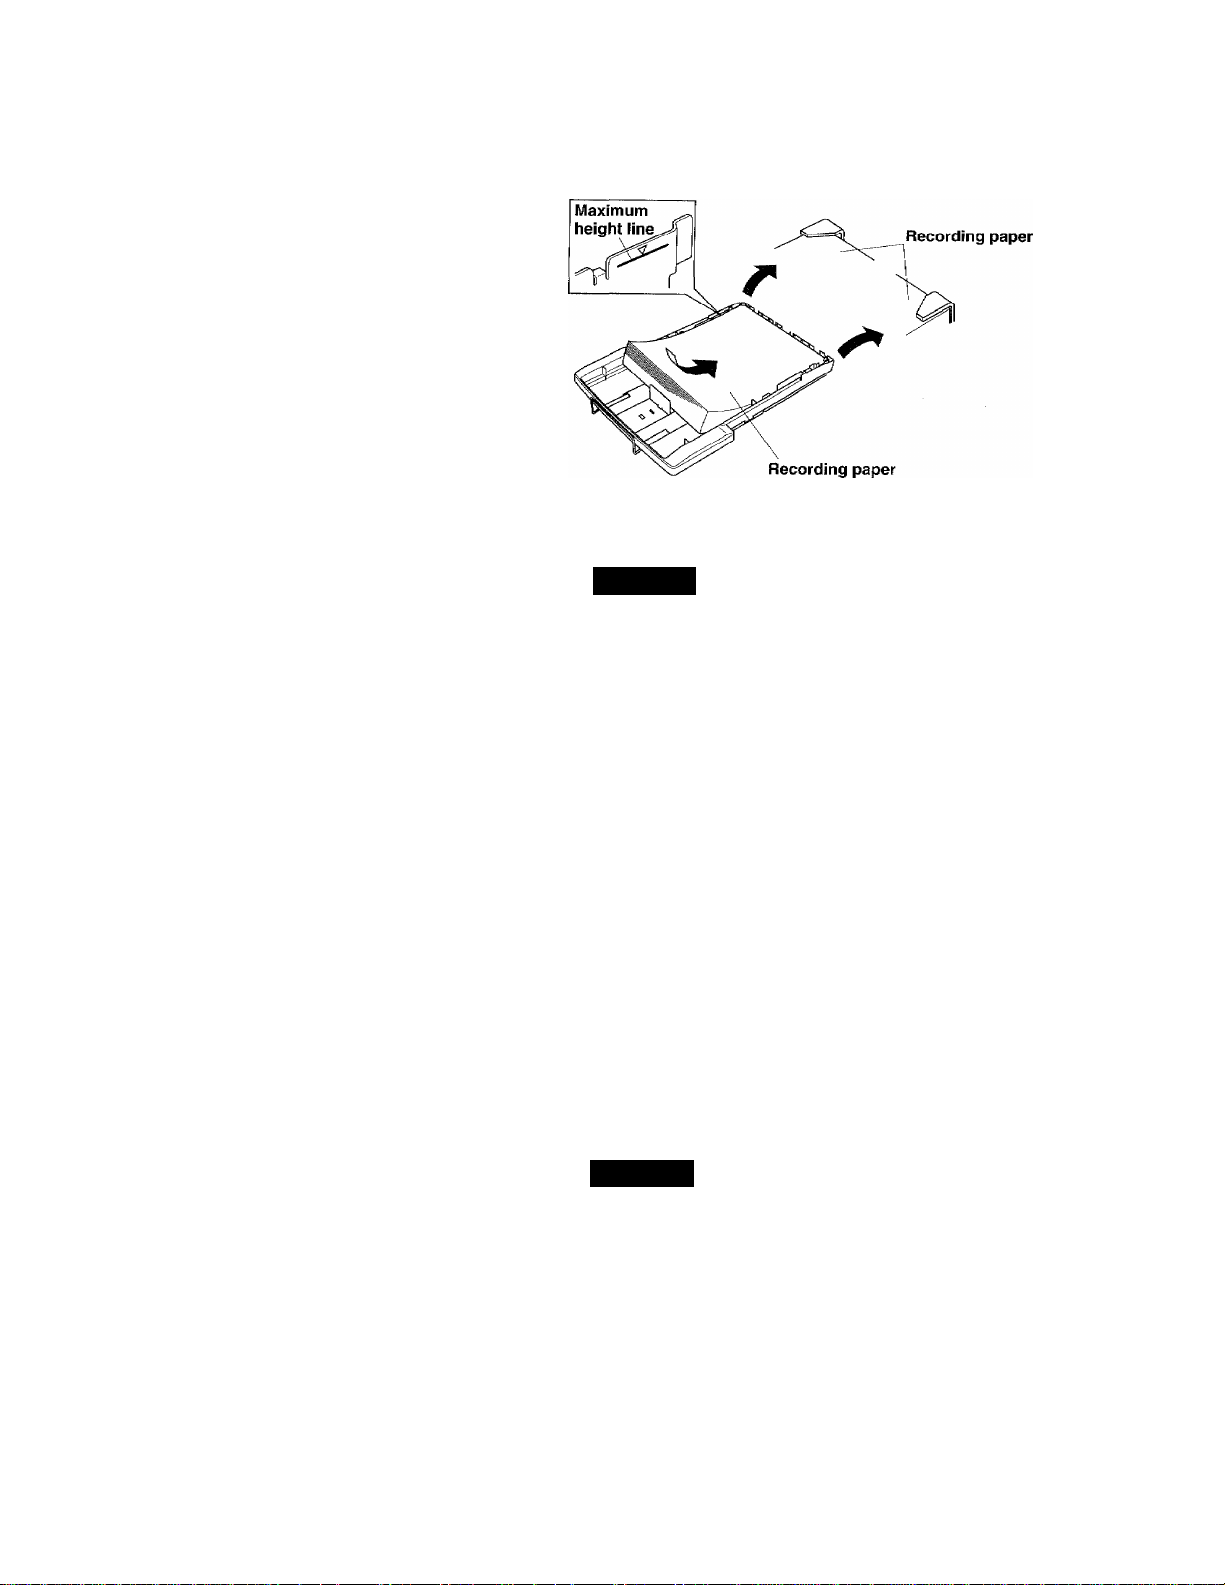
6) Place the paper in the
cassette.
Make sure the front right
and left corners of the paper
are under the edge tabs.
Do not place paper above
the maximum height line,
or paper may misfeed.
7) Close the cover on the
cassette.
8} Slide the paper cassette into
the fax machine untill it
locks into place.
NOTICE
About the Recording Paper..,
Please use standard copier paper for the recording paper as below :
Width : 216mm (8.5'')
Length; Letter/ Legal size
Weight; 17 lb to 24 lb
»
About the Cassette...
When you pull the paper cassette, it is necessary to push down the paper plate until
the cassette “clicks” into position before you re-install the cassette to the fax machine.
Otherwise the “REFILL PAPER CASSETTE” will remain on the LCD display. Also,
please do not pull out or re-insert the cassette while the machine is doing a job (for
example, copying, transmitting or receiving), or a paper jam may occur.
4. Connect the handset,
5. Connect the power code.
When you connect the power, your fax machine will automatically print a power failure report,
and the display will show “01/01/1995 00:00”.
NOTICE
1. This fax machine must be grounded using a 3-prong plug.
2. Since the machine is grounded through the power outlet, you can protect yourself
from potentially hazardous electrical conditions on the telephone network by
keeping the power to your fax machine on before you connect it to a telephone line.
1-4
Page 14

SETUP &
6. Connect the telephone line.
Multi Line Connections (PBXs)
Most offices use a central telephone system. While it is often relatively simple to
connect the machine to a key system or a PBX (private branch exchange), we suggest
that you contact the company that installed your telephone system and ask them to
connect the fax machine for you.
Handset curled cord
Telephone line cord
FOR YOUR INFORMATION
It is advisable to have a separate line for the fax machine. You can then leave the
machine in AUTO Answer Mode to receive faxes at any time of the day or night.
If the fax machine is to be connected to a multi-line system, ask your installer to
connect the unit to the last line on the system. This will prevent the unit from being
activated each time a telephone call is received.
• As with all fax units this machine must be connected to a two wire system. If your
line has more than two wires, proper connection of the fax machine can not be
made.
If you have call waiting, ring master, an alarm system, or any other custom calling
feature on your telephone line, it may create a problem in operation of your fax unit.
Connecting to a Private Branch Exchange
The following points should be kept in mind if you are installing the machine to work
with a private branch exchange(PBX),
1) It is not guaranteed that the imit will operate correctly under all circumstances
with PBXs. Any cases of difficulty should be reported first to the company that
handles your PBX.
2) If all incoming calls will be answered by a switchboard operator, it is recom
mended that the Answer Mode be set to be MANUAL. (See page 7-2.) All incoming
calls should initially be regarded as telephone calls.
3) The unit may be used with either the pulse or tone dialing telephone types.
i-5
Page 15
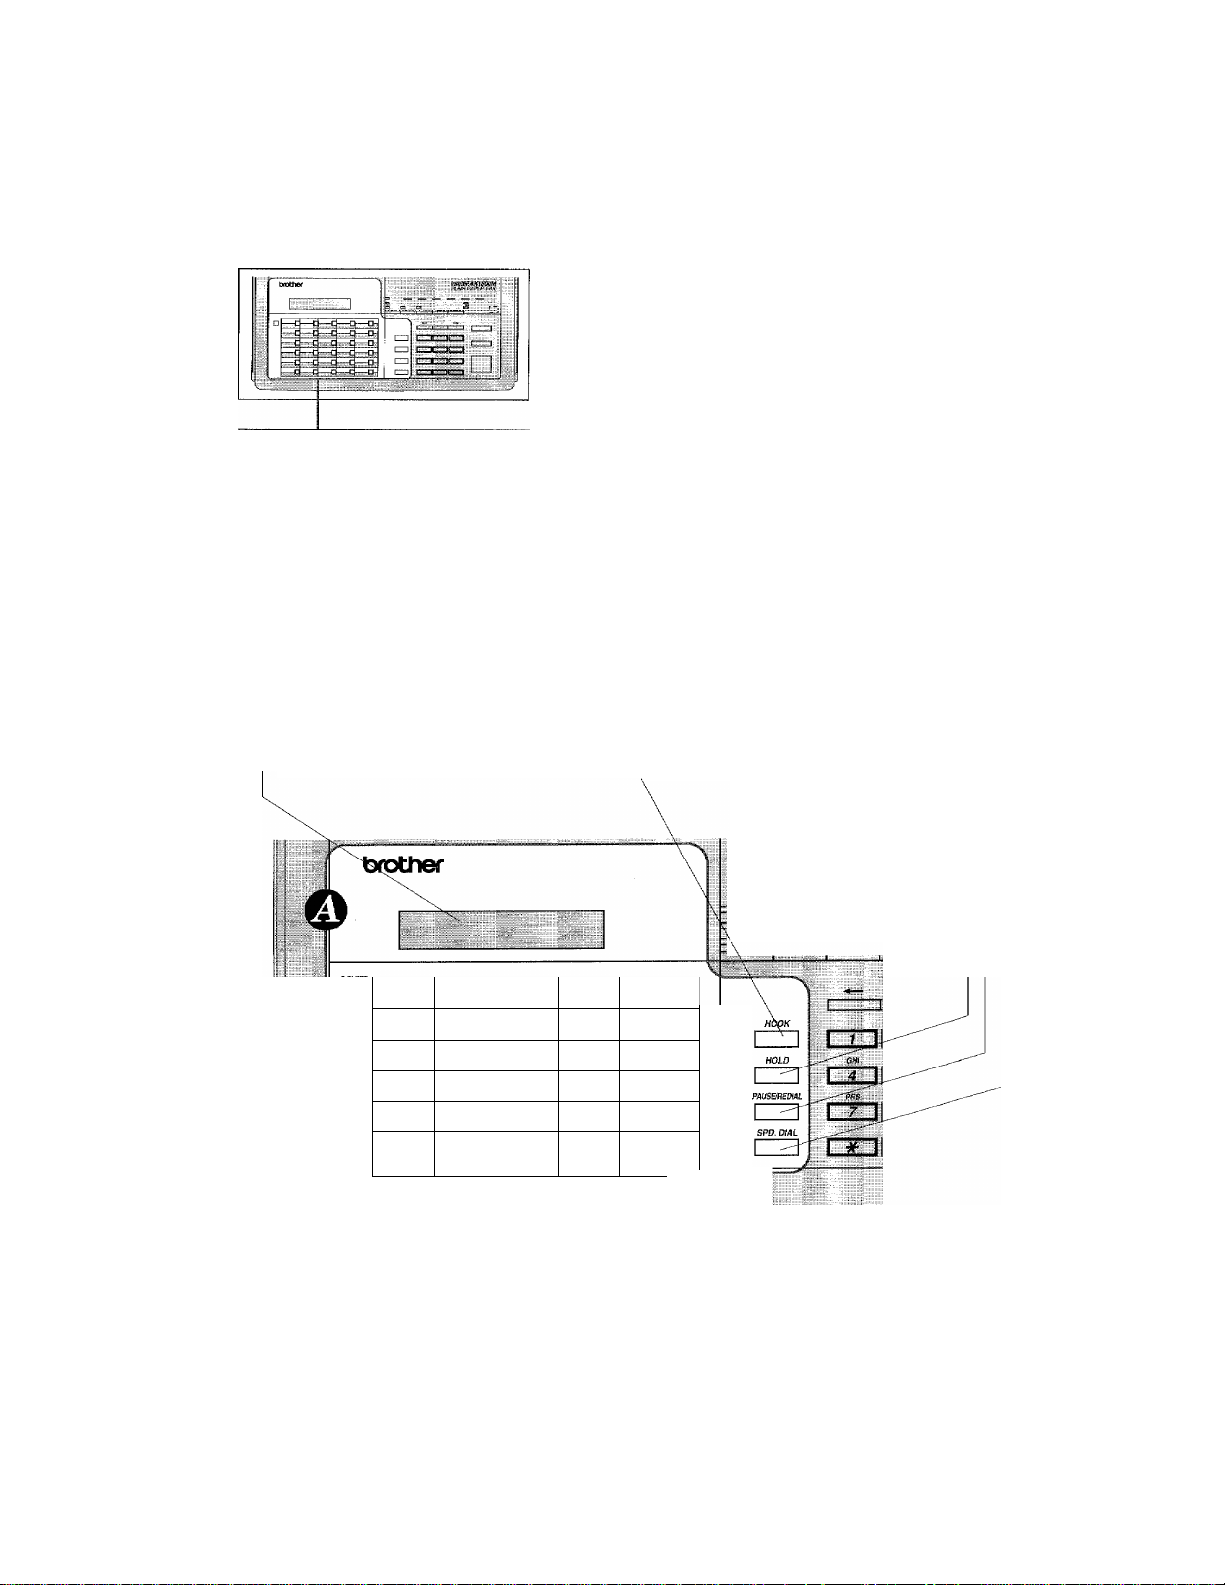
2. THE CONTROL PANEL KEYS
FAX-900
THE CONTROL PANEL KEYS
© Telephone Area
FAX-950MI980MH500M
® One-Touch Area
brother
□
n——cj—d—ch
—q—Q—□—Q—n—q—□—□-
™c
—id—d—□—□-
eE
—d—q—□—□—q—p—q—Q-
@ User Setting Area
HlqETfJ POiUJiVQ SentNO
] Mtt ^□ci7i0iiMi3e ntxR maiscAN
ozmxniio
i'
Gtfi JKL frflVO
I
rrnmm
[ZZ3 ICZ3CZZ1GZI
SPD. DIAL 1 * OZ
[ZZ] il OnrXDCXD
©Telephone Area
mtelWAXTSOOM
PLAIN PAPER FAX
COPY
3 I I
2-1
Page 16
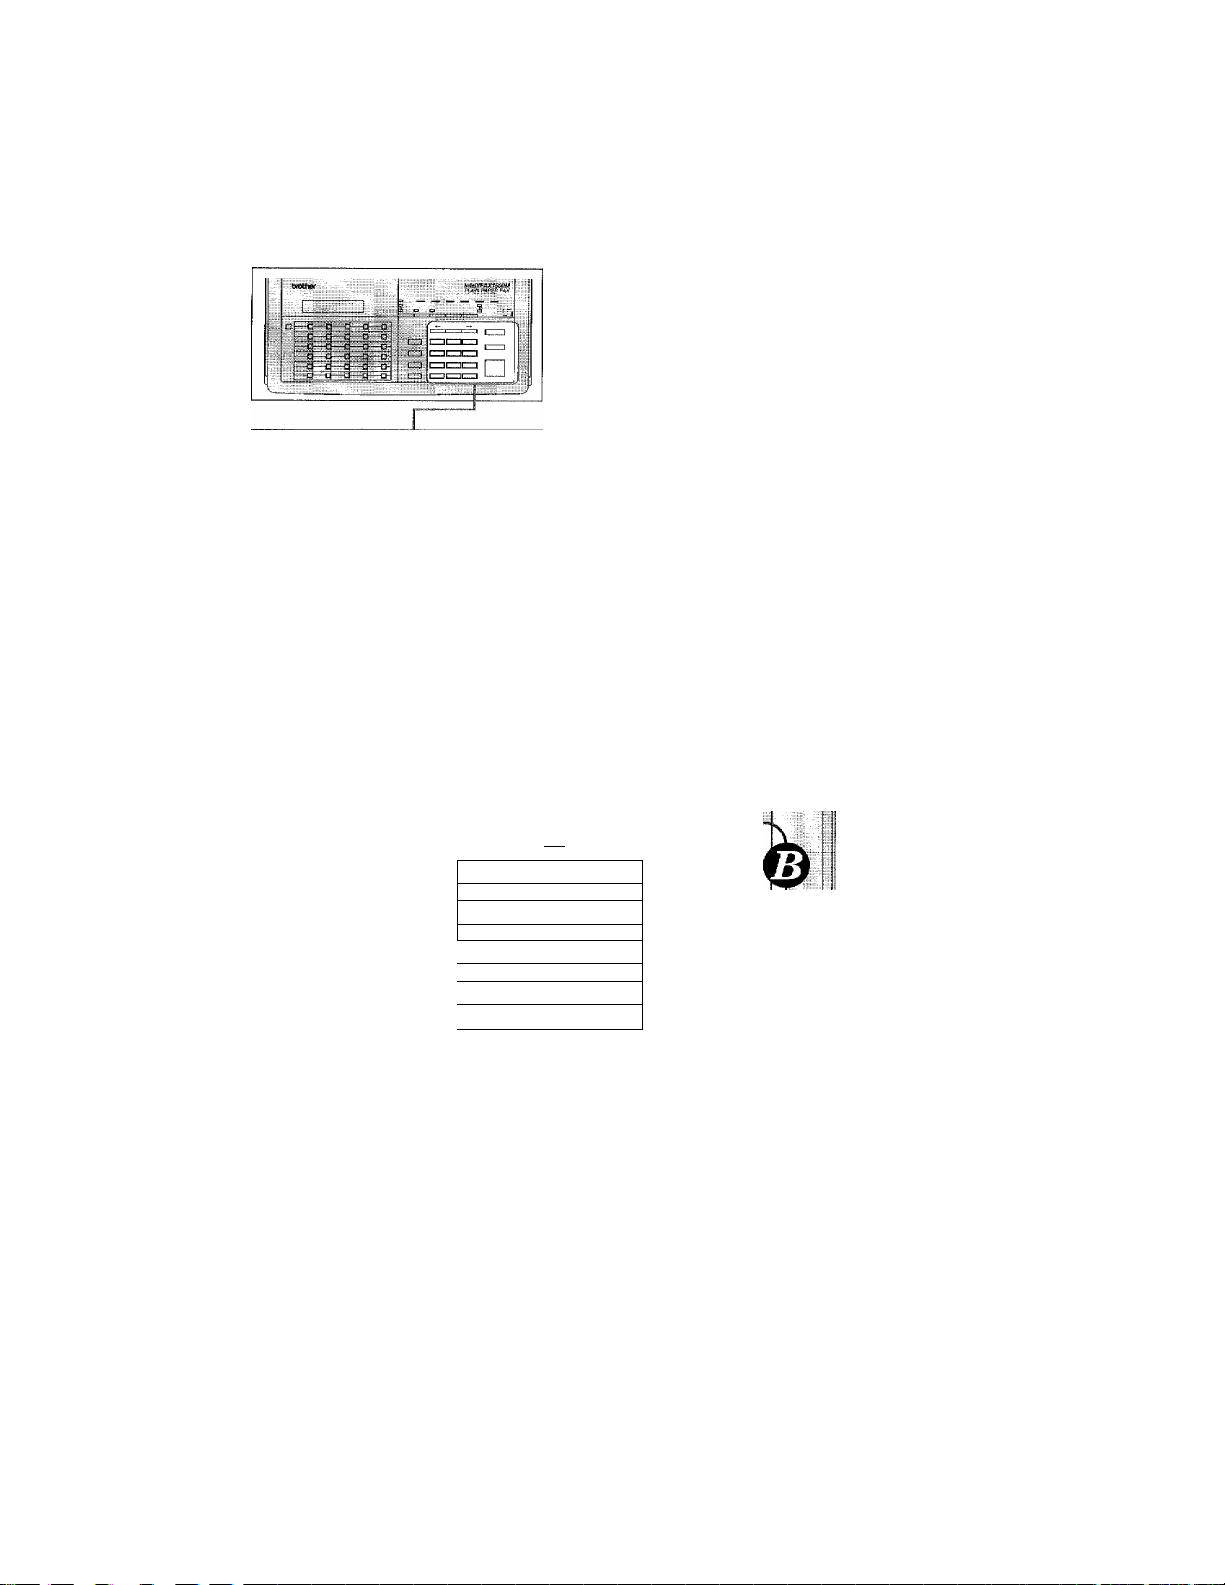
THE CONTROL PANEL KEYS
1. Liquid Crystal Display 2, HOLD
O ONE-TOUCH AREA
The LCD displays messages that will
help you set up and operate your fax
machine. (On-Screen Programming)
(See page 3-1.)
3. HOOK
This key lets you dial telephone and \
fax numbers without lifting the hand- \
set. (See page 5-1.)
—□—c
T.
—
—c
«dC
c
—□—c
—q—c
—q—c
—q—□
■C
—□wCh
£] □
You can use this key to put a call on
hold. (See page 5-1.)
4. PAUSEÌREDIAL
This key re-dials the last number
called. (See page 6-5.) This key is also
used to insert a pause in autodial
numbers. (See page 5-1.)
5. SPD. DIAL
This key lets you access
previously stored speed
dial phone numbers with
a two digit number. (See
page 4-7, 5-1.)
..... sOfl
||Ì||k||QiÌ
■lElCh
/ 6. SHIFT
This key is used to access the “31” through These keys give you instant access to
“60” One-Touch keys. (See page 4-4.) previously stored phone numbers.
7. One-Touch Dial Keys
\
(See page 4-4, 5-1.)
2 2
Page 17
THE CONTROL PANEL KEYS
© TELEPHONE AREA
8. (Left Arrow)
This key moves the LCD cursor to
the left. It also allows you to back
up one step when you are in a
function mode (see page 3-5) or
Telephone Index.
10. TEL-INDEX
This key allows yon to alpha
betically look upnumbers stored
in the dialing memory. (Seepage
5-2.)
mpix
—
II
—
ABC
2
JKL mo ^
5
HOLD
[zz: ^
FiUSE'fEaAi I
------
1 1 II
G>i.'
1 ^
JL8JL
UL ir
0
nr
II
II
9, COPY
Press this key to make a copy.
(See page 8-1.)
11, STOP
This key stops a fax, cancels an
operation, or exits from func
tion mode. (See page 3-5.)
DEF-X
3 1
■^!
WXY 1
9 V
QZ \
# h
12, Number Keys
These twelve keys are used to
dial phone and fax numbers (see
page 5-1), and can also be used
as an alphanumeric keyboard
for entering information into the
fax machine (see page 3-7).
13, START
Use this key to start an operation,
such as sending a fax. (See page 6-3.)
14.
—► (Right Arrow)
This key moves the LCD cursor to the
right, and it also lets you advance one step
when you are in function mode (see page 3-
5) or Telephone Index.
2-3
Page 18
CONTROL PANEL
® USER SETTING AREA
* When the cover is closed.
15. PRINTING
CARTRIDGE
The LED will blink when the Print
ing Cartridge needs to be replaced.
17. COVERPAGE
This key is used to send a Cover Page as
the first page of a fax transmission.
(See page 6-14.)
¡¡¡■P^
.......
.
...........
16. TIMER
This key is used to set a delayed
transmission. (See page 6-7.)
18. PUSH
Push at this point and open the
cover to access. “User Setting
Area D.”
20. QUICKSCAN
(Only for FM-950MI980MH500M)
19. CALL
This key is used to activate a
call reservation and call back
message. (See page 6-17.)
21. Resolution
This key is used to set the reso
lution requirements when send
ing a fax. (See page 6-2.)
2-4
This key enables you to scan in your
originals at three times the normal
speed, by storing them in the memory
before actual transmission. (See page
6-6, 9-4.) When QUICKSCAN is
pressed, Broadcasting is available.
(See page 6-8.)
20. CURRENT SETTING
(Only for FAX-900)
This key is used to set contrast,
multiple resolution setting, overseas
mode, password, etc. (See page 6-3, 6-
11, 6-12, 10-2.)
Page 19
Ц ■- n-
5 a
L..^.' ^ -■
THE CONTROL PANEL KEYS
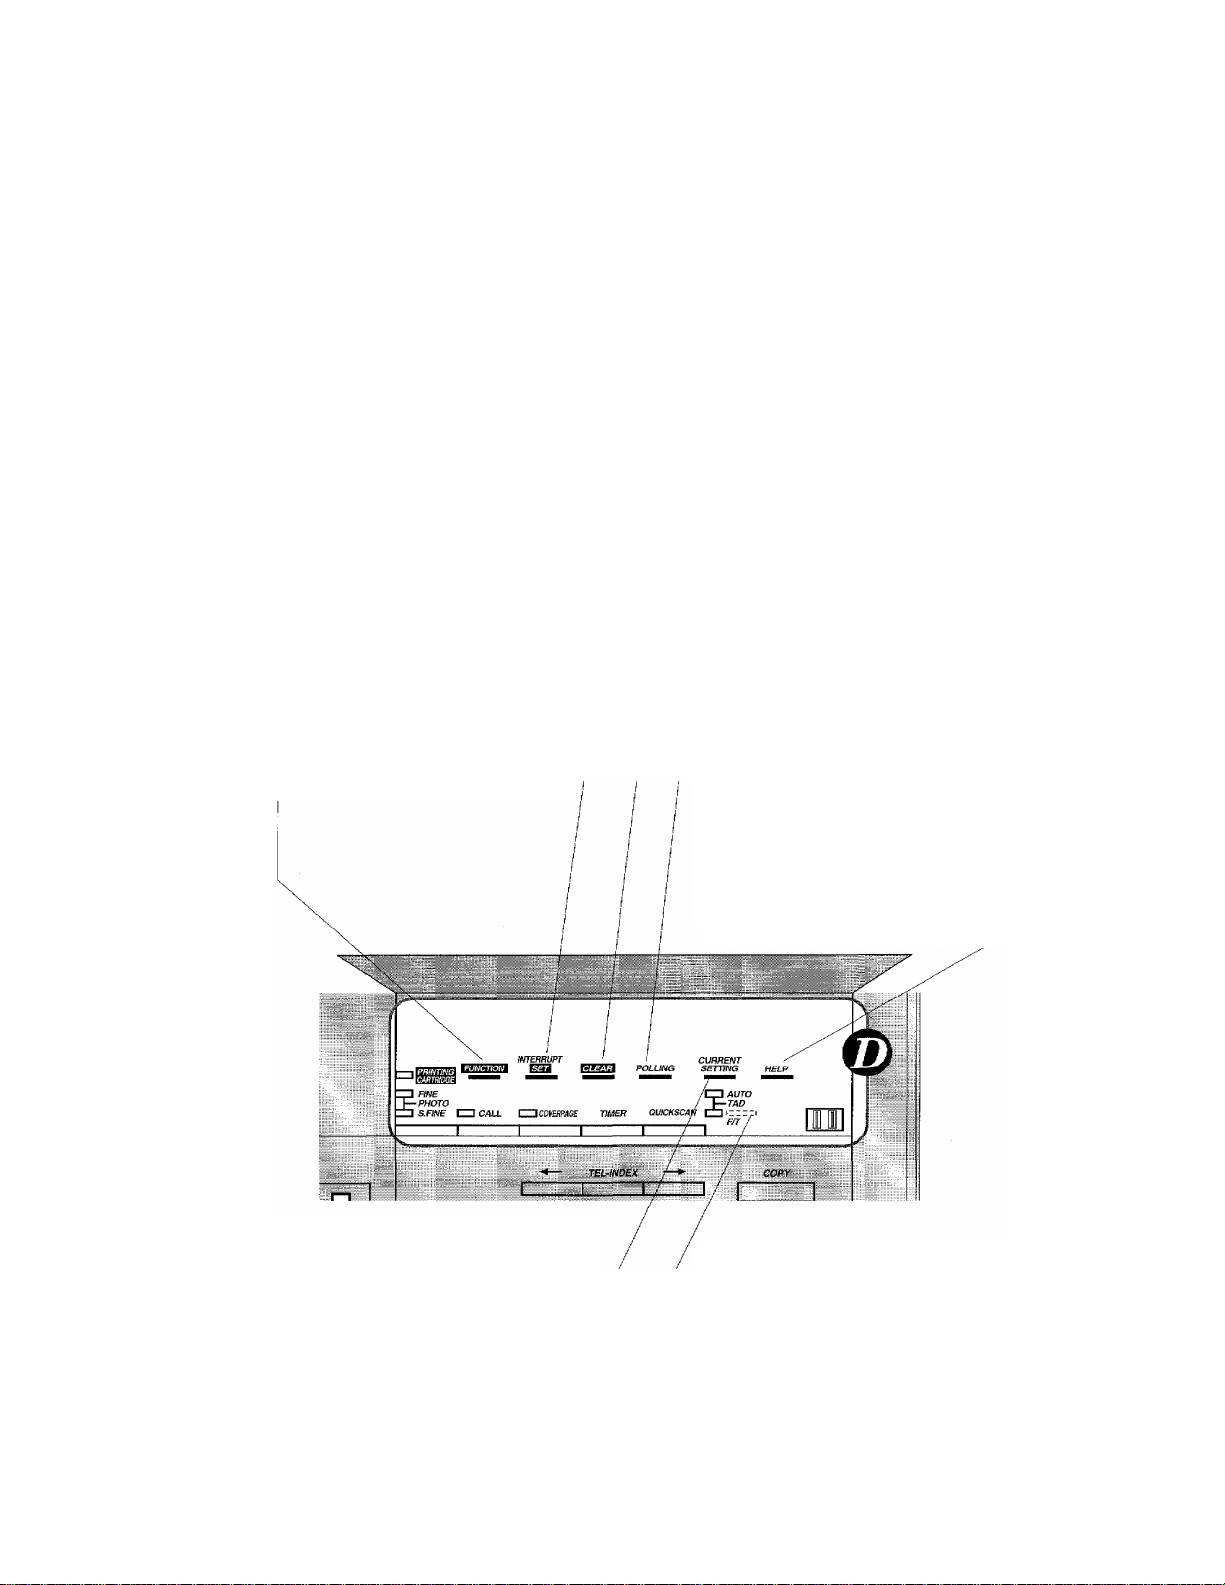
® USER SETTING AREA
* When the cover is open.
22. FUNCTION
This key accesses the function and
programming mode (OSP), so you
can alter various settings. (Seepage
3-1.)
24. INTERRUPTfSET
This key is used to temporarily
interrupt the job. (See page 6-9.)
This key is used for storing a
function setting into the fax
machine. (See page 3-5.)
23. CLEAR
This key deletes entered data or
backs up one step in function procedime. (See page 3-5.)
25. POLLING
This key accesses the polling
feature. (See page 9-1.)
26. HELP
(Only for FAK-d50MI980Mll500M)
Press this key whenever you want
a quick reference Help List printed.
This Help List will give you
information on how to perform cer
tain settings for a function, how to
register information, or how to get
some basic information for sending
or receiving faxes.
(See page 3-1, 3-5, 3-6)
27. CURRENT SETTING
(Only for FAX-950MI980MI1500M)
This key is used to set contrast,
multiple resolution setting, overseas
mode, password, etc. (See page 6-3,6-
11, 6-12, 10-2.)
28. Answer Mode
This key is used to specify how
the fax machine should handle
incoming calls. (See page 7-1.)
2-5
Page 20

IQHOW TO USE ON-SCREEN PROGRAMMING (OSP) AND HELP KEY
3. HOW TO USE ON-SCREEN PROGRAMMING (OSP) AND HELP KEY
User-friendly Programming
We have designed your fax machine with on-screen programming and a HELP key (only for FAX950M/980M/1500M), for user-friendly programming that helps you take full advantage of all the
functions your fax machine has to offer.
On-screen Programming (OSP)
Since your fax programming is done on the LCD, we created step-by-step on-screen prompt
messages to help you program your fax machine. All you need to do is follow the prompt
instructions as they guide you through the function menu selections and programming options
and settings.
Function Selection Table
________________________________________
If you have a basic understanding of how to program a fax machine, you can perform most of the
programming settings without the owner's manual. To help you understand what function
selections, options, and settings are found in your fax programs, we have the following Function
Selection Table.
Read through this table to gain a basic understanding of what your new fax model can do, and
then the next section will begin instructing you how to use on-screen programming.
Level one
function
1. CANCEL
JOB
2. PRiNT
REPORTS
Level two
function
Explanation of Options
If you wish to cancel a job that has been set
with the timer, a polled job etc., use this
function.
You can print several different lists and
reports, which are available under function
item 2. PRINT REPORTS.
Factory
setting
Page
6-9
11-1
If you register names and numbers on One-
1. SETUP ONETOUCH DIAL
Touch dial keys, you can dial a number
automatically just by pressing a One-Touch
4-4
key. (60 locations)
If you register names and numbers as Speed-
3. SET AUTO
DIAL
2. SETUP
SPEED-DIAL
Dial numbers, you can dial a number auto
matically just by pressing SPD. DIAL and
4-7
a two digit number. (100 locations)
S-1
3. SETUP NUMBER
GROUPS
(Only lor FAX-950M/
This is used for setting up a group number
used for broadcasting.
4-8
Page 21

HOW TO USE 0№SCREEN PROGRAMMING (OSP) AND HELP KEY
Level one
function
4. USER
OPTIONS
Level two
function
1. SMOOTHING
2. BEEPER
3. COVERPAGE
4. GRAY SCALE
5. PRINT
REDUCTION
6. PRINTER
ALARM
1. SET
TONE/PULSE
DIAL
Explanation of Options
Smoothing enhances the appearance of in
coming faxes.
If you set SMOOTHING to ON, you can
receive messages with smoothing.
ON/OFF
You can adjust the volume of the beeper
with this function.
OFF/LOW/HIGH
If you set COVERPAGE to ON, you can send
your documents with a Cover Page generated
by your machine. When the COVERPAGE
setting is ON, you can select a Cover Page
comment.
ON/OFF
You can select a GRAY SCALE level.
16/32
You can set up the printing reduction.
OFF/93%/87%/73%/MANUAL
You can setup the printing alarm condition.
ONCE/3 TIMES/CONTINUE
There are two different dial types and you
must select the type of signal suitable for
your telephone.
TONE/PULSE
■ Factory
setting
ON
LOW
OFF
32
93% 7-6
ONCE 7-7
TONE
Page
7-4
4-1-2
6-16
6-13
4-1
5, TELEPHONE
OPTIONS
2. SET RING
DELAY
3.AUT0 REDIAL
4, SPEAKER
VOLUME
5. SET F/T
RING TIME
6. SET RING
VOLUME
The number of rings that will occur before
F/T or AUTO Answer Mode selections are
activated.
0/1/2/3/4 rings
If you set AUTO REDIAL to ON, your ma
chine will automatically re-dial the last
number called if the number was busy or the
call failed for some other reason.
ON/OFF
You can set the speaker volume.
OFF/LOW/HIGH
F/T RING TIME sets the time for simulated
ringing in F/T mode.
10/20/30/60 seconds
You can set the ring volume.
OFF/LOW/HIGH
2 7-2
ON
LOW
20
HIGH
6-5
7-5
7-4
7-5
3-2
Page 22

HOW TO USE ON-SCREEN PROGRAMMING (OSP) AND HELP KEY
Level one
function
5. TELEPHONE
OPTIONS
6. SETUP
SYSTEM
Level two
function
Explanation of Options
If you have distinctive ringing service from
your phone company, you can use this func
7. DISTINCTIVE
(Only for FAX-950M/
980M/1500M)
tion to register the ringing pattern of your
fax number. And if you set it to ON, you can
use the registered number as a fax number
only.
OFF/ON/SET
If you enter the date and time in 24-hour
1. SET DATE format, the LCD will display the date and
AND TIME time and will also be printed on outgoing
faxes.
If you frequently have delayed jobs, all for
2. SET DAILY
JOB TIMER
execution at same time each day, you can
program that time. Once you register it,
you do not need to enter that time, just
press TIMER.
3. ACT, REPORT
INTERVAL
You can select the time interval at which
the activity report is printed.
6/12/24 hours, 2/4/7 days, OFF
You can enter your name or company name,
fax number and telephone number in STA
4. SET
STATION ID
TION ID.
It is printed at the top of each page of every
outgoing fax. It is also printed on the auto
matic Cover Page.
Factory
setting
OFF
01/01/1995
00:00
00:00
OFF
Page
7-13-17
4-2
6-7
11-3
4-3
5. FAX REMOTE
CODE
6. SET
COVERPAGE
7. SET RECEIVE
PASSWORD
Current Setting Chart
Level one
function
CURRENT
SEHING
Level two
function
1. CONTRAST
If you enter REMOTE CODE, you can acti
vate or deactivate the fax machine from a
remote telephone.
ON/OFF
You can register your own two programma
ble comments on the Cover Page.
You can setup the password for the receiv
ing documents.
ON/OFF/PLUS
Explanation of Options
There are three types of contrast settings.
Usually the AUTO setting is acceptable.
But if you want to send an especially light
or dark document, please change the set
ting.
AUTO: Default setting is AUTO. Contrast
setting always reverts to AUTO after one
transmission.
S. LIGHT: To send very light documents.
S. DARK: To send very dark documents.
ON
>K51 (ACT.)
#51 (DEACT.)
OFF
Factory
setting
AUTO ^ 6-3
7-10
6-15
10-3
Page
3-3
Page 23
HOW TO USE ON-SCREEN PROGRAMMING (OSP) AND HELP KEY
Level one
function
Level two
function
Explanation of Options
Factory
setting
Page
If you need to send a set of originals at
various resolutions, this function will allow
2. RESOLUTION
you to send your required resolution by
page. (If all documents are the same reso
lution, use the Resolution key. See page 2-
STAN
DARD
6-12
4 #21.)
CURRENT
SETTING
3. OVERSEAS
MODE
STANDARD/FINE/S. FINE/PHOTO
If you have trouble when sending overseas,
you may want to use set OVERSEAS MODE
to ON.
OFF
6-11
ON/OFF
4. PASSWORD
TRANSMISSION
You can send a fax with four-digit pass
word,
10-2
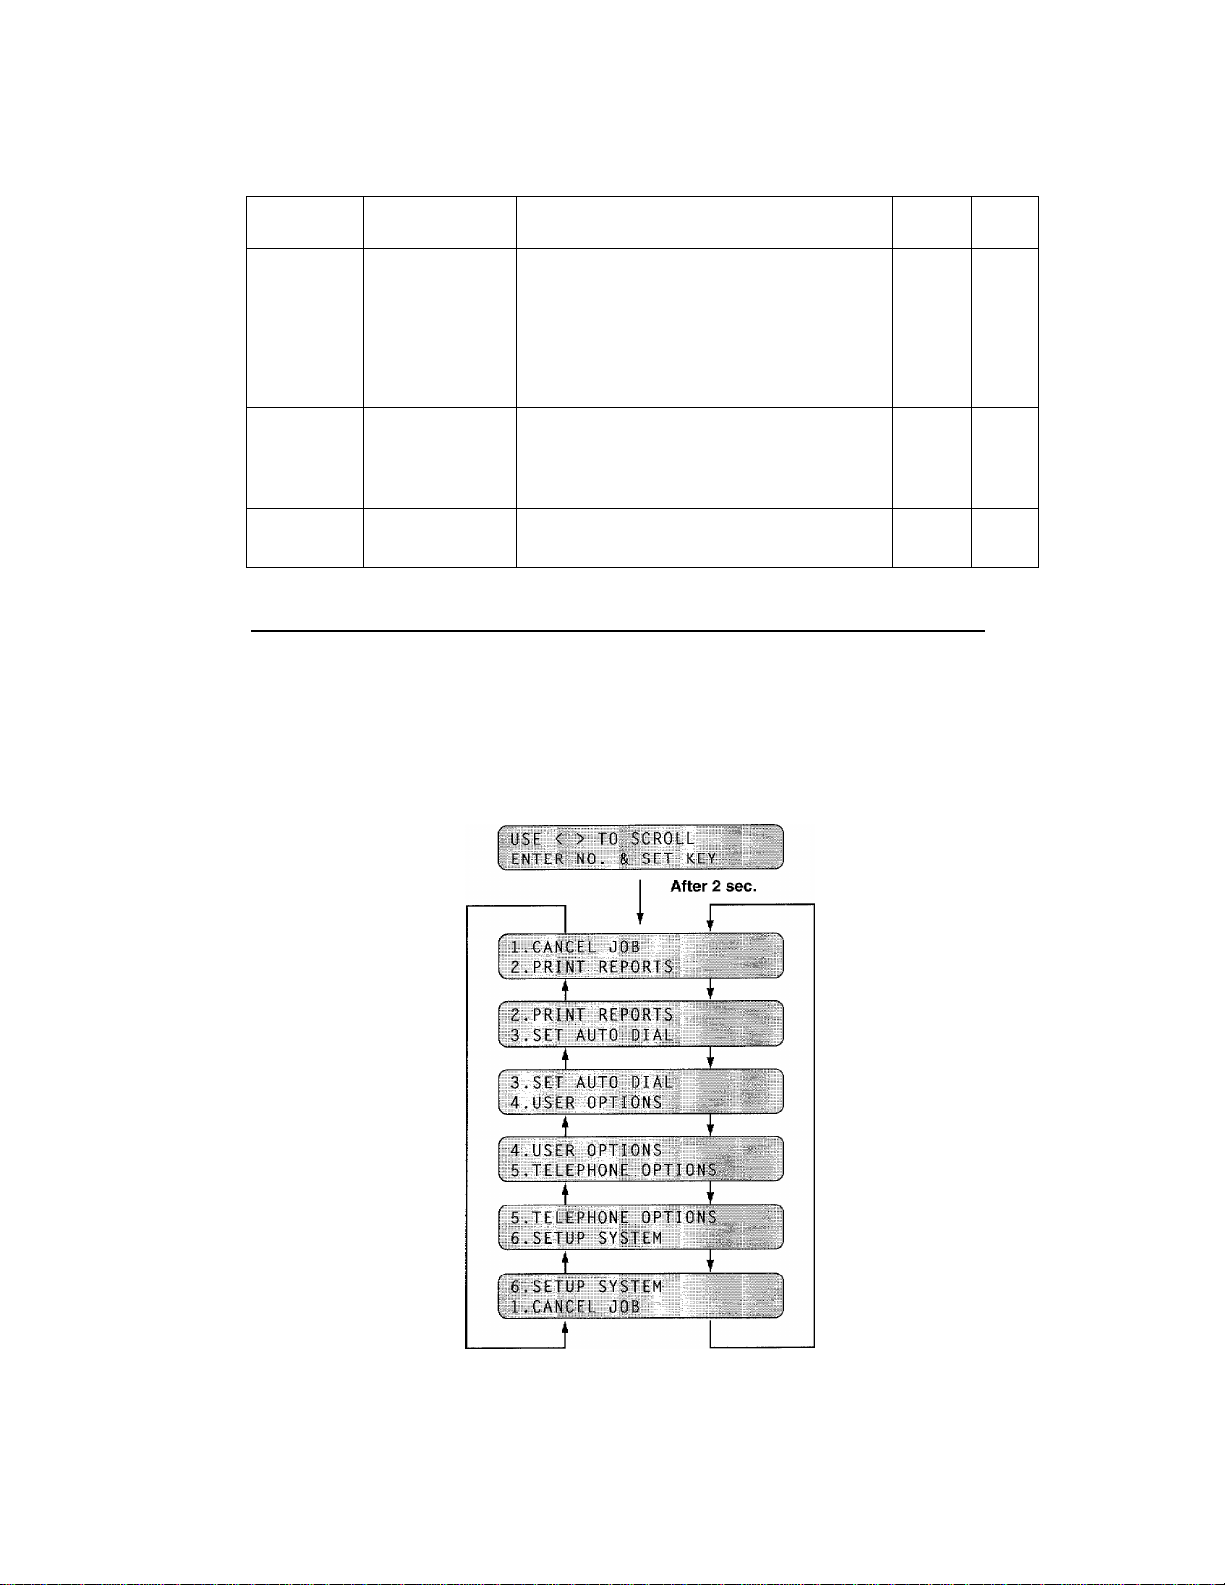
Using the Function Mode to Access On-Screen Programming (OSP)
You can access the function mode by pressing FUNCTION found in the User Setting Area of your
fax Control Panel. (See page 2-5.)
When you enter the function mode, your fax machine will display a list of Level One Functions
to choose from (see pages 3-1 through 3-3 for these Level One Functions), as seen below.
Left arrow
sequence
Right arrow or
auto scroll
sequence
a number of upper row will blink.
3-4
Page 24

HOWTO USE ON-SCREEN PROGRAMMING (OSP)
: ip
.............
These function options will appear two at a time on the display. You can then choose one of these
options by pressing SET when your desired option appears on upper row of the LCD and blink
it’s number.
You can also move through the function menu options at a faster rate by pressing —► (right
arrow). (See page 2-3 to locate this key on your Control Panel.) When you find the option you want
on upper row, press SET.
You can simply press the Level One Function number associated with each option (refer to page
3-1 through 3-4).
Helpful Hints If you want to exit the function mode, simply press STOP. Also, if you select the
wrong menu, and to return to the previous step, press CLEAR.
..
..... ...............
......
:
Displays for On-Screen Programming (OSP)
SPEAKER : HIGH
.SELECT < > & S
ET KEY
When you see the LCD displays, the upper row of LCD will
1
show the currently selected option, and lower row will
show a help message that gives you brief instructions on
how to proceed. The example shows the current speaker
volume is high and prompts you to use <— (left arrow) and
—► (right arrow) to alter the setting, and then to press SET
to store it.
Help Key (OnlyforFAX-950MI980Mll500M)
Press this key whenever you need a quick reference Help List printed. This Help List will give
you information on how to perform settings for a function, how to register information, or how to
get some basic information for sending or receiving faxes.
How to print a Help List
Press HELP to get a print-out of the Help List. Use it when you need information about how to
register or set one of the functions, or how to send or receive faxes. You can request a print-out
whenever the machine meets the following conditions:
-while the LCD displays the date and time.
-while the machine is timer waiting.
-while the machine is polled/polling waiting.
-while the machine is at level one or two of the function menu,
-while you are using the phone.
3-5
Page 25

**iHc*-i:***ir****il; |-| [ : P LIST ★ *’^ ** * “^ ** * ’
<STEPS FOR KEY EUYCTIOfJS)
DPRESS FUNCTION
EjSELECT A LEVEL ONE FUNCTION
BY PRESSING NUMBER KEY;--,
(FROM THE SELECTION I I
CHART ON THE RIGHT)
3)SELECT A LEVEL TWO EUNCTION
8Y PRESSING NUMBER KEY
4)SELECT THE DESIRED SETTING
USING THE ARROW KEYS.
SjPRFSS SFT
6)PRESS STOP TO EXIT
NOTE;
MAKE SURE YOU FIRST SET
TONE/PULSE(FUNCTIO\ 5-1),
DATE/TIME(FUNCTION 6-1) AND
STATION ID{FUNCTION 6-4).
<FUNCTION SELECTION CHART)
LEVEL ONE
1.CANCEL JOB
2.PRIN1 KLRORIS--
3.SET AUTO DIAL-- -1.SETUP ONE-TOUCH DIAL
4.USER OPTIONS - --I.SMOOTHING (ON/OFF)
5.TELPH0NE
OPTIONS --
6.SETUP SYSTEM --
LEVEL TWO
■1 .ACTIVIT’'' REPORT
2. ALL DIAL LIST
3. TELEPH0NE/FAX INDEX
4. C0VERPAGE FORMA^
5. CALL BACK MSG,FORMAT
6. USER 0°TI0N LIST
7.TRANSMIT REPORT
S.P'EMORY STATUS LIST
2.SETUP SPEED-DIAL
3.SETUP NUMBER GROUPS
2.BEEPER
3,C0VF_RPAGE
4.GRAY SCALE
5.PRINT REDUCTION
e.PRIiNTER ALARM
-l.SET TONE/PLUSE DIAL (TONE/PULSE)
?,SET RING DtLAY (0/1/2/3/4)
3.AUT0 REDIAL
4.SPEAKER VOLUME
5.SET F/i RING 1IME (10/20730/60)
6.SET RING VOLUME
/.DISTINCTIVE
-l.SET DATE AND TIME
2.SET DAILY COB TIMER
3.AC1.REP0R INTERVAL
4.SE, STATION ID
5.TAX REMOTE CODE
5.SET COVERPAGE
7,SET RECEIVE PASSWORD (ON/OFF/PLUS)
OPTIONS
(ON/OFF)
(OFF/lOW/HIGH)
(ON/OFF)
(32/16)
(OFF/93/87/73/
fONCE/3 TIMES/
(ON/OFF)
(OFF/LOW/HIGH)
(02F/L0W/HIGH)
(OFF/ON/SET)
(0FF/6H/E2H/24H/
(HAX/TEL/NAME)
(ON,'OFF,SET CODE)
MANUAL)
CONTINUE)
20/4D/7D)
KSTORING ONE-TOUCH)
FUNCTION
KSENDING A FAX (AUTO))
NUMBER
INSERT KEYS
[T] ^ □ OR
DOCUMENTATO^
SPRINTING A LIST/REPORT>
FUNCTION
I I
MANUAL MODE AUTO MODE
*-0R DEDICATED *FOR DEDICATED
TCLCPHONC use TAX use ONLY.
ONLY.
ONE-TOUCH
NUMBER START
KEY
CD -> □ ^
“0 SELECT
REPORT TYPE
□
ONE-TOUCH NUMBER
SPD.JIA
OR
<-AX R
EXAMP EE
KEYS
□
TO EN”ER
PHONE
START
□
TWO
DIGITS
□
ECEP'^ION SETTINGS)
F/T MODE
*FOR BOTH FAX AVD
TCLCPilOiVL'.
f -k--k-ic -h yc -k -k-k
AL = HA
SET
□
KEYS
TO ENTER
NAME
TAD MODE
*WHEN CONNECTING
CXTlRNAL TlLFTKONl
ANSWERING DEVICE.
SET
□
3-6
Page 26

HOW TO USE ON-SCREEN PROGRAMMING (OSP) AND HELP KEY
How to Enter Text in Function Mode
Each number key has two or three letters printed above it. The following keys “1”, and “>K”have
no printed letters because they have special characters.
ABC DEF
1
GHI
4
PRS TUV
7
2
JKL
5
8 9
QZ
3
MNO
6
WXY
0 #
By pressing the appropriate number key the correct number of times, you can get the
character you want. When you are making certain settings, such as the station ID settings, you
need to enter text into your fax machine.
Key
2 A B
3
4 G
5
6 M N
7
8 T
9 w
0
Let’s say that you want to enter the initials “BR”. Follow the example of next page,
once
D E
J
P R
Q
twice three times
C 2
F
H
K
I 4
L 5
0
s
U V
X
z
Y 9
0
four times
KEYS TO BE PRESSED
1. Press 2 twice to enter the letter B.
2. Press 7 twice to enter the letter R,
NAME
ENIEI</PRE
NAME:B
ENTER./PRESS SET TO END
f NAML■; BR
, LN U R/PRfSS SET TO END
:l TO
3
6
7
8
Q
.. .. . .. .
END
3. Press SET.
3-7
Page 27

HOW TO USE ON-SCREEN PROGRAMMING (OSP) AND HELP KEY
.
..................................
1. If you want to enter a blank space, press —(right arrow) twice.
2. If you entered a letter incorrectly and want to change it, you can use ^4— (left
arrow) to move the cursor back to where it is. When you reach the letter, you can
enter a new one in it’s place. You can only overwrite letters, not insert them, so
you may have to go back and overwrite a lot of letters if you forget to enter a letter.
3. If you enter a character that is assigned to the same number key as the previous
character, press —► (right arrow) to move the cursor to the right.
FOR YOUR INFORMATION
............
^ -..
.... hhiNNE: : ;:;::;:NNNNNi^* T:::NS
How to Enter Special Characters, Symbols and Punctuation
Marks in the Function Mode
1 key
-------------* key —#key
The “1” key contains all the accented characters. The and the “#” key are used for punctuation
marks and symbols. Let’s say that you want to enter the Symbol Follow the example below.
-----
----------------
AEOUACEEl
-----
(space) !”#$%&’()*+,-./
:;<=>?@[]^_
KEYS TO BE PRESSE
1. Press * to show a list of characters.
2. Press sK, sK, * (6 times).
3. Press —► (right arrow).
T eSSb
NAHE:JAME:5
ENTER/PRESS .SE! 10 ENIj
NAHL: JAMES
MARK 1 C - . /
NAME:JAMES &
MARK- )=K-i-.-. /
name:JAMES &
ENTER.-'PRE.SS SET TO EMC
3-8
Page 28

Pill^E FUNCTION SETTINGS
4. TELEPHONE FUNCTION SETTINGS 1
There are some settings, such as the date and time, you should make to your fax machine before
you begin using it. Once entered, these settings will remain in the machine until you change them.
You can begin customizing the settings by pressing
activates the function mode and On - Screen Programming prompts. You can complete a variety
of settings in this mode.
Setting the Dialing Mode (TonelPulse)
Your fax machine supports both tone (or multi-frequency) and pulse (or rotary) dialing. It is
initially set to TONE, so you do not need to change the setting if you use that kind of line. If you
are using a pulse dial line, you can change the setting to PULSE by following the steps below:
FUNCTION on the control panel. This
F LCD
1. Press PUSH and open the cover.
2. Press FUNCTION.
You will see scrolling options on the display.
You can choose one.
3. Press 5.
4. Press 1.
After two seconds you will be automatically
prompted to select pulse or tone.
5. Press <— (left arrow) or —► (right
arrow) to find the dialing mode that
matches your telephone line.
Example: PULSE.
6. Press SET.
7. Press STOP to return to date and
time.
Setting the Beeper Sound Level
01/01/1995 00:00
f AX/COPY; rN.5iRT DOCUHFNT
UiE SCROLL
FNTER N0. & SFT KKY
5.TF:1 EPflONF OPTIOhiS
PRESS STOP TO CANCEL
l.SLL TONL/PULSr DIAL
PRESS STOP iC) CANCFl
ПГЛ1 HFIPOU : lONE
SELECT < > & SET KEY
DIAL Hi-[HOD: IMPULSE
SELECT < > & SET
mSET lONI/PblSE DIAL
2 . SET RING DEI AY
....
IEY:
If the beeper setting is LOW or HIGH, it will ‘"beep” every time you press a key, make an error,
or at the end of sending or receiving a fax.
The initial setting on your fax machine for the beeper is LOW. If you do not want the beeper on,
select OFF, and if you want it loud, select HIGH.
4-1
Page 29
lilllllll
1. Press PUSH and open the cover.
2. Press FUNCTION.
3. Press 4.
4. Press 2.
5. Press <— (left arrow) or —► (right
arrow) imtil you get the setting you
want.
Example: OFF.
SEHINGS
STATUS OF LCD DISPLAY
01/Oi/
FAX/си
US‘ <
rN ! ER
PRESS .STOP Г0 CЛNCFL
2.B:fp:R
PRFSS STOP
P-:
S E
В LLP
SLLL
199b 00:00
i^VilNSERI ilOC
feio SCROLL: N0. & S^T KEY
. iJSt R OIMTONS
CANCEL
LOW
> A SLL KEY
ER : OF г
SET kf:y
'Л
UMlNT
'
6. Press SET.
2 .BEEPER
S.COVLRPAGE
7. Press STOP to return to date and
time.
Setting the Date and Time
Your fax machine shows the date and time on the display and prints it on every fax page you send.
You can set the date and time in function mode.
YS TO BE PRESSED
1. Press PUSH and open the cover.
2. Press FUNCTION.
3. Press 6.
4. Press 1,
5. Enter the last two digits of the year.
Example: 94.
STATUS OF LCD DISPLAY
( n 1 / 0
: FKx/i
(use < > TO SCROLL
. PRESS STOP TO CANCEL
= 4 .SET DALE AND TIME
(PRESS STOP TO CANCEL
rENTER & SET
/ ] Q i-T ri 0 ■ n Г.1
:0PV;INSFR1 COCLMEN" ^
Enter N0.;:A set kev
fj. SETUP SYSl-M
YEAR T-XX
.......
YIAR : 94
ENIER & SET KEY
Л
KFY
6. Enter two digits for the month. (JAN.
= 01, OCT.= 10, etc.)
Example: 09.
'month ; XX
гМШТН 1 09
ENTER & SEI KEY
4-2
Page 30

TELEPHONE FUNCTION SETTINGS
liilil:
7, Enter two digits for the day.
Example; 12.
8. Enter the time in 24-hour format.
Example: 15:25 (3:25 P.M.).
9. Wait for two seconds.
10. Press STOP to exit and view the new
date and time.
Helpful Hints If you do not register your station ID, you can not print the date and time on
I CAY : XX
! FNTFR & SET KEY
CAY : ]?
[ tin tR & SET KEY
TIME : XX:XX
ENTtR & SET KEY
TIME : L 5:2 b
ENIER & SET KEY
1 .SI i CATF ANIl T !Mt
2. SLY IJAILV JOB TIMER
Oh)/12/1994 15:25
FAX/COPY:INStRl DOCUMENT
every fax pages you send.
Setting the Station ID ______
The Station ID is for identification purposes. Here you can store your name, fax number, and
telephone number. Your machine then prints this information on the electronic Cover Page and
every fax page you send.
TUS OF LCD DISPLAY
1. Press PUSH and open the cover.
2. Press FUNCTION.
3. Press 6.
4. Press 4.
You will then be prompted to enter your fax
number.
5. Enter your fax number (up to 20 dig
its).
Example: 4155554444.
6. Press SET.
You will now be prompted to enter your
telephone number.
7. Enter your telephone number (up to
20 digits).
If your telephone number and fax number
share the same line, enter the same number
again.
Example: 4155554445.
09/J2/I994 15:25
EAX/CrjFY : IN-StRI DOCUMEN
UbE < > TO SCROlI
FNIIR NO. a SF.I KEY
6. SI TUP SYSTEM
PRESS STOP 10 CANCEL
4. SET STATION ID
71
I PRFSS STOP TO CANCFl
'■ FAX:
. r NT TR S SET KEY
FAX:4T55554444
FNTFR a SET KEY
1*1*
TEL:
[ ENTER a SET KEY
iiiii
4-3
Page 31

TELEPHONE FUNCTION SETTINGS
8. Press SET.
You will be prompted to enter your name or
company’s name.
9. Enter your name by using the number
keys (up to 20 characters).
Example; BROTHER.
Refer to the section “How to Enter Text in
the Function Mode” on the page 3-7, 8.
10. Press SET to confirm the entry.
NAME:
h'NTFR/PP.rSS SET TO LND
NAME:BROTHER
LNTER/PRESS S.^T TO t.ND
! 4.St i STAIION TO
.. 5.1-AX Rf-MOrE CODE
11. Press STOP to return to date and
time.
Helpful Hints 1. The telephone number that you stored above is only used for the Call Back
Message and the Cover Page features.
2. If you do not enter a fax number, no additional information can be entered.
3. When you enter a space, use —► (right arrow). Then it will be registered as a
blank space,
NOTICE
The Telephone Consumer Protection Act. of 1991 makes it unlawful for any person
to use a computer or electronic device to send any message via a telephone fax
machine unless such massage clearly contains in a margin at the top or bottom of
each transmitted page or on the first page of the transmission, the date and time it
is sent and an identification of the business or other entity, or other individual
sending the message and the telephone number of the sending machines or such
business, other entity, or individual.
In order to program this information into your fax machine, you should complete the
steps of the previous page.
Storing One-Touch Dial Numbers
You can dial numbers automatically by storing telephone or fax numbers as One-Touch dial
numbers. You can also store names with the numbers so that when you call, you can verify the
destination on the display. You can store a maximum of 60 phone numbers (01-60). To use 31 to
60 One - Touch number locations, you need to press SHEFT. For example, One - Touch location
“31” is accessed by pressing SHIFT ■+ One-Touch “01” simultaneously. Here is how to store a
telephone number as a One-Touch dial number:
If you are regi.stering a number that is not in your area make sure you program the number with
a “1” plus the area code.
4-4
Page 32

wimiimm.,
aiillli
WKKtmSsm
TELEPHONE FUNCTION SETTINGS
.
......
.
KEYS TO BE PRESSE
«
1. Press PUSH and open the cover.
2. Press FUNCTION.
3. Press 3.
4. Press 1.
5. Press one of the One-Touch keys, you
want to use to store a number.
Example: One-Touch 05.
The One-Touch keys are not the number
keys.
6. Enter the number (up to 20 digits).
Example: 4155551212.
7. Press SET.
You then will be prompt to enter the name or
company associated with this number.
STATUS
f 09/12/1994 la:?9
i FAX/COPV: INSERT DOCUMENT
USE < > TO SCROLL
ENTER N0. & SET KEY
■"s.Sn A9T0 DIAL
PRESS STOP TO CANCEL
l.SETUi’ ONE-iOUCH DIAL
[ TRESS STOP TO CANOEL -hTit
SiTUP ONE-1 OUCH DIAL.
SELECT ONE- TOUCH Kl Y
DISPLAY
*0S :
ENTER ^ .Sl-T KEY
¥:0b;4i&hiljbi2.L?
ENTER & SET KTY
NAME:
ENTER/PRF.SS SET TO END
’■
8. Enter the name by using the number
keys (up to 17 characters).
NAMEiNJ OFFICE
ENTER/FRESS SET TO
END
Example: NJ OFFICE.
(See pages 3-7 and 3-8 for how to enter text.)
9. Press SET,
10. Select the type of number (FAX, TEL,
F/T or CHAIN) by using ◄— (left arrow)
TYPE 0^ NUMBER : FAX
SELECT < > & 5T1 KEY
TVPE OF NUMBER ; FAX
SFIFCT < > R .SFT KFY
or —► (right arrow) to display the type
you want.
(See For Your Information of next page.)
Example: FAX.
11. Press SET.
' Sh I i.l.- n
SELECI ONE-TOUCH KEY
NF-TOIICH niAl
12. Return to step 5 to enter another
number, or press STOP to return to
date and time.
Helpful Hints If you have to wait for a dial tone when you get access to the outside line, you
should use PAUSE/REDIAL.When you press PAUSE/REDIAL, a dash
will appear on the display. By storing the numbers with a pause, you can create
a delay of 3.5 seconds.
J
4-5
Page 33

TELEPHONE FUNCTION SETTINGS
FOR YOUR INFORMATION
Types of Numbers
When you store a number as a One-Touch or as a Speed-Dial number, you have a
choice of choosing the type of number. There are 4 options:
1. FAX (A fax number).
2. TEL (A telephone number).
3. F/T (Both a fax number and a telephone number)
4. CHAIN (A number, usually an access code, for chain dialing).
Chain Dialing
Sometimes you may want to choose from among several long-distance carriers when
you make a call. This is because rates may vary depending on the time and
destination. To take advantage of low rates, you can register the access code of a long
distance carrier as a One-Touch or a Speed-Dial number for chain dialing. To do this,
you store the access code as you would a regular number and register it as a “chain”
number. (See the step 10 of page 4-5.) Then, when you want to make a call, you use
this number in combination with the regular number, which also may be a OneTouch or a Speed-Dial number.
This is also important for transmissions using credit cards.
E
If you want to store a phone/credit card number to be used in your dialing sequence,
you must store that phone/credit card number as a “chain” number. You can start a
chain dialing call by pressing a One-Touch key or Speed-Dial number where your
chain number is stored. Next you press another One-Touch or Speed-Dial number for
the regular phone number (either FAX, TEL or F/T number), or enter the number
manually. And then press START to begin calling.
NOTE: When you send a fax using your credit card number in chain dialing, do NOT
send a cover page because your credit card number will be on it.
4-6
Page 34

TELEPHONE FUNCTION SETTINGS
iiiiiii.:-.-;;
Storing Speed-Dial Numbers
When you store a phone or fax number as a Speed-Dial number, you need to enter two digits
number, from 01 to 00 using the number keys. For example, you cannot enter “5”. You need to
enter “0”, “5”, You can store as many as 100 numbers as Speed-Dial numbers.
1. Press PUSH and open the cover.
2. Press FUNCTION.
3. Press 3.
4. Press 2.
5. Use the number keys to enter two
digits number.
Example; 05.
6. Enter the number (up to 20 digits).
Example: 5555151.
7. Press SET.
You then will be prompted to enter the name
or company associated with this number.
8. Use the number keys to enter a name
(up to 15 characters).
Example: MANCHESTER.
(See pages 3-7 and 3-8 for how to enter text.)
09/12/1994 15:25
FAX/COPY:1М5К8Г OOCUMF
USL < > 10 SC80LL
ENTER N0. & SET KEY
3.SET лито DIAL
PRESS STOP TO CANCEL
? . SM UP SPEED-DIAL.
PRESS STOP TO CANCEL
SETUP SPFFD-DTAL
ENTER & SET KFY
SI TUP SPEED DIAL : #05
ENTER & SET KEY
#05 :
ENTER & SET KEY
#05:5555151
ENIER & SET KEY
NAME:
ENTER/PRESS SLl TO END
NAME:MANCHES'ER
ENTER/PRESS SET TO END
NT
9. Press SET.
10. Select the type of number (FAX, TEL,
FAT or CHAIN) by using <— (left ar
row) or —► (right arrow) to display the
type you want.
Example: TEL.
11. Press SET.
12. You are ready to enter another SpeedDial number, or press STOP to return
to date and time.
4-7
TYPE OF NUMBER : IЛХ
SCI ECT < > & SEE KEY
TYPE or NUMBER : TEI
SELECT < > & SET KLY
' S E г и ?
ENTER
S P E. Ill -DIAE :
& SET
KLY
#_
.
l4
...
Page 35

CTION SEHINGS
...
...
.
Hsipful Hints 1. Print the All Dial List to make sure you have stored the correct numbers. (See
page 11-2.) This list will contain the type of number: FAX, TEL, or F/T.
2. Even if there should be a loss of electrical power to your fax machine,
the telephone and fax numbers you have stored will not be lost.
FOR YOUR INFORMATION
■I
■i*
y^hen You Wish to Change the Stored One-Touch and Speed Dial
Numbers (During Step 5 on Page 4-5, 7)
When you access the function for a One-Touch key or Speed-Dial number, that is
already in use, you will be asked if you wish to change it or to exit and select a
different One-Touch or Speed-Dial number. This display does not appear if the OneTouch key or Speed-Dial you chose is not assigned.
1. Press 1 to assign a new number to the One-Touch key or Speed-Dial, or press 2 to
choose a different One-Touch key or Speed-Dial.
>l=0b:.NJ OrnCE
CHANGE ? l.YES 2.NO
2. If you are replacing an existing number with a new one, the old number and name
will appear in the display. Press CLEAR to erase the old number and name. Then,
enter the new number and name and press SET to store the entry.
Memory Storage
Your fax machine is equipped with an internal battery that will keep the memory
working for up to two hours after power has been cut off. After that time, the date and
time will be lost and you will have to re-enter the information. All other settings in
the SET AUTO DIAL, USER OPTIONS and SETUP SYSTEM functions are stored
permanently and will be retained even in the event of a power failure.
Helpful Hints If your fax machine is connected to a PBX, you may need to insert an additional
number before each fax or telephone number to get access to the outside line.
Setting up Number Groups (Only for FAX-950M/980M/ 1500M)
You can have at most 6 groups of number which, can assign one of the One-Touch dialing keys
as a group number. For each number group, you can assign up to 159 numbers (consisting of OneTouch numbers or Speed-Dial numbers), and each number group can have a name up to 17
characters long. You can use number groups for broadcasting.
___________________
4-8
Page 36

TELEPHONE FUNCTION SETTINGS
KEYS TO BE PRESSE
1. Press PUSH and open the cover.
2. Press FUNCTION.
3. Press 3.
4. Press 3.
5. Press one of the One-Touch keys, to be
the stored group number.
Example: Select “ One-Touch 01” as a group.
6. After two seconds enter the group
number by using the number keys.
Example: 1,
7. Enter the One-Touch or Speed-Dial
numbers in this group.
OF LCD DISPLAY
09/12/1994
KAX/COFY:INSERT DGCUMLN'
USF < > TO SCROLI
FNTIR N0. & SET KEY
s.sr-r AUTO dial.
PRESS STOP TO CANr.M
s.SlTuf number groups
PRESS STOP 10 CANCEL
SETUP NUMBER GROUPS
SIT.EOT ONE-1 OUCH KEY
SETUP NUMBER GROUP
ENIER 8 SEl KEY
SE HIP NUMBER GROUP
INTER & SET KEY
! GOl;
[select AUrO DIALS & 5ET
GOT:#02#05^03
HEAU OFTICE
GO
GOl
8. Press SET.
9. Enter the group’s name.
Example: ALL BROTHER.
10. Press SET.
NAME:
ENTFR/PRESS SET TO END
NAME: AIE EiROTHE.R
ENTER/FRESS SET TO END
3.SEIUP NUMBER GROUPS
1 .SETUP ONE-TOUCH DIAI
11. Press STOP to return to date and
time.
Helpful Hints You can print a list of all One-Touch numbers and Speed-Dial numbers. Group
number will be listed under One-Touch numbers. (See page 11-2.)
4-9
Page 37

lili
USING THE UNIT AS A TELEPHONE
5. USING THE UNIT AS A TELEPHONE
Your fax machine can be used to make regular telephone calls. You can dial numbers manually,
by pressing the number keys, or by using One-Touch or Speed-Dialing.
Manual Dialing
1. Pick up the handset, or press HOOK.
2. When you hear the dial tone, you can begin dialing by pressing the number keys.
3. If you used HOOK, pick up the handset when the call is answered.
One-Touch Dialing
1. Pick up the handset, or press HOOK.
2. When you hear the dial tone, press the desired One-Touch key.
3. If you used HOOK, pick up the handset when the call is ansvv^ered.
If you try to use a One-T ouch number that has not been registered, you will hear a warning sound
and the display will carry a message reading, “NOT REGISTERED”. The display will return to
normal after 2 seconds.
Speed Dialing
1. Pick up the handset or press HOOK.
2. When you hear the dial tone, press SPD. DIAL and then the two digit Speed-Dial number.
3. If you used HOOK, pick up the handset when the call is answered.
ipWDUR INFORMATION
Using Keys with the Telephone
- Use PAUSE / REDIAL for putting a pause between numbers.
- Use HOLD to put a call on hold. You can put down the handset without
disconnecting the call. You must pick up the handset to release the call from
HOLD,
- Use# to switch the dialing type from “pulse” to “tone”. This key is also used for push
button services, such as those offered by banks, credit card companies, or paging
On Hook Dialing
When you make a call using HOOK, you can listen to the other end of the line, but
they can’t hear you unless you pick up the handset. Also, if you press HOOK again
before you pick up the handset, the call will be disconnected.
5-1
Page 38

USING THE UNIT AS A TELEPHONE
iiMII
ilB
Telephone Index
Once you have registered a name and number as a One-Touch number or as a Speed Dial number,
you can search for that name alphabetically using the Telephone Index. You can also dial a
number directly from the Telephone Index.
STATUS OF LCD DISPLAY
09/l?/1994 lb:?5
FAX/COPY:INSERI DOCUMENT
1. Press TEL.INDEX.
2. Use the number keys to input the first
character of the stored name, and
press <— (left arrow) or —► (right
arrow) to find the name.
Example: input the first character “N”,
3. Pick up the handset, or press HOOK.
4. Press START to begin dialing.
- Return the handset to its cradle or
press HOOK to cancel the call.
I EL.INDEX
ENTER CHARACTER
N INJ OrriCE
SELECT < > & START
5-2
Page 39

miiiiil:::
BASIC FAX TRANSMISSIONS SENDING FAXES
6. SENDING FAXES
A) BASIC FAX TRANSMISSIONS
The Size of Your Documents
The size of the documents you want to send by fax should not be larger (or smaller) than your fax
machine can accommodate. The documents should each be between 148 and 216 mm (5.8 and 8.5
inches) wide and between 100 and 900 mm (3.9 and 35.4 inches) long.
The maximum width of the scanned area is 208 mm (8.2 inch).
How to Set the Document
To send a fax, first insert the document you wish to send, face down, in the
document feeder. The top edge of the document should go in first, or the fax will
be received up side-down.
To prevent the document from going crooked as it is fed, adjust the paper
guides to fit the width of the document.
NOTICE
V
dOl
Page 40

111111.
SENDING FAXES basic fax transmissions
The Auto Document Feeder (ADF)
The Auto Document Feeder (ADF) automatically feeds documents (up to 30 pages) into the fax
machine, one at a time. The thickness and weight of the documents should fall into the following
categories:
Thickness: For one sheet: 0.07 to 0.12 mm (2.8 x 10"^ to 4.7 x 10’^ inches).
For multiple sheets: 0.07 to 0.10 mm (2.8 x 10'® to 3.9 x 10'^ inches).
Weight: For one sheet: 52 to 85 g/m^ (0.07 x 10'^ to 0.121 x 10'^ Ibs/inch^).
For multiple sheets: 52 to 80 g/m^ (0.07 x 10'® to 0.114 x 10'® Ibs/inch^).
As a reference, please note that the paper on which this is printed has the following thickness and
weight:
Thickness; 0.10mm (3.9 x 10 ®inches)
Weight: 80g/m^(0.114 x 10'®lbs/inch®)
Before inserting documents into the document feeder, fan the sheets of paper to make sui'e the
documents are not stuck together. Then tap the leading edge on a table so that all the pages are
even when placed in the feeder. Make sure you always put the documents in face down.
Getting Ready to Send Faxes
Resolution
You can choose a setting (STANDARD, FINE, SUPERFINE, or PHOTO) for the resolution any
time before you press START or COPY. You can choose a setting by pressing the Resolution key.
(IZH means light off. means light on.)
STANDARD
FINE
SUPERFINE
PHOTO
To set resolution per page, refer to Multiple Resolution Transmission on page 6-12.
I I FINE
I—PHOTO
CZI S.FINE
H FINE
I—PHOTO
□□ S.HWE
I I HNE
1—PHOTO
!■ S.FINE
........
\\
■■ RNE
I— PHOTO
■I S.RNE
--------
The STANDARD resolution can be used for most typewritten
text. When the STANDARD setting is on, both lights are off.
Transmission speed is normal.
The FINE resolution is an ideal setting to use if you want to send
documents that have small print. When the FINE setting is on,
the FINE light will be lit.
Transmission speed is slower than STANDARD.
The SUPERFINE resolution is a good setting to use for documents
with very small print or artwork. When the SUPERFINE setting
is on, the S. FINE light will be lit.
Transmission speed is slower than FINE.
The PHOTO resolution is ideal for sending documents that have
varying shades of gray, such as photographs. The PHOTO setting
is on when both lights are lit.
Transmission speed is slower than FINE.
Contrast
The fax machine has automatic contrast control, but if you need to send a document that is very
light or very dark, you may want to set the contrast yourself.
6-2
Page 41

■■■
.
..........S ENDING FAXES
#' j;C.''..£■■■
Use SUPER LIGHT to send a very light document.
Use SUPER DARK to send a very dark document.
KEYS TO BE PRESSED
1. Press PUSH and open the cover.
2. Insert the documents face down in the
feeder.
3. Press CURRENT SETTING.
4. Press 1.
5. Use^— (left arrow) or—► (right ar
row) to select one of the settings,
AUTO, S.LIGHT, or S. DARK.
Example: S. LIGHT.
6. Press SET.
7. Press STOP to exit.
.Ú- : .
Jr'l:
M/12Ar9-94......::Lfe25 "
FAX/COPY:INSERT PÜEUMENI
G'vX
COPY
" US
ENHR NO. & SEI KLv
f1.CONTRAST
^PRESS Slop '0 CANCT
CONTRAST ::írEAÜT:Q
FN ; ÍM Nl
K:PR:ESl CÍIPY KTY
É < > 10 SCROl1
}. 1 A R T
_
: > ÍÍ s !: ]■ k [ V
XONTRMT.vS.LliteJ ..
SELEC^ < > A SIT KEY
1. .CONTRAST
2. RES0IUT I ON
■fAX: & STAttT
fOiRY: PRESS COPY REY
lili
Then start fax sending operation below or copy (page 8-1),
Sending a Fax Automatically
KEYS TO BE PRESSE
1. Insert the documents face down in the
feeder.
Enter the fax number.
2.
Example: One-Touch dialing.
3. Press START,
STATUS OF LCD DIS
09/12/1994 1 L, : ?b ■
PAWCOPY : INSERT DOCUMENT
'FAX : ENTER NO.
CQi>V: PRESS COP
■- — '■
[ iTOS
NO GEM Cl.
i N0: OFFLCi
DIALING
ÍNdSlFFTCF
sf.noing;
¿4 START
...... J
^ liiUTliiiilWllX
P.Ol
J
6-3
Page 42

Jii :■ ■ '' ..iii::;-.'. : 3||i / '... |||;|; ..
Sending a Fax Manually
llliii
' 09/1? / ¡9 94 ] ,5:?b
. hAX/Cu.W : INSfRT DCCU MSiNiT ,
1. Insert the documents face down in the
feeder.
2. Pick up the handset or press HOOK
and listen for the dial tone.
3. Dial the fax number.
You can use manual dialing, One-Touch
FAX : LNFLR N0. &S I A R1
COPY; FTFSS COf'Y K
-------------■ --
---
CNiLR N0. & START
">1.05 ...
.
N.J OFF :CF
dialing, or Speed-Dialing, or Tel-Index.
4. When you hear a fax tone, press
START.
NjdMiCL.
S6ND1TO
Your fax machine will begin sending the
documents.
5. Return the handset to its cradle, if
you did not use HOOK.
FOR YOUR INFORMATION
Dialing a Number
There are several ways to dial a number. When you dial, you can check the display
to see who you are calling. Choose one of the following dialing methods:
1) Manual Dialing
Dial the fax number by pressing the number keys, then press START.
2) One-Touch Dialing
Press one of the One-Touch keys. (The numbers must be stored beforehand. See
page 4-4.) Then press START.
3) Speed-Dialing
Press SPD. DIAL, then use the number keys to enter a two digit code.
For example, press “0”, “5” for 05. (The numbers must be stored beforehand. See
page 4-7.) Then press START.
4) Telephone Index
You can use the Tel-Index to make telephone or fax calls. (See page 5-2.)
-—-
---
N
=;k-
N
Talking to the Other Party When Sending a Fax
When you are sending a fax manually and you hear the recipient’s voice instead of
fax tones, you can use the handset to have a conversation. When or if you want to then
send a fax, ask the person on the other line to press START on his/her fax machine
and when you hear fax tones you can press START to begin sending your fax.
6-4
Page 43

■■IllIilB
BASIC FAX TRANSMISSIONS
SENDING FAXES
И1ШИ1Ш
Automatic and Manual Re-dialing
If a number you have dialed is busy or your call did not go through for some other reason, you can
re-dial that number. There are two ways for re-dialing, “automatic” and “manual.” Automatic re
dialing can only be used for faxes that were sent using automatic transmission — not for
telephone calls. The factory setting is “auto re-dial on”, but you can change it to “auto re-dial
off’, if needed. If the re-dial function is set to “auto re-dial on”, it will automatically re-dial the
number 3 times at 5 minute intervabs before giving up. Whether the setting is on or off, the fax
machine will re-dial the number when you press PAUSE/REDIAL (manual re-dialing).
Setting the Auto Re-dial
STATUS OF LCD DISPLAY
1. Press PUSH and open the cover.
2. Press FUNCTION.
3. Press 5.
4. Press 3.
5. Use — (left arrow) or —► (right ar-
row) to turn the auto re-dial function
ON or OFF.
Example: OFF.
6. Press SET.
7. Press STOP to exit.
FOR YOUR INFORMATION
Possible Settings When You Send a Fax Manually
■' 09/13/1994
^ 1AX/COPY: It
IJSr < > TLl SCÍÍOL!..
IP I Eli NO. & SET KEY
C
b. ITI. lPHONE 0
PRL.SS STOPPO:
'S.AUIO REL4AL
PRESS STOP TO
AUTO RFDTAl. :
S-LECI < > & i
"auto REDIAI. :
^ S Г1 ! 0 Г <: > &
З.ЛиТО RELMAL
4.SPEAKER VOlUMF
S-^RT DOCUMliNI ^
^1 IONS
CANCEL
cancel
ON -
liLKEY;-- ■=■
;ft key
шгЛ
n..'ÌÉ
..
\
V
Resolution (See page 6-2, 6-12.)
Cover Page (See page 6-14.)
Call Reservation (See page 6-17.)
• Contrast (See page 6-2, 3.)
* Overseas Mode (See page 6-11.)
6-5
Page 44

,BII
iilif
SENDING FAXES BASIC FAX TRANSMISSIONS
iiiiiilllii:
FOR YOUR INFORMATION
...
Printing Page Headers
Your fax machine can print a page header on top of every document you send. It is
printed on the receiving party’s fax paper. It contains the date and time of
transmission, yomr fax number and name (Station ID), and page number. Of course
you need to register your Station ID beforehand for that information to be available.
Transmission Date and Time
09/12/1S94
15; 25
Station ID
4155554444
BROTHER
Page Number
PAGE
Sending a Fax by Using Quick-Scan (Memory Transmission)
(Only for FAX-950M1980MI1500M)
If you are faxing a set of documents that are confidential in nature or you just need your original
documents right away, you don't have to stand at the machine and wait for the transmission of
each page to be completed. You can use Quick-Scan (or memory transmission) in order to get your
original documents quickly before transmission.
BE PRESSED ■.mw
0a/l.<'/1994 l!i:25
FAX/COPY:INSERT DOCUMENT
1. Insert the documents into the feeder.
FAX : ENTER NO. & START
COPY ; PRESS COPY KEY
2. Press QUICKSCAN.
ENTER NO. & SI ART 100%
3. Enter the fax number.
i
■ No OFTICT.
4. Press START to begin scanning the
documents into memory. Once
MEMORY
completed, the fax machine will dial
the destination.
FOR YOUR INFORMATION
If You Get a MEMORY FULL Message When Trying to Send a Fa^ hy
Using Quick-Scan
If the memory becomes full when scanning page one, the display shows “PRESS
STOP KEY”, then press STOP to abort the job.
If the memory becomes full on page 2 or more of a multi-page document, you will be
prompted to press START to send the portion already scanned, or STOP to abort the
job.
6-6
100%
Page 45

BASIC FAX TRANSMISSIONS SENDING FAXES
Delayed Transmission
You can set the timer to send documents at a later time (up to 24 hours later). Your fax machine
will also produce a report, the “Delayed Sending Report”, after the fax is sent. You can set up to
three different documents for delayed transmission (only for FAX-950M/980M/1500M).
h^;
1. Insert the documents into the feeder.
2. Press QUICKSCANifyou use memory
transmission, or not you can send
your fax normally, (only for FAX950M/980M/1500M)
3. Press TIMER.
4. Enter the time in 24-hour format us
ing the number keys.
Example; 19:45 (7:45 P.M.).
5. Enter the fax number.
6. Press START.
The fax machine waits until the specified
time to call.
.........
lOOii
10 OS
■
.
OF LCD DISPLA
09/1.^/1994 15:2b
FAX/COPY:INSERT DOCUMENT
FAX : ENTE^^nS
COPY: PRESS COP'-^ KEY
ENTER N0
! Sr!" flME = 00:00
. ENTER & SET KEY
SEE TIME = :i 9 : ^ 5
ENTER & SET <LY
L9:4b
ENTER NO. & STARE
^05
NJ OEFICE
MEMORY 100%
09/J..P/1994 15:26
FAX / C0PY : ] NS E R ! DOC UME. N I
Setting the Daily Timer (for Delayed Transmissions)
_________________
The Daily Timer function lets you send a fax at a set time every day. This is handy for sending
delayed jobs that must go out at the same time daily. Once you make this setting, you don’t have
to enter the time everyday. You just press TIMER, the number and SET if you want to send.
r
KEYS TO BE PRE
1. Press PUSH and open the cover.
2. Press FUNCTION.
3. Press 6.
4. Press 2.
STATUS OF LCD DISPLAY
09/12/1994 1b:25
F AX/C0 PY:IN S E RT 00CUMEN T
■' USE < > 10 SCROLL
[ ENTER N0. & SEE K
6.SETUP SYSTEM
PRESS STOP 10 CANCEL
2.SET DAILY UOB TIMER
PRESS STOP TO CANCEI
DAILY JOS TIMER
ENTER & SFl KEY
-.1. >
tY
.00:00
6-7
Page 46

FAX TRANSMISSIONS
5. Enter the time in 24-hour format us
ing the number keys.
DAILY
(ENTER
JOB 1 I
& SET
MER
KEY
: 19:4?
Example; 19:45 (7:45 P.M.).
6. Wait for two seconds.
' 2.SET
,:::3v4CT.
DAi LV
REFOR[
JOBINTIMi.R
rFRVAL
7. Press STOP to exit.
Broadcasting (Only for FAX-950M !980M11500M)
By using the numbers you have stored for One-Touch dialing, Speed-Dialing, or group dialing, you
can automatically send faxes to a maximum of 160 different locations at once.
STATUS OF LCD DISPLAY
I 09.ПР/199А 15:25
1 FAX/COPY:TNSrRf OOCUMFNI
1. Insert the documents into the feeder,
2. Press QUICKSCAN.
3. Enter the One-Touch, Speed-Dial, or
group numbers, one after the other.
[-AX ; FNTFR :NO. Л START
COPY: PRFbS COPY KtY
: f NI i;r no . & STAR i
GOl
A: I RROrih R
100% i
4. Press START and the fax machine
will read the documents into memory,
and then start sending faxes to all the
numbers you entered.
i м::‘'ЮЯУ_
HL-Au OFFICE
DIALING
HFAD OFFICE
SLNiJJ NG
FORj/OUR INFORMATION
Getting Familiar with the Broadcasting Function
1. To Stop the broadcast in progress, press STOP.
2. Enter the chain dialing numbers as you normally would, but keep in mind that
each key counts as one location, so the number of locations you can call becomes
limited. (You have up to 160 locations you can call with One-Touch, Speed-
Dialing, and group numbers.)
3. If the line is busy or for some other reason a connection could not be made during
broadcasting, the fax machine will automatically re-dial the number. (See page 6-
5.)
4. If the memory is full, press STOP to abort the job or press START to send the
portion that is in the memory (if more than one page has been scanned.) (See page
6-6.)
100%
P.Ol
6-8
Page 47

BASIC FAX TBAj^isMissioNs SENDING FAXES
Holpul Hints 1. Use the Telephone Index to help you choose the numbers you want to broadcast
to. (See page 5-2.)
2. After transmission is completed, a Broadcast Report will be printed
automatically to let you know the result of transmission.
Interrupting the Timer and Polled Job
You can send a fax without canceling the timer (see page 6-7) or polled waiting (see page 9-2) with
documents in the feeder by “interrupting” it. When you interrupt the timer to send a “new” set
of documents, the fax machine does not automatically re-dial the number if it is busy. Also, you
cannot use the function mode when you are interrupting the timer.
Example: TIMER WAITING with document in the feeder.
YS TO BE PRE
1. Press PUSH and open the cover.
2. Press INTERRUPT.
3. Remove documents from the fax ma
chine.
4. Place “new” documents into the feeder.
5. Enter the new number to send the
documents then press START.
6. After the transmission is finished,
place the “old” documents back into
G9./12/1994 15:25
TIMER WAIT [N'G 19:45
! INTERRUPT
: REMOVE DOCUMENT
: INTERRUPT
. EAX/COPY;INSERl OOCUMTN'
[AX OR COPY
INIERRUPr rO RESET
NJ OFFICE
OIAI.J NG
FAX OR COPY
INTERRUPT TO RESET
the feeder.
7. Press INTERRUPT to restore the
timer.
09/1
. TIMER WAITING__i9:45
4 lb; 25
Canceling a Job
Use the cancel job function to permanently remove scheduled tasks such as polling or polled job
(see page 9-2) and timer job (see page 6-7) from your fax machine.
For example: TIMER WATING.
1. Press PUSH and open the cover.
2. Press FUNCTION.
STATUS OF LCD DISPLAY
09/12/1994 15:25
TIMER WAITING 19:45
USE < > TO SCROLL
ENTER N0. & SET KEY
6-9
Page 48

SENDING FAXES
:|ieiiie
3. Press 1.
Any waiting jobs that have been setup will
appear in the display.
4. Use ◄— (left arrow) or —► (right ar
row) to select the job you wish to
cancel.
5. Press SET.
6. Press 1 to cancel the selected job, or 2
to exit without canceling.
If 1 is selected, the job will be canceled and
the next job in the queue will appear in the
display.
7. To cancel the next job, press 1 again.
To exit, simply press 2.
In the event that no Jobs are waiting to be
processed, a “NO JOB WAITING” message
will appear in the display.
8. Press STOP to exit.
I.'cancel job
■ hfes I I OP JG CANCl 1
I9;4b NJ OFFICE
,$£LECi-< > & SET KEY
19 Hb NJ 0
CANCEL. ? 1.’
T1 C1
'ES P.AiO
6-10
Page 49

....
.........
Si
OPTIONS SENDING FAXES
...N...
..
B) FAX TRANSMISSION OPTIONS
Setting the Overseas Mode
If you experience difficulty with sending faxes overseas, you may want to use the overseas mode.
Using the Overseas mode is an effective way to send faxes overseas.
KEYS TO BE PRESSED
1. Press PUSH and open the cover.
2. Insert the documents into the feeder.
3. Press CURRENT SETTING.
4. Press 3.
5. Press ◄— Cleft arrow) or —► (right
arrow) to switch to ON.
6. Press SET.
7. Press STOP to exit.
8. Then start the fax sending operation.
(See page 6-3.)
After sending your fax,the machine will
revert to OFF.
STATUS OF LCD DISPLAY
:12/T994 1^,
[ fA.V.^CQPY:lNSEHT DCCUMENI
FAX : ENTER N0. & STARl
C3iW: PRESS COPY KEY
:hSip::<: > TO scROi i
^'rfiPR NO. & SLI Kl-Y
MOVERSEAS MODE
.spi;p :f|i-
OVERSEAS MOO- ; OFF
, SEU-CT < > & SLI KEY
OVERSEAS MOlJE : ON
SEIEf.;- < > & SET KEY
3.0VERSiAS=
■1 . PASS^jQRD TRANSMlSStCN
l-.NTHi N3. & START
6-11
Page 50

SENDING FAXES FAX
IBI
Setting Your Fax Machine for Multiple Resolution Transmission
This is a temporary setting for the current transmission.
You can set the resolution of the documents you send by pressing the RESOLUTION. Once you
set the resolution, all the pages will be sent with the same resolution. However, there may be
times when you want to send some pages with one type of resolution, such as “standard”, and other
pages in another resolution, such as “photo”. Ifyou send all pages in photo resolution, for instance,
it would take a great deal of time. It would be nice if you could specify the resolution for each page
to minimize transmission time. You are in luck because you can make such a setting using the
CURRENT. SETTINGS function.
Pi.rap
...
........
.
KEYS TO BE PRE
1. Press PUSH and open the cover.
2. Insert the documents into the feeder.
3. Press CURRENT SETTING.
4, Press 2.
5. Press ◄— (left arrow) or —► (right
arrow) to find the resolution you want
for the page in your documents.
Example: FINE.
6. Press SET.
Return to step 5 for setting the resolution for
page 2 and the following pages.
7. When you finish setting the resolu
tion for all your pages, press STOP.
8. Enter the fax number.
STATUS OF LCD DISPLAY
PAX./'COPY
FAX :: tN
CnPY: PR
USE < > TO SOROLL.
ENIhR N0
' ?.iUS0L.;J
[. t Knb^J il
i: PAtE m
PAGE Oi
SKI i-ET <
'PAGL 0?
SKIECT <
FAX : ENIF.R NO. i!i START
COPY: PRESS COPY KEY
'M lb: 25
rlNSÉRT DOCUMENT
TER NO. & STARI
. & SEE KEY
....
:■
-----
linNnyUl ' LJ Uiw-iitiL-. L ••• -j
(■standard
> * SFT.KrV ,
: FINE Ì
> ^ SEIJ<TY
: FINE ■
> & SET KEY
-
.........
----
9. Press START.
The resolution will revert to STANDARD
after the documents have been sent.
e-12
Page 51

FAX TRANSMISSION OPTIONS SENDING FAXES
Gray Scale
You can set initial gray scale level either 16 or 32. The default setting is 32. This is effective to
sending photographs. If you try to send a document with 32 level photo mode, and the receiving
machine does not have super fine mode, the machine will fall back to the 16 level automatically.
aiL
BE PRESSE
1. Press PUSH and open the cover.
2. Press FUNCTION.
3. Press 4.
4. Press 4.
5. Press <— (left arrow) or —► (right
arrow) to choose either 16 or 32.
Example: 16.
6. Press SET.
7. Press STOP to exit.
STATUS OF LCD DIS
I 09/12/199^ 15:2b
[ .!^AX/C0PY: IM5L1U DCCUMtlU
use < > TO SCROLL
! ENTER NO. & SEI KEY
4.UbEk OPTIONS
PRESS STOP TO CANCEL
4.CdiAY SCALE
PRESS STOP TO CANCIf
■ GRAY SCALE : 32
i SELEC1 < > & SET KEY
GRAY SCALE : 16
SELECT < > & SLl KEY
4. GRAY SCALE
5. PRINT REOUCTiON
6-13
Page 52

ilp
FAX TRANSMISSION OPTIONS
Sending a Fax with a Cover Page
An automatic Cover Page will allow you to send details of who the fax is going to, who it is from
and when it was sent. This is what the Cover Page looks like;
09/ 12/ 1994
TO:
FROM:
COMMENT: PLEASE CALL
15:25
=== COVER
NJ OFFICE
FAX:
: 4155551212
BROTHER
: 4155554444
FAX:
TEL:
4155554445
02 PAGE[S] TO FOLLOW
(1)
(2)
(3)
(4)
(1) The “TO” information comes from the One-Touch or the Speed-Dial memory. If you are
dialing manually, the name of the destination will be left blank.
(2) The “FROM” information comes from the Station ID,
(3) The number of pages you are sending. But when Cover Page is sent each time by using the
automatic settings {see page 6-16), the number of pages will be left blank.
(4) Your comments. You may customize comments.
FOR YO№4NFORM/giQNyl^^^^^^^
The Comments Section on the Cover Page
You can choose one comment from among 6 options. The first option is to send no
comment at all. The next 3 are built-in comments, and the last two are ones you can
set yourself (For more information see page 6-15.)
1. COMMENT OFF
2. PLEASE CALL
3. URGENT
4. CONFIDENTIAL
5. (Your own customized comment).
6. (Your own customized comment).
6-14
Page 53

■nSSION OPTIONS SENDING FAXES
KEYS TO BE PRESSED
1. Insert the documents into the feeder.
2. Press COVERPAGE.
3. Use •<— (left arrow) or —► (right ar
row) to select the comment you want.
Example; 2.PLEASE CALL.
4. Press PUSH and open the cover.
5. Press SET.
6. Enter the number of pages you are
sending. (Enter to leave the
number of pages blank.)
The Cover Page light should come on.
7. Enter the fax number and press
START.
STATUS OF LCD DISPLAY
0 9/i fill) 9 4 IS; 25'
^Y:TNSER[ DOCUMENT
■ FAX :
, COPY:
'1.COM'1ENT OFF ]
^ SELEC
2.PLEASE CAl L
■iiLlPffcX > H SET KEY
' TOTAL PAOf
[enter & SI
TNTlii NO. & START
F.NTRR NO. & START
PRESS COPY KEY
T < > & SFT KEY
...............
'S ? : 00
:T KEY
llllll
ENDING C 0:V..EiTt G ..............
Customizing Your Cover Page Comment
You can customize the comment on your Cover Page as follows:
KEYS TO BE PRESSED
1. Press PUSH and open the cover.
2. Press FUNCTION.
3. Press 6.
4. Press 6.
5. Press <— (left arrow) or —► (right
arrow) to select 5 or 6 where you wish
to store a comment.
Example: 5.
6. Press SET.
(PRESS STOP TO CANCEL
'e.SEl COVERP^
^5.
^ ENTER/FRtSS i
STATUS OF LCD DISPLAY
09/:L2/1994 15:25
eSx /CSERT DOCUMENT
E < > TO SCROLL
us
FNTER N0. & SET Ki
6vSETUP SYS!'
.
PRESS STOP Tf
Y
.......XT;:;,
........
.
SELECT < > &
5.
SEL.ECT < > S
SET "lii
.Sfr...
iLT'Tf;iN:l4—
......
.. - -J
.....
■
..........
.............
i ^
..............
6-15
Page 54

SENDING FAXES FAX TRANSMISSION OPTIONS
7. Enter your customized comment by
using the number keys (up to 27 char
KTDP SECRET
^ FNIFk/PRESS set to [ ND
acters).
(See page 3-7-8 for more details.)
Example: TOP SECRET.
8. Press SET,
6.SL1
7;5ЁТ”--в:Е1да^^
.
......
9. Press STOP to exit.
Setting Cover Page ONfOFF
If you often send an automatic Cover Page, you can set it to ON to avoid having to set up the details
of the Cover Page each time. Here is how you can switch the setting for the automatic Cover Page
to ON or OFF:
KEYS TO BE PRESSED
1. Press PUSH and open the cover.
2. Press FUNCTION.
3. Press 4.
Fa;</C0PY: insert nüCUMENT
USE < > iO Sr.ROL_
tNTLR NU. & SE.1 KLY
■'4.USER OPl IÜNS
PtEÎ
OF LCD DISP
,271994 1
iTQ^ TC CANCEL
4. Press 3.
5. Press <— (left arrow) or —► (right
arrow) to choose ON or OFF.
Example: ON.
6. Press SET.
7. If you selected ON, you need to select
a comment, by pressing <— (left ar
row) or —► (right arrow).
Example: 2.PLEASE CALL.
8. Press SET.
The Cover Page light will be lit.
9. Press STOP to exit.
STCOVLRPAGL
PRESS STOP IC CANCEi.
COVERPAC
SELECT
COVERP.AGL : GN::
^ SEI EG! < > & SET KEY
1. COMM ENT 0ЕГ
SELLCI < > » SKI KEY
2. P! EASE CAEi.
ST-.U-.CT < > & SET KEY
■ 3.C0VERPAGE
4.GRAY SCAl E
it : CEI
> & SET KEY
6-16
Page 55

SENDING FAXES
FOR YOUR INFORMATION
..........
"••'•■V .
......
Jiliilii!
Sending an Automatic Cover Page
If you have the Cover Page ON/OFF setting to ON, the total number of pages will not
be printed on the Cover Page. Also, the comment you selected when you set it to ON
will be printed on all the Cover Pages you send.
Helpful Hints Even if the Cover Page ON/OFF setting is ON, you can avoid sending an
automatic Cover Page by pressing COVERPAGE once to turn off the Cover
Page for that transmission. (The Cover Page light will be off.)
Sending a Fax with Call Reservation
You can send a fax and then talk to the recipient using the Call Reservation feature. After your
fax has been printed on the receiving end, the receiving fax machine will ring as if it were receiving
a telephone call. If the recipient picks up the handset, your fax machine will ring. Then you can
pick up your handset and start a conversation. If you have both Call Reservation and Call Back
Message set to ON and the recipient does not pick up the handset when it rings, your fax machine
will leave a fax message asking them to call you back.
I
STATUS OF LCD DISPLAY
Ciy4
fAX/fO^YTlNSrRT
1. Insert the documents into the feeder.
2. Press CALL.
3. Use <— (left arrow) or —► (right ar
row) to select Call Back Message ON
or OFF.
Example: Call Back Message ON.
4. Press PUSH and open the cover.
5. Press SET.
The call light should come on.
6. Enter the fax number, then press
START.
7. Pick up your handset if it rings.
^FAX : -N l ER RO. k SVARI
COPY : -tU.SS kOPYaREY^ ■
CALL BlikyMSG. : iPN;./
■SFLECT. REY-i
CAL MSG. : CN
& SET REY
ENTER NO. & START
N uJ 0 F F 1 C E
|j [AL TNG
6-17
Page 56

SENDING FAXES FAX TRANSMISSION OPTIONS
09/12/1994 15:25
=== CALL BACK MESSAGE ===
/i: ■iPli'" T/iiliT -:si|
T0 : NJ OEFICE
FAX: 4155551212
FROM; BROTHER
PLEASE CALL AT [TEL] 4155554445
■:F0W-YOffRMGifi^ .................................
_________
[FAX] 4155554444
■ ■■■I
Using the Call Reservation Function
1. There are some fax machines that will not respond to this function.
2. When you use auto re-dialing, you cannot use the Call Reservation function, but
if Call Back Message is ON, your fax machine will leave a Call Back Message to
ask the other party call you back.
3. You cannot use Call Reservation with the timer or with the polling function.
Next~FAX Reservation (Only for FAX-950M(980M/ 1500M)
You can use Next-FAX Reservation for sending a fax when the fax machine is busy receiving or
memory sending. This function saves you from having to wait until the incoming fax has finished
coming through or the outgoing fax in the memory has finished transmission. All you have to do
is insert the documents as you normally would and follow a few other simple steps.
KEYS TO BE PRESSED
1. Insert the documents into the feeder.
2. Enter a fax number.
3. Press START.
, RECEIVING
NEXIIAX RESERVE
ENTER NO. & STAR!__________J
I4J555 1.234
ENTER NO. & ...............
1415551234
PRESS SET KEY
U.l.U-UM
.
.
R.OI
4. Press PUSH and open the cover.
5. Press SET.
If a One-Touch or SPEED DIAL number is selected that is not stored, a warning beep will sound.
141551
NEXT-1
FAX/COPY:INSERT DOCUMENT
1415551214
DIALING y::v
RESERVED
15:25
6-18
Page 57

FAX TRANSMISSiON OPTIONS
mm
FOR YOUR INFORMATION
1. Next-FAX Reservation cannot be used when there are documents in the document
feeder awaiting timer transmission or polled waiting or when the interrupt
function is in use.
2. When you are making a call using Next-FAX Reservation, you can dial manually,
or use One-Touch, Speed-Dial, Redial, or Chain dialing. However, when you use
One-Touch dialing, the screen will display the number of the One-Touch number
you are using, such as “>K0r’ and not the name of the person you are calling.
Similarly, if you use Speed-dialing, the screen will show you only the Speed-Dial
number, such as “#02”.
3. You can set the resolution for Next-FAX Reservation by using the RESOLUTION
key, but you cannot change any settings using the FUNCTION, CALL, COVER
PAGE, TIMER, COVER PAGE keys, etc. (For example you cannot change a
setting for multiple resolution transmission by using the CURRENT SETTING
key.)
4. To cancel a Next-FAX Reservation, remove the documents and press STOP.
ECM (Error Correction Mode) Feature (OnlyforFAX-950MI980Mll500M)
The Error Correction Mode (ECM) is a means for checking the integrity of a fax transmission
while it is in progress. ECM transmissions are only possible between machines that both have
the ECM feature. Your machine has this ECM feature so if other party also has ECM, you can
send and receive a fax message that is continually checked for its integrity.
■iiili
Sufficient memory must be available for this feature to work.
Also this feature will take longer to complete transmissions.
I
6-19
Page 58

RECEIVING FAXES AND OTHER CALLS BASIC SETUP TO RECEIVE FAXES
7. RECEIVING FAXES AND OTHER CALLS
A) BASIC SETUP TO RECEIVE FAXES
Selecting an Answer Mode________________________
There are 4 answer modes for your fax machine. You can choose one by pressing the Answer Mode
key repeatedly until you find the mode you want. Choose one that suits yoim needs. If you need
more information about a particular mode, refer to the page number given.
{ o means light off, means light on.)
Answer Mode
1. MANUAL
O AUTO
I—TAD
□ F/T
For
Answers each call manually.
Mainly telephone use.
See Page
7-2
If you want to answer each incoming call, choose MAlNUAL mode.
2. AUTO
sW/
I—TAD
□ F/T
AUTO
Dedicated fax use. Telephone line and fax
line are separate.
7-2
If you use your telephone line exclusively for sending and receiving faxes, you may want to use
AUTO mode. In this mode, you can receive all your incoming faxes automatically.
3. F/T
I I AUTO
1—TAD
■■ F/T
Both fax and telephone use. When you
share one line for your telephone and
fax machine.
7-3
If you want to use your telephone line for both fax and telephone, you may want to choose F/
T mode. In F/T mode, your fax machine will answer incoming faxes automatically.
4. TAD
■I AUTO
\—TAD
■ F/T
Use with external TAD (Telephone
Answering Device). When you are not at
home.
7-11
- When you want to use your fax machine together with your telephone answering machine,
choose TAD mode.
- The TAD must be a physical device that is connected to the “EXT” jack on the back of the fax
machine. (See page 7-11.)
- TAD mode will not work with an outside telephone answering service.
1-1
Page 59

AND OTHER CALLS
Manual Reception (MANUAL mode)___________________________
When you set the Answer Mode to manual, you must answer each incoming call yourself. Here
is what you should do when using MANUAL Mode:
If You Get a...
1. Regular phone call
2. Phone call and request
to send a fax
3. Fax tone...
Then You Should...
Talk as you normally would.
Press START after finishing talking, and replace the handset.
Note : Sender must also press START.
Press START, and replace the handset.
Automatic Fax Reception (AUTO mode)
You can automatically receive all your faxes in Automatic Fax Reception mode (AUTO mode),
Select this mode by pressing the Answer Mode key.
Setting the Ring Delay
You can set up the number of rings before the fax machine will receive automatically in AUTO
mode and F/T mode.
YS TO BE PRE
1. Press PUSH and open the cover.
STATUS OF LCD DISPLAY
09/12/19№X5jy.6
Fix/COPY : INSÙ# DOCUMENF
2. Press FUNCTION.
3. Press 5.
4. Press 2.
Press ◄— (left arrow) or —► (right
arrow) repeatedly until you find the
number of rings you want.
Example: 00.
When you set 00, you can receive your
incoming faxes without a ring delay.
6. Press SET.
7. Press STOP to exit.
E < > TOLSCROLL
' US
L NTER NOI- & SET KEY
5.TE.:htPftQN.:E: #PTI0NS U
PRESS:STÓP TO CANCEL
2.SET; RTWG DTLAY PRESS#»: TO CANCEL
RING OF
SELECI
' r;nl3 01
[sei rei
a;,;SET:;RlNC RELAY
3.AU"0 RiniAl
4A:Y-U^-D2
< > & SET <EV J
•:AV : 00
< > 1. SEi KEY
MTiiiiiiiih
J
I
>
7-2
Page 60

RECEIVING FAXES AND OTHER CALLS
The FIT Switch (FIT Mode)
When you share one line for your telephone and fax machine, in F/T switch answer mode, you can
receive faxes automatically, and if you get a voice call, your fax machine will ring. The F/T switch
can determine whether an incoming call is a fax or a telephone call. (See chart below.)
Incoming Call
The fax machine
picks up after ring
time elapses.
The fax machine picks up
the call and automatically
detects whether a voice
or fax call.
Fax call
Fax reception is
automatically
activated.
The fax message
is received.
The caller may
hang up.
All extensions in the home
will ring for 0-4 rings (user
selectable).
Voice call
Only the fax handset
rings, thus signaling
you to pick up.
The handset will ring
between 10-60 seconds
(user selectable).
The caller stays on the
line through the entire
10-60 second ring time.
You pick up any
extension within ring
time selection.
You must manually
determine if it is a
voice or fax call.
Fax call
A) If you are at the fax
machine, press
START.
B) If you are at an ex
tension phone, you
can transfer the fax
call to the fax unit
by pressing your
remote activation
code (three digits).
You pick up
the fax handset.
Voice call
Talk as
normal.
7-3
Taik as normal.
The fax mode
is activated.
The caller may hang up.
Page 61

WâSiCSêTUP TO RECEIVE MAXES
Setting the FIT Ring Time
______
_________
You can specify the maximum time you want the fax machine to ring in case of telephone. There
are four predefined settings; 10, 20, 30 or 60 seconds.
STATUS OF LCD DISPLAY
1. Press PUSH and open the cover.
2. Press FUNCTION.
3. Press 5.
4. Press 5.
5. Press <— (left arrow) or —► (right
arrow) repeatedly until you find the
09/127199:4:15:25
FÀMC0PY : IN$IRT^h0CUMËtT
1JSc”< :>--T0 SCRQPt ■
ENTER::N0:v.t;:& SET KEY"-
ÆYTELËPHDNE ormo N 5
pRË-ss; STOP
s’. SM \ R;NÜ rin-
PRESY:$TQM::T0 can gèi
■■№.:::::filNG ■■20MSE-C
jiËlhCPJ
■F/T Ring
'SÉL£CT-^<'T::iP:SfT KEY
....... "V SEIyilY'
..
tïmè" : 10 Stt'
_____
....
setting you want.
Example; 10 SEC.
6. Press SET.
7. Press STOP to exit.
■' F . s 1
:T F/t RING/TIME
^ 6.SF
:i RING .VOLUME LL
................
'
Smoothing
The smoothing feature enhances the appearance of incoming faxes by making the lines smooth
and takes no additional time. This function does not apply to outgoing faxes, or to lists or reports
you print. The initial setting is ON.
KEYS TO BE PRESSE
1. Press PUSH and open the cover.
2. Press FUNCTION.
3. Press 4.
4. Press 1.
i-T”=;
STATUS OF LCD DISPLA
09/12/1994 15:r2 5 ^
fM/ CO PY ; 1N SE RT POC U M E NT
USE < > TO SCRÜi.E
ENTER -
4.0:$ER hPTIhte
PRESS Slop 1(1 t.ANtn
1. SMOOTH I NG M
, f’RESS STOP ro CANOI
SHfiOTHlNri :0N:;::
SFEECr < > & SM KEY
.......
& S£7 KEY
"i
J
7-4
*
Page 62

RECEIVING
liASIC SETUP TO RECEIVE FAXES
■iii
■I*
■l a..
5. Press ^— (left arrow) or —► (right
arrow) to choose ON or OFF.
■■ SMOOTH] NC
. SFLECi <
i : OFF
> a SEl KFY
Example: OFF.
6. Press SET.
7. Press STOP to exit.
HGlpful Hints If the printing reduction is set to ON (See page 7-7.), the smoothing function is
l.SMOOTMiNG
?.HI-EPER
not available.
Speaker Volume
There are three settings available for the speaker volume, OFF, LOW or HIGH. This setting
controls the loudness of the fax machine’s speaker, which is connected to the phone line. The
initial setting is LOW,
KEYS TO BE PRESSED
1. Press PUSH and open the cover.
2. Press FUNCTION.
3. Press 5.
STATUS OF LCD DISPLAY
L, , L :li5; 2Ei
D0CU^Mi;ffF-
•'
.............
iJS; < > 10 SC RULE
; EhtE R NO. % SET
.1 I- I.I PMONF OPT 1 E
[ PRESS STOP 10 CAF
....
............................
..........
KEY
.......
.
_________
in;s- ■■ ■ t:;:: "
^
4. Press 4.
5. Press <— (left arrow) or —► (right
arrow) to choose a setting either OFF,
4.SPEAKER V0_UMl
P \< E S S Slop U LANCh 1_
speaker : tow
SFI FE.l < > & Sh i KFV
SPEAKER : HIGH
«EIFET < > & SLI KEY
LOW or HIGH.
Example: HIGH.
6. Press SET.
4 . SPEAkFR VOIUP^E
5.:SET:-P7I RINI TllE
7. Press STOP to exit.
Ring Volume
You can set the ring volume to either OFF, LOW or HIGH. The initial setting is HIGH.
STATUS OF LCD DISPLAY
1. Press PUSH and open the cover.
2. Press FUNCTION.
0;:9/12/1994 IS
FAX/COPY:INSERT DOCUMENT
USE .... :o sckOLET
( ENTEiillO). & SET KEY
.
tTTi
7-5
Page 63

:U&;!:::;:ì:ì:bss^
:es and other calls
3. Press 5.
4. Press 6.
5. Press <— (left arrow) or —► (right
arrow) to choose either OFF, LOW or
5. I FILEPHUNI OPTIO
;S STOP TO CAN L . j
::^.sLi r:ng volumi
10 CANO EL
Rf
№ VOLUME : lUGE
SE _lC; < > .^ SET E :ey ■
RiN:&0L! : LOW
/SE LE Cl < >
..
KE;y
NS : : Ì
HIGH.
Example: LOW.
6. Press SET.
6. SEI ^TNG VOIUMT
7. :DJSTTNCL&g
1. Press STOP to exit.
Helpful Hints Even if you select OFF, the ring volume during F/T ringing and Call Reservation
ringing is LOW.
Print Reduction
You can set the printing reduction ratio to either “OFF”, “9S%”, “87%”, “73%’Vand “MANUAL (5099%)”.
When receiving a fax even if the other party sends letter sized document(8.5Xll inch), you should
receive the document with reduction to be printed on a letter sized paper because actual data is
longer than letter size by adding “Header Information”. (See page 6-6.) Therefore it is very
important to choose reduction ratio previously.
added
header
4mm 4mm
;2mm
:1mm
You are recommended to choose following reduction ratio;
other party sends Your receiving Recommended
you the size of...
Letter document (8.5"x11'')
(mostly domestic communication)
A4 document (8.2“x11.6")
(mostly international Communication)
Legal document
(8.5"x14")
paper size
Reduction Ratio
Letter
Legal
Letter
Legal OFF
Letter
Legal
93%
OFF
87%
73%.
93%
If legal sent to letter (and setting reduction is over 73%) then the reception will he split over 2
pages.
7-6
Page 64

RgSEIVINQ ^XES^ND
KEYS TO BE PRESSED
1. Press PUSH and open the cover,
2. Press FUNCTION.
3. Press 4.
4. Press 5.
5. Press (left arrow) or (right
arrow) to choose either OFF, 93%,
87%', 73%', MANUAL.
Example : 87%.
6. Press SET.
If you choose MANUAL, enter reduction
ratio (50 - 99%) and then press SET.
7. Press <— (left arrow) or —► (right
arrow) to choose either ON or OFF.
In copy mode, there is no header informa
tion so that you may not choose “ON” when
you want to copy a document to a same size
of paper.
Example; OFF.
8. Press SET.
STATUS OF LCD DISPLAY
lhLU?./l994 \b:?b
FAX7COPY:ONSERT DOCURENT^
USE: < > TO -SCROLL: ■
ENTER SET KEY
4 . US
Mi UPTIONS
. PRI S
S STOP TO CAN;
ILPRINI ILLjU
, PRi SS STCI’ 1
!<l n
UCITON : 93%
SEE
ECt < >& SET KEY :
V.
: UN : 87%
S i < > If, SI I K1 V
%0PY REDUCTION :
^ SELECT < > & SET
CORY..
U0:FF
SELEG:1A7> & SET KEY
5.PRINT REDUCTION
e.PRfNXER MARM
GTIQN
0 cancel
orr
KEY
N
J
J
'
9. Press STOP to exit.
Printer Alarm
You can set number of printer alarm either “ONCE”, “3 TIMES”, and “CONTINUE”. This alerm
informs you that the machine can not print due to out of printing cartridge, out of paper and so
on. If you want to set alarm “OFF”, please set “Beeper (see page 4-1) to OFF”. So this setting is
effective in case that beeper setting is “LOW” or “HIGH”.
PRINTING
CARTRIDGE
7-7
"cilANGf
[ PIUNI INI
L CAR!KlUGL ^
Page 65

■m:iiIiisWlB!!*i
STATUS OF LCD DISPLAY
1. Press PUSH and open the cover.
o.97T27i:g;:sM^^
_IA^/::gPy : 1 NS[JITJJ0C31M£^
2. Press FUNCTION.
_gNTMt Sf] ygy
3. Press 4.
4. Press 6.
5. Press -<— (left arrow) or —► (right
arrow) to choose either ONCE, 3
fcUSER: OPfioNS
PRtS3 STOP -0 CANCLL
~6 . i^RHEFR A;Alir^
PR2SS FTOP TO CANCEL
#RliTER OmCE.
Sr.I rCT < > a 91:1 <LY
_______
7rI nTer' AU.RM"": Y'\ tT'1Us~
SH.LCi < > a 5LT KEY
TIMES or CONTINUE.
Example : 3 TIMES.
6. Press SET.
C.PRIRUR alarn;
4T=S.MddTHXWls;/
........
-f:..:..
7. Press STOP to exit.
Receive into the Memory
If the machine can not print received document, such as the case of out of paper or out of printing
cartridge and so on, it will automatically store into the memory.
When you recover the machine in accordance with LCD display’s instruction, the machine will
print them out automatically.
7-S
Page 66

REMOTE ACTIVATION
B) REMOTE ACTIVATION
If you are using a touch tone phone, you can remotely activate or deactivate your fax machine from
an external phone {a phone connected to your fax machine) or from an extension phone (a phone
connected to the same line as your fax machine).
FOR YOUR INFORMIOM:
Connecting an External or Extension Telephone to the Unit
You may connect an external or extension telephone to your fax machine, as shown
below. Use the “EXT.” jack on your fax machine.
Alternatively, you may wish to use this “EXT.” jack to connect a telephone answering
device (TAD).
If the external telephone is in use, the warning message “EXTERNAL TEL IN USE”
will be displayed. When the handset on the fax machine is picked up, an alarm will
sound. You can disconnect the external phone and switch to fax machine by pressing
HOOK.
Using Remote Codes
If you are on an external phone (or extension phone), and you get an incoming fax call, you can
transfer the call back to your fax machine by entering a remote activation code. In the same
situation, if you get a telephone call from someone who requests that you switch on your fax, you
can transfer the call back to your fax machine with this code. Also, you can deactivate the fax
machine with another remote code during the F/T ringing from extension phone. In essence you
have one remote code to activate your fax machine and one remote code to deactivate it. The
remote code to activate is “*51”, and the remote code to deactivate is “#51”. If you want
to set your own code, see the following section, “Registering Remote Codes”.
7-9
Page 67

REMOTE ACTIVATION RECEIVING FAXES AND OTHER CALLS
Limitation of Using External (or Extension) Phones
1. If you accidentally pick up an extension phone when a fax is coming in, you may
disrupt the transmission or render some portions unreadable.
2. The remote activation and deactivation code may not work with some telephone
systems or telephone sets.
Registering Remote Codes
KEYS TO BE PRESSED
1. Press PUSH and open the cover.
2. Press FUNCTION.
3. Press 6.
4. Press 5.
5. Press (left arrow) or —► (right
arrow) to choose ON or OFF.
Example; ON.
6. Press SET.
7. Enter new remote code to activate.
(Factory setting is “*51”.)
8. Enter new remote code to deactivate.
(Factory setting is “#51”.)
STATUS OF LCD DISPLAY
09/L2/199^i 15:25
FAX/COPY:INSERT DOCUMENT
USE < > TO SCROLL
& SET KEY
5.FAX REMOTE CODE
PRESS STOP 10 CANCEL
REMOTE ACTIVAIION : ON
. SELECT < > & SET KEY
-kEMOTElACT IVATION ; ON
^SE EEC I < > & SLI' KEY
REM0IE AC 1. CODE : ^51
EliTER & SET _K_^Y
REMofr DEACT.CODE ; #5.1
, ENUR S SET KEY
____________
_______________
;
:
9. Wait for two seconds.
10. Press STOP to exit.
b.l-AX REMO it CODE
6.SCI CGVERPAGE
7-10
Page 68

C) CONNECTION TO A TELEPHONE ANSWERING DEVICE
(TAD)
The TAD Mode
When you leave your fax machine set in TAD mode, phone calls will be forwarded to the externally
connected telephone answering device, and yoiir fax calls will be received automatically.
Helpful Hints When You Use TAD Mode
1. You can inform callers beforehand that if they call manually and get your
telephone answering device when they want to send a fax, all they have to do
is press your remote code (*51 unless you have changed it) to activate your fax
machine.
2. Another alternative is to record a TAD message that says, for example, “This
answering machine is connected to a fax unit. If you leave a voice message,
please speak after beep. If you send a fax message, please press (your remote
activation code) after the beep. Thank you.”
3. You need to erase the incoming messages on your external telephone answering
device when it’s full, or TAD mode will not answer any calls, faxes or otherwise.
7-ii
Page 69

■li
COSNECTIO\
FOR YOUR INFORMATION
Sequence of TAD Mode Reception
Incoming Call
The call is picked up
by the external TAD.
(Recommended short
ring delay such as 1
ring or 2 rings.)
------
itóllili
"
Fax reception is
automatical iy
activated by the
CNG Fax Tone.
The fax message
is received on
paper.
Auto dial
fax call
The external TAD
outgoing message
begins (recommended
length of less than
20 seconds).
Voice call
The caller leaves a
voice message on the
external TAD,
The caller must
Manual
fax call
1
1
The caller
can also
send a fax message.
press your remote
code to activate
the fax machine.
The fax message is
received on paper.
Telephone Answering Deyice
1. Set the telephone answering device so that it is ready to record incoming telephone
calls.
2. Set the number of TAD rings to
3. Try to record the shortest possible message on your telephone answering device
(up to 20 seconds).
Please note that some faxes that are sent manually cannot be received automatically
because some fax machines do not send a fax tone in manual mode.
So you must indicate a remote activation code for the caller to enter. (See page 7-10.)
one or two.
7-12
Page 70

1
RECEIVING FAXES AND OTHER CALLS
....
ms№mimG№
iiiiiiiiiiyiiwiiiiiiiiiS
D) DISTINCTIVE RINGING (Only for FAX-950M/980M/1500M)
Distinctive Ringing
:yt5i¥eQB*INFORMATION
Whnt Is Distinctive Ringing?
Distinctive ringing is a service offered by telephone carriers that allows you to have
several different numbers on one line, each with its own distinctive ring. This way,
when you get an incoming call, you can identify what number is being called by the
ring pattern. Your local telephone carrier can provide you with more information
about this service. This service is usually offered as a monthly charge to your normal
phone bill.
Can My Fax Machine Utilize Distinctive Ringing?
Yes, it has a distinctive ringing function that allows you to register one additiu^.al
distinctive ring pattern. (See page 7-14.) The ring pattern you register should be for
the number you want to use as your dedicated fax number. Once you register the
pattern, your fax machine will be able to identify its own incoming calls and
automatically start to receive faxes, regardless of how you last set the answer mode.
You can only register one additional ring pattern.
Can I Change the Setting Later?
Yes, you can change or cancel the distinctive ringing setting anytime.
How Will the Fax Machine Treat All Other Distinctive Ringing?
It will act the way it normally does. In other words, the fax machine will treat all the
other unregistered, distinctive rings according to the machine’s answer mode setting
(MANUAL, AUTO, F/T, or TAD). For instance, if a call comes in that is not for your
(registered) dedicated fax number, and the machine is set to MANUAL, the fax
machine will respond as per the MANUAL mode.
How Does the Distinctive Ringing Function Work?
When you receive an incoming call, the fax machine compares the ring pattern with
the one that is registered. If the two are identical, then the fax machine automatically
accepts the call as an incoming fax. Otherwise, the fax machine will treat the call in
the usual way, depending on the machine's answer mode setting (MANUAL, AUTO,
F/T, or TAD). The function has 3 modes: (ON, SET, OFF). Set it to ON when you want
to use it, and to OFF when you do not want to use it. Use the SET mode for registering
a number.
WhaCs the Advantage of Using the Distinctive Ringing Function?
By registering a ring pattern (see page 7-14) you may operate your fax machine in
the most efficient way possible should you require the distinctive ringing service.
With the distinctive function ON, you can receive your faxes automatically, and
people who call you on one of your other numbers do not have to talk to your fax
machine. It basically gives you two independent numbers by using only one line.
7-13
Page 71

illli
FAXES AND OTHER CALLS
Helpful Hints If You Do Not Have a Distinctive Ringing Service...
Your phone cair-ier can give you more information about it.
If you are not currently receiving a distinctive ringing service, don't
try to set up your distinctive ring feature. It may cause your machine
to malfunction. If your phone carrier provides this service and you decide to
use it, it's a good idea to use one of the new numbers you receive for your fax
number and keep the old number for it's original purpose. Remember to tell
your customers and colleagues your new fax number.
If You Already Have a Distinctive Ringing Service...
It is a good idea to register the ring pattern of your existing dedicated fax
number. Use the registration mode under the distinctive ringing function. You
will not be able to use the fax machine's distinctive ringing feature until this
pattern has been registered. {See below.)
Setting the Distinctive Ringing Function
If you currently have a distinctive ringing service (a telephone service that provides you with
multiple numbers, each with a distinctive ring, on one line), you can register any one of the ring
patterns of your line with your fax machine so that it can immediately identify a call as an
incoming fax by the distinctive ring pattern it uses. You also will need to arrange to have someone
call your fax machine to do this.
You may have difficulty registering a distinctive ring pattern if your fax machine is
connected to a telephone answering device. Disconnect it before you set this function.
1. Press PUSH and open the cover.
2. Press FUNCTION.
3. Press 5.
4. Press 7.
5. Press <— (left arrow) or —► (right
arrow) to find the SET mode.
6. Press SET.
STATUS OF LCD DISPLAY
^li9 7Yz/-i<}9A
I- A X / C 0 P Y::I N S I R1 D 0 C U MIN T
USE < > TO SCROLL
' o . 1ILEPHONUsOPTIONS
, pRi.:iS STOP..TO-ilNCEE
7.DISTINCTIVE
mvss S’OP TO CANCr;
DISTTNGIME'' : OFF ;
.SILECT-< :^ S SiT-KlY
*
NC i I V h :
D 1 S [
S F. 1. f < > & St
KEY
’ ’ 1
FI
1 KEY
:;7 J4.sf
^ 1 .SET TONE/PUl-Sr nJAL.
7-14
Page 72

RECEIVING FAXES AND OTHER CALLS
7. Press STOP.
IMPORTANT:
- “D/R SET MODE” stays on screen
until set.
- Answer mode LED is flashing.
- You now must wait for someone to
call the corresponding fax number
with distinctive pattern or ask a
friend to call your specific distinctive
ring fax number.
8. Once someone calls, listen carefully
and see if the rinsr pattern is the one
corresponding to the number vni] went
to register. If it is and the LCD shows
the message “PICKUP TO SET” after
two or more rings, lift up the handset
on the fax machine.
9. Press START to set (or STOP to
cancel).
10. Press START again to receive the in
coming fax, or if the call is a voice call,
talk into the handset.
FdliiOBRHNFOeMATION
f n/
R Sf“ MODE
...
PICK S“T
'start to s?t
;3ttp. TO;. cM
RlGISITRlD
riLtPHONt/l-AX -
...........
•
.
"-••j
.
i -if'}
While You Are Setting the Distinctive Ringing Function:
1. When someone calls your fax machine, it will continue to ring until you pick up the
handset or press HOOK, even if you have set the number of rings.
2. If you get a call and the ring pattern is NOT the one you want to register, press
STOP. (See step 8 above.)
3. There are some ring patterns that cannot be registered.
4. Answer mode is automatically switched to MANUAL during registration. The
answer mode that you had set before distinctive ringing registration now flashes.
NOTE: Some Telephone Answering Devices may pick up a call before your fax
machine finishes detecting the ringing pattern. We suggest you set your
Answering Device ring delay to its maximum setting.
Once You Have Finished Setting the Distinctive Ringing Function:
1. The Distinctive Ringing function will be set to ON, and you will be ready to use
this function.
2. You will not hear the first two rings of all incoming calls on the fax machine.
However, other extension phones connected to the same line, or any external
phones connected to the fax machine will ring. If the fax machine recognizes the
ring pattern, it will automatically accept the call as an incoming fax, and you will
not hear any further ringing. Otherwise, you will hear the phones continue to ring,
and the fax machine will also ring.
3. You can receive faxes on numbers other than the one you registered. The fax
machine will respond to these calls according to how you have set the answer mode
(MANUAL, AUTO, F/T, or TAD).
7-15
Page 73

Helpful Hints Remember that you should let your phone ring at least twice before answering
to allow the fax machine to pick up first if necessary. Answering an incoming
call before two rings will defeat the purpose of the distinctive ringing function.
You should turn the distinctive ringing function to OFF if you move and/or get
a new number. To turn off the distinctive ringing set-up go into function mode.
How to Turn the Distinctive Ringing Function ON or OFF
The distinctive ringing function is designed to accommodate the distinctive ringing service (a
telephone service that provides you wdth multiple numbers, each with a distinctive ring, on one
line). Please note that you need to register the ring pattern of your fax number before you can set
the distinctive ringing mode ON. (See page 7-14.)
wmm
illiiiP
1. Press PUSH and open the cove.
2. Press FUNCTION.
3. Press 5.
4. Press 7.
5. Press <— (left arrow) or —► (right
arrow) to find the mode (OFF, SET,
ON) you want.
Example : ON.
6. Press SET.
7. Press STOP to exit.
09/12/1994/ 45 : 25
CO P Y. ;4h:S||4-4;q|i^
[us: <
ENTER
5 . If LEPHQ.NE OPTIONS
PRESS SToF TO ,cancel
/.DISTiNCTlVE
PRESS/ ST iU CANCEL
> !C SCROl.!
N0./ SET KEY
y
rDI:.STlNCT4vE : 0#
t;:4eLECT . < > Sf Mr KEY/
i:.! s [NC ■ i VI. : ON
;i < / a SET KEY
SELEC
kv-
7 . ..
1 vSET TONf / hULSE::
.
.. ... .. ... ■
7-16
Page 74

ElVING FAXES AND OTHER CALLS
Dismxrm RINGING iOniy for FAX-950M! 9S0M; mOM}
FOR YOUR INFORMATION
If you wish to use an external Telephone Answering Device (TAD) and the distinctive
ringing feature with your fax machine:
1. You must use the distinctive ringing pattern for your fax number, otherwise both
the TAD and fax may conflict in picking up the call.
2. Select the TAD mode on your fax machine {see page 7-1).
3. Connect the external TAD intoEXT. jack of your fax machine (seepage 7-11). Do
not parallel connect the external TAD into other wall jack.
4. You must set the external TAD to its maximum ring delay setting (minimum 4
rings).
5. You can not use the Toll Saver feature of the external TAD when using the
distinctive ringing feature.
If you do not use an external Telephone Answering Device (TAD) with your fax
machine: Select the MANUAL mode on your fax machine (see page 7-1).
7-17
Page 75

HOW TO USE
8. HOW TO USE COPY FUNCTIONS
Making a Copy
These are the steps for making one copy each of your original documents:
...L . ' -V'"- ''
1. Place the documents face down into
the feeder.
2. Press COPY.
3. Press COPY, again. Or after 5 seconds,
STATUS OF LCD DISPLAY
^AX/CGRV :
FAX r:ENTER NO. &ySTART
CORY: R RES SLC DRY KEY :
Number oi copi i s ; oi
INTI,; i. COPY KEY
COPYJNG
uu
NSIR
"YDO&UMENT
■Mmisiii
the copying will start.
^ COPY 1 N6
p. 0'
J
COPY '.NO
- {For FAX-900) the machine will start copying after pressing COPY in step 2.
Helpful Hints 1. When you want to make a copy, make sure the text or image on the original
document is not too close to the edge.. Your fax machine cannot read anything
closer than 4 mm (1/8 inch) from the edge.
P .0^
2. You can select the resolution to either SUPERFINE or PHOTO. Set the
resolution to either one. If you do not set the resolution, the fax machine
automatically makes a copy in the SUPERFINE setting. For example, if your
original is a photo, you may select the PHOTO resolution. (To get the PHOTO
resolution, press the RESOLUTION key repeatedly until both lights are lit.)
You can also set the resolution page by page using the CURRENT SETTINGS
function. (See page 6-12.)
3. Do not pull on the paper while copying is in progress. This may ruin the copied
image.
8‘1
Page 76

Bdlfli) USE COPY FUNCTIONS
Making Multiple Copies (Only for FAX-950M!980M! 1500M)
There are two ways to make multiple copies on your fax machine. The first is the stacking method, this
will make (#) copies of page one, (#) copies of page two and so on. These will all be stacked on top of each
other. The second method is the sorting or collating method. This is when the fax machine scans the
entire document and then makes 1 copy of page 1, 2, 3, 4 in order. Then makes a second copy of 1, 2, 3,
4 until a total of n copies has been made.
(Stacking)
YS TO BE PR
1. Insert the documents face down into
the feeder.
2. Press COPY.
3. Enter two digits for the number of
copies you want using the number
keys (Max. 99 copies).
Example ; 05.
4. Press COPY or just wait 5 seconds.
5. Press <— (left arrow) or —► (right
arrow) to select the stacking or sorting
method.
Example : STACK,
6. Press COPY to begin copying.
(Sorting)
STATUS OF LCD DISPLAY
05/l?/i994 1Г);?5
I ЛХ/CnPY : INSFRI IHJCUMi N I
f TAX : :nt:
COPY: PPFS S CO-v KEY
NcMIiFR OH CO^fFS : 01
^ LN iTP. a copy icrv
NOMiii-ii OF COP ILS ; Ob
HNU4 & COPv KFY
'multi copy
SELECT < >
L1 1 COPV :
' MÜ
LECr < > &
COPYING
.
N0:.v.:...& STARK 1
________
S 1 ACK
COPY KE^
S ТАСКЕ
CORY KEY
STACK- P. 01
'
1РЛ
i J
8-2
Page 77

■ ...
Iliiii
NOTE: 1. When making Multiple Copies, do not let the receiving tray overstacked. Remove
copied paper from receiving tray frequently.
2. When making Multiple Copies, make sure there is enough recording paper in the
machine.
3, Original documents should be straight, non wrinkled, to be correctly fed. Otherwise
the documents may occasionally jam.
What To Do When You Get a “MEMORYFULL”Message while Making Copies
If you are using the stacking method, press STOP. If you are using the sorting
method, press COPY to copy the portion that is in the memory, or press STOP to
cancel.
.
HOW TO USE COPY FUNCTIONS
8-3
i
Page 78

ibiifNC
9. POLLING -
q||il|||||||:
....... ■b::'':''''
iiiiili
ii:;::i :::. ;:®il
iliilililH
||||i|||^^|||||i^i||i
FOR YQUR INFORMATION:
What Is Polling?
Polling is the process of retrieving faxes from another fax machine. You may use
your machine to “poll” other machines, or you may ask someone to poll your machine.
The party who polls pays for the cost of the call.
How Does It Work ?
First two parties set up their fax machines so that they can accommodate polling.
Then one party leaves documents in the fax machine so that the other party can call
up and have the documents sent to them.
When to Use Polling?
Use polling to control the cost of sending a fax.
1. If you want to pay for the cost of the call: Send out faxes to other parties as you
normally would, and if another party has documents to send you, ask if you can
poll for it.
2. If you want others to pay for the cost of the call: Ask them to poll your fax machine
for documents they want, and have them fax any documents that you want.
* There are some fax machine that will not respond to this function.
Helpful Hints Using Polling Effectively (Examples)
Problem No. 1: You want another party to send you a long fax, but they do not
want to pay for the call.
Solution; Ask them to leave the document in their fax machine so you can
poll for it.
Problem No. 2: Sales representatives have difficulty sending in faxes to the
head office’s fax machine because it is busy so much of the time.
Solution: Head office can poll the sales representatives’ fax machines.
Problem No. 3: Because of the time or location, it is cheaper for someone else to
call you than it is for you to make the call.
Solution: Ask the other party to poll for the documents and offer to pay for
the call at their lower rate.
9-1
Page 79

IT":.-...
liliiillllllllllll
.......
Polling Another Fax Machine
Once you have set up polling, as described below, and the other party has set their fax machine
to “POLLED WAITING”, you can automatically receive their documents.
..
......
.
.
:.::r,':.. .
iiiiEill-Siiil
■
STATUS OF LCD DISPLAY
Make sure no documents are in the
feeder.
' Cy/12/l994 :
■■ A L iJ P: INS
a :?9
ERT i)OCU
M L N r
1. Press PUSH and open the cover.
2. Press POLLING.
3. Press SET.
4. Enter the fax number.
5. Press START.
' PGI
TNG :
SH
:cr s r. & SET REyL-:
ENTEk NG. START
N..J on ICE
STANGARD
A" POLL ' ::T
TTlilfil
J
‘s
Setting up Polled Waiting
Polled Waiting is when you place a document in your fax machine and set your nnachine to allow
another fax machine to retrieve that document. Your fax machine wall print a Polled Report after
the transmission.
JL
STATUS OF LCD DISPLAY
■D;9/12/:l:MAa5.r25"'T-
[ FAX/CffRY: I NS№T DOCUMENT J
1. Place the documents into the feeder.
2. Press PUSH and open the cover. Press
POLLING.
3. Press SET.
4. Press START and wait for the polling
call to come in.
[fax
POLLING r STANDARD-
SELECT < > & Srr KlY
PRESS .SIAri'; K\J_
■:)9/12./:994 lS:2b
FNILR N0 & START .1
PRESS COI
.......TOLL
i;Y. KLYy. J
L POLLfhlplTING
9-2
Page 80

POLLING
iiw...
—
«■I
.........
.
...........................
.
..........
ilili
..
Secure Polling
Secure Polling is a way to keep your documents and others’ from falling into the wrong hands
while the fax machines are set up for polling. You can use Secure Polling only with another
Brother fax machine. Your four-digit ID number must be entered on the fax machine that polls
for your documents.
Polling Another Fax Machine with Secure Code
________________
You can poll another fax machine that has Secure Polling by following the steps below;
You need to make sure you are using the same ID number as the other party.
KEYS TO BE PRESSED
Make sure no documents are in the
feeder.
STATUS OF LCD DISPLAY
09/.l2/:99^ 15:25
;Ffe:)i/C0PY:lN5tlD DOCbMENT ,
Press PUSH and open the cover.
1. Press POLLING.
2. Press <— (left arrow) or —► (right
arrow) to find the POLLING SE CURE
■iOLtlNG : SIANOARD
SELECT < > & SET KF:
ipOTLIhb : SFCURF
: s|;LECT:f< > i!; si-i kl
setting.
3. Press SET.
4. Enter a four digit code. This is the
same security code of the fax machine
you are polling.
Example: 1234.
5. Enter the fax number.
"poi1!NG ID : XXXX
. LN^ LR & SET Kfv
■"polling id : 1234
ENTER & SET KEV
[■ POI _
[ FNTLR NO. & START
' ^0 5
, NJ OFFICE
__
:yJ
...
■■
_____
iiiiiBli
..
^
■
"l
6. Press START.
9-3
Page 81

■ •
.........
:
il
mmm
............
.
.
MiiiiiN
■■■»«I
Setting up Polled Waiting with Secure Polling
Secure Polling allows you to create a Polling ID number to protect your documents during polled
waiting mode. Anyone who polls your machine must enter this polling ID number.
PRESSED
1. Press PUSH and open the cover.
2. Place the documents into the feeder.
3. Press POLLING.
4. Press ◄— (left arrow) or —► (right
arrow) to find the POLLING SECURE
STATUS OF LCD DISPLA
' 0
4 /1 2 / _ 9 94 15:25
Fj
NX/COPY:
■ F.
\X : FNI
Cl
jPY: ?RE
'POLLING : STAMOA
SF.I FG1 < > & s:t KCY
POlllNG : StCURr
SL-LRCT < > & Sbl KbY
INSERj- DOCUMF
r.H NO. & 5IAF
SS COPY KrY
■ -''A
‘NT
<; j
setting.
5. Press SET.
6. Enter a four digit code.
Example: 1234.
7. Press START and wait for the polling
call to come in.
Helpful Hints You should select the Answer Mode to be either AUTO or F/T to make your
documents are polled.
■ 1
0 L1.1N fj
MTEFi &
1 ^
FOLilNG ID : I?3-1
^ KNTtR A StT KPy
PFifSS STAR
0a/12/:l:994 .15:23 -
Pfttip WAITING
JD : XXXX
St.; KEY
11 1
■ P
\J
r KLY
__
-iii
____
'
^
Delayed Polling
_____________________________________________
_
After you select STANDARD or SECURE, press SET, then press TIMER and use the number
keys to enter the time at which you want the polling to take place.
Setting up for Polled Waiting with Quick-Scan (Only for FAX-950M/980M/1500M)
Before pressing START, press QUICKSCAN so that you can store your polled waiting document
in the memory.
Helpful Hints Once you setup the polled waiting documents in the memory, this document
will not be erased after polled until you erase it from memory. To erase this
documents, please use the Cancel Job (See page 6-9).
9-4
Page 82

lililí
10. PASSWORD
FOR YOUR INF0RMAÌI0N
What is Password ?
The password is provided for use in a closed network of fax machines. It can also be
used to prevent reception of “junk faxes” that can interfere with your daily opera
tions. It can also help jmu avoid the transmission of faxes to the wrong parties.
How Does it Work ?
First receiving party set up “RECEIVE PASSWORD” to “ON” and then enter four
digit of password.
When you send a fax message, you should add the same four digit password. In case
this four digit password of both sending and receiving party machines are same, you
can send/receive message. Also, both side’s machine should be Brother (or compat
ible) machine.
What is Password Plus ?
ililiilllliili
If you have activated the password function, only people who have set the correct
password code on their Brother fax machine can exchange faxes with your machine.
To help avoid difficulties, you can use the Password Plus feature. It is most effective
to prevent reception of “junk faxes”. In case you choose “Password Plus” in “RE
CEIVE PASSWORD”, the machine will accept to receive the document not only sent
by the party with correct password, but also sent by the party who is listed in your
One-Touch dial numbers. (The machine detects the last four digit number and
whether it matches last four digit number in previously registered in One-Touch
dials. In this case, the sending machine must not be Brother fax machine.)
10-1
Page 83

liiii
Sending a Fax with a Password
Before set up, you should make sure the password code of the other party.
YS TO BE PRESSED
1. Press PUSH and open the cover. (Only
for FAX-950M/980M/1500M)
2. Place the documents face down in the
feeder.
3. Press CURRENT SETTING.
4. Press 4.
5. Enter a four digit code.
Example: 1234.
6. Enter the fax number.
7. Press START.
STATUS
09/12/1994 15:25
V.
______
. . . .
1 FAX :
; COPY:
i USE < > TO SCROLL
[ ENTER
■ 4.PASSWORD TRANSMTSSTON
! PRESS STOP TO CANCEL
PASSWORD : XXXX
ENIER & SET KEY
PASSWORD : 1234
ENTER & SET KEY
PASSWORD
ENTER NO. h START
*05
NJ OFFICE
ENTER N0. & START 1
PRESS COPY KEY
N0. Л SET KEY
10-2
Page 84

PASSWORD
iliiiiC
Receive Password
You can set receive password status either “ON”, “OFF”, or “PLUS”.
KEYS TO BE PRESSED
1, Press PUSH and open the cover.
: :h A )i / G0 P Y ; I MS E RT ' TO
2. Press FUNCTION.
3. Press 6.
4. Press 7.
5. Press ^— (left arrow) or —►► (right
arrow) to choose either “ON”, “OFF”
or PLUS”.
Example; PLUS.
6. Press SET.
7. Enter four digit password cord.
Example: 1234.
8. Press SET.
If you choose ON, you should enter four digit
password code.
9. Press STOP to exit.
USE SCROLD
iilLl3:iilil|E Ji T sill I
■evtijuR sraEM..
PR E S S ST O P T O C AN C E L
"/ . SE T R E CE I VE P A SS W OR D
PR E S AS : S TO P T O C A hC i LL :
R EC EI V E P A SS WO R D I -
"SeEIct')<■ ■■>.&'"SET kEUTLj^
[ífCnVE PASSWORD : PLUS
SeleqSl seltW:'-'
R EC ET V lL R A SS WO k D : X XX X
|i£NTER:-v;a;:liT. KEYu::.
'r ' | -C E: V [ p as s wo r d ; 1 ? S4
EN T ER S! : ^ K E Y
7 .S ET - - RE C EI V E PA SS W OR D
1 . SE T; . . .. :h A T E; : A ND T I M Ú .
10-3
Page 85

RilNTING REP0R1S AND
■ - iL" - _ Mi ■ ■ ■■■:
J1. PRINTING REPORTS AND LISTS
You can print the following lists and reports under function item 2. PRINT REPORTS.
Level one
function
2. PRINT REPORTS
Level two
function
1, ACTIVITY REPORT
2. ALL DIAL LIST
3. TELEPHONE/FAX
INDEX
4. COVERPAGE
FORMAT
5. CALL BACK MSG.
FORMAT
6. USER OPTION
LIST
7. TRANSMIT
REPORT
Explanation of Options
The Activity Report lets you know
whether transmissions and incoming
faxes were received.
This is a list of the names and numbers
that are stored in One-Touch and
Speed-Dial memory. Printed in OneTouch and Speed-Dial number order.
The same as the All Dial list but printed
in alphabetical order.
This allow^s you to check the Cover
Page format.
Used to check the Call Back Message
format.
The settings for FUNCTION 2-7 and 4
to 6 (Cover Page, Tone/Pulse, Ring De
lay, etc.) are printed here.
You can set up whether the
Transmission Verification Report will
be printed after sending all faxes or
not.
ON/OFF
Page
11-4
11-2
6-14
6-18
8. MEMORY STATUS
LIST
{Only for FAX-950M/
980M/1500M)
The addressee and the amount of
occupied memory for items stored in
the memory are printed here.
Other Reports
The following reports are printed automatically, for your information.
Power Failure Report
Polled Report
Delayed Sending Report
Broadcast Report (Only for FAX-95OM/980M/1500M)
11-5
11-1
Page 86

PRINTING REPORTS AND LISTS
All of reports and lists can be printed as shown below.
KEYS TO BE PRESSE
1. Press PUSH and open the cover.
2. Press FUNCTION.
3. Press 2.
4. Press the number of the level two
function you wish to print.
Example: l.ACTIVITY REPORT.
5. Press START.
ti:-.
L
I 09/1P./199A 15:?b
F A X / C 0 P Y : T N Slif '-DO MIÌT J
" liSh < > TO SCROLL
. ENTF
R NO. & SET KEY
?.PRTNT RI-PGRiS
^ PRESS STOP TO CANCEL
CTIVITY REPQRI
SS STOP TO CA
l.ACTIVITY REPORT
PRESS START KEY
N TI fJ G
AC’ I Vi ■Y REPORT
Printing the All Dial List
You can print out a list of all One-Touch numbers and Speed-Dial numbers.
ALL DIAL LIST
ALL DIAL LIST
TIME; 09/12/1994 15:25
NAME: BROTHER
FAX ; 4155554444
ONE-TOUCH DIAL
NUMBER
4:01
*02 234-5678
*03
FAX/TEL NUMBER
61-2018285881
334-5565
DESTINATION
FAX
TEL ABC COMPANY
FAX
AUSTRALIA OFFICE
HEAD OFFICE
TEL : 4155554445
GROUP
i ■ "f:-: :
■Pii»
.....
..............
11-2
Page 87

PRINTING REPORTS
Activity Report Interval
An activity report can be printed at certain intervals that you specify. You have a choice of setting
the journal interval period to “OFF”, “6 hours”, “12 hours”, “24 hours”, “2 days”, “4 days”, or “7
days”. The activity report will provide a list of all outgoing and incoming faxes (up to 30) during
the period. The initial setting is “OFF”,
If you wish to print the activity report manually, follow instructions on page 11-2.
STATUS OF LCD DISPLAY
1. Press PUSH and open the cover.
2. Press FUNCTION.
3. Press 6.
4. Press 3.
5. Press <— (left arrow) or —► (right
arrow) to choose the setting.
Example: 12 HOURS.
If you select seven days, you should choose
the base day of the week.
6. Press SET.
7. Enter the time to print in 24-hour
format using the number keys.
Example; 19:45 (7:45 P.M.).
8. Wait for two seconds.
9. Press STOP to exit.
^ l-AX/rjOPY : : N
hsf"'< >
i-.NOK N0. & SEl KEY
::6.1;i:TUP SYSTEM
Hii-ss s;np 10 canclL
StAelSRtrORl liTERVAL
PRESS "STOP 10 CANCit
■■ Atl.iitPORl : Of
LLtr < > & Si .1 KEY
' rVFRY 1? iinURS
[ S: L
LSI < > & SE
7START-ATB: 00 :00
.
.....................
5! A RT AT ; 19 :45®
[■■■ENTtR.'..t-S;PU,^^^
.3 . ACT . RF TORTTlNTi.RV.AL.
.'4 STAT ilW- ■ ■ 11:1...:. -S"
.15:25
SEiil DOCUMENI
-V
r KEY
■
.........................
..
...
;. -
.....
.... y
■■■
11-3
Page 88

PRINTING REPORTS AND LISTS
ACTIVITY REPORT
ÌIWBÌÌìn
TIME: 09/12/1994 15:25
NAME; BROTHER
FAX : 4155554444
TEL : 4155554445
DATE
09/12
09/12
09/12
TIME
10:00 BROTHER BOSTON
10:10
14:53 BROTHER BOSTON
FAX NO./NAME
NJ OFFICE
CV :
CA : CALL BACK MSG
POL :
COVERPAGE
POLLING
DURATION PAGE(S) RESULT
04:23 20 CV CA OK
00 00 BUSY
48 01 CV CA
OK TX
Transmission Verification (Xmit) Report
Set the Transmission Verification Report to ON or OFF. The initial setting is OFF.
OFF: Report will be printed if errors occur.
ON; Report will be printed every time a fax sent completely or an error occurs.
KEYS TO BE PRESSE
1. Press PUSH and open the cover.
2. Press FUNCTION.
3. Press 2.
4. Press 7.
5. Press ◄— (left arrow) or —► (right arrow) to choose the setting.
Example: ON.
STATUS OF LCD DISPLA
09/12/1994 15:25
r/\X/C0F'Y : l.NSERT DOCOKENl
USr < > TO SCROLL
■Inter no. & sei kly
2.PRINT RFPORtS :
PRESS STOP 10 CANCEL
:? .TRANSmTt REP0RTi^^::::A
RRESS STOP :;:TQ::;,CANCEh
IRANI
SELECT < > & S£
r TRANS
MIT REPORT : ON
1: < > & KEY .-■/
SElEC
COMMENT
TX
TX
>
UiiU Ì)
6. Press SET.
7. Press STOP to exit.
11^4
■/.TRANSMIT RFPORl
8.MEMORY STATUS LIST
Page 89

PRINTING REPORTS AND LISTS
Memory Status List (Only for FAX-950M1980M11500M)
_____________________
The MEMORY STATUS LIST will show you the addressee and amount of occupied memory for
items stored in the memory such as delayed transmissions, polled waiting, and out of paper
received.
MEMORY USED LIST
09/12/1994 15:25
BROTHER
4155554444
02^
03%
0Z%
02%
10%
81%
TIMER
POLLING
REDIAL WAITING (ECM) :: BROTHER BOSTON
ECM
FREE
WAITING (ECM)
(ECM) : 18:00 (BROADCAST)
(ECM) : HEAD OFFICE
TIME:
NAME:
FAX :
TEL : 4155554445
11-5
Page 90

lE§iL^RmiNTEN#^NCE AND TROUBLESHOOTING
12. REGULAR MAINTENANCE AND TROUBLESHOOTING
Regular Maintenance
You can keep your fax machine in optimum condition by cleaning it on a regular basi s. Avoid using
thinners or other organic solvents to clean the machine and do not use any water.
Follow the four steps below:
1. Unplug the telephone line and then the power cord.
When you reconnect these line.s later, make sure to connect the power cord first, then the
telephone line.
2. Wipe any dirt off the machine using a slightly damp cloth.
3. Clean the scanner.
Moisten a small piece of soft, lint-hee cloth with Isopropyl alcohol and carefully remove any
dirt from the glass cover and from the white bar of the scanner.
4. Clean the printer.
Moisten a small piece of soft, lint-free cloth with Isopropyl alcohol and keep wiping the edge
of the print head until all dirt is removed.
Cover
Helpful Hints If the scanner and the printer are dirty, the quality of the transmission or
reception image, and copy becomes degraded. Use the avobe procedure,
therefore, to clean these parts frequently.
12-i
Page 91

REGULAR MAINTENANCE AND TROUBLESHOOTING
Paper Jams
Your fax machine will sound an alarm if the document jams while going through the feeder or if
the recording paper becomes stuck. The display will show “DOCUMENT JAM” or “RECORDING
PAPER JAM”.
Fixing a Document Jam
1. Open the control panel.
2. Remove the jammed documents.
3. Close the control panel.
4. Press STOP.
Fixing a Recording Paper Jam
1. Open the top cover.
___________________________________________________
I
5. Remove the jammed paper.
- Pull the jammed paper.
12-2
Page 92

REGULAR MAIMfB^ANCE AND JROUfiLESHOOTJNG
- Press © to open the paper guide and remove the jammed paper by pulling in upward direction.
Recording paper
Turn © gear to backward to feed the paper and remove it.
6. Install the cassette.
Be sure to push the paper plate down until it locks in position.(See Page 1-3.)
7. Install the cartridge.
8. Push down the printer head until you hear a “click”.
9. Close the top cover.
Recording paper
12-3
Page 93

REGULAR MAINTENANCE AND TROUBLESHOOTING
Troubleshooting
You may occasionally encounter a problem with your fax machine or telephone line. If this
happens, your fax machine often identifies the problem and displays an error message. Refer to
the following list when you see an error message on the display. If additional help is needed,
please contact the following Customer Service numbers :
1-800-284-4FAX (4329)
1-908-356-8880 (Extension 7920)
Canada 1-514-685-0600 (Montreal)
1-604-278-8466 (Vancouver)
Error Messages
CHECK RECORDING COVER
The top cover or printer head is not completely closed. Push it down until you hear a “click.”
CHANGE PRINTING CARTRIDGE
The printing cartridge has run out. Replace the used cartridge to new one. (See page 1-2.)
CLEAN UP SCANNER
The scanner is dirty. Clean the scanner. (See page 12-1.)
COMM.ERROR
You encountered a communications error that resulted from a poor quality phone line. Try the
call again.
Error Codes
20 XX
80 01
90 01
74 00
This Error Code is usually caused by poor telephone line,
or having a special telephone feature such as “Call
Waiting” assigned to this line.
Their machine sent a disconnect command from their location. This could be
caused by a document jam, a recording paper empty, or mechanical problems on
their unit, or there may be problems on the telephone line.
AO 11
Remote side disconnected the transmission. This could be caused by them
stopping the transmission before completion.
FFXX
This is a mechanical error on your fax machine. For example : FF E A “Document
Jam”. Please clear the jam and try to send again.
CONNECTION FAIL
You may request Polling function to other party even if remote station does not have polled
waiting.
DOCUMENT JAM
The documents were not inserted properly. Open the control panel and remove the documents.
Close the control panel and press STOP and re-insert the documents and adjust the. guides on
either side of the document, and try sending the fax again. (See page 12-2.)
ID MISMATCH
You may have the wrong ID for secure polling function and password transmission. Try calling
the other party to meet the ID.
12-4
Page 94

REGULAR MAINTENANCE AND TROUBLESHOOTING
LINE DISCONNECTED
The telephone line was disconnected by other party during the communication. Try calling the
other party to see what happened.
MACHINE ERROR XX and PRESS STOP KEY
Contact the Customer Service number listed on page 12-4.
NO RESPONSE OR BUSY
The number you called does not answer or is busy. You may also have reached a number that is
not connected to a fax. Check the number and dial manually by pressing HOOK key.
NOT REGISTERED
The One-Touch key or Speed-Dial number has no number assigned to it. You need to register a
phone number. (See page 4-4, 7.)
PRINTER FAULT and PRESS STOP KEY
The recording head has overheated. Then unplug the power cord and wait for 30 minutes.
RECORDING PAPER JAM
The recording paper is jammed. Remove the jammed paper. (See page 12-2, 3.)
REFILL PAPER CASSETTE
The recording paper is empty. You need to place the paper in the cassette. (See page 1-3.) The
cassette is not setting corectly. Try to re-set it. (See page 1-3.)
SCANNER ERROR
Try to clean scanner and white bar. (See page 11-2.)
If you still get the scanner error, please contact the customer service numbers listed on page 12-
4.
Other Problems
When Dialing Doesn’t Work...
You may have the wrong dialing mode. Change the TONE/PULSE setting. (See page 4-1.) You
may also want to check all the telephone line connections, such as to the handset and to the wall
jack. Check also that the power cord is connected. Check by pressing HOOK to see if dial tone is
heard.
Poor Copy Quality
Someone may complain that faxes they receive from you are faded. Your resolution setting may
be inappropriate. Try the FINE or SUPERFINE settings and try to call again. Also, it is possible
that your scanner is dirty. So, you should clean it. (See page 12-1.)
Vertical Streaks
You may get faxes with vertical streaks. Make a copy on your machine to see. If you get the same
results, the recording head on your machine may be dirty, or the sender’s scanner may be dirty.
Try cleaning the recording head. (See page 12-1.)
Horizontal Streaks
You may get a fax with horizontal streaks or with missing lines. This normally results from a poor
telephone connection. Ask the other party to send the fax again.
12-5
Page 95

IMPORTANT INFORMATION
13. IMPORTANT INFORMATION
Stcindcird Telephone ond FCC Notices (Only applies to 120V model)
These notices are in effect on models sold and used in U.S.A.
This equipment is hearing-aid compatible.
When programming emergency numbers and/or making test calis to emergency numbers:
• Remain on the line and briefly explain to the dispatcher the reason for the call before hanging
up.
• Perform such activities in the off-peak hours, such as early morning or late evening.
This equipment complies with Part 68 of PCC Rules. On the rear panel of this equipment is a label
that contains, among other information, the FCC Registration Number and Ringer equivalence
Number (REN) for this equipment. You must, upon request, provide this information to your
telephone company.
You may safely connect this equipment to the telephone network by means of a standard modular
jack, USOC RJllC.
An FCC compliant telephone cord and modular plug is provided with this equipment. This
equipment is designed to be connected to the telephone network or premises wiring using a
compatible modular jack which is Part 68 compliant.
The REN is useful to determine the quantity of devices you may connect to your telephone line
and still have those devices ring when your telephone number is called. In most, but not all areas,
the sum of the RENs of all devices connected to one line should not exceed five(5), To be certain
of the number of devices you may connect to your line, as determined by the REN, you should
contact your local telephone company to determine the maximum REN for your calling area.
If your IntelliFAX900/950M/980M71500M causes harm to the telephone network, the telephone
company may discontinue your service temporarily. If possible, they will notify you in advance.
But if advanced notice is not practical, you will be notified as soon as possible. You will be informed
of your right to file a complaint with the FCC.
Your telephone company may make changes in its facilities, equipment, operations or procedures
that could affect the proper functioning of your equipment. If they do, you will be notified in
advance to give you an opportunity to maintain uninterrupted telephone service.
If you experience trouble with this IntelliFAX900/950]VI/980M/1500M, please contact the
manufacture’s authorized service agency for information on obtaining service or repair. The
telephone company may ask that you disconnect this equipment from the network until the
problem has been corrected or until you are sure that the equipment is not malfunctioning.
If you are not able to solve a problem with your fax machine, contact Brother service personnel
at l-800-284-4FAX(U.S.A. Only).
1-800-284-4329
Warning
For protection against the risk of electrical shock, always disconnect all cables from the wall outlet
before servicing, modifying or installing the equipment.
This equipment may not be used on coin service provided by the telephone company nor connected
to party lines.
13-1
Page 96

a^RlANT INFORMATION
illllilllii«
This equipment has been tested and found to comply with the limits for a Class B digital device,
pursuant to Part 15 of the FCC Rules. These limits are designed to provide reasonable protection
against harmful interference in a residential installation. This equipment generates, uses, and
can radiate radio frequency energy and, if not installed and used in accordance with the
instructions, may cause harmful interference to radio communications. However, there is no
guarantee that interference will not occur in a particular installation. If this equipment does
cause harmful interference to radio or television reception, which can be determined by turning
the equipment off and on, the user is encouraged to try to correct the interference by one or more
of the following measures:
• Re-orient or relocate the receiving antenna.
• Increase the separation between the fax equipment and the receiver.
• Connect the fax equipment on a separate line.
• Consult the dealer or an experienced radio/TV technician for help.
Brother cannot accept any financial or other responsibilities that may be the result of
your use of this information, including direct, special or consequential damages.
There are no warranties extended or granted by this document.
ill
mil
This serial number may be found on the label affixed to the back of the unit. For your convenience,
note the number below and retain this owner’s manual to serve as a permanent record of your
purchase, in the event of a theft or fire, or for future reference.
MODEL NO. IntelliFAX900/950M/980M/1500M SERIAL NO.
NAME OF DEALER
DATE OF PURCHASE
_______________________________
_
13-2
Page 97

IPORTANT INFORMATION
Important Safety Instructions
1. Read all of these instructions
2. Save them for later reference.
3. Follow all warnings and instructions marked on the product.
4. Unplug this product from the wall outlet before cleaning. Do not use liquid or aerosol cleaners.
Use a damp cloth for cleaning.
5. Do not use this product near water.
6. Do not place this product on an unsuitable cart, stand, or table. The product may fall, causing
serious damage to the product.
7. Slots and openings in the cabinet and the back or bottom are provided of ventilation; to ensure
reliable operation of the product and to protect it from overheating, these openings must not
be blocked or covered. The openings should never be blocked by placing the product on a bed,
sofa, rug, or other similar surface. This product should never be placed near or over a radiator
or heat register. This product should not be placed in a built-in installation unless proper
ventilation is provided.
8.
This products should be operated from the type of power source indicated on the marking
label. If you are not sure of the type of power available, consult your dealer or local power
company.
9
This product is equipped with a 3-wire grounding type plug, a plug having a third (grounding)
pin. This plug will only fit into a grounding-type power outlet. This is a safety feature. If you
are unable to insert the plug into the outlet, contact your electrician to replace your obsolete
outlet. Do not defeat the purpose of the grounding-type plug.
10. Do not allow anything to rest on the power cord. Do not locate this product where persons will
walk on the cord.
11. If an extension cord is use with this product, make sure that the total of the ampere ratings
on the products plugged into the extension cord do not exceed the extension cord ampere
rating. Also, make sure that the total of all products plugged into the wall outlet does not
exceed 15 amperes (U.S.A. only).
12. Never push objects of any kind into this product through cabinet slots as they may touch
dangerous voltage points or short out parts resulting in a risk of fire or electric shock. Never
spill liquid of any kind on the product.
13. Do not attempt to service this product yourself, as opening or removing covers may expose
you to dangerous voltage points or other risks. Refers all servicing to service personal at 1800-284-4FAX.
14. Unplug this product from the wall outlet and refer servicing to qualified service personnel
under the following conditions;
A. When the power cord or plug is damaged or frayed.
If liquid has been spilled into the product.
B.
If the product has been exposed to rain or water.
c.
If the product does not operate normally when the operating instructions are followed.
D.
Adjust only those controls that are covered by the operating instructions since improper
adjustment of other controls may result in damage and will often require extensive work
by a qualified technician to restore the product to normal operation.
If the product has been dropped or the cabinet has been damaged.
E.
If the product exhibits a distinct change in performance, indicating a need for service.
F.
13-3
Page 98

INDEX
14. INDEX
Activity Report
ADF
.......................................................... ....6-2
All Dial List
Answer Mode.............................
Auto Mode
Beeper
....................................................
Broadcast
.................................
..................................................
............................................7-1, 7-2
..................................................
A
B
11 -1, 11-3
..........
11-1, 11-2
2-5, 7-1
3-1,4-1
6-8
FCC Notice
EFine............................................................... 6-2
F/T Mode
F/T Ring Time................................................ 7-4
Function
Gray Scale
Groups............................................................4-8
..............................................
.......................................... 7-1, 7-3
........................................
....................................................
13-1
2-5, 3-1-3-5
6-13
c
Call Back Message
Call Reservation.............................................2-4, 6-17
Canceling.......................................................6-9
Cartridge
Cassette .......................................
Chain Dialing.................................................4-6
Cleaning
Connecting
Contents
Contrast
Control Panel Keys....................................2-1-5
Copy............................................
Cover Page
Current Setting
Daily Timer.................................................. 6-7
Date and Time
Delay
Distinctive Ringing
Document
...............
..................................................
.....................................................
..................................................
......................................................
...............................................
.....................
...............
...............
.........................
.................
......
2-4, 6-3, 6-11,6-12, 10-2
2-4,6-18, 11-1
1-2, 1-3, 2-4, 7-7
1-2, 1-3, 1-4
1-5, 7-9, 7-11
......
2-4, 6-14-17, 11-1
D
..............................................
...............................
12-1
ii~v
6-2, 6-3
2-3, 8-1-3
4-2
6-7, 7-2
7-13-17
6-1, 6-2
H
Help
...................................................
Hook
....................................................
Hold
.......................................................2-2, 5-1
Interrupting
Jacks
.............................................
Jam..................................................... 12-2, 12-3
2-5,3-5-6
2-2, 5-1
2-5, 6-9
1-6, 7-9, 7-11
M
Manual Mode
Manual Dial
Memory
Multiple Copies.............................................8-2
Multiple Resolution Transmission
.......................................
..........................................
................................................
............
7-1,7-2
5-1,6-4
4-8, 7-8
6-12
N
Next-FAX Reservotion.....................
..........
6-18
E
ECM..............................................................6-19
Error Message...
External
Extention
...............................................7-9, 7-11
14-1
.........................................
..................................................... 7-9
12-4
One-touch Dial
..........
2-2, 4-4, 4-5,4-8, 5-1,5-2, 6-4
On Hook Dial
Overseas Mode
Packing list
.................................................5-1
....................................................
...................................... 6-11
1-2
Page 99

Paper
....................................................
Password
Pause...................................................... 2-2, 5-1
PBXs..................................................... 1-6,4-8
Photo
Polling....
Power..............................................
Printer Alarm......................................... 3-2, 7-7
...................................
...................................................
...............................
9-1,9-2, 9-3, 9-4
1-3, 1-4
10-1,10-2,10-3
6-2,6-13
1-5, 13-1
Q
Quickscan
.......................................................
2-4, 6-6
R
Redial..............................................................2-2, 6-5
Reduction............................................... 3-2, 7-6
Remote Activation
Remote Code..................................7-9-10, 7-11
Remote Deactivation..............................7-9-10
Reports...............................................11-1-11-4
Resolution
Ring Delay................................................... 7-2
Ring Volume
........................
....
.....................7-9-10, 7-11
2-4, 6-2, 6-12, 6-13
.............................................
7-5
TIMER
.............................................
Trouble Shooting
Transmission Verification Report 11-1,11-4
Tone/Pulse..........................
..................................
2-4, 6-7, 9-4
.
.................
12-4~5
4-1,5-1
INDEX
s
Secure Polling
Setting up
SHIFT
......................................................
Smoothing.....................................................7-4
Speaker Volume.......................................... 7-5
Specifications
Speed Dial.. 2-2, 4-6,4-7, 4-8, 5-1,5-2, 6-4
Station ID....................................4-3, 6-6, 6-14
Standard Mode
Super Dark
Superfine Mode
Super Light
TAD Mode
Telephone Index
Test Sheet
......................................
.............................................
...........................................
.............................................
...
.................................................
..........................................
...................................................6-3
9-3, 9-4
1-2-1-6
2-2. 4-4
15-1
6-2
6-3
6-2
T
............................
................
..........................................................i
7-1,7-11,7-12
2-3, 5-2, 6-4, 11-1
14-2
Page 100

SPECIFICATIONS
iSllKili
15. SPECIFICATiONS
Type
Compatibility
Coding System
Modem Speed
Document input width
Scanning/Printing width
Paper size
Cassette capability
Printer type
Gray scale
Display
Polling types
Contrast control
Resolution
One-Touch dial
Speed-Dial
Memory
Automatic redial
Speaker type
Auto answer
Communication source
Operating environment
Power source
Power consumption
Dimensions
Weight
--- ■ ■ ;ii
Desktop facsimile transceiver
CCITT Group 3
Modified Huffman (MH)
9600/7200/4800/2400; Automatic Fallback
148mm to 216mm (5.8 inches to 8.5 inches)
208mm (8,2 inches)
Letter/Legal
200 sheets (201b)
Line thermal with Ribbon
32/16 level
LCD, 24 characters x 2 line
Standard, Secure, Delay
Automatic/Super Light/Super Dark (manual setting)
• Horizontal 8pels/mm (203 pels/inch)
• Vertical Standard 3.85 lines/mm (98 lines/inch)
• Fine/Photo (16 level) 7.7 lines/mm (196 lines/inch)
• Superfine/Photo (32 level)
15.4 lines/mm (392 lines/inch)
60 stations
100 stations
256KB for out-of-paper Receiption (FAX-900)
256KB (FAX-950M/980M)
512KB (FAX-1500M)
3 times at 5 minute intervals
Monitor
0, 1, 2, 3 or 4 rings
Public switched telephone network
41 -
120V AC 50/60Hz (U.S.A., Canadian Version Only)
Standby: under 15 watts
Peak: under 170 watts
449 X 424 X 216 (mm) (17.7 x 16.7 x 8.5 (inch))
8.0kg/17.51b
Specifications are subject to change for improvement without prior notice.
15-1
 Loading...