

Page 1
SETUP RECEIVE
39
For FAX/TEL Mode Only
When the fax machine is in FAX/TEL mode, it will use the F/T Ring Time
(double ringing) to alert you to pick up a voice call. If you’re at the fax
machine, you can lift the handset to answer.
If you’re at an extension phone, you’ll need to lift the handset during the
F/T Ring Time and press 5 1 between the double rings. If no one is
on the line, or if someone wants to send you a fax, send the call back to the
fax machine by pressing 5 1.
Changing Remote Codes
Remote Codes might not work with some telephone systems. The preset Fax
Receive Code is 5 1. The preset Telephone Ans wer Code is 5 1.
If you are always disconnected when accessing your external TAD remotely , try
changing the Fax Receive Code from 5 1 to and the T elephone
Answer Code from 5 1 to 9 9 9.
See
Setting F ax
Storage
p. 73
Function
Press
1
Press or to select ON (or OFF).
2
, 2, 4.
REMOTE ACT.:ON?
3
Press
when the screen displays the setting you want.
Set
FAX RECEIVE:*51
If you want to, enter a new Fax Receive Code, then press
4
Set
.
TEL ANSWER:#51
If you want to, enter a new Telephone Answer Code, then press
5
Stop
6
Press
to exit.
Set
Printing a Fax in Memory
If you have Fax Storage ON for remote retrieval, you can still print a fax
from memory when you are at your fax machine.
Function
Press
1
Press
2
After printing is finished, press
3
Start
, 8, 4.
.
Stop
to exit.
.
Page 2
40
CHAPTER FIVE
Polling
Polling is the process of retrieving faxes from another fax machine. You can
use your fax machine to “poll” other machines, or you can have someone
poll your machine.
All parties involved in polling need to set up their fax machines to
accommodate polling. When someone polls your machine to receive a fax,
they pay for the call; if you poll someone’s fax machine to receive a fax,
you pay for the call.
Some fax machines do not respond to the polling function.
Setting Up Polling Receive
Polling Receive is when you call another fax machine to receive a fax from it.
Press
1
The screen displays
Function
, 2, 8.
POLLING RX:OFF?
SELECT <- -> & SET
Press or to choose ON.
2
Set
3
Press
. The screen displays
ENTER FAX NO.
PRESS START KEY
Enter the fax number you are polling.
4
Start
5
Press
. The screen displays DIALING.
Page 3
See
Canceling a
Scheduled Job
p. 42
SETUP RECEIVE
Setting Up Sequential Polling Receive
Your fax machine can request documents from several fax units in a single
operation. Afterwar d, a Sequential Polling Report will be printed.
Function
Press
1
The screen displays
, 2, 8.
POLLING RX:OFF?
SELECT <- -> & SET
Press or to select Polling ON.
2
POLLING RX:ON?
Set
Press
3
The screen prompts you to enter the fax numbers to be polled.
.
ENTER FAX NO.
PRESS START KEY
41
Specify the destination fax machines you wish to poll, using One Touch,
4
Speed Dial, a Group or the dial pad. You must press
each location.
Start
Press
5
for a document.
. Your fax machine will poll each number or group member in turn
Help/Broadcast
ACCEPTED
DIALING
between
Page 4
42
CHAPTER FIVE
Canceling a Scheduled Job
You can cancel tasks you’ve scheduled, such as Delayed Fax or Polling
Transmit.
If the fax machine is idle,
Press
1
Any waiting jobs will appear on the display. If no jobs are waiting, the
screen displays NO JOB WAITING.
If you have more than two jobs waiting, use or to select the job
2
you want to cancel. Press
—OR—
If you have only one job waiting, go to Step 3.
Press 1 to cancel—OR—Press 2 to exit without canceling.
3
To cancel another job, return to Step 2.
Press
4
Function
, 4.
4.REMAINING JOBS
Set
when the screen displays your selection.
Stop
to exit.
See
(Option) Multi-
function Link
Pro Software
p. 135
If your fax machine is busy, press
cancel a job.
You can check which jobs are waiting in memory by following Steps 1 and
2 above .
Stop
, then follow Steps 2 through 4 to
Setting Multi-Function Link Pro Mode
(Only if You Purchased Multi-Function Link Pro)
If you connect your fax machine to your PC, you can receive faxes into your
PC. After completing all setup for Multi-Function Link Pro mode, you can
turn on Multi-Function Link Pro to reroute incoming faxes to your PC.
Function
Press
1
The screen displays
Press or to select ON (or OFF).
2
Press
3
Press
4
, 2, 0.
0.MF LINK
Set
when the screen displays your selection.
Stop
to exit.
Page 5

SETUP RECEIVE
43
Distinctive Ringing
This fax machine feature lets you use the Distinctive Ringing subscriber
service offered by some telephone companies, which allows you to have
several telephone numbers on one phone line. Each phone number has its own
Distinctive Ringing pattern, so you’ll know which phone number is ringing.
This is one way you can have a separate phone number for your fax machine.
Your fax machine has a Distinctive Ringing function, allowing you to dedicate
one phone number just for receiving faxes. You’ll need to follow the directions
below to “register” the new Distinctive Ringing pattern, that was assigned by
the Telephone Company, so your fax machine can recognize its incoming calls.
You can change or cancel the Distinctive Ringing pattern at any time. You
can switch it off temporarily, then tur n it back on. When you get a new fax
number, be sure to reset this function.
If you are not sure which ring pattern you have call your telephone
company. Then assign your ring pattern in the steps below.
You can register only one Distinctive Ringing pattern with the fax machine.
Some ringing patterns cannot be registered.
■
The fax machine will answer only calls to its registered number.
■
To have your TAD answer only the main number, the fax machine must
be in Manual mode.
■
In FAX/TEL or FAX mode, the fax machine will answer all numbers on
the phone line.
Page 6
44
CHAPTER FIVE
Registering Your Distinctive Ringing Pattern
Disconnect the fax machine from any TAD or telephone company Voice
1
Mail.
Set the fax machine to MANUAL mode.
2
Press
3
feature.
Press or to select the SET mode.
4
Press
5
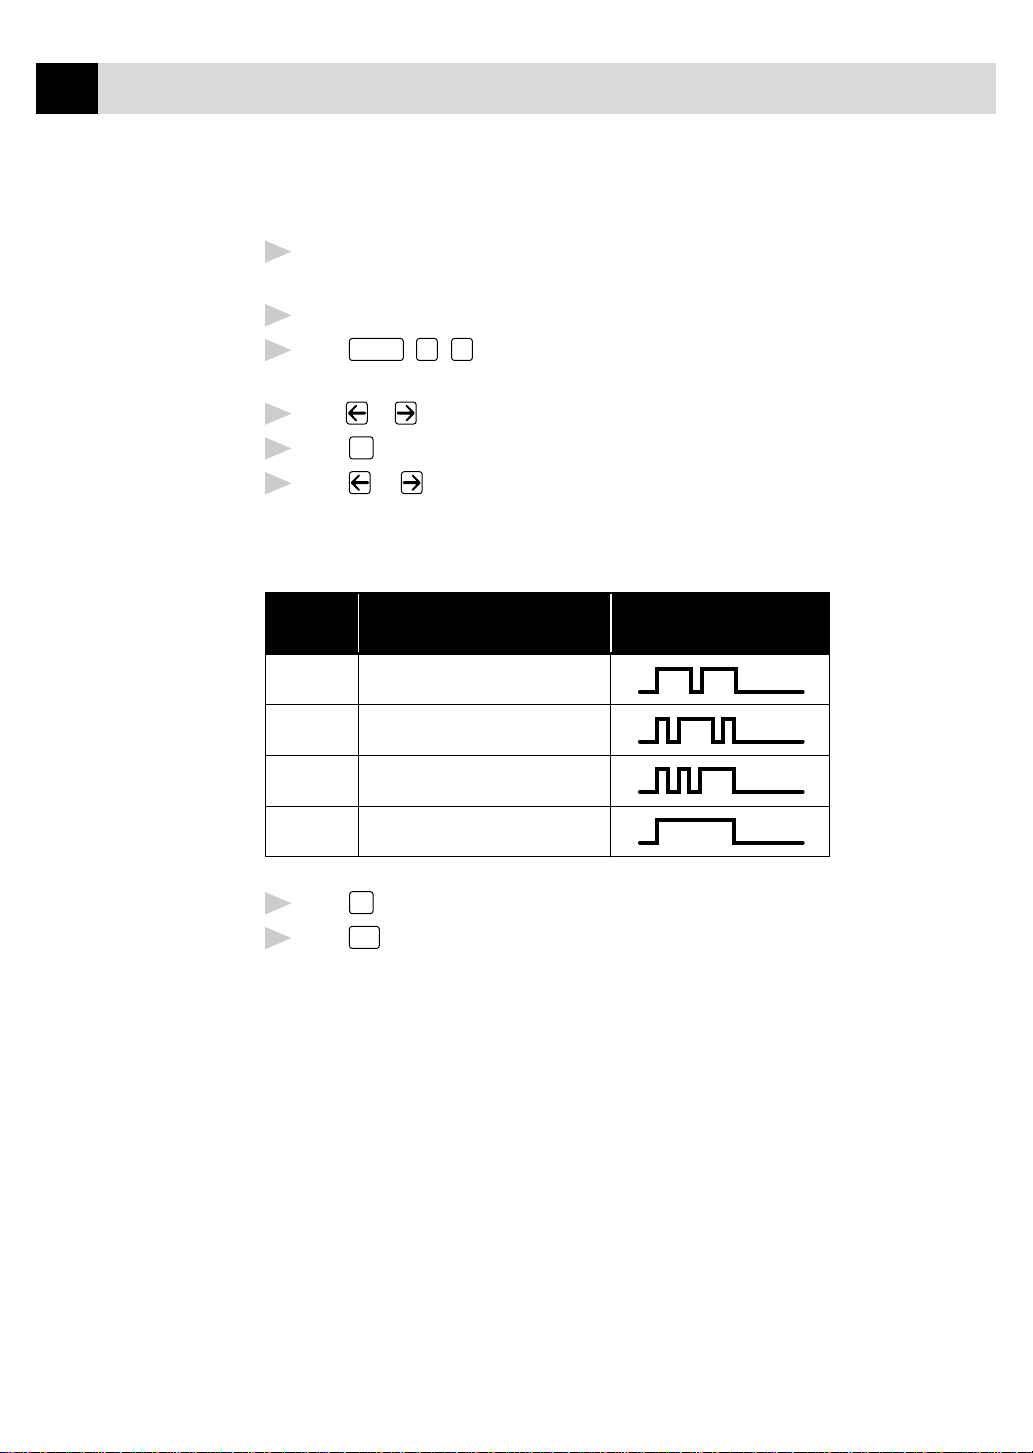
Press or to select the prestored ring pattern you want to assign.
6
(You will hear each pattern as you scroll through the four patterns.) Be
sure to choose the pattern assigned by the Telephone Company.
Ring
Pattern
Function
, 0, 1. The screen displays the current setting of this
Set
when the screen displays DISTINCTIVE: SET?.
Rings
1
2
3
4
Press
7
Press
8
Once you’ve registered the Distinctive Ringing pattern in your fax machine,
you can turn this feature on or off. To change the setting, follow Steps 1 to
4 above, selecting ON (or OFF).
long - long
short - long - short
short - short - long
very long (normal pattern)
Set
.
Stop
to exit.
Page 7

SETUP RECEIVE
45
Caller ID
The Caller ID feature of this fax machine lets you use the Caller ID
subscriber service offered by many local phone companies. This service
provides you, by means of the screen display, the name or telephone number
of your caller as the line rings.
After a few rings, the screen displays the telephone number of your caller
(or name, if available). Once you pick up the handset, the Caller ID
information disappears from the screen, but the call information remains
stored in the Caller ID memory.
See
Printing Caller
ID List
p. 46
■
You will see the first 16 characters of the number or name.
■
OUT OF AREA means call originates outside your Caller ID service
area.
■
PRIVATE CALL means the caller has intentionally blocked
transmission of information.
■
CALL PICKUP remains on the screen when no Caller ID information
was transmitted.
If both the name and number are received, the screen displays only the name.
You can print a list of Caller ID information received by your fax machine.
Caller ID service varies with different carriers. Call your local phone
company to determine the kind of service available in your area.
Viewing Caller ID List
Caller ID memory stores information for up to thirty calls; when the thirty-first
call comes in, information about the first call is erased. You can scroll through
Caller ID information to review those calls made to your fax machine.
Function
Press
1
Press or to select DISPLAY #?.
2
Press
3
, 0, 2.
Set
. The screen displays the ID of the most recent call. If the
name was not received, it will not be displayed.
Press or to scroll through the Caller ID memory and select the
4
Caller ID you want to view.
5
Press
to see detailed information of the selected ID. The screen
Set
shows the caller’s name and number and the date and time of the call.
Press or to return to the Caller ID listing—OR—Press
6
Stop
to exit.
Page 8
46
CHAPTER FIVE
Printing Caller ID List
Press
1
Press or to select PRINT REPORT.
2
Press
3
Press
4
Clearing a Caller ID Stored in Memory
For effecti ve use of the memory, it is recommended that you clear the Caller IDs
stored in memory by pressing
name.
Call Waiting Caller ID (For FAX 2750 Only)
The Call Waiting Caller ID feature lets you use the Call Waiting Caller ID
service offered by many local telephone companies. The feature displays
the telephone number (or name, if available) of Call Waiting callers on your
fax machine’s screen.
Function
Set
.
Start
.
, 0, 2.
Clear
when the display shows the number or
To answer a Call Waiting signal while you're talking on the phone, ask
1
the other party if you can put them on Hold a minute to catch the other
call. The screen displays the Caller ID.
Speed Dial
Press
2
To switch back to the first call, press
3
Either caller can hang up at any time. However, if you hang up you will
disconnect both callers.
to switch to the second call.
Speed Dial
again.
Page 9

CHAPTER SIX
Setup Send
6
Before You Begin
■
Documents must be between 5.8 and 8.5 inches wide, and 3.9 and 14.1
inches long. Your fax machine can scan an image only 8.2 inches wide,
regardless of how wide the paper is.
47
Guides
Paper
■
Make sure you insert documents face down, top edge first.
■
Adjust the paper guides to fit the width of your document.
■
The FAX 2750’s automatic document feeder (ADF) can hold up to 20
pages, feeding each one individually through the fax machine. Use
standard (14 lb–24 lb) paper when using the ADF; if you’re using heavier
paper, feed each sheet individually to prevent paper jams.
The FAX 3750’s automatic document feeder (ADF) can hold up to 30
pages if you stagger the pages and meet the following conditions:
Temperature: 68° F. – 86° F. (20° C. – 30° C.)
Humidity: 50 % – 70 %
Paper: Xerox 4200 (20LB/LTR),
Xerox 4024 (24LB/LTR),
Page 10

48
CHAPTER SIX
Stagger the pages
See
Resolution
p. 55
■
■
Fan the paper, then stagger the pages in the document feeder as shown
below:
Resolution
Press
(before you send the fax) to select the resolution for the
document you’re sending.
DO NOT use curled, wrinkled, folded or ripped paper, or paper with
staples, paper clips, paste or tape attached. DO NOT use cardboard,
newspaper or fabric.
See
One-Touch
Dialing
p. 68
See
Speed Dialing
p. 68
■
Make sure documents written in ink are completely dry.
Manual Transmission
Manual transmission lets you hear the dial tone, ringing and fax receiving
tones before sending the fax.
Insert the document face down in the feeder.
1
Pick up the handset and listen for a dial tone
2
—OR—press
Enter the fax number you want to call (you can enter the digits using the
3
Hook
and listen for a dial tone.
dial pad, or you can enter a One Touch or Speed Dial number or you can
call from the Tel-index).
When you hear the fax tone, press
4
If you’r e using the handset, hang up.
5
Start
.
Automatic Transmission
This is the easiest way to send a fax. IMPOR TANT : Do not pick up the handset,
or press
1
2
3
Hook
.
Insert the document face down in the feeder.
Enter the fax number using One Touch, Speed Dial, Tel-index or the dial pad.
Start
Press
.
Page 11
SETUP SEND
Manual and Automatic Fax Redial
If you’re sending a fax manually and the line is busy, after you disconnect
the call press
If you’re sending a fax automatically and the line is busy, the fax machine
will automatically redial up to three times at 5 minute intervals.
Redial/Pause
to retry the number.
Dual Access
You can scan up to 50 documents into the fax memory, even while the fax
machine is receiving or sending another fax (from memory). You can set
temporary settings for each fax you’re scanning, except Timer and Polling.
If you try to scan in and store a 51st fax, the fax machine will send it
immediately, without storing it in memory.
If you get a MEMORY FULL message while scanning the first page of a
fax, press
while scanning in a subsequent page, you'll have the option to press
transmit the pages scanned so far, or to press
Stop
to cancel scanning. If you get a MEMORY FULL message
Start
Stop
to cancel the operation.
to
49
Make sure the document feeder is empty.
1
Place the document in the feeder.
2
Enter the fax number.
3
Start
Press
4
screen displays the job number (#XX) of the fax, and how much
memory is available. Then the fax machine starts dialing. You can
immediately repeat Steps 1 through 4 for the next fax.
Your fax machine normally operates in Dual Access mode. However, you
can override Dual Access by using Real Time Transmission.
. The fax machine starts scanning the document and the
Real Time T ransmission
When memory is full, the fax machine cannot continue to scan documents
into memory before sending. However, you can turn on REAL TIME TX.
Then place the documents in the feeder and enter the fax number. As soon
as the phone line is free, the fax machine starts dialing and sending the fax.
Place the document in the feeder.
1
Function
Press
2
The screen displays
, 3, 9.
9.REALTIME TX:OFF?
Page 12

50
Function
CHAPTER SIX
3
4
5
6
7
8
9
Set
Press
To change the default setting, press or to select ON (or OFF) and
go to Step 7—OR—For the next fax transmission only, press or to
select NEXT FAX ONLY.
Press
For the next fax only, press or to select ON (or OFF).
Press
Set
Set
.
REALTIME TX:ON?
.
.
ACCEPTED
OTHER SETTINGS?
1.YES 2.NO
Press 1 if you want to select additional settings. The display returns to
the SETUP SEND menu—OR—Press 2 if you are finished choosing
settings and go to Step 9.
Enter fax number and press
Start
.
See
Canceling Jobs
in Memory
p. 51
Checking the Jobs Status
Check which jobs are still waiting in memory to be sent. (If no jobs are
waiting, the screen displays NO JOB WAITING.)
If the fax machine is idle, press
1
busy, go to step 2.
If you have multiple jobs waiting, use or to scroll through the
2
list.
Stop
3
Press
to exit.
, 4—OR—if the fax machine is
Canceling Jobs While Scanning the Document
You can cancel a job while you are scanning it into memory by pressing
Stop
. Eject the document by pressing
Stop
again.
Page 13
SETUP SEND
Canceling Jobs in Memory
You can cancel tasks you’ve scheduled, such as Delayed Fax, Polling Receive,
Polling Transmit or fa xe s i n memory waiting to be sent.
If the fax machine is idle,
Function
Press
1
Any waiting jobs appear on the display. If no jobs are waiting, the
screen displays NO JOB WAITING.
If you have more than two jobs waiting, use or to select the job
2
you want to cancel. Press
—OR—
If you have only one job waiting, go to Step 3.
, 4.
4.REMAINING JOBS
Set
when the screen displays your selection.
#02 SALES REPORT
1.CLEAR 2.EXIT
51
Press 1 to cancel—OR—Press 2 to exit without canceling.
3
To cancel another job, return to Step 2.
Stop
Press
4
If the fax machine is busy, press
cancel a job.
to exit.
Stop
, then follow Steps 2 through 4 to
Basic Sending Operations
See
One Touch
Dialing
p. 68
See
Speed Dialing
p. 68
See
Setting Station
ID
p. 28
Composing Electronic Co ver Page
The cover page is generated at the receiving party’s machine. Your cover
page includes the name stored in the One Touch or Speed Dial memory. If
you’re dialing manually, the name is left blank.
The cover page indicates your Station ID, and the number of pages you’re
sending. If you have Coverpage Setup set to ON (
number of pages remains blank.
Function
3 1), the
Page 14
52
CHAPTER SIX
You can select a comment to include on your cover page.
1.COMMENT OFF
2.PLEASE CALL
3.URGENT
4.CONFIDENTIAL
Instead of using one of the comments above, you can enter up to two
customized messages, each 27 characters long. Use the chart on page 29 to help
enter characters.
Most of the SETUP SEND functions are temporary settings that allow you
to make adjustments for each document you send. However, so you can set
up your cover page and cover page comments in advance, the Cover Page
Setup and Cover Page Message functions change the default settings.
Cover Page for Next Fax Only
Make sure the Station ID is set up (p. 28). This feature does not work
without the Station ID.
You can set the fax to send a cover page with a particular document. This
cover page will include the number of pages in your document.
Insert the document in the feeder.
1
Function
Press
2
When the screen displays NEXT FAX ONLY?, press
3
Press or to select ON (or OFF).
4
Press
5
Press or to view the comment selections.
6
Set
.
3, 1.
Set
.
1.COMMENT OFF
2.PLEASE CALL
3.URGENT
4.CONFIDENTIAL
5.(USER DEFINED)
6.(USER DEFINED)
7
Press
Set
when the screen displays your selection.
Page 15
SETUP SEND
Enter two digits to indicate the number of pages you are sending. (Enter
8
0 0
to leave the number of pages blank.) If you make a mistake,
press to back up and reenter the number of pages.
Set
9
Press
. The screen displays
ACCEPTED
OTHER SETTINGS?
1.YES 2.NO
Press 1 if you want to select additional settings. The display returns to
10
the SETUP SEND menu—OR—Press 2 if you are finished choosing
settings, and go to Step 11.
Enter the fax number you’re calling.
11
Start
Press
12
Always Send Cover Page
.
53
Make sure Station ID is set up (p. 28). This feature does not work without
the Station ID.
You can set the fax machine to send a cover page whenever you send a fax.
The number of pages in your fax is not included when you use this setting.
Function
Press
1
Press or to select.
2
, 3, 1.
COVERPAGE:OFF?
COVERPAGE:ON?
When the screen displays COVERPAGE: ON?, press
3
ON, a coverpage is always sent when you send a fax.)
If you selected ON, you must select a comment. Use or to view
4
possible selections. (You can select your custom comment.)
Set
. (If you select
1.COMMENT OFF
2.PLEASE CALL
3.URGENT
4.CONFIDENTIAL
5.(USER DEFINED)
6.(USER DEFINED)
Page 16

54
CHAPTER SIX
5
6
Using a Printed Cover P age
If you prefer using a printed cover page that you can write on, you can print
the sample page and attach it to your fax.
1
2
3
4
Set
Press
when the screen displays your selection. The screen displays
ACCEPTED
OTHER SETTINGS?
1.YES 2.NO
Press 1 if you want to select additional settings. The display returns to
the SETUP SEND menu—OR—Press 2 to exit if you are finished
choosing settings.
Function
Press
Press or to select PRINT SAMPLE?.
Press
Press
, 3, 1.
Set
when the screen displays your selection.
Start
. Your fax machine prints a copy of your cover page.
See
Entering Text
p. 29
TO:
FROM:
FAX:
TEL:
COMMENT:
- - -
COVER PAGE
- - -
PAGE[S] TO FOLLOW
- - -
- - -
Cover Page Message
You can set up two custom comments.
Composing Your Own Comments
Function
Press
1
The screen displays: 2.COVERPAGE MSG
Press or to choose position 5 or 6 for your customized comment.
2
Press
3
Use the dial pad to enter your customized comment.
4
Set
, 3, 2.
.
Page 17

5
Resolution
Press
Set
. The screen displays
ACCEPTED
SETUP SEND
55
OTHER SETTINGS?
1.YES 2.NO
Press 1 if you want to select additional settings. The display returns to
6
the SETUP SEND menu—OR—Press 2 to exit.
Contrast
If your document is very light or very dark, you might want to set the
contrast accordingly. Use S.LIGHT to send a very light document. Use
S.DARK to send a very dark document.
Insert the document, face down, in the feeder.
1
Function
Press
2
Press or to select AUTO, S.LIGHT or S.DARK.
3
When the screen displays your selection, press
4
, 3, 3.
Set
. The screen displays
See
Multiple
Resolution
Transmission
p. 60
ACCEPTED
OTHER SETTINGS?
1.YES 2.NO
Press 1 if you want to select additional settings. The display returns
5
to the SETUP SEND menu—OR—Press 2 if you are finished
choosing settings and go to Step 6.
Enter a fax number and press
6
Start
to send a fax.
Resolution
When you have a document in the feeder, you can use the
change the default setting. Press
lights change to the setting you want. For Standard, turn Fine and S. Fine
lights off. For Photo, turn them both on.
Standard—Suitable for most typed documents.
Fine—Good for small print; transmits a little slower than standard resolution.
Super Fine—Good for small print or artwork; transmits slower than fine
resolution.
Photo—Use when document has varying shades of gray; slowest transmission
time.
continuously until you see the
Resolution
key to
Page 18

56
CHAPTER SIX
Advanced Sending Operations
Overseas Mode
After you send a fax using this feature, the feature turns itself off.
Insert document.
1
Function
Press
2
The screen displays
Press or to select ON (or OFF).
3
Press
4
, 3, 5.
5.OVERSEAS MODE
Set
when the screen displays your selection. The screen displays
ACCEPTED
OTHER SETTINGS?
1.YES 2.NO
Press 1 if you want to select additional settings. The display returns
5
to the SETUP SEND menu—OR—Press 2 if you are finished
choosing settings and go to Step 6.
Enter the fax number you’re calling.
6
Start
7
Press
.
Page 19

SETUP SEND
Call Reservation
You can send a fax and let the other party know that you want to have a
conversation after the fax transmission is complete. The other fax machine
will ring as if it were receiving a telephone call; if the other party picks up
the handset, your fax machine will ring. Lift the handset to speak.
If you set Call Reservation and Call Back message to ON, your fax machine
leaves a message if the other party does not answer.
Insert the document in the feeder.
1
Function
Press
2
Reservation.
Press or to select ON (or OFF).
3
If you set Call Reservation to ON, press
4
selection. The screen displays the current setting for Call Back Message.
, 3, 6. The screen displays the current setting for Call
CALL RESERVE:OFF
CALL RESERVE:ON
Set
when the screen displays your
57
CALL BACK:OFF?
CALL BACK:ON?
Press or to select ON (or OFF).
5
Set
6
Press
when the screen displays your selection. The screen displays
ACCEPTED
OTHER SETTINGS?
1.YES 2.NO
Press 1 if you want to select additional settings. The display returns to
7
the SETUP SEND menu—OR—Press 2 if you are finished choosing
settings, and go to Step 8. The screen prompts you to enter the fax
number you want to call.
Enter the fax number.
8
Start
Press
9
If you’ve set Call Reservation to ON, pick up your handset if the fax
10
machine rings.
You cannot use auto redial with Call Reservation. You cannot use Call
Reservation with Delayed Transmission or with Polling. You must register
your Station ID to set Call Back Message to ON.
.
Page 20

58
CHAPTER SIX
Print Sample Call Back Message
1
2
3
4
Delayed Fax
Function
Press
Press or to select PRINT SAMPLE?.
Press
Press
Set
Start
, 3, 6.
.
.
See
Delayed Timer
p. 32
See
Interrupting
Delayed Fax
and Polling
Transmit Jobs
p. 62
After you have preset the time of day for delayed faxes (in Delayed Timer),
you can use this function up to 50 times each day to set up delayed faxes.
Insert the document in the feeder.
1
Function
Press
2
Press
3
Press 1 to leave the originals waiting in the document feeder—OR—
4
Press 2 to scan the document into memory.
, 3, 7.
Set
. The screen displays
1.DOC 2.MEMORY
ACCEPTED
OTHER SETTINGS?
1.YES 2.NO
Press 1 if you want to select additional settings. The display returns to
5
the SETUP SEND menu—OR—Press 2 if you are finished choosing
settings and go to Step 7. The screen prompts you to enter the fax
number.
ENTER FAX NO.
PRESS START KEY
Enter the fax number.
6
Start
Press
7
up in Delayed Timer (
. The fax machine will wait to send the fax at the time you set
Function
, 1, 6).
Page 21

Broadcasting
SETUP SEND
59
See
Setting Up
Groups for
Broadcasting
p. 65
Broadcasting is automatically sending the same fax message to multiple fax
numbers. Using the
Help/Broadcast
key, you can include up to 24 One Touch
locations, up to 100 Speed Dial locations, and up to 50 manually dialed
numbers (maximum of 174 locations if you did not use up any locations for
Groups, access codes or credit card numbers). However, available memory
will vary with the types of jobs in memory and the number of locations used
for broadcasting. If you broadcast to more than the maximum locations
available, you will not be able to set up transmissions using dual access and
the timer.
The easiest way to broadcast is to press Group keys, you can include
One Touch, Speed Dial, and manually dialed numbers in the same
broadcast. You must press
Help/Broadcast
between each of these locations.
Use the Telephone Index to help you choose the numbers easily.
After the broadcast is completed, a Broadcast Report will be printed
automatically to let you know the results.
■
To stop the broadcasting in progress, press
Stop
. The LCD display asks
if you want to cancel all locations or the location that is being sent.
■
Enter the long dialing sequence numbers as you normally would, but
keep in mind that each key counts as one location, so the number of
locations you can call become limited.
■
If the line is busy or for some other reasons a connection could not be
made while broadcasting, the fax machine will redial the number
automatically.
■
If the memory is full, press
Stop
to abort the job or press
Start
to send
the portion that is in the memory (if more than one page has been
scanned).
Insert the document into the feeder.
1
Enter a number using One Touch, Speed Dial, Group number, Tel-index
2
or the dial pad.
Example: Group number
Help/Broadcast
Press
3
Enter the next number.
4
. You will be prompted to press the next number.
Example: Speed Dial
Help/Broadcast
5
Press
.
Page 22

60
CHAPTER SIX
6
7
Your fax machine will read the document into memory and then start
sending faxes to all the numbers you entered.
Multiple Resolution Transmission
Use this feature to select separate resolution settings for each page of the
fax you’re sending. This could be useful if you’re sending a fax with photos
and letters, or some pages with small print and others with normal print.
Resolution settings return to STANDARD after the fax is sent.
1
2
3
4
Enter the next fax number.
Example: Manual dialing, using the dial pad.
Start
Press
Insert the document in the feeder.
Press
Use or to select resolution for page 1, then press
Repeat Step 2 for subsequent pages.
Press
The screen displays
.
Function
, 3, 4.
Stop
when you’re f inished.
Set
.
ACCEPTED
OTHER SETTINGS?
1.YES 2.NO
Press 1 if you want to select additional settings. The display returns to
5
the SETUP SEND menu—OR—Press 2 if you are finished choosing
settings.
Enter the fax number you’re calling.
6
Start
Press
7
If you want to copy a document using multiple resolutions, press
Step 6.
.
Copy
in
Page 23

SETUP SEND
61
See
Interrupting
Delayed Fax
and Polling
Transmit Jobs
p. 62
Setting Up Polling Transmit
Polling Transmit is when you set up your fax machine to wait with a
document so another fax machine can retrieve it.
Place the document to be retrieved in the feeder.
1
Function
Press
2
The screen displays
Press or to choose ON.
3
Press
4
Press 1 to select DOC if you want your fax machine to scan the
5
printed document at the time it is polled—OR—Press 2 to select
MEMORY.
, 3, 8.
POLLED TX:OFF?
SELECT <- -> & SET
Set
. The screen displays
1.DOC 2.MEMORY
ACCEPTED
OTHER SETTINGS?
1.YES 2.NO
Press 1 if you want to select additional settings. The display returns to
6
the SETUP SEND menu—OR—Press 2 if you are finished choosing
settings and go to Step 7.
Start
Press
7
If you pressed 1 in Step 5, the printed document remains in the document
feeder until your fax machine is polled. However, you can “interrupt” it to
send another fax.
.
Page 24

62
CHAPTER SIX
Interrupting Delayed Fax and Polling Transmit Jobs
You can send a fax or make a copy now, even if you have the fax machine
set to send a fax later or to be polled. However, you cannot use automatic
redial or the Function mode.
1
2
3
4
5
6
7
Function
Press
Wait 2 seconds, then remove the documents that are waiting in the
feeder.
, 5.
INSERT DOCUMENT
Place the “new” document you want to send now in the feeder.
Enter the new fax number for the documents you want to send now.
Start
Press
After the transmission is finished, place the “old” documents back into
the feeder.
Press
.
Function
, 5 to restore the Delayed Fax and/or Polling.
Page 25

CHAPTER SEVEN
Setup A uto Dial
Numbers
7
Storing Numbers f or Easy Dialing
You can set up your fax machine to do three types of easy dialing: One T ouc h,
Speed Dial, and Groups for Broadcasting of faxes.
63
See
One T ouch
Dialing
p. 68
See
ALL DIAL
Report
p. 79
See
Changing
One Touch
and
Speed Dial
Numbers
p. 65
Storing One Touch Dial Numbers
You can store 24 fax/phone numbers that you can dial by pressing one key . To
access numbers 13 to 24, hold down the Shift key.You also can store names with
these numbers. When you press a One Touch dial location, the screen displays the
name or number as the call is dialed.
One Touch keys are not the dial pad k e ys. They ar e the 12 k eys (numbers
01–24) located to the right of the dial pad.
Function
Press
1
Press the One Touch key where you want to store a number. (One Touch
2
key 01 has been pre-programmed for Brother Fax-Back System (USA
only). You can override it if you wish.) The screen displays the location
you selected.
Enter a number (up to 20 digits). If you want to enter a pause in the
3
dialing sequence (for example, to access an outside line), press
Redial/Pause
second pause when the number is dialed, and a dash appears on the
screen.
Press
4
, 6, 1.
as you’re entering digits. Pressing
Set
. The screen prompts you to enter a name for this number.
Redial/Pause
enters a 3.5
NAME:
Page 26

64
CHAPTER SEVEN
Use the dial pad to enter the name (up to 15 characters). You can use the
5
chart on page 29 to help you enter letters—OR—Go to Step 6 to store
the number without a name.
Press
6
or to select the type you want.
FAX A fax only number
TEL A telephone (voice) number
FAX/TEL Both a fax and telephone (voice) number
Press
7
Return to Step 2 to store another One-T ouch number—OR—Press
8
When you dial an AUTO DIAL number, the screen displays the name you’ ve
stored, or, if you hav en’ t stored a name, the n umber you’ve stored.
Set
. The screen prompts you to select the type of number this is. Use
Set
.
Stop
to exit.
See
Speed Dialing
p. 68
See
ALL DIAL
Report
p. 79
If you need to store a longer pause than 3.5 seconds, press
more times.
Even if you lose electrical power, numbers stored in memory will not be lost.
Redial/Pause
two or
Storing Speed Dial Numbers
You can store Speed Dial numbers, so y ou ca n dial by pressing only three
keys. There are 100 Speed Dial locations. Even if you lose electrical power,
numbers stored in memory will not be lost.
Function
Press
1
The screen prompts you to enter a location.
Use the dial pad to enter a two-digit location (00–99).
2
Press
3
number you’re stor ing.
, 6, 2.
SPEED-DIAL? #
Set
. The screen displays your entry, then prompts you to enter the
#05:
ENTER & SET
Enter the number (up to 20 digits).
4
Set
5
Press
. The screen now prompts you to store a name with this number.
NAME:
Page 27

SETUP AUTO DIAL NUMBERS
Use the dial pad to enter the name (up to 15 characters). You can use the
6
chart on page 29 to help you enter letters—OR—Press
to store the number without a name.
Set
Press
7
The screen prompts you to select the type of number this is. Use or
8
to select the type you want.
Press
9
Return to Step 2 to store another Speed Dial number—OR—Press
10
Even if you lose electrical power, numbers stored in memory will not be lost.
.
FAX A fax number
TEL A telephone (voice) number
F AX/TEL Both a fax and telephone number
Set
.
Set
and go to Step 8
Stop
to exit.
65
Changing One Touch and Speed Dial Numbers
If you try to store a One Touch or Speed Dial number in a location where a
number is already stored, the screen displays the current name stored there, then
prompts you to either
1. CHANGE—OR—2. EXIT.
Press 1 to change the number stored, or press
1
change.
Enter a new number .
2
■
If you want to erase the number, press
of the digits.
■
If you want to change a digit, use or to position the cursor under
the digit you want to change, then type over it.
Follow the directions from Step 4 in Storing One Touch Numbers or Step 5
3
in Storing Speed Dial Numbers.
2
to exit without making a
Clear
when the cursor is to the left
Setting Up Groups for Broadcasting
Groups allow you to send the same fax message to many fax numbers by pressing
only one One Touch key (Broadcasting). First, you’ll need to store each fax
number as a One Touch or Speed Dial number. Then, you can combine them into
a Group. Each Group uses up a One Touch key. Finally, you can have up to six
small Groups, or you can assign up to 123 numbers to one large Group.
Page 28

66
One T ouch Dial
CHAPTER SEVEN
You can include up to 23 One Touch locations, and up to 100 speed Dial
locations. If you broadcast to more than the maximum locations available,
you will be unable to set up transmissions using Dual Access and the Timer.
1
See
Storing
Numbers
p. 63
and
Storing Speed
Dial Numbers
p. 64
and
Broadcasting
p. 59
2
3
4
5
Function
Press
, 6, 3.
The screen displays
SELECT ONE-TOUCH
Select a One Touc h key where you wish to store the Group number.
(For example, press One Touch key 02 for Group 1).
SETUP GROUP:GO
Use the dial pad to enter the Group number. (For example, press 1 for
Group 1).
Press
To include One Touch or Speed Dial numbers in the Group, enter them
as if you were dialing. For example, for One Touch key 05, press One
Touch key 05. For Speed Dial location 09, press
0, 9
ENTER & SET
Set
.
Speed Dial
on the dial pad. The display shows 05, #09.
, then press
G01:*O5#O9
Set
6
Press
. The screen prompts you to enter a name.
NAME:
Use the dial pad and the chart on page 29 to enter a name for the group
7
(for example, NEW CLIENTS).
Press
8
Press
9
You can print a list of all One Touch and Speed Dial numbers. See Chapter 10,
Printing Reports.
Even if you lose electrical power, numbers stored in memory will not be lost.
ENTER & SET
Set
.
Stop
to exit.
Page 29

CHAPTER EIGHT
Telephone
O perati o ns
8
Dialing Options
You can use your fax machine to make voice telephone calls by dialing
manually, or by using Tel-index, One Touch or Speed Dial memory.
67
Manual Dialing
Manual dialing is simply pressing all of the digits of the phone number .
Pick up the handset—OR—Press
1
When you hear a dial tone, dial the call using the dial pad.
2
If you pressed
3
party answers. (The speaker works only one way; the other party won’t
be able to hear you unless you pick up the handset.)
To hang up, replace the handset.
4
Hook
to dial the call, pick up the handset when the other
Hook
.
Page 30

68
CHAPTER EIGHT
One T ouch Dialing
See
Storing One
Touch Dial
Numbers
p. 63
See
Storing Speed
Dial Numbers
p. 64
Pick up the handset—OR—Press
1
When you hear a dial tone, press the One Touch key of the location you
2
Hook
.
want to call.
If you pressed
3
Hook
to dial the call, pick up the handset when the other
party answers. (The speaker works only one way; the other party won’t
be able to hear you unless you pickup the handset.)
To hang up, replace the handset.
4
If you try to use a One Touch location with no number stored in it, you
hear a warning sound, and screen displays NOT REGISTERED. The
display returns to normal after 2 seconds.
If you are sending a fax, press
you picked up the handset, press
Start
after pressing the One Touch key. If
Start
when receiving the fax machine
answers with fax tones.
Speed Dialing
Pick up the handset—OR—Press
1
When you hear a dial tone, press
2
Speed Dial number.
Hook
.
Speed Dial
, then press the two-digit
If you pressed
3
Hook
to dial the call, pick up the handset when the other party
answers. (The speaker works only one way; the other party won’t be able to
hear you unless you pickup the handset.)
T o hang up, re place the handset.
4
If you are sending a fax, press
If you picked up the handset, press
Start
after pressing the Speed Dial number .
Start
when the receiving fax machine
answers with fax tones.
Page 31

TELEPHONE OPERATIONS
Dialing Access Codes and Credit Card Numbers
69
See
Storing One
Touch Dial
Numbers
p. 63
Sometimes you may want to choose from among several long distance
carriers when you make a call. Rates may vary depending upon the time
and destination. To take advantage of low rates, you can store the access
codes or long-distance carriers as One Touc h numbers. You can store these
long dialing sequences by dividing them and setting them up on separate
keys in any combination. You can even include manual dialing using the
dial pad. The combined number will be dialed in the order you entered it, as
soon as you press
Start
.
You can store "555" on One Touch key 03 and "7000" on One Touch key
02
. If you press One Touc h 03, 02, and
Start
, you can dial "555-7000". To
temporarily change a number, you can substitute part of the number with
manual dialing using the dial pad. For example, to change the number to
555-7001 you could press One Touch 03 and press 7, 0, 0, 1 using
the dialing pad.
Hold
Hold
Press
1
You can replace the handset without disconnecting the call.
2
Pick up the fax machine handset to release the call from Hold. Picking
3
up an extension handset will not release the call from Hold.
to put a call on Hold.
Pause
Redial/Pause
Press
dialing overseas, you can press
the length of the pause.
to insert a 3.5 second pause between numbers. If you are
Redial/Pause
as many times as need to increase
Page 32

70
CHAPTER EIGHT
Tone/Pulse
If you have pulse dialing service, but need to send tone signals (for
telephone banking, for example), follow the directions below. If you have
touch tone service, you do not need this feature to send tone signals.
Lift the handset.
1
Press . Digits dialed after this send tone signals.
2
When you hang up, the fax machine returns to pulse dialing service.
3
Searching Telephone Index
See
Storing One
Touch Dial
Numbers
p. 63
and
Storing Speed
Dial Numbers
p. 64
You can search for names you have stored in One Touc h and Speed Dial
memories. Names are stored alphabetically .
Tel-index
Press
1
Press or to search the memory.
2
When the screen displays the name you want to call, pick up the
3
handset or press
Press
4
If you pressed
5
party answers. (The speaker works only one way; the other party won’t
be able to hear you unless you pickup the handset.)
When the call is over, hang up.
6
, then enter the first letter of the name you’re looking for.
Hook
.
Start
to begin dialing.
Hook
to dial the call, pick up the handset when the other
Page 33

CHAPTER NINE
Remote Fax
Options
9
Fax Forwar ding/Paging
You cannot use Paging and Fax Forwarding at the same time.
71
You cannot use Paging and Fax Forwarding when “Fax Storage” is set to OFF.
Programming a Fax Forwarding Number
When Fax Forwarding is set to ON, your fax machine stores the received fax
in memory, then dials the fax number you’ve programmed, and forwards the
fax message.
Function
Press
1
Press or until the screen displays
2
Press
3
will be forwarded.
Enter the forwarding number (up to 20 digits).
4
Press
5
Press
6
, 8, 1.
FAX FORWARD?
Set
. The screen prompts you to enter the fax number where faxes
FWD#:
ENTER & SET
Set
.
Stop
to exit.
Page 34

72
CHAPTER NINE
Programming Paging Number
When Paging is selected, your fax machine dials the pager number you’ve
programmed, and dials your Personal Identification Number (PIN) when
connected, to activate your pager and let you know you have a fax message
in the memory.
Press
1
Press or until the screen displays
2
Press
3
Enter your pager phone number (up to 20 digits) followed by .
4
Do not include the area code if it is the same as that of your fax machine.
For example,
Press
5
If your pager requires a PIN, enter the PIN, press , press
6
enter your fax number, then press . For example,
1 2 3 4 5
Function
, 8, 1.
PAGING?
Set
. The screen prompts you to enter your pager number.
PAG#:
ENTER & SET
1 8
Set
0 055 5 1 2 3 4
.
Redial/Pause
1 8
0 0
5 2 1 2 8 4 6
.
Redial/Pause
,
.
—OR—
If you do not need a PIN, press
Redial/Pause
, enter the fax number, then
press . For example,
Redial/Pause
Press
7
Press
8
Set
Stop
.
1 8
to exit.
0 0
5 2 1 2 8 4 6
You cannot change a Paging number or PIN remotely.
.
Page 35

Setting Fax Storage
REMOTE FAX OPTIONS
73
See
Remote
Retrieval
p. 74
See
Printing
a Fax in
Memory
p. 39
If you set Fax Storage to ON, you will be able to retrieve fax messages from
another location, using Fax Forwarding, Paging, or Remote Retrieval
functions. The screen will indicate when you have a fax stored in memory.
Function
1
Press
, 8, 2. The screen prompts you to choose a fax setting.
FAX STORAGE:OFF?
SELECT & SET
Press or to select ON (or OFF).
2
Set
Press
3
Press
4
If there are faxes in memory when you turn Fax Storage OFF, the screens
prompts you to erase any faxes in memory.
when the screen displays your selection.
Stop
to exit.
ERASE ALL FAX?
1.YES 2.NO
If you press 1, all fax data is erased and Fax Storage is turned off. If you
press 2, data is not erased, and Fax Storage remains on.
Changing Remote Access Code
Enter your Remote Access Code when the fax machine picks up your call,
so you can access features remotely. The access code is preset to 1 5 9 ,
but you can change this.
Function
See
Changing
Remote Codes
p. 39
Press
1
Enter a three-digit number from 000 to 999. Do not use the same digits
2
that appear in your Fax Receive Code or Telephone Answer Code.
Press
3
Press
4
Set
Stop
.
, 8, 3.
to exit.
Page 36

74
CHAPTER NINE
Remote Retrieval
You can call your fax machine from any fax machine using touch tone and
use a Remote Access Code and other button presses to retrieve fax
messages. Keep the included Remote Control Access Card in your wallet as
an aid.
See
Changing
Remote
Access Code
p. 73
Using Remote Access Code
Dial your fax number from a fax machine using touch tone.
1
When your fax machine answers and beeps, immediately enter your
2
Remote Access Code (1 5 9 ).
The fax machine signals the kinds of messages received:
3
1 long beep—Fax message(s)
No long beeps—No messages
The fax machine then prompts you with two short beeps to enter a
4
command. If you wait longer than 30 seconds to enter a command, the
fax machine hangs up. If you enter an invalid command, the fax
machine beeps three times.
Press 9 0 to reset the fax machine when you finish.
5
Hang up.
6
If your fax machine is set to Manual mode, you can access your machine by
waiting about 2 minutes, then entering the Remote Access Code within 30
seconds.
Page 37

REMOTE FAX OPTIONS
Remote Commands
Follow the commands below to access features remotely. When you call the
fax machine and enter your Remote Access Code (1 5 9 ), the system will
signal you with two short beeps to enter a remote control command.
75
Remote Control Commands
95 Changing Fax Forwarding
/Paging setting
1 OFF
2 Fax Forwarding
3 Paging
4 FAX FWD No.
6 Fax Storage ON
7 Fax Storage OFF
96 Retrieve FAX
1 Memory Status List
2 Retrieve all faxes
3 Erase fax from the
memory
97 Check the receiving status
1 FAX
98 Change Answer Mode
1 TAD
2 FAX/TEL
3 FAX
90 Exit
If you hear one long beep, the change is accepted. If
you hear three short beeps, you cannot change it
because the conditions have not been met (Example:
registering paging number). You can register your fax
forwarding number by using 4. FAX FWD NO (see
page 71). Once you have registered the number, the
fax machine will change automatically to
FAXFWD:ON mode. Then retrieve a Memory Status
List by entering 961 (see page 76) to make sure that
the Fax Forwarding number you registered is correct
in the List.
You can set FAX STORAGE ON or OFF.
Enter the number of a remote fax machine to receive
the Memory Status List or stored fax message(s). (See
page 76.)
If you hear one long beep, you can erase fax
message(s) from the memory.
You can check whether your fax machine has received
any fax message(s). If yes, you will hear one long
beep. If no, you will hear three short beeps.
If you hear one long beep, you can change the Answer
Mode. If you hear three short beeps, you cannot
change it.
After a long beep, you can exit remote control.
Operation Details
Page 38

76
CHAPTER NINE
Retrieving Memory Status List
You can retrieve the Memory Status List from a remote fax machine to see if
you have any fax messages.
Dial your fax machine’s number.
1
When you hear the beep, immediately enter your Remote Access Code
2
(1 5 9 ).
When you hear two short beeps, use the dial pad to press 9 6 1.
3
Using the dial pad, enter the number of the remote fax machine (up to
4
20 digits) where you want the Memory Status List forwarded, and then
press .
You cannot use and as dial numbers. However, if you want to store a
pause, press .
After you hear your fax machine beep, hang up and wait.
5
Your fax machine calls the remote fax machine. The remote fax
machine prints the Memory Status List.
Retrieving Fax Messages
Dial your fax number.
1
When you hear the beep, immediately enter your Remote Access Code
2
(1 5 9 ).
As soon as you hear two short beeps, use the dial pad to press 9 6 2.
3
Using the dial pad, enter the number (up to 20 digits) of the remote fax
4
machine where you want your fax messages forwarded, and then press
.
You cannot use and as dial numbers. However, if you want to store a
pause, press .
After you hear your fax machine beep, hang up and wait.
5
Your fax machine calls the remote fax machine. The remote fax
machine prints your fax messages.
Page 39

REMOTE FAX OPTIONS
Changing Fax Forwarding Number
You can change the default setting of your fax forwarding number from a
remote fax machine.
Dial your fax number.
1
When you hear the beep, immediately enter your Remote Access Code
2
(1 5 9 ).
When you hear two short beeps, enter 9 5 4.
3
Enter the new number (up to 20 digits) of the remote fax machine
4
where you want your fax messages forwarded, and then press .
You cannot use and as dial numbers. However, if you want to store a
pause, press .
To retrieve the Memory Status List, when you hear two short beeps, use
5
the dial pad to press 9 6 1.
77
Use the dial pad to enter the number of the remote fax machine (up to
6
20 digits), and then press .
After you hear your fax machine beep, hang up and wait.
7
Your fax machine calls the remote fax machine. The remote fax
machine prints the Memory Status List showing the new forwarding
number.
Check the forwarding number.
8
If the forwarding number is incorrect, return to Step 1 and reset it.
Page 40

78
CHAPTER NINE
Page 41

CHAPTER TEN
P rin tin g
Repo rts
10
Fax Settings and Activity
You can print the following lists and reports:
79
1.XMIT REPORT
2.ACT.REPORT
3.ALL DIAL
4.TEL.INDEX
5.USER SETTINGS
Choose if you would like a
Transmission Verification Report
printed after every fax you send.
Activity Report lists information
about the last 50 incoming and
outgoing faxes. TX means
Transmit; RX means Receive.
Lists names and numbers stored in
One Touc h and Speed Dial
memory, in numerical order.
ALL DIAL list (above),
alphabetically.
Lists settings for INITIAL SETUP,
SETUP RECEIVE, SETUP SEND,
PRINT REPORTS, REMOTE FAX
OPT, and TEL SERVICE.
6.MEMORY STATUS
Lists summary information and
amount of occupied memory.
Page 42

80
CHAPTER TEN
To Print a Report
1
2
3
4
Transmission Verification (Xmit) Report
You can use the Xmit Report as proof that you sent a fax. This report lists the
time and date of transmission, and whether the transmission was successful.
When the feature is OFF, the report is printed automatically only if there’s
an error during transmission. If the report indicates NG, send the document
again. If the report indicates you should check the readability of certain
pages, resend those pages.
Function
Press
Enter the number (see p. 79) of the report you want to print. For
example, press 4 to print the TEL.INDEX.
Press
Press
Start
Stop
, 7.
.
to exit.
When the feature is ON, the report is printed with every fax you send.
Function
Press
1
Press or to select ON or OFF.
2
Press
3
Press
4
Set
Stop
.
, 7, 1.
to exit.
Activity Report Interval
You can set the fax machine to print activity reports at specific intervals
(6, 12, 24 hours, 2, 4 or 7 days). If you set the interval to OFF, you can
print the report by following the steps in the previous section.
Function
Press
1
Press or to display:
2
Press
3
Press or to choose your setting. If you choose 7 days, the screen
4
prompts you to choose a day at which to begin the 7-day countdown.
When the screen displays the setting you want, press
5
Enter the time to begin printing, in 24-hour format. (For example, enter
6
19:45 for 7:45 PM).
Press
7
Press
8
, 7, 2.
INTERVAL?
Set
.
Set
.
Stop
to exit.
Set
.
Page 43

CHAPTER ELEVEN
Making Copies
11
Using the Fax Machine as a Copier
You can use your fax machine as a copy machine, making up to 99 copies at
a time. The fax machine can stack the copies or collate (sort) them.
81
Enlarge
Sort
The scannable area of your fax machine begins at approximately one-eighth
inch (4 mm) from the edge of the paper.
1/8" (4 mm)
Reduce
Photo
1/8" (4 mm)
Copy
Not Printable
Page 44

82
CHAPTER ELEVEN
Making a Single Copy
The default resolution for a single copy is AUTO, which you can use for
documents containing both text and photographs. You can also select S. Fine
and Photo, as needed.
Insert the document face down in the feeder.
1
Copy
Press
2
Do NOT pull on the paper while copying is in progress.
Making Multiple Copies
There are two ways to make multiple copies on your fax machine. You can
choose whether the copies will be STACKED (all copies of page 1, then all
copies of page 2, etc.), or SORTED (collated). The default resolution for
multiple copies is AUTO.
, then wait five seconds—OR—Press
Copy
again.
Stacking Multiple Copies
Insert pages to be copied face-down in the feeder.
1
Copy
Press
2
Use the dial pad to enter the number of copies you want (up to 99).
3
Wait five seconds—OR—Press
4
.
Copy
again.
Sorting Multiple Copies
Sorting uses more memory then stacking.
Insert pages to be copied face-down in the feeder.
1
Sort
Press
2
Use the dial pad to enter the number of copies you want (up to 99).
3
Wait five seconds—OR—Press
4
If you select
message while you are scanning the first page, press
and restart it to make a single copy. If you selected
FULL message appears while scanning subsequent pages, you can press
Copy
to copy the portion that is in memory, or press
the copy job using less memory, press
.
Sort
or stack after pressing
Copy
.
Copy
and get a MEMORY FULL
Copy
for stacked copies.
Stop
to cancel the job
Sort
and the MEMORY
Stop
to cancel. To restart
Page 45

MAKING COPIES
Reducing and Enlarging Copies
Insert pages to be copied face-down in the feeder.
1
Enlarge
Press
2
Press or to select AUTO, 200%, 150%, 125%, 120%, 100%,
3
93%, 87%, 75%, or 50%.
Copy
Press
4
Use the dial pad to enter the number of copies you want (up to 99).
5
Wait five seconds—OR—Press
6
Reduce
or
when the screen displays your selection.
.
Copy
again.
Copying a Photograph
83
Copy
Photo
without pressing
again.
You can copy a photograph by pressing
Insert the photo(s) face-down in the feeder.
1
Photo
Press
2
Use the dial pad to enter the number of copies you want (up to 99).
3
Wait five seconds—OR—Press
4
.
Resolution
.
Page 46

84
CHAPTER ELEVEN
Page 47

CHAPTER TWELVE
O p tional
Accessori es
(For FAX 2750 Only)
12
Memory Board
The memory board is installed on the main controller board inside the fax
machine. When you add the optional memory board, it increases the performance
modes for both fax and printer operations.
85
Optional Memory for the Printer & Fax Operations
The FAX 2750 has 2 MB of memory and can recognize 1 MB (ME1000) or
2 MB (ME2000) of Optional Memory. Be careful to purchase the
appropriate memory board for your needs.
For the Printer
Additional memory is useful and may be necessary if you want to download
many different fonts or want to print a very complex document.
For the Fax
Additional memory is available and will expand the memory used for
sending and receiving faxes.
Model Name Optional Memory Total
fax machine 2750 1 MB 2.3 MB (up to 230 pages)
1.3 MB –OR–
(up to 130 pages) 2 MB 3.3 MB (up to 330 pages)
Using Brother #1 Chart with MMR coding and Standard Resolution.
Page 48

86
CHAPTER TWELVE
Installing the Optional Memory Board
Unplug the power cord from the AC outlet and disconnect the interface cable.
1
W ARNING
Unplug the power cord before installing (or removing) the memory board.
Press down on the top of the rear cover to release the hook, and pull the rear
2
cover out.
W ARNING
Do not touch the surface of the main controller board.
Page 49

OPTIONAL ACCESSORIES (FOR FAX 2750 ONLY)
To install the memory board onto the main controller board, use the
3
87
attached spacer and plug it into the connectors on the left of the main
controller board.
Memory
Board
Connector
Spacer
Connector
Main
Controller
Board
W ARNING
■
Hold the edge of the memory board. Do not touch the surface of the board.
■
Make sure the memory board is securely seated in the main controller board.
Reinstall the rear cover.
4
Reconnect the interface cable.
5
Plug the power cord into the AC outlet.
6
Page 50

88
CHAPTER TWELVE
 Loading...