

Page 1
USING THE OPERATION PANEL
INSTRUCTION
MANUAL
VERWENDUNG
DER
BEDIENUNGSTAFEL
UTILISATION DU PANNEAU
COM
USO
MAN
DEL
Please read
Please keep
Bitte
Bitte
Orientierung!
Veuillez
Veuillez garder ce manuel
DE
PANEL
this
this
vor
Gebrauch
halten Sie diese Bedienungsanleitung
lire
ce manuel
D~
CONTROL
instruction manual before using
instruction manual
der
Maschine diese Bedienungsanleitung lesen!
d'instructions
d'instructions
DE
BEDIENUNGSANLEITUNG
MANUEL D'INSTRUCTIONS
MANUAL
DE
INSTRUCCIONES
F-40
the
machine.
within
avant
easy reach
stets
d'utiliser
pres de vous pour une verification rapide.
for
quick
griffbereit
Ia machine.
reference.
zur schnellen
Por favor lea este
Por favor guarde este manual de instrucciones al alcance
rapida referencia.
c
F·40
manual de instrucciones antes de usar Ia maquina.
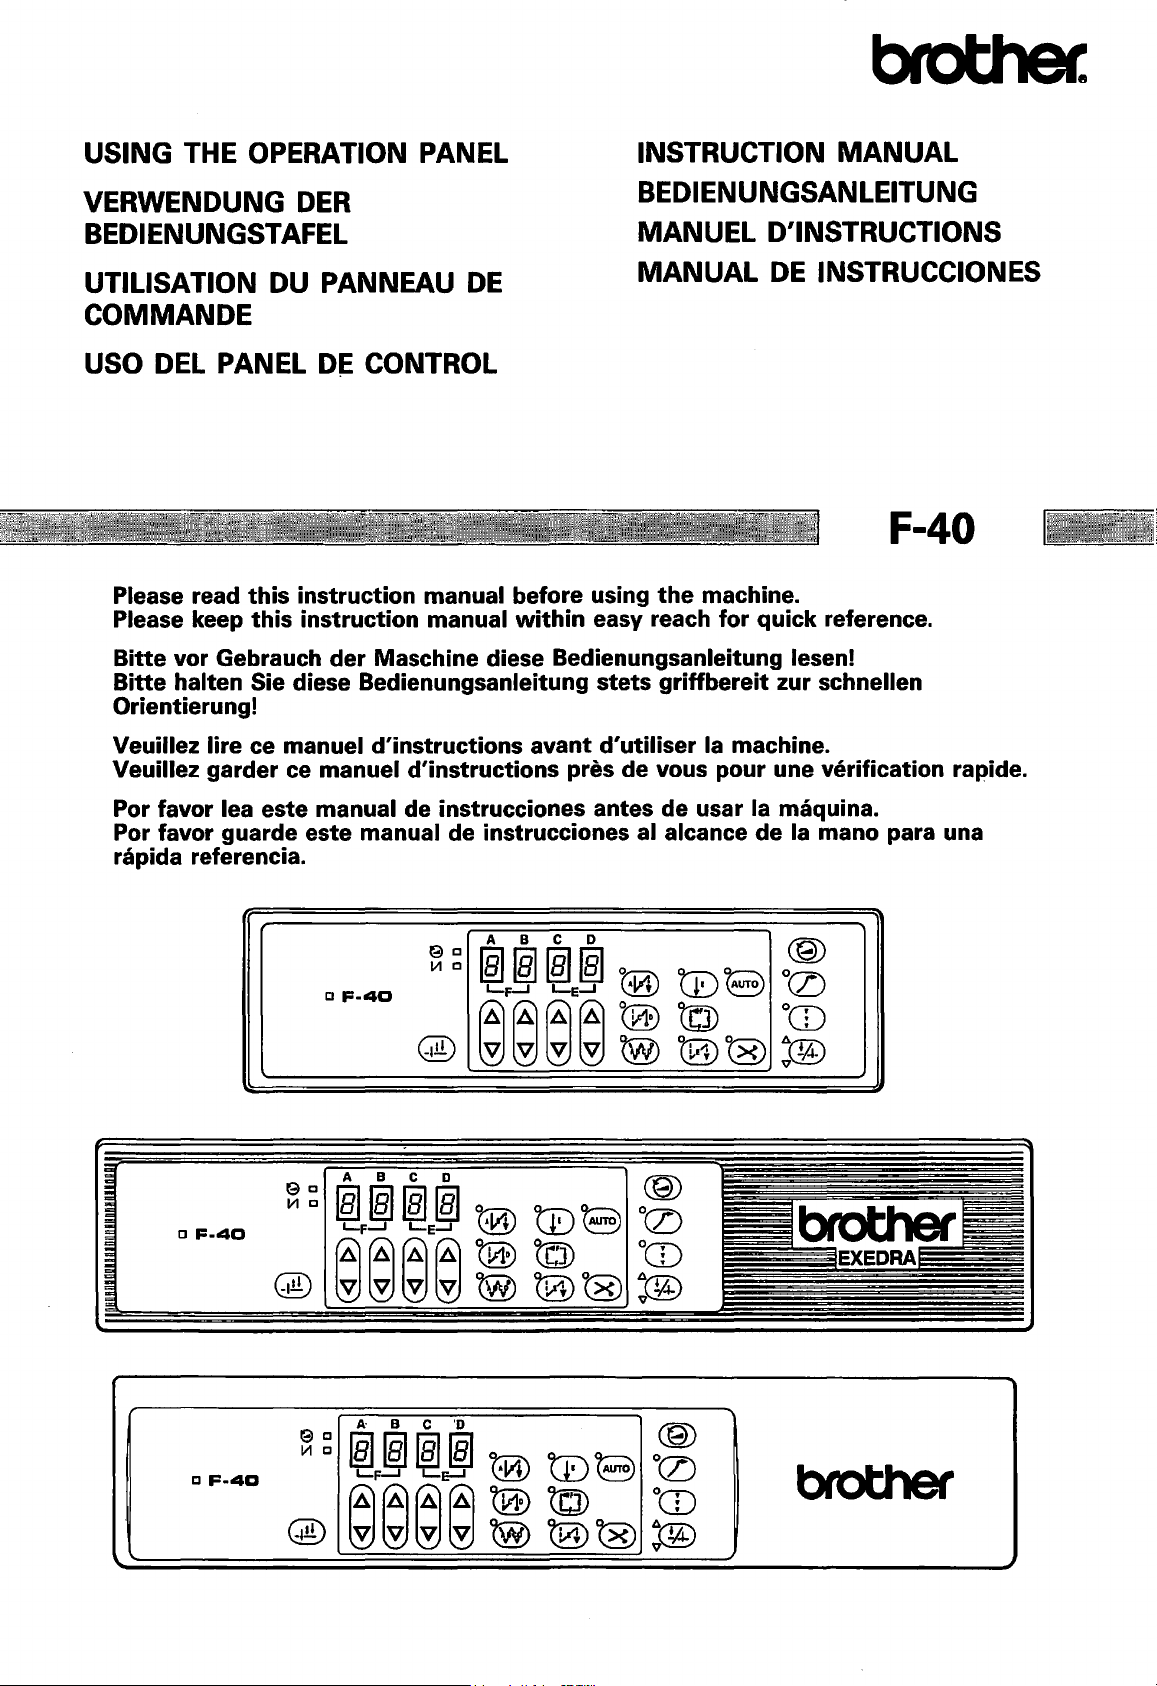
A B c D
IB)c
VI
c
fm~fmfmo
c
F-40
@
1-f....J
~~~~
L-e...J
v v v
® m 9
t0V
tk»
0E!J
t0)~
de
Ia
~
OCZ)
OCD
:oo
mano para una
A·
c
F·40
G)c
Ill c
B C
rm~rmrm
L-f-J
1-E-1
'D
~
m 9
~
OCZ)
OCD
@
~~~~
vvv'@)t0)~
t0V
tk»
:00
brother
Page 2
Thank you
this instruction
is important
Furthermore, because
cations
Vielen
lnbetriebnahme der Bedienungstafel sorgfaltig durch. Fur eine optimale Leistung und einen sicheren Betrieb ist
es
sehr wichtig, sich uber die richtige Betriebsmethode
Wegen der stetigen Weiterentwicklung unserer Produkte ist
von denen in dieser Bedienungsanleitung angegebenen abweichen konnen.
Nous vous remercions d'avoir achete
commande,
produit,
De
plus, en raison des ameliorations que nous apportons continuellement a nos produits suite a nos recherches
permanentes,
figurant dans le present manuel.
Gracias
manual de instrucciones.
correctamente,
Ademas, como resultado de las mejoras que constantemente realizamos
el resultado de investigaciones que realizamos continuamente, las especificaciones del producto que haya
adquirido pueden ser un poco diferentes de
for
purchasing the Brother operation panel. Before using the operation panel, please be sure
manual. To obtain the best performance
to
have a full understanding
we
for
the product which you have purchased may differ slightly
Dank
fur
den Kauf der Bedienungstafel von Brother. Lesen Sie bitte diese Bedienungsanleitung vor
lire attentivement le present manuel d'instructions. Pour profiter
et
pour l'utiliser
il
se
por
haber adquirido un panel de control de Brother. Antes de usar
es
muy
are continually improving our products
en
toute securite, il est important de bien comprendre comment le faire fonctionner.
peut que les specifications du produit que vous avez achete different legerement de celles
Para
obtener los mejores resultados de este producto, y asegurarse de que funcionara
importante que comprenda completamente
of
the correct method
le panneau de commande de Brother. Avant d'utiliser le panneau de
las especificadas
from
this product, and also
of
operation.
as
a result
zu
informieren.
es
moglich, daB die technischen Daten geringfugig
Ia
en
este manual.
to
ensure safe operation,
of
from
manera de usarlo.
continuing research, the specifi-
those listed in this manual.
au
mieux des possibilites de
el
panel de control, debe leer este
en
nuestros productos las cuales son
to
read
ce
SAFETY INSTRUCTIONS
it
SAFETY INDICATIONS
This instruction manual and the indications and symbols that are used on the machine itself are provided in
order
to
ensure safe operation
The meanings
type
of
always be strictly observed.
damage
of
each indication and symbol are classified
or
injury that each one represents. The instructions following each indication and symbol must
AND
of
this machine and
THEIR MEANINGS
to
prevent accidents and injury
as
shown below in accordance
to
yourself
or
other people.
with
the degree and
SICHERHEITSHINWEISE
SICHERHEITSHINWEISE UNO IHRE BEDEUTUNG
Diese Bedienungsanleitung und die Hinweise und Symbole auf der Maschine sollen einen sicheren Betrieb der
Maschine
Die Bedeutung der
Verletzungsgefahr
halten werden.
INDICATIONS
Ce
Ia
machine
Les
degre
que indication
sicherstellen und die Unfall- und Verletzungsgefahr verringern.
manuel d'instructions
en
significations de chaque indication
et le type d'endommagement ou de blessure que chacun d'eux represente.
einzelnen Ausdrucke und Symbole sind wie
eingeteilt Die Anweisungen, die den Ausdrucken und Symbol
INSTRUCTIONS
DE
SECURITE
et
toute securite
et
chaque symbole doivent etre toujours strictement respectees.
les indications
et
d'
eviter des accidents
ET
LEUR SIGNIFICATION
et
symboles figurant sur
et
de chaque symbole sont classees comme indique ci-dessous selon le
et
des blessures a votre entourage et a vous-meme.
DE
folgt
nach dem Grad der Beschadigungs- und
SECURITE
Ia
machine elle-meme permettent d'utiliser
en
folgen, mussen strikt einge-
Les
instructions suivant cha-
INSTRUCCIONES
INDICACIONES
Las
indicaciones y simbolos usados
el
funcionamiento seguro de
Los significados de cada indicaci6n y
el
grado y tipo de dano o herida que representan.
los
se
deben tener
muy
DE
SEGURIDAD Y SUS SIGNIFICADOS
en
este manual de instrucciones y
Ia
maquina y para evitar accidentes y heridas.
simbolo se clasifican de
en
cuenta.
Las
DE
instrucciones que acompanan estas indicaciones y simbo-
SEGURIDAD
en
Ia
Ia
manera indicada a continuaci6n de acuerdo con
misma maquina son para asegurar
Page 3
Indications
Hinweise
Indications
lndicaciones
The indications which are used in this manual and their meanings are shown below.
Die in dieser Bedienungsanleitung verwendeten Ausdrucke und ihre Bedeutung sind nachstehend aufgefuhrt.
Les
indications utilisees dans le present manuel
Las
indicaciones que
A Warning
se
usan
en
este manual y sus significados
....................
et
Failure
.
cation
or
severe injury
leurs significations sont indiquees ci-dessous.
se
in~:ncan
to
observe the instructions which appear after this indi-
while using the
to
the user.
a continuaci6n.
motor
will
almost certainly result in death
A Warnung
................
A Avertissement
A Aviso
A Caution
A Achtung
...........................
.....................
...................
A Attention
A Atenci6n
..................
Die Anweisungen, die diesem Ausdruck folgen, sind
rensituationen bei Verwendung des Motors, bei deren
:
..
tung eine hohe Verletzungsgefahr oder sogar Lebensgefahr besteht.
Si
l'on ne respecte pas les instructions mentionnees apres cette
indication lorsqu'on
probabilite de blessures ou de deces de l'utilisateur.
Las
instrucciones a continuaci6n de esta indicaci6n representan
situaciones
..
el
motor
te.
Failure
.
cation
moderate injury
Die Anweisungen, die diesem Ausdruck folgen, sind
rensituationen bei Verwendung des Motors, bei deren
.
tung eine geringere Verletzungsgefahr oder Beschadigungsgefahr besteht.
Si
I' on ne respecte pas les instructions mentionnees apres cette
indication lorsqu'on
sures legeres ou moyennes de l'utilisateur, ou d'endommagement de
Las
instrucciones a continuaci6n de esta indicaci6n representan
.
situaciones
el
motor
leves o darios.
en
seguramente puede resultar
to
observe the instructions which appear after this indi-
while using the
Ia
machine.
en
posiblemente puede resultar
utilise le moteur, il y aura une tres grande
las cuales
to
las cuales el no respetar
el
motor
the user,
utilise
no respetar las instrucciones
could possibly result in slight
or
le
moteur, il y aura un risque de bles-
en
heridas serias o muer-
physical damage.
las
instrucciones
en
heridas moderadas a
fur
fur
Gefah-
MiBach-
al
usar
to
Gefah-
MiBach-
al
usar
Page 4

Symbols
Symbole
Symboles
Simbolos
The symbols which are used in this manual and their meanings are shown below.
Die
in
dieser Bedienungsanleitung verwendeten Symbole und ihre Bedeutung sind nachstehend
Les
symboles utilises dans ce manuel
Los
slmbolos que
se
usan en este manual y sus significados
et
leurs significations sont indiques ci-dessous.
se
indican a continuaci6n .
aufgefuhrt
.................................... This symbol is used
Mit
....................................
....................................
.................................... This
....................................
.................................... Este
diesem Symbol
gewiesen .
Ce
symbole indique le danger d'electrocution.
Este
simbolo
cos.
symbol is used
served.
Mit
diesem Symbol wird auf allgemeine VorsichtsmaBnahmen hinge-
wiesen, die beachtet werden mussen.
Ce
symbole indique les precautions generales a prendre.
slmbolo
se
usa para indicar que existe peligro de golpes electri-
se
usa
to
indicate the danger
wird
auf die Gefahr von elektrischen Schlagen hin-
to
indicate general cautions that should be ob-
para indicar que
of
electric shocks.
se
debe tener cuidado
en
general.
Page 5
INSfALLING
THE
OPERATION
PANEL
INSfALLATION
DU
PANNEAU
DE
COMMANDE
INSfALLATION
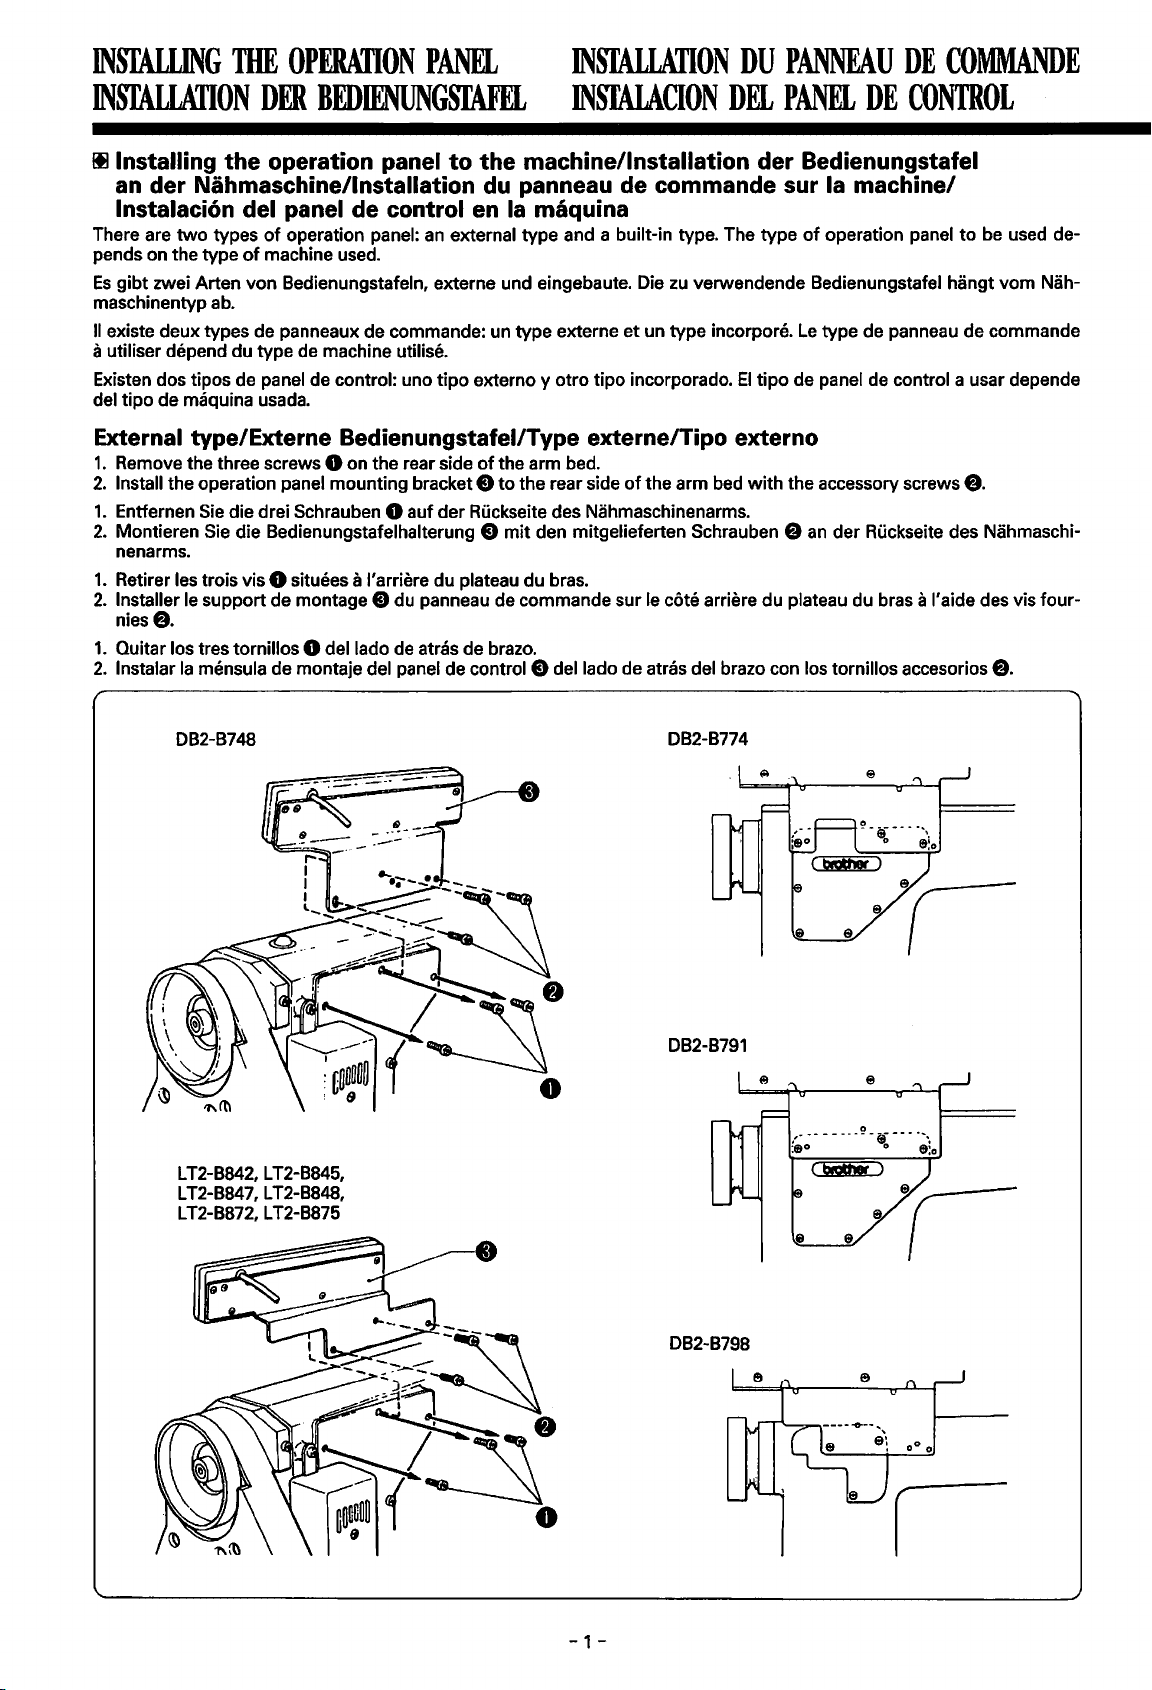
Ill Installing
DER
BEDIENUNGSfAFEL
the
operation panel
to
INSfAIACION
the
machine/Installation
DEL
PANEL
der
DE
CONTROL
Bedienungstafel
an der Nahmaschine/lnstallation du panneau de commande sur Ia machine/
lnstalacion del panel
There are
pends on the type
Es
gibt
maschinentyp
II
existe deux types de panneaux de commande: un type externe
two
types
of
operation panel:
of
machine used.
zwei Arten von 8edienungstafeln, externe und eingebaute. Die
ab.
de
control
an
external type and a built-in type. The type
en
Ia
maquina
zu
verwendende 8edienungstafel hangt vom Nah-
et
un type incorpore.
of
operation panel
Le
type de panneau de commande
to
be used de-
a utiliser depend du type de machine utilise.
Existen dos tipos de panel de control: uno
del tipo de maquina usada.
External type/Externe Bedienungstafei/Type externe/Tipo externo
1.
Remove the three screws 0 on the rear side
2.
Install the operation panel mounting bracket C)
1.
Entfernen Sie die drei Schrauben 0 auf der Ruckseite des Nahmaschinenarms.
2.
Montieren Sie die 8edienungstafelhalterung C)
nenarms.
1.
Retirer les trois vis 0 situees a l'arriere du plateau du bras.
2.
Installer le support de montage C) du panneau de commande sur le cote arriere du plateau du bras a I' aide des vis four-
niese.
1.
Quitar los tres tornillos 0
2.
lnstalar
Ia
mensula de montaje del panel de control C)
dellado
tipo
externo y otro tipo incorporado.
of
the arm bed.
to
the rear side
mit
de atras de brazo.
El
tipo
of
the arm bed
den mitgelieferten Schrauben e
dellado
de atras del brazo con los tornillos accesorios
with
de panel de control a usar depende
the accessory screws
an
der Ruckseite des Nahmaschi-
e.
e.
082-8748
L T2-8842, L T2-8845,
LT2-8847,LT2-8848,
LT2-8872,LT2-8875
082-8774
082-8791
082-8798
-1-
Page 6
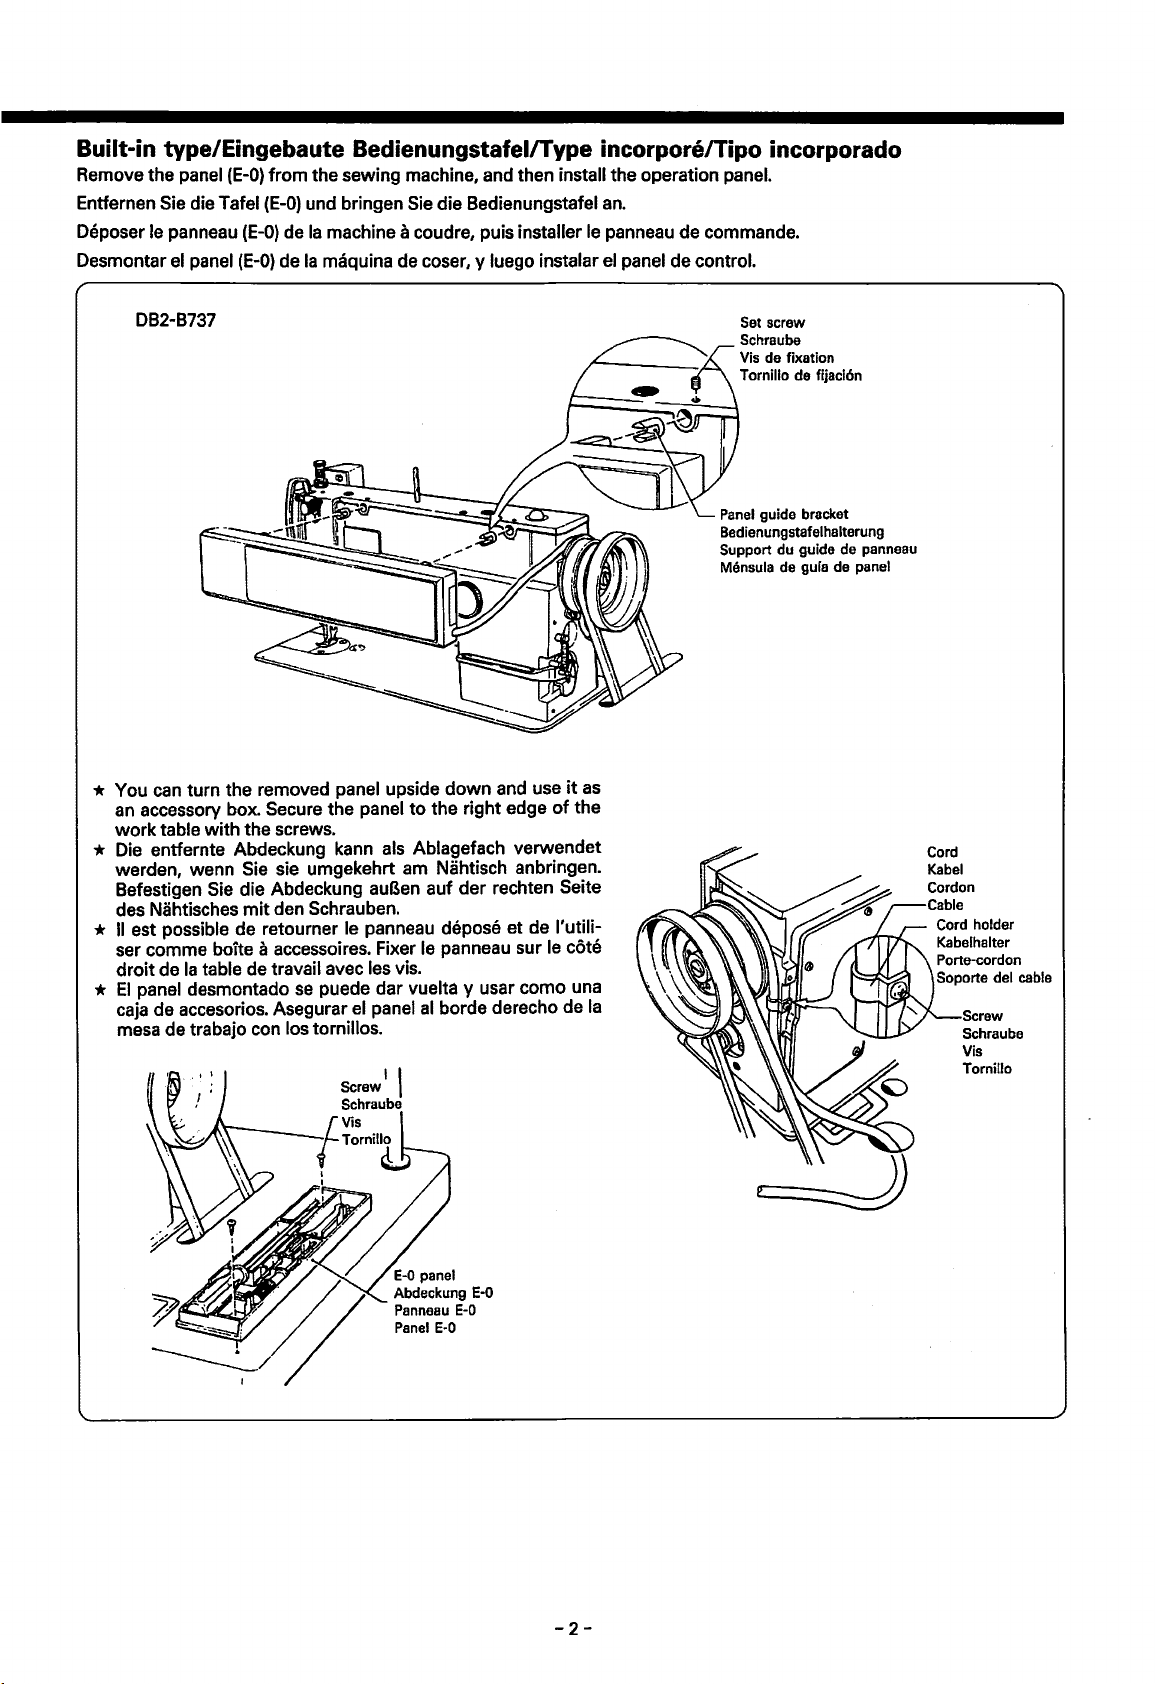
Built-in type/Eingebaute Bedienungstafei/Type incorpore/Tipo incorporado
Remove the panel
Entfernen Sie die Tafel
Deposer le panneau
Desmontar
el
panel
(E-0)
(E-0)
(E-0)
from
the sewing machine, and then install the operation panel.
(E-0)
und bringen Sie die 8edienungstafel
de
Ia
machine a coudre, puis installer le panneau de commande.
de
Ia
maquina de coser, y luego instalar el panel de control.
an.
D82-8737
* You can turn the removed panel upside
an
accessory box. Secure the panel
work
table with the screws.
down
to
the right edge
and use
of
it
the
as
* Die entfernte Abdeckung kann als Ablagefach verwendet
werden, wenn
8efestigen
des Nahtisches
*
II
est possible de retourner le panneau depose et de l'utili-
ser comme boite a accessoires. Fixer le panneau sur le cote
droit
*
de
El
panel desmontado
caja de accesorios. Asegurar
mesa de trabajo con los tornillos.
Sie sie umgekehrt am Nahtisch anbringen.
Sie die Abdeckung auBen auf der rechten Seite
mit
den Schrauben.
Ia
table de travail avec les vis.
se
puede dar vuelta y usar como una
el
panel
al
borde derecho de
Ia
Set screw
Schraube
Vis de fixation
Tornillo de fljacl6n
Panel
guide bracket
Bedienungstafelhalterung
du guide de panneau
Support
Mensula de gura de panel
Cord
Kabel
Screw
Schraube
Vis
Tornillo
-2-
Page 7
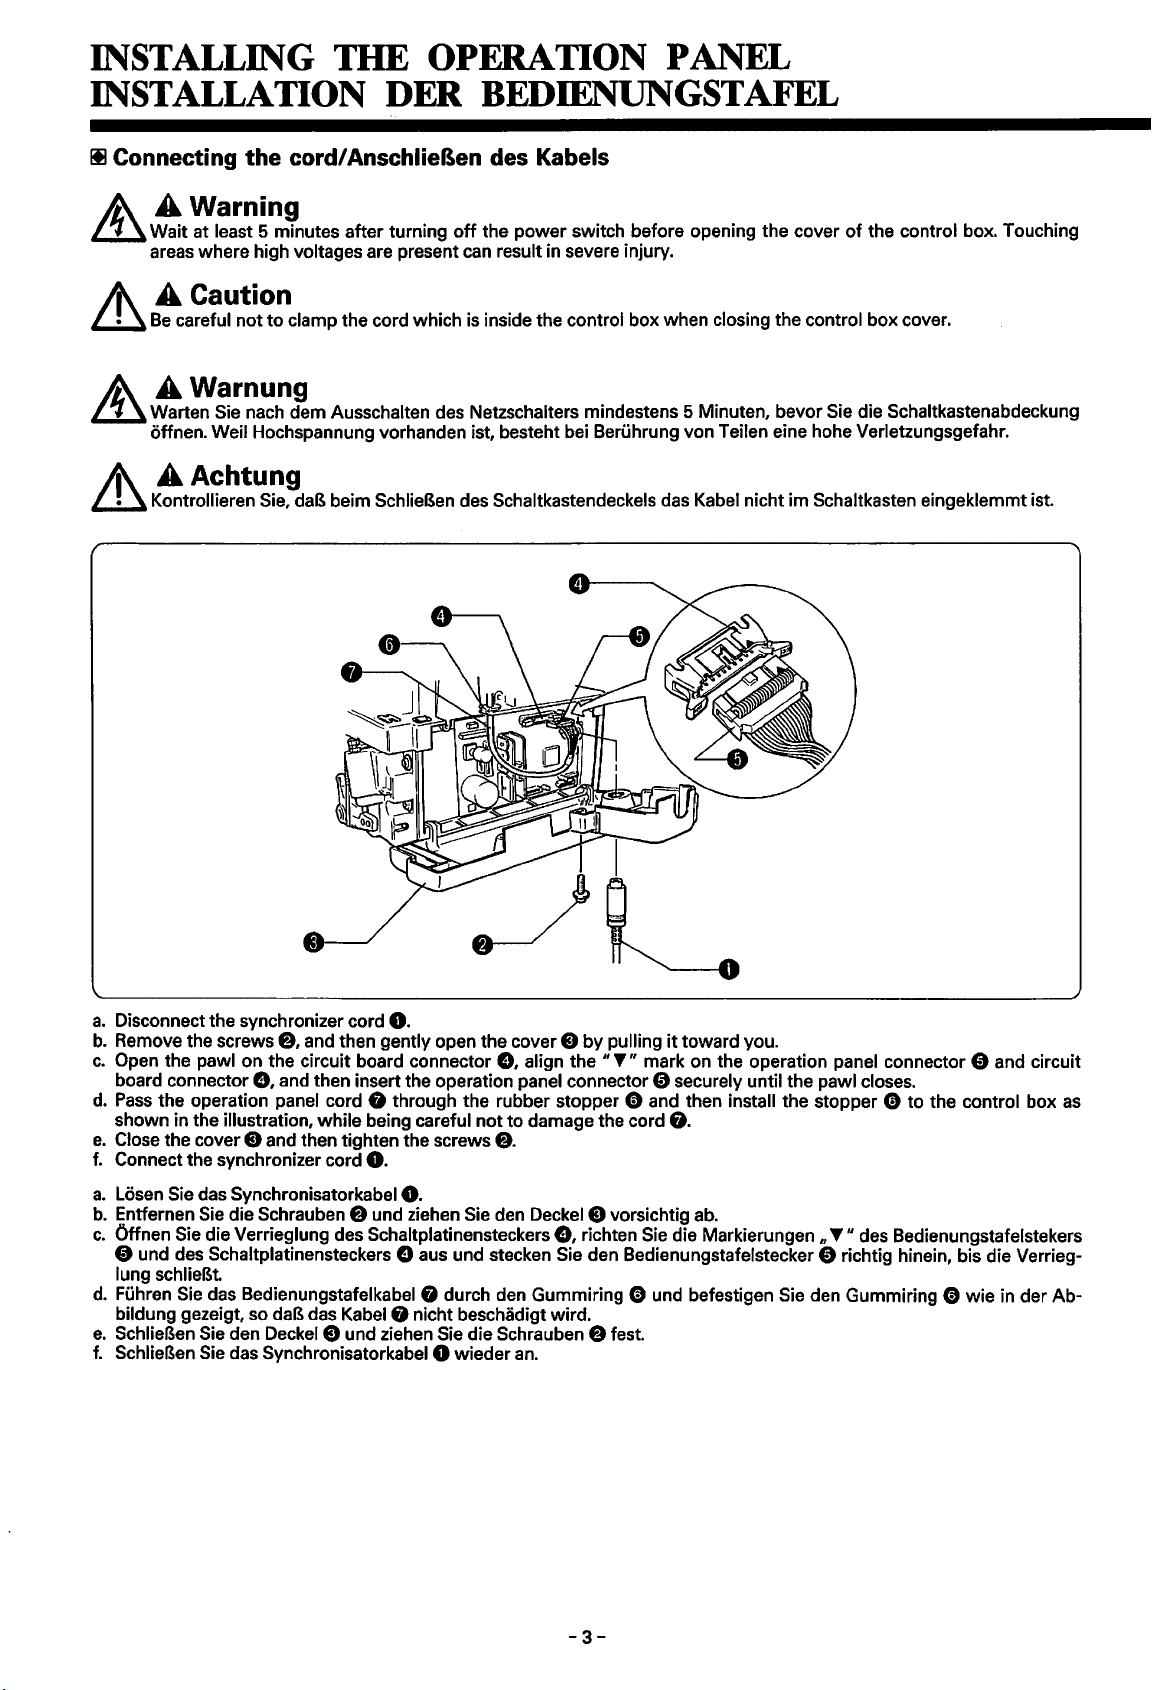
INSTALLING THE OPERATION PANEL
INSTALLATION DER BEDIENUNGSTAFEL
Ill Connecting
A
AWarning
L.:l:.J.
Wait at least 5 minutes after turning
areas where high
the
A\ A Caution
L.l.1
L.:l:.J.
L.l.1
Be
careful not
A
AWarnung
Warten Sie nach dem Ausschalten des Netzschalters mindestens 5 Minuten, bevor Sie die Schaltkastenabdeckung
offnen. Weil Hochspannung vorhanden ist, besteht bei Beruhrung von Teilen eine hohe Verletzungsgefahr.
A\
AAchtung
Kontrollieren Sie, daB beim SchlieBen des Schaltkastendeckels das Kabel nicht
cord/
AnschlieBen des Kabels
off
the
power
switch before opening the cover
voltages are present can result in severe injury.
to
clamp the cord which is inside the control box when closing the control box cover.
of
the control box. Touching
im
Schaltkasten eingeklemmt ist.
a.
Disconnect the synchronizer cord
b.
Remove the screws
c.
Open the pawl on the circuit board connector
board connector
d.
Pass
the operation panel cord 8 through the rubber stopper 0 and then install the stopper 0 to the control box
shown in the illustration, while being careful
e.
Close the cover 8 and then tighten the screws
f.
Connect the synchronizer cord
a.
Losen Sie das Synchronisatorkabel
b.
Entfernen Sie die Schrauben 8 und ziehen Sie den Deckel 8 vorsichtig
c.
Offnen Sie die Verrieglung des Schaltplatinensteckers
8,
and then gently open the cover 8 by pulling
8,
and then insert the operation panel connector 0 securely until the pawl closes.
0.
0.
0.
8,
align the
not
to
damage the cord G.
8.
8,
it
toward you.
"T"
mark on the operation panel connector 0 and circuit
ab.
richten Sie die Markierungen ,
T"
des Bedienungstafelstekers
0 und des Schaltplatinensteckers 8 aus und stecken Sie den Bedienungstafelstecker 0 richtig hinein, bis die Verrieg-
lung schlieBt.
d.
Fuhren Sie das Bedienungstafelkabel 8 durch den Gummiring 0 und befestigen Sie den Gummiring 0 wie in der Abbildung gezeigt, so daB das Kabel G nicht beschadigt wird.
e.
SchlieBen Sie den Deckel
f.
SchlieBen Sie das Synchronisatorkabel 0 wieder
E)
und ziehen Sie die Schrauben 8 fest.
an.
as
-3-
Page 8
INSTALLATION
DU
PANNEAU
DE
COlVIMANDE
INSTALACION DEL PANEL DE CONTROL
Ill Branchement du cordon/Conexi6n del cable
A A Advertissement
~
~
Attendre
du boitier de commande. Certains composants
lestouche.
au
moins 5 minutes apres avoir mis l'interrupteur principal en position d'arret avant d'ouvrir le couvercle
A\ A Attention
Veiller
ace
que le cordon place a l'interieur du boitier de commande.ne soit pas pince lorsqu'on referme de cou-
vercle du boitier de commande.
A A·Aviso
~
Despues de desconectar
El
controles.
tocar las areas donde exista alto voltaje puede ocasionar heridas graves.
el
interrupter principal esperar
A\ A Atencion
~
Se
debe tener cuidado de no apretar
Ia
caja de controles.
de
el
cable que
se
trouvant sous haute tension, on risque de graves blessures si on
al
menos 5 minutos antes de abrir
se
encuentra dentro de
Ia
caja de controles
Ia
tapa de
al
cerrar
Ia
caja de
Ia
cubierta
a.
Debrancher
b.
Retirer les vis
c.
Ouvrir le cliquet d'arret du connecteur de
panneau de commande et sur le connecteur
neau de commande jusqu'a
d.
Faire passer
boitier de commande comme indique sur
e.
Refermer le couvercle E) puis resserrer les vis
f.
Brancher le cordon 0 du synchroniseur.
a.
Desconectar
b.
Quitar los tornillos
c.
Abrir
nectar de tablero de circuitos
d.
Pasar
como
e.
Cerrar
f. Conectar
le
cordon 0 du synchroniseur.
f),
puis ouvrir doucement le couvercle E)
ce
le
cordon G du panneau de commande a travers
el
cable del sincronizador
f),
Ia
uiia del conector del tablero de circuitos
el cable del panel de control G a traves del tope de caucho 0 y luego instalar
se
indica en
Ia
cubierta E) y luego apretar los tornillos
el
cable del sincronizador
y luego suavemente abrir
Ia
figura, teniendo cuidado de no danar
que le cliquet d'arn3t se verrouille.
8,
y luego insertar
0.
Ia
carte a circuits
8 de
!'illustration,
f).
0.
en
le tirant vers soi.
e,
aligner les reperes
Ia
carte a circuits, puis inserer fermement le connecteur 8 du pan-
Ia
butee
en
en
veillant a
Ia
cubierta E) tirando de ella hacia adelante.
e,
alinear
el
conector del panel de control 0 hasta que
f).
el
Ia
marca
cable
caoutchouc
ne
pas endommager le cordon
II
y,
G.
II
y n marques sur le
0,
puis installer
connecteur.
Ia
butee 0 sur le
G.
del conector del panel de control e y
Ia
una
se
el
tope 0
en
cierre.
Ia
caja de controles tal
-4-
el
du
co-
Page 9
USING
VERWENDUNG
THE
OPERATION
DER
BEDIENUNGSfAFEL
PANEL
UTHJSATION
USO
DEL
DU
PANNEAU
PANEL
DE
DE
COMMANDE
CONTROL
* Key operations and the number
and the number
sewing.
* For keys which have
off
when the key is pressed once more. This operation is repeated each time the key is pressed.
* To carry out
are illuminated.
of
stitches before starting
an
indicator
two
or
more operations simultaneously, press all
of
stitches set cannot be changed during sewing.
to
sew. Note that the end backtacking feature can be set and canceled while
to
their left, the indicator will illuminate when the key is pressed once, and will switch
of
the necessary keys so that the respective indicators
Be
sure
to
confirm all key settings
* Wahrend dem Nahan konnen keine Tasten bedient und die Stichzahl kann nicht eingestellt werden. Deshalb mussen Sie
vor
dem Nahbeginn aile Einstellungen und die Stichzahl kontrollieren. Beachten Sie aber, daB sich der Endriegel
wahrend dem
* Bei den Tasten
nochmaligen Drucken erlischt die Anzeige wieder.
Nahan ein- und ausschalten
mit
einer Anzeige auf der linken Seite leuchtet die Anzeige bei einmaligem Drucken der Taste auf. Beim
laBt
Mit
jedem Tastendruck
wird
die Anzeige ein- oder ausgeschaltet.
* Urn mehr als eine Funktion gleichzeitig auszufuhren, mussen die entsprechenden Tasten gedruckt werden, so daB die
Anzeigen aufleuchten.
*
Les
reglages des touches et du nombre de points ne peuvent pas etre modifies
tousles
tion de point d'arret en fin de couture peut
* Pour les touches dotees d'un temoin place sur leur gauche,
touche,
touche.
reglages des touches
et
s'eteindra lorsqu'on appuie a nouveau sur
et
du nombre de points avant de commencer a coudre. Bien noter cependant que
etre reglee et annulee
Ia
touche.
en
cours de couture.
ce
temoin s'allumera lorsqu'on appuie une fois sur
II
en
sera de meme a chaque fois qu'on appuie sur
* Pour effectuer deux operations ou plus simultanement, appuyer sur toutes les touches correspondantes de
que leurs indicateurs respectifs s'allument.
*
Las
teclas y
ajustes de las teclas y numeros de puntadas antes de comenzar a coser. Tener
atras final
*
Para
teclas que tienen un indicador a
apagara cuando
*
Para
realizar dos o mas operaciones simultaneamente, oprima todas las teclas necesarias de manera que los respecti-
vos indicadores
el
numero de puntadas no pueden ser cambiadas durante
se
puede ajustar y cancelar durante
se
vuelva a presionar
se
enciendan.
Ia
Ia
Ia
izquierda,
tecla otra vez.
costura.
el
indicador no
Esta
operaci6n
Ia
se
encendera cuando
se
repite cada vez que
en
cours de couture. Veiller a verifier
costura. Asegurarse de confirmar todas los
en
cuenta que
se
Ia
funci6n de remate por
oprima
se
oprime
Ia
tecla una vez y
Ia
Ia
fonc-
maniE~re
tecla.
Ia
Ia
se
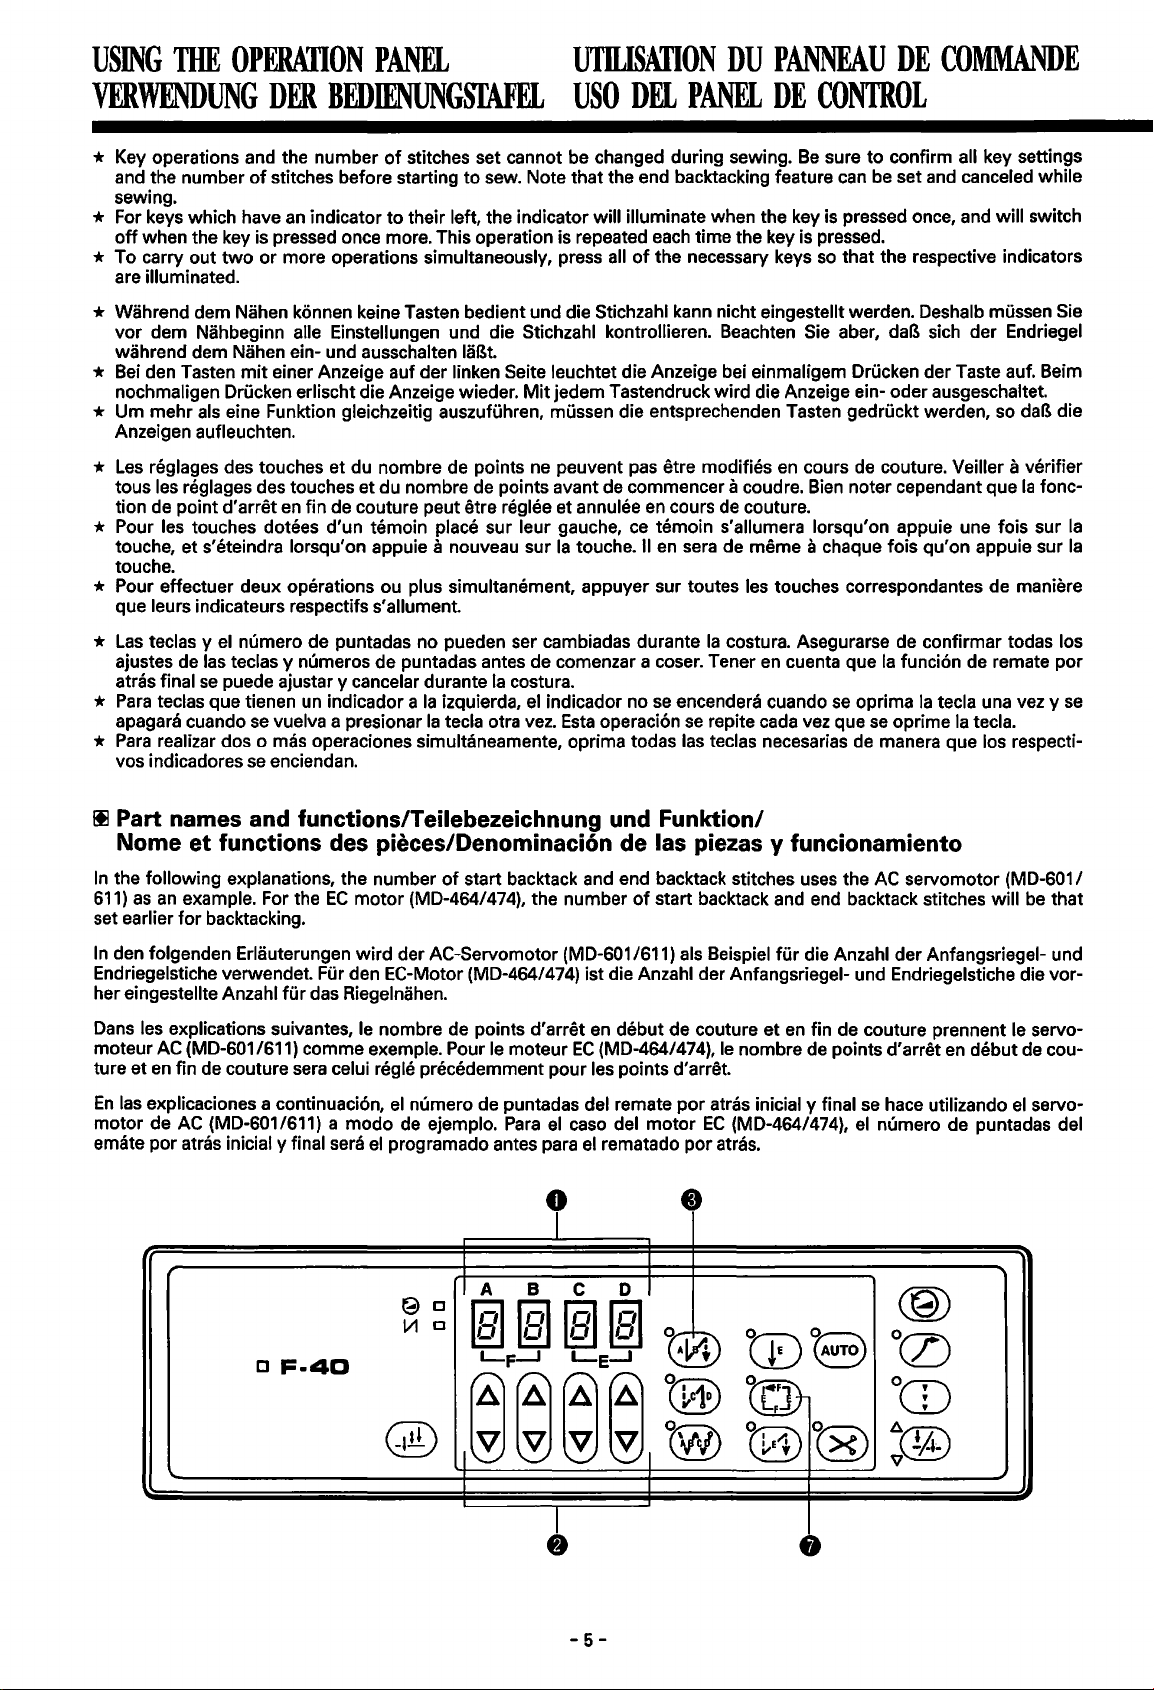
Ill Part names and functions/Teilebezeichnung und
Nome
In
the following explanations, the number
611)
set earlier
In
den folgenden Erlauterungen
Endriegelstiche verwendet.
her eingestellte Anzahl
Dans
moteur
ture
En
las explicaciones a continuaci6n,
motor de
emate
et
functions
as
an
example. For the
for
backtacking.
les explications suivantes, le nombre de points d'arret
AC (MD-601 /611) com me example. Pour le moteur
et
en
fin de couture sera celui regie precedemment pour les points d'arret.
AC (MD-601/611) a modo de ejemplo.
por
atras inicial y final sera
des pieces/Denominacion de las piezas y funcionamiento
of
EC
motor
wird
der AC-Servomotor (MD-601 /611) als Beispiel fUr die Anzahl der Anfangsriegel- und
Fur den EC-Motor (MD-464/474) ist die Anzahl der Anfangsriegel- und Endriegelstiche die vor-
fur
das Riegelnahen.
el
el
programado antes para el rematado
start backtack and end backtack stitches uses the AC servomotor (MD-601 I
(MD-464/474), the number
en
debut de couture
EC
(MD-464/474), le nombre de points d'arret
numero de puntadas del remate
Para
el
caso del
of
0
l
I I
c
F-40
t9
lll
lA
[]
c
B c D I
Ll
lmlm
L...f_J
IBIIBI
L-e...J
Funktion/
start backtack and end backtack stitches will be that
et
en
por
motor
por
fin de couture prennent le servo-
atras inicial y final
EC
(MD-464/474),
atras.
se
hace utilizando
el
numero de puntadas del
en
debut de cou-
el
servo-
®
a
AlA
ms
OCZ)
OCD
@
~~~~
I V V V
I I
w tot
(ffj)
1
•
-5-
t0)~
v
~®
4t
1A~
Page 10

0
LED
display/LED-Anzeige/Affichage LED/Pantalla
• Displays the number
stitches
the sewing speed
•
Auf
eingestellte Stichzahl
stiche
D)
• Affiche le nombre de points d'arret en debut
points
de points de presse de plis
d'arret (A, 8, C et
• Exhibe el numero de puntadas de remate por atras inicial y final (A,
das de largo fijo
de plisado
(E),
the number
dieser Anzeige
(E),
angezeigt.
die Nahgeschwindigkeit (A, 8, C und
a longueur fixe
(E),
of
(A,
8, C and
wird
D).
(E),
el numero de puntadas de costura de etiquetas
Ia
velocidad de costura (A, 8, C y
LED
start and end backtack stitches
of
label sewing stitches
D)
and the backtack sewing speed (A, 8, C and
die Stichzahl
(E),
die Stichzahl
(E),
le nombre de points de couture d'etiquettes d'identite
(E),
fur
den Anfangs- und den Endriegel (A, 8, C und
fur
das Etikettnahen
Ia
vitesse de couture
et
(A,
8, C and
(E
and
F),
the number
D)
und die Riegelnahgeschwindigkeit
en fin de couture (A, 8, C et
(A,
D) y Ia
(E
8, C et
velocidad de costura de remate (A, 8, C y
und
D)
D),
of
F),
die Stichzahl
et
Ia
vitesse de couture de points
8,
C y
(E y F),
the number
pleat presser stitches
D),
el numero de puntadas
of
fixed-length
D).
D),
fur
die Falten-
(A,
D),
le nombre de
(E
et
F),
le nombre
el numero de punta-
(E),
die fest-
8, C und
D).
fJ Stitch number setting keys/Stichzahltasten/Touches de reglage du nombre de points/Teclas de ajuste de numero de
puntadas
• These keys are used
ber
of
fixed-length stitches
presser stitches
D).
• Press ~ to
•
Mit
festeingestellte Stichzahl
Faltenstiche
und
• Drucken Sie die Taste ~ zum Erhohen des Einstellwerts von 0 bis 9 und drucken Sie die Taste v
zum Verringern des Einstellwerts von 9 bis
•
Ces
et
C
d'identite
vitesse de couture de points d'arret (A, 8, C et
• Appuyer sur
touche v pour diminuer
• Estas teclas
D),
y
F),
el
costura de remate (A, 8, C y
• Oprima ~ para aumentar el ajuste de 0 a
increase a setting
diesen Tasten konnen die Stichzahlen
D)
touches permettent de regler le nombre de points d'arret
(E),
eingestellt werden.
D),
le nombre de points a longueur fixe
(E
et
se
el
numero de puntadas de largo
numero de puntadas de plisado
to
set the number
(E),
the number
(E),
the sewing speed (A, 8, C and
from
(E),
die Nahgeschwindigkeit (A, 8, C und
F),
le nombre de points de presse de plis
Ia
touche ~ pour augmenter
usan para ajustar el numero de puntadas de remate por atras inicial y final (A, 8, C
die Stichzahl
Ia
valeur
D).
of
start and end backtack stitches (A, 8, C and
0 up
to
9.
d'un
reglage entre 9
fijo
(E),
(E),
9.
of
label sewing stitches
D)
and the backtack sewing speed (A, 8, C and
Press v to decrease a setting
fur
den Anfangs- und Endriegel (A,
fur
das Etikettnahen
D)
und die Riegelnahgeschwindigkeit (A,
0.
(E),
le nombre de points de couture d'etiquettes
(E),
et
Ia
0.
D).
Ia
valeur d'un reglage entre 0 et
el numero de puntadas de costura de etiquetas
Ia
velocidad de costura
Oprima v para reducir
(E
and
F),
the number
from
(E
und
F),
die Stichzahl
en
debut
et
en
fin de couture
vitesse de couture
(A,
8, C y
D) y Ia
el
ajuste de 9 a
D),
9 down
8,
C und
(A,
8, C
9.
Appuyer sur
velocidad de
0.
the num-
of
pleat
to
0.
D),
fur
(A,
et
D)
8,
et
(E
die
die
C
8,
Ia
Ia
y
8 Start backtack key/Anfangsriegeltaste/Touche de point d'arret
0
®
• When this key is pressed, the number
• If the name label key G has been pressed, the number
is fixed at four.
• 8eim Drucken dieser Taste wird die eingestellte Stichzahl
genaht.
• 8ei gedruckter Etikettnahtaste G ist die Stichzahl
festei ngestellt.
• Lorsqu'on appuie sur cette touche, le nombre de points d'arret
et 8 (0 -9)
•
Si
on a appuye sur
ture dans l'une ou
• AI presionar esta tecla,
est cousu.
Ia
I' autre direction est fixe a quatre.
touche d'etiquette d'identite
se
case el numero de puntadas de remate por atras inicial para A y 8
9).
• Si
Ia
tecla de etiquetas 0
cada direcci6n
se
ajusta a cuatro.
ha
sido presionada, el numero de puntadas de remate por atras inicial
of
-6-
en
debut de couture/Teclas de remate por atras inicial
start backtack stitches set
of
start backtack stitches in each direction
fOr
fOr
den Anfangsriegel in allen Richtungen auf 4
0,
le nombre de points d'arret
for
A and 8
A und 8
(0 -9)
en
debut de couture regie pour A
(0 -9)
fur
den Anfangsriegel
en
is sewn.
debut de cou-
(0
-
en
Page 11

8
A B
[J
G)
[J
ll1
c
F·4D
@
End
backtack key/Endriegeltaste/Touche de point d'arret
final
• When this key is pressed, the number
• If the fixed stitch key 0
backtack stitches will be equal
•
If
the name label key 8 has been pressed, the number
fixed at four.
• Beim Drucken dieser Taste
naht.
Bei
gedruckter Feststichtaste 0 oder Faltennahtaste 0 ist die Stichzahl
•
wie die
•
Bei
eingestellt.
• Lorsqu'on appuie sur cette touche, le nombre de points d'arret
(0 -
• Si on a appuye sur
plis
fur
A und B eingestellte Stichzahl.
gedruckter Etikettnahtaste 8 ist die Stichzahl
9)
est cousu.
0,
le nombre de points d'arret
lm~
L..f.....J
~~~~
or
Ia
touche de point a longueur fixe 0 ou sur
B.
• Si on a appuye sur
dans l'une ou
• AI presionar esta tecla,
•
Si
Ia
tecla de puntadas fijas 0 o
de puntadas de remate
• Si
Ia
tecla de etiquetas 8
cada direcci6n
Ia
touche d'etiquette d'identite
I' autre direction est fixe a quatre.
se
case el numero de puntadas de remate por atras final para C y D
por
se
ajusta a cuatro
ha
c D
®
Ct
the pleat presser sewing key 0 has been pressed, the number
to
the number
wird
die eingestellte Stichzahl
atras final sera igual
sido presionada, el numero de puntadas de remate
..
Ll
lmlm
L-e...J
~
~~
0
w
•
en
fin de couture/Teclas de puntadas de remate
of
end backtack stitches set
of
stitches set
en
fin de couture sera egal
Ia
tecla de costura de plisados 0
al
0
!E
0
~E1
4f»
-~
~:)
for
of
end backtack stitches in each direction is
fOr
fur
den Endriegel in allen Richtungen auf 4 fest-
8,
le
nombre de points d'arret
numero de puntadas fijadas para A y
9
OCZ)
OCD
®
for
A and
C und D (0 -
en
fin de couture regie pour C
Ia
touche de couture de presse de
au
nombre de points regie pour A et
~®
v
C and D
B.
ha
(0
9)
fur
fur
den Endriegel gleich
sido presionada,
-
9)
is sewn.
den
End
en
fin de couture
el
B.
por
atras final
por
riegel ge-
atn1s
of
end
et
D
(0
-
9).
numero
en
8 Continuous backtack key/Riegeltaste/Touche de points d'arret continus/Tecla de remate continuo
• When this key is pressed, the number
tinuous backtack stitches.
matically trimmed. The number
each other.
• Beim Drucken dieser Taste wird ein Riegel
zahlen genaht.
Stichzahl
werden.
• Lorsqu' on appuie sur cette touche, le nombre de points regles pour A,
en
points d'arret continus. Apres que
sont automatiquement coupes.
points d'arret
• Cuando
como puntadas de remate continuo. Despues de que
costura A-B-C-0,
inicial y final
se
Am
fur
den Anfangs- und
en
fin de couture peuvent etre regles independamment.
presiona esta tecla,
el
se
puede ajustar independientemente.
After
Ende des A-B-C-0-Zyklus
el
hila se cortara automaticamente.
of
the machine finishes sewing one A-B-C-0 cycle, the thread is auto-
of
fur
Le
numero de puntadas ajustadas para A,
stitches set
start and end backtack stitches can be set independently
mit
den Endriegel konnen unabhangig voneinander eingestellt
Ia
machine a termine un cycle de couture A-B-C-0, les fils
nombre de points
den
wird
for
fur
der
d'
El
-7-
A,
B,
C and D (0 -
A,
B,
C und D
Faden automatisch abgeschnitten. Die
arre~
en
debut de couture
Ia
maquina termina de coser un ciclo de
numero de puntadas de remate par atras
9)
(0-
9)
B,
C et D (0 -
B,
C y D (0 -
will be sewn
eingestellten Stich-
et
as
con-
9)
sera cousu
le nombre de
9)
se
coseran
of
Page 12

CD
Fixed stitch key/Feststichtaste/Touche de point a longueur fixe/Tecla de puntadas fijas
• When this key is pressed, the number
• To sew start backtack stitches at this time, press the start backtack key
set
for
A and B will be sewn.
• To sew end backtack stitches at this time, press the end backtack key
set
for
B and A will be sewn.
• Wenn dieses Taste gedruckt wird, so
• Urn einen Anfangsriegel
eingestellte Stichzahl
• Urn einen Endriegel
stellte Stichzahl
• Lorsqu'on appuie sur cette touche, le nombre de points pour
• Pour coudre des points d'arret en debut de couture
d'arret
• Pour coudre des points d'arret
• Cuando
•
•
en
d'arret
en
se
Para
coser puntadas de remate
atras inicial
Para
coser puntadas de remate
atras final
wird
debut de couture
fin de couture
presiona esta tecla,
e.
Se
e.
Se
cosera
zu
nahen, mussen Sie die Anfangsriegeltaste e drucken. Die
wird
genaht.
zu
nahen, mussen Sie die Endriegeltaste e drucken. Die fUr B und A einge-
genaht.
e.
e.
Le
cosera
el
numero de puntadas ajustadas para A y
el
numero de puntadas ajustadas para
of
stitches
wird
Le
nombre de points regles pour A et B sera cousu.
en
fin de couture a
nombre de points regles pour
se
cose
el
numero de puntadas para
por
atras inicial
por
atras final
for
seam E
die Stichzahl
ace
ce
en
este momento, presionar
en
este momento, presionar
fur
moment, appuyer sur
moment, appuyer sur
G Name label key/Etikettnahtaste/Touche d'etiquette d'identite/Tecla de etiquetas
• When this key is pressed, the number
twice.
• To sew start backtack stitches at this time, press the start backtack key
backtack stitches in one
• To sew end backtack stitches at this time, press the end backtack key
tack stitches in one
• Wenn dieses Taste gedruckt wird, so
genaht.
• Urn einen Anfangsriegel
Anfangsriegelstichen in einer oder heiden Richtungen ist in diesem
•
Urn einen Endriegel
gelstichen in einer oder heiden Richtungen ist in diesem
Lorsqu'on appuie sur cette touche, le nombre de points pour les coutures E et F
•
cousu deux fois pour chacune des coutures.
• Pour coudre des points d'arret
d'arret
• Pour coudre des points d'arret
d'arret
direction, sera fixe a quatre.
• Cuando
(01 -99).
•
atras inicial
ajusta a cuatro.
•
atras final
ajusta a cuatro.
en
debut de couture
l'autre direction, sera fixe a quatre.
en
fin de couture
se
presiona esta tecla,
Para
coser puntadas de remate por atras inicial
e.
El
Para
coser puntadas de remate
e.
El
or
both directions will be fixed at four.
or
both directions
zu
nahen, mussen Sie die Anfangsriegeltaste e drucken. Die Anzahl von
zu
nahen, mussen Sie die Endriegeltaste e drucken. Die Anzahl von Endrie-
en
e.
e.
Le
se
numero de puntadas de remate
numero de puntadas de remate
of
stitches
will
be fixed at four.
wird
debut de couture
Le
nombre de points d'arret
en
fin de couture a
nombre de points d'arret
cosera dos veces el numero de puntadas para las costuras E y F
por
atras final
for
seams E and F
die Stichzahl
en
este momento, presionar
en
este momento, presionar
fur
Fall
ace
moment, appuyer sur
ce
moment, appuyer sur
por
atras inicial
por
atras final
(01 -99)
die Naht E
Ia
Bet
fest
en
is sewn.
e.
The number
e.
The number
(01 -99)
couture E
A sera cousu.
Ia
costura E
B.
By
A.
(01 -99)
e.
die Naht E und F
Fall
auf
4 eingestellt.
en
debut de couture, dans l'une ou
fin de couture, dans l'une ou l'autre
en
una o ambas direcciones
en
una o ambas direcciones
genaht.
(01 -99)
Ia
Ia
(01 -99).
Ia
tecla de remate
Ia
tecla de remate
will each be sewn
e.
The number
The number
(01 -99)
fest auf 4 eingestellt.
Ia
Ia
Ia
tecla de remate por
Ia
tecla de remate por
of
stitches
of
stitches
fur
A und B
est cousu.
touche de point
touche de point
of
end back-
zweimal
(01 -99)
touche de point
touche de point
of
por
por
start
sera
se
se
E) Pleat presser sewing key/Faltennahtaste/Touche de couture de presse de plis/Tecla de costura de plisados
When this key is pressed, the number
•
pressed.
• To sew start backtack stitches at this time, press the start backtack key
set
for
• To sew end backtack stitches at this time, press the end backtack key
• Wenn diese Taste gedruckt wird, so
• Urn einen Anfangsriegel
• Urn einen Endriegel
A and B will be sewn.
set
for
B and A will be sewn.
Betatigung gedruckt wird.
eingestellte Stichzahl
gestellte Stichzahl
wird
zu
wird
genaht.
zu
nahen, mussen Sie die Anfangsriegeltaste e drucken. Die
genaht.
nahen, mussen Sie die Endriegeltaste e drucken. Die
of
stitches
wird
for
seam E
die Stichzahl fUr die Naht E
-8-
(01
- 99) is sewn when the actuator is
e.
The number
e.
The number
(01
- 99) genaht, wenn die
of
of
fur
fur
B und A ein-
stitches
stitches
A und B
Page 13

•
•••
•
e
A B c
lll
c
F·4D
@
• Lorsqu'on appuie sur cette touche, le nombre de points pour
qu'on appuie sur l'actuateur.
• Pour coudre des points d'arret
d'arret
en
debut de couture
• Pour coudre des points d'arret
d'arret
en
fin de couture
• Cuando
se
•
Para
atras inicial
•
Para
atras final
E)
AUTO key/AUTO-Taste/Touche AUTO/Tecla AUTO
• When this key is pressed, machine operations (start backtack sewing, end backtack sewing, fixed
stitch sewing and thread trimming)
the treadle is depressed.
• This key is only valid when the continuous backtack key
has
• Wenn diese Taste und das Pedal gedruckt wird, werden die eingestellten Funktionen (Anfangsriegel, Endriegel,
gefUhrt bis die eingestellte Position erreicht ist.
• Diese Taste kann nur betatigt werden, wenn die Riegeltaste
kettnahtaste
• Lorsqu'on appuie sur cette touche, les operations de
debut de couture, couture des points d'arret
et coupe des fils) seront automatiquement
sur
Cette touche est utilisable seulement lorsque
•
point
• Cuando
inicial, costura de remate por atras final, costura de puntadas fijas, corte de hilo) hasta
fijada
•
Esta
puntadas fijas
se
presiona
presiona esta tecla,
el
actuador.
coser puntadas de remate
e.
Se
coser puntadas de remate
e.
Se
been pressed.
8 gedruckt ist.
Ia
pedale.
a longueur fixe 0 ou
se
presiona esta tecla,
al
pisar
el
tecla solo
se
0 o
rmrm
1-f.....J
~~~~
cosera el numero de puntadas ajustadas para A y
cosera el numero de puntadas ajustadas para A y
Nahen einer festeingestellten Stichzahl und Fadenabschneiden) automatisch aus-
pedal.
puede usar cuando
Ia
tecla de etiquetas
D
Ll
en
e.
Le
e.
en
Le
nombre de points regie pour
se
por
por
Ia
touche d'etiquette d'identite 8 a ate enfoncee.
Ia
L
rmrm
L-e.....J
Ia
couture E
debut de couture
nombre de points regie pour A et B sera cousu.
fin de couture a
cosera
el
numero de puntadas para
atras inicial
atras final
will
be automatically carried
executees jusqu'a
maquina funciona automaticamente (costura de remate por atras
se
haya presionado
ace
moment, appuyer sur
ce
moment, appuyer sur
Bet
A sera cousu.
en
este momento, presionar
en
este momento, presionar
out
0,
fixed stitch key 0 or name label key 8
0,
die Feststichtaste 0 und die Eti-
Ia
en
fin de couture, couture des points a longueur fixe
Ia
touche de points d'arret continus
machine (couture des points d'arret
Ia
position reglee lorsqu'on appuie
Ia
tecla de remate continuo
8.
~®
v
(01 -99)
Ia
costura E
B.
B.
up until the set position when
sera cousu lors-
Ia
touche de point
Ia
touche de point
(01
-
99)
Ia
tecla de remate
Ia
tecla de remate
0,
Ia
touche de
Ia
0,
cuando
posicion
Ia
tecla de
por
por
en
G)
Thread trimming key/Fadenabschneidetaste/Touche de coupe des fils/Tecla de corte de hilo
• When this key is pressed, the thread is trimmed after sewing is completed.
• This key is only valid when the fixed stitch key 0
• Wenn diese Taste gedruckt wird, so
• Diese Taste kann nur betatigt werden, wenn die Feststichtaste 0 oder die Etikettnahtaste 8 gedruckt ist.
• Lorsqu'on appuie sur cette touche, les fils sont coupes une fois que
• Cette touche est utilisable seulement lorsqu' on a appuye sur
ou sur
Ia
• Cuando
•
Esta
tecla solo
etiquetas
touche
se
d'
etiquette d'identite
presiona esta tecla,
se
puede usar cuando
8.
el
wird
am Ende des Nahens der Faden abgeschnitten.
8.
hilo
se
corta despues de completar
se
haya presionado
-9-
or
name label key 8 has been pressed.
Ia
Ia
Ia
tecla de puntadas fijas 0 o
couture est terminee.
touche de point a longueur fixe 0
Ia
costura.
Ia
tecla de
Page 14

tD
Sewing speed key/Nahgeschwindigkeitstaste/Touche de vitesse de couture/Tecla de velocidad de costura
tD
Sewing speed indicator/Nahgeschwindigkeitsanzeige/Temoin de vitesse de couture/lndicador de velocidad de costura
G)
Backtack indicator/Riegelanzeige/Temoin de point d'am3t/lndicador de remate
CD
• When this key is pressed, the sewing speed indicator
shown in the
B,
Cand
•
If
this key is then pressed again, the backtack indicator
speed
values
•
If
this key is then pressed again
tD
and backtack indicator
• When the key operation panel is installed on the
speed cannot be set.
• Wenn diese Taste gedruckt wird, leuchtet die Nahgeschwindigkeitsanzeige
digkeit
und D
• Beim nochmaligen Drucken dieser Taste leuchtet die Riegelanzeige
keit
wird
B,
C und D eingestellt werden.
111
[J
Slow
start key/Langsamstarttaste/Touche de demarrage a vitesse lente/Tecla de comienzo Iento
• Wenn diese Taste erneut gedruckt oder
die Nahgeschwindigkeitsanzeige
• Wenn die Bedienungstafel an dem EC-Motor installiert ist, konnen die Nahgeschwindigkeit und die Riegelnahgeschwindigkeit nicht
• Lorsqu'on appuie sur cette touche, le temoin de vitesse de couture
apparait sur
respectives
• Si on appuie a nouveau sur cette touche, le temoin de
des points d'arret apparait sur
reglant les valeurs respectives pour A,
•
Si
on appuie a nouveau sur cette touche, ou si on
temoin
• Lorsque le panneau de commande a touches est installe sur le moteur
vitesse de couture
Cuando se presiona esta tecla,
•
costura se indica en
valores
• Si se vuelve a presionar esta tecla, el indicador de remate
remate se indicara en
pectivamente
• Si se presiona esta tecla otra vez o si se comienza a usar
velocidad de costura
• Cuando se
cidad
•
When this key is pressed, the first
and the
• Beim Drucken dieser Taste werden die ersten zwei Stiche am Nahbeginn (nach
Fadens und dem
• Lorsqu'on appuie sur cette touche, les deux premiers points du
ont
ete coupes
• Cuando se presiona esta tecla, las dos primeras puntadas
el
hilo y de que
LED
D.
will
for
A,
wird
eingestellt warden.
auf
display
be shown in the
B,
C and
auf
der LED-Anzeige 0 angezeigt. Die Nahgeschwindigkeit kann
der
LED-Anzeige 0 angezeigt. Die Riegelnahgeschwindigkeit kann
0.
You can then set the sewing speed
LED
G)
will
display
or
if
all switch off.
D.
tD
eingestellt warden.
l'affichage
pour
de
vitesse de couture
respectivos para A,
los valores para A,
ha
de
instalado el panel de teclas de control en el
costura ni
needle has been raised) are sewn
et
LED
0.11
A,
B, C et
pour
les points d'arret ne peuvent pas etre reglees.
el panel
Ia
pantalla
tD
y el indicador
Ia
velocidad de costura de puntada de remate.
Hochstellen der Nadel) Iangsam genaht.
que l'aiguille est en position relevee) sont cousus a vitesse lente.
Ia
aguja se haya levantado) se cosen lentamente.
est alors possible de regler
D.
l'affichage
tD
et le temoin de
el
indicador de velocidad de costura
LED
0.
B,
C y
D.
LED
B,
two
0.
You can then set the sewing speed
the machine is started, the
mit
und die Riegelanzeige
C y
dem Nahen begonnen wird, werden die LED-Anzeige
LED
B, C et
Entonces se podra ajustar
0.
de
0.11
D.
Luego
D.
remate
stitches at the sewing start (after the thread has been trimmed
at
low
tD
will illuminate and the sewing speed will be
by
setting the respective values
G)
will
illuminate and the backtack sewing
LED
display
EC
motor, the sewing speed and backtack sewing
G)
G)
ausgeschaltet.
tD
s'allume et
vitesse de couture en reglant les valeurs
G)
de
Ia
s'eteindront tous.
point
est alors possible
fait
point
demarrer
d'arret
Ia
d'arret
G)
tD
Ia
velocidad de costura ajustando los
.
encendera y
Ia
velocidad de costura ajustando res-
Ia
EC,
no podran programarse ni
debut
se
puede ajustar
G)
speed.
Ia
se apagaran.
G)
se
maquina,
motor
al
comienzo de
by
setting the respective
0,
sewing speed indicator
tD
und die Nahgeschwin-
mit
den Tasten
und die Riegelnahgeschwindig-
s'allume
regler
machine, l'affichage
EC,
se enciende y
pantalla
de couture (une fois que les fils
mit
den Tasten
Ia
vitesse de couture
et
Ia
vitesse de couture
Ia
vitesse de couture en
Ia
vitesse de couture et
Ia
velocidad de costura de
LED
0,
dem
Abschneiden des
Ia
costura (despues de cortar
Ia
el indicador de
for
A,
fur
A,
B,
C
fur
A,
0,
LED
0,
le
Ia
velocidad de
Ia
velo-
49
Correction key/Korrekturtaste/Touche de correction/Tecla de correcci6n
• When this key is pressed, correction sewing (slow speed)
head is pressed
been trimmed.
•
If
the actuator is pressed while the machine
• Nach dem Drucken dieser Taste konnen Korrekturstiche (langsame Nahgeschwindigkeit) genaht warden, wenn am
Fadenabschneiden konnen keine Korrekturstiche genaht warden.
• Wenn die Betatigung bei laufender Nahmaschine gedruckt wird, so
• Lorsqu'on appuie sur cette touche,
l'actuateur situe sur
sur
tion n'est pas effectuee
• Si on appuie sur l'actuateur pendant que
• Cuando se presiona esta tecla, se realiza
actuador de
realiza despues de haberse cortado
se presiona
• Si
while the machine is stopped. Correction sewing is
is
operating, the sewing direction is reversed.
Maschinenoberteil bei stillstehender Maschine die Betatigung gedruckt wird. Nach dem
Ia
Ia
apres que les fils
Ia
cabeza de
el
actuador mientras
tete de machine pendant que
Ia
maquina mientras
couture de correction
ont
ate coupes.
Ia
machine fonctionne,
Ia
costura de correcci6n (baja velocidad)
Ia
el
hilo.
Ia
maquina esta funcionando,
maquina esta parada.
is
Ia
-10-
carried
out
if
the actuator on the machine
not
carried
wird
(a
vitesse lente) est effectuee
machine est arretee.
Ia
direction de couture sera inversee.
Ia
direcci6n de costura
out
after the thread has
die Nahrichtung umgekehrt.
La
couture de correc-
La
costura de correcci6n no
si
si
on appuie
se
presiona el
se
invertira.
se
Page 15

c
F-40
t9
ll1
_,!!
B
A
CJ
CJ
rmrm
'--F.....J
~~~·~
c
0
0
rmrm
'--e-1
D
~
t0V
(Y1)
W9
ttJ)
t0)®
~
OCZ)
OCD
A
!A.
"V
CD
Needle
CD
up/down
Half stitch key/Halbstichtaste/Touche de demi-point/Tecla de media puntada
key/Nadeltaste/Touche d'elevement/abaissement de l'aiguille/Tecla de aguja arriba/abajo
• The
''A"
•
If
the treadle is pressed
will
rise above the needle plate and stop (needle up stop).
•
If
the treadle is pressed
will
drop
• Die
Anzeigen,
• Wenn das Pedal bei leuchtender Anzeige ,
Maschine
•
Wenn das Pedal bei leuchtender Anzeige ,
Maschine
A chaque pression sur cette touche, les
•
•
Si
on
met
ra
au-dessus de
• Si
on
met
sera au-dessous de
Los indicadores
•
se
• Si
•
• This key is used
• Diese Taste
• Cette touche permet d'elever ou d'abaisser l'aiguille lorsque le fonctionnement de
•
pisa
levantara por encima de
Si
se
pisa el pedal a
por debajo de
verwendet.
interrompu.
Esta
tecla
•
and
"v"
indicators illuminate each time this key is pressed.
to
the neutral position while the
to
below the needle plate and stop (needle down stop).
A"
und ,
mit
angehobener Nadel.
mit
abgesenkter Nadel.
Ia
pedale sur
Ia
Ia
el
se
plaque a aiguille et s'arretera (position d'arret superieure de l'aiguille).
pedale sur
Ia
"A"
pedal a
Ia
placa de aguja y
to
raise
wird
bei einer Unterbrechung des Nahens zum Anheben oder Absenken der Nadel
usa
para levantar o bajar
the neutral position while the
v"
leuchten, wenn diese Taste betatigt wird.
A"
in die Neutralstellung zuruckgestellt wird, stoppt die
v"
in die Neutralstellung zuruckgestellt wird, stoppt die
Ia
position neutre pendant que le temoin
Ia
position neutre pendant que le temoin
plaque a aiguille
y
"v"
se
encienden cad a vez que
Ia
posicion neutral mientras
Ia
placa de aguja y
Ia
posicion neutral mientras el indicador
or
lower the needle when machine operation is interrupted.
temoins"
et
s'arretera (position d'arret inferieure de l'aiguille).
se
parara (parada de aguja levantada).
se
parara (parada de aguja baja).
Ia
aguja cuando no
A"
et
el
"A"
indicator is illuminated, the needle
"v"
indicator is illuminated, the needle
"v"
s'allument.
"A"
"V"
se
presiona esta tecla.
indicador
"v"
se
puede usar
"A"
esta encendido,
d&
est allume, l'aiguille s'eleveest allume, l'aiguille s'abais-
esta encendido,
Ia
maquina.
Ia
aguja
Ia
aguja bajara
Ia
machine est
se
-11-
Page 16

SETTING
MEmODS
MEmODES
DE
REGLAGE
EINSTELLUNGEN
Example
1:
Fixed
stitch
sewing +
Start
METODOS
DE
and end backtacking
AJUSTE
Beispiel 1: Nahen einer festeingestellten Stichzahl und Anfangs- und End riegel
Exemple
Ejemplo
Setting
1.
Press the start backtack key
2. Press the end backtack key
3. Press the stitch number setting keys E)
4. Press the fixed stitch key
* The number
5.
Press the stitch number setting keys 0
Sewing
1.
When the treadle is pressed forward, the start backtack stitches set
ches
2. When the treadle is pressed back, the end backtack stitches set
trimmed.
@)o
VI
o
for
1:
Point a longueur
1:
Costura de puntadas fijas + Remate por atras inicial y final
fixe+
points
d'arret
~o(L)
tr:J)
(11)~
OCD
:oo
~
en
debut
et
en
I
A :
~/
V E 1 parenthbsos
•
0.
e.
to
e.
of
end backtack stitches will be set
seam
E,
and then the machine will stop.
set the number
to
to
set the number
Band
of
start backtack stitches
A.
of
fixed stitches
for
A and B will be sewn, followed
for
B and A will be sewn, and the thread will then be
for
for
seam
fin
de couture
1'1
: I
I
I
(C)
I
B/1(0)
~
/ lA
V
.____Thread
A and
E.
Tho Model shown
tho
EC
motor.
is
Das
in Klammern gozelgto Modell
~;
=;d~~~~;~~~
E1
modelo entro
correspondo al motor
Fadenabschneiden
Coupe
des
Corte
de
B.
by
In
parentheses
entre
lo
moteur
EC.
par~ntesis
EC.
trimming
fils
hilo
the fixed stit-
Einstellung
1.
Drucken Sie die Anfangsriegeltaste
2. Drucken Sie die Endriegeltaste
3. Drucken Sie die Stichzahltasten E), urn die Stichzahl A und B
4. Drucken Sie die Feststichtaste
* Die Stichzahl fUr den Endriegel
5.
Stellen Sie
mit
den Stichzahltasten 0 die festeingestellte Stichzahl
0.
e.
e.
wird
auf B und A eingestellt.
fur
den Anfangsriegel einzustellen.
fur
die Naht E ein.
Nihen
1.
Beim Drucken des Pedals nach vorne
von
Stichen genaht und die Maschine stoppt.
2. Beim Zuruckdrucken des Pedals warden die Endriegelstiche B und A genaht und danach
Reglage
1.
Appuyer
2. Appuyer sur
3. Appuyer sur les touches de
et
4.
Appuyer
*
Le
5. Appuyer sur les touches de reglage du nombre de points 0 pour regler le nombre de points a longueur fixe pour
couture
Couture
1.
Lorsqu'on appuie sur
suivis des points a longueur fixe
2.
Lorsqu'on appuie sur
les
Ajuste
1.
Presionar
2. Presionar
3. Presionar
4. Presionar
*
El
5. Presionar las teclas de ajuste de numeros de puntadas 0 para ajustar
Costura
1.
Cuando
das
2. Cuando se pisa hacia atras
el
sur
Ia
touche de point d'arn3t
Ia
touche de point d'arret
point
B.
sur
Ia
nombre de points d'arret en fin de couture sera regie pour
fils seront coupes.
numero de puntadas de remate
del numero de puntadas fijas para
hilo.
touche de point a longueur fixe
E.
Ia
pedale vers l'avant, les points d'arret
Ia
pedale vers l'arriere, les points d'arret en fin de couture regles pour
Ia
tecla de remate
Ia
tecla de remate
Ia
tecla de puntadas fijas E) para ajustar el numero de puntadas de remate
Ia
tecla de puntadas fijas
se
pisa hacia adelante
por
por
el
pedal, se coseran las puntadas de remate
wird
der
Anfangsriegel A und B genaht, danach
en
debut de couture
en
fin de couture
a longueur fixe E)
pour
0.
e.
regler
le
nombre de points d'arret en
wird
die festeingestellte Anzahl
wird
der
Faden abgeschnitten.
debut
de couture pour A
e.
Bet
A.
en
debut
pour
Ia
couture
atras inicial
atras final
0.
e.
E,
puis
Ia
machine s'arretera.
de couture regles
pour A et
Bet
A seront cousus, puis
por
atras inicial para A y
B seront cousus,
e.
por
atras final se ajustara para B y A.
el
pedal, se coseran las puntadas de remate por atras inicial ajustadas para A y
Ia
costura E y luego
Ia
maquina
el
numero de puntadas fijas para
se
parara.
por
atras final ajustadas para B y A, y
Ia
B.
costura
B,
se
E.
segui-
cortara
Ia
-12-
Page 17

Example
Beispiel
Exemple
Ejemplo
2:
Name label sewing +
2:
Etikettnahen, Nahen eines Endriegels, Abschneiden des Fadens und AUTO
2:
Couture
+ coupe des
2:
Costura de etiqueta + Remate
d'etiquette
fils
End
d'identite
+ AUTO
backtacking + Thread
+points
por
d'arret
atras final + Corte de
trimming
en
fin
de couture
+ AUTO
hilo
+ AUTO
Qc
Ill 0
@
Setting
1.
Press the end backtack key
2.
Press the name label key
*
At
this time, the number
3.
Press the stitch number setting keys E)
4.
Press the thread trimming key
5.
Press the AUTO key
Sewing
1.
When the treadle is depressed, the number
A B c 0
rmrmrmrm
L-f......J
L-e_J
~
~~~~
0.
e.
of
end backtack stitches in each direction will
e.
e.
to
set the number
of
stitches
4 stitches
4 Sticha
~
o(L)
om
4 points
4 puntadas
r------------
:
~@
v
of
name label stitches
for
seam E will be sewn, and the machine will then stop.
!f
: F :
L---~----J
be
fixed at four.
(C,
D)
(C,
D)
(C,
D)
(C,
~---*
E
for
seams E and
D)
Ell
* Because automatic sewing has been set, sewing will continue until the end point is reached
treadle.
2.
When the treadle is pressed once more, the number
stop.
3.
After seams E and
be trimmed.
Fare
sewn again,
four
end backtack stitches will be sewn in each direction and the thread will then
of
stitches set
for
seam F will be sewn, and the machine will then
The Model shown in parentheses
is
the
EC
motor.
Das
in Klammern gezeigte Modell
ist
der EC-Motor.
Le
modele montr6 entre
parentheses le moteur
El
modelo entre par6ntesis
corresponds al
,
Thread trimming
Fadenabschneiden
Coupe des
Corte de hilo
F.
with
a single press
motor
fils
EC.
EC.
of
the
Einstellung
1.
Drucken Sie die Endriegeltaste
2.
Drucken Sie die Etikettnahtaste
* Die Stichzahl
3.
Stellen Sie
4.
Drucken
5.
Drucken Sie die AUTO-Taste
fur
den Endriegel in beiden Richtungen ist damit fest auf 4 eingestellt.
mit
den Stichzahltasten E) die Stichzahl der Nahte E und F
Sie
die Fadenabschneidetaste
e.
0.
e.
e.
fur
das Etikettnahen ein.
Nih en
1.
Beim Drucken des Pedals werden die Stiche
fur
die Naht E genaht und danach stoppt die Maschine.
* Weil das automatische Nahen eingestellt ist, naht die Maschine beim einmaligen Drucken des Pedals ohne Unter-
brechung bis zum Endpunkt.
2.
Wenn das Pedal noch einmal gedruckt wird, werden die Stiche
Maschine wieder.
3.
Nach dem nochmaligen Nahan der Nahte E und F werden 4 Riegelstiche in jeder Richtung ausgefuhrt und der Faden
wird
abgeschnitten.
Reglage
1.
Appuyer sur
2.
Appuyer sur
*
Ace
3.
4.
5.
Couture
1.
moment le nombre de points d'arret en fin de couture dans l'une ou I' autre direction sera fixe a quatre.
Appuyer sur les touches de reglage du nombre de points E) pour regler le nombre de points d'etiquette d'identite pour
les coutures E
Appuyer sur
Appuyer sur
Lorsqu'on appuie sur
* Comme
en
appuyant une seule fois sur
2.
Si
on appuie a nouveau sur
s' arretera.
3.
Apres que les coutures E
chaque direction, puis
Ia
touche de point d'arret
Ia
touche
et
Ia
touche de coupe des fils G.
Ia
touche AUTO
Ia
couture automatique a ete reglee,
d'
etiquette d'identite
F.
e.
Ia
pedale, le nombre de points regie pour
Ia
Ia
et
Font
les fils seront coupes.
en
pedale.
pedale, le nombre de points regie pour
ete a nouveau executees, quatre points d'arret
debut de couture
0.
8.
Ia
couture continuera jusqu'a
fur
die Naht F ausgefuhrt und danach stoppt die
Ia
couture E sera cousu, puis
ce
que le point de fin de couture soit atteint,
Ia
couture E sera cousu, puis
en
fin de couture seront cousus dans
Ia
machine s'arretera.
Ia
machine
-13-
Page 18

Ajuste
1.
Presionar
2.
Presionar
*
En
3. Presionar las teclas de ajuste de numero de puntadas 8 para ajustar el numero de puntadas de etiquetas para las cos-
turas E y
4. Presionar
5.
Presionar
Costura
1.
Cuando se pise el pedal
* Debido a que se
una sola vez
2.
Cuando se vuelva a presionar el pedal, se cosera el numero de puntadas ajustadas para
se
3. Despues de coser las costuras E y
cortara.
Ia
tecla de remate
Ia
tecla de etiqueta
este momenta, el numero de puntadas de remate
F.
Ia
tecla de corte de hila
Ia
tecla AUTO
ha
seleccionado
el
pedal.
parara.
por
atras final
0.
8.
G.
0.
se
cosera el numero de puntadas para
Ia
costura automatica,
F,
se
coseran cuatro puntadas de remate por atras final en cada direcci6n y el hila
por
atras final en cada direcci6n se ajusta a cuatro.
Ia
Ia
costura
costura continuara hasta llegar al punta final con solo pisar
E, y Ia
maquina luego se parara.
Ia
costura
F,
y luego
Ia
maquina
se
Example
Beispiel
Exemple
Ejemplo
Setting
1.
Press the pleat presser sewing key
2.
Press the stitch
Sewing
1.
If
the actuator is pressed while the treadle is pressed
for
2.
After
* The AUTO key and thread
Einstellung
1.
Drucken Sie die Faltennahtaste
2. Stellen Sie
Nih
en
1.
Wenn die Betatigung wahrend des Maschinenbetriebs bei nach vorne gedrucktem Pedal gedruckt wird, so werden die
fur
2.
Nach
3:
Pleat presser sewing
3:
G)o
111
@
Nihen
3:
Couture de presse de plis
3:
Costura de plisados
A B
[J
[§][§]
L..F.....J
von Falten
D
•
w~
4J
~
Q
~E1
~
•
0.
number
seam E will be sewn
the treadle is pressed back, the thread
setting keys 8
with
backward stitches, and then sewing will return
trimming
to
set
the
number
forward
will
then be trimmed.
key cannot be used
0.
mit
den Stichzahltasten 8 die Stichzahl
die Naht E eingestellten Ruckwartsstiche genaht, danach
dem
Zuruckdrucken des Pedals
wird
der Faden abgeschnitten.
der
Naht E
~
o(L)
OCD
~@
v
of
backward stitches
and the machine is operating,
to
at
this time.
fur
die Ruckwartsstiche ein.
wird
wieder
auf
die normale Nahrichtung umgeschaltet
Thread trimming
Fadenabschneiden
Coupe des
Corte de hilo
for
seam
E.
the
number
the normal direction.
fils
of
stitches set
* Die AUTO-Taste und die Fadenabscneidetaste konnen nicht verwendet werden.
Reglage
1.
Appuyer
2.
Appuyer
Couture
1.
Si
de points
2.
les
* A ce moment,
Ajuste
1.
Presionar
2.
Presionar las teclas de ajuste de numeros de puntadas 8 para ajustar el numero de puntadas hacia atras para
ra
Costura
1.
Si se presiona el actuador mientras se pisa hacia adelante el pedal y
de puntadas para
2.
Despues
*
En
sur
Ia
touche de couture de presse de plis
sur
les touches de reglage de nombre de points 8
on appuie
fils seront coupes une fois
E.
este
sur
regles
de
momenta
l'actuateur pendant que
pour
Ia
couture E sera cousu en points arriere, puis
Ia
touche AUTO
Ia
tecla de costura de plisados
Ia
costura E con puntadas hacia atras, y luego
pisar hacia atras el pedal,
no se puede usar
0.
pour
regler le nombre de points arriere pour
Ia
pedale est enfoncee vers l'avant
qu'on
aura appuye sur
et
Ia
touche de coupe des fils ne peuvent pas etre utilisees.
Ia
pedale vers l'arriere.
Ia
couture reprendra dans
0.
Ia
maquina esta funcionando,
Ia
costura no volvera a
el
hila se cortara.
Ia
tecla AUTO ni
Ia
tecla de corte
-14-
de
hila.
et
que
Ia
machine fonctionne, le nombre
Ia
direction normale.
se
Ia
direcci6n normal.
cosera el numero
Ia
couture
Ia
E.
costu-
Page 19

Example
Beispiel
Exemple
Ejemplo
4:
Continuous backtack sewing
4:
Verriegeln
4:
Couture
4:
Costura de remate continuo
de
points
d'arret
continus
\
\ B I \
\
A \ /
\ I \
A
j C \
~----Thread
.,..--
I
0
//
trimming
Fadenabschneiden
Coupe
des fils
Corte
de
hilo
v \J
Setting
1.
Press the continuous backtack key
2.
Press the stitch number setting keys 8
Sewing
When the treadle is depressed, the continuous backtack stitches set
will be trimmed.
Einstellung
1.
Drucken Sie die Riegeltaste
2.
Stellen Sie
mit
den Stichzahltasten 8 die Anzahl Riegelstiche
Nihen
8eim Drucken des Pedals werden die
abgeschnitten.
Reglage
1.
Appuyer sur
2.
Appuyer sur les touches de reglage du nombre de points 8 pour regler le nombre de points d'arret continus pour A, 8,
CetD.
Couture
Lorsqu'on appuie sur
coupes.
Ia
touche de points d'arn3t continus
Ia
pedale, les points d'arret continus regles pour A, 8, C et D seront cousus, puis les fils seront
0.
0.
fur
to
A, 8,
set the number
C,
und D eingestellten Riegelstiche genaht und danach
of
continuous backtack stitches
for
A,
8,
C and D will be sewn, and then the thread
fur
A, 8, C und D ein.
0.
for
A, 8, C and
D.
wird
der Faden
Ajuste
1.
Presionar
2.
Presionar
A,
8,CyD.
Costura
Cuando
Ia
tecla de remate continuo
las
teclas de ajuste de numero de puntadas 8 para ajustar
se
pisa
el
pedal,
se
0.
el
numero de puntadas de remate continuo para
coseran las puntadas de remate continuo ajustadas para A, 8, C y
D,
y luego el hilo
se
cortara.
-
15-
Page 20

Example
Beispiel
Exemple
Ejemplo
5:
Setting
5:
Einstellen der
5:
Reglage de Ia vitesse de couture
5:
Ajuste de velocidad de costura
the
sewing speed
Nihgeschwindigkeit
•
0
D
1 A B
t9
Ill
c 0
@
[§][§]
L.....F-J
r v v
~~~~
c
[§][§]
L-e--1
(11)
v.
r:J1)
rm
1
tD~
o<Z)
trd)
t§)t8)
"E
y
om
:oo
~
•
Setting
1.
Press the sewing speed key
2.
Press the stitch number setting keys 8
* The maximum sewing speed
the
minimum
sewing speed is the sewing speed when the treadle is at the neutral position.
* The sewing speed display is cleared during sewing.
* When the key operation panel is installed on the
Einstellung .
1.
Drucken Sie die Nahgeschwindigkeitstaste
2.
Stellen Sie
mit
den Stichzahltasten 8 die Nahgeschwindigkeiten
* Die maximale Nahgeschwindigkeit ist durch die DIP-Schaltereinstellung im Schaltkasten festgelegt. Die minimale Nah-
geschwindigkeit ist die Geschwindigkeit, wenn sich das Pedal in der Neutralstellung befindet.
* Wahrend dem Nahen
* Wenn die 8edienungstafel
0.
The sewing speed indicator
that
wird
die Nahgeschwindigkeitsanzeige geloscht.
an
dem EC-Motor installiert ist, kann die Nahgeschwindigkeit nicht eingestellt warden.
to
set the sewing speeds
can be set is the maximum speed determined
EC
motor, the sewing speed cannot
0,
so das die Nahgeschwindigkeitsanzeige 8 leuchtet.
f)
will illuminate.
for
A, 8, C and
fur
A, 8, C und D ein.
D.
by
the control box
be
set.
DIP
switch settings;
Reglage
1.
Appuyer sur
2.
Appuyer sur les touches de reglage du nombre de points 8
*
La
vitesse de couture maximale pouvant etre reglee est
teurs
neutre de
* L'affichage de
Ia
touche de vitesse de couture
DIP
du boitier de commande;
Ia
pedale.
Ia
vitesse de couture est efface pendant
0.
Le
temoin de vitesse de couture
pour
Ia
Ia
vitesse de couture minimale est
vitesse maximale determinee par les reglages des interrup-
Ia
couture.
regler les vitesses de couture
* Lorsque le panneau de commande a touches est installe sur le moteur
Ajuste
1.
Presionar
2.
Presionar las teclas de ajuste de numero de puntadas 8 para ajustar
*
La
Ia
caja de controles;
neutral.
*
La
* Cuando se
Ia
tecla de velocidad de costura
velocidad maxima que
exhibici6n de velocidad de costura
ha
instalado
se
Ia
puede ajustar es
velocidad minima de costura es
el
panel de teclas de control en el
0.
El
indicador de velocidad de costura 8 se encendera.
Ia
se
borra durante
velocidad maxima determinada
Ia
velocidad de costura cuando
Ia
costura.
motor
EC,
no podra ajustar
f)
s'allume.
pour
Ia
vitesse de couture correspondant a
EC,
Ia
vitesse de couture ne peut pas etre reglee.
Ia
velocidad de costura para A, 8, C y
por
los ajustes de interruptores
el
pedal esta en
Ia
velocidad de
A, 8, C et
D.
Ia
costura.
D.
Ia
position
Ia
posicion
DIP
de
-16-
Page 21

Example
Beispiel
Exemple
Ejemplo
6:
Setting
6:
Einstellen
6:
Reglage de Ia vitesse de couture de
6:
Ajuste de velocidad de costura de remate
the
backtack sewing speed
der
Riegelnihgeschwindigkeit
points
d'arret
I
•
Setting
1.
Press the sewing speed key 0 twice. The sewing speed indicator 8 and the backtack indicator 8 will both illuminate.
2.
Press the stitch number setting keys 8
* The maximum sewing speed that can be set is the maximum speed determined
the minimum sewing speed is the sewing speed when the treadle is at the neutral position.
* The sewing speed display is cleared during sewing.
* When the key operation panel is installed on the
to
set the backtack sewing speeds
EC
motor, the backtack sewing speed cannot be set.
for
A, 8, C and
by
D.
the control box
DIP
switch settings;
Einstellung .
1.
Drucken Sie die Nahgeschwindigkeitstaste 0 zweimal,
ge e leuchtet.
2.
Stellen Sie
mit
den Stichzahltasten 8 die Riegelnahgeschwindigkeiten
sodas
die Nahgeschwindigkeitsanzeige 8 und die Riegelanzei-
fur
A, 8, C und D ein.
* Die maximale Nahgeschwindigkeit ist durch die DIP-Schaltereinstellung im Schaltkasten festgelegt. Die minimale Nah-
geschwindigkeit ist die Geschwindigkeit, wenn sich das Pedal in
* Wahrend dem Nahen
* Wenn die Bedienungstafel
Reglage
1.
Appuyer deux fois sur
e s'allument tous deux.
d'arret
2.
Appuyer
*
La
teurs
neutre de
sur les touches de reglage du nombre de points 8 pour regler les vitesses de couture
vitesse de couture maximale pouvant etre reglee est
DIP
du boitier de commande;
Ia
pedale.
* L'affichage de
wird
die Nahgeschwindigkeitsanzeige geloscht.
an
dem EC-Motor installiert ist, kann die Riegelnahgeschwindigkeit nicht eingestellt warden.
Ia
touche de vitesse de couture
Ia
vitesse de couture minimale est
Ia
vitesse de couture est efface pendant
Ia
* Lorsque le panneau de commande a touches est installe sur le
ne peut pas
Ajuste
1.
Presionar dos veces
etre reglee.
Ia
tecla de velocidad de costura
0.
El
der
Neutralstellung befindet.
0.
Le
temoin de vitesse de couture 8 et le temoin de point
pour
A,
B, C et
D.
Ia
vitesse maximale determinee par les reglages des interrup-
couture.
indicador de velocidad de costura 8 y
moteur
Ia
vitesse de couture correspondant a
EC,
Ia
vitesse de couture pour les points d'arret
el
indicador de remate
Ia
position
e se encenderan.
2.
Presionar las teclas de ajuste de numero de puntadas 8 para ajustar
*
La
velocidad maxima que se puede ajustar
Ia
caja de controles;
tral.
*
La
exhibici6n de velocidad de costura se borra durante
* Cuando se
puntada de remate.
ha
Ia
velocidad minima de costura
instalado el panel de teclas de control en
es
Ia
velocidad maxima determinada
es
Ia
velocidad de costura cuando
Ia
costura.
el
motor
Ia
velocidad de costura para A,
por
los ajustes de interruptores
el
EC,
no podra programarse
B,
C y
D.
pedal esta en
Ia
velocidad de costura de
Ia
posicion neu-
DIP
de
-17-
Page 22

LIST
Normal Treadle
lock
sewing
Fixed
stitch
sewing
Fixed
stitch
sewing
Name
label
sewing
Pleat
presser
sewing
OF OPERATIONS
Application
Thread
trimming
stitch
pressed
back
Treadle
pressed
back
*4
Treadle
pressed
forward
on
Treadle
pressed
back
Treadle
pressed
back
Backtacking
Start
End
OFF
OFF
ON
OFF
OFF
ON
ON
ON
OFF OFF
OFF
ON
OFF
ON
ON
ON
OFF
OFF
OFF
ON
OFF
ON
ON
ON
OFF OFF
OFF
ON
OFF
OFF
Start
backtack
key
End
backtack
key
OFF
ON
OFF
ON
OFF
ON
OFF
ON
OFF OFF
ON
OFF
ON ON ON
OFF
OFF
OFF
OFF
OFF
ON
ON
OFF
OFF
ON ON
ON
OFF
ON
OFF
ON
OFF
Fixed
stitch
key
OFF
OFF
OFF
OFF
ON
ON
ON
ON
ON
ON
OFF
OFF
OFF
Stitch number
setting
OFF
OFF
OFF
OFF
OFF
OFF
OFF
OFF
OFF
OFF
OFF
OFF
OFF
OFF
ON
*3
F E
0 0
0
0
0 0 0 0
0 0 0
0
0 0 0
0 0
0
0
Thread
trimming A B
key
Continuous
backtack label
key
OFF
OFF
OFF
OFF
OFF OFF
OFF
OFF
OFF
ON
ON
ON
ON
OFF OFF
OFF
OFF
OFF
OFF
OFF
OFF
OFF
OFF OFF
OFF
OFF
OFF OFF
OFF
OFF
OFF
OFF OFF
Name
OFF
OFF
OFF
OFF
OFF
OFF
OFF
OFF
OFF
OFF
ON
ON
key
Pleat
presser
sewing
key
keys
c
0
0 0
0
0 0
0 0 9
0 0
0
0
0 0 0
0 0
0
D
0
0
0
0
0
0
0
0
0
Reference
figure
no.
1
2
3
4
5
6
7
8
10
11
12
13
14
15
Note
*1
*1
*1
*1
*2
Continuous backtack
sewing (automatic
thread trimming after
cycle
completed)
* 1 The number
*2
The number
*3
(0)
indicates that sewing can
*4
For
nos.
5 - 8 in the table above, a regular lock stitch is used until the fixed length seam is sewn and thread trimming
OFF OFF OFF
of
end backtack stitches is set
of
end backtack stitches in each direction is fixed at four.
be
OFF
to
OFF
B and
carried out without
OFF
A.
it
being necessary
ON
OFF
to
make any stitch number settings.
OFF
0 0 0
0
is completed.
*5
If
the actuator is pressed while the correction switch indicator is on, the machine will sew correction stitches. This is
not possible after thread trimming
has
been carried
out
16
-18-
Page 23

Ill
Examples of sewing
No.1 Normal lock stitch No.2 Start backtack
l
l
No.3 End backtack No.4 Start/end backtack
'
Thread trimming activated by reversing treadle. Thread trimming activated after end backtack by reversing treadle.
No.5 Fixed stitch sewing only
I
stitch I
E I
I
I
I
I
I
I
l
Fixed
•
Thread trimming activated by reversing treadle. Thread trimming activated after end backtack by reversing treadle.
Fixed
No.9
stitch and thread No.1 0 Start backtack, fixed stitch
trimming and thread trimming and thread trimming stitch and thread trimming
No.6
Start backtack and fixed No.7 Fixed stitch sewing and end No.8 Start/end backtack and fixed
stitch sewing backtack stitch sewing
AI/
Fixed
I
If
B/1
I
I
v
E l E I
stitch I
I
I
I
I
l
Fixed stitch I
•
No.
11
I
I
~
I
I
I
(C)
/1
I
B/
I(D)
I/
I A
v
•
Fixed stitch, end backtack No.
I
/1
A I
B/
I
I/
I
V
El
Fixed stitch : I
12
Start/end backtack, fixed
I
(C)
I B / I(D)
I/
v
It
lA
•
I
/1
A I
8/
I l
I/
I
v
El
I
I
I
I
I
I
*
Sewing completed through thread trimming by holding treadle depressed.
No.
13
Name label only
---------
it
I
1 E
I I
I I
I - F I
L-------------o~
Thread trimming activated by
reversing treadle.
---------
• • • • • · • Thread trimming (Thread trimming is carried
--
F-
~
II
El
Normal lock stitch sewing
Fixed stitch sewing
No.
14
Name label only,
tack
4 stitches
The
thread is trimmed when the
treadle is depressed after
backtacking. Backtacking is fixed at
4 stitches.
(C,
·~
End
D)
back-
No.15 Pleat presser sewing
end
Thread trimming activated by
reversing treadle.
out
when the treadle is pressed
I
I
E
~ ~
I
{C) A {D)
I
B/
I
I/
I A
II
I
*
I
a
back.)
I
II
Ahttps://manualmachine.com/
No.
16
Continuous backtack
\
i I
E I
I
I
{C)
II
I
B/
I/
V I
',, A ,
B I \ D I
A\
tl
C \
\\
t/
I
\ I
v v
Sewing completed through thread
trimming by holding treadle
pressed.
* · · · · · · Fixed stitch sewing followed by end backtack sewing and thread trimming (Thread trimming is carried
even
if
The Model shown in parentheses is the
the treadle is
not
pressed back.)
EC
motor.
*
{D)
I
I A
*
de-
out
-19-
Page 24

LISTE
Anwendung
Fadenabschneiden
Normales
Nahan
Verriegelungsstich
Feststichnahan
Feststichnahan
Etikettniihen
Faltenna-
hen
Verriegeln (Abschnei-
den
einem Zyklus)
des
mit
*4
Fadens
Pedal
zuruckgedruckt
Pedal
zuruckgedruckt
Pedal
nach
vorne
gedruckt
Pedal
zuruckgedruckt
Pedal
zuruck-
1 gedruckt
nach
VON
Riegel
Anfang
OFF
ON
OFF
ON ON
OFF
ON
OFF
ON
OFF
ON
OFF
ON
OFF
OFF
OFF
OFF
BETRIEBSZUSTANDEN
OFF
OFF
OFF
OFF
ON
ON
ON
ON
ON
ON
OFF
OFF
OFF
Fadenabschneide
Riegelta- Etkett- Falten- A B c
ste
taste
OFF
OFF
OFF
OFF
OFF
OFF
OFF
OFF
ON
ON
ON
ON
OFF OFF
OFF
OFF
OFF
OFF
OFF
OFF
OFF
OFF
OFF
OFF
OFF
OFF
OFF
OFF
OFF
OFF
OFF
ON
En
OFF
OFF
ON
OFF
OFF
ON
ON
OFF
OFF
ON
ON
OFF
ON
OFF
OFF
Anfangsriegelta-
ste
de
OFF OFF
ON
OFF
ON
OFF OFF
ON
OFF
ON ON ON
OFF OFF
ON
OFF
ON
OFF
OFF
OFF
OFF
Endriegeltaste
OFF
ON
ON
OFF
ON ON
OFF
ON
ON
OFF
ON
OFF
OFF OFF
Feststichtaste
nahtaste nahtaste
OFF OFF
OFF
OFF
OFF
OFF
OFF
OFF
OFF
OFF
OFF
OFF
OFF
ON
ON
OFF
OFF
OFF
OFF
OFF
OFF
OFF
OFF
OFF
OFF
OFF
OFF
OFF
OFF
OFF
ON
OFF
Stichzahltasten
*3
F E
0 0
0 0
0 0
0
0
0
0 0
0 0
0
0
0 0
0
0 0 0 0
0 0 0 0
0 0
.0
0 0 0
0
0 0
0 0
0 0 0
D
Abb.
0 4
0
0 6
0 7
0
0
0
0
0
0
10
11
12
13
14
15
16
Be-
Nr.
merkung
1
2
3
5
*1
8
*1
9
*1
*1
*2
* 1 Die Stichzahl
*2
Die Stichzahl
*3
Mit
*4
(0)
Fur Nr. 5 bis 8 in der obenstehenden Tabella
fur
den
End
fur
wird
den
angegeben, daB ohne Einstellung von Stichzahlen genaht werden kann.
riegel ist auf B und A eingestellt
End
riegel ist in heiden Richtungen auf 4 festeingestellt
wird
fur
die Feststichnaht bis zum Abschneiden des Fadens ein Verriege-
lungsstich verwendet.
*5
Falls bei eingeschalteter Korrekturstichtaste die Betatigung gedruckt wird,
dem Fadenabschneiden
konnen keine Korrekturstiche ausgefuhrt warden.
so
warden Korrekturstiche genaht. Nach
-20-
Page 25

Ill
Nahbeispiele
Nr.1 Normaler Verriegelung- Nr.2 Zurucknahen am Anfang
sstich
l
Faden
wird beim Zuruckdrucken des Pedals abgeschnitten.
Nr. 5 Nur
Nahen einer fest-
gesetzten Stichzahl
I
Festgesetzte :
Stichzahl
E I
1
I
I
I
I
~
Faden
wird beim Zuruckdrucken
j
Nr. 6 Zurucknahen am Anfang und
Nahen der festgesetzten
Stichzahl
I
A
B/
I
I
AI/
Festgesetzte
Stichzahl
v
E I
I
I
1
I
I
I
I
l
•
des
Pedals abgeschnitten.
Nr. 3 Zurucknahen am
II
C/1
/
ID
[/
.
Faden
wird am
E I
wird am
Ende
I
1
I
I
(C)
I
I /
v
Ende
B/
/1
abgeschnitten.
Niihen der festgesetzten
Nr. 7
Stichzahl und
amEnde
Festgesetzte J
Stichzahl
Faden
abgeschnitten.
En
de
des Zurucknahens beim Zuruckdrucken
Zuruc;kniihen
(D)
1
lA
Nr.4 Zuruckniihen am Anfang und
En
de
Nr.S Zuruckniihen am Anfang und
Ende und
gesetzten Stichzahl
AI
Festgesetzte I
Stichzahl 1
Niihen der fest-
I
11
B / I l
I/
I
V E I
(C)
I
B/
I/
v •
•
des
Zurucknahens beim Zuruckdrucken des
des
II
I(D)
lA
Pedals
Pedals
Nr.
11
Nr.
9 Festgesetzte Stichzahl und
Fadenabschneiden
*
Durch Drucken des FuBpedals wird der Nahvorgang bis zum Fadenabschneiden ausgefUhrt.
Nr.13 Nur Etikett Nr.14 Nur Etikett, Zurucknahen Nr.15 Faltennahen
Nr.10 Zurucknahen am Anfang,
festgesetzte Stichzahl und
Fadenabschneiden
I
/1
JB/1
At/
V I
E I
I
I
I
I
I
I
*
amEnde
4 Sticha
(C,
D)
Festgesetzte Stichzahl,
Zurucknahen
Fadenabschneiden
j-------------,
!f
: E E I
I I
I I
I - F I
L-------------4
Faden
des
Pedals abgeschnitten.
- - - - - - - - - Feststichnahen
• • • • • • • Fadenabschneiden (Der Faden
* · · · · · · Feststichnahen
Das in Klammern gezeigte
F-
wird beim Zurlickdrucken
Normales Nahan
wenn das Pedal nicht zuruckgedruckt wird.)
~~
Der
Faden
wird abgeschnitten,
wenn das
geln
hen
mit
gefolgt
Modell ist
Pedal
gedruckt wird.
ist auf 4 Stiche festgelegt
Verriegelungsstich
vom
der
"
nach
dem Verrie·
Das
Zurucknii-
wird
bairn Zuruckdrucken des Pedals abgeschnitten.)
Endriegel und Abschneiden des Fadens (Der Faden
EC-Motor.
Faden
wird beim Zuruckdrlicken
des
Pedals abgeschnitten.
i
a
am
Ende und
12
Zuruckniihen am Anfang
Nr.
und Ende, festgesetzte
Stichzahl und Fadenabs-
chneiden
:
AI/
V I
B/1
1
E I
I
I
(C)
I
I/
V I
B/
II
I
lA
I
(D)
*
Nr.16 Kontinuierliches
nahen
\
"'
1
\'
a
\ I \ I
A\fiC\ff
\/
v v
Durch Drucken des FuBpedals
wird der Niihvorgang bis zum
Fadenabschneiden ausgefuhrt.
wird
abgeschnitten, auch
\
\\I
Dl
Zuruck-
*
,
-21-
Page 26

LISTE DES OPERATIONS
Application
Coupe
des fils
Pedale
a
Couture
point
normal
Couture
points
longueur
fixe
Couture
points a
longueur
fixe I' avant
Couture
d'etiquette
d'identite
Couture
presse
plis
Couture
d'arret continus
(coupe
matique
cycle
noue
de
a
*4
de
de
de
de
points
des fils auto-
une
termine)
enfoncee
vers
l'arriere
Pedale
enfoncee
vers
l'arriere
Pedale
enfoncee
vers
Pedale
enfoncee
vers
l'arriere
Pedale
enfoncee
vers
l'arriere
fois
Point d'arret
Debut
OFF
ON
OFF
ON
OFF
ON
OFF
ON ON ON
OFF
ON
OFF
ON
OFF
OFF
OFF
OFF
le
Touche
de
point
d'arret
en
debut
de
cou-
ture
Fin
ON
ON
ON
ON
ON
ON
OFF
OFF
ON
OFF
ON ON
OFF OFF
ON
OFF
OFF
ON
OFF
ON ON
OFF
OFF
OFF OFF
OFF
OFF
OFF
OFF
OFF
OFF
OFF
OFF OFF
Touche
de
d'arret
en
couture fixe continus
Touche Touche
point
de
point
a lon-
fin
de
gueur
OFF
OFF
ON
OFF
ON
ON
OFF
OFF
ON
OFF OFF
ON
OFF OFF
OFF
OFF
OFF
OFF
ON
ON
ON
ON
ON
ON
ON
ON
OFF
OFF
Touche
de
coupe
des
de
points
d'arret
fils
OFF
OFF
OFF
OFF
OFF OFF
OFF
OFF
OFF
ON
ON
ON
ON
OFF
OFF OFF
OFF
OFF
OFF
OFF
OFF
OFF
OFF
OFF
OFF
OFF
OFF
OFF
OFF
OFF
OFF OFF
ON
Touche Touche
d'etiquette ture
d'identits
de
cou- lustra-
de
presse
de
plis
OFF
OFF
OFF
OFF OFF
OFF OFF
OFF OFF
OFF
OFF
OFF
OFF
OFF
OFF
ON
ON
OFF
OFF
OFF
OFF
OFF
OFF
OFF
OFF
OFF
OFF
OFF
OFF
ON
OFF
Touches
reglage
nombre
points
*3
A B c
F
0
0
0 0 0
0 0 0
du
de
de
0
0
D
E
0 3
0
0 5
0
No.
tion
referenee
0 0 0 0 7
0
0 0 0
0
0
0 0 0
0
0
0
0
0
0
0
0 0 0
0
0 0 0
0 0 0
0 0 0
0 0 0
1
2
4
6
8
9
10
11
12
13
14
15
16
d'il-
de
Remarque
*1
*1
*1
*1
*2
*1
Le
nombre de points d'arret
*2
Le
nombre de points d'arret
*3
(0)
indique que
Ia
couture peut etre executee sans qu'il soit necessaire d'effectuer aucun reglage du nombre de
en
fin de couture est fixe sur
en
fin de couture dans chaque direction est fixe a quatre.
Bet
A.
points.
*4
Pour les
gueur fixe
*5
Si
tion. Ceci
Nos.
5-8
du tableau ci-dessus, un point noue normal est utilise jusqu'a
so
it
executee et que les fils soient coupes.
on appuie sur l'actuateur pendant que l'indicateur de correction est allume,
n'
est pas possible a pres que les fils
ont
ete coupes.
ce
que
Ia
couture
Ia
machine coudra les points de correc-
de
points a lon-
-22-
Page 27

Ill
Exemples de coutures
N°1
Points noues normaux
l
~
Appuyer sur l'arriere de
N°5 Couture
Points
reglable 1
de
bra
en
points
reglable seulement
nombre 1 l
E I
~
I
I
I
I
I
I
N°2 Points d'arret
Ia
pedale pour couper
en
nom-
N°6 Points d'arret
Points
reglable
en
couture ture couture
I
B/1
AI/
debut de N°3 Points d'arret
v
I
'
Les
les
fils.
I
IB/1
V E I
nombre :
en
11
1 l
I
I
I
I
couture et couture
en
nombre reglable
AI/
en
•
debut de
de
points
fils sont coupes apres
couture,
N°7 Couture de points
Points
reglable I
en
reglable et points d'arret
fin de couture
en
nombre~
en
fin de cou- N°4 Points d'arret
A I
c/1
/
lo
/
•
Ia
appuyant sur l'arriere de
I
El
I
I
(C)
8
/
I
I/
v •
realisation des points d'arret
en
nombre
en
II
(D)
I
I A
:
AI
v
Ia
pedaJe.
N°8 Points d'arret
couture et couture de points
en
nombre reglable
A:
Points
en
reglable I
nombre l
en
debut/fin de
B//
/
/1
c/
/
/ .
en
debut/fin de
I
11
~/
~
V
El
(C)
I B / I(D)
I/
v •
I
ID
en
11
I
fin de
l
I A
Appuyer sur l'arriere de
N°9 Points
N°13 Etiquette d'identite un-
en
et coupages
iquement
nombre reglable
----------
!t
: E E l
I I
I I
...
I - F 1
F-
_____________
des
La
Ia
pedale pour couper las fils.
fils
couture
se
-
.,
'I
,.
N°10
Points d'arret
couture, points
reglable et coupage des fils
AI
I
I/
V
B/
El
en
debut de
en
nombre
II
I l
I
I
I
I
I
I
I
*
termine par le coupage de fils
N°14 Etiquette d'identite
ment, Points d'arret
de couture
4 points
(C,
unique-
0)
"'
Les
fils sont coupes apres
couture,
N°11
Points
points d'arret
ture et coupage des fils
en
appuyant et maintenant
en
N°15 Couture de fronces
fin
[
en
appuyant sur l'arriere de
en
nombre reglable,
i
Ia
en
fin de cou-
en
position enfoncee
a
ElJ~~
J
Ejj~~
realisation des points d'arret
Ia
pedale.
N°12 Points d'arret
de couture, points
bra reglable, coupage des
fils
A!
~/:
V I
Ia
pedale.
N°16 Couture continue
d'arret
',,
\
A\
tl C \
\ I
\ I \ I
v v
en
E I
l
(C)
I
B/
I/
V I
1\
B I \ D I
!'
\\
en
debut/fin
en
11
1(0)
I A
*
en
*
,
I
fin de
nom-
I
points
Les
fils sont coupes lorsqu'on ap-
Appuyer sur l'arriere de
pedale pour couper
- - - - - - - - - Couture de points a longueur fixe
• • · • • • • Coupe des fils (Les fils sont coupes lorsqu'on appuie sur
les
fils.
Couture a point noue normal
puie sur
Ia
points d'arret
ete
a 4 points.
* · · · · · · Couture de points a longueur fixe suivie par
des
Le
modele montre entre parentheses est le moteur
fils (Les fils sont coupes meme si on n'appuie pas sur
Ia
cousus.
pedale apres que
en
fin de couture ont
Le
point d'arret est fixe
les
Appuyer sur l'arriere de
pour couper les fils.
Ia
couture de points
EC.
_
_
23
Ia
pedale vers l'arriere.)
Ia
pedale vers l'arriere.)
La
Ia
pedale
d'arnlt
en fin de couture puis par
couture
page de fils
tenant
pedale.
se
termine par
en
appuyant et main-
en
position enfoncee
le
Ia
coupe
cou-
Ia
Page 28

LISTA DE OPERACIONES
Aplicaci6n
Corte
hllo
de
de
*4
de
de
de
de
de
completer
Pedal
pisado
hacia
atras
Pedal
pisado
hacia
atras
Pedal
pisado
hacia
adelante
Pedal
pisado
hacia
atras
Pedal
pisado
hacia
atras
remate
hilo des-
Costura
pespunte
normal
Costura
puntadas
fijas
Costura
puntadas
fijas
Costura de
etiquetas
Costura
plisados
Costura
continuo (corte auto-
matico
pues
ciclo)
Remate
de
Comienzo
OFF
ON
OFF
ON
OFF
ON
OFF
ON
OFF
ON
OFF
ON
OFF
OFF
OFF OFF OFF
OFF OFF OFF OFF
el
Tecla
rem
por atras por atras
inicial
Final
OFF
OFF
OFF
OFF
OFF
OFF
OFF
OFF
ON
ON
OFF
ON
ON
ON
ON
ON ON
ON
ON
OFF OFF
ON
OFF
ON
OFF OFF
ON
OFF
OFF OFF
OFF
ate
de
Tecla
de
rem
ate
final
OFF
OFF
ON
ON
OFF
ON ON
ON
OFF
ON
ON
ON
OFF
Tecla
de
puntadas
fijas hilo continuo
OFF
OFF
OFF
OFF
ON
ON
ON
ON
ON
ON
ON
OFF
OFF
OFF
OFF
Tecla
de
de
corte
OFF
OFF
OFF
OFF OFF
OFF
OFF
OFF
OFF
ON
ON
ON
ON
OFF
OFF
OFF OFF
OFF
Tecla
rem
OFF
OFF
OFF
OFF
OFF
OFF
OFF
OFF
OFF
OFF
OFF
OFF
OFF
ON
ate
de
Tecla
etiquetas
de
Tecla
plisados
OFF
OFF
OFF
OFF
OFF OFF
OFF
OFF OFF
OFF
OFF
OFF
OFF
OFF
ON
ON
OFF
OFF
OFF
OFF
OFF
OFF
OFF
OFF
OFF
OFF
OFF
OFF
OFF
OFF
ON
OFF
Teclas
te de numero
de
*3
de
A B c
0 0
0 0 0
0 0 0
0 0 0
0
0 0
0 0 0
0 0 0
0 0 0
0 0 0
0
de
ajus-
puntadas
F E
0
0 0 5
0 0 8
0
0
0 0
0
0 0
0
0
0
0
0
0
0
0
0
0
0
D
No.
figura
de
refe-
rencia
3
4
6
7
9
10
11
12
13
14
15
16
de
Nota
1
2
*1
*1
*1
*1
*2
* 1
El
numero de puntadas de remate
*2
El
numero de puntadas de remate
*3
(0)
*4
indica que
Para
los numeros 5 - 8 en
Ia
costura
se
el
por
atras final se a justa a B y
por
atras final en una o ambas direcciones
puede realizar sin que
sea
necesario tener que ajustar el numero de puntadas.
A.
se
cuadro de arriba, se usa un pespunte normal hasta coser puntadas de largo fijo y cortar el
hilo.
*5
Si
el actuador se presiona mientras el indicador de interrupter de correcci6n esta encendido,
tadas de correcci6n. Esto no
sera posible de realizar despues que
se
haya cortado
ajusta a cuatro.
el
hilo.
Ia
maquina cosera pun-
-24-
Page 29

Ill Ejemplos de costura
N° 1 Pe!;punte normal
'
Cortahilos activado por
el
pedal
en
N°2 Rematado por atras inicial
l
Ia
posici6n de amrcha atras
N°3 Rematado por atras final
Cortahflos activado
posici6n de marcha atras
luego del rematado por atras final, con
N°4
Rematado por atras inicial/
final
el
pedal
en
Ia
S61o
N°5
puntadas fijas
Puntadas:
fijas
e,
I
1
I
I
I
I
l
•
Cortahflos activado por
N°9
Puntadas fijas y cortahflos
I
E
~
l
I
I
I
I
*
el
N°6 Rematado por atras inicial y
puntadas fijas
I
AI
8/
1/
v
Puntadas l
fijas
pedal
en
Ia
posici6n de marcha atras
N°10 Rematado
puntadas fijas,
I
I
AI/
V I
Se
completa
A
I
I
El
l
1
I
I
I
•
por:
atras inicial,
cortahflos
11
8/
I
I
El
I
I
I
I
I
*
Ia
costura cuando
Puntadas fijas y rematado
N°7
por
atras final
Puntadas;
I
1
El
I Puntadas 1
I
(C)
11
8
I
I
/
I/
1A
v
(D)
N°8 Rematado por atras inicial/
final
y puntadas fijas·
I
II
I
8/
AI/
V E I
fijas 1
•
Cortahflos activado luego del rematado por atras final, con
posici6n de marcha atras
N°
11
Puntadas fijas, y rematado
por atras,
cortahilos
I
E i l
!
(C)
A
I
8/
I(D)
I/
lA
V I
*
se
corta el hilo pisando el pedal
N°12 Rematado por atras inicial/
final, puntadas fijas, cortahrlos
I
I fijas
I l
(C)
J1
I
8/
I(D)
I/
I A
v
•
el
pedal
en
Ia
N°13
S61o
etiqueta
N°
14
S61o
por
etiqueta, Rematado
atras final
4 puntadas
(C,
D)
N°
15
Costura de plisados
l
a
,-------- - '
:t
: E E I
I I
I I
I I
I - F 1
L----------
Cortahllos activado por
en
Ia
posici6n de marcha atras
- - - - - - - - - Costura de puntadas fijas
• • • • • • · Corte del hilo
* · · · · · · Costura de puntadas fijas seguidas de costura de remate
El
modelo entre parentesis corresponds al
F-
II
---41
El
el
pedal
Costura de puntadas
aliza incluso sin pisar el
hilo
despues del remate por atras final.
remate
de
(EI
corte del hilo se realiza
"
se
corta cuando
se
ajusta a 4 puntadas.
pespunte normal
pedal hacia atras.)
se
pisa el pedal
motor
Cortahllos activado por
El
Ia
posici6n de marcha atras
al
pisar el pedal hacia atras.)
por
EC.
-25-
atras final y corte
el
pedal en
16
Rematado por atras con-
N°
tinuo
1\
\\
81\
A\
1/
c\
\ I
\\
v v
Se
completa
corta
de
hilo
Ia
el
hilo pisando
(EI
corte del hilo
costura cuando
* \
,
Dl
1/
I
el
pedal
se
se
re-
 Loading...