

Page 1
mzm~e,ij~
INSTRUCTION MANUAL
DH4-B980, 8981
'·"
',
~
c:OJmaBJUI~~A,
c:
OJmaB.iji§l~,
c1J'5,
®~~ c ~
~~~L:fi@Jf.I"'Fc~\o
ll:
9 ~ ll:Jm
b W
tt
~i.IPJT
ll:,
fi~
lJ
-r:
< tt.c
~\a
--:>------1
~------------------~
5.)(
AON~mJO)~J!
[C::~i\]
8981
l:i:O)flfjg1Jt3ij ~ 8:"ttl\lo
1-1
g;g~l±1lra,<
1.
;1.
A
J±~~ffl
iTo
2.
~m-1JrQ1':~-?
3.
-:::>ih-8~r'f~To
1-2
~~1±1lf§;<
1.
::I-;~7f)~Mt:iTo
matr:
..
2.
-:>
i
h.
iK'JJvO)!lSKb't«l:t
3.
-:::>
i h-tl
4.
-:>
~
h-8
s.
::1
·:~ 7 f)~
iK'JJvl~~b'.A~
6.
-:>
i
h.f)~~~t1JrQ1~:illl
7.
-:::>ich&~r,fi-to
_.:
.....
-.
g-~~a
v
~
.:z.
v-
9 Q(J)-:> i
/j.f)~
.
<
~
illi
L0.3Mpa~:~b1ti
g-~~a
iili\,\Eilm~0)8:8:~9o
tl
t:O
~
~En1JrQ1
..
mtttJ'""FtJ'~*t"
t:O~f$i)
~~I~
...I:Jf,
1m~
iTo
..
m!t1Jt..t1J'~8:9o
':
~
~
i)
i-to
o
i-to
JX~~t1JitiH:
L0.3Mpa':~:b-tti
illi
LiTo
~I~
..t'f
To
To
·/
Page 2
3.
:;;~."At:.
I
\:.r~-C1)1J'dJ.8btt~m
IN0$"1-LJJJ
· -?i)j.tlt:O:a-$ocVJ,
IN
b i'il:t15
.
I\/?-
:a-~
/9~:~
J&l'J{;j£tiTo
/\/?-8~~'?~Li"to
L*
-c'
"'? i
)j.;b
t:O:a-frffci)
-c
J\::.r~-~l:timl~~:i~?~c~"-1'':/
1.
/\
/7-
:a-3lEJf'J:J}J ~ -tt
2 .
.1-
AfiJFiJ~Js.J-~:1t
< i
_1.
A
UdF
-c:-1\
/7-(J){~.IE,
i'IJ
-cas<
~1ttt
iT
c.>C;(JJ)1J'Ji'f->9<~o
0
iJ~)j.-g..t.J-tt~~~t~
•
~iEicti~
•
1\':/'l-lctJib
4.1
·f/7
3fhzzzzzzJ
Ll\/?-:a-,~1A
2.
4.2
0 X X X
l.J\/?-:a-J~1A
2.
1.
~iJn.A
2.
1-'~f'J:;
3.
12345678
~~~~~~~~
OFF
71
~9 o
'?
Ji
Li-to
{IJli';( 'J)
lSmmOJFclic!li:~:Q~c{!JiEc~~-g
.>(:AifB1J'=m~tel~tmt.t991~::>t,
*111
EI
(/)~""A
.>(
:Afgj1J'~
*IH
Et
(!)~""\'A
,i
-c:wu
"*'
·;~
'?
1
·;t
Jv
7°A
7 .-f
<
1
..
;-
-r
~w
t
fffl
1
·;~
'Y
"7~1
~cJSflt,
(7J1J)
1
J
-c:
.~-A fYFtJ~t~
::>l,
\tel\
(7J1J)
IJ
-c:
7-
o
'?
i
t t i To
7-(J)2ilttW
'Y
7 No.2 J
OFF
ON
\(teet,
t:'i~h.,
::J~-o.>~IE
t:'i~h.,
A
IMFtJ~:tS.J--ei~"
;-
o
'?~xi
\o
o
\tel
\::J~-o.>~IE
191Ji:LiTo
x
.o
1
-r:wu
'? 1 ;-
o
191Ji:LiTo
\
-t
t:~xt:
~
To
\/~-b't!b''J
25ms
50ms
"t'l.
\:QIIijfm
.o
·
.>C;(~~m9:Qc~fctJ\':/~-I;:Mt,\1t.>C;(!li1J'~t:lJ;t:Q~c
tgg
0
Sic
lJ
-c
< n:c!t,
•
,c;(~fN09f.9ouli:.>C;(0
~l,
\C::
C
~fil~
lJ
-c
1.
~N'Jtl
2.
*'fLv\7-A:a-.J..A.A
t:8:a-
~
Ji:LiTo
3.
3.;(
A c
I\/?-
\o
c.>CAA
( n:c!l,
.0
\o
cVJ
7-
At
~
·;~;'\8t:~L~-c~N'Jtlt:-r:·~
(!)7}\h.ilb-tt~~:a-
1&
~'~
J(fJOJmJr;:-g~rdJn'
'?
9~
LiTo
LiT
0
Page 3

DH4-B980, 8981
Please read this manual before making any adjustments.
Please keep this manual within easy reach for quick reference.
•When replacing the cutting
to
3.
block. (Refer
and 4.)
block
with a new one, be sure
to
adjust the contact between the knife and the cutting
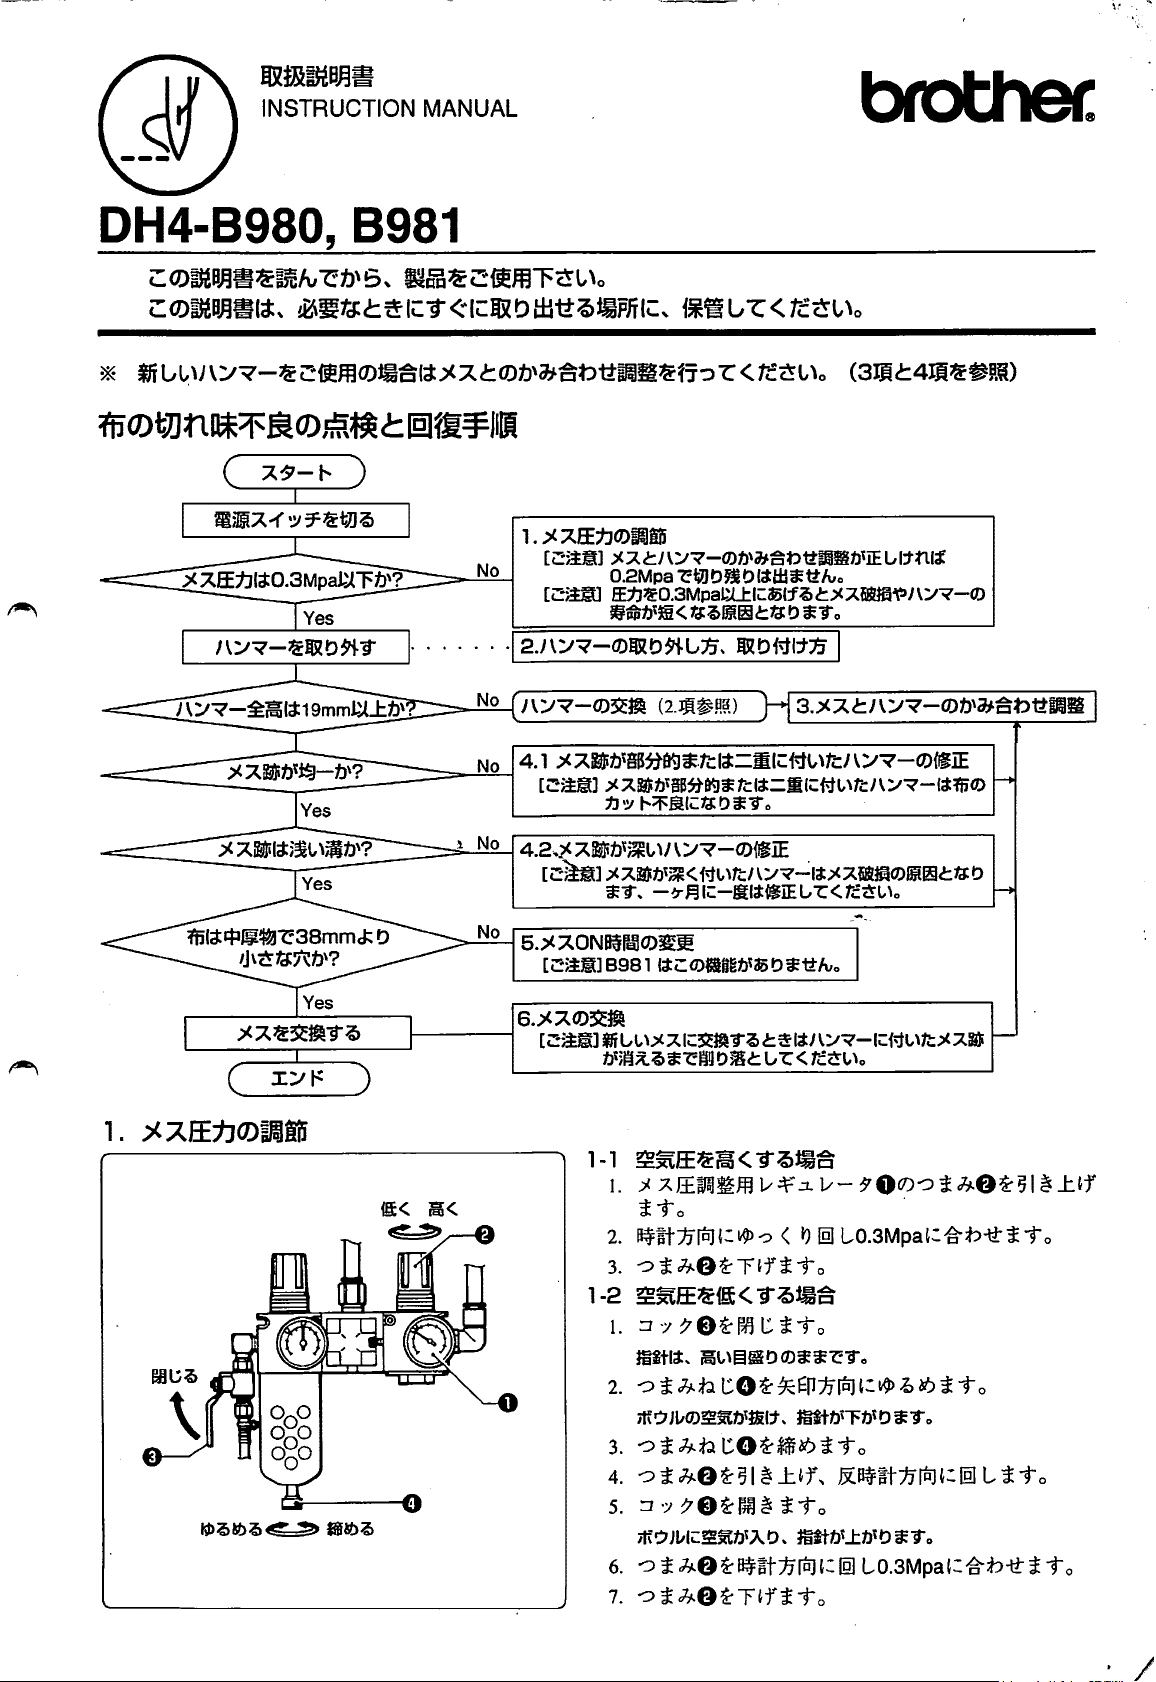
Poor buttonhole cutting correction flowchart
Turn off the power.
1. Adjusting the cutting pressure
No the knife pressure adjustment regulator is set to
~-....:....:~
-=>.....;....;..;;-t
No the knife incision breaks
-====---~~~~~~~!!!!.r__~::::::=---:l
~::::::---=N~o=----~4.2
------=.::...:.::.:.:::::..:.:..:==::.:.:.:::;;:.:;..:.-
Note: The knife should be able to cut sufficiently if the air pressure for
Note: If the cutting pressure is increased to more than 0.3 Mpa, it will
cause the cutting block to become worn
damaged.
·12.
Removing and installing the cutting block I
Replacing the cutting block
(Refer to 2.)
4.1
Filing the cutting surface of the cutting block on which
Note: If the knife incision breaks off on the cutting block
or
is shifted, poor buttonhole cutting in the material
will be the result.
Filing the cutting surface
knife incision
If the knife incision in the cutting block is deep, it
Note:
'
--....
will damage the knife.
is
deep
3.
Adjusting
the knife and the cutting block
off
or
is
shifted
of
the cutting block in which
0.2 Mpa.
or
the knife to become
the
contact
between
Replace the knife
1. Adjusting the air pressure
To decrease To increase regulator
To loosen
~To
tighten
5.
Changing the knife operation time
~---;
for
the knife pressure
Note: The 8981 does not have this function.
6.
Replacing the knife
Note: When replacing the knife with a new one, file the
surface of the cutting block smooth and until the
knife does not leave a mark
1-1. To increase the air pressure
1-2. To decrease the air pressure
on
the cutting block.
1. Lift the knob
f)
of the knife pressure adjustment
0.
2.
Gently turn the knob
0.3Mpa.
3. Push down the knob
1. Close the cock E).
The needle will remain at the high-pressure position.
2. Turn the knob screw 0 in the direction of the arrow in
the
illustration to loosen it.
The air
will
escape from the reservoir and the needle
3.
Tighten the knob screw
4. Lift the knob 8 and turn it counterclockwise.
5.
Open the cock
Air
will enter the reservoir and the needle
6.
Gently turn the knob
0.3Mpa.
7.
Push down the knob
8.
f)
and set the air pressure to
f).
0.
will
move.
f)
and set the air pressure to
f).
will
drop.
.
I
Page 4

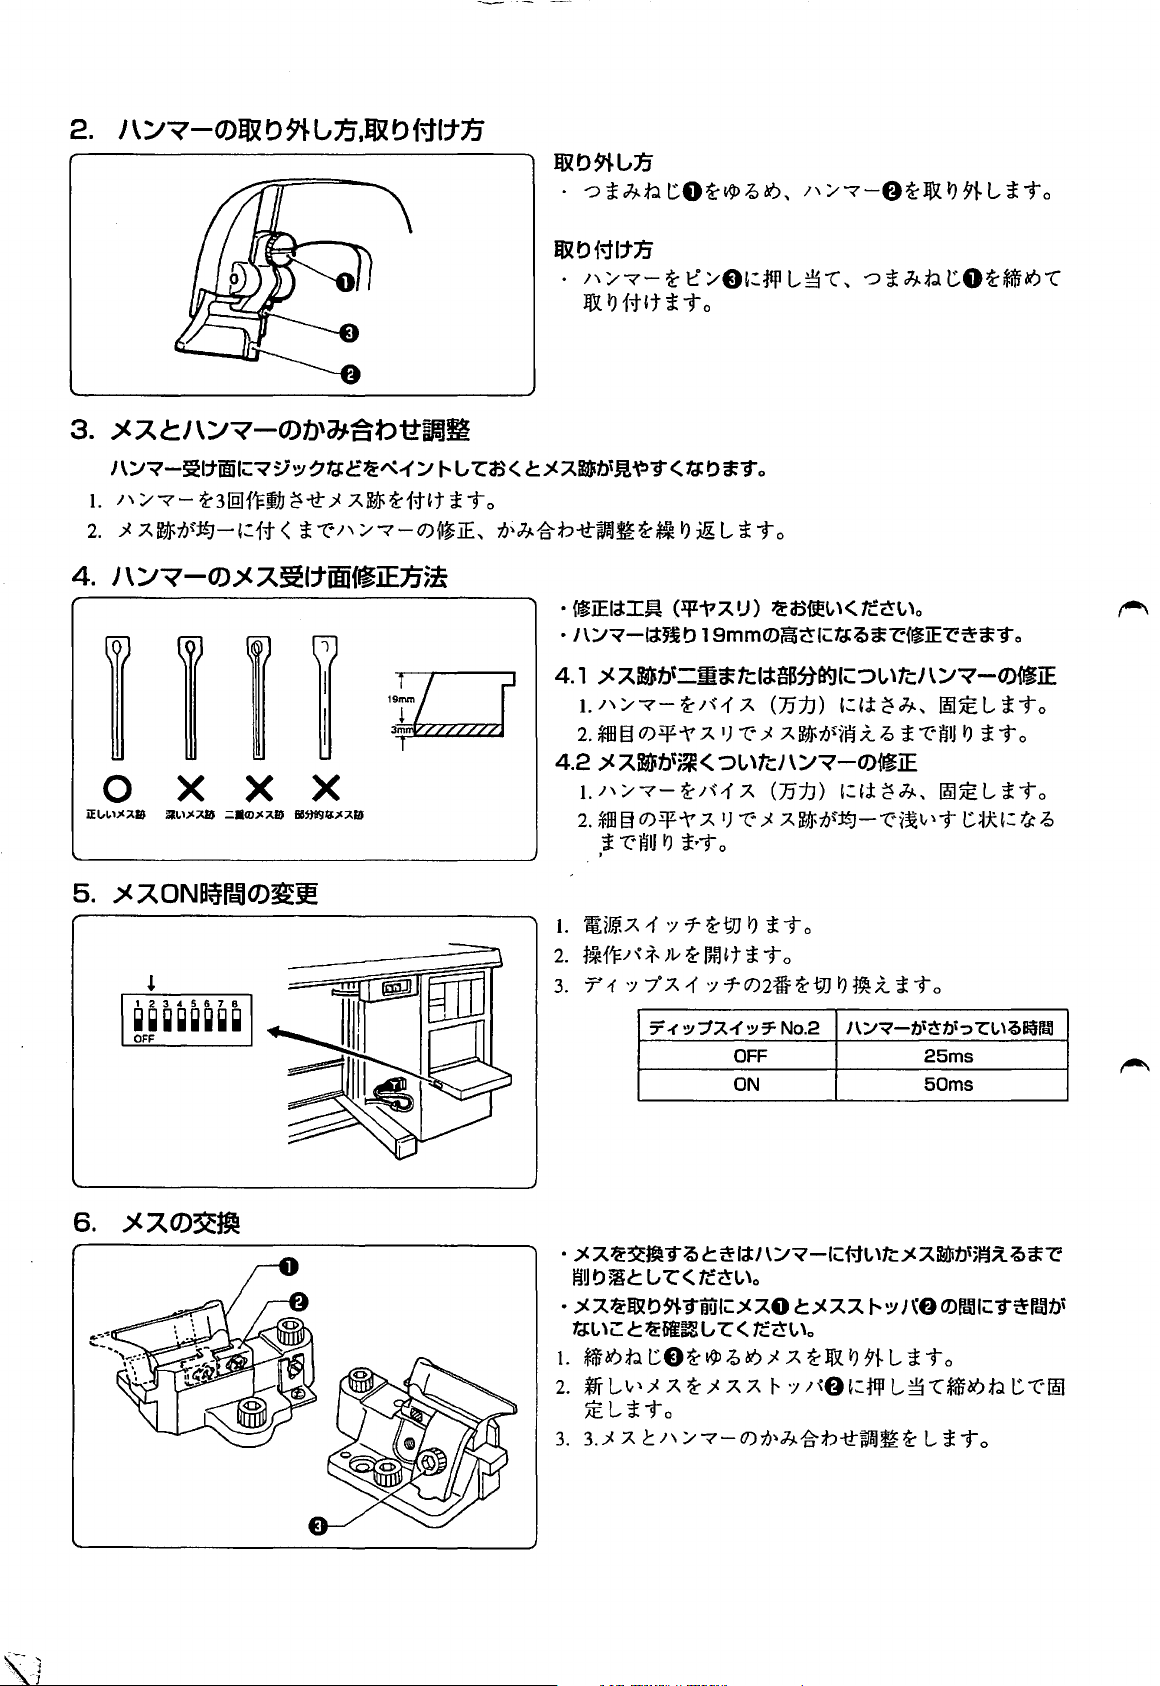
2.Removing and installing the cutting block
Removing the cutting block
Loosen the screw
0,
and then remove the cutting block
8.
Installing the cutting block
Press the cutting block against the pin
thescrewO.
3.
Adjusting the contact between the knife and the cutting block
To see the knife incision more easily, color the cutting surface
1.
Operate the cutting block three times with the knife making a mark on it each time.
2.
Adjust the position of the cutting block or contact between the knife and the cutting block until the knife consistently
makes a mark
4.
Filing the cutting surface
0
Knife Knife Two Partial
incision incision is knife knife
is correct too deep inc:isions incision
X
in
the same place.
1
X
X
of
the cutting block
1~
3~
• Use a flat file
•The
4.1
1.
2.
4.2 Filing the cutting surface of the cutting block in which
1.
2.
of
the cutting block with a marker pen.
for
filing.
cutting block can be filed until
Filing the cutting surface of the cutting block on which
the knife incision breaks off or is shifted
Grip the cutting block in a vise.
File the surface of the cutting block smoothly until the
knife incision is erased away.
incisior is deep
knife
Grip the cutting block
File the surface of the cutting block smoothly until a
_
...
:s{ngle
knife incision can still be seen faintly.
in
a vise.
its
8,
height
and tighten
is
19 mm.
5.
Changing the knife operation time
12345678
~~~~~~~~
OFF
&.Replacing the knife
1. Turn off the power switch.
Open the operation panel.
2.
3.
Set DIP switch No.2 to ON.
DIP switch No.2 Cutting block on time
OFF 25ms
ON
•When replacing the knife with a new one, file the surface
the cutting block until smooth and until the knife does
leave a mark on the cutting block.
•
Before replacing the knife, be sure
gap between the knife
1.
Loosen the screw
2.
Insert the new knife 0 into the knife stopper
then tiguten it with the screw
3.
3.
Adjusting the contact between the knife and the cutting
block.
0 and the knife stopper
8,
and then remove the knife
to
8 .
SOms
check that there
8.
8,
is
0.
of
not
no
and
brother.
BROTHER INDUSTRIES,LTD. NAGOYA,JAPAN
118-980, 981
591980-251
1997
.ll.
H
CD
 Loading...