

Page 1

Wireless Setup Instructions for Windows
Connecting the Brother machine to the
wireless network
Configure the wireless settings (Typical
Wireless Setup in infrastructure mode)
1. On your machine, press Menu. Press ▲ or
▼ to choose Network and press OK.
Press ▲ or ▼ to choose WLAN and press OK.
Press ▲ or ▼ to choose Setup Wizard and
press OK.
When Network I/F switched to Wireless is
displayed, press OK to accept.
This will start the wireless setup wizard.
To cancel, press Clear/Back.
2. The machine will search for available SSIDs.
If a list of SSIDs is displayed, use the ▲ or ▼
keys to choose the SSID you wrote down, then
press OK. Go to Step 6.
Note: It will take several seconds to display a
list of available SSIDs.
If your access point is set to not broadcast the
SSID you will have to manually add the SSID
name. Go to Step 3.
3. Press ▲ or ▼ to choose <New SSID> and
press OK. Go to Step 4.
4. Enter the SSID you wrote down in step 16 on
page 30 using the dial pad to choose each letter
or number. You can use the d and c keys to
move the cursor left and right. For example, to
enter the letter a, press the 2 key on the dial pad
once. To enter the number 3, press the 3 key on
the dial pad seven times.
The letters appear in this order: lower case,
upper case and then numbers.
(For more information, see Entering Text for
Wireless Settings on page 46.)
Press OK when you have entered all the
characters.
5. Press ▲ or ▼to choose Infrastructure, then
press OK.
6. Use the a, b and OK keys to choose one of
the options below: If your network is configured
for Authentication and Encryption you must
match the settings used for your network.
No Authentication or Encryption:
Choose Open System, press OK then
choose None for Encryption Type and press
7. Choose the appropriate key number and
press OK. Enter the WEP key you wrote down in
step 16 on page 30 using the dial pad to choose
each letter or number.
You can use the ◄ and ► keys to move the
cursor left and right. For example, to enter the
letter a, press the 2 key on the dial pad once. To
enter the number 3, press the 3 key on the dial
pad seven times.
The letters appear in this order: lower case,
upper case and then numbers.
Press OK when you have entered all the
characters, then press 1 for Yes to apply your
settings. Go to Step 9.
8. Press ▲ or ▼ to choose TKIP or AES for
Encryption Type and press OK. Enter the
WPA/WPA2-PSK password you wrote down
using the dial pad to choose each letter or
number.
You can use the ◄ and ► keys to move the
cursor left and right. For example, to enter the
letter a, press the 2 key on the dial pad once. To
enter the number 3, press the 3 key on the dial
pad seven times.
The letters appear in this order: lower case,
upper case and then numbers.
Press OK when you have entered all the
characters, then press 1 for Yes to apply your
settings. Go to Step 9.
9. Your machine will now try to connect to your
wireless network using the information you have
entered. If successful, “Connected” will appear
briefly on the LCD.
If your machine does not successfully connect to
your network, verify your network settings
OK. Then press 1 for Yes to apply your
settings. Go to Step 9.
No Authentication with WEP Encryption:
Choose Open System, press OK then use
the ▲ or ▼ to choose WEP for the
Encryption Type and press OK.
Go to Step 7.
Authentication with WEP Encryption:
Choose Shared Key and press OK.
Go to Step 7.
Authentication with WPA/WPA2-PSK
(TKIP or AES) Encryption:
Choose WPA/WPA2-PSK and press OK.
Go to Step 8.
1
© 1995 - 2010 Brother International Corporation
www.brother-usa.com
Page 2
Wireless Setup Instructions for Windows
collected, then repeat Steps 1 to 8 to make sure
you have entered the correct information.
If your access point does not have DHCP
enabled you will need to manually configure the
IP address, subnet mask and gateway of the
machine to suit your network. See the Network
User’s Guide for details.
Wireless setup is now complete. A four level
indicator at the top of your machine’s LCD will
show the wireless signal strength of your access
point or router.
To install MFL-Pro Suite, continue
Before you install MFL-Pro SuiteaMake sure that
your computer is ON and you are logged on with
Administrator rights.
Important
Before installation, if you are using personal
firewall software (other than Windows® Firewall),
anti-spyware or antivirus applications,
temporarily disable them.
If there are any programs running, close
them.
Make sure there are no memory cards or a
USB Flash memory drive inserted.
The screens may differ depending on the
operating system.
The supplied CD-ROM includes ScanSoft™
PaperPort™ 11SE. This software supports
Windows® 2000 (SP4 or greater), XP (SP2
or greater), XP Professional x64 Edition and
Windows Vista®. Update to the latest
Windows® Service Pack before installing
MFL-Pro Suite.
Install MFL-Pro Suite for Windows
1. Put the supplied CD-ROM into your CD-ROM
drive. If the model name screen appears,
choose your machine. If the language screen
appears, choose your language.
Note: If the Brother screen does not appear
automatically, go to My Computer (Computer),
double-click the CD-ROM icon, and then doubleclick start.exe.
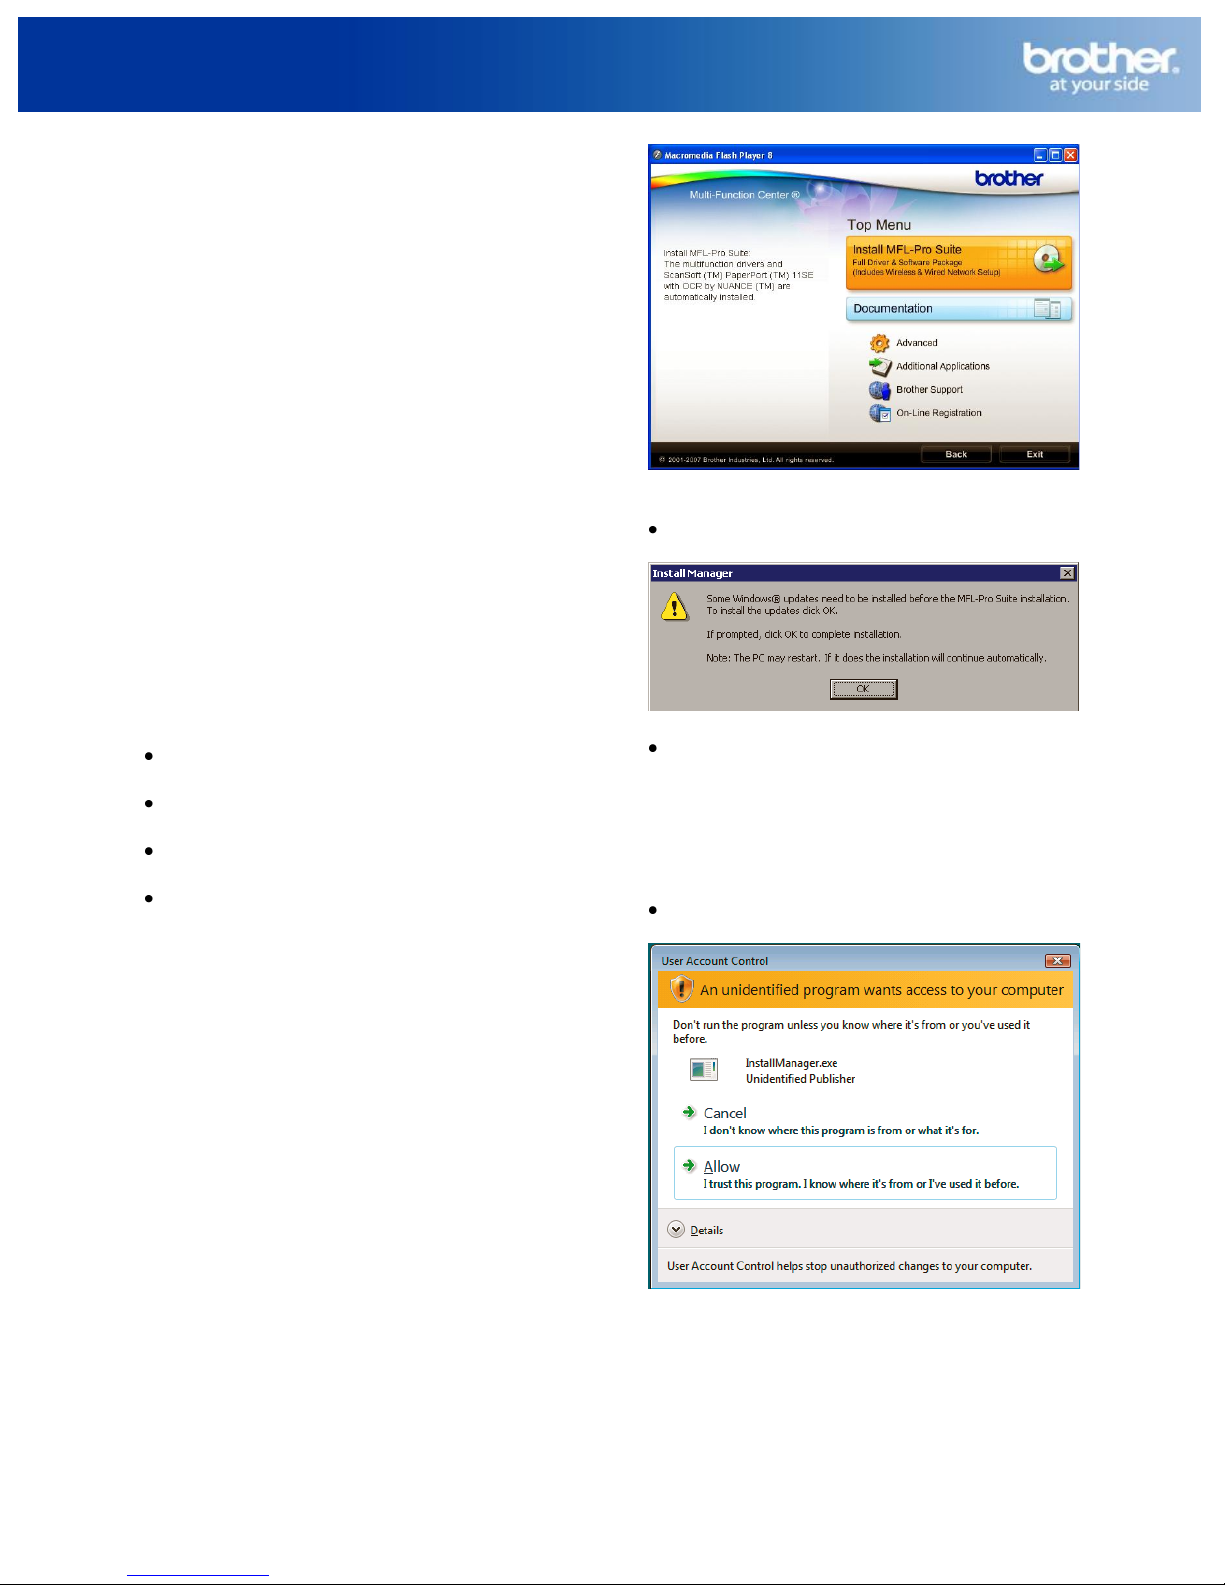
2. The CD-ROM main menu will appear. Click
InstallMFL-ProSuite.
Note
If this screen appears, click OK and restart
your computer.
If the installation does not continue
automatically, open the main menu again by
ejecting and then reinserting the CD-ROM or
double-click the start.exe program from the
root folder, and continue from b to install
MFL Pro Suite.
For Windows Vista®, when the User
Account Control screen appears, click Allow.
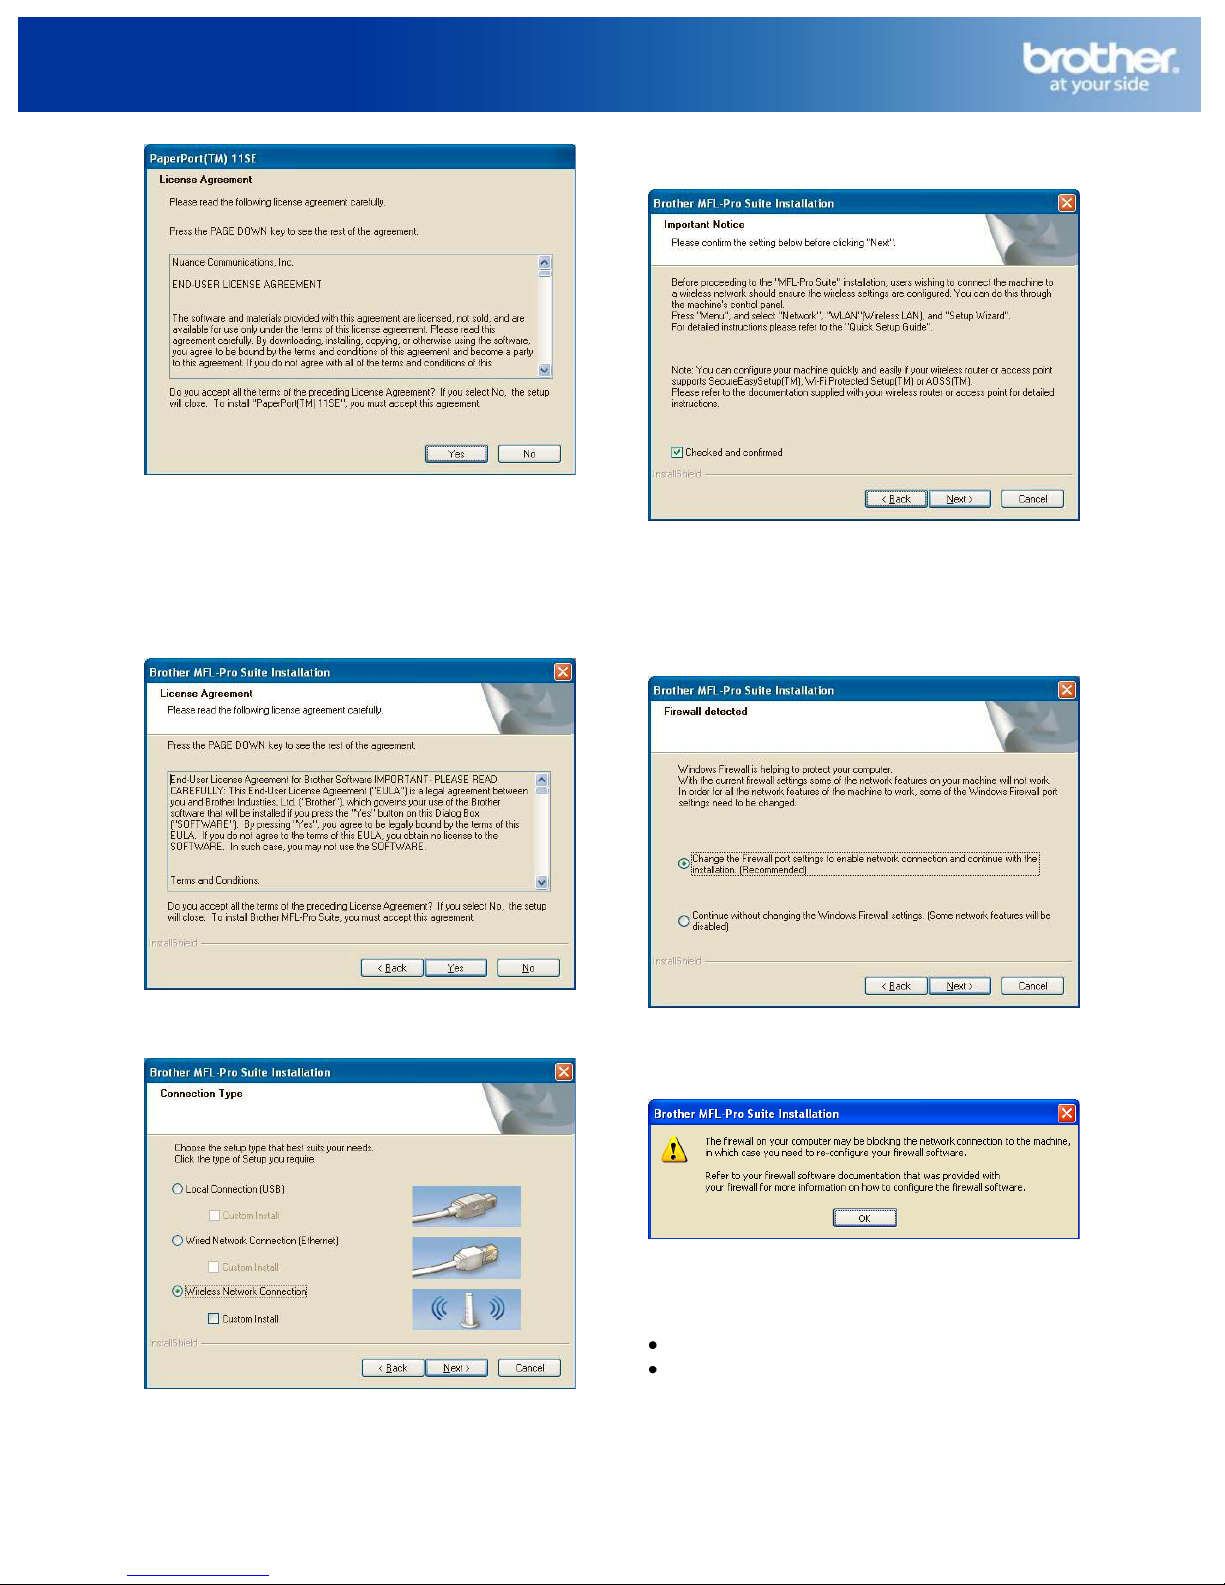
3. When the ScanSoft™ PaperPort™ 11SE
License Agreement window appears, click Yes if
you agree to the Software License Agreement.
2
© 1995 - 2010 Brother International Corporation
www.brother-usa.com
Page 3
Wireless Setup Instructions for Windows
7. Click on Checked and confirmed check box,
then click Next.
4. The installation of ScanSoft™ PaperPort™
11SE will automatically start and is followed by
the installation of MFL-Pro Suite.
5. When the Brother MFL-Pro Suite Software
License Agreement window appears, click Yes if
you agree to the Software License Agreement.
6. Choose Wireless Network Connection,
then click Next.
8. For Windows® XP SP2/Windows Vista®
users, when this screen appears, choose
Change the Firewall port settings to enable
network connection and continue with the
installation. (Recommended) and click Next.
If you are using a firewall other than Windows®
Firewall or Windows® Firewall is off, this screen
may appear.
See the instructions provided with your firewall
software for information on how to add the
following network ports.
For network scanning, add UDP port 54925.
© 1995 - 2010 Brother International Corporation
www.brother-usa.com
For network PC-Fax receiving, add UDP
port 54926.
3
Page 4
Wireless Setup Instructions for Windows
If you still have trouble with your network
connection, add UDP port 137.
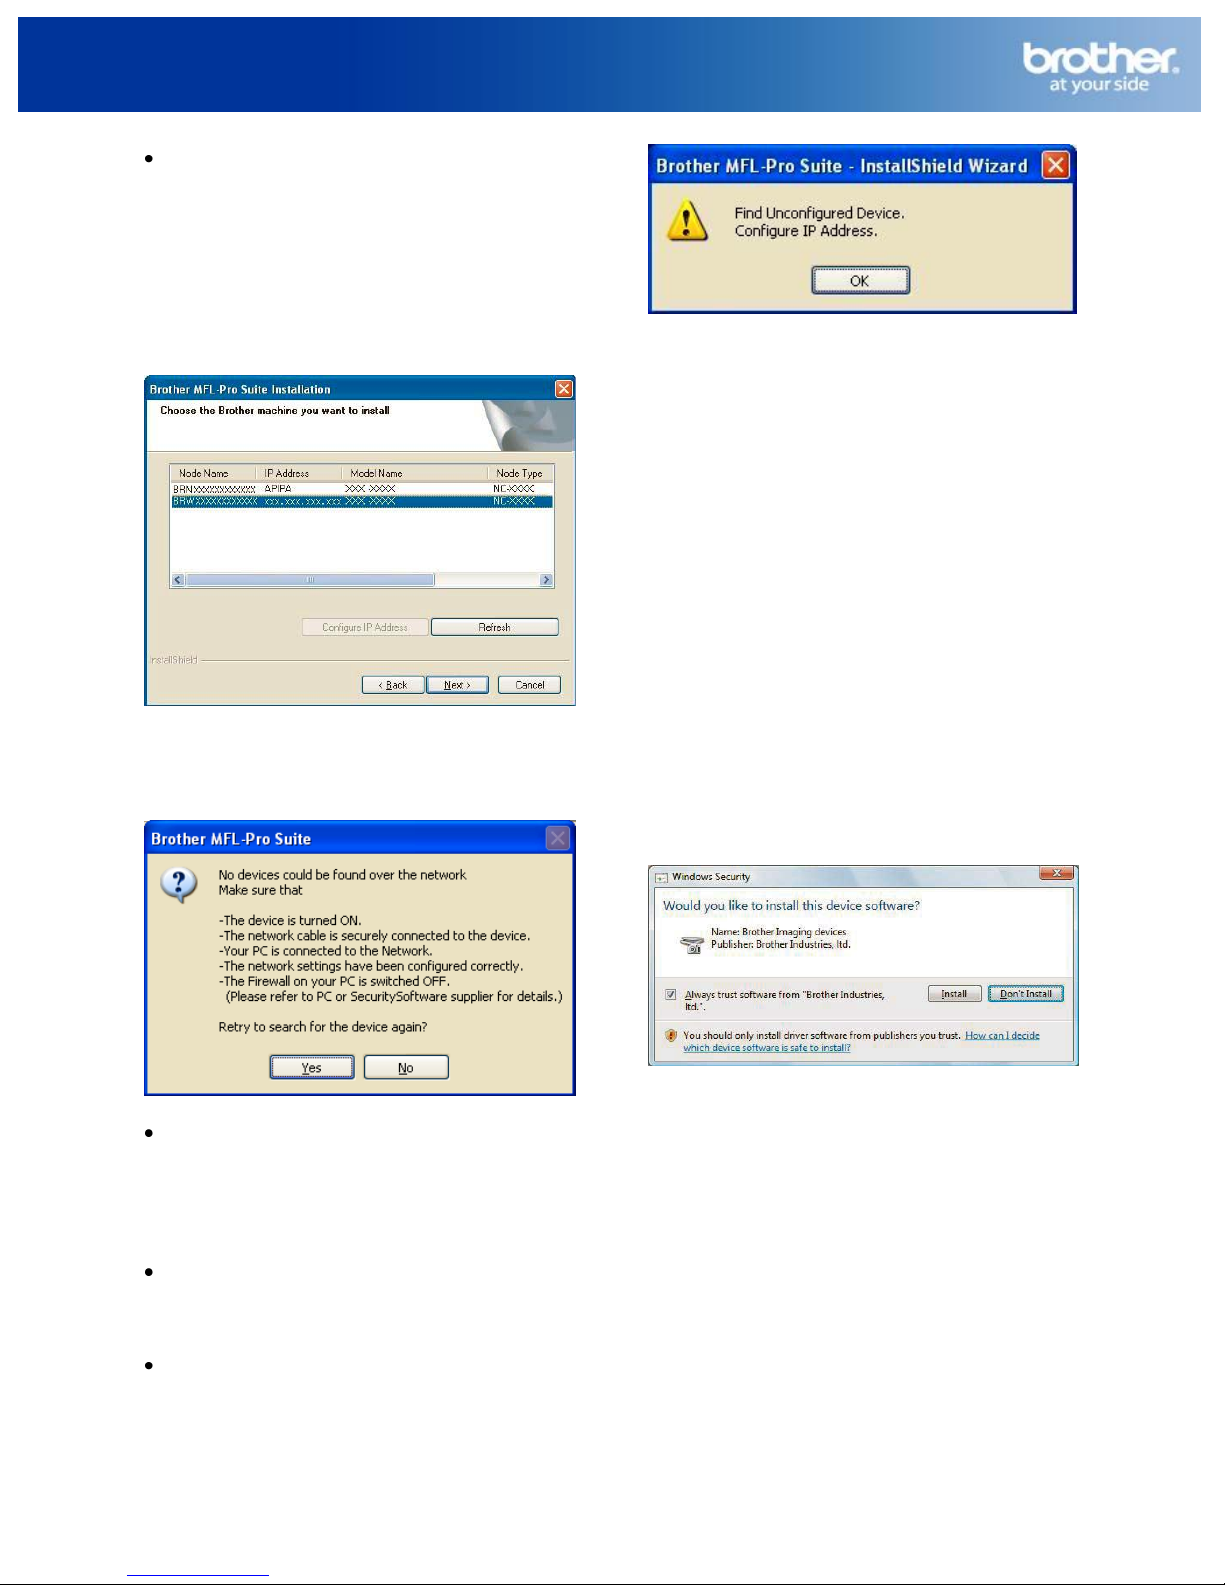
Note: If the machine is configured for your
network, choose the machine from the list, then
click Next.
This window will not appear if there is only one
machine connected on the network, it will be
chosen automatically.
If your machine shows APIPA in the IP Address
field, click Configure IP Address and enter an IP
address for your machine that is suitable for
your network.
Click OK.
The Configure IP Address window will appear.
Enter an IP address for your machine that is
suitable for your network by following the onscreen instructions.
9. The installation of the Brother drivers will
automatically start. The installation screens
appear one after another.
Important DO NOT cancel any of the screens
during the installation. It may take a few seconds
for all screens to appear.
Note: For Windows Vista®, when this screen
appears, click the check box and click Install to
complete the installation correctly.
If your wireless settings fail, an error
message will appear during the installation
of MFL-Pro Suite and the installation will be
terminated. If you encounter this failure, go
to step 16 on page 30 and setup the
wireless connection again.
If you are using WEP and the LCD displayed
'Connected' but your machine is not found,
make sure you entered the WEP key
correctly. The WEP key is case sensitive.
If the machine is not yet configured for use
on your network, the following screen
appears.
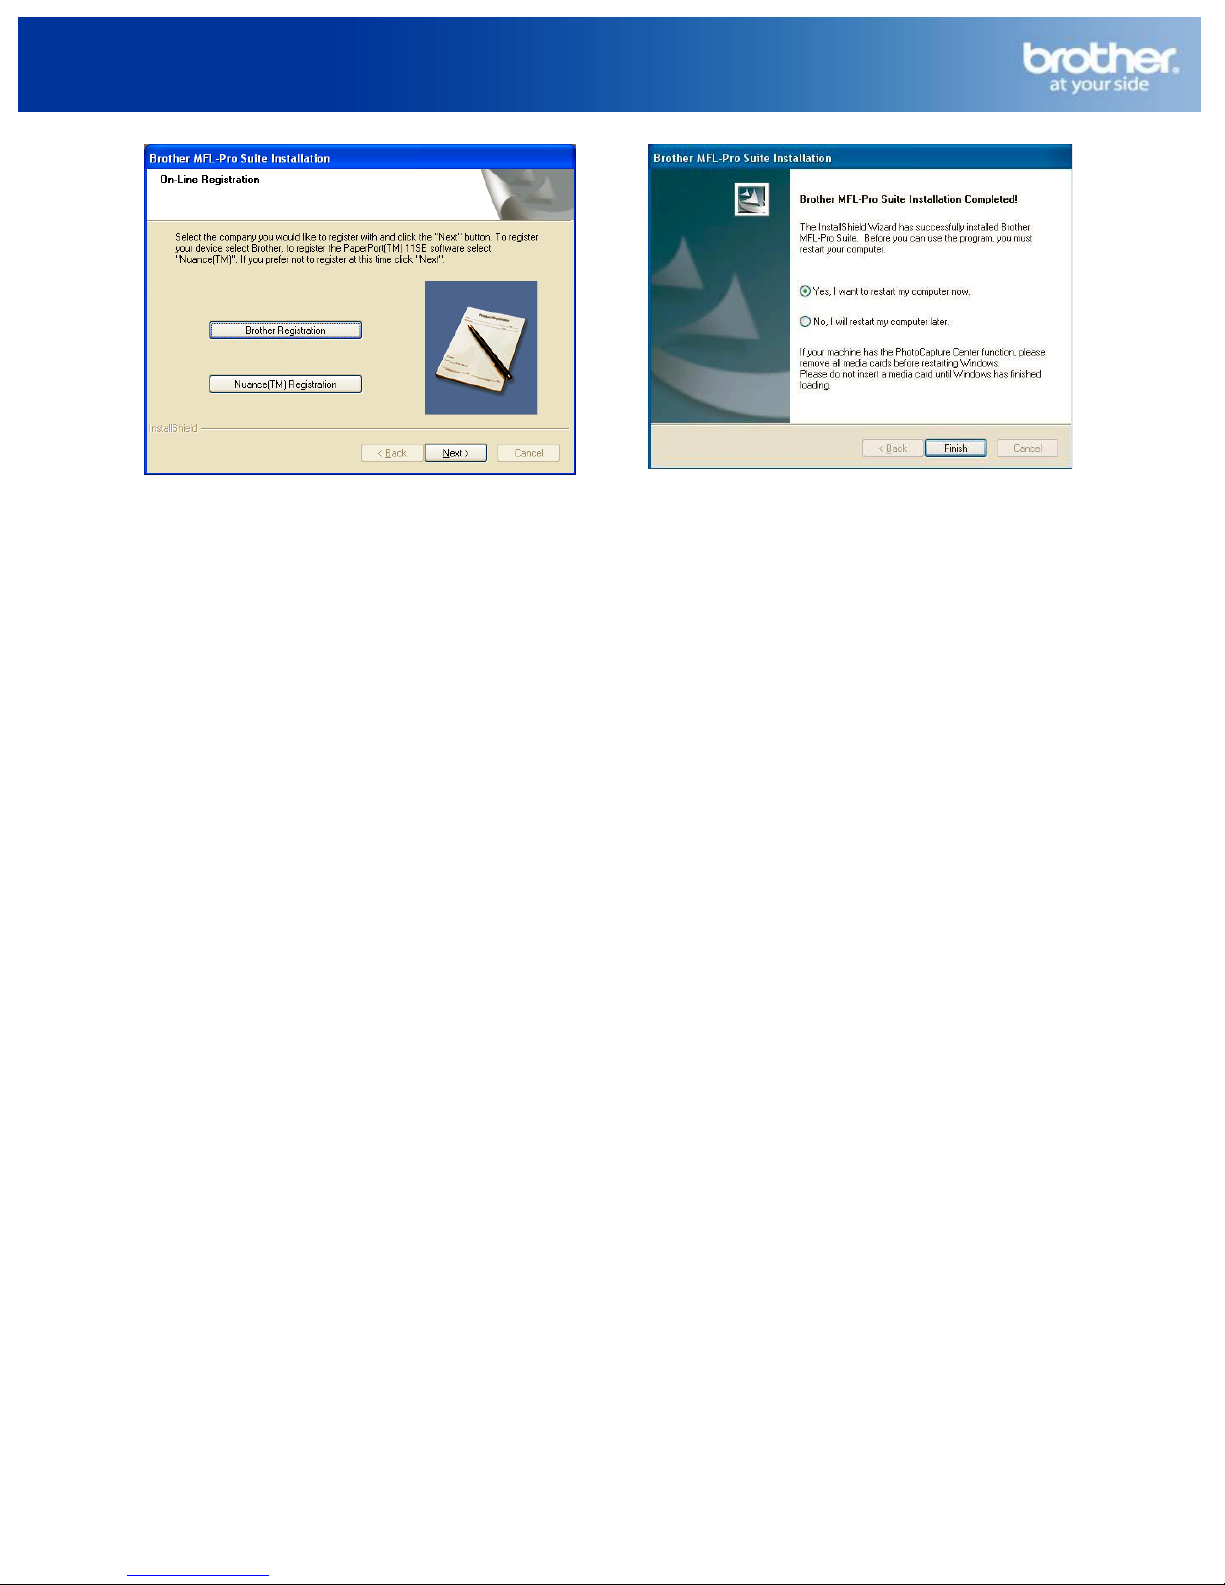
10. When the On-Line Registration screen is
displayed, make your selection and follow the
on-screen instructions. Once you have
completed the registration process, close your
web browser to return to this window, then click
Next.
4
© 1995 - 2010 Brother International Corporation
www.brother-usa.com
Page 5
Wireless Setup Instructions for Windows
11. Click Finish to restart your computer. After
restarting the computer, you must be logged on
with Administrator rights.
Note
If an error message appears during the software
installation, run the Installation Diagnostics
located in Start/All Programs/Brother/MFCXXXX (where MFC-XXXX is your model name).
The installation is now complete.
YOU CAN NOW CLOSE THIS WINDOW AND
RETURN TO THE WIRELESS PRINTING
ASSISTANT
5
© 1995 - 2010 Brother International Corporation
www.brother-usa.com
 Loading...