

Page 1
US гыс,1 i;,i I cwRfi
Page 2

Please record in the blank space below the MODEL NO. and SERIAL NO, of this typewriter. The
MODEL NO. and SERIAL NO. are located on the back of the typewriter.
MODEL NO.: SERIAL NO:
Please keep these numbers in a safe place for future reference.
___________________________
FCC NOTICE
This equipment generates and uses radio frequency energy and if not installed and used properly,
that is, in strict accordance with the manufacturer's instructions, may cause interference to radio
and television reception, it has been type tested and found to comply with the limits for a class
B computing device in accordance with the specifications in SubpartJ of Part 15 of FCC Rules, which
are designed to provide reasonable protection aginst such interference in a residential installation.
However, there is no guarantee that such interference to radio or television reception, which can
be determined by turning the equipment on and off, will be avoided. The user is encouraged to
try to correct the interference by one or more of the following measures:
- Reorient the receiving antenna
- Relocate the computer with respect to the receiver
- Move the computer away from the receiver
- Plug the computer into a different outlet so that the computer and receiver are on different
branch circuits. If necessary, the user should consult the dealer or an experienced radio/television
technician for additional suggestions. The user may find the following booklet prepared by the
Federal Communications Commission helpful; “Howto Identify and Resolve Radio-TV Interference
Problems’’. This booklet is available from the US Government Printing Office, Washington, D.C.,
20402, Stock No. 004-000-00345-4.
THE EQUIPMENT MUST BE INSTALLED NEAR THE SOCKET OUTLET, WHICH MUST BE
EASILY ACCESSIBLE.
Page 3

--.i.V-Lrv-
jf'"' ■■ ■' ' '.■''' ' ' ■ ' '"'^' ■'■' ’■ ' ’'■ '' f^Kf?'"' ■■■ -K''’ ■■■■ '■■,'''ir,'
ffiilAVl»■lAмaffililial■•|J»^i.i»■r8ihValffil.^:¿«,^;iм^.w■в^™klllli■;■.■rl^fm^-^!fefev;J^it ,,i.i;V.№.:.ji'Kjg»-
GENERAL VIEW............................................5
CM2000 KEYBOARD LAYOUT
....................
Multilingual Keyboards
THE DISK DRIVE
6
What is a Disk Drive?.................................
GETTING STARTED....................................I-I
Getting to Know Your Typewriter
Quick Reference Guide
Key Functions
About your Typewriter
About This User Guide
MENU ITEMS
............................................
..............................
.....................................
...............................
..............
.............
................I -4
1-5
I-I
i-l
I -1
I -4
What Is a File? ..........................................
Inserting and Removing a Floppy Disk 2-3
Initializing New Disks
Caring for Your Disks
Backing up a Disk
Disk Error Messages
SETTING UP THE TYPEWRITER...............I
Paper Supporter
Support arm...................................... I
Acoustic Cover
Margin scale.......................................I
Top Cover
Cassette Daisy Wheel
.........................................
...........................................
Glare Screen
......................................
...................................................I
Opening the top cover
Closing the top cover
...............................
Removing the cassette daisy wheel.... I
Inserting the new cassette daisy
wheel
.................................................
......................
........................
I
I
1
1
I
I -
BASIC TYPING
The Keyboard............................................3-1
ALT and CODE Keys
Typewriter Operation .,.....,.,„..,„„.„.....3-2
Moving Around The Page
Carrier Return
Tab Key......................................................3-3
Index and Reverse Index
Cursor Keys
Backspacing
Cassette Ribbon.......................................I -
Removing the old cassette ribbon....! -
Inserting the new cassette ribbon
Correction Tape
Removing the old correction tape ... 1 -
Installing the new correction tape .... I -
......................................
Switching The Machine On And Off.. I -
Loading Paper
Automatic Paper Insertion
Manual Paper Adjustment
Paper Thickness Control
Self-Demonstration
..................................
......................
....
...
.....................
.................................
....
..................
I -
I-
Relocation
Status Indicators
Changing Settings....................................3-6
Status Indicators
I-
I I I
I
SELECTING TYPING MODE
Normal (Manual Carrier Return)
The Hot Zone
Automatic Carrier Return
.. .. ... ... .. ... .. ... ...
—iit
...........................
.........................................
Types Of Disk Your Machine
Can Use
............................................
...
...........................
.............................
Write-Protecting Your Disks
.....................................
-------------------------
.........
...................................3-1
................................
Selecting TW Operation
........................
...........................................
...
.....................
Micro Index/Reverse Index
..............................................
.............................................
Simple backspace
Express backspace
Micro backspace
...........................
...........................3-5
...............................
...............................................
......................................
.....................................
............
..........................................
.....
1-19
2-2
2-5
...............
..2-7
....................
...............
3-4
3-5
.......
............
4-2
..................4-2
2-1
2-1
2-2
2-4
2-6
2-6
3-1
3-2
3-3
3-3
3-3
3-4
3-4
3-4
3-5
3-6
3-7
4-1
4-1
Page 4

m
Table of Contents
Typing On The Display..............................4-3
Line-By-Line
Permanent Spaces and Hyphens
Justified Typing
SETTING THE LINE FORMAT
Line Format Memory
Selecting A Line Format
...............................................
Ending A Line
.....................................
.........................................
Left-aligned.........................................4 5
Justified
...............................................
...................
.................................
...........................
............
4-3
4-4
4-5
4-5
4-5
5-1
5-1
5-1
Format Memory Reset...............................5-2
Changing A Line Format
..........................
5-2
Setting Line Spacing................................5-3
Setting Typing Pitch ...............................5-3
Margins And Page Length .......................5-4
Preset Margins...................................5-4
Margin Release
Setting Margins..................................5-5
Setting Left Margin
Setting Right Margin
.................................
..........................
.........................
5-5
5-5
5-5
Setting Start Position (Top Margin) ....5-6
Setting End Position (Page Length)
Setting And Using Tabs
Normal tabs
Decimal Tabs.....................................5-8
Using Decimal Tabs
Tab Clear
Auto tab set........................................5-9
All Tab Clear
Setting The Hot Zone
...........................
.......................................
....................
..........................................
......................................
..............................
.........
.....5-8
5-6
5-7
5-7
5-9
5-9
5-10
TEXT ALIGNMENT IN TW MODE.... 6-1
Indentation.....................................
Line Indentation
Paragraph Indentation
Indent Clear
Centering
.......................
Centering Between Margins..............6-3
Centering Between Tabs...................6-3
Centering At The Carrier Position
Right Margin Flush
................................
.......................................
............................
................................ 6-4
.
...........
........................
......
6-1
6-1
6-2
6-3
6 I
6-4
TEXT ATTRIBUTES
....................................
Shift And Caps Keys................................7-1
Shift
...................................................
Shift lock
............................................
Caps...................................................7-2
Bold Text
...................................................
7-1
7-2
7-3
Automatic Underline............................... 7-3
Continuous Underline —
Word-By-Word Underline
....
................
.........................
....7-4
7-4
Expanded Typing.................................... 7-4
Subscript And Superscript.....................
Subscript
Dead Keys
Superimposed Characters
Setting impact
Selecting Keyboard
MAKING CORRECTIONS
............................................7-5
Superscript
........................................
...............................................
.......................
Extra Characters................................7-7
.......................................
..................................
1 (Standard).......................................7-8
2 (International)
3 (Symbol)
.................................
.........................................
.........................
7-S
7-5
7-7
7-7
7-8
7-8
7-8
7-9
8-1
Corrections In NORMAL And AUTO
mode
........................................................
Character Correction
Word Out
....................................................
.........................
8-1
8-1
8-2
Line Out......................................................8-3
Insertions And Deletions
Insertions............................................8-4
Deletions
............................................
.........................
8-4
Relocation..................................................8-6
Manual Correction.....................................8-7
Corrections in UL, JUSTIFY And WP
Modes........................................................ 8-8
Inserting Or Overwriting Text
Inserting Text
.....................................
.............
Overwriting Text........................................8-9
Deleting Incorrect Text
.....
.....................
8-10
Backspace Or Character Correction .8-10
Deleting A Word
Deleting A Line
..............................
.......8-11
......................................
8-12
M
8-5
8-8
8-8
1
Page 5

FRAMING AND LINE DRAWING
Horizontal Line Drawing
Vertical Line Drawing
Drawing A Rectangular Frame
Drawing A Tabular Grid
Frames With Complex Shapes
BASIC WORDPROCESSING
Advantages Of Wordprocessors
Using the Wordprocessoi*
Selecting AAfP Mode
..............................
Printing Mode........................
Non-Printing Mode
.................................
Creating Or Editing A Document
Saving Your Document
Auto Save
................................................
...............
....................
.........................
.........
.....................
.........
.................
..........
....................
..................
..........
..........................
9-1
9-1
9-2
9-3
9-4
9-5
10-1
10-1
10-1
10-2
10-3
10-3
10-4
10-4
10-6
Recovering An Auto Save File_____ 10-6
The Wordprocessor Screen-------------- 10-6
Moving Around The Page
Moving Up And Down The Page.....10-7
Moving Across The Page
......................
................
10-7
10-7
Layout Indicators....................................10-8
Typing In WP Mode
Word Wrap.....................................10-10
Adding Text To A File In Printing
Mode
Switching Back To TW Mode
Or MAIN MENU
..........................
...............................................
..............................
10-10
10-1 I
10-1 I
FORMATTING YOUR DOCUMENT I l-l
Justification In WP Mode
........................
I l-l
The Format Menu....................................I I -2
Changing The Format.......................I I -3
Selecting A Format
Deleting A Format............................I I -4
Checking The Format And Status... I I -5
..........................
I I -4
Page Format...........................................11 -5
Setting The Paper Size
Entering Header Or Footer Text
Page Breaks
Using GO TO
...........................................
...........................................
......................
.....
.....
I I -6
I 1-7
11 -8
11-9
TEXT ALIGNMENT IN WP MODE ..12-1
Line Indentation
.......................................
12-1
Paragraph Indentation ............................12-1
Centering In WP Mode
Centering Between The Margins
Centering Between Tabs...................12-2
.............................
......
12-2
12-2
Right Margin Flush...................................12-3
Inserting Alignment Markers After
Typing
................................................
Hyphenation In WP Mode
.................
12-3
(2-3
Permanent Spaces In Wf Mode...............12-5
BLOCK OPERATIONS..............................13-1
Copying A Block
Temporary Memory
Copying-Text From Temporary
Memory
Moving A Block..............................
.....................................
.................................
............................................. 13-4
.........
13-1
13-3
13-4
Deleting A Block.......................................13-5
Block Functions And Formatting
...........
13-5
SEARCHING AND REPLACING
TEXT
..........................................................14-1
Search
.......................................................
Search And Replace
Defining A Search String
Hyphen Scan
ABBREVIATED PHRASES
................................
....................................
.....
Maintaining Your Phrase Files
..................
................
...............
14-1
14-3
14-5
14-6
15-1
15-2
Adding Or Editing An Abbreviated
Phrase
.......................................................
Deleting A Phrase
Deleting all Phrases
Loading A Phrase File
Saving A Phrase File
....................................
........................ 15-5
......................
........................
i 5-2
15-4
15-5
15-6
Using Abbreviated Phrases....................i 5-6
Using Phrases In Display Typing
Modes
...............................................
Using Phrases In NORMAL And
AUTO Modes
....................................
15-6
15-8
PRINTING YOUR DOCUMENT ....... 16-1
Printing The Current Page......................16-1
Printing The Whole Document
........... 16-2
Page 6

*
Stop Codes...............................................i 6-5
Inserting Text At A Stop Code
SPELLING CHECKER
Using The Spelling Checker In
TW Mode..........................................17-2
............................
........
16-5
17-1
Find Mode................................................17-3
Adding A Word
One Word Spelling Check (TW)
.......................................
Redundancy Check
............
.........................
17-5
17-5
17-5
Using The Spelling Checker In
WP Mode..................................................17-6
Checking The Whole Document
One Word Spelling Check (WP)
...........
............
17-7
17-7
Using the Spell Checker in WP
Printing Mode
..........................................17-7
Maintaining The User Dictionary....... 17-8
Deleting Words From The User
Dictionary
Deleting All Words
Loading A User Dictionary
Saving A User Dictionary
.......................................
.................................
...
.................17-9
....................
.........
17-8
17-9
17-10
FORM TYPING...................................... 18-1
Creating A Form Typing File
Filling In A Form
Changing A Form
..........
...........................
...................................
..........
18-1
18-5
18-6
Switching Back To TW Mode Or Main
Menu.........................................................
18-9
MAINTENANCE AND
TROUBLESHOOTING.............................20-1
Maintenance............................................20-1
Environment
Cleaning
Supplies
T roubleshooting
....................................
..........................................
...........................................
....................................
20-1
20-1
20-2
20-3
SPECIFICATIONS....................................20-4
EXTRA CHARACTERS AND
SYMBOL KEYBOARD.............................20-5
Additional and Alternate
Characters
Keyboard 3 (Symbol Keyboard)
MULTILINGUAL KEYBOARDS
...............................................
............
...............
20-5
20-6
20-6
Daisy Wheel Codes for Multilingual
Keyboards
...............................................
20-6
INDEX.............................................................I
ORGANIZING YOUR FILES
File Management Menu .........................
The File Management Menu
Copying A File
.........................................
Deleting A File............
Renaming A File
.....................................
File Conversion .....................................
Deleting All Files
....................................
..............
............
.....19-1
..................
.................
19-1
19-3
19-3
19-5
19-5
19-6
19-8
Switching Back To TW Mode Or
Main Menu...............................................19-9
APPENDIX...............................................20-1
Page 7
tm
£V"'"7^"t;;v.~'".■■■■
,:,i::N;"
......
::iii&i?y'i--’
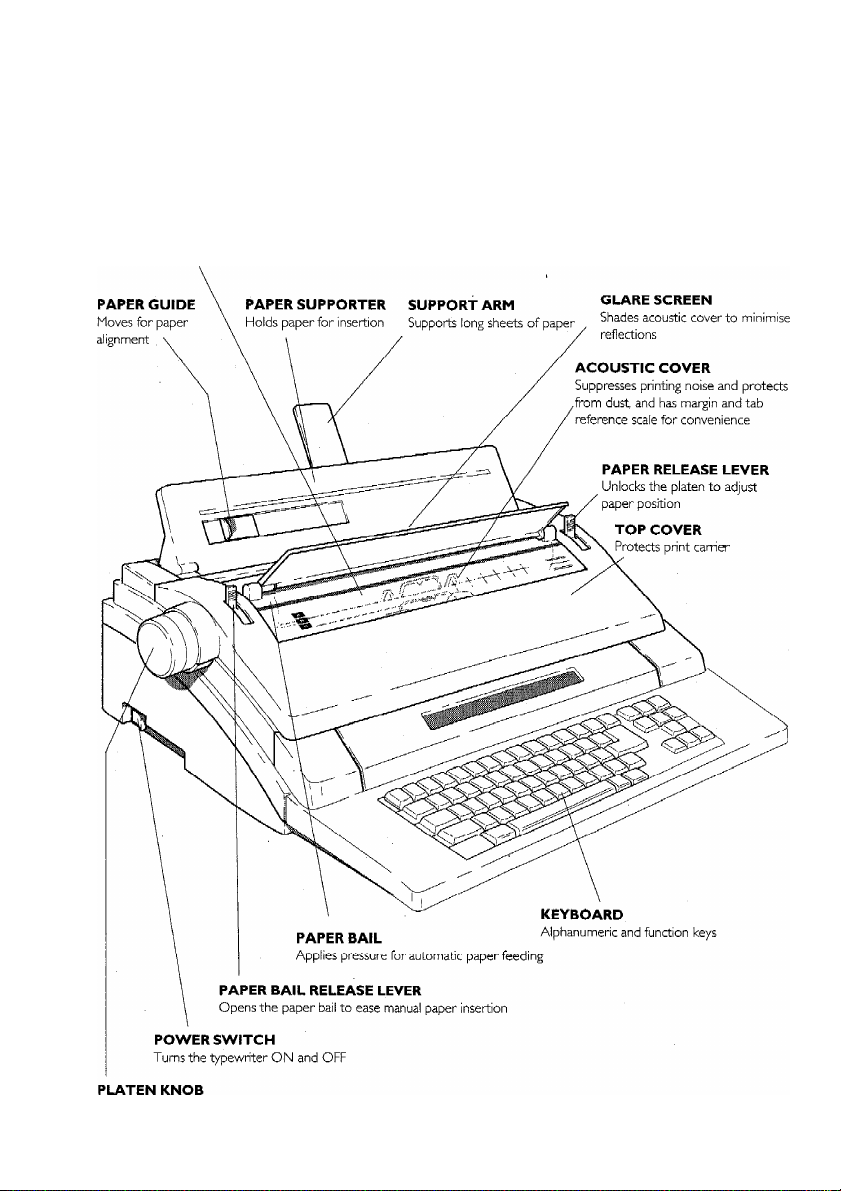
PRINTER CARRIER
Printing msrha.ni?;m that holds the ribbon rassette, daisy wheel, and correction tape
It moves back and forth along the platen
Tir--'^"M';'i--”'' ■■ ■ Mr -
...........
v.vr-;:\., /:.---:^v^
v-‘>v'-
Tii='
.:-;■ ■ ■■■■:■■;.............: : -.fS-
■-■■■•■•
.......
rc'tiigM-r'---;: ■■..■ . -:.-vi:^
Feeds paper manually
Page 8
Alternative Style
Tab Key
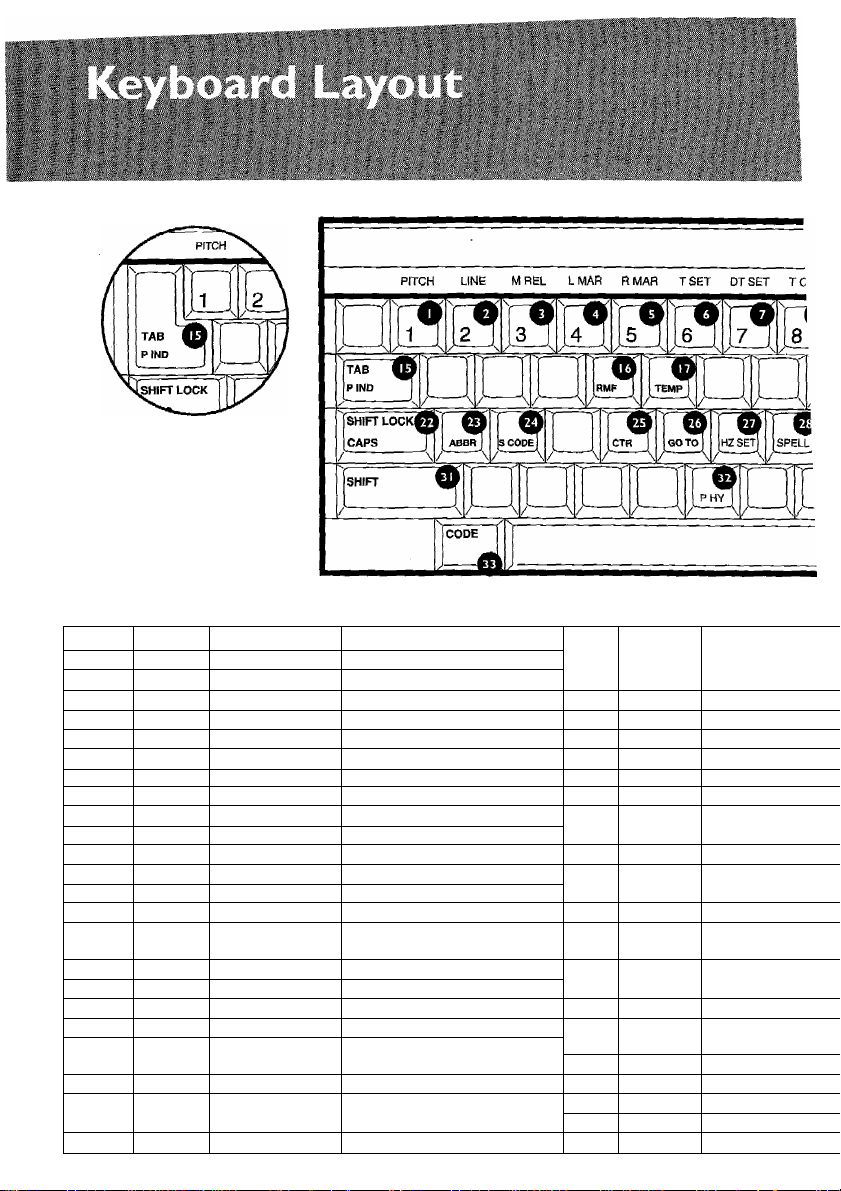
FUNCTION KEYS
KEY NO.
LEGEND
PITCH
1*
5*
6*
7*
8*
10* BOLD
11*
12-
13 BKSP
13*
14
14*
15 TAB
15*
16* RMF
17* TEMP
18*
19*
79 ■
LINE
M REL
LMAR
RMAR
TSET
DTSET Decimal Tab Set Sets a decimal tab
TCLR
UNDLN
EXPAND
IMPACT
BS 1 Micro Backspace Backspaces 1/120 inch
RELOC
EXPR
FIND
INSERT INSERT Turns text Insertion on/off
OPERATE
PRINT Print
NAME
Typing Pitch Sets 10, 12, 15 or PS pitch
Line Spacing
Margin Release
Left Margin
Right Margin
Tab Set Sets a tab stop 23*
T ab Clear
Underline
Bold Turns bold printing on/off
Expand
Impact
Backspace Moves the carriage one space left
Relocate Returns typing carriage after
Express Backspace
Tab
Paragraph Indent
Right Margin Rush
TEMP
OPERATE
FUNCTION 21
Sets 1, 1.5 or 2 line spacing
Releases margin stops
Sets the left margin
Sets the right margin
Clears a tab 25* CTR
Switches underline on/off 26*
Switches expanded typing on/off
Sets typing impact
corrections
Returns carriage to left margin
Moves carriageto nexttab position
Turns on paragraph indent mode 32*
Turns on right margin flush printing
Copies text to/from temporary
memory 34
Selects typewriter mode
NORMALAUTO,L7L,JST
Prints multilingual keyboard layouts
21*
22
22* CAPS
24*
27*
28*
29-
30*
35*
36*
RETURN
INO CLR
ABBR
"S CODE
GO TO
HZ SET
SPELL Spelling Check
KB
LIND
31
33
35
36 WORD OUT
PHY
CODE Code
CORRECT
CORRECT
LINE OUT Line Out
Carriage Return
Indent Clear
Shift Lock
Caps
ABBR
STOP CODE
Centring
GOTO
Hot Zone Set
Keyboard
Line Indent
Shift
Permanent Hyphen
Spacebar
Character Correct
Manual Correct
Word Out
Page 9
Alternative Style
Return Key
Returns the printing carriage to
the left margin and advances one
ine
Turns off paragraph indent mode
Locks shift mode on
Turns caps on or off
Inserts an abbreviated phrase
nserts a stop code in the tesd:
Turns centring mode on
Goes to selected page or finds
mis-spelt words
Sets the width of the hot zone
Turns the spelling checker on or
off
Selects keyboard 1, II or III
Moves the carriage fives spaces
right
Selects shift mode or cancels shift
lock
Prints a permanent hyphen
Used to display and set functions
indicated with *
Moves the carriage one space right
Automatically deletes a character
Used for manual correction
Automatically deletes a word
Automatically deletes a line of text
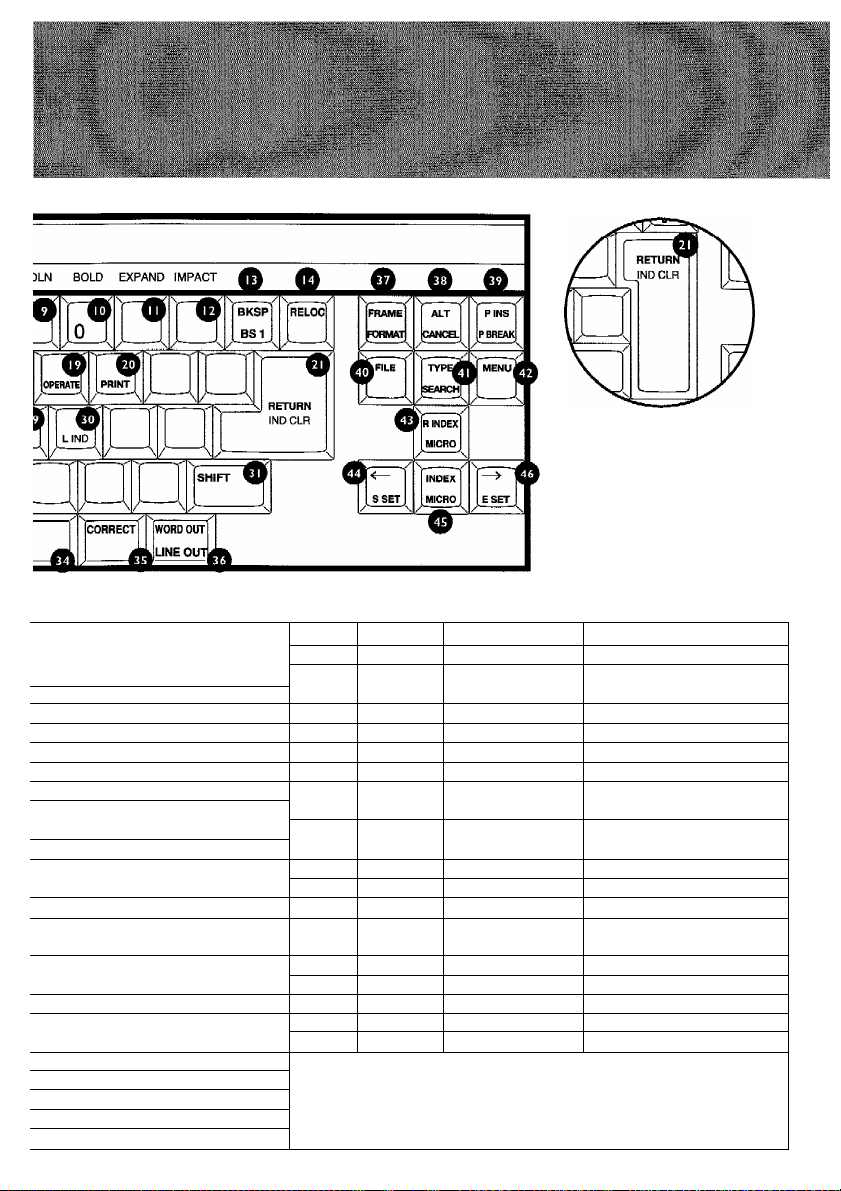
37 FRAME
J7''
FORMAT Line Format
38 ALT
38* CANCEL
39 PINS Paper Insert
39* P BREAK Page break
40 FILE
41 TYPE TYPE
41* SEARCH
42
43 R INDEX
43* MICRO Micro Reverse Index
44
44*
45 INDEX Index
45* MICRO Micro Index
46
46* ESET
MENU MENU
SSET Start Set Sets the top margin
Framing
Alternate Function
Cancel
FILE
SEARCH Searches for specified text in WP
Reverse Index
Left Cursor
Right Cursor
End Set Sets the bottom margin
Notes:
1. Functions marked * are used with the CODE key,
Funrtion?; mijrked ane used with the ALT key.
Starts or ends text framing
Selects a stored line format
Used to display and set functions
indicated with ''
Used to abandon many operations
Used forautomatic paperinsertion
Inserts a page break
Saves a wordprocessor file
Switches between TvV and WP
mode
mode
Calls up menu options
Moves the paper down 1/12 inch
Moves the paper down 1/48 inch
Moves the typing carriage one
space left
Moves the paper up 1/12 inch
Moves the paper up 1/48 inch
Moves the carriage one space right
Page 10

Page 11

GETTING STARTED
This section gives you a quick guide to the function keys and menus of
your typewriter
Quick Reference Guide
The most frequently used functions ofyourtypewriterare activated by special keys. Other
functions are called up by pressing the [MENU] key, when the display screen will show
a list of choices. The quick reference guide gives a brief description of these key functions
and menus. Some of these functions may be unfamiliar at this stage, but more detailed
descriptions are given in other sections of the User Guide. See also the keyboard layout
on pages 6 and 7.
Key Functions
ALT
CANCEL
+
ALT
CANCEL
+
+
+
Sets typing pitch
(I0/I2/I5/PS)
Sets line spacing
(1/1.5/2)
Margin release
Left margin set
+
Right margin set
CANCEL
CIANCEL
+
+
ALT
+
ALT
+
Tab set
Decimal tab set
Tab clear
Turns underlined
text on or off
Turns bold text
on or off
Page 12

Setting Up Your Typewriter
ALT
CANCEL
nELOC
EXPR
Turns expanded
text on or off
Sets typing impact
(Light/Medium/
Heavy)
Backspaces one character
BKSP
Backspaces
BS1
I /120 inch
Relocates the carrier to the end
of the typing line
Moves the carrier
REUOC
EXPH
to the left margin
TAB
PIND
Moves to the next tab
position
RETURN
Carrier return
(ND CLR
+
+
+
+
Prints the keyboard
layoutin SET UP mode,
or the current page
of a WP document
RETURN
IND CLR
Inserts an
abbreviated phrase
in the text
SHIFT LOCK
CAPS
Locks
keyboard in
caps mode
Inserts a stop code
in the text
Clears
paragraph
indent.
TAB
+
PINO
+
+
+
+
Indents a
paragraph
Turns on right
margin flush typing
Saves text to
temporary memory
Turns text
insertion on or off
Sets typing mode
(Normal/Auto/
Line-By-Line/
ALT
CANCEL
ALT
CANCEL
ALT
CANCEL
+
+
+
+
+
Turns on centered
typing
Jumps to a selected
page number or finds
a mis-speit word
Sets the hot zone
(3to 12 characters)
Turns spelling
checker on or off
Selects keyboard
(Standard/
International/
Symbol)
Page 13
Setting Up Your Typewriter
SHIR LOCK
CAPS
[SPACE]
WORD OUT
LINE OUT
Indents the line
five ipar.ei
Types upper case
characters and
punctuation marks
Locl<s the
keyboard
in shift mode
Inserts a
permanent
hyphen
Moves carrier right
one character
Automatic
character deletion
Manual character
deletion
Automatic word
deletion
PBREAK
E
PINS
Automatic paper insertion
TYPE
SEARCH
inii
CRoJ
INDEX
MICRO
Inserts a page break
Saves a wordprocessor or
form typing file
Switches between
typewriter and
wordprocessor
Searches for
specified text in
WP mode
Calls up menu items
(see next page)
Moves paper down by
1/12 inch
Moves paper up
by 1/12 inch
CODE
s—
FRAME
PORMAT
CANCa.
WORD OUT
+
LINE OUT
Automatic line
deletion
CODE
+
Frame and line CODE
drawing
ALT
Selects a line
+
5
format
Used to abandon
+
an operation
Moves paper down
mNDEX
micro]
by I /48 inch
Moves paper up by
INDEX
[micro]^
Moves carrier or
cursor left one
space
Moves carrier or
cursor right one
space
1/12 inch
Page 14

Setting Up Your Typewriter
+
+
Moves carrier or
cursor left I /120
inch
Moves carrier or
cursor right 1/120
inch
Sets top margin
Sets page length
Note!
Keys shown with the [ALT] key also work with the [CODE] key, but keys shown with the
[CODE] key do not work with the [ALTj key.
About your Typewriter
Your Brother typewriter is actually two machines in one. It’s a powerful typewriter with
all the features you expect from a Brother machine, There’s also a display typing mode that
allows you to see each line of text and comect it before printing. Your typewriter is also
a wordprocessor that allows you to create and edit entire documents before printing
them. You can switch between wordprocessing and ordinary typing at the push of a
button, so if you are in the middle of wordprocessing a document and need to type a short
memo or address an envelope, it's no problem. Just switch to typewriter mode, do your
typing, and switch straight back to your wordprocessor document at the point where you
left off
There’s also a form typing mode that makes it easy to fill in pre-printed forms, and the file
management feature allows you to organize your wordprocessor documents.
About This User Guide
This guide is divided into five main sections. These describe, getting started, typewriter
operation, wordprocessor operation, form typing and file management. These sections
are identified by the words GETTING STARTED, TW, WP, FORM TYPING or FILE
MANAGEMENT at the edge of each page.
Because your machine can work as a typewriter or as a wordprocessor, some features
described in the typewriter section are applicable to the wordprocessor, and vice versa.
These sections have TW/WP at the edge of the each page.
Page 15
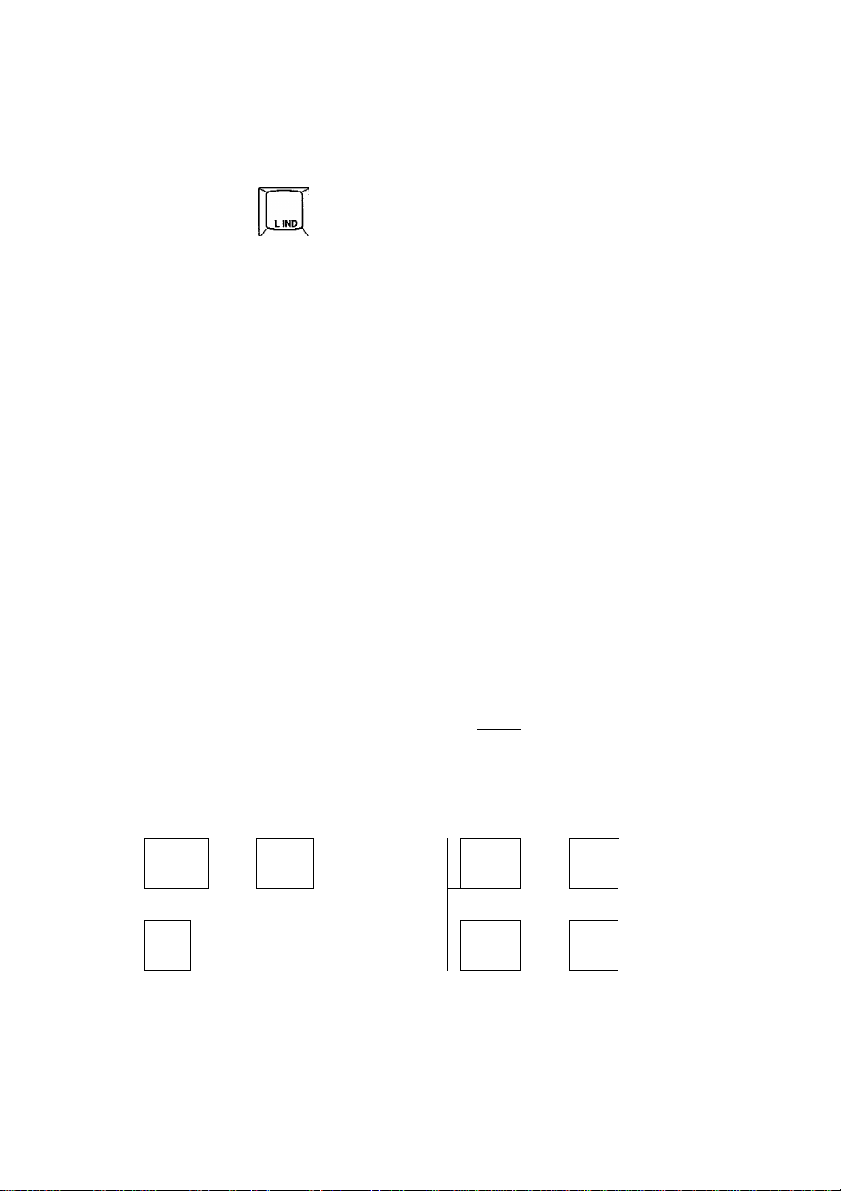
Menu Items
Setting Up Your Typewriter
MAIN MENU
TTPE MODE SCREEN
I
PRESS MENU KET
WP INDEX SCREEN
PRESS MENU KEY
hCOPY
2:DEL
3:REN
4:PR[NT
F TYPE INDEX SCREEN
t
CTR
RMF
EDIT
DELETE
LOAD
SAVE
FIND
ONE WORD ON/OFF
1 c
USER DICT.
PRESS MENU KEY
l:DEL ONE
2:DEL ALL
3:LOAD
4;SAVE
4; FILE
MANAGEhENT
_£
_______
I PRESS MENU KEY j
PRESS MENU KEY
PRESS MENU KEY PRESS MENU KEY
I ¡COPY
2;DEL
3:REN
4:PRINT
FILE management
INDEX SCREEN
_
PRESS MENU KEY
I ¡COPY
2:DEL
3:REN
4;CONV
S:DISK DEL
POSITION SET MENU
!:LEFT
2:RlGHT
3:CTR
^;DTAB
S:S CODE
l:WP>ASCH
2:ASC»>WP
3:WP200/EMI050>WP
! ¡POSITION SET
2:DEL ALL
Page 16
Setting Up Your Typewriter
Setting up the Typewriter
This section tells you how to set up your typewriter for typing. If you
didn't remove the yellow packing pieces and fit the paper supporter
when you unpacked the typewriter, now is the time to do it before
you attempt to power up the machine.
Paper Supporter
The paper supporter is used to check and adjust the position of the paper,
Attach the paper supporter by inserting the tabs into the holes provided on the top of the
typewriter.
The sliding paper guide can be used to adjust the position of the left edge of the paper,
relative to the extreme left position of the print carrier, which is indicated by the ‘O' mark
on the embossed scale.
Support arm
The support arm can be folded out to provide additional support to long sheets of paper.
Page 17
Setting Up Your Typewriter
Note;
Should you need to move your typewriter, we suggest that you remove the paper
supporter first to avoid the risk of damage.
Acoustic Cover
The acoustic cover suppresses the noise created by the typing carrier and prevents dust
from entering the typewriter. Electronic typewriters really dislike dust, so make sure that
the acoustic cover of your typewriter is always closed.
Margin scale
The margin scale is embossed on the acoustic cover. It shows the three pitch scales (for
10, 12 and 15 characters per inch), the left and right margins, the tab stop positions and
the position of the carrier.
Glare Screen
The glare screen can be adjusted to shade the acoustic cover in orderto reduce reflections.
Page 18
Setting Up Your Typewriter
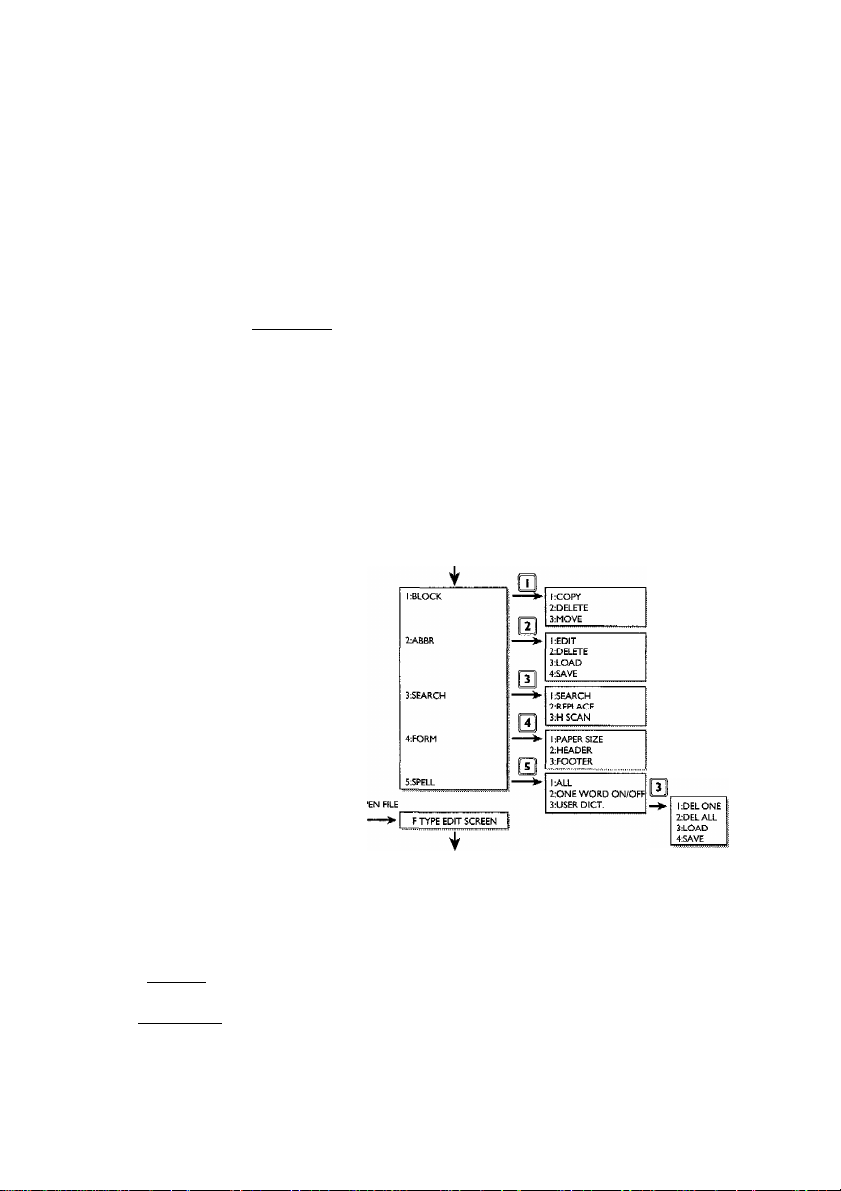
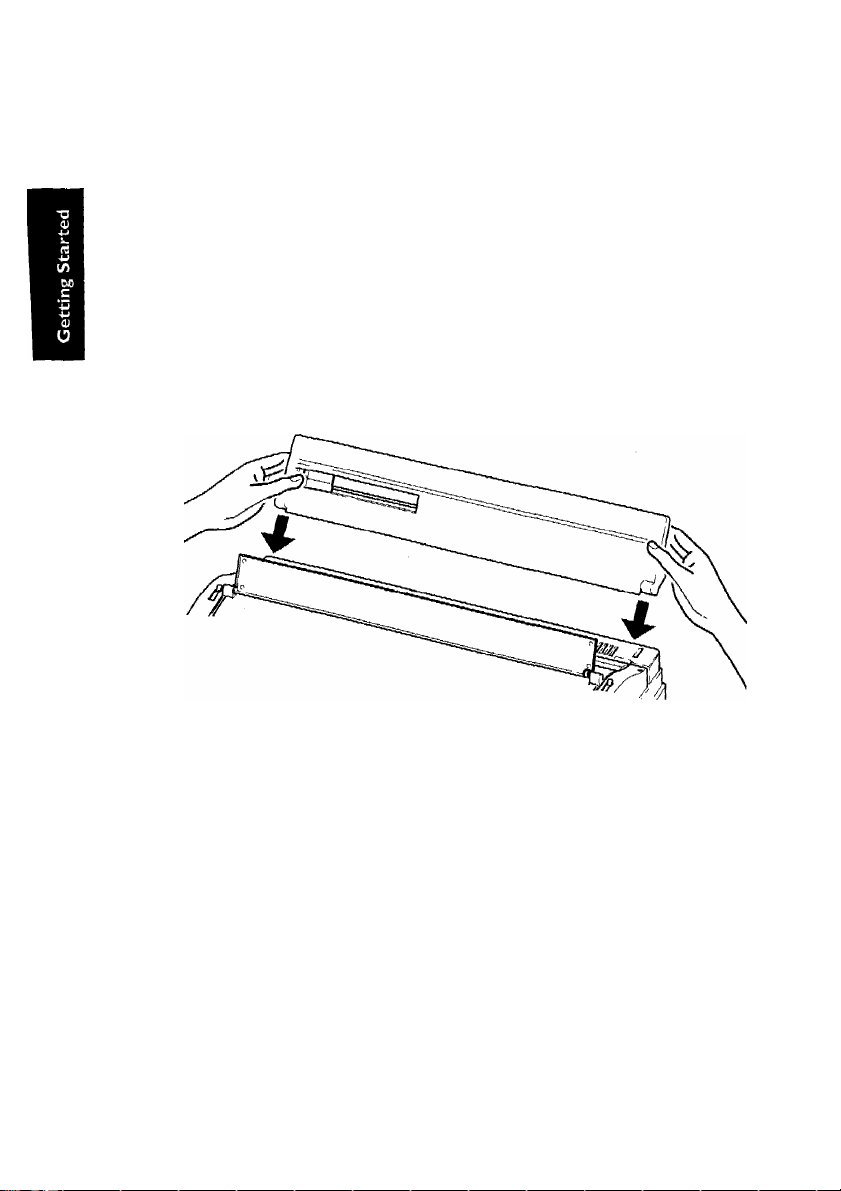
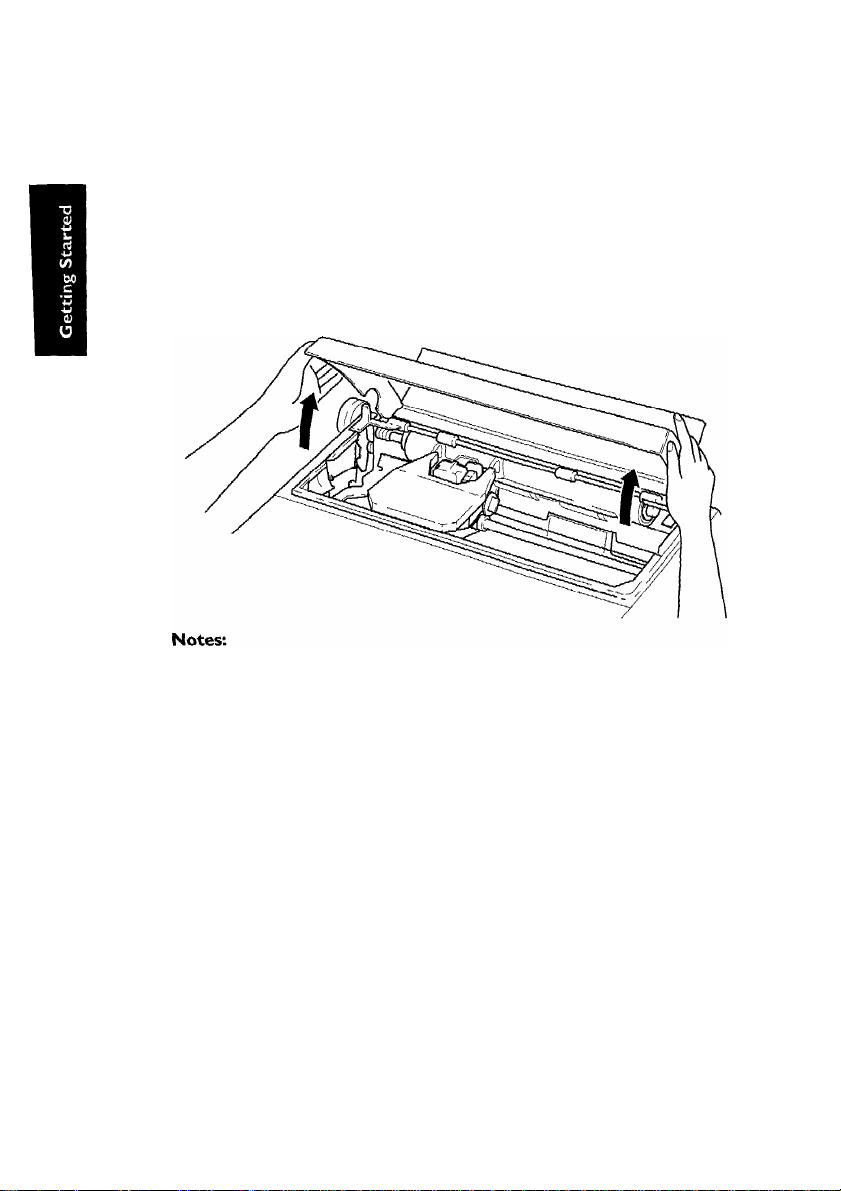
Top Cover
Opening the top cover
In order to insert a new cassette daisywheel, cassette ribbon or spool of correction tape,
first place the top cover ofthe typewriter to the upright position. Do this by placing both
hands on either end of the cover and lifting it upwards until it stands by itself.
1. The keyboard locks up when the cover is raised, and typing is not possible until it is closed
again,
2. Opening the top cover has no effect on margin settings, tab settings or the correction
memory, all of which are retained without change.
3. While the cover is open, the message;
^CuUEK UHbh
will appear in the display.
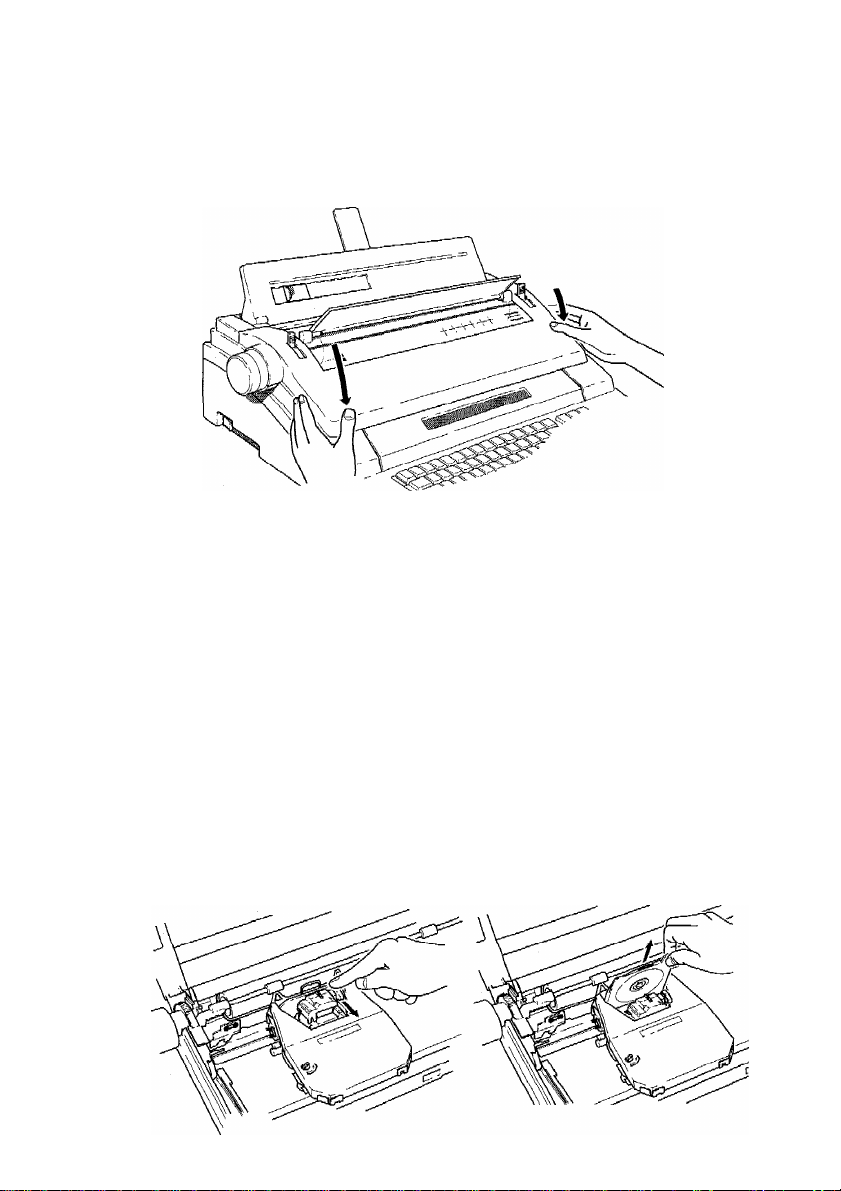
Closing the top cover
After inserting the cassette daisy wheel, cassette ribbon or spool of correction tape, close
the top cover by replacing itto its original position. Ensure that it is firmly in place afterclosing.
Note:
If the top cover is closed with the unit switched ON, the carrier will automatically travel
to the left edge, then return to its previous position.
Page 19
Setting Up Your Typewriter
Cassette Daisy Wheel
Brother's slip-in, slip-out cassette daisywheels are known the world overfortheir beautiful
true letter quality type print Here’s your chance to discover it for yourself
Your typewriter comes with a cassette daisy wheel already installed. You may, at some
point, wish to exchange it for one with a different typeface, onto place a new one in. With
the Brother typewriter, this is a very simple task.
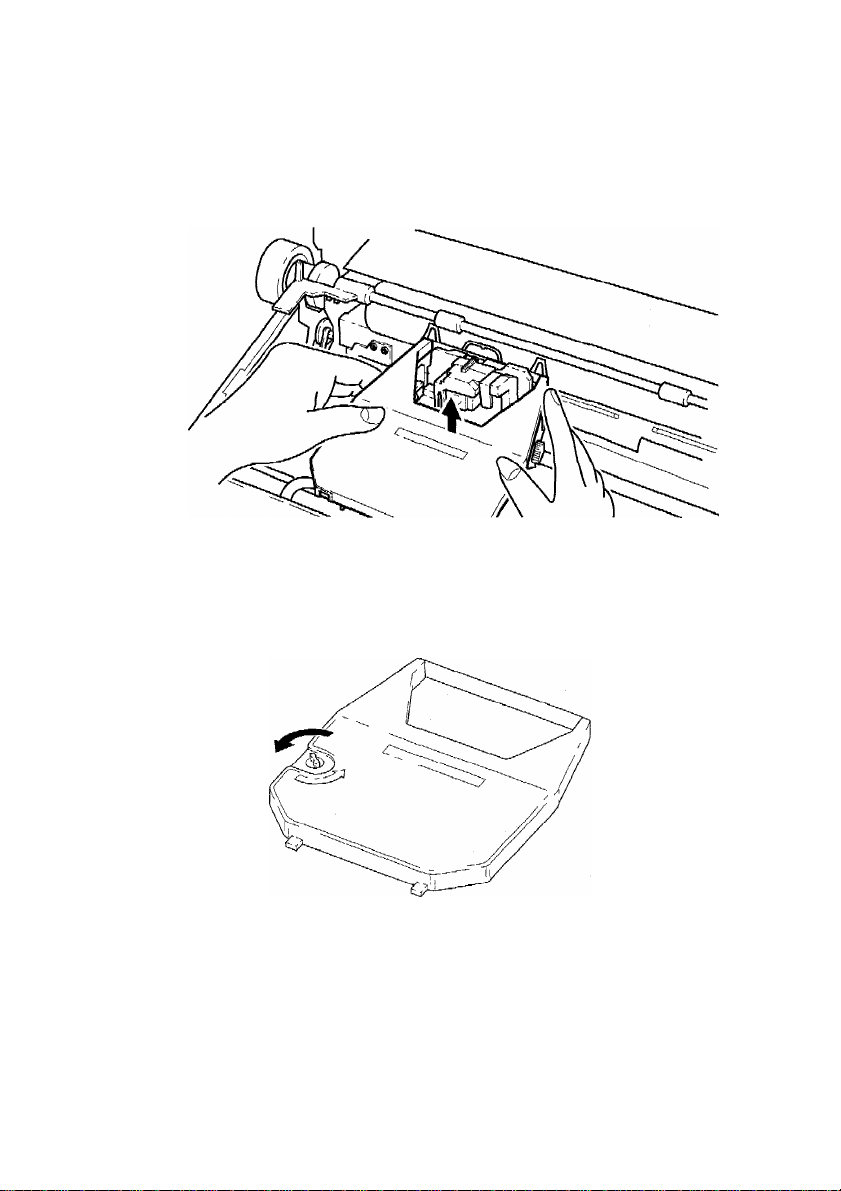
Removing the cassette daisy wheel
To remove the cassette daisy wheel, pull the locking lever towards you to release it, then
grasp the ‘ear of the cassette daisywheel between your thumb and forefingerand simply
pull it out
Note;
The cassette ribbon need not be removed in order to remove the cassette daisy wheel.
Page 20
Setting Up Your Typewriter
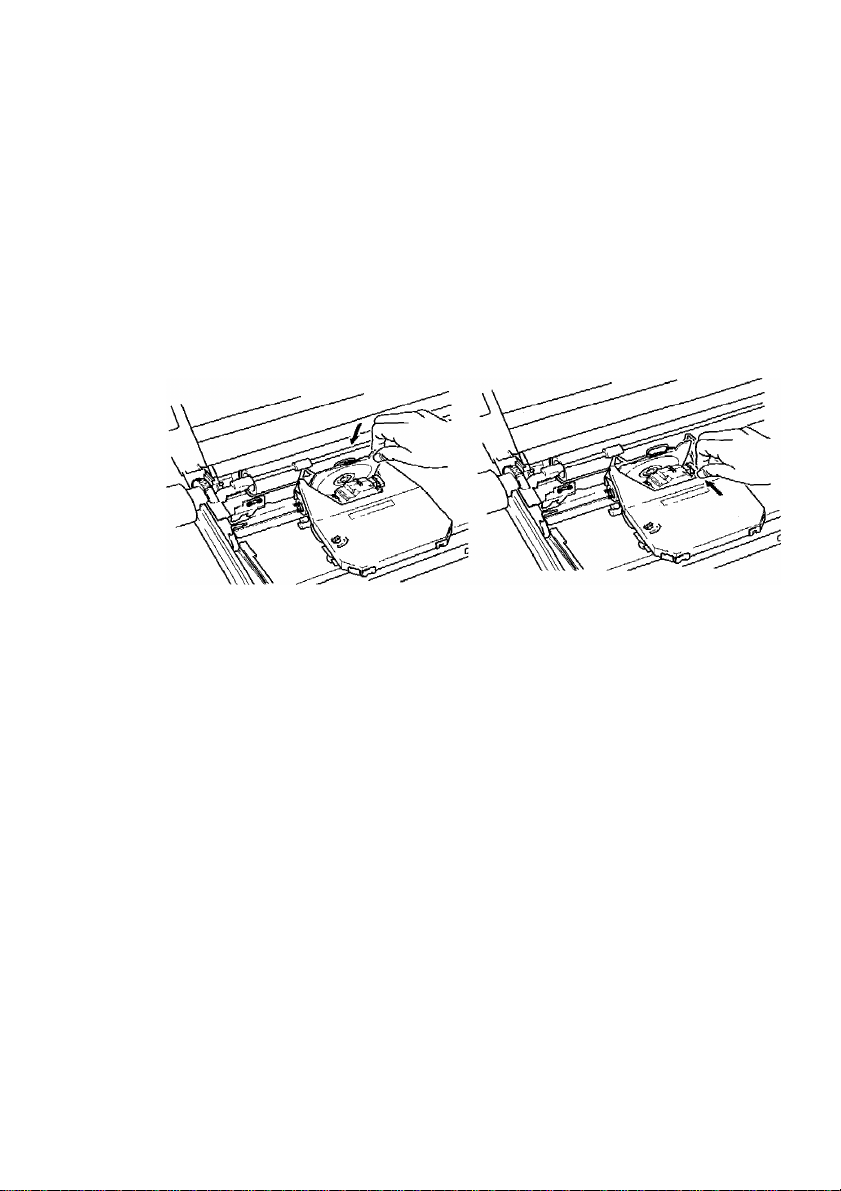
Inserting the new cassette daisy wheel
Grasping the 'ear' of the new cassette daisy wheel, slip it into the cassette guide slot and
slide it in as far as it will go.
Now press the locking lever back toward the platen until it clicks into place. Do not force
the lever. If you have any difficulty, recheck the cassette daisy wheel to ensure that it is
properly set and try again.
Notes:
1. Be sure that the ‘ear’ ofthe cassette daisywheel is to the right during insertion. Putting
it in backwards can damage both the cassette daisy wheel and the motor mechanism.
2. If the cassette daisy wheel is not properly locked into position, characters will not be
properly typed.
3. There is a wide selection of Brother cassette daisy wheels available.
Cassette Ribbon
The wide range of Brother cassette ribbons available have two unique features in common:
they are clean and troublefree. Clean means that the ink goes where it is supposed to go,
on the paper, and not on your- hands!
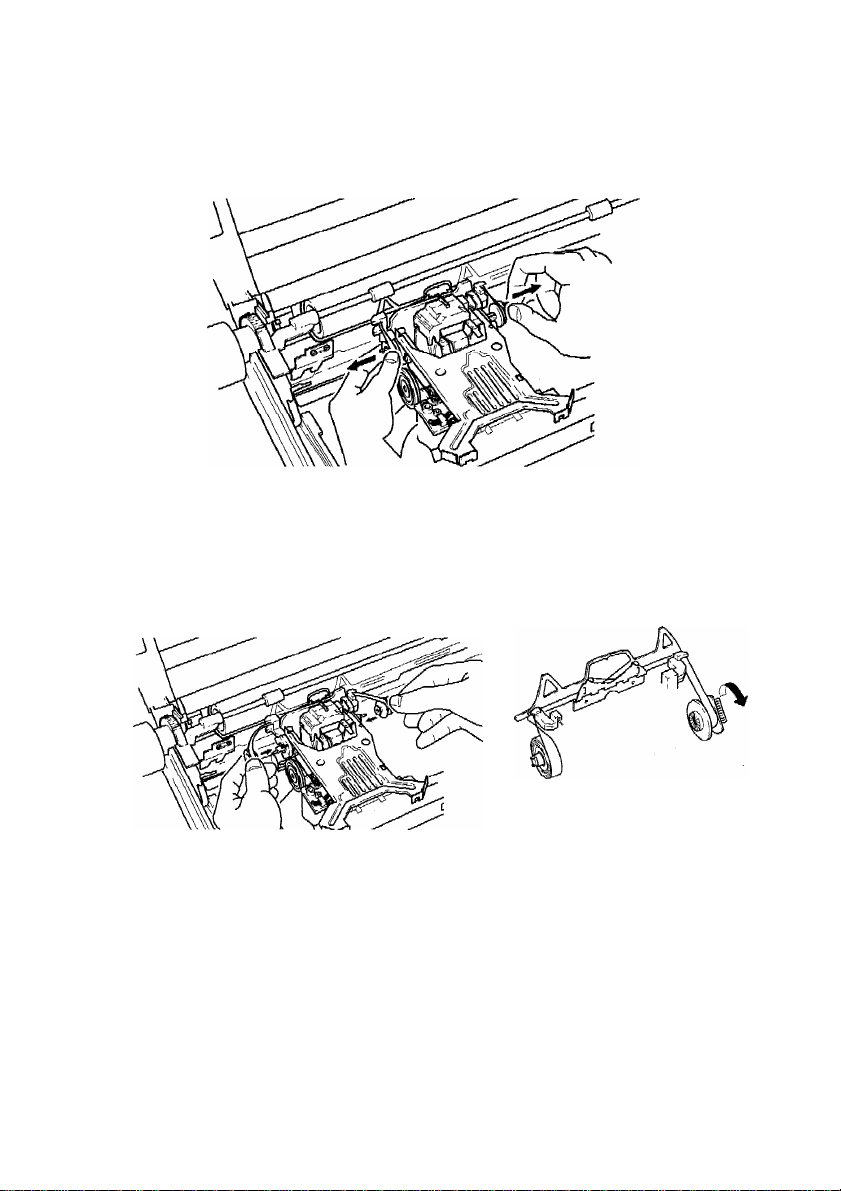
Removing the old cassette ribbon
First, use the [SPACEBAR] or [BKSP] key to move the carrierto the center ofthe platen. To
remove the cassette ribbon, hold the cassette with both hands and raise the front end (that
near to the platen). Then, when the ribbon is clear, simply lift the cassette up and out
WEUS
Page 21
Setting Up Your Typewriter
2. Brother cassette ribbons are available in four different types:
Correctable film ribbon (standard w^ith this model)
One-time film ribbon
Multistrike film ribbon
Nylon ribbon
The correctable film ribbon is also available in red, blue, green and brown.
Correction Tape
The correction tape guarantees afaultless document every time. What's more, the bottom
of yourtypewriter will never be full of pieces of old correction paper and lumps of dried
up correction fluid!
Removing the old correction tape
If you need to replace the correction tape, first make sure that the carrier is in the center
of the platen by using the [SPACEBAR] or [BKSP] key. Then remove the cassette ribbon.
Now just pull out the left and right spools of the old correction tape from the carrier.
Page 22
Setting Up Your Typewriter
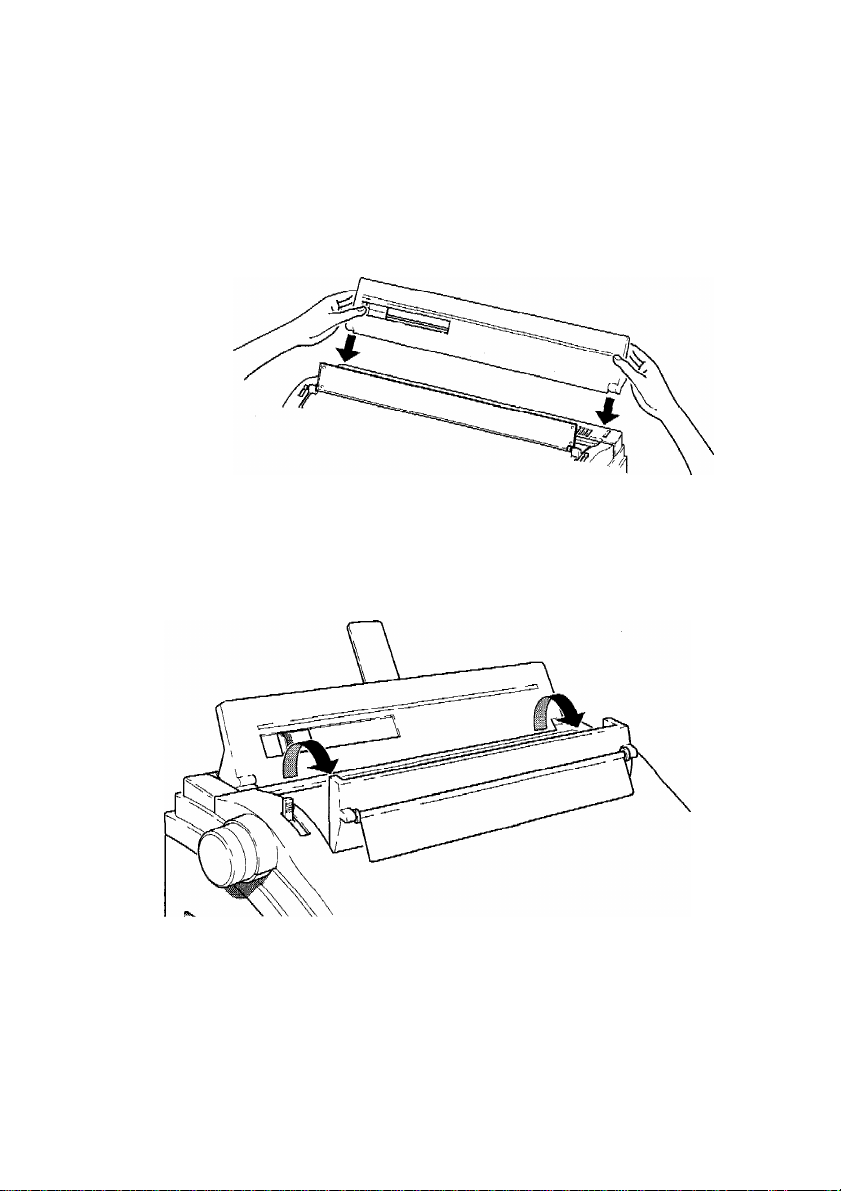
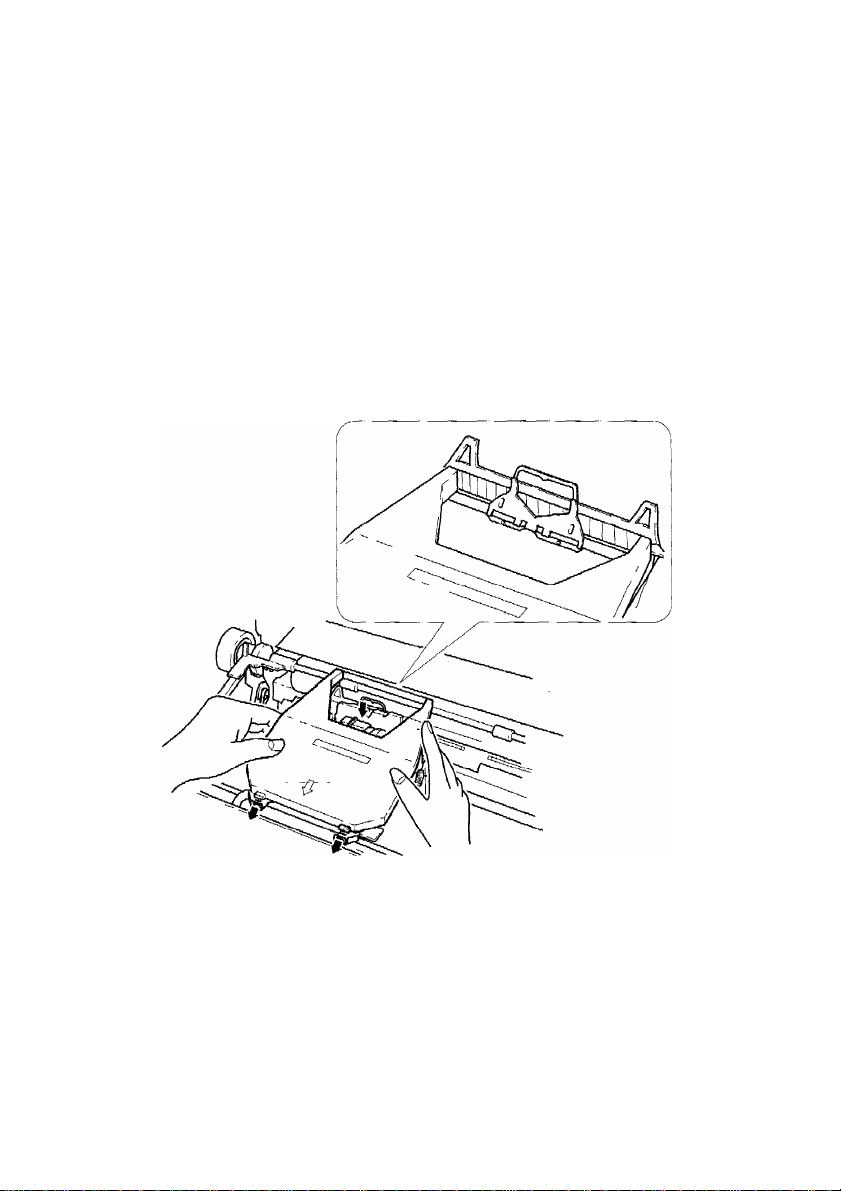
Inserting the new cassette ribbon
Remove the stopper from the nev/ cassette ribbon and turn the ribbon feed knob
counterclockwise to tighten the ribbon.
Now locate the lugs on the back edge of the cassette into the locating holes in the cassette
ribbon table, and slide the ribbon between the ribbon guides.
With the ribbon set between the ribbon guides, press the cassette down until it locks into
place. Turn the ribbon feed knob again slightly anticlockwise to tighten the ribbon.
Notes:
I. A window is provided in the cassette to allow you to check on the remaining amount
of ribbon.
Page 23
Setting Up Your Typewriter
Installing the new correction tape
First install the left spool, then thread the tape across the left and right guide rollers and
install the right spool. Make sure that the active (non-shiny) side of the correction tape is
facing towards the platen.
Take up the slack by tumingthe right spool counterclockwise until the white portion of the
tape begins to wind onto the right spool.
Note:
Brother' correcLion tapes are available in two types:
Liftoff correction tape (standard with this typewriter)
This is used together with the correctable film ribbon.
Coverup correction tape
This is used together with the multi-strike film ribbon, one-time film ribbon or the nylon
ribbon,
Page 24

Setting Up Your Typewriter
Switching The Machine On And Off
Before switching on for the first time, check that there is no floppy disk in the disk drive
on the right-hand side of the machine, as this can complicate matters, if there is a disk in
the drive, press the rectangular button to eject it.
Use of the disk drive will be discussed later.
The power switch is located on the left hand side of the machine near the back. To switch
on, press the side of the switch marked 1 - ON so that the red bar on the switch is visible.
To switch off, press the side of the switch marked O - OFF.
When you first switch on yourtypewriter, the machine will initialize itself The carrier will
move to the extreme left position, then to the left margin, and the daisywheel will rotate,
then stop. During this time the display will show the message;
■v
■ ¿iniUKK ING»= = a
After this the MAIN MENU screen appears.
\ 'CriiH 1N MEHU.i^
S" 1 U.< jii = -I' ■ r ! Y r'E ■H" = r I L.C. rift
<
_____________________________________________________
This gives you the four operating options of your typewriter
You can select these options in one of two ways;
1. Usethe leftand right cursor keys — and to move the rectangularcursorsymbol
■!r'-iSbc.lih.r'‘íT
(1) to the option you wish to choose. Then press the [RETURN] key to confirm the
selection.
2. Use the shortcut of pressing the number key corresponding to the option you wish
to select. There is no need to press the [RETURN] key after pressing the number key,
the machine will go straight into the option you selected.
The 4— and —^ keys can be used in almost all operations of the machine, for selecting
options and moving left and right across the display.
Page 25

Setting Up Your Typewriter
You will probably wantto use cursor selection until you become familiar with the machine,
to reduce the possibility of mistakes, but for conciseness we shall always refer to selection
by number.
Selecting TW lets your machine operate as a normal typewriter, but w'lth the useful option
oftyping each line oftext on the liquid crystal display screen, for correction before printing.
WP is the wordprocessor mode. When you select the word processor mode, the text you
type will be displayed on the liquid crystal screen, and you can correct mistakes, insert and
delete words, and perform many other editingfunctions, to make sure that yourdocument
is perfect before you actually print it on paper.
You can also save your documents as files on the floppy disk and recall them at any later
time.
F TYPE selects the Form Typing mode, which you will find a great time-saver if you
frequently have to ПН in pre-pririted forms. Once you have set up the typewriter for a
particular form, you will be able to type in the blank spaces on the form and, when you have
finished typing in one space, the printing carrier will automatically move to the beginning
of the next space.
FILE MANAGEMENT is the mode you will select when you want to carry out operations
on the document files you have stored on a floppy disk, such as copying, renaming, deleting
and so on.
It's easy to switch between the various operating modes of your typewriter. If you are in
WP, F TYPE or FILE MANAGEMENT mode, and need to do some quick typing such as
a short memo or envelope, you can simply press the [TYPE] key to jump into TW mode,
After doing your typing, press the [TYPE] key again to jump back to what you were doing
at the point where you left off.
If you are in TW, WP, F TYPE or FILE MANAGEMENT mode, and want to quit it
completely and select another mode, simply press the [FILE] key. This will allow you to
save your work, then return you to the MAIN MENU, from which you can select a different
option.
Loading Paper
After switching on the machine, you are ready to insert a sheet of paper and set up your
typewriter ready for typing.
Page 26
Setting Up Your Typewriter
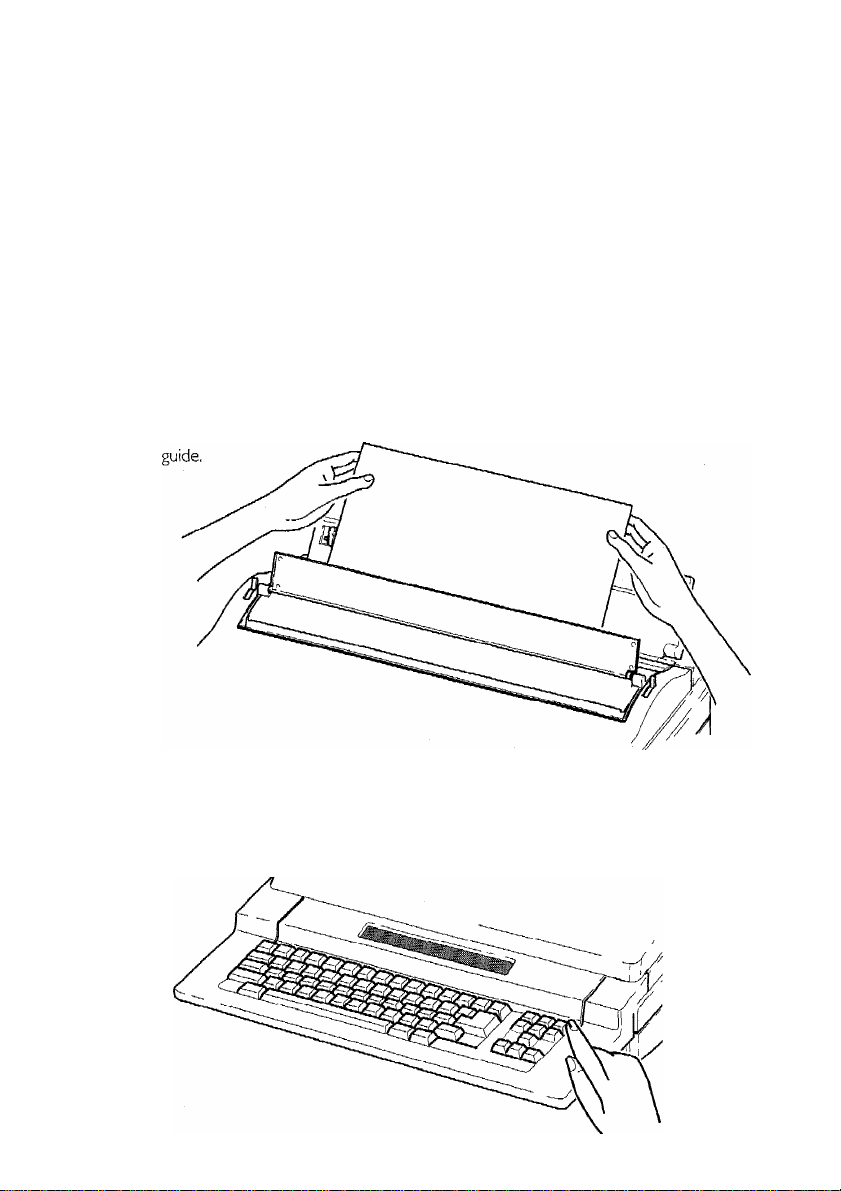
Automatic Paper Insertion
Inserting a sheet of paper into a typewriter has never been simpler just three easy steps
and you’re off! Most types of smootl i finish paper can be used with your typewriter. Rag
content and other types of rough paper, however, are not recommended.
First, ensure that the power switch is ON, and that the PAPER RELEASE LEVER is set to
the back position.
Place the paper guide in the desired position, then, holdingthe sheet as straight as possible.
Now press [P INS]. The carrier will first move to the left end of the platen and then back
to the center of the margin scale, the paper bail will lift, and the platen will rotate to feed
in the sheet of oaoer automatically.
Page 27

Setting Up Your Typewriter
Afterthe paper has been inserted, press[RETURN]to move the carrier to the left margin
position. When you are in normal typing mode, you will be prompted to do this.
PRESS RTN-
S’^U Yr'L MUL'-L,
Notes!
The distance the paper is fed in will determine the position of the first typing line in
relation to the top edge of the paper (the top margin). You can adjust this using the
START SET function, as described later. The factory setting of the top margin is one
inch.
If the paper is crooked or not properly aligned after automatic insertion, it may be
adjusted manually. First turn the platen or use [INDEX] to feed more paper through,
then pull the paper release leverfoiw/ard. This will liftthe paper bail and release the paper
so that it may be moved manually. Align the paper until it is straight, then return the
paper release lever to its back position and turn the platen knob or use [INDEX] and
[R INDEX] to return the paper to the position where you wish to begin typing. For
finer adjustment, use these keys with the [CODE] key held down.
Manual Paper Adjustment
If the paper is crooked or not properly aligned after automatic insertion, it may be adjusted
manually. First pull the paper bail lever forward to raise the paper bail and avoid it catching
on the paper. Turn the platen knob or use [INDEX] to feed more paper through, then
pull the paper release lever forward. This will liftthe paper bail and release the paper so that
it may be moved manually. Align the paper until It is straight, then return the paper release
lever to its back position and turn the platen knob or use [INDEX] and [R INDEX] to
return the paper to the position where you wish to begin typing. For finer adjustment, use
these keys with the [CODE] key held down.
Page 28
Setting Up Your Typewriter
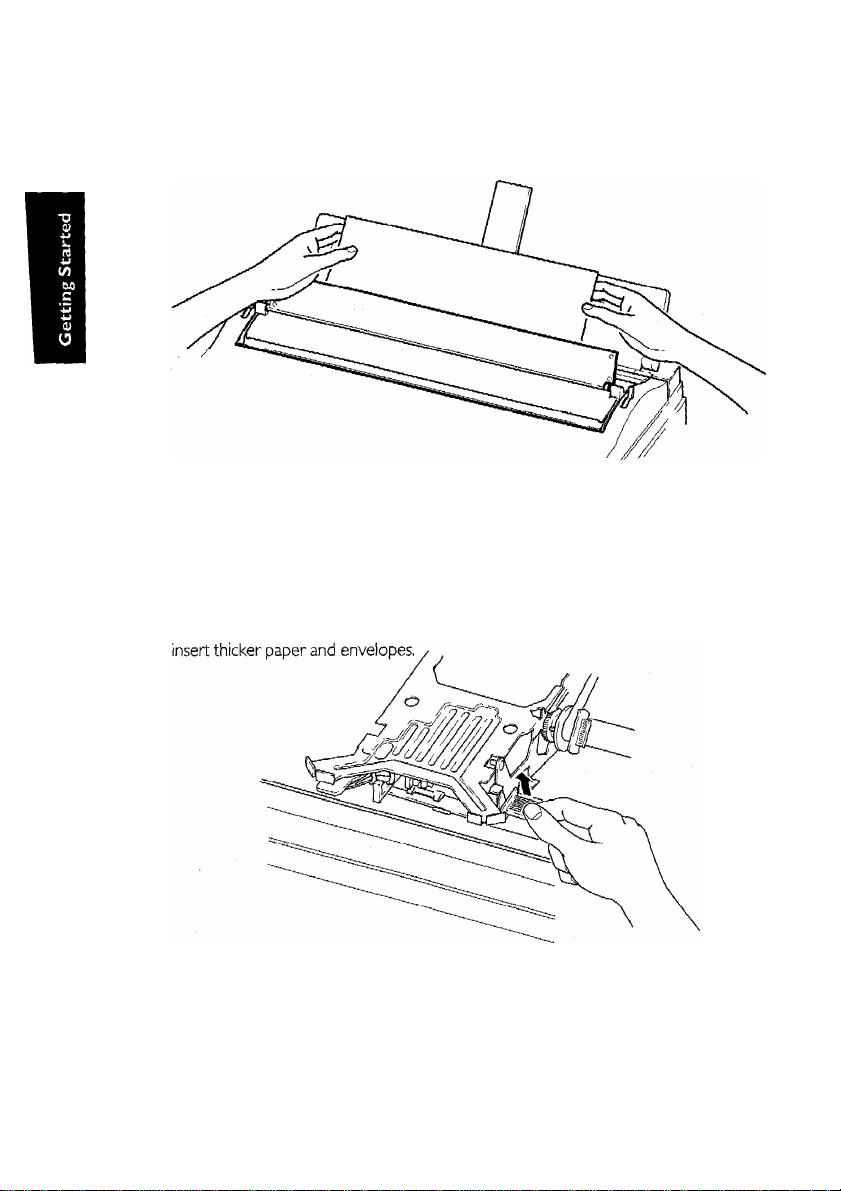
Paper Thickness Control
The paper thickness control is located on the right side of the cassette ribbon table.
The lever is normally pushed right down in its standard position. Pulling up the lever
increases the space between the carrier print head and the platen, thus enabling you to
Self-Demonstration
Your typewriter has a built-in self demonstration that tells you about the many advanced
features of your machine.
Page 29

Setting Up Your Typewriter
To activate the self-demonstration:
1, Make sure that your machine is sv/itched on, with a daisy wheel and cassette ribbon
fitted, and that the MAIN MENU is in the display.
2. Press the MENU key. The following message will appear on the display:
»iltNU-i
1SSET Uh' 2sSELh DEflO
3. Press the [2] key to select SELF DEMO. The following message will appear:
INSERT PPPER SMD PRESS RTN =
4, Insert a sheet of paper, as described earlier, and press [RETURN].
The following message will appear, and the self-demonstration will begin to print.
j^PkE™'S ChNllL huR nHiN MlNU
< i-biuLF L*LmU> >
If you wish to cancel the self-demonstration before it has finished, hold down the [CODE]
key and press the [CANCEL] key.
Multilingual Keyboards
If you wish to type in some foreign languages, for example Turkish, you may find that the
English daisywheel does not contain all the required characters, andfor languages with nonLatin characters such as Greek the character set is completely different
Of course, you can simply put a foreign language daisy wheel in your typewriter, but you
may find the results are not very good.
Firstly, the keyboard layout may not be the same as it would be on the proper foreign
language keyboard.
Secondly, when you type a character using an English daisy wheel, the printing impact is set
to suit that particular character, so that the print density remains even, (For example, a small
character such as a full stop needs less impact than a capital B).
Page 30

Setting Up Your Typewriter
If you use a foreign language daisy wheel, the typewriter does not know the correct typing
impacts forthe characters on that daisy wheel, and some characters may appear darkerthan
others.
Fortunately, the multilingual keyboard feature of yourtypewriter allows you to get the best
results when you use foreign language daisywheels.
To select a different keyboard language;
I. With the main menu on the screen, press the [MENU] key.
The following menu will appear.
1SSET UP 2sSELF DEMO
2. Press [I] to select SETUP.
The following message will appear
The first item in the display is shown as asterisks, because it is the default value, which is
. •=-. "<C I Ur
different for each country, (e.g UK English forthe United Kingdom).
To see other options, you can use [INDEX] and [R INDEX] to scroll the display up and
down, and ^— and to select either the left or right hand option in the display.
i jrr-. \
W B lie? '■ju
\ y
a
Page 31

Setting Up Your Typewriter
i! 02 > £Ni3
< 02 )
J.ENC-i GERMhN
ENG
FRENCH
TURKISH
DUTCH
suiss>:;kb2;:=
IThLIhN
FIN--SUE
PORkBKHZILi
NOR.--Di=iN<DPN;:i
S“SPfiII
The two digit number alongside the language selection is the keyboard and daisy wheel
code forthat language. For example, the keyboard code for Dutch is 32, and all Dutch daisy
wheels are labelled 32 or32F, depending on whether the daisywheel has the vertical bar
(1) framing character or not A complete listing of multilingual keyboards, by language, is
given in Appendix B.
When you have selected the keyboard layout you want press [RETURN] to confirm the
selection and return to the MAIN MENU.
Press [CODE] + [PRINT] to print out a map of the foreign language keyboard layout
You must have the foreign language daisy wheel installed to do this.
To return to the MAIN MENU without changing the keyboard code, press [CODE] +
[CANCEL].
< 20 >
<29)
<32)
< 36) GREEK<KB2)
<52)
<60)
< 64 ) nor.--dhn<ngr)
<70)
<7S)
CRN
L-SPR < 27 )
S=RFR <3'1)
SUiISS<KB1)
LhTIN
POR
ICE <74)
<1B)
< 3 b )
<42)
<53)
<64)
<70)
Note!
1. The machine returns to the default keyboard setting each time it is switched off If you
want to use another keyboard you must set it up each time the machine is switched
on.
Page 32

Page 33

•jS"- •■•ЗК'
Ж
What is a Disk Drive?
While your typewriter is switched on, the machine can store up to 32,400 characters of
text in its internal memory, but there are two disadvantages to this. Firstly, the stored text
would be lost if the machine was switched off, and secondly, once the memory became
full you would not be able to store any more text.
To allow you to save unlimited amounts oftext, yourtypewriter is equipped with a floppy
disk drive. This is located in the right-hand side of your typewriter.
The floppy disk drive allows you to transfer your document from the machine’s memory
and record it on a rotating disk made of a magnetic material similar to audio and video
cassette tapes.
Once you have saved a document on a disk, it will remember the document even if the
power is switched off. Furthermore, if a floppy digli becomes full and can hold no more
information, you can remove it from the diskdrive and replace it with a blank one. You can
also use a disk from yourtypewriter (and the documents on it) in some other Brother
wordprocessors or an IBM compatible personal computer,
Page 34

The Disk Drive
What is a File?
A floppy disk records documents as a sequence of coded data in the form of magnetic
signals on the disk's surface. The collection of data that makes up a particular document
is known as a FILE. Since there may be many different documents saved on a floppy disk,
each one must be given a FILE NAME so that you can see what files are on the disk, and
retrieve the one you want without having to read every one on the disk
A file name consists of up to 8 characters, followed by a 3 character code called the file
name extension. The extension is used by your machine to identify what kind of file this
is. For example, TEXTFILE.WPT is a Brother wordprocessor file.
When you are giving your files names, you do not need to worry about the extension, it
is added automatically by yourtypewhter. The only characters that are allowed in file names
are letters Ato Z, numbers Oto 9 and the hyphen (-). Yourtypewriterdoes not distinguish
between upper and lower case letters in file names, and letter input will be converted to
upper case.
If you try to input an invalid character, or type more than 8 characters in the file name, a
warning beep will sound.
When you have to cany out operations that involve loading files into memory, a list of files
will appear on the screen. These screens are known as index screens.
File names should be chosen so that you can easily find the document you want on the
disk You may wish to use names that are mnemonics, or arranged in alphabetical or
numerical order.
Types Of Disk Your Machine Can Use
This machine accepts only the following types of 3.5 inch floppy disks:
MF 2DD (Double Sided/Double Density/Double Track)
Your machine cannot use high density (“HD") floppy disks, so be sure to purchase only
double density double track (“DD") disks. It is recommended that you use Brother brand
disks.
Page 35

Inserting and Removing a Floppy Disk
Insert the floppy disk as shown in the illustration. You will feel some resistance if you try
to insert the disk the other way around.
To remove the disk, simply press the eject button .
The Disk Drive
CAUTION! The floppy disk may be inserted and removed when the power is either on
or off It may also be left in the drive while transporting the machine. However, you should
never insert or remove it while a message indicates that a disk operation is in progress, for
example:
Page 36

The Disk Drive
■<:iPLEh’bL Uifi I !
Initializing New Disks
A new floppy disk can be used by a system only after being “formatted" - that is, initialised
by the system for specific, use by that system.
Whenever you carry out an operation for which your typewriter needs to use the disk
drive, such as saving document the typewriter first checks that there is a disk in the drive.
If there is not, the following message will appear in the display:
^INSERT DISK fiND PRESS RTN.
You should insert a disk and press the [RETURN] key,
If there is a disk in the drive, the disk format is checked. If the disk is unformatted or has
a different format, the following prompt appears:
^INITIALIZE? VyN
Press m to initialize the disk, or [N] to abandon the procedure. Initialization of the disk
will take a few minutes,
•WARNING! - Initializing a disk erases any data that might be on it. If you initialize a disk
from a personal computer, for example, the files will be completely destroyed. Once the
disk has been initialized, however, it will be in the proper format for use with your
typewriter,
•The disk which comes with this machine is not initialized.
Page 37

The Disk Drive
Note!
Your typewriter can read disks that have been initialized on IBM-compatible personal
computers and other wordprocessors that use the same disk format. However, it can use
only certain types of files created on those machines.
If you ask your typewriter to use an incompatible type of file, it will give the following
warning:
1 NUhL id hi Lb ! VPE
Hold down the [CODE] key and press the [CANCEL] key to abandon this operation.
::!TCC"
Caring for Your Disks
Although 3.5-inch floppy disks are rugged and the system has incorporated in it every
reasonable precaution to prevent inadvertent erasure, accidents will happen. New disks
frequently come with cards or labels listing some of the things that can go wrong; for
example:
Mechanical damage due to heat, dust, dropping, crushing, spilled liquids, etc.
Electrical damage due to exposure to magnetic fields. These are generated, not just by
magnets, but also by electrical and electronic equipment such as loudspeakers, television
sets and computer monitors, and many other types of equipment,
DON’T
- leaye your disks lying around where they may become dirty or damaged,
- leave your disks lying on or near electrical or electronic equipment,
- open the shutter of the disk and never touch the surface directly.
- use magnetic materials near the disk.
- expose the disk to extremely high or low temperatures.
DO
Store your disks in the original manufacturer's carton or in a dustproof disk storage case.
Page 38

The Disk Drive
Write-Protecting Your Disks
All 3.5-inch floppy disks hdve a switch that protects their contents from accidental erasure.
When the switch is in its READ ONLY position, you can read information from a disk, but
you cannot erase old information or store new information on the disk Put the switch in
the READ ONLY position to protect a disk containing valuable information.
Note!
Ifyourtypewritertriesto store information on a write-protected disk for example, saving
a document, the following message will appear
40RITE PROTECTED DiSK-
nOUE PROTECT TRB. PRESS RTN TO RETRY-
Backing up a Disk
The best insurance against losing important data is to make backups (duplicate copies) of
your files. You can do this with the COPY function, as explained in the section on FILE
MANAGEMENT.
Page 39

Disk Error Messages
During disk operations, you may see the following warning messages;
-iiL-' I bK i" ULL. =
INSERT NEU DISK fiND PRESS RTN-
This means the disk can hold no more data. Replace it with a disk that has some
space remaining.
jxriri CTT! m “ i-iL| P-TErL-'"
■ =3 I UU i il-il i i rj.L_ir.ZE i_ii -j L= .L Z'K ■ ■
INSERT NEW DISK HND PRESS RThT
The maximum number of files allowed on a disk is I 12, even if the disk is not full.
Replace it with a disk that has some space remaining and contains less than I 12
files.
The Disk Drive
■^y!:iiEtyTiETE?\„y^^i<. erRuR;^__
INSERT NEW L’ibK mNL' !"‘K!r.!r>b RTN-
Yourmachinethinl<sthatthediskmay be faulty - replace it, ifthe problem persists,
consult your dealer.
Page 40

Page 41

■ '
The Keyboard
.
I;?''!V , ■■, ■ '■■■' ■■ .^ , ■
This section teiis you how to use your machine in the typewriter or
TW mode, in this section you wiii iearn how to do basic typing and
use the many usefui features of the machine.
Don't be afraid to experiment Whatever keys you press, you cannot
damage the machine, and the worst that can happen is that you
may waste some paper.
Your typewriter's keyboard has a full set of character keys for typing alphabetic and
numeric characters, symbols and punctuation marks. It also has a number of keys for calling
up the many functions of the typewriter, the use of which will be discussed. A diagram of
the keyboard, with a brief description of each function key, appears on pages 6 and 7.
ALT and CODE Keys
Many keys ofthe typewriter have text or symbols for secondary functions printed on them
in green.
These functions are selected by first holding down the [CODE] key, then pressing the key
for the function.
Some of these functions can also be selected using the [ALT] key. The use ofthe [CODE]
and [ALT] keys in relation to specific functions will be discussed later. Note that keys
shown as being used with the [ALT] key can also be used with the [CODE] key, but keys
shown as being used with the [CODE] key will not work with the [ALT] key.
Page 42

Basic Typing
Important Notes!
1. Forconcisenfiss, once the function ofalcey has been explained, we shall use the symbol
for the function, for example [BKSP] for BACKSPACE. When referring to the
secondary function ofthe key, we shall use the symbol for the secondary function, for
example [BS I ] for MICRO BACKSPACE. When referringto functions used with the
[CODE] or [ALT] keys, we shall say “press [CODE] + [BS I]’’ to mean “hold down
the [CODE] key, then press the [BS I] key", for example.
2. When the flashing cursor symbol is over a character, the display alternates between
the cursor and the character, e.g. ® ^ E —^ As it is not possible to show
this alternation in the diagrams, the cursor symbol will, in general, be shown instead
ofthe character, except where it is more important to see the text.
Typewriter Operation
When using your typewriter in TW mode, you can use it like an ordinary typewriter, with
each character being printed as it is typed. Alternatively, you can type a line of text on the
display, and only print it after you have checked and corrected it. In this section we will
look at these different modes of operation, but first, you need to select typewriter mode.
Selecting TW Operation
<<MhIN r1ENU>>
TliJ 2s yp 3=F TYPE 4s FILE MPNfiGEMENT
The machine should be switched on, with the MAIN MENU in the display.
To select typewriter operation, press [I]. If the machine has not been used before, the
following message should appear.
TVC'Cr r-fOPiP -.. \
i I i L_ ! ■■■
The number in the top right-hand comer of the display tells you how many characters
remain between the current carriage position and the right margin. It will decrement by
one for every space that the carriage moves to the right, and is useful for setting tabs as
well as telling you how many characters remain on the current line.
Page 43

The left and right margins are factory set to 10 and 75, so this number will be 65 if the
machine has not been used before. If the machine has been used before and the margins
have been changed, this number may be different,
If the machine has been used before, you may see the display "RUT” on the top line of
the display. Alternatively, or “..TST" may appear in this position, in which case the
bottom line of the display will be blank. These display messages have to do with the four
operating modes of the typewriter, which will be discussed later.
Moving Around The Page
Your typewriter has keys that let you move the carriage accurately to any part of the page
and back to your original typing position, without having to make any time-consuming
manual adjustments of the platen.
Carrier Return
The [RETURN] key advances the paper by one line, depending on the line space setting,
and returns the print carriage to the left margin.
Basic Typing
Tab Key
The tab key moves the carriage to the right by one tab position each time it is pressed,
the distance depending on what tabs have been set
Index and Reverse Index
The index and reverse index keys are used for vertical adjustment of the paper, and for
shifting the paper up and down by 1/12 inch fortyping subscripts and superscripts.
The [INDEX] key moves the paper up by 1/12 inch (moves down the page) each time
it is pressed.
The [R INDEX] key moves the paper down by 1/12 inch (moves up the page) each time
it is pressed.
If [INDEX] or [R INDEX] are held down for more than 0.5 seconds, the paper will move
continuously until the key is released.
TAB
FIND
R INDEX
MICRO
Page 44

Basic Typing
Note!
When typing on the display in TW or WP (non-printing) mode, [INDEX] and [R INDEX]
are used for scrolling the display up and down.
Micro Index/Reverse Index
If [INDEX] and [R INDEX] are pressed while holding down [CODE], the up or down
movement is I /48 inch.
X—
Cursor Keys
The left and right cursor keys - — and —^ move the carriage left or right by one
character. If ft— or is held down for more than 0,5 seconds, the carriage will move
continuously until the key is released. If the cursor keys are used with the [CODE] key
held down, the carriage movement is 1/120 inch.
However, when typing on the display [CODE] + — and [CODE] + move the
cursor symbol (^) to the beginning or end of the line respectively,
^ 1
ssetI
/
Backspacing
You may wish to move the carriage back over text you have already typed fora variety
of reasons; for example, to manually underline text, or when making corrections.
Your typewriter has three different backspace functions.
Simple backspace
Press the [BKSP] key to move the carnage to the left one space at a time. Holding down
[BKSP] for more than 0,5 seconds moves the carriage continuously to the left.
Note!
It may appearthat [BKSP] duplicates the function of ^—, but when typing on the display
in TW or WP mode, ft— merely moves the cursor to the left, whereas [BKSP] moves
the cursor to the left and deletes the text that has been typed.
W
;WEU£
BKSP
BS1
Page 45

Basic Typing
Express backspace
Holding down [CODE] ?^nd pressing the EXPRESS BACKSPACE key - [EXPR] will bring
the carriage immediately back to the left margin, When typing on the display, [CODE] +
[EXPR] moves the cursor symbol to the beginning of the line.
Micro backspace
Holding down [CODE] and pressing the MICRO BACKSPACE key - [BS I] will move
the carriage to the left by I /120 of an inch. As the distance backspaced remains constant
at I /120 of an inch regardless ofthetyping pitch being used, backspacing in this case varies
by pitch as shown in the following table:
Pitch Spacing
10 I /12 of a character pitch
12 I /10 of a character pitch
15 I /8 of a character pitch
PS I /10 of a character pitch (nominal)
Thisfunction is useful in numerous different ways, including positioning a character or word
when the paper has been reinserted into the typewriter, or fortyping a character or word
into a limited space on the document. See “Insertions And Deletions" in the next section
for more information.
RELOC
EXPR
BKSP
BS1
Relocation
If you break off typing and move the carriage back along the typing line, using the cursor
and backspace keys, to make a correction, for example, yourtypewriter remembers where
the carriage was when you left off typing.
When you finish making corrections, the [RELOC] key returns the carriage back to your
original typing position.
Note!
Relocation is possible only while making corrections on the current typing line, or the
pr^ious line.
RELOC
EXPR
Page 46

Basic Typing
Status Indicators
Before you start typing, you will probably want to set up your typewriter with the correct
margins, tabs, line spacing and typing pitch, so that the layout of your document is correct
when you print it. You may also wish to switch on (or ofif) text attributes such as bold,
underline and expanded printing.
Before you can change any of the items above, you need to know what the current settings
are, The most frequently used status indicators are shown permanently on the top line
of the display, for example:
FIND SHFT CNT BLD EXP PUT Sf
<<iVPE M0DE>>
The others status indicators can be displayed by pressing the [ALT] key, when the
following display will appear
P X N1-' bHi" r UNT b'LD LXP UU1 bP KB i
PI i UM = 1U L = bP “ 1 ■> U HZ s !"■ FUT = 'I
Don’t worry if the display is not exactly like the examples shown above, since the actual
indications will depend on how the machine is set up. Some of the indications may be
different from those shown in the above example, and some of the indications on the top
line of the display may be blank, indicating that a function is turned off.
Each of the above indicators shows the current status of a text attribute such as bold and
underline, and layout or format attributes, for example typing pitch and line spacing. At
this stage you probably won't know what many of these indicators mean. A brief glossary
is given in the table below, and all the functions will be explained in detail later.
If no indication appears in a particular position in the display, the function is turned off apart
from the typing mode, where no display means normal typing mode.
Changing Settings
9“O-J
INPsil
Those functions permanently shown on the top line of the display (apart from [SHIFTj
and [SHIFT LOCK]) are changed by holding down the [CODE] key and pressing the key
for the function to be changed, Some of these functions are simply toggled on or off each
Page 47

time the function key is pressed. Others cycle through a number of different settings as
the function key is pressed repeatedly.
Those functions that are only displayed when the [ALT] key is pressed can be changed
by pressing the key for the function while the [ALT^ key is held down. These functions
selected also work with the [CODE] key, but the [AL"n key allows the status of the
function to be viewed before pressingthe keyto change it, whereas the [CODE] key does
not display the function until the function key is pressed, which also changes the setting.
Note!
The status oftabs and margins is not shown on the display. These have to be set using the
counter in the top right comer of the display.
STATUS INDICATORS
Basic Typing
FUNCTION DESCRIPTION DISPLAY
Paragraph indent mode OFF NONE
Paragraph indent mode ON FIND
Shift, Shift Lock and CAPS all OFF NONE [SHIFT] and
FUNCTION KEY(S)
[CODE] + [P IND]
[CODE] + [CAPS]
Caps Lock ON
Shift key held down SHFT [SHIFT]
Shift lock ON SHFT
Underline OFF
Continuous Underline CHT
Word-by-word underline liIRD
Bold printing OFF
Bold printing ON
Expanded printing OFF NONE [ALT] + [EXPAND]
Expanded printing ON
COPS
[CODE] + [CAPS]
[SHIFT LOCK]
(overrides CAPS)
NONE [ALT] + [UNDLN]
NONE
[ALT] + [BOLD]
BLD
E;..;p
Page 48

Basic Typing
Normal typing mode
Auto carriage return mode
Line-by-line typing mode
Justified typing mode JUST
Spelling checker OFF NONE
Spelling checker ON
Keyboard 1
Keyboard 2 KB: 2
Keyboard 3
Typing impact Low
Typing impact Medium
Typing impact High
Typing pitch 10
Typing pitch 12
Typing pitch 15
Proportional spacing
Single line spacing
NONE
PUT
L.---L
qp
KB: 1
KB:3
iriP:L
IMP: ri
iriP:H
PITCH:10
PITCH:12
FITCH:15
PITCH:PS
L.SP:1.0
[ALT] + [OPERATE]
[ALT] + [SPELL]
[ALT] + [KB]
[ALT] + [IMPACT]
[ALT] + [PITCH]
[ALT] + [LINE]
1 1/2 line spacing
Double line spacing
Hot zone (3 to 12 characters)
Current format number (1 to 5) FMT: (1 to 5)
L.SP: 1.5
L. SP:2"0
HZ: (3 to 12)
[ALT] + [HZ SET]
[ALT] + [FORMAT]
Note!
Keys shown with [ALT] key will also work with the [CODE] key, but keys shown with
[CODE] key do not work with the [ALT] key.
Page 49

-;:vf;-c'."^-—-
sv',*^'> s' ':'.-',.A'!^vCvs
anw,,',
..h....
....
A. ..1... ^..n.r*. .ni'
v^T- ™;:- ■: ^r:
Selecting Typing Mode
When used in TW mode, your typewriter has four distinct modes of operation:
Normal operation (manual carrier return)
Automatic carrier return
Display typing (line-by-line, left aligned)
Display typing (line-by-line, justified)
The typing mode is selected by holding down [ALT] and pressing the [OPERATE] key.
Each time [OPERATE] is pressed, the typing mode indication will change in the
following sequence:
NORMAL (no display) —^ flUT —^ L/L ^ J!i>T —^ NORMAL
Normal (Manual Carrier Return)
In normal typing mode, your typewriter prints each character as it is typed. Carrier return
is accomplished manually, by pressing [RETURN] at ftie end of each line.
Pressing [RETURN] advances the paper by the number of lines set with [LINE] (1, 1.5
or 2) and returns the carrier to the left margin.
..
vifie ■■ 4e&tJiitek ifbf tftis;,;®ew''^i^:rO'the't;''';T;i(peWftiter|R ■■■■■
mke,/ .. eaBYC[RETURN|, yf.) t, , „y:r;;; ^
: ".You can. produce professional looking' documents; In a[REtURN]: ■
..................................................................................-
To select normal operation, hold down [ALT] and press [OPERATE] until the typing
mode indication is blank.
....................................................
Page 50

Selecting Typing Mode
The Hot Zone
The hot zone is an area that begins before the right margin and extends up to the right
margin. You can set the start of the hot zone to be between 3 and 12 characters before
the right margin. This is independent of the typing pitch, so if you set the hot zone to 5
characters in 10 pitch, it will still be 5 characters if you change to 15 pitch.
The hot zone helps you to keep your typed lines neatly within the margins by giving you
a warning when you are getting close to the right margin. When the carrier enters the hot
zone, the beeper will sound. You then have the remainder of the hot zone in which to
finish off your line by ending a word and pressing [RETURN], or by splitting a word with
a hyphen and pressing [RETURN]. If you do not press [RETURN] before the right margin
is reached, the carrier will lock and no further typing is possible until either [RETURN] or
S +
[CODE] + [M REL] is pressed.
If the word you are currently typing cannot be hyphenated and is too long to fit on the
line, you may wish to delete the portion of it you have already typed by pressing the
WORD OUT key
Alternatively, you can release the right margin by holding down [CODE] and pressing the
mar;gin release key [M REL], in order to fit the word on the line. Of course, the word will
then extend beyond the right margin.
The hot zone is set by pressing [ALT] + [HZ SET]. This is described in more detail in the
section on setting the line format.
The default setting of the hot zone is 6.
Automatic Carrier Return
Automatic carrier retum saves you having to press the [RETURN] key every time you
reach the end of a line. This function works by automatically performing a camier returning
whenever you end a word by pressing [SPACE] or split a word by pressing the hyphen
key while the carrier is in the hot zone. The carrier will also return if you press the
[RETURN] key at any time.
To turn on the automatic carrier retum mode, hold down the [ALT] key and press the
[OPERATE] key until the typing mode indication changes to FlUT.
T'he'many TEeatu'r^^ "bT' this" new 'Brotiier '' Eypewr'iter[$PACE]'.''''
■inake tmingyreally'' easy. [[RETURN]]
'You '¿an produce professional lookihg'documents; i'i[SPACE]
¿'fraction of the time, .
Page 51

Selecting Typing Mode
Notes:
If you type up to the right margin with no spaces or hyphens in the hot zone, the beeper
will sound, the carrier will stop at the right margin and will not return automatically.
Press the [RETURN] key or [SPACE] to return the carrier or [CODE] + [M REL]to
continue typing past the right margin.
You cannot type a hyphen at the right margin position to breaka word and return the
carrier, if you have reached the right margin position and wish to hyphenate a word,
you can either use [CODE] ,+ [M REL] to continue typing past the right margin, or
delete some characters using the character correction key [CORRECT], then type in
the hyphen.
Typing On The Display
The normal and auto carrier return modes are fine for experienced touch typists who
rarely make mistakes, but less skilled typists will find the two display typing modes very
helpful, since you can see your text on the display before you print it, and correct it if
necessary.
When you type on the display, the carrier moves across the paper so that you can see
where yourtext will be printed, but it is not printed until a whole line has been typed. There
are two different modes for display typing, LINE-BY-LINE and JUSTIFY.
Line-By-Line
To select line-by-line typing, hold down the [ALT] key and press the [OPERATE] key until
Lx’L appears in the display,
L.-'L
the =iuick ii'hoi.i.!
In the line-by-line typing mode, the text is not printed as you type it, but is displayed on
the screen.
Depending on the margins you have set and the typing pitch, the entire line of text may
be too long to fit on the display, which is only 40 characLers wide. In this case, when the
text reaches a point five characters from the right-hand side of the display it will scroll to
the left.
I U.::.
.11
Page 52

Selecting Typing Mode
L/L
brown fox Jumps ouer the lazy doi
You can move back along the line using the left cursor key - —, and view the text that
is off the left side of the display ,
L---'L i" 2'^
■'le =iuick brown fox JurnFS ooer the i azy
Do not try to use the backspace key - [BKSP] to move to the left, as this will delete the
text you just typed.
Similarly, to move to the right-hand end of the text line, press the right cursor key —
To move quickly to the beginning of the line, press [CODE] + [EXPR] or [CODE] + .
To move quickly to the end of the line, press [RELOC] or [CODE] + —
Ending A Line
When the text reaches the hot zone, the beeper will sound. If you end a word with a space,
split a word with a hyphen, or press [RETURN], the carrier will return and the text will
be printed.
LxL ► 1
es of this brand”new Brother type-
^ '.-'O
v'jjrfiefinanx:'f,eatqres\',of;; t-MB.-'
► 59
writer
Hyphens typed in the hot zone are shown dotted (■■•) on the display to distinguish them
from normal hyphens (~), but they print out the same.
Page 53

H
Permanent Spaces and Hyphens ““ ^ [SPACE] j
In some cases you may wish to finish a word within the hot zone and type another short
word on the same line, or you may have a hyphenated phrase such as mother-in-law that
you do not want to split over two lines.
In this case you can use the permanent space or hyphen function.
To type a permanent space or hyphen, hold down the [CODE] key and press either the
[SPACE] or the [P HY] key. Your space or hyphen will be typed without the carrier
returning, and it will not return until you type a normal space or hyphen.
When you type a permanent space on the display, it is shown differently to distinguish
it from a normal space.
pttwriter make typiny extreme 1 y...easy
permanent space
Justified Typing
Selecting Typing-Mode
^ "1
The justified typing mode is similar to the line-by-line mode, except that the text is evenly
justified between the margins when it is printed, instead of left-aligned.
Left-aligned
■..■'■'■■YQiir Brother typWrriter ±.s actually: three'iiiWhiiies-. in ■ ' ■ 'i
a pdweriii'l;' pype^ithr 'TeaturO's'- ypu j
:.l.expect':,thorn-i
■■ ■-typing: |Rc>ae/that; allo.ws .ypn to.'see -'eacb, Tl'he -6f: text and^.J
■
..............
e0.rrept'j l.t■ bef or-e.f'prittting;';''
Justified
,T:p:" ,|iree.j.h:la6h|hee:,r:ii'^ ^
,7 Broths ^
j'hhat . yjihe,j; Mj,
.''-jdhiit-het; ; t yWjF'h'h-. Tip'' - i'-'.jh
Page 54

Selecting Typing Mode
Justified typing is turned on by holding down the [ALTl key and pressing the [OPERATE]
key until J5T appears in the display.
justified textthat has too few words on a line will not look good, as there will be large gaps
between words. (Typographers call this a loose line).
Also, text such as an address may require to be left -aligned,
To:.
.
.
Mr: J. Smith,
Bro ther Bouse,
1 .Tame. Street, . . ■
"Audenshaw, ■
In order to avoid loose lines, and to allow left-alignment of text that requires it, your
typewriter will justify text only if it extends into the hot zone, and the line is ended by a
space or hyphen.
lithe line is ended by a carrier return inside the hot zone, or before the hot zone is reached,
the line will be printed left-aligned.
Page 55

Your typewriter has a number of functions that affect the overall
layout and appearance of your document. These are shown in the
table below, together with their factory settings.
■■'i;?
........
Line Spacing
Typing Pitch
Hot Zone
Left Margin
Right Margin
Tabs
Top Margin (Start Position)
Page Length (End Position)
These settings are known collectively as the LINE FORMAT.
Single
10 characters per inch
6 characters
10 columns in from left
75 columns in from left
Every 10 columns
I inch
Not set
Line Format Memory
If you frequently have to type different types of document, it can be tedious and timeconsuming to change the line format manually every time you have a different job to do.
Fortunately, yourtypewriter makes changing the line format easy, by having five memories
in which line format information can be saved. The contents of all five line format memories
are factory setto the values given in the table above, but you can change them to suit your
own requirements.
Selecting A Line Format
To select a line format, hold down [ALT] and press the [FORMAT] key.
Page 56

Setting the Line Format
Each time you press the [FORMAT] key, the FMT display on the status screen will change
in the sequence; 1 ——^4—^5—^ 1.
When the machine is first used, all five format memories are the same, so the format
functions displayed on the status screen will not change. Once you have changed the
contents of thefomat memories you will see these functions change as you cycle through
the five fomat memories,
The format memories are backed up. This means that the format information is not lost
when the machine is switched off. Also, when you switch the machine on again, the
selected fomat will be the one that you were using when you switched the machine off.
Format Memory Reset
The fomat memories in your machine are factory set with the values mentioned earlier,
but it is quite likely that you will change them while using the machine. Should you wish to
restore the factory settings at any time, you can do this quite simply,
1. Select the format number you wish to restore to factory settings, using [ALT] +
ALT
CANCa
[FORMAT],
2. Hold down the [ALT] key and press the [CORRECT] key.
3. The fomat memory will be restored to factory settings, and the following message will
be displayed:
AiFORMfiT IS CHfiNGED TO DEFAULT SETTING,
Changing A Line Format
Changing the contents of a line fomat memory to suit your own requirements is very
simple. Every time you make a change to one of the line fomat functions, the change is
automatically saved in the fomat memory that you currently have selected.
Ifyouhave some workthat requires frequent format changes, and otherworkthat requires
pre-defined fomats, it's a good idea to use fomat memory I as your “scratch” format
memory and reserve the other four memories for your fixed formats.
Howto change the various functions that make up the line format infomation is described
below.
Page 57

Setting the Line Foimat
Note!
Margins, tabs and the hot zone cannot be changed in line-by-line or justified typing modes.
You must select NORMAL or AUTO modes when setting these items.
Setting Line Spacing
Yourtypewriter offers you three choices of line spacing: single line spacing, one and a half
line spacing, and double line spacing. To select the desired line spacing, hold down [ALT]
and press the [LINE] key. Each time [LINE] is pressed, the L<* SP display will change in the
following sequence;
ALT
CMNCB.
•1.0 -1.5 2.0 1-0
Single line spacing piaces I/6 inch of space between lines.
One and a half line spacing places I/4 inch of space between lines.
Double line spacing piaces I/3 inch of space between lines.
Note!
The factory setting of line spacing is 1.0.
Setting Typing Pitch
Yourtypewriter offers you four choices of pitch:
Pica, or lO pitch (lO characters per inch)
Elite or 12 pitch (12 characters per inch)
Micron or 15 pitch (15 characters per inch)
ALT
CANCB.
PS or Proportional Spacing
10, 12 and 15 pitch are fixed pitches, i.e. the print carrier advances a fixed distance after
typing any character. With proportional spacing, the distance the carrier advances after
typing a character depends on the actual character width. Therefore, the number of
characters per line in PS depends on what characters are typed, since you can get more
I's on a line than M’s.
For the purposes of setting margins and tabs, the nominal or average character spacing of
PS can be taken as 12 pitch.
Page 58

Setting the Line Format
To select the desired pitch, hold down [ALT] and press the [PITCH] key. Each time
[PITCH] is pressed, the PITCH display will change in the following sequence:
■10 -12 15 -> PS 10
lO pitch allows 120 characters to be typed per line.
12 pitch allows 144 characters to be typed per line.
15 pitch allows 180 characters to be typed per line,
The maximum characters per line in PS pitch is variable.
Note!
The factory setting of pitch is 10.
Margins And Page Length
The margin settings ofthetypewriterallowyouto determine the overall layout ofthe page.
Left and right margins define the overall width ofthe text and its horizontal position on
the page, Top margin (START SET) determines the vertical position ofthe text relative
to the top edge of the page, and page length (END SET) determines the overall height
of the text.
Preset Margins
When you first switch on your typewriter, the margins have been preset at the factory in
lO pitch and for single line spacing. If you change either of these, the preset margins will
vary, depending on the typing pitch and line spacing, as shown in the following table ,
Pitch
lO
I2
IS
Line Spacing
l.O 6 Not set
1.5
2.0 3
Left margin Right margin
lO
I2
IS
Top Margin Page Length
4
75
90
I I2
Not set
Not set
Page 59

Setting the Line Format
Margin Release
The print carrier will normally not move outside the margins. However, on occasion, you
may wish to type outside the margins. It will also be necessary to move the carrier past the
margins if you want to set margins outside the ones currently set.
To move to the left of the left margin:
1, Use [BKSP] or to move to the left margin.
2. Hold down [CODE] and pressthe MARGIN RELEASE key- [M REL] andthen continue
to press [BKSP], -4— or —^ untilthe carrier reaches the place whereyou wish to begin
typing or set a new left margin
Similarly to move past the right margin, press [M REL] when the margin is reached, then
continue typing.
Setting Margins
If you do not wish to use the standard margins, you can set your own margins very easily.
Setting Left Margin
To set a new left margin:
1. Move the carriertothe new left mar;gin position using [SPACE], — [BKS P] and
keys as necessary. If the new margin position is to the left of the old margin, you will
need to use [CODE] + [M REL] before you can move outside the old margin.
2. Hold down the [CODE] key and press the LEFT MARGIN key - [L MAR], The left
margin is now set
Setting Right Margin
To set a new right margin:
1. Move the carriertothe new right margin position using [SPACE], — [BK SP] and ^—
as necessary.
2. Press the RIGHT MARGIN key - [R MAR], The right margin is now set,
If you wish to move beyond the existing right margin to set a new one, use [CODE] + [M
REL] then [SPACE] or —If you use [SPACE], you should first ensure that the machine
is in NORMAL typing mode, since you cannot use [SPACE] to move beyond the right
margin in AUTO, LINE-BY-LINE orJUSTIFY modes, as the carrier will return if [SPACE]
is pressed in the hot zone.
LMAR
-A
Page 60

Setting the Line Format
The minimum width between left and right margins depends on the typing pitch, as shown
in the following table.
Pitch
10 20 characters 10 characters
12 24 characters
15 30 characters
Min Margin Width
Expand mode
12 characters
15 characters
Setting Start Position (Top Margin)
Automatic paper insertion normally sets the paper so that typing will start approximately
one inch (25.4 mm) from the top of the page. However, you can change this position using
the START SET function, so that auto-insertion will set the paper to a start position
anywhere between one and six inches (25.4 and 152.4 mm) from the top of the page.
To set the start position:
1. Insert a sheet of paper and press the [P INS] key to auto-insert the page.
The display will show the message; .¿iPRESS RTN«
However, if you wish to setthe start position you should not press [RETURN] at this stage.
2. Use [INDEX] and [R INDEX] to adjust the position of the page to where you wish
to begin typing,
3. Hold down [CODE] and press the START SET key - [S SET] to save that setting as
the start line.
Setting End Position (Page Length)
The appearance of multi-page documents is enhanced ifthetext ends at the same position
on each page. Your typewriter allows you to set the page length using the END SET
function, so that you cannot type below the end position.
To setthe end position;
1. First insert the paper as above, using the [P INS] key. Do not press [RETURN],
2. Use [INDEX] and [R INDEX] to adjust the paper to the desired end position.
3. Hold down [CODE] and press the END SET key - [E SET] to set the end position.
Page 61

Setting the Line Format
Notes!
1. There must be at least 5 lines between the start position and the end position.
2. The end position cannot be more than 16.5 inches or 419 .1 mm from the top of the
page.
3. The start and end positions are measured absolutely from the top edge of the page
and are completely independent of each other. Changing start position does not affect,
end position, and vice versa.
4. When the carrier reaches the end of the page the following message will appear
^Ph0E end- press correct to continue.
If you wish to type an extra line, press the [CORRECT] key and continue typing.
If you wish to cancel the current page end setting, press [CODE] + [E SET] when the page
end is reached.
Setting And Using Tabs
Tabs allow you to move the typing position quickly and automatically to a preset position.
As their name suggests, they are useful for typing tables, and are also used for indenting
paragraphs.
Normal tabs
Normal tabs are left-aligned, i.e. the first letter of the text is aligned to the tab stop.
To set a normal tab:
1. Move the carrier to the position at which a tab is required.
2. Hold down [CODE] and press the TAB SET key - [T SET].
3. To use the tab stop, press theTAB k ey- [TAB], and the carrier will move to the tab
position automatically.
Page 62

Setting the Line Format
Notes!
1. When a tab is to be set in the same position as a decimal tab (see below), the decimal
tab in that position will be changed to a normal tab when [T SET] is pressed.
2. Tab positions are set according to the absolute position of the carrier (in units of 1/
120 in.) based on the left edge, so they do not change even when the margins or pitch
have been changed,
3. A maximum of 30 tabs, including decimal tabs, can be set on your typewriter
Decimal Tabs
This function allows you to type columns of numbers aligned on a decimal point, or on the
space after the last digit in the case of numbers that do not have a fractional component
(integers).
If you have text that needs to be right-aligned to a tab instead of left-aligned (i.e. aligned
on the last letter of the text instead of the firsts letter), you can use a decimal tab for this
purpose.
To set a decimal tab:
1. Move the carrier to the position at which a decimal tab is required.
2. Hold down [CODE] and press the DECIMAL TAB SET key- [DT SET] .To move the
carrier to the decimal tab stop, press [TAB],
Notes!
1. When a decimal tab is set in the same position as a normal tab, the normal tab in that
position will be changed to a decimal tab when [CODE] + [DT SET] are pressed.
2. Decimal tab positions are set accordingto the absolute position of the carrier (in units
of i / 120 in.) based on the left edge, so they do not change even when the margins
or pitch have been changed,
3. A maximum of 30 decimal tabs, including normal tabs, can be set on your Lypewriter.
Using Decimal Tabs
Typing text at a decimal tab is different from typing at a normal tab. Since text at a decimal
tab is aligned on the decimal point or the space after an integer number, your typewriter
needs to know where this appears before it can print the text.
When you use the [TAB] key to move to a decimal tab stop, the message:
¿iDECIMfiL TPiE will appear on the top line of the display.
Page 63

Setting the Line Format
Ifyour number has an integer part before the decimal point, type this in. Each character you
type will appear on the display, and the carrier will move one space to the left.
If your number has a decimal point, type this. The integer part of the number and the
decimal point will be printed. You can then type the fractional part of the number, which
will be printed after the decimal point in the normal way.
If the number is an integer, press [TAB] to print the number and move to the next tab
position, or [RETURN] to print the number and end the line. '’’clh
Tab Clear
To clear a nonrial or decimal Lab:
1. Move the carrier to the position of that tab using [TAB].
2. Hold down [CODE] and press the TAB CLEAR key - [T CLR].
CODE
2
TSET
\
---------
/
+
Auto tab set
If [CODE] + [T SET] is pressed for more than half a second, tabs will be set every 10
columns from the current left margin position and the following message will appear
TfiB SET DONE
Note!
All tab set does not work with decimal tabs.
All Tab Clear
If [CODE] + [T CLR] is pressed for more than half a second, all tabs will be cleared, and
the following message will appear
Jl”si ! "T!-:!“!!“ ¡"'I CTCiDHPi
^ 0.5 SEC
^ 0.5 SEC
Page 64

Setting the Line Format
Note!
If you have selected paragraph indent mode (as described later) and subsequently dearthe
paragraph indent tab, the tab will be cleared but the typewriter will remain in paragraph
indent mode until it is cancelled by holding down [CODE] and pressing [RETURN].
Setting The Hot Zone
Use of the hot zone was discussed in the section on selecting typing mode.
Tosetthehotzone, hold down [ALT] and press the [HZ SET] key until the required setting
appears in the display. Each time you press [HZ], the hot zone indication will change in
the sequence;
10-> 11 12->5-
5—>6
ALT
CANCEL
Note!
The default setting of the hot zone is 6 characters.
U
:wEus
Page 65

-.I:-''''!,?''
i' W. -i
: m |; I f t ■* -f ■ »
The overall layout of your page Is determined by the margins, line
spacing and typing pitch. Text is normally printed left-aligned or
justified, depending on which typing mode is selected. In addition,
you may wish to change the layout of the text locally, by right or left
aligning it, by centering, or by indenting lines and paragraphs.
Indentation
Your typewriter can perform both line indentation and paragraph indentation,
Line Indentation
The line indentation function allows you to indent the first line of your paragraphs in one
step without spacing or setting a tab. With the carrier at the left margin, hold down the
[CODE] key and press the [L IND] key. The carrier will automatically move over five
spaces and wait for you to begin typing. Each time you press the [L IND] key, the carrier
will move 5 spaces to the right
";?y.
-W'
;*■
,.#r
Note!
When typing on the display, line indent is indicated by five permanent spaces.
L--L
-=iuick browt
Paragraph Indentation
The paragraph indent function will indent an entire paragraph to the position of the next
tab, without you having to use the [TAB] key at the beginning of each line, so you must
have at least one tab set to use this function.
^ foxi
----------^------------------
!*■ 41
s
TAB
Page 66

Text Alignment in TW Mode
T o indent a paragraph, hold down the [CODE] key and press the [FIND] key. The PIND
indicator will appear in the display, and the carrierwill move over to the first tab and wait
for you to begin typing. If you want to indent to a tab other than the first tab, continue
to press [CODE] + [P IND] until the tab is reached, then begin typing.
Thereafter, whenever the carrier return is pressed, the carrier will return to that tab
position rather than the left margin,
If you want a subsequent paragraph to be indented even further to the right, hold down
the [CODE] key and press the [P IND] key again.
The number of different paragraph indents you can have is limited only by the number of
tabs and the space between the margins.
..............^' Ttvi s parifesem
Notes!
Ifyou want to type to the leftofthe paragraph indent point duringthe paragraph indent
mode, simply use [BKSP], ^— or [CODE] + [EXPR] to move the carriertothe place
where you wantto begin typing. To get backto the paragraph indent point aftertyping,
press the [RETURN] key.
Indent Clear
To clear the paragraph indent mode, hold down the [CODE] key and
press the [IND CLR] key. The carrier will now return to the left margin.
Page 67

Text Alignment in TW Mode
Centering
Your typewriter allows you to type three different kinds of centered text:
-centered between the margins.
-centered between adjacent tabs.
-centered around the current position of the carrier.
Centering Between Margins
To type text centered between margins:
1. Return the carrier to the left margin.
2. Hold down the [CODE] key and press the [CTR] key. The message -¿3CEHTERIH0
will appear on the top line ofthe display, and the carrier will move to a position midway
between the left and right margins and place the machine in the centering mode.
3. Type in your text. When you type, the characters will not be printed on the page, but
will appear on the display, and the carrier will move half a space to the left for every
character and space you type. In the expand mode the carrier moves one full space
to the left for every character and space you type.
4. When you have finished typing the line, press the [RETURN] key to printthe line and
perform a carrier return. After printing, the machine will leave the centering mode.
5. Centering can also be selected by pressingthe MENU key, pressing [1 ] to select CTR/
RMF and pressing [1] again to select CTR.
Centering Between Tabs
Centering between tabs allows you to create tables in which the items in a column are
aligned centrally above one another, instead of left-aligned, right aligned, or decimal
aligned.
To center between tabs:
1. Use the [TAB] key to move the carrier to a tab position.
2. Hold down the [CODE] key and press the [CTR] key, or select centering using the
[MENU] key.
3. Type in the text as before.
4. Press [TAB] to print the text and move to the next tab, or [RETURN] to print the
text and perform a carrier return. The text will be centered about a point midway
between the tab and the next tab to the right.
Page 68

Text Alignment in TW Mode
Notes!
1. You cannot center between the left margin and a tab, because centering carried out
with the carrier at the left margin is assumed to be centering between margins.
2. You can create as many columns of tab-centered text as you like, up to the limit of
30 tab positions. However, if you try to type text whose width exceeds the distance
between the adjacenttabs, the beeperwill sound and nofurthertypingwill be possible.
This prevents the possibility of columns overlapping.
Centering At The Carrier Position
To center text around the current carrier position:
1. Move the carrier to the required position.
2. Hold down the [CODE] key and press the [CTR] key, or select centering using the
[MENU] key..
3. Type in the text as before and press [TAB] or [RETURN] to print it It will be centered
around the current carrier position.
Notes!
1. You cannot centertext around the current carrier position atthe left margin, orifthere
is a tab at that position.
2. Text typed on the display in centering mode can be corrected in the same way as
normal display typing,
3. To leave the centering mode before any data has been input, pressing [CODE] +
[CANCEL] or [CODE] + [CTR] keys will release yourtypewriterfromthe centering
mode.
Right Margin Flush
Right margin flush automatically aligns text flush with the right margin. To type text right
margin flush:
1. Hold down the [CODE] key and press the [RMF] key while the carrier is anywhere
to the left ofthe right margin. The message xiR IGHT MPRGIH FLUb-H will appear
on the top line of the display, and the carrier will move to the right margin,
2, Type in the text. When you type, the characters will not be printed but will appear
on the display, and the carrier will move one space to the left for every character you
subsequently type (two in the expanded mode).
Page 69

Text Alignment in TW Mode
3. When you have finished typingthe line, pressthe [TAB] key or [RETURN] keyto print
the line and perform a carrier return. After printing, the machine will leave the right
margin flush r7^ode.
Notes!
I. Text typed on the display in right margin flush mode can be corrected in the same way
as normal display typing,
To leave the right margin flush mode before anything has been typed, pressing
2.
[CODE] + [CANCEL] or [CODE] + [RMF] keys will release your typewriter from
the right margin flush mode and relocate the carrier to its previous position.
Right margin flush can also be selected by pressing the MENU key, pressing [1] to
3.
select CTR/RMF and [2] to select RMF.
Page 70

Page 71

m
¥'
..
■■■
..
Formatting and text alignment functions change the overall layout of
text on the page. This section looks at keys that are used to
change the appearance of the actual characters typed. Most of
these functions operate in a similar way in WP mode as when
typing on the display in TW mode.
Shift And Caps Keys
Your typewriter normally prints lower case letters and numerals, plus the punctuation
marks and symbols shown on the lower part of other keys. However, you will often want
to type upper case letters (for beginning a sentence etc.) and the symbols shown on the
upper part of other keys.
■'r';-
■
, .... -... . ... ■ .... ., . ,>
mm.
............
•'• '■■ . '
...
■■■"""« '
.....
......
J"- '■'
.r''""'
......
....
fi ::.-^;
■ *’
The [SHIFT], [SHIFT LOCK] and [CAPS] keys allow you to do this.
Shift
There are two shift keys, one on each side of the keyboard. If you hold down either of the
[SHIFT] keys, you may type upper case letters and the upper characters shown on other
keys, Releasing this key automatically returns the keyboard to the lower case mode, The
shift keys are generally used if you only want to capitalise the first letter of a word, or for
inserting punctuation marks and other symbols,
-.Mi-
Brother Ï ntsmat i ona 1 i
■-Bi pfefgY':,!
Page 72

Text: Attributes
Shift lock
The SHIFT function can be locked on by pressing the [SHIFT LOCK] key. To return to
lower case typing, press either of the [SHIFT] keys. In this case, whatever key you press,
it will be the upper character on the key that is printed.
SHFT L--L
BROTHER INTERNfiTIONfiLS
Caps
If you want to type upper case letters but want the lower characters on other keys (e.g.
numerals), hold down the [CODE] key and press the [CAPS] key, To return the keyboard
to normal mode, press [CODE] + [CAPS] again.
SHIFT LOCK
CAPS
mu
31
SHIFT LOCK
CAPS
CHFS
PART NO. XP291234B
< - — - - - — -
While the keyboard is in CAPS mode you can still access the upper characters on non
letter keys by pressing the [SHIFT] key or the [SHIFT LOCK] key, because the SHIFT
mode overrides the CAPS mode.
Some keys have characters printed on them in green. These characters are printed by
holding down the [CODE] key and pressing the appropriate character key. A table of
these characters is also given in the Appendix at the back of this manual.
L.-L
i>- 4?
Page 73

Bold Text
Place your typewriter in the bold typing mode by holding down the [CODE] key and
pressing the [BOLD] key until BLD appears in the display. All characters subsequently
typed will be printed in bold.
Holding down the [ALT] key and pressing the [BOLD] key once again will clear the bold
function and return the typewriter to the normal mode.
Notes!
1, The bold function can be performed in the centring, right margin flush, and decimal
tab modes.
2, When typing on the display, bold text is indicated by the bold marker alternating with
the typed text.
Text Attributes
BLD _L£;L
The fo11ow i n9 text i s I
n
bold
Automatic Underline
Your typewriter can underline text automatically as you type it, either with a continuous
line or word-by-word.
Holding down the [ALT] key and pressing the [UNDLN] key repeatedly cycles through
the underline setting in the sequence:-
OFF (no display) —^ CHT —^ WRD —^ OFF
Sh 29
Page 74

Text Attributes
Continuous Underline
To switch on continuous underlining, hold down the [ALT] key and press the [UNDLN]
key until CNT appears in the display. While your typewriter is in this mode, all characters
and spaces typed will be underlined,
To cancel continuous underline mode, holddown the [ALT] key and press the [UNDLN]
key until there is no underline indicator in the display.
Word-By-Word Underline
Word-by-word underlining underlines all characters except spaces. To switch on word-
by-word underlining, hold down the [ALT] key and press the [UNDLN] key twice, until
i.i.lRD appears in the display.
To cancel the word-by-word underline mode, hold down the [ALT] key and press the
[UNDLN] key once, so that the underline indicator disappears from the display.
Notes!
1. The auto underline function can be performed in the centring, right margin flush, and
decimal tab modes.
2, When typing on the display, underlined text is indicated by the underline marker
alternating with the underlined text.
UN i LrfL
The fol loi.i.iin9 text- is
__
____ ____
under i 3. ned
Expanded Typing
The expand function adds an extra space after each character typed in any pitch, To place
your typewriter in the expand mode, hold down the [ALT] key and press the [EXPAND]
key, so that EXP appears in the display.
Page 75

Text Attributes
To cancel expanded printing, hold down the [ALT] key and press the [EXPAND] key
once more, so that the EXP indicator disappears from the display.
ty-:gewri'dd:®roe;h::i|p:ean'|::;i:e=i"x';p:::;:;a
Note!
When typing on the display in EXPAND mode, the extra spaces are shown as permanent
spaces.
i
j— L-'*' i
-• I_I K UJ l~l b' 1^ U •—! I” NI.
Subscript And Superscript
If you have to type mathematical or scientific documents, you may find the need for
subscript and superscript characters. These can easily be typed, either on paper or on the
display.
+ B /Q
Subscript
To type subscript text, press [CODE] + [.] to enter subscript mode. The typing line will
move down by 1/ 12 inch (i.e. the paper will move up).
Type the subscript text, then press [CODE] + [,] again to return to normal typing.
Superscript
Superscript is the reverse of superscript. Press [CODE] + [,], and the typing line will move
up by 1 /12 inch (i.e. the paper will move down).
Type the superscript text, then press [CODE] + [.] to return to normal typing,
Page 76

Text Attributes
Notes!
I. When typing on the display, the shape of the cursor changes to B for superscript and
■ for subscript. Superscript and subscript text already typed are indicated by the
subscript or superscript marker alternating with the text.
2. In NORMAL and AUTO typing modes you can have two levels of subscript or
superscript by pressing [CODE] + [.] or [CODE] + [,] twice.
You cannot do this in the display typing modes, since only one level of subscript can be
shown on the display.
3. Subscript and superscript text can also be bold, underlined and/or expanded.
4. The index and reverse index keys [R INDEX] or [INDEX] are not normally used for
subscript and superscript, since holding them down can move the paper continuously.
However, if you want the displacement of subscript or superscript characters to be
less than 1 /12 inch, use them with the [CODE] key ([CODE] + [R INDEX] or
[CODE] + [INDEX]) and the vertical movement of the carrier is only 1 /48 inch. This
does not work when typing on the display.
5. If use of the [R INDEX] or [INDEX] keys moves the platen up or down by more than
1/4 inch, the line comection memory is cleared, since the typewriter cannot return the
paper accurately back to its original position for automatic correction.
Page 77

Dead Keys
Dead keys are used for diacritical marks (e.g. accents) that may be placed over typed
characters. The carrier does not move when a dead key is pressed, so the character
beneath the accent can be typed without having to backspace. When a dead key is pressed
in the underline mode, the dead key character will not be underlined.
Note!
When typing on the display, the dead character alternates with the base character. For
example même is displayed as:
merfie ^ ^ ri'ieme
Superimposed Characters
On some occasions you may wish to superimpose two characters. For example, you may
wish to type a hyphen through a 7 to make a continental-style 7,
It's fairly obvious that you can do this in NORMAL and AUTO modes by backspacing and
typing the hyphen on top of the 7.
Text Attributes
However, if you try to do this when typing on the display, backspacing deletes the 7.
To get around this:
1. Type the 7.
2. Hold down [CODE] and press [BKSP], The 7 is not deleted.
3. Type the hyphen.
The 7 and the hyphen will alternate in the display, and both of them will be printed,
r —^ ~ —^ f'
Extra Characters
The extra characters printed in green on the bottom half of some of the keys are typed
by holding down the [CODE] key and pressing those keys.
A list of characters accessed by the code key is given in the Appendix.
Page 78

Text Attributes
Setting Impact
Typing impact may be adjusted according to the quality and thickness of the paper you
wish to use, or to the number of carbon copies you are making.
Select the desired impact force by holding down the [ALT] key and pressing [IMPACT]
until the required impact setting appears in the display. Each time [IMPACT] is pressed,
the IMP display changes in the sequence:
/
-------
ALT
DANCa
—^
IhPsM H L -> M
Notes!
1, Your typewriter is able to make up to 4 carbon copies in addition to the original
document,
2. The default setting of impact is Medium,
+
s
-------------
/
Selecting Keyboard
A Prestige 1012 daisy wheel is supplied with your typewriter. However, a wide range of
other daisy wheels is available for your typewriter. As well as having different typefaces,
some of these daisy wheels have different sets of characters to suit different applications.
Your typewriter has three keyboard settings that can be changed at the press of a key to
allow it to work properly with commonly-used types of daisy wiieel.
For users who frequently wish to type in foreign languages, a wider range of multilingual
keyboard settings is available through the SET UP menu, to allow your typewriter to work
with many different foreign daisy wheels.
ALT
CANca
1 (Standard)
This is the keyboard that you will probably use most of the time with "ENGLISH” daisy
wheels. When an English daisy wheel is used with keyboard I, the characters shown on
the left side of the keytop are printed.
2 (International)
This keyboard should be used when an optional "INTERNATIONAL” daisy wheel has
been inserted. You may have noticed that some of the keytops have characters printed
on the right side as well as on the left. When an international daisy wheel is used and
keyboard 2 is selected, these characters are printed instead of the characters shown on
the left side of the keytop. A complete table of these extra characters is given in the
Appendix
Page 79

3 (Symbol)
This keyboard is for when you need to type mathennatical formulae or equations that
require special symbols, usingthe optional “SYMBOL” daisywheel. The symbol keyboard
layout is shown in Appendix A.
To select the desired keyboard, hold down [ALT] and press the [KB] key, until the
required keyboard setting appears in the display. Each time you press [KB], the KB display
will change in the sequence:
KB5 -1 2 —> 3 -> 1
Note!
The default keyboard setting is keyboard I,
Text Attnbutes
Page 80

Page 81

Making corrections on your typewriter has never been easier. Your
typewriter has a two-line correction memory that stores all the
characters typed on the current and previous lines in TW mode.
This allows you automatically to delete a character, a word, or a
whole line of incorrect text, and replace it with correct text In WP
mode you can correct any part of your document
Similar correction functions are available in both TW and WP modes, though the exact
way they operate depends on which mode you are using.
If you are typing On the display or using WP mode, you can make your corrections before
even committing the text to paper. If you are typing in NORMAL or AUTO modes, you
can automatically remove incomect text with the correction tape, before typing in the
correct text.
Corrections In NORMAL And AUTO mode
In NORMAL and AUTO modes, text is printed as you type it, so if you make any mistakes
you must remove the old text with the correction ribbon before typing in the new text.
Character Correction
To correct a character automatically:
I. Use [SPACE], [BKSP], or [INDEX] or [R INDEX] as required, to move the
carriage directly overthe incorrect character.
■ A — ■" A i
Page 82

Making Corrections
2. Press [CORRECn.
3. If you wish to erase more characters to the left of the one you just erased, press
[CORRECT] again.
4. You may type the correct character, or move on as necessary.
si||;;:riiYeh,p|yl§ipiilfeY=ieT^
rA
Notes!
1. The automatic correction function works on bold, subscript, superscript, dead and
underlined characters.
2. If you superimpose two characters for any reason, the automatic charactercorrection
works only on the second character. The first character should be corrected manually.
Word Out
The word out function will remove a whole or partial word from your document. To
remove a word:
I. Position the carriage on the last character of the word that you wish to delete, or tfie
space after it. If you wish to delete only part of a word, position the carriage on the
last character to be deleted.
Ai .
......
WORD OU7
LINE OUT
Page 83

Making Corrections
2. Press [WORD OUT]. The character at the current carriage position, and everything
to the left of it will be erased, until a space between words is reached.
i tilii SsiSTailleiii&iid JlEoifil'',,
After erasing the word, the carriage will remain at the position of the last character erased,
and await your corrected input
Line Out
This function allows you to erase all or part of the current or previous typing line. To erase
a line:
1. Position the carriage at the end of the line, or on the last character to be erased.
2. Hold down [CODE] and press [LINE OUT],
The character at the current carriage position, and everything to the left of it, will be erased.
WORD OUT
LINE OUT
Page 84

Making Corrections
Insertions And Deletions
Instead of replacing incorrect characters or words with ones having the same number of
characters, you may wish to insert extra characters, or delete them, or replace entire words
with new ones having more or less characters.
Inthis case you may find that there istoo little space available to makethecorrTection without
running into the next word, or too much space so that a big gap is left.
MicrO'Spacing and backspacing [CODE] + —^, [CODE] + ^—, [CODE] + [BS I], allow
fine adjustment of the spacing of your corrections, so it is not apparent that insertions or
deletions have been made.
+ H/B/H
Insertions
If you try to insert an extra character into a word, you will be left with no space between
it and the next word. You can even this up by moving the whole word half a space to the
left, as follows:
I, Use word out to delete the incorrect word.
Press [WORD OUT].
A-*—A
2. Hold down [CODE] and press [BS I ] or . Each time [BS I] is pressed, the carriage
moves 1/120 inch to the left. If you move the carriage too far you can use [CODE]
+ —^ for fine movement of the carriage to the right
Page 85

Making Corrections
The number oftimes you need to press [BS 1 ] fora half space depends on the typing pitch.
Pitch No. of presses
10 6
12 or PS 5
IS 4
You may now type in the correct word.
Deletions
If you try to delete a character from a word, you will be left with an extra space after the
word, you can even this up using [BS 1] so that you have one-and-a-half spaces on either
side of the word, as follows:
I. Use word out to delete the incorrect word.
illliiillH
Press [WORD OUT].
-- -- --- -
A
Page 86

MakJng Corrections
2. Press [CODE] + several times to move the carriage half a space to the right. Each
time you press [CODE] + —the carriage will move 1/120 inch to the right.
3. Type in the correct word.
The above examples only show the insertion or deletion of a single character, If you wish
to insert or delete more than one character, or replace several words with other words,
you can use the same principle by deleting several words and using micro-spacingto expand
or reduce the spaces between the replacement words.
Relocation
After finishing your corrections, press [RELOC] to return to your original typing position.
RELOC
EXPR
Page 87

Manual Correction
You can only perform automatic correction on the current typing line and the previous line.
Manual correction may be performed at any place on the page, as follows;
I. Move the carriage to the character to be corrected using [INDEX], [R INDEX],
[SPACEBAR], [BKSP] —> or — as necessary,
tssil.S'ËplpeEffi;iE;Ylly ■ ; ^
Making Corrections
2. Hold down [CODE] and press [CORRECT], Then press the key for the incorrect
character.
That character will be erased and the carriage will remain in that position for you to type
in a new character, or move on, as necessary.
3. Type in the correct character.
Page 88

Making Corrections
Ifyou wantto correct another character, you nnust move to that character and use [CODE]
+ [CORRECT] again.
If you wantto make insertions or deletions using manual correction, you can delete entire
words, character by character, and adjust the spacing ofthe new words using micro-spacing,
as with automatic correction,
4. Afterfinishing your corrections, use [INDEX], [R INDEX], [SPACEBAR] and [BKSP],
as required, to return to your original typing position.
Notes!
1, If [SPACE] is pressed after [CORRECT] has been pressed, the correction function
is cleared and the carriage will move to the nght one space.
2, You cannot use [RELOC] to return to youroriginal typing position after making manual
corrections.
Corrections in L/L, JUSTIFY And WP Modes
When typing on the display, correction is done on the display before the line is printed. In
WP mode you can, of course, correct any part of the document at any time.
Inserting Or Overwriting Text
When inserting extra characters or words in display typing, you don’t need to worry about
making space on the page for the new words, just turn on the INSERT function.
When replacingtextwith newtext,you don’t have to erase the old text first, you can simply
overwrite it if the INSERT function is turned off.
Inserting Text
If you miss out some words or characters it’s very easy to insert them as follows:
I. Make sure that INSERT is turned on by pressing [CODE] + [INSERT]. The cursor
will change from 1 to 0, to indicate that insert is turned on.
Page 89

Making Corrections
2. Move the cursor to the position at which you wish to insert the text, and begin typing.
The text to the right of the cursor will be pushed along the line as the new text is
inserted.
The '^uick brownU-j umps oyer the lazîJ do9
Type ‘‘[SPACEJfox “
Tria auick Dr'iji.Mn "foxuj urfiPir- O'v-er" the
Notes!
1, in L/L, JUSTIFY and WP printing modes, if inserting text pushes the end ofthe line up
to the right margin, the beeperwill sound, the keyboard will lock and you cannot type
in any more text. Press [RETURN] to print the line as it is, or delete some text from
the end of the line to make room for more insertions.
2. In WP non-printing mode, you can insert as much text as you like.
Overwriting Text
Ifyou wantto overwrite some incorrect text, make sure that the INSERT mode is turned
off. The cursorchangeto asolid block Position the cursor at the position where you wish
to overwrite and begin typing. The character(s) beneath the cursor will be replaced with
the new character(s) that you type.
Tht! -luick brouif! §sn JUniPi:- OUPP ths i-3zy
Type “fox”
Page 90

Making Corrections
I he -^u i c
Notes!
1. If the new text is shorterthan the text you are overwriting, you will have to delete any
remaining characters of the old text.
2. If the new text is longerthan the text you are overwriting, turn on INSERT when you
get to the end of the old text to insert the remainder of the new text.
b!'"‘Ot.ijr! ouet“' the Xezy
Deleting Incorrect Text
Like NORMAL and AUT O typing modes, there are three basic ways in which you can delete
incorrect text. The only difference is that you do it on the display instead of on paper.
The correction keys work slightly differently from the NORMALand AUTO modes. When
you press one of the correction keys, the character beneath the cursor position is not
deleted, so you must always position the cursor one character to the right of the last
character you wish to delete.
Backspace Or Character Correction
When typing on the display, there is really no difference between these two operations.
The backspace key also acts as a delete key.
/
m
/VEUS
Use the cursor keys to position the cursor one space to the right ofthe character you wish
to delete. Press [BKSP] or [CORRECT] and the character to the left ofthe cursor will be
deleted. Press [BKSP] or [CORRECT] again to delete further characters.
ihe =Tuick broi.ur> fo9GJumps oosr
Press [BKSP] or [CORRECT].
X r 11=: j, -rlZ J
Page 91

Making Corrections
=i!jick brui.i.in foLiJ ¡.jriiPs o‘-.-'er- t-he lazy
You may now type in the correct character(s). (Make sure INSERT mode is turned on).
i na ‘-iijick Dr'Own TuxLj.j Lin'!!“':"’* cusi'"' iazy
Deleting A Word
I. Move the cursorto the space afterthe last character of the word you wish to delete.
i ha i ck b 1 ack u fox J urnps^ o'jar t.ha 1 azid
2. Press [WORD OUT], The word will be deleted.
The '=iuick Gfox Jlih'ips ouar t-ha lazy do9
3. If you want to insert a new word, simply type it in. (Make sure insert mode is turned
on).
I ha '=!u i ck br oM.inn fox J umps^ oyer tha 1 azy
4. If you don’t want to insert a new word, press [CORRECT] or [BKSP] to delete the
extra space.
If you position the cursor part way through a word, that portion of the word to the left
of the cursorwill be deleted.
WORD OUT
LINE OUT
Page 92

Makjng Corrections
c-----------------------------------------------
The many useful
Press [WORD OUT],
The many useful
<___________________________
Type in the correct text;
p i cDures
Oures of
-----------------------------
of this new
th i new
—
-------—--------—^
The many useful fsaDures of this neu
Deleting A Line
To delete a line or part of a line, position the cursoratthe point where you wish the deletion
to begin, hold down [CODE] and press [LINE OUT]. Everything on the line to the left of
the cursor will be deleted.
s
__________________________________
— - — - — - - — —- >1
-------------------
WORD OUT
LINE OUT
L
The auick brownGfox
Press [CODE] + [LINE OUT].
□fox Jumps ouen the
Jumps ouer the la2:y
lazy do9
— - — _ _ _ _ K
Page 93

-tf'*».-.- '.i....
'"f-; :/¿^.;í;'"■
_ ■ .-■-^íri;,,.. ‘-S-í.; ""í^'l ,■ ' JS
fe;
The framing and Une drawing function on your typewriter allows you
to draw horizontal and vertical lines, and to draw rectangular boxes
and tabular grids around text.
Note!
Framing only works in NORMAL or AUTO typing modes, not in the display typing modes.
Horizontal Line Drawing
To draw a horizontal line:
1. Position the carriage where you want the left-hand end of the line to be (A), You can
use [SPACE],[TAB], [BKSP], [CODE]+[BS 1], [CODE]+ [CODE]
+ [RETURN], [INDEX], [R INDEX], [CODE] + [INDEX], [CODE] + [R
INDEX], as required, to position it precisely.
2. Press the [FRAME] key. The message .¿iFRRMING will appear in the display,
i#' .if l
■ ■ /«S'i
3. Move the carriage to the point where you want the right-hand end of the line to be
(B), using [SPACE],[TAB], [BKSP], [CODE]+[BS I], [CODE]+ ,
[CODE] + —as required.
4. Press the [FRAME] key again.
The message: .dFRPhlNGj PRESS RTN TO PRINT will appear in the display.
5. Press the [RETURN] key and the line will be printed. The carriage will then return to
its original position.
[FRAME]
= (OPTIONAL) —^ ^ ^ ^ ^ ^ ^ ^ ^ ^ [FRAME]
■- - - -- - - - - - -- - - - - - - - - - - - -- - - - - - - - - - - ■
A B
Page 94

Frame and Line Drawing
Note;
You can draw a double horizontal line if you have keyboard 2 selected and an International
daisy wheel fitted, which has the ledger line symbol (=).
You can also draw double lines if you have keyboard 3 selected and a Symbol daisy wheel
fitted.
Immediately after pressing the [FRAME] key for the first time, press [=] before moving
the carriage to the right When you press the [FRAME] key again, followed by the
[RETURN] key, the line will be printed double.
Vertical Line Drawing
To draw a vertical line:
Position the carriage where you want the top of the line to start (A), using the above
keys as required.
Press the [FRAME] key. The message -:SFRflriIN8 will appear in the display.
2.
3. Move the carriage to the point where you want the bottom of the line (B), using
[INDEX], [R INDEX], [CODE] + [INDEX], [CODE] + [R INDEX], as required, to
position it precisely.
4, Press the [FRAME] key again, then the [RETURN] key, as before. The line will be printed,
and the carriage will then return to its original position.
[FRAME]
г
г
[FRAME]
В
Page 95

Frame and Line Drawing
Drawing A Rectangular Frame
Drawing a simple frame is almost as easy as drawing lines. All you have to do is tell your
typewriter where the top-left and bottom right corners of the frame are, and it will do the
rest,
1. Begin in the same way as for drawing a line, by moving the carriage to the point where
you want the top left comer of the frame (A), and pressing the [FRAME] key.
As with drawing a horizontal line, if you want the top line of the frame to be a double
line, press [=].
2. Now move the carriage down and to the right, to the point where you wantthe bottom
right comer of the frame (B), In the example, the carriage is shown as moving down
first, then to the right, but in fact you can move the carriage down and right in any
sequence of steps.
If you want the bottom line of the frame to be a double line, press [=].
3. Press the [FRAME] key, followed by the [RETURN] key, as before. The frame will be
printed, and the carriage will i-etum to the top left-hand corner of the frame.
[FRAME] ^
(OPTIONAL)
—> -> = (OPTIONAL)
[FRAME]
Page 96

Frame and Line Drawing
Drawing A Tabular Grid
In order to draw a tabular grid, your typewriter needs to know, not only the position of
the top left and bottom right comers of the frame, but also where the internal, horizontal
and vertical lines of the grid will be.
1. Begin in the same way as fordrawingasimple frame, by movingthe carriage to the point
where you want the top left comer of the frame (A), and pressing the [FRAME] key,
if you want the top line of the frame to be a double line, press [SHIFT] + =.
2, Now move the camiage down to the position of the first, internal, horizontal line of
the grid, (B) and press [SHIFT] + _ (underline) for a single line, or [SHIFT] + =s for
a double line.
3, Repeat this procedure for all the horizontal lines of the grid,
4, Now move the carnage right, to the position of the first, internal, vertical line of the
grid (E), and press the key for the vertical framing character (|),
5. Repeat the procedure for every (internal) vertical line in the grid,
6. Now move the carriage to the bottom right-hand comer of the grid, and press the
[FRAME] key, followed by the [RETURN] key, as before.
The grid will be printed, and the camiage will return to the top left-hand comer of the grid.
FRAME
ranuAi
[FRAME] ^
(OPTIONAL)
_OR as
i
_OR^
i
i
OR =
1
B
c
D
E
E
___________
.
G
[FRAME]
Page 97

Frame and Line Drawing
Notes!
1. The above examples show only one way to draw frames and tabular grids. If you find
it more convenient, you can move the carriage to the right first and define the vertical
lines, before moving the carriage down and defining the horizontal lines.
2. The maximum number of horizontal lines in a grid is limited to 70. If you try to set more
than this, the beeper will sound,
3. The maximum number of vertical lines in a grid is limited to 30. if you try to set more
than this, the beeper will sound.
4. You must use daisywheels with the vertical bar(|) symbol forframing, otheoA^ise vertical
lines will be printed as periods.
5. You must use keyboard 2and an International daisywheel, orkeyboard 3 and asymbol
daisy wheel, if you want to use the double ledger line (=z) for horizontal lines.
6. Framing only works when the default keyboard is selected for keyboard I, If you have
selected aforeign language keyboard for Keyboard I usingSET UP, framingwill network
at all.
Frames With Complex Shapes
You may want to drawframes whose shape is not rectangular, or grids where the horizontal
and vertical lines do not extend all the wayto the edges. For example, you may want atable
to have a rectangular box the full width of the table across the top, Lo accommodate the
title.
You can do this by building up the frame as a combination of several smaller frames.
Page 98

Page 99

.......f..;-
^^^^3. j^&. M ^^.^.1 ffl
A-. ■■■■■■■■
Although your Brother typewriter can function as an ordinary
typewriter, once you have used its wordprocessing features you will
probably never want to use it any other way, except for typing very
short documents and envelopes.
Advantages Of Wordprocessors
You have already seen the advantages of the Line-by-line and Justify modes, which allow
you to view and correct a line of text on the screen before you print it
The wordprocessor mode allows you to create and edit, not Just one line of text, but an
entire document using the display screen, without doing any printing. Only when the
document has been edited and corrected to your satisfaction do you need to commit it
to paper.
You can also save documents as files on floppy disk, and re-use or edtthem later. A more
detailed explanation of files and use of the disk drive is given in the chapter on File
Management If you have not used a machine with a disk drive before, we suggest you
read that chapter first.
Using the Wordprocessor
If you are used to using an ordinary typewriter and have never used a wordprocessor, it
may take you a little time to become familiar with the wordprocessor features of your
Brother typewriter.
However, once you see how easy it is to create perfect documents before committing
them to paper, you probably won't want to use your typewriter any other way.
CWEUS
Page 100

Basic Wordprocessing
As with using ypurtypewriter in the TW mode, don't be afraid to experiment. You cannot
damage the typewriter by pressing the wrong keys. The worst that can happen is that you
may waste some paper or delete some files from the disk.
Selecting WP Mode
To use your typewriter as a word processor.
I. It’s a good idea to have a disk in the disk drive, for saving your document on later.
However, you can use the wordprocessor without a disk in the drive.
If the disk has not been used before, you may get the following message:
dlHITISLIZE? V-'N
Press [Y] to initialize the disk. This may take a few minutes.
2. Press the [2] key to select WP from the MAIN MENU screen.
I1LNU>>
1 = 2sUiP 3SF TYPE 4= FILE riftNflGEriEN'
The following WP index screen will appear,
«!>jp ihdey:> iHElOhlLE-H
This screen tells you how many thousand (K) characters of space are left on the disk, and
gives you the option of creating a new file in either printing or non-printing mode.
(NEWFILE.P or NEWFILE.N)
NEWFILE is simply a blank file in which you can create a new document When saving
your document after creating it, you will need to give it a difterent file name.
^■HNEuiFILE^P
RLriniNs726»0K
 Loading...