

Page 1
BAS H series
Please read this manual before using the machine.
Please keep this manual within easy reach for quick reference.
LCD PANEL / OPERATION PANEL
INSTRUCTION MANUAL
Page 2

CONTENTS
1. USING THE LCD PANEL (BASIC OPERATIONS) ··················· 1
1-1. Name and function of each LCD panel item ·································································1
1-1-1. Main names and functions ·················································································1
1-1-2. Home screen ······································································································1
1-1-3. Sewing operation screen ····················································································2
1-2. Parameter setting method ····························································································4
1-2-1. X/Y-scale, X/Y-offset ··························································································5
1-2-2. Slow start pattern ································································································7
1-2-3. Using the lower thread counter ··········································································8
1-2-4. Using the production counter ·········································································· 10
1-2-5. Split number setting method ············································································ 11
1-3. Copying programs ····································································································· 13
1-4. Checking the sewing pattern ····················································································· 14
1-5. Setting the work clamp lift amount ············································································· 16
1-5-1. For BAS-311H/BAS-326H/BAS-326H-484/BAS-341H/BAS-342H ·················· 17
1-5-2. For BAS-360H/BAS-365H ··············································································· 19
2. USING THE LCD PANEL (ADVANCED OPERATIONS) ·········· 21
2-1. Memory switch setting method ··················································································· 21
2-2. List of memory switch settings ···················································································· 23
2-3. Using cycle programs ································································································· 25
2-4. Direct selection ··········································································································· 29
2-5. Setting the sewing screen display ·············································································· 30
2-6. Initialization method ···································································································· 32
2-7. Maintenance mode ····································································································· 34
3. USING STORAGE MEDIA ························································36
3-1. Notes on handling ········································································································ 36
3-2. Folder structure ············································································································ 36
3-3. Importing and exporting data ······················································································· 37
3-4. Importing items of sewing data separately ·································································· 39
BAS H series
Page 3
1. USING THE LCD PANEL (BASIC OPERATIONS)
1. USING THE LCD PANEL (BASIC OPERATIONS)
CAUTION
To prevent problems, do not use objects with sharp points to operate the LCD panel.
1-1. Name and function of each LCD panel item
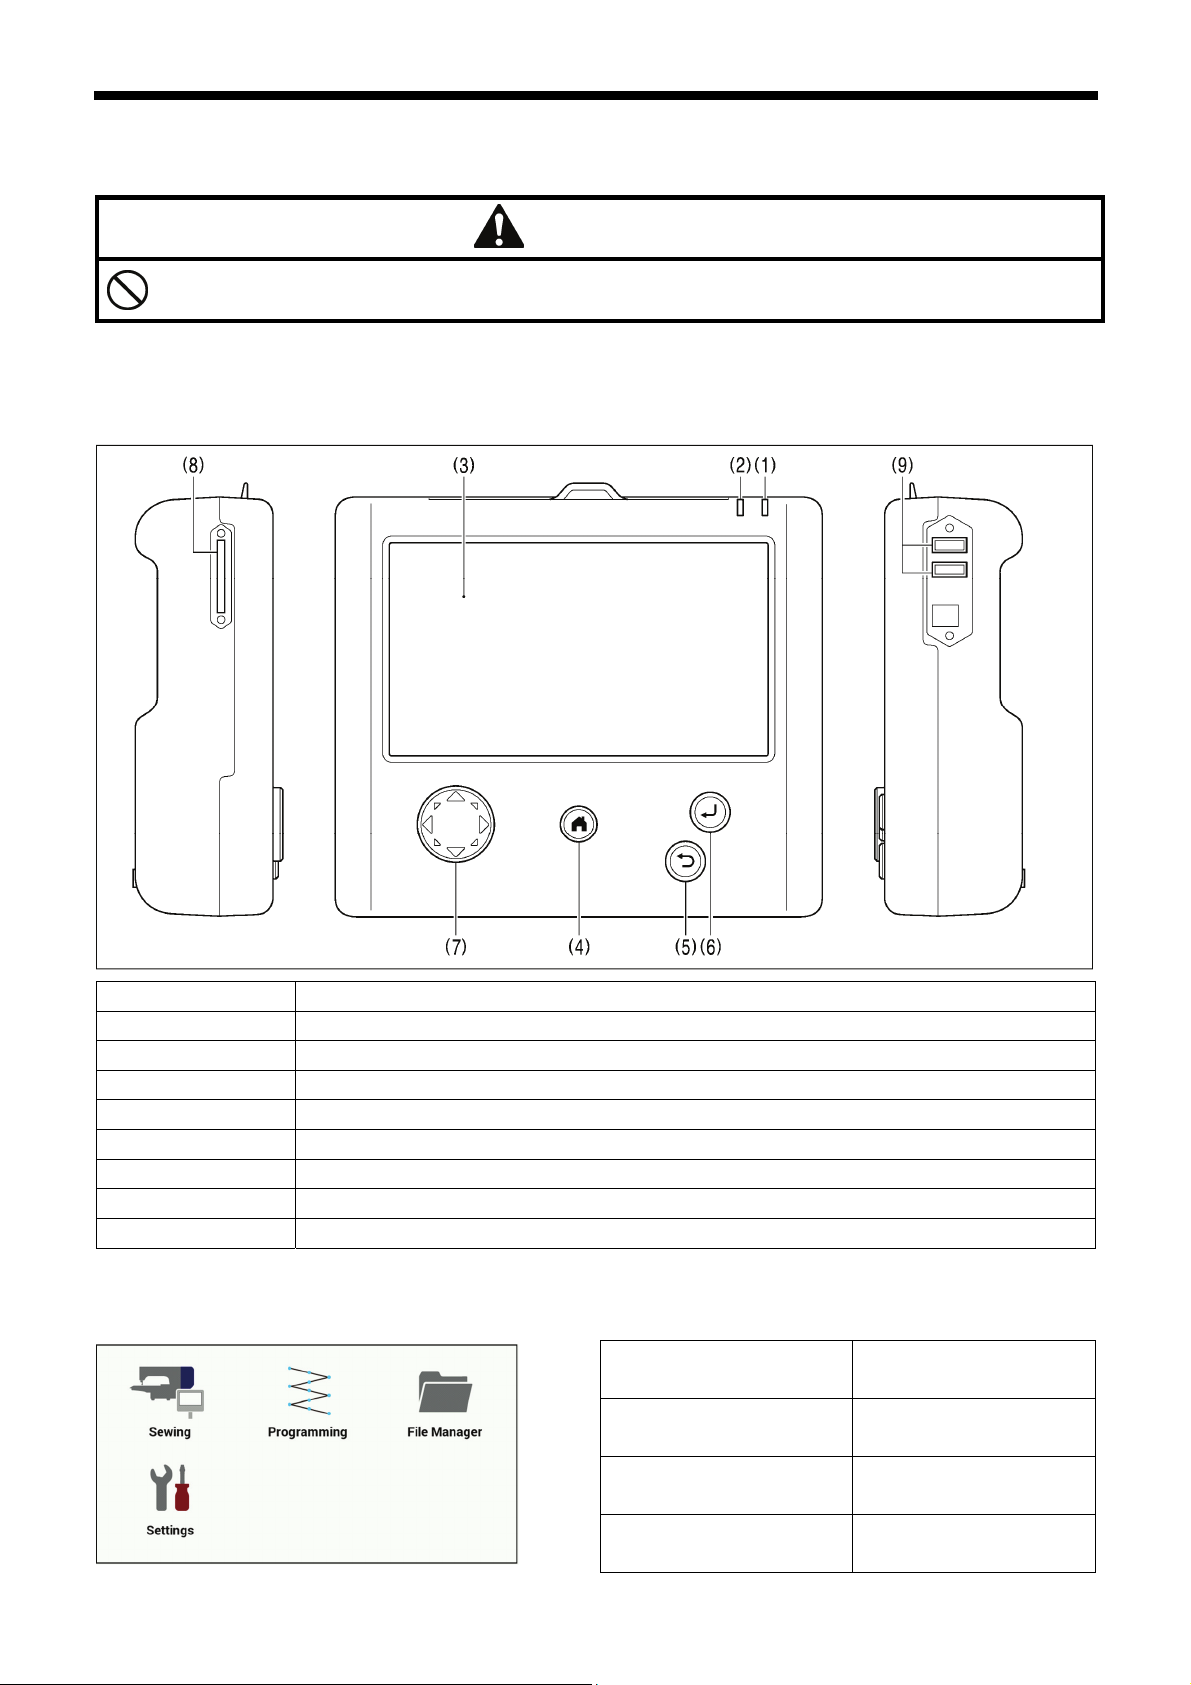
1-1-1. Main names and functions
(1) Power indicator Illuminates when the power is turned on.
(2) Caution indicator Illuminates when an error occurs.
(3) LCD/touch panel This displays messages and touch keys (icons).
(4) HOME key This key is used to return to the home screen.
(5) BACK key This key is used for operations such as returning to the previous step and canceling settings.
(6) ENTER key This key is used for operations such as confirming settings.
(7) JOG key This key is used when programming sewing data.
(8) SD card slot Insert an SD card.
(9) USB port×2 Connect a USB memory or other device.
1-1-2. Home screen
4289B
Press the HOME key to display the home screen.
(1)
(4)
(2)
(3)
(1) Sewing key Touch to switch to the
(2) Programming key Touch to switch to the
(3) File Manager key Touch to switch to the
(4) Settings key Touch to switch to the
BAS H series
sewing operation screen.
programming screen.
file manager screen.
setting menu screen.
1
Page 4
1. USING THE LCD PANEL (BASIC OPERATIONS)
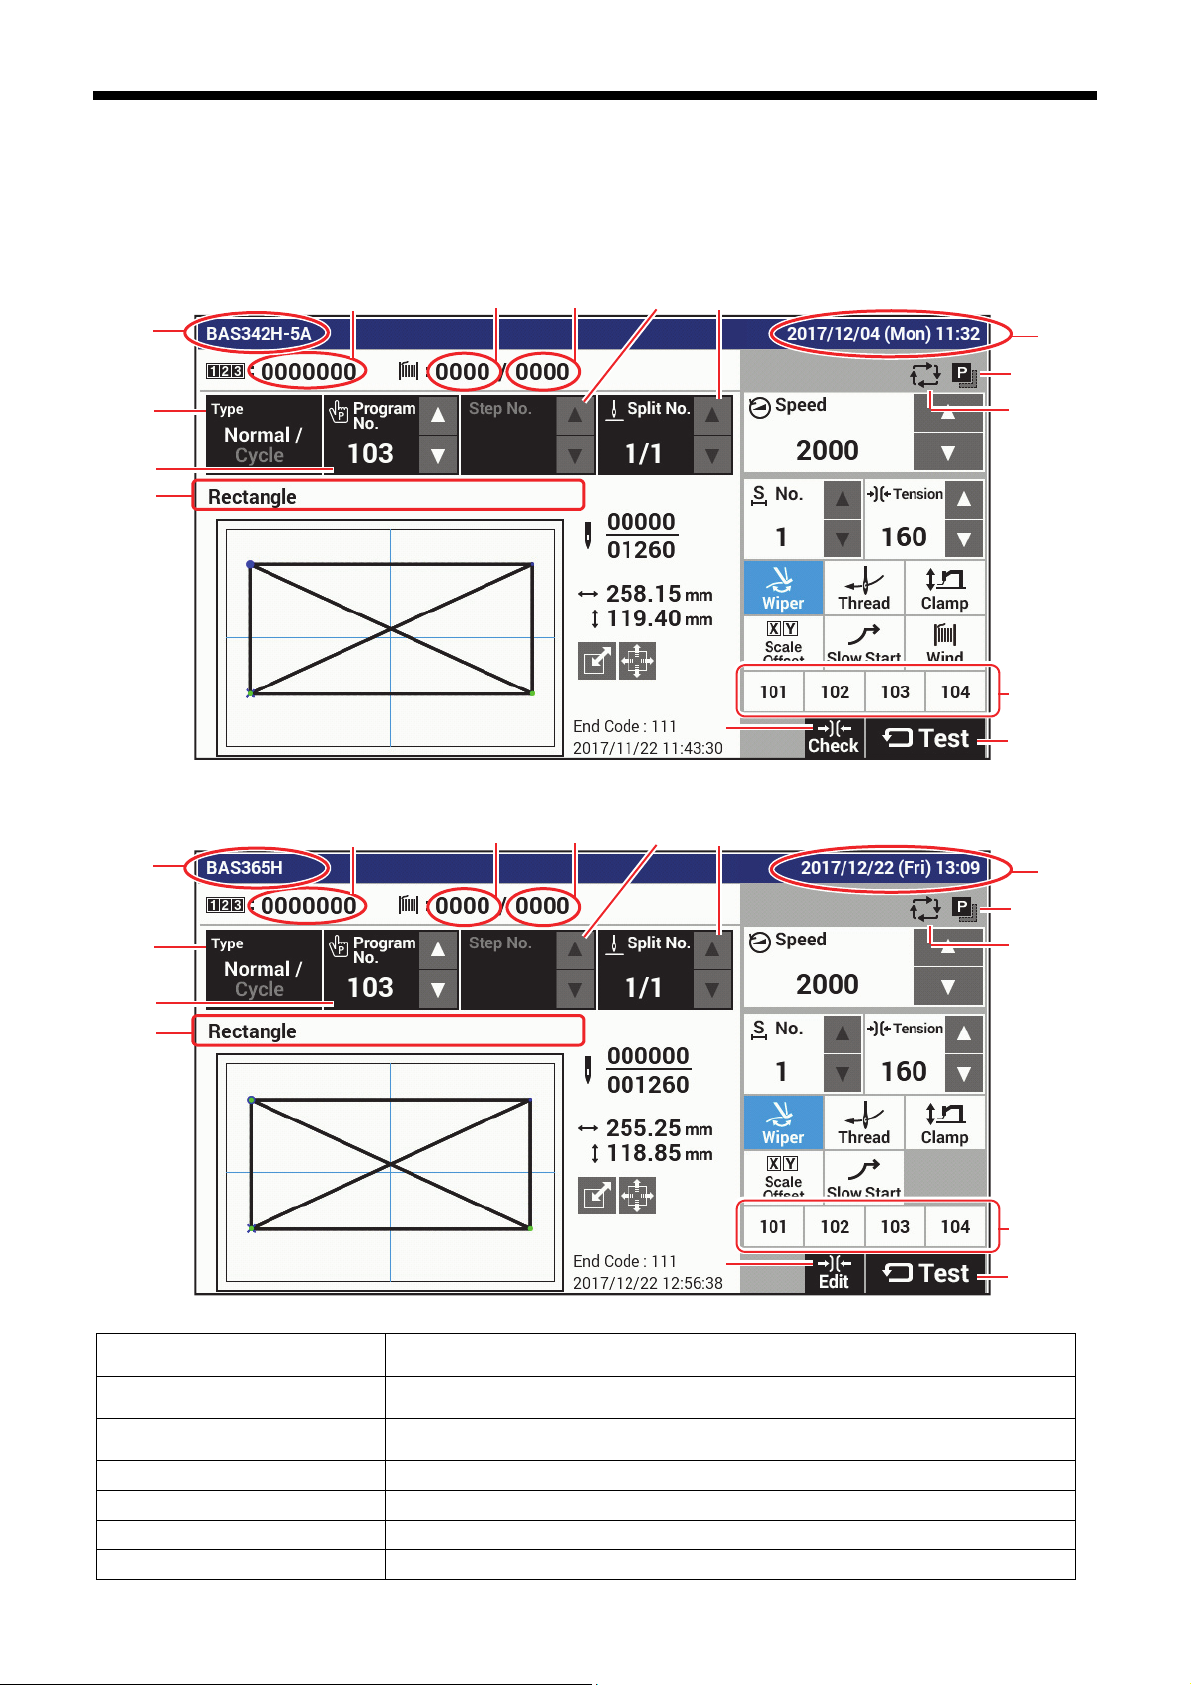
1-1-3. Sewing operation screen
When the power is turned on while the LCD panel is connected to the sewing machine, this screen is displayed
・
automatically.
If any other screen is being displayed, touch the sewing key in the home screen to display this screen.
・
[For BAS-311HN, BAS-326H, BAS-326H-484, BAS-341H and BAS-342H]
(27)
(6)
(7)
(29)
[For BAS-360H and BAS-365H]
(27)
(6)
(7)
(29)
(1) Production counter key
(2) Lower thread counter key
(3) Lower thread setting key
(4) Cycle program key
(5) Copy key
(6) Type key
(7) Program No. keys
2
(25)
(25)
(1)
(1)
This shows the production counter value.
If you keep pressing this key, the display switches to the setting menu screen.
This shows the lower thread counter value.
If you keep pressing this key, the display switches to the setting menu screen.
Displays the lower thread setting value. If you keep pressing this key, the display
switches to the setting menu screen.
Touch to switch to the cycle program editing screen.
Touch to switch to the sewing program copying screen.
Touch to select the program type.
Touch to display/select the current program number.
(2)
(2)
(3)
(24)
(3)
(24)
BAS H series
(8)
(8)
(26)
(26)
(9)
(10)
(11)
(22)
(13)
(23)
(16)
(20)
(9)
(10)
(11)
(22)
(13)
(23)
(16) (17)
(20)
(12)
(14)
(17)
(14)
(15)
(18)
(12)
(15)
(Continued on next page)
(28)
(5)
(4)
(19)
(21)
(28)
(5)
(4)
(19)
(21)
Page 5
1. USING THE LCD PANEL (BASIC OPERATIONS)
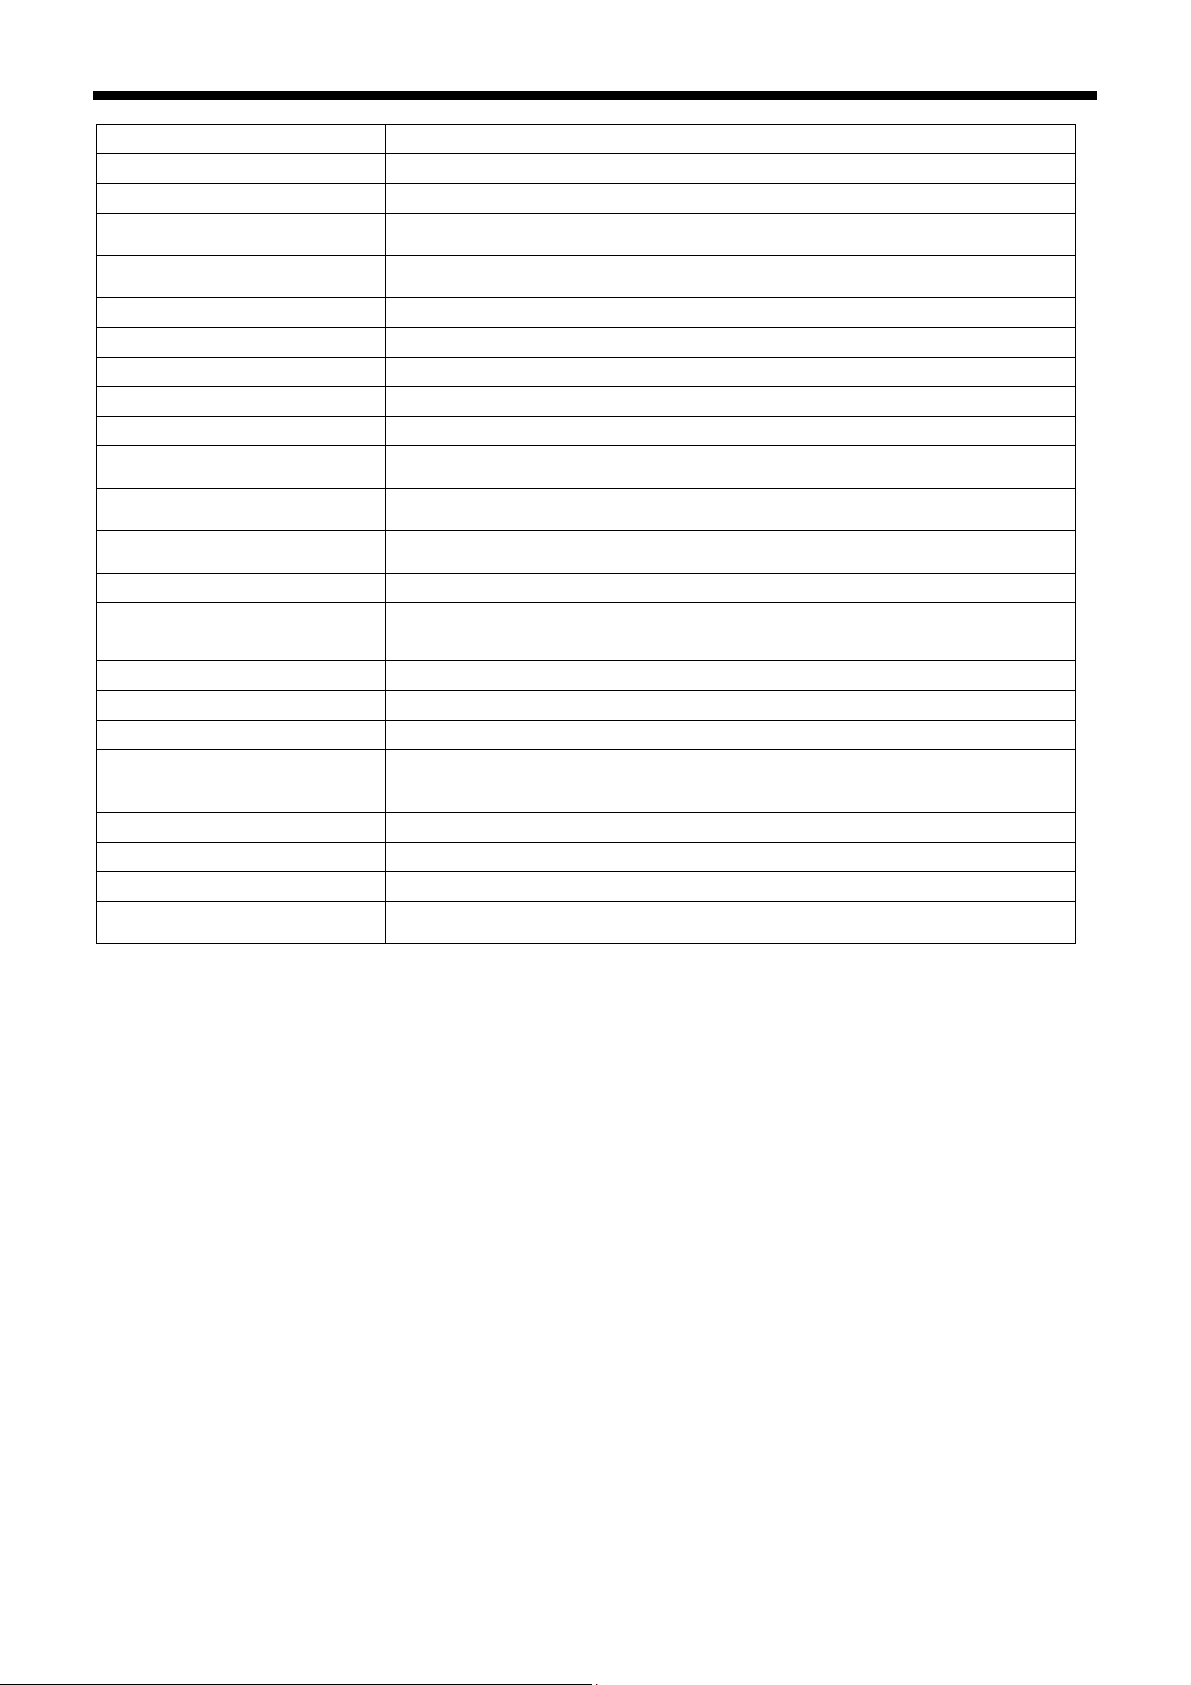
(8) Step No. keys
(9) Split No. keys
(10) Speed keys
(11) Section No. keys
(12) Tension keys
(13) Wiper key
(14) Thread key
(15) Clamp key
(16) Scale Offset key
(17) Slow Start key
(18) Wind key
(19) Direct selection keys
(20) Tension operation check key
(21) Test key
(22) Current stitch number
/ Total number of stitches
(23) Sewing area size
(24) Sewing data information
(25) Preview
(26) Scale/Offset key
(27) Model name
(28) Date and time
(29) Comments
(30) Tension editing check key
Touch to display/select the current step number.
Touch to display/select the current split number.
Touch to display/select the sewing speed.
Touch to display/select the section number for the digital tension.
These are not displayed when digital tension is not being used.
Touch to display/select the digital tension value.
These are not displayed when digital tension is not being used.
Touch to switch the thread wiper on/off.
Touch to switch to the threading screen.
Touch to switch to the Adjust Clamp Height setting screen.
Touch to switch to the Scale/Offset setting screen.
Touch to switch to the Slow Start setting screen.
Touch to switch to the thread winding screen.
This is not displayed for the BAS-360H/365H.
You can register normal/cycle program numbers into each of these keys.
When you keep pressing a key, the program assigned to that key is selected.
Touch to switch to the tension operation check mode.
This is not displayed when digital tension is not being used.
Touch to switch to test mode.
Shows the current stitch number and the total number of stitches.
Shows the size of the sewing data area.
Shows information about the sewing data.
Shows a preview of the sewing data.
This is displayed when the Scale/Offset setting values have been changed from the
default setting values.
Touch the key to display the setting value.
Shows the model name and specifications.
Shows the current date and time.
Shows comments about the sewing data.
Touch to switch to digital tension editing mode.
This is not displayed when digital tension is not being used.
BAS H series
3
Page 6
1. USING THE LCD PANEL (BASIC OPERATIONS)
1-2. Parameter setting method
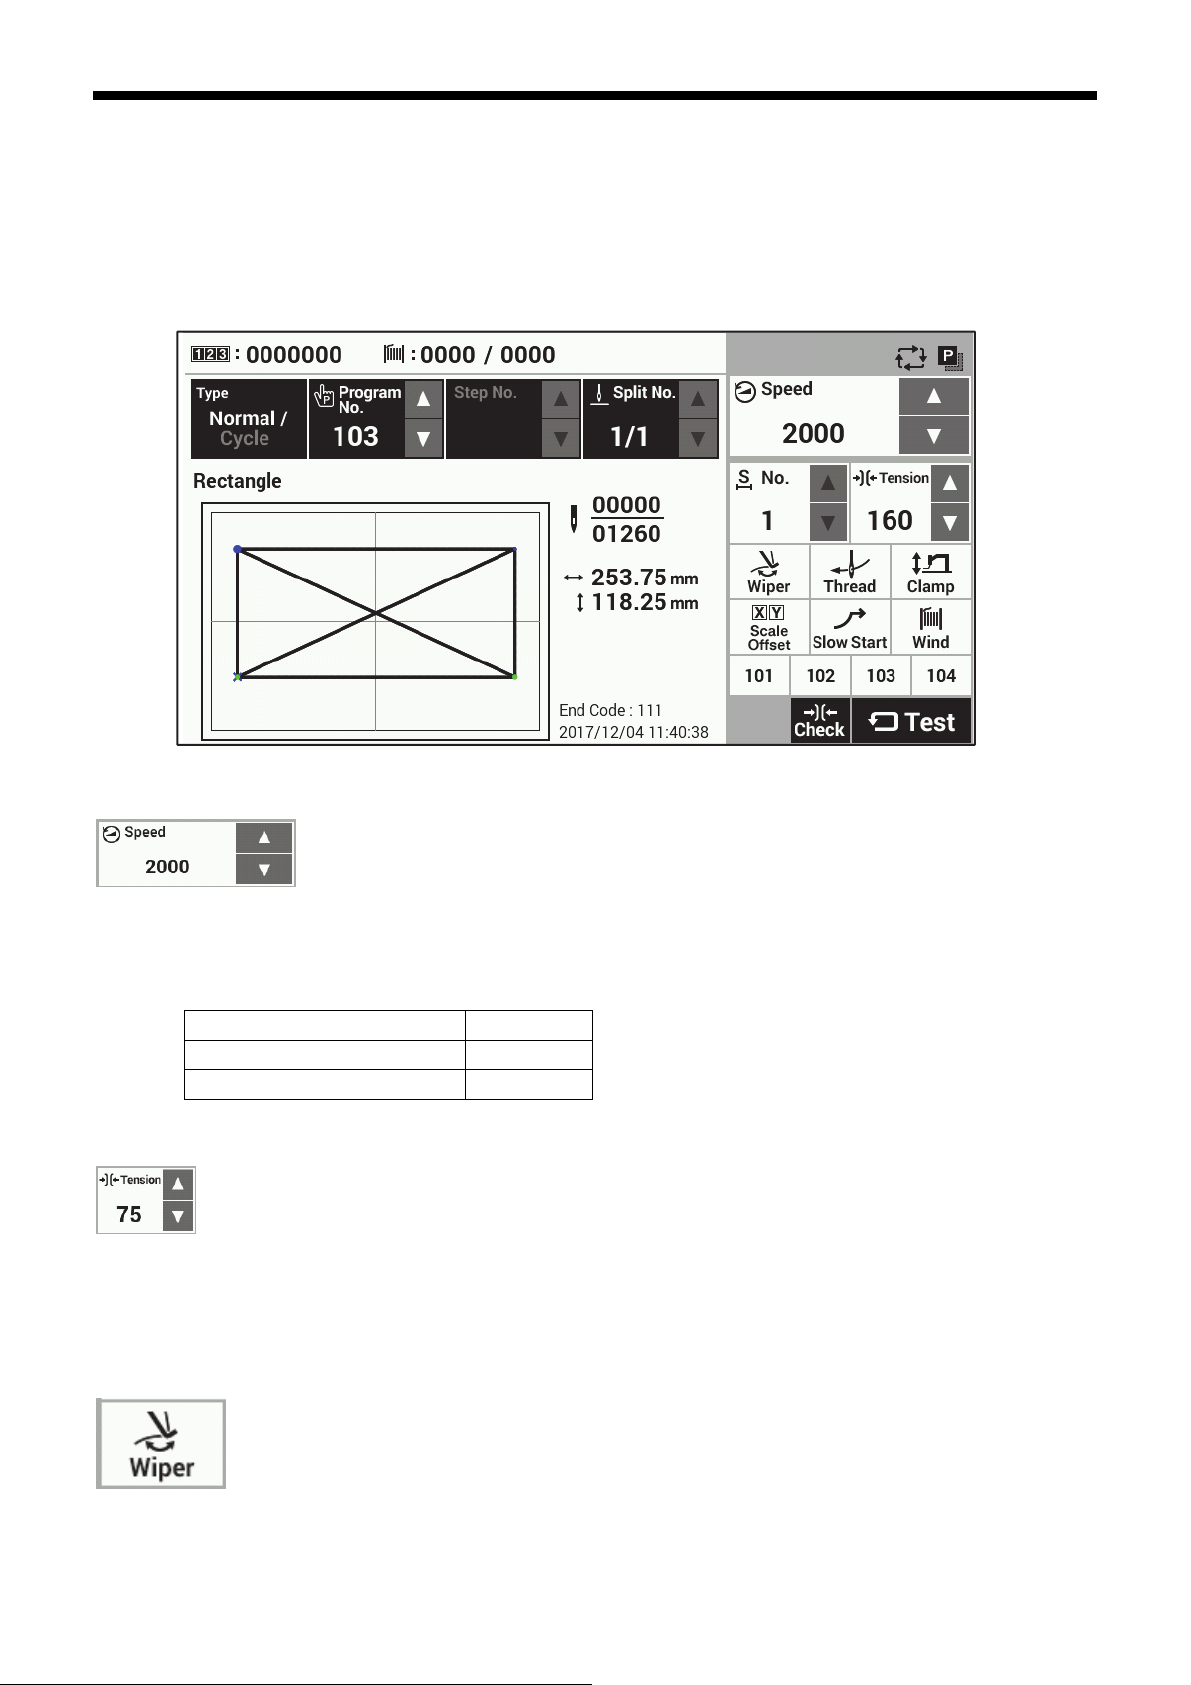
Parameter settings are made at the sewing operation screen.
* For details on the sewing data reading method, refer to "3. Using storage media".
* For details on memory switch setting methods, refer to "2-1. Memory switch setting method".
(3)
(4) (5)
(1)
(2)
Sewing speed
Use the Speed △ and ▽ keys (1) to make the setting.
・Setting range: 200 sti/min to corresponding value in the table below
100 sti/min units Initial value: 2,000 sti/min
Table: Maximum sewing speed for each model
Models other than those below 2800 sti/min
BAS-326H-484 2200 sti/min
BAS-360H/BAS-365H 2700 sti/min
Digital tension
Touch the Tension △ or ▽ key (2) to change the tension value.
・Setting range: 0 to 300 or 0 to 500 (for BAS-360H and BAS-365H)
Initial value: For -3 specifications, 100 For -5 and -7 specifications, 160
Thread wiping
Touch the Wiper key (3) to turn the wiper on or off. (The initial value varies for each model and specification.)
When the setting is on, the key is displayed in blue.
4
BAS H series
Page 7
1-2-1. X/Y-scale, X/Y-offset
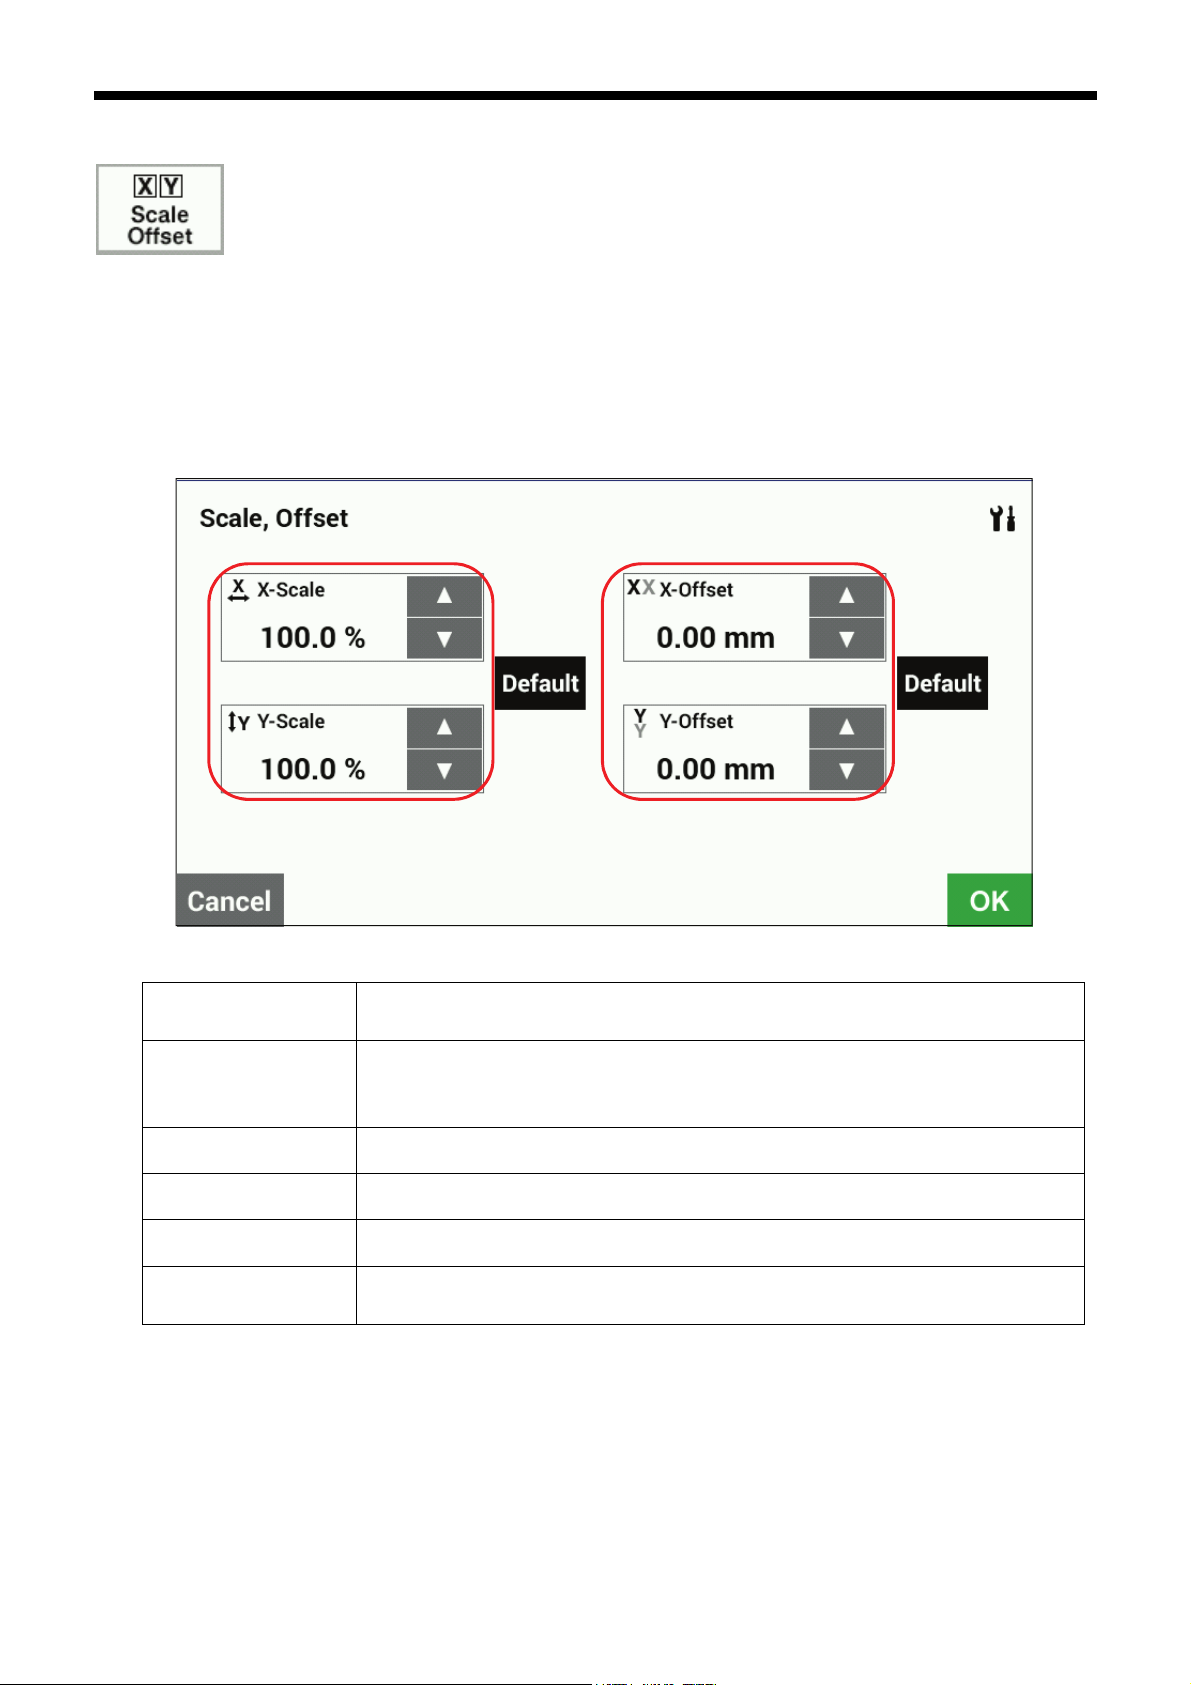
Touch the Scale Offset key (4) in the sewing operation screen to display the X/Y-scale and X/Y-offset setting
screen.
Use when you would like to enlarge, reduce or move the pattern without changing the sewing data.
* When memory switch no. 400 is set to ON, the X-scale, Y-scale, sewing speed and work clamp height can be
recorded separately for each program number.
[X/Y-scale and X/Y-offset screen]
(1) X/Y-scale
(X-Scale, Y-Scale)
(2) Offset
(X-Offset, Y-Offset)
Limited by available sewing area.
Setting range: 0 to 400%, 0.1% units, initial value: 100%
When activating the offset, first carry out home position detection(*).
Setting range: 0 to 300 mm, 0.05 mm units
Initial value: 0 mm
1. USING THE LCD PANEL (BASIC OPERATIONS)
(1) (2)
(4)
(4)
(6)
(3) (5)
(3) OK key Touch to confirm the setting and return the display to the previous screen.
(4) Default key Touch to return the setting to the initial value.
(5) Cancel key Touch to return to the previous screen without changing the setting.
(6) Setting key
* When the foot switch is depressed to the 2nd step, home position detection is carried out.
(If using a two-pedal foot switch, lower the work clamp before depressing the start switch. For the hand start switch,
use the right switch to lower the feed plate lock cylinder and work clamp, and then press the left and right switches at
the same time.)
Touch to display the screen for setting the center point for scaling and the display units
(% or mm).
BAS H series
5
Page 8
1. USING THE LCD PANEL (BASIC OPERATIONS)
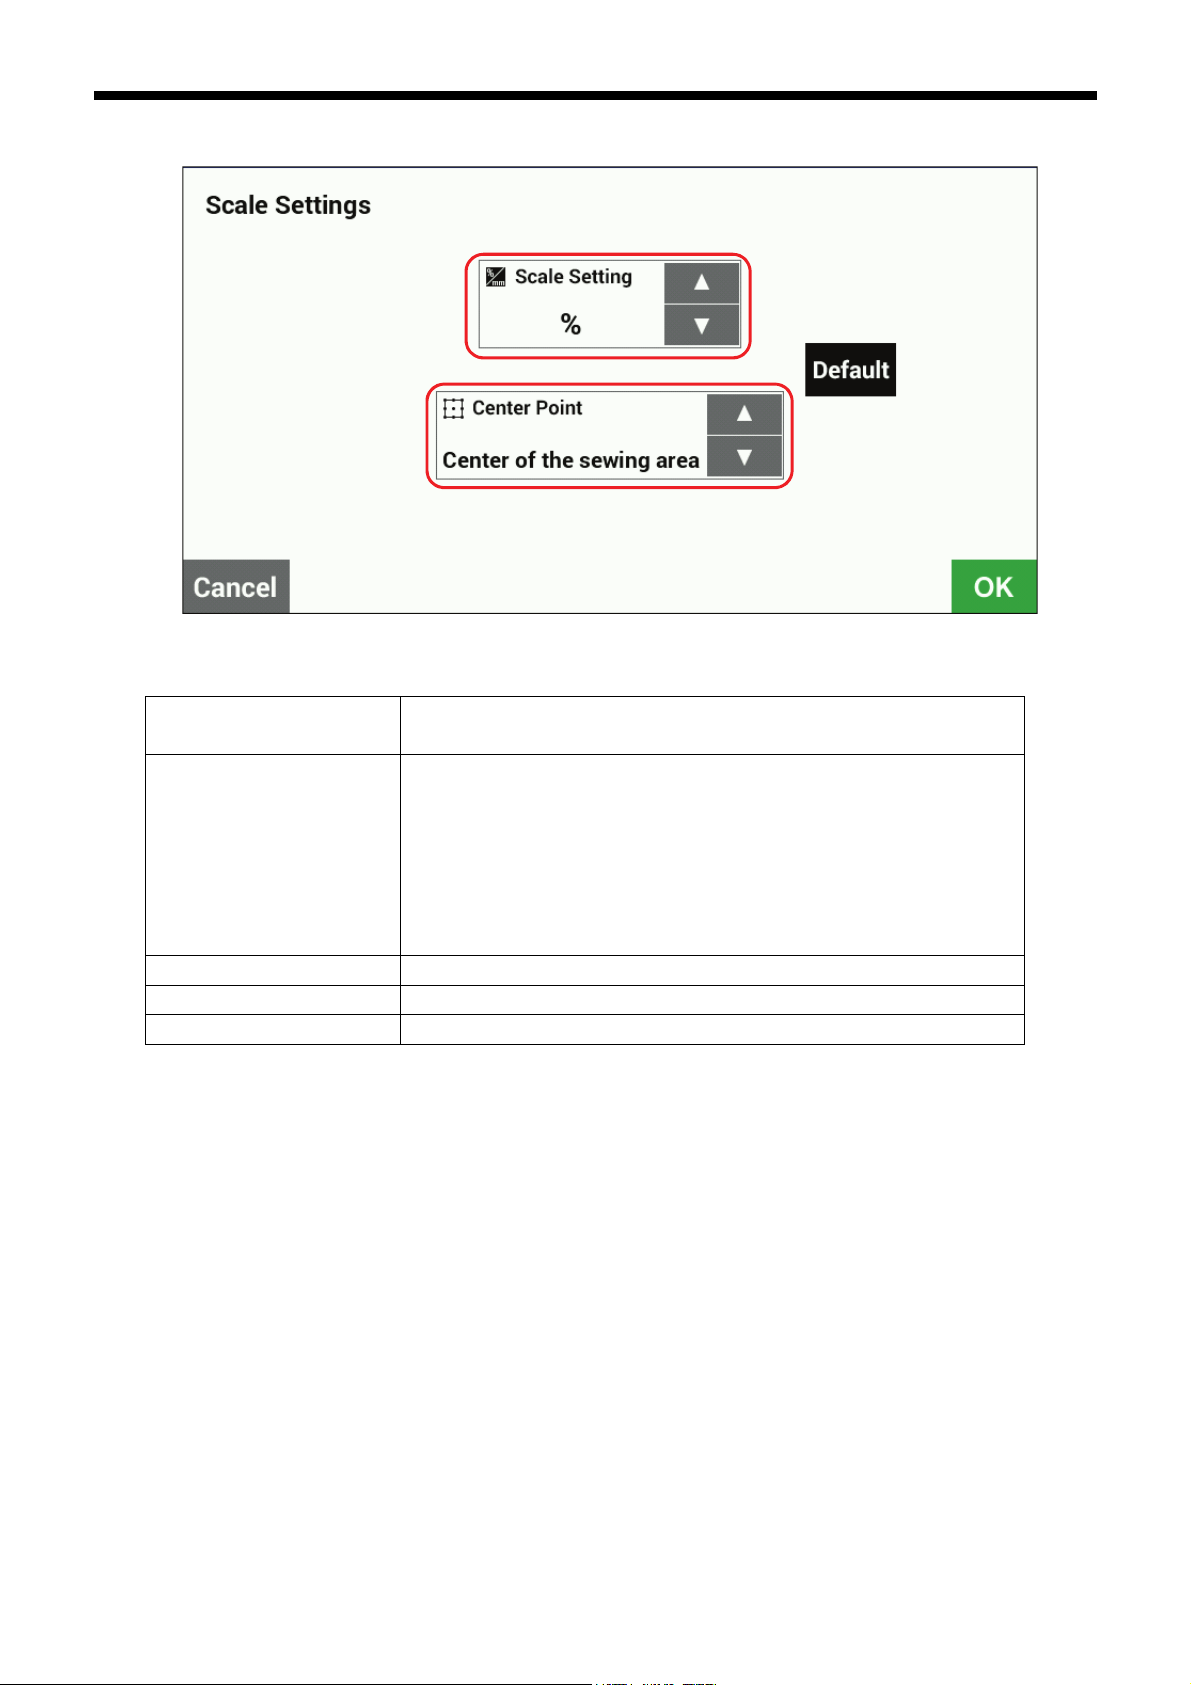
[Scale setting screen]
(11)
(7) Scale setting units Touch to change the scaling units.
Setting range: %, mm, initial value: %
(8) Scaling center point Touch to change the scaling center point.
Setting range: Sewing frame center position, sewing start position, center of
pattern, forward center of pattern, rear center of pattern,
rear-left corner of sewing area, front-left corner of sewing
area, rear-right corner of sewing area, front-right corner of
sewing area
Initial value: Center of sewing frame
(9) OK key Touch to confirm the setting and return the display to the previous screen.
(10) Default key Touch to return the setting to the initial value.
(11) Cancel key Touch to return to the previous screen without changing the setting.
(7)
(10)
(8)
(9)
6
BAS H series
Page 9
1-2-2. Slow start pattern
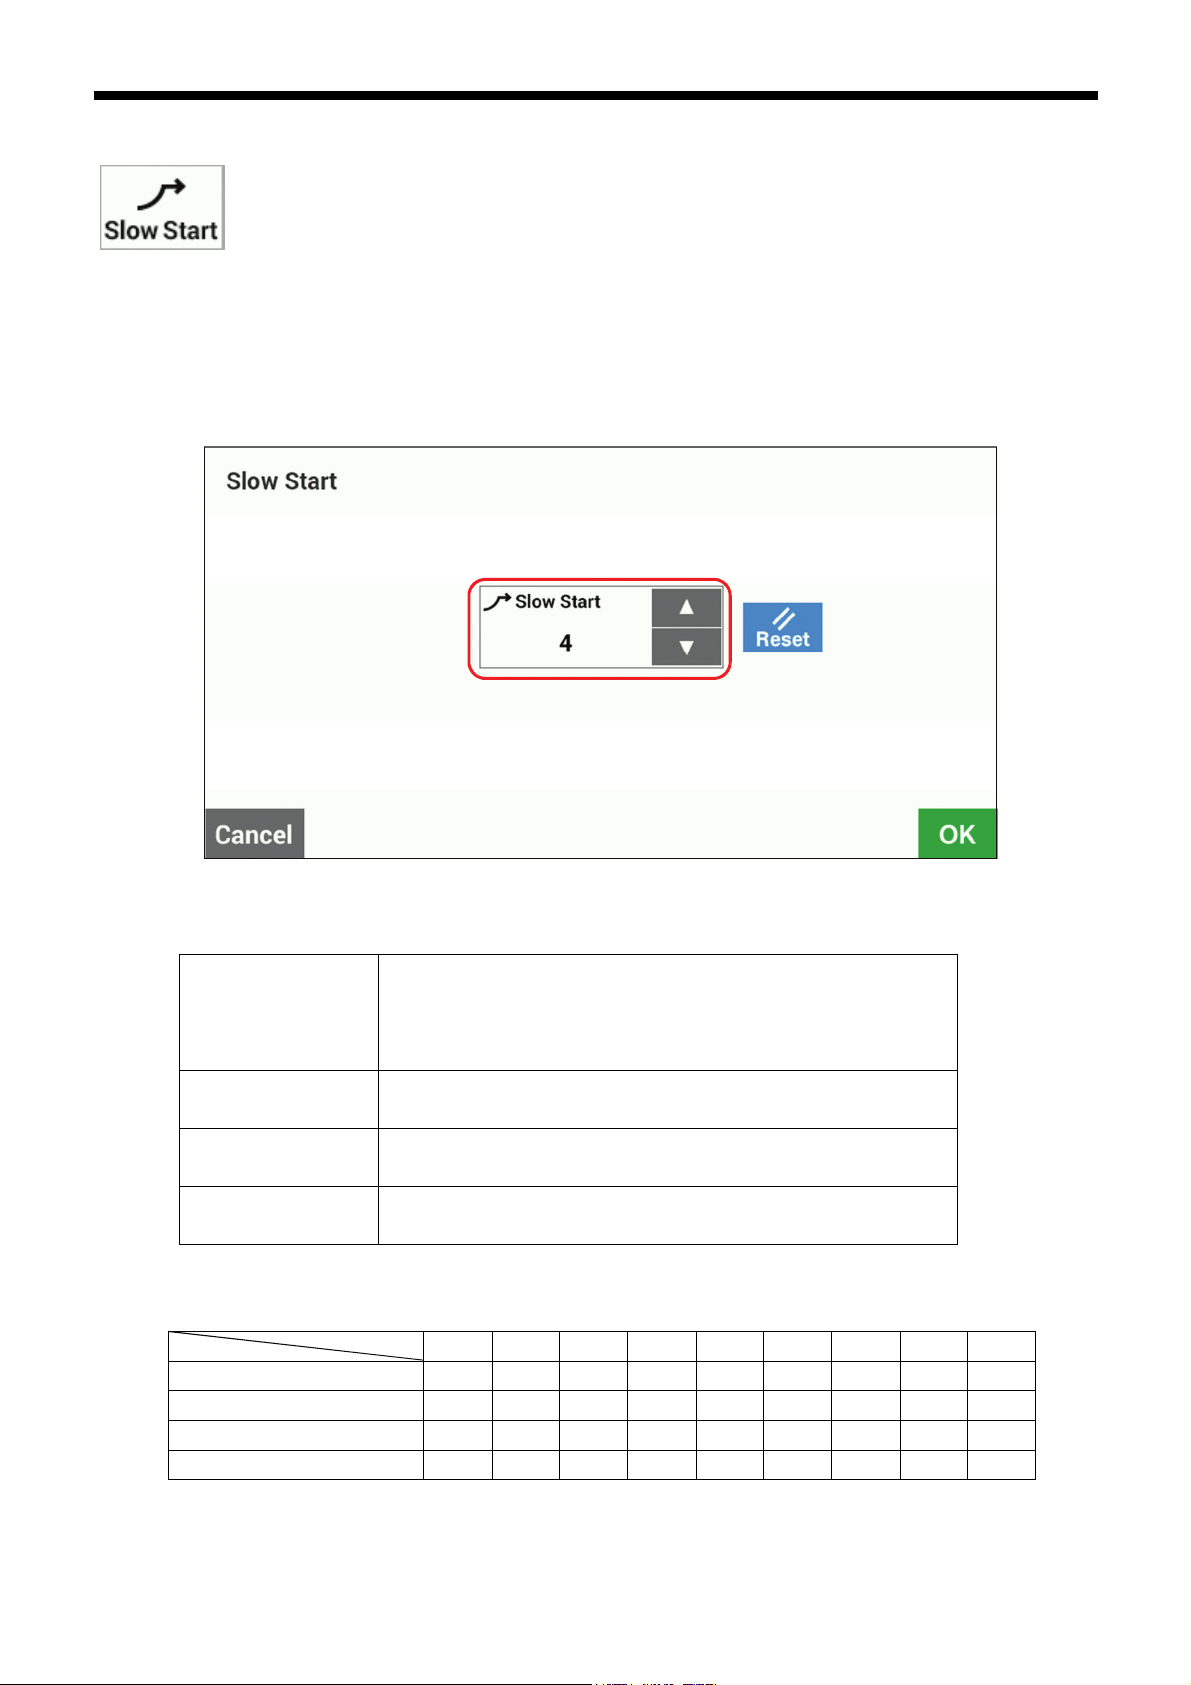
Set memory switch No. 100 to ON and then touch the Slow Start key (5) in the sewing operation screen to display
the slow start setting screen.
This is used to stop the thread from pulling out at the sewing start, and at times when skipped stitches might easily
occur.
* When memory switch no. 400 is set to ON, slow start patterns can be recorded separately for each program
number.
Slow Start (1) Touch the △ or ▽ key to adjust the starting-up speed at the sewing
OK key (2) Touch to confirm the setting value and return to the sewing operation
Cancel key (3) Touch to return to the sewing operation screen without changing the
Reset key (4) Touch to return the value to the value which was first displayed when
Table Setting values and starting-up speeds
Sewing speed for 1st stitch 200 200 300 400 400 400 400 600 800
Sewing speed for 2nd stitch 200 300 400 400 500 600 800 1000 1200
Sewing speed for 3rd stitch 300 400 500 600 800 1000 1200 1600 *1
Sewing speed for 4th stitch 500 600 700 900 1200 1400 *1 *1 *1
*1 Sewing will be carried out at the sewing speed which is set by the “Sewing speed” parameter.
start.
* The smaller the number, the slower the start.
* Refer to the following table for the speed setting values.
screen.
setting value.
you switched to the setting screen.
Lo 1 2 3 4 5 6 7 8 9
BAS H series
1. USING THE LCD PANEL (BASIC OPERATIONS)
(1)
(4)
(2) (3)
7
Page 10
1. USING THE LCD PANEL (BASIC OPERATIONS)
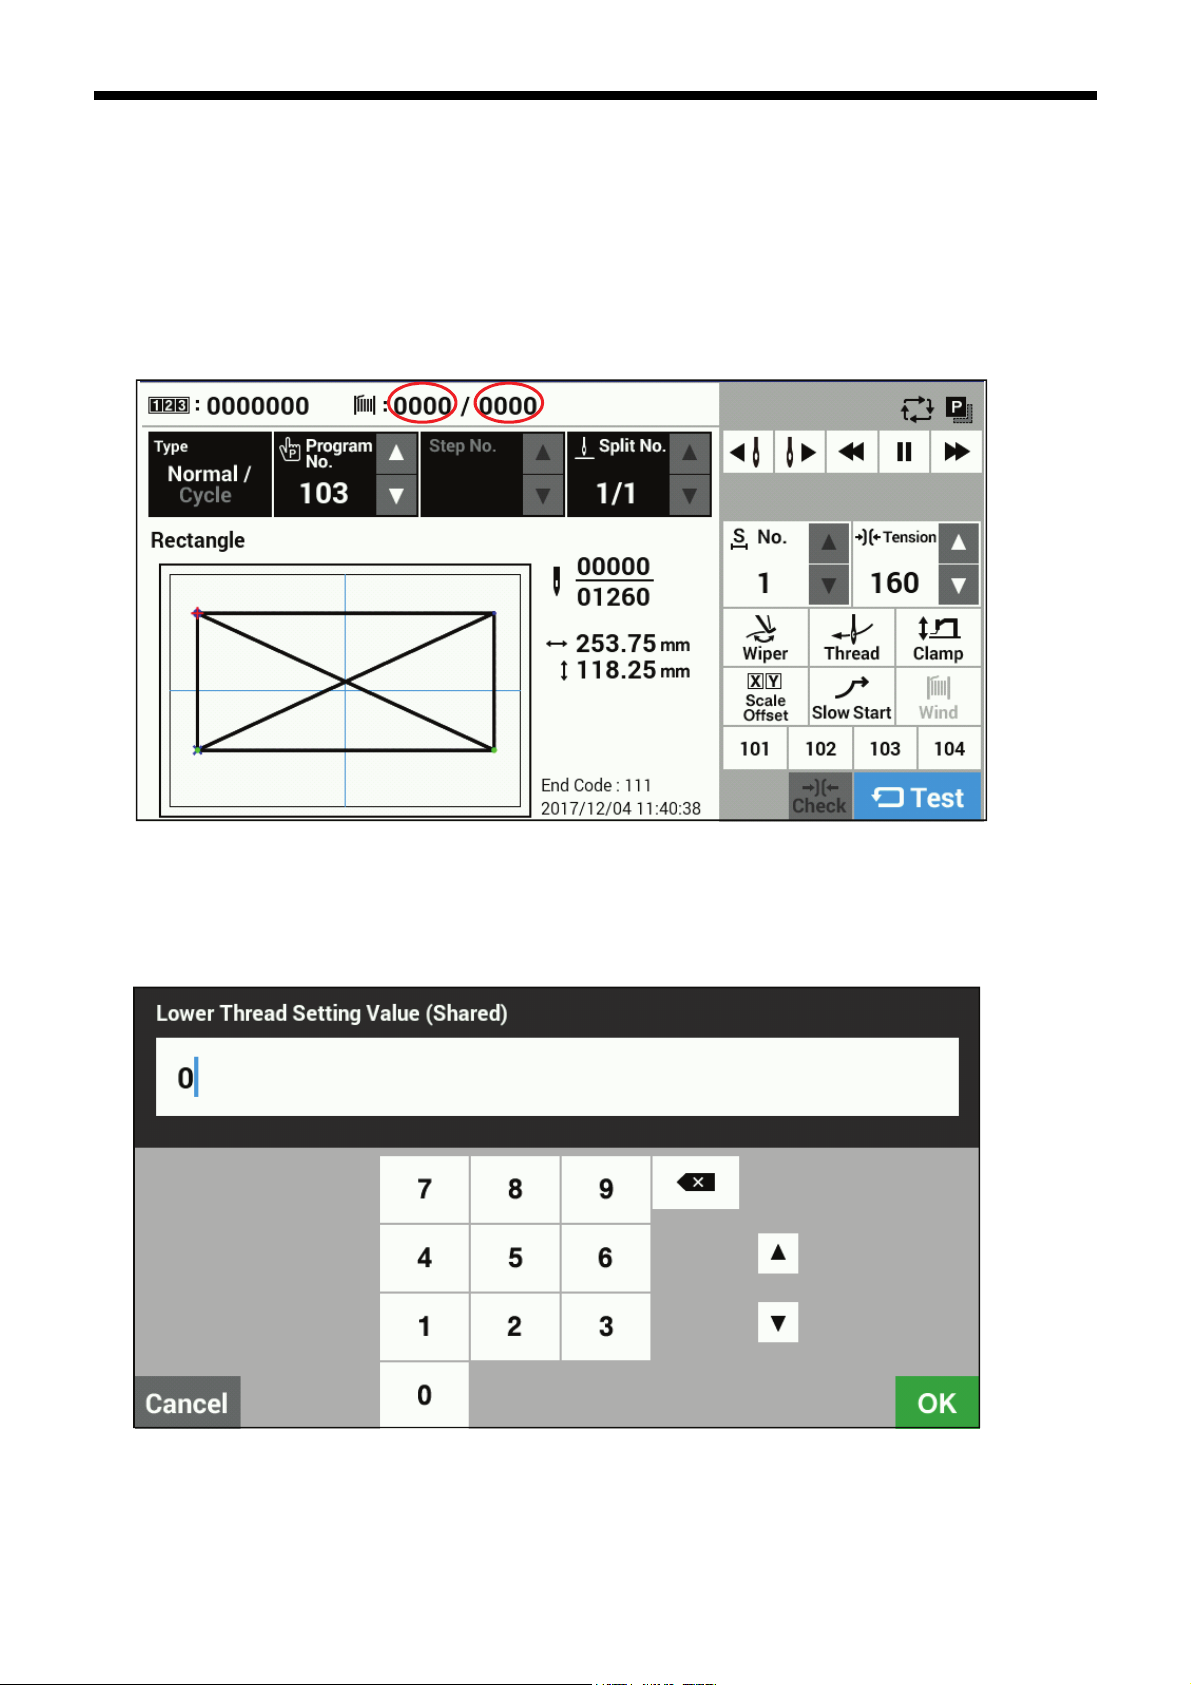
1-2-3. Using the lower thread counter
If you use the lower thread counter to set the number of articles which can be sewn with the amount of lower thread available,
you can stop the lower thread running out in the middle of sewing a pattern.
<Setting the lower thread setting value>
If you keep pressing the lower thread setting key (1) in the sewing operation screen, the screen will switch to the input
screen for the lower thread setting value.
[Sewing operation screen]
(2)
(1)
(1)
(2)
Enter the value and then touch the OK key (3) to confirm the value.
When the lower thread setting value has been set, the same value will appear as the lower thread counter value (2).
f the value is set to "0000", the lower thread counter will not operate.
・ I
The lower thread setting value can be set to "0"-"9999".
8
BAS H series
(3)
Page 11
1. USING THE LCD PANEL (BASIC OPERATIONS)
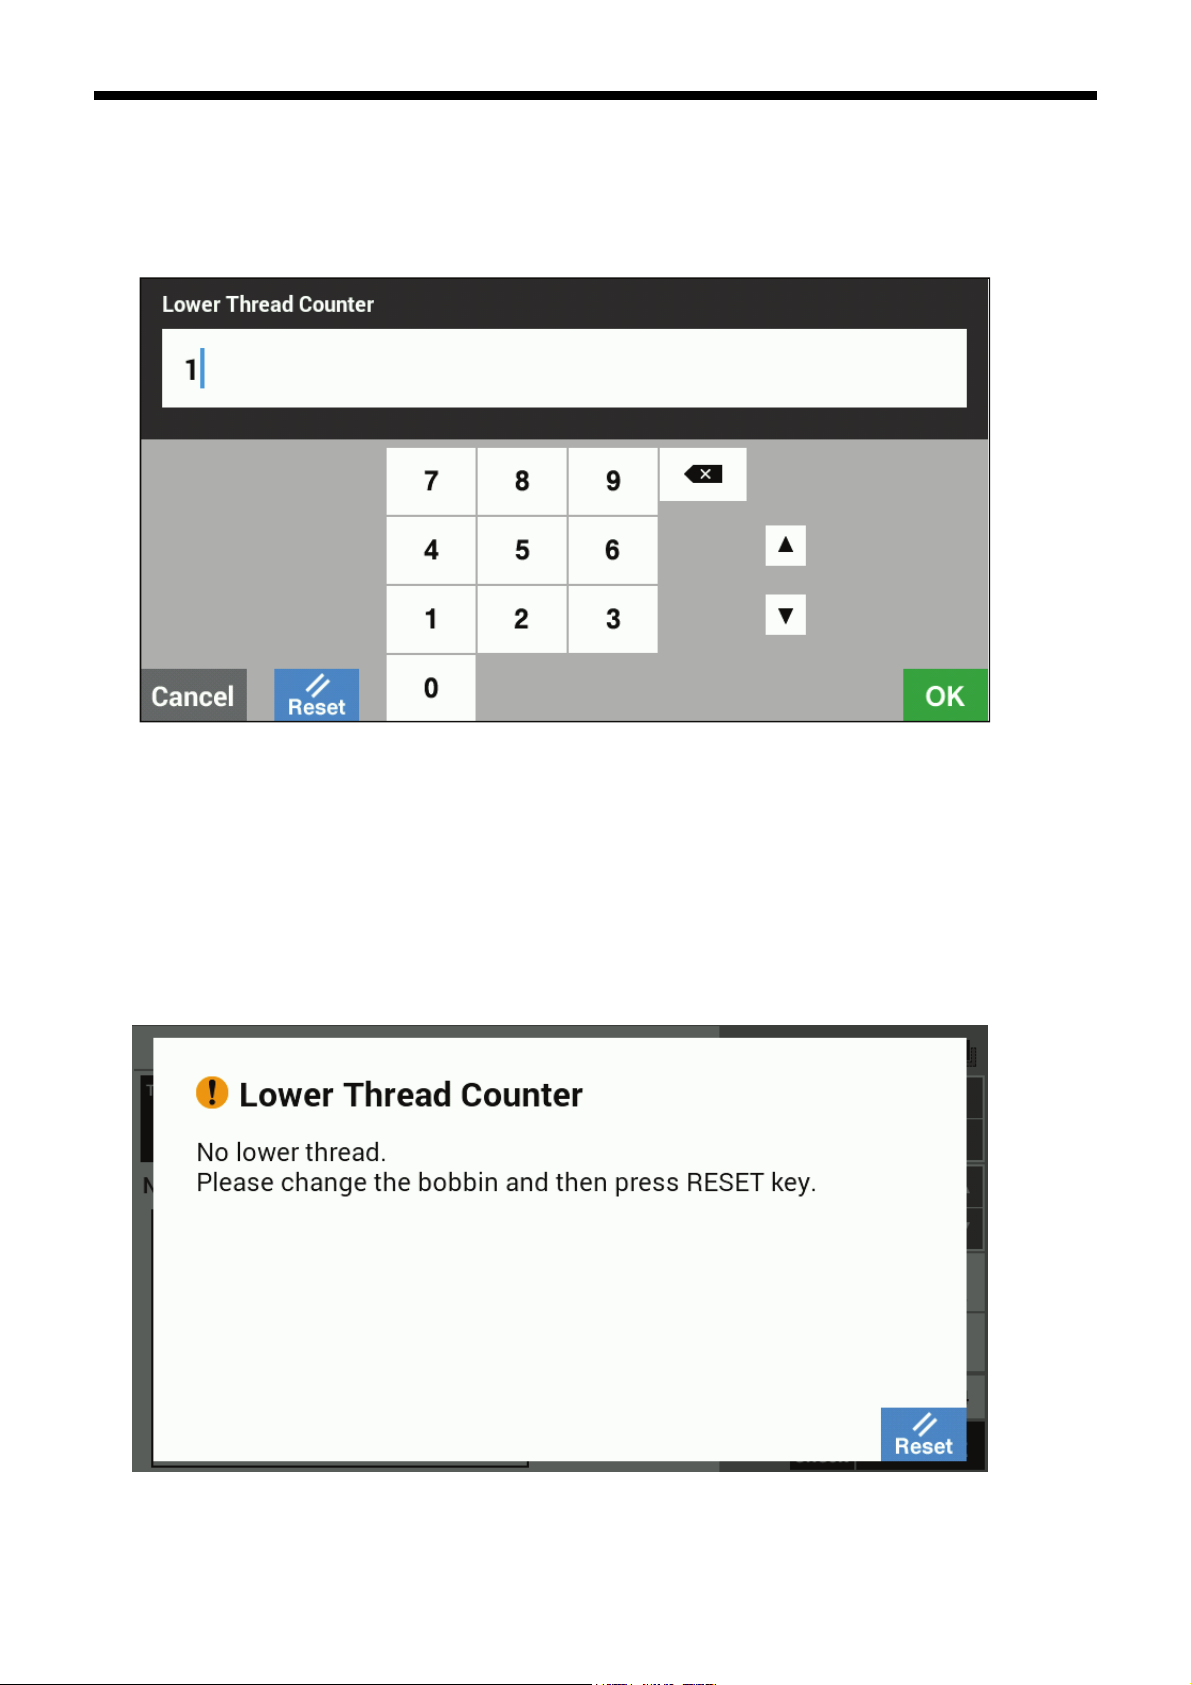
<Setting the lower thread counter value>
If you keep pressing the lower thread counter key (2) in the sewing operation screen, the screen will switch to the input
screen for the lower thread counter value.
Enter the value and then touch the OK key (5) to confirm the value.
Touch the Reset key (4) to set the lower thread setting value as the lower thread counter value.
The lower thread counter value can be set from "0" to the lower thread setting value.
(4) (5)
<Lower thread counter operation>
If the initial value for the lower thread counter is set to a value other than "0", the lower thread counter will operate.
The counter value decreases by 1 each time sewing of an item is completed, and when it reaches "0", a message screen
is displayed and the buzzer sounds.
When this happens, the sewing machine cannot be operated.
Touch the Reset key (6) to return the lower thread counter value to the initial value, and then sewing will be possible
again.
[Message screen]
(6)
BAS H series
9
Page 12
1. USING THE LCD PANEL (BASIC OPERATIONS)
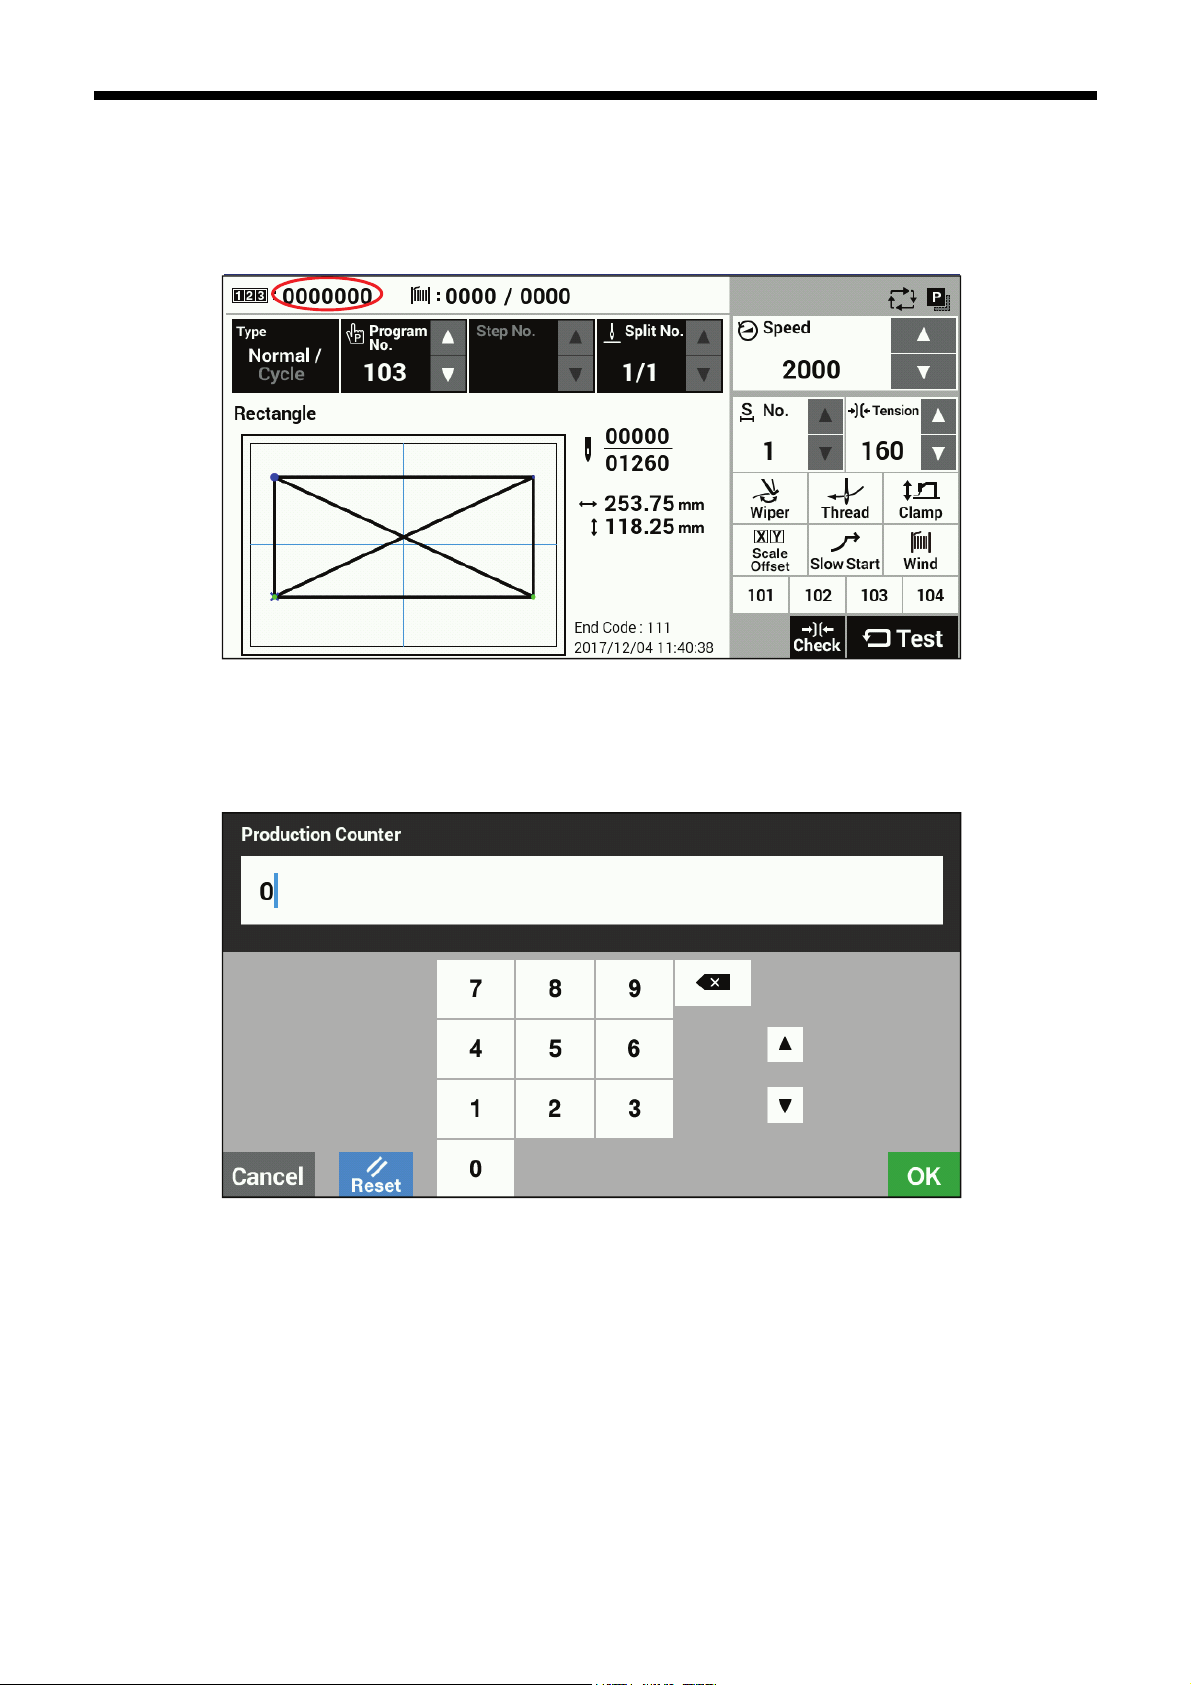
1-2-4. Using the production counter
<Setting the counter value>
If you keep pressing the production counter key (1) in the sewing operation screen, the screen will switch to the input
screen for the production counter.
The counter value can be set to a value from "0" to "9999999".
If you would like to return the value to "0", touch the Reset key (2) and then touch the OK key (3).
After doing this, the display will return to the sewing operation screen.
Touch the Cancel key (4) to return to the sewing operation screen without changing the value.
<Production counter operation>
The production counter always operates, and it increases by 1 each time sewing of an item is completed.
(1)
(2) (4)
(3)
10
BAS H series
Page 13
1. USING THE LCD PANEL (BASIC OPERATIONS)
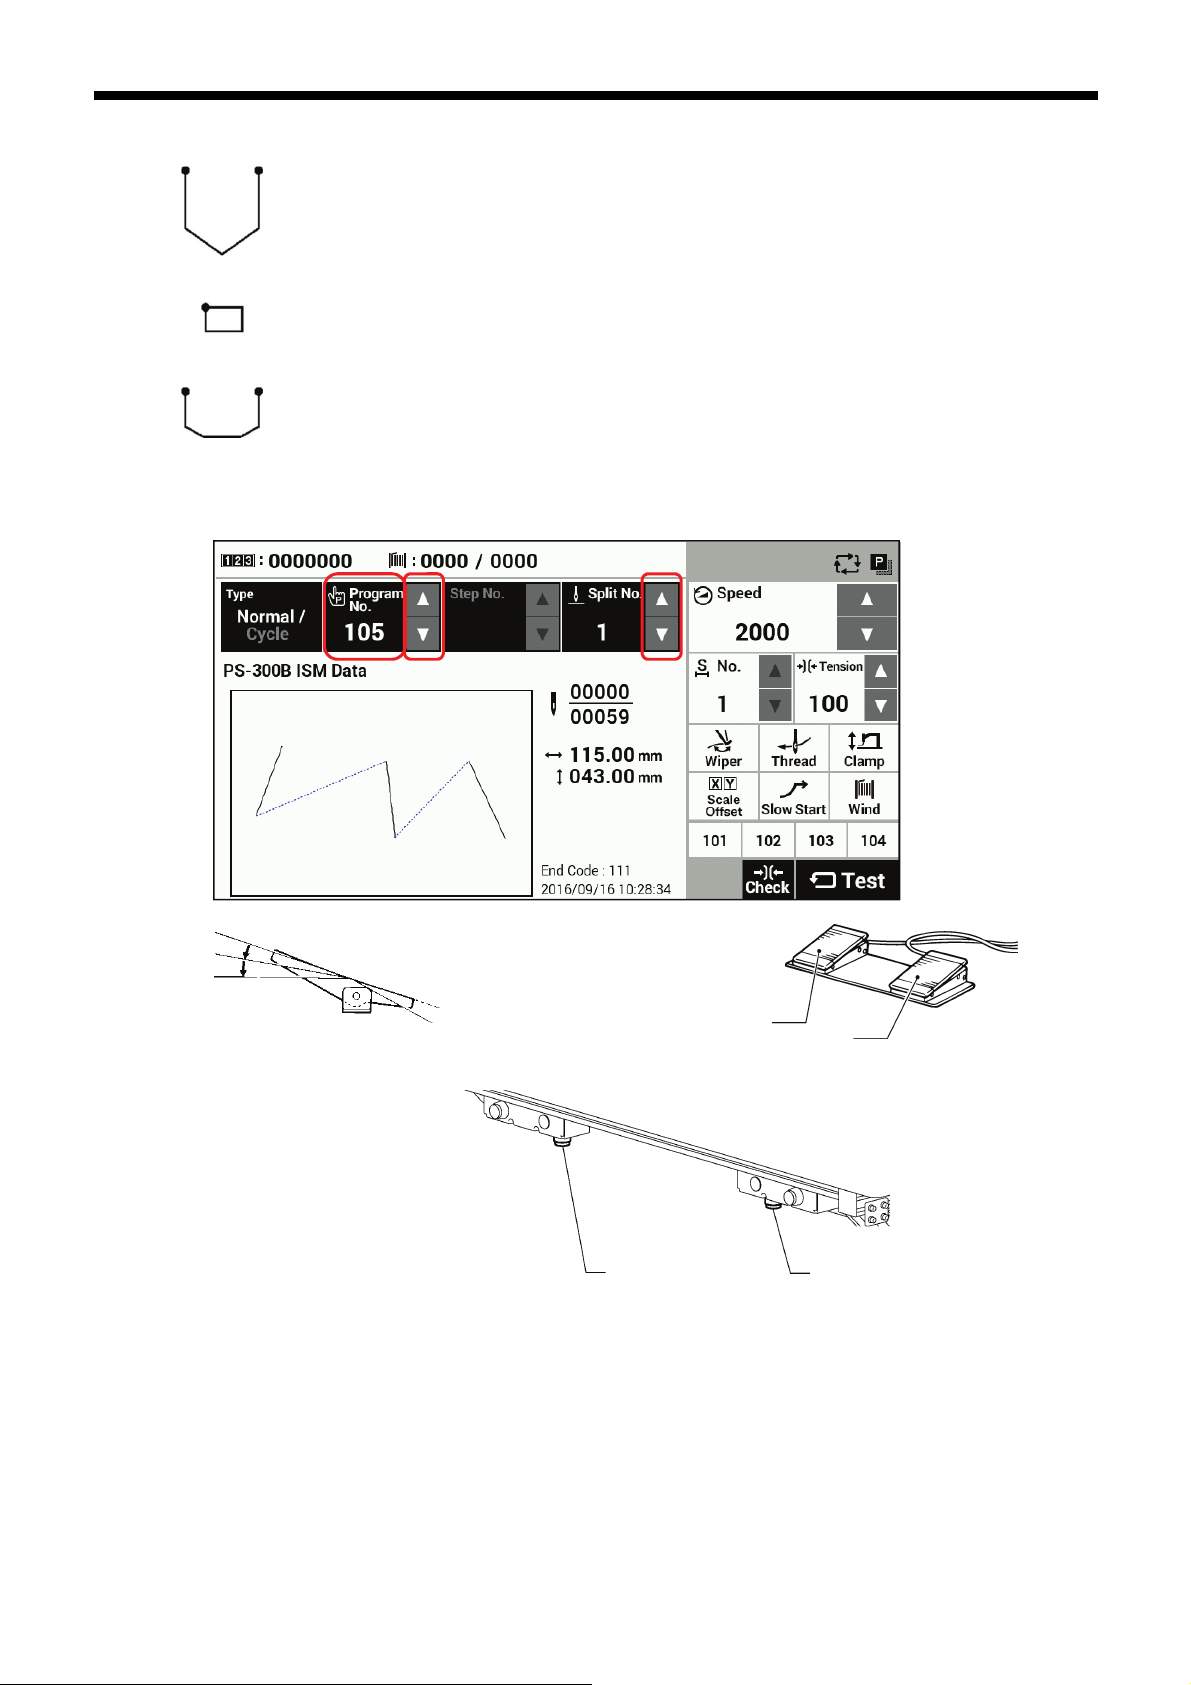
1-2-5. Split number setting method
If split codes (sewing interrupt data) exist in one program, the number which indicates
the pattern which has been divided by the split codes is called the split number.
Pattern 1
Pattern 2
4964Q
[Sewing operation screen]
Pattern 3
Pattern 1: Split No. 1
Pattern 2: Split No. 2
Pattern 3: Split No. 3
(1) (2) (3)
2nd step
4441Q
Work clamp switch (2-step)
Start switch
4923Q
Left switch
Right switch
4169B
1.
Touch the "Program No." △ or ▽ key (1) to select the program number which includes the split code.
The "Program No." value (2) will flash.
・
Depress the foot switch to the 2nd step to carry out home position detection.
2.
(If using a two-pedal foot switch, lower the work clamp before depressing the start switch. For the hand start switch, use
the right switch to lower the feed plate lock cylinder and work clamp, and then press the left and right switches at the same
time.)
* The feed mechanism will move to the home position and the program number will be confirmed. (The “Program No.”
setting (2) will stop flashing and illuminate steadily.)
Use the "Split No." △ or ▽ key (3) to select the split number.
3.
BAS H series
11
Page 14

1. USING THE LCD PANEL (BASIC OPERATIONS)
p
The setting for memory switch No. 403 lets you select the split mode.
[Continuous split]
Memory switch No. 403 = 0
Sewing is carried out each time in the order of steps 1 → 2 → 3 → 1 (for example, if there are two split codes).
・
[Independent split]
Memory switch No. 403 = 1
・The
attern for the displayed split number is sewn independently.
12
BAS H series
Page 15

1-3. Copying programs
[Sewing operation screen]
1. USING THE LCD PANEL (BASIC OPERATIONS)
(1)
Touch the Copy key (1) to switch to the program copy screen.
[Program copy screen]
Select the copy source program No. and the copy destination program No.
Touch the OK key to carry out copying. After copying, the display will return to the previous screen.
Touch the Cancel key to return to the previous screen without copying.
* The number which is selected as the copy destination program number will flash only if sewing data already exists in a
program assigned to that number.
BAS H series
13
Page 16

1. USING THE LCD PANEL (BASIC OPERATIONS)
1-4. Checking the sewing pattern
Use test feed mode to operate the feed mechanism in order to check the needle movement.
Check that the needle hole does not come out from the frame of the work clamp.
1
The Test key is displayed in blue.
[Sewing operation screen]
2
Continuous test feed
2nd step
(1)
Work clamp switch (2-step)
Start switch
1. Touch the Test key at the sewing operation
screen.
2. Press the △ or ▽ key (1) to set the program
number that you would like to check.
1. Depress the foot switch to the 2nd step (for a
2-pedal foot switch, lower the work clamp and
then depress the start switch. For the hand
start switch, press the right switch to lower the
feed plate lock cylinder and work clamp, and
then press the left and right switches at the
same time.) Furthermore, if you touch the
continuous feed key (2), the feed mechanism
will start moving continuously one stitch at a
time.
(The current stitch number in the stitch number
display will increase by 1 each time.)
14
Left switch
Right switch
(5)
BAS H series
2. When the feed reaches the end of the pattern,
it stops.
・ If you would like to stop the feeding operation,
touch the continuous feed stop key (3).
・ If you touch the continuous feed key (4), the
feed mechanism will start moving continuously
in the direction of the sewing start position one
stitch at a time.
・ Touch the Move to sewing start key (5) to
return to the sewing start.
4441Q
4923Q
4169B
Page 17

3
[For BAS-311HN, BAS-326H, BAS-326H-484, BAS-341H
and BAS-342H]
Single stitch check
[For BAS-360H and BAS-365H]
Checking the specified number of stitches
(7) (8)
(6)
(8) (7)
(4)
(3) (4)
(3)
(2)
(2)
1. USING THE LCD PANEL (BASIC OPERATIONS)
1. If you touch the stitch forward key (7) or the
stitch back key (8), the feed mechanism will
move by the specified number of stitches.
・ Touch the Move to sewing start key (5) to
return to the sewing start.
2. At the specified number of stitches, touch the +
or - key (6) to specify the number of stitches to
move.
3. If you touch the stitch forward key (7) or the
stitch back key (8), the feed mechanism will
move by the specified number of stitches
・ If you would like to stop the feeding operation,
touch the continuous feed stop key (3).
・ Touch the Move to sewing start key (5) to
return to the sewing start.
BAS H series
15
Page 18

1. USING THE LCD PANEL (BASIC OPERATIONS)
1-5. Setting the work clamp lift amount
The settings for the work clamp and intermittent presser foot lift amounts can be changed at the sewing operation screen.
* For pneumatic work clamp specifications, only intermittent presser foot height setting mode will be available.
[Sewing operation screen]
(1)
Touch the Clamp key (1) to display the Adjust Clamp Height setting screen.
16
BAS H series
Page 19

1. USING THE LCD PANEL (BASIC OPERATIONS)
1-5-1. For BAS-311H/BAS-326H/BAS-326H-484/BAS-341H/BAS-342H
(6)
・Work clamp height setting (can only be selected for motor driven-type work clamp)
- Use the Type keys (2) to select "Work Clamp Height".
- If you use the Height keys (3) to change the Height value, the sewing machine's work clamp will move.
(setting range: 15 - 25 initial value: 20)
- Touch the OK key (4) to confirm, or touch the Cancel key (6) to return to the sewing operation screen
without changing the setting.
- Touch the Reset key (5) to return the value which currently appears in the display to the value which was
first displayed when you switched to the setting screen. The sewing machine's work clamp will operate
according to this value.
・Intermediate work clamp height setting (can only be selected for motor driven-type work clamp)
Selection is only possible when memory switch No. 003 is set to "2".
- Use the Type keys (2) to select "Intermediate Work Clamp Height".
- If you use the Height keys (3) to change the Height value, the sewing machine's work clamp will move.
(setting range: 1 - 15 initial value: 7)
- Touch the OK key (4) to confirm, or touch the Cancel key (6) to return to the sewing operation screen
without changing the setting.
- Touch the Reset key (5) to return the value which currently appears in the display to the value which was
first displayed when you switched to the setting screen. The sewing machine's work clamp will operate
according to this value.
・Intermittent presser foot height setting
- Use the Type keys (2) to select "Intermittent Presser Foot Height".
- If you use the Height keys (3) to change the Height value, the sewing machine's intermittent presser foot
will move.
(setting range: 0.0 - 10.0 initial value: 5.0)
- Touch the OK key (4) to confirm, or touch the Cancel key (6) to return to the sewing operation screen
without changing the setting.
- Touch the Reset key (5) to return the value which currently appears in the display to the value which was
first displayed when you switched to the setting screen. The sewing machine's intermittent presser foot
will operate according to this value.
(2)
(5)
(3)
(4)
BAS H series
17
Page 20

1. USING THE LCD PANEL (BASIC OPERATIONS)
NOTE:
When setting the work clamp height and the
intermediate work clamp height, check that slider (1) is
touching the work clamp lifter plate assembly (2).
3091B
Intermittent presser foot operation
Doing standby
When lowered
1 Intermittent presser foot lift amount
2 Intermittent presser foot height stroke drop
position
3 Intermittent presser foot stroke amount
* After the presser foot has been replaced, it
will be necessary to make corrections to the
intermittent stroke drop position.
Ask the place of purchase for information on
the correction method.
When sewing
5033Q
18
BAS H series
Page 21

1. USING THE LCD PANEL (BASIC OPERATIONS)
1-5-2. For BAS-360H/BAS-365H
Adjust the intermittent presser foot height by setting the intermittent stroke drop position and the intermittent stroke amount.
[Stroke drop position setting]
(2)
[Stroke amount setting]
(6)
Type (1) Touch the △ or ▽ key to select the item to change.
(1)
(3)
(9)
(10)
(4) (5)
(7)
(8)
Touch the △ or ▽ key to change the stroke drop position.
Height (2)
Reset key (3)
OK key (4) Touch to confirm the setting value and return to the sewing operation screen.
Cancel key (5) Touch to discard the setting value and return to the sewing operation screen.
Stroke (6)
If you change the value, the sewing machine's intermittent presser foot will move.
Setting range: 0.5 to 7.0 mm, 0.1 mm units, initial value: 2.0 mm
Touch to return the value which currently appears in the display to the value which was first displayed
when you switched to the setting screen. The sewing machine's intermittent presser foot will move
according to this value.
Touch the △ or ▽ key to change the stroke amount.
If you change the value, the sewing machine's intermittent presser foot will move.
Setting range: 0.0 to 10.0 mm, 0.1mm units, initial value: 3.0 mm
BAS H series
19
Page 22

1. USING THE LCD PANEL (BASIC OPERATIONS)
Stroke Up key (7)
Stroke Down key (8)
Intermittent presser
foot height (9)
Stroke drop position
(10)
Touch to raise the intermittent presser foot.
However, the key is disabled while the intermittent presser foot is rising.
Touch to lower the intermittent presser foot.
However, the key is disabled while the intermittent presser foot is lowering.
Displays the sum of the value set for the stroke drop position and the value set for the stroke amount.
(“Intermittent presser foot operation” (2))
Displays the value set for the stroke drop position.
(“Intermittent presser foot operation” (3))
Intermittent presser foot operation
Doing standby
When lowered
1 Intermittent presser foot lift amount
2 Intermittent presser foot height stroke drop
position
3 Intermittent presser foot stroke amount
* After the presser foot has been replaced, it
will be necessary to make corrections to the
intermittent stroke drop position.
Ask the place of purchase for information on
the correction method.
When sewing
4170B
20
BAS H series
Page 23

2. USING THE LCD PANEL (ADVANCED OPERATIONS)
2. USING THE LCD PANEL (ADVANCED OPERATIONS)
CAUTION
To prevent problems, do not use objects with sharp points to operate the LCD panel.
2-1. Memory switch setting method
Press the HOME key to switch to the home screen.
[Home screen]
Touch the Settings key (1) to switch to the setting menu screen.
[Setting menu screen]
(1)
Select “Memory Switch”.
BAS H series
21
Page 24

2. USING THE LCD PANEL (ADVANCED OPERATIONS)
[Memory switch selection screen]
(3)
Select the number of the memory switch that you would like to change the setting for.
・
When you touch the number of the memory switch you would like to change the setting for, the display will
change to the memory switch editing screen.
・
Touch the OK key (4) to return to the setting menu screen.
・
Modified (2): This displays the numbers of memory switches that have been changed from default settings.
・
All (3): This displays all memory switches.
[Memory switch editing screen]
(8)
(6)
This lets you change memory switch values.
(2)
(4)
(5)
(7)
(9)
22
Number ( ) keys (5): These change the memory switch number.
・
Value ( ) keys (6): These change the memory switch setting value display (ON/OFF, number).
・
・
Reset key (7): This displays the initial value.
・
Cancel key (8): This returns the display to the memory switch selection screen without confirming the value.
OK key (9): This confirms the value and then returns the display to the memory switch selection screen.
・
BAS H series
Page 25

2-2. List of memory switch settings
No.
001
002
003
100
200
400
403
Setting
range
Work clamp lift timing after sewing is completed
0 Work clamp is not raised automatically.
1 Work clamp is raised at the final stitch position.
2 Work clamp is raised after moving to the home position.
Work clamps lowering operation (Models other than pneumatic work clamp specifications/BAS341H/BAS342H) (*2)
0 Left and right work clamps are lowered at the same time.
1 Work clamps are lowered in order left > right.
2 Work clamps are lowered in the order right > left.
Work clamp lowering operation (BAS341H/BAS342H only) (*2)
0 Work clamp dropping in one step
1 Work clamp dropping in two steps (*1)
2 Do not use this setting.
Work clamp lowering operation (Motor-driven work clamp specifications only)
Analog lowering: Work clamp is lowered in direct proportion to the pedal
0
1
2
Slow start method
OFF
ON
Single-stitch test feed
OFF
ON
Sewing condition detail settings
OFF Parameters which are common to all programs are used.
ON Parameters can be set separately for each program.
Split mode selection
0 Continuous split mode
1 Single split mode
depression amount, and sewing starts when the pedal is fully depressed.
* This operation is only possible for foot switch specifications; for two-pedal foot
switch specifications, operation is the same as for a 2-step work clamp.
1-step work clamp: Work clamp is lowered when pedal is depressed to the 1st step,
and sewing starts when pedal is depressed to the 2nd step.
2-step work clamp: Work clamp is lowered to intermediate height when pedal is
depressed to the 1st step, and work clamp is fully lowered and sewing starts when
the pedal is depressed to the 2nd step.
The sewing speed for the first 5 stitches will be in accordance with the setting for
memory switch Nos. 151 to 155. (Ask the place of purchase for details on memory
switch Nos. 151 to 155.)
The sewing speed for the first 4 stitches can be selected from the nine slow start
patterns “1” to “9”. (Refer to Slow start pattern in “1-2. Parameter setting method”.)
Initial value of slow start pattern: 4
Test feed starts when the foot switch (start switch) is depressed, and it continues
automatically until the final stitch.
Test feed starts when the foot switch (start switch) is depressed, and it moves
forward by one stitch each time the switch is depressed.
In addition, after test feed starts, test feed will move forward one stitch at a time
when the machine pulley is turned by hand.
2. USING THE LCD PANEL (ADVANCED OPERATIONS)
Function name
Setting details Initial value
2
0
0
2
OFF
OFF
OFF
0
(*1) The position of the work clamp stopper must be set.
(*2) This is not displayed for the BAS-360H/365H.
BAS H series
(Continued on next page)
23
Page 26

2. USING THE LCD PANEL (ADVANCED OPERATIONS)
No.
407
408
409
410
Setting
range
Assignment to direct selection key 1
OFF No program number is assigned to direct selection key 1.
1 - 999 The program number is assigned.
C01 - C30 The cycle program number is assigned.
Assignment to direct selection key 2
OFF No program number is assigned to direct selection key 2.
1 - 999 The program number is assigned.
C01 - C30 The cycle program number is assigned.
Assignment to direct selection key 3
OFF No program number is assigned to direct selection key 3.
1 - 999 The program number is assigned.
C01 - C30 The cycle program number is assigned.
Assignment to direct selection key 4
OFF No program number is assigned to direct selection key 4.
1 - 999 The program number is assigned.
C01 - C30 The cycle program number is assigned.
Function name
Setting details Initial value
101
102
103
104
24
BAS H series
Page 27

2. USING THE LCD PANEL (ADVANCED OPERATIONS)
2-3. Using cycle programs
Sewing patterns that have been recorded in user programs can be saved in up to 30 cycle programs.
One cycle program can contain up to a maximum of 50 steps.
When sewing the sewing patterns in a certain order, it can be useful to save them in a cycle program beforehand.
* If memory switch No. 400 is set to OFF, cycle program setting and selection cannot be carried out.
<Registration method>
This describes the procedure using an example in which program number 106 is registered as the 1st step,
program number 200 is registered as the 2nd step and program number 252 is registered as the 3rd step of cycle
program number C01.
1. Touch the cycle program key in the sewing operation screen to switch to the cycle program editing screen.
* To edit a cycle program which has already been created, first select the desired cycle program number and then
touch the cycle program key.
[Sewing operation screen]
2. Touch the add step key (1) in the cycle program editing screen to switch to the add step screen.
[Cycle program editing screen]
(6)
(5)
(1)
(2)
(3)
(4)
(7)
BAS H series
25
Page 28

2. USING THE LCD PANEL (ADVANCED OPERATIONS)
Descriptions of keys
(1) Add step Switches to the screen for selecting a program to add.
(2) Delete step Deletes the program which is currently selected.
(3) Move step (forward) Moves the currently-selected program one step toward the start.
(4) Move step (backward) Moves the currently-selected program one step toward the end.
When saving a new program:
(5) Save
(6) Save as ... Switches to the cycle program save screen.
(7) OK Switches to the sewing operation screen.
Switches to the cycle program save screen.
When saving an existing cycle program that has been edited:
The save program dialog box is displayed.
3. Select "Program No." in the add step screen and then touch the OK key to add that program number. The display will
then return to the cycle program editing screen.
* If you touch the multiple select key (8), you can select multiple files.
[Add step screen]
(8)
[Cycle program editing screen]
(5)
(6)
(1)
(2)
(3)
(4)
(7)
26
BAS H series
Page 29

2. USING THE LCD PANEL (ADVANCED OPERATIONS)
4. Repeat the operations in steps 2. and 3. to create the desired cycle program, and then touch the Save key (5) or Save
as ... key (6) to switch to the cycle program save screen.
5. Enter the cycle program number, and then touch the OK key. The cycle program will be saved and the display will
return to the cycle program editing screen. Numbers from C01 to C30 can be saved.
[Cycle program editing screen]
(5)
(6)
[Cycle program save screen]
6. Touch the OK key (7) in the cycle program editing screen to return to the sewing operation screen.
BAS H series
27
Page 30

2. USING THE LCD PANEL (ADVANCED OPERATIONS)
<Method of use>
When cycle programs have been registered, you can select the cycle program numbers from the sewing operation screen.
[Sewing operation screen]
(9)
(10)
(11)
(12)
(13)
Descriptions of keys
(9) Type key Select "Cycle".
The currently selected cycle program number is displayed.
(10) Program No. keys
(11) Step No. keys
(12) Section No. keys
(13) Tension keys
Touch the ▽△ keys to select the cycle program number that you would like to
use.
The currently selected step number is displayed.
Touch the ▽△ keys to select the step number.
The currently selected section number is displayed.
Touch the ▽△ keys to select the section number.
The tension value of the currently selected section number is displayed.
Touch the ▽△ keys to select the tension value.
28
BAS H series
Page 31

2. USING THE LCD PANEL (ADVANCED OPERATIONS)
2-4. Direct selection
You can use the direct selection keys to directly select program numbers and cycle program numbers.
[Sewing operation screen]
<Recording method>
This is carried out using memory switch Nos. 407 to 410.
Setting range: OFF, 001 - 999, C01 - C30
Direct selection
1 key
Corresponding memory
switch number
Initial value 101 102 103 104
407 408 409 410
Direct selection
2 key
・ If there are no program numbers registered in a direct selection key (i.e. it is OFF), "---" will be displayed and the
display will become inactive.
・ If a program number (sewing pattern) which has been registered in a direct selection key cannot be loaded, the
display will be inactive and the key cannot be selected.
・ If you keep pressing a direct selection key, the display will switch to the settings for the program number displayed
with this key.
Direct selection keys
1 to 4
Direct selection
3 key
Direct selection
4 key
BAS H series
29
Page 32

2. USING THE LCD PANEL (ADVANCED OPERATIONS)
2-5. Setting the sewing screen display
This lets you set whether the codes which are displayed in the sewing screen preview are displayed or not displayed.
1. Press the HOME key to switch to the home screen.
Touch the Settings key (1) to switch to the setting menu screen.
[Home screen]
(1)
2.
Select "Sewing Screen".
[Setting menu screen]
BAS H series
30
Page 33

2. USING THE LCD PANEL (ADVANCED OPERATIONS)
3. Select "Display Setting of Sewing Data Preview".
[Sewing Screen]
4. The codes which can be switched between displayed and not displayed in the sewing screen preview are displayed in a
list.
If you would like the codes to be displayed, select the corresponding check box.
If you would like the codes to be not displayed, unselect the corresponding check box.
* These settings are not applied during digital tension editing mode.
BAS H series
31
Page 34

2. USING THE LCD PANEL (ADVANCED OPERATIONS)
2-6. Initialization method
Press the HOME key to switch to the home screen.
[Home screen]
(1)
Touch the Settings key (1) to switch to the setting menu screen.
[Setting menu screen]
Select "Data Management".
Select "Format".
32
BAS H series
Page 35

2. USING THE LCD PANEL (ADVANCED OPERATIONS)
The following five items will be displayed for initialization.
- Sewing data, cycle program, user parameter
- Cycle program, user parameter
- Memory Switch Settings
- Panel settings, programmer settings, sewing settings
- Extended option program
Place a check mark against the items you would like to initialize, and then touch the OK key (2) to start the
initialization.
When initialization is finished, the finished message screen will be displayed.
(2)
BAS H series
33
Page 36

2. USING THE LCD PANEL (ADVANCED OPERATIONS)
2-7. Maintenance mode
If you switch to maintenance mode, you can then move the machine head to the to the edge when carrying out adjustment,
etc.
[Home screen]
Press the HOME key to switch to the home screen.
(1)
[Setting menu screen]
Select "Sewing Machine Adjustment".
34
[Sewing Machine Adjustment Screen]
Select "Maintenance".
BAS H series
Page 37

[Maintenance Screen]
Press the left switch and the right switch simultaneously. The machine head will then move
Remove both work clamp frame and feed plate, and turn off the power.
2. USING THE LCD PANEL (ADVANCED OPERATIONS)
BAS H series
35
Page 38

3. USING STORAGE MEDIA
3. USING STORAGE MEDIA
CAUTION
Do not connect anything to the USB port other than the USB memory. If this is not observed, problems with
operation may result.
To prevent problems, do not use objects with sharp points to operate the LCD panel.
3-1. Notes on handling
【SD】
Compatible cards: SD (max. 2 GB), SDHC (max. 32 GB)
-
Compatible file formats: FAT16, FAT32
-
【USB Memory】
-
Compatible file formats: FAT16, FAT32
Max. size: 32 GB
-
3-2. Folder structure
Data type File name Folder name
ISMS0***.SEW
Sewing data
Memory switch memorysw.db Same as above
ISMS0***.EMB
(*** is the program number.)
\BROTHER\ISM\ISMDH**\
\BROTHER\ISM\ISMDH**\ (For BAS-360H and
BAS-365H)
(The sewing machine's ID code appears in the **
part.)
(Ask the place of purchase for details on the method
of changing the settings.)
User parameter userparam.db Same as above
ISMCYC**.SEW
Cycle program
Panel setting values settings.db Same as above
Extended option data
Error log
(** is the cycle program
number.)
ISMSEQ**.SEQ
(** is the extended option
number.)
e*******.csv
m*******.db
(******* is the serial number.)
Same as above
Same as above
\BROTHER\ISM\ISMLDT\
36
BAS H series
Page 39

3-3. Importing and exporting data
[
1
SD card slot
2
Home screen]
(1)
[Setting menu screen]
USB port
3. USING STORAGE MEDIA
Insert an SD card or USB memory.
NOTE:
・
Make sure that the media is facing the
correct way when inserting it.
Always be sure to keep the cover closed
・
except when inserting and removing the
media, otherwise dust may get inside and
cause problems with operation.
・ Press the HOME key to switch to the home
screen.
・ Touch the Settings key (1) to switch to the
setting menu screen.
4290B
3593B
・
If you select "Data Management" > "Import
(Storage Media to Panel)", the display
switches to the import screen. If you select
"Data Management" > "Export (Panel to
Storage Media)", it switches to the export
screen.
BAS H series
37
Page 40

3. USING STORAGE MEDIA
3
[Import screen]
[Export screen]
(2)
Select the items to be imported or exported,
and then touch the OK key (2).
[Items to import]
Sewing data (all)
Cycle program, user parameter
Memory switch settings
Panel settings, programmer settings
Extended option program
* To select and import only part of the
sewing data, refer to the procedure in 3-4.
[Items to export]
Sewing data (all)
Cycle program, user parameter
Memory switch settings
Panel settings, programmer settings
Extended option program
Error log
(2)
38
BAS H series
Page 41

3-4. Importing items of sewing data separately
3. USING STORAGE MEDIA
If you would like to import sewing data separately, do it from the file manager screen. Folders are not specified.
1
SD card slot USB port
2
[Home screen]
(1)
Insert an SD card or USB memory.
NOTE:
・ Make sure that the media is facing the
correct way when inserting it.
・ Always be sure to keep the cover closed
except when inserting and removing the
media, otherwise dust may get inside and
cause problems with operation.
・
Press the HOME key to switch to the
home screen.
・
If you touch the File manager key (1), the
display will switch to the file manager
screen.
[File manager screen]
・
Touch the media key in the top-left corner
to select "SD Card" or "USB Memory".
The display will switch to the respective
main folder.
4290B
3593B
3
* For details on other functions, please contact the place of purchase.
BAS H series
(2)
・ Select the files to be imported and then
touch the import key (2) .
* If you would like to select multiple files,
you can select files in multiple select
mode.
Touch to switch between multiple
select and single select mode.
39
Page 42

INSTRUCTION MANUAL
* Please note that the contents of this manual may differ slightly from the actual product purchased as a result of product improvements.
© 2015, 2016, 2018 Brother Industries, Ltd. All Rights Reserved.
This is the original instructions.
BAS H series
I8041230B E
2018.04.B (1)
 Loading...