

Page 1
brother.
OWNER’S
F A X
825MC
875MC
MANUAL
CONTENTS
Chapter 1. SETUP & PREPARATION BEFORE USE
Chapter 2. THE CONTROL PANEL KEYS
Chapter 3. HOW TO USE ON-SCREEN PROGRAMMING (OSP) AND HELP KEY
Chapter 4. TELEPHONE FUNCTION SETTINGS
Chapter 5. USING THE UNIT AS A TELEPHONE
Chapter 6. SENDING FAXES
Chapter 7. RECEIVING FAXES AND OTHER CALLS
Chapter 8. POLLING
Chapter 9. HOW TO USE COPY FUNCTIONS
Chapter 10. MESSAGE CENTER MODE SETTINGS
Chapter 11. MESSAGE CENTER PRO SETTINGS
Chapter 12. PRINTING REPORTS AND LISTS
Chapter 13. REGULAR MAINTENANCE AND TROUBLESHOOTING
Chapter 14. IMPORTANT INFORMATION
Chapter 15. INDEX
Chapter 16. SPECIFICATIONS
....
....................................................................
..
Page 2
Page 3

(r
How to Use This Owner’s Manual
Thank you for purchasing a Brother fax machine. This fax machine has been designed
to be simple to use, but you can use it to its fullest potential by taking some time to read
this owner's manual. You will be ready to use the fax machine as soon as you read the
first four chapters. Then you can refer to topics in the remaining chapters, as needed.
Structure of the Manual
■ Chapters 1~4
How to set up the fax machine and what you need to know before you use it.
■ Chapters 5~7
Basic operations, how to send and receive faxes.
■ Chapters 8~11
Advanced operations for sending and receiving faxes.
■ Chapter 12
How to print reports and lists.
■ Chapters 13~14
Important Information.
Finding Information in the Owner’s Manual
• Use the table of contents. This side of the manual is coded so you can find topics
easily.
• If there is a key on the fax machine you are not familiar with, refer to chapter
2.
• To find information about a function, refer to the “Function Selection Table” in
chapter 3.
• If you have trouble, refer to chapter 13 on troubleshooting.
• Use the chapter 15 index.
Test Sheet Procedure
Please fill out the TEST SHEET and fax it to 1-908-469-4547 (USA), 1-514-685-0702
(CANADA) as your first transmission. This will verify that your fax machine is
properly installed.
When this document is received at Brother Diagnostic Center, a confirmation sheet will
be sent back to your machine from Brother Automatic Fax Back Response System (USA
only). Be sure to set up your “Station ID”. (See page 4-3.)
USA
FAX NO.
TEL NO.
CANADA
FAX NO.
TEL NO.
1-908-469-4547 (Fax Transmission Only)
1-800-284-4FAX (Voice Phone Only)
1-800-284-4329
1-514-685-0702
1-800-853-6660
Page 4

Page 5

CONTENTS
FOR YOUR INFORMATION
❖ SETUP & PREPARATION BEFORE USE 1-1
Common Misunderstandings about Fax Machines
What Are Fax Tones?............................................................................................
Why Does the Ring Change in F/T Mode?...........................................................1-1
What is the Fax “Handshake”?.............................................................................1-2
What Causes the Transmission Verification Report to Print
“Result: NG”?.........................................................................................................1-2
Is This a Fax Call?.................................................................................................
How Can I Send the Call to My Fax Machine?
What is the Difference Between Automatic and Manual Transmission?.. 1-3
What is the Difference Between Automatic and Manual Dialing?
What Should I Do If My Fax Machine Does Not Have a Dial Tone?
Choosing a Suitable Place for Your Fax Machine
The Good Places......................................................................................................1-4
And the Bad Places............................................................................................... 1-4
Packing List.................................................................................................................. 1-5
Setting up Your Fax Machine
Roll Over Phone Lines ...........................................................................................1-7
Two Line Phone System.........................................................................................1-7
Multi Line Connections (PBXs)........................................................................... 1-9
Connecting to a Private Branch Exchange...........................................................1-9
Custom Features on Your Phone Line..................................................................1-9
......................................................................................
❖ THE CONTROL PANEL KEYS 2-1
TELEPHONE AREA....................................................................................................2-2
ONE-TOUCH AREA....................................................................................................2-3
FUNCTION AND USER SETTING AREA................................................................2-4
MESSAGE CENTER PRO AREA
..............................................................................
❖ HOW TO USE ON-SCREEN PROGRAMMING (OSP)
AND HELP KEY 3-1
User-friendly Programming
On-screen Programming (OSP)...................................................................................3-1
Using the Function Mode to Access On-screen Programming (OSP)
Alternating Displays for On-screen Programming (OSP)
Function Selection Table...............................................................................................3-2
Help Key.........................................................................................................................3-7
How to Print a Help List............................................................................................... 3-7
How to Enter Text in Function Mode
How to Enter Special Characters, Symbols and Punctuation Marks in
Function Mode..............................................................................................................3-10
....
.....................................................................................3-1
........................................................................
❖ TELEPHONE FUNCTION SETTINGS 4-1
Setting the Dialing Mode (Tone/Pulse)........................................................................4-1
Setting the Beeper Sound Level
Setting the Date and Time........................................................................................... 4-2
Setting the Station ID.................................................................................................. 4-3
• Printing Page Headers .............................................................................................. 4-4
Storing One-Touch Dial Numbers................................................................................4-4
...................................................................................
....................................................
....................................................
....................
................
......................................................
......................
.........................................
l-I
1-1
1-2
1-3
1-3
1-3
1-4
1-5
2-5
3-1
3-2
3-9
4-1
Page 6

CONTENTS
lilBHiiMillil
Chapter
• Types of Numbers...................................................................................................4-6
• Chain Dialing.......................................................................................................... 4-6
Storing Speed-Dial Numbers........................................................................................4-6
• When You Wish to Change the Stored One-Touch and Speed-Dial
Numbers (During Step 4 on Page 4-5, 7)
• Memory Storage..................................................................................................... 4-8
Setting Up Number Groups..........................................................................................4-8
..............................................................
4-8
USING THE UNIT AS A TELEPHONE 5-1
Manual Dialing.............................................................................................................. 5-1
One-Touch Dialing........................................................................................................5-1
Speed Dialing.................................................................................................................5-1
• Using HOLD, PAUSE, # with the Telephone
• On Hook Dialing.....................................................................................................5-1
• Optional Settings When You Send a Fax Manually.............................................5-1
Searching the Telephone Index....................................................................................5-2
SENDING FAXES
A) DOCUMENT BASICS.
The Size of Your Documents
How to Insert the Document.......................................................
The Auto Document Feeder (ADF)
Getting Ready to Send a Fax
SETTING THE RESOLUTION
SETTING THE CONTRAST..............................................
B) BASIC FAX TRANSMISSIONS................................................
• Sending a Fax........................................................................
• Talking to the Other Party When Sending a Fax
Sending a Fax Automatically......................................................
Sending a Fax Manually
Automatic and Manual Re-dialing.............................................
C) ADVANCED FAX TRANSMISSIONS
Sending a Fax by Using Quick-Scan (Memory Transmission)...
• If You Get a MEMORY FULL Message When Trying to Se
a Fax by Using Quick-Scan..........................................
Delayed Transmission...........................................
Setting the Daily Timer (for Delayed Transmissions)
Broadcasting
• Getting Familiar with the Broadcasting Function
Sending by Multi-Transmission
Interrupting the Timer and Polled Job
Canceling a Job....................................................................
D) FAX TRANSMISSION OPTIONS
Setting the Overseas Mode
Setting Your Fax Machine for Multiple Resolution Trans
Sending a Fax with an Electronic Cover Page Message ..
• The Comments Selection on the Cover Page
Customizing Your Cover Page Comment
Printing the Cover Page.............................................................
To Always Send a Cover Page...................................................
........................................................................
......................................................
...........................................
......................................................
.........................................
.............................................................
.....................................
.........................................
.............................
...................................
.................................................
................................................
..............
..............
.
....................
................................
5-1
6-1
.6-1
.6-1
.6-1
.6-2
.6-2
.6-2
.6-3
.6-4
.6-4
.6-4
.6-4
.6-5
.6-5
.6-6
.6-6
.6-6
.6-7
.6-7
..6-8
..6-8
..6-9
6-10
6-11
6-12
6-12
.6-13
.6-14
.6-15
.6-15
.6-16
.6-16
Page 7

CONTENTS
■ y v ;: Sending a Fax When the Cover Page Is ON.......................................................6-17
Sending a Fax with Call Reservation .................................................................6-18
• Using the Call Reservation Function ...............................................................6-19
Printing the Call Back Message
: ECM (Error Correction Mode)
^777 Error Re-Transmission..........................................................................................6-20
Next-FAX Reservation.........................................................................................6-21
❖ RECEIVING FAXES AND OTHER CALLS 7-1
iiillllllllil BASIC SETUP TO RECEIVE FAXES.................................................................7-1
7 ; T Selecting an Answer Mode.....................................................................................7-1
Manual Reception (MANUAL Mode)
Automatic Fax Only Reception (AUTO Mode)
Setting the Ring Delay............................................................................................7-2
The F/T Switch (F/T Mode)...................................................................................7-3
Recording an F/T Outgoing Message (OGM)......................................................7-4
Setting the F/T Ring Time
Smoothing................................................................................................................7-5
77 Speaker Volume.......................................................................................................7-6
Ring Volume............................................................................................................7-6
7 :7 7;': ■ 7 • Reception into Memory/Out of Paper Reception
liililillili B) REMOTE ACTIVATION.........................................................................................................................7-8
What is Remote Activation?..................................................................................7-8
V77:r7-:;:77
77
Troubleshooting.....................................................................................................7-10
7
: t;
fliitllliilliiltM Hookup....................................................................................................................7-12
;i 777i'77777777:7 Distinctive Ringing.............................................................................................. 7-13
7: :7;77;77 7ii :7777;7:77" What Is Distinctive Ringing?.........................................................................7-13
r^7v/;777:y 77i7:7 7 7 ;7 Can My Fax Machine Use Distincdve Ringing?
7;
777
: 7^7
7:U;7777::;:;7.77:; 7-v Number(s) on the Line:
7/777
• Connecting an External or Extension Telephone...............................................7-8
Using Remote Codes............................................................................................. 7-8
Using the Activation Code:........................................................................... 7-9
Using the Deactivation Code: ........................................................................7-9
Making the Remote Codes Easier to Use..............................................................7-9
777
Changing and Registering Remote Codes...........................................................7-10
C) CONNECTING A TELEPHONE ANSWERING DEVICE (TAD)
■ 7:; ■; 7: How to Use External TAD with the Unit
, r: • Connecting an External TAD to the Unit.........................................................7-11
Example of the Sequence of External TAD Reception......................................7-12
Recording the TAD’s Outgoing Message (OGM)
D) DISTINCTIVE RINGING...................................................................................7-13
Can I Change the Setting Later?
:: 7 7 How Will the Fax Machine Treat All Other Numbers?
7; 7 : The Message Center Answers the Other Phone Number(s)
777777
7..7 on the Line:......................................................................................................7-14
External Telephone Answering Device (TAD) Answers Other
How Does the Distinctive Ringing Function Work?..................................
Flowchart Sequence of an Incoming Call....................................................7-15
What is the Advantage of Using the Distinctive Ringing Function? 7-16
..........................................................................
............................................................................
.................................................................
...................................................
.....................................................................................
..............................................
................
............................................................
.............................................
.......................................
................................................................
.............................
..................................................................................
6-19
6-20
7-2
7-2
7-4
7-7
7-11
7-11
7-12
7-13
7-13
7-13
7-14
7-14
Page 8

CONTENTS
€Mo]^erS^
Chapter 9.
Chapter 10.
Which Phone Number Should I Register?..................................................7-16
What Must I Do To Set Up Distinctive Ringing?
Setting the Distinctive Ringing Function............................................................7-16
How to Turn the Distinctive Ringing Function ON or OFF.............................7-17
E) CALLER ID........................................................................................................ 7-18
What is Caller ID?................................................................................................7-18
Advantages of Caller ID.......................................................................................7-18
How Does the Caller ID Work?...........................................................................7-18
The Caller ID Appears on the Display When Your Telephone
Rings............................................................................................................. 7-18
The Caller ID is Stored in Your Machine’s Memory.................................7-19
Scanning through a Caller ID in the Memory
■ Clearing the Caller ID Stored in Memory......................................................7-20
Printing the Caller ID List...................................................................................7-20
.......................................
...................................................
7-16
7-19
POLLING 8-1
• What Is Polling?..................................................................................................... 8-1
• How Does It Work?................................................................................................8-1
• When to Use Polling?.............................................................................................8-1
Polling Another Fax Machine (Calling) .................................................................... 8-2
Setting up Polled Waiting (Being Called) ...................................................................8-2
Secure Polling.................................................................................................................8-3
Polling Another Brother Fax Machine with Secure Code (Calling)
Setting up Polled Waiting with Secure Polling (Being Called)..................................8-4
Delayed Polling.............................................................................................................. 8-5
Setting up Polled Waiting with Quick-Scan................................................................8-5
Sequential Polling..........................................................................................................8-6
.........................
8-3
HOW TO USE COPY FUNCTIONS 9-1
Making a Single Copy................................................................................................. 9-1
Making Multiple Copies
• What to Do When You Get a “MEMORY FULL” Message while
Making Copies........................................................................................................ 9-2
...............................................................................................9-2
MESSAGE CENTER MODE SETTINGS 10-1
A) GETTING STARTED......................................................................................... 10-1
What Is the Message Center Mode?...................................................................10-1
What Do I Want the Message Center to Do?.....................................................10-2
Flowchart Sequence of an Incoming Call......................................................... 10-3
The 3 Basic Steps to Turn the Message Center Mode On
Setting the Message Storage................................................................................10-7
Recording the MSG CTR Outgoing Message (MSG CTR OGM)
Activating the Message Center Mode ................................................................10-9
B) GETTING YOUR MESSAGES..........................................................................10-9
How Will 1 Know Messages Have Been Received?...........................................10-9
• What Happens When the Memory Is Full.....................................................10-10
Playing an Incoming Voice Message (ICM) and Recorded Memo
(or Voice Alarm) ................................................................................................10-10
Back-up Printing Option................................................................................... 10-11
Printing a Fax Message......................................................................................10-11
................................
...................
10-7
10-8
Page 9

|i(§|||§|i|i||
CONTENTS
• Erasing and Printing FAX Messages.........................................................10-12
Calling Your Message Center for Messages (See Remote Retrieval)... 10-12
C) ERASING YOUR MESSAGES........................................................................10-12
Erasing Incoming Voice Messages, Fax Messages and Recorded
Memo (or Voice Alarm)
One by One Erasing.....................................................................................10-12
All in One Erasing.......................................................................................10-13
D) CHANGE THE OUTGOING MESSAGE..................................................... 10-13
Playing Your Outgoing Message (OGM)
Erasing Your Outgoing Message (OGM).........................................................10-14
E) MORE FEATURES ...........................................................................................10-14
Setting the Toll Saver.........................................................................................10-14
Setting the Maximum Time for Incoming Messages
(ICM MAX. TIME)............................................................................................10-15
Changing the Recording Mode Setting (Voice Quality)
Recording a Conversation
Recording a Memo..............................................................................................10-16
F) PAGING/FAX FORWARDING.......................................................................10-17
What is Paging/Fax Forwarding?.....................................................................10-17
Setting Up Paging (Registering Paging Number)
Setting Up Fax Forwarding (Registering Fax Forwarding Number) .... 10-19
• Memory Back-up of Message Center Memory
Changing the Fax Forwarding Number Remotely .........................................10-20
G) REMOTE RETRIEVAL....................................................................................10-20
What Is Remote Control Access?......................................................................10-20
Setting the Remote Access Code........................................................................10-20
Using the Remote Access Code
Remote Control Commands
Retrieving the Memory Status List and Fax Messages Remotely
Changing the Fax Forwarding Number Remotely........................................ 10-24
H) VOICE ALARM.................................................................................................10-24
Voice Alarm........................................................................................................ 10-24
Setting the Voice Alarm.....................................................................................10-24
• Recording Voice Messages for the Voice Alarm.......................................10-26
How Will the Voice Alarm Perform When the Set Time Comes
Using the Voice Alarm: Playing Entries, Erasing Entries One by
One, Erasing All at Once................................................................................... 10-27
Remote Control of the Voice Alarm
❖ MESSAGE CENTER PRO SETTINGS 11-1
A) GETTING STARTED.......................................................................................11-1
What is Message Center Pro?.............................................................................11-1
What Fax-on-Demand and Voice-on-Demand Do
• Application Examples of Fax-on-Demand/Voice-on-Demand
Features ........................................................................................................ H-2
What the Personal Mailbox Does........................................................................11-2
• Application Examples of Personal Mailbox................................................11-3
How the Caller Accesses the Fax-on-Demand, Voice-on-Demand
Memory Boxes or Personal Mailboxes
.....................................................................................
.........................................................
.................................
.................................................................................
............................................
........................................
.........................................................................
..............................................................................
.................
...................
.................................................................
............................................
...............................................................
10-12
10-13
10-15
10-16
10-18
10-20
10-21
10-22
10-23
10-26
10-28
11-1
11-4
Page 10

CONTENTS
iilliillBiiliil
Ifitiililiililliil
Iliillilillillililiiliil
flilllilllilililiil.
iiilllililiilitlilliu
¡l lljj lll ill l
iilBiiliiliii:
lilijillllililllllililiii
ilMilill Hiiiiiiliiiiillll
B) SETTING UP THE FAX/VOICE-ON-DEMAND
• * 1st Level OGM; (Message Center Pro Outgoing Message)
• ** 2nd Level OGM; (Fax-on-Demand, Voice-on-Demand,
Mailbox Outgoing Message)............................................................
• Access to the Target Memory Box:
Setting up Step la: For Fax-on-Demand
Storing/Erasing/Printing Fax Information in a Memory Box
Setting up Step lb: For Voice-on-Demand.............................................
Recording/Erasing/Playing Voiee Information in a Memory
Box
.....................................................................................................
II
C) SETTING UP THE PERSONAL MAILBOX.......................................
Setting up Step Ic: For Personal Mailbox..............................................
Setting up a Password and Recording a Personal Mailbox OGM
for the Mailbox
Setting up Step 2: Recording/Erasing/Playing the 2nd Level OGM
for each Fax-on-Demand, Voice-on-Demand, and Personal Mailbox
Recording an OGM...............................................................................
Erasing an OGM....................................................................................
Playing an OGM....................................................................................
Setting up Step3: Recording/Erasing/Playing the 1st Level OGM
(Message Center Pro OGM)........................................................................
Recording the Message Center Pro OGM...........................................
Erasing the Message Center Pro OGM...............................................
Playing the Message Center Pro OGM................................................
Setting up Step 4; Turning on the Message Center Pro............................
D) LISTENING TO ICMs (Incoming Messages)............................................
Listening to the ICMs in the Personal Mailboxes......................................
Retrieving the ICMs (Incoming Messages) in the Personal Mailbox
Remotely........................................................................................................
Recording a Memo in Personal Mailbox on the Machine.........................
Erasing ICMs (Incoming Messages) from the Personal Mailboxes.
Erasing Voice ICMs One by One.........................................................
Erasing the Fax/Voice ICMs All at One Time
.............................................................................
.................................................
................................................
................................
....................................
PRINTING REPORTS AND LISTS
Activity Report Interval..........................................................................................
Printing the All Dial List
Transmission Verification (Xmit) Report
Memory Status List.................................................................................................
........................................................................................
.............................................................
❖ REGULAR MAINTENANCE AND TROUBLESHOOTING 13-1
Cleaning........................................................................................................................13-1
Paper Jams .................................................
Fixing a Document Jam
Fixing a Cutter Jam or Printer Jam
Troubleshooting
Error Messages....................................
Other Problems
.........................................
......................
...................................
.. 11-5
.. 11-6
..11-6
.. 11-6
..11-7
..11-7
11-10
11-10
11-12
11-12
11-12
11-13
11-13
11-14
11-15
11-16
11-16
11-17
11-17
11-18
11-18
11-18
11- 19
11-20
11-21
11-21
11-22
12- 1
.. 12-2
.. 12-4
.. 12-5
.. 12-6
.. 13-1
.. 13-1
., 13-2
.. 13-3
.. 13-3
.. 13-4
Page 11

CONTENTS
❖ IMPORTANT INFORMATION
Standard Telephone and FCC Notices (Applies only to 120V model).
Vi: Important Safety Instructions
❖ INDEX
iiiiiliiil
iiiiiiililiiJil®
liliiiiittlliiiiiW
!ffiS*!SSS5i85!a;i;!i^
IlillllMlPli
Ilf V|I V|if-O
lilllllliiM
illilllllllli
❖ SPECIFICATIONS
..........................................................................
14- 1
.......
14-1
.......14-3
15- 1
16- 1
llllliil illllllBllliilli
IMlllillliillliili
IlilllBIflliiilllllillli
Page 12

■mi:
^ap||:|r|rpi
SETUP & PREPARATION BEFORE USE
Hill
1. SETUP & PREPARATION BEFORE USE
Common Misunderstandings about Fax Machines
This section is for people who are using a fax machine for the first time. Its purpose is to take away
the mystery. Once you understand the meaning of the new tones you will be hearing on your phone
line, you will be able to send and receive faxes with ease. This will help you troubleshoot an
occasional problem with a fax transmission, by listening through your one-way speaker to
discover the problem.
What Are Fax Tones?
First the sending machine sends CNG tones, soft intermittent beeps at 4 second
intervals. You will hear them when you dial and press the START key. CNG stands for “calling”
tones. They continue for 30 seconds after dialing: during that time the sending machine must
begin the “handshake” with the receiving machine. Each time you send an “automatic” fax
transmission, you are sending calling tones over the phone line. Learn to listen for these soft beeps
each time you answer a phone on your fax line so you will know if you are receiving a fax message.
Then the receiving machine responds with fax receiving tones, loud chirping sounds.
When a machine begins the receiving mode cycle, it will chirp for 40 seconds over the phone line.
At the same time, the fax machine’s display screen will say “receiving”. If you set your machine
to AUTO answer mode for a dedicated fax line, it will answer every call automatically with fax
receiving tones. Sometimes people will call your fax line by mistake and hang up when they hear
the shrill chirping sounds. Your machine is not malfunctioning when it continues to say
“receiving”; it must complete its 40 second cycle, even though the call was not a fax message and
the caller hung up. To take your machine out of receiving mode, press the STOP key.
The fax machine answers with a short heep when it answers in F/T or Message Center mode.
This can not be changed. After the beep the fax machine listens for CNG tones. When it hears CNG
tones, it responds with receiving tones.
Why Does the Ring Change in FIT Mode?
When a double-ring (short, short) occurs after the normal long rings in the Fax/Tel
Switch (F/T mode), it means your fax machine is telling you to take over a call. The fax
machine has answered either a telephone call or a manual fax (no calling tones). When you hear
the double-ring, pick up any extension phone or the handset of your fax machine.
1-1
Page 13

piliilili
SETUP & PREPARATION BEFORE USI
What is the Fax “Handshake^*?
The calling machine sends CNG tones (beeps) and the receiving machine sends receiving tones
(chirps). During the handshake these tones must overlap for 2-4 seconds so the fax machines can
set up protocol. The sending machine states how it is sending the message; the receiving machine
answers whether it is capable of receiving that way. The sending machine’s CNG tones continue
for only 30 seconds after the number is dialed. Calls must be answered within 4 rings (20-22
seconds) or less, because the handshake can not begin until the call is answered. With 4 rings,
only 8-10 seconds are left for the fax machines to hear their tones clearly and communicate.
Timing is crucial.
When you have a telephone answering device (TAD) on your fax line, you can set the TAD to
answer in 4 rings as long as you record a 5 second silence as the beginning of your OGM (outgoing
message). (See page 7-11 for more information.) This will prevent the OGM from covering up the
fax tones during the 8 seconds that are left for the handshake. As soon as your TAD answers a
call, your fax machine will listen for fax tones for 30 seconds. So you must limit your speaking to
20 seconds (25 second total OGM). Since many people dial manually without realizing they are
not sending fax tones, you should give your Remote Activation Code (*51) as the last part of your
20 second Message. For example: '‘After the beep, either leave a message or send a fax by pressing
*51.” (See page 7-11 for more information.)
lilfiiiliiifill
What Causes the Transmission Verification Report to Print ^^Result:
During the handshake, the document(s) you are sending begin to roll through the feeder and stop
until the handshake is completed and the machines are ready to send and receive the data. If there
is noise or static on the phone line or if the machines do not agree on protocol, they drop their baud
rate to the next lower level and try again. The initial baud rate is 14400, then 12000, 9600, 7200,
4800 and finally 2400. Transmissions as low as 2400 baud can be successful. So, do not stop your
machine. If the transmission fails, a Transmission Verification Report will be printed automatically
with “Result; NG”. This usually means the transmission was “No Good” because of temporary
noise or static on the phone line. Try to send the fax again. Also, you may try sending a fax to other
locations to see if the problem is on the phone line at your end.
Is This a Fax Call?
There are three signs that the call you answered is a fax. You will hear either soft intermittent
beeps (Automatic transmission), silence (Manual transmission) or the voice of someone telling
you he/she is trying to send you a fax (Manual transmission). Do not hang up the handset. It
is very frustrating for the person who hears you repeatedly answer and hang up. People who dial
manually are waiting to hear fax tones before pressing START. You must activate your fax
machine to take over the call before you disconnect the line by replacing the handset.
1-2
Page 14

How Can I Send the Call to My Fax Machine‘s
When you answer a call that is a fax transmission, you must activate your fax machine to go into
fax receiving tones (chirping) before you hang up. If you have answered the fax handset, press the
START key and hang up immediately. If you are on another phone, there is no START key so you
must press your three-digit Remote Activation Code. The factory default setting is *51. Press the
code quickly and wait to hear your fax machine chirp through the handset. It takes 3 seconds
for the fax to respond. You can press the code as many times as needed.
What is the Difference Between Automatic and Manual Transmission?
Automatic transmission is the easiest way to send a fax. Simply place the document(s) face
down in the feeder, dial the phone number and press the START key immediately. Do not pick
up the handset or press the HOOK key. Calling tones will go over the phone line.
Manual transmission occurs when you start with a dial tone before you dial, by lifting the
handset or pressing the HOOK key. You will hear the rings on the phone line. You must wait to
hear the receiving machine answer with a chirp before you press the START key. If you wait too
long to press START without a document in the feeder, your fax machine will go into receiving
mode instead of sending and you will see “receiving” on the .screen.
What is the Difference Between Automatic and Manual Dialing?
Automatic dialing is when you dial by pressing the keys where you stored a number. Your fax
machine stores two kinds of automatic dialing numbers: One-Touch and Speed-Dial. Reserve
your most frequently dialed numbers (and Groups) for your One-Touch keys; all you have to do
is press the One-Touch key followed hy the START key (2 key strokes). To use a Speed-Dial
number, press the Speed-Dial key and the two-digit code you used to store the number, followed
by the START key (4 key strokes). You can dial automatically using One-Touch and Speed-Dial
numbers for both automatic and manual transmissions.
Manual dialing is simply pressing all the digits of the phone number. You can dial manually for
both automatic and manual transmissions.
What Should I Do If My Fax Machine Does Not Have a Dial Tone?
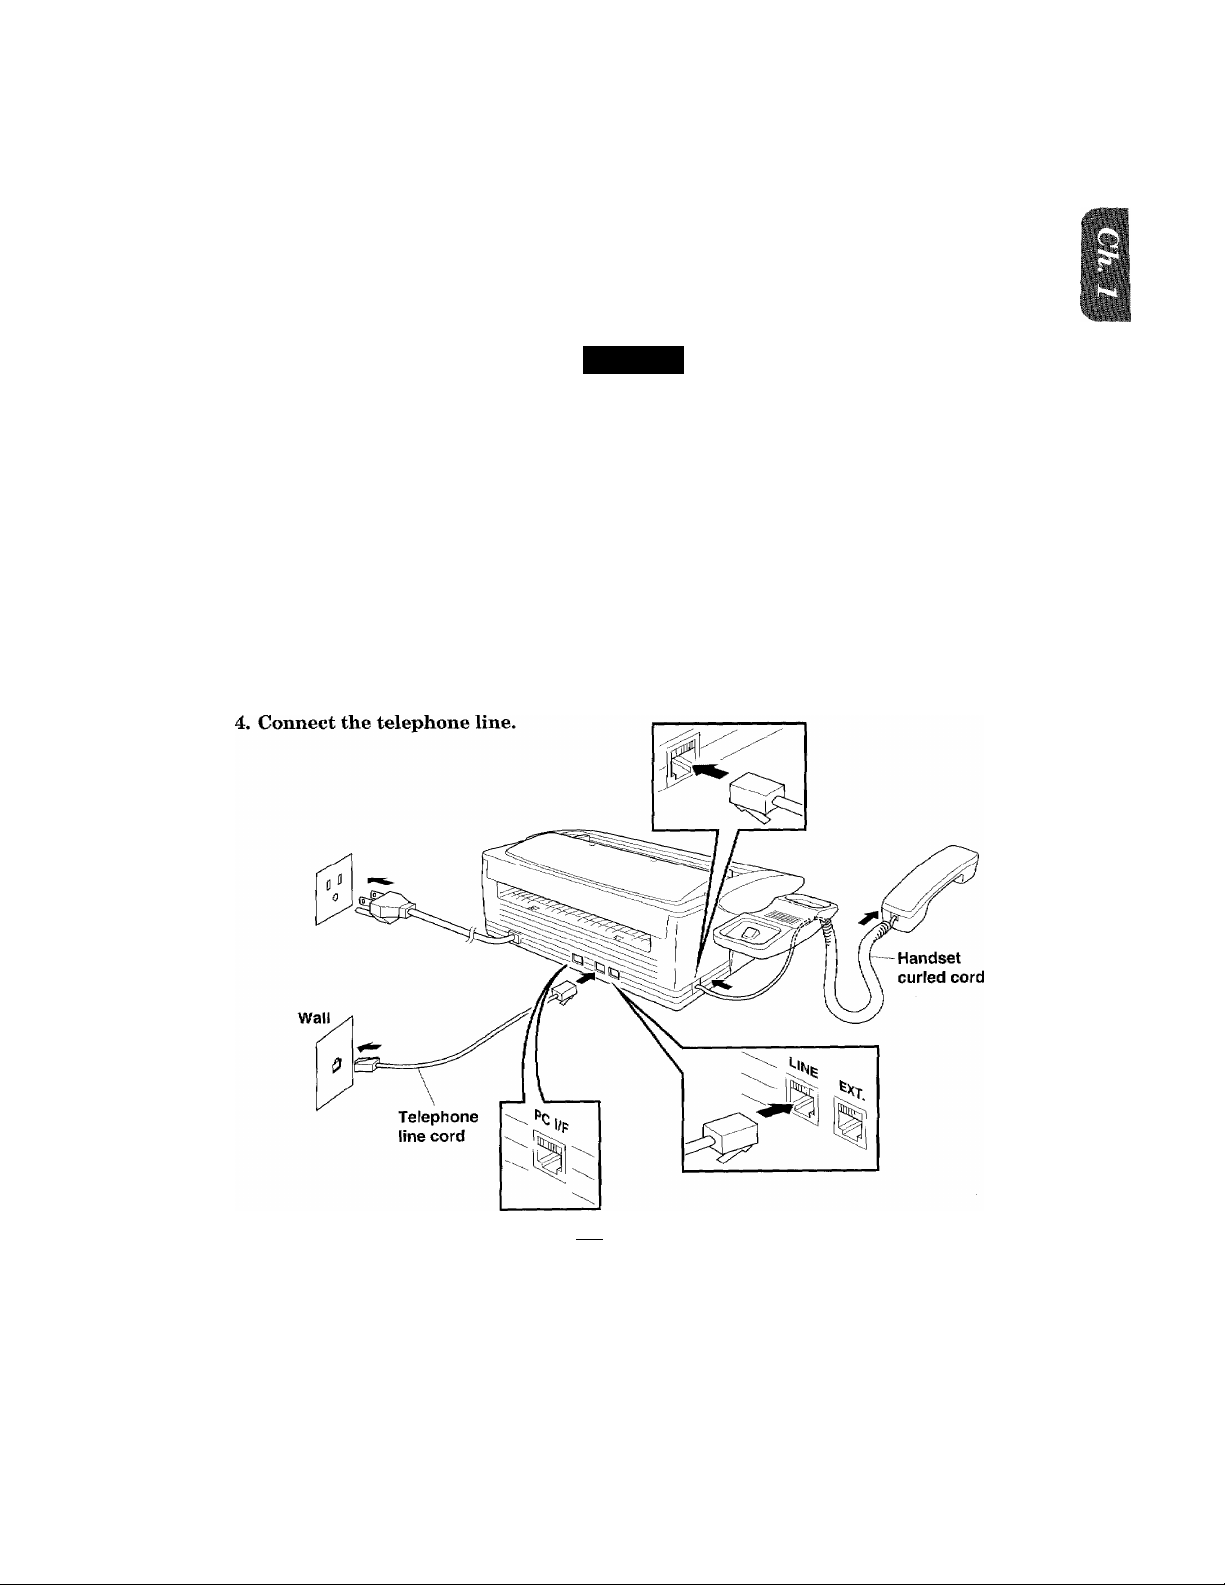
Thei-e are three jacks in the back of the fax machine: LINE, EXT and PC I/F. Double-check that
the telephone line cord is plugged into the LINE jack and not into EXT or PC I/F. (Plugging the
telephone line cord into the EXT or PC I/F jack is the most common cause of no dial tone.)
If the telephone line cord is plugged into the LINE jack of the fax machine and you do not get a
dial tone, test the phone line. Go to another phone and check for a dial tone; then bring that
working telephone and cord and plug them into the wall jack for your fax machine. If you do not
get a dial tone with the working phone, the problem is the phone line. Call the Telephone
Company and report the problem.
1-3
Page 15

Choosing a Suitable Place for Your Fax Machine
Use the following list as a guide to find a suitable place for your fax machine.
The Good Places...
Place your fax machine on a flat, stable surface, such as a desk.
Select a place that is free of vibration and shocks.
Locate it near a telephone jack and a standard, grounded power outlet.
And the Bad Places...
Avoid setting it up in a high-traffic area.
Avoid setting up the machine near heaters, air conditioners, water, chemicals, or refrigerators.
Do not select a place that exposes your fax machine to direct sunlight, excessive heat, moisture,
or dust.
Do not connect your fax machine to electrical outlets controlled by wall switches or automatic
timers. Disruption of power can wipe out information in the unit’s memory.
Do not connect your fax machine to electrical outlets on the same circuit as large appliances or
other equipment that might disturb the power supply.
Avoid interference sources, such as speakers or the base units of cordless phones.
1-4
Page 16
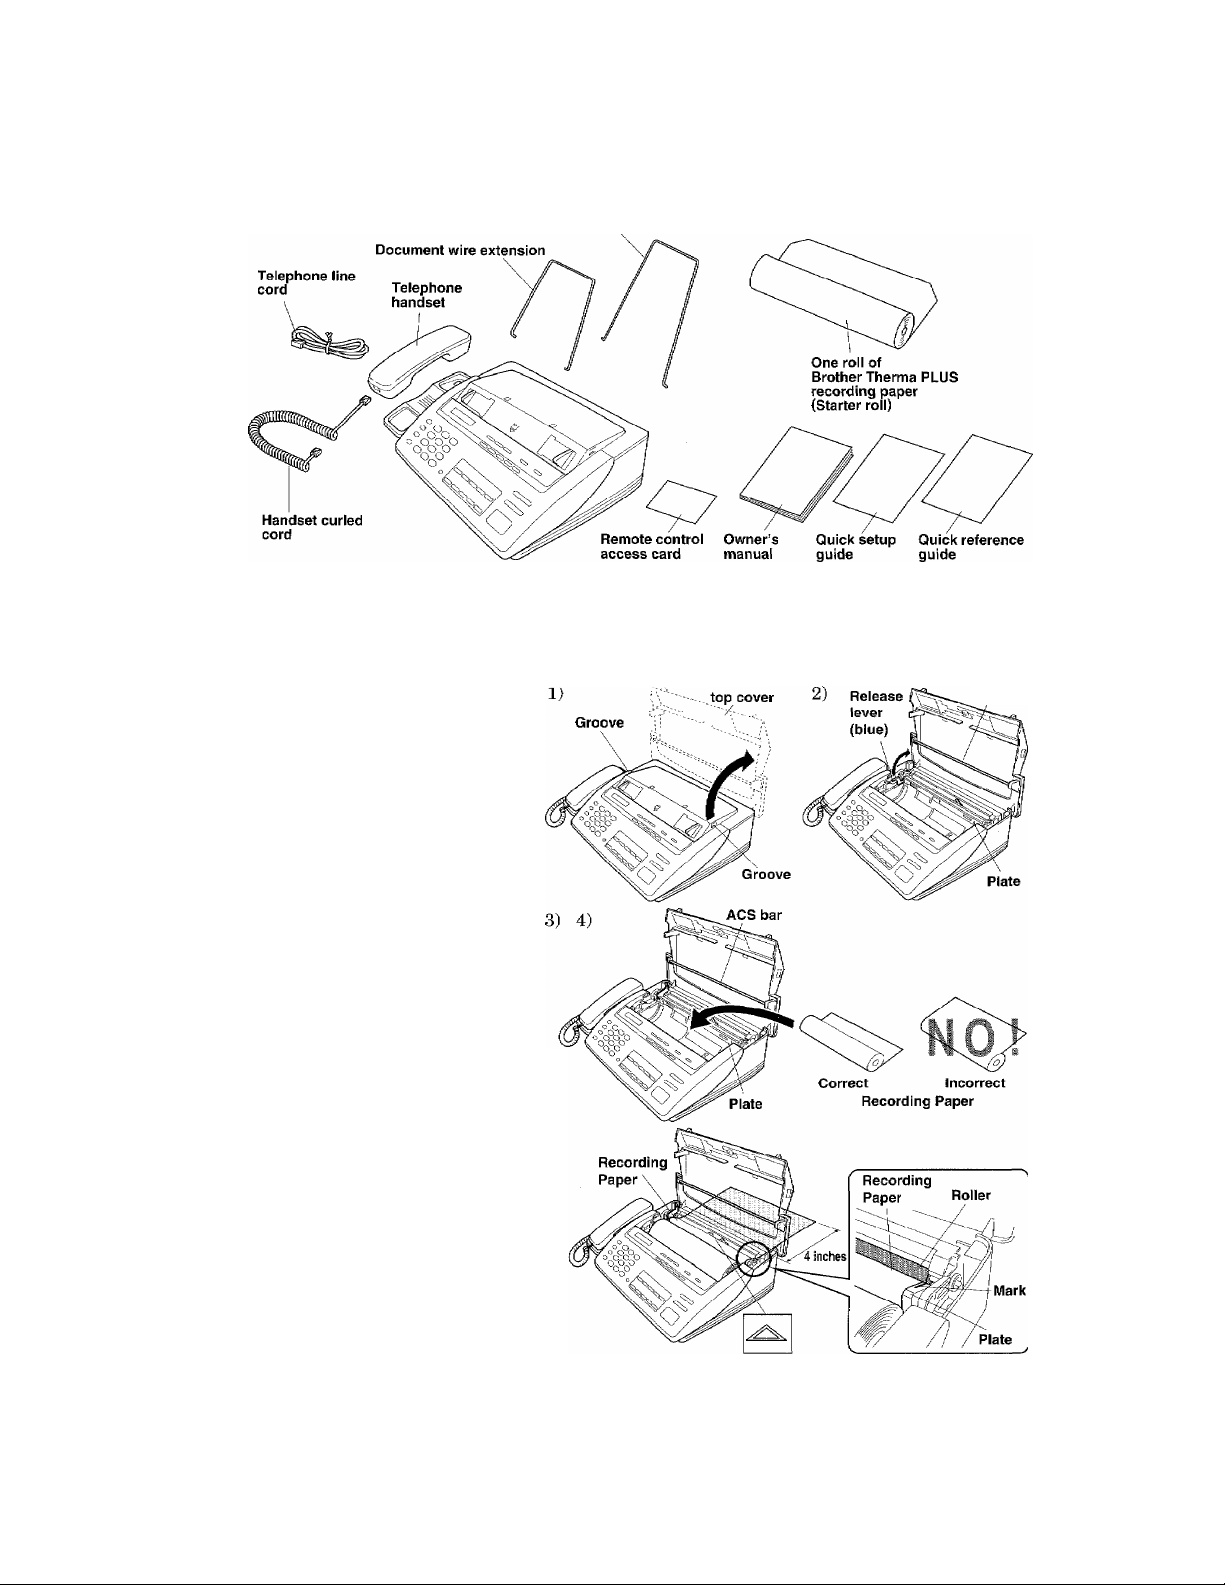
Packing List
Please check to see that you have the following items:
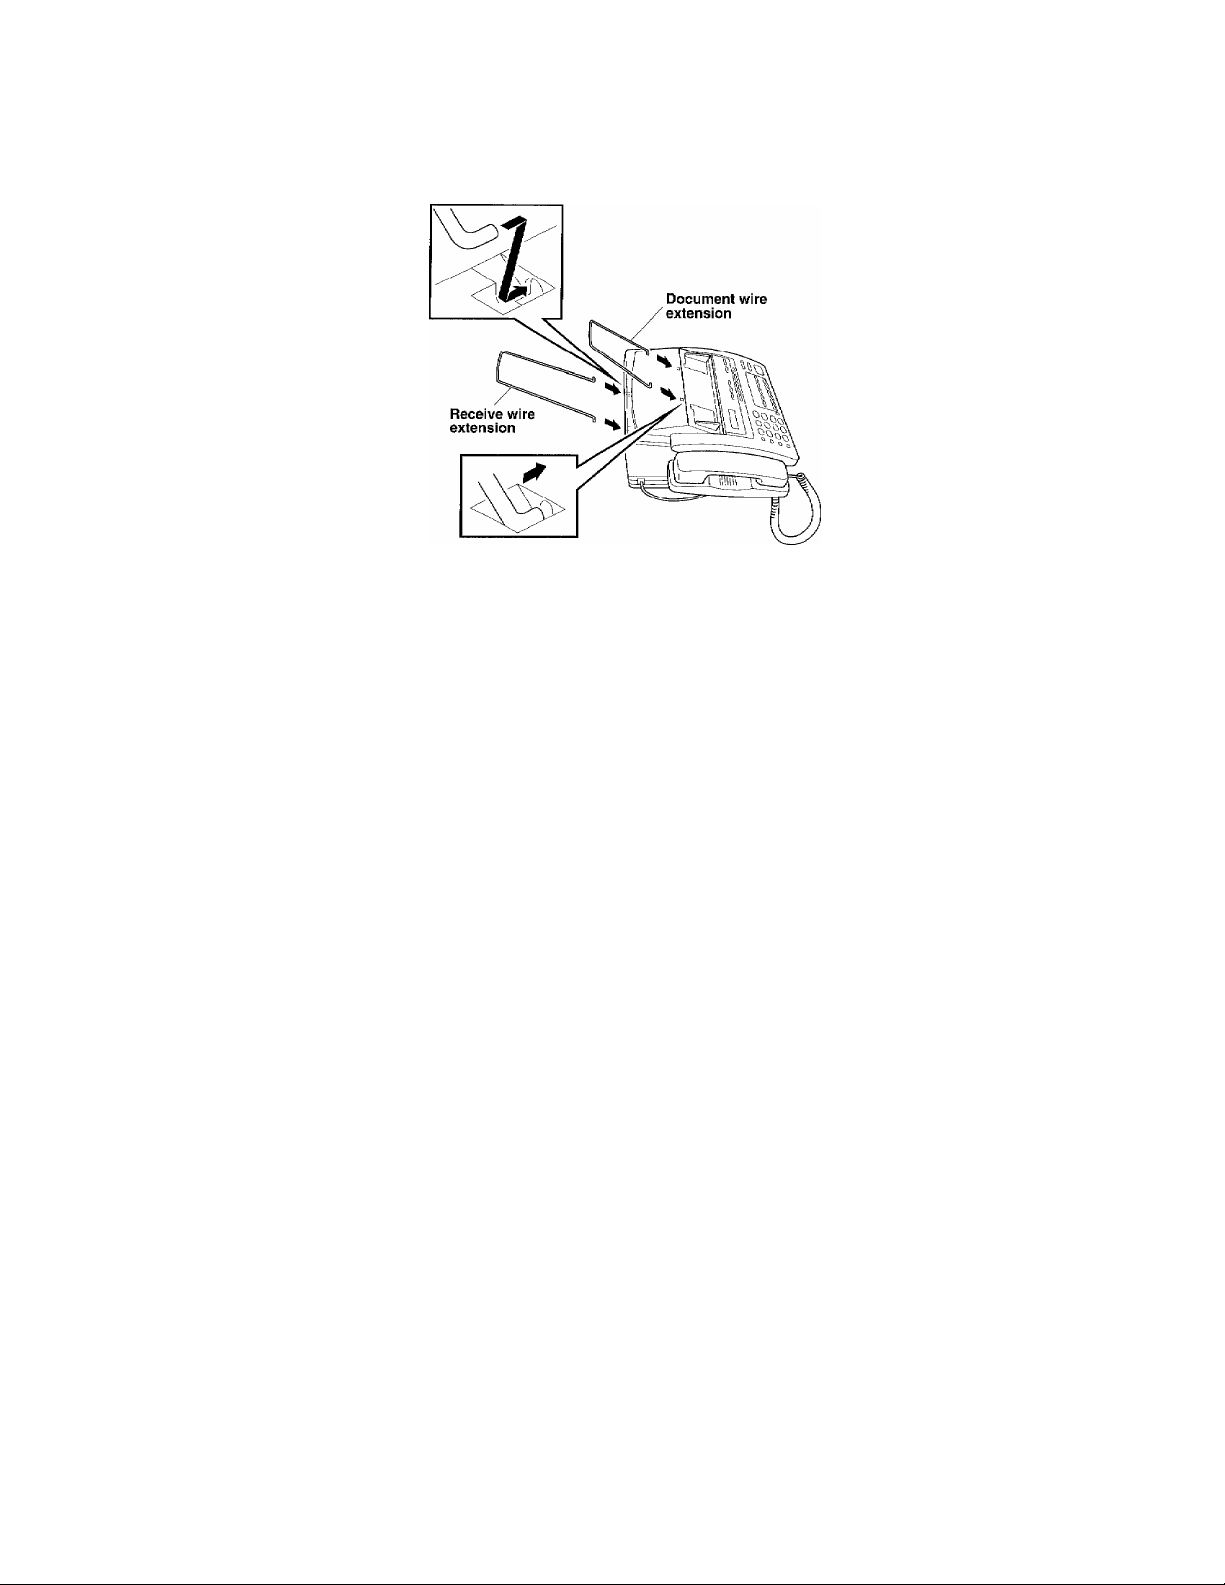
Receive wire extension
Setting up Your Fax Machine
Follow these steps to set up your fax machine:
1, Load the recording paper.
1) Lift up the machine’s top cover
by placing your finger in the
grooves on both sides of the
fax machine and lifting up.
2) Pull the release lever (blue)
on the print head unit so that
you can lift it up and remove
the recording paper.
3) Take the new roll of recording
paper out of its wrapper. If
you are replacing a roll, you
must remove any paper
remaining in the machine.
4) Insert the new recording pa
per into the paper bin, with
the paper coming under
the top of the roll. 5)
5) Insert the edge of the paper
into the slot between the roller
and the plate marked with
Pull and hold the
paper out about 4 inches (10
cm) from the back side. Adjust
the recording paper so that it
is between the marks.
Machine
ACS bar
1-5
Page 17
6) Push the release lever (blue) down, then close the machine top cover.
2. Connect the handset.
3. Connect the power cord.
When you connect the power, your fax machine will cut the fax paper automatically, and the
display will read; “01/01/1996 00:00”.
NOTICE
1. This fax machine must be grounded using a 3-prong plug.
2. Since the machine is grounded through the power outlet, you can protect yourself
from potentially hazardous electrical conditions on the telephone network by
keeping the power to your fax machine on when you connect it to a telephone line.
Similarly, you can protect yourself when you want to move your machine, by
disconnecting the telephone line first, and then the power cord.
3. Lightning and Power Surges can damage this product! We recommend that you
use a quality Surge Protection Device on the AC power line as well as the
telephone line or unplug the lines during a lightning storm.
' PC L/F jack is only for use
with the Brother Missing
Link option. If you have
not purchased this option
then ignore this part.
1-6
Page 18
SETUP & PREPARATION BEFORE USE
5. Attach the wire extensions.
FOR YOUR INFORMATION
Roll Over Phone Lines
A roll over phone system is a group of two or more separate telephone lines that pass
incoming calls to each other if they are busy. The calls are usually passed down or
“rolled over” to the next available phone line in a preset order.
Your fax machine can work in a roll over system as long as it is the last
number in the sequence so the call can not roll away. Do not put the fax machine
on any of the other numbers. When the other lines are busy and a second fax call is
received, the fax call is transferred to a line that does not have a fax machine.
Two Line Phone System
A two line phone system is nothing more than two separate phone numbers on the
same wall outlet. The two phone numbers can be on separate jacks (RJll) or
combined into one jack (RJ14). Your fax machine must be plugged into an RJll jack.
RJll and RJ14 jacks may be equal in size and appearance and both may contain 4
wires (black, red, green, yellow). To test the type of jack, plug in a two line phone and
see if it can access both lines. If it can, you must separate the lines for your fax
machine.
Converting Telephone Wall Outlets
There are three ways to convert to an RJll receptacle. The first two ways may
require assistance from the telephone company. You can change the wall outlet from
one RJ14 jack to two RJ11 jacks. Or, you can have an RJ11 wall outlet installed and
slave or jump one of the phone numbers to it. The third way is the easiest. Buy a
triplex adapter.
1-7
Page 19
SETUP & PREPARATION BEFORE
Ji
FOR YOUR INFORMATION
You can plug a triplex adapter into an R J14 wall outlet. It will separate the wires into
two separate RJll jacks (line 1, line 2) and a third RJ14 jack (lines 1 and 2). Plug the
fax machine into L2 of the triplex adapter.
RJ14
r
LI
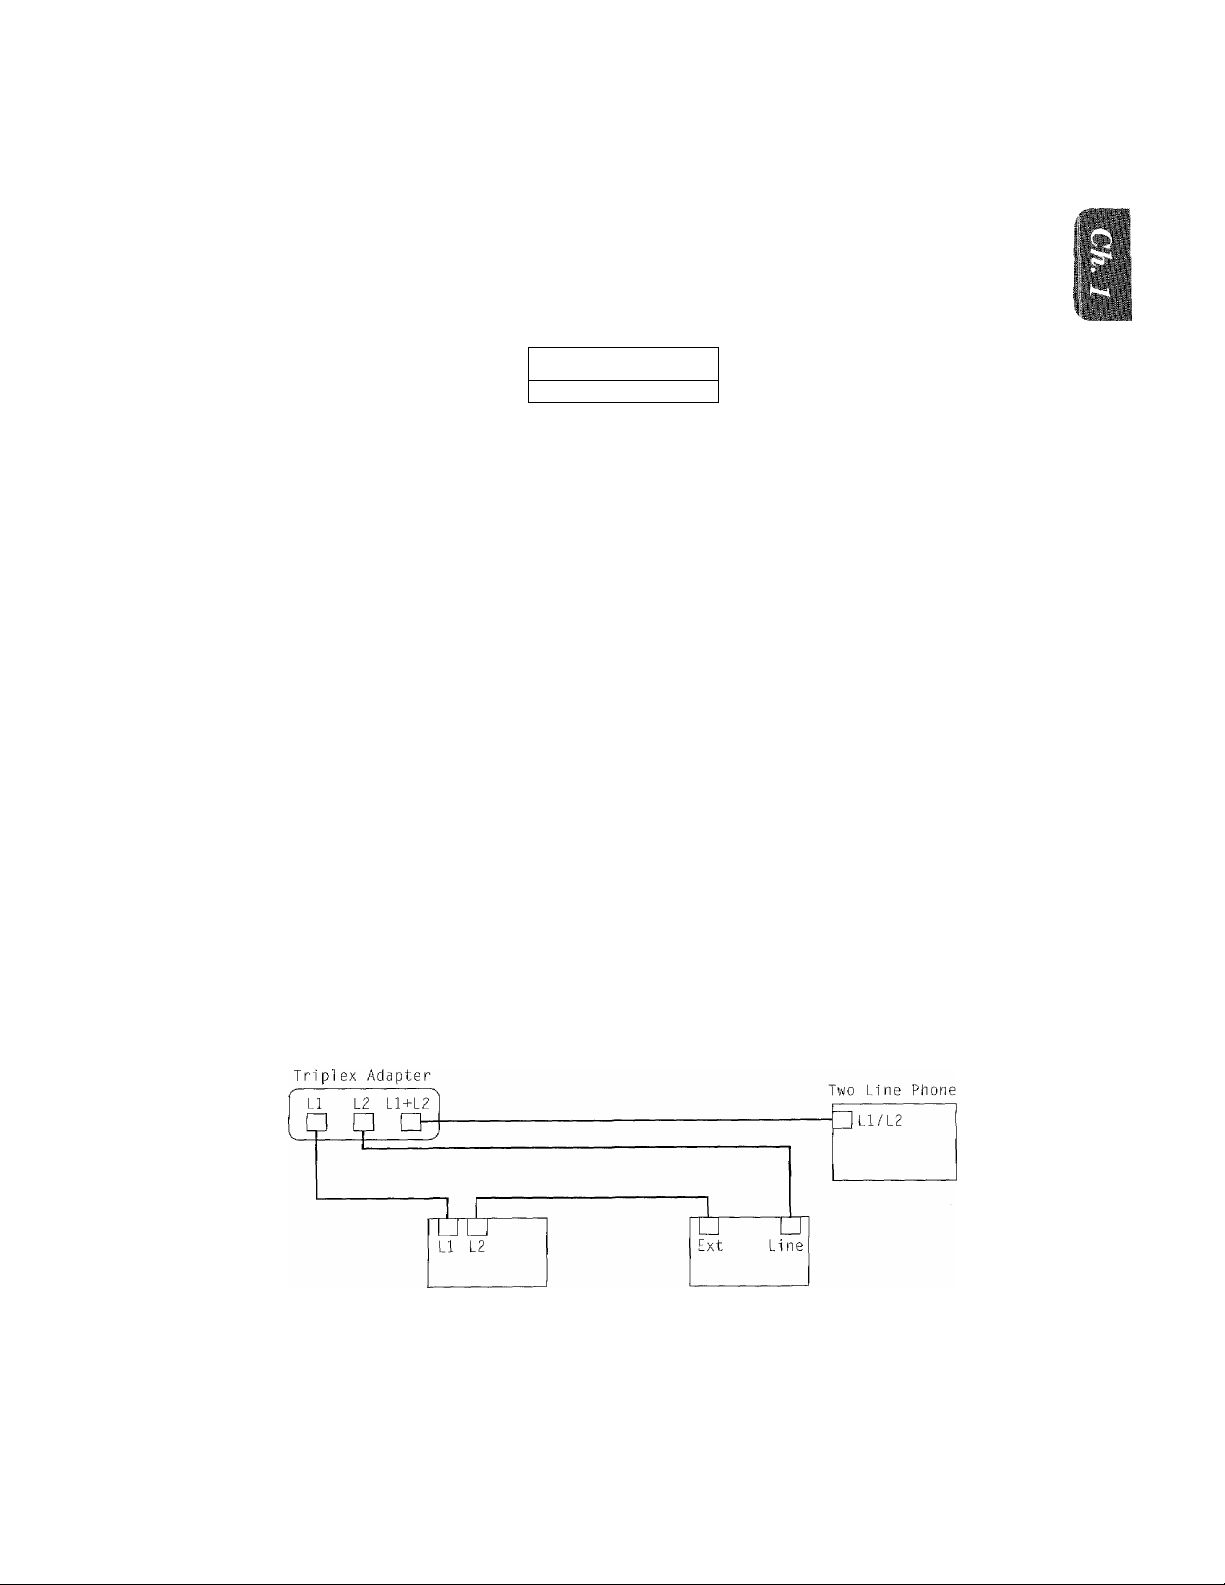
Installing a Fax Machine^ Two Line TAD and Two Line Telephone
When you are installing a two line telephone answering device (TAD) and a two line
telephone, your fax machine must be isolated on one line at both the wall jack and
at the TAD. The most common connection is to put the fax machine online 2. The back
of the two line TAD must have two telephone jacks; one labeled LI or LI and L2 and
the other labeled L2. You will need at least three telephone line cords: the one that
came with your fax machine and two for your two line TAD. You will need a fourth
line cord if you add a two line telephone.
L2 L1+L2
] CTTl
RJll RJll RJ14
Triplex Adapter
>
Place the two line TAD and two line telephone beside your fax machine. Plug one end
of the telephone line cord for your fax machine into the L2 jack of the triplex adapter;
plug the other end into the LINE jack in the back of the fax machine. Plug one end
of the first telephone line cord for your TAD into the LI jack of the triplex adapter;
plug the other end into the LI or LI and L2 jack in the back of the two line TAD. Plug
one end of the second telephone line cord for your TAD into the L2 jack in the back
of the two line TAD; plug the other end into the EXT jack in the back of the fax
machine. The two line TAD hookup is complete. It will answer both lines as usual.
You can keep two line telephones on other wall outlets as always. There are two ways
to add a two line telephone to the fax machine’s wall outlet. Plug the telephone line
cord from the two line telephone into the L1+L2 jack of the triplex adapter. If you
prefer, you can plug it into the TELE jack in the back of the two line TAD instead.
Cwo Line TAD
Fax Machine
1-8
Page 20

iliiljiiljil ^
Multi Line Connections (PBXs)
Most offices use a central telephone system. While it is often relatively simple to
connect the machine to a key system or a PBX (private branch exchange), we suggest
that you contact the company that installed your telephone system and ask them to
connect the fax machine for you.
It is advisable to have a separate line for the fax machine. You can then leave the
machine in AUTO Answer Mode to receive faxes at any time of the day or night.
If the fax machine is to be connected to a multi-line system, ask your installer to
connect the unit to the last line on the system. This will prevent the unit from being
activated each time a telephone call is received.
• As with all fax units this machine must be connected to a two wire system. If your
line has more than two wires, proper connection of the fax machine can not be
made.
Connecting to a Private Branch Exchange
The following points should be kept in mind if you are installing the machine to work
with a private branch exchange (PBX).
1) It is not guaranteed that the unit will operate correctly under all circumstances
with PBXs. Any cases of difficulty should be reported first to the company that
handles your PBX.
2) If all incoming calls will be answered by a switchboard operator, it is recom
mended that the Answer Mode be set to be MANUAL. (Seepage 7-2.) All incoming
calls should initially be regarded as telephone calls.
3) The unit may be used with either the pulse or tone dialing telephone types.
Custom Features on Your Phone Line
If you have Call Waiting, Ring Master, Voice Mail, an Answering Service, Alarm
System or any other custom feature on your telephone line it may create a problem
in the operation of your fax machine.
1-9
Page 21
Ni
® MESSAGE CENTER
® FUNCTION AND
00
1
1
tss
&
;s
os
S
ce
S
2
CTS
OB
Qd
S
Pi
8
1
o
r—
5
2
P
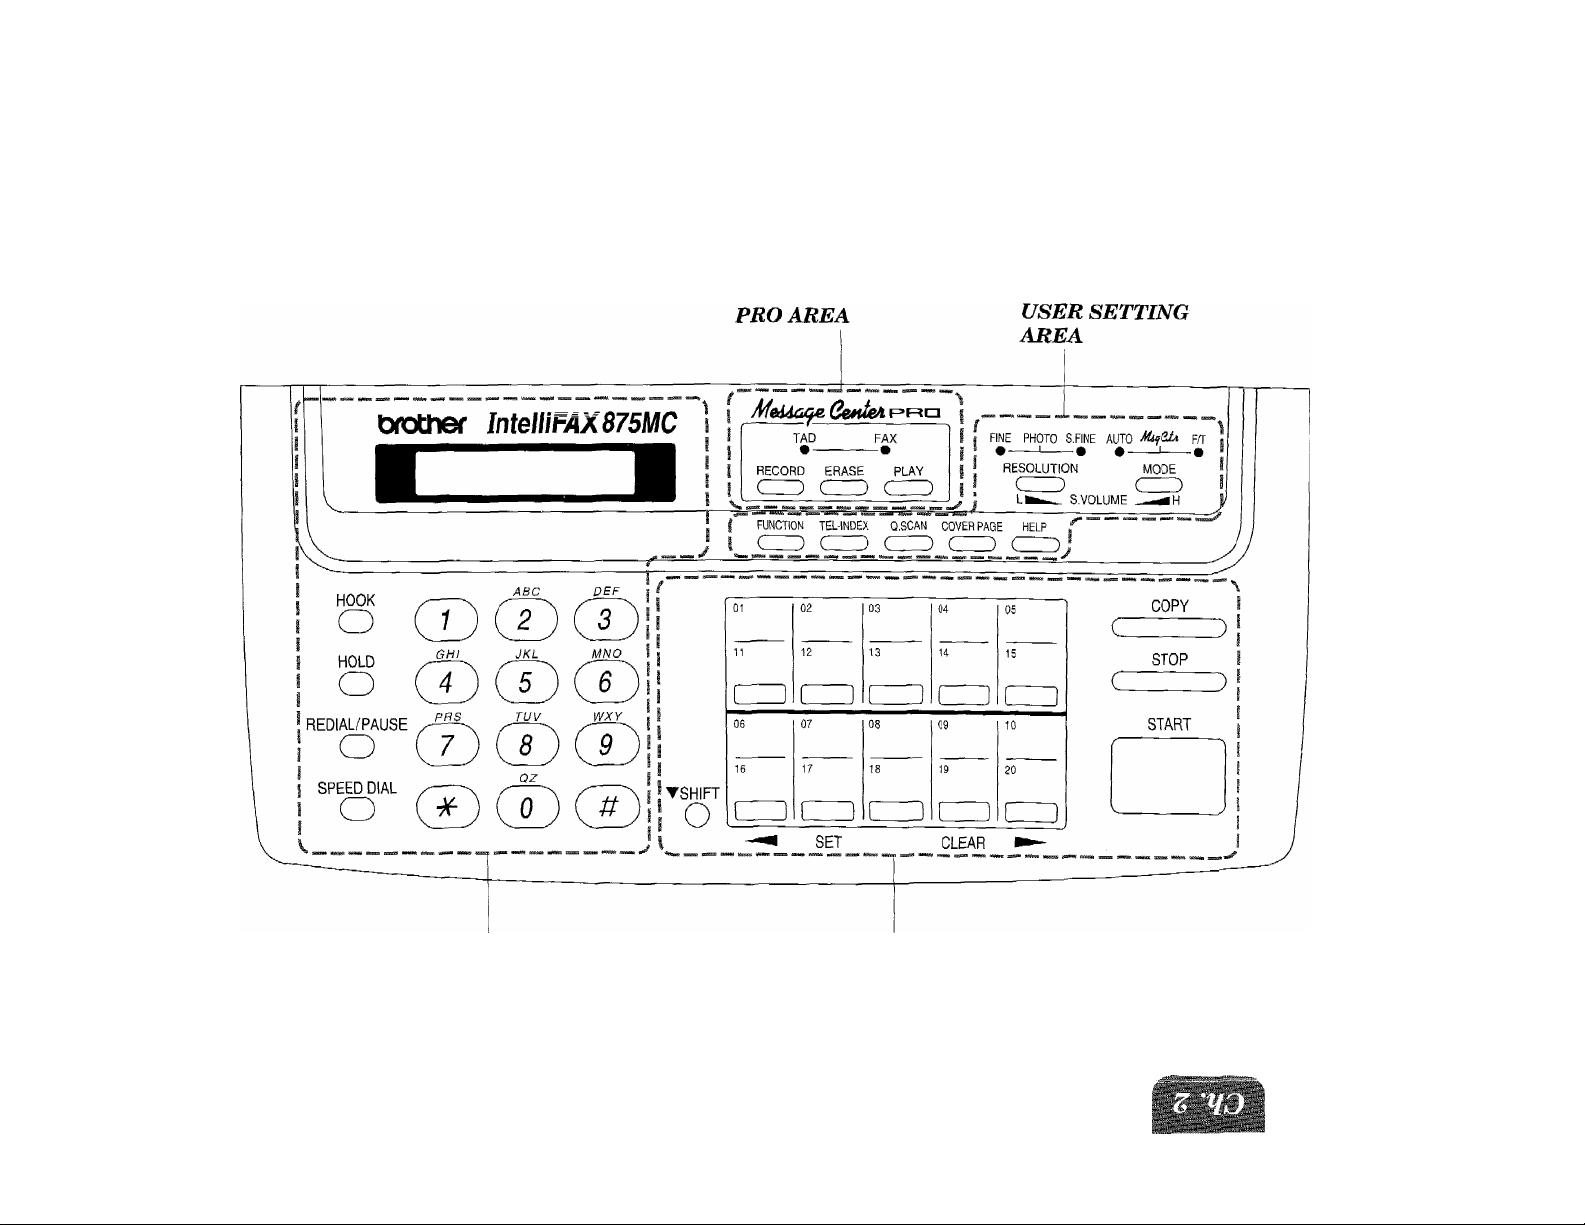
© TELEPHONE AREA
ts
© ONE-TOUCH AREA
wtst
iiiii
Page 22
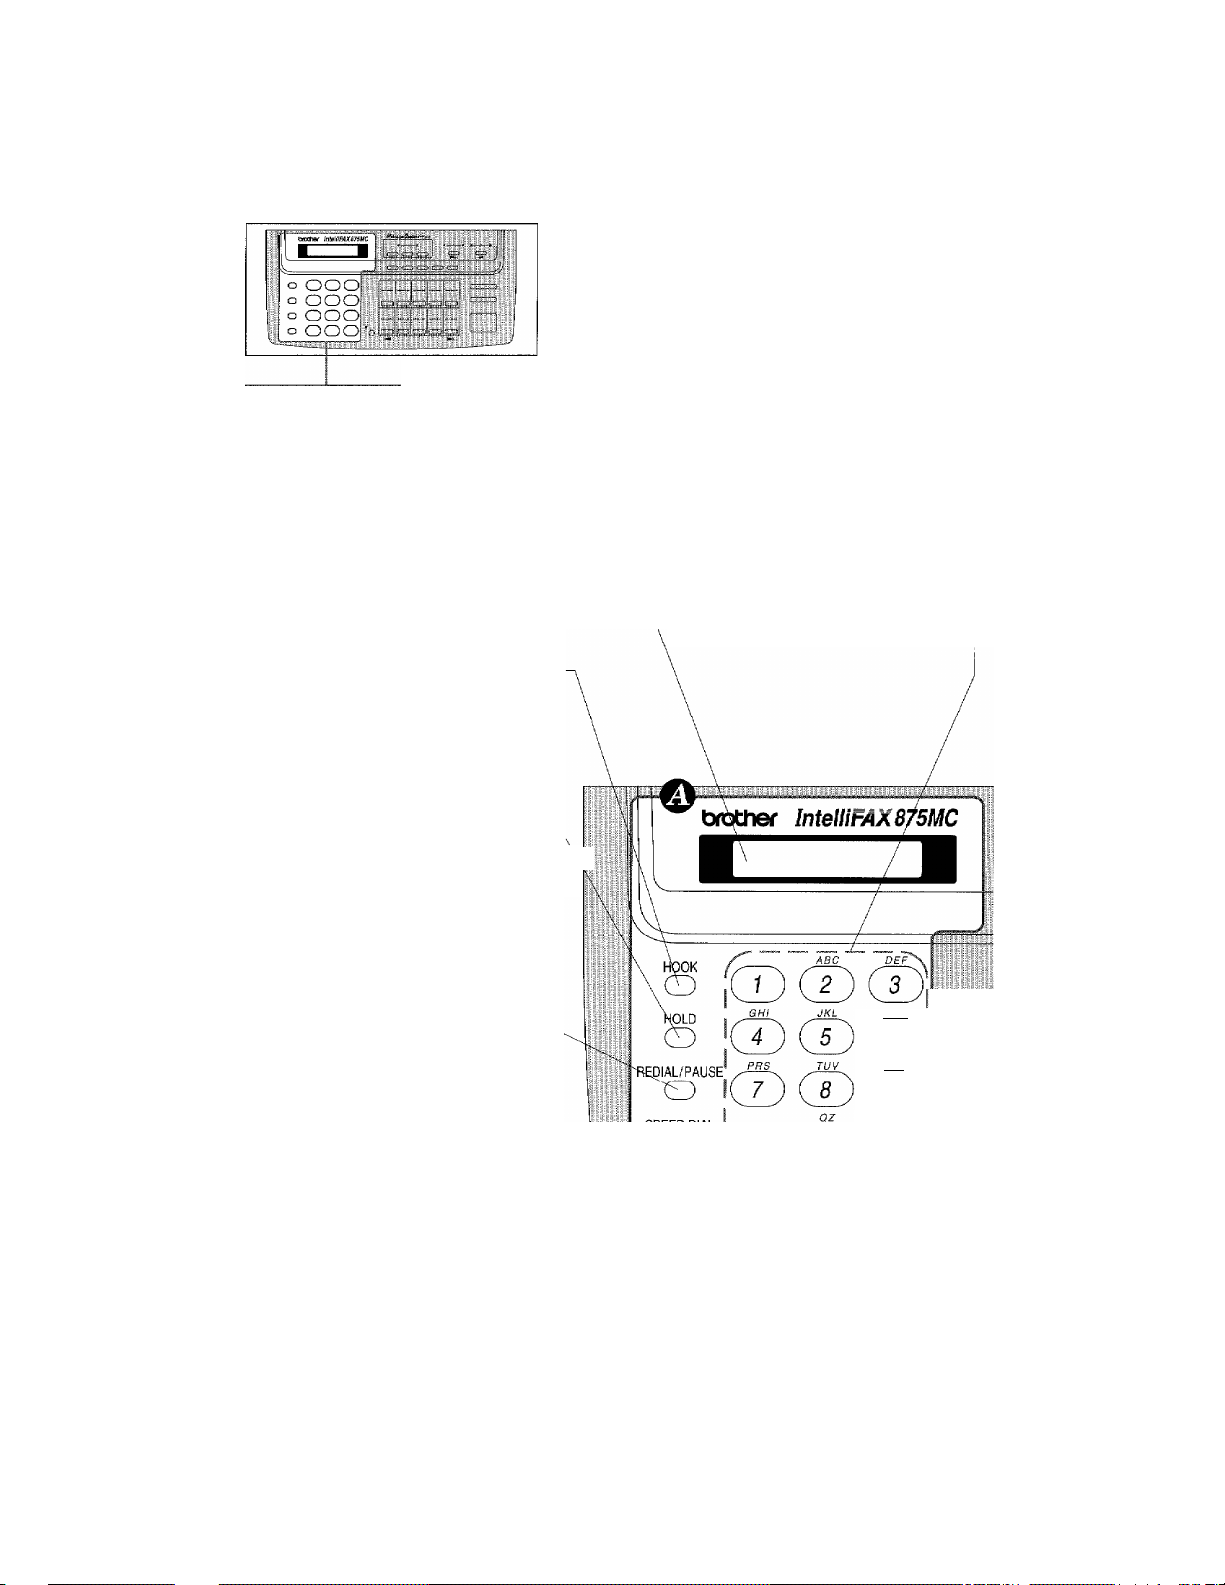
® TELEPHONE AREA
intelli FAX-875MC
L Liquid Crystal Display
The LCD displays messages that
will help you set up and operate
your fax machine. (On-Screen
Programming) (See page 3-1.)
5. HOOK
This key lets you dial telephone
and fax numbers without lifting
the handset. (See page 5-1.)
4. HOLD
You can use this key to put a call \i|
on hold. (See page 5-1.)
5. REDIALfPAUSE
2, Number Keys
These twelve keys are used
to dial phone and fax num
bers (see page 5-1), and can
also be used as an alpha
numeric keyboard for en
tering information into the
fax machine (see page 39~10).
MNP
This key re-dials the last number
called, (See page 6-6.) This key is
also used to insert a pause in
autodial numbers.
(See page 4-5, 5-1.)
6, SPEED DIAL
This key lets you access previ
ously stored speed dial phone
numbers with a two digit number.
(See page 4-6, 5-1.)
2-2
||ij®
®!
WXY I
&
BWiil
Page 23
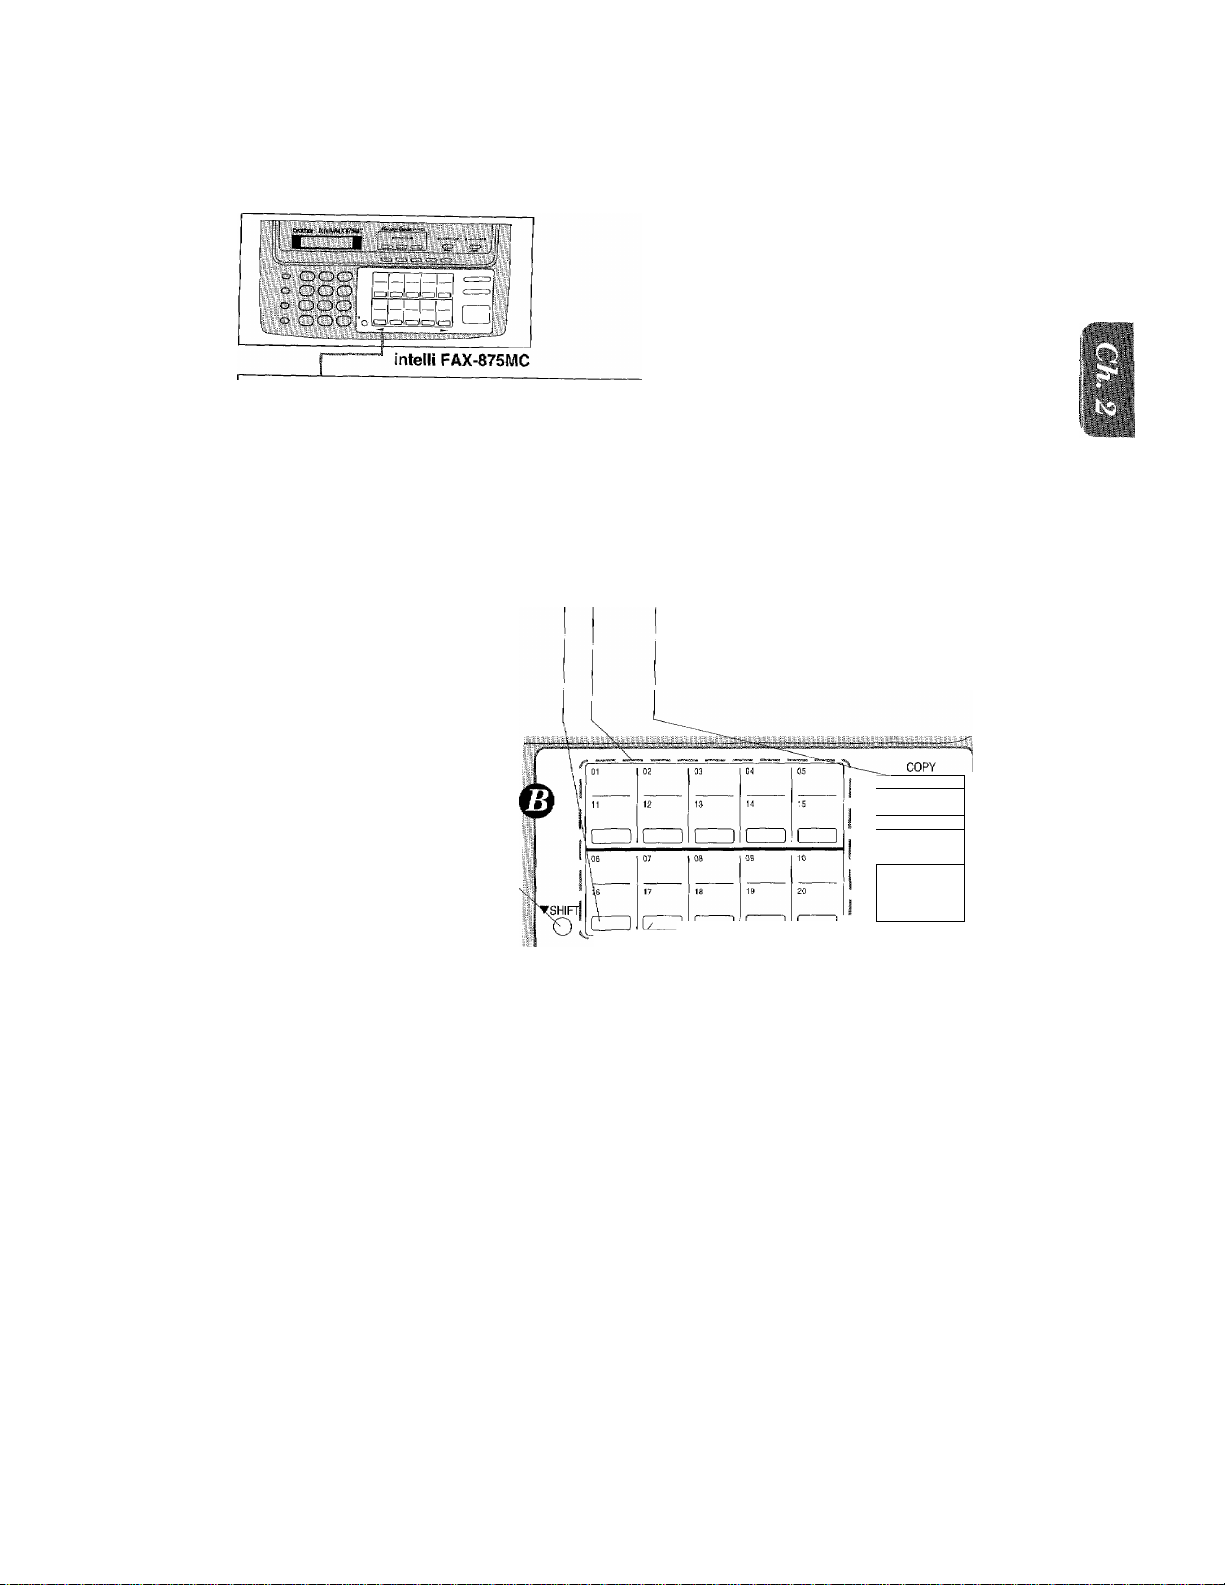
© ONE-TOUCH AREA
7. One-Touch Dial Keys
These ten keys give you in
stant access to previously
stored phone numbers. (See
page 4-4, 5-1.)
a
This key moves the LCD cur
sor to the left. It also allows
you to back up one step when
you are in function mode (see
page 3-1) or Telephone Index
(see page 5-2).
(Left Arrow)'
IL SHIFT
This key is used to access
the “11” through “20” OneTouch keys. (See page 4-4.)
12. SET^
This key is used for storing a
function setting into the fax
machine. (See page 3-2.)
8. COPY
Press this key to make a copy.
(See page 9-1.)
10, STOP
This key stops a fax, cancels
an operation, or exits from
function mode. (See page 3-2.)
STOP
-------
T
START
'
\
\
J I
_________
I I 1/
-----) ------
/
/
/
1 , X
13. START
Use this key to start an
operation, such as sending
a fax. (See page 6-4.)
\ ^
14. CLEAR -
This key deletes entered data
or backs up one step in a
function procedure.
(See page 3-2.)
^ Thé Lefî and Right Arrow keys, SET and CLEAR keys are also shared with one-touch keys.
/ IS.
This key moves the LCD cursor to the
right, and it also lets you advance one
step when you are in function mode (see
page 3-1) or Telephone Index (see page
5-2).
(Right Arrow)'
2-3
Page 24
CONTROL PANEL
® FUNCTION AND USER SETTING AREA
intelli FAX-875IVtC
m FUNCTION
This key accesses the function and
programming mode (OSP), so you can
alter various settings. (See page 3-1.)
18. TEL-INDEX
This key allows you to alphabeti
cally look up numbers stored in the
dialing memory. (See page 5-2.)
17, RESOLUTION
This key is used to set the resolution
requirements when sending a fax.
(See page 6-2.)
19. MODE
This key is used to specify how
the fax machine should handle
incoming calls. (See page 7-1.)
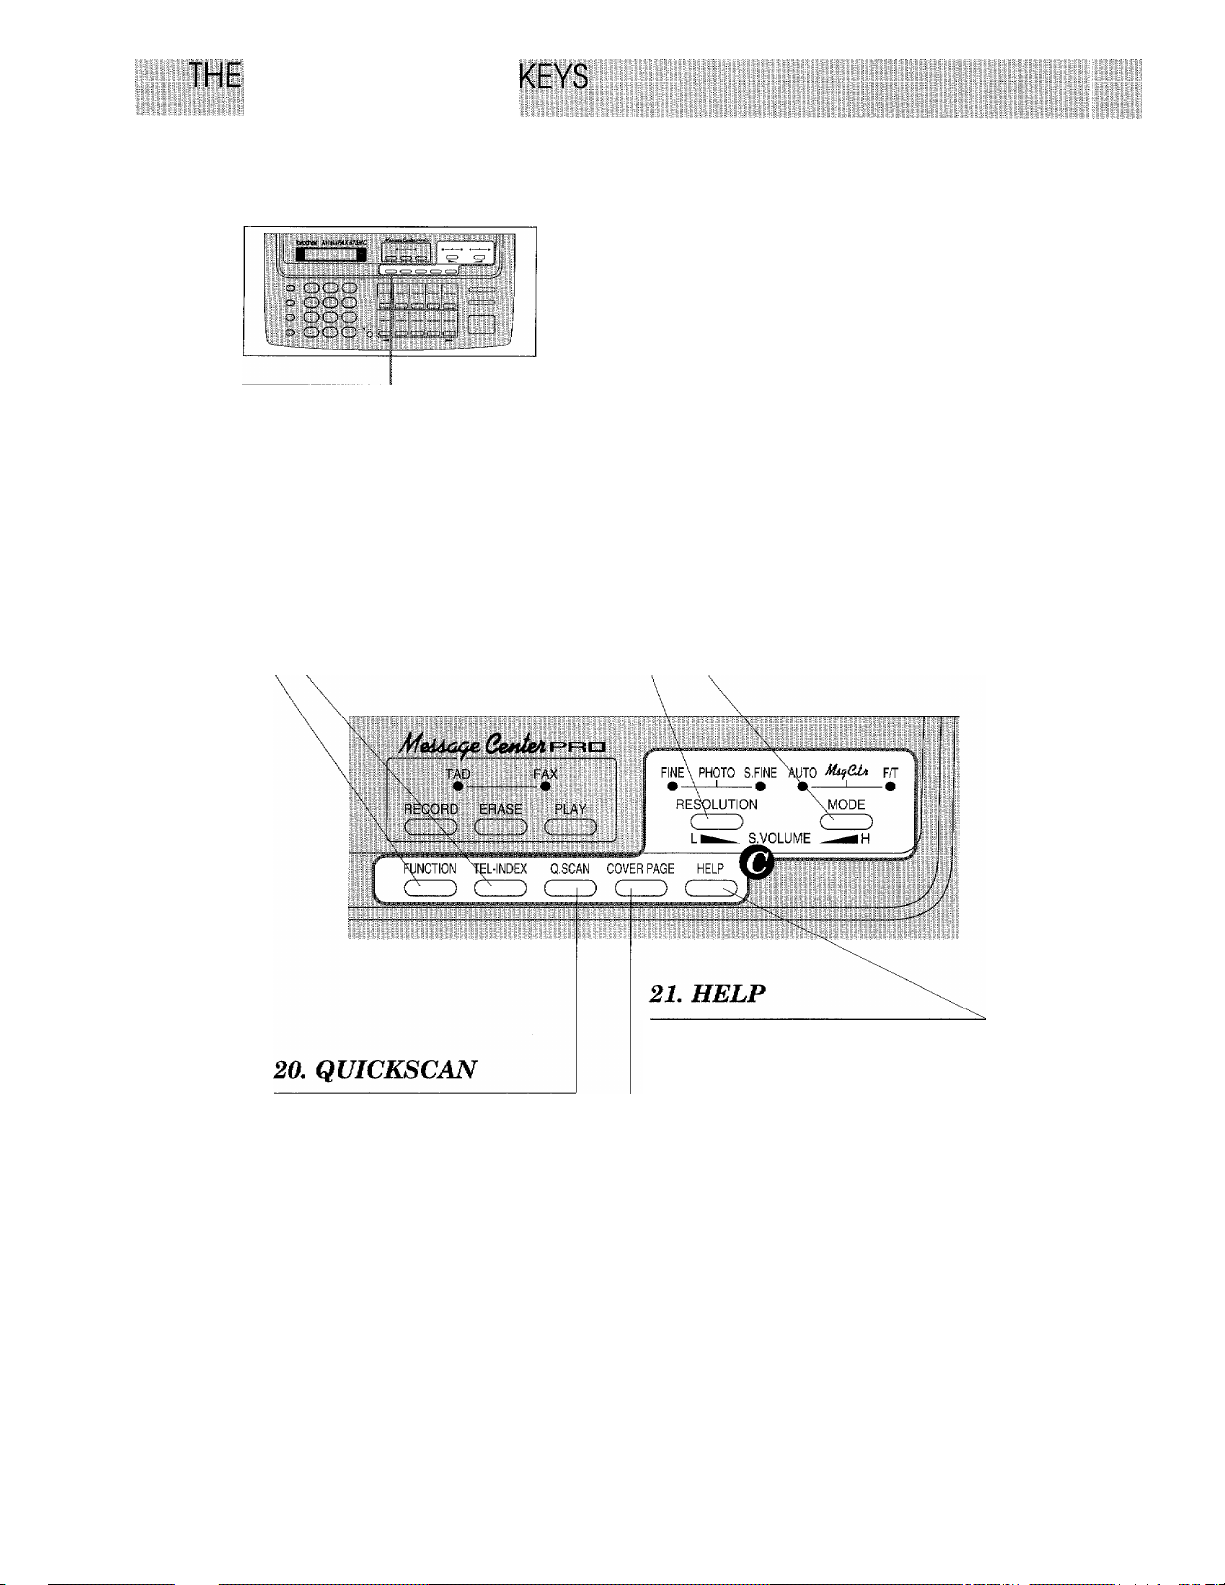
This key enables you to scan in your
originals at twice the normal speed,
by storing them in the memory before
actual transmission. (See page 6-6.)
When it is pressed, Broadcasting is
available. (See page 6-8.) When it is
pressed together with SHIFT, Multi
TX is available. (See page 6-9.)
2-4
Press this key whenever you want a quick
reference Help List printed. This Help
List will give you information on how to
perform settings for a function, how to
register information, or how to get some
basic information for sending or receiving
faxes. (See page 3-7-8.)
22. COVER PAGE
This key is used to send an automatic
Cover Page as the first page of a fax
transmission. (See page 6-14.)
Page 25
® MESSAGE CENTER PRO AREA
intelli FAX-875MC
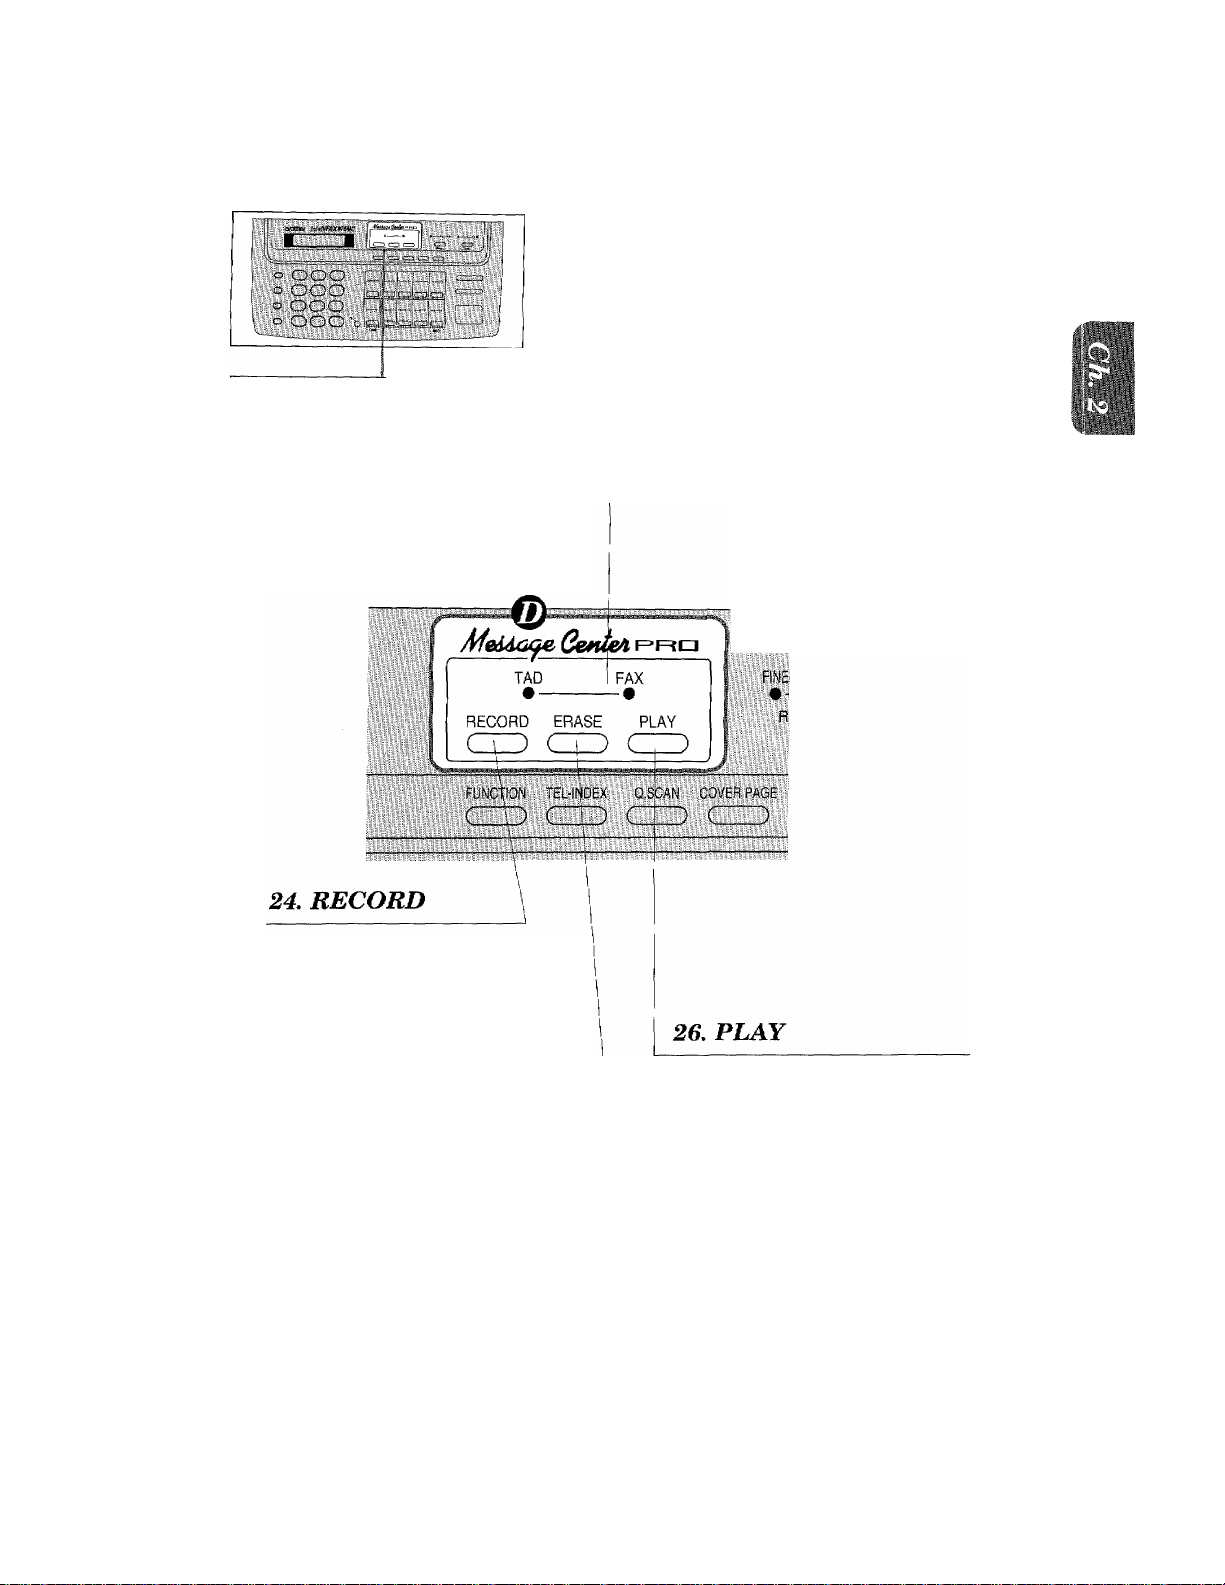
23. TAD and FAX
Indicator Lights
These lights tell you whether voice or
document messages are stored in the
memory. (See page 10-9.)
Use this key to record outgoing
voice messages, memos and
voice alarm messages into your
fax machine. (Seepage 10-8,16,
25.) You can also record voice or
fax messages and information
stored for the Message Center
Pro features. (See chapter 11.)
25. ERASE
This key erases voice or fax messages stored
in your fax machine. (See page 10-12, 13,
14.) You can also erase voice or fax mes
sages and information stored for the
Message Center Pro features. (See chapter
11.)
Use this key to listen to incoming
voice messages, outgoing voice
messages, memos and voice alarm
messages stored in your fax
machine. (See page 10-10,12.) You
can also play the voice messages
and information or print the fax
messages and information stored
for the Message Center Pro features.
(See chapter 11.)
2-5
Page 26

3. HOW 70 USE ON-SCREEN PROGRAMMING (OSP) AND HELP KEY ill
User-friendly Programming
We have designed your fax machine with on-screen programming and a HELP key, user-friendly
programming that help you take full advantage of all the functions your fax machine has to offer.
On-screen Programming (OSP)
Since your fax programming is done on the LCD, we created step-by-step on-screen prompt
messages to help you program your fax machine. All you need to do is follow the prompt
instructions as they guide you through the function menu selections and programming options
and settings.
Using the Function Mode to Access On-screen Programming (OSP)
You can access the function mode by pressing FUNCTION found in the “Function and User
Setting Area” of your fax Control Panel. {See page 2-4.)
When you enter function mode, your fax machine will display a list of Level One Functions to
choose from (see pages 3-2 through 3-7 for these Level One Functions), as seen below.
Press FUNCTION
+
iilMItSSiiffiiliilSi
1 T ^
1 l.TEMf
( 2.CANC
k
ililliiiiìilii
4
aHiaiaiPisi
4
S-1
Left arrow
sequence
1
4
iiiìiiiffiiiffliiiiBiiia«
4
f 6.TEL
"gRTrORSlHSEi
4 4
iiiiliSiliiBiiiiliiiilii
4
; 8.SETI
4
f 9.SETI ffiEHgsiaiiiwi
4
ÌÌSÌÌ№iBfiÌRÌiÌÌÌ&IS^^
4
4
4
4
4
4
Right arrow or
auto scroll
sequence
Page 27
These function options will appear one after the other on the display. You can then choose one of
these options by pressing SET when the option you want appears on the LCD.
You can also move through the function menu options at a faster rate by pressing (right
arrow). (Seepage 2-3 to locate this key onyour Control Panel.) When you find the option you want,
press SET.
You can simply press the Level One Function number associated with each option (refer to pages
3-2 through 3-7).
Helpful HinfS If you want to exit function mode, simply press STOP. Also, if you select the
wrong menu, and wish to return to the previous step, press CLEAR,
Alternating Displays for On-screen Programming (OSP)
When you see alternating displays, the LCD will
iiiilKMiiiiitiBftiiil
C
ALTERNATE
lliliiliiiiiiiligiill
usually alternate between the currently selected
option, and a help message giving brief instruc
tions on how to proceed. The example shows the
:)
current speaker volume is high and prompts you
to use (left arrow) and (right arrow) to
change the setting, and then to press SET to store
it.
Function Selection Table
If you have a basic understanding of how to program a fax machine, you can perform most of the
programming settings without the owner's manual. To help you understand the function
selections, options, and settings that are found in your fax programs, we have the following
Function Selection Table.
Read through this table to gain a basic understanding of what your new fax model can do, and
then the next section will begin instructing you how to use on-screen programming.
Level one
function
1.TEMP.
(TEMPORARY)
SETTINGS
Level two
function
1. TIMER
2. POLLING
3. CALL
RESERVE
Explanation of Options
Use this for sending documents at a later
time.
Polling is the process of retrieving faxes
from another machine. You can also choose
if you want your polling secured.
STANDARD/SECURE
You can send a fax and then talk to the
recipient using the CALL RESERVE func
tion.
ON/OFF
Factory
setting
—
STAN
DARD
OFF
Page
6-7
8-1-6
6-18
S-2
Page 28

Level one
function
1.TEMP.
(TEMPORARY)
SEHINGS
Level two
function
4. CONTRAST
5. RESOLUTION
6. OVERSEAS
MODE
Explanation of Options
There are three types of contrast settings.
Usually the AUTO setting is acceptable. But
if you want to send an especially light or dark
document, you should change this setting.
AUTO; Default setting is AUTO. Contrast
setting always reverts to AUTO after
one transmission.
S. LIGHT: To send very light documents.
S. DARK: To send very dark documents.
If you need to send a set of originals at
various resolutions, this function will allow
you to set the required resolution page by
page. (If all documents are the same resolu
tion, use the RESOLUTION key. See page 24 #17.)
STANDARD/FINE/S. FINE/PHOTO
If you have trouble when sending overseas,
you may want to set OVERSEAS MODE to
ON.
ON/OPP
1 Factory
setting
AUTO
STAN
DARD
OFP
Page
6-3
6-13
6-12
2. CANCEL
JOB
3. PRINT
REPORTS
4. SET AUTO
DIAL
See page 12-1 for
a list of reports.
TONE-TOUCH
DIAL
2. SPEED-DIAL
3. SETUP
GROUPS
If you wish to cancel a job that has been set
with the timer, a polled job etc., use this
function.
You can print several different lists and
reports, which are available under function
item 3. PRINT REPORTS.
If you register names and numbers on OneTouch dial keys, you can dial a number
automatically just by pressing a One-Touch
key. (Max. of 20 locations)
If you register names and numbers as SpeedDial numbers, you can dial a number
automatically just by pressing SPEED DIAL
and a two-digit number. (Max. of 40 locations
for PAX-825MC and 80 locations for FAX875MC)
This is used for setting up a group number
used for broadcasting.
—
—
—
X
6-11
12-1-6
4-4-5
4-6-7
4-8-9
3-3
Page 29

Level one
function
5. USER
OPTIONS
i Level two
function
1. SMOOTHING
2. BEEPER
3. COVERPG
ON/OFF
4. ERROR RE-TX
1.TONE/PULSE
Explanation of Options
Smoothing enhances the appearance of in
coming faxes.
I If you set SMOOTHING to ON, you will
receive messages with the smoothing en
hancement.
ON/OFF
You can adjust the volume of the beeper with
this function.
OFF/LOW/HIGH
If you set COVER? AGE to ON, you can send
your documents with a Cover Page gener
ated by your machine. When the
COVERPAGE setting is ON, you can select
a Cover Page comment.
ON/OFF
If you set ERROR RE-TRANSMISSION to
ON, the machine automatically resends the
page once an error occurs.
ON/OFF
There are two different dial types and you
must select the type of signal suitable for
your telephone line.
TONE/PULSE
Factory
setting
ON
LOW
OFF 6-16
OFF
TONE 4-1
1
Page
7-5
4-1-2
6-20
6. TEL
OPTIONS
2. RING DELAY
3. SPEAKER
VOLUME
4. m RING
TIME
5. RING VOLUME
6. DISTINCTIVE
This is the number of rings before the fax
machine answers the call when in F/T or
AUTO Answer Mode.
0/1/2/3/4 rings
You can adjust the speaker volume with this
function.
OFF/LOW/HIGH
F/T RING TIME sets the time for simulated
ringing in F/T mode.
10/20/30/60 seconds
The settings are OFF/LOW/HIGH.
If you have distinctive ringing service from
your phone company, you can use this
function to register the ringing pattern of
your fax number. And if you set it to ON, you
can use the registered number as a fax
number only.
OFF/ON/SET
2
LOW 7-6
HIGH
7-4-5
7-6-7
20
OFF 7-13-17
7-2
3-4
Page 30

s.is:r.i
11
Hill
HOW TO USE ON-SCREEN PROGRAMMING AND HELP
Level one
function
6. TEL
OPTIONS
7. SETUP
SYSTEM
Level two
function
7. CALLER ID
1. DATE/TIME
2. DAILY TIMER
3. INTERVAL
4. STATION ID
Explanation of Options
You can display the last 30 caller IDs that
are stored in the memory.
If you enter the date and time in 24-hour
format, the LCD will display the date and
time and they will also be printed on outgo
ing faxes.
If you frequently have delayed jobs, all for
execution at the same time each day, you can
program that time. Once you register it, you
do not need to enter that time, just set Timer
Transmission in temporary settings.
You can select the time interval when the
activity report will be printed.
6/12/24 hours, 2/4/7 days, OFF
You can enter your name or company name,
fax number and telephone number in
STATION ID.
It is printed at the top of each page of every
outgoing fax. It is also printed on the
automatic Cover Page.
Factory
setting
—
01/01/1996
00:00
00:00
OFF
—
Page
7-18-21
4-2
6-7-8
12-2
4-3
8. SETUP
MSG CTR
5. REMOTE
CODE
6. SET
COVERPAGE
1. MSG
STORAGE
2. BACKUP PRINT
3. FAX FWD/
PAGING
If you enter a REMOTE CODE, you can
activate or deactivate the lax machine from
a remote telephone.
ON/OFF
You can register your own two custom
comments for the Cover Page.
You can select memory usage of the machine
in MESSAGE CENTER mode.
FAX;ON/OFF, TAD:ON/EXT/OFF
You can set the machine to print a back-up
copy of faxes that are received into the Mes
sage Center memory.
ON/OFF
You can choose among PAGING, FAX FOR
WARDING or OFF. PAGING ON will cause
the fax machine to page you when it receives
a fax message. FAX FORWARDING ON will
cause the fax machine to send any stored
faxes that are received to another predeter
mined fax number.
OFF/FAX FORWARD/PAGING
ON
*51 (ACT.)
#51(DEACT.)
—
FAX: OFF
TAD: ON
ON
OFF
7-8-10
6-15
10-7
10-11
10-17-20
3-5
Page 31

Level one
function
Level two
function
4. REMOTE
ACCESS
5. ICM MAX. TIME
Explanation of Options
You can register a REMOTE ACCESS ID (3
digits) allowing you to operate the machine
remotely. (Example ; Retrieving an incom
ing fax message)
This is the maximum length for your voice
information in Voice-on-Demand, the ICMs
in Personal Mailbox and Message Center,
Memos and Voice Alarm recordings.
20/25/30/35/40/45/50/55/60 seconds
Factory
setting
159>K
30 10-15
Page
10-20-21
8. SETUP
MSG CTR
9. SETUP MC
PRO
1 6. OGM
7. PRINT FAX
8. RECORDING
MODE
9. TOLL SAVER
1.MSG CTR PRO
2. OGM
3. MAIL BOX
4. FAX INFO
The machine has two types of OGM (Outgo
ing Messages) for MSG CTR and FAX/TEL
switch. After selecting the message type,
you can play, record or erase.
You can print incoming faxes that were
stored in MSG CTR memory.
To get more recording time for incoming
messages, memos, and voice messages,
change the sound quality setting from HIGH
to NORMAL.
If you set TOLL SAVER to ON, you can
check if a message was received by the ring
delay. Tall saver overrides the Ring Delay
setting. ON/OFF
You can turn the Message Center Pro Mode
on or off with this switch. ON/OFF
You can record Level 1 and 2 OGMs for
callers, telling them what to do in each step.
MSG CTR PRO/MAIL BOX/FAX ON DEMAND/VOICE ON DEMAND
There are 5 personal mail boxes. For each
mail box, the owner can record his/her own
OGM for callers. 01/02/03/04/05
You can store the fax information for each
Fax on Demand memory box. You have up to
99 memory boxes. 01-99 (The number of
available boxes depends upon the amount of
information you store.)
MSG
CTR
OGM
7-4,
10-13-14
10-11
NORMAL 10-15-16
OFF
OFF
10-14-15
11-18
MSG
CTR
11-13-16
PRO
11-12-13
01
11-7-9
5. VOICE INFO
You can store the voice information for each
Voice on Demand memory box. You have up
to 99 memory boxes. 01-99 (The number of
available boxes depends upon the length of
your messages.)
—
11-10-11
3-6
Page 32

KEY I
Level one
function
0. INTERRUPT
Level two
function
Explanation of Options
You can send a fax without canceling the
timer or polled waiting, even if there are
documents in the feeder, by “interrupting”
it.
Factory
setting
—
Page
6-10
Help Key
Press this key whenever you need a quick reference Help List printed. This Help List will give
you information on how to perform settings for a function, how to register information, or how to
get some basic information for sending or receiving faxes.
How to Print a Help List
Press HELP to get a printout of the Help List. Use it when you need information about how to
register or set one of the functions, or how to send or receive faxes. You can request a printout
whenever the machine meets the following conditions:
-while the LCD displays the date and time.
-while the machine is timer waiting.
-while the machine is polled/polling waiting.
-while the machine is at level one or two of the function menu.
-while you are using the phone.
3-7
Page 33

lisa
-*r-:V****-ir*-l-*-Jc**5lr* j-|l[_p I ¡57
<ST£PS FOR KEY FUNCTIONS>
DPRESS FLTXTION
L
2,1 SEE EOT A LEVEL ONE FUNCTION
BY PRESSING HUHBER KEY /~v
(FROM THE SELECTIGH (j
CHARI ON SHE RIGHT) ^
3TSELECT A LEVEL Tlv'O FUNOTLON
BY PRESSING NUMBER KEY
4)SEL£CT THE UESIRED SETTING
USING "HE ARROW KE^S
5)PRESS SET
6)RRESS STO.s "0 EXIT
NOT r.
MAKE SURE YOU FIRST S^"
TONE/PULSEiFLNCTION 6-1),
CATE/TiME(FUNCTION ?-l) AND
STATION IDCFUNCTION 7-A).
FUNCTION
INSERT f^EYS
DOCUMENT TO
TUNC I
MANUAL MODE
*FOR DEDICATED
TELEPHONE USE
ONU Y .
UZJ UZD
SSTORING ONE-TOLCh>
(SENDING A FAX (AUTO)>
NUMBER
0 O
DIA.^
SPRINTING A LIST/REPORT>
ONE-TOUCH Q START
OR
NUMBER
KEY
^ o
TO SELECT
REPORT TYPE
AUTO MODE
*FGR DEDICATED
FAX USE ONLY,
<FAX R.ECEPTION SETTINGS)
LEVEL ONE
I.TEMP.SETTINGS
2.CANCEL JOB
3.PRINT REPORTS
4.SET AUTO DIAL
5.USER OPTIONS
6.TEL OPTIONS
•SETUP SYSTEM
B,SETUP MSG CTR---1.HSG STORAGE
9.SETUP MC PRO
0,INTERRUPT
(AMPLE
ONE-TOUCH
□ l
SPEED DIAL
0 R + —^
TWO
DIGITS
SFUNCTION selection
NUMBER
KEYS
O
TO ENTER
PHONE
LEVEL TWO
- - .TIMER
2. POLLING
3. CALL RESERVE
¿.CONTRAST
5.RESOLUTION
6.OVERSEAS MODE
---l.ACT.RE.^ORT
¿.ALL dial
3. TEL.INDEX
4. C0VF.RRAGE
B.CA.Ll back MSG
6.USER OPTIONS
/.XMIT REPORT
5. MEMORY ST.4TUS
9.CALLER ID
--1 .G'NE-TCIICH niAL
2.SPEED-DIAL
S.SETLI« GROUPS
--1.SMOOTHING
2. BEEPER
3. C0VERDG ON/OFF
4. ERROR RE-TX
--1.T0NE/PULSE
2.RI.NG DELAY
3.SPEAKER VOLUME (OFF/EOfj/HISH)
4.F.''T RING TIME (10/20./30/60)
5 , RIN G V 0 L U M E (0 r F / l 0 kE'' HIG H)
6.DISTINCTIVE (OFF/Oh/SET)
Y.CALL.ER ID
-l.DATE/TJME
2,DAILY TIMER
3,INTERVAL
4.S1AiION 10
5,REMOTE CODE
6.SET CGVEfiPAGE
2. BACKUP PRIN"
3. FAX FWD/PAGING
4. REMOTE ACCESS
5.ICM MAX.TIME
6.0GH
/.PRINT FAX
.«.RECORDING MODE (HIGH/NORMAL)
9.TOLL SAVER (ON/OFF)
-i.MSG CTR PRO
2. OGH
3. M.AÎL BOX
4. FAX INFO
5. VOICE INFO
□
SET
o
F/T MODE
*FOR BOTH FAX AND
TELEPHONE.
CHART)
OPTIONS
(Standard/s«cu.r.e;
(ON/OFF)
(AUTO/S.LIGh'T/S. DARK)
(STD / FINE/S,TIME/PHOTO)
(OiN/OT)
(ON/OFF)
(OH/OF«)
(OrE./LOW/HIGH)
(ON/OFF!
(ON/OFF)
(TONE.-'PUlSE)
iOC/Cl/02/03/04;
(OFF/6 H/12H/24 h/2 D/4D/1D)
( FAX/TEL/M,At'E ;
iON/Of^T^StT CODE)
( F A X ; 0 N / 0 F F, T A D ; 0 N / 0 F F / F X T )
(O.N/OFF)
iOTT/.TAX FORWARD./PAGING)
(20/25/30/35/40/45/50/5 5/60 )
(MSG CTR 0G.M/F/Î CGM)
(ON/OFF)
(MSG CTR PRO/M.AIE BOX
;0I/B2/03.i04,MJol
(01-99)
(01-99)
ALPHA
KEYS
>o -
"0 ENTER
NAME
MSG CTR
*FOR BOTH TAD AND
FAX USE.
□
SET
FAX/VOICE ON DEMAND)
{HELP LIST of FAX-875MC)
—
Page 34

iiiillil
How to Enter Text in Function Mode
Number keys have two or three letters printed above it. The following keys “1”, and have
no printed letters because they have special characters.
ABC
(D
GHf
(D
PRS
(D
By pressing the appropriate number key the correct number of times, you can access
the character you want. When you are making certain settings, such as the Station ID, you
need to enter text into your fax machine.
Key once
2
3
A B C
D
(D
JKL
(D
TUV
®
QZ
twice three times
E F 3
4 G H I
DEF
®
MNO
®
WXY
®
(D
four times
2
4
5 J K L 5
6
7
8 T
M
P
N 0 6
R
U V 8
s 7
9 w X Y 9
0
Q
z
0
Q
Let’s say that you want to enter the initials “BR.” Follow the example below.
mm
KEYS TO PRES
C
1. Press 2 twice to enter the letter B.
2. Press 7 twice to enter the letter R.
3. Press SET.
3-9
THE DISPLAY WILL SHOW:
i ENTER & SET
i NAME:i
i NAME:BR
ïlilîiili
_
:)
1
Page 35

1. If you want to enter a blank space, press (right arrow) twice.
2. If you entered a letter incorrectly and want to change it, you can use (left
arrow) to move the cursor back. When you reach the letter, you can enter a new
one in it’s place. You can only overwrite letters, not insert them, so you may have
to go back and overwrite a lot of letters if you forget to enter a letter.
3. If you need to enter a character that is assigned to the same number key as the
previous character, press (right arrow) to move the cursor to the right.
How to Enter Special Characters^ Symbols and Punctuation
Marks in Function Mode___________________________
Ikey-
...............
* key
..........
# key
-----
The “1” key contains all the accented characters. The and the “#” key are used for punctuation
marks and symbols. Let's say that you want to enter the Symbol Follow the example below.
— AEOUAgEEl
..........
- (space) !”#$%&’()*+,-■/'
------
----- :;<=>?@[]
THE DISPLAY WILL SHOW:
_____________
1. Press * to show a list of characters.
2. Press * (6 times).
3. Press (right arrow).
3-10
Page 36

4. TELEPHONE FUNCTION SEWNGS
There are some settings, such as the date and time, you should make to your fax machine before
you begin using it. Once entered, these settings will remain in the machine until you change them.
You can begin customizing the settings by pressing FUNCTION on the control panel. This
activates the function mode and On - Screen Programming prompts. You can complete a variety
of settings in this mode.
Setting the Dialing Mode (TonelPulse)_____________________________
Your fax machine supports both tone {or multi-frequency) and pulse (or rotary) dialing. It is
initially set to TONE, so you do not need to change the setting if you use that kind of line. If you
are using a pulse dial line, you can change the setting to PULSE by following the steps below:
¡Hi'
1. Press FUNCTION.
You will see scrolling options on the dis
play. You can choose one.
2. Press 6.
3. Press 1.
After two seconds you will be automati
cally prompted to select pulse or tone.
4. Press (left arrow) or (right
arrow) to find the dialing mode
that matches your telephone line.
Example; PULSE.
5. Press SET.
6. Press STOP to return to the date
and time.
Setting the Beeper Sound Level
THE DISPLAY WILL SHO
iiaiiMiBaBiiiiMasiH
liiaijgiiiiSwEiiiiiBili
k( SE LLCI ^
liiifiiiiiilliiliii
li lit!
If the beeper setting is LOW or HIGH, it will “beep” every time you press a key, make an error,
or at the end of sending or receiving a feix.
The initial setting on your fax machine for the beeper is LOW. If you do not want the beeper on,
select OFF, and if you want it loud, select HIGH.
4-1
Page 37

THE DISPLAY WILL SHOW:
1. Press FUNCTION.
2. Press 5.
3. Press 2.
1и1§шжм11Ж1ямар|1
ШМММЙЦШ11Ш1Я1|
liWliiiiBlBBtiiiSMl
IliiMiliiiiiiillliiii
^ iWMlIiiiiilPltlWiii ^
4. Press (left arrow) or (right
arrow) until you get the setting you
want.
Example: OFF.
5. Press SET.
6. Press STOP to return to the date
and time.
Setting the Date and Time
Your fax machine shows the date and time on the display and prints it on every fax page you send.
You can set the date and time in function mode.
KEYS TO PRESS
THE DISPLAY WILL SHOW;
i
1. Press FUNCTION.
2. Press 7.
3. Press 1.
4. Enter the last two digits of the year.
Example: 96.
5. Enter two digits for the month.
(JAN = 01, OCT = 10, etc.)
Example: 09.
6. Enter two digits for the day.
Example: 12.
7. Enter the time in 24-hour format.
Example: 15:25 (3:25 P.M.).
8. Wait for two seconds.
9. Press STOP to exit and view the
new date and time.
^5й11Д8ЯШ11йй§111
SfeSMiiffKiSiiiiSS
iMMBiwiiiMiliiiiMii
iliiiitiiaiMiilsiill
iieiPiililiiWitigiiil
11111Я1йЯ1И1М1ммаД
|йИ1М й11 м1Ш В1Р 1
11В111И111Я1Я@
Г 1.DATE/TIME
ШШтмШШШШШШшЩ
I
4-2
Page 38

Illi
Setting the Station ID
The Station ID is for identification purposes. Here you can store your name, fax number, and
telephone number. Your machine then prints this information on the electronic Cover Page and
every fax page you send.
: :i i H
HE DISPLAY WILL SHO
(iliiiiiiiiiiiiiiiilii
1. Press FUNCTION.
2. Press 7.
S,:'
3. Press 4.
You will then be prompted to enter your
fax number,
4. Enter your fax number (up to 20
digits).
Example: 4155554444.
5. Press SET.
You will now be prompted to enter your
telephone number.
6. Enter your telephone number (up
to 20 digits).
If your telephone number and fax
number share the same line, enter the
same number again.
Example: 4155554445.
7. Press SET.
You will be prompted to enter your name
or company’s name.
8. Enter your name by using the
number keys (up to 20 characters).
Example: BROTHER.
Refer to the section “How to Enter Text
in Function Mode” on page 3-9-10.
[ 4.STATION
tiiiiiiil
11
L
C
iliiiliiiBlliiiiiiii
iiiiilililiiiiiiiliB
, plpppSiSlliilil^^ ,
^ iBliiligiiiBigiiliiiia ^
---------■
i NAME
c
itiiiiiiiHjgiiiijllfiiiB
------
iiilllil
I
I
:)
:)
9. Press SET to confirm the entry.
10. Press STOP to return to the date
and time.
4-3
f 4.STATI0N ID
Page 39

iliiiitliliaififiiii» FUNC
illlit 8® IBS ® S
Printing Page Headers
Your fax machine can print a page header on top of every document you send. It is
printed^ on the receiving party’s fax paper. It contains the date and time of
transmission, your fax number and name (Station ID), and page number. Of course
you need to register your Station ID beforehand for that information to be available.
iiiili
ii
Transmission Date and Time
09/12/1996 15
25
4155554444 BROT
Station ID
■ _ ^
Page Number
'ER PAGE Cl
Helpful Hints 1. The telephone number that you store is used only for the Call Back Message
and the Cover Page features.
2. If you do not enter a fax number, no additional information can be entered.
3. When you enter a space, use (right arrow). Then it will be registered as a
blank space.
4. If Station ID has already been programmed, then after Step 3 the name will be
displayed with the prompt “1” to change “2” to exit. Press “1” if you need to
change any information. Pressing “2” to exit will take you out of the function.
NOTICE
The Telephone Consumer Protection Act. of 1991 makes it unlawful for any person
to use a computer or electronic device to send any message via a telephone fax
machine unless such messages clearly contain in a margin at the top or bottom of
each transmitted page or on the first page of the transmission, the date and time it
is sent and an identification of the business or other entity, or other individual
sending the message and the telephone number of the sending machines or such
business, other entity, or individual.
In order to program this information into your fax machine, you should complete the
steps on the previous page.
Storing One-Touch Dial Numbers
You can dial numbers automatically by storing telephone or fax numbers as One-Touch dial
numbers. You can also store names with the numbers so that when you call, you can verify the
destination on the display. You can store a maximum of 20 phone numbers. To use 11 to 20 OneTouch number locations, you need to press SHIFT. For example, One-Touch location ‘Tl” is
accessed by pressing SHIFT+One-Touch “01” simultaneously (see page 2-3). Here is how to store
a telephone number as a One-Touch dial number:
4.4
Page 40

KEYS TO PRESS
THE DISPLAY WILL SHOW:
iiiiiiiliiiliillisiiii
1. Press FUNCTION.
2. Press 4.
3. Press 1.
4. PresstheOne-Touchkeyyouwant
to use to store a number.
Example: One - Touch 05.
The One-Touch keys are not the number
keys.
5. Enter a number (up to 20 digits).
Example; 14155551212.
NOTE: If you have to wait for a dial tone
to access an outside line, you
should use REDIAL/PAUSE.
When you press REDIAL/PAUSE,
a dash will appear on the
display. By storing the numbers
with a pause, you can create a
delay of 3.5 seconds.
6. Press SET.
You then will be prompted to enter the
name or company associated with this
number.
iiiiillilillliliiiiil
iiiiiltlliKiWililliliil
tiliilililPiiiiiiiiiit
c
i; ENTER & SET
1
NAME:
c
iliiiiiiiiiiliiiiii
iii:)
7. Enter the name by using the
number keys (up to 15 characters).
Example: NJ OFFICE.
(See page 3-9-10 for how to enter text.)
8. Press SET.
9. Select the type of number (FAX,
TEL, F/T, CHAIN) by using
(left arrow) or (right arrow) to
display the type you want.
(See For Your Information on page 4-6.)
Example: FAX.
10. Press SET.
11. Return to step 4 to enter another
number, or press STOP to return to
the date and time.
4-5
liiiiiiiitiiMiilltllii
iSiiiiiiiiiiiiiiClB
Page 41

mmmm
Types of Numbers
When you store a number as a One-Touch or as a Speed-Dial number, you have a
choice of choosing the type of number. There are 4 options;
1. FAX (A fax number).
2. TEL (A telephone number).
3. F/T (Both a fax number and a telephone number)
4. CHAIN (A number, usually an access code, for chain dialing).
Chain Dialing
Chain dialing is used to store a very long dialing sequence. You can spread the
number over two or more keys if you register the first key(s) in the sequence as type
“Chain”. Chain tells the system that the dialing sequence is not completed
and that there is more to follow. The last key in the sequence must be any other
dial type (either FAX, TEL or F/T). You can use any combination of One-Touch,
Speed-Dial and manually dialed numbers in a chain.
If you must wait for another dial tone at any point in the dialing sequence, store a
pause at that point in the number by pressing the PAUSE/REDIAL key. (If you need
a pause that is longer than 3.5 seconds, call our Fax Diagnostic Center at 1-S00-2S44329 (USA), 1-800-853-6660 (CANADA) for assistance.) Only one pause can be
stored in each One-Touch and Speed-Dial number.
When jfQu are ready to dial the chain number, simply press the keys one after the
other in sequence and then press START.
Chain dialing makes using access codes easy. Sometimes you may want to choose
from among several long-distance carriers when j'^ou make a call; rates may vary
depending upon the time and destination. To take advantage of low rates, you can
store the access code of a long-distance carrier as you would a regular number and
register it as a “chain” number. Then to dial, press this (access code) number followed
by the regular number and START.
You can set up chain dialing for phone/credit card numbers, the same way. However,
when using chain dialing, do NOT send a cover page because your credit
card number will be on it.
Storing Speed-Dial Numbers
When you store a phone or fax number as a Speed-Dial number, you must enter a two-digit
number, from 01 to 40 for FAX-825MC and from 01 to 80 for FAX-875MC using the number keys.
For example, you cannot enter “5”. You need to enter “05”. You can store as many as 40 numbers
(FAX-825MC) or 80 numbers (FAX-87SMC) as Speed-Dial numbers. After you finish entering the
numbers, print the All Dial List to check that you have stored them correctly. (See page 12-4.) This
list will contain the type of number: FAX, TEL, F/T, or CHAIN.
Even if there should be a loss of electrical power to your fax machine, the telephone
and fax numbers you have stored will not be lost.
4-6
Page 42

ICLtrnL^INt (-UIN(^IIUIN bhi IIINt^b
■ ■
1. Press FUNCTION.
2. Press 4.
3. Press 2.
4. Use the number keys to enter a
two-digit number.
Example: 05.
5. Enter the number (up to 20 digits).
Example: 5555151.
6. Press SET.
You then will be prompted to enter the
name or company associated with this
number.
7. Use the number keys to enter a
name (up to 15 characters).
Example: MANCHESTER.
(See page 3-9-10 for entering text.)
THE DISPLAY WILL SHOW:
( #0
( NAME:MANCHESTER
8. Press SET.
9. Select the type of number (FAX,
TEL, F/T, CHAIN) by using
(left arrow) or (right arrow) to
display the type you want.
Example: TEL.
10. Press SET.
11. You are ready to enter another
Speed-Dial number, or press STOP
to return to the date and time.
<r &
s
4-7
Page 43

When You Wish to Change the Stored One-Touch and Speed-Dial
Numbers (During Step 4 on Page 4-5, 7)
Wh6n you accGss th.6 function for a Ono-Touch key or Speed-Dial number, tbat is
already in use, you will be asked if you wish to change it or to exit and select a
different One-Touch or Speed-Dial number. This display does not appear if the OneTouch key or Speed-Dial number you chose is not assigned.
1. Press 1 to assign a new number to the One-Touch key or Speed-Dial number, or
press 2 to choose a different One-Touch key or Speed-Dial number.
^ iiiiliiaiggiliiagjl
2. If you are replacing an existing number wuth a new one, the old number and name
will appear in the display. Press CLEAR to erase the old number and name. Then,
enter the new number and name and press SET to store the entry.
:)
Memory Storage
Your fax machine is equipped with an internal battery that will keep the date and
time information for up to one hour after power has been cut off. After that time, the
date and time will be lost and you will have to re-enter the information. All other
settings in the SET AUTO DIAL, USER OPTIONS and SETUP SYSTEM functions
(see page 3-3-5) are stored permanently and will be retained even in the event of a
power failure. However, the data stored in the memoiy such as Out-of-Paper
Reception and Memory Transmission will be lost after the powder is disconnected.
Helpful Hints If your fax machine is connected to a PBX, you may need to insert an additional
number before each fax or telephone number to access an outside line.
Setting Up Number Groups ______________________________________
Number Groups allow you to send the same fax message to many fax numbers by pressing only
one One-Touch key (Broadcasting). You must store each fax number first as a One-Touch or
Speed-Dial number. Then you can combine them into a Group. Each Group uses a One-Touch key.
You can have up to 6 smaller Groups or can assign up to 59 numbers on FAX-825MC and 99
numbers on FAX-875MC if you want one large Group. You can use the same stored number in
several groups. Groups can have a name up to 15 characters long.
KEYS TO PRESS
1. Press FUNCTION.
2. Press 4.
3. Press 3.
THE DISPLAY WILL SHOW:
¡jigiiifgyiliilllMiii
ri.TE MP.SETTI
BiiiigiBiiitiMiiiiB
i
4-8
Page 44

EPHONE FUNCTION SEHINGS
4. Press one ofthe One-Touch keys to ^ [ S
be the stored group number. (CiW
Example: select “One-Touch 1” as a group. ^---------------------------------------------
IliiiilililllilMIlii
5. After two seconds enter the group [ S
ilililSiiliiliiliilii
number by using the number keys. ——-
Example; 1. C ^
E
6. Enterthe One-Touch or Speed-Dial ( G
iililiillliillfilii
numbers in this group.
Example: #03, #05, *02.
(Note: Use the # key and number keys
for Speed-Dial numbers, and the * key
and number keys for One-Touch num-
bers.)
7. Press SET. ^ { [\|
iililiilliiiliiiiiili
E
8. Enter the group’s name.
Example: ALL BROTHER
9. Press SET.
10. Press STOP to return to date and
time.
Helpful Hints You can print a list of all One-Touch numbers and Speed-Dial numbers. Group
numbers will be listed under One-Touch and Speed-Dial numbers. (See page
12-4.)
:)
:)
4-9
^ : One-Touch
# : Speed-Dial
Page 45

UNIT AS A TELEPHONE
5. USING THE UNIT AS A TELEPHONE
Your fax machine can be used to make regular telephone calls. You can dial numbers manually,
by pressing the number keys, or by using One-Touch or Speed-Dialing.
»MM»
Manual Dialing
1. Pick up the handset, or press HOOK.
2. When you hear a dial tone, you can begin dialing by pressing the number keys.
3. If you used HOOK to dial, pick up the handset when the call is answered.
One-Touch Dialing
1. Pick up the handset, or press HOOK.
2. When you hear a dial tone, press the desired One-Touch key.
3. If you used HOOK, pick up the handset when the call is answered.
If you try to use a One-Touch number that has not been stored on the key you pressed, you will
hear a warning sound and the display will say,“NOT REGISTERED”. The display will return to
normal after 2 seconds.
Speed Dialing
1. Pick up the handset or press HOOK.
2. When you hear a dial tone, press SPEED DIAL and then press the two-digit Speed-Dial
number.
3. If you used HOOK, pick up the handset when the call is answered.
Using HOLD, PAUSE, # with the Telephone
- Use REDIAL / PAUSE for putting a 3,5 second pause between numbers.
- Use HOLD to put a call on hold. You can put down the handset without
disconnecting the call. You must pick up the fax handset to release the call from
HOLD.
- Use # temporarily to switch the dialing type from “pulse” to “tone”. This key is also
used for push-button services, such as those offered by banks, credit card companies,
or paging services.
On Hook Dialing
When you make a call using HOOK, you can listen to the other end through the one
way speaker of the machine, but they can’t hear you unless you pick up the handset.
Also, if you press HOOK again before you pick up the handset, the call will be
disconnected.
Optional Settings When You Send a Fax Manually
Resolution (See page 6-2, 6-13.)
Cover Page (See page 6-14.)
Call Reservation (See page 6-18.)
• Contrast (See page 6-3.)
• Overseas Mode (See page 6-12.)
5-1
Page 46

Searching the Telephone Index
Once you have stor ed a name and number as a One-To uch numb er or as a Spe ed- Dia l number,
you can searc h for that name alphabet ica lly using the Telep hon e Index , You can also dial a
numb er dir ectl y fro m th e T ele ph one Ind ex .
THE DISPLAY WILLSHO
Press TEL-INDEX.
2. Use the number keys to input the
first character of the stored name,
and press (left arrow) or
(right arrow) to find the name.
3. Pick up the handset, or press
HOOK.
4. Press START to begin dialing.
- Return the handset to its cradle
or press HOOK to cancel the call.
i tel Tindex
i NJ 0 F FICE
L_nj offi ce
5-2
Page 47

6. SENDING FAXES MWm
A) DOCUMENT BASICS
The Size of Your Documents
The size of the documents you want to send by fax should not be larger (or smaller) than your fax
machine can accommodate. The documents should each be between 148 and 216 mm (5.8 and 8.5
inches) wide and between 150 and 900 mm (5.9 and 35.4 inches) long.
The maximum width of the scanned area is 208 mm (8.2 inches), which can be printed on the
recording paper of the recipient's fax.
How to Insert the Document
To send a fax, first insert the document you wish to send, face down, in the
document feeder. The top edge of the document should go in first, or the fax
will be received up side-down.
To prevent the document from going crooked as it is fed, adjust the paper
guides to fit the width of the document.
NOTICE
V
dOl
i
Page 48

The Auto Document Feeder (ADF)
The Auto Document Feeder (ADF) automatically feeds documents (up to 15 pages) into the fax
machine, one at a time. The thickness and weight of the documents should fall into the following
categories:
Thickness: For one sheet: 0.07 to 0.12 mm (2.8 x 10'^ to 4.7 x 10'^ inches).
For multiple sheets: 0.07 to 0.10 mm (2.8 x 10 '^ to 3.9 x 10'^ inches).
Weight: For one sheet: 52 to 85 g/m'^ (0.07 x 10‘® to 0.121 x 10‘^ Ibs/inch^).
For multiple sheets: 52 to 80 g/m^ (0.07 x 10'^ to 0.114 x 10'^ Ibs/inch^).
As a reference, please note that the paper on which this is printed has the following thickness and
weight:
Thickness: 0.10mm (3.9 x 10’^ inches)
Weight; 80g/m^(0.114 x 10'® Ibs/inch^)
Before inserting documents into the document feeder, fan the sheets of paper to make sure the
documents are not stuck together. Then tap the leading edge on a table so that all the pages are
even when placed in the feeder. Make sure you always put the documents in face down.
Getting Ready to Send a Fax
SETTING THE RESOLUTION
You can choose a setting (STANDARD, FINE, SUPERFINE, or PHOTO) for the resolution any
time before you press START or COPY. You can choose a setting by pressing the RESOLUTION
key. (o means light off. means light on.)
FINE
STANDARD
FINE
SUPERFINE
PHOTO
To set different resolutions for each page of a multi page document, refer to “Multiple Resolution
Transmission” on page 6-13.
PHOTO S.FINE
O-
—^
-----
FINE PHOTO S.FINE
—'
------
FINE
PHOTO S.FINE The SUPERFINE resolution is a good setting to use for documents
O-
FINE PHOTO S.FINE
^
The STANDARD resolution can be used for most typewritten
O
text. When the STANDARD setting is on, both lights are off.
Transmission speed is normal.
The FINE resolution is an ideal setting to use if you want to send
O
documents that have small print. When the FINE setting is on,
the FINE light will be lit.
Transmission speed is slower than STANDARD.
' with very small print or artwork. When the SUPERFINE setting
is on, the S. FINE light will be lit.
Transmission speed is slower than FINE.
The PHOTO resolution is ideal for sending documents that have
varying shades of gray, such as photographs. The PHOTO setting
is on when both lights are lit.
Transmission speed is slower than FINE.
6-2
Page 49

SETTING THE CONTRAST
The fax machine has automatic contrast control, but if you need to send a document that is very
light or very dark, you may want to set the contrast yourself.
Use SUPER LIGHT to send a very light document.
Use SUPER DARK to send a very dark document.
- \V= * i * -V' i V-1
KEYS TO PRESS
1. Insert the documents face down
into the feeder.
2. Press FUNCTION.
3. Press 1.
4. Press 4.
The display will alternate messages.
5. Use (left arrow) or (right
arrow) to select one of the settings,
AUTO, S.LIGHT, or S. DARK.
Example: S.LIGHT.
6. Press SET.
7. Press STOP to exit.
THE DISPLAY WILL SHOW:
igllilliMililslglMlBiii
IMMiliillilillllMl
iaiiiPtBiiiiaiiialiii
^ [ UUIN
tiiillllMlpBitillMiii
r ”c r I r
gtililiiMiMiiiiliBliiiiii
^ gitleiiaiiMiiiaa
:)
D
Then start the fax sending operation (see page 6-4) or copy (see page 9-1).
6-3
Page 50

B) BASIC FAX TRANSMISSIONS
Sending a Fax
There are 3 basic ways of sending a fax:
1) Manual transmission:
You can talk or listen to the other party before you send a fax by picking up the
handset and dialing the number. After the other party has finished talking and
has pushed its START button, you will be able to send your fax by pressing your
START key and putting the handset back down in its cradle. (If you call and all
you hear is the chirping sound of a fax machine, you can go ahead and press your
START key, and then put down the handset.)
2) Automatic transmission:
You can send a fax without picking up the handset or without pressing HOOK
by dialing the fax number and then pressing START.
a. One-Touch Dialing
Press one of the One-Touch keys. (The numbers must be stored beforehand. See
page 4-4.) Then press START.
b. Speed-Dialing
Press SPEED DIAL, then use the number keys to enter a two-digit number.
For example, press “05” for 5. (The numbers must be stored beforehand. See page
4-6.) Then press START.
c. Telephone Index
You can use the Tel-Index to make telephone or fax calls.(See page 5-2.)
3) Timer transmission:
It is possible to send documents at a later time by using the TIMER function. (See
page 6-7.)
Talking to the Other Party When Sending a Fax
When you are sending a fax manually and you hear the recipient’s voice instead of
fax tones, you can use the handset to have a conversation. When or if you want to then
send a fax, ask the person on the other line to press START on his/her fax machine
and when you hear fax tones you can press START to begin sending your fax.
Sending a Fax Automatically
KEYS TO PRESS
THE DISPLAY WILL SHOW:
iiilliiiiiBiiiiiiiaill
1. Insert the documents face down
into the feeder.
6-4
iigiiiitiiililiiiBlliii
c
:)
Page 51

2. Enter a fax number.
Example; One-Touch dialing.
i NJ OFF!
3. Press START.
Sending a Fax Manually
1. Insert the documents face down
into the feeder.
2. Pick up the handset or press HOOK
and listen for the dial tone.
3. Enter the fax number.
You can use manual dialing, One-Touch
dialing, Speed Dialing, or Tel-Index.
4. When you hear a fax tone, press
START.
Your fax machine will begin sending the
documents.
[ OIALINi
W«1
i SENDINi
THE DISPLAY WILL SHOW:
C
[ COPY i; PilESS: COFin
c
SgjjiMliittBiiia
:)
3
5. Return the handset to its cradle, if
you did not use HOOK.
Automatic and Manual Re-dialing
If a number you have dialed is busy or your call did not go through for some other reason, you can
re-dial that number. There are two ways to re-dial, “automatic” and “manual.” Automatic
redialing can only be used for faxes that were sent using automatic transmission—not for
telephone calls. The factory setting is “auto re-dial on” and it will re-dial the number 3 times at
5 minute intervals automatically before giving up. The fax machine will also re-dial the last dialed
number when you press REDIAL/PAUSE {manual re-dialing).
6-5
Page 52

C) ADVANCED FAX TRANSMISSIONS
Sending a Fax by Using Quick-Scan (Memory Transmission)
If you are faxing a set of documents that are confidential in nature or you just need your original
documents back right away, you don't have to stand at the machine and wait for the transmission
of each page to be completed. You can use Quick-Scan in order to get your original documents back
before transmission.
INFORMATION
■
If You Get a MEMORY FULL Message When Trying to Send a Fax by
Using Quick-Scan
If the memory becomes full when scanning page one, the display shows “PRESS
STOP KEY”, then press STOP to abort the job.
If the memory becomes full on page 2 or more of a multi-page document, you will be
prompted to press START to send the portion already scanned, or STOP to abort the
job.
KEYS TO PRESS
THE DISPLAY WILL SHOW:
iliiiiiliiiiiiiiliiiii
1. Insert the documents into the
feeder,
2. Press Q.SCAN.
The display indicates how much memory
is available,
3. Enter the fax number.
iiiiiiiiiiiiiaiiiiiiii
c ^
c
riNTER fax"
iiisEiiaeX
: i Ji S Ji-Siij :k-i ii-i: kdrji ifk ki
lllil
iililiip
4. Press ST ART to begin scanning the
documents into memory. Once
completed,the fax machine will dial
the destination.
6-6
r MEM ORY
Page 53

Delayed Transmission
You can set the timer to send documents at a later time (up to 24 hours later). Your fax machine
will also produce a report, the "Delayed Sending Report”, after the fax is sent. You can set up to
three different documents for delayed transmission.
THE DISPLAY WILL SHOW:
1. Insert the documents into the
feeder.
2. Press Q.SCAN to use memory
transmission, or you can send your
fax normally.
3. Press FUNCTION.
:)
4. Press 1.
5. Press 1.
{iligiiliiiliiiiiilS
ISttliiilifliliiiiWlW
6. Enter the time in 24-hour format
using the number keys.
Example; 19:45 (7:45 P.M.).
7. Wait for two seconds.
8. Press STOP.
fgaitfjfjifijif
')
9. Enter the fax number.
10. Press START.
The fax machine will wait until the
specified time to call.
Setting the Daily Timer (for Delayed Transmissions)
The Daily Timer function lets you send a fax at a set time every day. This is handy for sending
delayed jobs that must go out at the same time daily. Once you make this setting, you don’t have
to enter the time everyday. The setting will stay the same until you change it. So you can use
it everyday, or only on days when you need it.
liiijaiWiiiWiiiiigM
_________________
a
I”
\V
V< V'He'V'i
I*.» 'I'*'
KEYS TO PRESS
1. Press FUNCTION.
2. Press 7.
3. Press 2.
THE DISPLAY WILL SHOW;
lilliliiiiigiilliiil
6-7
Page 54

4. Enter the time in 24-hour format
using the number keys.
Example: 19:45 (7:45 P.M.),
^
ENTE R TIME
; ENT ER TIME
5. Wait for two seconds, press STOP
to exit.
' 2.DAIL Y TI
mmsmi
Broadcasting
By using the numbers you have stored for One-Touch dialing, Speed-Dialing, or group dialing, you
can send faxes automatically to a maximum of 100 different locations (FAX-875MC) and 60
different locations (FAX-825MC) at once.
You can not broadcast to a number that has not been stored into memory.
KEYS TO PRES
1. Insert the documents into the
feeder.
2. Press Q.SCAN.
3. Enter the One-Touch and SpeedDial numbers, one after the other,
or a group number.
Example: Group number.
4. Press START and the fax machine
will read the documents into
memory, and then start sending
faxes to all the numbers you en
tered.
THE DISPLAY WILL SHOW;
C
BijiliiBiBliiiBlgii)
r MEMORY
c
f ENTER FAX
; ALL BROTHER
:)
:)
WiWSi Wimiffi.
Getting Familiar with the Broadcasting Function
To stop the broadcast in progress, press STOP.
* Enter the chain dialing numbers as you normally would, but keep in mind that
each key counts as one location, so the number of locations you can call becomes
limited. You have up to 60 locations on FAX-825MC and 100 different locations
on FAX-875MC. You can call with One-Touch, Speed-Dialing, and group num
bers.
* If the line is busy or for some other reason a connection could not be made during
broadcasting, the fax machine will re-dial the number automatically. (See page 6-
5.)
* If the memory is full, press STOP to abort the job or press START to send the
portion that is in the memory (if more than one page has been scanned.) (See page
6-6.)
* *
6~8
Page 55

Helpful Hints 1. Use the Telephone Index to help you choose the numbers you want to broadcast,
(See page 5-2.)
2. After transmission is completed, a Broadcast Report will be printed
automatically to let you know the result of transmission.
Sending by Multi-Transmission
Use multi-transmission for sending several different faxes to several destinations at once. For
example, you can fax “Document A” to one destination and “Document B” to another destination
automatically.
This is not to be confused with Broadcasting, which is sending one document(s) to many
destinations,
If you wish, you can combine this function with broadcasting so that you can fax different
documents to different lists of people at the same time. To do this, j^ou store various sets of
documents in memory. Then, for example, you can automatically fax “Document A” to one list of
people and “Document B” to another list of people. You can preset 3 different documents including
timer transmission in memory; if you set one timer transmission, multi-transmission is available
for two destinations.
After scanning documents, your fax machine will start sending them in scanned order.
If you press only Q.SCAN instead of SHIFT + Q.SCAN for the last document, your fax machine
will start dialing without waiting for 30 seconds.
KEYS TO PRESS
1. Insert “Document A” into the
feeder.
2. Press SHIFT + Q.SCAN together to
send by multiple transmission.
The display shows remaining memory.
3. Enter the fax number. (Or a series
of numbers if you are broadcast
ing.)
4. Press START to start scanning
documents.
5. Insert “Document B” within 30
seconds after “Document A” has
been scanned. (If you wait more
than 30 seconds to scan another
document, the machine will begin
to send the document(s) it has.)
•mm
THE DISPLAY WILL SHOW:
BKiiiiiitilliiliWil
filiiiiiiiiiisiBiillill)
C
iiSiiijiiliiPii'iilliii
iiiiiBliiBjiilliiiilMiil
r NJ OFFICE
iliiiiiiMMijjBiiBiil
lilillliMiMMliMliiiiMi
c
3
I
6-9
Page 56

6. Repeat the step 1, 2, 3, 4 for the
third document.
7. After 30 seconds, your fax machine
will start sending the documents
in scanned order.
( MUL TI TX .
Interrupting the Tinier and Polled Job
You can send a fax without canceling the timer (see page 6-7) or polled waiting (see page 8-2) with
documents in the feeder by “interrupting” it. When you interrupt the timer to send a “new” set
of documents, the fax machine does not re-dial the number automatically if it is busy. Also, you
can not use the function mode when you are interrupting the timer or polled waiting.
Example: TIMER WAITING with a document in the feeder.
7 0W]
KEYS TO PRESS
1. Press FUNCTION.
2. Press 0.
3. Wait for two seconds.
4. Remove documents from the fax
machine.
5. Place the “new” documents into the
feeder.
6. Enter the new fax number for the
documents you are sending now,
then press START.
7. After the transmission is finished,
place the “old” documents back into
the feeder.
8. Press FUNCTION and 0 to restore
the timer.
THE DISPLAY WILL SHOW:
iiliiiliijMMilillijtl
iiiigiiiiBiiillMBilMi
illlHIIlIlIIIIHHIil
iniiiiiiiBiiiiiBiiiia
r li
iiiiiiiiiaiiiiiiiaiiiS
6-10
Page 57

XIRA^SÍ
Canceling a Job
Use the cancel job function to permanently remove scheduled tasks such as polling or polled
waiting (see page 8-2) and a timer job (delayed sending) (see page 6-7) from your fax machine.
Example: TIMER WAITING with documents in the feeder.
KEYS TO PRES
1. Press FUNCTION.
2. Press 2.
Any waiting jobs that have been set up
will appear in the display.
If no jobs are waiting to be processed, a
“NO JOB WAITING” message will appear
in the display.
3. Use ^ (left arrow) or (right
arrow) to select the job you wish to
cancel.
4. Press SET.
5. Press 1 to cancel the selected job, or
2 to exit without canceling.
If 1 is selected, the job will be cleared and
the next job in the queue will appear in
the display.
6. To cancel the next job, press 1 again.
To exit, simply press 2.
THE DISPLAY WILL SHOW:
6-11
Page 58

D) FAX TRANSMISSION OPTIONS
Setting the Overseas Mode
If you experience difficulty with sending faxes overseas, you may want to use the Overseas mode.
Using the Overseas mode is an effective way to send faxes overseas, After sending your fax, the
overseas mode will switch itself OFF.
1. Insert the documents into the
feeder.
2. Press FUNCTION.
3. Press 1.
4. Press 6.
5. Press (left arrow) or (right
arrow) to switch to ON.
6. Press SET.
7. Press STOP to exit.
8. Then start the fax sending opera
tion. (See page 6-4-5.)
THE DISPLAY WILL SHO
c
jaigiSgSiMiliigiiliS
IgagiiBffiiiiiiiliSSiigi
^ fSllilliiSi
rOVERSEAS:ON
( ENTER FAX N0~.
^
...
-.f,
.......
....
c
jiillilll
f vi.f, v,,v
STAR
S
....
............................
T KE
ilill
:)
í,míMM V,r,r-,,r,-
6-12
Page 59

Setting Your Fax Machine for Multiple Resolution Transmission
This is a temporary setting for the current transmission job only.
You can set the resolution of the documents you send by pressing RESOLUTION. Once you set
the resolution, all the pages will be sent at the same resolution. However, there may be times
when you want to send some pages at one resolution, such as “standard”, and other pages in
another resolution, such as “photo.” If you send all pages in photo resolution, for instance, it would
take a great deal of time. It is better to specify the resolution for each page to minimize
transmission time. This is made possible by using the l.TEMP. SETTINGS function. The
resolution will revert to STANDARD after the documents have been sent.
KEYS TO PRESS
1. Insert the documents into the
feeder.
2. Press FUNCTION.
3. Press 1.
4. Press 5.
5. Press (left arrow) or (right
arrow) to find the resolution you
want for the first page of your
documents.
Example: FINE.
6. Press SET.
Return to step 5 for settingthe resolution
for page 2 and the following pages.
THE DISPLAY WILL SHOW;
iiliiiiiiaiKiiiwiiiii
BEBlSilgMliiiiiiglil
C
')
7. When you finish setting the resolu
tion for all your pages, press STOP.
8. Enter the fax number,
9. Press START.
^ Biliilliiiliiiiiiii ^
6-13
Page 60

Sending a Fax with an Electronic Cover Page Message
An automatic Cover Page will allow you to send details of who the fax is going to, who it is from
and when it was sent. This is what the Cover Page looks like:
09/12/1996 15:Z5
=== COVER PAGE ===
TO:
FROM
COMMENT: PLEASE CALL
(1) The “TO” information comes from the One-Touch or the Speed-Dial memory. If you are
dialing manually, the name of the destination will be left blank.
(2) The “FROM” information comes from the Station ID.
(3) The number of pages you are sending. When Cover Page is sent each time by using the
automatic settings (see page 6-16), the number of pages will be left blank.
If you have used the temporary Cover Page setting (see page below), the number of pages you
entered will be listed.
(4) Your comments. You may customize the comments (see page 6-15).
II
BS
NO OFFICE
FAX: 14155551212
BROTHER
FAX: 4155554444
TEL: 4155554445
03 PA6E[S] TO FOLLOW
THE DISPLAY WILL SHOW:
(1)
(2)
(3)
(4)
fliliBllllliiliilillii
1. Insert the documents into the
feeder.
iiliiiiiiilliiiiliiiiiiil
C
iiliiliiliiiiiiiiiBiMl
3
2. Press COVER PAGE.
3. Use (left arrow) or (right
arrow) to select the comment you
want.
Example; 2. PLEASE CALL.
4. Press SET.
5. Enter the number of pages you arc
sending. (Enter “00” to leave the
number of pages blank.)
Example: 03.
6. Enter the fax number and press
START.
6-14
c
liiliPiPiiMlillii-iMii
fiHilfilgjBMiiillMiiiilB
iliiiiiliiiiiliiiiliiiil
ijillillipgiilBiilliaBiil
r ENTER
c
3
s:)
Page 61

The Comments Selection on the Cover Page
You can choose one comment from among 6 options. The first option is to send no
comment at all. The next 3 are built-in comments, and the last two are ones you can
enter yourself, (For more information see “Customizing Your Cover Page Comment”
below.)
1. COMMENT OFF
2. PLEASE CALL
3. URGENT
4. CONFIDENTIAL
5. (Your own customized comment up to 27 characters).
6. (Your own customized comment up to 27 characters).
Customizing Your Cover Page Comment
You can customize the comment on your Cover Page as follows:
KEYS TO PRESS
1. Press FUNCTION.
2. Press 7.
3. Press 6.
4. Press (left arrow) or (right
arrow) to select 5 or 6 where you
wish to store a comment.
Example: 5.
5. Press SET.
6. Enter your customized comment
by using the number keys (up to 27
characters).
(See page 3-9-10 for more details.)
Example: TOP SECRET.
7. Press SET.
THE DISPLAY WILL SHOW;
C
f SELECT ^ ^
iiiljliiiililiiiil
f 5
6iai§ieBi№gMSMi§siliii
:)
8. Press STOP to exit.
6-15
Page 62

Printing the Cover Page
You can print a Cover Page to check the format.
wmmm
1. Press FUNCTION.
2. Press 3.
3. Press 4.
KEYS TO PRE
THE DISPLAY WILL SHOW:
igjjiiilBipgiigB
liiiMiiBiStiii-NiBjg
C T. p^inT reports
(~4.WVERPAGE
fT^RE^S ST<
4. Press START.
C PRINTI
u
To Always Send a Cover Page
If you often send an automatic Cover Page, you can set it to ON to avoid having to set up the
details of the Cover Page each time. Here is how you can switch the setting for the automatic
Cover Page to ON or OFF:
fMi.lljl
1. Press FUNCTION.
THE DISPLAY WILL SHO
{iiiliigBiiiiiiSiil
2. Press 5.
3. Press 3.
4. Press (left arrow) or ► (right
arrow) to choose ON or OFF.
Example: ON.
5. Press SET.
6. If you selected ON, you need to
select a comment, by pressing
(left arrow) or (right arrow).
Example: 2.PLEASE CALL. (Seepage 6-
15)
7. Press SET.
8. Press STOP to exit.
6-16
^ ilBlBilllHliiii ^
□
C
BiiiiiiiliSsaiBlsSaii
MigMiiiftiifliiiejji
Page 63

illll
Sending a Fax When the Cover Page Is ON
If you have the Cover Page ON/OFF setting to ON, the total number of pages will not be printed
on the Cover Page. Also, the comment you selected when you set it to ON will be printed on all
the Cover Pages you send.
Even if the Cove r Page ON/OFF settin g is ON, you can avo id sendin g an aut oma tic Cover Page
by p res sin g
If you want the total number of pages sent to be printed on the cover page, press COVERPAGE
once to set the COVERPAGE ON/OFF option to OFF. Then press COVERPAGE once again and
enter the number of pages. (See page 6-14.)
COVERPAGE
once to tu rn o ff th e Co ve r P age for th at tr ansm is sio n.
mmi
1. Insert the documents into the
feeder. The display will say
“COVERPAGE ON” for one second.
2. Enter the fax number.
3. Press START.
Your machine will begin transmit
ting the Cover Page and original
document.
KEYS TO PRESS
THE DISPLAY WILL SHOW;
■ 09/12/1996 15:25
( COVERPAGE ON )
^ i FAX: NO. & START >.
COPY: PRESS COPY ) ^
[ NJ OFFICE ]
i DIALING )
f SSI№ COySWASB"^
f SENDIN&^^ '
6-17
Page 64

Sending a Fax with Call Reservation
You can send a fax and then talk to the recipient using the Call Reservation feature. After your
fax has been printed on the receiving end, the receiving fax machine will ring as if it were receiving
a telephone call. If the recipient picks up the handset, your fax machine will ring. Then you can
pick up your handset and start a conversation. If you have both Call Reservation and Call Back
Message set to ON and the recipient does not pickup the handset when it rings, your fax machine
will leave a fax message asking them to call you.
KEYS TO PRES
1. Insert the documents into the
feeder.
2. Press FUNCTION.
3. Press 1.
4. Press 3.
5. Press (left arrow) or (right
arrow) to select Call Reservation
ON or OFF.
Example: Call Reserve ON.
6. Press SET.
7. Press (left arrow) or (right
arrow) to select Call Back Message
ON or OFF.
Example; Call Back Message ON.
THE DISPLAY WILL SHO
1
C
tSIilliiililgitlBijMiafBji
iliHiliiliiii
aiililiiiiBgiy
; CAL L
11
b
8. Press SET.
9. Press STOP.
6-18
tiiilBliigjliiiiiiilMi
^ illiiilBtliiiliiBtliiii
Page 65

10. Enter the fax number,
11. Press START.
12. Pick up your handset if it rings.
09/12/1996 15:25
=== CALL BACK MESSAGE ==
r/iA y -HAASMISSION OPTIONS
TO:
NJ OFFICE
FAX: 14155551212
FROM; BROTHER
PLEASE CALL AT [TELl 4155554445
[FAX] 4155554444
Using the Call Reservation Function
1. There are some fax machines that will not respond to this function.
2. When you use auto re-dialing, you cannot use the Call Reservation function, but
if Call Back Message is ON, your fax machine will leave a Call Back Message to
ask the other party call you.
3. You cannot use Call Reservation with the timer or with the polling function.
4. You must register your Station ID number to set Call Back Message: ON.
(See page 4-3.)
Printing the Call Back Message
You can print a sample Call Back Message to check the format.
KEYS TO PRESS
1. Press FUNCTION.
2. Press 3.
3. Press 5.
4. Press START.
mm
THE DISPLAY WILL SHOW:
iiiSBMtlifBiMlilliijiii
6-19
Page 66

ECM (Error Correction Mode)
The Error Correction Mode (ECM) is a way for the machine to check the integrity of a fax
transmission while it is in progress. ECM transmissions are possible only between machines that
both have the ECM feature. If they do, you can send and receive fax messages that are continually
checked for their integrity.
Sufficient memory must be available in your machine for this feature to work.
Error Re-Transmission
Error Re-Transmission is helpful when the receiving machine does not have ECM. Even though
your machine cannot check the integrity of the message, it will resend the page(s) affected after
occurrences of accidental noise have caused an error.
THE DISPLAY WILL SHOW:
iiiiilitiliitiliiiil
1. Press FUNCTION.
2. Press 5.
3. Press 4.
1. TEMP
iiilliiillliliiliiiMi
ERRO R RE:
4. Press (left arrow) or (right
arrow) to choose either ON or OFF.
Example; ON.
5. Press SET.
iiiiiiiliiiliiiiiili
6. Press STOP to exit.
- This feature is available only for memory transmission using Quick-Scan (see page
6-6-9).
iWilii
liiiij
:)
I
6-20
Page 67

■¡■aaa
Next-FAX Reservation
You can use Next-FAX Reservation for sending a fax when the fax machine is busy receiving or
transmitting from memory. This function saves you from having to wait until the incoming fax
has printed or the fax stored in memory has finished transmission. To use the Next-FAX
Reservation feature insert the documents as you normally would and follow a few other simple
steps.
THE DISPLAY WILL SHOW:
1. Insert the documents into the
feeder.
2. Enter a fax number.
3. Press START.
4. Press SET.
- If a One-Touch or SPEED DIAL number is selected that is not stored, a warning beep will
sound.
1. Next-FAX Reservation cannot be used when there are documents in the document
feeder awaiting timer transmission or polled waiting or when the interrupt
function is in use.
2. When you are making a call using Next-FAX Reservation, you can dial manually,
or use One-Touch, Speed-Dial, Redial, or Chain dialing. However, when you use
One-Touch dialing, the screen will display only the number of the One-Touch
number you are using, such as and not the name of the person you are
calling. Similarly, if you use Speed- dialing, the screen will show you only the
Speed-Dial number, such as “#02”,
3. You can set the resolution for Next-FAX Reservation by pressing RESOLUTION,
but you can not change any settings using the FUNCTION key. (For example you
cannot change a setting for multiple resolution transmission by using function
mode.)
L
L
KtfgiMiiiiiigiiaiiB
rb Ial:
i
i
4. To cancel a Next-FAX Reservation, remove the documents and press STOP.
6-21
Page 68

7.
RECEIVING FAXES AND OTHER CALLS
,
A) BASIC SETUP TO RECEIVE FAXES
Selecting an Answer Mode
There are four answer modes for your fax machine. Choose the mode that suits your needs by
pressing the MODE button repeatedly until you have changed the AUTO and F/T lights to the
setting you want. For more information about a particular mode, refer to the page number given.
(o means light off. means light on.)
Answer Mode
1. MANUAL
2. AUTO
3. F/T
AUTO
O
-----1---
AUTO F/T
-•
------1-----
AUTO FT
O
------1-----
-o
O
F/T
How it Works
You control the phone line and must answer every
call yourself. Use this mode when you are using a
computer modem on the line or if you receive very few
fax messages.
(Automatic) The fax machine automatically answers
every call with fax tones (dedicated fax line). You can
not receive a telephone call, but you can use the line
to call out.
(Fax/Telephone) The fax machine controls the phone
line and automatically answers every call. If it an
swers and hears fax tones coming over the line, it will
receive the fax message. If the fax machine answers
and does not hear fax tones, it will ring for you to pick
up a phone and take over the call. This mode is for
people who do not use an answering machine.
You can not have a telephone answering de>
vice in a separate phone jack on the same
phone line.
You must set the Ring Delay and F/T Ring Time.
If you have extension phones on the line, set the
Ring Delay to 4 rings.
SeePage
7-2
7-2
7-3
4. MSG CTR AUTO Mì^GJa
7-2
The fax machine automatically answers every call.
F/T
-•c
The messages are stored into memory on a “first
come, first served” basis.
10-1
Page 69

ÌBÌÉ
Manual Reception (MANUAL Mode)
When you set the Answer Mode to MANUAL, you must answer each incoming call yourself. Here
is what you should do when using MANUAL Mode:
If You Get a...
1. Regular phone call
2. Phone call and request
to send a fax
3. Fax tone...
Then You Should...
Talk as you normally would.
Press START when finished talking, and replace the handset.
Note: Sender must also press START.
Press START, and replace the handset.
________________
Automatic Fax Only Reception (AUTO Mode)
You can receive all your faxes automatically in Automatic Fax Reception mode (AUTO light is
ON). Select this mode by pressing MODE.
Setting the Ring Delay
You can set up the number of rings before the fax machine will receive automatically in AUTO
and F/T modes.
iiiSi
KEYS TO PRESS
wm-
THE DISPLAY WILL SHO
mm
1. Press FUNCTION.
2. Press 6.
3. Press 2.
4. Press (left arrow) or (right
arrow) repeatedly until you find
the number of rings you want.
Example: 00.
When you set 00, you can receive your
incoming faxes with no rings.
5. Press SET.
6. Press STOP to exit.
iliilEiiMiljiiliiilii
iMlgjjiiiiWIiliiiiill
C
i:Ì16ÌÌÌiaÌ8MllBgfl
fyiiiitiNiggiiiWiaifM
:)
7-2
Page 70

:-.: i i5.il.::;-: : i 1.:i".i'" " I'1.:1 Ii i 1:Í 1 :5ÍÍ 3 H 'i" M5’^ ^ Ì.3 Ì.3 Í IK j:;-I
||||¡|||||;||||Í|Í||||||Í|j||||Í||||||||||||f|ÍÍ
The FIT Switch (FIT Mode)
When you share one line for your telephone and fax machine, in the F/T switch mode, the fax
machine can determine whether an incoming call is a fax or a telephone call. (See Chart below.)
incoming Call
The fax machine
picks up after ring
delay elapses.
The fax machine picks up
the call and automatically
detects whether it is a fax
or voice call.
Fax call Voice call
Fax reception is
automatically
activated.
Only the fax handset
rings (double ring)
for you to pick up.
The handset will ring
between 10-60
seconds
The fax message
(user selectable).
is received.
The caller may
hang up.
The caller stays
on the line through
the entire 10-60 second
ring time.
All extensions in the home
will ring for 0-4 rings
(user selectable).
A) If you are at the
fax machine, press
START.
B) If you are at an
extension phone,
you can transfer
the fax call to the fax
unit by pressing your
remote activation
code (H<51).
You pick up
the fax handset.
You pick up any
extension within ring
delay selection.
You must manually
determine if it is a
voice or fax call.
Fax call
Voice call
Talk as
normal.
7-3
Talk as normal.
The fax mode
is activated.
The caller may hang up.
Page 71

Recording an FIT Outgoing Message (PGM)
You can store an outgoing message in your fax machine so that callers know what to do. For
example, you can leave a message that says:
“Hi, I can not answer your call right now; please call me again later. To send a fax, please wait
until you hear a fax tone, then press the START key. Or, you can press >1^51, wait for fax tones,
then press the START key.”
KEYS TO PRESS
1. Press FUNCTION.
2. Press 8.
3. Press 6.
4. Press (left arrow) or (right
arrow) repeatedly until you get the
F/T OGM.
5. Press SET.
6. Press RECORD.
7. Pick up the handset.
8. Record a message within 20 sec
onds.
Setting the FIT Ring Time
THE DISPLAY WILL SHOW:
IBiiaiflitliW
i F/T OGM
PàigiaBiigiiBigiiaili)
igiiiiilaBiiiiSiill
.....................
1^
You can specify the maximum time you want the fax machine to ring (double ring) to notify you
after it has answered a telephone call; there are four predefined settings: 10,20,30, or 60 seconds.
During this time, only the fax machine will ring. No other phones on the same line will ring.
KEYS TO PRESS
1. Press FUNCTION.
2. Press 6.
3. Press 4.
THE DISPLAY WILL SHOW:
1
(fcjgitMgiiS'Miiliiigii
■
7-4
iiS
Page 72

iiiia:
Iliili,
liiiiiiiiiiiiiii
4. Press (left arrow) or right
arrow) repeatedly until you find
the setting you want.
Example: 10 sec,
5. Press SET,
6. Press STOP to exit.
HBiiliMasiWiBiitiiiiiii
Smoothing
The smoothing feature enhances the appearance of incoming faxes by making the lines smooth
and takes no additional time. This function does not apply to outgoing faxes, or to lists or reports
you print. The initial setting is ON.
KEYS TO PRESS
1. Press FUNCTION.
2. Press 5.
3. Press 1.
THE DISPLAY WILL SHOW:
gaiiigiiijiiiiiiiijiiB
IgiiiiiiiilMiBiiiiiiiii
[ SMOOTHING:ON
i
c
4. Press (left arrow) or (right
arrow) to choose ON or OFF.
Example: OFF.
:)
5. Press SET.
6. Press STOP to exit.
7-5
iiiiiiliilililiilEjii
Page 73

Speaker Volume
There are three settings available for the speaker volume, OFF, LOW, or HIGH. This setting
controls the loudness of the fax machine’s speaker, which is connected to the phone line. The
initial setting is LOW.
KEYS TO PRES
THE DISPLAY WILL SHOW:
r 09/ iiiiiigiiiiil
1. Press FUNCTION.
2. Press 6.
3. Press 3.
4. Press (left arrow) or (right
arrow) to choose a setting either
OFF, LOW, or HIGH.
Example; HIGH.
5. Press SET.
6. Press STOP to exit.
Ring Volume
You can set the ring volume to either OFF, LOW or HIGH. The initial setting is HIGH. Even if
you select OFF, the ring volume will be LOW for F/T ringing, Call Reservation ringing and for
Distinctive ringing if it is SET.
UUîl.f-lJ
KEYS TO PRESS
THE DISPLAY WILL SHOW;
1. Press FUNCTION.
2. Press 6.
3. Press 5.
4. Press (left arrow) or (right
arrow) to choose either OFF, LOW,
or HIGH.
Example: LOW.
5. Press SET.
6. Press STOP to exit.
ÉiBliBBligiiiliiiliiiil
iiaiBiiiiiiiiMiiiKii
SiiiiiiialiBiiialMlI
{MigiSiiiiliiiiiiiiiliii ^
IliilitiiliBiliBISiBiiB
7-6
Page 74

Ì|p|pÌÌ1ÉÌÌ|;liii.H
Reception into MemoryiOut of Paper Reception
If the paper roll becomes empty, the LCD will display the message “PAPER ROLL
EMPTY’^ Simply load a new roll of paper. (See page 1-5.)
Y our fax machine will store incoming faxes in its memory automatically if it runs out
of paper. The contents of the memory will be printed when you replace the new paper
roll. Please see “Memory Back-up of Message Center Memory” (see page 10-20).
Vi i; i"i; ;: ;."i i.“ ; ;
7-7
Page 75

ktUtIVING FAXES AND OTHER CALLS
B) REMOTE ACTIVATION
What is Remote Activation?
If you answer a call that is a fax message, you can use the Remote Activation Code to make your
fax machine take over the call, If your fax machine answers a telephone call that is for you, you
can use the Remote Deactivation Code to pick up the call at an extension phone. (You do not need
a code to take over a call at the fax machine.) You must use a touch tone phone.
Connecting an External or Extension Telephone
You may connect an external telephone to your fax machine, as shown below. Use the
“EXT.” jack on your fax machine. Alternately, you may wish to use this “EXT.” jack
to connect a telephone answering device (TAD). An extension phone is a telephone
that is plugged into a separate wall jack on the same line.
If the external telephone is in use, the warning message “EXT. TEL IN USE” will be
displayed on the fax LCD. When the handset on the fax machine is picked up, an
alarm will sound. You can disconnect the external phone and switch to the fax
machine’s handset by pressing HOOK.
Using Remote Codes
The Remote Activation Code (*51) is used in F/T mode and MSG CTR mode. The Deactivation
Code (#51) is used only in F/T mode and MSG CTR mode.
7-S
Page 76

Ill
iiiilii
Using the Activation Code:
When you are at the fax machine, you will probably answer incoming calls before your fax
machine or answering machine is programmed to pick up. If you answer a call and no one
seems to be on the line, assume it is a fax message. Do not hang up. You must activate your
fax machine to take over the call first. (If you are holding the fax handset, just press START and
hang up.) If you are on an extension or external phone, press >1<51 and wait for your fax
machine to respond before you hang up. After 3 seconds you will hear receiving tones (chirps)
through the handset. Then hang up. You can repeat the code as many times as needed. Your fax
machine will take over the call and print the fax message. If your caller wants to talk before
sending the fax, you can have a conversation first and then activate your fax machine with the
code.
The Remote Activation Code can also be used by your callers. When you are using a TAD, your
outgoing message (OGM) should end with the statement “to send a fax, press ^51”. (See the
section on Connecting a Telephone Answering Device for more information.)
Using the Deactivation Code:
When your fax machine is in F/T mode, sometimes it will answer a call that is not fax calling tones
(a telephone call or manual fax). It will respond with a double ring (short, short) to alert you to
take over. Because it has already answered the call, only the fax machine will ring; extension
phones are no longer connected to the call. Pick up any phone except external phone on the line.
To take over the call at the fax machine:
Pick up the handset of the fax machine and talk to the caller as usual. If no one is there or someone
is trying to send you a meuiual fax, press the START key and replace the handset. Your fax
machine will display “receiving” and print the incoming fax message.
To take over the call at an extension phone:
Pick up the handset on another telephone and press #51 quickly during the silence between
the double ring pattern. When the fax machine hears the code it will stop ringing and let you
speak with the caller. If no one is on the line or someone is trying to send you a manual fax, send
the call back to the fax machine (H<51).
Making the Remote Codes Easier to Use
You can change the codes at any time. It may be easier for you and your callers to press the same
key three times (Example: *>l<* and ###). Although you can change the codes to any numbers you
want, try to avoid using digits for the Activation Code. The Remote Activation Code can not match
any number you dial. If you try to dial a phone number that includes the Activation Code, your
fax machine will go into receiving mode.
___________________________
7-9
Page 77

Troubleshooting
Sometimes other equipment on your phone line reserves a key that is in the Activation or
Deactivation code. (Some ansvrering machines reserve the key.) If the code you use to retrieve
messages from your answering machine causes the line to be disconnected, try changing the
Remote Codes. Change *51 to ### and #51 to 999. The Remote Activation and Deactivation Codes
may not work with some telephone systems or telephone sets.
NOTE: If you accidentally pick up an extension phone when a fax message is being received, you
may disrupt the transmission or render some portions unreadable.
Changing and Registering Remote Codes
mm
1. Press FUNCTION.
2. Press 7.
3. Press 5.
4. Press (left arrow) or (right
arrow) to choose ON or OFF.
Example: ON.
5. Press SET.
6. Enter new remote code to activate.
(Factory setting is ‘‘*51”.) Then
wait for 2 seconds.
7. Enter new remote code to deacti
vate. (Factory setting is “#51”.)
8. Wait for 2 seconds.
9. Press STOP to exit.
KEYS TO PRESS
THE DISPLAY WILL SHOW:
L
iMiBiiMgiiaiiiiM
BlllgjiiiiMiiiSlli
liitiipgiBiilfliWill
I
ggaaiiiaiiiiiiiiBiiii
7-10
Page 78

ilia
_
___________
-Eii;
...................................................................................
j
C) CONNECTING A TELEPHONE ANSWERING DEVICE
(TAD)
How to Use External TAD with the Unit
When you have a Telephone Answering Device on the fax phone line, the TAD will answer all the
incoming calls. Your Brother fax machine will listen in on the line for fax CNG tones. If it hears
them, it will take over the call and receive the fax message. If it does not hear fax tones, it will
let the TAD continue playing the outgoing message so the caller can leave a voice message.
The TAD must answer within 4 rings (2 rings are recommended). The fax machine can not hear
the CNG calling tones until the TAD answers the call. With 4 rings, only 8-10 seconds of CNG
calling tones are left for the “handshake”. So you must strictly follow the instructions for
recording the OGM.
You must erase the incoming messages frequently on your TAD. When the TAD’s memory is full
it will not answer incoming calls (fax or voice).
Set the TAD: EXT mode in the Message Storage.
Connecting an External TAD to the Unit
You may connect an external TAD to your fax machine, as shown below. Use the
“EXT.” jack on your fax machine.
Do not connect a TAD elsewhere on the same
phone line. This will cause problems because
your fax machine and TAD will both try to
control the line.
7-11
Page 79

■
Example of the Sequence of External TAD Reception
I
dB
Example) TAD: EXT. mode.
Fax reception is
automatically
activated by
fax tones.
The fax message
is received on
paper.
Auto
dialed
fax call
Incoming Call
The call is picked up
by the external TAD.
(Recommended
setting for TAD
is 2 rings.)
The external TAD
outgoing message
begins (recommended
length of less than
20 seconds).
Voice call
The caller leaves a
voice message on the
external TAD.
The caller must
Manual
dialed
fax call
k
The caller
can also
send a fax message.
press your remote
activation code
to activate the
fax machine.
The fax message is
received on paper.
Hookup
There is only one way you can hook up a Telephone Answering Device (TAD) on the fax phone line.
The TAD must be plugged into the back of the fax machine in the jack labeled EXT. Your
fax machine can not work properly if you plug the TAD into a wall jack. Follow these steps:
1. Plug the telephone line cord from the wall jack into the back of the fax machine in the jack
labeled LINE.
2. Plug the telephone line cord from your TAD into the back of the fax machine in the j ack labeled
EXT. (Double check that the telephone line cord comes from the jack in the TAD for telephone
line and not for telephone set.)
3. Put your fax machine in TAD mode by turning both the AUTO and F/T lights on.
4. Set your TAD to 4 rings or less. (The fax machine’s Ring Delay setting does not apply).
5. Turn the tad’s Answer mode to ON.
6. Record the OGM (outgoing message) on your TAD as explained below.
Recording the TAD^s Outgoing Message (PGM)
The TAD’S outgoing message is important because it must be set up to handle two kinds of fax
receptions: automatic and manual. Timing is important.
1. Record 5 seconds of silence as the beginning of your message. (Your fax machine will be able
to hear the fax calling tones, of automatic fax transmissions, before they stop.)
2. Limit your speaking to 20 seconds.
3. End your 20 secondmessageby giving your Remote Activation Code for people sending manual
faxes:
“After the beep, leave a message or send a fax by pressing *51.”
____________________
7-12
Page 80

NOTE: Do not assume that most callers send faxes automatically. Many people do not realize
they are not sending fax tones when they lift the handset or press HOOK. Also, some
machines may not send fax tones.
D) DISTINCTIVE RINGING
Distinctive Ringing
What Is Distinctive Ringing?
Distinctive ringing is a service offered by the telephone carriers that allows you to have several
different numbers on one phone line, each with it own distinctive ringing pattern. This way, when
you get an incoming call, you can identify the number beingcalled by its ring. Your local telephone
company can provide more information about this service. The service is usually offered as a
monthly charge to your normal telephone bill.
Can My Fax Machine Use Distinctive Ringing?
Yes, it has a distinctive ringing function that allows you to register the distinctive ringing pattern
of an additional phone number on the line. The number you register must be the number you want
to use as your dedicated fax number. Once you register the ringing pattern, the fax machine will
be able to identify its own incoming calls and automatically receive faxes at that number. You can
register only one ringing pattern. There are some ringing patterns that can not be registered.
Can I Change the Setting Later?
Yes, you can change or cancel the distinctive ringing setting at any time. You can switch it OFF
temporarily and then turn it back ON. When you move or get a new fax number, change the
distinctive ringing mode to SET so you can register the new number.
How Will the Feux Machine Treat All Other Numbers?
If you have registered the distinctive ringing number, the fax machine will answer the registered
number (with fax receiving tones) and receive faxes automatically. When a call comes in to your
main number or to additional distinctive ringing numbers, all the phones will ring. You can set
the fax machine’s Message Center or an external answering device (TAD) to answer calls on the
other number(s), (See the chart on page 7-15.)
If you change the answer mode on the fax machine to AUTO or F/T, that setting will override the
Distinctive Ringing setup. In AUTO or F/T modes, your fax machine will answer aU the
phone numbers (including its own ring pattern).
7-13
Page 81

The Message Center Answers the Other Phone Number(s) on the Line:
If you change the answer mode on the fax machine to MSG CTR (Message Center), it will allow
the Distinctive Ringing function to work. The Message Center will answer only the main number
or additional distinctive ringing numbers according to the way you have set Message Storage.
(See page 10-2-7 for details.)
NOTE: If you set the Message Storage to FAX; ONA^AD; OFF, the Message Center will be set
to answer the main number with fax receiving tones.
To have your Message Center’s OGM answer your main number(s);
1. Register the distinctive ringing number. (See “Setting the Distinctive Ringing Function” on
page 7-16.)
2. Set the Message Center’s Message Storage to either TAD; ON/FAX; OFF or TAD: ON/FAX; ON
mode. (See page 10-7.)
3. Keep the Message Center on (both AUTO and FA lights lit).
4. Turn Toll Saver OFF (see page 10-14) and set the Ring Delay to 4 rings (see page 7-2).
External Telephone Answering Device (TAD) Answers Other Number(s) on the
Line:
An external telephone answering device (TAD) can be set up to work with the Distinctive Ringing
function. The external TAD must be set to its maximum number of rings (at least 4 ring patterns).
Otherwise, it will answer the registered fax number before the fax machine has time to recognize
the ringing pattern. The external TAD’s OGM (outgoing message) will answer your main
number(s) if you do one of the following:
1. Plug the external TAD into the EXT jack of the fax machine (you will not hear the first two rings
on the fax machine). Set the Message Center’s Message Storage to either FAX; OFFAAD: EXT
or FAX: ON A AD: EXT. Turn the MSG CTR on (AUTO and FA lights lit) or set the fax machine
to MANUAL mode (AUTO and FA lights turned off).
2. Plug the external TAD into another phone jack and put the fax machine in MANUAL mode
(AUTO and FA lights turned off).
How Does the Distinctive Ringing Function Work ?
Your telephone number will have the standard ring pattern of long long, while the new number
could have a ring pattern of short short, long short, etc. When Distinctive Ringing is ON, you will
not hear the first two rings of all incoming calls on the fax machine. Extension phones will ring
as usual. If the fax machine recognizes the ring pattern, all ringing will stop and the fax machine
will answer and automatically receive the fax message. Otherwise, you will hear the extension
phones and the fax machine continue to ring. The fax machine always listens to at least two ring
patterns before it answers, so do not pick up the phone during that time. You will quickly learn
to recognize the ring pattern for faxes, so you will not be tempted to answer that number. Either
you, your Message Center or a telephone answering device can answer the main number(s).
7-14
Page 82

Flowchart Sequence of an Incoming Call
7-15
Page 83

asKfe^Si:yyftiyi|yy;*viy;i:;Syfr^:|yff^
What is the Advantage of Using the Distinctive Ringing Function?
Using Distinctive Ringing is the most efficient way to receive both fax and telephone calls on the
same line. It is much easier for your callers who dial manually. The fax machine will answer with
receiving tones so they will not have to press an activation code or wait 30 seconds to hear fax tones
(P/T mode). And the people who call to talk on your main number, will not have to talk to your
fax machine. Basically, it gives you two independent numbers without the higher cost of a second
line.
Which Phone Number Should I Register?
It is a good idea to keep your old number for its original purpose and to register the new number
as your fax number. Remember to give the new fax number to your customers and colleagues.
What Must I Do To Set Up Distinctive Ringing?
To use the Distinctive Ringing feature you must;
1. Get the distinctive ringing service from your telephone carrier.
2. When your distinctive ringing number is available, register it in the function called “Setting
the Distinctive Ringing Function”.
3. Keep the fax machine in MANUAL answer mode (both AUTO and F/T lights turned off.)
Setting the Distinctive Ringing Function
This function is a one-time procedure to register a distinctive ringing number with your fax
machine. Your fax machine will answer the registered number automatically, simulating AUTO
answer mode on a dedicated fax line. You can register only one number. Do not try to set up
this function if you do not have the distinctive ringing service. It mav cause your fax
machine to malfunction.
This procedure is in two parts: First, you must put the fax machine in SET mode; D/R SET MODE
will be on the display screen. Second, you must wait for your friend to call the distinctive ringing
number so you can register the ringing pattern. When a call comes in, do not pick up the handset
until the fax display says PICK UP TO SET. Then pick up the fax handset. If the caller dialed your
distinctive ringing number, press START and check that the display says REGISTERED before
you hang up. If the caller dialed the other number, press STOP and hang up to try again.
Before you begin this function:
1. If you have a telephone answering device, unplug it until after yon have finished registering
the distinctive ringing number.
2. Have a friend ready to call your distinctive ringing number.
KEYS TO PRESS
1. Press FUNCTION.
2. Press 6.
THE DISPLAY WILL SHOW:
1 1■TEMP■SETTI
I
7-16
Page 84

3. Press 6.
^ iiiiiciigiiiMiiiiiPM
4. Press (left arrow) or (right
arrow) to find the SET mode.
5. Press SET.
6. Press STOP.
NOTE: The display should say D/R SET
MODE. Also, the answer mode
lights will flash. You must now
wait for someone to call the
distinctive ringing fax number.
7. When the phone rings, listen care
fully to check that the ringing pat
tern is the one you want to register.
If it is, wait (at least two ring cy
cles) until the display says PICK
UP TO SET. Then pick up the fax
handset.
8. Press START to set.
Check that the display says
REGISTERED.
(If the other number was called, press
STOP to cancel.)
iiiaiMMiBiiiiiMiiti
liiBiiiigMifiiiiaiM
iiiiiiiiiiiiiiiiia'iifi
9. Hang up the handset.
After you complete this one-time setup:
1. The Distinctive Ringing function automatical^^ will be changed from SET to ON, Set the
answer mode based upon your needs (see page 7-15).
2. Be sure to have your friend call you on both numbers to test that everything is set up correctly.
3. If you do not complete this function by pressing START to register a number, your machine will
stay in MANUAL mode, So, if you decide not to register a number, you must repeat Steps 16 and in Step 4 change the mode to OFF.
How to Turn the Distinctive Ringing Function ON or OFF
The distinctive ringing function is designed to accommodate the distinctive ringing service (a
telephone service that provides you with a multiple numbers, each with a distinctive ring pattern,
on one line). You can change the distinctive ringing function setting to ON or OFF as needed after
you have registered the distinctive ringing number in the function called Setting the Distinctive
Ringing Function. To change the setting, repeat Steps 1-6 above; Step 4 is where you can select
either ON or OFF,
7-17
Page 85

E) CALLER ID
What is Caller ID?
Caller ID is a telephone service that allows the subscriber to see a display of the caller’s phone
number (and name in certain states) as the telephone rings. It is a fast way to screen your calls.
You can respond quickly to calls you missed, because Caller IDs are received and stored in your
machine’s memory.
__________________________
__
NOTICE
To get the Caller ID Service; apply for the Caller ID service at your local telephone
company.
The type of service varies from state to state and is determined by your telephone
company. Your particular service may display only the caller’s phone number or the
caller’s number and/or name.
Advantages of Caller ID
For Business
All businesses profit from a quicker response to customer calls. Businesses that provide mail
order services, money-lending services or provide confidential information, can protect them
selves from false orders or acceptance of false identification.
At Home
Residential customers can protect themselves from unwanted calls,
How Does the Caller ID Worki
The Caller ID Appears on the Display When Your Telephone Rings
As your telephone rings, the display shows you the caller’s phone number (or caller’s name in
certain states). You will know who is calling before you pick up the handset or before your machine
automatically receives the call. Once you pick up the handset, the caller’s ID disappears. If both
the caller’s phone number and name are received, only the name will appear on the display. You
will see the first 16 characters of the number or name.
• If “OUT OF AREA” appears on the display, it means that the call came from outside your caller
ID service area.
• If “PRIVATE CALL” appears on the display, it means the caller intentionally blocked the
transmission of his/her ID.
• If no caller ID was transmitted to your fax machine, “CALL PICKUP” will remain on the
display.
7-18
Page 86

The Caller ID is Stored in Your Machinées Memory
The machine can store a maximum of the last 30 incoming caller IDs in the memory, along with
the time and date of reception. The 31st call will cause the oldest ID to be erased.
The Caller ID information stored in the memory can be scrolled through on the display.
And you can also print the Caller ID list and review calls you received by checking the Caller IDs
(see page 7-20). This report will list the Date, Time, Phone Number (Caller ID), Name (in certain
states), and type of call (Comment).
NOTE: Please set up the number of rings to more than 02 in the Ring Delay (see page 7-2) before
you use the Caller ID. If you set up the number of rings to 01, you can not receive the
Caller ID.
Scanning through a Caller ID in the Memory
You can display the caller IDs that are stored in the memory to see who called you. (You can skip
to Step 4 below by pressing the SHIFT and TEL INDEX keys simultaneously.)
KEYS TO PRESS
VI i.-i
1. Press FUNCTION.
2. Press 6.
3. Press
7.
4. Press SET.
The Caller ID of the last call will appear
on the display.
- If no ID is stored, the beeper will sound
and “NO CALLER ID” will appear on
the display.
5. Press (left arrow) or (right
arrow) key to scroll through the
Caller IDs in the memory.
In this example, press the key 5
times.
- Pressing the key will cycle back
ward through the stored caller IDs
from the latest to the oldest. If you
press the key when the oldest ID
appears, the latest one will appear.
The key cycles forward.
THE DISPLAY WILL SHOW:
KiiiliillMiliiilliii
liiiiiiiiiiiiiiiigiiil
[ 25)5555151
- After 2 seconds, the date and time the
caller ID was received will appear.
6. Press STOP to exit.
6E1ÌÌBÌÌiÌBÌIÌÌSiÌMIÌKÌ)
Page 87

MiiiBi
Clearing the Caller ID Stored in Memory
For the effective use of the memory, it is recommended that you should clear the
Caller ID stored into memory by pressing CLEAR when the display shows the
number or name.
Printing the Caller ID List
You can print a listing of the Caller IDs for the last 30 calls received. Both telephone and fax
calls will be listed.
E DISPLAY WILL SHOW;
ifffliBtfiaiaaifgliiai
1. Press FUNCTION.
2. Press 3.
3. Press 9.
4. Press SET
5. Press START.
T Sample of Caller ID List
(D
DATE
09/04 13:03
01
02 09/04
03 09/04
04 09/04
TIME CALLER ID
13:04 908 322 1212
13:08 911 555 0000
13:10 912 555 5711
05 09/04 13:22
06 09/04
13:33 981 555 0101
07 09/04 13:37
08 09/04
09/04 13:57
09
13:45
10 09/04 14:00
11
09/04
14:01
CALLER ID LIST
908 322 1212
981 555 0101
911 555 0000
908 322 1212
912 555 5711
911 555 0000
981 555 0101
r printìng"'"^
: 09/04/1996 14:05
TIME :
NAME :: BROTHER
FAX :: 4155554444
TEL :
: 4155554445
(3)
NAME
JOHN GEORDAN
COMMENT
TEL RX
JOHN GEORDANTEL
SMITH SHARON ■
KIM DOBECK
TEL RX
TAD RX
JONES JENNIFER
JONES JENNIFER
TAD
SMITH SHARONTEL RX
JOHN GEORDAN
TEL TX
KIM DOBLCK RX
SMITH SHARON TX
JONES JENNIFERTAD RX
(Sample List of FAX-875MC)
7-20
Page 88

RECEIVING FAXES AND OTHER CALLS caller id
NOTE: “TX” means Transmit, “RX” means Receive.
CONTENTS OF THE LIST:
- DATE & TIME©
- CALLER ID©
- NAME (ONLY WHEN AVAILABLE) @
- COMMENT©
COMMENTS WILL INCLUDE:
• TX means your machine sent a fax message when it was polled or called.
• RX means your machine received a fax message (except polling and calling receiving).
• TEL means you answered a telephone call by your fax machine, external TAD or external
phone.
• TAD means you received an ICM in your Message Center memory.
• BLANK means the call was not answered or you answered by extension phone.
7-21
Page 89

What Is Polling^
Polling is the process of retrieving faxes from another fax machine. You may use
your machine to “poll” other machines, or you may ask someone to poll your machine.
The party who polls pays for the cost of the call.
How Does It Work?
First all parties set up their fax machines so that they can accommodate polling.
Then one party leaves documents in the fax machine so that the other party can call
and have the documents sent to them.
Polling side
Call
Receive document
Polled side
When to Use Polling?
Use polling to control the cost of who pays for sending a fax.
1. If you want to pay for the cost of the call: Send faxes to other parties as you
normally would, and if another party has documents to send you, ask if you can
poll for them.
2. If you want others to pay for the cost of the call; Ask them to poll your fax machine
for documents they want, and have them fax any documents that you want.
* There are some fax machines that will not respond to the polling function.
Helpful Hints Using Polling Effectively (Examples)
Problem No. 1: You want another party to send you a long fax, but they do not
want to pay for the call.
Solution: Ask them to leave the document in their fax machine so you can
poll for it.
Problem No. 2: Sales representatives have difficulty sending faxes to the head
office’s fax machine because it is busy so much of the time.
Solution; Head office can poll the sales representatives’ fax machines.
Problem No. 3: Because of the time or location, it is cheaper for someone else to
call you than it is for you to make the call.
Solution: Ask the other party to poll for the documents and offer to pay for
the call at their lower rate.
8‘1
Page 90

Polling Another Fax Machine (Calling)
Once you have set up polling, as described below, and the other party has set their fax machine
to “POLLED WAITING”, you can receive their documents automatically.
KEYS TO PRES
Make sure there are no documents
in your feeder.
1. Press FUNCTION.
2. Press 1.
3. Press 2.
4. Wait for two seconds.
5. Press SET.
6. Press STOP.
7, Enter the fax number.
Example: One-touch dialing.
8. Press START.
I ■
Setting up Polled Waiting (Being Called)
THE DISPLAY WILL SHOW:
llliiiiiiiiMiliiiliiii
{illiililliiiiiiliiliiii
Í 2.POLLING
IfiBiiilliiiilliiiilli ^
<- -> &
f 2. POLLING
ûiliiiBiijiiiliiiiiiiliia
c
NJ OFFICE
illiliiiiiiliitiilllM
1
ii)
Polled Waiting is when you place a document in your fax machine and set your machinete allow
another fax machine to retrieve that document. Your fax machine will print a Polled Report
after the transmission.
KEYS TO PRES
1. Place the documents into the feeder.
2. Press FUNCTION.
3. Press 1.
4. Press 2.
5. Wait for two seconds.
6. Press SET.
THE DISPLAY WILL SHOW:
iiiiliiiliiiiliiijii
Igiiiiiiiiiiilliiiiliil
C
iiaiiliigiiiiiiillili
fiiiijMiiigiiiiifiiiilil
iiiliiiiiggiiiiiiiiiili
iiiiiiiiiiilMMiBiliia
C
tgiiiiiBpiiWagiliiiiBl
r'2.POLLING
■
8-2
:)
:)
Page 91

7. Press STOP.
8, Press START and wait for the poll
ing call to come in.
(;;P;fiEiSS:aSrARr
i POLI. CD WArri NS 371
Secure Polling
Secure Polling is a way to keep your documents and others’ from falling into unauthorized hands
while the fax machines are set up for polling. You can use Secure Polling only with another
Brother fax machine. Your four-digit ID number must be entered on the fax machine that polls
for your documents.
Polling Another Brother Fax Machine with Secure Code (Calling)
You can poll another Brother fax machine that has Secure Polling by following the steps below:
You need to make sure you are using the same ID number as the other party.
THE DISPLAY WILL SHOW:
Make sure no documents are in the
feeder.
1. Press FUNCTION.
( 0 9 a a/l 9 ns
2. Press 1.
3. Press 2.
4. Wait for two seconds.
5. Press (left arrow) or (right
arrow) to find the POLLING
SECURE setting.
6. Press SET.
7, Enter a four-digit number. This is
the security code of the fax machine
you are polling.
Example: 1234.
8. Wait for two seconds.
9. Press STOP.
10. Enter the fax number.
Example: One-Touch dialing.
11, Press START.
(1.TEMP.SETTINGS )
BliglliliiiaiilBliiiM
^ (Isiliiiiiiigiiiiiiilill
^ f ' <; .'FCT ' '«*■ -'S FT' 1
t U. ElilviiT; ^ X'f- 'i -li
(^POlU'NGrSEGURE ]
( POLLING IDrXXXX J
( POLLING TO )
( :2-.-PO:LLl-NG':-ii:
..-( ENTER FAX NO. - )
f RES'S:/STARr:\l£yV' ]
Tmo iO'FEJC£-L-n
( DIALING ■ : 1
1 P . 01 ]
............
....................
]
)
8-3
Page 92

llllllll
Setting up Polled Waiting with Secure Polling (Being Called)__________
Secure Polling allows you to create a Polling ID number to protect your documents during polled
waiting mode. Anyone who polls your machine must enter this polling ID number.
THE DISPLAY WILL SHOW:
1. Insert the documents into the
feeder.
2. Press FUNCTION.
c
7
3. Press 1.
4. Press 2.
5. Wait for two seconds.
6. Press (left arrow) or (right
arrow) to find the POLLING
SECURE setting,
7. Press SET.
8. Enter a four-digit number.
Example: 1234.
9. Wait for two seconds.
10. Press STOP.
11. Press START and wait for the
polling call to come in.
ifiiliiiaiiliiiiwiiiBil
Miiiiiiiiiiiiiiiaj
HI
illiiiijiisliiiililiil
7
ililllllllllilllliillillil
iiiiiiiiiHilSIiiiilii
illtllilllllllllllllilllllillillilliilllliH
fiiMiiiiiiiiiiaiiiiiW
iliiiliiaitliiiiMlIi
8-4
Page 93

Delayed Polling
You can set the time when you want the polling to take place. After you select STANDARD or
SECURE, press SET, then press 1 and use the number keys to enter the time when you want
polling to take place.
.n'vsa'iiij
Make sure no documents are in the
feeder.
1. Press FUNCTION.
2. Press 1.
3. Press 2.
4. Wait for two seconds.
5. Press ^ (left arrow) or (right
arrow) to select STANDARD or
SECURE.
Example; STANDARD.
6. Press SET.
7. Press 1.
8. Enter the time.
KEYS TO PRESS
- If you select SECURE, remember to
give your password to the other party.
Example; 19:45 (7:45 P.M.).
THE DISPLAY WILL SHOW:
taiBMifijgiiiiiiMilil
fttaiMKiMiiiiiMiiiili
c
iii& 1 IMER
i SET TIME^OO:
:)
¡1
■
9. Wait for two seconds.
10. Press STOP.
c
iiliiiiiiiiMliiliiii
11. Enter the fax number.
Example: One-touch dialing.
12. Press START.
The fax machine will wait until the
specified time to call.
Setting up Polled Waiting with Quick-Scan
Before pressing START, press Q.SCAN so that you can store your polled waiting document in
the memory.
_________________________
Helpful Hints If you use Q.SCAN to place the Polled Waiting documents into the memory,
they will not be erased automatically after they are polled. To erase them you
.
........................................
must use the Cancel Job function. (See page 6-11.)
.............................................................. .................................................................
-
:)
Page 94

I KULLINC^
tSSii ÎSHïinis ÎÎ-^S Ki.: ; j; i ; 'iWi ;1i
Sequential Polling
This function is the reverse of Broadcasting, in which your machine sends a document to several
destinations. In a sequential polling operation, your machine will request documents from
several fax units in a single operation. After all the polling operations are finished, a Sequential
Polling Report will be printed automatically.
il-NiHïï¥HïNÎfeiiSiÎi|^
KEYS TO PRES
1. Make sure there are no documents
in the feeder.
2. Press FUNCTION.
3. Press 1.
4. Press 2.
5. Press (left arrow) or (right
arrow) to select STANDARD or
SECURE.
Example: STANDARD
6. Press SET.
7. Press STOP.
8. Specify the destination fax
machines, that you wish to poll by
entering the One-Touchkey(s) and/
or Speed-Dial numbers, one after
the other, or entering only a Group
number key.
Example: Group key,
• r;’;i *
THE DISPLAY WILL SHOW;
llailiigiiPiiiiilB
ijailtjililliiiiiiiilii
C
llA I
iiBiiBliiiiiaaiiiMii
( 2.POLLING
c
liSiiiSiiiilBiiiSiilj
(jwiiiSiipiilijiigsBB
3
3
9. Press START. Your machine polls
each number or group member in
turn for a document,
8-6
I DIALING
Page 95

9.
Making a Single Copy
When you want to make a copy, make sure the text or image on the original document is not too
close to the edge. Your fax machine cannot read anything closer than 4 mm (1/8 inch) from the
edge.
You can select the resolution to either SUPERFINE or PHOTO. Set the resolution to either one.
If you do not set the resolution, the fax machine automatically makes a copy at SUPERFINE
resolution. For example, if your original is a photo, you may select PHOTO resolution. {To get
PHOTO resolution, press RESOLUTION repeatedly until both lights are lit.) You can also set
the resolution page by page using the 1. TEMP. SETTINGS function. (See page 6-13.)
Do not pull on the paper while copying is in progress. This may distort the copied image and
damage your machine.
These are the steps for making one copy each of your original documents:
KEYS TO PRE
1. Place the documents face down into
the fax machine.
2, Press COPY.
3. Press COPY, again for a quicker
response. Or after 5 seconds, the
copying will start.
THE DISPLAY WILL SHOW:
illiigliiiiKiBiilil
C
fiiMWiiiBiiiiiiiiili
c
iaiiitHMiiiiMgigeii)
r
...
COPY ING____
O
3
I
9-1
Page 96

liiiiiliiilillllil
Making Multiple Copies
There are two ways to make multiple copies on your fax machine. The first is the stacking method,
this will make n copies of page one, n copies of page two and so on. These will all be stacked on
top of each other. The second method is the sorting or collating method. This is when the fax
machine scans the entire document and then makes 1 copy of page 1, 2, 3, 4 in order. Then makes
i:m
¡IjiijiliilliiitgiiliJi
1. Place the documents face down into
the feeder.
2. Press COPY.
^ liWiiSiiiiiiiiijliMSBli
^ illliitliiiliiliiiiiliiiiii
^ iliiiiiiiiiliitliiiiil ^
3. Enter two digits for the number of
copies you want using the number
keys (Max. 99 copies).
Example: 05.
4. Press COPY or just wait 5 seconds.
liiilieliiiiiililiiMWiiili
r irWiBtiiitigiiliiCM
^ ililiiiiiiiiilKiiilMlI
5. Press ^ (left arrow) or ► (right
arrow) to select the stacking or
sorting method.
Example: STACK,
6. Press COPY to begin copying.
NOTE: 1. When making Multiple Copies, do not let the receiving tray become over stacked.
Remove copied paper from the receiving tray frequently.
2. When making Multiple Copies, make sure there is enough recording paper in the
machine.
What to Do When You Get a “MEMO/2FFULL”Message while Making Copies
If you are using the stacking method, press STOP. If you are using the sorting
method, press COPY to copy the portion that is in the memory, or press STOP to
cancel.
tiiiliiiliiiiitiiiil
9-2
Page 97

W. MESSAGE CENTER MODE SETTINGS
The Message Center Memory has two modes for different uses; the Message Center Mode and the
Message Center Pro Mode. The Message Center Mode allows you to store the incoming fax/voice
messages into a flexible memory. Fax Retrieval, Paging and Fax Forwarding features are
available in this mode. The Message Center Pro Mode is an additional enhancement to the
Message Center Mode, and provides the Fax-on-Demand, Voice-on-Demand and Personal
Mailbox features. This chapter explains how the standard Message Center Mode performs. (The
Message Center Pro Mode is explained in chapter 11.)
TAD
O-
RECORD ERASE
FAX
-O
PLAY
CZD ( )( )
The Auto and F/T lights must be lit to turn on either Message Center Mode or Message Center
Pro Mode.
AUTO^a^ F/T
o—>—o
MODE
( )
A) GETTING STARTED
What Is the Message Center Mode?
The Message Center is a large flexible memory to more effectively manage your voice and fax
messages, while you are out.
This flexible memory can be used for voice messages, fax messages or a combination that stores
both types on a "first come, first served” basis. Any fax or voice message that is stored in the
memory can be retrieved from a remote location.
______________________________
10-1
Page 98

What Do I Want the Message Center to Do?
There are six of ways to allocate the flexible Message Center memory, depending upon which best
fits your needs.
You may need to use only one mode on a regular basis, but periodically change modes to meet high
or low message days. The six modes are as follows;
The factory setting is FAX: OFF/TAD: ON.
* Use 2) FAX; ON, TAX); EXT. and 3) FAX: ON, TAD: OFF mode when you want all available
memory to be used to store fax messages {for Fax Forwarding or Paging and Remote Retrieval).
Keep Backup Printing turned ON to get a printed copy (see page 10-11).
* Even when you set FAX: OFF mode (4) ~ 6)), you can use Quick-Scan and Broadcasting as usual.
▼ Mode Settings at a Glance
MSG CTR MODE WHAT IT DOES
1) FAX: ON
TAD: ON
2) FAX: ON
TAD: EXT.
(External Answering
Machine is ON.)
3) FAX: ON
TAD: OFF
4) FAX: OFF
TAD: ON
Both voice and fax messages will
be stored on a first come first
served basis in the memory.
Either Fax Forwarding or Pag
ing and Remote Retrieval ofvoice
and fax messages is available.
Voice calls will be stored in your
external answering machine,
which must be plugged into the
EXT jack of the fax machine.
The EXT TAD will answer all
your calls; retrieve voice mes
sages from it as usual. Paging
for voice messages is not avail
able.
Voice calls will not be stored. Use this mode when you do not
All available memory in the
Message Center will be used to
store voice messages. Faxes will
print on paper. You can do Paging
and Remote Retrieval of voice
messages.
WHEN TO USE
Use this mode when you wish to
store both fax and voice messages
in the memory. Erase your
messages frequently to keep
memory available for when you
need it.
Use this mode when you need all
your Message Center memory
for fax messages or if you prefer
the sound quality of a tape re
corder for your voice messages.
need to receive voice messages.
Use this mode if you wish to
retrieve voice messages from a
remote location, but can wait
until you are at the fax machine
to get your fax messages.
5) FAX : OFF
TAD: EXT.
(External Answering
Machine is ON.)
6) PAX : OFF
TAD: OFF
10-2
Fax messages will be received
only on paper, but will not be
stored in the memory. Voice calls
will not be stored unless an ex
ternal TAD is plugged into the
EXT jack of your fax machine.
Fax messages will be received
only on paper, but will not be
stored in the memory. Voice calls
will not be stored in the memory
either.
Use this mode if you need more
TAD memory than is available ,
in the Message Center or if you
prefer the sound quality of a
tape recorder.
Use this mode if you do not want
to use the Message Center
memory for receiving fax/voice
messages, or if you want to use
only Message Center Pro mode.
Page 99

Flowchart Sequence of an Incoming Call
Message Center Pro Mode: OFF
1) FAX: ON
If the caller stops speaking for 5 seconds while leaving a message, the machine will go to fax
receiving mode automatically.
1
REMOTE
CODE
^5^
MEMORY
10-3
Page 100

▼ Message Center Pro Mode: OFF
4) FAX: OFF
REMOTE
CODE
=i=51
PAPER
If the caller stops speaking for 5 seconds while leaving a message, the machine will go to fax
receiving mode automatically.
5) FAX: OFF
TAD: EXT.
(External Answering Machine is ON.)
Incoming Call
I
Fax reception is
activated by the
CNG Fax Tones
automaticaiiy.
Auto dial
fax cail
The external TAD
OGM is activated.
Manuai
fax cail
The caller must press
your remote code to
activate the fax
machine.
REMOTE
CODE
*51
10-4
PAPER
Voice cail
The fax message The caller leaves a The fax message
Is received on voice message on
paper. the external TAD.
EXT.
TAD
is received on
paper.
PAPER
 Loading...