

Page 1

USB Turntable
THE EASIEST WAY TO CONVERT RECORDS TO DIGITAL FILES
iConvert
®
Page 2

1
TABLE OF CONTENTS
Cautions and Warnings . . . . . . . . . . . . . . . . . . . . . . . . . . . . . . . . . . . . . . . . . . . . . . . . . . 2-3
Location of Controls . . . . . . . . . . . . . . . . . . . . . . . . . . . . . . . . . . . . . . . . . . . . . . . . . . . . . 4-6
Operation . . . . . . . . . . . . . . . . . . . . . . . . . . . . . . . . . . . . . . . . . . . . . . . . . . . . . . . . . . . . . . . . . 7
EZ Audio Converter Software . . . . . . . . . . . . . . . . . . . . . . . . . . . . . . . . . . . . . . . . . . . 8-11
Audacity Software . . . . . . . . . . . . . . . . . . . . . . . . . . . . . . . . . . . . . . . . . . . . . . . . . . . . 12-33
Troubleshooting . . . . . . . . . . . . . . . . . . . . . . . . . . . . . . . . . . . . . . . . . . . . . . . . . . . . . . .34-37
Compatibility . . . . . . . . . . . . . . . . . . . . . . . . . . . . . . . . . . . . . . . . . . . . . . . . . . . . . . . . . . . . .38
Specifications . . . . . . . . . . . . . . . . . . . . . . . . . . . . . . . . . . . . . . . . . . . . . . . . . . . . . . . . 39-40
Warranty. . . . . . . . . . . . . . . . . . . . . . . . . . . . . . . . . . . . . . . . . . . . . . . . . . . . . . . . . . . . . 41-42
Page 3

2
CAUTION
TO REDUCE THE RISK OF ELECTRIC SHOCK, DO NOT REMOVE COVER.
THERE ARE NO SERVICEABLE PARTS INSIDE.
TO REDUCE THE RISK OF FIRE OR ELECTRIC SHOCK, DO NOT EXPOSE
THIS UNIT TO RAIN OR MOISTURE.
The lightning flash with arrow-head symbol within an equilateral triangle
is intended to alert the user to the presence of uninsulated “dangerous
voltage” within the unit’s enclosure that may be of sufficient magnitude
to constitute a risk of electric shock.
The exclamation point within an equilateral triangle is intended to alert
the user to the presence of important operating and maintenance
(servicing) instructions in the literature accompanying the unit.
IMPORTANT SAFETY INSTRUCTIONS
All the safety and operating instructions should be read, adhered to and followed
before the unit is operated.
•
•
Page 4

DANGER
To reduce the risk of electric shock, burns, fire or injury:
Always unplug the unit from the electrical outlet immediately after using.
Do not use while bathing or in a shower.
Do not place or store unit where it can fall or be pulled into a tub or sink.
Do not place in or drop into water or other liquid.
Do not reach for a unit that has fallen into water. Unplug it immediately.
Care should be taken so that objects do not fall and liquids are not
spilled onto the unit.
Use only the included attachments or accessories. Other attachments
or accessories are not recommended by the manufacturer and may
damage the unit.
Connect the unit only to a power source as described in this manual.
Do not disassemble the unit. There are no serviceable parts.
Do not place the unit near heat sources such as radiators, heating
vents or direct sunlight.
Do not place the unit where there is moisture, rain, vibration, shock
or excessive dust.
Keep the unit dry.
1.
2.
3.
4.
5.
6.
7.
8.
9.
10.
11.
12.
3
Page 5

LOCATION OF CONTROLS
Adapter
Platter
Tonearm Set
1.
2.
3.
Arm Lift Lever
Tonearm Lock
4.
5.
4
2
4
5
1
3
Page 6

5
LOCATION OF CONTROLS
Dust Cover
Power Cord
USB Port
Signal Connectors
1.
2.
3.
4.
3 24
1
Page 7

6
LOCATION OF CONTROLS
Foot (4)
Speed Indicators
Stop Button
1.
2.
3.
2
1 3
Page 8

OPERATION
Select the speed for the record to be played by setting the SPEED
SELECT BUTTON.
Place a record on the turntable PLATTER. Use the 45 rpm record ADAPTER
on the turntable shaft when playing a 45 rpm, which has a large center hole.
Remove the stylus protector cover and release the tonearm clip.
Move the cueing lever to the “UP” position, then move the tonearm toward
the record. The turntable will start revolving.
Position the tonearm above the first groove of the record and move the
cueing lever to the “DOWN” position, the tonearm will automatically and
gently come down onto the record’s surface.
At the end of the record, the tonearm will rise and return to the arm rest
and switch off the entire unit automatically.
If you want to stop the record while it is playing, press the STOP button.
The tonearm will rise slowly and return automatically to the arm rest.
CAUTION: Do not touch the tonearm during the reject cycle.
USING MANUAL CUEING
The cueing lever is used when you want to momentarily interrupt the tonearm.
Slowly move the lever to the “UP” position to interrupt playing.
Slowly move the lever to the “DOWN” position to resume playing.
Keep the cueing lever in the “DOWN” position when the turntable
is not in use.
1.
2.
3.
4.
5.
6.
7.
1.
2.
3.
7
Page 9

EZ AUDIO CONVERTER SOFTWARE
The EZ Audio Software is the easiest way to transfer your vinyl and tape
recordings to your computer. To take advantage of advanced audio editing
features, you may wish to also install the optional Audacity Software
(see pages 12-33).
INSTALLING EZ AUDIO CONVERTER ON A PC
Insert the included CD into your computer’s CD drive.
A pop-up screen should appear automatically. Select “English” or “French.”
Click on the EZ AUDIO CONVERTER button to begin the
installation process.
Follow the on-screen instructions to install the EZ Audio Converter.
Once the EZ Audio Converter has been successfully installed,
click on the iTunes button to install iTunes.
Please note: The EZ Audio Converter uses iTunes to import your recordings.
iTunes needs to be installed on your computer before starting the EZ Audio
Converter software.
6. Follow the on-screen instructions to install iTunes.
7. Once the iTunes installation has successfully completed, click the EXIT button
to quit.
8. EZ Audio Converter and iTunes are now successfully installed on your computer.
1.
2.
3.
4.
5.
8
Page 10

INSTALLING EZ AUDIO CONVERTER ON A MAC
®
Insert the included CD into your computer’s CD drive.
Open the CD contents and double-click on the EZ Audio
Converter.Installer.pkg file to begin the installation process.
Follow the on-screen instructions to install the EZ Audio Converter.
4. Once the installation process has completed, you can find the EZ Audio
Converter application in your Applications folder.
TRANSFERRING MUSIC WITH EZ AUDIO CONVERTER
Once you have installed the EZ Audio Converter software, you can start recording!
Open EZ Audio Converter by going to Start > All Programs > MixMeister >
EZ Audio Converter—or, open EZ Audio Converter by accessing your
Applications menu.
When you open the software you will see the “Step 1 Get Connected”
screen. Connect the iConvert USB Turntable to the computer with the
included USB cable.
Once the USB is connected, click NEXT on the “Step 1 Get
Connected” screen.
The “Step 2 Get the Music Ready to Play” screen will appear.
Locate the beginning of the section you would like to record.
Note: We recommend checking your levels before you begin recording
and adjusting the gain level control on your device accordingly.
1.
2.
3.
1.
2.
3.
4.
5.
9
Page 11

The software will split tracks automatically when it detects silence in the
music. To split tracks manually, deselect the box labeled “Automatically
Split Recording into Separate Tracks.” Note: This auto-track feature is only
available for PC users.
When you are ready to start recording, click RECORD to immediately
play your music.
You are now recording! You should hear the audio from the device through
your computer speaker and see the audio meters move on your
computer screen.
If you have chosen to manually split the tracks, click NEW TRACK when
you hear the place in the song that you’d like to separate.
When you have finished recording, click NEXT to proceed to the next step.
IMPORTANT: To ensure you’ve downloaded the entire final track to
your computer, you must wait for the recording time window to display
“Recording Finish” before you click on NEXT.
11. Once you have finished recording, enter the Artist, Album and Track Titles
by clicking and typing into the corresponding fields. If you have recorded
more than 10 tracks, you can access the 11-20 fields by clicking NEXT.
12. When you are finished labeling your tracks, click NEXT to begin exporting your
recording to iTunes. Make sure you allow the exporting process to complete.
6.
7.
8.
9.
10.
10
Page 12

13. Once the software has exported your recordings to iTunes,
you will see RECORDING COMPLETE on your computer.
14. Click “YES” if you would like to continue recording.
15. Click “NO” if you do not want to record more songs.
16. After you have made your selection, click NEXT to record again
(follow steps 5-12) or exit the application.
17. You will now be able to access your recordings through iTunes.
Open iTunes and access your library by locating the Artist,
Album and Track Titles that you’ve entered.
18. From iTunes you can burn your recordings straight to a CD or load
them on your iPod. Consult the iTunes Help Menu for additional
information about using iTunes.
19. If you have any questions or problems using the EZ Audio Converter,
please refer to the Troubleshooting section starting on page 34.
11
Page 13

AUDACITY SOFTWARE
The Audacity Software has advanced audio editing features and is
the most user-involved way to transfer your recordings to your computer.
Important: Before starting the software, make sure that your USB turntable
is plugged into the computer and both the computer and the turntable are
plugged in and powered on.
INSTALLING AUDACITY SOFTWARE ON A PC
Plug the turntable into an AC outlet and connect the USB PORT
on the turntable to your computer’s USB port.
Turn on the turntable’s power switch.
Your PC’s Windows operating system will detect a new device and
a window will appear noting that the device is available to use.
Insert the CD that came with your USB turntable.
Run the file “install audacity-win-1.2.4b.exe” to install the Audacity
Software. Once installed, run the Audacity program.
1.
2.
3.
4.
5.
12
Page 14
INSTALLING AUDACITY SOFTWARE ON A MAC
®
Insert the included CD.
Open the CD icon on your desktop.
Drag the installation folder for Audacity to your hard drive. We recommend
that you move the folder to your “Applications” folder.
A window will appear that shows the files being copied.
Wait until the copying has completed and EJECT the CD.
Open the Audacity Software from the location you chose on your hard drive.
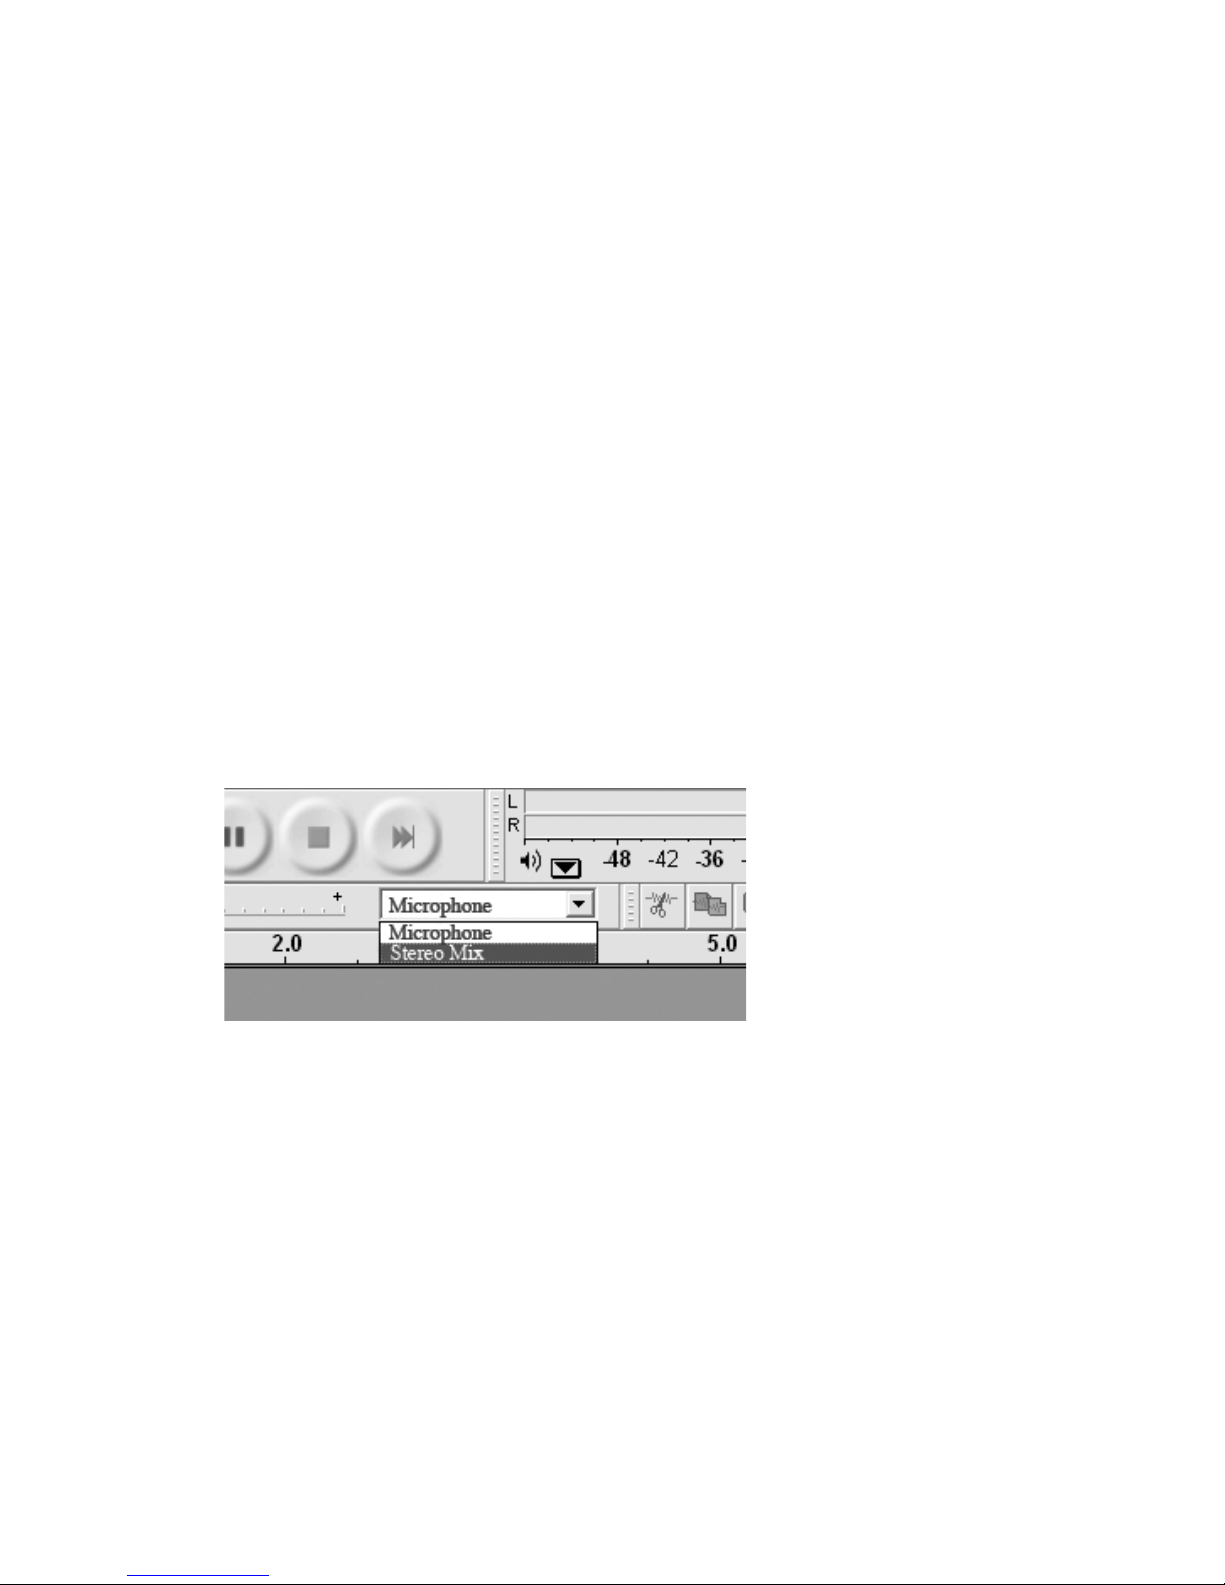
SOFTWARE CONFIGURATION
Click “Microphone” in the drop-down menu and select “Stereo Mix” (see below).
Select the “Edit” menu and then “Preferences.”
Select the USB audio device under the “Recording” selection. Select “Software
Playthrough” to hear the audio while recording.
Note: The USB turntable may show up with a different name in a Windows
system. This may depend on your computer model and operating system.
99% of the time it will contain “USB” in the name.
1.
2.
3.
4.
5.
6.
13
Page 15

Select “USB Audio Device” from “Audacity Preferences” (see below).
After configuring the settings, you are ready to begin recording.
If you are still having difficulty finding the USB turntable, check your system settings
or control panel to adjust the audio input settings from the sound control panel.
Note: a) You may choose to download the latest version of Audacity from
the following website: http://www.audacity.com. b) You may also check the
following website and download trial versions of more sound editing
software at http://www.bias-inc.com.
14
Page 16

Selection Tool - Selects the range of audio you want
to listen to or edit.
Envelope Tool - Changes the volume over time.
Draw Tool - Modifies individual samples.
Zoom Tool - Zooms in and out.
Timeshift Tool - Slides tracks left or right.
Multi Tool - Lets you access every tool at once, depending
on the location of the mouse and the keys you are holding down.
MAIN TOOLBAR
15
Page 17

Skip to Start - Moves the cursor to time 0. If you press “Play”
at this point, your project will play from the beginning.
Play - Starts playing audio at the cursor position. If only some audio
is selected, only the selection is played.
Loop
- If you hold down the shift key, the “Play” button changes
to a “Loop” button, which lets you keep playing the selection over
and over again.
Record
- Starts recording audio at the project sample rate (the sample
rate in the lower-left corner of the window). The new track will begin
at the current cursor position, so click the “Skip to Start” button first
if you want the track to begin at time 0.
Pause - Temporarily stops playback or recording until you press
“Pause” again.
Stop - Stops recording or playing. You must use the “Stop” button
before applying effects, saving or exporting.
Skip to End - Moves the cursor to the end of the last track.
AUDIO CONTROL BUTTONS
16
Page 18

Cut
Copy
Paste
Trim Away the Audio Outside the Selection
Silence the Selected Audio
Undo
Redo (repeat last command)
All of the buttons on this Toolbar perform actions—and with a couple of exceptions,
they’re all just shortcuts of existing menu items to save you time. Holding the mouse
over a tool will show a “tooltip” to remind you which one is which.
EDIT TOOLBAR
17
Page 19

TRACK POP-DOWN MENU
The Track Pop-Down Menu appears when you click in a track’s title. This lets you access
a few special commands that apply to individual tracks (see the following pages).
Zoom In
Zoom Out
Fit Selection in Window
- Zooms until the selection just fits inside
the window.
Fit Project in Window
- Zooms until all of the audio just fits inside
the window.
18
Page 20

Name - Changes the name of the track.
Move Track Up - Trades places with the track above the selected one.
Move Track Down - Trades places with the track below the selected one.
Waveform - Sets the display to waveform, the default way of visualizing audio.
Waveform (dB)
- Sets the display to waveform (dB), which is similar to waveform,
but on a logarithmic scale, measured in decibels (dB).
Spectrum
- Displays the track as a spectrogram, showing the amount of energy in
different frequency bands.
Pitch (EAC)
- Highlights the contour of the fundamental frequency (musical pitch)
of the audio, using the Enhanced Autocorrelation (EAC) algorithm.
Mono - Makes the selected track a mono track, meaning it is played out of just one
speaker, or played out of the left and right speakers equally.
Left Channel - Plays the selected track out of the left speaker.
Right Channel - Plays the selected track out of the right speaker.
Make Stereo Track
- If there is another track below the selected one, joins them
to make a single stereo track, with the top track representing the left speaker, and
the bottom track representing the right speaker. When tracks are joined into a
stereo pair, all edits automatically apply to both the left and right channel.
Split Stereo Track
- If the selected track is a stereo track (a pair of left and right
tracks joined together as a single track), this operation splits them into two separate
tracks that you can modify and edit independently.
19
Page 21

Set Sample Format - This determines the quality of the audio data and the amount
of space it takes up. 16-bit is the quality used by audio CDs and is the minimum
quality that Audacity uses internally (8-bit audio files are automatically converted
when you open them). 24-bit is used in higher-end audio hardware. 32-bit float
is the highest quality that Audacity supports, and it is recommended that you use
32-bit float unless you have a slow computer or are running out of disk space.
Set Rate - Sets the number of samples per second of the track. 44100 Hz is
used by audio CDs. Tracks can have different sample rates in Audacity; they are
automatically resampled to the project sample rate (in the lower-left corner of
the window).
FILE MENU
New - Creates a new empty window.
Open
- Opens an audio file or an Audacity project in a new window (unless the
current window is empty). To add audio files to an existing project window, use
one of the Import commands in the Project menu.
Close - Closes the current window, asking you if you want to save changes.
On Windows and Unix, closing the last window will quit Audacity, unless you
modify this behavior in the Interface Preferences.
Save Project
- Saves everything in the window into an Audacity-specific format
so that you can save and quickly continue your work later. An Audacity project
consists of a project file, ending in “.aup,” and a project data folder, ending in “_data.”
For example, if you name your project “Composition,” then Audacity will create a file
called “Composition.aup” and a folder called “Composition_data.” Audacity project files
are not meant to be shared with other programs—use one of the following Export
commands when you are finished editing a file:
20
Page 22

Save Project As - Same as Save Project (above), but lets you save a project
as a new name.
Recent Files
- Brings up a list of files you have recently opened in Audacity
to be re-opened quickly.
Export as WAV
- Exports all of the audio in your project as a WAV file, an industrystandard format for un-compressed audio. You can change the standard file format
used for exporting from Audacity by opening the File Format Preferences. Note that
exporting will automatically mix and re-sample if you have more than one track, or
varying sample rates. See also File Formats.
Export Selection As WAV - Same as above, but only exports the current selection.
Export as MP3 - Exports all of the audio as an MP3 file. MP3 files are compressed
and therefore take up much less disk space, but they lose some audio quality.
Another compressed alternative is Ogg Vorbis (below). You can set the quality
of MP3 compression in the File Format Preferences. See also MP3 Exporting.
Export Selection As MP3 - Same as above, but only exports the current selection.
Export as Ogg Vorbis - Exports all of the audio as an Ogg Vorbis file. Ogg Vorbis
files are compressed and therefore take up much less disk space, but they lose
some audio quality. Ogg Vorbis files tend to take up a little less disk space than MP3
for similar compression quality, and Ogg Vorbis is free from patents and licensing
restrictions, but Ogg Vorbis files are not as widespread. You can set the quality of
Ogg compression in the File Format Preferences.
Export Selection As Ogg Vorbis
- Same as previous, but only exports the
current selection.
21
Page 23

Export Labels - If you have a Label Track in your project, this command lets you
export the labels as a text file. You can import labels in the same text format using
the “Import Labels” command in the Project Menu.
Export Multiple - Lets you split your project into multiple files all in one step.
You can either split them vertically (one new file per track) or horizontally
(using labels in a Label Track to indicate the breaks between exported files).
Page Setup
- Configures how Audacity will print out the track waveforms using
the Print option, and what printer to use.
Print - Print out the main window view from Audacity showing the tracks
and waveforms.
Exit (Quit)
- Closes all windows and exits Audacity, prompting you to save
any unsaved changes first.
EDIT MENU
Undo - Undos the last editing operation you performed on your project. Audacity
supports full unlimited undo, meaning you can undo every editing operation back
to when you opened the window.
Redo - Redoes any editing operations that were just undone. After you perform
a new editing operation, you can no longer redo the operations that were undone.
Cut - Removes the selected audio data and places it on the clipboard. Only one
“thing” can be on the clipboard at a time, but it may contain multiple tracks.
Copy
- Copies the selected audio data to the clipboard without removing it from
the project.
22
Page 24

Paste - Inserts whatever is on the clipboard at the position of the selection or
cursor in the project, replacing whatever audio data is currently selected, if any.
Trim - Removes everything to the left and right of the selection.
Delete - Removes the audio data that is currently selected without copying
it to the clipboard.
Silence
- Erases the audio data currently selected, replacing it with silence
instead of removing it.
Split
- Moves the selected region into its own track or tracks, replacing the
affected portion of the original track with silence. See the figure below:
Duplicate - Makes a copy of all or part of a track or set of tracks into new tracks.
See the figure below:
Select > All - Selects all of the audio in all of the tracks in the project.
Select > Start to Cursor
- Selects from the beginning of the selected tracks
to the cursor position.
23
Page 25

Select > Cursor to End - Selects from the cursor position to the end of the
selected tracks.
Find Zero Crossings
- Modifies the selection slightly so that both the left and right
edge of the selection appear on a positive-slope zero crossing. This makes it easier
to cut and paste audio without resulting in an audible clicking sound.
Selection Save
- Remembers the current selection (or cursor position), allowing
you to restore it later.
Selection Restore
- Restores the cursor position to the last position saved by
“Selection Save.”
Move Cursor > to Track Start - Moves the cursor to the start of the current track.
Move Cursor > to Track End
- Moves the cursor to the end of the currently
selected track.
Move Cursor > to Selection Start
- Moves the cursor to the start of the
current selection.
Move Cursor > to Selection End
- Moves the cursor to the end of the
current selection.
Snap-To > Snap On - Enables “Snap-To” mode. When “Snap-To” mode is enabled,
the selection will be constrained to the nearest interval on the time scale, by default
the nearest second. So if you click and drag from 4.2 seconds to 9.8 seconds, it will
result in a selection from 4 seconds to 10 seconds, exactly. You can change the units
that are snapped to using the “Set Selection Format” option in the View Menu.
Snap-To > Snap Off
- Turns “Snap-To” mode off letting you select arbitrary
ranges of time.
Preferences - Opens the “Preferences” dialog.
24
Page 26

VIEW MENU
Zoom In - Zooms in on the horizontal axis of the audio, displaying more detail
about less time. You can also use the zoom tool to zoom in on a particular part
of the window.
Zoom Normal
- Zooms to the default view, which displays about one inch
per second.
Zoom Out - Zooms out, displaying less detail about more time.
Fit in Window - Zooms out until the entire project just fits in the window.
Fit Vertically
- Resizes all of the tracks vertically so they all fit inside the
window (if possible).
Zoom to Selection - Zooms in or out so that the selection fills the window.
Set Selection Format
- Lets you choose the formatting that is displayed at the
bottom of the window indicating the current selection time. Options include film,
video, and audio CD frames, seconds + samples or pure time. If you turn on
“Snap-To” mode in the Edit Menu, the selection will snap to the frames or other
quantization you have selected in this menu.
History - Brings up the history window, which shows all the actions you have
performed during the current session, including importing. The right-hand column
shows the amount of hard disk space your operations used. You can jump back
and forth between editing steps quite easily by simply clicking on the entries in the
window, the same as selecting “Undo” or “Redo” many times in a row. You can also
discard “Undo” history to save disk space. The history window can be kept open
while you work.
25
Page 27

Float Control Toolbar - Moves the Control Toolbar out of the window and into
its own floating window, so you can position it wherever you want. The menu item
changes to Dock Control Toolbar, which you can use to put the toolbar back into
the main window.
Float Edit Toolbar
- Moves the Edit Toolbar out of the window and into its own
floating window, so you can position it wherever you want. The menu item changes
to Dock Edit Toolbar, which you can use to put the toolbar back into the main window.
Float Meter Toolbar
- Does the same thing for Audacity’s VU meters, which you
use to set recording levels and adjust playback.
Float Mixer Toolbar
- Moves the Mixer Toolbar out of the window and into its own
floating window as above.
PROJECT MENU
Import Audio - Used to import audio from a standard audio format into your project.
Use this command if you already have a couple of tracks and you want to add
another track to the same project, maybe to mix them together. You cannot use this
option to import Audacity projects. The only way to combine two Audacity projects
is to open them in separate windows, then copy and paste the tracks.
Import Labels
- Takes a text file that contains time codes and labels, and turns
them into a Label Track.
Import MIDI - Imports MIDI files and puts them into a MIDI Track. Audacity can
display MIDI files, but cannot play, edit or save them.
26
Page 28

Import Raw Data - Allows you to open a file in virtually any un-compressed format.
When you select the file, Audacity will analyze it and try to guess its format. It will
guess correctly about 90% of the time, so you can try just pressing “OK” and
listening to the result. If it is not correct, however, you can use the options in the
dialog to try some other possible encodings. At the beginning of your imported
track(s), you may notice a little bit of noise. This is probably the file’s header, which
Audacity was not able to parse. Just zoom in and select the noise with the Selection
Tool, and then choose “Delete” from the Edit Menu.
Edit ID3 Tags
- Opens a dialog allowing you to edit the ID3 tags associated
with a project, for MP3 exporting.
Quick Mix - Mixes all of the selected tracks together. If you are mixing stereo tracks,
or mixing tracks that are marked as Left or Right Channel, the result will be a stereo
track (two channels), otherwise the result will be mono. Your tracks are implicitly
mixed whenever you hit the “Play” button and whenever you export. This command
offers a way to do it permanently and save the results to disk, saving on playback
resources. Note: If you try to mix two very loud tracks together, you may get clipping
(it will sound like pops, clicks, and noise). To avoid this, drag the gain slider on the
tracks down to reduce their volume before mixing.
New Audio Track - Creates a new empty Audio Track. This command is rarely
needed, since importing, recording and mixing automatically create new tracks as
needed. But you can use this command to cut or copy data from an existing track
and paste it into a blank track. If your existing track was recorded at a non-default
rate then you may need to use the “Set Rate” command from the Track Pop-Down
Menu to set the correct sample rate.
27
Page 29

New Stereo Track - Creates a stereo track (similar to above). You can also
create a Stereo Track by joining two tracks using the Track Pop-Down Menu.
New Label Track
- Creates a new Label Track, which can be very useful for
textual annotation.
New Time Track
- Creates a new Time Track, which is used to vary the speed
of playback over time.
Remove Tracks - Removes the selected track or tracks from the project. Even if only
part of a track is selected, the entire track is removed. You can also delete a track by
clicking the X in its upper-left corner. To cut out only part of the audio in a track, use
“Delete” or “Silence”.
Align Tracks
- All of the Align functions work on whole tracks or groups of tracks,
not on selections, even if they span across multiple tracks. They all operate by timeshifting tracks (moving them left or right), making it easier to synchronize tracks or
get rid of silence at the beginning. The cursor or selection stays in the same place
unless you use the “Align and Move Cursor” command below:
Align and Move Cursor
- Same as the functions above, except that the cursor or
selection is moved along with the tracks, allowing you to shift the tracks without
losing your relative place.
Add Label at Selection - Creates a new label at the current selection. You can title
the label by typing with the keyboard and then hitting “Enter” when you’re done.
Add Label at Playback Position
- Creates a new label at the current location where
you are playing or recording. Use this command if you want to mark a certain passage
while you’re listening to it. You can title the label by typing with the keyboard and then
hitting “Enter” or “Return” when you’re done. Only available while Audacity is playing.
28
Page 30

GENERATE MENU
If you choose an item from the Generate Menu when there are no tracks
in a project, a new track is created. Otherwise, the current track is used.
If a track is selected and the cursor is placed in a single place in the track
audio is inserted at the cursor position. The default duration is 30 seconds.
The audio created will replace the any selection, otherwise it is inserted
into the track, shifting up later parts of the track.
Silence - Inserts silence.
Tone - Creates a Sine wave, Square wave or Sawtooth wave.
White Noise - Inserts random audio samples, which sound like pure static.
Any items which appear after these three built-ins are VST, Ladspa or Nyquist
plug-ins. It is possible for a poorly written plug-in to crash Audacity, so always
save your work before using a plug-in. Note that any effect that doesn’t take
any audio as input will automatically be placed in the Generate Menu.
29
Page 31

EFFECT MENU
The items in this menu only work when you have audio selected. Audacity does
not have any real-time effects; you must select the audio, apply the effect and
then listen to the results.
Most effects have a Preview button. Clicking on this button plays up to three
seconds of audio, allowing you to hear what it will sound like after the effect
is applied. This is useful for fine-tuning the effect parameters.
Repeat Last Effect
- Selecting this command is a shortcut to applying the most
recent effect with the same settings. This is a convenient way to quickly apply
the same effect to many different parts of a file.
Amplify - Changes the volume of the selected audio. If you click the “Allow clipping”
check-box, it will let you amplify so much that the audio ends up beyond the range
of the waveform, and is clipped (distorted). The default value when you open the
effect is to amplify so that the loudest part of the selection is as loud as possible
without distortion.
Bass Boost - Enhances the bass frequencies in the audio.
Change Pitch
- Changes the pitch/frequency of the selected audio without changing
the tempo. When you open the dialog, the starting frequency is set to Audacity’s best
guess as to the frequency of the selection. This works well for recordings of singing
or musical instruments without background noise. You can specify the pitch change
in one of four different ways: musical note, semitones, frequency or percent change.
30
Page 32

Change Speed - Changes the speed of the audio by re-sampling. Making the
speed higher will also increase the pitch, and vice versa. This will change the
length of the selection.
Change Tempo
- Changes the tempo (speed) of the audio without changing
the pitch. This will change the length of the selection.
Compressor
- Compresses the dynamic range of the selection so that the loud
parts are softer while the volume of the soft parts remains the same. You can
optionally normalize the recording afterwards, resulting in the entire piece having
higher perceived volume.
Echo
- Very simple effect that repeats the selection with a decay, sounding like
a series of echoes. This effect does not change the length of the selection, so you
may want to add silence to the end of the track before applying it (using the
Generate Menu).
Equalization - Boosts or reduces arbitrary frequencies. You can select one of
a number of different curves designed to equalize the sound of some popular
record manufacturers, or draw your own curve.
Fade In - Fades the selection in linearly.
Fade Out - Fades the selection out linearly.
FFT Filter
- Similar to Equalization; lets you enhance or reduce arbitrary
frequencies. The curve here uses a linear scale for frequency.
Invert - Flips the waveform vertically, the same as a phase inversion
in the analogue domain.
31
Page 33

Noise Removal - Cleans up noise from a recording. First, select a small piece of
audio that is silent except for the noise, select “Noise Removal”, and click on the
“Get Noise Profile” button. Then select all of the audio you want filtered, select
“Noise Removal” again, and click the “Remove Noise” button. You can experiment
with the slider to try to remove more or less noise. It is normal for Noise Removal
to result in some distortion. It works best when the audio signal is much louder
than the noise.
Normalize
- Allows you to correct for DC offset (a vertical displacement of the
track) and/or amplify such that the maximum amplitude is a fixed amount, -3 dB.
It’s useful to normalize all of your tracks before mixing. If you have a lot of tracks,
you may then need to use the track gain sliders to turn some down.
Nyquist Prompt
- Allows you to express arbitrary transformations using a powerful
functional programming language. See the Nyquist section of the Audacity website
for more information.
Phaser - The name “Phaser” comes from “Phase Shifter,” because it works by
combining phase-shifted signals with the original signal. The movement of the
phase-shifted signals is controlled using a Low Frequency Oscillator (LFO).
Repeat - Repeats the selection a certain number of times. This operation is quite
fast and space-efficient, so it is practical to use it to create nearly-infinite loops.
Reverse - This effect reverses the selected audio temporally; after the effect
the end of the audio will be heard first and the beginning last.
32
Page 34

Wahwah - Uses a moving bandpass filter to create its sound. A Low Frequency
Oscillator (LFO) is used to control the movement of the filter throughout the
frequency spectrum. Adjusts the phase of the left and right channels when given
a stereo selection, so that the effect seems to travel across the speakers.
Plugins 1 to 15 ... etc. - These sub menus contain any VST, Ladspa, or Nyquist
plug-ins loaded by Audacity. It is possible for a poorly written plug-in to crash
Audacity, so always save your work before using a plug-in effect.
ANALYZE MENU
Plot Spectrum - To use this feature, first select a region of audio from a single track,
then select “Plot Spectrum.” It opens up a window that displays the Power Spectrum
of the audio over that region, calculated using the Fast Fourier Transform. The graph
represents how much energy is in each frequency. As you move the mouse over the
display, it shows you the nearest peak frequency. This window can also display other
common functions that are calculated using the Fast Fourier Transform, including
three versions of the Autocorrelation function. The Enhanced Autocorrelation
function is very good at identifying the pitch of a note.
The Analyze Menu is intended for effects and plug-in effects that do not modify
the audio, but simply open a dialog with some descriptive information. Audacity
also supports Analyze commands that create annotations in a Label Track.
HELP MENU
About Audacity - Displays the version number and credits. If you compiled Audacity
yourself, check here to verify which optional modules were successfully compiled in.
33
Page 35

TROUBLESHOOTING
PROBLEM CAUSE SOLUTION
I cannot hear the
music playing when
I am recording, and
I don’t see the audio
meters moving.
Make sure the USB
device is connected
to a working USB port
on your computer.
USB device
not powered.
USB device
not connected
to the computer.
Make sure the USB
device is connected
to a working USB port
on your computer.
If already connected,
try reconnecting the device
and restarting the software.
Bad USB cable
or port.
Try using a different
USB cable. Also, try
reconnecting the USB
device to a different USB
port on your computer.
34
Page 36

TROUBLESHOOTING
PROBLEM CAUSE SOLUTION
The music is playing
and the audio meters
are moving, but I am
not hearing the music.
Make sure your
computer’s sound card
is selected as your
playback device.
Audio output not
set correctly.
Computer speakers
are muted.
Turn up the volume
on your computer.
Computer speakers
are not connected.
If using external speakers,
make sure that they
are connected to your
computer’s sound card.
I am experiencing
poor sound quality.
Close all other
applications, restart the
computer, and run only
EZ Audio Converter.
Other software
applications are
interfering with the
EZ Audio Converter.
If transferring from vinyl,
gently clean the surface
of the record first.
Vinyl record is dirty
or scratched.
If using the USB turntable,
cartridge must be securely
connected to the tonearm.
Cartridge connection
is not secure.
35
Page 37

TROUBLESHOOTING
PROBLEM CAUSE SOLUTION
The recording sounds
loud and distorted.
If your own USB device
is equipped with a Gain
knob, turn it down.
The USB device’s
Gain level is set
too high.
The USB device’s
Gain level is set
too low.
If your own USB device
is equipped with a Gain
knob, turn it up.
Computer audio
output not is
not set correctly.
Make sure that your
computer’s audio sound
card is selected as your
playback device. Please
note; depending upon
your computer, the
playback device will be
different but should not
say “USB Audio Codec.”
The recording
is barely audible.
I cannot hear my
recordings once
I have transferred
them and tried to play
them on my computer.
While the USB
device is connected,
I cannot listen to any
music from my computer.
Same as above.
Same as above.
36
Page 38

TROUBLESHOOTING
PROBLEM CAUSE SOLUTION
On Windows Vista or 7,
my recordings are mono
instead of stereo.
In Vista or 7, you may
need to manually
specify “stereo” for
the recording input.
Recording input
properties in Vista or 7
not set to “stereo.”
37
Page 39

COMPATIBILITY
PC running Windows® XP (32-bit), Vista® (32-bit) or 7
Mac® running OS X 10.4* or higher (with Intel processor)
One available USB 1.1 port or higher
Compatible with most standard operating system drivers
*This product includes two Macintosh-compatible software recording programs on
the CD-ROM. The included EZ Converter software requires Mac OS 10.4 or higher.
However, the included Audacity software is compatible with Mac OS 10.1 or higher.
Customers with computers running Mac OS 9, may download an earlier version of
Audacity (v.1.0.0) for free at http://audacity.sourceforge.net/download/mac.
Windows and Vista are registered trademarks of Microsoft Corporation.
Mac is a trademark of Apple, Inc., registered in the U.S and other countries.
Intel is a registered trademark of Intel Corporation.
•
•
•
•
38
Page 40

SPECIFICATIONS
TURNTABLE
Type: . . . . . . . . . . . . . . . . . . . . . . . . . . . . . . . . . . . . . . . . Belt drive semi-automatic
Drive motor: . . . . . . . . . . . . . . . . . . . . . . . . . . . . . . . . . DC EG servo motor
Speed: . . . . . . . . . . . . . . . . . . . . . . . . . . . . . . . . . . . . . . 33-1/3 rpm and 45 rpm
Wow and flutter: . . . . . . . . . . . . . . . . . . . . . . . . . . . . . Less than 0.25% WRMS
Turntable platter: . . . . . . . . . . . . . . . . . . . . . . . . . . . . . 300mm diameter platter
CARTRIDGE
Type: . . . . . . . . . . . . . . . . . . . . . . . . . . . . . . . . . . . . . . . . Moving magnetic cartridge
Stylus: . . . . . . . . . . . . . . . . . . . . . . . . . . . . . . . . . . . . . . Bonded diamond, 0.6mil
(Radius of sphere)
Optimum tracking force: . . . . . . . . . . . . . . . . . . . . . . 2.5~3.5 grams
Output: . . . . . . . . . . . . . . . . . . . . . . . . . . . . . . . . . . . . . . 170mV-340mV
Frequency response: . . . . . . . . . . . . . . . . . . . . . . . . . 50-20,000Hz
Crosstalk: . . . . . . . . . . . . . . . . . . . . . . . . . . . . . . . . . . . 16 dB (1 KHz)
39
Page 41

SPECIFICATIONS (CONT.)
GENERAL
Power supply: . . . . . . . . . . . . . . . . . . . . . . . . . . . . . . . 110V 60 Hz
Power consumption: . . . . . . . . . . . . . . . . . . . . . . . . . 5W
Dimensions: . . . . . . . . . . . . . . . . . . . . . . . . . . . . . . . . . 16.5” w x 4.25” h x 14.25” d
Net weight: . . . . . . . . . . . . . . . . . . . . . . . . . . . . . . . . . . approx. 7lbs
40
Page 42

ONE (1) YEAR LIMITED WARRANTY
Brookstone® warrants this product against defects in materials and/or workmanship
under normal use for a period of ONE (1) YEAR from the date of purchase by the
original purchaser (“Warranty Period”). If a defect arises and a valid claim is received
within the Warranty Period, at its option, Brookstone will either 1) repair the defect
at no charge, using new or refurbished replacement parts, or 2) replace the product
with a new product that is at least functionally equivalent to the original product, or
3) provide a store credit in the amount of the purchase price of the original product.
A replacement product or part, including a user-installable part installed in accordance
with instructions provided by Brookstone, assumes the remaining warranty of the
original product. When a product or part is exchanged, any replacement item becomes
your property and the replaced item becomes Brookstone’s property. When a store
credit is given, the original product must be returned to Brookstone and becomes
Brookstone’s property.
Obtaining Service:
To obtain warranty service, call Brookstone Limited Warranty Service at
1-800-292-9819. Please be prepared to describe the product that needs service and
the nature of the problem. A purchase receipt is required. All repairs and replacements
must be authorized in advance. Service options, parts availability and response times
will vary. You are responsible for delivery and the cost of delivery of the product or any
parts to the authorized service center for replacement, per our instructions.
Limits and Exclusions:
Coverage under this Limited Warranty is limited to the United
States of America, including the District of Columbia and the U.S. Territories of
Guam, Puerto Rico, and the U.S. Virgin Islands. This Limited Warranty applies only
to products manufactured for Brookstone that can be identified by the “Brookstone”
trademark, trade name, or logo affixed to them or their packaging. The Limited
Warranty does not apply to any non-Brookstone products. Manufacturers or
suppliers other than Brookstone may provide their own warranties to the purchaser,
41
Page 43

but Brookstone, in so far as permitted by law, provides these products “as is.”
This warranty does not apply to: a) damage caused by failure to follow instructions
relating to product’s use or the installation of components; b) damage caused by
accident, abuse, misuse, fire, floods, earthquake or other external causes; c) damage
caused by service performed by anyone who is not a representative of Brookstone;
d) accessories used in conjunction with a covered product; e) a product or part
that has been modified to alter functionality or capability; f) items intended to be
periodically replaced by the purchaser during the normal life of the product including,
without limitation, batteries or light bulbs; g) any product sold “as is” including, without
limitation, floor demonstration models and refurbished items; or h) a product that is
used commercially or for a commercial purpose.
BROOKSTONE SHALL NOT BE LIABLE FOR INCIDENTAL OR CONSEQUENTIAL
DAMAGES RESULTING FROM THE USE OF THIS PRODUCT, OR ARISING
OUT OF ANY BREACH OF THIS WARRANTY. TO THE EXTENT PERMITTED BY
APPLICABLE LAW, BROOKSTONE DISCLAIMS ANY AND ALL STATUTORY OR
IMPLIED WARRANTIES, INCLUDING, WITHOUT LIMITATION, WARRANTIES
OF MERCHANTABILITY, FITNESS FOR A PARTICULAR PURPOSE AND
WARRANTIES AGAINST HIDDEN OR LATENT DEFECTS. IF BROOKSTONE
CANNOT LAWFULLY DISCLAIM STATUTORY OR IMPLIED WARRANTIES, THEN
TO THE EXTENT PERMITTED BY LAW, ALL SUCH WARRANTIES SHALL BE
LIMITED IN DURATION TO THE DURATION OF THIS EXPRESS WARRANTY.
Some states disallow the exclusion or limitation of incidental or consequential damages
or how long an implied warranty lasts, so the above exclusions or limitations may not
apply to you. This warranty gives you specific legal rights and you may also have other
rights, which vary from state to state.
42
Page 44

634899
Merrimack, New Hampshire USA 03054 • 800-846-3000 • www.Brookstone.com
 Loading...