

Page 1

Instruction Manual
FLOW-BUS LabVIEW™ Driver
Doc. no.: 9.17.078B Date: 13-05-2014
ATTENTION
Please read this Instruction Manual carefully before installing and operating the instrument.
Not following the guidelines could result in personal injury and/or damage to the equipment.
Page 2

Important information. Discarding this information could cause injuries to people or damage to the instrument or
installation.
Helpful information. This information will facilitate the use of this instrument.
i
www
Additional info available on the internet or from your local sales representative.
Check the packing list to ensure that you received all of the items.
Do not discard spare or replacement parts with the packing material and inspect the contents for damage.
Bronkhorst®
Disclaimer
The information in this manual has been reviewed and is believed to be wholly reliable. No responsibility, however, is assumed for
inaccuracies. The material in this manual is for information purposes only.
Bronkhorst®
May 2014
Symbols
Receipt of equipment
Check the outside packing box for damage incurred during shipment. Should the packing box be damaged, then the local carrier
must be notified at once regarding his liability, if so required. At the same time a report should be submitted to your distributor.
Carefully remove the equipment from the packing box. Verify that the equipment was not damaged during shipment. Should the
equipment be damaged, then the local carrier must be notified at once regarding his liability, if so required. At the same time a
report should be submitted to your distributor.
Refer to "Removal and return instructions" about return shipment procedures.
Equipment storage
The equipment should be stored in its original packing in a cupboard warehouse or similar. Care should be taken not to subject the
equipment to excessive temperatures or humidity.
Copyright
© 2014 Bronkhorst®
All rights reserved. This documentation is protected by copyright.
Subject to technical and optical changes as well as printing errors.
The information contained in this document is subject to change at any time without prior notification. Bronkhorst® reserves the
right to modify or improve its products and modify the contents without being obliged to inform any particular persons or
organizations. The device specifications and the contents of the package may deviate from what is stated in this document.
9.17.0782 FLOW-BUS LabVIEW™ Driver Manual
Page 3

i
www
See also paragraph 9 of the Conditions of sales:
http://www.bronkhorst.com/files/corporate_headquarters/sales_conditions/en_general_terms_of_sales.pdf
Bronkhorst®
Warranty
Bronkhorst products are warranted against defects in material and workmanship for a period of three years from the date of
shipment provided they are used in accordance with the ordering specifications and not subjected to abuse or physical damage.
Products that do not operate properly during this period may be repaired or replaced at no charge. Repairs are normally warranted
for one year or the balance of the original warranty, whichever is the longer.
The warranty includes all initial and latent defects, random failures, and undeterminable internal causes.
It excludes failures and damage caused by the customer, such as contamination, improper electrical hook-up, physical shock etc.
Re-conditioning of products primarily returned for warranty service that is partly or wholly judged non-warranty may be
charged for.
Bronkhorst® or affiliated company prepays outgoing freight charges when any part of the service is performed under warranty,
unless otherwise agreed upon beforehand, however, if the product has been returned collect to our factory or service center, these
costs are added to the repair invoice. Import and/or export charges, foreign shipping methods/carriers are paid for by the
customer.
© 2014 Bronkhorst®
FLOW-BUS LabVIEW™ Driver Manual
3
Page 4

Table of contents
...................................................................................................................................................................... 5
General Product Information 1
...................................................................................................................................................................... 51.1 Introduction
...................................................................................................................................................................... 51.2 References to Other Applicable Documents
...................................................................................................................................................................... 5Manuals and user guides 1.2.1
...................................................................................................................................................................... 5Technical drawings 1.2.2
...................................................................................................................................................................... 51.3 Supported Instruments
...................................................................................................................................................................... 51.4 System Requirements
...................................................................................................................................................................... 61.5 Installation of the driver package
...................................................................................................................................................................... 6NI Instrument Driver Finder Installation 1.5.1
...................................................................................................................................................................... 6Manual Installation 1.5.2
...................................................................................................................................................................... 7
Interfaces 2
...................................................................................................................................................................... 72.1 RS232 on Multibus Instrument
...................................................................................................................................................................... 7Applications, e.g. EL-FLOW 2.1.1
...................................................................................................................................................................... 82.2 RS232/FLOW-BUS Interface
...................................................................................................................................................................... 8D-connector for RS232 2.2.1
...................................................................................................................................................................... 9
Operation 3
...................................................................................................................................................................... 93.1 Accessing the Driver VI’s
...................................................................................................................................................................... 93.2 Driver Structure
...................................................................................................................................................................... 10Basic Application Structure 3.2.1
...................................................................................................................................................................... 10Standard Driver VI Structure 3.2.2
...................................................................................................................................................................... 12
Adding a Driver VI 4
...................................................................................................................................................................... 124.1 Sending a Parameter
...................................................................................................................................................................... 124.2 Requesting a Parameter
...................................................................................................................................................................... 134.3 Example
...................................................................................................................................................................... 15
Service 5
Bronkhorst®
9.17.0784 FLOW-BUS LabVIEW™ Driver Manual
Page 5

Bronkhorst®
The Bronkhorst® FLOW-BUS driver is a set of LabVIEW™ VIs (Virtual Instruments)
that implement the serial ASCII commands used on the FLOW-BUS. The VIs also
handle the conversion of data that is sent to or received from an instrument.
For more information about the commands and the data sent, please refer to
the RS232 interface with FLOW-BUS protocol manual (document nr. 9.17.027) or
to the operation instructions digital instruments manual (document nr. 9.17.023).
i
www
Manuals and Software tooling can be found at: http://www.bronkhorst.com/en/downloads
Operation instructions digital instruments
(document nr. 9.17.023)
FLOW-BUS interface
(document nr. 9.17.024)
RS232 interface with FLOW-BUS protocol
(document nr. 9.17.027)
Hook-up diagram laboratory-style MBC RS232 + analog
(document nr. 9.16.062)
Hook-up diagram industrial style MBC RS232 + analog
(document nr. 9.16.051)
Hook-up diagram CORI-FLOW RS232 + analog
(document nr. 9.16.044)
Hook-up diagram LIQUI-FLOW L30 digital RS232 + analog
(document nr. 9.16.073)
LabVIEW™ Version
LabVIEW™ 8.5 or higher
NI-VISA Version
NI-VISA 5.4 or higher
Connections
RS232 port with FIFO buffers
Computer
The computer must meet the minimum requirements needed for LabVIEW™
To avoid communication errors, it is advised to use a serial (RS232) port with hardware buffer overrun detection.
Few USB-RS232 converters have this feature, but e.g. the Digitus part no. DA-70156 has.
1 General Product Information
1.1 Introduction
Along with the driver some example VIs are included to demonstrate the structure of an application that utilizes the driver VIs. The
examples can also be used to test communication with an instrument, as the examples are all tested and functional.
The driver documentation is aimed at individuals with a reasonable working understanding of LabVIEW™, and is not intended as a
tutorial to developing applications written in the LabVIEW™ environment.
1.2 References to Other Applicable Documents
Manuals and guides for digital instruments are modular. General instructions give information about the functioning and
installation of instruments. Operational instructions explain the use of the digital instruments features and parameters. Fieldbus
specific information explains the installation and use of the fieldbus installed on the instrument.
1.2.1 Manuals and user guides
1.2.2 Technical drawings
1.3 Supported Instruments
All FLOW-BUS instruments and instruments with RS232 communication are supported, with the following limitations:
• RS232/FLOW-BUS interface, firmware >= 4.09
• Digital mass flow meters/controllers without RS232 communication: firmware >= V5.xx
• Digital readout control modules (E-7000): firmware >= V3.xx
1.4 System Requirements
© 2014 Bronkhorst®
FLOW-BUS LabVIEW™ Driver Manual
5
Page 6

Bronkhorst®
1) Open the NI Instrument Driver Finder from the
Tools»Instrumentation»Find Instrument Drivers or the
Help»Find Instrument Drivers menu.
2) Select Bronkhorst High-Tech from the manufacturer drop-down list.
If Bronkhorst High-Tech is not listed, enter 'FLOW-BUS' in the
search field.
3) Click the Search button. If the search button is disabled hit the
enter key.
4) Select the 'brflowbus Instrument Driver' entry from the search
results list.
5) Select the driver for the installed (or compatible) version of LabVIEW™.
6) Click the Install button*.
7) The NI Instrument Driver Finder will now download and install the
driver.
8) When the driver installation is finished you can close the NI Instrument
Driver Finder, and start using the Bronkhorst FLOW-BUS Driver.
Figure 1: NI Instrument Driver Finder
* If a login screen appears, enter your e-mail address and password to login with your NI account. If you do not
have a NI account, create a new account and then login.
i
www
The most recent version of the driver will always be available on NI’s Instrument Driver Network (IDNet):
http://sine.ni.com/apps/utf8/niid_web_display.model_page?p_model_id=22575 or
http://www.ni.com/downloads/instrument-drivers/
1) Close LabVIEW™.
2) Extract the downloaded bronkhorst_flow_bus.zip file to
the instrument library folder, located at
C:\Program Files\National Instruments\LabVIEW xx
\instr.lib*
Where 'xx' indicates the installed LabVIEW™ version.
3) Start LabVIEW™, during the start-up process an entry will
be created in the instrument driver menu to access the
driver VIs.
4) Before you start using the driver it is advised to mass
compile the driver VIs. The option Mass Compile can be
found under Tools » Advanced » Mass Compile, click on
this option and perform the following steps to mass
compile the driver VIs:
a. Navigate to the instr.lib\Bronkhorst FLOW-BUS folder.
b. Click the Current Folder button.
c. Click the Mass Compile button.
d. Wait for the process to finish and click on the Done button.
5) The driver is now ready to be used.
Figure 2: Library folder location
* C:\Program Files is a system folder and is followed by (x86) on 64-bit Windows versions and may differ on nonEnglish Windows versions.
1.5 Installation of the driver package
1.5.1 NI Instrument Driver Finder Installation
The driver can be downloaded and installed from LabVIEW™ by using the NI Instrument Driver Finder. To install the driver with this
tool please follow the next steps:
1.5.2 Manual Installation
If the Installation with the Instrument Driver Finder fails you can try a manual installation. For the manual installation you will also
need to manually download the driver package.
Please make sure you download the driver that is compatible with your installed version of LabVIEW™. After downloading please
follow these steps to install the driver:
6
FLOW-BUS LabVIEW™ Driver Manual 9.17.078
Page 7
Bronkhorst®
By default, the interface offers communication at a baud rate of 38400 baud. On instruments that offer the
possibility to change the RS232 baud rate, the baud rate may be configured differently. See the technical
documentation of your instrument for which baud rates are supported.
2 Interfaces
2.1 RS232 on Multibus Instrument
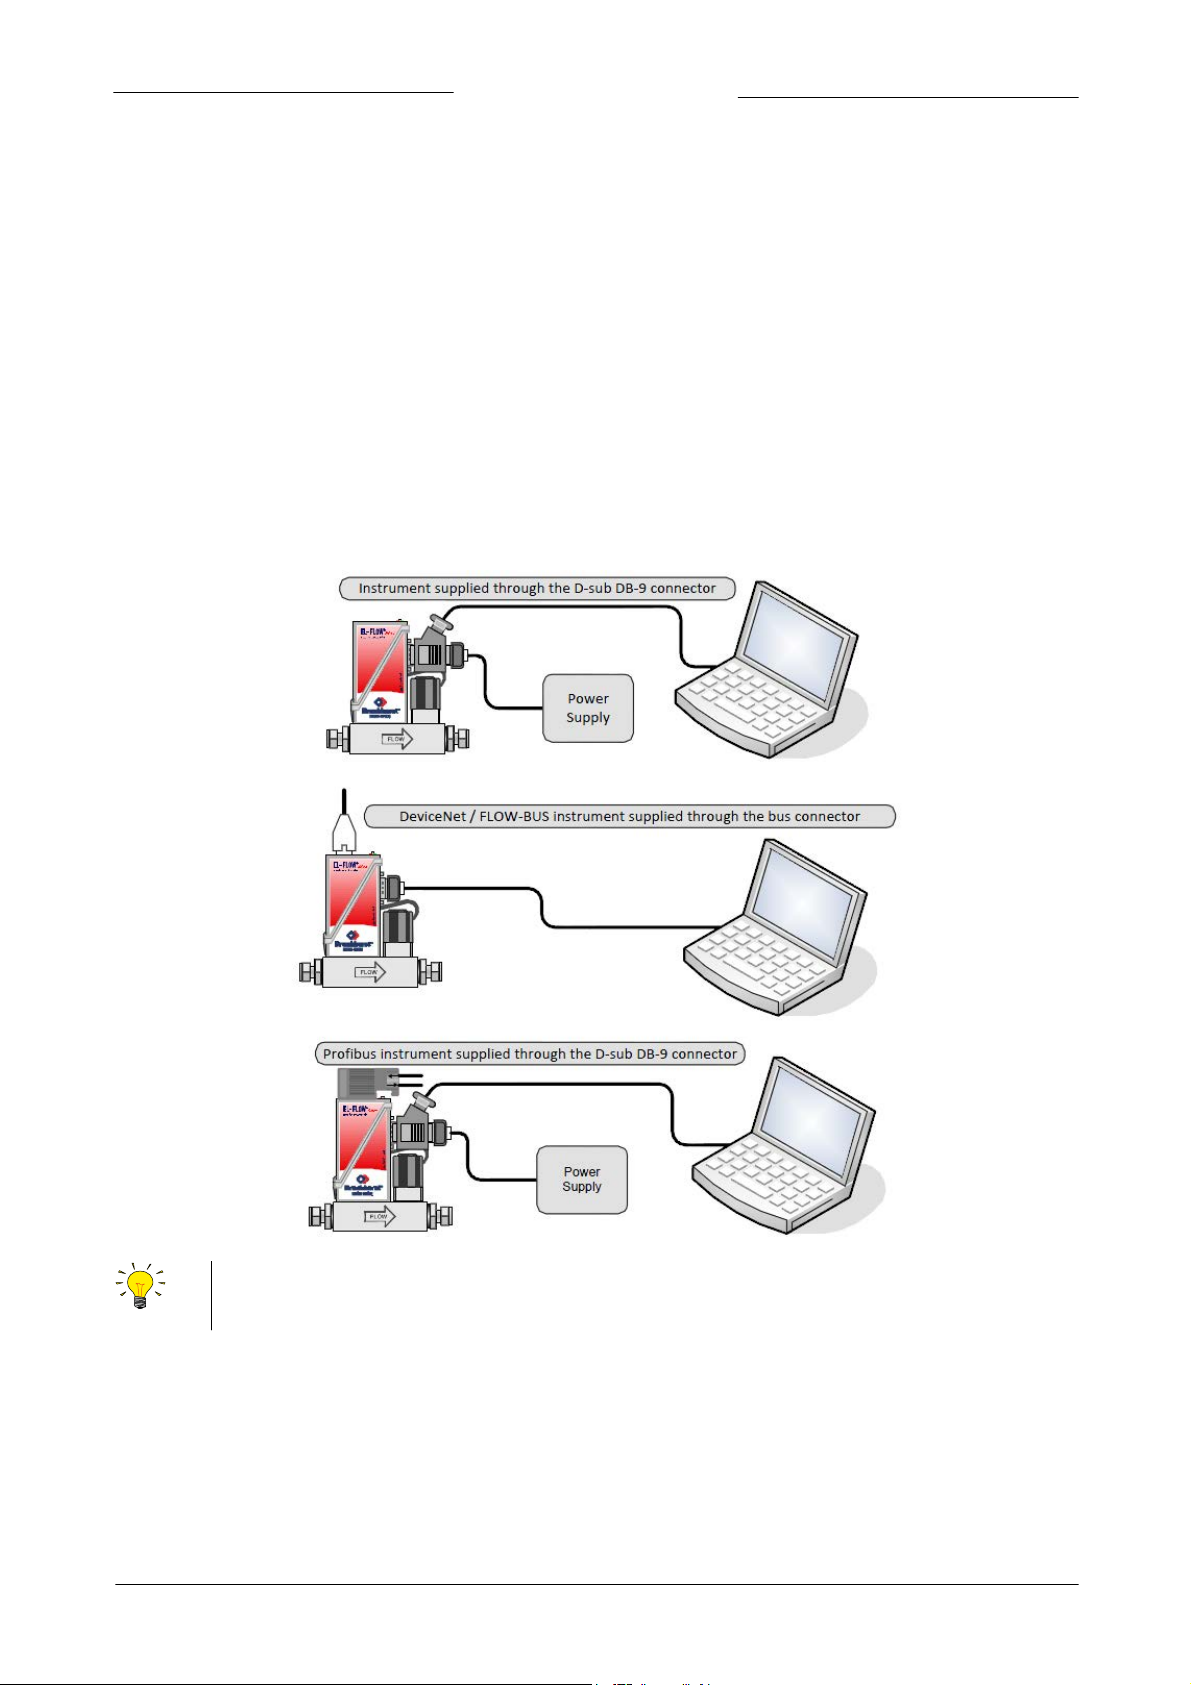
The RS232 interface on a multibus instrument can be connected to any RS232 V24 serial (computer) port. Make sure to respect the
hook-up diagram. Bronkhorst offers special cables for communication, separating the RS232 lines from the power and analog inand output. On the 9-pin male D-sub connector of the instrument RX and TX are available on pin 6 and pin 1.
Serial RS232 communication on a multibus instrument with RS232 can be treated as a FLOW-BUS system with one instrument and a
FLOW-BUS/RS232 interface. In case a FLOW-BUS fieldbus connection is present, other instruments connected to the FLOW-BUS can
be communicated with as well.
RS232 communication is possible by:
• 9-pin Sub D-connector (non-IP65 instruments, e.g. EL-FLOW)
• 8-pin DIN connector (IP65 instruments, e.g. CORI-FLOW)
For the exact connections please advise your hook-up diagram.
2.1.1 Applications, e.g. EL-FLOW
© 2014 Bronkhorst®
FLOW-BUS LabVIEW™ Driver Manual
7
Page 8

Bronkhorst®
Pin number
Description
1
not connected
2
TXD
3
RXD
4
not connected
5
0 Vd
6
DTR
7
CTS
8
RTS
9
Shield
2.2
The RS232/FLOW-BUS interface is an interface between the FLOW-BUS and the RS232 V24 serial (computer) port. It will either be
supplied as a separate enclosed unit with a FLOW-BUS connector and a RS232 connector or as an integral 14TE module of your E7000 readout and control system. The converter offers communication with a baud rate up to 38400 baud. Communication
software support is available. Communication settings are: 38400, n, 8, 1.
RS232/FLOW-BUS Interface
Figure 3: RS232/FLOWBUS Interfaces
2.2.1 D-connector for RS232
The female RS232 (x) (sub miniature 9-pin) D-connector has the following pin configuration:
8
FLOW-BUS LabVIEW™ Driver Manual 9.17.078
Page 9

Bronkhorst®
The driver VIs can be accessed via the functions palette on the block diagram of a
VI. To access the functions palette, open a (new) VI, open its the block diagram, and
finally open the functions palette from the View » Functions Palette menu. The
driver VIs are located in the functions palette under Instrument I/O » Instrument
Drivers » Bronkhorst FLOW-BUS.
Figure 4: Functions Palette
The Configure folder contains VIs that can configure values in an instrument.
An example of a Configure VI is the Configure Setpoint VI, which is used to
write a value for the setpoint parameter to the instrument.
The Data folder contains VIs that can be used to read data from an instrument.
In order to read data a request command needs to be sent first. An example of a
Data VI is the Read Measure VI, which can read the measure value from an
instrument.
The Utility folder contains VIs that can read and write to the instruments or do
neither. The VIs mostly perform actions that don’t affect the measuring and
controlling in the instrument, like the Error Query VI that uses a response already
received.
The VIs Close, Initialize, and VI Tree are located in the root of the Public folder.
The VIs Initialize and Close are needed to initialize (open) and close the connection
with the COM port on which the instrument or FLOW-BUS to RS232 Converter is
connected. The VI Tree gives you an overview of all VIs in the driver project on its
block diagram.
The Private folder contains VIs that are used in other driver VIs. These VIs are not
meant to be used on their own, and can only be used inside driver VIs.
Figure 5: Driver Structure folder
3 Operation
3.1 Accessing the Driver VI’s
3.2 Driver Structure
The driver project consists of a collection of folders with VIs that perform specific tasks.
The Example folder contains examples that will get you started with using the driver and building your own applications. They can
also be used to test the communication with an instrument.
The Public folder contains almost all VIs needed to communicate with an instrument. The VIs are grouped in three sub-folders
called Configure, Data, and Utility.
On all VIs that can communicate with an instrument, the VISA resource name in, the VISA resource name out, the Error in, the Error
out, and the Node Address connections need to be connected. The Node Address connector is used to address the correct
instrument when multiple instruments are connected on a bus. The VISA resource name-in and -out connections are used to pass
the connection with the COM port, that gets initialized by the Initialize VI, between VIs. The Error in/out connections are used to
pass errors between VIs and need to be connected in order for the driver VIs to report errors properly.
For more information about the various tasks the specific VIs perform, or for the process and parameter values of the parameter
accessed in the VI, utilize the context help in LabVIEW™. To enable the context help, click on the Help » Show Context Help option
in the menu or use the keyboard shortcut CTRL+H. Information about a VI or front panel control will show up when you hover over
a VI or control for a few moments.
© 2014 Bronkhorst®
FLOW-BUS LabVIEW™ Driver Manual
9
Page 10

Bronkhorst®
3.2.1 Basic Application Structure
The block diagram below shows an example from the example folder in the driver project. It concerns the Setpoint Configure and
Read VI. This example initializes the connection, writes the setpoint (percentage) and reads back the setpoint (direct) and capacity
unit from the selected instrument. After all values are read and written, the connection is closed and the program stops.
Figure 6: Setpoint Configure and Read VI
This is just an example of a very basic application using only a few of the VIs available. Bigger and more advanced applications can
incorporate loops, case structures and events to create interactive front panels. These more advanced applications can be used to
configure instrument settings and display the data read back from the instrument. An example of such an application is the
Bronkhorst FLOW-BUS Instrument Control Application VI in the Examples folder.
The Initialize- and Close-VI need to be present in every application. Those two VIs are used to open the connection to the COM
port with the correct settings, and to close that connection when the application is finished. Without proper initialization
communication to the instrument is not possible, and not closing the connection can result in errors when using the COM port in
other applications.
LabVIEW™ applications can be made as complex as you need them to be. Just make sure that all VISA and Error connections are
connected, initialized, and closed properly to insure correct operation.
To add functionality to the driver some knowledge of the driver VI structure is needed. This information is available in the next
chapters. Parameter properties can be found in the parameter properties table in document 9.17.027.
3.2.2 Standard Driver VI Structure
The image below shows the block diagram of the Configure Counter Limit VI, which can be found in the Configure » Counter
folder. This VI configures the counter limit/batch in units selected with the Configure Counter Unit VI. The value is a float in IEEE754 32-bits single precision notation of which the default setting is 0 ln.
Figure 7: Configure Counter Limit VI
All driver VIs that communicate to an instrument use a FLOW-BUS RW VI. This VI is located in the Private folder that corresponds to
the VIs function. The FLOW-BUS RW VI takes the values from the input cluster and uses these values to create a command string
that complies with the FLOW-BUS protocol. The values needed to read from, or write to, a specific parameter can be found in the
parameter properties table in document 9.17.027. In the cluster in the image above you can see all the settings to configure the
counter limit. These inputs are:
10
FLOW-BUS LabVIEW™ Driver Manual 9.17.078
Page 11

Bronkhorst®
Node Address
The address of the instrument (node) the message is meant for.
Communication Command
The type of command to send (Send parameter or Request parameter).
Process
The process number of the parameter.
Parameter
The parameter number of the parameter.
Data Type
The data type of the parameter.
Data for [data type]
The data that will be sent to the selected parameter in the selected instrument.
Constants that are not used will keep their default values.
In the image above the controls for the Node Address and the Data for Float or Long are wired into the cluster. Wiring controls into
the cluster makes the VI interactive, as the values can now be changed from the front panel. The controls are wired into the cluster
by means of the Bundle by Name function that only changes the selected values. The other values are copied from the input
cluster constants.
Most driver VIs closely resemble the pictured above. The output of the Configure Counter Limit VI does not need to be converted
before passing it into the FLOW-BUS RW VI, but there are other Configure VIs outputs which need to be converted.
The block diagram of a Read VI looks similar to the block diagram of a Write VI. Because there is no data to be send, the
parameters Data for [data type] are missing.
© 2014 Bronkhorst®
FLOW-BUS LabVIEW™ Driver Manual
11
Page 12

Bronkhorst®
Node Address
The address of the instrument (node) the message is meant for.
Communication Command
The type of command to send (send parameter with destination address and 00
response).
Process
The process number of the parameter.
Parameter
The parameter number of the parameter.
Data Type
The data type of the parameter.
Data for [data type]
The data that will be sent to the instrument, different data types require to be input in
different inputs.
i
www
All of these values can be found in the parameter properties table in document 9.17.027, 'Instruction manual RS232
interface'. http://www.bronkhorst.com/files/downloads/manuals_english/917027manual_rs232_interface.pdf
Node Address
The address of the instrument (node) the message is meant for.
Communication Command
The type of command to send (request parameter).
Process
The process number of the parameter.
Parameter
The parameter number of the parameter.
Data Type
The data type of the parameter.
i
www
All of these values can be found in the parameter properties table in document 9.17.027, 'Instruction manual RS232
interface'. http://www.bronkhorst.com/files/downloads/manuals_english/917027manual_rs232_interface.pdf
It is important to know that not all parameters are available on all FLOW-BUS instruments. Therefore not all VIs will
work on all FLOW-BUS instruments. For more details about parameters and their use see the technical
documentation of your instrument. The Bronkhorst software application FlowDDE also gives an overview of which
parameters are available on which devices.
4 Adding a Driver VI
The most important part of the driver is the building of command strings and the extraction of information from the instruments
response. These functions are performed by the FLOW-BUS RW VI that can be found in the Private folder. This chapter offers a
quick overview of the inputs required to start sending and receiving data with the FLOW-BUS RW VI. More information about the
FLOW-BUS RW VI can be found in the block diagram and in the context help of the VI.
4.1 Sending a Parameter
The following values have to be present in the cluster that feeds the FLOW-BUS RW VI in order to send a parameter to an
instrument.
4.2 Requesting a Parameter
The following values have to be present in the cluster that feeds the FLOW-BUS RW VI in order to request a parameter from an
instrument.
The output data depends on the Data Type. There are three data outputs, one for Character or Integer values, one for Float or
Long values, and one for Strings. If the requested Character or Integer value is a negative or signed value, the output value needs to
be converted to a signed integer.
To make these functions interactive, wire a front panel control to one of the cluster values by using the Bundle by Name function
(see the image in chapter 3.2.2).
12
FLOW-BUS LabVIEW™ Driver Manual 9.17.078
Page 13

Bronkhorst®
Parameter
number (DDE)
Parameter name
Group 0
Group 1
Group 2
Process
number
FB nr
(par)
Var
Type
Var
Length
...
115
User tag
11
1136c-2...
4.3 Example
This example shows how to create a VI that can configure the user tag of an instrument.
First we need the values of the folloing parameters:
Node Address
Communication Command
Process number
Parameter number
Data Type
Data
These parameters can be found in the the parameter properties table:
The next step is to enter the values in the corresponding fields of the FLOW-BUS Command Cluster. Note:
The Communication Command will be set to “send parameter with destination address and 00 response” which corresponds to
a write command with a status reply.
The combination of Var Type c and Var Length -2 indicates the data type is a string, so the Data Type will be set to String.
When all settings are entered the cluster should look like this:
Figure 8: FLOW-BUS Command Cluster
If this cluster is wired to the FLOW-BUS RW VI, every time the VI is executed, the same values will be sent. To make the VI
interactive, the controls of the node address and the string data can be wired into the cluster. To do this, wire the cluster to the
Bundle by Name function and select the Node Address and the Data for String as the inputs. Then create controls for these two
values and connect the output cluster to the FLOW BUS RW VI.
Figure 9: Interactive Parameter Bundle
© 2014 Bronkhorst®
FLOW-BUS LabVIEW™ Driver Manual
13
Page 14

Bronkhorst®
When everything is connected the VI can be used just like any other driver VI. The block diagram of the completed VI is shown
below.
Figure 10: Example VI
If you compare the image above to the image in chapter 3.2.2 or any other driver VI, you will see a lot of similarities. The only
differences are the entered values, and possibly the conversion of the data to write to the instrument. Therefore the easiest way to
make a new driver VI is to copy an existing one and change the necessary controls, indicators and values.
14
FLOW-BUS LabVIEW™ Driver Manual 9.17.078
Page 15

Bronkhorst®
5 Service
For current information on Bronkhorst High-Tech B.V. and service addresses please visit our website:
http://www.bronkhorst.com
Do you have any questions about our products? Our Sales Department will gladly assist you selecting the right product for your
application. Contact sales by e-mail:
sales@bronkhorst.com
For after-sales questions, our Customer Service Department is available with help and guidance.
To contact CSD by e-mail:
support@bronkhorst.com
No matter the time zone, our experts within the Support Group are available to answer your request immediately or ensure
appropriate further action. Our experts can be reached at:
+31 573 45 88 39
© 2014 Bronkhorst®
FLOW-BUS LabVIEW™ Driver Manual
15
 Loading...