

Broan 345GOBK, 345GOWW, 353SOBK Instructions Manual
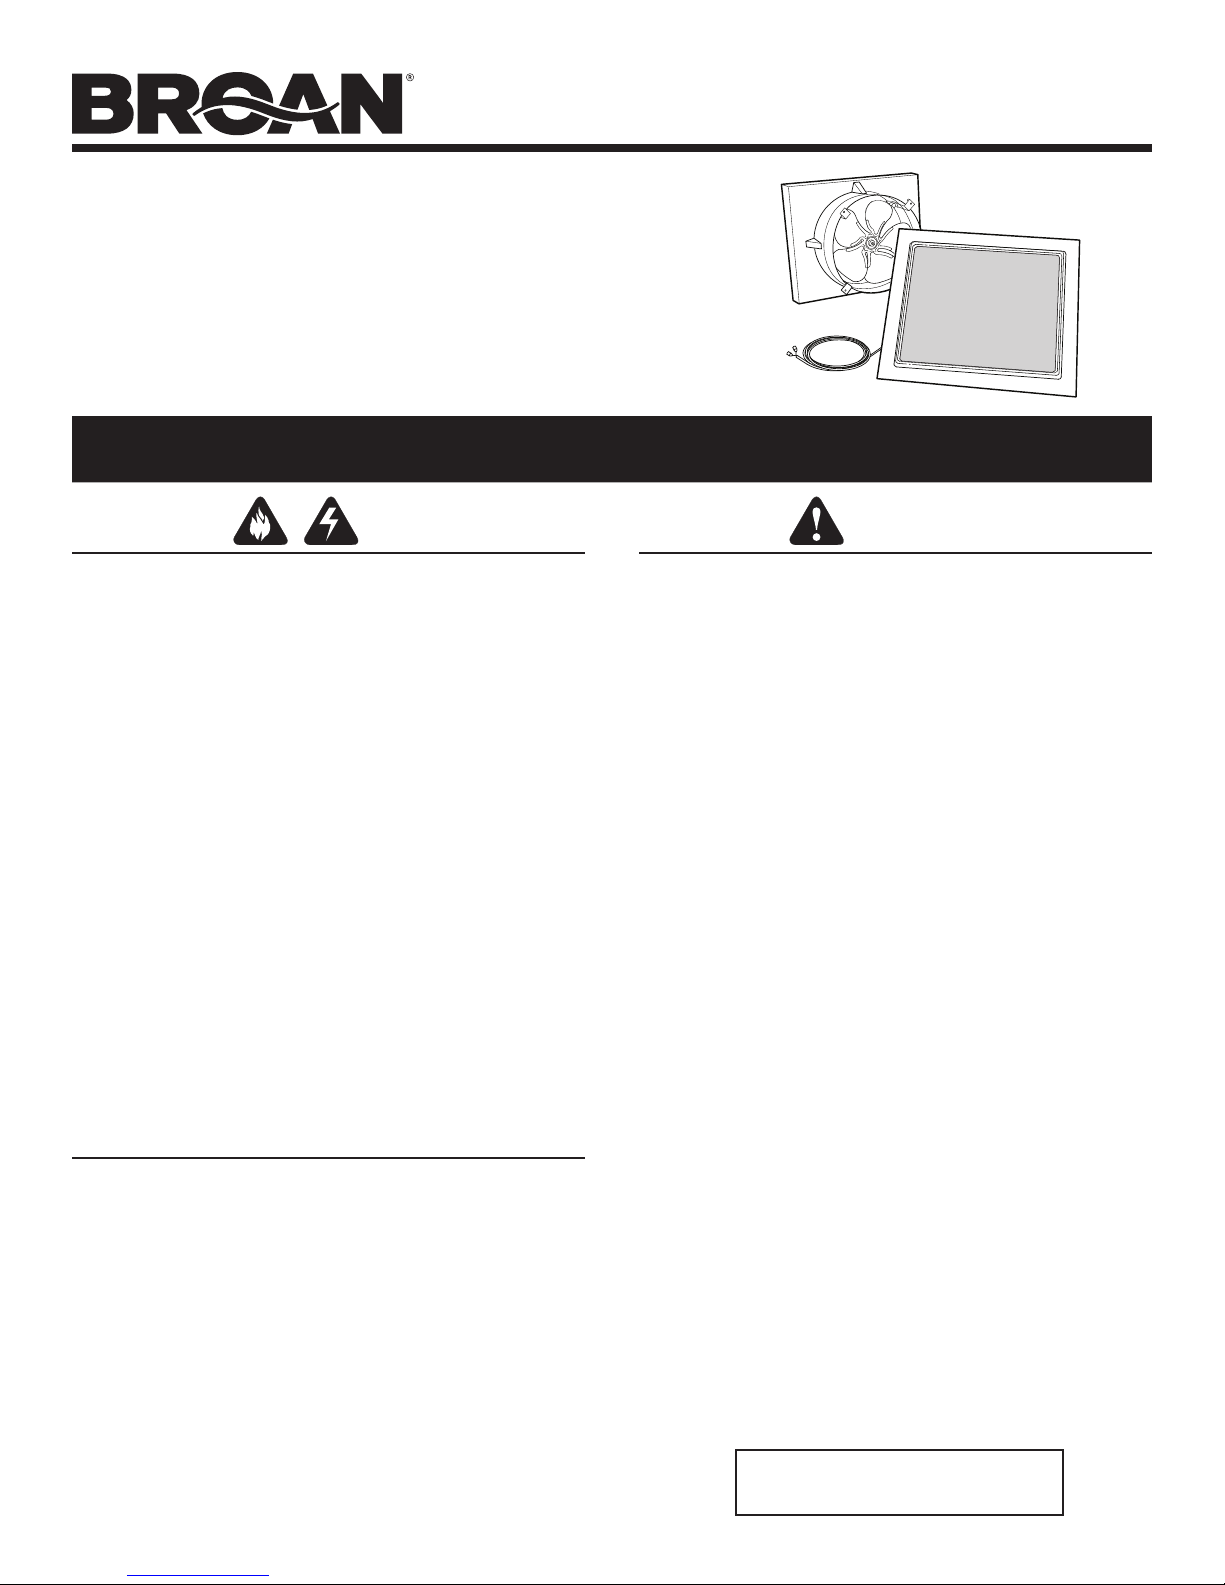
MODELS 345GOBK • 345GOWW
GABLE-MOUNT
SOLAR POWERED
ATTIC VENTILATOR
READ AND SAVE THESE INSTRUCTIONS
Page 1
WARNING
TO REDUCE THE RISK OF FIRE, ELECTRIC SHOCK, OR INJURY
TO PERSONS, OBSERVE THE FOLLOWING:
1. Use this unit only in the manner intended by the manufacturer.
If you have questions, contact the manufacturer at the address
or telephone number listed in the warranty.
2. Before servicing or cleaning unit, disable the ventilator by covering the solar panel with cardboard or disconnecting the wires
from the motor terminals (note wire locations when disconnecting).
3. Installation work must be done by a qualified person(s) in accordance with all applicable codes and standards, including
fire-rated construction codes and standards.
4. If removing an existing 120 VAC powered attic ventilator, use
only a qualified person(s) to remove any electrical wiring in
accordance with all applicable codes and standards.
5. Sufficient air is needed for proper combustion and exhausting
of gases through the flue (chimney) of fuel burning equipment
to prevent backdrafting. Follow the heating equipment manufacturer's guidelines and safety standards such as those published
by the National Fire Protection Association (NFPA), and the
American Society for Heating, Refrigeration and Air Conditioning Engineers (ASHRAE), and the local code authorities.
6. When cutting or drilling into wall or ceiling, do not damage
electrical wiring and other hidden utilities.
TOOLS AND MATERIALS REQUIRED
Slotted Screwdriver
r
Drill
r
1/4" Drill Bit
r
Sabre Saw or Keyhole Saw
r
Saw
r
Hammer
r
Ruler / Tape Measure
r
Pencil, Marker or Scribe
r
Utility Knife
r
Silicone or Roofing Cement
r
Galvanized Roofing Nails (1¾" min.)
r
CAUTION
1. For general ventilating use only. Do not use to exhaust hazardous
or explosive materials and vapors.
2. To avoid motor bearing damage and noisy and/or unbalanced
impellers, keep drywall spray, construction dust, etc. off power
unit.
3. This unit has an unguarded impeller. Do not use in locations
readily accessible to people or animals.
4. This ventilator operates when the solar panel is exposed to sun
light. To reduce risk of injury while installing, servicing or cleaning unit, cover the solar panel with cardboard or disconnect the
wires from the motor terminals (note wire locations when disconnecting).
5. The recommended open air inlet for this ventilator is 2 square
feet. The best location for these air intake vents are under the
eaves with direct access to the attic. Failure to provide these
intakes could cause natural-draft gas appliances to backdraft.
6. Your attic fan installation will create a screened opening into
your attic space. During a heavy rain storm there could be a
light spray of rain into this attic space. This is a normal condition
with all attic ventilators and will not cause any damage to the
structure. We recommend that you do not store any valuable
articles directly under the fan opening in the roof.
7. This ventilator is intended for gable (side wall) installation. Broan
Models 345, 349, 350, 355, & 356 Roof Mount Ventilators are
available for roof applications.
8. This ventilator is suitable for use with Broan Model 433 Automatic Shutter (purchase separately).
9. This ventilator includes a permanently lubricated motor. Do not
oil or disassemble.
10. The installation instructions contained in this document are only
a recommendation and individual professionals may have their
own methods of installation. If your roof has an existing warranty, installation of this product by anyone other than those
who installed the roof may jeopardize any future warranty claim.
Please check with the original installer of your roof if this is a
concern.
11. When working with asphalt shingles in cold weather (below
o
F), take care to avoid damage to the shingle edges and cor-
40
ners.
12. For installations in climates where cold weather condensation
is not a concern, Broan Model CWT45 thermostat is available.
It disconnects power to the motor when the temperature drops
below 50
reaches 61
o
F. Power is applied to the motor when the temperature
o
F.
Register your product online at:
www.broan.com/register
MODELS 345GOBK • 345GOWW
Page 2
VENTILATOR INSTALLATION
Note: This ventilator is capable of replacing an existing
120 volt powered attic ventilator. Only a qualified person should remove any electrical wiring in accordance
with local codes and standards.
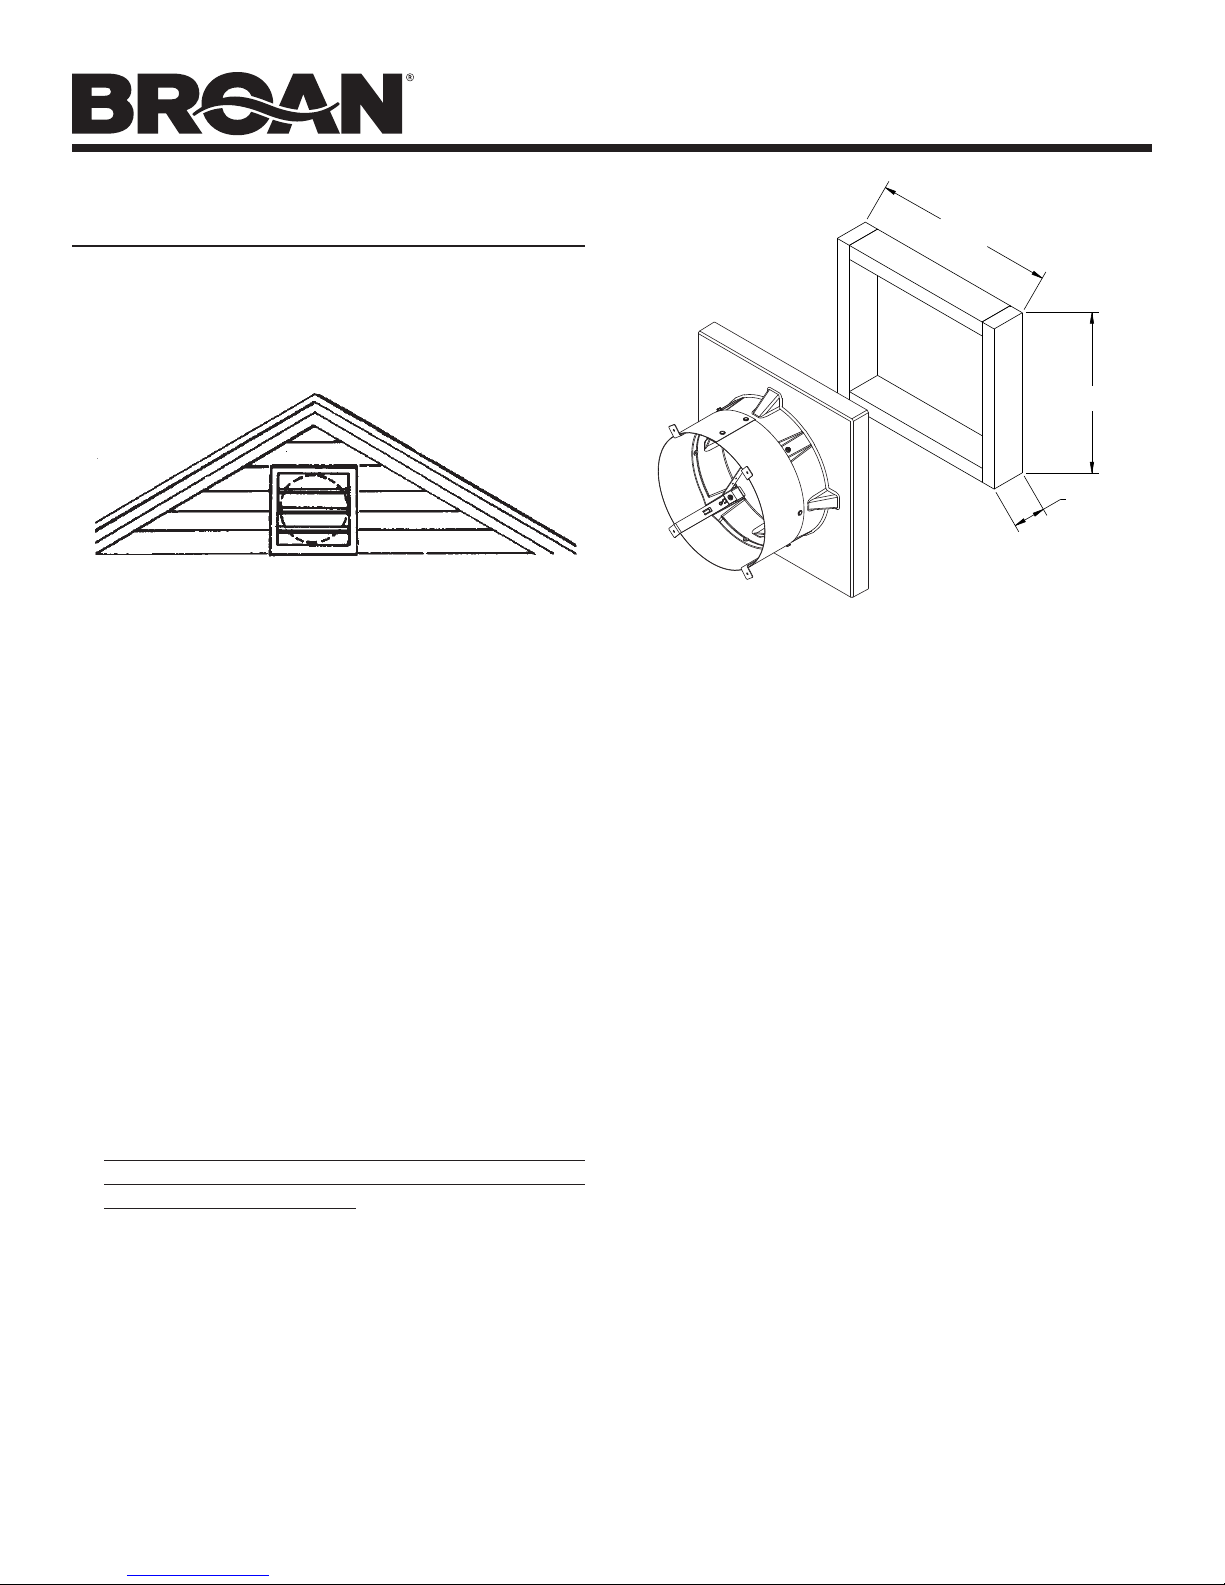
1. The ventilator is designed to mount behind existing
louvers. Louvers should be mounted in the center of
the gable as high as possible. For maximum efficiency,
the open area of the louver should be greater than the
outlet area of the ventilator. If no louver exists, one must
be installed. Follow the manufacturer’s recommendation
for installing the louver.
CAUTION! When installing louvers or ventilator, do
not remove any existing structural members without
providing alternate support members.
2. Locate the remote solar panel on your roof where the
sun’s exposure is best barring shade (trees, other
buildings etc) at 4:00pm in the hottest month of the year.
The solar panel comes from the factory with 15 feet of
wire. If the desired location of the solar panel is greater
than 15 feet away from the ventilator, an additional 50
ft of 14 AWG (minimum) UL listed or recognized copper
wire may be used.
19”
19”
2” MIN.
4. The ventilator can be installed between studs or placed
over a curb manufactured from 2” x 4” or 2” x 6” wood
(refer to illustration above for curb dimensions). Nail
or screw the ventilator to the wall studs or curb around
perimeter of base every 6 inches.
5. Make sure the outlet of the ventilator is properly sealed to
the exterior wall to maximize the amount of air exhausted
by the ventilator. When installing the ventilator behind
louvers, seal off any louver area not covered by the
ventilator base to prevent air leakage and recirculation.
3. Prior to installation, we recommend setting up the
ventilator and solar panel to verify operation. Take
the fan and solar panel to a location exposed to sun.
Connect the red solar panel wire to the black (negative)
motor terminal and the black solar panel wire to the
red (positive) motor terminal. Removing the cardboard
cover from the solar panel should cause the ventilator to
operate. Place cardboard over solar panel (for safety),
disconnect wire from motor terminals and proceed to
installation instructions outlined below.
REMOTE SOLAR PANEL
MODELS 345GOBK • 345GOWW
Page 3
INSTALLATION
6. Working from inside the attic, find the center of the
selected solar panel location identified in step 2, drill a
small hole in the roof decking large enough for the solar
panel wire to fit through.
7. Working from roof side, feed the solar panel wire through
the hole into the attic.
8. Run a bead of silicone or roof cement around the
perimeter of the underside of the solar panel and secure
to the roof using nails or screws. Nail or screw all corners
and perimeter of base every 6 inches. Seal the fastener
heads with silicone or roof cement.
9. From inside the attic, apply silicone around the wire
where it enters the roof.
10. Connect the red wire to the negative motor terminal and
the black wire to the positive motor terminal. Tape or tie
extra wire to prevent contact with the fan blade.
11. Remove cardboard from the solar panel and verify that
the ventilator operates.
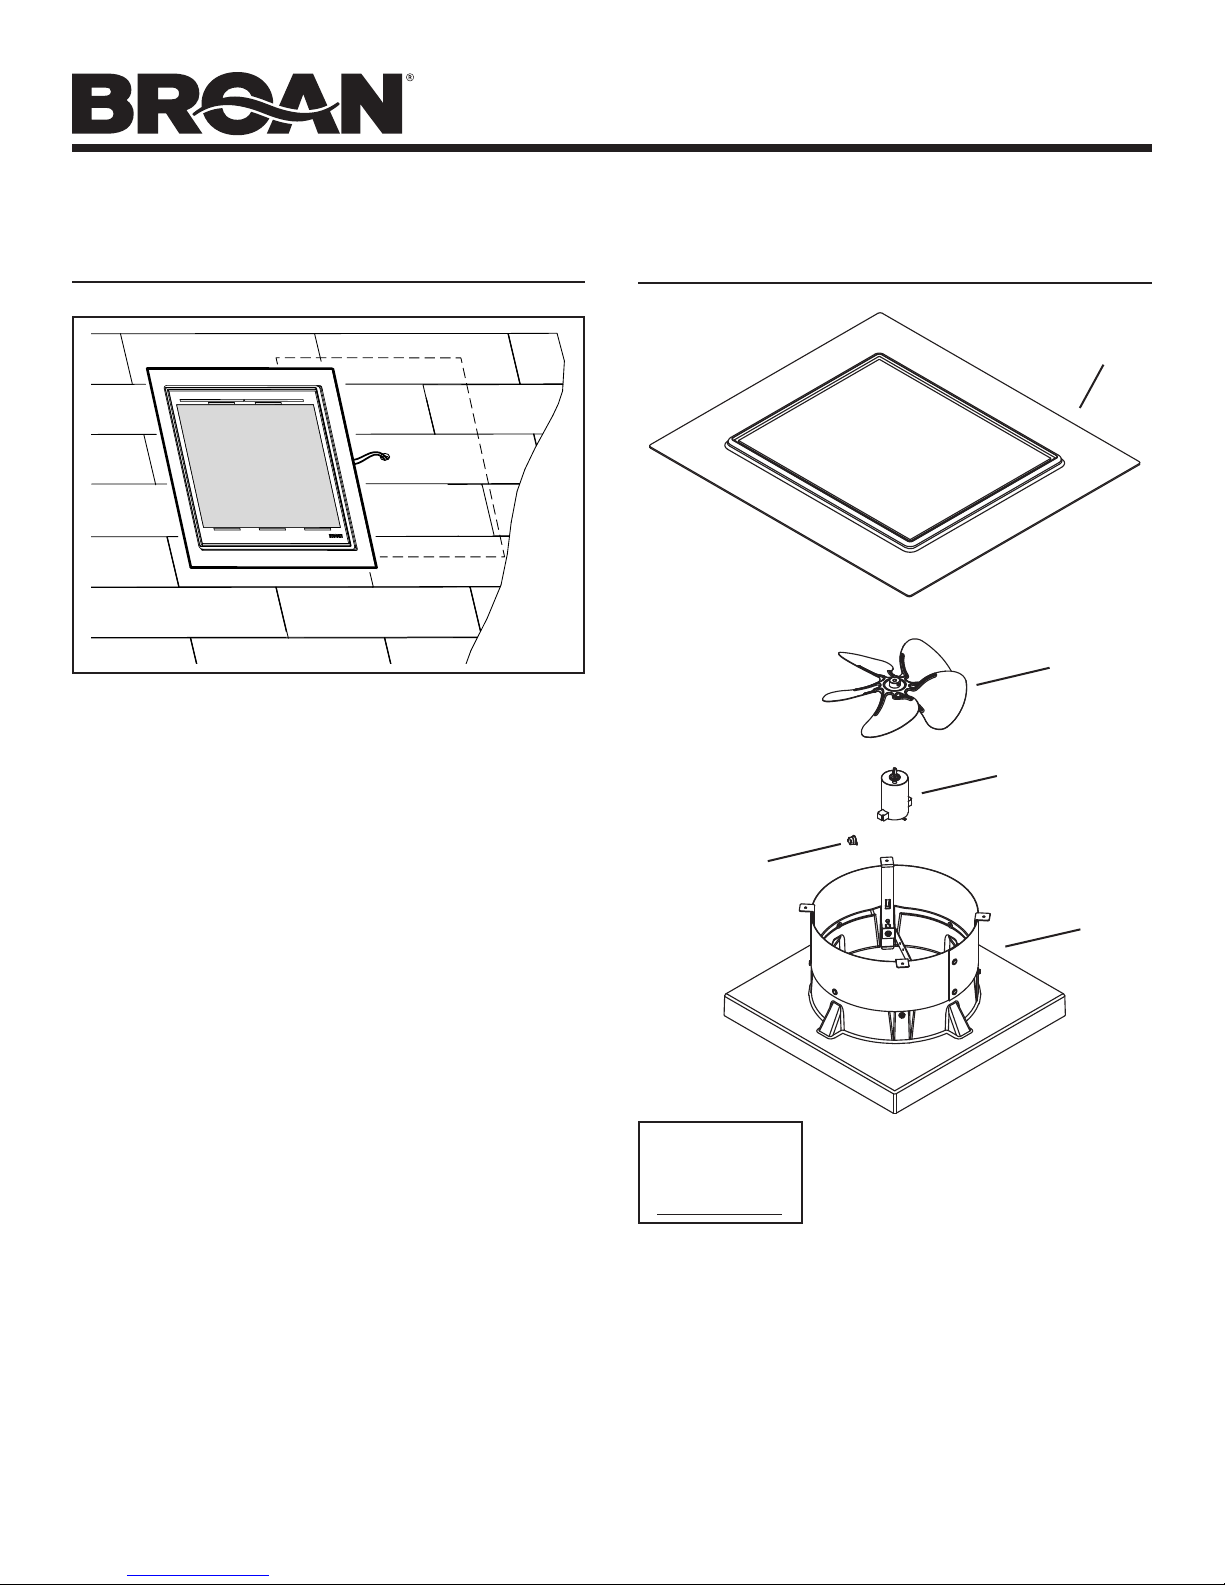
SERVICE PARTS
1
3
4
2
5
Replacement parts
can now be ordered
on our website.
Please visit us at
www.Broan.com
Model Model
Key 345GOBK 345GOWW Description
No. (Black) (Weathered Wood)
1 77001317 77001318 Solar Panel Assembly
2 CWT45 CWT45 Thermostat (Optional)
3 79310005 79310005 Fan Blade w/ Set Screw
4 79080082 79080082 Motor, DC
5 77001285 77001286 Roof Sheet Panel
MODELS 345GOBK • 345GOWW
Page 4
WARRANTY
BROAN-NUTONE LLC
– Exclusive Limited Warranty –
The Exclusive Limited Warranty Agreement (the “Warranty”) is entered into by and between Customer and Broan-NuTone LLC
(“Broan”). Customer has carefully reviewed this Warranty and agrees that Broan’s performance of its obligations hereunder will
provide Customer with an adequate remedy which will serve the essential purpose of the parties’ agreement relating to the products
manufactured by Broan and identified on the reverse side hereof (the “Products”). Customer acknowledges and agrees that he/she is
purchasing the Products for residential purposes (and not for industrial or commercial purposes) after careful inspection of the same.
Customer’s rights and benefits hereunder inure solely to Customer, as the original purchaser of the Products, and are non-assignable
and non-transferable. No other party or entity, including, without limitation, subsequent purchasers or owners of the Products shall
have or be entitled to assert any rights or benefits hereunder.
EXCLUSIVE LIMITED WARRANTY; LIMITATION OF REMEDIES. Broan hereby warrants the Customer that the Products’ motors
are and will remain for a period of two (2) years from the date of delivery to Customer; and the Products are and will remain for a
period of six (6) years from the date of delivery to Customer (collectively, the “Warranty Period”), free of defects in materials and
workmanship, provided that such Products are used for their intended purpose and are properly serviced in accordance with the
User’s Manual provided to Customer. Subject to the foregoing, if at any time during the Warranty Period any Product fails to conform
to the foregoing warranty by reason of defects in materials or workmanship, Customer shall properly notify Broan in writing and shall
include with such notice a sales receipt or proof of purchase of the defective Product, and Broan at its option shall repair or replace
the defective Product or component part without charge to Customer, except for: (A) costs incurred in transporting the Products or
component parts to and from Broan’s designated dealer or its manufacturing plant in Hartford, Wisconsin; and (B) charges for labor
or other costs incidental to the removal or remounting of component parts repaired or replaced under this Warranty, both of which
shall be borne by Customer. Notwithstanding any provision herein to the contrary, this Warranty shall not extend or obligate Broan
to take any action with respect to: (A) Products which have been modified, altered, installed, used or operated in a manner which is
not recommended by Broan, including any Products in which parts not manufactured or approved by Broan have been installed; (B)
Products which have not been regularly or properly serviced in accordance with the User’s Manual or which have otherwise been
neglected; and (C) ordinary wear and tear, service and maintenance and replacement items. THIS WARRANTY APPLIES ONLY
TO MACHINERY, EQUIPMENT AND COMPONENT PARTS MANUFACTURED BY BROAN. THIS WARRANTY DOES NOT APPLY
OR EXTEND TO: (A) PARTS PURCHASED SEPARATELY FROM SUCH MACHINERY AND EQUIPMENT, WHICH ARE COVERED
BY A SEPARATE WRITTEN WARRANTY; OR (B) ITEMS OF EQUIPMENT OR ACCESSORIES MANUFACTURED BY PARTIES
OTHER THAN BROAN.
EXCEPT AS SPECIFICALLY STATED IN THE PARAGRAPH IMMEDIATELY ABOVE, BROAN MAKES NO WARRANTY OR REPRESENTATION, EXPRESS OR IMPLIED, INCLUDING, WITHOUT LIMITATION, ANY WARRANTY OF MERCHANTABILITY OR
FITNESS FOR A PARTICULAR PURPOSE. THE WARRANTY SET FORTH IN THE PRECEDING PARAGRAPH AND THE OBLIGATIONS AND LIABILITIES OF BROAN THEREUNDER REPRESENT CUSTOMER’S SOLE AND EXCLUSIVE REMEDIES
AND ARE EXPRESSLY MADE IN LIEU OF ANY AND ALL OTHER REMEDIES, WARRANTIES, GUARANTIES OR LIABILITIES,
EXPRESS OR IMPLIED, ALL OF WHICH ARE HEREBY EXPRESSLY WAIVED BY CUSTOMER. THERE ARE NO WARRANTIES
WHICH EXTEND BEYOND THE DESCRIPTION ON THE FACE HEREOF. IN NO EVENT SHALL BROAN’S LIABILITY HEREUNDER EXCEED THE PURCHASE PRICE FOR THE PRODUCTS. ADDITIONALLY, BROAN SHALL NOT BE LIABLE FOR ANY
SPECIAL, INDIRECT, INCIDENTAL OR CONSEQUENTIAL DAMAGES OF ANY NATURE WHATSOEVER.
Broan reserves the right to modify, alter or improve any products or equipment manufactured by Broan without incurring any duty or
obligation to modify, alter, improve or replace any of the Products covered hereby.
THIS WARRANTY SETS FORTH THE PARTIES’ FINAL, COMPLETE AND EXCLUSIVE AGREEMENT CONCERNING THE
PRODUCTS AND BROAN’S WARRANTY OBLIGATIONS. NO AFFIRMATION OF FACT, PROMISE, DESCRIPTION, DEMONSTRATION, SAMPLE OR MODEL CONSTITUTES A WARRANTY OR OTHERWISE MODIFIES, EXTENDS OR ALTERS THIS
WARRANTY UNLESS IN A WRITTEN INSTRUMENT SIGNED BY AN AUTHORIZED BROAN OFFICER.
This Warranty shall be governed by and construed in accordance with the laws of the State of Wisconsin. The venue for any action
arising out of or related to this Warranty shall be in Washington County, Wisconsin.
Broan-NuTone LLC Hartford, Wisconsin www.broan.com 800-558-1711
79040168B
 Loading...