

brite-View BVH-5101C User Manual

Table of Content
1. IMPORTANT INFORMATION...........................................................................................4
1.1 IMPORTANT SAFETY NOTES........................................................................................4
1.2 FEDERAL COMMUNICATIONS COMMISSION INTERFERENCE STATEMENT..........................4
2. INTRODUCTION...............................................................................................................7
2.1 PACKAGE CONTENT ..................................................................................................7
2.2 PRODUCT OVERVIEW.................................................................................................8
2.2.1 BUTTONS AND LEDS ..............................................................................................9
3. HARDWARE INSTALLATION .......................................................................................10
3.1 APPLICATION 1 –EXTEND WIRELESS ACCESS POINT COVERAGE ................................10
3.2 APPLICATION 2 – ULTRA-HIGH SPEED FOR.................................................................11
3.3 QUICK WI-FI ENCRYPTED CONNECTION- WPS BUTTON...............................................11
4. ENCRYPTED PLC NETWORK ..............................................................................................12
4.1 CREA TE AN ENCRYPTED PLC NETWORK GROUP.......................................................12
4.2 REMOVE DEVICE FROM AN EXISTING NETWORK GROUP ............................................. 13
4.3 CREATE ADDITIONAL ENCRYPTED NETWORK.............................................................13
5. ADVANCED WI-FI SETTINGS VIA WEB BROWER......................................................14
5.1 GETTING STARTED ...................................................................................................14
5.2 HOME.....................................................................................................................16
5.2.1 SELECT LANGUAGE..............................................................................................16
5.2.2 SETUP WIZARD ....................................................................................................16
5.2.3 OPERATION MODE CONFIGURATION.......................................................................17
5.3 INTERNET SETTINGS ................................................................................................19
5.3.1 LAN (LOCAL AREA NETWORK SETTINGS)..............................................................19
5.3.2 DHCP CLIENTS....................................................................................................21
5.4 WIRELESS SETTINGS ...............................................................................................21
5.4.1 BASIC (BASIC WIRELESS SETTINGS) .....................................................................21
5.4.2 ADVANCED (ADVANCE WIRELESS SETTINGS)..........................................................23
5.4.3 SECURITY (WIRELESS SECURITY/ENCRYPTION SETTINGS).......................................24
5.4.4 WPS (WI-FI PROTECTED SETUP)..........................................................................27
5.4.5 STATION LIST........................................................................................................28
5.4.6 SITE SURVEY (AP MODE SITE SURVEY).................................................................28
5.4.7 MAC FILTER ........................................................................................................28
5.5 ADMINISTRATION .....................................................................................................30
5.5.1 MANAGEMENT (SYSTEM MANAGEMENT).................................................................30
5.5.2 UPGRADE FIRMWARE............................................................................................31
2

5.5.3 SETTINGS MANAGEMENT.......................................................................................31
5.5.4 STATUS................................................................................................................32
5.5.5 STATISTICS ..........................................................................................................32
5.5.6 SYSTEM LOG........................................................................................................33
5.6 REBOOT .................................................................................................................33
5.6.1 REBOOT SYSTEM .................................................................................................33
5.7 CHANNEL NUMBER..................................................................................................34
6. ENHANCE PLC PERFORMANCE DURING INSTALLATION........................................35
7. SPECIFICATIONS ................................................................................................................37
3

Important Information
1.1 Important Safety Notes
BVH-5101 is intended for connection to the AC power line. For installation instructions, refer
to the Installation section. The following precautions should be taken when using this
product..
z Please read all instructions before installing and operating this product.
z Please keep all instructions for later reference.
z Please follow all warnings and instructions marked on the product.
z For safety reason, when device is being powered on, this product should NOT be
installed in any electric socket which makes the surface with venting holes on
the product to face downward (facing the floor).
z Unplug the Powerline device from the wall outlet before cleaning. Use a dry cloth
for cleaning. DO NOT use liquid cleaners or aerosol cleaners.
z DO NOT operates this product near water.
z This product should never be placed near or over a radiator, or heat register.
z This product relies on the building’s electrical installation for short-circuit (over current)
protection.
z DO NOT allow anything to rest on the product interconnect plug. DO NOT locates this
product where people may walk on the cords.
z Because this product sends data over the power line, it is recommended that you plug
directly into a power outlet. Do not plug the device into a UPS or power strip with surge
protection. The product has its own power filter for protection against surges.
z Only a qualified technician should service this product. Opening or removing covers
may result in exposure to dangerous voltage points or other risks.
z Unplug the product from the wall outlet and refer the product to qualified service
personnel for the following conditions:
¾ When the interconnect cords are damaged or frayed.
¾ If liquid has been spilled into the product.
¾ If the product has been exposed to rain or water.
¾ If the product does not operate normally when the operating instructions are
followed.
¾ If the product exhibits a distinct change in performance.
1.2 Federal Communications Commission Interference Statement
This equipment has been tested and found to comply with the limits for a Class B digital
device, pursuant to part 15 of the FCC Rules. These limits are designed to provide
reasonable protection against harmful interference in a residential installation. This
4

equipment generates, uses and can radiate radio frequency energy and, if not installed and
used in accordance with the instructions, may cause harmful interference to radio
communications. However, there is no guarantee that interference will not occur in a
particular installation. If this equipment does cause harmful interference to radio or television
reception, which can be determined by turning the equipment off and on, the user is
encouraged to try to correct the interference by one or more of the following measures:
-Reorient or relocate the receiving antenna.
-Increase the separation between the equipment and receiver.
-Connect the equipment into an outlet on a circuit different from that to which the receiver is
connected.
-Consult the dealer or an experienced radio/ TV technician for help.
CAUTION:
Any changes or modifications not expressly approved by the grantee of this device could
void the user's authority to operate the equipment.
Labeling Requirements
This device complies with Part 15 of the FCC Rules. Operation is subject to the following
two conditions: (1) this device may not cause harmful interference, and (2) this device must
accept any interference received, including interference that may cause undesired
operation.
RF Exposure Warning
This equipment must be installed and operated in accordance with provided instructions and
the antenna(s) used for this transmitter must be installed to provide a separation distance of
at least 20 cm from all persons and must not be co-located or operating in conjunction with
any other antenna or transmitter. End-users and installers must be provide wit h antenna
installation instructions and transmitter operating conditions for satisfying RF exposure
compliance.
Canada, Industry Canada (IC) Notices
This Class B digital apparatus complies with Canadian ICES-003 and RSS-210.
Operation is subject to the following two conditions: (1) this device may not cause
interference, and (2) this device must accept any interference, including interference that
may cause undesired operation of the device.
Radio Frequency (RF) Exposure Information
The radiated output power of the Wireless Device is below the Industry Canada (IC) radio
frequency exposure limits. The Wireless Device should be used in such a manner such that
5

the potential for human contact during normal operation is minimized.
This device has also been evaluated and shown compliant with the IC RF Exposure limits
under mobile exposure conditions. (antennas are greater than 20cm from a person's body).
Canada, avis d'Industry Canada (IC)
Cet appareil numérique de classe B est conforme aux normes canadiennes ICES-003 et
RSS-210.
Son fonctionnement est soumis aux deux conditions suivantes : (1) cet appareil ne doit pas
causer d'interférence et (2) cet appareil doit accepter toute interférence, notamment les
interférences qui peuvent affecter son fonctionnement.
Informations concernant l'exposition aux fréquences radio (RF)
La puissance de sortie émise par l’appareil de sans fil est inférieure à la limite d'exposition
aux fréquences radio d'Industry Canada (IC). Utilisez l’appareil de sans fil de façon à
minimiser les contacts humains lors du fonctionnement normal.
Ce périphérique a également été évalué et démontré conforme aux limites d'exposition aux
RF d'IC dans des conditions d'exposition à des appareils mobiles (les antennes se situent à
moins de 20 cm du corps d'une personne).
6

1. INTRODUCTION
BVH-5101 is a wireless AP device with Powerlione Communication (PLC) technology
integrated. The Powerline Wireless N Extender turns your home’s existing wall outlet into
instant “WLAN-ready” access point. It takes advantages of your home’s existing wiring to
deliver high speed network and wireless high-speed Internet access at the same time.
This product is suitable for general users to operate in their homes/houses, while advanced
configurations through web-browser described in later chapters are suitable for seasoned
users to change and manage the Powerline Wireless N Extender product settings.
2.1 Package Content
Before starting the installation of the device, please make sure the package contains the
following items:
Single pack Combo pack
Device
Accessories
Powerline Wireless
N Extender
¾ RJ-45 Cable x 1 ¾ RJ-45 Cable x 2
Powerline Ethernet
Bridge
Powerline Wireless
N Extender
7
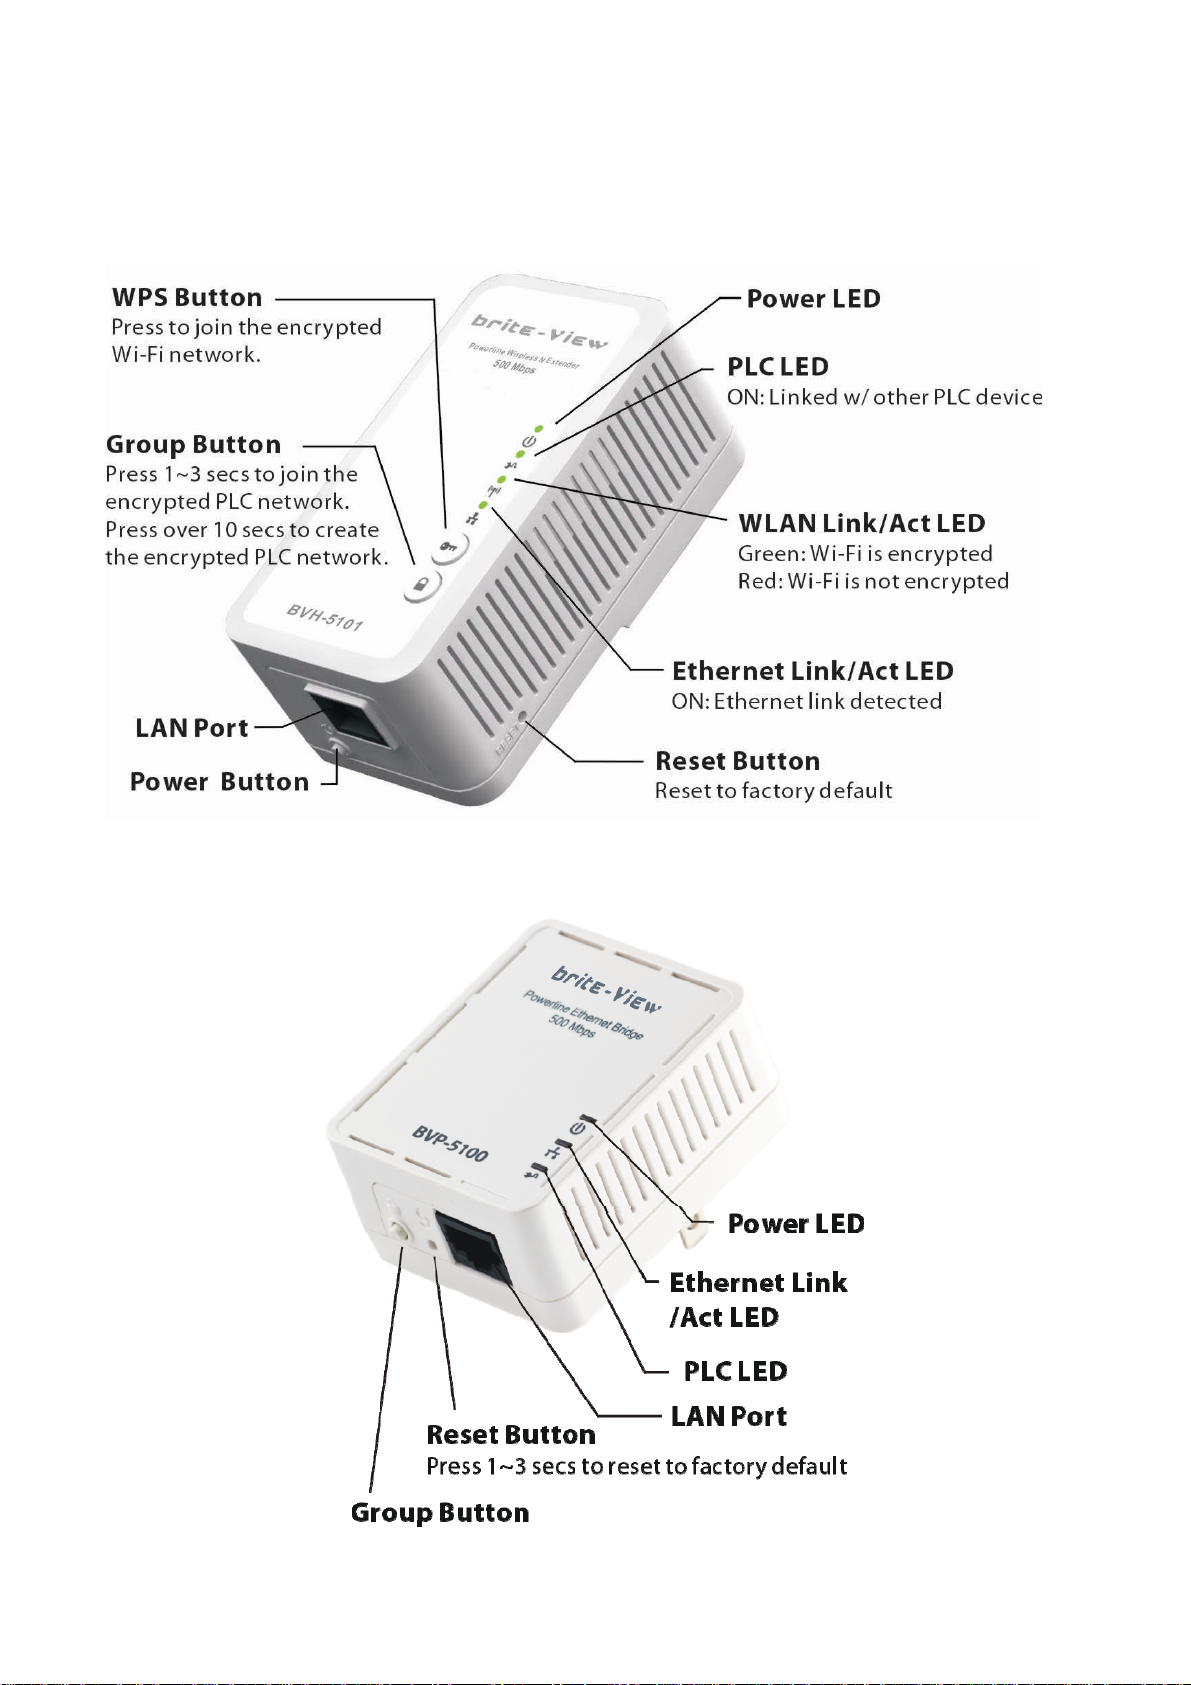
2.2 Product Overview
500 Mbps Powerline Wireless N Extender (BVH-5101)
500 Mbps Powerline Bridge (BVP-5100)
8
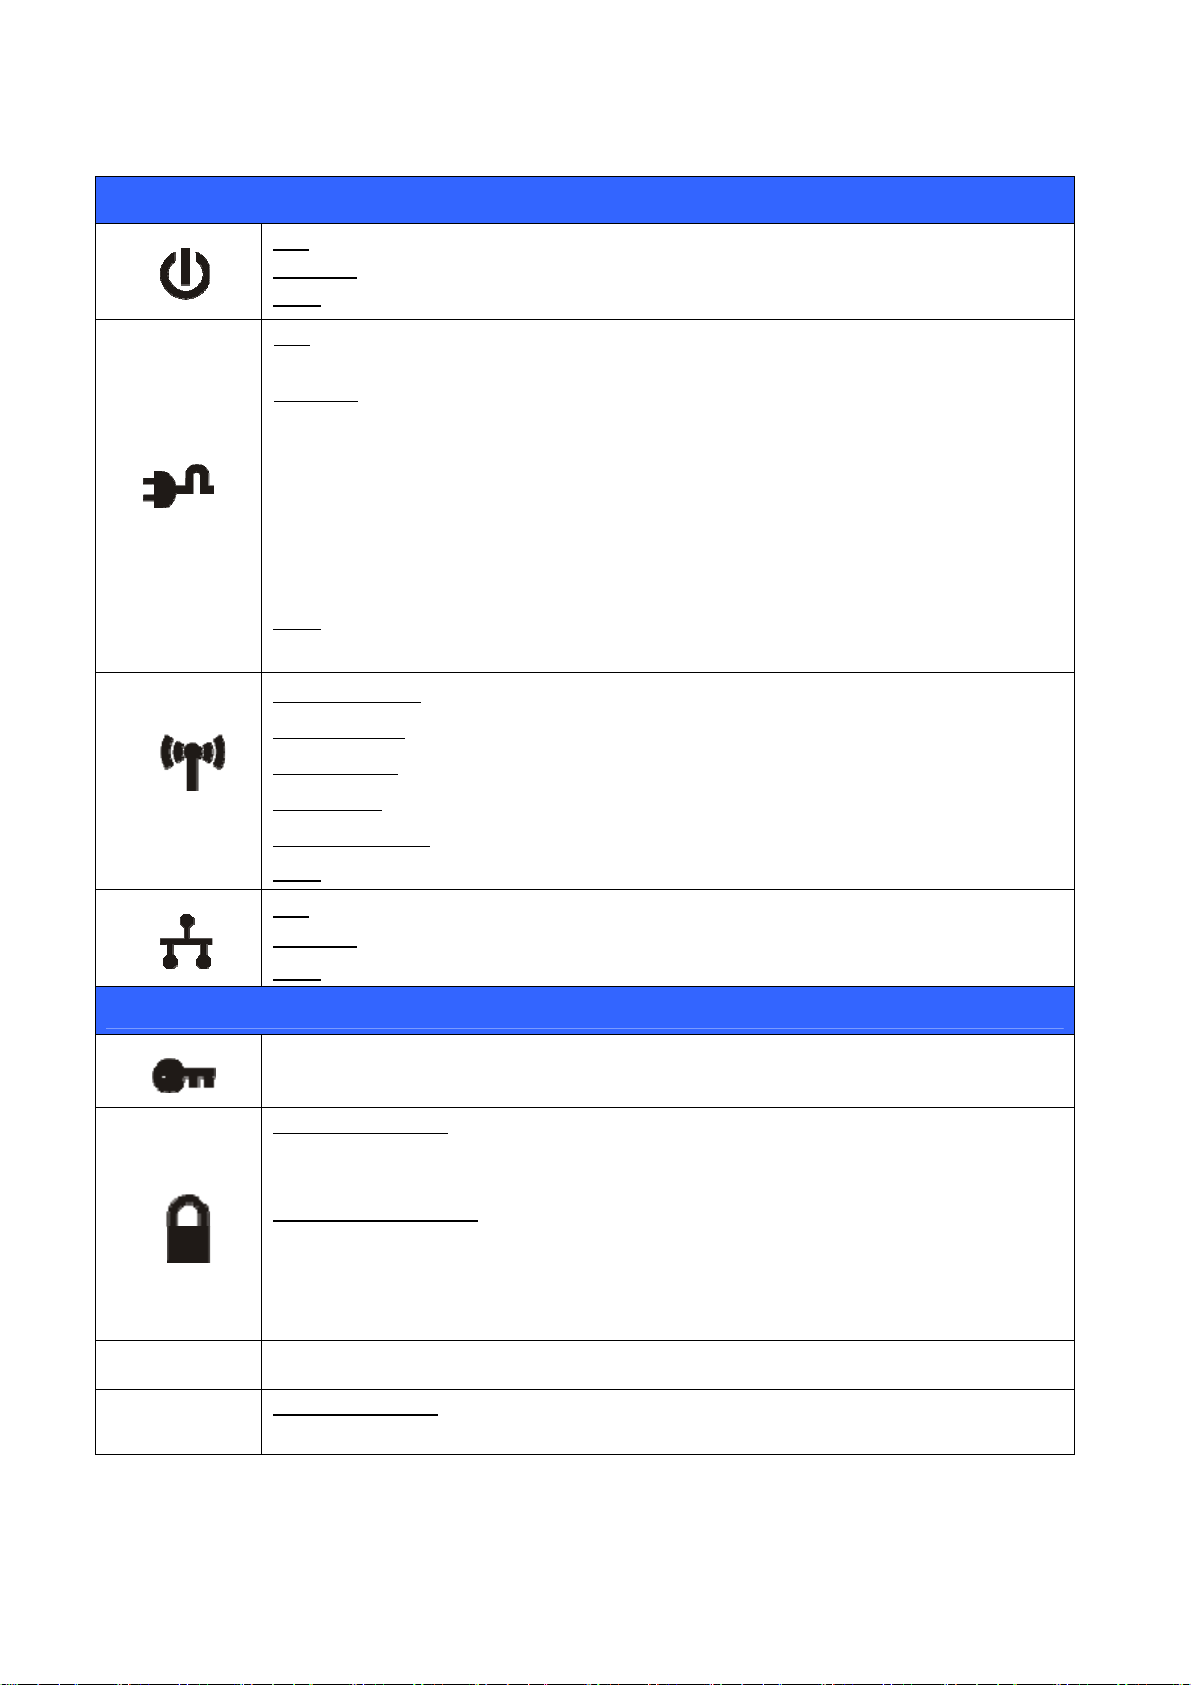
2.2.1 Buttons and LEDs
LED
ON: Power on and ready.
Blinking: PLC group pairing.
OFF: Power off.
ON: PLC connection detected.
Blinking:
1. Fast:
Powerline data rate > 60Mbps
2. Normal:
60Mbps > Powerline data rate > 10Mbps
3. Slow:
10Mbps > Powerline data rate
OFF: No PLC connection detected.
(They are too far to communicate or it is alone in its logical network).
Steady Green: Wi-Fi network with security protection.
Flash Green: Wi-Fi network traffic in transaction with security protection.
Steady Red: Wi-Fi network without security protection.
Flash Red: Wi-Fi network traffic in transaction without security protection.
Power Button
Reset Button
Blinking Green (0.5 sec ON / 0.5 sec OFF): WPS negotiation.
OFF:Wi-Fi disabled.
ON: Ethernet connection detected.
Blinking: Network traffic in transaction.
OFF: No Ethernet connection detected.
Buttons
WPS negotiation.
Press 10 seconds
Randomly generate a new PLC network group name.
Press 2 to 3 seconds
Start paring with the other PLC device. Paring procedure keeps for 2 minutes or
ends automatically when they are paired. It can be stopped manually by pressing
the button for 2 to 3 seconds again.
Push to power on/off the device.
:
:
Press 1 second: Reset to factory default setting.
Press the button when the device is powered (not in standby mode)
9
3. HARDWARE INSTALLATION
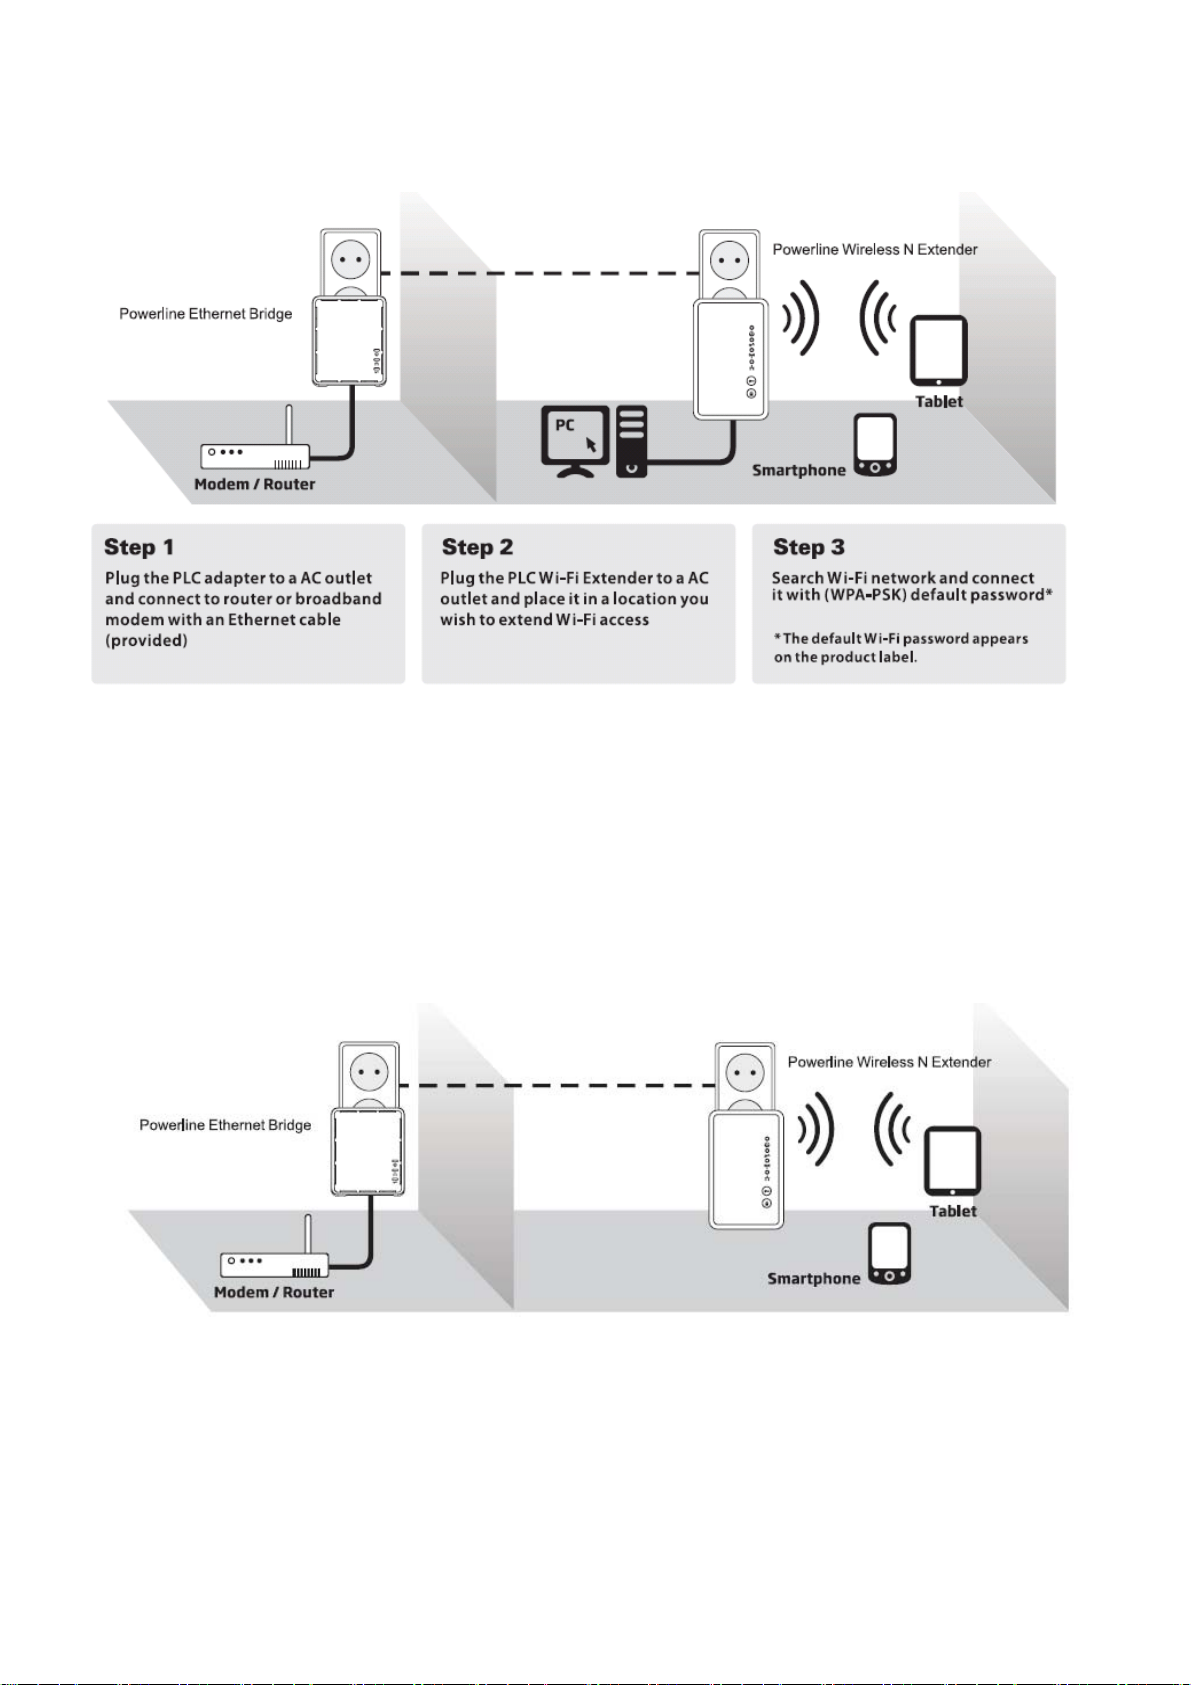
3.1 Application 1 –Extend Wireless Access Point Coverage
To extend wireless AP coverage in different room or floor, user can place the Powerline
Wireless N extender near the mobile devices such as iPad, Tablet, Smartphone and
Notebook. Then connect the Powerline Wireless N extender to powerline network for
delivering Internet signal.
10
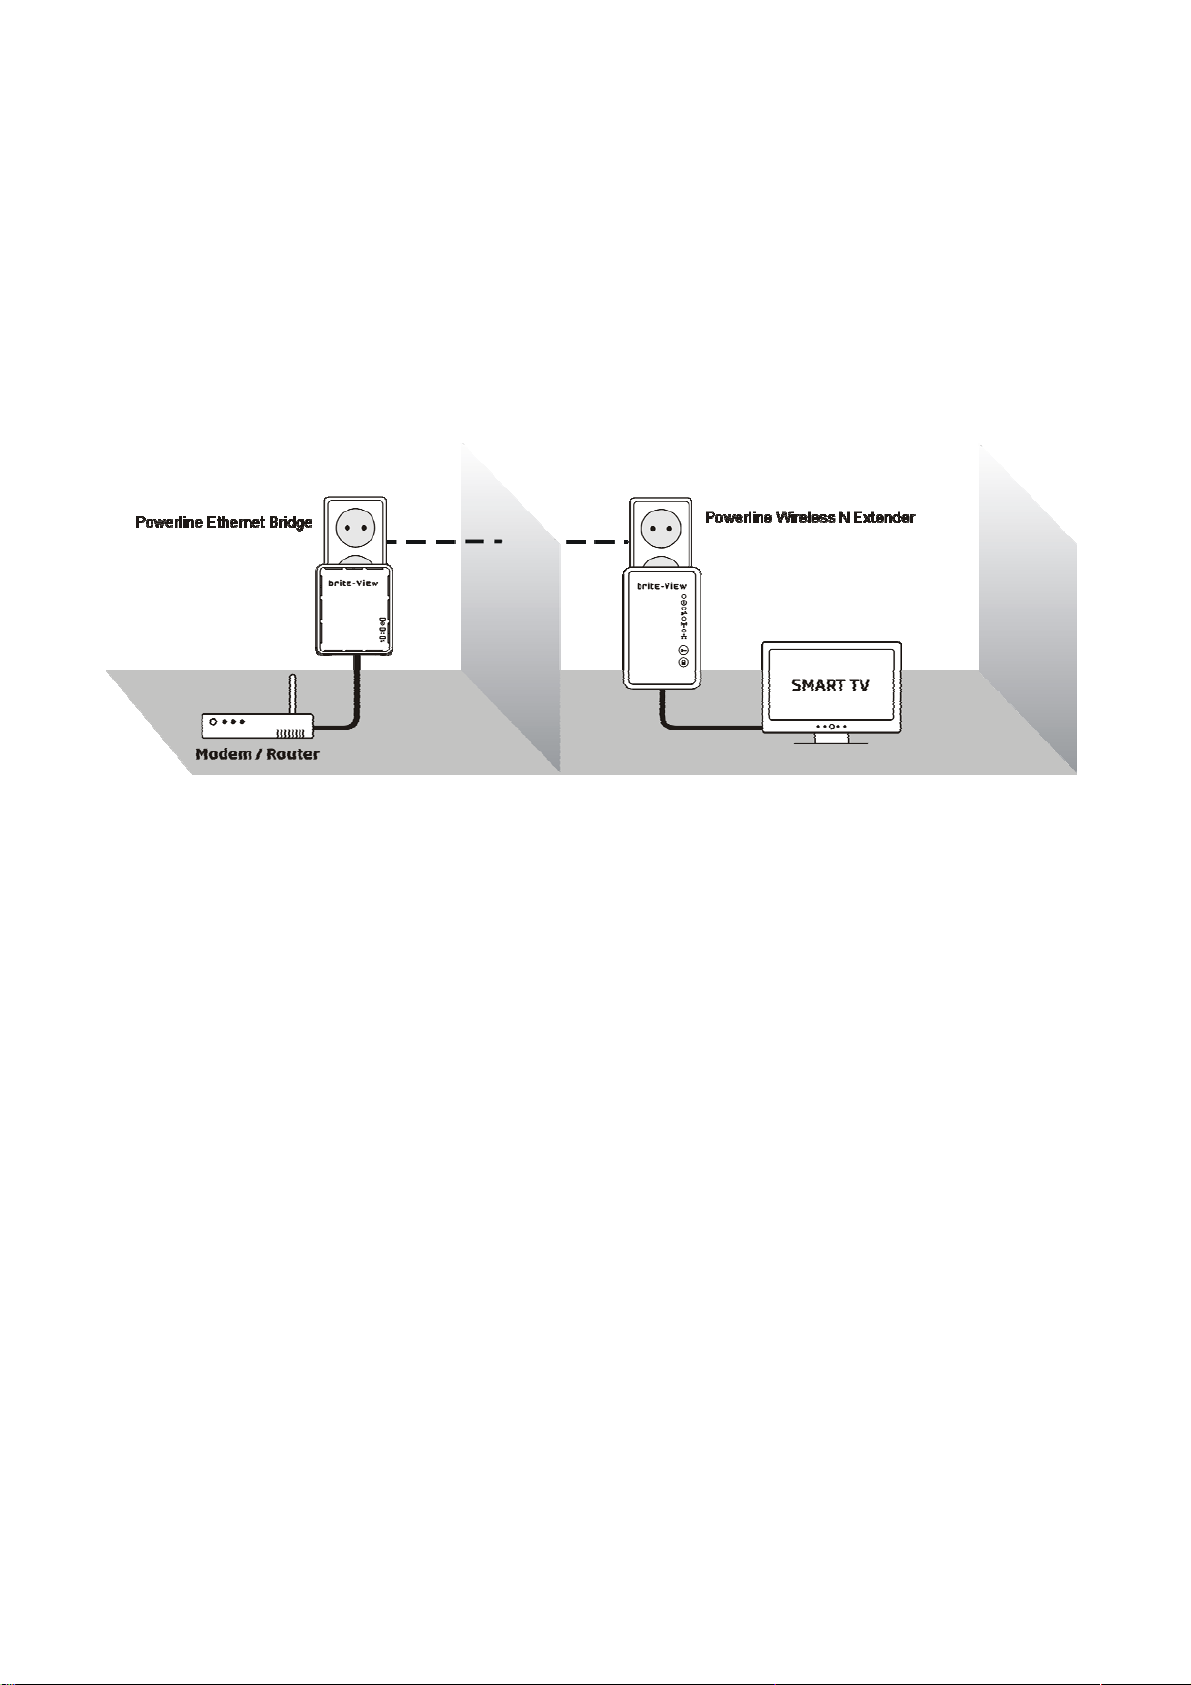
3.2 Application 2 – High Speed Network For HD Video Streaming
Wireless N Extender can serve as Powerline Ethernet Bridge to provide wired
connection for Ethernet compatible devices such as cable box or SmartTV. With advanced
Powerline technology, it can offer reliable and stable Internet network for HD video
streaming. Lag-Free.
3.3 Quick Wi-Fi Encrypted Connection- WPS Button
The default wireless encryption is set as “WPA-PSK” mode with Wi-Fi SSID and password
that appear on printing label at back of the device.
For Quick Wi-Fi encrypted connection, user can simply press “WPS” button on the device to
establish encrypted wireless network between your network compatible device and
powerline wireless N extender.
11

4. Encrypted PLC Network
4.1 Create an Encrypted PLC Network Group
The Powerline bridges are compliant HomePlug AV specification. Every ‘HomePlug AV’
compliant PLC device that has the same default network name, “HomePlug AV”, is capable
of communicating with other “HomePlug AV” devices. This is so called the “Public
Network”. Two or more powerline devices under the same network can communicate with
one another.
If you have a pair of powerline device, either one in the pair can be “device A” or “device B”.
By pressing the GROUP button more than 10 seconds; it will generate a random network
group (different from HomePlug AV). Users can take the following two steps to change the
public network group to the private network group to protect their data while transmitting
over the powerline. Users also can create more than one private network groups by
pressing GROUP button directly without software installation required.
*NOTE: Put the devices side by side will be more convenient du ring the setting pro cedure. After network group
is set, the devices can be deployed anywhere at home.
Step I: Clear Group Attribute
Clear the original network group of devices by pressing “GROUP” button more than 10
seconds until all LED lights simultaneously turns off and on once. At this moment, its
network group name has been changed to a random name. It means that the device is (1)
ready to be assigned another network name or (2) to be used as a seed device so
other PLC devices can join to a private network group.
Step II: Join to Other Network Group
1. Press GROUP button of device A for 2 to 3 seconds (make sure POWER LED starts
blinking).
2. Press GROUP button of device B for 2 to 3 seconds (make sure POWER LED starts
blinking).
12
 Loading...