


Brickcom CB-100Ae, CB-302Ap, CB-502Ap, WCB-502Ap, WCB-202Ap Installation Manual
...Megapixel (PoE) Cube
Network Camera
Cube Series
Easy Installation Guide
Table of Contents |
|
English.................................................................................................................. |
1 |
Deutsch ................................................................................................................ |
5 |
Español ................................................................................................................ |
9 |
Français.............................................................................................................. |
13 |
Italiano................................................................................................................ |
17 |
Nederlands ......................................................................................................... |
21 |
Português ........................................................................................................... |
25 |
Русский .............................................................................................................. |
29 |
Türkçe ................................................................................................................ |
33 |
................................................................................................................. |
37 |
Polski.................................................................................................................. |
41 |
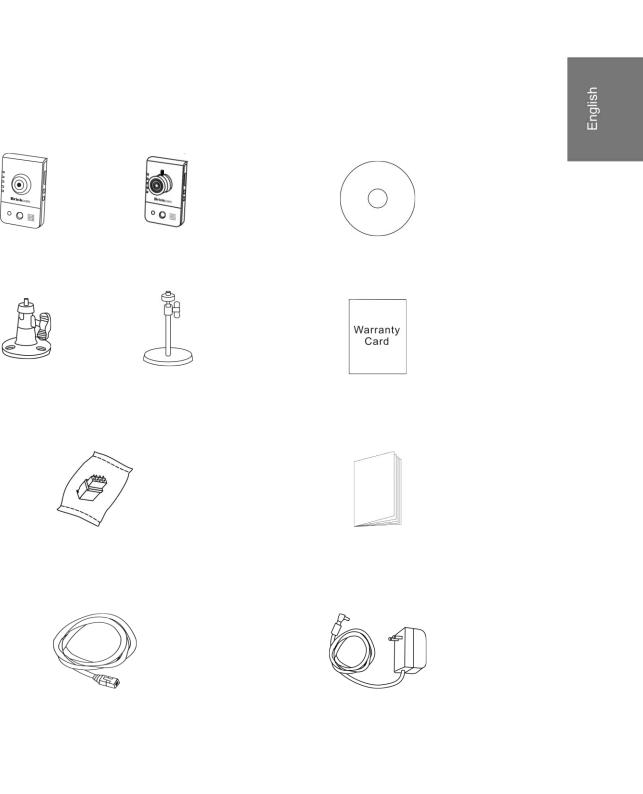
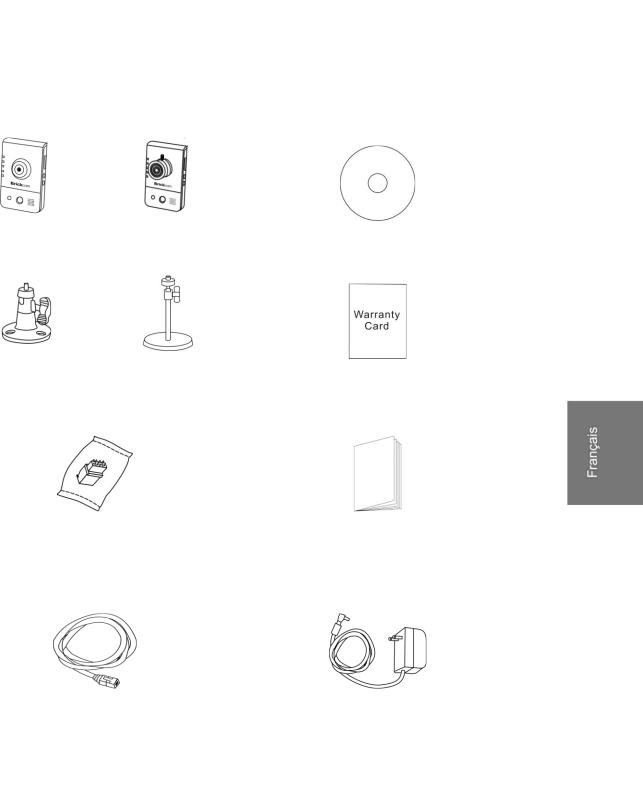
Step 1. Check Package Contents
a. |
Network Camera |
|
b. |
Product CD |
|
|
|
|
|
c. |
Camera Stand |
|
d. |
Warranty Card |
|
|
|
|
|
e. Terminal I/O Connector Block (*) |
|
f. |
Easy Installation Guide |
|
|
|
|
|
|
g. 1.5m White Flat RJ-45 cable |
|
h. |
Power Adapter (*Optional) |
|
|
(For CB-100Ae/ CB-100Ap only) |
|
|
|
|
|
|
|
|
|
|
1 |
|
|
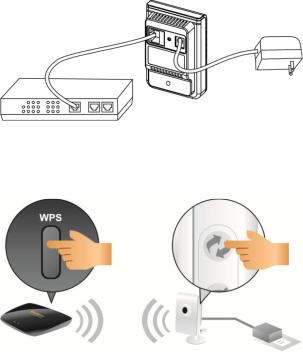
Step 2. Install Camera and Network Devices
< CB Series>
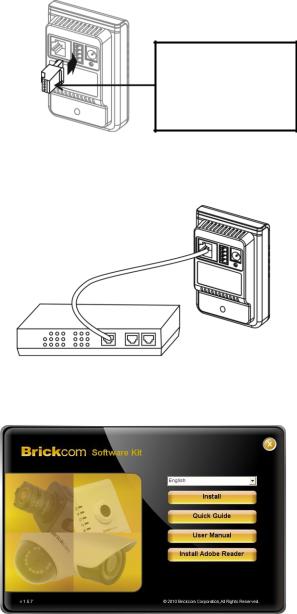
Wired Connection
Connect the supplied power cable from the camera to a power outlet and the camera to a switch via Ethernet cable.
Wireless Connection
Connect the supplied power cable from the camera to a power outlet. And press WPS button both on the camera and the wireless router (DWRT-600N).
1)Terminal I/O Connector Block Connection
Attach the supplied connector block to the terminal connector on the camera. Refer to the diagram below to attach external devices to the connector block.
2

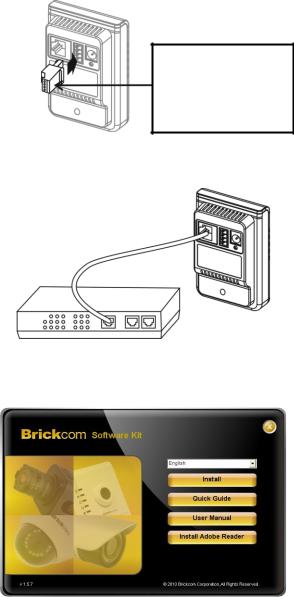
2)Power over Ethernet (PoE) Connection
The camera can be powered by a PoE-enabled switch. Connect the camera to the switch via Ethernet cable.
Step 3. Install the EasyConfig Software
Insert the CD into the CD-ROM, and follow the instructions of the Install Shield Wizard to finish installation.
3

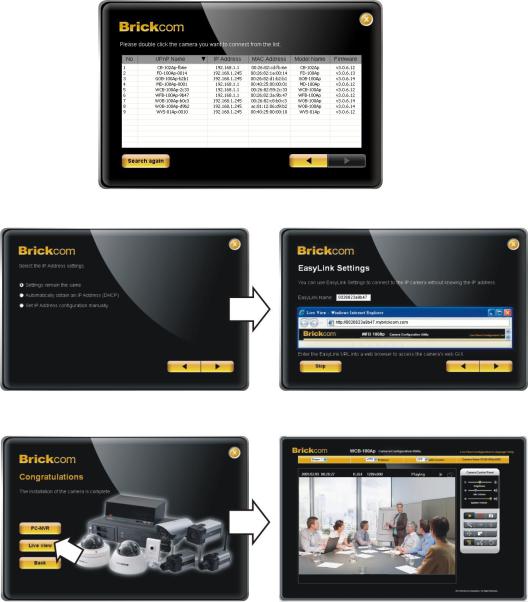
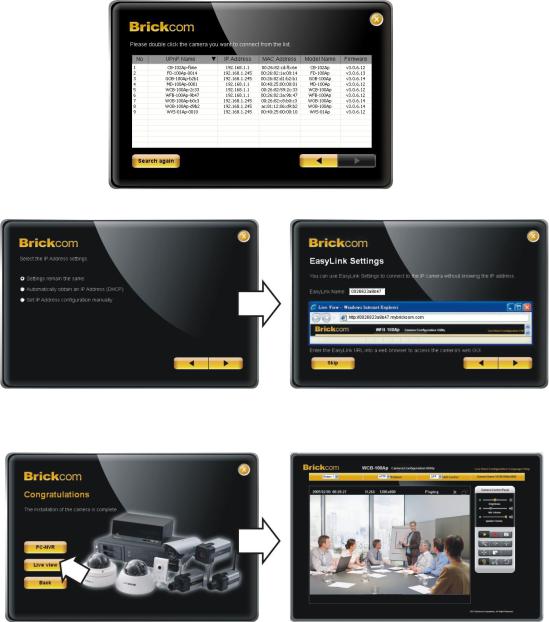
Step 4. Launch EasyConfig
Launch the EasyConfig software, and click on the camera from the survey list to connect.
Follow the EasyConfig software to configure the camera’s IP address and EasyLinkTM settings.
Step 5. Installation Completed
Click <Live View> to view the live video feed of the network camera.
4
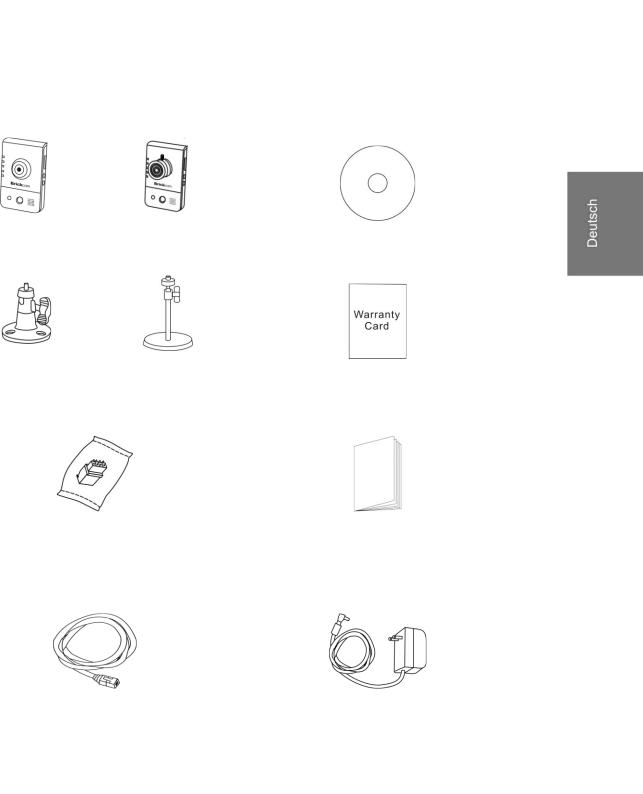
Schritt 1.Ü berprüfen Verpackungsinhalt
a. |
Netzwerkkamera |
|
b. |
Produkt-CD |
|
|
|
|
|
c. |
Kamerahalterung |
|
d. |
Garantiekarte |
|
|
|
|
|
e. |
Terminal I/O Schraubklemmleiste (*) |
|
f. Schnell-Installationshandbuch |
|
|
|
|
|
|
g. |
1.5m weißes RJ-45-Flachkabel |
|
h. |
Netzadapterstecker (*Optional) |
|
(For CB-100Ae/ CB-100Ap only) |
|
|
|
|
|
|
|
|
|
|
5 |
|
|

Schritt 2.Installieren Sie die Kamera und die Netzwerkgeräte
< CB Series>
Verkabelten Verbindung
Das mitgelieferte Netzteil von der Kamera an eine Netzsteckdose anschließ en und die Kamera über ein Ethernetkabel mit einem Switch verbinden.
Wireless Verbindung
Das mitgelieferte Netzteil von der Kamera an eine Netzsteckdose anschließ en. Bitte drücken Sie die WPS Taste auf der Kamera und den WLAN Router (DWRT-600N).
1)Terminal I/O Klemmleiste Digital Ein/-Ausgang
Bitte verbinden Sie den Klemmleisten-Stecker mit der Kamera. Das obige Diagramm beschreibt die verschiedenen Anschlüsse der Klemmleiste.
6
1: Erdung
2: Digitaleingang
3: Digitalausgang
4: Stromzufuhr + 5V
2)Stromzuführung über Ethernet (PoE)-Verbindung
Die Kamera kann direkt an einen PoE-fähigen Switch.
Schritt 3.Installieren der EasyConfig-Software
Die Installations-CD in das CD-ROM-Laufwerk einlegen, und befolgen Sie die Anweisung des InstallShield Wizards vollständig installieren zu können.
7
Schritt 4.Launch EasyConfig
Zum Starten des EasyConfig, und zum Verbinden machen Sie einen klick auf die Kamera auf der Ü bersichtsliste.
Bitte folgen Sie die Anleitung der EasyConfig Software und konfigurieren Sie die IP-Adresse und EasyLinkTM
Schritt 5.Installation vollständig
Klicken auf <Live-Ansicht>, um das Live-Video von der angeschlossenen IP-Kamera zu betrachten
8
Paso 1. Verifique el Contenido del Paquete
a. |
Cámara de Red |
|
b. |
CD del Producto |
|
|
|
|
|
c. Soporte de la Cámara |
|
d. |
Tarjeta de Garantía |
|
|
|
|
||
e. Terminal de Conexión de |
|
f. Guía Rápida de Instalació n |
||
|
Entrada/Salida (*) |
|
|
|
|
|
|
|
|
g. |
Cable Plano RJ-45 |
|
h. |
Adaptador de Corriente (*Optional) |
|
(For CB-100Ae/ CB-100Ap only) |
|
|
|
|
|
|
|
|
|
|
9 |
|
|

Paso 2. Instalar la Cámara y aparatos de Networking
< CB Series>
Cable de conexión
Conectar el cable de alimentación a la Cámara y conéctelo en la toma corriente y la cámara a un Switch usando un cable de Ethernet.
Conexión inalámbrica
Conectar el cable de alimentación a la Cámara y conéctelo en la toma corriente. Apretar el botón WPS de la cámara y del ruteador (DWRT-600N)
1)Extensiones de Conexión de Entrada/Salida
Coloque el conector en la cámara. Utilice el siguiente diagrama para agregar dispositivos al terminal.
10
1: Conexión a Tierra
2: Entrada Digital
3: Salida Digital
4: Potencia + 5V
2)Conexión a Través de Ethernet (PoE)
La cámara se puede conectar a un enchufe habilitado para PoE. Utilice un cable Ethernet para conectar la cámara al enchufe habilitado para PoE.
Paso 3. Instalar el software EasyConfig
Inserte el CD en la unidad de CD-ROM, y siga las instrucciones de InstallShield Wizard para terminar la instalación del Brickcom Software Kit.
11
Paso 4. Iniciar EasyConfig
Inciciar el software EasyConfig, y haga clic en la cámara de la lista para conectar.
Seguir el software EasyConfig y configurar la dirección IP de la cámara y EasyLinkTM.
Paso 5. Instalación Completa
Haga clic en <Vista en Vivo> para ver el video en vivo desde la cámara IP conectada.
12
Etape 1.Vérifiez le Contenu
a. |
Caméra Réseau |
|
b. |
CD d’Installation |
|
|
|
|
|
c. |
Pied de la Caméra |
|
d. |
Carte de Garantie |
|
|
|
|
|
e. |
Bloc Serre-Fils d’Extension I/O (*) |
|
f. Guide d’Installation Rapide |
|
|
|
|
|
|
g. |
1.5m de Câble Droit RJ-45 blanc |
|
h. |
Alimentation (*Optional) |
|
(For CB-100Ae/ CB-100Ap only) |
|
|
|
|
|
|
|
|
|
|
13 |
|
|
 Loading...