

turns instant
coffee into
authentic cappuccino
instruction booklet
®

2
! This appliance generates heat during use. Adequate precaution must be taken to
prevent the risk of burns, scalds, res or other damage to persons or property caused
by touching the exterior whilst in use or during cooling.
! Never use this appliance for anything other than its intended use. This appliance is for
household use only. Do not use this appliance outdoors.
! Always ensure that hands are dry before handling the plug or switching on the
appliance.
! Always use the appliance on a stable, secure, dry and level surface.
! This appliance must not be placed on or near any potentially hot surfaces (such as a
gas or electric hob).
! Do not use the appliance if it has been dropped, if there are any visible signs of
damage or if it is leaking.
! Ensure the appliance is switched off and unplugged from the supply socket after use
and before cleaning. Always allow the appliance to cool before cleaning or storing.
! Never immerse any part of the appliance or power cord and plug in water or any other
liquid.
! Never let the power cord hang over the edge of a worktop, touch hot surfaces or
become knotted, trapped or pinched.
! Never leave the appliance unattended when in use.
! Never release the water tank cap while in use. Perform the steam release procedure
or allow to cool fully.
! Never leave unused coffee in the funnel.
! Never use the appliance without the drip tray or cover in place.
! Never place anything on top of the appliance.
! Never ll the water tank with any liquid other than water. To prevent damage, never use
the appliance without water.
product safety
READ CAREFULLY AND KEEP FOR FUTURE REFERENCE
This product can be used by children aged 8 years and above, and persons
who require supervision, provided:
• they are familiar with the hazards associated with the product, and,
• they receive instruction by a competent person on how to safely use the
product.
Children must not play with the product. Cleaning and user maintenance
must not be done by children unless they are aged 8 or older and are
supervised.
If the supply cord is damaged, it must be replaced by the manufacturer, its
serviceagentorsimilarlyqualiedpersonsinordertoavoidahazard.

3
features
Due to our policy of continuous improvement, the actual product may differ slightly from the one illustrated in these instructions.
1. Instant coffee chamber cover (shown open)
2. Control dial
3. Cleaning tray
4. Removable drip tray and cover
5. Power on/off button
6. Power/Ready indicator
7. Water tank cap
f
q
w
g
y
o
a
i
e
r
t
u
s
d
8. Milk tank
9. Cleaning jug
10. Coffee funnel dispenser
11. Dispensing nozzle
12. Milk pipe
13. Coffee chamber
14. Locking button
4
To ensure that any residue left over from the manufacturing process is removed, ush the
machine with clean water as described in the following procedure:
1. Wash the milk tank in warm soapy water, rinse and dry.
2. Push the dial locking button and turn the control dial towards the INSTANT COFFEE
position.
3. Remove the coffee funnel dispenser and wash in warm soapy water, rinse and dry.
4. Replace the coffee funnel dispenser and close the cover by turning the control dial
towards STOP.
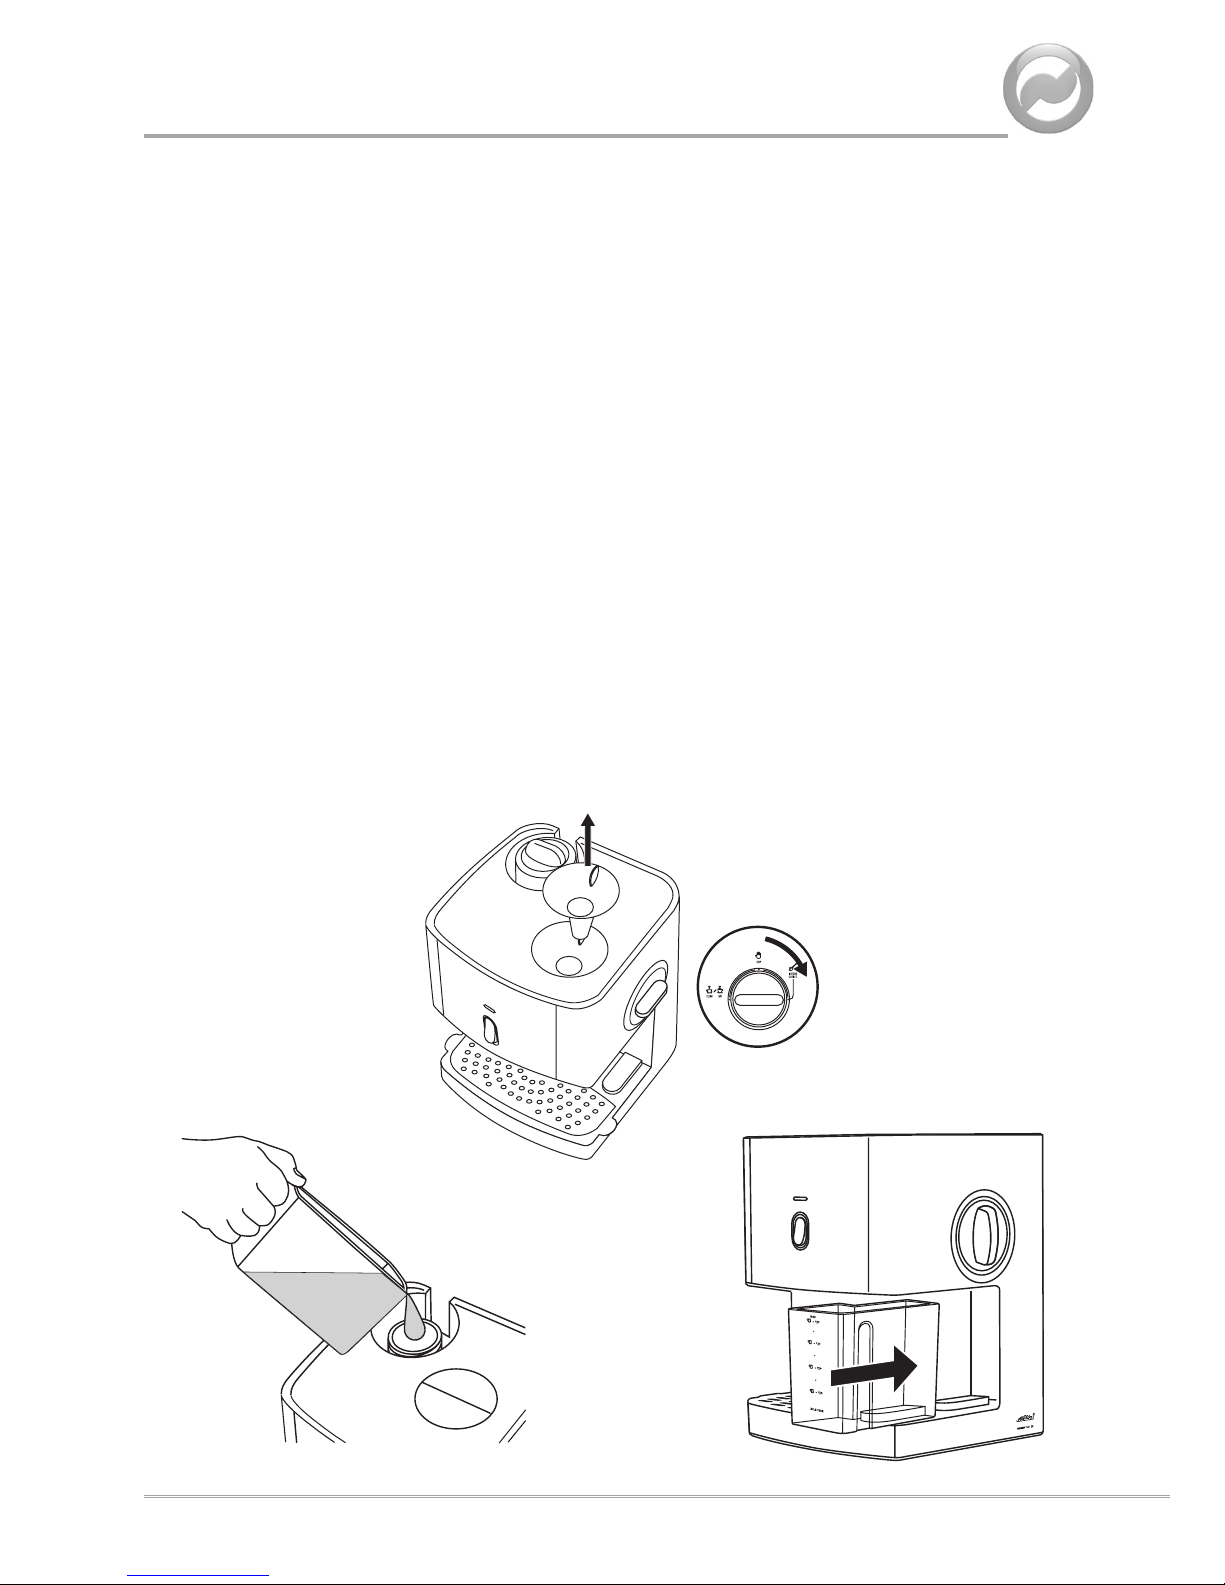
5. Remove the water tank cap and using the measuring guide on the cleaning jug, pour
300ml of clean water into the water tank.
6. Replace and tighten the water tank cap.
7. Ensure that the control dial is in the STOP position
8. Fill the milk tank with clean water up to the 8 cup mark and place on the unit. Ensure
that the tank is pushed fully back on the unit. Do not attempt to t or remove the milk
tank without ensuring the control dial is turned to the STOP position. Failure to do so
may be result in damage to the milk pipe.
before first use
w
e
t
i

5
before first use
d
g
o
9. Place the cleaning jug under the cappuccino nozzle.
10. Plug the unit into the mains and switch on. Press the power on/off button.
11. The power/ready indicator will light up orange. After approximately 5 minutes the
power/ready indicator will change to green/orange to indicate that it is ready.
12. To start cleaning turn the control dial anticlockwise to the CLEAN/GO! setting.
13. Clean water is ushed through the machine into the cleaning jug.
14. When all of the water from the milk tank has ushed through, turn the control
dial clockwise to the STOP position. A small amount of water will continue to be
dispensed.
15. Remove and empty the cleaning jug.
16. Your cappuccino maker is now clean and ready for use.

making cappuccino
DO NOT USE POWDERED OR GROUND COFFEE PRODUCTS. YOUR INSTANT
CAPPUCCINO MAKER IS DESIGNED TO USE INSTANT COFFEE GRANULES ONLY.
DO NOT USE ANY BEVERAGE OTHER THAN COFFEE.
To prevent damage, never use your instant cappuccino maker without water.
1. The maximum capacity is 300ml. If the water tank has already been lled there
should be enough water in the machine to make approximately 10 cups of
cappuccino.
2. Plug the unit into the mains and press the power on/off button on the front of the unit.
The power/ready indicator will illuminate orange.
3. Open the coffee chamber cover by pushing the dial locking button and turning the
control dial towards the INSTANT COFFEE position. Make sure that the coffee funnel
dispenser is in place.
4. Add the instant coffee granules using a teaspoon. Only add enough coffee to brew
ONE cup at a time.
5. You can adjust the quantity to suit your own taste.
6. Close the coffee chamber cover by turning the control dial towards STOP.
7. Fill the milk tank with milk up to the level required (number of mugs/cups). DO NOT
EXCEED THE MAXIMUM LEVEL. More milk can easily be added if you wish to
make more drinks.
8. Place the milk tank on the unit. Ensure that the tank is pushed fully back on the unit.
9. Wait for the power/ready indicator to illuminate green/orange.
10. Place a mug or cup under the cappuccino nozzle and turn the control dial to the
CLEAN/GO! position. The machine will start to dispense the cappuccino.
11. When the mug or cup is nearly full turn the control dial to the STOP position. A small
amount of cappuccino will continue to be dispensed as the machine nishes its cycle.
Ensure you have allowed this process to nish after each cappuccino made.
To make further cups of cappuccino add another teaspoon of coffee and repeat steps 8
to 11. The power/ready indicator will change between green/orange and orange as the
machine brings itself back up to temperature. It is perfectly normal for this to happen
whilst making a cappuccino.
After you have completed making all the required cappuccinos, please clean the machine
following the guidelines on page 8.
A small amount of steam may rise up the funnel after the cycle is complete. This is
perfectly normal.
6
 Loading...