

Page 1

Breville Customer Service Centre
Australian Customers
Mail: Locked Bag 2000
Botany NSW 1455
AUSTRALIA
Phone: 1300 139 798
Fax: (02) 9700 1342
Customer Service:
Email:
askus@breville.com.au
www.breville.com.au
www.breville.co.nz
Breville is a registered trademark of Breville Pty. Ltd. A.B.N. 98 000 092 928.
Due to continued product improvement, the products illustrated/photographed
in this brochure may vary slightly from the actual product.
Copyright Breville Pty. Ltd. 2015.
New Zealand Customers
Mail: Private Bag 94411
Botany Manukau 2163
Auckland NEW ZEALAND
0800 273 845
Phone:
Fax: 0800 288 513
Customer Service:
Email:
askus@breville.co.nz
BMO700 ANZ Issue - B15
Page 2
the Quick Touch
Instruction Booklet
™
Crisp
BMO700
Page 3

CONTENTSCONTENTS
3 Breville recommends safety first
8 Know your Breville product
9 Assembling your Breville product
– Using the crisper pan
10
11 Operating your Breville product
– Smart Cook | Grill settings
17
– Smart Reheat settings 28
– Smart Defrost settings 30
– A BIT MORE™ 33
– Shortcuts Panel 34
40 Hints & Tips
41 Care & Cleaning
43 Troubleshooting
2
Page 4

BREVILLE RECOMMENDS SAFETY FIRSTBREVILLE RECOMMENDS SAFETY FIRST
At Breville we are very safety conscious. We design and manufacture consumer products with
the safety of you, our valued customer, foremost in mind. In addition we ask that you exercise
a degree of care when using any electrical appliance and adhere to the following precautions.
IMPORTANT SAFETY INSTRUCTIONS
READ ALL INSTRUCTIONS
CAREFULLY BEFORE USE AND
SAVE FOR FUTURE REFERENCE
• Remove and safely discard any packaging
material and promotional labels before
using the Breville microwave oven for the
first time.
• To eliminate a choking hazard for young
children, remove and safely discard the
protective cover that is fitted to the power
plug of the Breville microwave oven.
• Do not place the microwave oven near the
edge of a bench or table during operation.
Ensure all surfaces are level, clean and free
of water or any other substances.
• Do not place the microwave oven on or
near a hot gas or electric burner, or where
it could touch a heated oven.
• Microwave oven to be installed as
freestanding unit only. When using
the microwave oven, provide adequate
air space above and on all sides for air
circulation. (see page 9 Installation,
point 2).
• Always operate the microwave oven on
a heat-resistant surface. Do not use on a
cloth-covered surface, near curtains or
other flammable materials.
• Do not use the microwave oven on a metal
surface, for example a sink drain board.
• Always ensure the microwave oven is
properly assembled before connecting to
the power outlet and operating. Do not use
the oven without the turntable roller and
glass turntable in place. Ensure the glass
turntable is positioned correctly into the
indents on the turntable roller.
• The microwave oven is not intended to be
operated by means of an external timer or
separate remote control system.
• Never use the microwave oven without
food or water in the oven cavity. Operating
the microwave oven when empty could
cause damage to the appliance.
• Do not leave the microwave oven
unattended when in use.
• Do not touch hot surfaces. Allow the
microwave oven to cool before moving or
cleaning any parts.
• Always ensure the microwave oven is
turned off at the power outlet and the cord
is unplugged from the power outlet before
attempting to move the appliance, when
not in use, if left unattended and before
disassembling, cleaning or storing.
• Keep the appliance clean. Follow the
cleaning instructions provided in this
book (page 41).
• Always turn the microwave oven off by
pressing the STOP/CLEAR button, switch
off at the power outlet and unplug at the
power outlet when it is not in use.
• Before cleaning, always press STOP/
CLEAR position, switch off at the power
outlet and unplug at the power outlet.
• Fire may occur if the oven is covered or
touches flammable material, including
curtains, draperies, walls and the like when
in operation
• Caution should be taken when toasting
and grilling high oil content foods, such as
pine nuts and walnuts. They may catch fire.
If this occurs, please keep the oven door
closed and switch off and unplug oven
until flame has extinguished.
• Do not place cardboard, plastic, paper or
other flammable materials into the oven.
• The temperature of accessible surfaces will
be high when the appliance is in operation
and also for some time after use.
3
Page 5

BREVILLE RECOMMENDS SAFETY FIRSTBREVILLE RECOMMENDS SAFETY FIRST
• Always wear protective, insulated oven
mitts when inserting, removing or handling
items from the oven.
• Always use extreme caution when
removing any of the accessories or
disposing of hot grease. Allow the oven to
cool before handling.
• Do not insert oversized foods into the oven
as they create risk of fire or electric shock.
• It is recommended to use only the Breville
provided accessories with this oven.
Do not store any materials other than the
Breville oven accessories in the oven when
not in use.
• Do not clean interior of the oven with
metal scouring pads as pieces can break off
the pad and touch electrical parts creating
a risk of electric shock.
• Do not attempt to operate the oven by
any methods other than those described
in this book.
• The top of the oven is very hot during
and after operation. Do not store any
item on top of the oven when in use
and when stored.
• Do not touch hot surfaces. Appliance
surfaces, including the door and outer
surface of the oven are hot during and after
operation. To prevent burns or personal
injury, always use protective hot pads or
insulated oven mitts, or use handles and
knobs where available, when inserting,
removing or handling items from the oven.
Alternatively allow the oven to cool down
before handling.
• The use of any accessory attachments
not recommended by Breville may
cause injuries.
• Use only the crisper pan provided by
Breville. The crisper pan must always be
placed at the centre of the glass turntable
and make sure the crisper pan does not
come in contact with the oven cavity which
can cause electric shock.
IMPORTANT SAFEGUARDS FOR
ALL ELECTRICAL APPLIANCES
• Fully unwind the power cord before use.
• Do not let the power cord hang over
the edge of a bench or table, touch hot
surfaces or become knotted.
• To protect against electric shock do not
immerse the power cord, power plug or
appliance in water or any other liquid.
• The appliance is not intended for use by
persons (including children) with reduced
physical, sensory or mental capabilities,
or lack of experience and knowledge,
unless they have been given supervision
or instruction concerning use of the
appliance by a person responsible for
their safety.
• Children should be supervised to ensure
that they do not play with the appliance.
• It is recommended to regularly inspect
the appliance. To avoid a hazard do not
use the appliance if power cord, power
plug or appliance becomes damaged in
any way. Return the entire appliance to
the nearest authorised Breville Service
Centre for examination and/or repair.
• Any maintenance other than cleaning
should be performed at an authorised
Breville Service Centre.
• This appliance is for household use only.
Do not use this appliance for anything
other than its intended use. Do not use
in moving vehicles or boats. Do not use
outdoors. Misuse may cause injury.
• The installation of a residual current
device (safety switch is recommended to
provide additional safety protection when
using electrical appliances. It is advisable
that a safety switch with a rated residual
operating current not exceeding 30mA be
installed in the electrical circuit supplying
the appliance. See your electrician for
professional advice.
• Always turn the appliance to the OFF
position, switch off at the power outlet
and unplug at the power outlet when the
appliance is not in use.
4
Page 6

BREVILLE RECOMMENDS SAFETY FIRST
BREVILLE RECOMMENDS SAFETY FIRST
• Before cleaning, always turn the appliance
to the OFF position, switch off at the
power outlet, unplug at the power outlet
and remove the power cord, if detachable,
from the appliance and allow all parts
to cool.
• Do not place this appliance on or near
a heat source, such as hot plate, oven
or heaters.
• Position the appliance at a minimum
distance of 10cm away from sidewalls and
20cm from top, curtains and other heat or
stream sensitive materials and provide
adequate space above and on all sides
for air circulation.
SPECIAL SAFETY
INSTRUCTIONS FOR YOUR
MICROWAVE OVEN
• Wipe the oven cavity with a soft, damp
cloth after each use. Leaving food residue,
grease or fat in the cavity could cause the
microwave oven cavity to overheat and
may cause the microwave oven to smoke
or catch fire.
• The microwave oven should be cleaned
regularly and any food splattering inside
the cavity should be removed. Failure to
maintain the microwave oven in a clean
condition could lead to deterioration of the
surface, adversely affecting the life of the
microwave oven and possibly resulting in
a hazardous situation.
• If the door seals or any of the microwave
oven is damaged, the microwave oven
must not be operated until it has been
inspected and/or repaired at an authorised
Breville Service Centre.
• The microwave oven is intended for
heating food and beverages. Drying of food
or clothing and heating or warming pads,
slippers, sponges, damp cloth and similar
may lead to risk of injury, ignition or fire.
• Ensure all food containers and/or plates
are suitable for use in the microwave oven.
This should be done prior to preparing food
for heating or cooking in the microwave
oven. Monitor foods and liquids heating or
cooking in the microwave oven at all times
due to the possibility of containers igniting.
• Containers or plates suitable for use in the
microwave oven should not exceed the
width of the glass turntable as this may
impede the rotation of the turntable and
result in food being unevenly cooked.
• Liquids or other foods must not be heated
in sealed containers since they are liable
to explode.
• Some containers and/or plates may appear
suitable for use in the microwave oven but
may be coated in a glaze that will absorb
the microwave energy, overheat and cause
the container to crack. The glaze may also
prevent the food from heating/cooking.
• Food and/or liquids should not be heated
or cooked directly on the glass turntable.
Food and/or liquids must be placed into a
suitable microwave-proof container before
placing onto the glass turntable.
• Food and/or liquids should not be heated
or cooked in plastic or paper containers or
bags, unless specified a suitable for use by
the manufacturer, due to the possibility of
containers exploding or igniting.
• When heating food in plastic or paper
containers, keep an eye on the oven due to
the possibility of ignition.
• Metal clips or twist ties should be removed
from the packaging as these could cause
sparking and/or fire.
• Do not use recycled paper or kitchen paper
towelling when cooking. Recycled paper
may contain small metal or other impurities
which could cause sparking and/or fire.
• Do not use metal containers or utensils in
the microwave oven as these could cause
sparking and/or fire unless supplied by
Breville BMO700 microwave oven..
• Only use utensils that are suitable for use in
microwave ovens.
5
Page 7

BREVILLE RECOMMENDS SAFETY FIRST
BREVILLE RECOMMENDS SAFETY FIRST
• Food grade foil should not be used in
the microwave oven as this could cause
sparking and/or fire.
• Ensure that lids and caps covering
containers are removed prior to
placing liquids and/or foods into the
microwave oven.
• Feeding bottles and baby food jars should
have lids and caps removed before
warming or heating in the microwave oven.
To avoid burns or scalding after heating,
the contents should be stirred or shaken
and the temperature checked before
serving.
• Always ensure the temperature of food or
drink which has been heated or cooked
in the microwave oven has been tested
before eating, drinking or serving to others,
especially children, disabled or
elderly people.
• The heating of liquids and beverages in
the microwave oven can result in delayed
eruptive boiling. Care must be taken when
handling any containers containing hot
liquids or beverages.
• Do not heat popcorn in the microwave
oven unless it has been commercially
packaged for microwave use. There may be
a number of un-popped kernels that may
overcook and burn when popping popcorn.
Do not use oil unless recommended by
the manufacturer. Do not pop popcorn
longer than the manufacturer’s instructions
(popping time should not exceed
3 minutes). Longer cooking could cause
scorching or fire.
• Do not cook any food surrounded by a
membrane (such as potatoes, chicken
liver, egg yolks, oysters, etc) without first
piercing the membrane several times with
a fork or similar utensils.
• Eggs in the shell and whole hard boiled
eggs should not be cooked or heated in
the microwave oven as they may explode
during cooking, at the end of cooking or
after removing from the microwave oven.
• Do not heat oil or fat in the microwave
oven. Doing so may cause the microwave
oven and/or the oil to overheat and/or
ignite.
• If any smoke is observed, switch off and
unplug the microwave oven at the power
outlet. Keep the door closed to stifle
any flames.
• Do not attempt to operate the microwave
oven by any method other than those
described in this instruction book.
• Do not disconnect the microwave oven
from the power supply by pulling on the
cord to unplug from the power outlet.
• When storing the microwave oven loosely
wind the cord. Do not wrap the cord around
the microwave oven.
• When heating food in plastic or paper
containers, keep an eye on the oven due to
the possibility of ignition.
• The glass window has been specially
treated to make it stronger, more durable
and safer than ordinary glass, however it
is not unbreakable. If dropped or struck
extremely hard, it may break or weaken,
and could at a later time shatter into many
small pieces without apparent cause.
6
Page 8

BREVILLE RECOMMENDS SAFETY FIRST
BREVILLE RECOMMENDS SAFETY FIRST
WARNING
• Do not attempt to operate the oven with the
door open since open-door operation can
result in harmful exposure to microwave
energy. It is important not to defeat or
tamper with the safety interlocks.
• Do not place any object between the
oven front face and the door or allow soil
or cleaner residue to accumulate on
sealing surfaces.
• Liquids and other foods must not be heated
in sealed containers since they are liable
to explode.
• If the door or door seals are damaged, the
oven must not be operated until it has been
repaired by a Breville Service Centre. It is
particularly important that the oven door
closes properly and that there is no damage
to the: (1)Door (bent), (2) Hinges and
latches(broken or loosened), (3) Door seals
and sealing surfaces.
• Do not put any foreign material between
the door and door jam of the microwave
oven as this could cause excessive leakage
of microwave energy.
• It is hazardous for anyone other than a
Breville Service Centre to carry out any
service or repair operation that involves the
removal of a cover which gives protection
against exposure to microwave energy.
• When the appliance is operated in the
combination mode, children should only
use the oven under adult supervision due to
the temperature generated.
• Surfaces may be hot during and after use.
• If the apparatus is not maintained in a
good state of cleanliness, its surface could
be degraded and affect the lifespan of the
product and lead to a dangerous situation.
SPECIFICATIONS
RATED POWER
GRILL INPUT
POWER
COMBINED
INPUT POWER
MICROWAVE
INPUT POWER
MICROWAVE
OUTPUT POWER
220–240V~ 50Hz
1800–1950W
840–1000W
1800–1950W
1450W
900W 2450MHz
306mm (H)
OUTSIDE
DIMENSIONS
513mm (W)
443mm (D) with handle
397mm (D) without handle
TURNTABLE
DIAMETER
CRISPER PAN
DIAMETER
NET WEIGHT
OVEN
CAPACITY
315mm
300mm
Approximately 15kg
25 Litres
These specifications may change without
notice.
SAVE THESE INSTRUCTIONS
7
Page 9
KNOW YOUR BREVILLE PRODUCT
KNOW YOUR BREVILLE PRODUCT
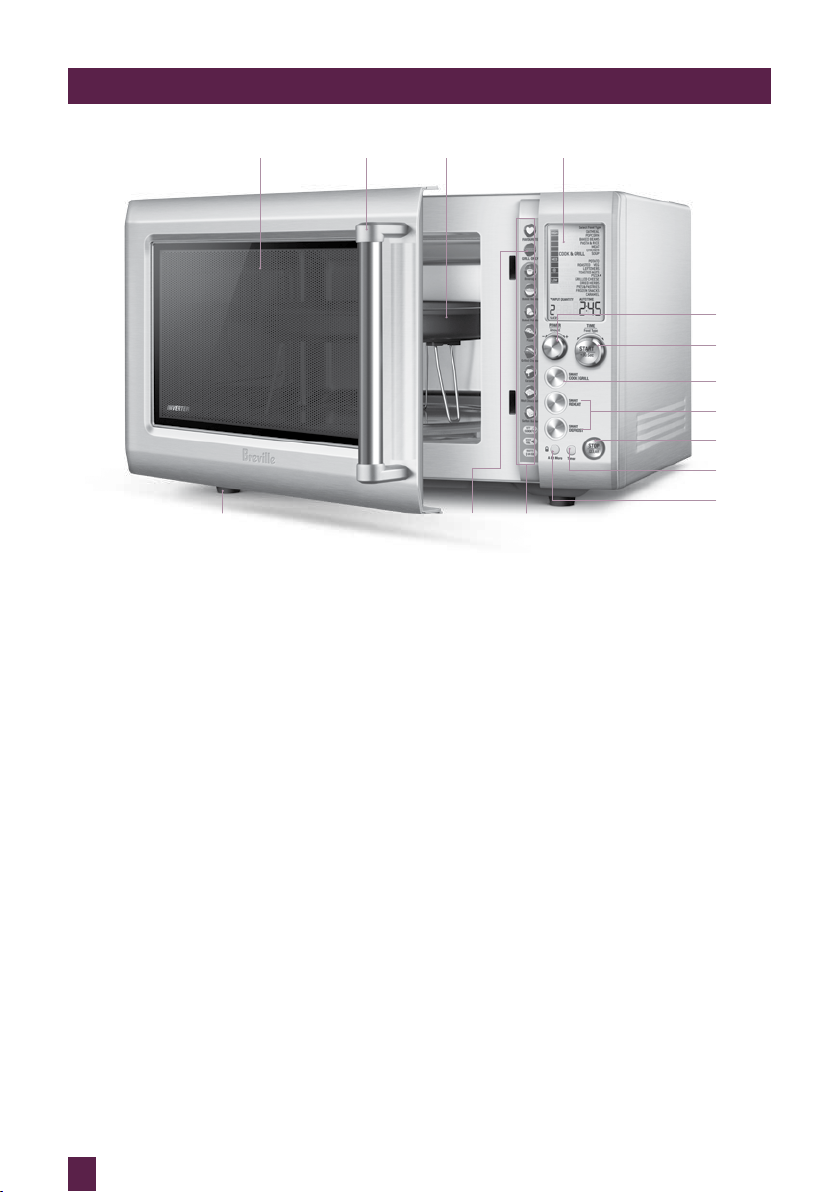
A B C
A. Viewing window
B. Door handle
Pull handle to open.
C. Crisper pan
D. LCD screen
E. POWER/AMOUNT dial
Turn dial to adjust the power level,
weight & quantity that corresponds
with the food type selected.
F. +30 INSTANT START BUTTON &
START/ FOOD TYPE/ TIME dial
Each press adds 30 second increments
at 100% power. Turn dial to select food
type or time.
G. SMART COOK & GRILL BUTTON
Select from a range of food types with
predetermined microwave and grill
times.
H. SMART REHEAT & DEFROST buttons
Allow you to choose from a range of
common food types with predetermined
times and power levels for selected
weights.
D
E
F
G
H
I
J
K
M
LN
I. STOP/CLEAR button
Press once to pause without cancelling the
program. Press twice to clear the display.
J. TIMER button
A convenient kitchen timer that works
independently. Easy to access and read
while completing other kitchen tasks.
K. A BIT MORE™ button & CHILD LOCK
Press once to add A BIT MORE™ time at
the end of the cooking cycle. Press and
hold for 3 seconds to set child lock.
L. Shortcuts panel
Refer to operation section for
detailed explanation.
M. INDEPENDENT GRILL FUNCTION
1000 watt grill element can be used at
anytime to brown and crisp food for added
flavour and texture.
N. Non-slip feet
8
Page 10
ASSEMBLING YOUR BREVILLE PRODUCT
ASSEMBLING YOUR BREVILLE PRODUCT
BEFORE FIRST USE
Before first use remove all promotional stickers
and packaging material. Carefully unpack
the microwave oven and keep all the packing
material until all the parts of the microwave
oven have been found and the appliance
has been assembled. It is recommended to
keep all the packing material in a safe place
in case you wish to repack the product for
shipping purposes.
To remove any dust that may have
accumulated during packing, wash the
turntable roller and glass turntable in warm
soapy water, rinse in clean water then dry
thoroughly. Wipe the interior and exterior of
the microwave oven with a soft, damp cloth
then dry thoroughly.
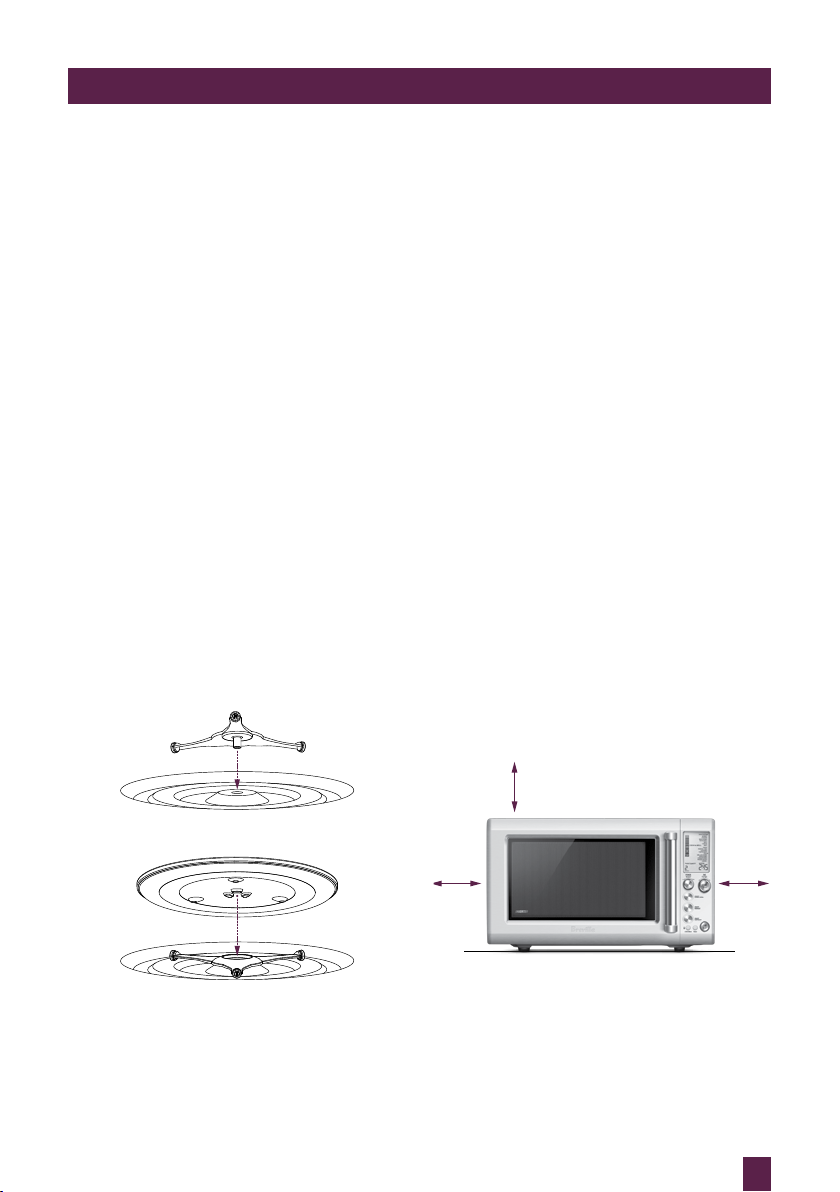
ASSEMBLING THE GLASS
TURNTABLE
1. Insert the turntable roller into position in
the indented space in the oven cavity base.
2. Place the glass turntable on top of the
turntable roller, matching the indents of
turntable roller at the center area.
INSTALLATION AND TURNING ON
THE MICROWAVE OVEN
1. Select a level surface that provides
enough open space for the intake and/or
outlet vents.
2. The rear surface of the appliance should
be placed against a wall. A minimum
clearance of 10cm is required between
the microwave and any adjacent walls.
• Leave a minimum clearance 20cm above
the microwave.
• Do not remove the legs from the bottom of
the microwave.
3. Blocking the intake and/or outlet openings
can damage the microwave.
4. Place the microwave as far away from
radios and TV as possible.
5. Operation of microwave may cause
interference to your radio or TV reception.
6. Plug your microwave into a standard
household outlet. Be sure the voltage and
the frequency is the same as the voltage
and the frequency on the rating label.
7. The microwave must not be placed in
a cabinet.
10cm
20cm
10cm
9
Page 11
ASSEMBLING YOUR BREVILLE PRODUCT
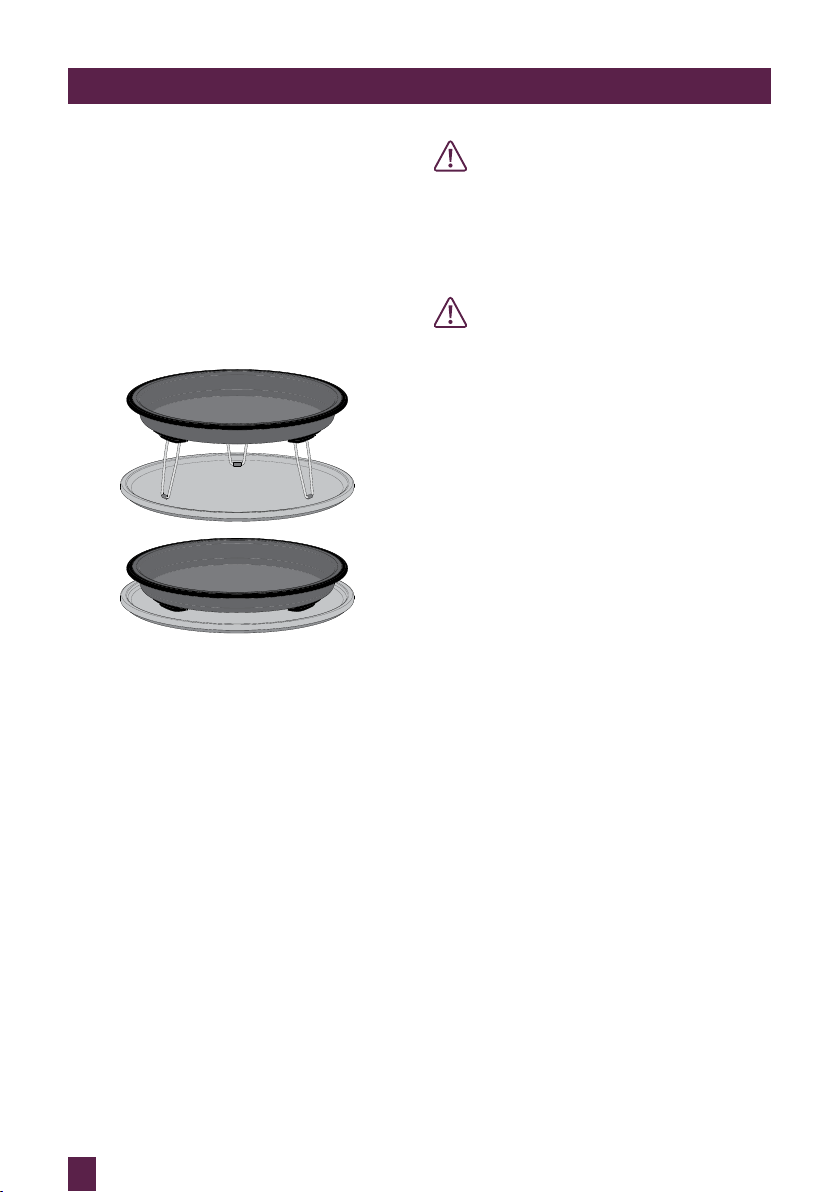
USING THE CRISPER PAN
The crisper pan is ideal for crisping up items
that can become soggy from microwave
reheating such as pies, quiches and pizza and
has been optimised to work in conjunction
with the Smart Settings.
The crisper pan can be used in either the upper
or lower position depending on the size of the
food or how much browning is desired.
To reduce risk of injury, or damaging the
microwave oven, ensure the crisper pan is
placed securely in the centre of the turntable
in both the upper and lower position. Avoid
placing Pyrex, plates or serving ware on
the crisper pan as they may overheat and
become damaged.
CAUTION
Surfaces are hot during and after operation.
Ensure pan is placed securely in the centre of
the turntable. This accessory is only to be used
with BMO700.
WARNING
• To avoid an electrical circuit overload, it
is recommended that no other appliances
are plugged into the same circuit as your
microwave oven (or other products) when
it is in use.
• Do not install oven over a range cooktop or
other heat-producing appliances. If installed
near or over a heat source, the oven could be
damaged and the warranty would be void.
• Check the oven for any damage, such as
misaligned or bent door, damaged door
seals and sealing surface, broken or loose
door hinges and latches and dents inside
the cavity or on the door. If there is any
damage, do not operate the oven and
contact a Breville service centre.
• Do not immerse the microwave oven, power
cord or plug in water or any other liquid.
10
Page 12
OPERATING YOUR BREVILLE PRODUCT
Food Type
TIME
Food Type
TIME
Food Type
TIME
Food Type
TIME
Food Type
TIME
FAVOURITE
Baked Beans
Baked Potato
Grilled Cheese
Beverage
Pizza
Caramel
Melt Chocolate
Soften Butter
GRILL ONLY
Food Type
TIME
Food Type
TIME
Food Type
TIME
Food Type
TIME
Food Type
TIME
OPERATING YOUR BREVILLE PRODUCT
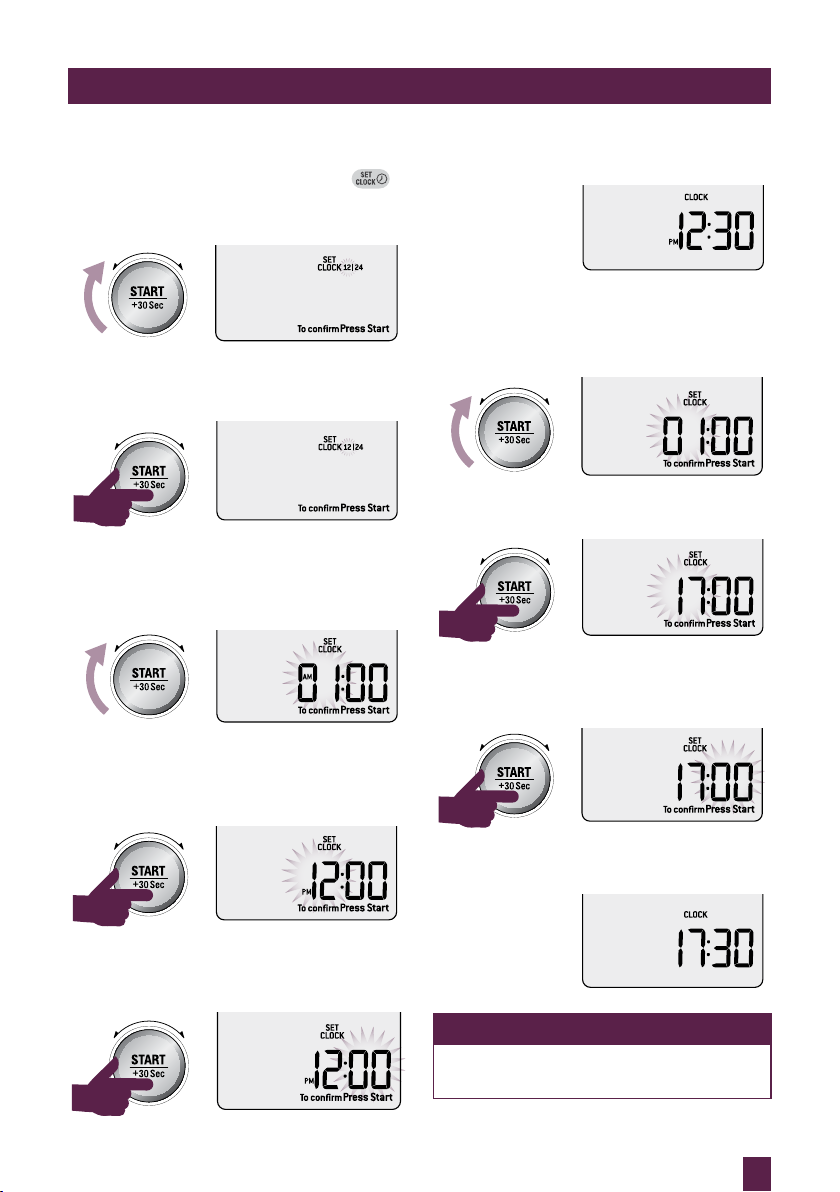
SETTING THE CLOCK
Press SET CLOCK on shortcuts panel.
The default time is 12hr. The highlighted digits
will flash to show it can be adjusted.
Turn the TIME dial to change between 12hr
and 24hr time. Press START to confirm
your selection.
Setting The Clock - 12 Hour Clock Display
The default time is 1:00. The highlighted digits
flash to show it can be adjusted.
Turn the TIME dial to adjust the hours.
From 1:00 to 11:00 the AM symbol will show.
From 12:00 to 11:00 the PM symbol will show.
Press START button to confirm.
The standby screen is now the clock screen
with the 12hr time.
Setting The Clock - 24 Hour Clock Display
The default time is 1:00. The highlighted digits
flash to show it can be adjusted.
Turn the TIME dial to adjust the hours and
Press START button to confirm.
Minutes now flash to show they can be
adjusted. Turn TIME dial to adjust minutes
and press START button to confirm.
The standby screen is now the clock screen
with the 24hr time.
Minutes now flash to show they can be
adjusted. Turn TIME dial to adjust minutes
and press START button to confirm.
NOTE
To show the clock before standby mode
is activated, press STOP/CLEAR.
11
Page 13
OPERATING YOUR BREVILLE PRODUCT
FAVOURITE
Baked Beans
Baked Potato
Grilled Cheese
Beverage
Pizza
Caramel
Melt Chocolate
Soften Butter
GRILL ONLY
FAVOURITE
Baked Beans
Baked Potato
Grilled Cheese
Beverage
Pizza
Caramel
Melt Chocolate
Soften Butter
GRILL ONLY
x 1
FAVOURITE
Baked Beans
Baked Potato
Grilled Cheese
Beverage
Pizza
Caramel
Melt Chocolate
Soften Butter
GRILL ONLY
POWER
Food Type
TIME
Food Type
TIME
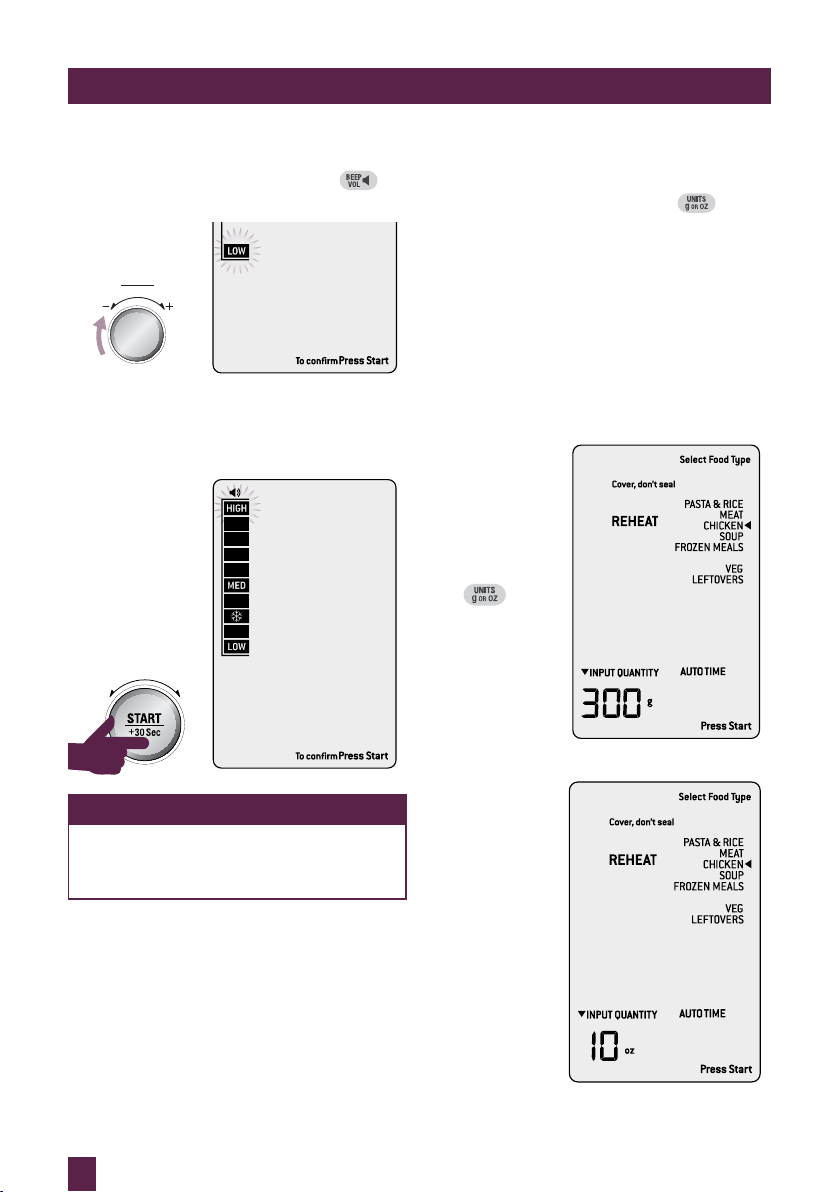
SETTING THE BEEP VOLUME
Press BEEP VOL on shortcuts panel.
The default beep volume is LOW.
Amount
Turn POWER dial to toggle between LOW,
MEDIUM and HIGH beep volume. Each
position will sound the BEEP VOL selected.
Press START button to confirm.
NOTE
If you forget to press START to confirm
BEEP VOL, the volume level will default
to your selected setting after 1 minute.
SETTING THE UNIT WEIGHT
CONVERSION MEASURE
Press UNITS on shortcuts panel.
The highlighted ounces (oz) will flash to show
it can be adjusted. Turn POWER dial to toggle
between ounces (oz) and grams (g). Press
START button to confirm.
Unit Weight Conversion During Operation
When weight is on the screen, as seen below in
SMART REHEAT CHICKEN setting, pressing
UNITS on shortcuts panel will convert the
weight from grams (g) to ounces (oz).
12
Page 14
OPERATING YOUR BREVILLE PRODUCT
Amount
POWER
Food Type
TIME
A Bit More Timer
SMART
DEFROST
SMART
REHEAT
SMART
COOK GRILL
PRESS & HOLD
FOR 3 SECONDS
Amount
POWER
Food Type
TIME
A Bit More Timer
SMART
DEFROST
SMART
REHEAT
SMART
COOK GRILL
Food Type
TIME
SMART
DEFROST
SMART
REHEAT
SMART
COOK GRILL
Food Type
TIME
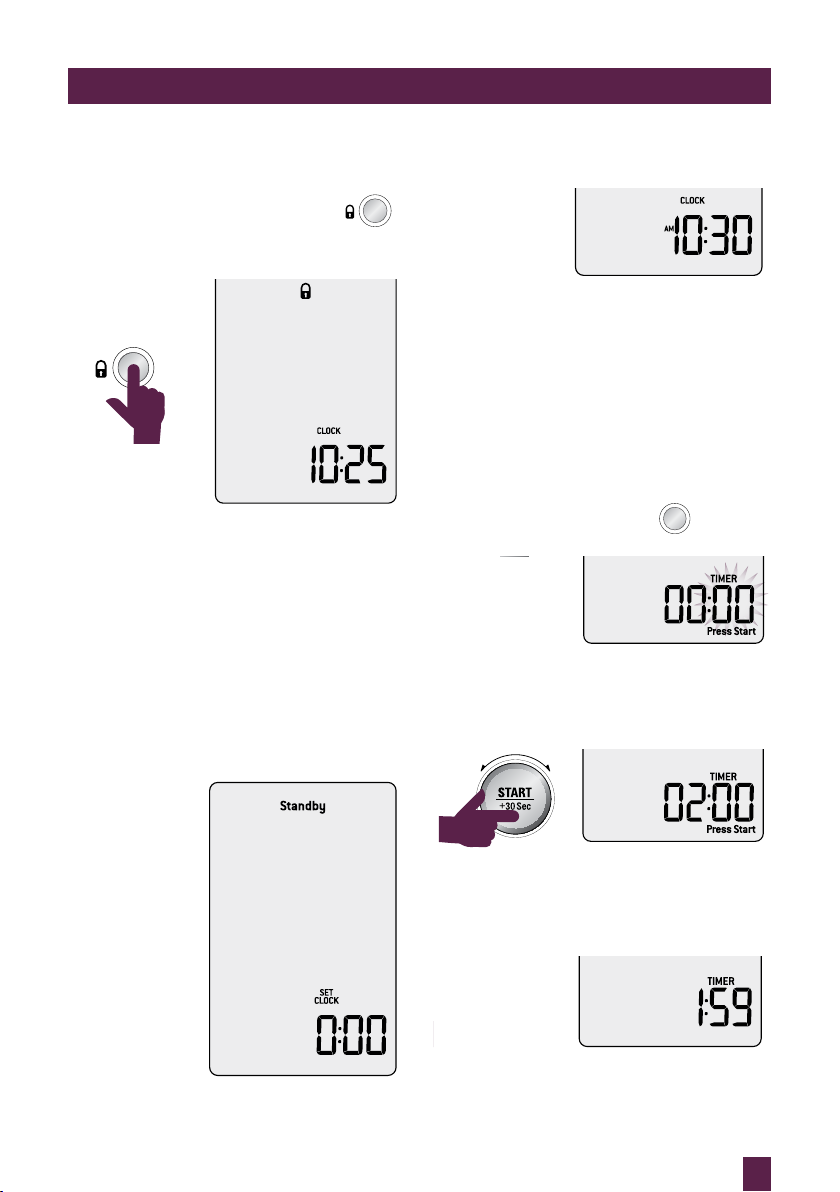
SETTING CHILD LOCK
Press and hold the A BIT MORE™ button
for 3 seconds. The CHILD LOCK
symbol will be displayed on the LCD
screen. The clock will be shown if the
clock is set.
To unlock the microwave, press and hold the
A BIT MORE™ button for 3 seconds.
The CHILD LOCK symbol will disappear
from the LCD screen and you will have full
functionality of your microwave.
STANDBY
When the microwave has been idle for
1 minute, STANDBY mode will be activated.
The backlight of the LCD will turn off and the
buttons will no longer be illuminated.
When the clock has been set STANDBY will
not be displayed on the LCD screen.
Stand-by mode when the clock is set.
To ‘wake up’ the microwave press any button,
turn any dial or open the door.
INDEPENDENT KITCHEN TIMER
The independent kitchen timer can be used as
either a count down or count up timer.
Setting the count down timer
Press TIMER on control panel.
The default time is 00:00.
The highlighted digits flash to show it can be
adjusted. Turn START dial to adjust to your
desired time in seconds, minutes and hours.
Press START button to begin.
Stand-by mode when the clock is not set.
The timer begins to count down. To pause the
timer, press STOP/CLEAR button once.
To clear the timer and return to the default
screen press STOP/CLEAR button twice.
13
Page 15

OPERATING YOUR BREVILLE PRODUCT
Food Type
TIME
SMART
DEFROST
SMART
REHEAT
SMART
COOK GRILL
Food Type
TIME
Food Type
TIME
Food Type
TIME
Food Type
TIME
At the end of the timer function, the microwave
will beep 3 times and the word “End” will flash
on the screen.
Setting the count up timer
Press TIMER on control panel.
The default time is 00:00.
The second digits will flash to show it can be
adjusted. Press START button to begin.
The maximum count up time is 95:00
(95 minutes).
At the end of the 95 minutes, the microwave
will beep 3 times and the word “End” will flash
on the screen.
NOTE
END will stay on screen for 1 minute
before returning to the default screen.
TIME & POWER LEVEL ADJUSTMENT
Select different times and microwave power
levels by simply turning the TIME and
POWER dials.
The maximum microwave cooking time is
95 minutes (95:00). There are 10 power levels
available.
Turning the TIME Dial
Turn TIME dial to adjust the time. The default
time will be 30 seconds.
The timer begins to count up to 95 minutes.
To pause the timer, press STOP/CLEAR button
once. Press START to resume timer. To clear
the timer and return to the default screen press
STOP/CLEAR button twice.
14
Page 16

OPERATING YOUR BREVILLE PRODUCT
Amount
POWER
Food Type
TIME
Amount
POWER
Food Type
TIME
100%
90%
80%
70%
60%
50%
40%
30%
20%
10%
Amount
POWER
Food Type
TIME
Turning the POWER Dial
Turn the POWER dial clockwise. When the
POWER dial is turned clockwise HIGH will
flash and 100% will be displayed.
When the POWER dial is turned anti-clockwise
the POWER LEVEL% will start to decrease
from 100% to 10%, in 10% increments.
NOTE
When the POWER dial is turned
clockwise or anti-clockwise both MELT
and SOFTEN will show on the LCD for
2 seconds then disappear.
15
Page 17

OPERATING YOUR BREVILLE PRODUCT
MANUAL POWER & TIME
ADJUSTMENT (SMART SETTINGS
& SHORTCUT SETTINGS)
Smart Settings and Shortcut settings have
pre-determined cook times and power levels
to give the best results. However, to suit your
personal preference adjustment of both power
and time is available during the cooking cycle.
Adjusting the power level while heating does
not affect the time.
The power bar will reflect the cooking power
level including programs where variable power
levels are used.
It is completely normal in these programs
to see the power bar change during the
cooking cycle.
+30 SEC INSTANT START
Press START/+30 Sec to begin cooking
instantly for 30 seconds with 100% microwave
power. Each additional press will increase
cooking time by 30 seconds.
WHEN COOKING IS FINISHED
At the end of any cooking cycle, the microwave
will beep 3 times, and the word End will flash
on screen.
The word End will stay flashing on the screen
for 5 minutes or once the door is opened.
FAN ONLY
At the end of the cooking cycle, the fan may
rotate to cool the electric components. This is
perfectly normal. You are still able to remove
your food from the microwave while the fan
operates.
The microwave (heating) icon will no longer be
displayed and the words FAN ONLY will flash
on the screen.
Heating Fan Only
16
Page 18

OPERATING YOUR SMART COOK | GRILL SETTING
Food Type
TIME
x2
Food Type
TIME
Food Type
TIME
Amount
POWER
Food Type
TIME
SMART
DEFROST
SMART
REHEAT
SMART
COOK GRILL
Amount
POWER
Food Type
TIME
SMART
COOK GRILL
STOP/CLEAR
Press STOP/CLEAR once to pause
the current function. Press twice to
clear and return to the default screen.
When in the default screen, press once to show
the clock.
The clock will only show if it is set. To set the
clock, follow the instructions on page 11 .
To return to the default screen press any
button, turn any dial or open the door.
SMART SETTINGS
Choose from SMART COOK |GRILL ,
SMART REHEAT and
SMART DEFROST.
Then select from a list of
commonly used food types
and press START. The
microwave will automatically
set the power level, microwave
time and grill time for the
selected quantity.
SMART COOK | GRILL
The SMART COOK|GRILL setting uses
predetermined microwave and grill times
to take the guess work out of cooking your
favourite food. It has been optimised to work
in conjunction with the crisper pan and is ideal
for crisping up items that can become soggy
from microwave heating.
Press SMART COOK|GRILL button to enter
SMART COOK|GRILL settings,
The microwave will beep once.
Turn TIME/FOOD TYPE dial
to select food type.
As the TIME/FOOD TYPE dial is turned the
arrow shifts and points to what food type is
selected.
17
Page 19

OPERATING YOUR SMART COOK | GRILL SETTING
Amount
POWER
Food Type
TIME
Food Type
TIME
Food Type
TIME
Food Type
TIME
Selecting a COOK setting
After selecting FOOD TYPE, turn AMOUNT
dial to adjust quantity or weight.
Press START to begin cooking.
Selecting a COOK & GRILL setting
Turn TIME/FOOD TYPE dial to select COOK
& GRILL food type.
Press START to display FROZEN or FRESH
options. Turn TIME/FOOD TYPE dial to
shift the arrow. Press START to confirm your
selection.
All unselected FOOD TYPES, the Press Start
and Input Quantity prompts are no longer
displayed on the LCD screen. The TIME
appears and begins to countdown.
NOTE
While the microwave is heating
time can be increased or decreased.
Adjusting the heating time does not
affect selected weight or quantity.
18
Page 20

OPERATING YOUR SMART COOK | GRILL SETTING
Food Type
TIME
Food Type
TIME
Food Type
TIME
Once FROZEN or FRESH has been selected
the PREHEAT PAN option will appear. Turn
the TIME/FOOD dial to toggle between yes or
no. Press START to confirm your selection.
NOTE
For best results, it is recommended to
preheat the crisper pan.
Preheating the crisper pan
Although the pan pre-heating time is locked to
total of 3 minutes, it can be reduced by turning
the dial anti-clock wise.
After selecting PREHEAT PAN the microwave
will prompt you to insert the empty crisper pan.
The time will display as 3 minutes, it can be
reduced by turning the dial anti-clock wise.
Insert the tray in the upper position and press
START to begin preheating. TIME will begin
to countdown.
NOTE
The preheat pan time has been
determined through kitchen testing
to offer the best food results. To
reduce risk of injury, or damaging the
microwave oven, the preheat time has
been locked to 3 minutes.
19
Page 21

OPERATING YOUR SMART COOK | GRILL SETTING
Food Type
TIME
Food Type
TIME
Food Type
TIME
Food Type
TIME
Food Type
TIME
Once the pan has completed preheating, or if
preheating phase is skipped, the microwave
will prompt you to place food on pan.
Microwave, grill or combination icons will
display as the cooking cycle progresses.
Turn AMOUNT dial to adjust quantity
or weight.
Press START to begin cooking. All unselected
FOOD TYPES, the Press Start and Input
Quantity prompts are no longer displayed on
the LCD screen. The TIME appears and begins
to countdown.
20
Page 22

OPERATING YOUR SMART COOK | GRILL SETTING
Icon descriptions
= Microwave only
= Grill only
= Microwave + grill
FOR BEST RESULTS
Oatmeal
The SMART COOK OATS setting designed to
gently cook your oats to tender without drying
or becoming lumpy.
The setting uses 2 power levels, firstly 100%
to get the starches activated and then 50% to
gently cook to tender.
This setting is suitable for quick cook
rolled oats.
Weigh out oats accurately and place into a
deep microwave-safe bowl. Do not cover
the bowl.
Add corresponding water amount. E.g. if you
are cooking 100g of oats you will need 500ml
water. For creamy oats, use 1 part oats to
5 parts water.
See Oats table on this page.
Turn the AMOUNT dial to select weight and
press START to begin cooking.
Halfway through the cook program, the oven
will beep and will flash “stir/turn food”. Pause
and stir oats and press START to continue.
At the end of the cooking cycle, stand for
5 minutes to allow oats to thicken and set.
Stir through milk, yoghurt or cream.
OATS WATER SERVES
1
⁄3 cup) 200ml 1–2
40g (
60g (½ cup) 300ml 2–3
120g (1 cup) 600ml 3–4
180g (1½ cups) 900ml 4–5
240g (2 cups) 1.2L 5–6
Popcorn
The SMART COOK POPCORN setting is
designed to pop the maximum amount of
kernels in each bag.
Turn the AMOUNT dial to select weight and
press START to begin cooking.
Pre-set weights are based on popcorn
bag sizes.
21
Page 23

OPERATING YOUR SMART COOK | GRILL SETTING
Rice
The SMART COOK RICE setting is designed
to cook rice so the rice grains remain separate
and tender.
The rice program is intelligently programed to
cook your rice on 2 power levels, firstly at 100%
and then at 50%.
The rice setting is suitable for white rice
such as long grain rice, arborio, jasmine
and basmati.
Weigh dry rice accurately and wash well with
cold water until water runs clear. Place into a
microwave-safe bowl.
Add corresponding water amount. Water to
rice ratio is based on 1.5 parts water to 1 part
rice. See Rice table on this page.
Cover bowl with a vented microwave-safe
plastic lid or vented microwave-safe plastic
wrap but do not seal.
Turn the AMOUNT dial to select weight and
press START to begin cooking.
At the end of the cooking cycle, stand for 5
minutes before removing the lid. Stir and serve.
RICE WATER SERVES
200g 300ml 1–2
250g 375ml 2
300g 450ml 2–3
350g 525ml 3–4
400g 600ml 4–5
450g 675ml 5–6
500g 750ml 6–7
600g 900ml 7–8
Meat
The SMART COOK MEAT setting is suitable
for cooking lamb cutlets, chops and T-bone
steaks.
Cook times are based on meat directly from the
refrigerator (approx. 5°C)
Preheat the crisper pan in the upper position
by following the prompts in the SMART
COOK MEAT setting.
Once the pan has completed preheating,
carefully remove the hot crisper pan from the
microwave using ovenproof mitts.
Arrange meat on the pan making sure thicker
ends are positioned towards the outer edges of
the crisper pan. Place crisper pan in the centre
of the turntable in the upper position.
Turn the AMOUNT dial to select weight and
press START to begin cooking.
Halfway through the cook program, the oven
will beep and will flash “stir/turn food”. Pause
and carefully pull out the crisper pan. Turn
meat over, return crisper pan to the microwave
and press START to continue.
At the end of the cooking cycle, allow meat to
stand for 5 minutes in the crisper pan before
removing and serving.
Chicken
The SMART COOK CHICKEN setting is
suitable for cooking chicken pieces such as
mini drumsticks, wings, thighs and breast.
Cook times are based on chicken directly from
the refrigerator (approx. 5°C)
Preheat the crisper pan in the upper position
by following the prompts in the SMART
COOK CHICKEN setting.
Once the pan has completed preheating,
carefully remove the hot crisper pan from the
microwave using ovenproof mitts.
Arrange chicken pieces on the pan making
sure thicker ends are positioned towards the
outer edges of the crisper pan. Place crisper
pan in the centre of the turntable in the upper
position.
22
Page 24

OPERATING YOUR SMART COOK | GRILL SETTING
Turn the AMOUNT dial to select weight and
press START to begin cooking.
Halfway through the cook program, the oven
will beep and will flash “stir/turn food”. Pause
and carefully pull out the crisper pan. Turn
chicken pieces over, return crisper pan to the
microwave and press START to continue.
At the end of the cooking cycle, allow chicken
to stand for 5 minutes in the crisper pan before
removing and serving.
Soup
The SMART COOK SOUP setting is designed
to cook 2 different soup recipes.
Select from 500ml, 1L and 2L of cooked soup
and follow ingredient weights and cook times.
Cut vegetables into very small diced pieces
approximately ½ cm in size.
Place butter and chopped onion into a deep
microwave-safe bowl. See Pumpkin Soup and
Potato & Leek Soup tables below for cooking
method and weights.
Cover bowl with a vented microwave-safe
plastic lid or vented microwave-safe plastic
wrap but do not seal.
Turn the AMOUNT dial to select weight and
press START to begin cooking.
During the cook program, the microwave will
beep and will flash “stir/turn food”. Pause and
add remaining ingredients. Reseal and press
START to continue.
At the end of the cooking cycle, allow soup to
stand for 5 minutes before removing the lid.
Carefully remove the lid and puree with a stick
blender until smooth.
Season to taste with salt and pepper. Serve with
a dash of cream or milk (optional).
Pumpkin Soup Table
Recipe conversion to different sizes
AMOUNT BUTTER PEELED
& FINELY
CHOPPED
ONION
500ml 20g 75g 125g 125g 250ml 1–2
1L 50g 150g 250g 250g 500ml 4–5
2L 80g 300g 500g 500g 1L 6–8
PEELED
& FINELY
DICED
POTATO
PEELED
& FINELY
DICED
PUMPKIN
CHICKEN
STOCK
SERVES
Potato & Leek Soup Table
Recipe conversion to different sizes
AMOUNT BUTTER WASHED
& FINELY
CHOPPED
LEEK
500ml 20g 200g 125g 250ml 1–2
1L 40g 400g 250g 500ml 4–5
2L 80g 800g 500g 1L 7–8
PEELED
& FINELY
DICED
POTATO
CHICKEN
STOCK
SERVES
23
Page 25

OPERATING YOUR SMART COOK | GRILL SETTING
Potato - Cut
The SMART COOK CUT POTATO setting is
suitable for all types of potatoes.
Cook times are based on potatoes at room
temperature (approx. 20°C).
Peel and cut potatoes into 30-40g size pieces
and place in a microwave-safe bowl. Add 1
tablespoon of water per 100g of potato.
Cover bowl with a vented microwave-safe
plastic lid or vented microwave-safe plastic
wrap but do not seal.
Turn the AMOUNT dial to select weight and
press START to begin cooking.
Halfway through the cook program, the oven
will beep and will flash “stir/turn food”. Pause
and stir potatoes, reseal and press START to
continue.
At the end of the cooking cycle, allow potatoes
to stand for 5 minutes before serving.
Potato - Whole
The SMART COOK WHOLE POTATO
setting is suitable for large whole Sebago
or unwashed potatoes approx. 300-400g in
weight.
Cook times are based on potatoes at room
temperature (approx. 20°C)
Wash potatoes to remove dirt and residue
from the surface. Pat dry and prick 4-5 times
with a fork.
Arrange potatoes around the outer edges of
the crisper pan. Place crisper pan in the centre
of the turntable in the lower position.
Turn the AMOUNT dial to select number of
potatoes and press START to begin cooking.
Halfway through the cook program, the oven
will beep and will flash “stir/turn food”. Pause
and carefully pull out the crisper pan. Turn
potatoes, return crisper pan to the microwave
and press START to continue
At the end of the cooking cycle, allow potatoes
to stand for 5 minutes in the crisper pan before
removing and serving.
Veg - Fresh
The SMART COOK FRESH VEG setting
is suitable for all types of vegetables such
as carrots, beans, broccoli, cauliflower and
zucchini.
Cook times are based on vegetables directly
from the refrigerator (approx. 5°C)
Cut vegetables into even sized pieces and
place in a microwave-safe bowl. Add 1
tablespoon of water per 100g of vegetables.
Cover bowl with a vented microwave-safe
plastic lid or vented microwave-safe plastic
wrap but do not seal.
Turn the AMOUNT dial to select weight and
press START to begin cooking.
Halfway through the cook program, the oven
will beep and will flash “stir/turn food”. Pause
and stir vegetables, reseal and press START to
continue.
At the end of the cooking cycle, allow
vegetables to stand for 5 minutes before
serving.
Veg - Frozen
The SMART COOK FROZEN VEG setting
is suitable for all types of packaged frozen
vegetables found at your supermarket such
as carrots, beans, broccoli, cauliflower and
zucchini.
Cook times are based on vegetables from the
freezer (approx. –18°C)
Place vegetables in a microwave-safe bowl.
Cover bowl with a vented microwave-safe
plastic lid or vented microwave-safe plastic
wrap but do not seal.
Turn the AMOUNT dial to select weight and
press START to begin cooking.
Halfway through the cook program, the oven
will beep and will flash “stir/turn food”. Pause
and stir vegetables, reseal and press START to
continue.
At the end of the cooking cycle, allow
vegetables to stand for 5 minutes before
serving.
24
Page 26

OPERATING YOUR SMART COOK | GRILL SETTING
Veg - Roasted
The SMART COOK ROASTED VEG setting
is suitable for small chat potatoes, pumpkin,
sweet potato and onion.
Cook times are based on vegetables at room
temperature (approx. 20°C)
Preheat the crisper pan in the upper position
by following the prompts in the SMART
COOK ROASTED VEG setting.
Once the pan has completed preheating,
carefully remove the hot crisper pan from the
microwave using ovenproof mitts.
Cut vegetables into 3–5cm even sized pieces
and toss in olive oil. Arrange vegetables on the
pan making sure thicker ends are positioned
towards the outer edges of the crisper pan.
Place crisper pan in the centre of the turntable
in the upper position
Turn the AMOUNT dial to select weight and
press START to begin cooking.
Halfway through the cook program, the oven
will beep and will flash “stir/turn food”. Pause
and carefully pull out the crisper pan. Turn
vegetables over, return crisper pan to the
microwave and press START to continue.
At the end of the cooking cycle, allow
vegetables to stand for 5 minutes in the crisper
pan before removing and serving.
Toasted Nuts
The SMART COOK TOASTED NUTS setting
is suitable for toasting whole nuts such as
walnuts, cashews, raw and blanched almonds,
macadamia nuts and pine nuts so they are
golden in colour and crisp in texture.
Weigh nuts and place onto the crisper pan in a
single layer. Place crisper pan in the centre of
the turntable in the lower position.
Turn the AMOUNT dial to select weight and
press START to begin cooking.
Halfway through the cook program, the oven
will beep and will flash “stir/turn food”. Pause
and carefully pull out the crisper pan. Stir nuts,
return crisper pan to the microwave and press
START to continue.
At the end of the cooking cycle, if nuts are to
your desired colour and crispness, remove to a
cold plate.
If nuts require more heating, allow nuts to
stand for 5–10 minutes in the crisper pan,
stirring once or twice during this time.
Pizza - Fresh
The SMART COOK FRESH PIZZA setting
is ideal for reheating any cold leftover cooked
pizza so the dough is crisp and the toppings
hot and melted.
Cook times are based on pizza directly from
the fridge (approx. 5°C)
Preheat the crisper pan in the upper position
by following the prompts in the SMART
COOK FRESH PIZZA setting.
Once the pan has completed preheating,
carefully remove the hot crisper pan from the
microwave using ovenproof mitts.
Arrange pizza slices on the pan making sure
thicker ends are positioned towards the outer
edges of the crisper pan. Place crisper pan
in the centre of the turntable in the upper
position.
Turn the AMOUNT dial to select number of
slices and press START to begin cooking.
Halfway through the cook program, the oven
will beep and will flash “stir/turn food”. Pause
and carefully pull out the crisper pan. Rearrange food so that the food in the centre of
the pan is moved to the outside and vice versa.
Return crisper pan to the microwave and press
START to continue.
At the end of the cooking cycle, allow pizza
slices to stand for 5 minutes in the crisper pan
before removing and serving.
25
Page 27

OPERATING YOUR SMART COOK | GRILL SETTING
Pizza - Frozen
The SMART COOK FROZEN PIZZA setting
is ideal for reheating frozen pizza so the dough
is crisp and the toppings hot and melted.
Cook times are based on pizza directly from
the freezer (approx. –18°C).
Preheat the crisper pan in the upper position
by following the prompts in the SMART
COOK FROZEN PIZZA setting.
Once the pan has completed preheating,
carefully remove the hot crisper pan from the
microwave using ovenproof mitts.
Arrange pizza slices on the pan making sure
thicker ends are positioned towards the outer
edges of the crisper pan. Place crisper pan
in the centre of the turntable in the upper
position.
Turn the AMOUNT dial to select number of
slices and press START to begin cooking.
Halfway through the cook program, the oven
will beep and will flash “stir/turn food”. Pause
and carefully pull out the crisper pan. Rearrange food so that the food in the centre of
the pan is moved to the outside and vice versa.
Return crisper pan to the microwave and press
START to continue.
At the end of the cooking cycle, allow pizza
slices to stand for 5 minutes in the crisper pan
before removing and serving.
Dried - Herbs
The SMART COOK DRIED HERBS setting
heats fresh herbs so they become dry and
crisp in texture. It is a great way to use up an
abundance of fresh herbs in your garden as
they will retain good colour and fragrance for
longer than store bought varieties.
For best results use hard herbs such as thyme,
rosemary, sage, oregano and even continental
parsley.
Pick leaves off the fresh herbs and discard the
stalk or stem. Wash gently in a sieve to remove
any grit and dirt. Shake to remove excess water
and pat dry with a paper towel.
Line crisper pan with 2 layers of paper towel,
measure herbs and place onto the crisper pan
in a single layer. Place crisper pan in the centre
of the turntable in the lower position.
Turn the AMOUNT dial to select cup size and
press START to begin cooking.
Halfway through the cook program, the oven
will beep and will flash “stir/turn food”. Pause
and carefully pull out the crisper pan. Turn
herbs, return crisper pan to the microwave and
press START to continue.
At the end of the cooking cycle, if herbs are to
your desired crispness, remove to a cold plate.
If herbs require more heating, remove paper
towel and allow herbs to stand for 5-10 minutes
in the crisper pan, stirring once or twice during
this time.
Store your dried herbs in an airtight container
in a dark cupboard for 6-12 months.
Pies & Pastries - Frozen
The SMART COOK FROZEN PIES &
PASTRIES setting is ideal for reheating any
frozen cooked, savoury or sweet pie or pastry
so the filling is hot and the outside crisp and
golden. It is suitable for foods such as meat
pies, apple pies, party pies, sausage rolls,
danishes and crumbles.
Cook times are based on pies and pastries
directly from the freezer (approx. –18°C).
Preheat the crisper pan in the upper position
by following the prompts in the SMART
COOK FROZEN PIES & PASTRIES setting.
Once the pan has completed preheating,
carefully remove the hot crisper pan from the
microwave using ovenproof mitts.
Arrange pies or pastries on the pan allowing
1–2 cm gaps between the pieces in the crisper
pan. Place crisper pan in the centre of the
turntable in the upper position.
Turn the AMOUNT dial to select weight and
press START to begin cooking.
26
Page 28

OPERATING YOUR SMART COOK | GRILL SETTING
Halfway through the cook program, the oven
will beep and will flash “stir/turn food”. Pause
and carefully pull out the crisper pan. Rearrange food so that the food in the centre of
the pan is moved to the outside and vice versa.
Return crisper pan to the microwave and press
START to continue.
At the end of the cooking cycle, allow pies and
pastries to stand for 5 minutes in the crisper
pan before removing and serving.
Pies & Pastries - Fresh
The SMART COOK FRESH PIES & PASTRIES
setting is ideal for reheating any fresh cooked
savoury or sweet pie or pastry so the filling
is hot and the outside crisp and golden. It is
suitable for foods such as meat pies, apple
pies, party pies, sausage rolls, danishes and
crumbles.
Cook times are based on pies and pastries
directly from the fridge (approx. 5°C)
Preheat the crisper pan in the upper position
by following the prompts in the SMART
COOK PIES & PASTRIES setting.
Once the pan has completed preheating,
carefully remove the hot crisper pan from the
microwave using ovenproof mitts.
Arrange pies or pastries on the pan allowing
1–2 cm gaps between the pieces in the crisper
pan. Place crisper pan in the centre of the
turntable in the upper position.
Turn the AMOUNT dial to select weight and
press START to begin cooking.
Halfway through the cook program, the oven
will beep and will flash “stir/turn food”. Pause
and carefully pull out the crisper pan. Rearrange food so that the food in the centre of
the pan is moved to the outside and vice versa.
Return crisper pan to the microwave and press
START to continue.
At the end of the cooking cycle, allow pies and
pastries to stand for 5 minutes in the crisper
pan before removing and serving.
Frozen Snacks
The SMART COOK FROZEN SNACKS
setting is ideal for reheating frozen snacks
such as chicken nuggets, fish fingers, breaded
chicken strips, frozen crumbed fish fillets and
frozen potato chips.
Cook times are based on food snacks directly
from the freezer (approx. –18°C)
Preheat the crisper pan in the upper position
by following the prompts in the SMART
COOK FROZEN SNACKS setting.
Once the pan has completed preheating,
carefully remove the hot crisper pan from the
microwave using ovenproof mitts.
Arrange food pieces on the pan making sure
thicker ends are positioned towards the outer
edges of the crisper pan. Place crisper pan
in the centre of the turntable in the upper
position.
Turn the AMOUNT dial to select weight and
press START to begin cooking.
Halfway through the cook program, the oven
will beep and will flash “stir/turn food”. Pause
and carefully pull out the crisper pan. Turn
food over, return crisper pan to the microwave
and press START to continue.
At the end of the cooking cycle, allow food to
stand for 5 minutes in the crisper pan before
removing and serving.
27
Page 29

OPERATING YOUR SMART REHEAT SETTING
Food Type
TIME
Amount
POWER
Food Type
TIME
SMART
REHEAT
SMART
COOK GRILL
Amount
POWER
Food Type
TIME
Food Type
TIME
SMART REHEAT
The SMART REHEAT setting uses lower
power levels to gently reheat food without
drying or overcooking.
SMART REHEAT setting will heat your food to
perfect serving temperatures.
Press SMART REHEAT button to
enter SMART REHEAT settings,
the microwave will beep once.
Turn TIME/FOOD TYPE dial to select
food type.
As the TIME/FOOD TYPE dial is turned
the arrow shifts and points to what food type
is selected.
Press START to begin reheating.
After selecting FOOD TYPE, turn AMOUNT
dial to adjust quantity or weight.
28
All unselected FOOD TYPES, the Press Start
and Input Quantity prompts are no longer
displayed on the LCD screen. The TIME
appears and begins to countdown.
NOTE
While the microwave is heating,
time can be increased or decreased.
Adjusting the heating time does not
affect selected weight or quantity.
Page 30

OPERATING YOUR SMART REHEAT SETTING
FOR BEST RESULTS
Pasta & Rice
The SMART REHEAT PASTA & RICE setting
is suitable for reheating already cooked pasta
and rice.
Reheat times are based on rice and pasta
directly from the refrigerator (approx. 5°C)
Place food in a microwave-safe bowl. Add a few
tablespoons of water or sauce.
Cover bowl with a vented microwave-safe
plastic lid or vented microwave-safe plastic
wrap but do not seal.
Halfway through the reheat program, the oven
will beep and will flash “stir/turn food”. Pause
and stir food, starting from the outside of the
bowl to the center. Reseal and press START to
continue.
Meat
The SMART REHEAT MEAT setting is
suitable for reheating already cooked chops,
steaks and bolognese. Reheat times are based
on meat directly from the refrigerator
(approx. 5°C).
Arrange meat on the pan making sure thicker
ends are positioned towards the outer edges of
the crisper pan. Place crisper pan in the centre
of the turntable in the upper position.
If reheating bolognese, place in a microwavesafe container and do not cover.
Halfway through the reheat program, the oven
will beep and will flash “stir/turn food”
Pause and turn and press START to continue.
Chicken
The SMART REHEAT CHICKEN setting
is designed to gently reheat chicken pieces
without drying and overcooking. It is not
suitable for reheating whole chickens.
Reheat times are based on chicken pieces
directly from the refrigerator (approx. 5°C).
Arrange chicken pieces on the pan making
sure thicker ends are positioned towards the
outer edges of the crisper pan. Place crisper
pan in the centre of the turntable in the
upper position.
Halfway through the reheat program, the oven
will beep and will flash “stir/turn food”
Pause and carefully pull out the crisper pan.
Turn chicken pieces over, return crisper pan to
the microwave and press START to continue.
For larger amounts over 1kg, turn chicken twice
during the cooking cycle.
Soup
The SMART REHEAT SOUP setting is
suitable for reheating canned soups at
room temperature 20°C.
Place soup into a microwave-safe bowl and
cover with a vented microwave-safe lid or
microwave-safe plastic wrap.
Halfway through the reheat program, the oven
will beep and will flash “stir/turn food”
Pause and stir, starting from the outside to
the center.
Reseal and press START to continue.
When reheating cold soups from the
refrigerator (approx. 5°C) add an extra
1–2 minutes to the reheat time.
Frozen Meals
The SMART REHEAT FROZEN MEALS
setting is suitable for reheating homemade
or store bought frozen casseroles, curries and
frozen dinners to serving temperatures.
Reheat times are based on frozen meals
directly from the freezer (approx. –18°C)
Remove frozen meal from packaging and place
in a microwave-safe container or plate.
Cover container with a vented microwave-safe
plastic lid or vented microwave-safe plastic
wrap but do not seal.
29
Page 31

OPERATING YOUR SMART DEFROST SETTING
Food Type
TIME
Amount
POWER
Food Type
TIME
Amount
POWER
Food Type
TIME
SMART
DEFROST
SMART
REHEAT
SMART
COOK GRILL
Halfway through the reheat program, the oven
will beep and will flash “stir/turn food”. Pause
and stir food, starting from the outside of the
container to the centre. Carefully break up any
large parts of thawed meat and stir or turn over.
Reseal and press START to continue.
Veg
The SMART REHEAT VEG setting is suitable
for reheating already cooked cold vegetables
such as potatoes, peas, beans, broccoli,
cauliflower and zucchini.
Reheat times are based on vegetables from the
refrigerator (approx. 5°C).
Place vegetables in a microwave-safe bowl and
cover with a vented microwave-safe plastic lid
or vented microwave-safe plastic wrap but do
not seal.
Halfway through the reheat program, the oven
will beep and will flash “stir/turn food”. Pause
and stir vegetables, reseal and press START to
continue.
Leftovers
The SMART REHEAT LEFTOVERS setting is
suitable for reheating a plate of leftovers from
the refrigerator (approx. 5°C).
A plate of food is equivalent to 300g.
For even reheating, place food onto a
microwave-safe plate or into a bowl. Cover food
with a vented microwave-safe lid or vented
microwave-safe plastic wrap.
Halfway through the reheat program, the oven
will beep and will flash “stir/turn food”.
Pause and stir, reseal and press START.
SMART DEFROST
The SMART DEFROST setting is designed to
gently defrost foods without overheating and
drying out of edges.
Press SMART DEFROST button
to enter SMART DEFROST
setting, the microwave will beep once.
Turn TIME/FOOD TYPE dial to select the
food type.
As the TIME/FOOD TYPE dial is turned
the arrow shifts and points to what food type
is selected.
After selecting FOOD TYPE, turn AMOUNT
dial to adjust quantity or weight.
30
Page 32

OPERATING YOUR SMART DEFROST SETTING
Food Type
TIME
Press START to commence defrosting.
All unselected FOOD TYPES, the Press Start
and Input Quantity prompts are no longer
displayed on the LCD screen. The TIME
appears and begins to countdown.
NOTE
While the microwave is defrosting
time can be increased or decreased.
Adjusting the defrosting time does not
affect selected weight or quantity.
FOR BEST RESULTS
• Defrost times are for thoroughly frozen
food that has been in the freezer for at least
24 hours and maintained at temperatures
of –18°C or lower.
• When freezing meats, poultry and fish,
use good quality plastic wrap, bags and
containers.
• Always freeze meats in a single layer no
thicker than 3–5 cm.
• To separate meat, such as chicken pieces
or steak, place wax paper or plastic film
between each layer.
• Ensure that all air has been removed and
packaging has been sealed securely.
• Label the packs with type and cut of meat,
date and weight.
• Remove any packaging and bags from
frozen meats before defrosting.
• Shield thin ends of chops, steaks or
chicken with foil to prevent overheating
and cooking of those areas.
• Position foods in a single layer with thinner
parts in the center and thicker ends around
the outside of the turntable.
• After the defrost cycle, most foods will
still be somewhat icy in the center when
removed from the microwave. Stand food
for 5–15 minutes until completely thawed.
Meat
The SMART DEFROST MEAT setting is
suitable for defrosting meat such as beef, lamb
and pork.
It is important that the frozen meat is no
thicker than 3–5 cm.
Remove any packaging, foam trays and
absorbent pads from the meat.
Place directly onto a microwave-safe plate or
shallow dish.
Halfway through the defrost program, the oven
will beep and will flash “stir/turn food”
Pause and remove any defrosted meat and set
aside in the refrigerator. Turn the frozen meat
over and return to the microwave oven. Press
START to restart program.
At the end of the program, remove meat and
stand 5–15 minutes to thaw completely.
31
Page 33

OPERATING YOUR SMART DEFROST SETTING
Chicken
For chicken pieces; position chicken pieces in
a single layer in a microwave-safe dish, plate or
container.
Arrange thicker ends around the outside of the
turntable. Shield thinner pieces such as wings
with foil to prevent overheating and cooking.
Halfway through the defrost program, the oven
will beep and will flash “stir/turn food”.
Pause and turn over chicken pieces. Press
START to restart program.
At the end of the cooking cycle, remove
chicken from oven and stand 5–15 minutes to
thaw completely.
For whole chickens
Remove from original packaging. Rinse frozen
chicken under cold water and pat dry. Shield
wings, leg tips and parson's nose with foil.
Place chicken, breast side down onto the
turntable lined with a paper towel.
Halfway through the defrost program, the oven
will beep and will flash “stir/turn food”
Pause and turn chicken over. Place a strip of
foil large enough to cover the breast meat.
Press START to restart defrost program.
After defrost cycle has ended, remove chicken
from microwave and discard foil. Rinse under
tap water, making sure to wash the cavity well
to loosen the icy core.
Place onto a clean plate and pat dry.
Cover with cling film and refrigerate until
completely thawed.
Soup
The SMART DEFROST SOUP setting is
suitable for defrosting frozen homemade or
store bought soups directly from the freezer
(approx. –18°C).
Remove soup from any packaging and place
into a microwave-safe bowl. Do not cover.
Halfway through the defrost program, the oven
will beep and will flash “stir/turn food”
Pause and break up any large icy parts of the
soup by stirring from the outside of the bowl to
the centre. Press START to continue.
After the defrost cycle has ended, the soup will
be ready for reheating to serving temperatures.
Choose a suitable setting from the SMART
REHEAT menu.
Frozen meals
The SMART DEFROST FROZEN MEALS
setting is suitable for defrosting homemade
frozen casseroles, curries and meat sauces.
Defrost times are based on frozen meals
directly from the freezer (approx. –18°C)
Remove frozen meal from any packaging and
place into a microwave-safe container.
Do not cover.
Halfway through the reheat program, the oven
will beep and will flash “stir/turn food”.
Pause and stir food from the outside towards
the center; press START to continue.
For meals which contain large pieces of meat
such as chicken pieces, carefully break up any
thawed parts and stir or turn meat over.
After the defrost cycle has ended, the food will
be ready for reheating to serving temperatures.
Choose a suitable setting from the SMART
REHEAT menu.
32
Page 34

A BIT MORE™
Amount
POWER
Food Type
TIME
SMART
REHEAT
SMART
COOK GRILL
Food Type
TIME
Amount
POWER
Food Type
TIME
A Bit More Timer
SMART
DEFROST
SMART
REHEAT
SMART
COOK GRILL
Amount
POWER
Food Type
TIME
Food Type
TIME
A BIT MORE™ BUTTON
Use A BIT MORE™ when cooking
is finished and your food is not
quite cooked or hot enough.
One simple press of A BIT MORE™ will add
a little extra cooking time.
If A BIT MORE™ is pressed and there is no
previous SMART COOK & GRILL, REHEAT,
DEFROST or shortcut setting the microwave
will default to the basic mode and add extra
time at 100% power.
The A BIT MORE™ button can also be used
after any SMART COOK & GRILL, REHEAT,
SMART DEFROST or shortcut setting.
For example
1. User presses the SMART REHEAT button.
2. Using the TIME/FOOD TYPE dial,
select MEAT.
3. Using the AMOUNT dial select 200g.
4. Press START to begin reheating.
5. Reheat process ends.
33
Page 35

Amount
POWER
Food Type
TIME
A Bit More Timer
SMART
DEFROST
SMART
REHEAT
SMART
COOK GRILL
FAVOURITE
A BIT MORE™OPERATING YOUR SHORTCUTS PANEL
6. Open the Microwave door, check food,
and if A BIT MORE™ reheating time is
required, close the door. The microwave
will return to the default screen.
7. Press the A BIT MORE™ button to add
A BIT MORE™ cooking time. The timer
will start to count down.
NOTE
As soon as A BIT MORE™ button
is pressed the microwave will start
cooking.
FAVOURITE
The shortcuts FAVOURITE setting will record
your most used and favourite reheat, defrost or
shortcut setting.
At the press of a button, your favourite
program can be duplicated time after time.
1. Set the microwave to your favourite setting.
2. Press and hold the FAVOURITE
button on shortcuts panel inside the door
for 2 seconds. The FAVOURITE symbol
will be displayed on the LCD screen.
3. Press START to begin your favourite
setting.
NOTE
The microwave will save this setting
for future use. Pressing the Favourite
button next time will display your saved
Favourite setting on the LCD screen.
To change your Favourite setting at any
time, repeat steps 1 and 2 above.
GRILL ONLY
The shortcuts GRILL ONLY setting is ideal for
adding extra colour to already cooked foods
such as melts, pies, pastries and snack foods.
1. Press the GRILL ONLY
shortcuts panel inside the door.
2. Preheat the crisper pan in the upper
position by following the prompts in the
GRILL ONLY setting.
3. Once the pan has completed preheating,
carefully remove the hot crisper pan from
the microwave using ovenproof mitts.
4. Arrange food on the pan making sure
thicker ends are positioned towards the
outer edges of the crisper pan. Place crisper
pan in the centre of the turntable in the
upper position.
5. Turn the TIME dial to the grill time and
press START to begin cooking.
button on the
34
Page 36

OPERATING YOUR SHORTCUTS PANEL
FAVOURITE
Beverage
Beverage
The shortcuts BEVERAGE setting is suitable
to reheat hot drinks such as coffee and tea
that may have become cold. The BEVERAGE
setting will warm your drink to approx.
60–65°C which is suitable to drink right away.
1. It is based on 200ml of beverage at room
temperature.
2. Position cups around the outside of the
turntable.
3. Press the BEVERAGE
button on the
shortcuts panel inside the door.
4. Turn the AMOUNT dial to select the
number of cups and press START to begin
cooking.
5. At the end of the reheat cycle, stir heated
drinks and allow to stand for 1–2 minutes
before consuming. Be aware, that
overheating drinks may scold or burn.
Baked beans
The shortcuts BAKED BEANS setting is
programed to reheat baked beans to serving
temperatures without splattering and breaking
up of the beans.
1. Place beans into a suitable microwave-safe
bowl and do not cover.
2. Press the BAKED BEANS
button on
shortcuts panel inside the door.
3. Turn AMOUNT DIAL to select weight and
press START button to begin heating.
COMMON
CAN SIZES
COMMON
CAN WEIGHT
120g–130g 120g
220g 220g
420g–425g 425g
SELECTED
WEIGHT ON
MICROWAVE
820g–850g 850g
35
Page 37

OPERATING YOUR SHORTCUTS PANEL
Beverage
Beverage
Baked Potato
The shortcuts BAKED POTATO setting is
suitable for large whole Sebago or unwashed
potatoes approx. 300-400g in weight.
Cook times are based on potatoes at room
temperature (approx. 20°C).
1. Wash potatoes to remove dirt and residue
from the surface. Pat dry and prick 4-5
times with a fork.
2. Arrange potatoes around the outer edges
of the crisper pan. Place crisper pan in
the centre of the turntable in the lower
position.
3. Press the BAKED POTATO
button on
the shortcuts panel inside the door.
4. Turn the AMOUNT dial to select the
number of potatoes and press START to
begin cooking.
5. Halfway through the cook program, the
oven will beep and will flash “stir/turn
food”. Pause and carefully pull out the
crisper pan. Turn potatoes, return crisper
pan to the microwave and press START to
continue.
6. At the end of the cooking cycle, allow
potatoes to stand for 5 minutes in the
crisper pan before removing and serving.
Pizza
The shortcuts PIZZA setting reheats frozen
pizza so the dough is crisp and the toppings
hot and melted.
Cook times are based on pizza directly from
the freezer (approx. –18°C).
1. Press the PIZZA
button on the
shortcuts panel inside the door.
2. Preheat the crisper pan in the upper
position by following the prompts in the
PIZZA setting.
3. Once the pan has completed preheating,
carefully remove the hot crisper pan from
the microwave using ovenproof mitts.
4. Arrange pizza slices on the pan making
sure thicker ends are positioned towards
the outer edges of the crisper pan. Place
crisper pan in the centre of the turntable in
the upper position.
5. Turn the AMOUNT dial to select weight
and press START to begin cooking.
6. Halfway through the cook program, the
oven will beep and will flash “stir/turn
food”. Pause and carefully pull out the
crisper pan. Re-arrange food so that the
food in the centre of the pan is moved to
the outside and vice versa. Return crisper
pan to the microwave and press START to
continue.
7. At the end of the cooking cycle, allow pizza
slices to stand for 5 minutes in the crisper
pan before removing and serving.
36
Page 38

OPERATING YOUR SHORTCUTS PANEL
Beverage
Pizza
Grilled Cheese
The shortcuts GRILLED CHEESE setting
makes either closed toastie sandwiches or
open melts so the cheese is melted and the
bread is crisp and golden.
This setting is suitable for any type of bread
such as sliced white bread or thick, grained
sourdough. For best results, liberally apply
butter or your spread of choice to at least one
side of the bread.
1. Press the GRILLED CHEESE
button
on the shortcuts panel inside the door.
2. Preheat the crisper pan in the upper
position by following the prompts in the
GRILLED CHEESE setting.
3. Once the pan has completed preheating,
carefully remove the hot crisper pan from
the microwave using ovenproof mitts.
4. When making closed toasties; butter
outside of bread slices and fill with cheese
(and cold cuts if desired) ensuring toastie
filling is no thicker than 1cm. Arrange
toasties on the pan. Place crisper pan in
the centre of the turntable in the upper
position.
When making open melts; arrange
buttered bread slices on the crisper pan
without any toppings. Place crisper pan
in the centre of the turntable in the upper
position.
5. Turn the AMOUNT dial to select number
of serves and press START to begin
cooking.
6. Halfway through the cook program, the
oven will beep and will flash “stir/turn
food”. Pause and carefully pull out the
crisper pan.
7. For closed toasties; turn toasties over,
return crisper pan to the microwave and
press START to continue.
For open toasties; turn bread slices over,
add cheese and toppings and return crisper
pan to the microwave. Press START to
continue.
8. At the end of the cooking cycle, remove
and serve immediately.
37
Page 39

OPERATING YOUR SHORTCUTS PANEL
Beverage
Pizza
Caramel
The shortcuts CARAMEL setting is ideal for
making sauces or hard toffee.
The CARAMEL setting uses 2 power levels,
firstly 80% to dissolve the sugar in the water
and then 100% to evaporate the water and melt
the sugar.
This setting is suitable for making light
caramel. To increase the darkness see darkness
table below for additional times.
1. Choose a clear Pyrex bowl that is large
enough to contain the hot sugar mixture
when boiling. Wash the bowl well to
remove any residue oil or grit that will
cause the caramel to crystallise.
2. Place sugar and water into the bowl and
mix well with a metal spoon. See Caramel
table below for cooking method and
weights.
3. Wash down any stray sugar grains from
the side of the bowl using a pastry brush
dipped in clean water. Stray sugar grains
will cause the caramel to crystallise if not
properly incorporated.
4. Place the bowl in the centre of the
turntable.
5. Press the CARAMEL
button on the
shortcuts panel inside the door.
6. Turn the AMOUNT dial to select weight
and press START to begin cooking.
7. During the cook program, the oven will
beep and will flash “stir/turn food”. Pause
and carefully remove the cooking bowl
from the microwave using oven proof
mitts.
CAUTION
Melted sugar is extremely hot and will
burn if it comes into contact with the
skin. Always practice extreme caution
when cooking caramel.
8. Swirl the bowl gently to dissolve any
remaining sugar. Wash down any stray
sugar grains from the side of the bowl
using a pastry brush dipped in clean water.
9. Return bowl to the microwave and press
START to continue.
10. At the end of the cooking cycle, if caramel
is to your desired colour, carefully remove
the cooking bowl from the microwave
using oven proof mitts.
To make toffee; pour hot sugar mixture
onto a metal tray lined with baking paper.
Add any additional ingredients and leave
at room temperature to cool completely.
To make butterscotch sauce; add butter
and cream to the hot sugar mixture and
stir through.
11. If caramel is not to your desired colour,
add additional time following the darkness
table below and check every 30 seconds.
Always remove caramel when it is close
to your desired colour as it will continue
to cook after heating has stopped and
become darker on standing.
Caramel Table
Recipe conversion to different sizes
AMOUNT SUGAR WATER CHECK
1 cup 1 cup
(220g)
2 cups 2 cups
(440g)
½ cup
(125ml)
1 cup
(250ml)
EVERY
1 MIN
AFTER
10 mins
20 mins
Darkness Table
CARAMEL
COLOUR
Light 1–3 min 30 sec
Medium 2–4 min 30 sec
Dark 3–4 min 30 sec
TIME ADDED
AFTER COOKING
CHECK
EVERY
38
Page 40

OPERATING YOUR SHORTCUTS PANEL
Beverage
Pizza
Caramel
Beverage
Pizza
Caramel
Melt chocolate
The shortcuts MELT CHOCOLATE setting
is designed to melt chocolate without
overheating and seizing of the chocolate.
NOTE
The melt chocolate setting was tested
with dark chocolate melts. If using
other types of chocolate, check at short
intervals to prevent possible seizing
of chocolate.
1. Place chocolate in a suitable microwave-
safe bowl and do not cover.
2. Press the MELT CHOCOLATE
button
on shortcuts panel inside the door.
3. Turn AMOUNT DIAL to select weight and
press START button to commence melting.
4. Halfway through the program, the
microwave will beep and will flash
Stir/turn food. Pause and stir chocolate
and press START button to continue.
NOTE
At the end, some of the chocolate
may still hold their shape; stir until
completely melted and smooth.
Soften butter
The shortcuts SOFTEN BUTTER setting is
designed to soften butter so it is suitable to
cream immediately in a mixer.
The soften butter setting will soften butter that
has been taken directly from the refrigerator
(approx. 5°C).
1. Cut butter as a whole piece and place on a
microwave-safe plate or bowl. Do not cover.
2. Press the SOFTEN BUTTER
button
on shortcuts panel inside the door.
3. Turn AMOUNT DIAL to select weight
and press START button to commence
softening.
NOTE
The butter should be soft enough to poke
your finger easily into the centre. The
butter should not be melted.
39
Page 41

HINTS & TIPS
HINTS & TIPS
INTRODUCTION TO
MICROWAVE COOKING
• Microwaves are invisible waves of
electromagnetic energy similar to radio
waves. Instead of being converted to
sound as in a radio or mobile phones, it is
converted into a heat source which heats
food from the inside.
• Microwaves cook because food molecules
of water, fat and sugar react to the energy
provided by the microwaves. That
energy is absorbed by the food causing
the molecules to vibrate quickly. This
movement creates friction which causes
the food to heat up and therefore cook.
• The energy in a microwave is not
distributed evenly throughout the cavity.
The turntable rotates constantly while
cooking which prevents uneven cooking.
• Microwave cooking is considered the
“cool” cooking method as only the food
gets hot and surrounding air stays cool.
• Microwaves are safe and economical on
electricity with savings up to 50%.
• Ovens need no preheating therefore
the kitchen stays cooler. Cooking is
cleaner with less odours and washing up
is reduced.
• Microwave ovens cook foods rapidly, some
foods are better cooked in a microwave
oven as they retain more flavour, texture
and goodness, such as plain fish fillets, soft
fruit, vegetables and fat free cakes.
• In a microwave the heat is produced
INSIDE the food. In all other conventional
cooking methods, heat is applied from
OUTSIDE through transference of heat by
convection or radiation.
• Microwave energy penetrates the food to
a depth of about 25mm. Small foods under
5cm in diameter such as eggs are
penetrated to the centre from all sides.
In larger foods, energy creates heat in the
outer layer; this then moves to the centre
by conduction, as it does with
conventional cooking.
SOME IMPORTANT TIPS FOR
MICROWAVE COOKING
To help equalize energy in the food so that it
cooks evenly follow these helpful tips.
1. Arrange foods with varying size ends, such
as chicken drumsticks and broccoli with
the thicker or tougher part positioned to
the outside of the dish. This ensures the
parts that require more cooking will receive
more energy, so the food will cook evenly.
2. Covering the dish during cooking holds
in the heat and steam to speed up cooking
time. Use a microwave safe lid or plastic
wrap that has been vented by turning back
one edge at the side of the dish to form a
narrow vent to release excess steam.
3. Choose cooking dishes that are shallow
and preferably have straight sides. Shallow
dishes enable the food to cook faster and
straight edges prevent the edges from
being overcooked.
4. Arrange individual items such as ramekins
or whole potatoes around the outside of
the turntable. Make sure to leave space
between items so the energy can penetrate
from all sides.
5. Use round shaped microwave dishes.
Round shapes cook more evenly than
square or rectangle dishes which absorb
most of the energy in the corners causing
food to overcook and toughen.
6. Heat breads, biscuits or oily food on the
crisper pan or paper towel. This prevents
the build up of steam between food and
glass turntable, keeping surfaces crisp and
dry. Cover foods with paper toweling to
prevent splatters.
7. Stir foods from the outside to centre of
the dish once or twice during cooking to
equalize heat and speed microwaving.
8. Turn medium to large food items over
twice during microwaving. This enables
even exposure to microwaves.
40
Page 42

CARE & CLEANING
9. Elevating some types of food such as cakes,
roast vegetables and dough products can
be advantageous. It allows more energy
to penetrate the food from all sides, base
and top. Use a microwave safe plastic or
ceramic rack. If a rack is unavailable, use
an upturned bowl or cup to elevate plates
of food.
10. Do not elevate any special browning
dishes, jugs of sauce or custard, small
quantities of food or mugs of beverages.
11. Internal temperatures of foods continue
to rise so that they continue cooking even
after they have been removed from the
microwave oven. It is better to undercook
food as it will continue to cook once
removed from the microwave.
MICROWAVE UTENSILS
• Containers, plates, dishes, etc. used in
the microwave oven should always be
microwave–safe. Check if stated on the
underside of the utensil or contact the
manufacturer.
• To test if a container, plate or dish
is microwave–safe, place it into the
microwave oven with 1 cup of cold water
(in a microwave–safe cup) and heat on
High (100%) Power for 1 minute. If the
container is hot and the water is cold, the
container is not suitable for microwave
oven use. If the container is cold and the
water is hot, then the container is suitable
for microwave oven use.
• Microwave-safe cookware will not become
hot by the microwave energy, but it will
become hot from contact with hot food.
When the food becomes hot, some of this
heat is transferred to the dish. Always use
oven mitts or clothes to remove hot dishes
from the microwave.
• Metal containers and utensils should not
be used in the microwave oven unless
provided with BMO700 microwave oven.
CARE & CLEANING
• Switch off the microwave oven at the power
outlet and remove the plug from the power
outlet before cleaning.
• Keep the inside of the
clean. When food splatters or spilled
liquids adhere to the microwave oven
internal walls, wipe with a damp cloth.
Mild detergent may be used if the cavity
gets very dirty. Avoid the use of spray and
other harsh cleaners as they may stain,
streak or dull the door surface.
• The outside surfaces should be cleaned
with a damp cloth. To prevent damage to
the operating parts inside the microwave
oven cavity, water should not be allowed to
seep into the ventilation openings.
• Wipe the door and window on both sides of
the door seals and adjacent parts frequently
with a damp cloth to remove any spills or
spatters. Do not use an abrasive cleaner.
• Do not allow the control panel to become
wet. Clean with a soft, damp cloth. When
cleaning the control panel, leave the
microwave oven door open to prevent it
from accidentally turning on.
• If steam accumulates inside or around the
outside of the oven door, wipe with a soft
dry cloth. This may occur when cooking
foods high in moisture or if the microwave
oven is operated under high humidity
conditions, this is normal.
• It is occasionally necessary to remove the
glass turntable for cleaning. Wash the glass
turntable in warm soapy water, rinse in
clean water and dry thoroughly.
• The turntable roller and microwave oven
floor should be cleaned regularly to ensure
the glass turntable rotates correctly and
avoids making excessive noise. Simply wipe
the bottom surface of the microwave with a
soft damp cloth. The turntable roller may be
washed in mild soapy water, rinse in clean
water and dry thoroughly. When removing
the turntable roller from the cavity floor
for cleaning, be sure to replace in the
proper position.
microwave oven
41
Page 43

CARE & CLEANING
CARE & CLEANING
• Wash the crisper pan on the top rack of the
dishwasher. Alternatively, wash in warm
soapy water, rinse with clean water and
dry thoroughly. If required, remove legs by
pinching inwards and pulling away from
the leg housing.
• Remove odours from your microwave oven
by combining a cup of water with the
juice of one lemon in a deep microwavesafe bowl, microwave on High for
5 minutes. Wipe the microwave oven cavity
thoroughly and dry with a soft cloth.
• When it becomes necessary to replace the
oven light, please consult your Breville
Service Centre to have it replaced.
• Please do not dispose this appliance with
domestic rubbish; it should be taken to the
appropriate disposal centre provided by the
local council municipalities.
• If storing the microwave oven, press the
STOP/CLEAR button, switch off at the
power outlet then unplug the power cord.
Ensure the microwave oven is completely
cool, clean and dry. Secure the roller ring
and glass turntable and close the door.
Do not place heavy objects on top. Store
the microwave oven upright.
BEFORE YOU CALL FOR SERVICE
• Check to ensure that the oven is plugged
in securely. If it is not, remove the plug
from the power outlet, wait 10 seconds and
plug it in again securely.
• Check for a blown circuit fuse or a tripped
main circuit breaker. If these seem to be
operating properly, test the power outlet
with another appliance.
• Check to ensure that the control panel is
programed correctly and the timer is set.
• Check to ensure that the door is securely
closed engaging the door safety lock
system. Otherwise, the door safety lock
system will prevent the microwave from
switching on.
NOTE
If none of the above rectify the situation,
then contact your Breville Service
Centre. Do not try to adjust or repair the
oven yourself.
42
Page 44

TROUBLESHOOTING
TROUBLESHOOTING
POSSIBLE PROBLEM EASY SOLUTION
Microwave oven
interfering with
radio, TV or similar
equipment.
Dim microwave
oven light.
Steam accumulating
on door and hot air
coming out from vents.
POSSIBLE PROBLEM POSSIBLE REASON EASY SOLUTION
Microwave oven will
not start.
Microwave oven
does not heat.
• Clean door and sealing surface of the oven.
• Reorient the receiving antenna of radio or television.
• Relocate the microwave oven with respect to the receiver.
• Move the microwave oven away from the receiver.
• Plug the microwave oven into a different outlet so that
microwave oven and receiver are on different branch circuits.
• When operating on low power levels, the microwave oven light
may be dimmer.
• During operation, steam may be produced. Most will exit
through the vents, however some may accumulate around the
oven door.
• Power cord not
plugged in properly or
switched on.
• Fuse blown or circuit
breaker problem.
• Trouble with outlet.
• Door not closed
properly.
• Unplug, put the plug in again
and switch on.
• Replace the fuse or reset circuit
breaker.
• Have a professional check that
the outlet is not faulty.
• Ensure door is shut properly.
Glass turntable makes
noise during operation.
LCD time digit shows
EA1A then V1:00 or
similar information
then goes to default
mode.
LCD time digit shows
00 for a short period
of time then shows 1 or
0 and stays at 1 or 0.
• Turntable roller not
assembled properly or
needs to be cleaned.
• Both A BIT MORE™
& SMART REHEAT
button are pressed at
the same time under
the default mode.
• Both A BIT MORE™
& SMART REHEAT
button are pressed at
the same time under
the default mode.
• Reset and clean if necessary.
• No action required. This is
normal and LCD just shows
the model type and software
version.
• If the LCD time digit stays at 0,
send the unit back to repair.
• If LCD time digit stays at 1,
Press STOP/CLEAR to set the
unit back to default mode.
43
 Loading...