

Breville BFP300 User Manual

Wizz™
Processor
Duo
Instructions
BFP300

2
Contents
Page
Introduction 3
Breville recommends safety first 4
Know your Breville Wizz™ Processor Duo 6
Assembling and using your Breville Wizz™ Processor Duo 8
- The food processor bowl 8
- The blender jug 11
Basic food processing techniques 13
- Chopping with the processing blade 13
- Pureeing with the processing blade 15
- Mixing with the processing blade 16
- Kneading with the dough blade 16
- Whisking and whipping with the whisk blade 17
- Slicing, shredding, grating and French Fry cutting 18
- Using the citrus juicer 20
- Using the blender jug 20
Processing tips 21
Cleaning, care and storage 22
Recipe ideas R1

Congratulations
on the purchase of your new Breville Wizz™ Processor Duo
3

4
Breville recommends safety first
We at Breville are very safety conscious. We design and manufacture consumer products with the safety
of you, our valued customer foremost in mind. In addition we ask that you exercise a degree of care when
using any electrical appliance and adhere to the following precautions:
IMPORTANT SAFEGUARDS FOR YOUR WIZZ™ PROCESSOR DUO
Carefully read all instructions before operating
•
and save for future reference.
Remove and safely discard any packaging
•
material and promotional labels before using the
Wizz™ Processor Duo for the first time.
To eliminate a choking hazard for young
•
children, remove and safely discard the
protective cover that is fitted to the supply plug
of this appliance.
Do not place the Wizz™ Processor Duo near
•
the edge of a bench or table during operation.
Ensure the surface is level, clean and free of
water, flour, etc. Vibration during operation may
cause the appliance to move.
Do not place this appliance on or near a hot
•
gas or electric burner, or where it could touch a
heated oven.
Handle the Wizz™ Processor Duo and
•
attachments with care - remember the blades
and discs are razor-sharp and should be kept
out of reach of children. Use blade protectors
when storing processing blades.
Always make sure the Wizz™ Processor Duo
•
is completely assembled before operating.
The appliance will not operate unless properly
assembled.
Ensure the speed control dial is in the
•
OFF (0) position and the Wizz™ Overhead Drive
Food Processor is switched off at the power
outlet and unplugged before attaching the food
processor bowl, blender jug, processing blade,
dough blade, whisk blade, discs, citrus juicer,
food processor lid, blender jug lid or blender
locking cover.
Always secure the food processor bowl or
•
blender jug into the motor base before attaching
the processing blade, discs, citrus juicer, food
processor lid or blender jug lid.
Always operate the Wizz™ Processor Duo
•
with the food processor lid and blender jug lid
securely inserted into position. Insert the blender
safety locking cover if the blender jug is not
required.
Do not push food into the food chute of the
•
food processor bowl with your fingers or other
utensils. Always use the food pusher provided.
Keep hands, knives and other utensils away
•
from moving processing blade, blending blade,
dough blade, discs and citrus juicer.
Do not place hands or fingers in the food
•
processor bowl and blender jug of the Wizz™
Processor Duo unless the motor and blending
blade, processing blade, dough blade, whisk
blade and discs have come to a complete stop.
Ensure the speed control dial has been turned
to the off position and the appliance is switched
off at the power outlet and unplugged before
removing the lid from the food processor bowl
and/or the blender jug.
Do not use attachments other than those
•
provided with the Wizz™ Processor Duo.
Do not attempt to operate the Wizz™ Processor
•
Duo by any method other than those described
in this booklet.
Ensure the motor and the whisk blade, citrus
•
juicer or discs, processing blade, blending blade
and dough blade have completely stopped
before disassembling. Ensure the speed control
dial has been turned to the OFF (0) position, the
appliance is switched off at the power outlet and
unplugged when not in use if left unattended
and before disassembling, cleaning or storing.
Please Note: When the appliance is completely
assembled and the speed control dial is in the
OFF (0) position, but still switched on at the
power outlet, the PULSE button will activate.
Care should be taken when removing the food
•
from the food processor bowl and blender

Breville recommends safety first continued
jug by ensuring the motor and blender blade,
processing blade, dough blade, whisk blade
or discs have completely stopped before
disassembling. Ensure the speed control dial
has been turned to the OFF (0) position, the
appliance is switched off at the power outlet
and unplugged before removing the lids from
the food processor bowl and/or the blender jug.
The food processor bowl and/or the blender
jug should then be unlocked from the motor
body and the processing blade, dough blade,
whisk blade or discs carefully removing before
attempting to remove the processed food.
Care should be taken when removing the juice
•
from the food processor bowl, when the citrus
juicer is attached by ensuring the motor and
the citrus juicer has completely stopped before
disassembling. Ensure the speed control dial
has been turned to the OFF (0) position and the
appliance is switched off at the power outlet and
unplugged before removing the citrus juicer. The
food processor bowl should be unlocked from
the motor body and the citrus juicer carefully
removed before attempting to remove juice.
Stiff mixtures, or heavy loads, such as dough,
•
may cause the processing blade to rotate
more slowly than normal. If this happens, do
not process continuously for longer than 30
seconds.
Do not process hot or boiling liquids – allow
•
liquids to cool before placing into the food
processor bowl or blender jug.
Do not use the Wizz™ Processor Duo on a sink
•
drain board.
To protect against electric shock do not immerse
•
power cord, power plug or motor base in water
or any other liquid.
Do not move the Wizz™ Processor Duo whilst in
•
operation.
Do not leave the Wizz™ Processor Duo
•
unattended when in use.
Do not place any part of the Wizz™ Processor
•
Duo in the microwave oven.
Do not process thin fluids such as water, milk,
•
stock, juice, etc. above the MAX (1.5 litre) level
in the food processor bowl or the MAX (2 litre)
level in the blender jug. Always add drier or
thicker ingredients to the food processor bowl
prior to adding fluids.
Keep the appliance clean. Follow the cleaning
•
instructions provided in this book.
IMPORTANT SAFEGUARDS FOR ALL
ELECTRICAL APPLIANCES
Unwind the power cord fully before use.
•
Do not let the power cord hang over the edge of
•
a table counter, touch hot surfaces or become
knotted.
This appliance is not intended for use by
•
persons (including children) with reduced
physical, sensory or mental capabilities, or lack
of experience and knowledge, unless they have
been given supervision or instruction concerning
use of the appliance by a person responsible for
their safety.
Children should be supervised to ensure they do
•
not play with the appliance.
It is recommended to regularly inspect the
•
appliance. Do not use the appliance if power
supply cord, plug or appliance becomes
damaged in any way. Return the entire
appliance to the nearest authorised Breville
Service Centre for examination and/or repair.
Any maintenance other than cleaning should
•
be performed at an authorised Breville Service
Centre.
This appliance is for household use only. Do
•
not use in moving vehicles or boats. Do not use
outdoors. Do not use this appliance for anything
other than its intended use. Misuse may cause
injury.
The installation of a residual current device
•
(safety switch) is recommended to provide
additional safety protection when using
electrical appliances. It is advisable that a safety
switch with a rated residual operating current
not exceeding 30mA be installed in the electrical
circuit supplying the appliance. See your
electrician for professional advice.
5

6
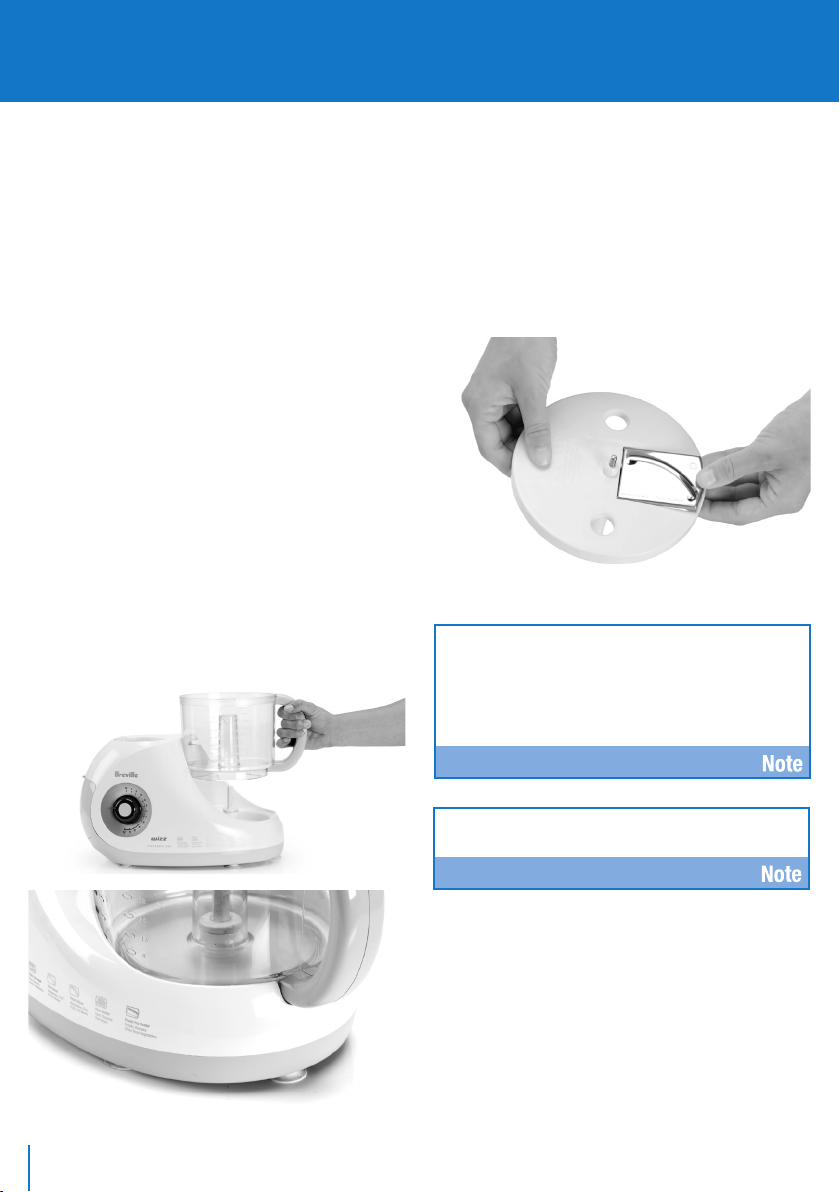
Know your Breville Wizz™ Processor Duo
Motor Base:
1. Motor Base – houses the motor and holds the
Food Processor Bowl and Blender Jug.
2. On/Off and Speed Control Dial – circular dial
on the motor base enables the food processor
and blender to be turned OFF (0) and ON by
selecting a speed between 1-12 (low-range
1-4, mid-range 5-8, high range 9-12).
3. Pulse Button – located in the centre of the
Speed Control Dial - press in and hold briefly
for short bursts of power. The motor will
automatically stop when the pulse button is
released. The pulse button can be used when
the speed control dial is in the OFF (0) position
(and the power has been turned on) or when
the speed control dial is set to a speed setting.
4. Internal Storage Compartment – on the left-
hand side of the motor base – safely stores
the slicing, shredding, grating and French Fry
discs of the food processor.
5. Cord Storage - allows the power cord to be
neatly wrapped around the base of the food
processor.
6. Non-slip Rubber Feet - for added stability.
Safety interlock switches - prevent the motor
from operating unless the food processor
bowl, blender jug, lids blender safety locking
cover and/or citrus juicer are correctly locked
into position (not shown).
Food Processor:
7. Food Processor Bowl – 1.5 litre bowl holds
chopped, sliced and grated ingredient.
8. Food Processor Bowl Lid – locks onto the food
processor bowl.
9. Food Chute - used for feeding food into the
food processing bowl.
10. Food Pusher – for pushing food down the food
chute of the food processor.
11. Processing Blade – swift action for chopping
and mixing a variety of foods.
12. Dough Blade – softer action for combining
dough ingredients.
13. Whisk Blade – can be used for whisking
ingredients.
14. Disc Holder – holds the thin/thick slicing disc,
thin/thick shredding disc, fine grating disc and
French fry disc.
15. Thin Slicing Disc (D) – can be used for creating
thin slices.
16. Thick Slicing Disc (C) – can be used for
creating thick slices.
17. Thin Shredding Disc (A) – can be used for
finely shredding food.
18. Thick Shredding Disc (B) – can be used for
coarsely shredding food.
19. Fine Grating Disc (E) - can be used for finely
grated food.
20. French Fry Disc (F) – can be used for creating
potato chips.

Know your Breville Wizz™ Processor Duo continued
Blender:
21. Blender Jug – 2 litre jug for blending
ingredients.
22. Blending Blade – swift action for blending a
variety of liquids and foods.
23. Blender Jug Lid – locks onto the blender jug.
24. Blender Jug Inner Cap – can be used to
measure small amounts up to 50ml – remove
cap from the blender jug lid to add ingredients
during the blending process.
25. Blender Safety Locking Cover – removed when
the blender jug is attached to the motor base.
14
18
16
19
17
20
15
Citrus Juicer:
Citrus Cone – used to extract juice from citrus fruit
(not shown)
Citrus Filter Basket – is inserted into the food
processor bowl and separates the citrus juice from
the pulp (not shown)
Accessories:
Spatula – for scraping the sides of the food
processor bowl and blender jug (not shown)
111213
23
24
87 9 10
21
22
1
4
3
2
5
6
7
8
Assembling and Using your Breville Wizz™ Processor Duo
BEFORE FIRST USE
Remove and safely discard all packaging materials
and promotional labels or from your Wizz™
Processor Duo.
Wash the food processor bowl, blender jug, lids
and other attachments in warm soapy water
using a mild detergent. Dry thoroughly. (Refer to
the ‘Cleaning, Care and Storage’ section of this
booklet on page 22).
THE FOOD PROCESSOR BOWL
Assembling and operating the food
processor
The food processor bowl and lid and the blender
safety locking cover must be correctly assembled
for the food processor to operate.
Step 1. Place the motor base on a dry, level
surface, such as a bench top
Step 2. Place the food processor bowl over the
drive shaft on the motor base so that the
handle fits firmly into the groove on the
right-hand side of the motor base.
2a
Attaching the slicing/shredding/
grating/French Fry cutting discs
Step 1. Select the desired slicing/shredding/
grating/French fry discs (disc marked A-F)
and assemble onto the disc holder. To fit
a selected disc onto disc holder fit the
bottom of the disc (face up) into the disc
holder and then push the top of the disc
securely into place.
1
Each time the Wizz™ Processor Duo is
reassembled, be sure to attach the food
processor bowl and blender jug (if required)
onto the motor base before attaching the lids.
Insert the blender safety locking cover if the
blender jug is not required.
Do not blend food/wet ingredients in the food
processor and blender jug simultaneously
2b

Assembling and Using your Breville Wizz™ Processor Duo
continued
Step 2. To remove the disc, hold disc holder with
the disc facing away and place thumbs
underneath disc and push out.
2
Step 3. Place the disc holder shaft with the disc
holder attached over the food processor
bowl shaft, and push down into place.
3
Attaching the processing blade, dough
blade and whisk blade
Step 1. Select the processing blade, dough blade
or whisk blade and place it over the food
processor bowl shaft. Push down to
secure.
1
Attaching the food processor bowl lid
Step 1. To attach the food processor bowl lid,
position the lid on the food processor bowl
with the food chute positioned just to the
right of the top of the handle.
CAUTION: THE PROCESSING BLADE AND THE
DISCS ARE EXTREMELY SHARP!! USE CAUTION
WHEN HANDLING AND STORING THESE PARTS.
USE THE BLADE PROTECTOR WHEN STORING THE
PROCESSING BLADE.
1
9
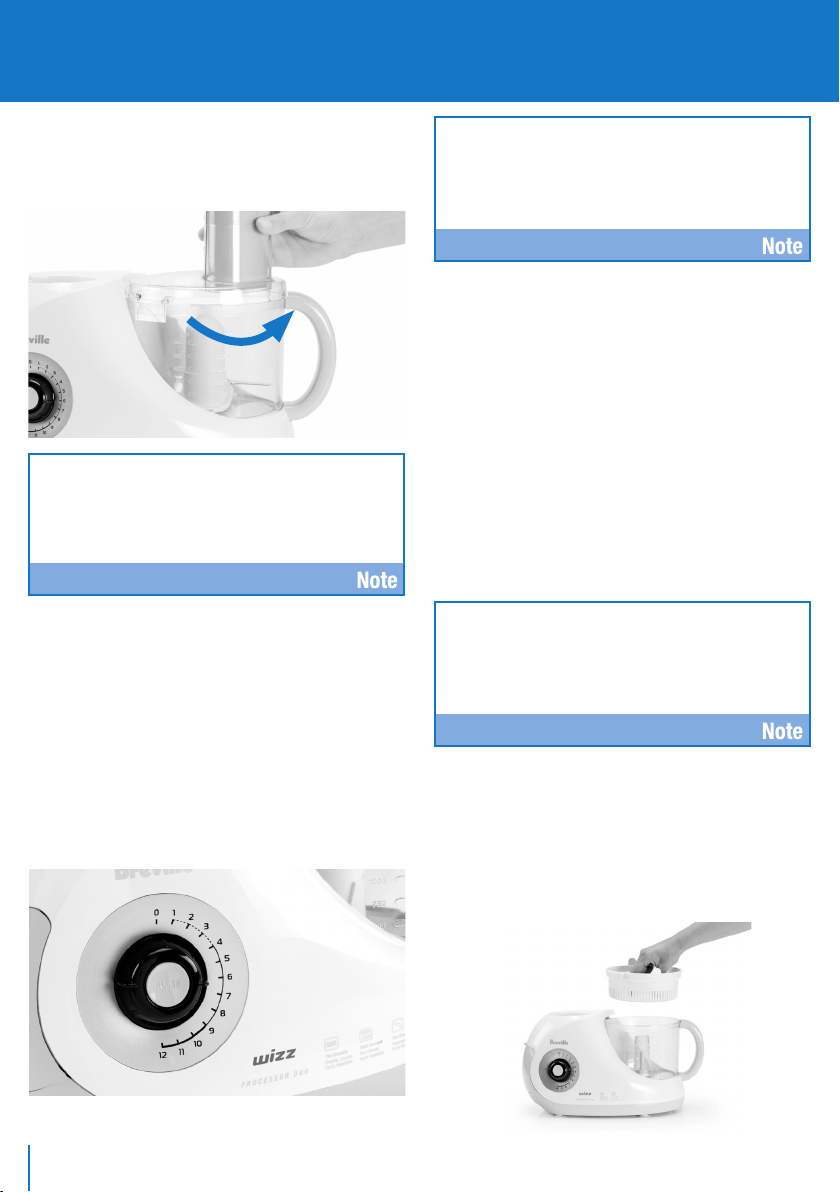
10
Assembling and Using of your Breville Wizz™ Processor Duo
continued
Step 2. Turn the lid anti-clockwise to slot the
locking tab on the lid into the interlocking
safety catch in the motor base (see figure
1 and 2).
2
The Wizz™ Processor Duo will not operate
unless the food processor bowl and lid, and
blender jug and lid or the blender safety
locking cover are positioned correctly and
locked into position.
Processing with the food processor bowl
Step 1. To commence processing turn the speed
control dial clockwise to the desired speed.
If the Pulse setting is required, press the
button located in the centre of the speed
control dial and hold briefly for short bursts
of power. Select high-range speeds when
using the processing blade for mixing and
chopping and select a low to mid-range
speed for slicing, shredding and grating,
unless stated otherwise in the recipe section.
1
Some stiff mixtures, or heavy loads, such as
dough, may cause the dough blade to rotate
more slowly than normal. If this happens, do
not process continuously for longer than 30
seconds.
Assembling & operating the citrus juicer
The food processor bowl, filter basket and blender
safety locking cover must be locked into position
for the citrus juicer to operate. The processing
blade or slicing/grating discs are not required to
be in position in the food processor bowl when
using the blender jug.
Step 1. Place the motor base on a level, dry
surface, such as a bench top.
Step 2. Place the food processor bowl over the
drive shaft on the motor base so that the
handle fits firmly into the groove on the
right-hand side of the motor base.
Each time you reassemble your Wizz™
Processor Duo with the Citrus Juicer, be sure
to attach the food processor bowl to the motor
base first before attaching the filter basket and
citrus cone.
Attaching the filter basket and citrus cone
Step 1. Attach the filter basket by positioning it on
the food processor bowl directly over the
motor shaft with the front filter interlocking
tab in between the bowl handle and the
rear of the food processor bowl.
1
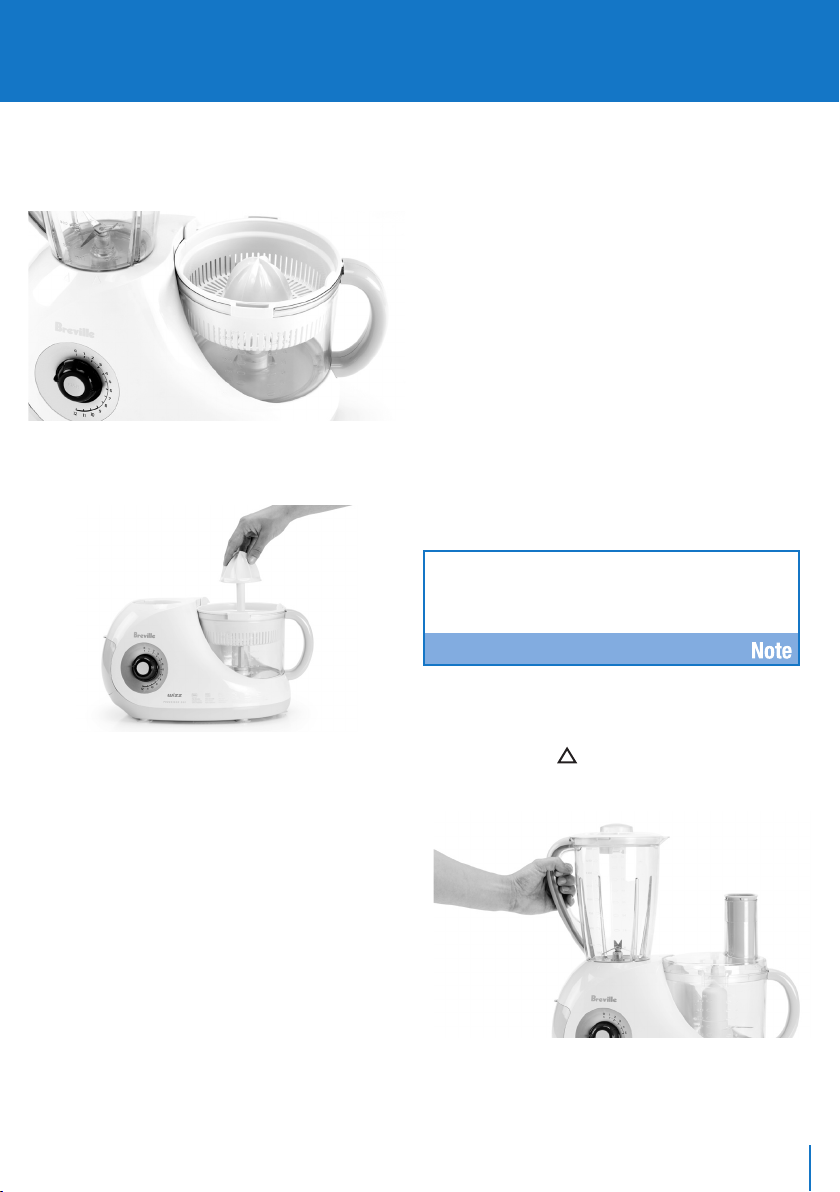
Assembling and Using of your Breville Wizz™ Processor Duo
continued
Step 2. Turn the filter basket anti-clockwise to slot
the locking tab on the filter basket into the
interlocking safety catch in the motor base.
Ensure the filter basket is positioned firmly.
2
Step 3. Place the citrus cone onto the drive shaft
through the centre hole of the filter basket.
3
Juicing with the citrus juicer
Slice citrus fruit in half across the fruit segments.
Place a citrus fruit half over the citrus cone, and
hold down, turning the speed control dial to a lowrange speed. Keep pressure over the fruit as the
cone rotates, being careful to keep hand and fingers
clear of the rotating citrus cone and filter basket.
THE BLENDER JUG
Assembling and operating the
blender jug
The food processor bowl and lid must be locked
into position for the blender jug to operate.
The processing blade or slicing/grating discs are
not required to be in position in the food processor
bowl when using the blender jug. Refer to page 8
for assembling the food processor.
Step 1. Place the motor base on a level, dry
surface, such as a bench top.
Removing the blender safety locking
cover
Step 2. Remove the blender safety locking cover
by rotating clockwise to unlock then lift
out of position.
The Wizz™ Processor Duo blender will NOT
operate unless the food processor bowl and
lid are correctly assembled.
Attaching the blender jug and lid
Step 1. Place the blender jug onto the motor base
over the symbol and turn jug anticlockwise until it locks into place.
1
11

12
Assembling and Using of your Breville Wizz™ Processor Duo
continued
Step 2. To attach blender jug lid, position the lid
on top of the blender jug and rotate anticlockwise to slot the locking tab on the lid
into the interlocking safety catch on the
handle (see figure 2).
2
Always ensure that the blender jug lid is
locked firmly into place before operating.
The appliance will not operate if the food
processor bowl, blender jug and lids are not
correctly assembled.
Blending with the blender jug
Step 1. To commence blending turn the speed
control dial clockwise to the desired speed.
If the Pulse setting is required, press the
button located in the centre of the speed
control dial and hold briefly for short bursts
of power.
Step 2. To remove blender jug, hold handle
and turn in a clockwise direction. When
finished using the blender jug, always
remove the blender jug from the motor
base and insert the blender safety lock
cover. Place the blender safety lock cover
onto base aligning the arrow on the cover
with symbol on the base and turn anticlockwise until it locks into place, aligned
with the symbol.
If the blades or discs should jam while
processing or blending, ensure dial is turned
to the OFF (0) position and the appliance is
switched off at the power outlet and the power
cord is unplugged. Remove the processor
bowl lid or blender jug lid and adjust any food
wedged between the blade and the processor
bowl or blender jug, or in the disc. Replace the
lid and proceed as normal. If this occurs again,
the food processor bowl or blender jug may be
overloaded, so remove some of the food and
process in smaller batches.
NEVER place hands inside the blender jug when
it is fitted to the Wizz™ Processor Duo motor
base. Always use a spatula provided or other
plastic utensil to push food back onto blades,
as the blades in the blender jug are sharp.

Basic Food Processing Techniques
USING THE FOOD PROCESSING BOWL
The Wizz™ Processor Duo can process foods in a variety of ways depending on which processing blade
or disc you choose.
Chopping with the processing blades
The processing blade chops raw and cooked food to the consistency required, from coarsely chopped
to minced. The results will depend on the type of food and amount of time the food is processed.
Always remember to place the processing blade into the food processor bowl before adding the food.
To avoid over-processing check the consistency frequently if the food being chopped requires a
coarse or roughly chopped texture. If necessary, turn the speed control dial to the OFF (0) position
and remove the lid, and use the spatula to scrape down the sides of the food processor bowl to
ensure even processing.
RAW
VEGETABLES,
FRUITS,
COOKED
MEATS
RAW MEAT Trim meat of any bone, fat or gristle
GARLIC,
CHILLI,
GINGER
HERBS Wash herbs and dry well. Remove stalks/
Cut ingredients into approximately 2.5cm
cubes. Use the PULSE button for roughly
chopped texture. Use high-range speed finely
chopped texture. It may be necessary to
scrape the sides of bowl using the spatula to
ensure more even chopping.
and cut into approximately 2.5cm cubes.
Process on high-range speed until chopped/
minced to desired consistency. It may be
necessary to scrape the sides of the bowl
using the spatula to ensure more even
chopping.
For garlic, peel cloves and leave whole.
For chilli, leave whole (remove seeds for
milder chilli). For ginger, peel and cut into
2.5cm cubes. Process using high-range
until chopped to desired consistency. Store
chopped garlic or chilli mixed with a little oil
in an airtight container in refrigerator for up
to 1 week. Mix ginger with a little sherry.
stems if necessary. Use PULSE button to
chop to desired consistency. It may be
necessary to scrape the sides of bowl using
the spatula to ensure more even chopping.
Min 125g -
Max 500g
Min 125g -
Max 500g
Min 125g -
Max 500g
Min 1 bunch
(approx 50g) Max 2 bunches
(approx 100g)
Processing blade
Processing blade
Processing blade
Processing blade
13
 Loading...