

Page 1
INSTRUCTION
MANUAL
CORNER BAKERY
BREAD & DESSERT MAKER
MODEL NUMBER TR888
Page 2

1.
TABLE OF CONTENTS
Important Safeguards ..................................................................................................................2
Additional Important Safeguards ...............................................................................................3
Electric Power ............................................................................................................................3
Polarized Plug ............................................................................................................................3
Power Outage .............................................................................................................................4
Before Your First Use ..................................................................................................................4
Your Corner Bakery Bread & Dessert Maker ............................................................................5
Control Panel .............................................................................................................................6
Using the Breadman®..............................................................................................................7-9
Kneading and Baking Cycles ....................................................................................................10
Program Specification Chart.....................................................................................................11
Making Dough and Baking Bread .......................................................................................12-14
Using the Delay Bake Timer ...................................................................................................15
Butter ........................................................................................................................................16
Dessert .....................................................................................................................................18
Cleaning Instructions ...............................................................................................................20
Storing ......................................................................................................................................21
Troubleshooting ..................................................................................................................21-22
Bread and Dough Check List ....................................................................................................23
Suggestions ...............................................................................................................................24
In-Warranty Service Information ............................................................................................25
Specifications ...........................................................................................................................26
Warranty....................................................................................................................................27
Page 3

2.
When using electrical appliances, basic safety
precautions should always be followed including the following:
1. READ ALL INSTRUCTIONS.
2. Do not touch hot surfaces. Use handles or
knobs.
3. To protect against electrical shock do not
immerse cord, plugs, or appliance in
water or other liquid.
4. Close supervision is necessary when any
appliance is used by or near children.
5. Unplug from outlet when not in use and
before cleaning. Allow to cool before putting on or taking off parts.
6. Do not operate any appliance with a damaged cord or plug, or after the appliance
malfunctions or has been damaged in any
manner. Contact Consumer Service for
examination, repair or adjustment.
7. The use of accessory attachments not
recommended by the appliance manufacturer may cause injuries.
8. Do not use outdoors.
9. Do not let cord hang over edge of table or
counter, or touch hot surfaces.
10. Do not place on or near a hot gas or
electric burner, or in a heated oven.
11. Extreme caution must be used when moving an appliance containing hot oil or
other hot liquids.
12. To disconnect, remove plug from wall
outlet.
13. Do not use appliance for other than
intended use.
14. Avoid contacting moving parts.
SAVE THESE INSTRUCTIONS
FOR HOUSEHOLD USE ONLY
CAUTION:
A short power-supply cord (or
detachable power-supply cord) is provided to
reduce the risk resulting from becoming entangled in or tripping over a longer cord.
Longer detachable power-supply cords or
extension cords are available and may be used
if care is exercised in their use.
If longer detachable power-supply cord or
extension cord is used, (1) the marked electrical rating of the cord set or extension cord
should be at least as great as the electrical rating of the appliance, and (2) the cord should be
arranged so that it will not drape over the countertop or tabletop where it can be pulled on by
children or tripped over unintentionally.
READ AND SAVE THESE INSTRUCTIONS
WARNING:
A risk of fire and electrical shock exists in all electrical appliances and may
cause personal injury or death. Please follow all safety instructions.
IMPORTANT SAFEGUARDS
Page 4

3.
ADDITIONAL IMPORTANT SAFEGUARDS
CAUTION HOT SURFACES: This appliance generates heat and escaping steam during use. Proper precautions must be taken to prevent the risk of burns, fires, or other
injury to persons or damage to property.
1. A person who has not read and understood all operating and safety instructions
is not qualified to operate this appliance. All users of this appliance must read
and understand this Owner’s Manual before operating or cleaning this appliance.
2. Unplug from outlet when not in use and before cleaning. To avoid electric
shock, never immerse or rinse this appliance in water or any other liquid.
3. If this appliance falls or accidentally becomes immersed in water, unplug it from
the wall outlet immediately. Do not reach into the water!
4. When using this appliance, provide adequate air space above and on all sides for
air circulation. Do not operate this appliance while it is touching or near curtains, wall coverings, clothing, dishtowels or other flammable materials.
5. To reduce the risk of fire, do not leave this appliance unattended during use.
6. If this appliance begins to malfunction during use, immediately unplug the cord.
Do not use or attempt to repair a malfunctioning appliance!
7. The cord to this appliance should only be plugged into a 120V AC electrical
wall outlet.
8. Do not use this appliance in an unstable position.
9. Do not use this appliance for other than its intended use.
ELECTRIC POWER
If electric circuit is overloaded with other appliances, your bread maker may not operate
properly. The bread maker should be operated on a separate electrical circuit from other
operating appliances.
POLARIZED PLUG
This appliance has a polarized plug (one blade is wider than the other). As a safety feature to reduce the risk of electrical shock, this plug is intended to fit in a polarized outlet
only one way. If the plug does not fit fully in the outlet, reverse the plug. If it still does
not fit, contact a qualified electrician. Do not attempt to defeat this safety feature.
Page 5

4.
POWER OUTAGE
During the Bread programs, if the bread maker loses power before the baking process
begins, you may try starting the bread maker at the beginning of the program again for
all programs except Fast Bake™. If using Dough program, you may also try starting it at
the beginning of the program again. This may not always produce an acceptable loaf. If
you are not sure when the outage occurred, remove the dough ball from the pan and
place in an oven-safe baking container. Allow to double in size and place in a preheated
350°F/177°C oven for 30-45 minutes or until done. If it is done, the bread should sound
hollow when tapped on the top of the loaf.
If you are using the Fast Bake™ program or if the bread has already begun to bake when
the outage occurs, you must begin with new ingredients.
Should a power outage occur during the Dessert program, provided it has not begun to
bake, you can try starting the program from the beginning. This may not always produce
an acceptable result.
BEFORE YOUR FIRST USE
1. Please fill out warranty information.
2. Unpack and clean the Bread & Dessert Maker. See Cleaning and Storing.
3. Place the Bread & Dessert Maker away from edge of counter on a dry, stable surface away from burners and away from areas where cooking grease or water may
splatter onto it. Avoid placing it where it may tip over during use.
4. Plug the Bread & Dessert Maker into a 120 V ~ 60 Hz outlet.
Page 6
5.
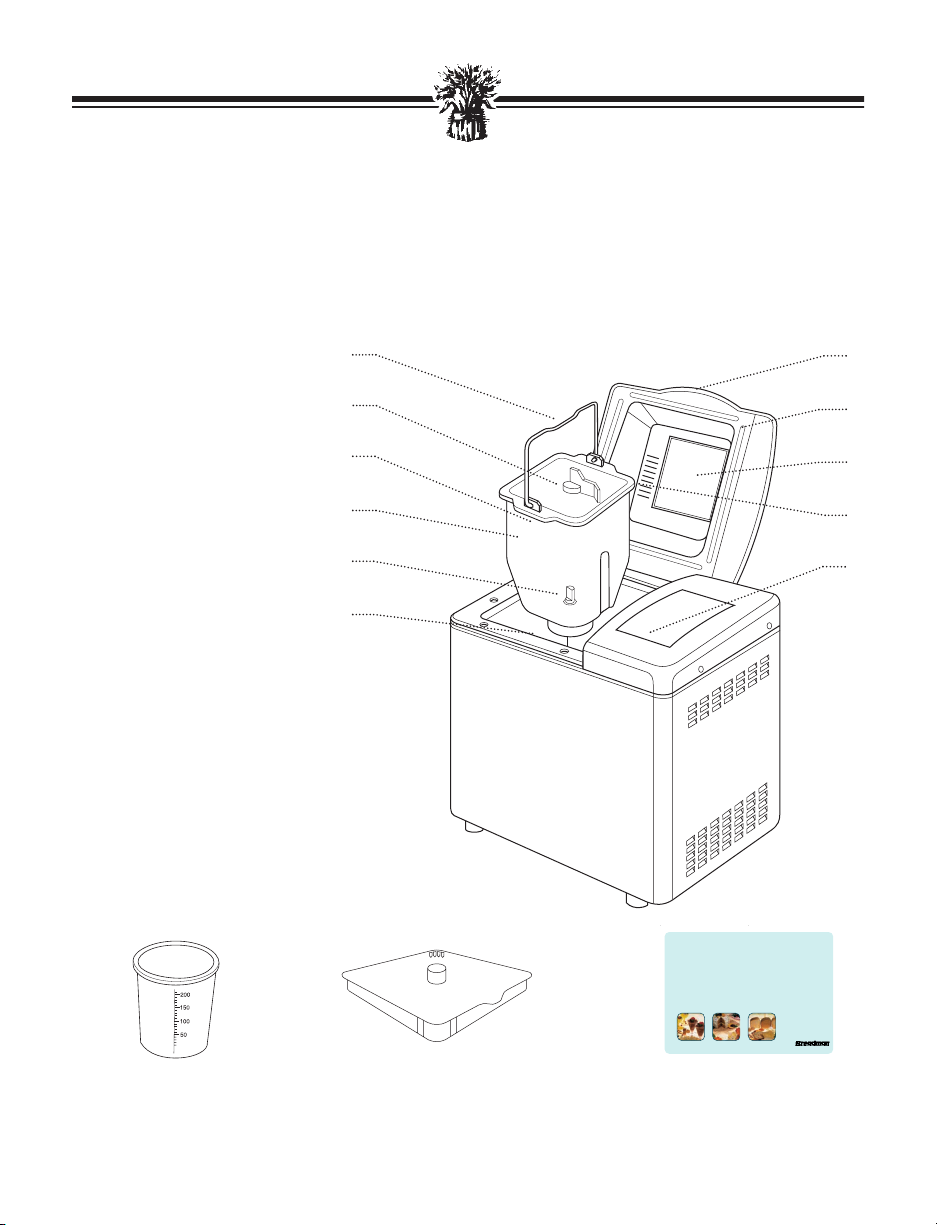
1. Pan Handle
2. Kneading Blade
flat side down (P/N
55S866)
3. ▼ Front ▼
4. Bread Pan (P/N 55S867)
5. Shaft, rotates the
Kneading Blade
6. Inner Case
7. Handle
8. Lid (P/N 55S864)
9. Viewing Window
10. Air Exhaust
11. Control Panel
1.
2.
3.
4.
5.
6.
7.
8.
9.
10.
11.
The Corner Bakery
Bread & Dessert Maker
Cookbook
®
61218
FOR BUTTER ONLY
Liquid Measuring Cup
(1 cup)
(P/N 22257)
Cookbook for Breads,
Doughs, Butters and
Desserts (P/N 61218)
Accessories
Butter Lid (Use this lid for
Butter program only.)
(P/N55S884)
YOUR CORNER BAKERY BREAD
& DESSERT MAKER
The illustrations in this Instruction Manual are for information purposes only. You may
find your bread maker and parts look different, however, the steps for operation are the
same.
Page 7
6.
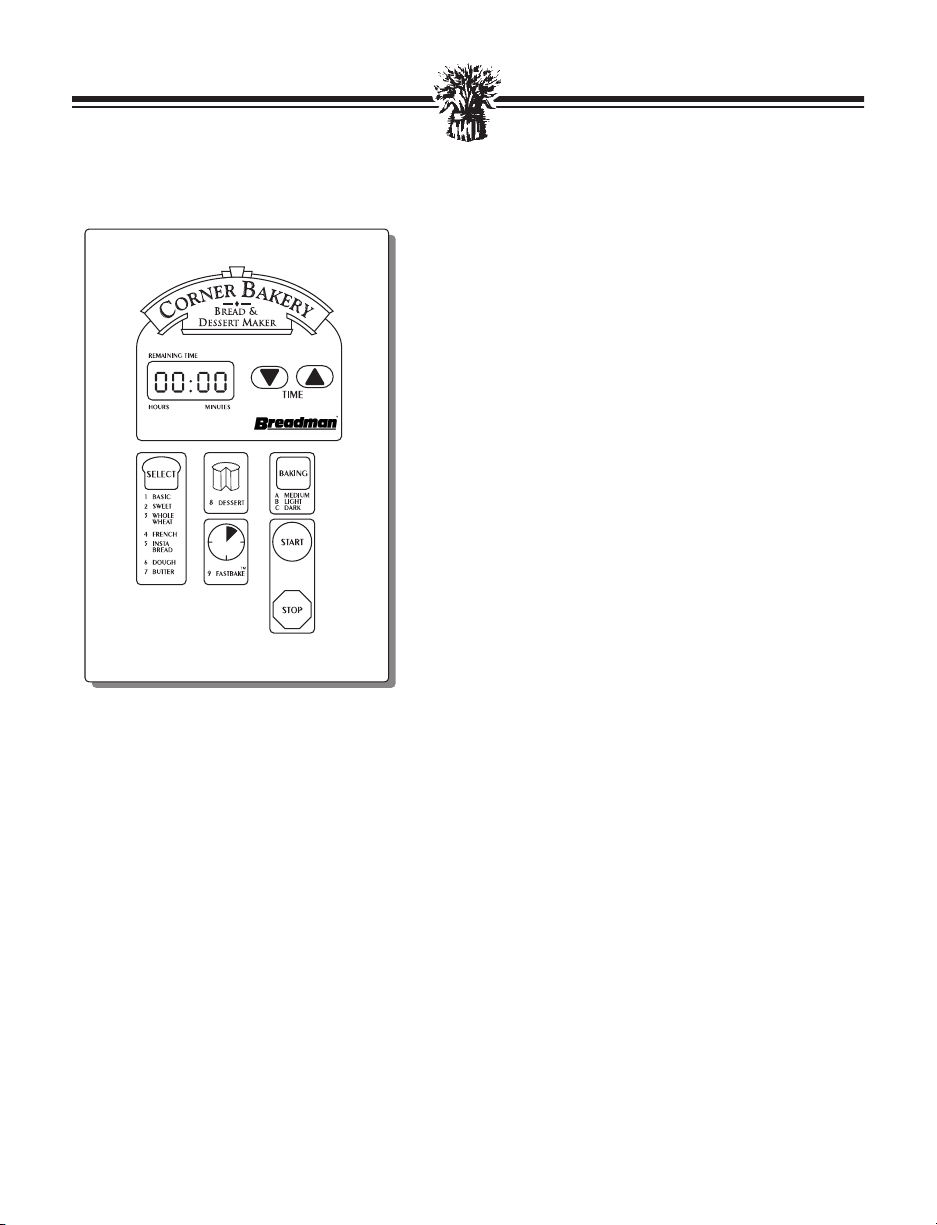
CONTROL PANEL
A. Display Window
Indicates the number of the program, crust
color (if using programs 1-5) and amount of
time left for completion of program. Indicates
display signals.
B. SELECT
Press until program number is visible in Display Window for all programs except Dessert
and Fast Bake™.
C. DESSERT
Press to select the Dessert program. The number 8 will be visible in the Display Window.
D. FAST BAKE™
Press to select the Fast Bake™ program. The
number 9 will be visible in the Display Window.
E. ▼ ▲ TIME
Press arrows to delay program. The time will
advance in 10 minute intervals up to 13:00
hours. Press the START button; the colon will
blink. The timer cannot be used on Butter,
Dessert or Fast Bake™ programs.
F. BAKING
Press to select light or dark crust color for
Bread programs only; medium is preset. Use
light crust for breads high in sugar.
G. START
After selecting the program, the baking control and timer (if needed), press to start the
program or timer countdown.
H. STOP
Press and hold for more than 2 seconds during
the cycle to cancel a program.
Note: When the Corner Bakery Bread &
Dessert Maker is packaged for shipment,
a clear plastic film is placed over the
control panel; carefully peel it off.
I. Program Cancel
If you want to cancel the selected program,
press the STOP button and hold it down for
more than 2 seconds at any time during the
cycle.
J. Program Select Recall
If you have started the Corner Bakery Bread &
Dessert Maker and are not sure which program
you have selected, you may recall this information. Press and hold the START button at any
time. The number of the program and the crust
color selection (if available) will be visible in
the Display Window.
Page 8

7.
USING THE BREADMAN
®
Before using the Breadman®for the first time, carefully read all
of the instructions included in this manual.
With your new Breadman®Corner Bakery Bread & Dessert
Maker:
• You can use commonly available pre-packaged bread mixes.
Follow the instructions on the package.
• You can bake a loaf of bread from scratch. See the Corner
Bakery Bread & Dessert Maker Cookbook included with
your Breadman®Corner Bakery Bread & Dessert Maker for
lots of tasty options.
• There are also many bread machine cookbooks available at
bookstores nationwide.
• You can make dough for rolls or shaped loaves you’ll bake in
your own oven.
• Use the Dough Cycle to do the mixing and kneading for
you, then shape, proof, and bake it in the Breadman®Corner
Bakery Bread & Dessert Maker, or in a conventional oven.
• Insert the Bread Pan into the Oven Chamber. Press down
until it locks into place.
• Remember to attach your Kneading Paddle FIRST, then
add the ingredients BEFORE inserting the Bread Pan into
the Oven Chamber.
• When you remove the Bread Pan after Baking, BE SURE
TO WEAR OVEN MITTS to prevent burning. Hold the
Handle and lift the Bread Pan up and out of the Bread
Baker.
• Remove the loaf by turning the Bread Pan upside down and
shaking gently, then check to see that the Kneading Paddle
is removed from the loaf. If it is stuck in your bread, use a
non-metal utensil to gently remove it, taking care not to
scratch the Kneading Paddle.
Inserting and
Removing the
Bread Pan
Page 9

8.
USING THE BREADMAN®(CONTINUED)
• Use oven mitts when working with bread or any part of the
Breadman®that is hot from baking.
• Wipe off crumbs and clean the Breadman®, as needed,
after baking.
• Unplug the Breadman®Corner Bakery Bread & Dessert
Maker when you are not using it.
• It is normal for the Viewing Window to collect moisture
during the Rise Cycle. As your food bakes, the moisture
soon will evaporate so you can watch your bread’s baking
progress.
• Do not touch the Viewing Window during use. The Viewing
Window gets very hot.
• Don’t open the Lid during Baking. This causes baked
products to bake improperly.
• Don’t unplug the Breadman®during Kneading or Baking.
This will stop the operation.
• You have Instant Recall™ Power Failure Back-Up. If the
electricity in your home goes out, the Breadman®Corner
Bakery Bread & Dessert Maker’s memory stores the active
program for up to 15 minutes.
Operating Tips
Caution
Page 10

9.
USING THE BREADMAN®(CONTINUED)
• To protect young children, keep the Breadman®out of their
reach when you’re not there to supervise – especially during
the Kneading and Baking Cycles.
• Use the Breadman®on a flat, hard surface. Don’t place it
near a flame or heat, or on a soft surface (such as carpet).
Avoid placing it where it may tip over during use. Dropping
the Breadman®could cause it to malfunction.
• To avoid burns, stay clear of the Steam Vent during Kneading and Baking. Also, do not touch the Viewing Window –
it gets very hot.
• ALWAYS HANDLE THE HOT BREAD PAN OR BAKING
RACK WITH A POT HOLDER OR OVEN MITT. After
baking, wait for the Breadman®to cool down before touching or cleaning the Bread Pan, Baking Rack or internals of
the Breadman®without oven mitts.
• Never use metal utensils with the Breadman®. These can
scratch the non-stick surface of the Bread Pan.
• Avoid electric shock by unplugging the machine before
using a damp cloth or sponge to wipe the interior of the
Oven.
• Never use the Bread Pan on a gas or electric cooktop, on an
open flame or in a microwave oven.
• Avoid covering the Steam Vent during Kneading and Baking
Cycles. This could cause the Breadman®to warp or discolor.
• Always make sure the Kneading Paddle is removed from the
bread prior to slicing.
Caution
Page 11

10.
KNEADING AND BAKING CYCLES
All Breadman®recipes tell you what program to select for each recipe. Refer to prepackaged bread mix directions to determine the program selection for each specific mix.
The Dessert program features a beep signal to check for proper mixing. The Fast Bake™
program features a beep signal to check the dough ball. The Sweet, Whole Wheat and
Dessert programs contain beep signals to check the dough ball and/or add additional
ingredients (i.e., raisins, nuts). Refer to program specification on page 10.
• Use this program for basic bread recipes and most
packaged bread mixes.
• This program works best if a recipe is high in sugar, fat, eggs
or cheese.
• If a recipe contains more than 50% whole wheat flour, use
this program. During the first 20 minutes, the bread maker is
preheating prior to first knead.
• This program is best suited for breads low in fat and sugar,
which results in a crisp crust and a coarse, chewy interior.
• Use this program on recipes indicated with a in the Bread
Index of the Corner Bakery Cookbook. Simply omit the
amount of active dry yeast called for in the recipe and use
the larger amount of active dry yeast listed for the Insta
Bread program instead.
• This program is used to prepare dough for making bread or
rolls which are shaped before baking in a conventional
oven.
• The kneading blade churns the heavy whipping cream for
30 minutes. The heating element does not warm the inner
case.
• This program will mix and bake/cook cakes, cheesecakes,
pie fillings/puddings and fudge.
• Use this program to make bread in less than one hour. The
crust color is preset to medium. Simply use the special
instructions and recipes found in the Corner Bakery Cookbook.
Program
Basic
Program
Sweet
Program
Whole Wheat
Program
French
Program
Insta Bread
Program
Dough
Program
Butter
Program
Dessert
Program
Fast Bake™
Page 12

11.
- BASIC
*The Dessert program will beep 2 times when the display reads 1:48 as a reminder to stir the ingredients. The Fast Bake™program will beep when the
display reads :53 to check the dough ball and scrape any ingredients from the sides of the pan.
**The Sweet, Whole Wheat and Dessert programs will beep to tell you when to check the dough ball and/or add additional ingredients, i.e. raisins or
nuts, in specialty breads or when to add ingredients in desserts.
1 - Delay timer
2 - Preheat
3 - Mix
4 - 1st knead
5 - Display time for
beep to stir*
6 - Rest
7 - 2nd knead
8 - Display time for
beep to add**
9 - 1st rise
10 - Punch
11 - 2nd rise
12 - Punch
13 - 3rd rise
14 - Bake/Cook
15 - Cool
16 - Churn
17 - End
18 - Total
19 - Keep warm
3:50 - 13:00
-
2 min
5 min
-
5 min
12 min
-
40 min
4 sec
26 min
4 sec
60 min
50 min
20 min
-
[:H]
3:40
3 hours
3:50 - 13:00
-
2 min
5 min
-
5 min
12 min
3:25
40 min
4 sec
26 min
4 sec
60 min
50 min
20 min
-
[:H]
3:40
3 hour
4:10 - 13:00
20 min
2 min
11 min
-
50 min
12 min
2:34
20 min
4 sec
15 min
4 sec
40 min
50 min
20 min
-
[:H]
4:00
3 hours
3:50 - 13:00
-
2 min
11 min
-
50 min
12 min
-
20 min
4 sec
15 min
4 sec
40 min
50 min
20 min
-
[:H]
3:40
3 hours
2:09 - 13:00
-
2 min
5 min
-
-
17 min
-
17 min
4 sec
8 min
4 sec
30 min
40 min
-
-
[:H]
1:59
3 hours
1:13 - 13:00
-
2 min
4 min
-
5 min
12 min
-
40 min
4 sec
-
-
-
-
-
-
End
1:03
-
--
--
2 min
9 min
:53
-
-
-
16 min
-
-
-
-
32 min
-
-
End
:59
-
-
-
-
-
-
-
-
-
-
-
-
-
-
-
-
30 min
End
:30
-
-
-
2 min
5 min
1:48
5 min
8 min
1:20
20 min
-
-
-
-
55 min
20 min
-
End
1:55
-
- WHOLE
WHEAT
- SWEET
- FRENCH
- INSTA
BREAD
- DOUGH
- BUTTER
- DESSERT
- FAST
BAKE
™
Process
PROGRAM
Page 13

12.
MAKING DOUGH AND BAKING BREAD
Programming
Note: Use plastic lid for Butter program only.
The following are the general steps for using your bread maker. Depending on the program or recipe you choose, some steps may not apply or there may be additional steps.
Refer to the Bread, Fast Bake™, Dough, Butter and Dessert sections.
1. Add all ingredients to the pan in the order listed in the recipe.
2. For more detailed ingredient information or regular bread and dough instructions, refer to Corner Bakery Cookbook.
3. The Fast Bake™ program does not have a delay or hold warm feature.
4. The illustrations in this Use and Care Guide are for information purposes only.
You may find your bread maker and parts look different, however, the steps for
operation are the same.
Open the Lid and remove the Bread Pan by
pulling straight up, using the Pan Handle.
Attach the Kneading Blade onto the Shaft,
flat side down.
STEP 2STEP 1
Page 14

13.
Place all ingredients in Bread Pan in the
order listed.
NOTE: If using the Fast Bake™ program or
delay timer, add all of the ingredients
at the beginning. The ingredients
will be chopped into smaller pieces.
Insert Bread Pan until it fits securely into
bottom of bread maker with the ▼ FRONT
▼ marking facing the front of the bread maker.
This will provide a more even airflow during
baking/cooking.
Close the Lid. Plug into 120 V ~ 60 Hz outlet.
The display indicator will light up. Place bread
maker away from
edge of counter.
Select program and baking control. The
BAKING function is used to select the bread
crust color for all
bread programs
except Fast
Bake™. It can
be baked
medium, light
or dark. It is not
necessary to
press the control
when medium is
desired. Smaller
size recipes and
mixes will not fill
the Bread Pan when finished.
STEP 6
STEP 5
STEP 4
STEP 3
▼ FRONT ▼
Yeast
Dry
Ingredients
Water or
Liquids
Page 15

14.
Press START. The program time remaining is
displayed and counts down. The Fast Bake™
program will beep as a reminder to check the
dough ball. At this
time, use a rubber
spatula to scrape
any ingredients
from the sides of
the Bread Pan.
The Sweet and
Whole Wheat
programs will
beep as a
reminder to add
additional ingredients during the
second knead.
Opening the Lid will not stop kneading. Add
ingredients quickly and evenly over dough to
prevent heat loss. At this time also check the
dough ball and use a rubber spatula to scrape
any ingredients from the sides of the Bread
Pan. Close Lid.
The bread maker will beep when bread or
dough is done. Press STOP and remove the
Bread Pan using oven mitts. If you do not stop
the unit and remove the bread, it will automatically go into the keep warm function on all
programs except
Dough and Fast
Bake™. During
the keep warm
function [:H]
will be visible in
the Display
Window. Your
bread will be
kept warm for
three hours and
then the bread
maker will shut off. For best results, remove
bread immediately after the bake process is
complete. At the end of Dough and Fast
Bake™, End will be visible in the Display
Window.
Turn the Bread Pan upside down and shake
several times to release the bread or dough.
Place the bread upright on a wire rack to cool
20-30 minutes
before cutting.
This allows the
steam to escape.
Be sure to
remove the
Kneading Blade
from the bread.
Follow shaping
and baking
directions for
dough.
CAUTION: The Bread Pan, Kneading Blade and bread will be very hot.
Always unplug after use. Note: The
unit must be allowed to cool down
between each use.
STEP 9
STEP 8
STEP 7
Page 16

15.
USING THE DELAY BAKE TIMER
The delay timer can be set to delay bread making up to 13
hours. At the selected time, delicious bread will be ready. The
delay timer works for all programs except Fast Bake™ Bread,
Butter and Dessert.
Add all ingredients to the Bread Pan in the order listed. It is
critical to add the yeast last, on top of the flour and away from
the liquid. This will keep the yeast from activating until the
bread maker starts to mix.
When delaying bread, reduce the amount of water by 1-3 teaspoons, depending on the size of loaf. Set the program and
bread baking control. Before pressing the START button, set
the timer for however long you want to wait before the bread
is done.
Example: It is 9:00 p.m. now. The bread is to be ready at 6:30
a.m. the next morning. Set the timer for 9:30, because there
are 9 hours and 30 minutes between 9:00 p.m. and 6:30 a.m.
When pressed, the time will advance in 10
minute increments.
When constant pressure is applied to the
button, the time will advance quickly.
Press the START button. The timer is set,
and the colon blinks. After one minute, 9:29 is
displayed. The timer will continue to count
down in 1 minute increments.
Note: The bread maker will start
when the timer has counted down to
the start time for the program to
begin.
STEP 3
STEP 2
STEP 1
13 Hour
Delay Bake Timer
Page 17

16.
BUTTER
The Butter program does not have a delay feature.
For more detailed ingredient information and butter instructions refer to the Corner
Bakery Cookbook.
Note: Use plastic lid for Butter program only.
Open the Lid and remove the Bread Pan by
pulling straight up, using the Pan Handle.
Attach the Kneading Blade onto the Shaft,
flat side down.
Pour heavy whipping cream in Bread Pan.
Place Butter Lid on Bread Pan. Use Butter Lid
for Butter
program only.
Insert Bread Pan until it fits securely into
bottom of bread maker with the ▼FRONT ▼
marking facing
the front of
the bread
maker. This
will provide
more even airflow.
STEP 4
STEP 3
STEP 2
STEP 1
HEAVY
WHIPPING
CREAM
Page 18

17.
Close the Lid. Plug into 120 V ~ 60 Hz outlet.
The Display Window will light up.
Select Butter program.
Press the START button. The program time
remaining is displayed and counts down.
The bread maker will beep when butter is
done. Press the STOP button and remove the
Bread Pan.
Without removing Butter Lid, tilt the Bread
Pan, pouring the buttermilk off the butter.
Remove Butter Lid and pour one cup of cold
water into the
Bread Pan and
replace Lid. Tilt
Bread Pan to
drain water from
butter and repeat.
Remove butter
from Bread Pan
using a rubber or
plastic spatula.
CAUTION:
Always unplug
after use.
STEP 9
STEP 8
STEP 7
STEP 6
STEP 5
Page 19

18.
DESSERT
Programming
The Dessert program does not have a delay feature.
For more detailed ingredient information and dessert instructions refer to the Corner
Bakery Cookbook.
Note: Use Butter Lid for Butter program only.
Open the Lid and remove the Bread Pan by
pulling straight up, using the Pan Handle.
Attach Kneading Blade onto the Shaft, flat
side down.
Place all ingredients in Bread Pan in the
order listed. No mixing of ingredients outside
the machine is necessary.
Insert Bread Pan
until it fits
securely into
bottom of bread
maker with the
▼ FRONT ▼
marking facing
the front of the
bread maker.
This will provide
a more even airflow during baking/cooking.
STEP 4
STEP 3
STEP 2
STEP 1
▼ FRONT ▼
Dry
Ingredients
Liquids
Page 20

19.
Close the Lid. Plug into 120 V ~ 60 Hz outlet.
The Display Window will light up.
Press DESSERT button. Place bread maker
away from edge of counter.
Press START. The program time remaining is
displayed and counts down. When the Display
Window reads
1:48, the
machine will
beep 2 times and
stop mixing.
Take a rubber
spatula and
scrape the dry
ingredients from
the top sides and
bottom corners
of the Bread Pan
into the wet mixture. At 1:43 mixing will
resume. When the Display Window reads 1:20,
it will beep 4 times as a reminder to add additional ingredients. Add ingredients quickly
and evenly over batter to prevent heat loss.
Close Lid.
The bread maker will beep when dessert is
done. Press STOP and remove the Bread Pan
using oven mitts for all desserts except cheesecakes. See special
instructions for
cheesecakes in
the Corner Bakery Cookbook.
Place the Bread Pan on a heat resistant surface. Refer to the Corner Bakery Cookbook for
additional mixing, cooling and removing
instructions.
CAUTION: The
Bread Pan,
Kneading Blade
and dessert will
be very hot.
Always unplug
after use.
STEP 9
STEP 8
STEP 7
STEP 6
STEP 5
Page 21

20.
CLEANING INSTRUCTIONS
CAUTION: Always unplug the bread maker and allow to cool completely before cleaning. Carefully unpack the bread maker and remove all packaging materials.
Clean-up of bread maker
1. Unplug and allow to cool before cleaning.
2. Remove the Bread Pan from inside the bread maker.
3. Clean exterior of bread maker with a damp cloth and
plastic scouring pad if necessary. Do not rub too hard as
the surface may become scratched.
4. Remove any flour, bread crumbs or other food from the
inside of the oven cavity using a damp sponge, cloth or a
small portable vacuum cleaner. A plastic scouring pad
may be used if necessary. Do not rub too hard as the surface may become scratched.
5. To clean the glass in the Lid, use a glass cleaner or mild
detergent and a damp cloth or plastic scouring pad. Do
not use an abrasive cleaner or pad as they might scratch
the glass.
6. Rinse with a damp cloth and dry thoroughly.
Clean-up of bread pan and kneading blade
CAUTION: Do not immerse Bread Pan or wash in dishwasher.
1. Allow to cool before cleaning.
2. Fill with hot soapy water and remove Kneading Blade. If
necessary to remove the Kneading Blade from the Bread
Pan, allow the soapy water to remain in the pan for up to
30 minutes (longer times may damage the non-stick surface). It is not necessary to remove the Kneading Blade
for cleaning, but if you wish to, it must be removed after
each use otherwise it will become very difficult to
remove.
3. Wash Bread Pan and Kneading Blade with a nylon bristle
brush. Do not use steel wool, abrasive cleaners or metal
utensils on the Bread Pan or Kneading Blade as they will
damage the non-stick surface. Normal wear is to be
expected. The non-stick may discolor over time but that
in no way affects performance.
Page 22

21.
STORING
• All removable parts should be thoroughly cleaned and dried.
• Store bread maker with Kneading Blade inside Bread Pan
and Lid closed.
TROUBLESHOOTING
Bread and Dough
Possible Solution
The height and shape of bread may differ depending on the
ingredients, room temperature and length of the timer cycle.
Also, accurate measurement of ingredients is essential to make
delicious bread.
Stale ingredients or too much yeast may have been used.
Always use fresh ingredients. Accurate measurements are
essential to make delicious bread.
This can happen as the Kneading Blade is detachable. Use a
non-metal utensil to remove it. Caution: The Kneading Blade
will be hot.
Sometimes flour in the corner of the Bread Pan may not have
been completely kneaded into the dough. Scrape the flour off
the loaf with a spatula.
Longer delay times could alter the baking results.
No. If there is too little in the Bread Pan, the Kneading Blade
cannot knead well enough. If there is too much, bread swells
out of the Bread Pan.
Yes, in all programs except Fast Bake™. Be sure to deduct the
same measurement of water to equal liquid substitution (warm
to 80°F/27°C). Fresh milk is not recommended when using
the timer, because it may spoil while sitting in the pan.
Symptom
Why does the
height and shape
of bread differ in
each loaf?
The bread has an
unusual aroma.
Why?
The Kneading
Blade comes out
with the bread.
The baked loaf of
bread has a floured
corner.
Why can the timer
not be set for more
than 13 hours?
Can ingredients be
halved or doubled?
Can fresh milk be
used in place of dry
milk?
Page 23

22.
Dessert
Possible Solution
The height and shape of desserts may differ depending on the
ingredients. Accurate measurement of ingredients is essential
to make delicious desserts.
This can happen as the Kneading Blade is detachable. Use a
non-metal utensil to remove it.
Be sure to stir the dessert when it beeps two times at 1:48.
No, the ingredients will not mix and bake properly. Most of
the recipes have perishable ingredients and you must stir the
ingredients with 1:48 remaining.
No. If there is too little in the Bread Pan, the Kneading Blade
cannot mix well enough. If there is too much, the Bread &
Dessert Maker will not cook the dessert properly.
Yes. Be sure to deduct the same measurement of water to equal
liquid substitution.
Yes, egg replacement must be used because eggs will curdle
when making these recipes.
Symptom
Why does the
height and shape
of the desserts vary?
The Kneading
Blade comes out
with the dessert.
The dessert has
a floured corner.
Can the timer
be used?
Can ingredients be
halved or doubled?
Can fresh milk
be used in place
of dry milk?
Do I have to use
egg replacement
in the filling and
pudding recipes?
Page 24

23.
OPERATIONAL ERRORS
INGREDIENT PROBLEMS
Baking results:
A. Bread maker does not operate/ingredients not mixing
B. Smoke emitted from steam vent/burning smell
C. Sides of bread collapse/bottom is damp
D. Bread rises too much/coarse texture
E. Bread falls/coarse texture
F. Short & dense texture
G. Slices uneven & sticky
✓Check list:
1. Unplugged/power outage
2. Oven area is too hot (HI)
3. Oven area is too cold
4. Display reads: E:02, E:03, E:04, E:05, E:08
5. Ingredients spilled on heating element
6. Top Lid was open during baking
7. Bread left in Bread Pan too long after program
8. Bread sliced just after baking (steam was not
allowed to escape)
9. Whole Wheat program chosen
10. Kneading Blade not installed
11. Not enough
12. Too much
13. Not enough
14. Too much
15. No yeast
16. Not enough
17. Too much
18. No sugar, molasses or honey
19. Ingredients used other than recommended
20. Wrong type of
flour used
21. Yeast touched
water before
kneading
22. Old yeast used
23. Wrong type of
yeast
24. Temperature of liquid either too hot or
too cold
Water
Flour
Yeast
Flour
Yeast
A. B.
C.
D. E.
F. G.
MEASUREMENT ERRORS
Bread and dough
✓check list
Page 25

24.
24.
SUGGESTIONS
The following suggestions have a corresponding number found on the check list
on the previous page. Be sure to read both.
1. Plug into 120 V ~ 60 Hz outlet. Refer to power outage instructions.
2-3. Open Lid, remove Bread Pan and allow to cool or warm up.
4. Needs service.
5. Wait until program is complete; unplug, allow to cool and clean.
6. Only open Lid during kneading process to check dough ball or to add
ingredients.
7. Remove bread as soon as program is done and place on wire rack.
8. Allow to cool approximately 20 minutes.
9. Programs begin with preheat. No movement occurs in the Bread Pan.
10. Put Kneading Blade on the shaft of Bread Pan.
11-14. Check the dough ball at the beep. Each dough ball, except those prepared in
Fast Bake™ should be round, smooth-textured, soft and slightly tacky to the
touch. When touched, the dough ball will leave a little dough on your finger.
Fast Bake™ dough ball will be sticky to the touch. When touched, it will
leave dough on your finger. If more like a batter, add 1 TBL flour. Allow to
mix; add more if necessary. If too dry, add 1 tsp water. Allow to absorb; add
more if necessary.
15. Follow recipe.
16. Increase by 1/4 tsp.
17. Decrease by 1/4 tsp.
18. Artificial sugar substitutes are not recommended.
19. Follow recipe or substitution recommendations.
20. Flours cannot be substituted.
21. Place yeast on top of flour away from liquids.
22. Make sure yeast is fresh and room temperature.
23. For all programs, except Fast Bake™, use active dry/rapid or Quick•Rise™
yeast in equal amounts. Follow bread maker yeast directions. See
Fast Bake™ directions.
24. Liquid temperature should be 80°F/27°C for all programs except Fast Bake™
which should be 110-115°F/43°-46°C.
Page 26

25.
IN-WARRANTY SERVICE INFORMATION
Please refer to warranty statement to determine if in-warranty service applies. This
appliance must be serviced by a Breadman®authorized service center.
Unauthorized service will void warranty.
If an authorized service center is not available locally, your appliance may be returned,
postage prepaid, to our National Service Center at the address shown in the back of this
book. Call Consumer Service for return authorization.
Products must be adequately protected to avoid shipping damage. Surround your appliance with three inches of protective padding and include a copy of your dated sales
receipt and a note explaining the problem you have experienced. We recommend
insuring your package. No CODs accepted.
Keep Dated Sales Receipts for Warranty Service.
Keep this booklet. Record the following for reference:
Date purchased
Model number
Date Code (stamped on bottom)
Page 27

26.
SPECIFICATIONS
Power supply 120 V ~ 60 Hz
Heater 430W
Kneading Motor 75W
Dimension (WxDxH) 13
1/2" x 10" x 131/2"
Weight Approx. 19 lbs.
Page 28

LIMITED ONE YEAR WARRANTY
Warranty: This Breadman®product is warranted by Salton, Inc. to be free from defects in materials or workmanship for a
period of (1) year from the original purchase date. This product warranty covers only the original consumer purchaser of
the product.
Warranty Coverage: This warranty is void if the product has been damaged by accident in shipment, unreasonable use,
misuse, neglect, improper service, commercial use, repairs by unauthorized personnel, normal wear and tear, improper
assembly, installation or maintenance abuse or other causes not arising out of defects in materials or workmanship. This
warranty is effective only if the product is purchased and operated in the USA, and does not extend to any units which
have been used in violation of written instructions furnished with the product or to units which have been altered or modified or to damage to products or parts thereof which have had the serial number removed, altered, defaced or rendered
illegible.
Implied Warranties: ANY IMPLIED WARRANTIES WHICH THE PURCHASER MAY HAVE ARE LIMITED IN DURATION TO
ONE (1) YEAR FROM THE DATE OF PURCHASE. Some states do not allow limitations on how long an implied warranty lasts,
so the above limitation may not apply to you.
Warranty Performance: During the above one-year warranty period, a product with a defect will be either repaired or
replaced with a reconditioned comparable model (at our option) when the product is returned to the Repair Center, or the
purchase price refunded. The repaired or replacement product will be in warranty for the balance of the one-year warranty period and an additional one-month period. No charge will be made for such repair or replacement.
Service and Repair: Should the appliance malfunction, you should first call toll-free 1 (800) 233-9054 between the hours of
9:00 am and 5:00 pm Central Standard Time and ask for CONSUMER SERVICE stating that you are a consumer with a problem. Please refer to model number TR888 when you call.
In-Warranty Service (USA): For an appliance covered under the warranty period, no charge is made for service or postage.
Call for return authorization 1 (800) 233-9054.
Out-of Warranty Service: A flat rate charge by model is made for out-of-warranty service. Include $15.00 (U.S.) for return
shipping and handling. We will notify you by mail of the amount of the charge for service and require you to pay in advance
for the repair or replacement.
For Products Purchased in the USA, but Used in Canada: You may return the product insured, packaged with sufficient
protection, and postage and insurance prepaid to the USA address listed below. Please note that all customs duty / brokerage fees, if any, must be paid by you and we will require you to pay the cost of customs duty / brokerage fees to us in
advance of our performing any service.
Risk During Shipment: We cannot assume responsibility for loss or damage during incoming shipment. For your protection, carefully package the product for shipment and insure it with the carrier. Be sure to enclose the following items with
your appliance: any accessories related to your problem, your full return address and daytime phone number, a note
describing the problem you experienced, a copy of your sales receipt or other proof of purchase to determine warranty
status. C.O.D. shipments cannot be accepted.
Limitation of Remedies: No representative or person is authorized to assume for us any other liability in connection with
the sale of our products. There shall be no claims for defects or failure of performance or product failure under any theory
of tort, contract or commercial law including, but not limited to negligence, gross negligence, strict liability, breach of warranty and breach of contract. Repair, replacement or refund shall be the sole remedy of the purchaser under this warranty,
and in no event shall Salton be liable for any incidental or consequential damages, losses or expenses.
Some states do not allow the exclusion or limitation of incidental or consequential damages, so the above limitation or
exclusion may not apply to you.
Legal Rights: This warranty gives you specific legal rights, and you may also have other rights which vary from state to
state.
For more information on Salton products: visit our website: www.breadman.com, or email us at:
breadman@saltonusa.com or eSalton.com
P/N 61228
© 2003 Salton, Inc. All Rights Reserved. Printed in China
To return the appliance, ship to:
Attn: Repair Center
Salton, Inc.
708 South Missouri Street
Macon, MO 63552
To contact us, please write to or call:
Salton, Inc.
P.O. Box 7366
Columbia, MO 65205-7366
1 (800) 233-9054
E-mail: Salton@Saltonusa.com
Page 29

28.
Page 30

IMPORTANT NOTICE
If any parts are missing or defective,
DO NOT return this product.
Please call our Consumer Service Department for assistance.
800-233-9054
Monday—Friday 8am—5pm CST
Thank you
TR888 P/N 61228
Printed in China ©2003 Salton, Inc.
If, after reading this instruction
booklet, you still have questions about using the
Breadman
®
Corner Bakery Bread & Dessert Maker,
please write or call:
Salton, Inc.
P.O. Box 7366
Columbia, MO 65205-7366
1-800-233-9054
Monday—Friday 8am—5pm CST
For more information on Salton, Inc. products, E-mail us at:
breadman@saltonusa.com
OR, visit our website:
http://www.breadman.com
or www.eSalton.com
 Loading...