


TR845
INSTRUCTION
MANUAL
AUTOMATIC BREAD BAKER
®

TABLE OF CONTENTS
Important Safeguards . . . . . . . . . . . . . . . . . . . . . . . . . . . . . . . . . . . . . . . . . . . . . . . . . .
®
Your Breadman
. . . . . . . . . . . . . . . . . . . . . . . . . . . . . . . . . . . . . . . . . . . . . . . . . . . . . . 2
Control Panel . . . . . . . . . . . . . . . . . . . . . . . . . . . . . . . . . . . . . . . . . . . . . . . . . . . . . . . . . 3
Using the Breadman
Baking Cycles . . . . . . . . . . . . . . . . . . . . . . . . . . . . . . . . . . . . . . . . . . . . . . . . . . . . .
®
. . . . . . . . . . . . . . . . . . . . . . . . . . . . . . . . . . . . . . . . . . . . . . . . . 4 - 6
7 - 9
Super Rapid Breads, As Easy As 1-2-3! . . . . . . . . . . . . . . . . . . . . . . . . . . . . . . . . . 10
Super Rapid Bread Recipes . . . . . . . . . . . . . . . . . . . . . . . . . . . . . . . . . . . . . . . . . . . . 11 - 14
Making Dough and Baking Bread
Using the Batter Breads™ Cycle
Dough Cycle Instructions
. . . . . . . . . . . . . . . . . . . . . . . . . . . . . . . . . . . . . . . . . . . . . . 21
. . . . . . . . . . . . . . . . . . . . . . . . . . . . . . . . . . . . . . . 15 - 19
. . . . . . . . . . . . . . . . . . . . . . . . . . . . . . . . . . . . . . . 20
Jam Cycle Instructions . . . . . . . . . . . . . . . . . . . . . . . . . . . . . . . . . . . . . . . . . . . . . . . . 22
Using the Delay Timer
. . . . . . . . . . . . . . . . . . . . . . . . . . . . . . . . . . . . . . . . . . . . . . . . . 23 - 24
1
Using the Pause Button
. . . . . . . . . . . . . . . . . . . . . . . . . . . . . . . . . . . . . . . . . . . . . . . . 25
Cleaning Instructions . . . . . . . . . . . . . . . . . . . . . . . . . . . . . . . . . . . . . . . . . . . . . . . . . . 26
Jam Recipes . . . . . . . . . . . . . . . . . . . . . . . . . . . . . . . . . . . . . . . . . . . . . . . . . . . . . . . . . . . 27
Pizza Dough Recipe . . . . . . . . . . . . . . . . . . . . . . . . . . . . . . . . . . . . . . . . . . . . . . . . . . . . 28
Trouble Shooting . . . . . . . . . . . . . . . . . . . . . . . . . . . . . . . . . . . . . . . . . . . . . . . . . . . . . . 29 - 31
Warranty . . . . . . . . . . . . . . . . . . . . . . . . . . . . . . . . . . . . . . . . . . . . . . . . . . Inside Back Cover

IMPORTANT SAFEGUARDS
When using the Breadman®Automatic
Bread Baker, basic safety precautions
should always be followed, particularly
the following:
1. READ ALL INSTRUCTIONS BEFORE USE.
2. Do not touch hot surfaces. Use
handles or knobs. Always use oven
mitts when handling hot materials and
allow metal parts to cool before
cleaning.
3. Unplug this product from wall outlet
when not in use and before cleaning.
Allow to cool thoroughly before putting
on or taking off parts.
4. Do not immerse appliance in water or
any other liquid.
5. Close supervision is always necessary
when this or any appliance is used by
or near children.
6. Do not allow anything to rest on the
power cord. Do not plug in cord where
persons may walk or trip on it.
7. Do not operate this or any appliance
with a frayed or damaged cord, or
after the appliance malfunctions, or
has been damaged in any manner.
Return the appliance to Salton, Inc.
Repair Dept. for examination
and repair.
8. Avoid contact with any moving parts.
9. Do not use attachments not
recommended by Salton, Inc.; they
may damage the appliance or
cause injury.
10. This appliance is intended for
household use only. Do not use
outdoors or for commercial purposes.
11. Do not let the cord hang over the
edge of a table or counter, or touch
hot surfaces. Do not place on an
unsteady or cloth-covered surface.
12. Do not place the appliance near a hot
gas or electric burner, in a heated
oven or in a microwave.
13. Keep the unit at least 4 inches away
from walls or any other objects when
using it.
14. To disconnect, grip the plug and pull
the plug from the wall outlet. Never
pull on the cord.
SAVE THESE INSTRUCTIONS
Note:
A. A short power-supply cord is provided
to reduce the risk of becoming
entangled in or tripping over a
longer cord.
B. If an extension cord is used:
(1) the marked electrical rating of the
extension cord should be at least
as great as the electrical rating of
the appliance, and
(2) the cord should be arranged so
that it will not drape over the
counter top or tabletop where it
can be pulled on by children or
tripped over unintentionally.
CAUTION: During use, the internal parts of
the Breadman®and the area around the
Steam Vent are HOT. Keep out of reach of
children to avoid possible injury.
FOR HOUSEHOLD USE ONLY
1
YOUR BREADMAN
®
1.
2.
3.
4.
5.
6.
7.
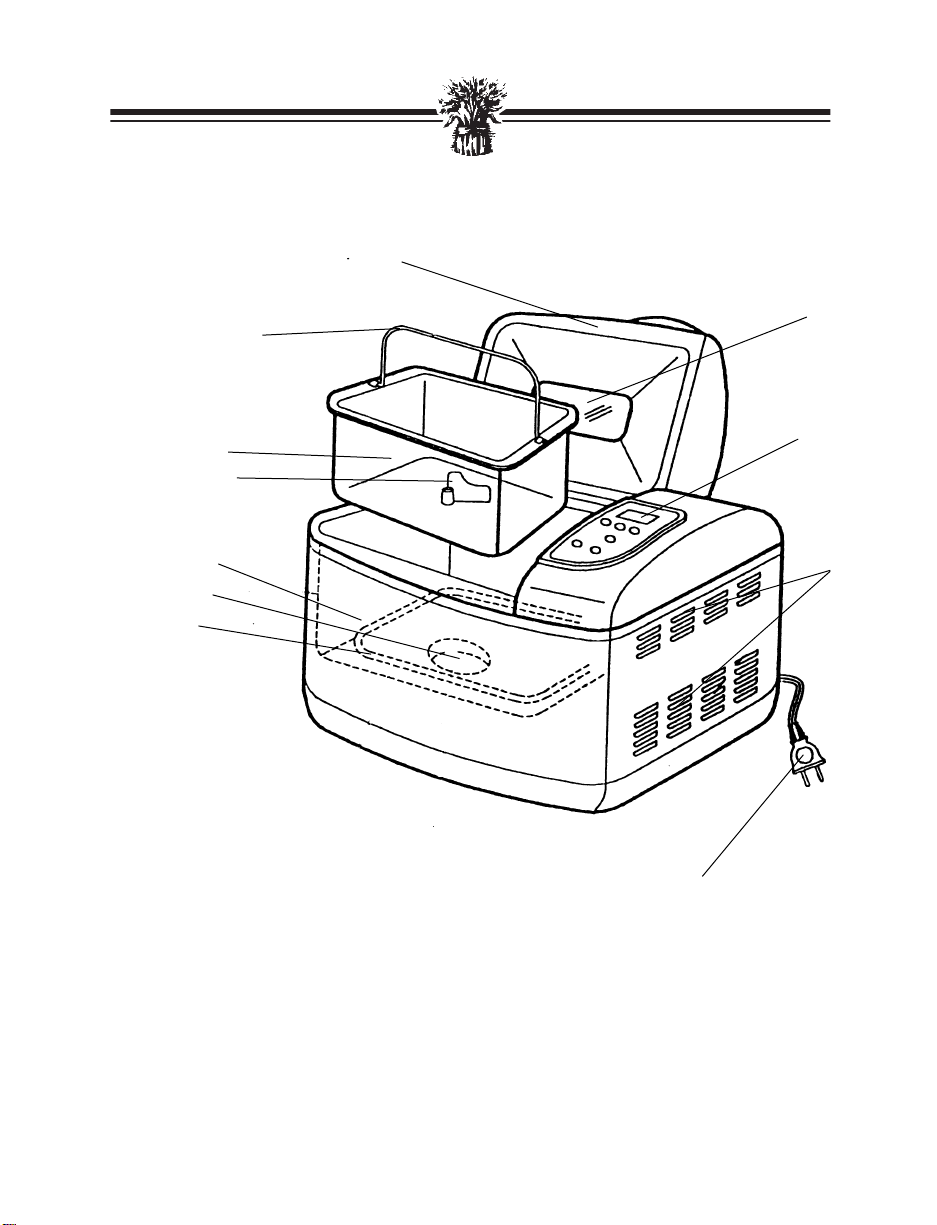
1. Removable Lid
2. Handle
3. Bread Pan
4. Kneading Paddle
5. Oven Chamber
6. Drive Shaft
7. Heating Element
8. Viewing Window
9. Control Panel
10. Steam Vents
11. Power Supply Cord with Polarized Plug
8.
9.
10.
11.
POLARIZED PLUG
This appliance has a polarized plug (one blade is wider than the
other). To reduce the risk of electric shock, this plug is intended to fit
into a polarized outlet only one way. If the plug does not fit fully in
the outlet, reverse the plug. If it still does not fit, contact a qualified
electrician. Do not attempt to modify the plug in any way.
2
CONTROL PANEL
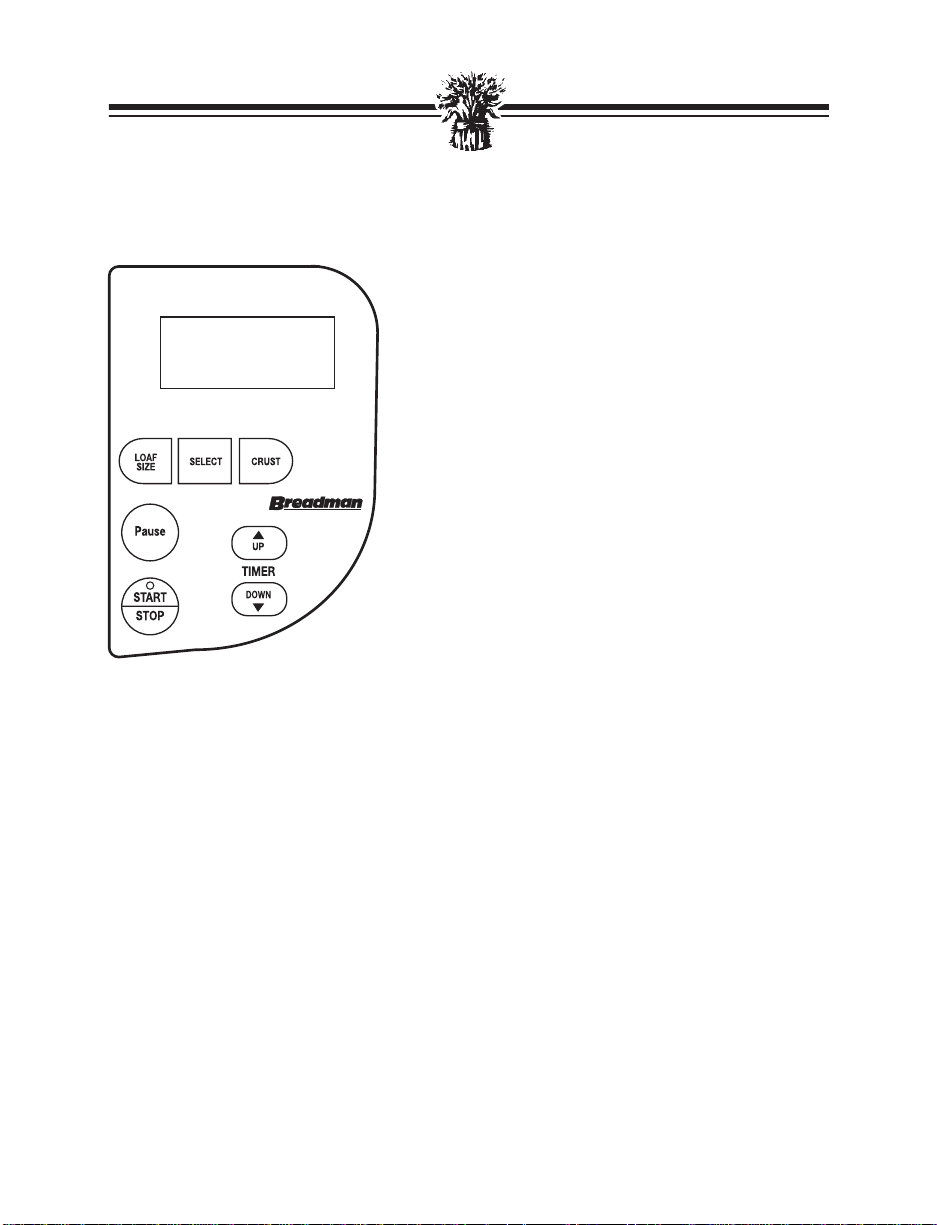
A. Display Window
FRUIT WHOLE WHEAT
WHITE & NUT BASIC RAPID FRENCH
2.0 lb.
1.5 lb.
1.0 lb.
JAM BATTER BREAD PIZZA super
BREADS™ DOUGH rapid
DARK
MED
LIGHT
®
D. Select
Press this Button to select the Baking or Dough Cycle you want. Each time the
SELECT Button is pressed, the Arrow in the Display Window will correspond with
the selection. Press the SELECT Button until your choice is indicated. If at any
time during the baking process you would like to check which Cycle has been
selected, simply refer to the Display Window on the unit.
E. Loaf Size
Press this Button to select what size loaf you would like to prepare. An indicator
symbol () will appear in the Display Window next to either the 1.0 lb., 1.5 lb., or
2.0 lb. loaf.
Shows your selection, Loaf Size and
Timer setting.
B. Timer
Use this Button to add or subtract time
displayed in the Display Window.
Each time you press this Arrow,
the Timer advances 10 minutes.
Each time you press this Arrow,
the Timer is set back 10 minutes.
(Hint: Holding down the Arrow Buttons in
place with either fast forward or fast
reverse the time.)
C. Pause
The PAUSE function can be activated only
after the machine has started a baking
program. For more details, refer to the
PAUSE section in this book.
F. Crust Control
To control the crust color of your loaf, press this Button. You have a choice of
Light, Medium or Dark. An indicator symbol () will appear next to your choice
when this Button is pressed.
F. Start/Stop
Press START/STOP Button to begin the Cycle that you choose and to begin the
Timer. The time remaining will appear in the Display Window. Use this Button to
stop the baking process and clear the Program. Press and hold the START/STOP
Button to stop a Baking Cycle at any point.
3

USING THE BREADMAN
With your new Breadman®Automatic Bread Baker:
• You can use commonly available pre-packaged bread mixes.
Follow the instructions on the package. We do not
recommend using 1 lb. mixes in this machine!
• You can bake a loaf of bread from scratch. See the
Recipe & Menu Planner included with your Breadman
for lots of tasty options.
• You can make dough for rolls, shaped loaves, and for pizza!
Choose the Dough or Pizza Dough Cycles. Use either of the
Breadman®’s Dough Cycles to do the mixing and kneading
for you, then shape, proof, and bake your bread loaves or
pizza yourself.
• You can make delicious non-yeast Batter Breads™, and cakes!
• You can make all kinds of tasty jams by using the
Jam Cycle.
®
®
Power Failure
Back-Up
Inserting and
Removing the
Bread Pan
• You have Power Failure Back-Up. If the electricity in your
home goes out, or you mistakenly unplug the machine, the
Breadman®’s memory stores the active program. If power is
re-connected within one hour of that time period, the
Breadman®will return to baking your bread.
NOTE: If you experience frequent surges in your area, please
use a surge protector.
• If your power is out for longer than 60 minutes, and if you are
using any dairy products, perishables or meats in your bread,
for health, sanitary and other considerations, you should
discard the contents of the recipe and start again with new
fresh ingredients.
• To insert the Bread Pan, place into the Oven Chamber and
press down firmly to seat it into place. Then place the
Kneading Paddle onto its shaft before adding any ingredients.
4

USING THE BREADMAN
• To remove the Bread Pan from the Bread Machine, hold the
Handle with a mitt and lift gently out of the Oven Chamber.
NOTE: Always hold the Bread Pan by the Handle when
inserting and removing from the Oven Chamber.
Caution
When removing the Bread Pan after baking, always wear oven
mitts to prevent injury.
®
(continued)
Operating Tips
Caution
• Use oven mitts when working with bread or any part of the
Breadman®that is hot from baking.
• Wipe off crumbs and clean the Breadman®as needed,
after baking.
• Unplug the Breadman®when you are not using it.
• It is normal for the Viewing Window to collect moisture
during the beginning of the Rise Cycle. As your bread
bakes, the moisture will evaporate so you can watch your
bread’s baking progress.
• Don’t open the Lid during baking. This can cause the bread
to bake improperly.
• To protect young children, keep the Breadman®out of their
reach when you’re not there to supervise — especially during
the Kneading and Baking Cycles.
• Use the Breadman®on a flat, hard surface. Don’t place it near
an open flame or heat, or on a soft surface (such as a carpet or
table cloth). Avoid placing it where it may tip over during
use. Dropping the Breadman®could cause it to malfunction.
• To avoid burns, stay clear of the Steam Vents during kneading
and baking. Also, don’t touch the Viewing Window — it gets
very hot.
5

USING THE BREADMAN
• After baking, wait for the Breadman®to cool down
thoroughly before touching or cleaning the Bread Pan or
metal parts of the Breadman®without oven mitts.
• Never use metal utensils with the Breadman®. These can
scratch the non-stick surface of the Bread Pan.
• Avoid electric shock by unplugging before using a damp
cloth or sponge to wipe the interior of the Oven.
• Never use the Bread Pan on a gas or electric cooktop or on
an open flame or in a microwave!
• Avoid covering the Steam Vents during Kneading and
Baking Cycles. This could cause the Breadman®to warp
or discolor.
• Always make sure the Kneading Paddle is removed from
the bread prior to slicing.
®
(continued)
6

BAKING CYCLES
Really in a hurry? If you’re in a rush and need to bake a
white bread flour recipe, try the 59 Minute Start-to-Finish
Super Rapid Cycle. Just remember to use the correct type
of yeast.*
The Breadman®Automatic Bread Baker has many program
settings from which you can choose.
• The Crust Control feature lets you choose Light, Medium
or Dark crusts for most bread varieties, including White,
French, Fruit & Nut, and Whole Wheat.
• The French Cycle is for breads with crisper crusts,
especially those that are lowest in fat and sweeteners, such
as French and Italian breads.
• Batter Breads™ uses high amounts of sugar and fat. Eggs
are added to make a nutritious sweet bread.
• The Jam Cycle makes your favorite jams.
The table on the following pages show how long each part of
the Baking Cycle takes.
*For breads made with the Super Rapid Cycle, always use
Quick-Rise™ yeast.
7

BAKING CYCLES (continued)
Baking
Cycle
2.0 lb. 1.5 lb. 1.0 lb. 2.0 lb. 1.5 lb. 1.0 lb. 2.0 lb. 1.5 lb. 1.0 lb. 2.0 lb. 1.5 lb. 1.0 lb.
White Fruit & Nut Whole Wheat Whole Wheat Rapid
Mix/Knead 6 min. 6 min. 6 min. 6 min. 6 min. 6 min. 5 min. 5 min. 5 min. 5 min. 5 min. 5 min.
Rest 6 min. 6 min. 6 min. 6 min. 6 min. 6 min. 30 min. 30 min. 30 min. 15 min. 15 min. 15 min.
Knead 2 25 min. 25 min. 25 min. 25 min. 25 min. 25 min. 25 min. 25 min. 25 min. 25 min. 25 min. 25 min.
Buzzer A BUZZER WILL SOUND 10 TIMES
Add Fruit 10 min. 10 min. 10 min. 10 min. 10 min. 10 min. 10 min. 10 min. 10 min. 10 min. 10 min. 10 min.
First Rise 25 min. 25 min. 25 min. 30 min. 30 min. 30 min. 48 min. 48 min. 48 min. 25 min. 25 min. 25 min.
Punch Down 1 min. 1 min. 1 min. 1 min. 1 min. 1 min. 1 min. 1 min. 1 min. 1 min. 1 min. 1 min.
Second Rise 16 min. 16 min. 16 min. 16 min. 16 min. 16 min. 30 min. 30 min. 30 min. 18 min. 18 min. 18 min.
Punch Down 1 min. 1 min. 1 min. 1 min. 1 min. 1 min. 1 min. 1 min. 1 min. 1 min. 1 min. 1 min.
Final Rise 55 min. 50 min. 45 min. 60 min. 55 min. 50 min. 55 min. 50 min. 45 min. 55 min. 50 min. 45 min.
Dark 65 min. 60 min. 55 min. 65 min. 60 min. 55 min. 65 min. 60 min. 55 min. 65 min. 60 min. 55 min.
Med. 55 min. 50 min. 45 min. 55 min. 50 min. 45 min. 55 min. 50 min. 45 min. 55 min. 50 min. 45 min.
Bake
Light 45 min. 40 min. 35 min. 45 min. 40 min. 35 min. 45 min. 40 min. 35 min. 45 min. 40 min. 35 min.
Dark 3:30 3:20 3:10 3:40 3:30 3:20 4:30 4:20 4:10 3:40 3:30 3:20
Total
Med. 3:20 3:10 3:00 3:30 3:20 3:10 4:20 4:10 4:00 3:30 3:20 3:10
Time
Light 3:10 3:00 2:50 3:20 3:10 3:00 4:10 4:00 3:50 3:20 3:10 3:00
Keep Warm 3 hrs. 3 hrs. 3 hrs. 3 hrs. 3 hrs. 3 hrs. 3 hrs. 3 hrs. 3 hrs. 3 hrs. 3 hrs. 3 hrs.
© Copyright 1999, Breadman
®
8

BAKING CYCLES (continued)
Baking
Cycle
French Super Rapid
2.0 lb. 1.5 lb. 1.0 lb. 2.0 lb. 1.5 lb. 1.0 lb.
Bread Pizza Jam Batter
Dough Dough Breads™
Mix/Knead 6 min. 6 min. 6 min. 2 min. 2 min. 2 min. 7 min. 5 min. 8 min.
Rest 6 min. 6 min. 6 min. 5 min.
Knead 2 25 min. 25 min. 25 min. 7 min. 7 min. 7 min. 18 min. 10 min. 21 min.
Buzzer A BUZZER WILL SOUND 10 TIMES
Add Fruit 10 min. 10 min. 10 min. 5 min. 5 min. 5 min. 10 min. 10 min.
First Rise 35 min. 35 min. 35 min. . 49 min. 34 min.
Punch Down 1 min. 1 min. 1 min. 1 min. 1 min.
Second Rise 16 min. 16 min. 16 min.
Punch Down 1 min. 1 min. 1 min.
Final Rise 55 min. 50 min. 45 min. 19 min. 17 min. 15 min.
Dark
Med. 65 min. 60 min. 55 min. 30 min. 28 min. 26 min. 81 min.
Bake
Light
Dark
Total
Med. 3:40 3:30 3:20 0:59 0:59 0:59 1:30 1:00 1:20 1:50
Time
Light
Keep Warm 3 hrs. 3 hrs. 3 hrs.
© Copyright 1999, Breadman
®
9

SUPER RAPID BREADS, AS EASY AS 1-2-3!
The Super Rapid Cycle, with hotter Rise and Bake temperatures, is convenient
for baking a hot, fresh loaf of bread in under an hour! The longer bread programs,
with lower rise and bake temperatures, will bake a taller, more developed loaf
of bread.
1. Add ingredients to the Bread Pan in the order listed. Refer to Super Rapid
Cycle Hints below for measuring information. Place the Bread Pan into the
Bread Baker.
2. Close the Lid. Select the Super Rapid Cycle and press START/STOP.
3. When finished baking, remove Bread Pan from the Bread Baker. BE SURE
TO WEAR OVEN MITTS to prevent burning. Invert and shake to remove
the loaf. Allow the loaf to cool standing upright on a wire rack before slicing.
Super Rapid Cycle Hints
• Water temperatures must be 100˚-115˚F / 40˚-45˚C.
• Larger amounts of Quick-Rise,™ RapidRise,™ Bread Machine* yeast must be
used. They may be substituted in equal amounts.
• The dough ball for the Super Rapid Cycle should be a very soft, sticky to the
touch, loose ball with a smooth texture. Do not add extra flour.
• Check the dough ball, and if necessary, use a rubber spatula to push any flour or
dough from the sides of the Bread Pan down into the dough ball.
• As a result of the increased temperatures during the rise and bake process, the
loaf of bread produced from this program may have a dark, crisp crust with a
split in the top of the loaf.
* These are special yeasts widely available in major grocery stores specifically for
59 minute super bake and super rapid breads.
10

SUPER RAPID BREAD RECIPES
We suggest starting your Super Rapid bread baking with this White Bread Recipe.
Refer to Super Rapid Cycle Hints for measuring information. Follow each step
carefully, noticing the water temperatures must be 100˚-115˚F / 40˚- 45˚C
that Quick-Rise
White Bread
Bread Flour 2-1/4 cups 3 cups 4 cups
Sugar 4 tsp. 2 TBL 2 TBL+2 tsp.
Nonfat Dry Milk 4 tsp. 2 TBL 2 TBL+2 tsp.
Salt 1 tsp. 1-1/8 tsp. 1-1/2 tsp.
Butter/Oil 1 TBL 1-1/2 TBL 2 TBL
Quick-Rise™ Yeast 3 tsp. 3-1/2 tsp. 4 tsp.
Water (100˚-115˚F/40˚-45˚C) 1 cup 1-1/8 cups 1-3/4 cups
PROGRAM Super Rapid Super Rapid Super Rapid
,™ RapidRise,™ Bread Machine yeast must be used.
1 lb. 1-1/2 lb. 2 lb.
11

SUPER RAPID BREAD RECIPES (continued)
Method
1. Remove the Bread Pan from the Bread Baker. Attach the Kneading Paddle onto
the Shaft. Have all ingredients ready. Make sure all ingredients, except water, are at
room temperature.
2. Use a liquid measuring cup to measure the water 100˚-115˚F / 40˚-45˚C and pour
into the Bread Pan.
3. Use a measuring spoon to measure the oil and add to the Bread Pan.
4. Use a measuring spoon to measure the sugar, salt and dry milk; level off with the
straight edge of a knife and add to the Bread Pan.
5. Lightly spoon bread flour into a dry measuring cup, level off with the straight edge
of a knife and add to the Bread Pan.
6. Carefully measure Quick-Rise™ yeast with a measuring spoon; level off with the
straight edge of a knife and add to the Bread Pan.
7. Place the Bread Pan into the Bread Baker. Push down on the Rim until it snaps
into place. Close the Lid and plug in the Breadman®.
8. Select Super Rapid Cycle and press START/STOP.
9. At the beep during the Kneading Cycle, (:53), check the dough ball. It should be
sticky to the touch. At this time, push down any dough or flour that may be on the
sides of the Pan.
10. When the Beeper sounds, the bread has finished baking.
11. Use oven mitts to carefully remove the Bread Pan.
CAUTION: The Oven Cavity, Bread Pan, Kneading Paddle and bread will be very
hot. Use oven mitts.
12. Turn Bread Pan upside down and shake several times to release the bread.
Do not use metal utensils inside the Bread Pan or Bread Baker. Remove the
Kneading Paddle and allow loaf to cool standing upright on wire rack
approximately 20 minutes before cutting.
13. When the bread has completely cooled, approximately 2 hours, store in an airtight container.
14. Unplug unit before cleaning. Do not immerse the Bread Pan in water.
See Cleaning Instructions.
12

SUPER RAPID BREAD RECIPES (continued)
White Wheat Bread
1 lb. 2 lb.
Water (100˚-115˚F/40˚-45˚C) 3/4 cup + 3 TBL 1-1/2 cups + 3 TBL
Oil 2 tsp. 1 TBL + 1 tsp.
Sugar 3 TBL 1/4 cup
Salt 1 tsp. 2 tsp.
Dry Milk 1 TBL + 1 tsp. 2 TBL + 2 tsp.
Bread Flour 1-3/4 cups 3-1/2 cups
Whole Wheat Flour 1/2 cup 1 cup
Quick-Rise™ Yeast 3-1/2 tsp. 4 tsp.
PROGRAM Super Rapid Super Rapid
French Bread
1 lb. 2 lb.
Water (100˚-115˚F/40˚-45˚C) 3/4 cup + 3 TBL 1-1/2 cups+ 2 TBL
Oil 1 TBL 2 TBL
Sugar 2-1/2 tsp. 1-1/2 TBL
Salt 3/4 tsp. 1-1/2 tsp.
Bread Flour 2-1/4 cups 4-1/3 cups
Quick-Rise™ Yeast 3 tsp. 4 tsp.
PROGRAM Super Rapid Super Rapid
Italian Bread
1 lb. 2 lb.
Water (100˚-115˚F/40˚-45˚C) 1 cup + 1 TBL 1-1/2 cups + 1 TBL
Oil 1 TBL. 2 TBL
Sugar 2 TBL 1/4 cup
Salt 1 tsp. 2 tsp.
Dry Milk 1 TBL + 1 tsp. 2 TBL + 2 tsp.
Dried Italian Seasoning 1-1/2 tsp. 1 TBL
Bread Flour 2-1/4 cup 4 cups
Quick-Rise™ Yeast 3-1/2 tsp. 4 tsp.
PROGRAM Super Rapid Super Rapid
13

SUPER RAPID BREAD RECIPES (continued)
Honey Granola Bread
2 lb.
Water (100˚-115˚F/40˚-45˚C) 1-1/2 cups + 1 TBL
Oil 4-1/2 TBL
Honey 2-1/2 TBL
Salt 2 tsp.
Dry Milk 4 TBL
Bread Flour 4-1/4 cups
Granola Cereal 1 cup
Quick-Rise™ Yeast 4 tsp.
PROGRAM Super Rapid
Cinnamon Raisin Bread
1 lb. 2 lb.
Water (100˚-115˚F/40˚-45˚C) 1 cup + 1 TBL 1-1/4 cups + 1 TBL
Oil 2 tsp. 1 TBL. + 1 tsp.
Brown Sugar 2-1/2 TBL 3-1/2 TBL
Salt 1 tsp. 1-1/2 tsp.
Dry Milk 1 TBL + 1 tsp. 2 TBL + 1 tsp.
Bread Flour 2-1/4 cups 3-1/2 cups
Cinnamon 3/4 tsp. 1 tsp.
Raisins 1/3 cup 1/2 cup
Walnuts 1/3 cup 1/2 cup
Quick-Rise™ Yeast 3-1/2 tsp. 4 tsp.
PROGRAM Super Rapid Super Rapid
14
 Loading...